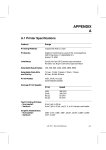
1
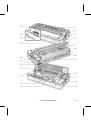
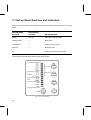
LA310 MultiPrinter Service Guide Order Number: ER-LA310-SG.001 digital equipment corporation maynard, massachusetts October 1992 The information in this document is subject to change without notice and should be construed as a commitment by Digital Equipment Corporation. Digital Equipment Corporation assumes no responsibility for any errors that may appear in this document. Digital Equipment Corporation 1992. All Rights Reserved. The following are trademarks of Digital Equipment Corporation: DEC DEC/CMS DEC/EDI DECnet DECSYSTEM-20 DECUS DECwriter DIBOL EduSystem IAS MASSBUS PDP PDT RSTS RSX UNIBUS VAX VAXcluster VT IBM is a registered trademark, and IBM Proprinter is a trademark of International Business Machines Corporation. Epson, FX-850, FX-1050 and ESC/P are registered trademarks of Seiko Epson Corporation. Printed in Italy. FCC NOTICE This equipment generates and uses radio frequency energy and if not installed and used properly, that is, in strict accordance with the manufacturer's instructions, may cause interference to radio and television reception. It has been type tested and found to comply with the limits for a Class B computing device in accordance with the specifications in Subpart J of Part 15 of FCC Rules, wich are designed to provide reasonable protection against such interference in a residential installation. However, there is no guarantee that interference will not occur in a particular installation. If this equipment does cause interference to radio or television reception, wich can be determined by turning the equipment off and on, the user is encouraged to try to correct the interference by one or more of the following methods. - Reorient the receiving antenna. - Relocate the computer or peripheral with respect to the receiver. - Move the computer or peripheral away from the receiver. - Plug the computer or peripheral into a different outlet so that they are on different branch circuits than the receiver. If necessary, the user should consult the dealer or an experienced radio/television technician for additional suggestions. The user may find the booklet How to Identify and Resolve Radio/TV Interference Problems, prepared by the Federal Communications Commission helpful. This booklet is available from the U.S. Government Printing Office, Washington DC, 20402, Stock No. 004-000-00345-4. To meet FCC requirements, a shielded parallel cable is required to connect the device to a personal computer or other Class B device. COMPLIANCE STATEMENT TO THE CANADIAN DEPARTMENT OF COMMUNICATIONS Radio Act Registration SOR/88-475 This digital apparatus does not exceed the Class B limits for radio noise emissions from digital apparatus as set out in the radio interference regulations of the Canadian Department of Communications. Le présent appareil numérique n'émet pas de bruits radio-életriques dépassant les limites applicables aux appareils numériques de Classe B prescrites dans le règlement sur le brouillage radio-életrique édicté par le ministére des communications du Canada. CONTENTS 1 Overview 1.1 1.2 2 Preparation Precautions and Suggestions Unpackaging and Preliminary Operations Installation Paper Loading Paper Printable Area Paper Handling Devices 2-1 2-1 2-1 2-2 2-5 2-5 2-7 2-8 3-1 Set-up Mode Switches and Indicators Entering Set-up Mode Printing the Printer's Current Configuration Changing the Printer's Configuration Saving New Values and Exiting Set-up Mode Recalling the Factory Defaults Optional Emulation Selection Set-up Error Conditions in Set-up Mode Tests & Diagnostics 4.1 4.2 4.3 4.3.1 4.3.2 4.3.3 4.3.4 4.3.5 1-2 1-4 2-1 Set-up 3.1 3.1.1 3.1.2 3.1.3 3.1.4 3.1.5 3.1.6 3.1.7 4 Identification Recommended Tools Installation 2.1 2.1.1 2.1.2 2.2 2.3 2.3.1 2.3.2 2.3.2 3 1-1 T & D Summary Power up Diagnostic Alignment Tests "H" Pattern Self Test Print Head Pattern Test PLU/PLD Test Carriage Motion Test Paper Sensor Adjustment LA 310 - Service Manual 3-2 3-3 3-4 3-5 3-8 3-8 3-8 3-9 4-1 4-1 4-2 4-2 4-2 4-3 4-3 4-4 4-4 i 4.4 4.4.1 4.4.2 4.4.3 4.4.4 5 Troubleshooting 5.1 5.2 5.3 5.3.1 5.3.2 5.3.3 5.3.4 6 ii Introduction Cleaning Cleaning Platen Printer Specifications Paper Specifications Appendix B.1 4-5 4-5 4-5 4-7 4-8 5-1 5-1 5-2 5-3 5-3 5-6 5-8 5-10 6-1 6-1 6-4 6-5 6-6 6-7 6-8 6-9 6-10 6-11 6-12 7-1 Appendix A.1 A.2 B General Printhead Replacement Printhead-Platen Distance Adjustment Cover Replacement Internal Console Replacement Mechanical Assembly Replacement Printhead Cable Replacement Main Board Replacement Power Supply Replacement Power Supply Fuse Replacement Cleaning 7.1 7.2 7.3 A General Rules Fault Isolation Fault Correction Power-Related Problems Operation-Related Problems Print-Related Problems Ribbon or Carriage-Related Problems Remove Replace 6.1 6.2 6.2.1 6.3 6.4 6.5 6.6 6.7 6.8 6.9 7 Service Tests Printing Self Test LA310 MultiPrinter Service Test Serial Port Loopback Self Test Parallel Port Loopback Self Test Spares and Part Number 7-1 7-1 7-1 A-1 A-1 A-5 B-1 B-1 C Appendix C.1 C.1.1 C.1.2 C.1.3 C.1.4 C.1.5 C.1.6 C.1.7 D C-1 Set-up Configuration Set-up Directory General Main Menu Protocol Selection Main Menu Communications Main Menu DEC PPL2 Main Menu IBM PP III Main Menu Epson FX-1050 Main Menu Appendix D.1 D.2 D.3 D.3.1 D.3.2 D.3.3 D.3.4 D.3.5 D.3.6 D.3.7 D.3.8 D.3.9 D.3.10 D.4 D.4.1 D.5 D.5.1 D.5.2 D.5.3 D.5.4 D.5.5 D.5.6 D.5.7 D.5.8 C-1 C-1 C-2 C-3 C-4 C-5 C-6 C-7 D-1 General Block Diagram DC/AC Power Supply BA 298 Board I/O Signal General Description CPU and EPROM-SRAM-E2PROM Memories "LOGO" Custom Needle Drive Circuit Paper and Carriage Motor Drive Circuit Console LED Drive Circuit Reverse Channel, CTS, RTS Signal Storing Circuit Console Signals, Sensors and Microswitches BA 298 Board Block Diagram BA 298 Board Component Location and Function "LOGO" Custom "LOGO" Custom Block Diagram Schematics BA 298 Logic and Memory BA 298 Custom and Centronics Interface BA 298 Console and Serial Interface BA 298 Needle Drivers BA 298 Motor Drivers BA 298 Power Supply BA 298 Board Layout BA 298 Board Vendor Bill of Materials LA 310 - Service Manual D-1 D-2 D-4 D-4 D-4 D-5 D-5 D-5 D-5 D-5 D-5 D-6 D-8 D-10 D-12 D-14 D-14 D-16 D-17 D-18 D-19 D-20 D-21 D-23 iii 1 OVERVIEW The LA 310 is a reliable, low cost, wide carriage, 9 wire dot matrix printer. It is designed to be a personal desk top printer suitable for general business applications in a small to medium computer environment. It has flexible paper handling and is capable of printing on single sheets, continuous forms, multiple part forms, labels, and envelopes. The LA 310 supports serial and parallel interfaces. Both are located on the main board. The serial interface connects with Digital compatible systems through Digital's DECconnect, modular 6-pin type connector (MMJ). The parallel interface connects through a standard 36-pin Centronics type. The active port is initially selected via the Setup function, though the printer can be connected to both serial and parallel ports, and switches automatically between them when data is received. Protocol can be determined automatically by the active port, even if the port is changed. Protocol can also be switched from the front panel or by software. The LA310 Printer contains the following protocols: DEC-ANSI-Compliant Printing Protocol Level 2 (DEC PPL2) IBM Proprinter III. Epson FX-1050 The printer has a slot for optional cartridges for one of the following: Optional emulation. Fonts. Additional character sets. The LA310 is produced in three voltage models to meet all worldwide voltage requirements. The LA310 allows the user to select either HSD, NLQ1, NLQ2 or Quiet print mode. In Quiet Mode acoustic noise is reduced to a minimum. The LA310 also has self test diagnostics. These are initiated by pressing front panel switches when the power is switched on. LA 310 - Service Manual 1-1 1.1 Identification Table 1-1 A First Look at the Printer Item Number Item Name 1. Rear cover (paper support) with guides 2. Paper Selection Lever 3. Platen Knob 4. Operator Control Panel 5. Prop (for holding paper support in sloping position) 6. Push tractor 7. Paper present switch on tractor 8. Power cord socket 9. Electrical data plate 10. Ruler 11. Plastic guide with red arrow head 12. Internal console 13. Metallic anti-smudge plate 14. Print head carriage 15. Print head 16. Platen 17. Bail bar and rollers 18. Parallel cable socket 19. Serial cable socket 20. Slot for optional card 21. Printhead distance lever 22. ON/OFF Switch 23. Front cover 24. Transparent cover 1-2 LA 310 - Service Manual 1-3 1.2 Recommended Tools You are recommended to use the following tools: Table 1-1 Recommended tools Part Number Description 29-26106-00 29-26109-00 12-25083-01 29-27887-01 29-11762-00 50 Hz Terminal Tool Kit 60 Hz Terminal Tool Kit MMJ Loopback Connector Parallel Loopback Connector Antistatic Kit 1-4 2 INSTALLATION 2.1 Preparation 2.1.1 Precautions and Suggestions For correct functioning of the printer, the following precautions should be taken: - Do not install the printer near to sources of heat or exposed to direct sun light. - Leave a free area around the printer to allow sufficient ventilation for the printer electronics. - Do not connect the printer to power supplies used for other industrial equipment, additionally it is essential that the printer is connected to a mains socket with a protective ground connection. - Functioning of the printer in a residential area may cause interference to radio-TV equipment in the immediate vicinity. The user should try to avoid such interference by relocating the printer and, whenever possible, connecting it to a dedicated power socket. - To avoid the possibility of electric shock, damage to the mechanical or electrical parts or voiding the guarantee, any internal modification to the printer must only be carried out by qualified service technicians. 2.1.2 Unpackaging and Preliminary Operations - In addition to the base printer, the packaging also contains Serial Interface Cable, Power Cord, Ribbon Cartridge and the Operating Manual. The Pull Tractor device is optional and, if ordered, is sent in separate packaging. Before unpacking, check that the indications on the bar code labels coincide with the customers order. - The bar code label contains the part number, revision and serial number. LA 310 - Service Manual 2-1 2.2 Installation Note: You should refer to the LA 310 Printer Installation and User's Guide to get more detailed information for the installation of the printer and loading of paper. 1. Unpack the LA 310 and inspect the contents for missing items or damage. The contents are: the printer, user documentation, ribbon cartridge, power cord and serial interface cable. Any damage or shortage should be reported. 2. Locate the LA 310 where it is to be used. 3. Remove the adhesive film from the transparent covers on the front of the printer. 4. Open the front cover (see Figure 2-1), raise it, and tip it back towards the rear of the printer. 5. Remove the strips of cardboard blocking the printer head and the bail bar (see Figure 2-1). Fig. 2.1 Removing the Cardboard Strips 2-2 6. Make sure that the label on the back of the printer quotes the same voltage as that available from the wall socket. 7. Connect the power cable first to the printer and then to the wall socket. DO NOT SWITCH ON 8. Unwrap the ribbon cartridge, removing the plastic strip which blocks the ribbon. If necessary, adjust the ribbon tension, by turning the knob on the upper side of the cartridge in the direction indicated by the arrow. Fig. 2.2 Preparing the Cartridge Open the front cover,raising it and tipping it back as far as it will go. Position the ribbon cartridge on the print head carriage and press it downwards. Make sure the ribbon feeds correctly between the print head and the metal anti-smudge plate on the plastic guide. LA 310 - Service Manual 2-3 Fig 2.3 Installing the Cartridge 9. Do not connect the data cable to the host system. 10. Run the print test. The print test is activated from a printer OFF condition, once you have loaded a sheet of paper, switch the printer off. Then,holding down the QUIET key on the operator console, switch the printer on again. Hold the QUIET key down until the mechanical reset has been completed and printing has started, then release it. To interrupt the print test temporarily, open the cover. Closing the cover then pressing the READY key will cause printing to resume. That print test can also be initiated with the cover open, by pressing the PRINT TEST key on the internal console, printing starts when the cover is closed. To terminate the execution of the printing test, switch off the printer. Check the print quality ensuring that all the characters are complete and clearly printed. 11. Connect the printer to the Computer System. 2-4 2.3 Paper Loading 2.3.1 Paper The printer can handle a wide range of paper types. The printable area will depend on the type of paper used. Both single sheets and continuous stationery can be used alone or with carbon or chemical copies; max. combination: original + 4 copies (see note). The paper weight of single sheets may vary from 60 to 100 g/m2. For larger dimensions, the weight should approach the maximum value ( 80- - -> 100 g/m2 ). For multipart forms, the paper weight will vary, depending on the number of copies and their type, from 150 to 290 g/m2, for a thickness 0.36 mm. The paper weight for continuous stationery may vary from 60 - 90 g/m2. For multicopy continuous stationery, the paper weight will vary, depending on the number of copies and their type: for carbon copies, from 130 to 220 g/m2, for a thickness 0.34mm; for chemical copies, from 130 to 220 g/m2, for a thickness 0.27mm. Remember to adjust the position of the print head distance lever according to the number of copies and/or paper thickness you are using. NOTE: When using multipart forms consisting of an original plus 4 copies use of the optional pull tractor is mandatory. LA 310 - Service Manual 2-5 The following table contains the dimensions and weight of the paper which can be used on your printer PAPER DIMENSIONS WEIGHT COPIES/ COMPOSITION Single sheet Width: 2 to 18 in (50 - 457.2 mm) Length: 2.5 to 21 in (63.5 - 533 mm) 60 - 100 g/m2 80 - 100 g/m2 Original only Multipart form Width: 2 to 18 in (50 - 457.2 mm) Length: 2.5 to 21 in (63.5 - 533 mm) 175 - 290 g/m2 Original + 1 to 3 carbon copies Original + 1 to 3 chemical copies 150 - 250 g/m2 Continuous stationery Width: 3.5* to 16 in pin to pin (89 - 406.4 mm) 60 - 90 g/m2 Original only Multicopy continuous stationery Width: 3.5 to 16 in pin to pin (89 - 406.4 mm) 150 - 270 g/m2 Original + 1 to 3 carbon copies **Original + 1 to 4 copies * 130 - 220 g/m2 This minimum width is achieved when the adjustable plastic guide between the tractors is removed. ** The use of the option at Pull Tractor is recommended for this paper composition, and in other situations where paper feed is critical. 2-6 2.3.2 Printable Area The maximum printable area on the page is illustrated in the followings diagrams. It will vary according to the type of paper used. SINGLE SHEETS DIMENSIONS CONTINUOUS STATIONERY 457.2 mm P (Paper feed path width) 454.4 mm 420 mm M (Max. width of standard sheet) 406.4 mm 345.4 mm W (Max. print line length) 345.4 mm 18.7 - 55.9 mm L (Left margin, min. and max.) 0 - 48.1 mm 18.7 - 55.9 mm R (Right margin, min. and max.) 0 - 48.1 mm 6 mm T (Top margin - TOF) 6 mm 13 mm B (Bottom margin - BOF) 0 - 25.4 mm LA 310 - Service Manual 2-7 2.3.3 Paper Handling Devices Use the following devices and manual controls on your printer to load and feed paper: - Paper guides on the rear paper support - Paper feed knob - Paper selection lever - Bail bar - Ruler - Print head distance lever - Internal sprocket ( Push Tractor ) - Operator console An optional External Sprocket ( Pull Tractor ) can be ordered and installed.The instructions for the installation and use of this optional device are supplied with the individual option. Paper Guides The position of the pair of paper guides on the rear paper support must be varied according to the type of paper. Fig. 2.4 Paper Guides 2-8 Paper Feed Knob With the printer in PAUSE state, use the paper feed knob to advance/retract paper and to remove jammed paper. Fig. 2.5 Paper Feed Knob Paper Selection Lever Position this lever towards the front of the printer if you are using single sheets. Set it towards the rear of the printer if you are using continuous stationery. Fig. 2.6 Paper Selection Lever Position for Single Sheet Fig. 2.7 Paper Selection Lever Position for Continuous Stationery LA 310 - Service Manual 2-9 Internal Sprocket ( Push Tractor ) This device feeds single or multicopy continuous stationery. An optional external sprocket ( Pull Tractor ) can be installed to ease heavy paper feeding. Fig. 2.8 Push Tractor External Sprocket ( Pull Tractor ) The optional pull tractor is required if the heavier types of multicopy continuous stationery are used and is mandatory if a paper composition consisting of an original plus four copies is used. It is mounted on top of the rear cover and conveys the printed forms on exit from the platen. The use of this option excludes paper backward motion. The set up feature Backward Motion must be set to DISABLE when using the pull tractor. Fig. 2.9 Pull Tractor 2-10 Print Head Distance Lever Use this lever to vary the distance between the print head and the platen. The distance will depend on the thickness of the paper you are using and/or the number of copies being printed. The lever has seven positions. Fig. 2.10 Print Head Distance Lever LA 310 - Service Manual 2-11 The following table illustrates the relation-ship between the lever position and the number of copies. LEVER POSITION NUMBER OF COPIES THICKNESS max. (mm) 0 Needle wear recovery 0.125 - Original copy 0.125 - Original + 1 copy 0.200 3 Original + 2 copies 0.280 - Original + 3 copies 0.360 - Original + 4 copies 0.360 (Pull tractor MUST be used) 6 Non print position X Ribbon cartridge replacement position The lever should be set in position 0 only when it is necessary to recover the correct print head - platen distance due to needle wear (after extensive and continuous printer use). In this case, position 0 will be equivalent position 1. 2-12 Bail Bar The bail bar holds the paper against the platen as it is fed through the printer. When loading any paper, check that the rollers on the bail bar are positioned correctly for the loading operation. They must be positioned in the grooves on the bail bar as follows: Width of paper used Recommended settings 8 inches Set Paper Width Setup feature to 8". Put the rollers on the bail bar in the grooves on the bar that are marked at ruler positions of approximately 40 and 90. This centers the printhead plastic guide on the rollers. More than 8 inches Set Paper Width setup feature to 13.6". Put the rollers on the bail bar in the grooves on the bar that are marked at ruler positions of approximately 40 and 90. This centers the printhead plastic guide on the rollers. Less than 8 inches Set the Paper Width setup feature to 1-8". This causes the default printhead to be aligned with the paper sensor mark. Put the rollers on the bail bar in the grooves on the bar that are marked at ruler positions of approximately 20 and 60. Note: If you do not use the correct settings, there is a high risk of the top of the paper jamming against the bail bar. Fig. 2.11 Bail Bar Settings LA 310 - Service Manual 2-13 Ruler The ruler, embossed on the printer bodywork between the platen and the push sprocket, simplifies horizontal alignment of the paper and the guides on the paper support. Fig. 2.12 Ruler Note: The ▲ on the ruler marks the position of the paper present photocell. 2-14 3 SET-UP When you enter Set-up mode, the Set-up Directory menu is displayed. From the Set-up Directory menu, you can enter the Main Menu for each option that is displayed on the Set-up Directory menu. At each main menu there are several levels of submenus. At each main menu or submenu, the item that was selected prior to entering this menu is printed in bold type, and the red triangle of the printhead is automatically positioned underneath the item. The items at the menu are either parameters that you can set, or submenus that you can move to. You can select parameters or submenus by pressing the ← and → keys to move to the item you want to select, and then pressing ↓. LA 310 - Service Manual 3-1 3.1 Set-up Mode Switches and Indicators There are five buttons on the operator control panel that perform functions in Set-up mode. Normal mode function Set-up mode function Set-up function Ready Set-up Enter/Exit Set-up mode Quiet/Quality → Next Item LF/Protocol ↓ Select item at cursor Parking ← Previous item FF ↑ Return to previous menu level The buttons are located on the front panel as follows: Fig. 3.1 Control Panel 3-2 3.1.1 Entering Set-up Mode Digital recommends that you enter Set-up mode in tractor-feeding mode, and not cut sheet mode. NOTE: You must not run Set-up mode with the Pull Tractor option installed. To enter Set-up mode: 1. Press and hold the Set-up switch while setting the power switch to ON (1). If you have put paper in the parking position and use tractor feeding, paper is loaded automatically. The printer automatically prints the first part of the Set-up directory: PRINT is the initial default entry. NOTE: If an option cartridge is installed, the type of cartridge is displayed before you enter the Set-up directory, with information about the contents of the cartridge. LA 310 - Service Manual 3-3 3.1.2 Printing the Printer's Current Configuration To examine the printer's current configuration, you can print all current settings. To print the current configuration: 1. At the Set-up directory, Print is the initial default entry. Select PRINT by using ↓. The printer then prints its current settings. The factory-set configuration for the LA310 MultiPrinter begins printing as follows: This is the beginning of the configuration list that the printer prints. 3-4 3.1.3 Changing the Printer's Configuration At each menu or submenu beyond the Set-up menu, the item that was selected prior to entering this menu is printed in bold type, and the red triangle on the print head is automatically positioned underneath the item. The symbol > > indicates that there are additional items at this level, which you can move to by using →. To change the printer's configuration from the Set-up menu: 1. Press ← or → to move to the menu that you want to change. Press ↓ to select the menu. The items at the menus are either parameters that you can set, or submenus (with parameters) that you can move to. Refer to Appendix C for details of all submenus and parameters. 2. Use ← or → to move the cursor to the parameter that you want to change. The cursor moves to the parameter that you want to select. 3. To select the item at the cursor, press ↓. The printer underlines the item that you selected. Example: For example,to change the error beep on the printer to three beeps, refer to Appendix C to find the menu on wich you can find the Error Beep settings. Appendix C shows that the Error Beep settings appears on the GENERAL menu. 1. Press and hold the Set-up switch while settings the power switch to ON (1). The first part of the Set-up Directory is printed: LA 310 - Service Manual 3-5 Using ← and → , move the cursor to GENERAL. Press ↓ to select the General menu. The entry GENERAL is underlined, and the first part of the General menu is displayed: 2. As the error beep setting is not listed on that part of the menu, press → twice to move to the next line of the menu: 3. The error beep setting is still not listed. Press → three times to move to the next line of the menu: 4. As the error beep settings is still not listed, press → three times to move to the final line of the menu: 3-6 5. Press → to move to the error beep setting, and press ↓ to select it. The printer underlines ERROR BEEP and displays the error beep settings: The entry ONE BEEP is bolded as it is the default settings. 6. Press → to move to the THREE BEEPS setting,and press ↓ to select it. The selected item is underlined, the printer enters in GENERAL menu, and the cursor points to the ERROR BEEP submenu: LA 310 - Service Manual 3-7 3.1.4 Saving New Values and Exiting Set-up Mode Pressing the Set-up switch once while in Set-up mode stores your set-up changes in the printer's memory, exits Set-up mode, and automatically returns the printer to print mode. NOTE: If you switch off the printer, or if the power is otherwise interrupted before you press the Set-up switch, no changes are stored in the printer's memory. 3.1.5 Recalling the Factory Defaults To recall factory default settings, from the Set-up Directory: 1. Use ← or → to move the cursor to the FACTORY DEFLT setting. 2. Press ↓. Refer to the table of factory set-up defaults in Appendix C for details of all factory defaults. 3.1.6 Optional Emulation Selection Set-up Optional emulation can be resident EPSON FX-1050 emulation, or emulation provided by a cartridge installed in the printer. To determine which optional emulation you want to use, you must define the emulation using optional emulation set-up. To enter the optional emulation selection set-up: 1. Set the power switch to OFF (0). 2. Press and hold simultaneously the SET-UP and PROTOCOL buttons. 3. Set the power switch to ON (1). If tractor mode is set, and paper has not already been inserted, the printer loads paper automatically. 4. 3-8 The printer enters Optional Emulation Selection Set-up. All indicators (except the Fault indicator) flash simultaneously. 5. Use ← or → to move the cursor between the EPSON FX-1050 or CARTRIDGE setting. 6. Press ↓ to select the setting you require. 7. Use → to move to the MAIN SET-UP option, and press ↓ to move back to the Main Set-up menu. OR Press the Set-up key to exit this set-up and save the new setting. 3.1.7 Error Conditions in Set-up Mode When the printer detects that there is no paper, or that the printer cover is open, the following applies: 1. 2. Paper Out condition in Set-up mode: - In cut sheet mode, the FF switch is active to load a sheet and resume set-up automatically. - In tractor mode,as soon as paper is detected in the left tractor, the FF switch is active to load paper and resume set-up automatically. Cover Open condition in Set-up mode: - When the cover is closed after a Cover Open condition, all indicators remain off with the exception of the Ready indicator wich blinks. Only the Ready switch is active. - When you press the Ready switch, Set-up mode is resumed by re-entering the submenu that was selected prior to the Cover Open condition. LA 310 - Service Manual 3-9 4 TESTS & DIAGNOSTICS 4.1 T & D Summary Table 4.1 provides the list of modes with the related front panel buttons that is to be depressed at power up in order to initiate each self-test,setting or test mode. Table 4.1: Self-tests, Set Modes and Test modes Test Front Panel Button(s)Pressed Level Mode type Internal Diagnostics Automatic at power-up User Self-test Printing Self Test Quiet User Self-test User Form Length Mode FF User Set Mode Top of Form Setting Parking User Set Mode Set-up Mode Ready User Set Mode DUMP Printing (Control Rendition Mode) LF User Test Mode LA 310 MultiPrinter Service Test FF + LF Field Self-test "H" Test Quiet + FF - Print Head Pattern - PLU/PLD Test - Carriage Motion Self Test Field Set Mode Serial Port Loopback Test LF + Parking Field Self-test Parallel Port Loopback Test Parking + LF Field Self-test Automatic Test Mode 1 Parking + Quiet Digital and Vendor Test mode Automatic Test Mode 2 LF + Quiet Digital and Vendor Test mode Paper Sensor Adjustment Quiet + Parking + LF Field LA 310 - Service Manual Set Mode 4-1 4.2 Power up diagnostic Self test operations to check internal logic are performed automatically at power-up. Detected failures cause the Fault light to blink and the test to stop. The automatic diagnostics include the following tests: 1. a ROM checksum test to verify all bits of ROM 2. a RAM pattern test to exercise and verify all bits of RAM 3. a NVR ( Non Volatile RAM ) checksum test 4. all the control panel indicators remain on for 2 to 4 seconds. This test is applied only if no switch is pressed at power-up. During the NVR test, if the NVR memory is detected empty, it is filled with factory settings. If at power-up an optional cartridge is installed, a checksum test of the cartridge shall be performed. 4.3 Alignment Tests 4.3.1 "H" Pattern Self Test The test is provided by the printer when the Quiet and the FF buttons are pressed simultaneously before the printer is turned on, and are released after power-up. This self test is intended for use to adjust bidirectional, horizontal print accuracy ( Horizontal Dot Alignment ). This test consists of printing 4 full lines of H's at 10 pitch at the 7 possible adjustment settings. Vertical line spacing is 7/72" so that the H's will connect vertically. This allows easy selection of the best adjustment setting. Before printing each "H" pattern, the printer prints the adjustment number first. The currently selected adjustment setting is printed after the seven "H" patterns. 4-2 The adjustment setting can be changed by pressing the LF switch which causes the next number to be printed. Pressing the FF button will store the last selection and willl initiate the Printhead pattern test. Switch off to stop this test. 4.3.2 Print Head Pattern Test The printer is capable of executing a print head pattern which will allow Field Personnel to check the print head for individual needle wear. This pattern shall include individual needle activation. 4.3.3 PLU/PLD Test The printer is capable of executing a print pattern as follows: Characters "MID" are printed starting at column one of the current line; then the following sequence is executed from the left margin (paper width is defined by set-up): - "PLU" characters are printed after a 1/2 inch partial line up - then "MID" characters are printed after a 1/2 inch partial line down - then "LPD" characters are printed after a 1/2 inch partial line down - then "MID" caracters are printed after a 1/2 inch partial line up then a carriage return is performed. This pattern is executed continuously until the FF button is pressed which causes the next test, Carriage Motion test, to start. Printing is performed at 10 CPI, normal print mode, draft quality, at 6 lines per inch. LA 310 - Service Manual 4-3 4.3.4 Carriage Motion Test The printer is capable of executing a carriage motion self test which causes the printer to execute carriage motions and ribbon motions continuously. Detected failures cause the Fault light to blink. During this test, paper supply is not checked by the printer. When the cover is open, carriage motion stops. It shall resume after the cover is put in place, and the Ready switch is pressed. During this test, the carriage home position is checked at regular intervals, approximately 100 cycles. 4.3.5 Paper Sensor Adjustment This adjustment must be performed when either the main board or mechanical assembly is replaced. This adjustment enables the setting of the paper sensor photocell located underneath the platen. The adjustment procedure is the following: a. - Printer is turned off. - Insert paper in the tractors but do not load paper under the platen. - Set the printer to tractor mode. b. Simultaneously press the Quiet, Parking, LF buttons whilest switching on the printer. c. Release all buttons when all indicators turn on. Carriage resets, and beep is produced and all indicators turn off except the Fault indicator which is on. d. Press the Quiet button and release it. All indicators turn on and off with the exception of the Fault indicator. e. Load paper manually with the platen until the paper is put in front of the printhead. During this operation, the platen motion is released to enable smooth manual loading. f. Press the Quiet button and release it. After 1 or 2 seconds, all indicators turn on and off with the exception of the Fault indicator. At this point the printer is able to determine a setting for the paper sensor 4-4 adjustment and to save it in NVM. This adjustment is based on the type of paper used. g. Turn the printer off. NOTE: This adjustment may also be performed in friction mode. The setting saved in NVM during this operation is not reset by the FACTORY DFLT function available in the set-up mode. 4.4 Service Tests 4.4.1 Printing Self Test The printer has the capability to execute a printing self test, if paper is loaded. This test consists of printing the 94 printable characters of the ASCII character set continuously in an 80 or 136 character wide swirl pattern, depending on the PAPER WIDTH set-up feature. The print quality and printing modes are also defined by Set-up. This test is initiated when the Quiet button (PRINT TEST button on the internal console) is pressed at power up. This test can be initiated with the cover open at powerup, but the test can start only if the cover is closed and if paper is loaded. Detected failures cause the Fault indicator to blink. When no paper is detected the Fault indicator is on, once the paper is loaded, manually or using the FF button, the test starts automatically provided that the cover is closed. During this test the carriage home position shall be checked every 2 pages. If this test fails,the test is stopped and the Fault indicator blinks. 4.4.2 LA 310 MultiPrinter Service Test This test consists of unique test patterns and portions of all the other test patterns. This test is designed to thoroughly exercise all mechanical elements of the LA 310 MultiPrinter. For this test, the form length (at least 11": if a paper length of less than 11" is stored, the printer will default to an 11" setting) and paper width are defined by set-up. For each form used during this test, the First line printing and the Last line printing test are both performed. LA 310 - Service Manual 4-5 Each of the following tests shall not overlap the bottom of the form. When needed, the printer shall perform a form feed with the Last line printing and First line printing tests. Unless specified, all printed text shall be printed at 10 CPI, 6 LPI, Draft density, normal print mode. This test shall exibit the following test items: 1. First line printing test: the first line of the form is printed with: a. the underlined letter "E" from column 1 to 5 b. the underlined Space is printed from column 6 to 75 (or 131) c. the underlined letter "E" from column 76 to 80 (or 132 to 136) 2. Title: LA 310 MultiPrinter Service Test 3. Configuration information (one line per item ): a. Paper feeding mode: Tractor Feeding, Friction Feeding. b. Firmware code version and edit number c. Type of cartridge installed d. Form length e. Paper width f. Backward Motion features enabled or disabled. 4. The H-pattern alignment test pattern (with no adjustment capability) 5. The printhead test with one numbered output per individual pin. 6. Paper movement test: this test prints two dashed lines ( 2.2 ± 0.1 mm apart ), then after all other steps of the current form, prints a solid continuous line. This line must be centered between the first two lines. In Friction mode and/or if the BACK/MOTION feature is disabled, this test is not performed. 7. PLU/PLD test ( one line ) 8. Printing self test normal mode ( 3 lines ) 9. Printing self test Quiet mode ( 3 lines ) 10. HSD Printing self test ( 1 line ) 11. NLQ Printing self test ( 1 line ) 12. NLQ 2 Printing self test ( 1 line ) 4-6 13. Carriage motion exerciser: 2 full cycles ( one cycle is: carriage movement from one end to the other and back ) 14. Black boxes text : 3 one square-inch black boxes are printed in graphics mode. The 3 boxes are aligned horizontaly, the gap between each box is 1 inch. The graphics resolution is 120 dpi, horizontal and vertical. 15. A continuous line printing: one dot ( wire position 4 ) printed for one line 16. Last line of the form print test: same pattern as the first line printing test. This test is initiated when the FF and LF buttons are pressed simultaneously before the printer is turned on and release after power-up. If paper is not loaded at power-up, automatic loading shall apply. This test can be run with the cover open or closed. During this test, all indicators except the Fault indicator are on permanently. At completion of this test, 2 form feeds are performed, the indicators remain on. The LA 310 MultiPrinter must be switched off to leave this test. 4.4.3 Serial Port Loopback Self Test The printer is capable of executing a serial loopback test which externally loops the send data signal back to the receive data signal, and the DSR signal back to the DTR signal of the serial port. Detected failures cause the fault light to blink. To run this test insert the MMJ Loopback plug and simultaneously depress the LF and Parking buttons whilst powering on the printer. Released the buttons to initiate this test. The printer must be powered off to terminate the test. This test transmits the ASCII Swirl character sequence on the send data signal at the selected baud rate and in the selected character format. If the printer does not detect data on the receive data line within one second after the loopback test is started, then the fault light blinks. It is the same if a signal output to the DTR is not detected on the DSR circuit. The printer internally limits the character transmission rate to prevent input buffer overflow during execution of the test. The printer interprets any received data normally. Succesful execution of the test is determined by operator examination of the printed test pattern. During this test, the Serial indicator is On. LA 310 - Service Manual 4-7 4.4.4 Parallel Port Loopback Self Test The printer is capable of testing the parallel port using the loopback connector as defined in Figure 4.1. The Parking and FF buttons must be depressed simultaneously before turning poweron and released after power-on initiate this test. The printer shall provide each output signal and check input circuits accordingly. This test is run continuously. Detected failures cause the Fault light to blink and the test to stop. The printer must be powered off to terminate the test. Figure 4.1 Parallel Port Loopback From Printer BUSY (11) (1) STROBE ACK (10) (2) (5) (8) DATA 1 DATA 4 DATA 7 PE (12) (3) (6) (9) (14) DATA 2 DATA 5 DATA 8 Not Used (31) INIT (4) (7) DATA 3 DATA 6 SLCT (13) FAULT (32) During this test, the Parallel indicator is On. 4-8 To Printer 5 TROUBLESHOOTING 5.1 General Rules - Learn about the problem. Talk to the operator who is using the equipment and probably knows more about the problem than anyone else. - Examine the environment. Could it cause problems for the equipment? For example, is it very dirty or very hot? - Identify the problem. Before removing any FRUs, demonstrate the fault to yourself. The LA 310 printout will show many of the problems. - Isolate the problem. Use the faultfinding notes and tables and any other assistance to help you. Also check the initial power-up sequence as detailed in Section 3.1. - Correct the problem. Use replacement and adjustment procedures to bring the equipment back to full service. - Test the equipment. Wherever possible test the equipment in the presence of the operator to show that the problem has been fixed and that no other problems have been introduced. LA 310 - Service Manual 5-1 5.2 Fault Isolation The following sections list possible fault syntoms and give tests you can make and actions you can take to help to clear those syntoms. Table 5-1 indicates what problems are covered in this chapter and where you can find the relevant information. Table 5-1 Problems Covered in this Chapter Problem Areas Section Specific Faults Power related problems Section 5.3.1 - Operation-related problems Section 5.3.2 - LA 310 stops printing. - No reverse paper feed. - Paper is not positioned at perforation for tear-off feature. - Printhead carriage does not move smoothly. - Carriage does not move. Print-related problems Section 5.3.3 - Print faint or of poor quality. - Character or characters do not print evenly or are not uniform in pitch. - Print lines overlap. - Characters printed at a slant. - Paper tears or jams. - Font cartridge is installed and printer uses internal character font. - Printer does not stop when out of paper. Ribbon or carriage- Section 5.3.4 related problems 5-2 No indicators on when power is switched on. At power on, the carriage does not move. Printing does not start. No response to computer commands. LOCAL led is off. - Carriage moves but there is no printout during printing self-test. - Pinfeed paper does not advance. - Single sheet paper does not advance. - Ribbon problems - Carriage does not move smoothly 5.3 Fault Correction 5.3.1 Power-Related Problems No indicators on when power is switched on. 1. If the printer is functioning correctly but no indicators are on, replace the Console PCB assembly. 2. Test the power supply at the wall socket by relocating the printer or metering. If faulty, contact the responsible site engineer. 3. Make sure the power cord is firmly inserted into both the printer and the wall socket. 4. Switch the power off and disconnect the power cable. Check whether a fuse has blown. Check the fuse on the Power Supply and replace the fuse if necessary (see page 6-12): 630 mA for 220/240 V 1.25 A for 120 V 5. Check whether the secondary output of the transformer is normal. a. Switch the power off and disconnect the power cable. Disconnect the 2-pin connector J265 on the Main Board. b. Connect the power cable, switch the power on and measure the AC voltage from the secondary of the transformer. If the measured voltage is not a nominal 30 VAC, switch the power off, disconnect the power cable and replace the Power Supply. If the measured voltage is a nominal 30 VAC, switch the power off, disconnect the power cable and then replace the Main Board or/and the Mechanical Assembly. Be sure to reconnect the 2-pin connector J265 to the Main board. LA 310 - Service Manual 5-3 At power on, the carriage does not move. 1. Make sure the access cover is seated correctly. 2. Logic may not be receiving the access cover switch signal. a. Make sure the connection between the operator panel and the Main Board is good. b. Replace the Operator Panel. c. Replace the Main Board. 3. Make sure the printhead carriage can move. Push and pull from side to side. It should move freely. If not: a. Remove any visible obstruction. b. Replace the Mechanical Assembly. Printing does not start. 1. Make sure the READY indicator is on. If not , press the READY switch. Printing should start when you send data from the host computer. 2. Make sure the printer is connected to the host computer. 3. Make sure the host computer can send data. 4. Make sure you have selected the correct protocol. 5. Make sure you have selected the correct port. 6. Logic may not be receiving the READY signal. a. Make sure the connection betweeen the operator panel and the Main Board is good. b. Replace the operator Panel Board. 7. Logic may not be able to respond to READY signal. Replace the Main Board. 8. Replace the Mechanical Assembly. 5-4 No response to computer commands. READY indicator is on. 1. Examine the data cable connections. Reseat the data cable if necessary. 2. Check the condition of the data cable. Replace if damaged. 3. Run the printing self test. If this is not satisfactory, replace the Main Board. Run the loopback test. If the test gives satisfactory result, the problem may be in the host computer. 4. Examine the features setup for a communications mismatch. Carriage moves, but there is no printout during printing self test. 1. Make sure the ribbon is installed. 2. Examine the ribbon path. Does the ribbon pass in front of the whole printhead? Adjust if necessary. 3. Check the printhead distance lever if at the correct setting. 4. Printhead pins may not be able to respond to control signals. Replace the Printhead. 5. Printhead may not be receiving control signals. Replace the Mechanical Assembly. 6. The Main Board may not be able to send printhead control signals. Replace the Main Board. Pinfeed paper does not advance. 1. Make sure the tractor/friction feeder lever is set to tractor feed. 2. Ensure that the paper sensor on the left tractor is been depressed by the paper. 3. The paper feed mechanism may be jammed or broken. Replace the Mechanical Assembly. 4. Replace the Main Board. LA 310 - Service Manual 5-5 Single sheet paper does not advance. 1. Make sure the tractor/friction feed lever is set to friction feed. 2. The paper feed mechanism may be jammed or broken. Replace the Mechanical Assembly. 3. Replace the Main Board. 5.3.2 Operation-Related Problems LA 310 stops printing. 1. This is an "out of paper" response.Load paper. If the READY indicator is blinking, press the READY button. The LA 310 should continue printing. 2. Make sure the paper is not torn or otherwise damaged. If it is, replace with undamaged paper. 3. Make sure that the connection of the paper edge detector to the Main Board is good. 4. Replace the Main Board. 5. Replace the Mechanical Assembly. No reverse paper feed. 1. Are you trying to park the paper? The printer will not reverse paper feed when: a. In PAUSE state (READY indicator blinking). b. Tractor/friction feeder lever is in friction feed position. 2. Make sure you are not at the end of paper. 3. Make sure the backward motion feature (in set-up) is enabled. 4. Make sure that the connection of the paper edge detector to the Main Board kit is good. 5. Make sure that the paper is not damaged. 5-6 6. Replace the Main Board. 7. Replace the Mechanical Assembly. Paper is not positioned at perforation for tear-off feature. 1. Make sure the printer is in the PAUSE state. If the READY indicator is on press the READY button. 2. If the platen has been moved by hand, reload the paper. Make sure you use a complete form for the first sheet. 3. Select the correct form length using the setup feature. 4. Make sure that the rear paper cover is in the raised position. 5. Replace the Main Board. Printhead carriage does not move smoothly. 1. Examine the paper pathway. Remove any obstructions. 2. Examine the printhead carriage bar (the round bar on which the printhead moves). Is it dirty? If so, clean it with a soft cloth. 3. Examine the carriage area for obstructions. Remove as necessary. 4. Replace the Main Board. 5. Replace the Mechanical Assembly. Carriage does not move. 1. Examine the paper pathway. Remove any obstructions. 2. Replace the Main Board. 3. Replace the Mechanical Assembly. LA 310 - Service Manual 5-7 5.3.3 Print-Related Problems Print faint or poor quality. 1. Is the paper thickness control set correctly for the paper you are using? Adjust if necessary. 2. Have you used the correct paper? chapter 2.3 contains a full specification of the paper you can use. Replace paper if it does not match the specifications. 3. Make sure the ribbon is tensioned correctly. 4. Is the ribbon cartridge properly seated? Reseat as necessary. 5. Does the ribbon need changing? Replace with a new ribbon if necessary. 6. Replace the printhead. 7. Replace the Main Board. Character or characters do not print evenly or are not uniform in pitch. 1. Examine the paper pathway for dirt or other obstruction that may cause the gap between printhead and platen to vary. Remove the obstruction. 2. Replace the Mechanical Assembly. 3. Replace the Main Board. Print lines overlap. 1. Examine the paper parthway for dirt or other obstruction that may prevent the platen from rotating freely. Remove the obstruction. 2. Make sure the tractor/friction feed lever is set fully to the front or the rear and not in an intermediate position. 3. Make sure the platen can rotate freely by moving the platen knob. 5-8 4. Replace the Mechanical Assembly. 5. Replace the Main Board. Characters printed at a slant, Paper tears, Paper jams. 1. Make sure the tractor/friction feed lever is set fully to the front or to the rear and not in an intermediate position. 2. Examine the paper pathway, remove any obstructions. 3. Is the paper too loose or too taut between the tractors? Readjust the tractor spacing so that the paper lies smoothly but without any tension. 4. Replace the mechanical assembly. Font cartridge is installed and the printer uses internal character font. 1. Switch the printer off and check the font cartridge is correctly inserted. 2. Check the font cartridge is selected in the printer setup. 3. Check the proper control sequences are sent to the printer by the host system. Printer does not stop when out of paper. 1. The printer circuits do not detect that there is no paper. Examine the paper pathway. Remove any obstructions. Press the READY button when the paper pathway is cleared. 2. Make sure that the connection of the paper edge detector to the Main Board is good. 3. Replace the Main Board. 4. Replace the Mechanical Assembly. LA 310 - Service Manual 5-9 5.3.4 Ribbon or Carriage-Related Problems Ribbon Problems. 1. Make sure the ribbon is: a. Tensioned correctly. b. Not worn thin or dry. c. Not torn damaged in any other way. d. Not jammed. e. The correct type as recommended by Digital. 2. Replace the Mechanical Assembly. 3. Replace the Main Board. Carriage does not move smoothly. 1. Examine the paper pathway. Remove any obstructions. 2. Examine the printhead carriage bar (the bar on which the printhead moves). Is it dirty? If so, clean with a soft cloth. 3. Examine the carriage area for obstructions. Remove as necessary. 4. Replace the Mechanical Assembly. 5. Replace the Main Board. 5-10 6 REMOVE REPLACE 6.1 General This chapter describes how to remove, replace and adjust major FRUs of the LA 310 MultiPrinter. Figure 6.1 shows the removal sequence of the Field Replacable Units. RIBBON PLATEN KNOB PAPER GUIDE PANEL GROUP PRINTHEAD PAPER SELECT LEVER CONSOLE PULL TRACTOR OVERLAY (OPTIONAL) TOP COVER ASSEMBLY MECHANICAL ASSEMBLY CONSOLE ASSEMBLY POWER SUPPLY UNIT MAIN CASING MAINS FUSE MAIN BOARD PRINTHEAD CABLE WARNING Set the power switch to 0 (off) and disconnect the AC power cord when you remove or replace an FRU. LA 310 - Service Manual 6-1 WARNING The procedures described in this chapter involve the removal of the system covers and should be performed by trained personnel only. ADVARSEL! Ifølge de procedurer, som er beskrevet i dette kapital, skal systemets beskyttelsesplader fjernes; dette bør kun udføres af personer der ved hvordan dette skal gøres. WAARSCHUWING Bij de procedures die in dit hoofdstuk worden beschreven dienen beepaalde delen van de systeemomhulling te worden verwijderd; dit mag uitsluitend worden gedaan door opgeleid personeel. NOTE VAROITUS!) Tässä luvussa kuvatut toimenpiteet liityvät järjestelmän suojakansien irrottaiseen. Ainoastaan koulutettu henkilökunta saa suoritta nämä toimenpiteet. AVIS! Ce chapitre décrit les interventions qui demandent que les couvercles exterieurs des appareils soient enlevés. Ces travaux devraient être mis en main uniquement par des techniciens expérimentes. VORSICHT! Bei der Ausfuhrung der in diesem Kapitel beschriebenen Anweisungen mussen die Systemabdeckungen entfernt werden. Dies sollte nur von geschultem Personal ausgefuhrt werden. 6-2 ATTENZIONE La procedura descritta in questo capitolo comporta la rimozione delle coperture e deve essere eseguita solo da personale specializzato. ADVARSEL I dette kapitel beskrives bl. a. hvordan man fjerner dekslene rundt systemet. Dette arbeidet må bare utføres av fagfolk. AVISO Os procedimentos descritos neste capítulo respeitam à formo como se retiram as protecções do systema. Dada a sua especificidade, recomendamos que seja axecutado por pessoal especializado. ¡ATENCION! Los procedimientos descritos en este capitulo incluyen el desmontaje de las cubiertas del sistema y debe ser realizado dolamente por personal entrenado. VARNING I detta kapitel beskrivs hur systemkaapan tas bort. Detta faar endast utfoeras av utbildad personal. LA 310 - Service Manual 6-3 6.2 Printhead Remove and replace the printhead as follows. WARNING If the printer was recently used, the printhead may be hot. Be careful when handling the printhead. 1. Open the top cover. 2. Shift the carriage to the center of the platen. 3. Remove the ribbon cartridge. 4. Remove the screws (A). 5. Unplug the head connector. To install a printhead, reverse steps 1 to 5. Note:Execute the adjustment DISTANCE PRINTHEAD - PLATEN as describe on the next page. Figure 6.1 Removing the printhead 6-4 6.2.1 Printhead-Platen Distance Adjustment 1. Open the top cover. 2. Remove the paper and the ribbon. 3. Set the paper thickness adjustment lever to position 1. 4. Slacken off the printhead retaining screws (A). 5. Using feeler gauges or the gauge supplied with the new printhead FRU, set the printhead-platen gap to 0.30 − 0.35 mm. 6. Tighten the printhead retaining screws (A). Figure 6.2 Printhead-Platen distance adjustment LA 310 - Service Manual 6-5 6.3 Cover Replacement 1. Put the paper selection lever in the friction mode position. 2. Pull off the platen knob and the paper selection lever. 3. Open the top cover, then push up to remove it. 4. Rise the paper guide panel and pull up to remove it. 5. Remove the two mounting screws (A), to remove the upper cover. 6. Push the hook of the control panel case from inside and up to remove it. Installation: Install covers in reverse order of removal. A Figure 6.3 Remove the cover 6-6 6.4 Internal Console Replacement 1. Remove the top covers as shown in 6.3 2. Disconnect the control panel board connector from the main board. Installation: Install the console in reverse order of removal. CONNECTOR Figure 6.4 Disconnect the control panel board LA 310 - Service Manual 6-7 6.5 Mechanical Assembly Replacement 1. Remove the covers. 2. Remove the operator console 3. Lift up the mechanical assembly, and disconnect all connectors from the Main Board and remove printhead cable from the base. Installation: Install the mechanical assembly in reverse order of removal. Note:After mechanical assembly replacement, it is necessary to adjust the paper sensor (see page 4-4). Figure 6.5 Mechanical assembly replacement 6-8 6.6 Printhead Cable Replacement 1. Remove the mechanical assembly. 2. Remove the printhead and unplug the head connector. 3. Remove the printhead cable Installation: Install the printhead cable in reverse order of removal. Note: After printhead replacement it is necessary to adjust the distance between printhead and platen (see page 6-5). Figure 6.6 Printhead Cable Replacement LA 310 - Service Manual 6-9 6.7 Main Board Replacement 1. Remove the mechanical assembly. 2. Unplug the power supply connector (1) from the board. 3. Unscrew the three screws (2) to remove the Main Board. Installation: Install the Main Board in reverse order of removal. Note:After Main Board replacement, it is necessary to adjust the paper sensor (see page 4-4). 2 1 Figure 6.7 Main Board replacement 6-10 6.8 Power Supply Replacement 1. Remove the mechanical assembly. 2. Unplug the power supply connector (A) from the board. 3. Unscrew the two screws (B and C) to disconnect the power supply from ground. 4. Remove the power supply group by pulling on (D); then lift up it (E). Installation: Install the Power Supply in reverse order of removal. A B E D C Figure 6.8 Power Supply replacement LA 310 - Service Manual 6-11 6.9 Power Supply Fuse Replacement 1. Remove the cover 2. Unscrew the screws A, B and C. 3. Lift up the cover D and replace the fuse. Note:Fuse rating: 630 mA for 220/240 V; 1.25 A for 120 V. B C A D Figure 6.9 Power Supply Fuse replacement 6-12 7 CLEANING 7.1 Introduction The LA 310 has been designed as a low maintenance printer. Most of the maintenance needed is determined by the environment in which it operates. High ambient temperatures cause the oil on the paper moving mechanism and carriage to dry out. Dust, dirt atmosphere, and residue from the ribbons and paper coat the internal surfaces (especially the oily ones), and will eventually clog the mechanism. Use a few minutes of a site visit to examine and clean the printer. 7.2 Cleaning Customer cleaning responsabilities are defined in chapter 7 of the LA 310 MultiPrinter Installation and User Guide. Wipe off any dirt with a soft cloth. Remove obstacles such as small pieces of paper using tweezers. CAUTION Be very careful not to damage the mechanism when clearing obstacles. 7.3 Cleaning Platen Open the access cover and clean the platen surface with DEC platen cleaner. LA 310 - Service Manual 7-1