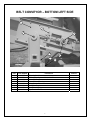
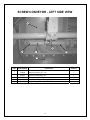
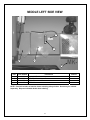
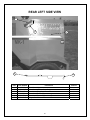
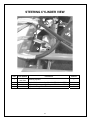
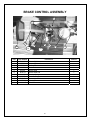
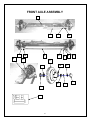
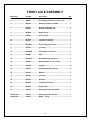
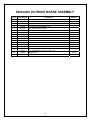
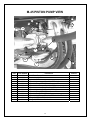
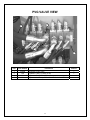
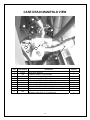
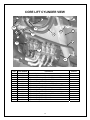
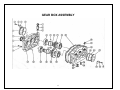
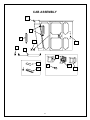
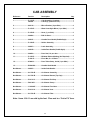
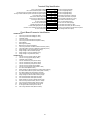
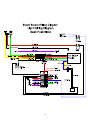
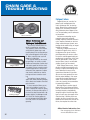
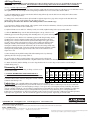
1
MODEL MK-1 MK-1 500001 Serial Numbers 500132 500081 THRU and higher Revision Date: September 2009 Broce Manufacturing Company 1460 SOUTH SECOND AVENUE DODGE CITY, KS 67801 U.S.A. (620) 227-8811 Fax (620) 227-3012 www.brocebroom.com I Broce Manufacturing Company, Inc. WARRANTY REGISTRATION Purchased From (Dealership) Company: ___________________________________________________ Address: ___________________________________________________ City: _________________________ State: ____ ZIP: ________ Delivery Date to Dealer: ___ / ___ / ___ Unit Hours: _______________ Model Number: __________ Serial Number: ____________ Purchaser Company: ___________________________________________________ Address: ___________________________________________________ City: _________________________ State: ____ ZIP: ________ Delivery Date to Owner: ___ / ___ / ___ Unit Hours: _____________ Purchaser - Type of Business Construction/Highway Equipment Dealer Rental Municipality Asphalt Contractor Other 1. The Purchaser has been instructed and/or has read the manual and understands proper preventive maintenance, operation and safety precautions. 2. The Warranty and Limitations of Liability are found in the Warranty pages enclosed in the Parts and Operators Manuals. 3. Broce Manufacturing Co. Inc. reserves the right to make design changes or modifications to Broce products at any time without incurring any obligation to make similar changes or modifications to previously sold units. 4. If this Document is not signed and returned to Broce Manufacturing Co. Inc., the warranty begins at the date of delivery to the Dealership. I hereby acknowledge acceptance of above and conditions in the Warranty Policy Purchaser/Owner: __________________________________________________________ Dealer Representative: __________________________________________________________ Broce Manufacturing Co. Inc. 1460 South 2nd Avenue Dodge City, KS 67801 (877) 227-8811 II III BROCE MANUFACTURING COMPANY BROCE BROOM LIMITED TWELVE MONTH WARRANTY For a period of twelve (12) months or 1,000 hours whichever comes first, from the date of delivery of product to the original user, Broce Manufacturing of Dodge City, Kansas warrants each product to be free from manufacturing defects, subject to the limitations contained in this policy. This limited warranty covers parts and labor. This warranty does not apply to defect caused, in whole or in part, by unreasonable use while in the possession of the user, including, but not limited to, failure to properly set up product, failure to provide reasonable and necessary maintenance, normal wear, routine tune ups or adjustments, improper handling, accidents, operation at speed or load conditions contrary to published specifications, improper or insufficient lubrication, or improper storage. This warranty is not a guarantee that the performance of each product will meet the expectations of the purchaser. Broce Manufacturing shall not be liable for consequential damage of any kind, including, but not limited to: consequential labor costs or transportation charges in connection with the replacement or repair of defective parts, lost time or expense which may have accrued because of said defects. In no event shall Broce Manufacturing’s total liability hereunder exceed the product purchase price. Many components used by Broce Manufacturing are subject to the warranties of their respective manufacturers. If their warranty differs in any way such as length of time or hours of usage, whether higher or lower, that warranty supersedes the Broce 12 month, 1,000 hour standard. These warranties will be considered void if the product is modified or repaired in any way not expressly authorized, or if closed components are disassembled prior to return. Closed components include, but are not limited to gearboxes, hydraulic pumps, motors, cylinders and actuators. Our obligation under the warranty is expressly limited, at our option, to the replacement or repair at Broce Manufacturing of Dodge City, KS or at a service facility designated by us. We are not responsible for unauthorized repairs or replacements. Any implied or statutory warranties, including any warranty of merchantability or fitness for a particular purpose, are expressly limited to duration of this written warranty. We make no other express warranty. This warranty cannot be extended, broadened, or changed except in writing by an authorized officer of Broce Manufacturing. Broce Manufacturing reserves the right to make changes or improvements in its products in the future without incurring obligations to make these changes and improvements to products previously supplied. Broce Manufacturing Co. Inc. 1460 South 2nd Avenue Dodge City, KS 67801 (877) 227-8811 IV V VI TABLE OF CONTENTS Belt Conveyor Pages ..................................................................................... 1-8 Top End View ............................................................................................ 1 Top Left Side View .................................................................................... 1 Middle Left Side View ................................................................................ 2 Lower Left Side View ................................................................................. 2 Bottom Left Side View ............................................................................... 3 Top Right Side View .................................................................................. 4 Belt Cleaner View ...................................................................................... 4 Bottom Right Side View ............................................................................. 5 Lift Cylinder Mount View ............................................................................ 6 Lift Cross Tube View ................................................................................. 7 Leveling Cylinder View .............................................................................. 7 Pivot Cylinder View .................................................................................... 8 Slat Conveyor Pages...................................................................................... 9-11 Left Side View............................................................................................ 9 Right Side View ......................................................................................... 10 Drive Side View ......................................................................................... 11 Screw Conveyor Pages.................................................................................. 12-14 Left Side View............................................................................................ 12 Center View ............................................................................................... 13 Outer Left Side View .................................................................................. 14 Frame Attached Components ....................................................................... 15-40 Left Side – Below Cab View ...................................................................... 15 Right Side – Broom Core View .................................................................. 16 Core Motor View ........................................................................................ 17 Middle Left Side View ................................................................................ 18 Fuel/Hydraulic Tank View .......................................................................... 19 Rear Left Side View ................................................................................... 20 Rear Drive View......................................................................................... 21 Pressure Manifold View ............................................................................. 22 Steering Pump View .................................................................................. 23 Steering Cylinder View .............................................................................. 24 Bolster Assembly ....................................................................................... 25 Brake Control Assembly ............................................................................ 26 Front Axle Assembly .................................................................................. 27-28 Front Brake Assembly ............................................................................... 29-30 M-46 Hydrostat View ................................................................................. 31 M-45 Piston Pump View ............................................................................ 32 PVG Valve View ........................................................................................ 33 Hydraulic Tank View .................................................................................. 34 VII TABLE OF CONTENTS (Cont.) Frame Attached Components (Cont.) ........................................................... 15-40 Case Drain Manifold View ......................................................................... 35 Core Lift Cylinder & Lift Lock Solenoid ...................................................... 36 Gear Box Assembly ................................................................................... 37-38 Water Spray System .................................................................................. 39-40 Curb & Gutter Brush Option....................................................................... 41-42 Cab Components and Electrical ................................................................... 43-63 Cab Assembly ........................................................................................... 43-44 TM Cab Front View .................................................................................... 45 Seat & Suspension Components ............................................................... 46 Broom/Conveyor Control Box .................................................................... 47 Transmission Control Box ......................................................................... 48 Hydrostatic Control Assembly.................................................................... 49 Dash/Steering Assembly ........................................................................... 50 Gauges & Senders .................................................................................... 51-52 Windshield Wipers & Washer .................................................................... 53-54 Misc. Switchers, Fuses, Etc. ...................................................................... 55-56 Lights & Horns ........................................................................................... 57-58 Heater/Defroster System ........................................................................... 59-60 Air conditioner System ............................................................................... 61-63 Engines & Related Parts ................................................................................ 64-68 3054B Cat Engine and Related Parts ........................................................ 64-66 C4.4 Cat Engine and Related Parts........................................................... 67-68 Hydraulic Diagrams........................................................................................ 69-71 Wiring Diagrams ............................................................................................. 72-82 Chain Care & Troubleshooting ..................................................................... 83-87 Dodge Grip-Tight Bearing Manual ................................................................ 88-89 Dodge Speed Reducer Manual ...................................................................... 90-97 TechnoDrive Pump Drives Service Manual .................................................. 98-105 Parking Brake Release Procedure ................................................................ 106 External Dimensions and Weights................................................................ 107 VIII BELT CONVEYOR - TOP END VIEW 1 3 2 ITEM PART NUMBER 1 2 3 4 320629 205076 320601 320622 4 DESCRIPTION Conveyor Belting, 12” x 33’ 4” Conveyor Drive Coupling Head Pulley w/ Shaft Return Rollers QUANTITY 1 1 1 4 BELT CONVEYOR - TOP LEFT SIDE 1 2 2 4 3 ITEM PART NUMBER 1 2 3 4 205084 320600 320602 205082 DESCRIPTION LH Upper Side Frame, 17.5 Head and Center Conveyor Bearings Center Wing Pulley w/ Shaft Conveyor Cross Member IX QUANTITY 1 4 1 2 BELT CONVEYOR – MIDDLE LEFT SIDE 1 4 2 ITEM PART NUMBER 1 2 3 4 5 6 205061 205060 855066 855067 205086 205063 3 6 5 DESCRIPTION QUANTITY Upper Side Sheet Side Gusset Center Side Plate w/ bushing Lift Side Bracket 1/2” x 1” Cap Screw w/ Zerk, LH & RH Return Sheet 2 4 2 2 2 1 BELT CONVEYOR – LOWER LEFT SIDE 1 4 3 2 ITEM PART NUMBER 1 2 3 4 205062 855291 205229 205230 DESCRIPTION Lower Deflector, LH Conveyor Cross Tube w/Left Side Support & Splined Shaft Belt Conveyor Wing Rubber Lower Belt Conveyor Rubber 2 QUANTITY 1 1 2 1 BELT CONVEYOR – BOTTOM LEFT SIDE 1 3 2 4 7 5 6 8 ITEM PART NUMBER 1 2 3 4 5 6 7 8 855077 205086 320604 320605 320603 320611 320636 320634 DESCRIPTION Take-Up Side Plate – Lower, LH 1/2” x 1” Cap Screw w/ Zerk, LH & RH Lower Take-up Frame Lower Take-up Bearing Wing Pulley w/ Shaft Swing Bearing, Lower Swing Bearing, Upper Taper Lock 3 QUANTITY 1 2 2 2 1 1 1 1 BELT CONVEYOR - TOP RIGHT SIDE 4 3 2 3 4 5 1 ITEM PART NUMBER 1 2 3 4 5 205078 325008 N/A N/A 205083 DESCRIPTION QUANTITY Conveyor Hydraulic Motor Mount Belt Conveyor Motor Hydraulic Hose Assembly, 52” – 1AA8MR6 & 1AA6FR6 Hydraulic Adapter Fitting – FF1852T0610S RH Upper Side Frame, 17.5 1 1 2 2 1 BELT CONVEYOR – BELT CLEANER 1 2 3 ITEM PART NUMBER 1 2 3 855233 205235 205232 DESCRIPTION Belt Conveyor Cross Member Belt Conveyor Cleaner Blade Retainer Belt Conveyor Cleaner Blade 4 QUANTITY 1 1 1 BELT CONVEYOR – BOTTOM RIGHT SIDE 3 11 9 5 8 4 1 6 10 ITEM PART NUMBER 1 2 3 4 5 6 7 8 9 10 855052 N/A 205064 N/A N/A N/A N/A N/A 855088 N/A 11 205087 2 7 DESCRIPTION Right Side Support Bracket w/ Bushing Quick Coupler – Female FD49-1005-08-06 Lower Deflector, RH Hydraulic Hose Assembly, 46” – 1AA8MB6 & 1AA8MR6 Hydraulic Hose Assembly, 44” – 1AA8MB6 & 1AA8MR6 Quick Coupler – Male FD49-1004-08-06 Hydraulic Adapter, 3474-08-08 Steel Hydraulic Line – 114” Take Up Side Plate - Lower, RH Hydraulic Fitting Rear Belt Conveyor Cross Member (inside – not visible in photo) 5 QUANTITY 1 2 1 1 1 2 2 2 1 2 1 BELT CONVEYOR – LIFT CYLINDER MOUNT 7 8 4 7 2 3 6 1 9 ITEM PART NUMBER 1 2 3 4 5 6 7 8 9 855030 325012 RC-19 N/A N/A N/A N/A N/A 205231 DESCRIPTION Bottom Lift Support w/ Bushings & Shaft Belt Conveyor Lift Cylinder, 3” x 29 5/8” Cylinder Pin Hydraulic Fitting, FF1868T0406S Hydraulic Hose Assembly, 115” – 1AA4FR4 & 1AA6FRB4 Hydraulic Hose Assembly, 84” – 1AA4FR4 (2) Hydraulic Adapter Tee, FF1865T0406S Hydraulic Hose Assembly, 52” – 1AA4FRB4 (2) Slat Conveyor Discharge Deflector (Rubber) 6 QUANTITY 1 1 1 2 1 1 1 1 1 BELT CONVEYOR – LIFT CROSS TUBE 2 1 ITEM PART NUMBER 1 2 855068 RC-19 DESCRIPTION QUANTITY Belt Conveyor Lift Cylinder Cross Tube Cylinder Pin 1 1 LEVELING CYLINDER VIEW 4 2 1 3 5 ITEM 1 2 3 4 5 NS NS PART NUMBER 325023 325022 N/A N/A N/A 855092 325029 K00025 DESCRIPTION Leveling Cylinder Assembly w/ Mount Plate, LH Leveling Cylinder Assembly w/ Mount Plate, RH Hydraulic Hose Assembly, 21” – 1AA4FR4 & 1AA6FR4 Vent, BV-SAE-6 Hydraulic Fitting, FF1852T0406S Leveling Cylinder Foot Seal Kit for Leveling Cylinder Cylinder Charge Kit 7 QUANTITY 1 1 2 2 2 2 1 1 BELT CONVEYOR – PIVOT CYLINDER VIEW 12 1 10 7 3 5 4 6 9 2 8 11 13 14 UNDERSIDE VIEW ITEM PART NUMBER 1 2 3 4 5 6 7 8 9 10 11 12 13 14 325013 N/A N/A N/A N/A N/A N/A N/A N/A N/A N/A N/A N/A 855290 DESCRIPTION Swing Cylinder, 2” x 12” Hydraulic Hose Assembly, 16” – 1AA4FRA4 & 1AA4FRB4 Hydraulic Fitting, FF1852T0406S Hydraulic Fitting, FF1865T0406S Hydraulic Hose Assembly, 92” – 1AA4FRA4 & 1AA6FRC4 Hydraulic Hose Assembly, 80” – 1AA4FRA4 & 1AA6FRB4 Accumulator Female Quick Coupler, 5601-4-4S Plug, 5659-4 CAT Tee, 8T2352 Check Valve, C20S-1/4” Hydraulic Adapter, FF1852T0606S Nipples, 2083-4-4S Lever Circle Cylinder with Splines 8 QUANTITY 2 2 2 2 1 1 2 2 2 2 2 2 4 1 SLAT CONVEYOR – LEFT SIDE VIEW 3 4 8 6 6 2 5 1 7 ITEM PART NUMBER 1 2 3 4 5 6 7 8 205020 320607 320606 205025 325011 N/A N/A N/A DESCRIPTION Slat Conveyor Side, LH Slat Conveyor Take-up Frame Slat Conveyor Take-up Bearing Slat Conveyor Head Shaft Load Holding Valve Hydraulic Adapter, FF1852T0408S Hydraulic Adapter, FF1852T0404S Hydraulic Hose Assembly, 61” – 1AA4FR4 & 1AA6FRC4 9 QUANTITY 1 2 2 1 1 2 1 1 SLAT CONVEYOR – RIGHT SIDE VIEW 7 2 1 4 6 3 5 9 ITEM PART NUMBER 1 2 3 4 5 6 7 8 9 205019 205031 205039 205032 N/A 205098 205040 N/A 205099 8 5 DESCRIPTION Slat Conveyor Side, RH Slat Conveyor Top Cover, Upper Speed Reducer Bracket Slat Conveyor Top Cover, Lower Hydraulic Hose Assembly, 121” – 1AA8FRB8 (2) Front Frame Cover, Top Slat Conveyor Window Hydraulic Hose Assembly, 190” – 1AA4FR4 & 1AA6FRC4 Front Frame Cover, Bottom 10 QUANTITY 1 1 1 1 2 1 1 1 1 SLAT CONVEYOR – DRIVE SIDE VIEW 3 1 5 2 5 4 ITEM PART NUMBER 1 2 3 4 5 320615 325007 320616 N/A N/A DESCRIPTION Dodge Speed Reducer Slat Conveyor Motor Speed Reducer Shaft Adapters, Set of 2 Hydraulic Adapter, FF1868T0406S Hydraulic Adapter, FF1852T0810S 11 QUANTITY 1 1 1 1 2 SCREW CONVEYOR - LEFT SIDE VIEW 2 4 5 1 5 3 ITEM 1 2 3 4 5 PART NUMBER 320618 320619 855018 855017 205227 320609 320625 DESCRIPTION Screw Conveyor, 25” – RH Screw Conveyor, 25” – LH Screw Conveyor Box, LH Screw Conveyor Box, RH Rock Shield, 14” x 7’ Core Frame Support Bearing, LH & RH Auger Wedge Cutout (2 LH & 2 RH) 12 QUANTITY 1 1 1 1 1 2 4 SCREW CONVEYOR – CENTER VIEW 2 1 5 3 4 6 7 ITEM PART NUMBER 1 2 3 4 5 6 7 320621 205029 320620 205024 205028 320608 855021 DESCRIPTION Slat Conveyor Chain Slat Sprockets Center Conveyor Shaft Slat Conveyor Floor Lower Slat Conveyor Bearing Slat Conveyor Floor Connector Assembly 13 QUANTITY 2 16 4 1 1 2 1 SCREW CONVEYOR – LEFT OUTER VIEW 1 4 3 2 ITEM PART NUMBER 1 2 3 205016 205023 320613 855141 855140 4 DESCRIPTION Auger Conveyor End Plate, LH & RH Outboard Screw Conveyor Stub Shaft, LH & RH Outboard Auger Bearings Dust Shield, LH Dust Shield, RH (Not Shown) 14 QUANTITY 2 2 2 1 1 LEFT SIDE VIEW – BELOW CAB 2 5 7 6 1 4 3 ITEM PART NUMBER 1 2 855001 204999 205000 RW-500 RW-502 N/A N/A 205161 205160 205162 3 4 5 6 7 DESCRIPTION Frame Assembly Brush Support Bracket RH Brush Support Bracket LH 8’ Set, Poly Wafers w/ Spacers 8’ Set, Half Poly & Half Wire Wafers w/ Spacers Hydraulic Hose Assembly, 46” – 1AA12FR12 Hydraulic Fitting, FF1944T1212S Front ROPS Attaching Bracket, LH Front ROPS Attaching Bracket, RH Rear ROPS Attaching Bracket 15 QUANTITY 1 1 1 1 1 2 2 1 1 2 RIGHT SIDE VIEW – BROOM CORE 7 5 6 1 3 2 4 ITEM PART NUMBER 1 855004 205043 205044 320610 205228 203010 D-17 855037 2 3 4 5 6 7 DESCRIPTION Core Frame Assembly Brush End Gate, RH Brush End Gate, LH Core Support Bearing, RH Core Side Sheet Rubber End Plate Core Idle Assembly Core Cover Assembly 16 QUANTITY 1 1 1 1 2 2 1 1 CORE MOTOR VIEW 2 1 4 3 ITEM PART NUMBER 1 2 3 4 325010 N/A 855005 DD-257-R DESCRIPTION Core Motor OMSW 400 Hydraulic Fitting, FF1852T1210S Core Assembly Core Drive Assembly (Splined Hub) 17 QUANTITY 1 2 1 1 MIDDLE LEFT SIDE VIEW 4 3 1 2 4 ITEM PART NUMBER 1 2 3 4 855153 855158 305505 311665 DESCRIPTION Hydraulic Tank Assembly Fuel Tank Assembly Sight Glass Decal Kit QUANTITY 1 1 1 1 NOTE: Decal Kit includes all exterior decals including safety stickers. Decals may be ordered separately. Request individual decals when ordering. 18 FUEL/HYDRAULIC TANK TOP VIEW 3 2 5 4 1 ITEM PART NUMBER 1 2 3 4 5 T-703-BA T-702-B 344175 304172 304172 DESCRIPTION Hydraulic Cap Fuel Cap Fuel Gauge Assembly 3/8” Fuel Hose, 48” 3/8” Fuel Hose, 60” QUANTITY 1 1 1 1 1 19 REAR LEFT SIDE VIEW 2 3 1 4 5 ITEM PART NUMBER 1 2 3 4 5 NS 855215 VF-803-R VF-319-RA 205221 203274 VF-317-B DESCRIPTION Hood Assembly Hood Catch (Rubber Strap Only) Catch Assembly (Complete Front Hood Retract Support Linkage Rear Hood Retract Support Linkage Hinge, Set of 2 20 QUANTITY 1 2 2 2 2 1 REAR DRIVE VIEW 4 3 7 5 6 8 1 2 ITEM PART NUMBER 2 325002 325001 K00024 3 N/A 4 N/A 1 5 N/A 6 7 N/A N/A Included in Item 2 8 DESCRIPTION QUANTITY Poclain 34ci Motor with parking brake, LH and RH Poclain 34ci Motor, no brake S/N 500001-500050, LH only Brake Release, 2” x 2” Square Tube, RH Only Hydraulic Hose Assy., 68” – 1AA6FRA6 & 1AA6FRC6, RH Hydraulic Hose Assy., 25” – 1AA6FRA6 & 1AA6FRC6, LH Hydraulic Hose Assy., 10.5” – 1BA12FRA12 (2) (R-Port, RH) Hydraulic Hose Assy., 50” – 1BA12FRA12 (2) (R Port, LH) Hydraulic Hose Assy., 19” – 1BA12FRA12 & 1BA12FRB12 (L-Port, RH) Hydraulic Hose Assy., 46.5” – 1BA12FRA12 (R-Port, LH) Hydraulic Fitting, FF1852T1212S (2 per Side, L & R-Port) Hydraulic Fitting, 2 1 1 1 1 1 Brake Release, 12mm x 110 mm Stud 1 1 1 1 4 2 Note: Picture shows RH Rear Drive Motor with brake release assembly attached. Brake release, Items #2 & #8, are to be used only to release Drive Motor Brake if needed. Items must be removed for normal operation. 21 PRESSURE MANIFOLD VIEW 6 4 5 3 2 1 ITEM PART NUMBER 1 2 3 4 5 6 325017 NA NA NA NA NA DESCRIPTION Pressure Manifold Hydraulic Fitting, FF1852T1216S Hydraulic Hose Assy., 27” – 1BA16FR16 & 1BA16FRB16 Hydraulic Hose Assy., 28” – 1BA16FR16 & 1BA16FRB16 Hydraulic Fitting, FF1852T1616S Hydraulic Fitting, FF2068T1616S 22 QUANTITY 1 4 1 1 1 1 STEERING MOTOR VIEW 6 1 5 3 3 3 4 2 2 ITEM PART NUMBER 1 2 3 4 5 6 325009 NA NA NA NA 203250 DESCRIPTION Steering Motor Hydraulic Hose Assembly, 20” – 1AA6FR6 & 1AA6FRB6 Hydraulic Fitting, FF1852T0608S Hydraulic Hose Assembly, 18” – 1AA6FR6 & 1AA6FRB6 Hydraulic Hose Assembly, 12” – 1AA6FRB6 & 1AA6FRC6 Power Steering Unit Mount 23 QUANTITY 1 2 4 1 1 1 STEERING CYLINDER VIEW 3 4 1 2 4 ITEM 1 2 3 4 PART NUMBER See Front Axle View NA NA NA DESCRIPTION QUANTITY Steering Cylinder 1 Hydraulic Hose Assembly, 66” – 1AA6FRA6 & 1AA6FRB6 Hydraulic Hose Assembly, 74” – 1AA6FRA6 & 1AA6FRB6 Hydraulic Fitting, FF1852T0606S 1 1 2 24 BOLSTER ASSEMBLY 1 4 2 7 5 6 3 ITEM PART NUMBER 1 2 3 4 5 6 7 752002 203002 852002 852003 309507 309505 309506 DESCRIPTION Bolster Assembly, Complete Bolster Pin Bolster A-Frame Assembly Bolster Support Oil Light Bushing, 1 1/4” x 1 1/2” x 1 1/2” Oil Light Bushing, 1 1/4” x 1 1/2” x 2” Oil Light Bushing, 1 1/4” x 1 1/2” x 2 1/4” 25 QUANTITY 1 1 1 1 1 1 1 BRAKE CONTROL ASSEMBLY 2 7 5 4 8 6 11 ITEM PART NUMBER 1 2 3 4 5 6 7 8 9 10 11 B-240-R 855188 B-284 401216 855191 B-241-R 344460 205197 BLS-15 B-27084A HC-229-R 3 1 9 10 DESCRIPTION Master Cylinder Master Cylinder Mount Rubber Boot Push Rod Brake Pedal Brake Pedal Pad Tension Spring Pedal Bushing Brake Light Switch Clevis Clevis Pin QUANTITY 1 1 1 1 1 1 1 2 1 1 1 26 FRONT AXLE ASSEMBLY 1 2 10 4 7b 6 5 19 21 7a 3 8 9 13 14 12 17 18 15 11 20 27 16 FRONT AXLE ASSEMBLY Reference Part No. Description Qty. 1. ................................. 403090 .................... Front Axle Assembly (6 Lug x 5 1/2) .............. 1 2 .................................. 203526 .................... Steering Cylinder Assembly ........................... 1 4 .................................. 403091 .................... Knuckle w/Spindle, LH .................................... 1 403092 Knuckle w/ Spindle, RH 1 5 .................................. BF4454 ................... King Pin Cap ..................................................... 2 6 .................................. 403093 .................... Tie Rod Tube .................................................... 1 7a ................................ BF4470 ................... Jam Nut, RH Thread ......................................... 1 7b ................................ BF4471 ................... Jam Nut, LH Thread ......................................... 1 8 .................................. BF4465L ................. Tie Rod End, RH Thread .................................. 1 9 .................................. 203523 .................... Lock Nut ............................................................ 2 10 ................................ BF4465R ................ Tie Rod End, LH Thread .................................. 1 11 ................................ BF4460 ................... Seal .................................................................... 2 12 ................................ BF4461X................. Inner Bearing Kit (w/Race) .............................. 2 13 ................................ 203544 .................... Hub Assembly, (6 Lug x 5 1/2) ........................ 2 14 ................................ 69957B ................... Lug Nut .............................................................. 10 15 ................................ 752547 .................... Outer Bearing Kit (w/Race) ............................. 2 16 ................................ 400195 .................... Washer .............................................................. 2 17 ................................ 203549 .................... Lock Nut ............................................................ 2 18 ................................ 203550 .................... Hub Cap ............................................................ 2 19 ................................ BF4470 ................... Jam Nut, RH Thread ......................................... 1 20 ................................ BF4455 ................... King Pin Kit ....................................................... 1 21 ................................ 203520 .................... Steering Cylinder Heims End.......................... 1 Not Shown.................. 203553 .................... Steering Cylinder Seal Kit ............................... 1 Not Shown.................. 304039 .................... Wheel – 6 Lug ................................................... 1 28 5200-6000 LB FRONT BRAKE ASSEMBLY 1 13 2 12 3 11 4 5 6 9 10 7 8 14 15 16 29 5200-6000 LB FRONT BRAKE ASSEMBLY ITEM PART NUMBER 1 2 3 4 5 6 7 8 9 10 11 12 13 14 203554 203530 203531 203532 203533 203534 203535 203536 203537 203538 203539 203540 203541 203542 203543 203544 203555 FA-306-R 15 16 NS DESCRIPTION Complete Caliper Assembly w/ Pads Friction Pads, Organic Brass Bleed Screw, 1/4” – 28 Brass Bleed Screw Adapter, 1/8” Guide Bolt Sleeve O-Ring Guide Bolt Rubber Sleeve Guide Bolt Stainless Steel Sleeve Guide Bolt (M11 x 1.5) w/ Thread Locker 90 1/8” NPT to 3/16” F.I.F. Caliper Piston, 2 1/4” Stainless Steel Rubber Dust Boot Piston Rubber Seal 1/8” NPT Brass Plug Caliper Mounting Bracket 12” Integral Rotor w/ Hub, 5 Lug x 5 1/2 12” Integral Rotor w/ Hub, 6 Lug x 5 1/2 Wheel Stud Brake Hose 30 QUANTITY 1 1 1 1 1 1 1 1 1 1 1 1 1 1 1 1 5 or 6 2 M-46 HYDROSTAT VIEW 8 11 10 1 6 7 9 12 3 ITEM PART NUMBER 1 2 3 4 5 6 7 8 9 10 11 12 325003 325005 N/A N/A N/A N/A N/A N/A N/A N/A N/A N/A 2 4 5 DESCRIPTION M-46 Hydrostat Steering Pump Hydraulic Hose Assy., 25” – 1GA32FJ32 & 1 G32FLA32 Hydraulic Fitting, FF1852T1612S Hydraulic Fitting, FF1852T1616S Hydraulic Fitting, FF1852T1216S Hydraulic Fitting, FF1852T0610S Hydraulic Hose Assy., 76” – 1AA6FRB6 & 1AA6FRC6 2” Ball Valve Hydraulic Hose Assy., 28” – 1AA12FRB12 (2) Hydraulic Fitting, FF1868T1212S Hydraulic Fitting, 2021-32-32 31 QUANTITY 1 1 1 1 1 2 1 1 1 1 1 1 M-45 PISTON PUMP VIEW 2 8 9 12 5 3 13 7 1 6 10 4 11 ITEM PART NUMBER 1 2 3 4 5 6 7 8 9 10 11 12 13 325004 325015 325020 N/A N/A N/A N/A N/A N/A N/A N/A N/A N/A DESCRIPTION M-45 Piston Pump, 75cc Suction Manifold Hydraulic Oil Filter Hydraulic Hose Assy., 22” – 1GA16FRB16 (2) Hydraulic Fitting, FF1852T1616S Hydraulic Hose Assy., 19” – 1GA16FRB16 Hydraulic Hose Assy., 48.5” – 1BA16FRB16 & 1B16FLA16 Hydraulic Hose Assy., 27” – 1AA8FRB8 (2) Hydraulic Fitting, FF1852T0810S Hydraulic Fitting, FF1852T0404S Hydraulic Hose Assy., 76” – 1AA4FRB4 & 1AA4FRC4 Flange Kit, FF593-449-74446-32 Flange Kit, FF593-449-74446-16 32 QUANTITY 1 1 2 1 2 1 1 1 1 1 1 1 1 PVG VALVE VIEW 3 4 2 1 ITEM PART NUMBER 1 2 3 4 325006 N/A N/A N/A DESCRIPTION PVG32/6 Control Valve Hydraulic Fitting, FF1852T1616S Hydraulic Fitting, FF1852T2016S Hydraulic Hose Assy., 7.5” – 1GA20FR20 & 1GA20FRB20 33 QUANTITY 1 1 1 1 HYDRAULIC TANK VIEW 11 3 12 6 9 7 8 10 5 ITEM PART NUMBER 1 2 3 4 5 6 7 8 9 10 11 12 N/A N/A 306538 N/A N/A N/A N/A 306535 N/A N/A N/A N/A 4 1 3 2 DESCRIPTION Hydraulic Fitting – Elbow, 6805-20-20FG Hydraulic Fitting, 2083-20-20S 1 1/4” Ball Valve – 1/4 Turn Valve Hydraulic Fitting, FF2031T2020S Hydraulic Hose Assy., 12”–1GA20FR20 & 1GA20FRB20 Hydraulic Hose Assy., 65” – 1AA12FR12 (2) Hydraulic Fitting, FF2032T1212S 3/4” Ball Valve Hydraulic Adapter Fitting, 6401-12-12 Hydraulic Hose Assy., 26” – 1GA20FR20 & 1GA20FRA20 Hydraulic Adapter Fitting, FF2031T2020S Hydraulic Adapter Fitting, 6401-20-20 34 QUANTITY 1 1 1 1 1 1 1 1 1 1 1 1 CASE DRAIN MANIFOLD VIEW 9 1 6 4 5 2 7 3 8 ITEM PART NUMBER 1 2 3 4 5 6 7 7 8 325016 N/A N/A N/A N/A N/A N/A N/A N/A 9 N/A DESCRIPTION Case Drain Manifold Hydraulic Adapter, FF1852T0406S Hydraulic Bushing, FF1010-1206S Hydraulic Fitting, FF1852T0606S Hydraulic Fitting, FF1852T1212S Hydraulic Fitting (Port 7), FF1852T0812S Hydraulic Fitting, FF1852T1212S (3054B Cat Engine Only) Hydraulic Fitting, FF1868T1212S (3054C Cat Engine Only) Hydraulic Hose Assy., 40” – 1AA12FR12 & 1AA12FRB12 Hydraulic Hose Assy., 93” – 1AA6FRA6 & 1AA6FRB6 Hydraulic Fitting (Port 5), FF1852T0612S 35 QUANTITY 1 1 1 3 1 1 1 1 1 1 1 CORE LIFT CYLINDER VIEW 9 6 2 10 13 1 8 5 13 3 4 7 11 12 14 ITEM PART NUMBER 1 2 3 4 5 6 7 8 9 10 11 12 13 14 325014 325019 N/A N/A N/A N/A N/A N/A N/A N/A N/A N/A N/A N/A DESCRIPTION Core Lift Cylinder, 2” x 12” Dual Locking Valve – Lift Lock Solenoid Hydraulic Hose Assy., 43” – 1AA4FR4 & 1AA4FRB4 Hydraulic Hose Assy., 88” – 1AA4FRB4 Hydraulic Fitting, FF1852T0406S Hydraulic Hose Assy., 20” – 1AA4FRB4 (2) Hydraulic Hose Assy., 39.5” – 1AA4FR4 & 1AA6FRB4 Hydraulic Fitting, FF1852T0406S Hydraulic Hose Assy., 63” – 1AA4FR4 & 1AA4FRB4 Hydraulic Fitting, FF1852T0406S Hydraulic Hose Assy., 14” – 1AA4FRB4 & 1AA6FRB4 Hydraulic Fitting, FF1852T0610S Hydraulic Fitting, FF1852T0406S Hydraulic Fitting, FF1868T0406S 36 QUANTITY 1 1 1 1 1 1 1 1 1 1 1 2 1 1 GEAR BOX ASSEMBLY 37 GEAR BOX ASSEMBLY ITEM PART NUMBER 1 4 5 6 7 8 9 12 13 14 15 21 22 23 24 25 26 27 28 29 30 31 32 33 39 2070106 4605257 4620054 2021180 2061243 4605257 4574013 2009044 2013240 4598030 2010119 4588040 4609020 4620054 4605257 2061243 2021179 4605257 4614014 2010117 4611108 4615227 4597165 4588040 4609020 DESCRIPTION Oil Gauge Ball Bearing Key Driven Shaft Gear Ball Bearing Silicone Sealant Tube Housing Shim O-Ring Plate Plug Washer Key Ball Bearing Gear Main Shaft Ball Bearing Pin Cover Washer Screw Oil Seal Plug Washer QUANTITY 1 2 2 2 2 2 1 1 X 1 1 1 1 1 1 1 1 1 1 1 19 19 1 1 1 38 WATER SPRAY SYSTEM 3 2 4 1 7/8 5/6 11 10 13 12 9 39 WATER SPRAY SYSTEM 16 18/19 20 23 22 17 21 14/15 20 ITEM PART NUMBER 1 2 3 4 5 6 7 8 9 10 NS NS NS 11 12 13 14 15 16 17 NS NS NS 18 19 20 21 22 23 344178 205254 205255 205253 855251 855252 855249 855250 344254 WS-148 1700-0044 3800-0025 3351-0005 302402 205262 306950 205247 205248 306125 WS-155 WS-158 TP8002 1458 205245 205246 306901 306925 345007 855270 DESCRIPTION Water Tank Tank Strap Rear Tank Strap Front Inside Tank Strap Front Outside Frame Bracket Assembly RH Frame Bracket Assembly LH Tank Basket Assembly RH Tank Basket Assembly LH Ball Valve Inline Strainer, Complete Strainer Gasket Strainer Screen Strainer Cup Pump Pump Mounting Bracket Check Valve Spray Bar RH Spray Bar LH T-Fitting Nozzle Assembly Nozzle Screen Nozzle Spray Tip Nozzle Cap Bracket RH Bracket LH Barb Tee 1/2” Brass Nozzle Housing Fitting, Hose Barb to 1/2 FNPT 90 Deg Water System Step 40 QUANTITY 2 4 2 2 1 1 1 1 1 1 1 1 1 1 1 1 1 1 1 9 9 9 9 1 1 2 2 2 2 CURB/GUTTER BRUSH OPTION 6 12 5 2 14 8 11 10 11 4 14 7 1 13 9 15 3 10 ITEM PART NUMBER 1 2 3 4 5 6 7 8 9 10 11 12 13 14 15 855300 325039 325037 305913 305916 854001 854003 854004 400912 400911 400910 204019 204018 204017 204016 DESCRIPTION Mount Cylinder, Lift Arm Cylinder, Spring Return Cylinder, Tilt Brush Motor Main Lift Arm Motor Mount Tilt Arm C-Clips C-Clips C-Clips Motor Mount Pin Spring Cylinder Pin Lift and Tilt Cylinders Pin Center Pivot Pin QUANTITY 1 1 1 1 1 1 1 1 2 5 4 1 1 2 1 41 CURB/GUTTER BRUSH OPTION 2 3 1 ITEM 1 2 3 PART NUMBER 304299 304296 854006 204027 DESCRIPTION QUANTITY Curb Brush (Wire) or Curb Brush (Poly) Hub Extension Brush Mounting Plate 1 1 1 4 5 6 ITEM PART NUMBER 4 5 6 305980 320637 307071 DESCRIPTION Variable Speed Controller Joystick Control Switch, Toggle 42 QUANTITY 1 1 1 CAB ASSEMBLY 1 2 3 12 13 5 4 6 10 7 8 9 11 43 CAB ASSEMBLY Reference Part No. Description Qty. 1 ...................................P-315-B .................. Cab Assembly, Complete ................................ 1 345055.................... Cab Keys, (Sold as a Pair) ............................... 1 2 ...................................202116 ................... Mirror Bracket, (2 per Side) ............................. 4 3 ...................................P-353-R .................. West Coast Style Mirror (1 per Side) .............. 2 4 ...................................P-352-B .................. Strut, (1 per Side).............................................. 2 5 ...................................309406 ................... Ball for Strut ...................................................... 2 6 ...................................345051 ................... Outside Door Handle (Paddle Style) ............... 2 7 ...................................P-320-B .................. Striker Assembly .............................................. 2 8 ...................................345053 ................... Latch Assembly ................................................ 2 9 ...................................345050 ................... Inside Door Handle (Paddle Style) .................. 2 10 .................................304089 ................... Door Seal, 14’ per door .................................... 1 11 .................................P-325-R .................. Window Rubber Molding, (As Required)........ 1 P-316-R .................. Floor Mat, 5’ x 4’ Blank..................................... 1 12 .................................K00002 ................... Door Tether Strap, Inside (1 per Side) ............ 2 13 .................................B239920C .............. Outside Grab Handle ........................................ 1 Not Shown ..................345052 ................... Inside Grab Handle ........................................... 2 Not Shown ..................AC-708-R ............... Air Cleaner Assembly ...................................... 1 Not Shown ..................AC-785-R ............... Air Cleaner Bonnet (Top Cap) ......................... 1 Not Shown ..................P10-3113 ................ Air Cleaner End Cap ......................................... 1 Not Shown ..................P00-3951 ................ Air Cleaner Clamp ............................................ 2 Not Shown ..................110-20027 .............. Air Cleaner Flex Hose ...................................... 1 Not Shown ..................P10-2114 ................ Air Cleaner Vent................................................ 1 Not Shown ..................AC-709-R ............... Air Cleaner Filter............................................... 1 Note: Items 10 & 11 are sold by the foot. Floor mat is a “Cut to Fit” item. 44 CAB – FRONT VIEW 2 5 3 4 ITEM PART NUMBER 1 2 3 4 5 NS NS AC-708-R AC-785-R P10-3113 P00-3951 110-20027 P10-2114 AC-709-R DESCRIPTION Air Cleaner Assembly Bonnet End Cap Clamp Flex Hose Vent Filter 1 QUANTITY 1 1 1 1 1 1 1 45 SEAT AND SUSPENSION COMPONENTS 3 1 3 5 2 4 ITEM PART NUMBER 1 BS-1050 C-211-R C-211-SH C-211-RT 855182 BS-1054 2 3 4 5 DESCRIPTION Seat Retractable Seat Belt (Shown) Retractable Seat Belt w/ Shoulder Harness (Not Shown) Tether Strap Set (for use w/ Suspension Seat) Control Box Assembly Suspension Assembly 46 QUANTITY 1 1 1 1 1 1 BROOM/CONVEYOR CONTROL BOX 3 5 6 4 3 2 2 2 7 1 7 ITEM PART NUMBER 1 2 3 4 5 6 7 307432 307417 307416 307427 307071 307415 311165 DESCRIPTION Conveyor Joystick Control Broom, Conveyor, & Auger Speed Pot Control Broom Float/Run & Emergency Brake Switches Emergency Stop Switch Core Lock On/Off Switch Broom Raise/Lower Control Panel Decals (Set of 2) 47 QUANTITY 1 3 2 1 1 1 1 TRANSMISSON CONTROL BOX 1 2 3 ITEM PART NUMBER 1 2 3 855171 855172 309456 DESCRIPTION Transmission Hand Control Box Hand Control Box Cover Throttle Cable 48 QUANTITY 1 1 1 HYDROSTATIC CONTROL ASSEMBLIES 1 3 2 ITEM PART NUMBER 1 2 3 403035 309470 205175 DESCRIPTION Hand Control Kit Hand Control Cable Bracket QUANTITY 1 1 1 49 DASH/STEERING ASSEMBLY 3 4 2 5 1 ITEM PART NUMBER 1 2 3 4 5 855168 205169 305945 S-253-R 001665 DESCRIPTION Dash Housing Dash Side Cover Steering Column Steering Wheel Assembly Dash Back Cover 50 QUANTITY 1 1 1 1 1 GAUGES AND SENDERS 2 1 4 3 5 9 10 7 8 6 11 12 51 GAUGES AND SENDERS ITEM PART NUMBER 1 2 3 4 5 6 7 8 9 I-222-HO I-221-R I-223-R I-220-V I-219-R I-222-B 307084 307088 76502 IS-221-R 10 IS-221-WC 11 12 NS W117 344175 IS-219-WC DESCRIPTION Hour Meter Oil Pressure Gauge Fuel Gauge Voltmeter Temperature Gauge (Engine) Tachometer Temperature Sender, CAT 3054C Temperature Sender, CAT 3054B Hour Meter Sending Unit Oil Pressure Sender Pressure Sender w/ Contact Note: Use w/ warning or shutdown system Murphy Switch, Engine shutdown system Fuel Sender Warning Shutdown Water Sender 52 QUANTITY 1 1 1 1 1 1 1 1 1 1 1 1 1 1 WINDSHIELD WIPERS & WASHER 14 5 4 1 7 2 3 6 10 8 9 11 13 53 12 WINDSHIELD WIPERS & WASHER ITEM PART NUMBER 1 2 1-182-54MO LE581022-1 2-615-2218 2-615-2214 2-615-15 BK721005 2-615-19 2-615-60 2-615-17 721014 2-615-24 2-615-2226 2-686-67 66-01 66-01A 1-182-54 1-182-54R 3 4 5 6 7 8 9 10 11 12 13 14 DESCRIPTION Wiper Motor Drive Arm 18” Blade (Canopy Windshield) 14” Blade (Rear) Wiper Motor Wiper Motor Mount Wiper Drive Arm (Tapered Motor Shaft) Wiper Shaft & Arm Assembly Pantograph Adapter & Gasket Link & Bolt Kit (Includes Bolts, Washers, & Clips) Pantograph Drive Arm 26” Blade Two Speed Wiper Switch Washer Pump & Reservoir Washer Kit (Includes Tubing & Hardware) Wiper Kit – Canopy Windshield (Motor, Blade, Arm) Wiper Kit – Rear (Motor, Blade, Arm) 54 QUANTITY 1 1 1 1 1 1 1 1 1 1 1 1 1 1 1 1 MISC. SWITCHES, FUSES, ETC. 7 5 1 2 6 3 55 4 MISC. SWITCHES, FUSES, ETC. ITEM PART NUMBER 1 PBL-12 46050-12 46050-10 WH4411201 23836 X770050 76052 307044 307045 307235 2 3 4 5 6 7 NS DESCRIPTION Warning Light Fuse Block (12 Fuse Capacity) Fuse Block (10 Fuse Capacity) Relay – Air Conditioning Shutoff Universal Accessory Switch Air Restrictor Sender (Air Cleaner Ind.) Pressure Switch (Air Conditioner Shutoff) Ignition Switch Key (Pair) Push Button Switch for Preheat 56 QUANTITY 1 1 1 1 1 1 1 1 1 1 LIGHTS – HORNS 9 5 13 6 7 14 11 15 10 4 2 3 12 16 1 8 57 LIGHTS - HORNS ITEM PART NUMBER 1 2 3 4 5 6 7 8 9 10 11 12 13 14 15 16 9-50004-SBA 4-75001 6-70001 16-35800 23836 550 550FH LG-100-SBA 7-40004 3614A RH-250 LDA-50-1R 4-302 307031 108-00-132 307228 DESCRIPTION Driving Light Turn Signal Stop/Turn Signal Turn Signal Switch Universal Accessory Switch Flasher Flasher Socket Light Group Kit w/ 950004-SBA Driving Lights Amber Beacon Amber Strobe Light Reverse Alarm Reverse Alarm Switch Traffic Horn Flush Mount Tail/Brake Lights Work Light Back Up Light QUANTITY A/R 2 2 1 1 1 1 See Note A/R A/R 1 1 1 2 A/R 2 Note: Light Group Kit, Part Number LG-100-SBA, contains all signals, switches, lights, and wiring harness required for field installation. 58 HEATER/DEFROSTER SYSTEM 14 2 17 15 16 10 5 7 8 13 6 9 4 1 3 12 11 59 HEATER/DEFROSTER SYSTEM ITEM PART NUMBER 1 2 3 4 5 6 7 8 9 10 11 12 13 14 15 16 17 KIT 403153 403154 403155 403156 403157 403158 403159 403160 403161 403162 Call 403164 403193 403166 403167 403168 403169 Call DESCRIPTION Case, Bottom/Side Coil Cast, Top/Side Panel, Blower Resistor, 3-Speed Housing, Blower Motor, CCW Wheel, Blower Ring, Venturi Hose, Vent Motor Blower Plenum, Heater Louver, 3” Round Plenum, Defrost Hose – Flex, Wire, Metal, 2.5” Dia. Wire Harness – Heater Switch, 4 Position Rot. Knob – Rotary Switch Heater/Defroster Kit, CAT 3054B & 3054C 60 QUANTITY 1 1 1 1 1 1 1 1 1 1 1 1 1 1 1 1 1 1 AIR CONDITIONING SYSTEM Features: 255 CFM Heavy Duty Powder Coated Finish all steel case. Low Profile for maximum headroom. Filtered, recirculated air. 61 AIR CONDITIONING SYSTEM ITEM PART NUMBER 1 2 3 4 5 6 7 8 9 10 11 12 NS NS 403184 403180 403175 403174 403183 403164 403177 403181 403173 403176 403187 403178 403182 403185 DESCRIPTION Cover, Evaporator Blower Assembly Coil, Evaporator Valve, Exp., Block, R134a Housing, Evaporator Louver, 3” Round Knob, Fan Decal, Fan Switch, Rotary Thermostat Bracket, Mounting, Exp. Valve Filter TSTAT Knob Binary Switch 62 QUANTITY 1 1 1 1 1 1 1 1 1 1 1 1 1 1 63 ENGINES AND RELATED PARTS 64 3054B ENGINE AND RELATED PARTS 31 37 30 38 35 11 24 23 32 15 3 12 26 27 6 10 34 25 28 8 14 29 21 13 36 7 20 2 22 1 5 9 16 4 19 18 33 65 17 3054B ENGINE AND RELATED PARTS ITEM PART NUMBER 1 2 3 4 5 6 7 8 9 10 11 12 13 14 15 16 17 18 19 20 21 22 23 24 25 26 27 28 29 30 31 32 33 34 35 36 37 38 NS NS NS NS NS 344062 852045 305766 852043 852042 852051 852052 163-1934 344506 344505 852075 203193 203190 203192 203191 344040 203123 JE-705-B JE-758-B 853605 344031 203105 AC-760-R AC-760-B 304061 AC-763-R DE-770-R P182059 P119410 PC-710-B PC-765-R PC-711-R 304095 P003951 AC-764-R TT-771-R P103113 P102980 344507 344504 304027 344079 344078 DESCRIPTION CAT 3054B Diesel Engine Oil Cooler Sleeve Oil Cooler Right Rear Motor Mount (front of broom) Left Rear Motor Mount (front of broom) Oil Cooler Tube, 23 1/2” Oil Cooler Tube, 6 1/2” Radiator Assembly Lower Radiator Hose Upper Radiator Hose Oil Cooler Mount Right Side Oil Cooler Seal Lower Seal (Rubber) Left Side Oil Cooler Seal Upper Seal (Rubber) Tail Pipe Muffler Clamp Muffler Head Pipe Clamp Exhaust Pipe Exhaust Gasket Exhaust Heat Shield Rubber Elbow, 3” x 3” Rubber, 3.5” x 3” Rubber Hump Hose, 3” x 3” Connecting Tube, Short Air Cleaner (Dual Element) Service Element Safety Element Precleaner, 4” Precleaner, Top Precleaner Bowl Engine Isolator Kit Clamp Strap Turbo II Precleaner Cup Air Cleaner Baffle CAT Fan Fan Belt Compressor Belt, A/C Only Fuel Filter Oil Filter 66 QUANTITY 1 1 1 1 1 1 1 1 1 1 1 1 1 1 1 1 2 1 2 1 1 1 2 1 1 1 1 1 1 1 1 1 4 1 2 1 1 1 1 1 1 1 1 C4.4 ENGINE AND RELATED PARTS 31 37 30 38 35 11 24 32 15 3 12 26 23 27 23 34 39 10 28 8 29 14 25 21 36 13 20 22 1 5 2 16 9 4 7 19 6 33 67 18 17 C4.4 ENGINE AND RELATED PARTS ITEM PART NUMBER 1 2 3 4 5 6 7 8 9 10 11 12 13 14 15 16 17 18 19 20 21 22 23 24 25 26 27 28 29 30 31 32 33 34 35 36 37 38 39 NS NS NS NS NS 344062 852045 325027 203600 203601 852042 852043 344508 344511 344510 853606 203187 203188 203186 203189 344010 203123 JE-705-B JE-758-B 853605 344031 203105 AC-760-R AC-760-B 304195 202152 DE-770-R P182059 P119410 PC-710-B PC-765-R PC-711-R 304095 P003951 AC-764-R TT-771-R P103113 P102980 344509 101-3770 5M8155 304196 344079 344078 DESCRIPTION CAT C4.4 Diesel Engine Oil Cooler Hose Guide Sleeve Oil Cooler Right Front Motor Mount Left Front Motor Mount Right Rear Motor Mount Left Rear Motor Mount Radiator Assembly Lower Radiator Hose Upper Radiator Hose Oil Cooler Mount Right Side Oil Cooler Seal Lower Seal (Rubber) Left Side Oil Cooler Seal Upper Seal (Rubber) Tail Pipe Muffler Clamp Muffler Head Pipe Clamp Exhaust Pipe Exhaust Gasket Exhaust Heat Shield Rubber Elbow, 3” x 3” Rubber Elbow, 3.5” x 3” Heater Hose Connecting Tube, Short Air Cleaner (Dual Element) Service Element Safety Element Precleaner, 4” Precleaner, Top Precleaner Bowl Engine Isolator Kit Clamp Strap Turbo II Precleaner Cup Air Cleaner Baffle Radiator Cap CAT Fan Fan Belt Compressor Belt, A/C Only Fuel Filter Oil Filter 68 QUANTITY 1 1 1 1 1 1 1 1 1 1 1 1 1 1 1 1 2 1 2 1 1 1 2 1 1 2 1 1 1 1 1 1 4 1 2 1 1 1 1 1 1 1 1 1 HYDRAULIC DIAGRAMS 69 HYDRAULIC VALVE DIAGRAM To Port 3 Case Drain Manifold To RH Poclain Drive Motor To Port 8 Case Drain Manifold To M-46 Charge Port Broom Raise/ Lower Cylinder Lift Lock Solenoid Leveling Cylinder Accumulator PVG Valve Slat Conveyor Motor Swing Cylinders B B A A Belt Conveyor Lift Cylinder Load Holding Valve Accumulator Belt Conveyor Motor Broom Rotation Motor Leveling Cylinder 70 HYDRAULIC DIAGRAM To Lift Lock Solenoid Hydraulic Tank Steering Cylinder RH Drive Motor Pressure Manifold Steering Motor Bulkhead Bulkhead R L Top Oil Cooler Oil Filter Steering Pump M-46 Pump Top View M-45 Piston Pump PVG Valve B B A A A B 5 Bottom Port 3 9 2 7 1 6 8 L R 4 To Lift Lock Solenoid Case Drain Manifold To Slat Conveyor Motor To Lift Lock Solenoid 71 LH Drive Motor WIRING DIAGRAMS 72 73 74 75 Terminal Strip Identification 12v to Joystick (Red w/ White) 1 12v to Circuit board P2-4 (Red w/ White) 2 12v Broom & Conveyor rotation solenoid P2-5 (Red w/ White 3 12v Auger rotation & Broom up/down solenoid P2-6 (Red w/ White 4 From Float switch (Orange) 5 From Broom rotation dial (Purple) 6 From Conveyor rotation dial (Gray 7 From Auger rotation dial (Pink) 8 12v From E-stop (Red) 9 To Core lock solenoid (Purple10 To Brake lock solenoid (Dr. Blue 11 To Dash brake light (Blue w/ Yellow) 12 Ground to Core & Brake lock solenoids (Black 13 12v From E-stop (Red) 14 Circuit Board Connector Identification CONNECTOR P1 1 12V Conveyor Solenoid Left/Right (Dr. Blue) 2 12V Conveyor Solenoid Left/Right (Lt. Blue) 3 12V Battery (Red) 4 12V Conveyor Solenoid Raise/Lower (White) 5 12V Conveyor Solenoid Raise/Lower (White w/ Red) 6 Ground (Black) 7 Solenoid ground (Black) 8 Brake and Core lock Ground (Black) 9 12V Conveyor Rotation And Broom Rotation Solenoid (Yellow) 10 12V Auger Rotation & Conveyor Raise/lower Solenoid (Green) 11 Varing Voltage for Core Up/Down/Float (Orange) 12 Varing Voltage for Broom Rotation (Purple) 13 Varing Voltage for Conveyor Rotation (Grey) 14 Varing Voltage for Auger Rotation (Pink) CONNECTOR P2 1 12V from Conveyor joystick (right) (Dr. Blue) 2 12V from Conveyor joystick (left) (Lt. Blue) 3 12V Battery (Red w/ White) 4 12V from Terminal Strip 2-27 (Red w/ White) 5 12V from Terminal Strip 3-26 ( Red w/ White) 6 12V from Terminal Strip 4-25 (Red w/ White) 7 12V from Conveyor joystick (lower) (White) 8 12V from Conveyor joystick (raise) (White w/ Red) 9 9V to Float switch (Black w/ Blue) 10 Varing Voltage from Broom Raise/Lower & Float switch (Orange) 11 6V to Float switch & Broom up/down switch (Black w/ Green) 12 8V to Broom Raise/Lower switch (Brown w/ White) 13 4.5V to Broom Raise/Lower switch (Brown w/ Green) 14 Varing Voltage from Broom Rotation switch (Purple) 15 8.6V to Broom Rotation switch (Blue w/ Yellow) 16 5.7V to Broom Rotation switch (Blue w/ White) 17 Varing Voltage from Conveyor Roation switch (Gray) 18 8.6V to Conveyor Rotation switch (Green w/ Yellow) 19 5.7V to Conveyor Rotation switch (Green w/ Red) 20 Varing Voltage from Auger Rotation switch (Pink) 21 9V To Auger Rotation switch (Red w/ Yellow) 22 2.8V to Auger Rotation switch (Black w/ White) 76 3A 3A 3A 3A 3A 3A 3A 3A 3A 28 27 26 25 24 23 22 21 20 19 18 17 16 15 12v from E-stop (Red w/ White) 12v from E-stop (Bridge Strip) 12v from E-stop (Bridge Strip) 12v from E-stop (Bridge Strip) Core up/down solenoid P2-10 (Orange Broom rotation solenoid P2-14 (Purple Conveyor rotation solenoid P2-17 (Grey Auger rotation solenoid P2-20 (Pink 12v to core lock switch (Purple) 12v from Core lock switch (Purple) 12v from Brake lock switch (Dr. Blue) 12v from Brake lock switch (Dr. Blue w/ Yellow) Ground for Core & Brake lock solenoids P1-8 (Black 12v to Parking brake switch (Red) 77 78 79 80 81 PVG Wiring Pin Out Values Function Conveyor Pivot Conveyor Rotate Broom Rotate Auger Rotation Conveyor Raise/Lower Broom Raise/Lower Wire Color Dk Blue Lt Blue Black Gray Yellow Black Purple Yellow/Red Black Pink Green Black White White/Red Black Orange Brown Black Pin Hirschman Connector 2 1 (+) 2 1 (+) 2 1 (+) 2 1 (+) 2 1 (+) 2 1 (+) Normal Voltage 0 0 grounded 5.7v 12v grounded 5.7v 12v grounded 5.7v 12v grounded 0 0 grounded 6v 12v grounded 82 Operation Voltage 12v right 12v left 6 to 9v 6 to 9v 2.8v forward 9.1v reverse 12v lower 12v raise 4.5v up 8v down 9v float CHAIN CARE & TROUBLE SHOOTING Fatigue Failure Stress Corrosion Stress Corrosion and Hydrogen Embrittlement Fatigue Failure Bushing Fatigue 32 These closely related failures are similar in appearance and nature. They appear as cracks which initiate at the point of highest stress and tend to extend in an arc-like path parallel to the rolling grain of the material. Often, more than one crack will appear on a side plate. This type of failure can be caused by operating in an acidic or caustic medium or atmosphere. Carbon steel and certain grades of stainless steel are subject to stress corrosion cracking when exposed to a corrosive environment. Also, exposure of carbon steel chain to moisture can lead to rusting and stress corrosion cracking. The reactions of many chemical agents with metals liberate hydrogen, which attacks and weakens the metal grain structure. If stress corrosion failure occurs, check the installation to see if the chain is exposed to chemicals, gases, moisture, or other possible causes. If the chain has been cleaned with a detergent solution, the detergent could be at fault. For cleaning purposes, use only detergent-free fluids. Never use acids, such as in acid bath degreasing. Fatigue failures are a result of repeated cyclic loading beyond the chain’s endurance limit, or rated capacity. Extent of the overload and frequency of its occurrence are factors which determine when fatigue will occur. The overloading can be continuous or intermittent. Continuous overloading may be caused by worn teeth or pocket buildup, imposing overloads with each cycle. Impulse overloads can be from motor overload torque, dynamic overloading due to sudden stops, or impact loading on conveyors. Generally, a fatigue crack starts at the point of highest stress, which is the aperture of the pin or bushing plate. Repeated cyclic stresses cause the crack to extend approximately perpendicular to the pitch line of the chain until the plate breaks. Unlike a pure tension failure, there is no noticeable yielding (stretch) of the material. When fatigue failure occurs, the application should be examined for continuous or impulse overloading conditions. Determine the cause of the overload and eliminate it if possible. (Be sure to check sprockets for worn teeth or pocket buildup.) If the cause cannot be eliminated, determine the extent of the overload and increase chain size (capacity) to accommodate the operating conditions. Bushing fatigue is another type of fatigue failure. Such fatigue manifests itself as circumferential cracks near the bushing link plate or longitudinally along the length of the bushing. Both types of cracks may also appear in the same bushing. If bushing cracks are evident, do not try to repair the chain. Determine and correct the cause of the failure, then replace the entire chain. Allied-Locke Industries Inc. . . . the company that delivers www.alliedlocke.com 83 CHAIN CARE & TROUBLE SHOOTING Tension Failure Galling (Abnormal Wear) This type of failure occurs when the ultimate tensile strength of a chain is exceeded (when the chain is subjected to a one-time load greater than it can withstand). Normally, tension failure can be identified by fractured side plates showing a definite yield in the metal itself. Pin fracture, either near the center of the pin or a pin shear failure between the side plates, can also be a result of tension failure. When a chain breaks because of shocks or overloads, all of its components are affected, even though the unbroken parts may appear sound. To avoid repetitive failures, the entire chain should be replaced. Tension failures can result from any condition which creates improper engagement between links and sprockets, characterized by the chain riding up on the sprocket teeth. In addition, dirt and foreign matter buildup in the sprocket tooth pockets will prevent proper seating of the chain, creating an overload condition between link and tooth. Sprockets should be checked periodically; if any foreign material has accumulated, it should be promptly removed. Another variation of tension failure is cracked bushings. In applications contaminated by dirt or grit, abrasive material may penetrate the links. When it reaches the inside and outside bushing surfaces, this material literally grinds into the bushings during articulation, reducing their wall thickness and lowering chain tensile strength. Eventually the bushings crack under load. Galling, or the tearing away of metal particles from the load-bearing surfaces, occurs as a result of inadequate lubrication or excessive operating speed. The mating surfaces of the pins and bushings actually weld together, then break away as the joints flex over the sprockets. Once started, galling accelerates rapidly and is highly destructive. Galling can occur at high speed (within allowable speed limits) if lubrication is inadequate or misdirected. Check lubrication system to be sure that: a) proper type of lubricant is being used; b) lubricant flow is not obstructed; c) lubricant is penetrating chain joints. Galling at speeds beyond allowable limits cannot be solved by lubrication changes. It can be prevented only by making necessary design changes to comply with speed limitations. Pin Galling Importance of Lubrication One of the most important, but overlooked, factors affecting chain life is proper lubrication. Besides minimizing metal-to-metal contact, lubrication provides cooling and impact damping at high speeds. It also reduces corrosion and carries away foreign matter, which is vital in abrasive environments. Side Plate Fracture Due to Tension Failure Allied-Locke Industries Inc. . . . reach for the star of quality Toll Free: Phone: 800-435-7752 Fax: 800-462-3130 Local: Phone: 815-288-1471 Fax: 815-288-7945 www.alliedlocke.com 84 33 CHAIN CARE & TROUBLE SHOOTING Lubrication plays an important role for chain life because chain wear and its stretch results from friction in the area between pin and bushing. Proper lubrication is necessary to reduce metal to metal contact and interference at chain joints. Method and amount of lubrication Type Method A B Amount Apply oil with a brush or spout can aiming at clearance between pins and roller links on the slack side of chain in operation. periodically to keep chain joints from drying (generally about every 8 hours) Drip lubrication Use simple casing and apply oil drops from a drip cup. at a rate of 5 to 20 drops per minute for each strand of chain, the higher the speed the more the the drops per minute. Oil bath lubrication Chain runs through an oil reservoir kept in leak-proof casing. too much oil kept in reservoir (if h dimension is too high) can generate heat in oil and deteriorate its quality, therefore oil level should be kept in such a way as to maintain h dimension to be about 6 to 12mm. Slinger disc lubrication Oil disc mounted on lower sprocket picks up oil from the oil reservoir kept in leakproof casing and splashes it on chain. Disc should run at rim speed of more than 200 meters per minute. If chain width exceeds 125mm, oil disc should be used on both sides of chain. Oil level should be kept lower than chain lowest point to maintain h dimension to be about 12 to 25mm Forced lubrication Oil pump is used to force continuous spray of oil after cooling to chain within a leak-proof casing. No. of spray oil holes should be N⫹1 if the number of chain strand is N. C In all types of lubrication, roller chain should be cleaned periodically using light oil or gasoline. In order to see if lubrication is performed satisfactorily, remove chain from drive and check its pin and bushing. If pin and bushing show flaking or being colored to red or dark brown, poor lubrication generally exists. 34 Allied-Locke Industries Inc. . . . chain - sprockets - buckets 85 www.alliedlocke.com CHAIN CARE & TROUBLE SHOOTING Tips on Trouble Shooting Chain Life Expectancy Bushing and Pin Wear Surfaces Chain life expectancy can be expressed as a maximum percent of elongation. When using up to 67tooth sprockets, normal life expectancy is approximately 3% elongation. Thus, to avoid sudden tension failure, chain should be replaced when its length increases 0.36″ per foot on the average. When using sprockets with over 67 teeth, life expectancy is reduced in relationship to the following formula: permissible chain elongation⫽200 N where N is the number of teeth in the larger sprocket. Excessive Wear Normal Wear If the load-bearing surfaces show discoloration (brown-red oxide), lubrication is insufficient. Fretting corrosion has set in, and the abrasive oxide produced will greatly increase the wear rate. Among other causes of excessive wear are: • Tight Chain—insufficient sag in the slack strand. Lessen idler tension or distance between sprockets until slack is 2% to 3% of the sprocket center-to-center distance. • Excessive Slack—chain whips and creates noise. Adjust idlers or sprocket distances for proper slack. • Worn or Misaligned Sprockets— can cause chain overloads and accelerate the wear rate. Replace sprockets when teeth show excessive wear or are hook-shaped. Proper sprocket size is also important to minimize the wear rate. Use sprockets with a minimum of fifteen teeth for smoothest operation and longest life. The fewer teeth there are in a sprocket, the greater the wear rate because of the high angle of articulation. Wear normally takes place in the pin and bushing load-bearing areas. As they wear, the chain gradually elongates. The rate of chain wear is greatly affected by lubrication. When properly lubricated, load-bearing surfaces of the pin and bushing will look shiny and smooth. Example 200⫽1.8% N Allied-Locke Industries Inc. . . . the company that delivers Call Toll Free Fax your inquiry (800) 435-7752 (800) 462-3130 (United States) (U.S. and Canada) (815) 288-7945 (Illinois and Canada) www.alliedlocke.com 86 35 CHAIN CARE & TROUBLE SHOOTING CHAIN CARE & TROUBLESHOOTING Problem Possible Causes What To Do Excessive noise I I I I I I Chain vibration I Resonance to the vibration cycle of machine to be installed I High load fluctuation I Change vibration cycle of chain or machine I Use torque converter or fluid coupling Wear on inside of link plate and one side of sprocket teeth I Misalignment I Realign sprockets and shafts Chain climbs sprockets I Excessive chain slack I Heavy overload I Adjust center or idler take-up I Reduce load or install stronger chain Broken pins, bushings or rollers I Chain speed too high for pitch and sprocket size I Use shorter pitch chain or install larger diameter sprockets I Heavy shock or suddenly applied loads I Material build-up in sprocket tooth pockets I Reduce shock load or install stronger chain I Remove material build-up or install side gashed sprockets I Inadequate lubrication I Chain or sprocket corrosion I Lubricate properly I Install anti-corrosive chain or sprockets Chain clings to sprocket I Center distance too big or high load fluctuation I Excessive chain slack I Adjust the center distance or install idler take-up I Same as above Chain gets stiff I I I I I I I I Misalignment of sprocket Loose casings or bearings Too little or too much slack Chain and/or sprocket wear Inadequate lubrication or no lubrication Chain pitch size too large Misalignment Inadequate lubrication Corrosion Excessive load I Material build-up in chain joint I Peening of link plate edges Breakage of link plate I Subjected to shock load I Vibration I Moment of load inertia is too big 36 Allied-Locke Industries Inc. I I I I I I Realign sprockets and shafts Tighten set-bolts Adjust center or idler take-up Replace chain and/or sprocket Lubricate properly Check chain drive recommendation Realign sprockets and shafts Lubricate properly Replace with anti-corrosive chain Reduce load or replace with chain of suitable strength I Shield drive from foreign matter I Check for chain interference I Reduce shock (e.g., install a shock absorber) I Install a device to absorb vibration (e.g., tightener, idler wheel) I Chain section should be checked (increase number of strands or select next larger size chain) . . . reach for the star of quality 87 www.alliedlocke.com INSTRUCTION MANUAL DODGE GRIP-TIGHT ADAPTER MOUNT BALL BEARINGS ® WARNING To ensure that drive is not unexpectedly started, turn off, lock out, and tag power source before proceeding. Failure to observe these precautions could result in bodily injury. Shaft & Mounting Surface Inspection Table 1 - Shaft Tolerances Shaft should be smooth, straight, & within commercial tolerances (Table 1). Remove burrs & align mounting surfaces within 2 degrees. Assemble Adapter & Bearing 1) If the locknut is loose from the bearing, FIRST place locknut into bearing inner ring groove, THEN insert adapter into bearing bore until it rests against the locknut. Rotate locknut clockwise to engage adapter sleeve. Shaft Size (in) Commercial Shaft Tolerances (in) Up to 1 1/2” +0.000” / - 0.002” 1 5/8” - 2 1/2” +0.000” / - 0.003” 2 11/16” - 3 7/16” +0.000” / - 0.004” Table 3 - Locknut Rotation From Handtight Pillow Blocks & Tapped Base Housings Series Shaft Size GT (Normal Duty) Shaft Size GTM (Medium Duty) Locknut Rotation 203 - 204 1/2" - 3/4" 17 - 20 mm ----- 1/2 Turn 205 - 210 7/8" - 1 3/4" 25 - 45 mm 3/4" - 1 1/2" 20 - 40 mm 2/3 Turn 211 - 218 1 15/16" - 2 15/16" 50 - 75 mm 1 11/16" - 3 1/2" 45 - 85 mm 1 Turn NOTE: For Tapped Base (TB) housings drill mounting holes with 1/16” minimum bolt clearance to assist with proper installation. 2) During installation it is best practice is to remove all of the weight from the bearing via slings or jacks. However, if it is difficult to remove all weight then insure the dead weight on the bearing during installation does not exceed the values listed in Table 2. Table 2: Maximum Dead Load On Bearing During Installation Table 4 - Mounting Bolt Torque (in-lbs) Metal Housings All Housing Types Non-Metallic Polymer Housing Pillow Block, 2 & 4 Bolt Flange, Flange Bracket Maximum Dead Load Per Bearing Series (lbs) 203-206 60 207-210 65 211-214 70 215-218 75 3) Slide the unit into position onto the shaft. If the unit will not slip onto the shaft, turn locknut counter-clockwise to expand adapter sleeve. 4) Wearing gloves, rotate locknut clockwise, by hand, as tight as possible until adapter sleeve grips and does not spin on the shaft or move axially. If needed, tap on locknut outer diameter while turning locknut to assist with this step. Scribe the line on the locknut above the adapter sleeve slot. Bolt Size (in) Dry Torque (in lbs) Bolt Size (in) Dry Torque (18-8 Stainless) (in lbs) 3/8 7/16 1/2 5/8 3/4 240 384 600 1200 2100 3/8 7/16 1/2 9/16 5/8 225 350 500 650 1000 7/8 2040 Tapped Base Bolt Size (in) Dry Torque (18-8 Stainless) (in lbs) 3/8 7/16 1/2 175 350 400 5) Lock bearing to shaft by rotating locknut, with a spanner wrench or brass bar & hammer, clockwise by amount shown in Table 3. NOTE: The use of air chisels is not recommended. 6) Center housing & mounting bolts over mounting holes & tighten bolts to proper torque (Table 4). Tighten locknut setscrew until 3/32” Allen key bends (25 in-lbs). 7) Repeat above steps for mounting 2nd housing. Do not tighten mounting bolts on 2nd housing until second bearing has been completely locked to the shaft. Bolts must fit freely between housing & mounting surface. If the mounting bolts do not fit freely, loosen mounting bolts on both housings & center both units. If the bolts still will not fit freely, remove one unit from the shaft, reposition housing, & reinstall. WARNING Because of the possible danger to person(s) or property from accidents which may result from the improper use of products, it is important that the correct procedure be followed. Products must be used in accordance with the engineering information specified in the catalog. Proper installation, maintenance, and operating procedures must be observed. The instructions in the instruction manuals must be followed. Inspections should be made as necessary to ensure safe operation under prevailing conditions. Proper guards and other suitable safety devices or procedures as may be desirable or as may be specified in safety codes should be provided, and are neither provided by Baldor Electric Company nor are the responsibility of Baldor Electric Company. This unit and its associated equipment must be installed, adjusted, and maintained by qualified personnel who are familiar 88 with the construction and operation of all equipment in the system and potential hazards involved. When risk to persons or property may be involved, a holding device or shear bars must be an integral part of the driven equipment. All Flange Housings WARNING: Special attention to the installation procedure for flange bearings is necessary to maintain the proper internal clearance & achieve maximum life. The installation of the first flange differs from the installation of the second flange. (See step 1 Assemble Adapter & Bearing page 1) 2) During installation it is best practice is to remove all of the weight from the bearing via slings or jacks. However, if it is difficult to remove all weight then insure the dead weight on the bearing during installation does not exceed the values listed in Table 2. 3) Slide the FIRST unit into position onto the shaft. If the bearing will not slip onto the shaft or more axially, turn locknut counter clockwise to expand adapter sleeve. 4) (Using gloves) rotate locknut clockwise by hand until it is tight & adapter sleeve grips & does not spin on the shaft. This is the starting point. Scribe a line on the locknut above the adapter sleeve slot. (If needed, tap on locknut outer diameter while turning locknut to assist with this step.) 5) Lock bearing to shaft by rotating locknut, with a spanner wrench or brass bar & hammer, clockwise by amount shown in Table 2. NOTE: The use of air chisels is not recommended. 6) Tighten locknut setscrew until 3/32” Allen key bends (or 25 in-lbs). Tighten housing bolts to proper torque (Table 3). 7) Slide the SECOND flange onto the shaft and hand tighten as in step 4 but leave 1/16” minimum gap between the flange housing & the mounting surface. See picture to the right. 8) It is important to note that the 1/16” minimum gap between the flange housing and the mounting surface must be maintained while getting the bearing hand tight to the shaft. Wearing gloves, rotate the locknut clockwise, by hand, until adapter sleeve grips and does not spin or move axially on the shaft. If needed, tap on the locknut outer diameter while turning the locknut to assist with this step. At this point you should have difficulty in rotating the locknut by hand and you should not be able to move the bearing axially along the shaft by hand. If the bearing can be moved axially along the shaft by hand then continue rotating the nut gradually until it grips the shaft. Scribe a line on the locknut above the adapter sleeve slot. 9) Insert housing bolts & pull the housing flush with mounting surface by alternately tightening the bolts to the proper torque (Table 4). 1/16” Min. 10) Lock bearing to shaft by rotating locknut, with a spanner wrench or drift pin & hammer, clockwise by amount shown in Table 3. Tighten locknut setscrew until 3/32” Allen key bends (25 in-lbs). 11) Rotate the shaft by hand, no binding or excessive drag should be felt. If excessive drag is felt, loosen the second bearing & reinstall starting at step 8. Dismounting All Units Table 5 - Suggested Lubrication Intervals in Weeks 1) Remove all weight from the bearing via slings or jacks & secure the shaft from rotation. 2) LOOSEN THE HOUSING MOUNTING BOLTS & COMPLETELY REMOVE SETSCREW IN THE LOCKNUT. RPM Hours Run Per Day 3) Rotate locknut counter clockwise with spanner wrench or drift pin & hammer until bearing is free. 1 to 250 RPM 251 to 500 RPM 501 to 750 RPM 751 to 1000 RPM 1001 to 1500 RPM 1501 to 2000 RPM 2001 to 2500 RPM 2500 to Max RPM 8 12 12 10 7 5 4 3 3 16 12 7 5 4 2 2 1 1 24 10 5 3 2 1 1 1 1 Lubrication: (Use compatible Lithium base NGLI #2 grease & see Table 5) The Dodge Grip-Tight bearing has been greased from the factory & is shaft ready. When re-lubricating slowly add grease until fresh grease is seen purging past the seal. In the higher speed ranges, excess grease may cause temporary bearing overheating. The amount of grease a bearing will take for a specific high speed application is best determined by experience. When establishing a re-lubrication schedule, note that a small amount of grease at frequent intervals is preferred to a large amount of grease at infrequent intervals. Lubrication recommendations are intended for standard products applied in general operating conditions. For modified products, high temperature applications, and other anomalous applications contact product engineering at 864-284-5700 www.baldor.com www.ptplace.com www.dodge-pt.com www.reliance.com Baldor Electric Company Headquarters P.O. Box 2400, Fort Smith, AR 72902-2400 U.S.A., Ph: (1) 479.648.5792, Fax (1) 479.648.5792, International Fax (1) 479.648.5895 Baldor - DODGE/Reliance 6040 Ponders Court, Greenville, SC 29615-4617 U.S.A., Ph: (1) 864.297.4800, FAX: (1) 864.281.2433 5/07 Copyright © 2007 Baldor Electric Company All Rights Reserved. Printed in USA. This material is not intended to provide operational instructions. Appropriate instruction manuals and precautions should be studied prior to installation, operation or maintenance of equipment. 89 IM499312 . Parts Replacement Manual For HYDROIL™ TORQUE-ARM™ Speed Reducers Taper Bushed For Char-Lynn H, S, T and 2000 Series 6B Spline Motors SIZES: HXT325A HXT425A/HXT415A HXT525B WARNING: Because of the possible danger to persons(s) or property from accidents which may result from the improper use of products, it is important that correct procedures be followed: Products must be used in accordance with the engineering information specified in the catalog. Proper installation, maintenance and operation procedures must be observed. The instructions in the instruction manuals must be followed. Inspections should be made as necessary to assure safe operation under prevailing conditions. Proper guards and other suitable safety devices or procedures as may be desirable or as may be specified in safety codes should be provided, and are neither provided by Baldor Electric Company nor are the responsibility of Baldor Electric Company. This unit and its associated equipment must be installed, adjusted and maintained by qualified personnel who are familiar with the construction and operation of all equipment in the system and the potential hazards involved. When risk to persons or property may be involved, a holding device must be an integral part of the driven equipment beyond the speed reducer output shaft. World Headquarters P.O. Box 2400, Fort Smith, AR 72902-2400 U.S.A., Ph: (1) 479.646.4711, Fax (1) 479.648.5792, International Fax (1) 479.648.5895 Dodge Product Support 6040 Ponders Court, Greenville, SC 29615-4617 U.S.A., Ph: (1) 864.297.4800, Fax: (1) 864.281.2433 www.baldor.com © Baldor Electric Company MN1664 (Replaces 499829) All Rights Reserved. Printed in USA. 06/30/09 *1664-0609* 90 REDUCER INSTALLATION 1. 2. On sizes HXT3A, HXT4A, and HXT5B, replace the plastic plug that protects the threaded hole in the reducer housing with the eyebolt supplied with the reducer. Determine the running position of the reducer (see Fig. 1). Note that the reducer is supplied with either 4 or 7 plugs; 4 around the sides for horizontal installations and 1 on each face for vertical installations. These plugs must be arranged relative to the running positions as follows: Horizontal Installations—Install the magnetic drain plug in the hole closest to the bottom of the reducer. Throw away the tape that covers the filler/ventilation plug in shipment and install plug in topmost hole. Of the 3 remaining plugs on the sides of the reducer, the lowest one is the minimum oil level plug. 3. Mount Taper Bushed reducer on driven shaft per instruction sheet No. 499629 packed with tapered bushings. 4. Install torque arm and adapter plates using the long reducer bolts. The bolts may be shifted to any of the holes on the input end of the reducer. 5. Install torque arm fulcrum on a rigid support so that the torque arm will be approximately at right angles to the center line through the driven shaft and the torque arm anchor screw. CHAR-LYNN H, S, T AND 2000 SERIES 6B SPLINE MOTOR INSTALLATION Consult the local Char-Lynn Motor dealer for hydraulic motor information. REDUCER LUBRICATION CAUTION Unit is shipped without oil. Add proper amount of recommended lubricant before operating. Failure to observe these precautions could result in damage to, or destruction of, the equipment. Use a high grade petroleum base, rust and oxidation inhibited (R & O) gear oil—see tables. Follow instructions on reducer nameplate, warning tags, and in the installation manual. Under average industrial operating conditions, the lubricant should be changed every 2500 hours of operation or every 6 months, whichever occurs first. Drain reducer and flush with kerosene, clean magnetic drain plug and refill to proper level with new lubricant. The running position of the reducer in a horizontal application is not limited to the four positions shown in Figure 1. However, if running position is over 20º either way from sketches, the oil level plug cannot be safely used to check the oil level, unless during the checking the torque arm is disconnected and the reducer is swung to within 20º in positions “B” and “D” or 5º in positions “A” and “C” of the positions shown in Figure 1. Because of the many possible positions of the reducer, it may be necessary or desirable to make special adaptions using the lubrication fitting holes furnished along with other standard pipe fittings, stand pipes and oil level gages as required. CAUTION Too much oil will cause overheating and too little will result in gear failure. Check oil level regularly. Failure to observe these precautions could result in damage to or destruction of the equipment. Under extreme operating conditions, such as rapid rise and fall of temperature, dust, dirt, chemical particles, chemical fumes, or oil sump temperatures above 200ºF, the oil should be changed every 1 to 3 months depending on severity of conditions. WARNING To ensure that drive is not unexpectedly started, turn off and lock out or tag power source before proceeding. Failure to observe these precautions could result in bodily injury. 91 Table 1 – Oil Volumes † Position A Reducer Size Quarts (Approx) S Liters (Approx) 48 1½ 1.42 48 60 17/8 1.77 72 104 3¼ 3.08 128 Fluid Ounces (Approx) HXT315A HXT325A HXT415A HXT425A HXT515B HXT525B Volume of Oil Required to Fill Reducer to Oil Level Plug † Position B † Position C S S Fluid Fluid Quarts Quarts Ounces Liters Ounces (Approx) (Approx) (Approx) (Approx) (Approx) 1½ 1.42 24 Liters (Approx) Fluid Ounces (Approx) † Position D S Quarts (Approx) Liters (Approx) ¾ .71 72 2¼ 2.13 2¼ 2.13 40 1¼ 1.18 56 4 3.79 104 3¼ 3.08 128 †† Refer to Fig. 1 on page 2 for mounting positions. S U.S. Measure: 1 quart = 32 fluid ounces = .94646 liters. 1¾ 1.66 4 3.79 Note: If reducer position is to vary from those shown in Figure 1 either more or less oil may be required. Consult factory. CAUTION Do not use oils containing slippery additives such as graphite or molybdenum disulphide in the reducer when backstop is used. These additives will destroy sprag action. Failure to observe these precautions could result in damage to, or destruction of, the equipment. CAUTION Extreme pressure (EP) lubricants are not recommended for average operating conditions. Failure to observe these precautions could result in damage to, or destruction of, the equipment. Minimum Oil Recommendations for Average Operating Conditions Table 2 – Lubrication Recommendations – ISO Grades for Ambient Temperatures of 15º to 60º Output RPM 301–400 201–300 151–200 126–150 101–125 81–100 41–80 11–40 1–10 1 220 220 220 220 220 220 220 220 220 2 220 220 220 220 220 220 220 220 220 3 150 150 150 220 220 220 220 220 220 4 150 150 150 150 220 220 220 220 220 5 150 150 150 150 150 220 220 220 220 Reducer Size 6 7 8 9 150 150 150 150 150 150 150 150 150 150 150 150 150 150 150 150 150 150 150 150 150 150 150 150 150 150 150 150 220 220 220 220 220 220 220 220 10 150 150 150 150 150 150 150 220 220 12 150 150 150 150 150 150 150 150 220 13 150 150 150 150 150 150 150 150 220 14 150 150 150 150 150 150 150 150 220 Table 3 – Lubrication Recommendations – ISO Grades for Ambient Temperatures of 50º to 125º Output RPM 15 150 150 150 150 150 150 150 150 220 301–400 201–300 151–200 126–150 101–125 81–100 41–80 11–40 1–10 1 320 320 320 320 320 320 320 320 320 2 320 320 320 320 320 320 320 320 320 3 220 220 220 320 320 320 320 320 320 4 220 220 220 220 320 320 320 320 320 5 220 220 220 220 220 320 320 320 320 Reducer Size 6 7 8 9 220 220 220 220 220 220 220 220 220 220 220 220 220 220 220 220 220 220 220 220 220 220 220 220 220 220 220 220 320 320 320 320 320 320 320 320 10 220 220 220 220 220 220 220 320 320 12 220 220 220 220 220 220 220 220 320 13 220 220 220 220 220 220 220 220 320 14 220 220 220 220 220 220 220 220 320 15 220 220 220 220 220 220 220 220 320 Below – 23ºF call application engineering. 20ºF to -22ºF use Mobil SHC 627. Above 125ºF use Mobil SHC 634. See page 8 for lubricant viscosity classification equivalents. NOTE: Pour point of lubricant selected should be at least 1 0 º F lower than expected minimum ambient starting temperature. Special lubricants may be required for food and drug industry applications where contact with the product being manufactured may occur. Consult a lubrication manufacturer’s representative for his recommendation. GUIDELINES FOR TORQUE-ARM REDUCER LONG-TERM STORAGE During periods of long storage, or when waiting for delivery or installation of other equipment, special care should be taken to protect a gear reducer to have it ready to be in the best condition when placed into service. By taking special precautions, problems such as seal leakage and reducer failure due to the lack of lubrication, improper lubrication quantity, or contamination can be avoided. The following precautions will protect gear reducers during periods of extended storage: Preparation 1. Drain the oil from the unit. Add a vapor phase corrosion inhibiting oil (VCI-105 oil by Daubert Chemical Co.) in accordance with Table 3. 2. Seal the unit air tight. Replace the vent plug with a standard pipe plug and wire the vent to the unit. 3. Cover the shaft extension with a waxy rust preventative compound that will keep oxygen away from the bare metal (Non-Rust X-110 by Daubert Chemical Co.). 4. The instruction manuals and lubrication tags are paper and must be kept dry. Either remove these documents and store them inside or cover the unit with a durable waterproof cover which can keep moisture away. 5. Protect the reducer from dust, moisture, and other contaminants by storing the unit in a dry area. 6. In damp environments, the reducer should be packed inside a moisture-proof container or an envelope of polyethylene containing a desiccant material. If the reducer is to be stored outdoors, cover the entire exterior with a rust preventative. When Placing the Reducer into Service 1. Assemble the vent plug into the proper hole. 2. Clean the shaft extensions with a suitable solvent. 3. Fill the unit to the proper oil level using a recommended lubricant. The VCI oil will not affect the new lubricant. 4. Follow the installation instructions provided in this manual. Table 4 – Quantities of VCI #105 Oil Case Size HXT3A HXT4A HXT5B VCI #105 & #10 are interchangeable. VCI #105 is more readily available. 3 92 Quarts or Liters .1 .2 .3 Note: The two-digit numbers are for reference only. Order parts by the six-digit numbers inthe Parts List. Each six-digit number is a complete identification of the part or assembly 93 Refer ence 12 6 No. Req’d . Name of Part HXT3A Part No. HXT4A Part No. HXT5B Part No. Refer ence Backstop Assembly 1 243106 244106 245154 HOUSING 1 243534 244567 245587 36* Air Vent 1 241237 241237 245237 42* 16 Housing Bolt 6 411440 411442 411464 78* 18 Adapter Housing Bolt 2 411442 411444 411466 19 Washer 4 419094 419094 419096 6 20 Lockwasher 6 419012 419012 419013 22 Hex Nut 8 407089 407089 407091 24 Dowel Pin 2 420055 420055 420110 6 Pipe Plug 2 430031 430031 430033 6 Magnetic Plug 1 430060 430060 430062 4 416524 411035 21 Countershaft Cover Screws (Backstop Side) Countershaft Brg. Cover (Backstop Side) 1 243559 244574 27 Lockwasher 4 419007 419009 1 389720 389721 389722 243561 244593 245220 1 243558 244524 355011 2 243578 244673 245545 RTV Sealant, Tube 1 465044 465044 465044 5 3 7 1 /16" Bore 1½" Bore 5 1 /8" Bore 11 2† 389704 389711 389732 32 Carrier and Cover Screws 10 411390 411407 411407 33 Lockwasher 10 419010 419011 419011 34 Backstop Cover 1 243560 244493 245547 38 Backstop Cover Screw 4 416524 411035 411406 39 Lockwasher 4 419007 419009 419009 40* Input Shaft 25:1 Ratio 1 243498 244587 245641 44* Input Shaft Brg. 15:1 Ratio ...... 244089 245084 1 /16" Bore 1 243272 244093 245086 2" Bore 1 243274 244095 245088 2 /8" Bore 1 ...... 244109 ...... 1 243276 244111 245090 2¼" Bore 1 ...... 244113 245092 2 /16" Bore 7 1 ...... 244115 245094 2½" Bore 1 ...... ...... 245099 1 ...... ...... 245110 11 15 2 /16" Bore S Bushing Screw S Lockwasher 1 402204 402280 402144 Cup 1 403139 403027 403104 1 /16" Bore 46* Input Shaft Brg.+ Cone 1 402273 402142 402269 1 /8" Bore 1 403094 403102 5 3 403073 COUNTERSHAFT 1 389701 48 50* S Countershaft with Pinion 25: 1 Ratio S First Reduction: 1 243555 Gear 52* 25:1 Ratio S Key ...... ...... 1 /16" Bore 1 443265 443254 ...... 1½" Bore 1 443265 443254 ...... 1 443265 443254 ...... ...... 1 443266 443254 1 443266 443254 ...... 1 443267 443255 443251 1 243239 244212 245212 1 243215 244215 244215 (Input Side) Cup 1 403094 403000 403027 Cone 1 402273 402000 402203 Cup 1 403094 403000 403027 1 243545 244578 245594 2† 389705 389712 389718 1 389703 389710 389717 90 60* 1 /6" Bore 15 1 /16" Bore 1 443269 443255 443251 2" Bore 1 443268 443255 443251 2 /8" Bore 1 ...... 443258 ...... 1 443270 443259 443251 1 3 2 /16" Bore 2¼" Bore 1 ...... 443260 443251 2 /16" Bore 7 1 ...... 443261 443243 2½" Bore 1 ...... ...... 443244 1 ...... ...... 443245 11 2 /16" Bore 15 2 /16" Bore 6 Taper Bushed 6 S Output Hub Taper Bushed 1 243556 244588 245590 243570 244188 245186 S Key, Bushing to Output Hub 3 7 S Key, 1 /8" thru 1 /8" Bore Bushing to Output Hub 64* S Output Gear S Output Gear Key 1 2 243216 244217 355064 72 Bushing Back-up Plate 2 243308 244099 245114 74 Retaining Ring 2 421109 421108 421107 76 Output Hub Seal Carrier (Input Side) 1 243547 244591 245592 77 Roll Pin 1 409022 409022 409022 102 80* Output Hub Cone 2 402272 402286 402193 104 81* Bearing Cup 2 403127 403163 403016 106 82* Output Hub Bearing Shim Pack 2† 389706 389713 389719 110 62* 7 S Key, Bushing to Shaft OUTPUT HUB ASSEMBLY∨ ...... 443264 1¾" Bore 55* Countershaft Brg. Shim Pack 419012 ...... 1 11 402203 59* 419011 443264 1 /16" Bore 402000 (Backstop Side) 419011 1 245596 402273 Countershaft Brg. 6 244590 244214 1 Countershaft Brg. Cover (Input Side) 245112 411435 1 /8" Bore Cone 58 ...... 411408 389715 Countershaft Brg 57* ...... 411407 389708 54* 56* 1 6 7 5 25:1 Ratio ASSEMBLY∨ ...... 243270 Cone Cup ...... ...... 1 1 /8" Bore (Input Side) (Backstop Side) 244081 244083 244087 45* 47* 243262 243264 244085 2 /16" Bore 88 1 1 243268 2 /16" Bore 86 ...... ...... 243266 3 244586 ...... ...... 244079 1 1 Input Shaft Bearing Shim Pack ...... 243284 243260 1 15 ASSEMBLY∨ 243282 1 1¾" Bore 7 USHING 1 1 1 /16" Bore 419009 30* HXT5B Part No. 1 1 /8" Bore 84 HXT4A Part No. SEAL KIT∨* 1 /16" Bore 244574 HXT3A Part No. S Backstop Cover Gasket S Input Shaft Seal S Output Hub Seal 411394 26 No. Req’d . Name of Part 94 96 98 100 ∨ Includes parts listed immediately below marked “S” Housing assembly also includes a two-piece housing. Bushing assemblies include 2 bushings. S Parts marked “S” make up the assemblies under which they are listed. 6 Not shown on drawing. + Part No. 402266 for HXT525B. † See last paragraph under “ORDERING PARTS.” * Recommended spare parts 5 7 ß On size HXT3A for 1 /16" thru 1¾" bores and HXT5B for 1 /16" thru 2¼" bores. 5 Required for HXT5B, 4 required for HXT3A and HXT4A 112 114 116 118 120 122 . 94 15 1 /16" & 2" Bore 1 ...... ...... 443250 1ß 443262 ...... 443202 1 ...... 443257 ...... 1 ...... 443256 ...... TORQUE-ARM ASSEMBLY∨ 1 243097 245097 245097 S Rod End S Hex Nut S Turnbuckle S Extension 1 243245 245245 245245 1 407095 407097 407097 1 243246 245246 245246 1 243247 245247 245247 S L.H. Hex Nut S Fulcrum S Fulcrum Screw S Hex Nut 1 407244 407246 407246 1 243249 246249 246249 1 411484 411484 411484 1 407093 407093 407093 ADAPTER ASSEMBLY∨ 1 259153 259154 259155 S R.H. Adapter Plate S L.H. Adapter Plate S Adapter Bushing S Adapter Bolt S Lockwasher S Hex Nut 1 243242 244244 245242 1 243241 244243 245241 1 243243 245243 245243 1 411437 411460 411460 1 419012 419013 419013 1 407089 407091 407091 243467 244573 245643 417081 417108 417108 419046 419047 419047 124 Motor Adapter 25:1 Ratio 126 Adapter Screw 1 128 Lockwasher 4 REPLACEMENT OF PARTS A DODGE TORQUE-ARM Speed Reducer can be disassembled and reassembled by careful attention to the instructions following, using tools normally found in a maintenance department. WARNING External loads may cause machine movement. Block machine before removing any drive train components. Failure to observe these precautions could result in bodily injury. Cleanliness is very important to prevent the introduction of dirt into the bearings and other parts of the reducer. A tank of clean solvent, an arbor press, and equipment for heating bearings and gears should be available for shrinking these parts on shafts. 1. Remove bushing screws. 2. Place the screws in the threaded holes provided in the bushing flanges. Tighten the screws alternately and evenly until the bushings are free on the shaft. For ease of tightening screws make sure screw threads and threaded holes in bushing flanges are clean. 3. Remove the outside bushing, the reducer and then the inboard bushing. Our factory is prepared to repair reducers for customers who do not have proper facilities or who for any reason desire factory service. The oil seals are of the rubbing type and considerable care should be used during disassembly and reassembly to avoid damage to the surface on which the seals rub. The keyseat in the input shaft as well as any sharp edges on the output hub should be covered with tape or paper before disassembly or reassembly. Also be careful to remove any burrs or nicks on surfaces of the input shaft or output hub before disassembly or reassembly. DISASSEMBLY: 1. Remove all bolts from housing. Drive back hollow dowel pins on either side of housing. Remove backup plates and snap rings on the output hub on taperbushed reducers. Open housing evenly to prevent damage to parts inside. 2. Lift shaft, gear and bearing assemblies from housing. 3. Remove seals, seal carriers and bearing cups from housing. ORDERING PARTS: When ordering parts for reducer, specify reducer size number, reducer serial number, part name, part number and quantity. It is strongly recommended that when a pinion or gear is replaced, the mating gear or pinion be replaced also. REASSEMBLY: If the large gear on the output hub must be replaced, it is recommended that an output hub assembly with a gear assembled on the hub be ordered to secure undamaged surfaces on the output hub where the oil seals rub. However, if it is desired to use the old output hub, press the gear and bearing off and examine the rubbing surface under the oil seal carefully for possible scratching or other damage resulting from the pressing operation. To prevent oil leakage at the shaft oil seals the smooth surface of the output hub must not be damaged. 1. Output Hub Assembly: Heat gear to 325º to 350ºF for shrinking onto output hub. Heat bearing cones to 270º to 290ºF for shrinking onto output hub. 2. Countershaft Assembly: Heat gear to 325º to 350ºF and bearing cones to 270º to 290ºF for shrinking onto shaft. 3. Input Shaft Assembly: Shaft and pinion are integral. Heat bearing cones to 270º to 290ºF for shrinking onto shaft. If any parts must be pressed from a shaft or from the output hub, this should be done before ordering parts to make sure that none of the bearings or other parts are damaged in removal. Do not press against outer race of any bearing. 4. Drive the dowel pins back into position in the righthand housing half. 5. Install countershaft cover in right-hand housing half. Place housing half on blocks to allow for protruding End of output hub. Install bearing cups in right-hand housing half making sure they are properly seated. Because old shaft oil seals may be damaged in disassembly it is advisable to order replacements for these parts. 6. Mesh output hub gear and small countershaft gear together and set in place in housing. Set input shaft assembly in place in the housing. Make sure bearing rollers (cones) are properly seated in their cups. Set bearing cups for left-hand housing half in place on their rollers. If replacing a bearing or a shaft, it is advisable to order a set of shims for adjustment of bearings on the shaft assembly. If replacing a housing, a set of shims should be ordered for each shaft assembly because the adjustment of the bearings on each shaft assembly is affected. REMOVING TAPER BUSHED REDUCER FROM SHAFT: 7. Clean housing flange surfaces on both halves, making sure not to nick or scratch flange face. Place a new bead of gasket eliminator on flange face and spread evenly over entire flange leaving no bare spots. Place other housing half into position and tap with a soft hammer (rawhide not lead hammer) until housing bolts can be used or draw housing halves together. Torque housing bolts per torque values listed below. WARNING To ensure that drive is not unexpectedly started, turn off and lock out or tag power source before proceeding. Failure to observe these precautions could result in bodily injury. 95 8. 9. Place output hub seal carrier in position without slims and install two carrier screws diametrically opposed. Torque each screw to 25 lb.-ins. Rotate the output hub to roll in the bearings and then torque each screw once to 50 lb.-ins. Do not retorque screws. Again turn output hub to roll in the bearings. With a feeler or taper gage, measure the gap between the housing and the carrier, clockwise from and next to each screw. To determine the required shim thickness, take the average of the two feeler gage readings. Remove carrier and install the required shims. Note: Total shim thickness per carrier should not include more than .009" plastic shims and each plastic shim should be inserted between two metal shims. Place a 1/8" diameter bead of Dow Coming RTV732 sealant on the face around the I.D. of the end shim (sealant is to be between reducer housing and shim) and install carrier on reducer housing. Torque carrier bolts to value shown in Table 5. Output hub should have an axial end play of .001" to .003". 10. Again using the same procedure as in step 8, adjust the input shaft bearings, except the axial end play should be .002" to .004". 11. Apply sealant to the input shaft cover gasket and install input shaft cover in right-hand housing half. Install input and output seals. Extreme care should be used when installing seals to avoid damage due to contact with sharp edges on the input shaft or output hub. This danger of damage and consequent oil leakage can be decreased by covering all sharp edges with tape or paper prior to seal installation. Fill cavity between seal lips with grease. Seals should be pressed or tapped with a soft hammer evenly into place in the carrier applying pressure only on the outer edge of the seals. A slight oil leakage at the seals may be evident during initial running in but should disappear unless seals have been damaged. 12. Install bushing back-up plate and snap rings. Adjust the countershaft bearings using the same method as in step 8 above. The axial end play should be .001" to .003". Table 5 – Bolt Tightening Torque Values Reducer Size HXT309A HXT315A HXT325A HXT409A HXT415A HXT425A HXT509B HXT515B HXT525B Housing Bolts (in.-lbs.) Seal Carrier Bolts (in.-lbs.) 600 204 600 360 900 360 Table 7 – Manufacturers’ Part Numbers For Replacement Countershaft Bearings TORQUEARM Reducer Size HXT315A HXT325A HXT415A HXT425A HXT515B HXT525B TORQUE-ARM Reducer Output Hub Bearing DODGE Part Number 402272 403127 402268 403163 402193 403016 Countershaft Bearing Adapter Side DODGE Timken Part No. Part No. 402273 15012 403094 15245 402000 M86649 403000 M86610 402203 2789 403027 2720 Table 8 – Manufacturers’ Part Numbers For Replacement Input Shaft Bearings Table 6 – Manufacturers’ Part Numbers For Replacement Output Hub Bearings TORQUE-ARM Reducer Drive Size HXT315A HXT325A HXT415A HXT425A HXT515B HXT525B Countershaft Bearing Input Side DODGE Timken Part No. Part No. 402273 15102 403094 15245 402000 M86649 403000 M86610 402203 2789 403027 2720 Size HXT315A HXT325A HXT415A HXT425A HXT515B Timken Part Number LM814849 LM814810 498 492A 42381 42584 HXT525B 96 Input Bearing Input SiDe DODGE Timken Part No. Part No. 402204 LM48548A 403139 LM48510 402280 2788 403027 2720 402144 28579 403104 28521 402144 28579 403104 28521 Input Bearing Adapter Side DODGE Timken Part No. Part No. 402273 15102 403094 15245 402142 26118 403102 26283 402269 350 403073 352 402266 350A 403073 352 Viscosity Classification Equivalents 97 MAM- 1104 Accoppiatori- manualedi servizio PumpDrives- servicemanual Boites de Repartition - manuel d'utilisation ceruennlrrA - ll motovienetrasmesso le pompe. dall'albero centraledell'accoppiatore aglialberilateralichecomandano - ll sensodi rotazione delleusciteè contrario a ouellodell'albero di entrata. - ll collegamento con le pompevieneeffettuato amezzodi manicotti scanalati. INSTALLAZIONE - La posizione di lavorodell'accoppiatore è quellaindicataa catalogo. Perposizioni diverseinterpellare il serviziotecnicoTechnodrive. - Staffaggio Nel caso di collegamento direttosullacampanacoprivolano del motorediesel,l'accoppiatore deve esserestaffatorigidamente allo a cui è staffatoil motore.Nel caso di montaggio indipendente di un accoppiatore stessobasamento con frizione.BDS145'o "BDS 290"occorrestaffare,oltreche sui pianilateralidell'accoppiatore, anchesui due pianilateralidellafrizione.Per i modellicon frizione "BDS2200"e "BDS3300"occorrestaffaresui pianilateralidell'accoppiatore e sulcentraggio A 205mm laloalberodi entratafrizione. - Montaggiopompe:l' accoppiatore vienefornitocon i supporlipompamontatisulleprese.Qualorasi dovessesmontareuna presa pompapersostituirla (fraanelloesternodel con altra,occorrefareattenzione che il nuovosupporlononcarichiassialmente i cuscinetti cuscinetto e supporlopompadeveesserciun giocodi 0,10+ 0,20mm). I manicotti di collegamento dellepompedevonoesseremontaticon i relativianellidi fermo,o con vite e rosettadi fissaggioin testa all'alberopompa,facendoattenzione che non venganoindotticarichiassialisuglialberia causadi errataposizionedi un anellodi fermo. La tenutaolioè realizzata sul supportopompacon anelloOR o con guarnizione. - L'accoppiatore vienefornitosenzaolio. prowistidi Primadellamessain funzioneprocedereal riempimento sino al massimoindicatosull'astadi livello.Negliaccoppiatori impianto di raffreddamento occorreriverificare il livellooliodopoaverawiatol'accoppiatore e riempitoscambiatore e tubazioni. - Nelcasodi accoppiatori prowistidi impiantodi raffreddamento assicurarsi che il sensodi rotazione in entrataall'accoppiatore siaquello previstoperla pompadi circolazione dell'olio; in casocontrario invertire i collegamenti con la pompa. - Assicurarsi che la temperatura dell'olio nonsuperi,in esercizio, i 105'C. piuefficacedell'accoppiatore. un raffreddamento Qualoratalevalorevengasuperatooccorreprevedere - L'alberodi entratadegliaccoppiatori, sia in versione"8" che in versione"BDS",nonaccettacarichiradialio assiali,è quindisconsigliato I'azìonamento con puleggia. - Gli accoppiatori confrizione"BDS"devonoessereazionatitramiteun giuntoche noninducasforziradialio assialisull'albero. ll montaggio sull'albero del semigiunto dellafrizionedeveessereeffettuato a caldo. ll semigiunto deveavereuna lunghezza utiledelforosuperiore a quelladell'albero e deveesserefissatoassialmenle convitee rondelì^ td i^ +^^+^ il | LEùLd ^[!^th^"^ a[ dtuct u. nelcollegamento Curarel'allineamento all'albero di entratadellafrizione. - Peril montaggio degliaccoppialori confrizione"BD"procedere comesegue: a) la frizionevienefornitain posizione innestata e con levadi comandosmontata;non disinnestare sinoa quandonon si è ultimaloil montaggio sul motore. pilotasull'alloggiamento pilotadeveesserea doppioschermoingrassato b) Posizionare il cuscinetto delvolano.ll cuscinetto a vita. pilotaè di solitomontatocon intederenza ll cuscinetto volanoe con giocosull'albero sull'alloggiamento frizione,Qualoranon ci fosse (o similare) volanooccorrebloccare interferenza sull'alloggiamento il cuscinetto con"loctite" sull'anello esternoperevitarnelo sfilamento. la coronadentatasulcentraggio c) Posizionare delvolanoe stringere le vitidi fissaggio. il gruppoaccoppiatore d) Posizionare sul motorefacendoattenzione ad inserirei dentidel discofrizionenellecavedellacoronadentata pilotacon l'estremità senzadanneggiarli e ad infilareil cuscinetto facendoscorrerela frizioneversoil motoresinoa quanto dell'albero oossibile. gradualmente e) Montarele vitidi fissaggio dellacampanaserrandole a croce. f) Posizionare la levadi comandoe disinnestare la frizioneverificando ruotinoliberamente. che le uscitedell'accoppiatore USO - Accoooiatori confrizione"BD"o "BDS" L a f r i z i o n e d e v e e s s e r e i n n e s t a t a u n i c a m em n toet co or enaim ll i n i m o o c o m u n q u e n odnias lo p r a d e1i0 0 0 g i r i' /. 1 velocemente. L'innesto deveessereeffettuato Nonfermarsicon la levain oosizione intermedia. Le stessenormevalgonoperil disinnesto. 98 ' . ' ,,rrt .-i-= : ===i+===="'-"''=urr=rrrrut"t = nnt'tU_relrzrOrue - Gli accoppiatori al riempimento sinoal massimoindicatosull'astadi sonofornitisenzaolio.Primadellamessain funzioneprocedere livello. -Usareo|ioperingranaggiconadditiviEP,indicediviscositàminimo95. ||tipodio|iopuòesserese|ezionato,infunzionede||atemperaturaambiente,su|latabellaA' - Effettuare (in ognicasonon oltrei 12 isuccessiviogni 1000ore di funzionamento il primocambiooliodopo50 ore di funzionamento; mesi). - Controllare periodicamente il livelloolio. - Assicurarsi i 105'C. dell'olio nonsuperi,in esercizio, che la temperatura - Per la lubrificazione con riferimento allefigure5-6-7, NLGI-2.I puntidi lubrificazione, dellefrizioniusaregrassoal litiodi consistenza sonoi seguenti: ogni300 ore. a) alberodi comando(A25,Fig.5): ingrassare 'BD 290',"BDS145',"BDS290".Su questefrizioni ogni300 oresullefrizioni"BD 145', b) Collaredi comando(A11,Fig.5): ingrassare (A19). di ispezione il coperchio (A11) è posizionato solotogliendo sul collaredi comando(A10)ed è raggiungibile l'ingrassatore (A11)è posizionato dellacampana(A16)ed sull'esterno Sullefrizioni"BD 2000",'BD3300","BDS2200',"BDS3300":l'ingrassatore ogni100ore. occorreingrassare -BDS2200',-BDS3300"):ingrassare ogni600ore. c) Levettedi comando(A43)(solosu "BD 2200","BD3300', è sull'esterno dellacampana ogni100ore;I'ingrassatore in entrataper"BDS2200",'BDS3300",(C12,Fig.7): ingrassare d) Cuscinetti ( C 1 1F, i g 7 . ). - Regolazione "AM...BD...",'AM...BDS...'). dellafrizione(accoppiatori per ottenereunaduratasoddisfacente dell'operadellaslessaed è responsabilità dellafrizioneè fondamentale La correttaregolazione toreverificarlaperiodicamente. a motorefermo. va' effettuata unicamente La regolazione dellafrizione(o la verifica) C o nr i f e r i m e nat ol l eF i g .1 , F i g . 5 : (A19)e, con la frizioneinnestata, la dislanzaA (Fig.1). misurare con unospessimetro di ispezione togliereil coperchio il valoredi A a 0,5 + 0,7 mm dellafrizioneripofiando a 1,3 mm occorreprocedere allaregolazione Qualorataledistanzasia superiore nelseguentemodo: il perno(436),ruotareil con un cacciavite la leva(A13)in direzione oppostaal motore,fare arretrare la frizionespingendo disinserire (A3a)in sensoorario,battendolo, con un martelloed un' astadi metallotenero,per un numerodi tacchesuffidispositivo di regolazione la correttaregolazione dellafrizione. cientia ripristinare idlcnnlarl dell'esploso e la quantità. il tipodi accoppiatore, il rapporto, il numerodi serie,il numerodi riferimento Perordinarei ricambispecificare GÈr,t:ÉhÀ1_ IttroÈunÍioN - The motionis transmitted by the pumpdrivecentralshaftto the lateralshaftswhichoperatethe pumps. - The rotationdirectionof the outputsis oppositeto that of the inputshaft. - Coupling withthe pumpsis doneby meansof splinedsleeves. rrusinLlÀiion - Theworkingpositionof the pumpdriveis as shownon the catalogue. position technical service. Fora different calluponTechnodrive - Mounting on a bracketsystem. to theflywheelhousingof the dieselengine,the pumpdrivemustbe firmlymountedwitha bracketsystem In caseof directconnection to the baseto whichthe engineis alsobracketed. to fit bracketsupports on the pump mountedwitha clutch"BDS145"or "BDS290"it is necessary Whena pumpdriveis independently drivesidesandalsoon the clutchsides. shouldbe doneontothe lateralpumpdrivesudacesandon the Forthe modelswithclutch"BDS2200'and"BDS3300"bracketing matchdiam.205 mm on the inputsideof the clutch. - Pumpassembly: ontothe pumpdriveoutputs. The pumpdriveis suppliedwiththe pumpsupponsalreadyassembled pafticular for replacement, attention shouldbe givento the newsupportas it mustnotaxiallyload lf a pumpsuppodmustbe dismantled of 0.10+ 0.20mm betweenthe bearingexternalringandthe pumpsupporl). the bearings(theremustbe a clearance withtheirretaining rings,or withthefixingscrewandwasher,on the pump sleevesof the pumpsmustbe assembled The connecting positioning ring. of a retaining on the shaftscausedby incorrect shafttop;checkthataxialloadsare not produced The oil sealingis guaranteed on the pumpholderby an O-ringor a gasket. - The pumpdriveis suppliedwithoutoil. by the oil dipstick. Beforestartup,fillit up to the maximumlevelindicated witha coolingsystem,checkthe oil levelagainafterthe pumpdrivehasbeenstadedandthe exchanger Forthe pumpdrivesequipped andpipingshavebeenfilled. - Forthe pumpdrivesequipped for the oil at the pumpdriveinputis as expected witha coolingsystem,checkthatthe rotationdirection pump;if not,invedthe wiringsto the pump. circulating - Ensurethatthe oil temperature, whenoperating, is no higherthan105"C. is higher,selecta moreefficient coolingsystemfor the pumpdrive. lf the temperature - The inputshaftof the pumpdrive,bothversions"B"and"BDS",willnot bearradialor axialloads.Forthisreasonthe pulleydriveshould not be used. - The pumpdrivewithclutch"BDS"mustbe drivenby a couplingnotproducing radialor axialloadon the shaft. 99 : : .'..;.,.;l1ii:i1.'...'1+.--i=:.-;tifffii=i:l'ÍÍ#'..'==l'=i.iitti|i;ii...1...|'..,:..',,,'.-i.. . Thecoup|ingf|angeistobeheatedwhenbeingmountedonthec|uichshaft. The usefullenghtof the couplingflangeholemustbe biggerthanthe usefullenghtof the clulchshaft;the couplingflangemustbe axially fixedby a screwanda washeron the shafttop. alignwhenconnecting to the inputshaftof the clutch. Carefully - Forthe assembly of the pumpdriveswith"BD"clutchproceedas follows: a) Theclutchis suppliedin engagedpositionandthe operating leveris notmountedon;do notdisengage untilthe assembly to the e n g i n ei s f i n i s h e d . b) Placethe pilotbearingon the engineflywheelbore.The pilotbearingmustbe doublescreentypeand greasedfor life-time. The pilotbearingis usuallymountedwithinterference on the flywheelhousingandclearance on the clutchshaft. lf thereis no interference on the flywheelhousing, the bearingshouldbe blockedwith"loctite" sealant(orsimilarproduct)on the externalringto preventit slippingoff. c) Placethe crownwheelon the flywheelcentering andtightenthefixingscrews. d) Placethe pumpdriveset on the engine,payingattention wheninserting theteethof the clutchdiskin the crownwheelslots,without them,andwheninserting the pilotbearingwiththe shaftmakingthe clutchsliptowardsthe engineas muchas possible. damaging e) Fitthe fixingscrewsof the housingand gradually cross-tighten them. f) Placeintorightposition the operating leveranddisengage the clutchby checking thatthe pumpdriveoutputsrotatefreely. LuqE - Pumpdriveswithclutch"BD"or "BDS", The clutchmustbe engagedonlywiththe engineidlingor, however, not morethan1000rpm. mustbe quicklyeffected. The engagement position. leverin an intermediate Do nothesitatewiththe operating The samerecommendations mustbe appliedfor disengagement. MAINTENANCE ] - The pumpdrivesaresuppliedwithoutoil. Beforetheirstartup fillthemup to the maximumlevelindicated by the oil dipstick. - Useoil for gearswithEP additives, minimumviscosity index95. Oiltypecan be choosen, depending on the ambienttemperature, on TableA. - Effectthe firstoil replacement after50 workinghours;nextoneseach1000workinghours(or,at the longest , every12 months). - Periodically checkthe oil level. - Ensurethatthe oiltemperature, whenworking,is nothigherthan105'C. - Forclutcheslubrication use lithiumgreasewithconsistency NLGI-2. points,referred Lubrication to Fig.5-6-7,arethe following: a) Crossshaft(A25,Fig.5): lubricate each300 hours. b) Drivesleeve(A11, Fig.5):lubricate each300 hourson clutches"BD 145","BD290","BDS145',.BDS290'.On theseclutchesthe greasenipple(A11) is locatedon the drivesleeve(A10) and is possible to be accessed onlyby takingthe inspection cover(A19)off. On clutches"BD 2200","BD3300","BDS2200',"BDS3300":the greasenipple(A11) is locatedon the outsideof the housing(A16) andgreasingis required each100workinghours. c) Controllevers(A43)(onlyon "BD 2200",'BD 3300',.BDS 2200',"BDS3300"):lubricateevery600 workinghours. d) Inputshaftbearings for "BDS2200",-BDS3300',(C12,Fig.7): lubricate each100workinghours;the greasenippleis on the outside ( C 1 1 ,F i g .7 ) . o f t h eh o u s i n g 'AM...BDS...'). - Clutchadjustment (pumpdrives.AM...8D...", A correctadjustment of the clutchis of fundamental importance to oblaina satisfactory durationof the sameand it is the responsability of the operatorto checkit periodically. (orchecking) Theclutchadjustment mustonlybe effectedwiththe enginestopped. Referring to Fig. 1, Fig.5: takethe inspection cover(A19) off and,withtheclutchengaged,measurethe distanceA (Fig.1) usinga thickness gauge. lf sucha distanceis morethan1.3mm it is necessary to adjustthe clutch,by resetting distance A to 0.5 + 0.7 mm in the following way: disengage the clutchby pressing the lever(A13)opposite to the engine,usinga screwdriver movebackthe pin (436),rotatethe adjustingdevice(434)clockwise,strikingit with a hammerand a soft metalrod,for a numberof lockgroovessufficientto resetthe correct adjustment of the clutch. t*-n l:seanÈ Whenorderingsparepartsspecifypumpdrivemodel,ratio,serialnumber,reference numberindicated on the exploded viewand desired quantity. TENERl\ailÉS - Lemouvement parl'arbre quicommandent esttransmis central de la boiteauxarbres latéraux lespompes. - Lesensde rotation dessortiesestopposéà celuide l'arbred'entrée. - Leraccordement aveclespompes estréalisé aumoyen desmanchons cannelés. :f'lsl l - La positionde travailde la boiteestcelleindiquée dansle catalogue. Pourdes positions autress' adresserau ServiceTechnique TECHNODRIVE. 100 - Bridage Dansle cas d'accouplement directsur la clochecouvre-volant du moteurdiesel,la boitedoitétrebridéesolidement au mémesoubassementoue le moteur. Dansle cas de montageindépendant d'uneboiteavecembrayage typq "BDS 145'- "BDS290",il faut bridernon seulement sur les planslatérauxde la boitemaisaussisur lesplanslatérauxde l'embrayage. Pourles modèlesavecembrayage type"BDS2200"et "BDS3300",il faultbridersur les planslatérauxde la boiteet sur le centraoeO 205mmdu cotéde l'arbred'entréede I'embrayage. - Montagede pompes: La boiteestfournieaveclessupporlsde pompemontéssur lesprises. En cas de nécessité de démontage d'uneprisede pompepourla remplacer par une autre,il fautfaireattention à ce que le nouveau supportne chargepas les roulements en direction axiale(entrela bagueexternedu roulement et le suppodde la pompe,il doity avoir u nj e u d e 0 , 1 0+ 0 , 2 0 m m ) . Les manchonsde raccordement des pompesdoiventétre montésavec leursbaguesd'arrètou avecvis et rondellesde fixationen tète de l'arbrede pompe,en faisantattentionà ce qu'iln'y ait pas créationde chargesaxialessur les arbresprovoquées par la position erronéed'unebagued'arrèt. La tenuede l'huileest réaliséesur le supportde la pompeà l'aided'unjointtoriqueou d'unegarniture. La boiteest livréesanshuile. Avantla miseen service,procéder au remplissage de l'huilejusqu'auniveaumaximumindiquésur la jauge. Pourles boiteséquipéesde systèmede refroidissement, il faut revérifier le niveaude l'huileaprésavoirfaitdémarrerla boiteet remoti l'échangeur et lesconduites. - Dansle cas de boiteséquipéesde systèmesde refroidissement, que le sensde rotationà l'entréede la boitesoit le mème s'assurer queceluiprévupourla pompede circulation d'huile;dansle cascontraire inverserles raccordements de la pompe. que la température S'assurer en excercice ne dépassepas les 1OS.C. Si cettelimitedevaitètredépassée,il faut prévoirun systèmede refroidissement plusefficacede la boite. - L'arbred'entréedesboitesdansla version"B"toutcommedansla version"BDS"n'accepte pasde chargesradialesou axiales. L'entraînement au moyende pouliesest doncdéconseillé. - Les boitesavec embrayage"BDS"doiventètre actionnéesau moyend'un accouplement qui ne provoquepas de forcesradialesou axialessur l'arbre. Le montagedu demi-accouplement sur l'arbrede I'embrayage doitètreeffectuéà chaud. Le demi-accouplement doitavoirune longueurd'alésage supérieure à cellede l'arbreet il doitètrefixéaxialement en tétede l'arbreet à l'aided'unevis et d'unerondelle. Veillerà l'alignement lorsdu raccordement à l'arbred'entréede I'embrayage. - Pourle montagedes boitesavecembrayage "BD"procéder commesuit: a) L'embrayage est livrédansla positionembrayéeavecle levierde commandedémonté,ne pas débrayertantque le montagesur le moteurn'estDasterminé, pilotesur l'emplacement b) Positionner le roulement pilotedoitavoirdeuxdéflecteurs du volant,Le roulement et doitètreoraisséà vie (type2RS). piloteest généralement Le roulement montéavecintedérence sur le siègedu volantet avecdu jeu sur l'arbrede I'embrayage. Dansle cas d'absence d'interférence sur le siègedu volant,il fautbloquerle roulement au moyende loctite(ou similaire) sur la bague externepourévitersa sortie. c) Positionner la couronned'entréesur le centragedu volantet serrerlesvis de fixation. d) Positionner le groupeembrayage sur le moteuren faisantattention de ne pas endommager lesdentsdu disqued'embrayage lorsde leurintroduction dansles rainuresde la couronnedentéeet d'enfilerle roulement piloteavecl'extrémité de l'arbreen faisantcoulisser l'embrayage en direction du moteurtantquecelaest posible. e) Monterlesvis de fixationde la clocheen lesserrantgraduellement en croix. f) Positionner le levierde commande et se meltreen positiondébrayeepourvérifierque lessoftiesde la boitetournentlibrement. EMPLOI - Boitesavecembrayages type "BD"ou "BDS" quesi le moteurtourneau minimumou ne dépassepas les 1000tours/minute. N'embrayer L'embrayage doit ètreeffectuérapidementet fermement. Ne pass'arrèter avecle levieren positionintermédiaire. Lesmémeréglessontvalablespourle débrayage. Èrufnerreru - Lesboitessont livréessanshuile. Avantla miseen service,procéder au remplissage de l'huilejusqu'auniveaumaximumindiquésur la jauge, - Utiliserde I'huilepourengrenages avecadditifsEP,indicede viscosité minimum95. Pourla sélection du typed'huileen fonctionde la température ambiante, consulter le tableauA. - Effectuer la première vidangeaprés50 heuresde fonctionnement et lesvidangessuivantes toutesles 1000heuresde fonctionnement (danstouslescas ne jamaislaisserpasserplusde 12 mois). - Effectuer un contrólepériodique du niveaud'huile. - S'assurer que la température de l'huileen excercice ne dépassepas les 1OS"C. - Pourla lubrification des embrayages, utiliserde la graisseau lithiumde consistance NL-Gl-2 Lespadiesà lubrifier indiquées sur lesfigures5-6-7sontlessuivantes: (A25,fig.5),graissertourtesles300 heures. Arbrede commande "BD 145' - 'BD 290"- 'BDS 145' - 'BDS 290"le graisseur Pourles embrayages (A11) est positionné sur le collierde commande(A10) e t l ' o n n e p e u t y a c c é d e r q u ' e n r e t i r a n t l e c o u v e r c l e d ' i n s p e c t i o n ( A 1 9 ) , e t l e g r a i s s a g e e s t r a c c o m a n d é t opuot eusr l e s3 0 0 h e u "BD 2200'- "BD3300'- .BDS2200'- "BDS3300",le graisseur embrayages est positionné sur la partieexternede la cloche(A16)et le 101 graissage estrecommandé toutesles100heures. - Levierdecommande (A43)sur"BD2200"- "BD3300"- .BDS2200'-"BDS3300'(uniquement) graisser toutesles600heures. Roulement en entréepour"BDS2200"-.BDS3300"(C1,fig.7) graisser toutesles100heures; le graisseur estsituésurla partieexternede lacloche(C11fig.7). - Réglage (boite'AM...BD','AM...BDS...'). de I'embrayage pouruneduréedeviesatisfaisante Unréglage correct de l'embrayage estfondamental de cedernier. périodique. L'opérateur estresponsable de soncontróle (ousoncontróle) quesi le moteurestà l'arrèt.Référence Leréglage de l'embrayage nepeutètreeffectué fig.1 et fig.5: (419),embrayer retirerle couvercle d'inspection et mesurer à l'aided'unjeudecàlesla distance A (fig.1). 1,3mm, il fautréglerI'embrayage Si cettedistance dépasse la valeurdeA à 0,5+O,7 enabaissant mm,en procédant commesuit: - débrayer en poussant Ielevier(A13)dansla direction opposée du moteur, - fairereculer le pivot(A36)au moyend'untournevis, - fairetournerle dispositiif (A34)danle sensde aiguilles de réglage d'unemontre, en utilisant un marteau et unetigeen métaltendre,la pourobtenirle réglage rotation doitétred'unnombre decranssuffisants correctde l'embrayage. Pourlescommande de piècesdétachées, veuillez spécifier la typede la boite,le rapport, le numéro desérie,le numéro de rep.de l'éclaté ainsiquela quantité. OLIO.OIL. HUILE +5"C/+4O"C GR XP 1OO GR XP 15O ALPHA SP 1OO ALPHA SP 150 REDUCTELF SP 1OO REDUCTELF SP 150 SPARTAN EP lOO SPARTAN EP 150 c. otL LG 150 TELESIA OIL 150 OMALA OIL 150 CARTER EP lOON CARTER EP 150 Tab.A 102 F i g. 1 AM2168 AM 22OB AM 23OB AM 2328 Accoppiatoria 2 prese Doublepumpdrives Boites2 sorties Fig.2 AM 32OB AM 33OB AM 3458 AM 365 Accoppiatoria 3 prese Triplepumpdrives Boites3 sorties 103 Fig.3 Accoppiatorea 4 prese Fourpumpdrive Boite4 sorties AM 450 Fig.4 Accoppiatoricon frizione Clutchdrivenpumpdrives Boitesde repartitionavecembrayage _P w 104 Fig.5 Accoppiatoricon frizione"BDS 145","8DS 290". Clutchdrivenpumpdrives,"BDS145"and "BDS290"versions. Boitesde repartitionavecembrayage"BDS 145","BDS 290", Fig.6 Gruppoalberodi entrata:valido per "BDS 2200"e "BDS 3300" Inputshaft assembly:valid for "BDS 2200"and "BDS 3900" Grupearbred'entréepour les modeles"BDS 22OO" et "BDS 3300" F tg.7 ffi 'ElTHt/NNilUE TWINDISCTECHNODRIVE S.r.l. ViaS. Cristoforo, 131- 40010.S. (Bo)- ITALIA M. DECIMA - Fax0039.051/6824234 - 6825814 Tel.0039.05116819711 Email: [email protected] www.technodrive. it lnternet: 105 u r z I u E o Broce MK-1 Rear Drive Motor Emergency Brake Release Procedure This procedure to be used only under emergency or service situations such as, moving a disabled vehicle to a safe location. Fig 1 1. Shut off engine and block wheels to prevent vehicle from rolling. 2. Remove Rubber Dust Plug in rear Drive Motors (Fig 1) 3. Install Brake Release Tool in Drive Motor (Fig 2) 4. Tighten 12mm nut to release brakes (Fig 3) 5. Brake Release Tool must be removed for safe normal operation 6. Reinstall Rubber Dust Plug Fig 2 WARNING Vehicle will roll freely with Brake Release Tool installed. Vehicle braking ability will be greatly reduced or disabled. Serious injury or death can occur. 106 Fig 3 BROCE MK-1 MODEL TRANSFER SWEEPER 114 " 182 " EXTERNAL DIMENSIONS 148 " 194 " 203 " 348 " 376 " FRONT AXLE CG 5,910 LBS. 10,260 LBS. TOTAL REAR AXLE 4,350 LBS. WEIGHTS (EMPTY WATER TANKS, NO OPERATOR) 64 " 89 " 2009 - Broce Manufacturing CO., Inc. 1460 S. 2nd Ave., Dodge City, KS 67801 (620) 227-8811 107