1
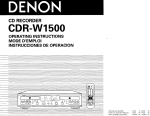
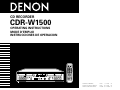
CD RECORDER
CDR-W1500
OPERATING INSTRUCTIONS
MODE D’EMPLOI
INSTRUCCIONES DE OPERACION
CD CD-R
_ DUBBING _
NORMAL HIGH
A ! "
RELAY
MODE
D # %
1
)
PCM AUDIO TECHNOLOGY / COMPACT DISC RECORDER
.
3
M*+
4
S
G & '
2
J(
5
/
V
P
,
−
6
: ;
Y < >
7
8
9
[ = ]
{ ? }
CLEAR
10
+10
REC
CDR-W1500
6
7
MENU
8
STOP
ENTER
PLAY
2
9
8
DUBBING
NORMAL
HIGH
TIME
DISPLAY
TITLE /
SELECT CHARACTER
TIME
CLEAR
INPUT
4 REC
FINALIZE
8
9
PLAY
STOP
PAUSE
1
2
3
9
PAUSE
3
PROG/DIRECT CALL
1 / ALL
A-B
REMOTE SENSOR
POWER
PLAY
STOP
PAUSE
1
2
3
RELAY MODE
OPEN / CLOSE
ON
PHONES
PHONES LEVEL
MULTI JOG
RANDOM
OFF
-
+
OPEN /CLOSE
MENU
TIME
TITLE CHARACTER
DISPLAY SEL. FADER INPUT
5
5
MIN
MAX
PUSH
ENTER
FINALIZE
B
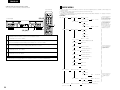
REMOTE CONTROL UNIT RC-278
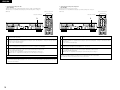
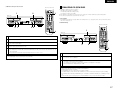
FOR ENGLISH READERS
POUR LES LECTEURS FRANCAIS
PARA LECTORES DE ESPAÑOL
PAGE
005 ~ PAGE 035
PAGE
036 ~ PAGE 066
PAGINA 067 ~ PAGINA 097
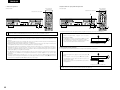
SAFETY INSTRUCTIONS
CAUTION
RISK OF ELECTRIC SHOCK
DO NOT OPEN
1.
Read Instructions – All the safety and operating
instructions should be read before the appliance
is operated.
11. Grounding or Polarization – Precautions should be
taken so that the grounding or polarization means
of an appliance is not defeated.
2.
Retain Instructions – The safety and operating
instructions should be retained for future
reference.
3.
Heed Warning – All warnings on the appliance
and in the operating instructions should be
adhered to.
12. Power-Cord Protection – Power-supply cords
should be routed so that they are not likely to be
walked on or pinched by items placed upon or
against them, paying particular attention to cords
at plugs, convenience receptacles, and the point
where they exit from the appliance.
4.
Following Instructions – All operating and use
instructions should be followed.
14. Cleaning – The appliance should be cleaned only
as recommended by the manufacturer.
5.
Water and Moisture – The appliance should not
be used near water – for example, near a
bathtub, washbbowl, kitchen sink, laundry tub, in
a wet basement, or near a swimming pool, and
the like.
15. Power Lines – An outdoor antenna should be
located away from power lines.
CAUTION: TO
REDUCE THE RISK OF ELECTRIC SHOCK, DO NOT REMOVE COVER
(OR BACK). NO USER SERVICEABLE PARTS INSIDE. REFER SERVICING
TO QUALIFIED SERVICE PERSONNEL.
The lightning flash with arrowhead symbol, within an equilateral triangle, is intended to alert the
user to the presence of uninsulated “dangerous voltage” within the product’s enclosure that may
be of sufficient magnitude to constitute a risk of electric shock to persons.
The exclamation point within an equilateral triangle is intended to alert the user to the presence of
important operating and maintenance (servicing) instructions in the literature accompanying the
appliance.
WARNING: TO REDUCE THE RISK OF FIRE OR ELECTRIC SHOCK, DO NOT EXPOSE
THIS APPLIANCE TO RAIN OR MOISTURE.
LABELS (for U.S.A. model only)
CERTIFICATION
THIS PRODUCT COMPLIES WITH DHHS RULES 21 CFR
SUBCHAPTER J APPLICABLE AT DATE OF MANUFACTURE.
CAUTION:
USE OF CONTROLS OR ADJUSTMENTS OR
PERFORMANCE OF PROCEDURES OTHER THAN THOSE
SPECIFIED HEREIN MAY RESULT IN HAZARDOUS
RADIATION EXPOSURE.
THE COMPACT DISC PLAYER SHOULD NOT BE ADJUSTED
OR REPAIRED BY ANYONE EXCEPT PROPERLY QUALIFIED
SERVICE PERSONNEL.
This device complies with Part 15 of the FCC Rules.
Operation is subject to the following two conditions :
(1) This device may not cause harmful interference,
and (2) this device must accept any interference
received, including interference that may cause
undesired operation.
This Class B digital apparatus meets all requirements
of the Canadian Interference-Causing Equipment
Regulations.
Cet appareil numérique de la classe B respecte toutes
les exigences du Règlement sur le matériel brouilleur
du Canada.
6.
• FOR U.S.A. & CANADA MODEL ONLY
CAUTION
TO PREVENT ELECTRIC SHOCK, MATCH WIDE
BLADE OF PLUG TO WIDE SLOT, FULLY
INSERT.
• POUR LES MODELES AMERICAINS ET
CANADIENS UNIQUEMENT
6A. An appliance and cart
combination should be
moved with care.
Quick stops, excessive
force, and uneven
surfaces may cause
the appliance and cart
combination to overturn.
7.
Wall or Ceiling Mounting – The appliance should
be mounted to a wall or ceiling only as
recommended by the manufacturer.
8.
Ventilation – The appliance should be situated so
that its location or position does not interfere
with its proper ventilation. For example, the
appliance should not be situated on a bed, sofa,
rug, or similar surface that may block the
ventilation openings; or, placed in a built-in
installation, such as a bookcase or cabinet that
may impede the flow of air through the
ventilation openings.
ATTENTION
POUR ÉVITER LES CHOCS ÉLECTRIQUES,
INTERODUIRE LA LAME LA PLUS LARGE DE LA
FICHE DANS LA BORNE CORRESPONDANTE DE
LA PRISE ET POUSSER JUSQU’ AU FOND.
Carts and Stands – The appliance should be used
only with a cart or stand that is recommended by
the manufacturer.
9.
Heat – The appliance should be situated away
from heat sources such as radiators, heat
registers, stoves, or other appliances (including
amplifiers) that produce heat.
10. Power Sources – The appliance should be
connected to a power supply only of the type
described in the operating instructions or as
marked on the appliance.
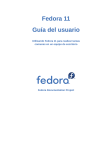
FIGURE A
EXAMPLE OF ANTENNA GROUNDING
AS PER NATIONAL
ELECTRICAL CODE
16. Outdoor Antenna Grounding – If an outside
antenna is connected to the receiver, be sure the
antenna system is grounded so as to provide
some protection against voltage surges and builtup static charges. Article 810 of the National
Electrical Code, ANSI/NFPA 70, provides
information with regard to proper grounding of
the mast and supporting structure, grounding of
the lead-in wire to an antenna-discharge unit, size
of grounding conductors, location of antennadischarge unit, connection to grounding
electrodes, and requirements for the grounding
electrode. See Figure A.
17. Nonuse Periods – The power cord of the
appliance should be unplugged from the outlet
when left unused for a long period of time.
18. Object and Liquid Entry – Care should be taken
so that objects do not fall and liquids are not
spilled into the enclosure through openings.
19. Damage Requiring Service – The appliance
should be serviced by qualified service personnel
when:
A. The power-supply cord or the plug has been
damaged; or
B. Objects have fallen, or liquid has been spilled
into the appliance; or
C. The appliance has been exposed to rain; or
D. The appliance does not appear to operate
normally or exhibits a marked change in
performance; or
E. The appliance has been dropped, or the
enclosure damaged.
20. Servicing – The user should not attempt to
service the appliance beyond that described in
the operating instructions. All other servicing
should be referred to qualified service personnel.
ANTENNA
LEAD IN
WIRE
GROUND
CLAMP
ANTENNA
DISCHARGE UNIT
(NEC SECTION 810-20)
ELECTRIC
SERVICE
EQUIPMENT
GROUNDING CONDUCTORS
(NEC SECTION 810-21)
GROUND CLAMPS
POWER SERVICE GROUNDING
ELECTRODE SYSTEM
(NEC ART 250, PART H)
NEC - NATIONAL ELECTRICAL CODE
2
ENGLISH
FRANCAIS
ESPAÑOL
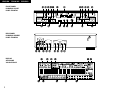
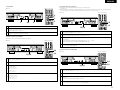
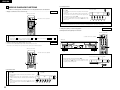
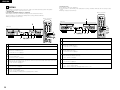
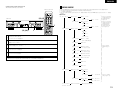
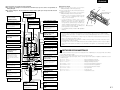
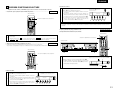
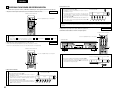
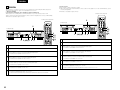
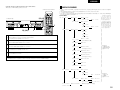
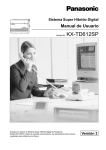
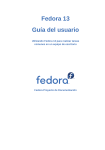
FRONT PANEL
PANNEAU AVANT
PANEL FRONTAL
!8 !9 t yu r
PCM AUDIO TECHNOLOGY / COMPACT DISC RECORDER
9
8
DUBBING
NORMAL
HIGH
TIME
@0
!2i !1 !5 !6
CDR-W1500
DISPLAY
TITLE /
SELECT CHARACTER
TIME
CLEAR
INPUT
4 REC
FINALIZE
8
9
PLAY
STOP
PAUSE
1
2
3
REMOTE SENSOR
PHONES
POWER
PLAY
STOP
PAUSE
1
2
3
RELAY MODE
ON
OPEN / CLOSE
PHONES LEVEL
-
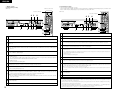
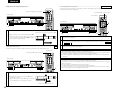
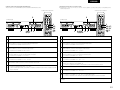
REAR PANEL
PANNEAU ARRIERE
PANEL TRASERO
+
OPEN /CLOSE
5
!0
q
MAX
we
PUSH
ENTER
!4
!3
!7
ANALOG
CDR
IN
CD/
CDR
OUT
CD
OUT
DIGITAL IN
DIGITAL OUT
CD/CD-R
L
CD
AC IN
R
COAXIAL
OPTICAL
@2 @1 @7 @5 @6
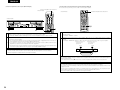
DISPLAY
AFFICHAGE
VISUALIZADOR
w
w
3
MENU
5
MIN
o
MULTI JOG
OFF
q
COAXIAL
OPTICAL
COAXIAL
OPTICAL
@3 @4 @8 @9
i o e
t
qr
y
u
ENGLISH
FRANCAIS
ESPAÑOL
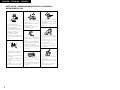
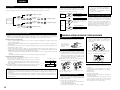
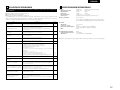
NOTE ON USE / OBSERVATIONS RELATIVES A L’UTILISATION /
NOTAS SOBRE EL USO
• Avoid high temperatures.
Allow for sufficient heat dispersion
when installed on a rack.
• Eviter des températures élevées
Tenir compte d’une dispersion de
chaleur suffisante lors de
l’installation sur une étagère.
• Evite altas temperaturas.
Permite la suficiente dispersión del
calor cuando está instalado en la
consola.
• Handle the power cord carefully.
Hold the plug when unplugging the
cord.
• Manipuler le cordon d’alimen-tation
avec précaution.
Tenir la prise lors du débranchement
du cordon.
• Maneje el cordón de energía con
cuidado.
Sostenga el enchufe cuando
desconecte el cordón de energía.
4
• Keep the set free from moisture,
water, and dust.
• Protéger l’appareil contre l’humidité,
l’eau et lapoussière.
• Mantenga el equipo libre de
humedad, agua y polvo.
• Unplug the power cord when not
using the set for long periods of
time.
• Débrancher le cordon d’alimentation
lorsque l’appareil n’est pas utilisé
pendant de longues périodes.
• Desconecte el cordón de energía
cuando no utilice el equipo por
mucho tiempo.
✽ (For sets with ventilation holes)
• Do not obstruct the ventilation
holes.
• Ne pas obstruer les trous d’aération.
• No obstruya los orificios de
ventilación.
• Do not let foreign objects in the set.
• Ne pas laisser des objets étrangers
dans l’appareil.
• No deje objetos extraños dentro del
equipo.
• Do not let insecticides, benzene,
and thinner come in contact with
the set.
• Ne pas mettre en contact des
insecticides, du benzène et un
diluant avec l’appareil.
• No permita el contacto de
insecticidas, gasolina y diluyentes
con el equipo.
• Never disassemble or modify the
set in any way.
• Ne jamais démonter ou modifier
l’appareil d’une manière ou d’une
autre.
• Nunca desarme o modifique el
equipo de ninguna manera.
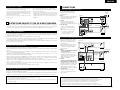
ENGLISH
IMPORTANT TO SAFETY
WARNING:
TO PREVENT FIRE OR SHOCK HAZARD, DO
NOT EXPOSE THIS APPLIANCE TO RAIN OR
MOISTURE.
NOTE:
This CD recorder uses the semiconductor laser. To allow you to
enjoy music at a stable operation, it is recommended to use this in a
room of 10 °C (50 °F) ~ 30 °C (86 °F).
• Place of installation
To ensure sufficient ventilation, leave a space of at least 10 cm
between the front, sides and back of the unit and walls or other
objects which may obstruct ventilation.
CAUTION:
1. Handle the power supply cord carefully
Do not damage or deform the power supply cord. If it is
damaged or deformed, it may cause electric shock or malfunction
when used. When removing from wall outlet, be sure to remove
by holding the plug attachment and not by pulling the cord.
2. Do not open the top cover
In order to prevent electric shock, do not open the top cover.
If problems occur, contact your DENON DEALER.
3. Do not place anything inside
Do not place metal objects or spill liquid inside the CD recorder.
Electric shock or malfunction may result.
Please, record and retain the Model name and serial number of your
set shown on the rating label.
Model No. CDR-W1500
Serial No.
Thank you for purchasing this DENON CD recorder. Please read the
operating instructions thoroughly in order to acquaint yourself with the
CD recorder and achieve maximum satisfaction from it.
Be sure to keep this manual for future reference, should any
questions or problems arise.
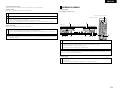
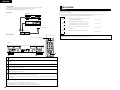
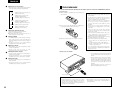
Please check to make sure the following items are included
with the main unit in the carton:
(1) Main unit …………………………………………………………1
(2) Remote control unit RC-278 ……………………………………1
(3) R6P/AA Dry cell battery …………………………………………2
(4) Connection cord …………………………………………………2
(5) Operating instructions……………………………………………1
(6) Service station list ………………………………………………1
TABLE OF CONTENTS
z
x
c
v
b
n
m
,
.
⁄0
⁄1
⁄2
⁄3
⁄4
⁄5
⁄6
⁄7
⁄8
⁄9
¤0
FEATURES ……………………………………………………5
CAUTIONS DURING USE……………………………………5
ABOUT CD-R/RW DISCS …………………………………5, 6
DISC HANDLING AND PRECAUTIONS …………………6, 7
RESTRICTIONS RELATED TO THE
CD-R/RW STANDARDS ……………………………………7
CONNECTIONS ………………………………………………7
PART NAMES AND FUNCTIONS ………………………8, 9
1 FEATURES
1. Various copying functions
• This set is equipped with a number of convenient copying
modes: “Disc dubbing” for copying entire discs, “Make CD
dubbing” for copying an entire disc then automatically
finalizing, “1-track dubbing” for copying single tracks, and
“Scan record dubbing” for selecting the tracks you want to
record while scanning CDs and copying the selected tracks.
• One of two copying speeds can be selected: normal speed
and double speed.
2. Recording from external devices
• This set is equipped with three convenient synchronized
recording functions: “Disc synchro recording” for recording
an album on the source side, “Make CD recording” for
automatically finalizing after synchronized recording of a disc,
and “Track synchro recording” for recording track at a time. It
is also possible to record manually.
3. An abundance of playback functions
• Thanks to the combination of the CD and CD-R units, this set
is equipped with three different play modes: “Relay play” for
relay playback between the disc in the CD unit and the disc in
the CD-R unit, “Mix play” for programmed or random playback
of the disc in the CD unit and the disc in the CD-R unit as if
they were a single disc, and “Dual play” with which the CD
and CD-R units can be operated independently.
• This set is equipped with the programmed play, random play,
and all-track, 1-track and A-B repeat play modes.
4. Rich Variety of Digital Input Jacks
• In addition to the analog input jacks, this unit is equipped with
a total of two digital input jacks. There is one optical digital
input jack for use with digital sources such as CD, MD and
satellite broadcasts, and there is one digital coaxial input jack.
5. Equipped with Sampling Rate Converter
• This converter permits direct digital input recording from DAT
or satellite broadcasts (32 kHz, 48 kHz) which have sampling
frequencies that differ from that of the 44.1 kHz used with
CD.
SETUP METHOD ……………………………………10 ~ 13
6. Text Entry and Display Function
• The album title and the track title for individual tracks can be
entered and displayed for recorded CD-R/RW discs.
COPYING PROCEDURE ……………………………13 ~ 15
7. Equipped with
REMOTE CONTROL UNIT………………………………9, 10
RECORDING FROM EXTERNAL DEVICES ………15 ~ 19
®, HDCD® (High Definition
Compatible Digital®) decoder (CD unit)
NORMAL PLAYBACK ………………………………………19
VARIOUS PLAYBACK FUNCTIONS ………………20 ~ 24
RELAY MODE …………………………………………24 ~ 27
FINALIZING CD-R/RW DISC ………………………………27
EDITING ………………………………………………28 ~ 33
MENU MODE
……………………………………………33
MESSAGES …………………………………………………34
TROUBLESHOOTING
……………………………………35
MAIN SPECIFICATIONS……………………………………35
®, HDCD®, High Definition Compatible Digital ®
and Pacific Microsonics TM are either registered
trademarks or trademarks of Pacific Microsonics, Inc. in
the United States and/or other countries.
HDCD system manufactured under license from Pacific
Microsonics, Inc. This product is covered by one or
more of the following: In the USA: 5,479,168,
5,638,074, 5,640,161, 5,808,574, 5,838,274,
5,854,600, 5,864,311, 5,872,531, and in Australia:
669114. Other patents pending.
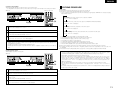
2 CAUTIONS DURING USE
• During track selection, during search and when the recorder
sustains a strong impact, the disc’s rotational speed
changes greatly, causing a small noise to be emitted. This is
not a malfunction of the recorder.
• If the CD recorder is operated while an FM or AM broadcast
is being received, there may be noise in the FM or AM
reception. Please switch the power to the CD recorder off at
such times.
• The CDR-W1500 has a broad dynamic range. Please
exercise caution when turning up the volume on the
amplifier in cases when the playback volume is low. If the
volume is turned up too high, it could damage the speakers.
• Placing this recorder or its connection cords near a TV or
other audio device could cause a humming sound to be
emitted. If this occurs, relocate the recorder or reroute the
connection cords.
• Be sure to remove the disc from the recorder before moving
it. The disc could be damaged if left in the recorder while it
is being moved.
• Do not place any object in the tray in the position where the
disc is loaded, or open and close the tray with anything
inside. Foreign objects in the tray could damage the play
mechanism.
• Do not move the recorder from a cold place to a warm place
suddenly. If the recorder is cold when brought into a warm
room, condensation could form, preventing proper operation
of the recorder. If condensation does form on the recorder
when it is brought into a warm room, wait at least 30
minutes before use.
CD Discs
This unit uses CDs (optical digital audio discs)
which bear the mark located at the right.
Note that specially shaped CDs, for example,
heart shaped or hexagonal cannot be played. Do
not attempt to use such CDs since doing so may
cause breakdown of this unit.
C
CD Text Discs
This unit can display text information on the
display when playing CD text discs which
contain text information in English category.
The CD text disc includes the mark shown at the
right.
NOTE:
• This unit can provide a text display of the following
types of characters. Other types of characters will
result in “_” being displayed.
• Alphabet
ABCDEFGHIJKLMNOPQRSTUVWXYZ
abcdefghijklmnopqrstuvwxyz
• Numbers
0123456789
3 ABOUT CD-R/RW DISCS
• Symbols
Discs that Can Be Used with this Unit
SPACE
CD-R Discs and CD-RW Discs
Be sure to use discs that bear either of the following marks
when recording with this unit.
Methods of Recording to Disc
CD-R Discs
• CD-R discs incorporate a pigment layer for recording.
When exposed to the recording laser, a change in form
occurs at the boundary of this layer and the plastic layer
resulting in the recording of the signal. The recorded
information is maintained until the end of the life of the
disc.
• After recording, finalized discs can be played on ordinary
CD players.
2 CD-RW Discs
• CD-RW discs incorporate a phase change layer. The
recording process causes this layer to change from a
crystal (reflective) condition to an amorphous (noncrystal) condition.
• Recorded information can be erased from CD-RW discs.
Deletion can take the form of deleting all of the disc
tracks or only the specified tracks working back from the
last track of the disc.
• Finalized CD-RW discs can be played on CD players
designed for use with CD-RW discs as well as on CD
recorders.
2
• CD-R Discs
• CD-RW Discs
Recordable
ReWritable
and an indication such as
“FOR CONSUMER”, “FOR
CONSUMER USE” or “FOR
MUSIC USE ONLY”.
✽ Recording will not be possible with discs that do not bear
the aforementioned marks.
5
ENGLISH
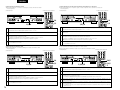
Digital Copies
Finalization Processing of CD-R Discs
A CD-R/RW disc onto which has been recorded using the digital input cannot be further digitally recorded (i.e., copied) onto a
separate CD-R/RW disc or MD, etc.. This is a standard established by the SCMS (Serial Copy Management System).
Unrecorded
disc
Recording is not possible.
Digital
Digital
source
Digital equipment
CD player, etc.
Analog
Digital
recording
Digital
Analog
source
Finalization Processing of CD-RW Discs
Recording is
possible.
Additional recording is possible.
Recording is possible.
Playback is not possible on an ordinary
CD player. Playback is only possible
with a CD recorder.
Digital
NOTES:
• Once a CD-R disc has been finalized, additional
recording will no longer be possible.
• The information that has been recorded to a CDR disc cannot be erased.
Recording is possible.
“Prior to Finalization”
Recording is Digital
possible.
Recording is not possible.
Recorded
disc
Analog
Analog
recording
After the recording of a CD-R disc is completed, finalization
processing is required to enable it to be played on an ordinary
CD player.
CD-RW discs cannot be played on an ordinary CD player,
even with finalization processing. Playback is possible
only on CD recorders or players suited for use with CDRW discs.They can only be played on a player that is
suited for use with CD-RW discs. Also note that CD-RW
discs can be erased after being finalized.
“After Finalization”
Recording is possible.
Additional recording is not possible.
Playback is possible on an ordinary CD
player.
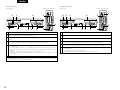
Track Numbers: Auto Track Function
4 DISC HANDLING AND PRECAUTIONS
★ Recording in the Synchro-recording mode (e.g., disc Synchro-recording, track Synchro-recording, and auto finalization recording)
results in the track numbers being automatically associated. The manner in which the track numbers are associated will differ as
follows for digital recording and for analog recording depending on the conditions.
2
Recording from a digital input
• When performing digital recording of a CD, track numbers are updated when the first sound is detected after the track
switches.
• When making a digital recording from a MD, a track number that is the same as the original track number will automatically
be associated.
• When recording from a DAT, track numbers are given when track switching is detected using the start IDs.
• When recording from a satellite broadcasts or other digital equipment, the detection of a blank portion of about 3 seconds or
longer, the same as when making recordings with an analog input, will result in the operation of the auto track function and
the automatic association of the track number.
• The track number might not switch correctly when there is a lot of noise in the blank portion between tracks.
• The track number might change when the signal level is very low within the track.
Recording from an analog input
Track numbers will automatically be associated when a blank portion of about 3
seconds or longer is detected.
• When the input signal is affected by noise or there is some other interference,
the track number might not change at the correct position.
• The track number might change when the signal level is very low within the
track.
✽ The on/off setting of the auto track function is possible in manual recording. (See
“Setting of the Auto Track Mark” on Page 11.)
2
Approximately 3 seconds
Blank portion
First track
Second
track
Disc Handling
Avoid touching the surface of the disc when inserting or
removing it.
Be careful not to get
fingerprints on the signal
recording surface.
Disc Cleaning
When the disc has become marked with fingerprints or dirt,
wipe it clean before use. The dirt will not affect the signal of
the disc, but the sound quality may drop and there may be
breaks in the sound. Note that when the surface of a CDR/RW disc is dirty, it may not record properly.
2 To wipe the disc clean, use one of the disc cleaning sets
available on the market or a soft cloth.
2
• Do not use record spray or static electricity prevention
products. Do not use benzene, thinner, or other
volatile chemicals.
CD-R/RW
disc
NOTES:
• When recording an analog source that contains a very low level signal within the track, or a digital source other than
CD/MD/DAT, switch off the auto track function then make a manual recording and associate the track numbers manually.
• When the recording level is set too low while recording an analog source or a digital source other than CD/MD/DAT, the
track numbers might not be associated at the correct position. Please set a suitable recording level.
Handling Precautions
Lightly wipe in the direction
from centre to outside.
Do not wipe in a circular
manner.
Storage Precautions
• Be sure to eject the disc after playing.
• Always return the disc to its case to avoid dust, scratches,
and misshaping.
• Do not leave the disc in the following places:
1. Where it will be exposed to direct sunlight for long
periods.
2. Where there is a lot of dampness and dust.
3. Where it will be exposed to heat such as from a heater.
6
NOTES:
• Do not attach commercially available disc labels or
other seals on the disc. Doing so may make it
impossible to record or play the disc properly.
• Do not allow fingerprints, oil, or dirt to adhere.
• Be careful not to scratch the surface, especially when
removing or returning the disc to the case.
• Do not bend the disc.
• Do not heat the disc.
• Do not enlarge the center hole.
• Do not write on the label surface (i.e., printed side) with a
ballpoint pen or pencil.
• Water droplets may form on the surface of the disc when it
is suddenly brought from a cold place such as outdoors to a
warm place. If this happens, do not dry the disc with a hair
dryer.
ENGLISH
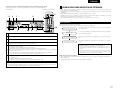
6 CONNECTIONS
Precautions When Loading Discs
• Only load one disc. Loading two or more discs in a layer will
cause breakdown and may also scratch the discs.
• Discs of the 8 cm size should be carefully aligned with the
recessed disc guide area and loaded without the use of an
adapter. If not properly loaded, the disc may fall out or the
disc holder may cease to open.
• Be careful not to get your finger caught when the disc
holder is closing.
• Do not place anything other than a disc on the disc tray.
• Do not use discs that are cracked, misshapen, or have been
repaired with an adhesive, etc.
• Do not use discs that have adhesive coming out from
cellophane tape or the label of a rental disc, or adhesive
remaining after removal of the label. Use of a disc in this
condition may result in the disc not being ejected or in
breakdown.
5 RESTRICTIONS RELATED TO THE CD-R/RW STANDARDS
★ Standards concerned with CD recorder playback have been established based on the existing standards of CD players;
however, for recording, the method differs from that used with existing cassette decks and MD recorders, etc. In view of this,
please gain a good understanding of the following restrictions associated with CD-R/RW discs and enjoy the medium.
Restrictions of Audio CD-R/RW Discs
• Only audio CD-R/RW discs can be recorded with this unit. “Use Audio CD” will be displayed when a disc other than one
for use with audio such as a CD-R/RW disc for use with a personal computer or another type of disc is loaded. (See “Discs that
Can Be Used with this Unit” on Page 5.)
• CD-R discs can be recorded to only once. The recorded information cannot be erased.
• The recorded information of CD-RW discs can be erased. When this disc has been finalized, erase after the finalization removal
operation has been performed. (See “Cancellation of CD-RW disc finalizing” on Page 28.)
• Recording mistakes made with CD-R discs cannot be erased; therefore, it is recommended that a CD-RW disc be used until you
are accustomed to the recording operation.
Restrictions in Recording with this Unit
• The recording operation procedure is the same for CD-R discs and CD-RW discs.
• When making additional recording to a previously recorded disc, the end of the last track is detected and recording is started
from there.
• The record standby mode cannot be set for CD-R/RW discs with a recordable time of about 8 seconds or less remaining.
“Disc Full” will be displayed at this time.
• A maximum of 99 tracks can be recorded to one CD-R/RW disc. When the recording reaches the 99th track, “Disc Full” is
displayed and recordings beyond this track will not be possible.
• Digital recording is not possible from CD-R/RW discs onto which have been digitally recorded, normal is it possible from MD or
DAT, etc. When a digital recording is attempted from such sources, “Copy Prohibit” is displayed. To record from these
digital sources, make the recording from the analog input. (See “Digital Copies” on Page 6.)
• This unit cannot record CD-ROM and other non-audio signal sources. When an attempt is made to record from such sources,
“Copy Prohibit” is displayed.
• When a recording is made from a disc that includes data other than audio signals such as CD graphics or CD-TEXT, only the
audio signal is recorded; other data is not recorded.
• DVD (Dolby Digital, DTS, and other compressed audio signals) cannot be recorded.
Compatibility with Other CD Players and Discs
• Finalization processing on a CD-R disc that has been recorded with this unit will permit that disc to be played on ordinary CD
player. (See “Finalizing CD-R/RW Disc” on Page 27.)
• Finalization processing on a CD-RW disc that has been recorded with this unit will permit that disc to be played only on a CD player
designed to be used with CD-RW discs or on another CD recorder. (See “Finalization Processing of CD-RW Discs” on Page 6.)
NOTES:
• To assure accurate recording, record with an ambient temperature of 30 °C or less.
• Do not obstruct the ventilation holes on the top.
• Recording may stop if the unit is subject to shocks during recording. If recording stops, it may no longer be possible to
use the disc normally.
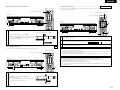
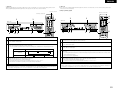
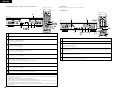
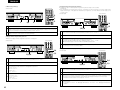
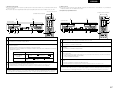
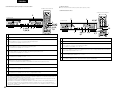
(1) Analog Input/Output Jack Connections
• Use the supplied pin plug cable when
making connections with the analog
input/output jacks.
q Input:
Connect the analog input jacks (ANALOG
IN) of this unit with the output jacks of
the amplifier (MD or TAPE).
w Output:
Connect the analog output jacks
(ANALOG OUT) of this unit with the
input jacks of the amplifier (MD or TAPE).
e CD-only output:
Only the CD side sound is output.
Connect to the amplifier’s input jacks
(CD, etc.).
✽ In the dual mode, only the sound of
the CD-R side is output from the
CD/CD-R output jacks, so this
connection is required.
Power
Supply
outlet
Amplifier
120 V
60 Hz
SIGNAL
GND
SPEAKER SYSTEMS
R
PHONO
INPUTS
TUNER AUX
CD
PB
TAPE-1 TAPE-2
/MD /DAT
L
REC
TAPE-1 TAPE-2
/MD /DAT
A
L
L
R
R
B
q
Power
Supply
outlet
e
CDR-W1500
120 V
60 Hz
ANALOG
CD/
CDR
OUT
CDR
IN
CD
OUT
DIGITAL IN
DIGITAL OUT
CD/CD-R
L
CD
R
COAXIAL
OPTICAL
COAXIAL
OPTICAL
COAXIAL
OPTICAL
w
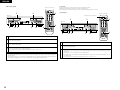
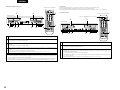
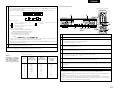
(2) Connection of Digital Input/Output Jacks
• Please use optical fiber cables, which is
available on the market, when making
connections to the digital (OPTICAL)
input/output jacks.
Use 75Ω/ohms pin plug cable, which is
available on the market, when making
connections to the digital (COAXIAL)
input/output jacks.
q Input:
Connections with Playback Equipment
such as the CD Players
The digital input jacks of this unit (either
DIGITAL IN OPTICAL or DIGITAL IN
COAXIAL) should be connected with the
digital output jacks of the CD player
(OPTICAL or COAXIAL).
w Output:
Connections with Equipment having a
Digital Input such as the MD Recorder
The digital output jacks of this unit (either
DIGITAL OUT OPTICAL or DIGITAL OUT
COAXIAL) should be connected with the
digital input jacks of the MD recorder or
other equipment (OPTICAL or COAXIAL).
e CD-only output:
Only the CD side sound is output.
Connect to the digital input jacks of an
MD recorder, etc.
MD recorder
ANALOG
OUT
DIGITAL
OUT
IN
IN
IN
IN
L
R
OPTICAL
COAXIAL OPTICAL-1 OPTICAL-2
q
Power Supply outlet
CDR-W1500
CD/
CDR
OUT
CD
OUT
DIGITAL IN
DIGITAL OUT
CD/CD-R
L
120 V
60 Hz
e
ANALOG
CDR
IN
CD
R
COAXIAL
OPTICAL
COAXIAL
OPTICAL
COAXIAL
OPTICAL
w
LINE OUT
DIGITAL
OUT
R
L
CD player
OUT
COAXIAL OPTICAL
NOTES:
• Do not plug the power plug into the power outlet until all connections have been completed.
• Connect the red plug of the pin plug cable into the R (right) jack and the white plug into the L (left) jack.
• Do not make a connection to the PHONO jack of the amplifier. Doing so will lead to breakdown.
• Firmly plug in the power plug. An imperfect connection will cause noise to be generated.
• Bundling the connection cables together with the power cable will cause hum or other noise.
• When the power plug is disconnected from the power outlet, wait about 5 seconds before reinserting.
7
ENGLISH
7 PART NAMES AND FUNCTIONS
!3
Front Panel
q
• Turns the CD recorder ON and OFF.
w
!4
Phones jack (PHONES)
Phones level control (PHONES LEVEL)
• Adjust the headphone volume.
r
!5
Disc tray (CD)
• Store-bought CDs and finalized CD-R/RW discs can be
played.
y
Display select button (DISPLAY SELECT)
• The display switches each time the button is pressed.
Time display
1 for both the
CD and CD-R
1
CD only
1
CD-R only
!6
!7
u
• When pressed while the display mode is set to CD or
CD-R, the text information is displayed.
• When text is being input, the characters change.
i
5
Input button (INPUT)
• Selects input source.
• Switching will be as follows each time the button is
pressed.
1
CD
1
OPT
(OPTICAL)
1
COAX
(COAXIAL)
TIME
1
ANALOG
✽ Switching is not permitted during recording.
o
CD unit operating buttons
:
2
:
3
:
8, 9 :
1
5
TIME
!0
Use this to start playback.
Use this to stop playback.
Use this to pause playback.
Use this to move to the beginning of
tracks.
: Use this to open and close the disc holder.
: Use this to switch between the elapsed
time, remaining track time and total
remaining time.
!8
!1
1
Relay
(RELAY)
1
Mix
(MIX)
1
!9
• Press this button to finalize.
!2
Clear button (CLEAR)
• Use this to delete programmed tracks or text input
characters.
• When pressed in the menu mode, the set returns to
the previous mode.
8
Make CD
1
dubbing
1-track
1
dubbing
Scan record
1
dubbing
Double-speed copy mode button
(DUBBING HIGH)
• The double-speed dubbing mode switches each time
this button is pressed.
Dual
(DUAL)
Finalize button (FINALIZE)
Normal speed copy mode button
(DUBBING NORMAL)
Disc
1
dubbing
• The mode switches each time the button is pressed.
Normal
@4
1
@0
Disc
dubbing
1
Make CD
dubbing
Display
• Information screen.
1
1-track
dubbing
1
Scan record
dubbing
•
:
This lights when the CD-R unit’s time is displayed.
• SKIP:
This lights when a track is set to be skipped.
• ON:
This lights when the skip play mode is turned on.
Digital CD/CD-R output jack
(DIGITAL OUT CD/CD-R OPTICAL)
w
@5
Digital input jack
(DIGITAL IN COAXIAL)
• Connects to the digital coaxial output of an external
digital sources.
@6
Digital input jack
(DIGITAL IN OPTICAL)
•
:
This lights when the CD unit’s time is displayed.
• HDCD:
This lights when playing discs recorded in HDCD
format.
• Connects to the digital optical output of an external
digital source.
@7
Analog CD-only output jacks
(ANALOG OUT CD)
• In all modes, only the CD side sound is output.
@8
Digital CD-only output jack
(DIGITAL OUT COAXIAL)
• In all modes, only the CD side digital data is output.
@9
Digital CD-only output jack
(DIGITAL OUT OPTICAL)
• In all modes, only the CD side digital data is output.
Display indications
q
Mode display (CD-R)
• CD:
CD (a pre-recorded CD or finalized CD-R or CD-RW
disc) is loaded.
• CD-R:
An unfinalized CD-R disc is loaded.
• CD-RW:
An unfinalized CD-RW disc is loaded.
• 4:
Lights during recording.
• 1:
Lights during play/recording.
• 3:
Pause function active.
• PROG:
Lights in program mode.
• 1 Tr, SYNC:
Synchronized recording active.
Mode display (CD)
• CD:
This lights when a disc is loaded.
• RAND:
Random indicator.
• PROG:
Program indicator.
• 3:
Pause indicator.
• 1:
Play indicator.
• Connects to the digital coaxial input of e.g. amplifier or
recording device.
• In the dual mode, only the CD-R side digital data is
output.
• The copy dubbing mode switches each time this
button is pressed.
Relay mode button (RELAY MODE)
1
Use this to start playback or recording.
Use this to stop playback or recording.
Use this to pause playback or recording.
Use this to move to the beginning of
tracks.
: Use this to open and close the disc holder.
✽ If the text information input operation
has performed but not finalized, the disc
holder cannot be opened until all the test
information has been deleted. (See Page
10.)
: During playback, use this to switch
between the elapsed time, remaining track
time and total remaining time. During
recording, use this to switch between the
elapsed time per track and the total
remaining recording time.
Digital CD/CD-R output jack
(DIGITAL OUT CD/CD-R COAXIAL)
• Connects to the digital coaxial input of e.g. amplifier or
recording device.
• In the dual mode, only the CD-R side digital data is
output.
CD-R operating buttons
:
:
3
:
8, 9 :
Title/Character button (TITLE/CHARACTER)
@3
Disc tray (CD-R)
2
Analog input jacks (ANALOG IN CD-R)
• Connects to the line output of an amplifier (left and
right).
Record button (4 REC)
1
Analog CD/CD-R output jacks
(ANALOG OUT CD/CD-R)
• Connects to the line input of an amplifier (left and
right).
• In the dual mode, only the CD-R side sound is output.
@2
• Press this button to record.
• The recording standby mode is set when the record
button (4 REC) is pressed alone.
• Press the play button (1 PLAY) while in the recording
standby mode to start recording.
• To stop recording or to cancel the recording standby
mode, press the stop button (2 STOP).
Remote control sensor (REMOTE SENSOR)
• Receives signals from the remote control.
t
Multi Jog dial (MULTI JOG)
• Recording level control (Recording).
• Selects settings (Menu mode).
• Jack for headphones.
e
@1
Menu button (MENU)
• This button is used when inputting disc and track titles
and for such editing operations as CD-RW Disc
erasing.
Power button
• RAND:
Plays tracks in random order.
• A.T.M.:
Auto track mark indicator.
• D.in:
This indicator lights when one of the digital inputs
(digital) is selected.
If this flashes after performing the recording operation,
check the connections of the digital input jacks.
• FADE:
This flashes during the fade-in and fade-out recording
operation.
Rear Panel
e
Shared mode displays
• REPEAT, 1:
Lights up when a track/complete disc (or program) is
repeated.
✽ Off when both the CD and CD-R units’ times are
displayed.
• REPEAT A-B:
This lights when in the A-B repeat play mode.
✽ Off when both the CD and CD-R units’ times are
displayed.
• SINGLE, TOTAL:
Time mode indicator.
✽ Off when both the CD and CD-R units’ times are
displayed.
• DUBB:
This lights when in the normal speed dubbing mode.
• DUBB HIGH:
This lights when in the double-speed dubbing
(copying) mode.
• MIX:
This lights when in the mixed (CD and CD-R units)
mode.
• RELAY:
This lights when in the relay play mode between the
CD and CD-R units.
• DUAL:
This lights when in the CD and CD-R unit dual mode.
ENGLISH
r
Input source display
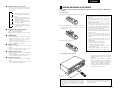
• Each press of the input switching button (INPUT)
causes the indicators to light as described below.
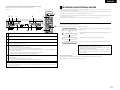
The included remote control unit (RC-278) can be used to operate the CDR-W1500 from a distance.
Inserting the batteries
ª
CD
8 REMOTE CONTROL UNIT
2
: This lights when the input source is set
to the internal CD.
q Remove the remote control unit’s back lid.
Cautions on batteries
• Use R6P (AA) batteries in the remote control unit.
• The batteries should be replaced with new ones after
approximately one year, though this depends on the
frequency with which the remote control unit is used.
• Even if the batteries are less than a year old, replace
them with new ones if the remote control unit no
longer operates even from a short distance from the
main unit.
• The included battery is only for verifying operation.
Replace it with a new battery as soon as possible.
• When inserting new batteries, wait about two
minutes after removing the old batteries before
inserting the new ones.
• Be sure to set the batteries in the proper “<” and
“>” directions, as indicated by the marks in the
remote control unit’s battery compartment.
• Remove the batteries when not using the remote
control unit for long periods of time.
• To avoid explosions and fluid leakage:
• Do not use one new battery with one old one.
• Do not use two different types of batteries.
• Do not short-circuit, disassemble, heat or dispose
of batteries in flames.
• If the battery fluid should leak, wipe all the fluid off
the battery compartment, then insert new batteries.
ª
OPT
: This lights when the DIGITAL IN
OPTICAL input jacks are selected.
ª
COAX
: This lights when the DIGITAL IN
COAXIAL input jacks are selected.
ª
ANALOG : This lights when the ANALOG CD-R IN
input jacks are selected.
t
Music calendar display
w Insert the two R6P (AA) batteries in the battery
compartment, in the direction indicated by the marks inside
the compartment.
• Tracks on a disc or in a program.
• Track in play/recording.
✽ Off when both the CD and CD-R times are displayed.
y
Multiple display
• This display indicates the number of tracks, track
number, play time, recording time, various operational
information, text messages, etc.
• When both the CD and CD-R times are displayed, the
CD-R time is displayed.
u
Level meter
e Put the back lid back on.
• Record level bar, indicates the audio signal level.
• When the CD-R unit is set to the recording mode, the
input level is displayed.
i
Track No. display
• When there is text information, the track number is
displayed.
• When both the CD and CD-R times are displayed, the
CD track number is displayed.
o
Time display
• When there is text information, the time is displayed.
• When both the CD and CD-R times are displayed, the
CD time is displayed.
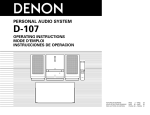
Using the remote control unit
• When operating the remote control unit, point it at
the main unit as shown in the diagram.
• The remote control unit can be operated from a
direct distance of approximately 8 meters from
the main unit. This distance will be shortened,
however, if there are obstacles or when operated
from an angle.
(The remote control unit will operate from a
horizontal angle of up to about 30°.)
9
8
SE
PAU
C
4 RE
P
STO
ZE
ALI
FIN
UT
INP
Y
PLA
AR
CLE
E
TIM
EN
OP
ES
ON
PH
EL
LEV
NU
ME
E
OS
/CL
-
30°
30°
CD-R
CD
AY E
REL
MOD
G
_
BING HIGH
_ DUB
MAL
NOR
"
!
A
D
#
'
&
3
%
P
2
M
1
*
S
.
−
6
Y
5
{
[
=
>
9
AR
CLE
8
/
7
<
:;
V
4
,
+
)
J(
]
?
}
+ 10
7
REC
10
U
E
PAUS
9
MEN
R
3
ENTE
6
A
PLAY
8
1/
-B
ALL
E
P
STO
CALL
2
TIME
DOM
RAN
TER
RAC
CHA
LIZE
FINA
TITL
CT
/DIRE
PROG
Y SEL.
DISPLA
R
FADE
T
INPU
78
RC-2
L UNIT
TRO
B
CON
OTE
REM
Approx. 8 meters
NOTES:
• The remote control unit may not operate if the remote
sensor is exposed to direct sunlight or strong artificial
light, or if there is an obstacle between it and the remote
sensor.
• Do not press buttons on the main unit and on the remote
control unit at the same time. Doing so will result in
malfunction.
9
ENGLISH
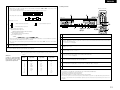
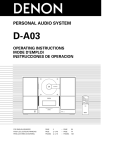
Names and Functions of Remote Control Unit Buttons
2 Buttons not explained here function in the same way as the corresponding buttons on the main unit.
2 Buttons marked “✽” function regardless of the function selector switch.
✽
✽
Normal speed dubbing
mode button (DUBBING
NORMAL)
High speed dubbing
mode button (DUBBING
HIGH)
✽
Relay mode button
(RELAY MODE)
Clear button (CLEAR)
Function selector
switch
Number buttons (1 to 10)
Use these buttons for direct
search and programmed playback.
Switches the operation of
the buttons between the
CD and CD-R.
+10 button
Use this button to enter track
numbers of 11 or over for direct
search and programmed playback.
Record button (4 REC)
Manual search reverse and
forward buttons (6 and
7)
Automatic search reverse
and forward buttons (8
and 9)
CD CD-R
Play button (1 PLAY)
_ DUBBING _
NORMAL
A ! "
RELAY
MODE
HIGH
D # %
1
Stop button (2 STOP)
)
S
Program/direct button
(PROG/DIRECT)
Press this button to switch
between the program setting
mode and the direct search mode.
Normally this is set to the direct
search mode.
.
5
/
,
−
: ;
Pause button (3 PAUSE)
Y < >
Repeat A - B button (A - B)
8
9
{ ? }
CLEAR
10
+10
Press this to perform A-B repeat
playback.
REC
6
7
MENU
ENTER
PLAY
2
9
PAUSE
Repeat 1/ALL button (1/ALL)
Press this to perform 1-track
repeat playback and all-track
repeat playback.
TIME
1 / ALL
Character button
(CHARACTER)
Finalize button (FINALIZE)
B
REMOTE CONTROL UNIT RC-278
Title button (TITLE)
Press this button to switch the
time display to the title display.
Display select button
(DISPLAY SEL.)
Input select button (INPUT)
Time button (TIME)
Fader button (FADER)
Press this for fade-in and fade-out
recording.
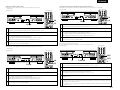
9 SETUP METHOD
★ The 9 items listed below can be set with the setup menu. The following messages will be displayed for the various setting
items.
• Close the disc trays and set the stop mode for both the CD and CD-R sections.
• The contents of the set menu are stored, but this data might be lost if the unit is disconnected from the power source for 2 to 3
days.
q “Sync. Rec?”…………………………………………… Synchro recording mode.
w “Sync. Level?” ……………………………………… Synchro recording level.
e “A.T. Mark?”…………………………………………… Auto track mark.
r “FadeIn Time?” ……………………………………… Fade-in recording time.
…………………………………… Fade-out recording time.
u “Custom Index” ……………………………………… Custom index.
i “Skip Play?”…………………………………………… Skip play.
o “Timer Play?”………………………………………… Timer playback.
FINALIZE
Random button (RANDOM)
10
NOTES:
• If your finger should get caught in the disc tray when it closes, press the OPEN/CLOSE button (5).
• Only Audio CDs will be accepted. If a non-audio disc is inserted, the display shows “Use Audio CD”.
• For recording it is important that the blank disc is completely free from dust particles or scratches. See “Disc cleaning”
on Page 6.
• When text information is entered but not finalized, the disc holder will not open until all of the text information has been
deleted.
“Text Erase OK?” will be displayed for 2 seconds. When the enter button is pressed during this interval, the text
information will be deleted and the disc holder can be opened.
y “Intro Time?”………………………………………… Scan recording intro time.
A-B
TITLE CHARACTER
DISPLAY SEL. FADER INPUT
✽
Disc tray
t “FadeOutTime?”
3
PROG/DIRECT CALL
RANDOM
Press this button to play the track
in random order.
(See Page 22.)
Enter button (ENTER)
6
7
STOP
Use this button to check the
programmed tracks.
P
[ = ]
8
Call button (CALL)
V
✽
OPEN/CLOSE button
(5)
3
M*+
4
Menu button (MENU)
Recess
G & '
2
J(
✽
2 Inserting Disc
q Press the OPEN/CLOSE button (5) to open the disc tray.
w Insert a disc in the appropriate recess in the tray, label side
up.
e Press the OPEN/CLOSE button (5) to close the tray.
• “Close” lights up, followed by “TOC Reading”
and the display will show the type of disc you inserted.
• If you insert a blank or partly-recorded CD-R or
unfinalized CD-RW, the CD recorder will calibrate the
disc for optimum recording. During this process the
display will first show “Now OPC” and then the
number of audio tracks. Calibration can take up to 60
seconds. (CD-R/RW)
• If a CD-R/RW is finalized it will show “CD” on the
display.
ENGLISH
(1) Setup Method
(Main unit)
A ! "
D # %
1
.
S
DUBBING
NORMAL
HIGH
9
CDR-W1500
DISPLAY
TITLE /
SELECT CHARACTER
TIME
TIME
CLEAR
INPUT
4 REC
FINALIZE
8
PHONES
PLAY
STOP
PAUSE
1
2
3
RELAY MODE
OPEN / CLOSE
ON
PHONES LEVEL
/
OFF
OPEN /CLOSE
+
MENU
5
MAX
(Main unit)
7
8
9
[ = ]
{ ? }
CLEAR
10
+10
9
PLAY
STOP
PAUSE
1
2
3
6
7
MENU
PUSH
ENTER
8
9
ENTER
PLAY
STOP
3
PROG/DIRECT CALL
2,3
2
RANDOM
1 / ALL
A ! "
A-B
2
3
.
PCM AUDIO TECHNOLOGY / COMPACT DISC RECORDER
CDR-W1500
2
9
8
DUBBING
NORMAL
HIGH
DISPLAY
TITLE /
SELECT CHARACTER
TIME
TIME
POWER
STOP
PAUSE
1
2
3
RELAY MODE
ON
OPEN / CLOSE
PHONES
PHONES LEVEL
-
CLEAR
INPUT
4 REC
FINALIZE
8
9
PLAY
STOP
PAUSE
1
2
3
,
Y < >
7
8
9
[ = ]
{ ? }
CLEAR
10
+10
REC
OPEN /CLOSE
+
MENU
5
6
7
MENU
8
FINALIZE
9
ENTER
PLAY
PAUSE
2
3
PROG/DIRECT CALL
Switch on the power.
1,2,3,4
RANDOM
1 / ALL
A-B
Press the menu button and turn the jog dial on the main unit or use the automatic search buttons on the remote control
unit to display “Setup Menu?”.
3
Press the enter button and enter the setup mode.
(Remote control unit)
A ! "
D # %
1
Set the unit to the setup mode, then turn the jog dial of the main unit or press the automatic search button of the
remote control to display “Sync. Level?”.
2
Press the enter button and set the synchro recording selection mode.
3
Turn the jog dial of the main unit or press the automatic search button of the remote control, then set the synchro
recording level.
• The setup value is displayed in the multiple display area. “Sync. -**dB”
✽ The setting range is from –54 dB to –30 dB, variable in 6 dB steps.
)
PCM AUDIO TECHNOLOGY / COMPACT DISC RECORDER
9
8
DUBBING
NORMAL
HIGH
TIME
CDR-W1500
DISPLAY
TITLE /
SELECT CHARACTER
TIME
CLEAR
INPUT
4 REC
FINALIZE
8
9
PLAY
STOP
PAUSE
1
2
3
.
4
Press the enter button and set the synchro recording level.
• “Complete” will be displayed.
5
/
V
POWER
STOP
PAUSE
1
2
3
RELAY MODE
OPEN / CLOSE
ON
PHONES
PHONES LEVEL
-
−
Y < >
8
9
{ ? }
CLEAR
10
+10
REC
+
5
OPEN /CLOSE
MENU
5
MAX
,
6
: ;
7
MULTI JOG
OFF
MIN
P
[ = ]
REMOTE SENSOR
PLAY
3
M*+
4
S
G & '
2
J(
6
7
MENU
2,4
PUSH
ENTER
8
STOP
ENTER
PLAY
2
1,2,3,4
9
1 / ALL
A-B
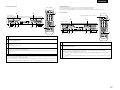
(4) Setting of the Auto Track Mark (ATM)
(Main unit)
PAUSE
3
PROG/DIRECT CALL
(Remote control unit)
1,3
A ! "
TIME
TITLE CHARACTER
S
FINALIZE
Set the unit to the setup mode, then turn the jog dial of the main unit or press the automatic search button of the
remote control to display “Sync. Rec?”.
9
8
DUBBING
NORMAL
HIGH
TIME
CDR-W1500
DISPLAY
TITLE /
SELECT CHARACTER
TIME
CLEAR
INPUT
4 REC
FINALIZE
8
9
PLAY
STOP
PAUSE
1
2
3
.
POWER
STOP
PAUSE
1
2
3
RELAY MODE
OPEN / CLOSE
ON
PHONES
PHONES LEVEL
5
/
V
OPEN /CLOSE
MENU
5
MAX
7
8
9
{ ? }
CLEAR
+10
6
7
MENU
Press the enter button and set the synchro recording selection mode.
STOP
ENTER
PLAY
4
1,2,3,4
RANDOM
9
PAUSE
3
PROG/DIRECT CALL
Press the enter button and set the synchro recording mode.
“Synchro Off”.
“Disc Synchro”.
“Make CD”.
“1Tr Synchro”.
2,4
PUSH
ENTER
2
3
−
Y < >
10
8
Turn the jog dial of the main unit or press the automatic search button of the remote control, then select the synchro
recording mode.
“Sync. Off?”.
“Disc Sync.?”.
“Make CD?”.
“1Tr Sync.?”.
,
6
: ;
REC
+
5
MIN
P
[ = ]
MULTI JOG
OFF
-
3
M*+
REMOTE SENSOR
PLAY
G & '
2
)
4
PCM AUDIO TECHNOLOGY / COMPACT DISC RECORDER
2
D # %
1
J(
RANDOM
DISPLAY SEL. FADER INPUT
1
FINALIZE
1
(2) Setting the Synchro Recording Mode
★ Perform the synchro recording mode settings. (See Page 18.)
(Main unit)
1,3
TITLE CHARACTER
TIME
DISPLAY SEL. FADER INPUT
2
2,4
PUSH
ENTER
STOP
1
−
6
: ;
V
MULTI JOG
OFF
5
MAX
3
P
5
/
REMOTE SENSOR
PLAY
G & '
2
M*+
)
4
S
MIN
DISPLAY SEL. FADER INPUT
D # %
1
J(
TITLE CHARACTER
TIME
(Remote control unit)
PAUSE
2
1
−
Y < >
REC
5
MIN
,
6
: ;
V
MULTI JOG
-
P
5
REMOTE SENSOR
POWER
3
M*+
)
4
PCM AUDIO TECHNOLOGY / COMPACT DISC RECORDER
G & '
2
J(
8
(3) Setting the Synchro Recording Level
★ This sets the synchro recording start level when synchro recording is used.
(See Page 18.)
★ When using synchro recording, recording will start when the level of the input signal exceeds a set value. Recording will stop
when the signal continues to be at level that is lower than the set value for 10 seconds or longer.
(Remote control unit)
TIME
1 / ALL
A-B
1,3
TITLE CHARACTER
DISPLAY SEL. FADER INPUT
FINALIZE
1
Set the unit to the setup mode, then turn the jog dial of the main unit or press the automatic search button of the
remote control to display “A.T. Mark?”.
2
Press the enter button and set the auto track mark selection mode.
3
Turn the jog dial of the main unit or press the automatic search button of the remote control to select auto track mark
on or off.
• The selected mode indication will flash. “On/Off”
4
Press the enter button and set the auto track mark on or off.
• “A.T.Mark On” or “A.T.Mark Off” will be displayed.
11
ENGLISH
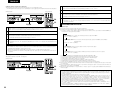
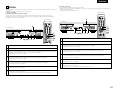
(7) Setting of the intro play time for scan recording
★ To perform scan recording, set the intro scan play time.
(See Page 15.)
(5) Fade-in time setting
★ To perform fade-in recording, set the fade-in time.
(See Page 19.)
(Main unit)
(Main unit)
(Remote control unit)
(Remote control unit)
A ! "
A ! "
D # %
1
G & '
2
)
M*+
P
5
4
,
−
S
9
8
DUBBING
NORMAL
HIGH
TIME
CDR-W1500
DISPLAY
TITLE /
SELECT CHARACTER
TIME
CLEAR
INPUT
4 REC
FINALIZE
8
9
STOP
PAUSE
.
/
V
: ;
Y < >
7
8
9
[ = ]
{ ? }
CLEAR
10
+10
PCM AUDIO TECHNOLOGY / COMPACT DISC RECORDER
DUBBING
NORMAL
HIGH
9
8
TIME
CDR-W1500
DISPLAY
TITLE /
SELECT CHARACTER
TIME
POWER
POWER
STOP
1
2
PAUSE
RELAY MODE
ON
OPEN / CLOSE
PHONES
PHONES LEVEL
REC
MULTI JOG
OFF
-
+
OPEN /CLOSE
5
3
MENU
PLAY
5
MIN
MAX
1
2
6
7
MENU
3
ENTER
STOP
PAUSE
1
2
3
RELAY MODE
ON
OPEN / CLOSE
PHONES
9
PHONES LEVEL
CLEAR
INPUT
4 REC
FINALIZE
8
9
PLAY
STOP
PAUSE
1
2
3
/
V
-
MAX
7
8
9
{ ? }
CLEAR
10
+10
MENU
6
7
MENU
8
9
ENTER
PLAY
PAUSE
PAUSE
2
2
3
PROG/DIRECT CALL
1,2,3,4
RANDOM
1 / ALL
A-B
1,3
1,2,3,4
RANDOM
TIME
1 / ALL
A-B
TITLE CHARACTER
DISPLAY SEL. FADER INPUT
DISPLAY SEL. FADER INPUT
FINALIZE
FINALIZE
1
Set the unit to the setup mode, then turn the jog dial of the main unit or press the automatic search button of the
remote control to display “Intro Time?”.
2
Press the enter button to set the intro scan play time setting mode.
3
Turn the jog dial on the main unit or use the automatic search buttons on the remote control unit to set the fade-in time.
• The setting is displayed on the multi-display section. “FadeIn **sec”
✽ The setting can be set between 1 and 15 seconds in steps of 1 second.
3
Turn the jog dial on the main unit or use the automatic search buttons on the remote control unit to set the intro scan
play time.
• The setting is displayed on the multi-display section. “ScanTime **s”
✽ The setting can be set between 5 and 30 seconds in steps of 5 seconds.
4
Press the enter button to set the fade-in recording time.
• “Complete” will be displayed.
4
Press the enter button to set the intro scan play time.
• “Complete” will be displayed.
1
Set the unit to the setup mode, then turn the jog dial of the main unit or press the automatic search button of the
remote control to display “FadeIn Time?”.
2
Press the enter button to set the fade-in time setting mode.
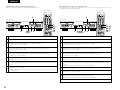
(6) Fade-out time setting
★ To perform fade-out recording, set the fade-out time.
(See Page 19.)
(8) Setting of the Custom Index
★ A desired name can be associated with the input jacks.
★ This is convenient for checking which equipment is connected with the input jacks.
(Main unit)
A ! "
D # %
G & '
1
2
3
)
M*+
4
S
PCM AUDIO TECHNOLOGY / COMPACT DISC RECORDER
9
8
(Main unit)
(Remote control unit)
J(
DUBBING
NORMAL
HIGH
TIME
.
5
/
V
P
,
(Remote control unit)
A ! "
S
Y < >
DISPLAY
TITLE /
SELECT CHARACTER
7
8
9
[ = ]
{ ? }
CLEAR
10
+10
9
8
TIME
CLEAR
INPUT
4 REC
FINALIZE
8
9
PLAY
STOP
PAUSE
1
2
3
DUBBING
NORMAL
HIGH
TIME
CDR-W1500
DISPLAY
TITLE /
SELECT CHARACTER
TIME
CLEAR
INPUT
4 REC
FINALIZE
8
9
PLAY
STOP
PAUSE
1
2
3
.
STOP
PAUSE
1
2
3
RELAY MODE
OPEN / CLOSE
ON
PHONES
PHONES LEVEL
-
+
OPEN /CLOSE
5
MIN
MAX
POWER
REC
MULTI JOG
OFF
5
MENU
6
2,4
PUSH
ENTER
8
STOP
ENTER
PLAY
2
RANDOM
9
STOP
PAUSE
1
2
3
RELAY MODE
OPEN / CLOSE
ON
PHONES
PHONES LEVEL
5
/
V
-
TIME
1 / ALL
A-B
7
8
9
{ ? }
CLEAR
+10
OPEN /CLOSE
MENU
6
Set the unit to the setup mode, then turn the jog dial of the main unit or press the automatic search button of the
remote control to display “FadeOutTime?”.
2
Press the enter button to set the fade-out time setting mode.
3
Turn the jog dial on the main unit or use the automatic search buttons on the remote control unit to set the fade-out
time.
• The setting is displayed on the multi-display section. “FadeOut**sec”
✽ The setting can be set between 1 and 15 seconds in steps of 1 second.
4
Press the enter button to set the fade-out recording time.
• “Complete” will be displayed.
ENTER
PLAY
2
5
2,4,5
1,2,3,4,5
RANDOM
9
PAUSE
3
PROG/DIRECT CALL
TIME
1 / ALL
A-B
TITLE CHARACTER
DISPLAY SEL. FADER INPUT
FINALIZE
1
7
MENU
PUSH
ENTER
STOP
1,3
−
Y < >
10
8
TITLE CHARACTER
DISPLAY SEL. FADER INPUT
MAX
,
6
: ;
REC
+
5
MIN
P
[ = ]
MULTI JOG
OFF
5
PAUSE
3
PROG/DIRECT CALL
1,2,3,4
PLAY
7
MENU
3
M*+
REMOTE SENSOR
POWER
PLAY
G & '
2
)
4
6
: ;
D # %
1
J(
−
PCM AUDIO TECHNOLOGY / COMPACT DISC RECORDER
CDR-W1500
REMOTE SENSOR
12
1,3
3
PROG/DIRECT CALL
TITLE CHARACTER
TIME
2,4
PUSH
ENTER
STOP
PLAY
STOP
−
Y < >
REC
OPEN /CLOSE
+
5
MIN
,
6
: ;
[ = ]
MULTI JOG
OFF
5
2,4
PUSH
ENTER
8
PLAY
3
P
5
REMOTE SENSOR
REMOTE SENSOR
PLAY
.
G & '
2
M*+
)
4
6
S
PCM AUDIO TECHNOLOGY / COMPACT DISC RECORDER
D # %
1
3
J(
J(
FINALIZE
1,3,5
5
1
Set the unit to the setup mode, then turn the jog dial of the main unit or press the automatic search button of the
remote control to display “Custom Index”.
2
Press the enter button and set the custom index entry mode.
3
Turn the jog dial of the main unit or press the automatic search button of the remote control to select the jacks for
which a name will be associated.
• The selected jacks indication will flash. “Opt/Coax/Ana”
4
Press the enter button and set the jacks for which a name will be associated. This will set the name entry mode.
5
Select the entry mode with the character button, then turn the jog dial of the main unit or press the automatic search
button of the remote control to select the characters. Enter one character at a time with the enter button.
• See “Text editings” on Page 31 for details of the character entry method, then perform operations 7 and 8.
ENGLISH
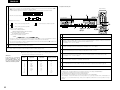
(9) Setting the Skip Play Mode
★ This allows playback that skips over tracks to which you do not want to listen.
(See “Registration of the tracks to which you do not wish to listen” on Page 29 for information on the setting of such tracks.)
(Main unit)
A ! "
D # %
G & '
J(
M*+
P
(Remote control unit)
)
4
S
PCM AUDIO TECHNOLOGY / COMPACT DISC RECORDER
9
8
DUBBING
NORMAL
HIGH
TIME
CDR-W1500
DISPLAY
TITLE /
SELECT CHARACTER
TIME
CLEAR
INPUT
4 REC
FINALIZE
8
9
PLAY
STOP
PAUSE
1
2
3
.
5
/
V
POWER
STOP
PAUSE
1
2
3
RELAY MODE
ON
OPEN / CLOSE
PHONES
PHONES LEVEL
7
8
9
{ ? }
CLEAR
10
+10
+
5
OPEN /CLOSE
MENU
5
MIN
MAX
ª
REC
MULTI JOG
OFF
-
−
Y < >
[ = ]
REMOTE SENSOR
PLAY
,
6
: ;
6
7
MENU
2,4
PUSH
ENTER
8
ENTER
9
PLAY
STOP
3
PROG/DIRECT CALL
RANDOM
1 / ALL
A-B
1,3
TITLE CHARACTER
TIME
DISPLAY SEL. FADER INPUT
Disc dubbing: In this mode, entire CDs can be copied onto CD-R/RW.
(“All Tr Dubb” is displayed.)
PAUSE
2
1,2,3,4
10 COPYING PROCEDURE
About copying
★ Copying can be performed easily from the set’s CD unit onto the CD-R unit.
★ There are two copying speeds (normal and high) and four copying modes.
• The mode switches as described below each time the normal speed copying button (NORMAL) or the high speed copying
button (HIGH) is pressed.
ª
Make CD: In this mode, entire CDs can be copied onto CD-R/RW then finalized automatically.
(“Make CD Dubb” is displayed.)
FINALIZE
1
Set the unit to the setup mode, then turn the jog dial of the main unit or press the automatic search button of the
remote control to display “Skip Play?”.
2
Press the enter button and set the skip play selection mode.
ª
1TR dubbing: In this mode, single tracks on CDs can be copied.
(“1Tr Dubbing” is displayed.)
ª
3
Turn the jog dial of the main unit or press the automatic search button of the remote control to select skip play on or off.
• The selected mode indication will flash. “On/Off”
4
Press the enter button and set the skip play to on or off.
• “S.Play On” or “S.Play Off” will be displayed.
NOTES:
• Finalizing the disc when tracks to which you do not want to listen have been registered, results in the skip play mode
automatically being switched on.
• Skip play is not possible on CD players that lack a skip play function.
• Program play and random play are not possible when there has been registration of tracks to which you do not want to
listen.
(10) Timer play mode setting
★ Timer playback is possible. (See Page 24.)
(Main unit)
A ! "
D # %
J(
M*+
)
4
S
PCM AUDIO TECHNOLOGY / COMPACT DISC RECORDER
9
8
G & '
(Remote control unit)
DUBBING
NORMAL
HIGH
TIME
CDR-W1500
DISPLAY
TITLE /
SELECT CHARACTER
TIME
CLEAR
INPUT
4 REC
FINALIZE
8
9
PLAY
STOP
PAUSE
1
2
3
.
5
/
V
POWER
STOP
PAUSE
1
2
3
RELAY MODE
OPEN / CLOSE
ON
PHONES
PHONES LEVEL
7
8
9
{ ? }
CLEAR
+10
REC
+
5
OPEN /CLOSE
MENU
5
MIN
MAX
−
10
MULTI JOG
OFF
-
,
Y < >
[ = ]
REMOTE SENSOR
PLAY
P
6
: ;
6
7
MENU
2,4
PUSH
ENTER
8
STOP
ENTER
PLAY
2
RANDOM
PAUSE
3
PROG/DIRECT CALL
1,2,3,4
9
TIME
1 / ALL
A-B
1,3
TITLE CHARACTER
DISPLAY SEL. FADER INPUT
FINALIZE
1
Set the unit to the setup mode, then turn the jog dial of the main unit or press the automatic search button of the
remote control to display “Timer Play?”.
2
Press the enter button and set the timer play selection mode.
3
Turn the jog dial on the main unit or use the automatic search buttons on the remote control unit to turn the timer play
mode on or off.
• The selected mode indication will flash. “On/Off”
4
Press the enter button to set the timer play mode on or off.
• “TimerPlayOn” or “TimerPlayOff” will be displayed.
Scan REC dubbing: In this mode, the desired tracks can be selected from CDs and copied.
(“Scan Rec Dub” is displayed.)
• The recording level is automatically set to the default value (0.0 dB).
• The repeat and random play modes are canceled when the copy mode is set.
• During normal speed copying you can listen to the sound as you copy.
• During high speed copying no sound is produced.
• No signals are output from the digital outputs during high speed copying.
• During copying, buttons other than the CD or CD-R stop buttons do not function.
• When CD TEXT compatible CDs are copied, the disc names and track names are also copied.
★ When copying, switch the relay mode to the normal or dual mode. Copying is not possible in the relay or mix mode.
★ For optimum recording, make sure there are no fingerprints, scratches or dust on the signal surface of the source side CD or
the CD-R/RW.
★ The auto track function is always activated in the copying mode. It is not possible to assign track numbers manually.
NOTES:
• Copying is normally performed with digital signals, but if digital copying is not possible due to SCMS restrictions, copying
is performed with analog signals. In addition, copying is always performed at normal speed. (See Page 6.)
• Analog signal copying is always performed in the normal speed mode.
• If when the copying mode is set the recordable time on the CD-R/RW is shorter than the time of the CD source you are
trying to copy, “CD-R Short” is displayed and both the CD and CD-R units are set to the stop mode. If this happens,
check the disc’s recordable time. (However, when recording track numbers 21 or higher from a source CD containing
over 20 tracks, “CD-R Short” is not displayed even if the source time you want to record is longer than the CDR/RW’s recordable time.)
• If the disc name has already been input on the disc on which you are recording, only the track names are copied.
• For some CDs, the text cannot be copied because of copyright protection. In this case “Text Protect” is
displayed.
• Do not turn off the power or unplug the power cord while “Now PMA Rec” is displayed after recording is completed.
Doing so may render the disc unusable.
13
ENGLISH
(1) Copying entire discs
(2) Copying one track at a time
(Main unit)
(Remote control unit)
(Main unit)
(Remote control unit)
CD CD-R
3
1
_ DUBBING _
NORMAL HIGH
2
3
A ! "
D # %
1
)
S
PCM AUDIO TECHNOLOGY / COMPACT DISC RECORDER
9
8
DUBBING
NORMAL
HIGH
TIME
CDR-W1500
DISPLAY
TITLE /
SELECT CHARACTER
TIME
CLEAR
INPUT
4 REC
FINALIZE
8
9
PLAY
STOP
PAUSE
1
2
3
.
5
/
V
POWER
STOP
PAUSE
1
2
3
RELAY MODE
OPEN / CLOSE
ON
PHONES
PHONES LEVEL
-
OPEN /CLOSE
5
MENU
: ;
S
PCM AUDIO TECHNOLOGY / COMPACT DISC RECORDER
8
9
CLEAR
DUBBING
NORMAL
HIGH
TIME
CDR-W1500
DISPLAY
TITLE /
SELECT CHARACTER
2
5
5
RANDOM
TIME
CLEAR
INPUT
4 REC
FINALIZE
8
9
PLAY
STOP
PAUSE
1
2
3
REMOTE SENSOR
POWER
7
MENU
ENTER
PLAY
2
4
9
PLAY
STOP
PAUSE
1
2
3
RELAY MODE
OPEN / CLOSE
ON
PHONES
PHONES LEVEL
MULTI JOG
OFF
-
+
5
OPEN /CLOSE
MENU
5
MIN
MAX
5
TIME
.
2
)
/
PAUSE
7
8
9
{ ? }
CLEAR
+10
REC
6
7
ENTER
PLAY
2
4
2
6
6
FINALIZE
RANDOM
TIME
1 / ALL
1
Load the CD you want to copy into the CD unit.
2
Load the CD-R/RW onto which you want to record into the CD-R unit.
2
Load the CD-R/RW onto which you want to record into the CD-R unit.
3
Press the normal or high speed copying button (NORMAL or HIGH) to display “All
Dubb”.
3
Press the normal or high speed copying button (NORMAL or HIGH) to display “1Tr Dubbing”.
4
Press the enter button to set the copying mode.
• The CD unit is set to the pause mode, the CD-R unit to the recording standby mode.
4
Press the enter button to set the copying mode.
• The CD unit is set to the pause mode, the CD-R unit to the recording standby mode.
5
Use the CD unit’s automatic search buttons to select the track you want to record.
5
Press the CD or CD-R unit’s play button.
• Copying starts.
• If the “Make CD” mode has been selected, finalization starts automatically after copying is completed. (See Page
27.) Once finalization is completed the stop mode is set automatically.
• To stop in the middle of copying, press the stop button on the CD or CD-R unit.
• If the program modes are set for the CD unit beforehand, copying is performed accordingly.
6
Press the CD or CD-R unit’s play button.
• Copying starts.
• When copying is completed, the CD-R unit is stopped.
• To stop in the middle of copying, press the stop button on the CD or CD-R unit.
CD
NOTE:
• If you wish to input text data, select the “All Tr Dubb” mode. With CD-R discs, text data cannot be input after the
disc has been finalized.
PAUSE
A-B
TITLE CHARACTER
DISPLAY SEL. FADER INPUT
Load the CD you want to copy into the CD unit.
9
3
PROG/DIRECT CALL
1
−
Y < >
10
STOP
6
,
6
: ;
MENU
A-B
Dubb” or “Make
V
P
[ = ]
1
Tr
3
M*+
5
8
TITLE CHARACTER
G & '
PUSH
ENTER
3
1 / ALL
DISPLAY SEL. FADER INPUT
14
9
8
6
D # %
1
J(
Y < >
+10
PROG/DIRECT CALL
A ! "
RELAY
MODE
4
PUSH
ENTER
4
3
−
{ ? }
STOP
1
,
7
8
5
2
REC
+
MAX
1
6
10
MULTI JOG
OFF
5
MIN
P
[ = ]
REMOTE SENSOR
PLAY
3
_ DUBBING _
NORMAL HIGH
3
M*+
4
5
G & '
2
J(
5
CD CD-R
RELAY
MODE
FINALIZE
4
ENGLISH
(3) Selecting tracks to be copied while scanning CDs and copying the selected tracks
★ The intro scan playing time can be set at the setup menu (Page 12).
11 RECORDING FROM EXTERNAL DEVICES
(Main unit)
(Remote control unit)
5
CD CD-R
5
3
1
_ DUBBING _
2
NORMAL
3
A ! "
RELAY
MODE
HIGH
D # %
1
)
PCM AUDIO TECHNOLOGY / COMPACT DISC RECORDER
9
8
DUBBING
NORMAL
HIGH
TIME
CDR-W1500
DISPLAY
TITLE /
SELECT CHARACTER
TIME
CLEAR
INPUT
4 REC
FINALIZE
8
9
PLAY
STOP
PAUSE
1
2
3
REMOTE SENSOR
POWER
PLAY
STOP
PAUSE
1
2
3
RELAY MODE
OPEN / CLOSE
ON
PHONES
PHONES LEVEL
MULTI JOG
OFF
-
+
5
OPEN /CLOSE
5
MIN
MAX
MENU
5
.
3
M*+
5
4
S
/
V
,
−
6
: ;
Y < >
7
8
9
{ ? }
CLEAR
10
+10
Recording Modes
REC
6
7
MENU
PUSH
ENTER
8
ENTER
PLAY
2
4,5
2
6
6
RANDOM
9
PAUSE
4,5
★ Your recorder offers several recording modes.
★ Setting is possible using the method of “Setup Method” on Page 11.
3
PROG/DIRECT CALL
1
P
[ = ]
STOP
6
G & '
2
J(
• When recording on an already recorded disc, recording automatically starts from the end of the section last recorded. When
doing so, pay attention to the remaining time.
• To clear the entire content of the disc and record from the beginning, first erase the entire disc. “(2) Erasing the tracks” Page
28.
• To assure accurate recording, record with an ambient temperature of 30 °C or less.
• Recording may stop if the unit is subject to shocks during recording. If recording stops, it may no longer be possible to use the
disc normally. (“Disc Error”)
• Switch to the normal or dual mode when recording. Operation is not possible in the relay or mix mode.
TIME
1 / ALL
A-B
Disc Synchro
TITLE CHARACTER
DISPLAY SEL. FADER INPUT
• To make a synchronized recording of the complete disc or a program simply by
starting the source.
FINALIZE
ª
1
Load the CD you want to copy into the CD unit.
2
Load the CD-R/RW onto which you want to record into the CD-R unit.
3
Press the normal or high speed copying button (NORMAL or HIGH) to display “Scan Rec Dub”.
4
Press the enter button to set the copying mode.
• Intro scan playback starts on the CD unit.
5
Set the tracks you want to record.
• For tracks you want to record, press the enter button.
• For tracks you do no want to record, press the automatic search forward button.
✽ Once all the tracks have been scanned, the CD unit is set to the pause mode, “Choice OK?” is displayed, and
the “PROG” indicator lights.
• Check the settings on the music calendar, and if they are OK press the enter button.
• If the settings are wrong, press the stop button then repeat steps 1 to 5.
6
Press the CD or CD-R unit’s play button.
• Copying starts.
• When copying is completed, the CD-R unit is stopped.
• To stop in the middle of copying, press the stop button on the CD or CD-R unit.
Make CD
• In this mode, finalization is performed automatically after synchronized recording
of all the tracks.
ª
1Tr Synchro
• To manually start a recording simply by pressing the REC button.
ª
Synchro Off
• To make a synchronized recording of a single track simply by starting the source.
NOTES:
• Analog recording is not possible in the Make CD mode.
• Use the copy mode to record HDCDs. Such discs may not be recorded
properly when recording from the exterior.
• Do not turn off the power or unplug the power cord while “Now PMA
Rec” is displayed after recording is completed. Doing so may render the
disc unusable.
Some remarks on recording:
• When Auto track is ON (default setting), track numbers will automatically be increased during recording.
• By programming the source first, a compilation can be recorded.
NOTE:
• A maximum of 30 tracks can be set to be recorded. Intro scan playback is performed even after 30 tracks have been set,
but no more tracks can be set.
15
ENGLISH
1. Manual recording
(1) Starting analog recording
(Main unit)
(Remote control unit)
(2) Starting digital recording
• This set includes a sampling rate converter.
When recording DATs or satellite broadcasts (32 kHz or 48 kHz) whose digital input signal sampling frequency is different from
that of CD (44.1 kHz), the sampling frequency is automatically converted to 44.1 kHz.
(Main unit)
Select the CD-R side.
(Remote control unit)
CD CD-R
CD CD-R
4 2
_ DUBBING _
NORMAL HIGH
8
D # %
G & '
1
2
3
)
M*+
5
4
S
CDR-W1500
.
/
V
P
,
4 2
9
DUBBING
NORMAL
HIGH
TIME
DISPLAY
TITLE /
SELECT CHARACTER
TIME
CLEAR
INPUT
4 REC
FINALIZE
8
9
PLAY
STOP
PAUSE
1
2
3
REMOTE SENSOR
POWER
PLAY
STOP
PAUSE
1
2
3
RELAY MODE
OPEN / CLOSE
ON
PHONES
PHONES LEVEL
MULTI JOG
OFF
-
+
5
OPEN /CLOSE
5
MIN
MAX
MENU
8
: ;
9
CLEAR
10
+10
REC
ENTER
PLAY
16
10
4
5
RANDOM
TIME
1 / ALL
DISPLAY
TITLE /
SELECT CHARACTER
TIME
2
3
OPEN / CLOSE
ON
PHONES
PHONES LEVEL
CLEAR
INPUT
4 REC
FINALIZE
8
9
PLAY
STOP
PAUSE
1
2
3
8
DISPLAY SEL. FADER INPUT
/
V
,
−
6
: ;
Y < >
7
8
9
{ ? }
CLEAR
10
+10
REC
6
7
MENU
MULTI JOG
OFF
-
+
5
OPEN /CLOSE
8
5
MAX
MENU
STOP
PUSH
ENTER
ENTER
PLAY
2
A-B
1
FINALIZE
9
2 5 10
B
10
4
5
RANDOM
9
PAUSE
3
PROG/DIRECT CALL
TITLE CHARACTER
TIME
1 / ALL
A-B
TITLE CHARACTER
DISPLAY SEL. FADER INPUT
FINALIZE
B
REMOTE CONTROL UNIT RC-278
REMOTE CONTROL UNIT RC-278
Load the CD-R/RW disc that is to be recorded.
3
Perform the operation of “Setup Method (2) Setting the Synchro Recording Mode ” on Page 11 and select the Synchro
off mode.
4
When using an already recorded Disc, press the TIME button to check the recordable time.
• The time display switches between the total recorded time and the recordable time each time the TIME button is
pressed.
5
Press the input switching button (INPUT) and select the analog source.
• The “ANALOG” display will light.
6
Perform the operation of “Setup Method” on Page 11 and select on/off of the ATM function.
• ATM Function on
The “ATM” display will light. When a blank portion (of about 3 seconds or longer) of the recording input signal is
detected, the track number is automatically associated and recorded.
• ATM Function off
This is recorded as the following track.
7
Start playing the selection you want to record on the CD player, cassette deck, etc.
8
Press the record button (4 REC).
• The recording standby mode is set.
9
Adjust the recording level with the jog dial and press the enter button.
• Adjust the input level adjustment control (INPUT LEVEL) so that the “OVER” indicator does not light even when the
volume is loudest. After adjusting, set the source to be recorded to the standby mode.
✽ The recording level can be set in advance using the menu mode.
• The set recording level will be stored in memory, but this data might be lost if the unit is not connected to a power
source for 2 to 3 days.
Start playing the selection you want to record on the CD player, cassette deck, etc.
1
RELAY MODE
MIN
2
11
PAUSE
PAUSE
Turn on the power.
Press the play button (1 PLAY).
• Recording starts.
STOP
9
1
10
TIME
POWER
PLAY
3
PROG/DIRECT CALL
2 5 10
5
P
REMOTE SENSOR
PUSH
ENTER
9
DUBBING
NORMAL
HIGH
7
MENU
2
1
9
8
6
CDR-W1500
.
G & '
3
M*+
[ = ]
Y < >
8
{ ? }
D # %
2
)
4
S
7
8
RELAY
MODE
1
J(
6
[ = ]
STOP
A ! "
8
−
PCM AUDIO TECHNOLOGY / COMPACT DISC RECORDER
8
_ DUBBING _
NORMAL HIGH
RELAY
MODE
A ! "
J(
PCM AUDIO TECHNOLOGY / COMPACT DISC RECORDER
Select the CD-R side.
1
Turn on the power.
2
Load the CD-R/RW disc that is to be recorded.
3
Perform the operation of “Setup Method (2) Setting the Synchro Recording Mode” on Page 11 and select the Synchro off mode.
4
When using an already recorded Disc, press the TIME button to check the recordable time.
• The time display switches between the total recorded time and the recordable time each time the TIME button is pressed.
5
Press the input switching button (INPUT) and select the digital source (Optical or Coaxial).
• The indicator for the selected input source (“CD”, “OPT” or “COAX”) lights.
6
Perform the operation of “Setup Method” on Page 11 and select on/off of the ATM function.
• ATM Function on
The “ATM” display will light. When a blank portion (of about 3 seconds or longer) of the recording input signal is detected, the
track number is automatically associated and recorded.
• ATM Function off
This is recorded as the following track.
7
Start playing the selection you want to record on the CD player, MD recorder, etc.
8
Press the record button (4 REC).
• If the “D. in” indicator is flashing, check the connections to the digital input jacks.
9
Adjust the recording level with the jog dial and press the enter button.
• Adjust the input level adjustment control (INPUT LEVEL) so that the “OVER” indicator does not light even when the volume is
loudest. After adjusting, set the source to be recorded to the standby mode.
✽ The recording level can be set in advance using the menu mode.
• The set recording level will be stored in memory, but this data might be lost if the unit is not connected to a power source for 2
to 3 days.
10
Press the play button (1 PLAY).
• Recording starts.
11
Play the selection to be recorded on the CD player, etc.
NOTES:
• “CD” can be selected by pressing the input selector button, but manual recording from the set’s CD unit is only possible in the dual
mode. (Refer to “Dual mode” on Page 26, 27).
• When you do not wish to change the digital recording level, set the jog dial so that “Level 00.0dB” is displayed. The recording
will be made without changing the input signal level.
• The recording level can be adjusted over a range of – ∞ to +12 dB for analog input recording and from – ∞ to 0 dB for digital input
recording. Note that the displayed setting values may include a degree of error in terms of calculation processing.
• When the recording level is – ∞, “Level---.-dB” is displayed and audio is not output.
ENGLISH
(4) Adding track numbers during recording
(3) Stopping recording
(Main unit)
(Remote control unit)
(Main unit)
(Remote control unit)
Select the CD-R side.
Select the CD-R side.
CD CD-R
_ DUBBING _
NORMAL HIGH
A ! "
D # %
1
)
S
PCM AUDIO TECHNOLOGY / COMPACT DISC RECORDER
9
8
DUBBING
NORMAL
HIGH
TIME
CDR-W1500
DISPLAY
TITLE /
SELECT CHARACTER
TIME
CLEAR
INPUT
4 REC
FINALIZE
8
9
PLAY
STOP
PAUSE
1
2
3
.
5
/
V
POWER
STOP
PAUSE
1
2
3
RELAY MODE
OPEN / CLOSE
ON
PHONES
PHONES LEVEL
-
OPEN /CLOSE
MENU
Y < >
S
PCM AUDIO TECHNOLOGY / COMPACT DISC RECORDER
8
9
{ ? }
CLEAR
+10
9
8
DUBBING
NORMAL
HIGH
TIME
CDR-W1500
DISPLAY
TITLE /
SELECT CHARACTER
TIME
POWER
PLAY
STOP
PAUSE
1
2
3
RELAY MODE
OPEN / CLOSE
ON
PHONES
PHONES LEVEL
PUSH
ENTER
STOP
1
1
ENTER
PLAY
2
-
+
OPEN /CLOSE
4 REC
FINALIZE
MENU
5
MAX
8
9
PLAY
STOP
PAUSE
1
2
TIME
1 / ALL
3
1
/
V
,
−
6
: ;
Y < >
7
8
9
[ = ]
{ ? }
CLEAR
10
+10
REC
6
7
MENU
9
8
PAUSE
ENTER
PLAY
STOP
2
A-B
2
TITLE CHARACTER
DISPLAY SEL. FADER INPUT
5
P
PUSH
ENTER
3
PROG/DIRECT CALL
RANDOM
INPUT
MULTI JOG
OFF
5
MIN
8
CLEAR
REMOTE SENSOR
7
MENU
.
G & '
3
M*+
)
4
7
6
D # %
2
J(
6
: ;
RELAY
MODE
1
−
REC
+
5
MAX
,
10
MULTI JOG
OFF
5
MIN
P
[ = ]
REMOTE SENSOR
PLAY
A ! "
3
M*+
4
_ DUBBING _
NORMAL HIGH
1
G & '
2
J(
CD CD-R
RELAY
MODE
2
FINALIZE
2
9
PAUSE
3
PROG/DIRECT CALL
RANDOM
TIME
1 / ALL
A-B
2
TITLE CHARACTER
DISPLAY SEL. FADER INPUT
FINALIZE
• Track numbers can be added during recording regardless of the recording mode.
1
During recording, press the stop button (2 STOP).
• The stop mode is set automatically once the end of the recordable time is reached.
NOTES:
• When performing digital recording of CD or MD, the track numbers are recorded automatically. (See Page 6.)
• When recording digital sources other than CD or MD, track numbers are automatically added when blank sections are
detected. (See Page 6.)
• During digital recording from CD or MD, the track number may not change if the same track is programmed twice in a
row or if the single track repeat mode is set.
• It is not possible to make digital recordings of Discs which have already been recorded digitally. The CDR-W1500 includes
a serial copy management system. This system limits reproduction of digital signals on digital audio devices to “one
generation”. Use analog recording to record Discs originally recorded digitally.
• The CDR-W1500 is for use in private homes and may not operate properly if used (to record, etc.) in combination with
professional equipment or other devices not designed for use in private homes.
• To eject the Disc if the “Copy Prohibit” or “Dig.Unlock” message is displayed during digital recording and
the recording pause mode is set, first press the stop button ( 2 STOP), then press the open/close button ( 5
OPEN/CLOSE) to eject the Disc.
Press the record button (4 REC).
1
During recording, press the record button (4 REC).
• When the record button (4 REC) is pressed during recording, a
track number is added at that point.
• A new track number cannot be added for approximately 4
seconds after the last track number.
1st track
2nd track
(Recording continues.)
(5) Stopping recording temporarily
• Recording can be stopped temporarily then resumed from the same point.
q Press the pause button (3 PAUSE).
2
During recording, press the pause button (3 PAUSE).
• When the pause button ( 3 PAUSE) is pressed during
recording, the pause mode is set at that point and the track
number changes.
• Press the play button (1 PLAY) to resume recording.
1st track
2nd track
w Press the play button (1 PLAY).
• A blank section of approximately 2 seconds is inserted before recording resumes.
17
ENGLISH
2. Synchronized recording of the Disc
(DISC SYNCHRO)
★ This mode is used when recording all the tracks of the CD or MD on the playback side.
★ Please also see “Setup Method (3) Setting the Synchro Recording Level” on Page 11.
3. Synchronized recording of the single track
(1Tr SYNCHRO)
★ This mode is used to record only one track.
★ Please also see “Setup Method (3) Setting the Synchro Recording Level” on Page 11.
(Main unit)
(Remote control unit)
(Main unit)
(Remote control unit)
Select the CD-R side.
Select the CD-R side.
CD CD-R
_ DUBBING _
NORMAL HIGH
3
A ! "
D # %
1
)
S
PCM AUDIO TECHNOLOGY / COMPACT DISC RECORDER
9
8
DUBBING
NORMAL
HIGH
TIME
CDR-W1500
DISPLAY
TITLE /
SELECT CHARACTER
TIME
CLEAR
INPUT
4 REC
FINALIZE
8
9
PLAY
STOP
PAUSE
1
2
3
REMOTE SENSOR
POWER
PLAY
STOP
PAUSE
1
2
3
RELAY MODE
OPEN / CLOSE
ON
PHONES
PHONES LEVEL
MULTI JOG
OFF
-
+
5
OPEN /CLOSE
5
MIN
MAX
MENU
3
.
5
/
V
P
,
Y < >
8
9
{ ? }
CLEAR
+10
9
8
DUBBING
NORMAL
HIGH
TIME
CDR-W1500
DISPLAY
TITLE /
SELECT CHARACTER
TIME
POWER
7
PLAY
STOP
PAUSE
1
2
3
RELAY MODE
OPEN / CLOSE
ON
PHONES
PHONES LEVEL
INPUT
4 REC
FINALIZE
8
9
PLAY
STOP
PAUSE
1
2
3
PLAY
2
MULTI JOG
OFF
-
+
5
OPEN /CLOSE
5
MIN
PUSH
ENTER
MAX
MENU
3
TIME
1 / ALL
5
/
V
P
,
−
6
: ;
Y < >
7
8
9
[ = ]
{ ? }
CLEAR
10
+10
REC
6
7
MENU
9
8
PAUSE
STOP
ENTER
PLAY
2
RANDOM
FINALIZE
9
PAUSE
3
PROG/DIRECT CALL
A-B
TITLE CHARACTER
DISPLAY SEL. FADER INPUT
.
G & '
3
M*+
PUSH
ENTER
3
PROG/DIRECT CALL
RANDOM
CLEAR
REMOTE SENSOR
REC
MENU
STOP
TIME
1 / ALL
A-B
TITLE CHARACTER
DISPLAY SEL. FADER INPUT
FINALIZE
1
Perform the operation of “Manual recording” on Page 16, perform the settings of the input jacks and the recording
level, and set the stop mode.
1
Perform the operation of “Manual recording” on Page 16, set the input jacks and the recording level, and set the stop
mode.
2
Perform the procedure at “Setup Method (2) Setting the Synchro Recording Mode” on Page 11 and select the disc
synchro mode or the make CD mode.
• The “SYNC” indication will light.
2
Perform the operation of “Setup Method (2) Setting the Synchro Recording Mode” on Page 11 and select the track
synchro mode.
• The “1Tr SYNC” indication lights.
3
Press the record button (4 REC).
• The recording pause mode is set and “Disc Synchro” or “Make CD” is displayed.
3
Press the record button (4 REC).
• This sets the record-pause mode and displays “1Tr Synchro”.
4
Use a CD player, cassette deck or other source to play the tracks that you wish to record.
• Recording will start automatically.
• In the make CD mode, finalization is performed automatically after recording stops.
✽ Please also see “Setup Method (3) Setting the Synchro Recording Level” on Page 11.
4
Use a CD player, cassette deck or other source to play the tracks that you wish to record.
• Recording will start automatically.
✽ Please also see “Setup Method (3) Setting the Synchro Recording Level” on Page 11.
• To stop synchro recording, press the stop button.
NOTE:
• If you wish to input text data, select the “Disc Synchro” mode. With CD-R discs, text data cannot be input after
the disc has been finalized.
18
S
PCM AUDIO TECHNOLOGY / COMPACT DISC RECORDER
7
ENTER
)
4
10
6
D # %
2
J(
6
: ;
RELAY
MODE
1
−
[ = ]
8
A ! "
3
M*+
4
_ DUBBING _
NORMAL HIGH
3
G & '
2
J(
CD CD-R
RELAY
MODE
• To stop synchro recording, press the stop button.
• If there is a soundless section of 3 seconds or more, recording stops when the next track starts.
• Recording stops if there is a soundless section of 10 seconds or more.
ENGLISH
4. Fade-in and fade-out recording
★ It is possible to record by gradually increasing the volume (fade-in) or decreasing it (fade-out).
(1) Fade-in recording
✽ Also refer to “Setup Method (5) Fade-in time setting” (Page 12).
1
Perform the procedure at “Manual recording” step 1 to 8 (Page 16).
2
Start playing the selection you want to record on the CD player, cassette deck, etc.
12 NORMAL PLAYBACK
1. Starting playback
First try playing the tracks in order.
Select the deck to be operated.
(Remote control unit)
3
Press the fader button on the remote control unit.
• “Fade In” is displayed, and “FADE” flashes during the fade in operation.
• The recorded sound is gradually increased from a recording level of – ∞ to the set recording level in the set time.
CD CD-R
1
(2) Fade-out recording
✽ Also refer to “Setup Method (6) Fade-out time setting” (Page 12).
1
A ! "
RELAY
MODE
D # %
J(
)
S
During recording, press the fader button on the remote control unit.
• “Fade Out” is displayed, and “FADE” flashes during the fade out operation.
• The recorded sound is gradually decreased from the set recording level to a recording level of -– ∞ in the set time.
9
8
DUBBING
NORMAL
HIGH
TIME
DISPLAY
TITLE /
SELECT CHARACTER
TIME
CLEAR
INPUT
4 REC
FINALIZE
8
9
PLAY
STOP
PAUSE
1
2
3
.
5
/
V
POWER
STOP
PAUSE
1
2
3
RELAY MODE
OPEN / CLOSE
ON
PHONES
PHONES LEVEL
-
7
8
9
{ ? }
CLEAR
+10
OPEN /CLOSE
MENU
6
STOP
3
2 3
1
7
MENU
PUSH
ENTER
8
NOTE:
• The fade in/out recording function does not work in the synchro or copy recording modes. Record manually if you want to
use the fade in/out function.
−
Y < >
REC
+
5
MAX
,
6
: ;
10
MULTI JOG
OFF
5
MIN
P
[ = ]
REMOTE SENSOR
PLAY
3
M*+
4
CDR-W1500
G & '
2
1
(Main unit)
PCM AUDIO TECHNOLOGY / COMPACT DISC RECORDER
1
_ DUBBING _
NORMAL HIGH
1
2 3
ENTER
PLAY
2
TIME
1 / ALL
Load the disc to be played.
2
• Press the PLAY button (1) to start CD play.
• “1”lights up and the track number and track time of the track in play appear on the display.
• Press the TIME button once, twice or three times to see:
Remaining track time, total remaining time, elapsed track time.
A-B
2
TITLE CHARACTER
DISPLAY SEL. FADER INPUT
1
PAUSE
3
PROG/DIRECT CALL
RANDOM
9
FINALIZE
NOTE:
• “No Disc” will be displayed at such times as when a disc is not loaded, the disc cannot be read properly due to
scratches or dirt, or the disc is loaded upside down.
2. Starting playback
3
Press the stop button (2 STOP).
• Playback stops.
• The stop mode is set automatically once all the tracks on the disc have been played.
19
ENGLISH
(2) Searching backward
13 VARIOUS PLAYBACK FUNCTIONS
Press and hold in the manual search
During playback, press and hold in the manual search reverse reverse button (6).
button (6).
• Normal playback resumes from the point at which the button
is released.
4th
track
• Manual search stops and playback starts if the beginning of
the first track on the disc is reached while pressing the
manual search reverse button (6).
• For high-speed backward search without hearing the sound,
press the manual search reverse button ( 6) while in the
pause mode.
In addition to normal playback, the CDR-W1500 also offers the playback functions described below.
1. Playing a certain track (remote control unit only)
………………………………………………………………… Direct Search
(Remote control unit)
2
CD CD-R
Select the deck to be operated.
_ DUBBING _
NORMAL HIGH
RELAY
MODE
Skip
A ! "
D # %
1
)
.
−
6
: ;
V
,
P
5
/
Y < >
7
8
9
[ = ]
{ ? }
CLEAR
10
Skip
Skip
Skip
3
M*+
4
S
Skip
6th
track
G & '
2
J(
5th
track
1
NOTE:
• There may be a slight break in the sound when returning to normal playback from the manual search mode.
+10
REC
6
3. Finding the beginnings of tracks during playback …………………………………………………………… Automatic Search
7
MENU
8
PLAY
STOP
(1) Moving ahead to the beginning of the next track
9
ENTER
PAUSE
2
3
PROG/DIRECT CALL
1 / ALL
(Remote control unit)
A-B
CD CD-R
1
Use the number buttons (1 to 10) and the +10 button to input the number of the desired track.
• For example:
Press button 4 to listen to the 4th track, buttons +10 and 2 to listen to the 12th track, +10 , +10 and 10 to
listen to the 30th track. Playback begins from that track.
Select the deck to be operated.
_ DUBBING _
NORMAL HIGH
A ! "
RELAY
MODE
D # %
1
(Main unit)
)
S
2. Finding the desired position while listening to the sound ……………………………………………………… Manual Search
• Use this function to skip rapidly through the disc while listening to the sound.
This function comes in handy when you want to find a certain section within a long track.
9
8
DUBBING
NORMAL
HIGH
TIME
CDR-W1500
DISPLAY
TITLE /
SELECT CHARACTER
TIME
CLEAR
INPUT
4 REC
FINALIZE
8
.
5
/
V
PLAY
STOP
PAUSE
1
2
3
RELAY MODE
OPEN / CLOSE
ON
PHONES
PHONES LEVEL
-
9
[ = ]
{ ? }
CLEAR
10
+10
9
+
OPEN /CLOSE
MENU
5
PLAY
STOP
PAUSE
1
2
3
6
7
MENU
(Remote control unit)
STOP
ENTER
A ! "
D # %
2
.
5
/
V
P
,
: ;
Y < >
7
8
9
{ ? }
CLEAR
10
+10
REC
6
7
MENU
STOP
ENTER
PLAY
2
PROG/DIRECT CALL
1
1
9
PAUSE
3
1 / ALL
A B
(1) Searching forward
1
20
A-B
TITLE CHARACTER
FINALIZE
−
6
[ = ]
8
1 / ALL
Press the automatic search forward button (9).
3
M*+
4
S
TIME
DISPLAY SEL. FADER INPUT
Select the deck to be operated.
G & '
2
)
RANDOM
RELAY
MODE
1
J(
1
PAUSE
3
PROG/DIRECT CALL
1
9
PLAY
2
CD CD-R
1
PUSH
ENTER
8
_ DUBBING _
NORMAL HIGH
−
Y < >
REC
OFF
MAX
,
6
: ;
8
MULTI JOG
5
MIN
P
7
REMOTE SENSOR
POWER
3
M*+
4
PCM AUDIO TECHNOLOGY / COMPACT DISC RECORDER
G & '
2
J(
During playback, press and hold in the manual search forward
button (7).
• Normal playback resumes from the point at which the button
is released.
2nd
• Playback stops if the end of the last track on the disc is
track
reached while pressing the manual search forward button
(7).
• For high-speed forward search without hearing the sound,
press the manual search forward button (7) while in the
Playback
pause mode.
Press and hold in the manual search forward
button (7).
3rd
track
Skip
Skip
Skip
4th
track
Skip
Skip
Press the automatic search forward button (9).
• During the search operation, press the automatic search
forward button ( 9 ) again to move further on to the
beginning of the following track.
2nd track
3rd track
4th track
ENGLISH
(2) Moving back to the beginning of the current track
5. Playing tracks in a certain order …………………………………………………………………………… Programmed Playback
(Remote control unit)
• Use this function to select certain tracks from the disc and program them to play in a certain order.
• Up to 30 tracks can be programmed.
CD CD-R
Select the deck to be operated.
_ DUBBING _
NORMAL HIGH
(Main unit)
RELAY
MODE
D # %
G & '
1
2
3
J(
)
M*+
.
9
8
DUBBING
NORMAL
HIGH
TIME
CDR-W1500
DISPLAY
TITLE /
SELECT CHARACTER
TIME
CLEAR
INPUT
4 REC
FINALIZE
8
9
PLAY
STOP
PAUSE
1
2
3
/
PHONES
POWER
STOP
PAUSE
1
2
3
RELAY MODE
OPEN / CLOSE
ON
PHONES LEVEL
(Remote control unit)
CD CD-R
8
9
[ = ]
{ ? }
CLEAR
10
+10
_ DUBBING _
NORMAL HIGH
REC
-
OPEN /CLOSE
+
MENU
5
MAX
−
Y < >
7
MULTI JOG
OFF
5
MIN
,
6
: ;
V
REMOTE SENSOR
PLAY
P
5
4
S
PCM AUDIO TECHNOLOGY / COMPACT DISC RECORDER
Select the deck to be operated.
A ! "
A ! "
6
7
(Main unit)
MENU
1
PUSH
ENTER
PLAY
STOP
S
PAUSE
PCM AUDIO TECHNOLOGY / COMPACT DISC RECORDER
1
1
RANDOM
1 / ALL
/
V
7
8
9
{ ? }
CLEAR
10
+10
9
8
DUBBING
NORMAL
HIGH
TIME
DISPLAY
TITLE /
SELECT CHARACTER
TIME
POWER
FINALIZE
PLAY
STOP
PAUSE
1
2
3
RELAY MODE
OPEN / CLOSE
ON
PHONES
PHONES LEVEL
CLEAR
INPUT
4 REC
FINALIZE
8
9
PLAY
STOP
PAUSE
1
2
3
-
+
5
OPEN /CLOSE
MENU
5
MAX
6
7
MENU
PUSH
ENTER
8
ENTER
PLAY
STOP
2
Press the automatic search reverse button (8).
3
Press the automatic search reverse button (8).
• During the search operation, press the automatic search
reverse button ( 8 ) again to move further back to the
beginning of previous track.
3rd track
4th track
5th track
2
REC
MULTI JOG
OFF
MIN
1
−
Y < >
[ = ]
REMOTE SENSOR
DISPLAY SEL. FADER INPUT
,
6
: ;
3
TITLE CHARACTER
TIME
.
3
5
P
A-B
2
PROG/DIRECT CALL
CDR-W1500
G & '
2
M*+
)
4
9
ENTER
D # %
1
J(
8
RELAY
MODE
3
1
PAUSE
3
PROG/DIRECT CALL
RANDOM
9
TIME
1
In the stop mode, press the PROG/DIRECT button.
• The “PROG” indicator lights.
2
Use the number buttons and the +10 button to select the tracks for programmed playback.
• For example, to program the 3rd, 12th and 7th tracks, press PROG/DIRECT , 3 , +10 , 2 and 7 .
3
Press the play button (1 PLAY).
• The tracks are played in the programmed order.
1 / ALL
A-B
3
TITLE CHARACTER
4. Stopping playback temporarily ………………………………………………………………………………………………… Pause
• Use this function to stop playback temporarily then resume from the same point.
• To check the contents of the program, press the CALL button. The programmed tracks appear in the programmed order
on the display each time the CALL button is pressed.
• To change the program, press the CLEAR button while in the stop mode, then program the desired track. The last
programmed track is replaced with the newly input track.
• To clear the entire program, press the PROG/DIRECT or open/close (5 OPEN/CLOSE) button while in the stop mode.
(Remote control unit)
Select the deck to be operated.
CD CD-R
_ DUBBING _
NORMAL HIGH
A ! "
RELAY
MODE
D # %
1
(Main unit)
)
9
8
DUBBING
NORMAL
HIGH
TIME
CDR-W1500
DISPLAY
TITLE /
SELECT CHARACTER
TIME
CLEAR
INPUT
4 REC
FINALIZE
8
.
5
/
V
PLAY
STOP
PAUSE
1
2
3
RELAY MODE
OPEN / CLOSE
ON
PHONES
PHONES LEVEL
-
−
6
: ;
Y < >
9
[ = ]
{ ? }
CLEAR
10
+10
9
REC
OFF
+
OPEN /CLOSE
MENU
5
MAX
,
8
MULTI JOG
5
MIN
P
7
REMOTE SENSOR
POWER
3
M*+
4
S
PCM AUDIO TECHNOLOGY / COMPACT DISC RECORDER
NOTES:
• The single track repeat mode and A-B repeat mode cannot be set during programmed playback.
• Programs with total playing times of over 99 minutes can be set, but the time will not be displayed properly.
• Programmed playback is not possible with non-finalized discs.
• The direct search operation is not possible during programmed playback.
• Track numbers of 21 or greater can be programmed for discs containing over 20 tracks, but when this is done the time is
not displayed properly.
G & '
2
J(
PLAY
STOP
PAUSE
1
2
3
6
7
MENU
PUSH
ENTER
8
STOP
ENTER
9
PLAY
PAUSE
2
3
PROG/DIRECT CALL
1
1
RANDOM
TIME
1 / ALL
A-B
1
TITLE CHARACTER
q Press the pause button (3 PAUSE).
1
During playback, press the pause button (3 PAUSE).
• The pause mode is set.
• Press the play button (1 PLAY) to resume playback from the
point at which the pause mode was set.
4th track
5th track
6th track
w Press the play button (1 PLAY).
21
ENGLISH
6. Playing in random order
………………………………………………………………………………………… Random Playback
• Use this function to play all the tracks on the disc once in random order.
7. Playing repeatedly …………………………………………………………………………………………………… Repeat Playback
(1) Playing a single track repeatedly [Single Track Repeat]
Select the deck to be operated.
Select the deck to be operated.
(Remote control unit)
(Remote control unit)
CD CD-R
_ DUBBING _
NORMAL HIGH
A ! "
D # %
1
(Main unit)
)
PCM AUDIO TECHNOLOGY / COMPACT DISC RECORDER
9
8
DUBBING
NORMAL
HIGH
TIME
CDR-W1500
DISPLAY
TITLE /
SELECT CHARACTER
TIME
CLEAR
INPUT
4 REC
FINALIZE
8
9
PLAY
STOP
PAUSE
1
2
3
.
5
/
V
POWER
STOP
PAUSE
1
2
3
RELAY MODE
OPEN / CLOSE
ON
PHONES
PHONES LEVEL
OPEN /CLOSE
MENU
5
MAX
: ;
Y < >
S
PCM AUDIO TECHNOLOGY / COMPACT DISC RECORDER
8
9
CLEAR
+10
9
8
DUBBING
NORMAL
HIGH
TIME
CDR-W1500
DISPLAY
TITLE /
SELECT CHARACTER
TIME
POWER
PLAY
STOP
PAUSE
1
2
3
RELAY MODE
OPEN / CLOSE
ON
PHONES
PHONES LEVEL
-
ENTER
PLAY
2
2
1
RANDOM
4 REC
FINALIZE
8
9
PLAY
STOP
PAUSE
1
2
3
/
V
1 / ALL
MENU
PUSH
ENTER
7
8
9
[ = ]
{ ? }
CLEAR
10
+10
7
MENU
2
8
STOP
9
ENTER
PLAY
PAUSE
2
2
−
Y < >
6
PAUSE
A-B
3
PROG/DIRECT CALL
3
TITLE CHARACTER
DISPLAY SEL. FADER INPUT
OPEN /CLOSE
5
MAX
,
6
: ;
REC
+
9
3
TIME
INPUT
3
P
5
MULTI JOG
OFF
5
MIN
PUSH
ENTER
PROG/DIRECT CALL
CLEAR
.
G & '
M*+
REMOTE SENSOR
7
MENU
STOP
D # %
2
)
4
{ ? }
6
RELAY
MODE
1
J(
6
7
8
2
A ! "
−
REC
+
5
MIN
,
10
MULTI JOG
OFF
-
P
[ = ]
REMOTE SENSOR
PLAY
2
3
M*+
4
S
2
_ DUBBING _
NORMAL HIGH
G & '
2
J(
CD CD-R
(Main unit)
RELAY
MODE
3
1
RANDOM
FINALIZE
TIME
1 / ALL
A-B
3
TITLE CHARACTER
DISPLAY SEL. FADER INPUT
FINALIZE
B
1
In the stop mode, press the RANDOM button.
• The “RAND” indicator lights.
1
Press the repeat 1/ALL button once.
• The “REPEAT 1” indicators light on the display and the single track repeat mode is set.
2
Use the automatic search buttons ( 8 and 9 ) to select the track to be played repeatedly.
2
Press the play button (1 PLAY).
• During normal playback:
Tracks are automatically played in random order.
• During the all-track repeat mode:
All tracks are played once in random order, then repeated in another random order.
• To cancel the random play mode, either set the stop mode or press the RANDOM button again.
3
Press the play button (1 PLAY).
• Playback starts.
• Once the selected track ends, it is played again from the
beginning.
• The single track repeat mode can also be set by pressing the
repeat 1/ALL button during playback. The current track is
played repeatedly.
• To cancel the single track repeat mode, press the repeat
1/ALL button repeatedly until the “REPEAT” indicator turns
off.
NOTES:
• The single track repeat mode and A-B repeat mode cannot be set during random playback.
• Random playback is not possible with non-finalized discs.
22
Press the repeat 1/ALL button once.
2nd track
3rd track
4th track
This operation is
repeated.
ENGLISH
(2) Playing all tracks repeatedly [All Track Repeat]
(3) Playing a section between any two points repeatedly [A–B Repeat]
★ This function allows you to play a certain section within a track repeatedly.
Select the deck to be operated.
CD CD-R
(Remote control unit)
(Remote control unit)
_ DUBBING _
NORMAL HIGH
A ! "
CD CD-R
RELAY
MODE
D # %
1
(Main unit)
2
J(
)
S
9
8
DUBBING
NORMAL
HIGH
TIME
CDR-W1500
DISPLAY
TITLE /
SELECT CHARACTER
TIME
CLEAR
INPUT
4 REC
FINALIZE
8
9
PLAY
STOP
PAUSE
1
2
3
.
5
/
V
POWER
STOP
PAUSE
1
2
3
RELAY MODE
OPEN / CLOSE
ON
PHONES
PHONES LEVEL
-
−
P
5
/
V
: ;
−
Y < >
7
8
9
[ = ]
{ ? }
CLEAR
10
+10
REC
Y < >
6
8
9
{ ? }
CLEAR
10
+10
OPEN /CLOSE
MENU
7
MENU
8
STOP
9
ENTER
PLAY
PAUSE
2
6
3
7
MENU
PROG/DIRECT CALL
1 / ALL
1,2
A-B
PUSH
ENTER
8
STOP
ENTER
PLAY
9
RANDOM
TIME
TITLE CHARACTER
PAUSE
DISPLAY SEL. FADER INPUT
2
3
PROG/DIRECT CALL
2
,
6
: ;
REC
+
5
MAX
,
.
3
M*+
6
7
MULTI JOG
OFF
5
MIN
P
[ = ]
REMOTE SENSOR
PLAY
3
M*+
4
PCM AUDIO TECHNOLOGY / COMPACT DISC RECORDER
G & '
G & '
2
)
4
S
A ! "
D # %
1
J(
_ DUBBING _
NORMAL HIGH
Select the deck to be operated.
RELAY
MODE
2
1
1 / ALL
A-B
2
B
REMOTE CONTROL UNIT RC-278
RANDOM
TIME
TITLE CHARACTER
DISPLAY SEL. FADER INPUT
FINALIZE
1
Press the repeat 1/ALL button twice.
• The “REPEAT” indicators light on the display and the all track repeat mode is set.
2
Press the play button (1 PLAY).
• The disc is played repeatedly.
• The all track repeat mode can also be set by pressing the repeat 1/ALL button twice during playback.
• If the repeat 1/ALL button is pressed during programmed playback, the tracks are played repeatedly in the
programmed order.
• To cancel the all track repeat mode, press the repeat 1/ALL button repeatedly until the “REPEAT” indicator turns off.
NOTES:
• The single track repeat mode cannot be set during programmed playback or random playback.
• Repeat playback is not possible with non-finalized discs.
FINALIZE
1
During playback, press the repeat A–B button at the position at which you want to start repeating (point A).
• The “REPEAT A-” indicator lights.
Press the repeat A-B button again at the position at which you want to stop repeating (point B).
• The “REPEAT A-B” indicator lights, the pickup returns to point A, and the section is played repeatedly.
(1) Press the repeat A-B button
during playback.
(2) Press the repeat A-B button
again.
(Point A)
(Point B)
2
2nd track
3rd track
4th track
This operation is
repeated.
• To stop A-B repeat playback, press the repeat A-B button on the remote control unit until the “REPEAT” indicator turns off.
The A-B repeat mode is canceled and normal playback starts from the beginning of the current track.
• If the stop button (2 STOP) is pressed, the A-B repeat mode is canceled and the stop mode is set.
NOTES:
• A-B repeat playback is not possible during programmed playback or random playback.
• The automatic and manual search functions cannot be used during A-B repeat playback or when setting point B.
• When A-B repeat playback is canceled when point B is set on a different track from point A, playback resumes from the
beginning of the track that is playing when the A-B repeat mode is canceled.
• A-B repeat playback is not possible with non-finalized discs.
23
ENGLISH
8.
•
•
•
Timer playback
A separately sold audio timer can be used to start playback or recording at a specific time.
Also refer to the operating instructions for the audio timer and amplifier.
The program and relay modes can also be used.
14 RELAY MODE
Relay mode
★
★
★
•
(1) Connections
CDR-W1500 (this set)
PCM AUDIO TECHNOLOGY / COMPACT DISC RECORDER
9
8
DUBBING
NORMAL
HIGH
TIME
CDR-W1500
DISPLAY
TITLE /
SELECT CHARACTER
TIME
CLEAR
INPUT
4 REC
FINALIZE
8
9
PLAY
STOP
PAUSE
1
2
3
Various types of playback and recording can be performed through relay operation between the set’s CD and CD-R units.
There are three relay modes.
The set mode is stored in the memory, but the data may be cleared if the power is not turned on for 2 or 3 days.
The mode switches as shown below each time the RELAY MODE button is pressed.
REMOTE SENSOR
PHONES
POWER
PLAY
STOP
PAUSE
1
2
3
RELAY MODE
ON
OPEN / CLOSE
PHONES LEVEL
MULTI JOG
OFF
-
+
5
OPEN /CLOSE
MENU
5
MIN
MAX
PUSH
ENTER
ª
Relay mode:
Amplifier
ª
Mix mode:
• The disc in the CD unit and the one in the CD-R
unit are played one after the other.
“Relay Play”
• Programmed play and random play of the disc in
the CD unit and the one in the CD-R unit can be
performed as if the two discs were a single disc.
“Mix Play”
• The CD and CD-R units can be operated
independently.
“Dual Play”
ª
Dual mode:
AC 120 V/60 Hz power outlet
ª
Audio timer
Normal mode:
• Either the CD or the CD-R unit can be operated.
(2) Timer playback
NOTE:
• Recording, finalizing and editing are not possible in the relay or mix mode.
(Remote control unit)
Select the deck to be operated.
CD CD-R
_ DUBBING _
NORMAL HIGH
A ! "
D # %
1
(Main unit)
)
9
8
PAUSE
2
3
TIME
RELAY MODE
OPEN / CLOSE
TIME
ON
PHONES
PHONES LEVEL
7
8
9
[ = ]
{ ? }
CLEAR
10
+10
CLEAR
INPUT
4 REC
FINALIZE
8
9
PLAY
STOP
PAUSE
1
2
3
REC
MULTI JOG
OFF
-
+
5
OPEN /CLOSE
MENU
5
MIN
MAX
−
Y < >
CDR-W1500
POWER
STOP
1
,
6
/
V : ;
REMOTE SENSOR
PLAY
P
5
S .
DISPLAY
TITLE /
SELECT CHARACTER
3
M*+
4
DUBBING
NORMAL
HIGH
G & '
2
J(
PCM AUDIO TECHNOLOGY / COMPACT DISC RECORDER
RELAY
MODE
6
7
MENU
PUSH
ENTER
8
STOP
ENTER
PLAY
2
5
RANDOM
PAUSE
3
PROG/DIRECT CALL
5
9
TIME
1 / ALL
A-B
1
TITLE CHARACTER
1
Turn on the power of the CDR-W1500 and the connected components.
2
Perform the procedure at “Setup Method (10) Timer play mode setting” (Page 13) and make the timer playback on
setting.
3
Load the Disc for timer playback into the CDR-W1500.
4
Set the amplifier's input selector to “CD”.
5
Press the play button (1 PLAY).
• Play the disc to check the volume.
6
Set the audio timer for the desired time.
• The power of the components connected to the audio timer turns off.
• When the set time is reached, the power of the various components turns on automatically and playback begins from
track one.
• The settings for the program mode, random mode, relay mode, etc., are stored in the memory before the power is turned
off.
• If there is no disc in the CD side and a disc is loaded in the CD-R side:
Timer playback does not function when the relay mode is set to normal or dual.
Timer playback functions for the CD-R side when the relay mode is set to relay or mix.
24
“Single Play”
ENGLISH
1. Relay play
★ With the relay play mode it is possible to play the disc in the CD side and the one in the CD-R side, relaying between them.
★ The programmed play and random play modes can be preset for the discs in the CD and CD-R units.
Select the CD side.
2. Mix mode
★ In the mix mode, programmed play and random play of the disc in the CD unit and the one in the CD-R unit can be performed as
if the two discs were a single disc.
(1) Mix programmed playback
(Remote control unit)
(Remote control unit)
CD CD-R
CD CD-R
1
_ DUBBING _
1
NORMAL
A ! "
RELAY
MODE
HIGH
D # %
G & '
2
1
(Main unit)
J(
)
4
2
5
P
,
1
A ! "
(Main unit)
PCM AUDIO TECHNOLOGY / COMPACT DISC RECORDER
9
8
DUBBING
NORMAL
HIGH
CDR-W1500
/
V
7
DISPLAY
TITLE /
SELECT CHARACTER
TIME
.
TIME
CLEAR
INPUT
4 REC
FINALIZE
8
8
Y < >
PCM AUDIO TECHNOLOGY / COMPACT DISC RECORDER
CDR-W1500
9
[ = ]
{ ? }
10
+10
CLEAR
9
8
DUBBING
NORMAL
HIGH
TIME
DISPLAY
TITLE /
SELECT CHARACTER
TIME
POWER
PLAY
STOP
PAUSE
1
2
3
RELAY MODE
OPEN / CLOSE
ON
PHONES
PHONES LEVEL
REC
MULTI JOG
OFF
-
+
5
OPEN /CLOSE
5
MIN
MAX
MENU
PLAY
STOP
PAUSE
1
2
3
CLEAR
INPUT
4 REC
FINALIZE
8
9
PLAY
STOP
PAUSE
1
2
3
.
6
7
MENU
PLAY
STOP
PAUSE
1
2
3
RELAY MODE
OPEN / CLOSE
ON
PHONES
PHONES LEVEL
5
/
V
OPEN /CLOSE
MENU
5
MAX
8
9
{ ? }
CLEAR
10
+10
6
8
ENTER
7
MENU
ENTER
PLAY
2
4
2 1
1
3
RANDOM
TIME
1 / ALL
A-B
4
5
TITLE CHARACTER
2 1
1
5
Load the discs you want to play in the CD and CD-R units.
2
Press the RELAY MODE button and select “Relay Play”.
• The “RELAY” indicator lights.
Use the CD or CD-R section repeat 1/ALL button on the remote control unit to turn the repeat mode on or off.
• The 1-track repeat mode cannot be set in the relay mode.
• The relay operation is performed as shown below according to the combination of the relay and repeat modes:
3
Repeat mode
Repeat on: “REPEAT”
indicator lit
Repeat off
4
RANDOM
TIME
1 / ALL
A-B
5
TITLE CHARACTER
FINALIZE
FINALIZE
B
B
1
3
3
PROG/DIRECT CALL
DISPLAY SEL. FADER INPUT
DISPLAY SEL. FADER INPUT
PAUSE
PAUSE
3
PROG/DIRECT CALL
9
9
STOP
PLAY
4
PUSH
ENTER
8
2
−
Y < >
7
PUSH
ENTER
STOP
,
6
: ;
REC
+
5
MIN
P
[ = ]
MULTI JOG
OFF
-
G & '
4
2
3
M*+
REMOTE SENSOR
9
REMOTE SENSOR
POWER
)
4
6
: ;
D # %
2
J(
−
S
S
RELAY
MODE
1
3
M*+
1
_ DUBBING _
NORMAL HIGH
REMOTE CONTROL UNIT RC-278
1
Load the discs you want to play in the CD and CD-R units.
2
Press the RELAY MODE button and select “Mix Play”.
• The “MIX” indicator lights.
3
Press the CD or CD-R unit’s PROG/DIRECT button on the remote control unit to set the program mode.
• The “PROG” indicator lights.
4
Follow the procedure at “Programmed playback” on Page 21 to program the tracks in the order in which you want to
play them.
• You can program tracks for both the CD and CD-R units by using the CD/CD-R selector switch on the remote control
unit to switch between them.
• Up to 30 tracks can be programmed.
5
Mix programmed playback starts when the CD or CD-R unit’s play button is pressed.
• The sound is output from the CD/CD-R output jacks.
• To quit the mix mode, press the relay mode button and select “Single Play”.
Relay operation
1 CD side playback
CD side playback
1 CD-R side playback
1 CD-R side playback
1 Stop
Relay play starts when the CD unit’s play button is pressed.
• The sound is output from the CD/CD-R output jacks.
• To quit the relay mode, press the relay mode button and select “Single Play”.
• The disc in the side that is not operating can be replaced during relay playback.
NOTE:
• When relaying between a CD and CD-R, the digital data from the CD/CD-R digital output terminal is interrupted
momentarily. The digital input of the connected external device is temporarily unlocked at this time.
NOTE:
• When relaying between a CD and CD-R, the digital data from the CD/CD-R digital output terminal is interrupted
momentarily. The digital input of the connected external device is temporarily unlocked at this time.
25
ENGLISH
3.
★
★
★
(2) Mix random playback
(Remote control unit)
Dual mode
In the dual mode, the CD unit and CD-R unit can be operated independently.
Manual recording from the main unit’s CD section can be performed.
It is possible to record from an external unit on the CD-R unit while playing a disc in the CD unit.
CD CD-R
1
_ DUBBING _
1
NORMAL
A ! "
RELAY
MODE
HIGH
D # %
1
(Main unit)
2
J(
)
9
8
DUBBING
NORMAL
HIGH
TIME
CDR-W1500
DISPLAY
TITLE /
SELECT CHARACTER
TIME
CLEAR
INPUT
4 REC
FINALIZE
8
9
PLAY
STOP
PAUSE
1
2
3
.
5
/
V
POWER
STOP
PAUSE
1
2
3
RELAY MODE
OPEN / CLOSE
ON
PHONES
PHONES LEVEL
OPEN /CLOSE
MENU
5
MAX
(1) Dual playback
(Remote control unit)
−
Select the deck to be operated.
6
: ;
Y < >
9
[ = ]
{ ? }
CLEAR
10
+10
CD CD-R
1
_ DUBBING _
NORMAL HIGH
1
A ! "
REC
+
5
MIN
,
8
MULTI JOG
OFF
-
P
7
REMOTE SENSOR
PLAY
2
3
M*+
4
S
PCM AUDIO TECHNOLOGY / COMPACT DISC RECORDER
G & '
6
(Main unit)
)
2
1
4
PAUSE
3
PROG/DIRECT CALL
1 / ALL
A-B
PCM AUDIO TECHNOLOGY / COMPACT DISC RECORDER
RANDOM
TIME
CDR-W1500
4
9
8
3
DUBBING
NORMAL
HIGH
TIME
DISPLAY
TITLE /
SELECT CHARACTER
TITLE CHARACTER
DISPLAY SEL. FADER INPUT
5
TIME
CLEAR
INPUT
4 REC
FINALIZE
8
9
PLAY
STOP
PAUSE
1
2
3
.
/
POWER
FINALIZE
PLAY
STOP
PAUSE
1
2
3
RELAY MODE
OPEN / CLOSE
ON
PHONES
PHONES LEVEL
V
6
-
[ = ]
{ ? }
CLEAR
10
+10
OPEN /CLOSE
MENU
6
7
MENU
PUSH
ENTER
B
STOP
ENTER
PLAY
2
2 1
1
3
RANDOM
TIME
1 / ALL
3
Press the CD or CD-R unit’s RANDOM button on the remote control unit to set the random mode.
• The “RAND” indicator lights.
4
Mix random playback starts when the CD or CD-R unit’s play button is pressed.
• The sound is output from the CD/CD-R output jacks.
• To quit the mix mode, press the relay mode button and select “Single Play”.
NOTES:
• If the program and random mode is not set in the mix mode, the operation is the same as in the relay mode (with the
repeat mode off).
• When relaying between a CD and CD-R, the digital data from the CD/CD-R digital output terminal is interrupted
momentarily. The digital input of the connected external device is temporarily unlocked at this time.
26
PAUSE
A-B
3
TITLE CHARACTER
DISPLAY SEL. FADER INPUT
Press the RELAY MODE button and select “Mix Play”.
• The “MIX” indicator lights.
9
3
PROG/DIRECT CALL
3
Y < >
REC
+
5
MAX
: ;
9
MULTI JOG
OFF
5
REMOTE CONTROL UNIT RC-278
2
−
8
8
Load the discs you want to play in the CD and CD-R units.
,
7
REMOTE SENSOR
MIN
1
P
9
S
PLAY
2
3
M*+
4
ENTER
G & '
2
J(
PUSH
ENTER
8
2 1
D # %
1
7
MENU
STOP
4
RELAY
MODE
FINALIZE
B
REMOTE CONTROL UNIT RC-278
1
Load the discs you want to play in the CD and CD-R units.
2
Press the RELAY MODE button and select “Dual Play”.
• The “DUAL” indicator lights.
3
Dual playback starts when the CD or CD-R unit’s play button is pressed.
• The sound of the CD is output from the CD-only output jacks and the sound of the CD-R is output from the CD/CD-R
output jacks.
• Only the sound of the CD-R is output from the headphones jack.
• The display can be switched with the DISPLAY SELECT button so that you can check the time information, etc., for
the CD and CD-R.
• To quit the dual mode, press the relay mode button and select “Single Play”.
ENGLISH
(2) Manual recording from the CD section
15 FINALIZING CD-R/RW DISC
(Remote control unit)
CD CD-R
1
_ DUBBING _
NORMAL HIGH
2
(Main unit)
RELAY
MODE
A ! "
D # %
G & '
1
2
3
J(
)
M*+
4
S
PCM AUDIO TECHNOLOGY / COMPACT DISC RECORDER
9
8
DUBBING
NORMAL
HIGH
TIME
CDR-W1500
DISPLAY
TITLE /
SELECT CHARACTER
TIME
CLEAR
INPUT
4 REC
FINALIZE
8
9
PLAY
STOP
PAUSE
1
2
3
.
5
/
V
POWER
STOP
PAUSE
1
2
3
RELAY MODE
OPEN / CLOSE
ON
PHONES
PHONES LEVEL
-
9
[ = ]
{ ? }
CLEAR
10
+10
(1) Auto finalizing
Auto finalizing is possible when using the Make CD recording function. See “Copying Procedure” and “Synchronized recording
of the Disc” on Page 13, 18.
OPEN /CLOSE
MENU
6
7
MENU
PUSH
ENTER
8
STOP
ENTER
PLAY
2
2 4
RANDOM
(2) Manual finalizing
9
PAUSE
(Remote control unit)
3
PROG/DIRECT CALL
3 1
Y < >
REC
+
5
MAX
6
: ;
8
MULTI JOG
OFF
5
MIN
3
−
7
REMOTE SENSOR
PLAY
P ,
★ Finalizing is a simple procedure, necessary to:
• Be able to play recordings on a CD player,
• Avoid further unwanted recordings on a disc,
• Avoid erasure of tracks on a CD-RW.
★ This operation is not possible in the relay or mix mode. Switch to the normal or dual mode to perform this operation.
★ Close the disc tray and set the stop mode for the CD section.
TIME
1 / ALL
A-B
TITLE CHARACTER
CD CD-R
DISPLAY SEL. FADER INPUT
FINALIZE
1
B
REMOTE CONTROL UNIT RC-278
4
_ DUBBING _
NORMAL
A ! "
RELAY
MODE
HIGH
D # %
1
(Main unit)
)
PCM AUDIO TECHNOLOGY / COMPACT DISC RECORDER
1
Load the CD you want to copy into the CD unit.
9
8
DUBBING
NORMAL
HIGH
TIME
CDR-W1500
DISPLAY
TITLE /
SELECT CHARACTER
TIME
CLEAR
INPUT
4 REC
FINALIZE
8
9
PLAY
STOP
PAUSE
1
2
3
.
5
/
V
POWER
2
Load the CD-R/RW onto which you want to record into the CD-R unit.
3
Press the RELAY MODE button and select “Dual Play”.
• The “DUAL” indicator lights.
4
Press the input selector button and set “CD”.
STOP
PAUSE
1
2
3
RELAY MODE
OPEN / CLOSE
ON
PHONES
PHONES LEVEL
OPEN /CLOSE
MENU
5
MAX
−
Y < >
7
8
9
{ ? }
CLEAR
+10
REC
+
5
MIN
,
6
: ;
10
MULTI JOG
OFF
-
P
[ = ]
REMOTE SENSOR
PLAY
3
M*+
4
S
G & '
2
J(
6
7
MENU
PUSH
ENTER
8
STOP
ENTER
PLAY
2
2
RANDOM
PAUSE
3
3
PROG/DIRECT CALL
3
9
TIME
1 / ALL
A-B
TITLE CHARACTER
DISPLAY SEL. FADER INPUT
FINALIZE
B
REMOTE CONTROL UNIT RC-278
5
2
Follow the procedure at “Recording From External Devices” on Page 15 ~19 to record.
• The display can be switched with the DISPLAY SELECT button so that you can check the time information, etc., for
the CD and CD-R.
• To quit the dual mode, press the relay mode button and select “Single Play”.
NOTE:
• Only digital signals can be recorded from the CD unit manually.
1
Load the CD-R/RW disc that is to be finalized.
2
With the recorder stopped press the FINALIZE button.
• “Finalize OK?” is displayed.
3
Press the ENTER button.
• The display counts down through the finalization.
• On completion, the total number of tracks and the total time recorded appears on the display.
• The disc indication of the display will become “CD”.
NOTES:
• Make sure the disc is absolutely free of scratches and dust particles.
• Finalizing will take at least 2 - 4 minutes.
• During finalization, the CD recorder accepts no operating commands.
• Text data is written to the disc when the disc is finalized. If you want to enter text, this must be done prior to finalizing.
• For information about cancelling CD-RW finalizing, see “Cancellation of CD-RW Disc Finalizing (i.e., Unfinalizing)” on Page
28.
• Never turn off the power or unplug the power cord during finalization. Doing so may render the disc unusable.
27
ENGLISH
(2) Erasing the tracks
★ This operation is valid only for CD-RW discs.
★ Use this operation to cancel finalizing when adding further recording to a finalized CD-RW disc and when erasing recorded
tracks.
★ Erasing is completed in several minutes.
16 EDITING
★ This operation is not possible in the relay or mix mode. Switch to the normal or dual mode to perform this operation.
★ Close the disc tray and set the stop mode for the CD section.
1. CD-R/RW editing
(1) Cancellation of CD-RW disc finalizing (i.e., Unfinalizing)
★ This operation is valid only for CD-RW discs. Finalizing cannot be cancelled from CD-R discs.
★ Use this operation to cancel finalizing when adding further recording to a finalized CD-RW disc.
★ Erasing is completed in several minutes.
(Remote control unit)
CD CD-R
(Remote control unit)
_ DUBBING _
NORMAL
2
A ! "
RELAY
MODE
HIGH
D # %
(Main unit)
J(
CD CD-R
_ DUBBING _
NORMAL HIGH
2
A ! "
RELAY
MODE
D # %
1
(Main unit)
)
PCM AUDIO TECHNOLOGY / COMPACT DISC RECORDER
9
8
DUBBING
NORMAL
HIGH
TIME
CDR-W1500
DISPLAY
TITLE /
SELECT CHARACTER
TIME
CLEAR
INPUT
4 REC
FINALIZE
8
.
5
/
V
PLAY
STOP
PAUSE
1
2
3
RELAY MODE
OPEN / CLOSE
ON
PHONES
PHONES LEVEL
-
+
OPEN /CLOSE
MENU
5
STOP
PAUSE
1
2
3
7
8
9
{ ? }
CLEAR
+10
6
STOP
7
PLAY
2
3,4,5,6,7 2 3
RANDOM
9
PAUSE
3
PROG/DIRECT CALL
1
TIME
1 / ALL
A-B
TITLE CHARACTER
DISPLAY SEL. FADER INPUT
STOP
PAUSE
1
2
3
RELAY MODE
OPEN / CLOSE
ON
PHONES
PHONES LEVEL
CLEAR
INPUT
4 REC
FINALIZE
8
9
PLAY
STOP
PAUSE
1
2
3
V
-
FINALIZE
−
Y < >
7
8
9
{ ? }
CLEAR
10
+10
OPEN /CLOSE
MENU
6
7
MENU
PUSH
ENTER
STOP
3
4,5,
6,7
3,4,
5
,
6
: ;
REC
+
5
MAX
P
[ = ]
MULTI JOG
OFF
5
MIN
B
28
TIME
POWER
REMOTE CONTROL UNIT RC-278
1
DISPLAY
TITLE /
SELECT CHARACTER
/
8
MENU
ENTER
TIME
5
ENTER
PLAY
2
PUSH
ENTER
8
DUBBING
NORMAL
HIGH
PLAY
Y < >
9
PLAY
9
8
−
REC
OFF
MAX
: ;
CDR-W1500
.
3
M*+
REMOTE SENSOR
,
6
10
MULTI JOG
5
MIN
P
[ = ]
REMOTE SENSOR
POWER
3
M*+
4
S
PCM AUDIO TECHNOLOGY / COMPACT DISC RECORDER
G & '
2
J(
)
4
S
G & '
2
1
RANDOM
PAUSE
3
PROG/DIRECT CALL
1 3,4,5,6,7 2 3
9
TIME
1 / ALL
A-B
TITLE CHARACTER
DISPLAY SEL. FADER INPUT
3
4,5,
6,7
3,4,
5
FINALIZE
B
REMOTE CONTROL UNIT RC-278
1
Switch on the power.
2
Load the CD-RW disc that is to be erased.
3
Press the MENU button, turn the jog dial of the main unit or press the automatic search button of the remote control,
and select the CD-R/RW edit mode.
• “CDR/RW Edit?” is displayed.
Switch on the power.
2
Load the CD-RW disc for which finalizing is to be cancelled.
3
Press the MENU button, turn the jog dial of the main unit or press the automatic search button of the remote control,
and select the CD-R/RW edit mode.
• “CDR/RW Edit?” is displayed.
4
Press the enter button, turn the jog dial of the main unit or press the automatic search button of the remote control, and
select the all tracks erase mode.
• “CD-RW Erase?” is displayed.
4
Press the enter button, turn the jog dial of the main unit or press the automatic search button of the remote control, and
select the unfinalize mode.
• “CD-RW Erase?” is displayed.
5
Now, press the enter button, turn the jog dial of the main unit or press the automatic search button of the remote
control, and select the all tracks erase mode.
• “All Erase?” is displayed.
5
Now, press the enter button, turn the jog dial of the main unit or press the automatic search button of the remote
control, and select the unfinalize mode.
• “TOC Erase?” is displayed.
6
Press the enter button.
• “Erase OK?” is displayed.
6
Press the enter button.
• “Erase OK?” is displayed.
7
Press the enter button again.
• “All Erase” display is flashing.
• When erasing is completed, the time display will be “Blank Disc”.
7
Press the enter button again.
• “TOC Erase” display is flashing.
• When unfinalizing is completed, the disc type display will be “CD-RW”.
ENGLISH
(3) Erasing one or more tracks away from the last track
★ When erasing a finalized CD-RW disc, first unfinalize the disc.
(4) Registration of the tracks to which you do not wish to listen
★ Tracks to which you do not wish to listen, such as those containing recording errors, can be set so that they will be skipped
over during play.
(Remote control unit)
(Remote control unit)
CD CD-R
_ DUBBING _
NORMAL HIGH
2
A ! "
D # %
1
(Main unit)
)
S
PCM AUDIO TECHNOLOGY / COMPACT DISC RECORDER
9
8
DUBBING
NORMAL
HIGH
TIME
CDR-W1500
DISPLAY
TITLE /
SELECT CHARACTER
TIME
CLEAR
INPUT
4 REC
FINALIZE
8
9
PLAY
STOP
PAUSE
1
2
3
.
5
/
V
POWER
STOP
PAUSE
1
2
3
RELAY MODE
OPEN / CLOSE
ON
PHONES
PHONES LEVEL
OPEN /CLOSE
MENU
5
MAX
9
CLEAR
7
MENU
PUSH
ENTER
8
ENTER
PLAY
3,4,5, 2 3
6,7,8
RANDOM
9
PAUSE
3
PROG/DIRECT CALL
TIME
1 / ALL
A-B
TITLE CHARACTER
DISPLAY SEL. FADER INPUT
S
PCM AUDIO TECHNOLOGY / COMPACT DISC RECORDER
8
+10
2
1
Y < >
{ ? }
STOP
)
3
4,5,
6,8
3,4,
5,7
9
8
DUBBING
NORMAL
HIGH
TIME
CDR-W1500
DISPLAY
TITLE /
SELECT CHARACTER
TIME
CLEAR
INPUT
4 REC
FINALIZE
8
9
PLAY
STOP
PAUSE
1
2
3
.
5
/
V
POWER
STOP
PAUSE
1
2
3
RELAY MODE
OPEN / CLOSE
ON
PHONES
PHONES LEVEL
OPEN /CLOSE
MENU
5
MAX
7
8
9
{ ? }
CLEAR
+10
6
7
MENU
PUSH
ENTER
8
STOP
ENTER
PLAY
2
1
3,4,5,6, 2 3
7,8,9,10
RANDOM
9
PAUSE
3
PROG/DIRECT CALL
FINALIZE
−
Y < >
REC
+
5
MIN
,
6
: ;
10
MULTI JOG
OFF
-
P
[ = ]
REMOTE SENSOR
PLAY
G & '
3
M*+
4
7
6
D # %
2
J(
6
: ;
RELAY
MODE
1
(Main unit)
−
REC
+
5
MIN
,
10
MULTI JOG
OFF
-
P
[ = ]
REMOTE SENSOR
PLAY
A ! "
3
M*+
4
_ DUBBING _
NORMAL HIGH
2
G & '
2
J(
CD CD-R
RELAY
MODE
TIME
1 / ALL
A-B
TITLE CHARACTER
DISPLAY SEL. FADER INPUT
3
4,5,6,7,
8,9,10
3,4,5,
7,8
FINALIZE
B
B
REMOTE CONTROL UNIT RC-278
REMOTE CONTROL UNIT RC-278
1
Switch on the power.
1
Switch on the power.
2
Load the CD-RW disc that is to be erased.
2
Load the CD-R/RW disc that contains tracks that you would like to skip in playback.
3
Press the MENU button, turn the jog dial of the main unit or press the automatic search button of the remote control,
and select the CD-R/RW edit mode.
• “CDR/RW Edit?” is displayed.
3
Press the MENU button, turn the jog dial of the main unit or press the automatic search button of the remote control,
and select the CD-R/RW edit mode.
• “CDR/RW Edit?” is displayed.
4
Press the enter button, turn the jog dial of the main unit or press the automatic search button of the remote control, and
select the one-track erase mode.
• “CD-RW Erase?” is displayed.
4
Press the enter button, turn the jog dial of the main unit or press the automatic search button of the remote control, and
select the skip track setting mode.
• “Skip Track?” is displayed.
5
Now, press the enter button, turn the jog dial of the main unit or press the automatic search button of the remote
control, and select the one-track erase mode.
• “1Tr Erase?” is displayed.
5
Now, press the enter button, turn the jog dial of the main unit or press the automatic search button of the remote
control, and select the skip track setting mode.
• “Skip Set?” is displayed.
6
Press the enter button.
• “**-**Tr Erase” is displayed.
6
Press the enter button.
• “Skip Set --Tr” is displayed.
7
Turn the jog dial of the main unit counterclockwise or press the automatic search REV button of the remote control, and
select the number of tracks you want to erase.
7
Turn the jog dial of the main unit or press the automatic search button of the remote control, and select the tracks you
want to skip. Press the enter button and set.
• The music calendar display of the selected track number will flash.
8
Press the enter button again.
• “Tr Erase” display is flashing.
• When erasing is completed, the number of tracks that remain following the erasure are displayed in a portion of the
music calendar.
8
Repeat Step 7 to add another track.
9
Press the enter button during the “Skip Set --Tr” display.
• “Skip Set OK?” is displayed.
10
Press the enter button.
• “Now PMA Rec” is displayed and the registration is completed.
• The music calendar display of the selected track number is switched off.
• The total track number and total time displays do not change even if tracks are set to be skipped.
29
ENGLISH
2. Text editings
(5) Cancelling the registration of tracks to which you do not wish to listen
2
(Remote control unit)
Up to 23 characters can be input for the track and disc titles.
(1) Adding disc titles
CD CD-R
(Remote control unit)
_ DUBBING _
NORMAL HIGH
2
A ! "
D # %
1
(Main unit)
)
9
8
TIME
CLEAR
INPUT
4 REC
FINALIZE
8
9
POWER
STOP
PAUSE
1
2
3
RELAY MODE
OPEN / CLOSE
ON
PHONES
PHONES LEVEL
7
8
9
[ = ]
{ ? }
CLEAR
10
+10
PLAY
STOP
PAUSE
1
2
3
REC
MULTI JOG
OFF
-
+
5
OPEN /CLOSE
MENU
5
MIN
MAX
6
7
MENU
PUSH
ENTER
8
STOP
ENTER
PLAY
2
3,4,5,6, 2 3
7,8,9,10
RANDOM
9
PAUSE
3
PROG/DIRECT CALL
1
TIME
1 / ALL
A-B
TITLE CHARACTER
DISPLAY SEL. FADER INPUT
CD CD-R
−
Y < >
REMOTE SENSOR
PLAY
,
6
/
V : ;
CDR-W1500
TIME
P
5
S .
DISPLAY
TITLE /
SELECT CHARACTER
3
M*+
4
DUBBING
NORMAL
HIGH
G & '
2
J(
PCM AUDIO TECHNOLOGY / COMPACT DISC RECORDER
RELAY
MODE
2
7
3
4,5,6,7,
8,9,10
3,4,5,
7,8
_ DUBBING _
NORMAL HIGH
A ! "
4,5,6,7
(Main unit)
RELAY
MODE
D # %
1
)
S
9
8
DUBBING
NORMAL
HIGH
TIME
CDR-W1500
DISPLAY
TITLE /
SELECT CHARACTER
TIME
CLEAR
INPUT
4 REC
FINALIZE
8
9
PLAY
STOP
PAUSE
1
2
3
.
5
/
V
POWER
STOP
PAUSE
1
2
3
RELAY MODE
OPEN / CLOSE
ON
PHONES
PHONES LEVEL
-
7
8
9
{ ? }
CLEAR
+10
OPEN /CLOSE
MENU
6
7
MENU
PUSH
ENTER
8
ENTER
STOP
B
REMOTE CONTROL UNIT RC-278
1
1
Switch on the power.
2
Load the CD-R/RW disc for which you want to cancel the settings of undesired tracks.
3
Press the MENU button, turn the jog dial of the main unit or press the automatic search button of the remote control,
and select the CD-R/RW edit mode.
• “CDR/RW Edit?” is displayed
4
Press the enter button, turn the jog dial of the main unit or press the automatic search button of the remote control, and
select the skip track setting mode.
• “Skip Track?” is displayed.
5
Now, press the enter button, turn the jog dial of the main unit or press the automatic search button of the remote
control, and select the skip track setting cancellation mode.
• “Skip Clear?” is displayed.
6
Press the enter button.
• “S.Clear --Tr” is displayed.
7
Turn the jog dial of the main unit or press the automatic search button of the remote control, and select the track you
want to cancel. Press the enter button and set.
• The music calendar display of the selected track number will flash.
8
Repeat Step 7 to add another cancellation.
9
Press the enter button during the “S.Clear --Tr” display.
• “SkipClearOK?” is displayed.
.
Press the enter button.
• “Now PMA Rec” is displayed and the registration is completed.
NOTES:
• Finalizing the disc when tracks to which you do not want to listen have been registered, results in the skip play mode
automatically being switched on.
• Skip play is not possible on CD players that lack a skip play function.
• Tracks to which you do not want to listen can be registered/cancelled 21 times.
• Program play and random play are not possible when there has been registration of tracks to which you do not want to
listen. (Programmed and random playback are possible once finalization is performed.)
• It is not possible to register or cancel tracks you do not want to hear with store-bought CDs or CD-R/RW discs that have
been finalized.
30
9
7
3,8
FINALIZE
PLAY
2
10
−
Y < >
REC
+
5
MAX
,
6
: ;
10
MULTI JOG
OFF
5
MIN
P
[ = ]
REMOTE SENSOR
PLAY
3
M*+
4
PCM AUDIO TECHNOLOGY / COMPACT DISC RECORDER
G & '
2
J(
3,4,5, 2
6,7
3,8
3,4,
5,7
RANDOM
PAUSE
3
PROG/DIRECT CALL
TIME
1 / ALL
A-B
TITLE CHARACTER
DISPLAY SEL. FADER INPUT
FINALIZE
7
B
REMOTE CONTROL UNIT RC-278
1
Switch on the power.
2
Load the CD-R/RW disc to which the disc name will be affixed.
3
Press the MENU button, turn the jog dial of the main unit or press the automatic search button of the remote control,
and select the TEXT edit mode.
• “Text Edit?” is displayed.
4
Press the enter button, turn the jog dial of the main unit or press the automatic search button of the remote control to
display “Text In?”.
5
Now, press the enter button, turn the jog dial of the main unit or press the automatic search button of the remote
control to display “Disc Title?”.
6
Press the ENTER button.
• The cursor flashes, indicating the title input standby mode.
ENGLISH
(2) Adding track titles
Input the title.
• Either turn the jog dial on the main unit or use the automatic search buttons (8 and 9) on the remote control
unit to select the desired character.
• Some characters that can be input on the CDR-W1500 cannot be displayed on other models.
(Remote control unit)
CD CD-R
2
8
• The shape of the cursor changes each time the CHARACTER button is pressed.
_ DUBBING _
NORMAL HIGH
A ! "
4,5,6,7,8
(Main unit)
RELAY
MODE
D # %
1
)
PCM AUDIO TECHNOLOGY / COMPACT DISC RECORDER
CDR-W1500
[Explanation of cursor:]
9
8
DUBBING
NORMAL
HIGH
TIME
DISPLAY
TITLE /
SELECT CHARACTER
TIME
CLEAR
INPUT
4 REC
FINALIZE
8
9
PLAY
STOP
PAUSE
1
2
3
.
5
/
V
POWER
………Special character input mode
PLAY
STOP
PAUSE
1
2
3
RELAY MODE
OPEN / CLOSE
ON
PHONES
PHONES LEVEL
OPEN /CLOSE
MENU
5
7
MAX
7
8
9
{ ? }
CLEAR
+10
8
1
• To erase a character, move the cursor to that character then press the CLEAR button.
• To correct a character, first erase it, then input the correct character.
✽ Turn the jog dial to input numbers or special characters not on the number keys or the
+10 key.
1
2
3
4
5
6
7
8
9
10
+10
PLAY
Capital letter
input mode
ABC
DEF
GHI
JKL
MNO
PQR
STU
VWX
YZ
–
–
3,4,5, 2
6,7,8
3,9
3,4,
5,6,8
PAUSE
3
PROG/DIRECT CALL
RANDOM
9
8
3,9
TIME
1 / ALL
A-B
TITLE CHARACTER
DISPLAY SEL. FADER INPUT
FINALIZE
8
B
REMOTE CONTROL UNIT RC-278
Press the MENU button to enter the input title.
Button
ENTER
2
SPACE
[Example:]
To input “%” using the number
keys on the remote control unit,
press button 2 twice in the
special character input mode.
7
MENU
STOP
• When the manual search forward button (7) or the ENTER button is pressed, the selected character is set, and the
unit is set to the input standby mode for the next character.
• The cursor can be moved back by pressing the manual search reverse button (6 ). Use this to correct input
characters.
8
6
PUSH
ENTER
………Small letter/number input mode
[Available characters and numbers]
Capital letter/number input mode:
ABCDEFGHIJKLMNOPQRSTUVWXYZ0123456789
Small letter/number input mode:
abcdefghijklmnopqrstuvwxyz0123456789
Special character input mode:
−
Y < >
REC
+
5
MIN
,
6
: ;
10
MULTI JOG
OFF
-
P
[ = ]
REMOTE SENSOR
………Capital letter/number input mode
3
M*+
4
S
G & '
2
J(
Small letter
input mode
abc
def
ghi
jkl
mno
pqr
stu
vwx
yz
–
–
Special character
input mode
!”
#%
&’
( )
*+
,–
./
:;
<>
[=]
{?}
1
Switch on the power.
2
Load the CD-R/RW disc to which the track name will be affixed.
3
Press the MENU button, turn the jog dial of the main unit or press the automatic search button of the remote control,
and select the TEXT edit mode.
• “Text Edit?” is displayed.
4
Press the enter button, turn the jog dial of the main unit or press the automatic search button of the remote control to
display “Text In?”.
5
Now, press the enter button, turn the jog dial of the main unit or press the automatic search button of the remote
control to display “Track Title?”.
6
Press the enter button again, turn the jog dial of the main unit or press the automatic search button of the remote
control, and select the track to which you would like to affix a track name.
• “**Tr Title?” is displayed.
7
Press the ENTER button.
• The cursor flashes, indicating the title input standby mode.
8
Input the title.
• For instructions on inputting titles, see step 7 under “(1) Adding disc titles” on Page 31.
9
Press the MENU button to enter the input track title.
NOTES:
• Text editing is not possible with commercial audio CDs or with finalized CD-R/RW discs.
• A maximum of 23 characters can be stored per item.
Approximately 900 characters can be input per disc.
• Entered text information is not written to the disc until the disc is finalized.
• Even when the power source is disconnected, the text information is stored for 2 to 3 days after being entered when the
disc has not been finalized. This text information might be lost if the unit is disconnected from the power source for a
long time.
31
ENGLISH
(3) Erasing disc titles
★ For finalized CD-RW discs, first unfinalize.
(4) Erasing track titles
★ For finalized CD-RW discs, first unfinalize.
(Remote control unit)
(Remote control unit)
CD CD-R
_ DUBBING _
NORMAL HIGH
A ! "
2,3,4
(Main unit)
D # %
1
)
S
9
8
DUBBING
NORMAL
HIGH
TIME
CDR-W1500
DISPLAY
TITLE /
SELECT CHARACTER
TIME
CLEAR
INPUT
4 REC
FINALIZE
8
9
PLAY
STOP
PAUSE
1
2
3
.
5
/
V
POWER
STOP
PAUSE
1
2
3
RELAY MODE
OPEN / CLOSE
ON
PHONES
PHONES LEVEL
-
: ;
OPEN /CLOSE
MENU
Y < >
S
PCM AUDIO TECHNOLOGY / COMPACT DISC RECORDER
8
9
CLEAR
+10
9
8
DUBBING
NORMAL
HIGH
TIME
CDR-W1500
DISPLAY
TITLE /
SELECT CHARACTER
1,2,3,4
1
1,2,3
POWER
ENTER
PLAY
2
CLEAR
INPUT
4 REC
FINALIZE
8
9
1
9
PLAY
STOP
PAUSE
1
2
3
RELAY MODE
OPEN / CLOSE
ON
PHONES
PHONES LEVEL
TIME
5
PLAY
STOP
PAUSE
1
2
3
/
V
-
MAX
1 / ALL
DISPLAY SEL. FADER INPUT
−
Y < >
7
8
9
{ ? }
CLEAR
10
+10
OPEN /CLOSE
MENU
6
7
MENU
1
PUSH
ENTER
8
PAUSE
STOP
ENTER
PLAY
2
A-B
1,2,3,4,5
TITLE CHARACTER
,
6
: ;
REC
+
5
MIN
P
[ = ]
MULTI JOG
OFF
5
3
PROG/DIRECT CALL
RANDOM
TIME
.
G & '
3
M*+
REMOTE SENSOR
7
MENU
PUSH
ENTER
STOP
D # %
2
)
4
{ ? }
6
RELAY
MODE
1
J(
6
7
8
32
2,3,4,5
(Main unit)
−
REC
+
5
MAX
,
10
MULTI JOG
OFF
5
MIN
P
[ = ]
REMOTE SENSOR
PLAY
A ! "
3
M*+
4
PCM AUDIO TECHNOLOGY / COMPACT DISC RECORDER
G & '
2
J(
CD CD-R
_ DUBBING _
NORMAL HIGH
RELAY
MODE
1
FINALIZE
1,2,3,4
PAUSE
3
PROG/DIRECT CALL
RANDOM
9
TIME
1 / ALL
A-B
TITLE CHARACTER
DISPLAY SEL. FADER INPUT
FINALIZE
B
B
REMOTE CONTROL UNIT RC-278
REMOTE CONTROL UNIT RC-278
1
Press the MENU button, turn the jog dial of the main unit or press the automatic search button of the remote control,
and select the TEXT edit mode.
• “Text Edit?” is displayed.
1
Press the MENU button, turn the jog dial of the main unit or press the automatic search button of the remote control,
and select the TEXT edit mode.
• “Text Edit?” is displayed.
2
Press the enter button, turn the jog dial of the main unit or press the automatic search button of the remote control to
display “Text Erase?”.
2
Press the enter button, turn the jog dial of the main unit or press the automatic search button of the remote control to
display “Text Erase?”.
3
Now, press the enter button, turn the jog dial of the main unit or press the automatic search button of the remote
control to display “Disc Title?”.
3
Now, press the enter button, turn the jog dial of the main unit or press the automatic search button of the remote
control to display “Track Title?”.
4
Press the enter button to define the erasure of the disc name.
• “Complete” is displayed.
4
Press the enter button again, turn the jog dial of the main unit or press the automatic search button of the remote
control, and select the track for which the track name will be erased.
• “**Tr Title?” is displayed.
5
Press the enter button to define the erasure of the disc name.
• “Complete” is displayed.
ENGLISH
(5) Erasing all the track titles and the disc title
★ For finalized CD-RW discs, first unfinalize.
17 MENU MODE
•
•
•
•
(Remote control unit)
CD CD-R
_ DUBBING _
NORMAL HIGH
2,3,4,5
(Main unit)
D # %
G & '
1
2
3
J(
)
M*+
5
4
9
8
DUBBING
NORMAL
HIGH
TIME
CDR-W1500
DISPLAY
TITLE /
SELECT CHARACTER
TIME
CLEAR
INPUT
4 REC
FINALIZE
8
.
/
V
PHONES
PLAY
STOP
PAUSE
1
2
3
RELAY MODE
OPEN / CLOSE
ON
PHONES LEVEL
-
Text In?
1
9
[ = ]
{ ? }
CLEAR
10
+10
+
OPEN /CLOSE
MENU
5
ª
Text Erase?
1
STOP
PAUSE
1
2
3
6
STOP
ENTER
PLAY
2
1
1,2,3
1
9
PAUSE
ª
Track Title?
TIME
1 / ALL
A-B
Setup Menu?
1
Sync. Rec?
1
**Tr Title?
Disc Sync.?
ª
Make CD?
TITLE CHARACTER
DISPLAY SEL. FADER INPUT
FINALIZE
ª
1Tr Sync.?
B
REMOTE CONTROL UNIT RC-278
ª
Sync. Off?*
Press the MENU button, turn the jog dial of the main unit or press the automatic search button of the remote control,
and select the TEXT edit mode.
• “Text Edit?” is displayed.
ª
Sync. Level?
1
2
Press the enter button, turn the jog dial of the main unit or press the automatic search button of the remote control to
display “Text Erase?”.
ª
A.T. Mark?
1
On*/Off
3
Now, press the enter button, turn the jog dial of the main unit or press the automatic search button of the remote
control to display “All Erase?”.
ª
FadeIn Time?
1
FadeIn 5sec*
4
Press the enter button.
• “Erase OK?” is displayed.
ª
FadeOut Time?
1
5
Press the enter button to define the one erasure.
• “Complete” is displayed.
ª
Intro Time?
1
1
1
ª
3
PROG/DIRECT CALL
RANDOM
**Tr Title?
7
MENU
8
1
All Erase?
ª
Disc Title?
9
PLAY
Disc Title?
ª
Track Title?
−
PUSH
ENTER
1,2,3,4,5
1
REC
OFF
MAX
,
Text Edit?
Y < >
8
MULTI JOG
5
MIN
P
e
6
: ;
7
REMOTE SENSOR
POWER
MENU MODE
RELAY
MODE
A ! "
S
PCM AUDIO TECHNOLOGY / COMPACT DISC RECORDER
When the MENU button is pressed, the menu mode is set and the set can be operated as shown on the diagram below.
Close the disc trays and set the stop mode for both the CD and CD-R sections.
“*” indicates default values.
Turn the jog dial clockwise to proceed to the “↓” display indicator. Press the ENTER button to proceed to the “→” display
indicator.
Sync. -54dB*
(–54 ~ –30 dB/6 dB step)
(1 ~ 15sec/1sec step)
FadeOut 5sec*
(1 ~ 15sec/1sec step)
ScanTime15s*
(5 ~ 30sec/5sec step)
NOTE:
• Erasure of text is not possible with commercial audio CDs or with finalized CD-R/RW discs.
ª
CDR/RW Edit?
1
ª
Custom Index
1
Opt/Coax/Ana
ª
Skip Play?
1
On/Off*
ª
Timer Play?
1
On*/Off
CD-RW Erase?
1
All Erase?
ª
TOC Erase?
ª
Skip Track?
ª
A. Rec Level?
1
Level 00.0dB*
1
ª
1Tr Erase?
1
** - **TrErase
Skip Set?
1
Skip Set **Tr
ª
Skip Clear?
1
S. Clear **Tr
1
¸
˝
˛
¸
Ô
˝
Ô
˛
¸
Ô
Ô
Ô
Ô
Ô
Ô
Ô
Ô
Ô
Ô
Ô
Ô
Ô
˝
Ô
Ô
Ô
Ô
Ô
Ô
Ô
Ô
Ô
Ô
Ô
Ô
Ô
Ô
˛
¸
Ô
Ô
Ô
˝
Ô
Ô
Ô
Ô
˛
Refer to “2. Text editings
(1) Adding disc titles and
(2) Adding track titles”
(Page 30, 31).
Refer to “2. Text editings
(3) Erasing disc titles and
(4) Erasing track titles
and (5) Erasing all the
track titles and the disc
title” (Page 32, 33).
Refer to “. SETUP
METHOD” (Page 10 ~
13).
Refer to “1. CD-R/RW
editing” (Page 28 ~ 30).
Change setting with jog dial
(or D.Rec Level?)
33
ENGLISH
18 MESSAGES
Messages may appear on the display while using the CDR-W1500. The meanings of these messages are explained below.
Message
TOC Reading
Reading disc information.
Message
Meaning
Name Full
23 text characters have already been input or a total of 900 characters
have already been input.
Open
During tray opening.
Mecha Error
Disc is not operating properly.
Close
During tray closing.
All Skip Tr
Skip is set for all tracks.
No Disc
Use Audio CD
Now PMA Rec
Disc Full
Copy Prohibit
Finalize *.**
PlaybackOnly
Now OPC
No disc inserted, disc unreadable or disc inserted upside down.
Inserted disc is no audio CD.
Updating disc contents.
CD-R Short
If the disc is removed, all the text information is cleared.
The recordable time on the disc is shorter than the time of the
recording source you are trying to copy.
The text information is copy-protected so the text cannot be copied in
the copy mode.
No digital recording can be made of the connected source.
See “Digital Copies” on Page 6.
Data signals other than audio signals have been input.
These signals are not recorded.
Now Tr Check
The CD side track information is being checked.
Time countdown when finalizing a disc.
When trying to record on a finalized CD-R or a prerecorded CD.
During laser power calibration for unfinalized discs.
Rec Error
An error has occurred during recording.
Disc Error
Recording or finalization is not possible due to a disc fault.
Blank Disc
When attempting to edit text for a disc which has no tracks.
Dig.Unlock
TextEraseOK?
Mode reception has been completed.
Text Protect
OPC failure during OPC procedure
(OPC = Optimum Power Calibration)
Sync. -**dB
Complete
No more recording possible.
OPC Error
No Name
34
Meaning
No text stored for disc.
Setting value of the synchro recording starting level.
There is an incomplete connection of the digital input jack during
digital input recording, or the input signal is not being input properly
due to some other factor.
(“*” indicates a letter or character.)
ENGLISH
19 TROUBLESHOOTING
20 MAIN SPECIFICATIONS
Check Again Before Assuming The Player Is Malfunctioning
Are all the connections correct ?
Are you following the instructions in the manual ?
2 Are the amplifier and speakers operating properly ?
If the CDR-W1500 does not seem to be functioning properly, check the table below. If this does not solve the problem, the CDRW1500 may be damaged. Turn off the power, unplug the power cord from the power outlet, and contact your store of purchase or
nearest DENON sales office.
2
Audio:
Frequency response:
Dynamic range:
S/N ratio:
Harmonic distortion:
Wow & flutter:
CD unit:
CD-R unit (for digital editing)
2 Hz to 20 kHz:
2 Hz to 20 kHz
98 dB:
88 dB
105 dB:
100 dB
0.003 % (1 kHz):
0.01 % (1 kHz)
Below measurable limits (±0.001 % W. peak)
2
Usable discs:
CDs (12 cm/8 cm)
Recorded audio CD-R discs for private use (CD-R unit)
Recorded audio CD-RW discs for private use (CD-R unit)
2
General:
Power supply:
Power consumption:
Maximum external dimensions:
2
2
Check
Symptom
Page
No power.
• Ensure that the POWER button is on.
• Ensure that the mains cable is plugged in correctly.
8
7
Auto track does not work.
• Check if auto track is selected.
• Check if there are 3 seconds silence in between the tracks.
• Check if the source is a consumer source with the digital output according to the IEC
audio standard.
11
6
–
No sound.
• Check the audio connections.
• If using an amplifier, try using a different source.
7
7
Amplifier sound is distorted.
• Check that the CD recorder analog output is not connected to the amplifier Phono input.
7
Play will not start.
• Ensure that the label of the CD is facing up.
• Clean the disc.
10
6
Remote control does not work.
• Point the remote control directly at the CD recorder.
• Check the batteries and replace if necessary.
9
9
•
•
•
•
6
–
5
7
Will not record.
•
•
•
•
Recording is distorted.
Clean the disc.
Check if CD-R is an unfinalized disc.
Check that the disc is recordable and replace if necessary.
Check whether there is time remaining on the disc.
(“Disc Full” is displayed.)
Check whether there is an attempt to digitally record a digitally recorded source.
(“Copy Prohibit” is displayed.)
Check whether the recording level adjustment is suitable.
The disc is not an AUDIO disc (“Use Audio CD” is displayed).
Wrong input source chosen. Input label flashing.
2
Mass:
AC 120 V, 60 Hz
29 W
434 (width) x 101 (height) x 330 (depth) mm
(including feet, knobs and terminals)
5.5 kg
Remote control unit:
Remote control system:
Power supply:
RC-278
Infrared pulse
DC 3 V, using two R6P (AA) batteries
✽ Design and specifications are subject to change without notice in the course of product improvement.
6
16
6
8
• Make sure the recording level is correct.
16
10 second pause between recordings.
• See setting the synchro recording level.
11
“Disc Error” on the display.
• If then appears on the display, the disc cannot be recorded further, and cannot be
finalized. But it can still be played on the CD recorder or another CD recorder. “Disc
Error”
A recorded CD-R disc cannot be played on
another player or CD unit.
• Finalize the disc.
• Is playback possible on another CD player? If so, clean the pickup of the player on
which the disc could not be played.
• CD-R discs cannot be played on some CD players.
Copying, recording, finalize and editing of
CD-R/RW is not possible.
• Is the relay mode set to “RELAY” or “MIX”?
Switch to “SINGLE” or “DUAL”.
Menu mode cannot be set.
Finalizing is not possible.
• Is the disc tray for the CD or CD-R section open? Close the disc trays for both the CD
and CD-R sections.
• Is the CD or CD-R section operating? Set the stop mode for both the CD and CD-R
sections.
–
6, 27
–
–
24
27, 33
27, 33
35
FRANCAIS
IMPORTANT POUR LA SECURITE
AVERTISSEMENT:
AFIN D'EVITER LES RISQUES D'INCENDIE OU
D'ELECTROCUTION, NE PAS EXPOSER CET
APPAREIL A LA PLUIE OU A L'HUMIDITE.
ATTENTION:
1. Manipulez le câble d'alimentation avec précautions
Ne pas endommager ou déformer le câble d'alimentation. Si celuici est endommagé ou déformé, il risque de provoquer une
électrocution ou un dysfonctionnement de l'appareil. Pour le
débrancher le câble d'alimentation de la prise du secteur, assurezvous de le tirer en le tenant par la prise et non pas par le fil.
2. Ne pas ouvrir le couvercle supérieur
Afin d'éviter tout risque d'électrocution, ne pas ouvrir le couvercle
supérieur. En cas de problème, contactez votre AGENT DENON.
3. Ne rien mettre à l'intérieur
Ne placer aucun objet métallique ou ne renverser aucun liquide à
l'intérieur du graveur de CD. Cela risque de provoquer une
électrocution ou un dysfonctionnement.
Veuillez noter et conserver le nom du modèle et le numéro de série
de votre appareil indiqués sur l'étiquette de caractéristiques.
N° de modèle CDR-W1500
N° de série.
Nous vous remercions de l’achat de l’enregistreur de CD DENON.
Lire attentivement le mode d’emploi afin de vous familiariser avec
l’enregistreur de CD et d’obtenir une satisfaction maximale de
l’appareil.
Assurez-vous de conserver ce manuel pour référence future en cas
de question ou de problème.
Veuillez vérifier que les éléments suivants sont inclus dans le
carton d'emballage avec l'appareil:
(1) Unité centrale ……………………………………………………1
(2) Télécommande RC-278 …………………………………………1
(3) Pile sèche R6P/AA ………………………………………………2
(4) Cordon de connexion ……………………………………………2
(5) Mode d’emploi ……………………………………………………1
(6) Liste des stations techniques agreees…………………………1
TABLE DES MATIERES
z
x
c
v
FONCTIONS …………………………………………………36
b
RESTRICTIONS IMPOSEES PAR LES NORMES
SUR LES CD-R/RW …………………………………………38
n
m
CONNEXIONS ………………………………………………38
,
.
⁄0
⁄1
TELECOMMANDE ……………………………………40, 41
⁄2
⁄3
⁄4
⁄5
⁄6
⁄7
⁄8
⁄9
¤0
LECTURE NORMALE
36
PRECAUTIONS PENDANT L'UTILISATION ……………36
AU SUJET DES DISQUES CD-R/RW …………………36, 37
MANIPULATION DES DISQUES ET PRECAUTIONS
A PRENDRE ……………………………………………37, 38
NOMS DES COMPOSANTS ET LEURS
FONCTIONS ……………………………………………39, 40
METHODE DE PARAMETRAGE ……………………41 ~ 44
PROCEDURE DE COPIE ……………………………44 ~ 46
ENREGISTREMENT A PARTIR DE SOURCES
EXTERNES ……………………………………………46 ~ 50
……………………………………50
DIVERSES FONCTIONS DE LECTURE ……………51 ~ 55
MODE RELAIS ………………………………………55 ~ 58
FINALISATION DE DISQUES CD-R/RW …………………58
EDITION ………………………………………………59 ~ 64
MODE MENU ………………………………………………64
MESSAGES …………………………………………………65
DEPISTAGE DES PANNES
………………………………66
CARACTERISTIQUES PRINCIPALES ……………………66
REMARQUE:
Ce graveur de CD utilise une diode laser. Pour vous permettre
d'apprécier la musique que procure un fonctionnement stable, il est
recommandé d'utiliser cet appareil dans une pièce à température
ambiante comprise entre 10 et 30 °C (50 à 86 °F).
• Lieu d'installation
Pour assurer une ventilation adéquate, laissez un espace
minimum de 10 cm tout autour et au-dessus de l'appareil et
retirez tout objet pouvant y faire obstruction.
1 FONCTIONS
1. Diverses fonctions de copie
• Cet appareil possède plusieurs modes de copie très pratiques :
“Disc dubbing” (Copie de disque) pour la copie de disques entiers,
“Make CD dubbing” (Copie complète de disque) pour la copie de
disques entiers avec finalisation automatique, “1-track dubbing”
(Copie d'une piste) pour la copie de piste unique et “Scan record
dubbing” (Copie de pistes sélectionnées) pour la sélection des
pistes à enregistrer pendant la vérification du contenu de CD et la
copie des pistes sélectionnées.
• Deux vitesses de copie sont disponibles : vitesse normale et double
vitesse.
2. Enregistrement à partir de sources externes
• Cet appareil dispose de trois fonctions pratiques d'enregistrement
synchronisé : “Disc synchro recording” (Enregistrement synchronisé
de disque) pour l'enregistrement d'un album côté source, “Make CD
recording” (Enregistrement complet de disque) pour
l'enregistrement synchronisé de disque avec finalisation
automatique et “Track synchro recording” (Enregistrement
synchronisé de piste) pour l'enregistrement d'une piste à la fois. Il
est aussi possible d'effectuer un enregistrement manuel.
3. Une abondance de fonctions de lecture
• Grâce à la combinaison d'un lecteur et d'un graveur de CD, cet
appareil dispose de trois modes de lecture différents : “Relay play”
(Lecture en relais) pour la lecture en relais du disque dans le lecteur
de CD et celui dans le graveur CD-R, “Mix play” (Lecture mixte) pour
une lecture programmée ou aléatoire des disques dans les deux
unités comme s'il s'agissait d'un seul disque et “Dual play” (Lecture
double) avec lequel chaque unités peut être commandée
indépendamment.
• Cet appareil permet la lecture programmée, la lecture aléatoire et les
modes de lecture à répétition de toutes les pistes, d'une seule piste
ou A-B.
4. Une riche variété de jacks d'entrée numérique
• En plus des jacks d'entrée analogique, cet appareil est équipé d'un
total de deux jacks d'entrée numérique. Il possède aussi un jack
d'entrée numérique optique pour une utilisation avec des sources
numériques telles que les CD, MD et émissions satellite et un jack
d'entrée numérique coaxial.
5. Est équipé d'un convertisseur de taux d'échantillonage
• Ce convertisseur permet l'enregistrement direct d'entrée numérique
provenant de DAT ou d'émissions satellite (32 kHz, 48 kHz) qui
possèdent des fréquences d'échantillonage différentes de 44,1 kHz
utilisée avec les CD.
6. Fonction de saisie de texte et d'affichage
• Le titre de l'album et les noms de piste individuelle peuvent être
saisis et affichés pour les disques CD-R/RW enregistrés.
®, HDCD® (High Definition
7. Equipé d'un décodeur
Compatible Digital®) (Décodeur numérique compatible haute
définition) (Unité CD)
®, HDCD®, High Definition Compatible Digital ®
(Digital Compatible Haute Définition) et Pacific
Microsonics TM sont des marques déposées ou des
marques de Pacific Microsonics, Inc. aux États-Unis
et/ou dans d’autres pays.
Système HDCD manufacturé sous licence de Pacific
Microsonics, Inc. Ce produit est protégé par un ou
plusieurs brevets d’invention: Aux États-Unis: 5,479,168,
5,638,074, 5,640,161, 5,808,574, 5,838,274, 5.854.600,
5,872,531, 5,864,311. En Australie: 669114. D’autres
brevets en instance.
2 PRECAUTIONS PENDANT
L'UTILISATION
• Si le graveur subit un fort impact pendant la sélection de
piste ou la recherche, la vitesse de rotation du disque
change de manière importante et émet un petit bruit. C'est
normal et n'indique pas un dysfonctionnement du graveur.
• Si le graveur de CD est utilisé pendant la réception d'une
émission FM ou AM, des bruits parasites risquent d'affecter
cette dernière. Dans ce cas, veuillez couper l'alimentation
du graveur de CD.
• Le CDR-W1500 possède une gamme dynamique très
étendue. Prenez garde lorsque vous augmentez le volume
de l'amplificateur quand le volume de lecture est bas. Si le
volume est réglé trop fort, les enceintes risquent d'être
endommagées.
• L'installation de ce graveur ou de ses connexions près d'une
télévision ou tout autre appareil audio peut provoquer
l'émission d'un bourdonnement. Si cela se produit, déplacez
le graveur ou modifiez le cheminement des câbles de
raccordement.
• Ne pas oublier pas de retirer le disque du graveur avant de la
déplacer. Si un disque est laissé dans le graveur pendant
son déplacement, il risque d'être endommagé.
• Ne placer aucun objet dans le tiroir à la place du disque ou
ouvrir et refermer le tiroir si quelque chose se trouve à
l'intérieur. Tout objet étranger risque d'endommager le
mécanisme de la platine.
• Ne pas déplacer soudainement le graveur d'un endroit froid
à un endroit chaud. De la condensation risque de se former
et de provoquer des dysfonctionnements du graveur. Si de
la condensation se forme sur le graveur lorsqu'il est amené
dans une pièce chaude, attendez au moins 30 minutes avant
de l'utiliser.
Disques CD
Cet appareil utilise des CD (disques optiques
numériques audio) portant la marque située à
droite.
Notez que les CD de forme spéciale, comme
ceux en forme de cœur ou hexagonaux ne peuvent être
utilisés. Ne pas tenter d'utiliser de tels CD car ils risquent
d'endommager cet appareil.
C
CD avec texte
Cet appareil peut afficher les textes d'information
lors de la lecture de CD qui comportent ces
textes, dans la catégorie anglaise.
Les CD avec texte se repèrent à la marque
indiquée à droite.
REMARQUE:
• Cet appareil permet l'affichage de textes composés
avec les types de caractère suivants. Tous les autres
types de caractère seront affichés ainsi “_”.
• Alphabétiques
ABCDEFGHIJKLMNOPQRSTUVWXYZ
abcdefghijklmnopqrstuvwxyz
• Chiffres
0123456789
• Symboles
3 AU SUJET DES DISQUES
CD-R/RW
SPACE
Disques pouvant être utilisés avec cet appareil
Disques CD-R et CD-RW
Assurez-vous d'utiliser des disques portant les marques
suivantes pour enregistrer avec cet appareil.
• Disques CD-R
Recordable
Méthodes d'enregistrement sur disque
Disques CD-R
• Les disques CD-R comportent une couche pigmentée
destinée à l'enregistrement.
Lorsque cette couche est exposée au rayon laser
d'enregistrement, une modification de forme se produit à
la limite avec le plastique et permet l'enregistrement du
signal. Les données sont enregistrées de manière
permanente pour toute la durée de vie du disque.
• Après l'enregistrement, les disques finalisés peuvent
être joués sur lecteurs de CD ordinaires.
2 Disques CD-RW
• Les disques CD-RW comportent une couche de
changement de phase. Le procédé d'enregistrement
modifie cette couche pour la faire passer d'un état
cristallin (réfléchissant) à un état non-cristallin (opaque).
• Les informations enregistrées peuvent être effacées des
disques CD-RW.
Le disque peut être effacé en totalité ou en partie en
effaçant seulement les pistes spécifiées, en remontant
par la dernière.
• Les disques CD-RW finalisés peuvent être joués sur les
lecteurs de CD conçus à cet effet ainsi que sur les
graveurs de CD.
2
• Disques CD-RW
ReWritable
et une indication telle que
“POUR LE
CONSOMMATEUR”, “POUR
UTILISATION PAR LE
CONSOMMATEUR” ou
“POUR UNE UTILISATION
MUSICALE UNIQUEMENT”.
✽ L'enregistrement est impossible avec des disques ne
portant pas les marques énumérées ci-dessus.
FRANCAIS
Copies numériques
Finalisation du traitement de disques CD-R
Un disque CD-R/RW qui a déjà été enregistré par une entrée numérique ne peut plus être enregistré numériquement (c'est à dire,
copié) sur un autre disque CD-R/RW ou MD, etc.. C'est une norme établie par le SCMS (Serial Copy Management System)
(Système de gestion de copie en série).
Numérique
Appareil
numérique
Lecteur de CD
etc.
Numérique
source
Enregistrement
numérique
Analogique
Numérique
Analogique
source
Enregistrement
analogique
Disque non
enregistré
L'enregistrement est
impossible.
Enregistrement possible
Finalisation du traitement de disques CD-RW
“Avant la finalisation”
L'enregistre
ment est
possible.
Numérique
L'enregistre
ment est
possible.
Numérique
Enregistrement supplémentaire
possible.
L'enregistrement est
possible.
La lecture n’est pas possible sur un
lecteur de CD ordinaire. La lecture est
possible uniquement avec un
enregistreur de CD.
L'enregistrement est
impossible.
Disque
enregistré
Analogique
“Après la finalisation”
La lecture est possible sur un lecteur
de CD ordinaire.
4 MANIPULATION DES DISQUES ET PRECAUTIONS A
PRENDRE
★ L'enregistrement en mode synchronisé (C'est à dire l'enregistrement synchronisé de disque, l'enregistrement synchronisé de
piste et l'enregistrement avec finalisation automatique) signifie aussi attribution automatique des numéros de piste. La manière
dont les pistes sont attribuées diffère entre enregistrements numérique et analogique, selon les conditions, de la façon
suivante.
Enregistrement à partir d'une entrée analogique
• Lors de l'enregistrement numérique d'un CD, les numéros de piste sont mis à jour à l'instant de détection du premier son
suivant un changement de piste.
• Lors d'enregistrements numériques de MD, les numéros de piste seront attribués automatiquement, exactement comme
sur l'original.
• Lors d'enregistrements à partir d'un DAT, un numéro de piste est attribué lorsque qu'un changement de piste est détecté
par l'identification d'introduction.
• Lors d'enregistrements d'émissions satellite ou de tout autre équipement numérique, la détection d'une section vierge
d'environ 3 secondes ou plus, déclenche la fonction de marquage automatique des pistes et l'attribution automatique de
numéros de piste comme pour l'enregistrement analogique.
• Le numéro de piste risque de ne pas être attribué au bon endroit lorsque le blanc de séparation de pistes comporte
beaucoup de bruit.
• Le numéro de piste peut changer si le niveau du signal descend très bas dans le cours d'une piste.
Enregistrement à partir d'une entrée numérique
Les numéros de piste seront automatiquement associés lorsqu'une section vierge
d'environ 3 secondes ou plus est détectée.
• Lorsque le signal d'entrée est affecté par du bruit ou toute autre interférence, le
numéro de piste peut être placé en position incorrecte.
• Le numéro de piste peut changer si le niveau du signal descend très bas dans le
cours d'une piste.
✽ L'activation ou la désactivation de la fonction de marquage automatique des pistes
est possible en enregistrement manuel (Voir “Réglage de la fonction de marquage
automatique des numéros de piste ATM”, page 42).
Les disques CD-RW ne peuvent pas être lus sur un
lecteur de CD ordinaire, même avec le traitement de
finalisation. La lecture est possible seulement sur des
enregistreurs ou lecteurs de CD appropriés aux disques
CD-RW. Il est également à noter que les disques CD-RW
peuvent être effacés après la finalisation.
Enregistrement supplémentaire
impossible.
L'enregistrement est possible.
Numéros de piste: Fonction de marquage de piste automatique
2
REMARQUES:
• Dès qu’un disque CD-R est finalisé,
l’enregistrement supplémentaire ne sera plus
possible.
• L’information qui a été enregistrée sur un disque
CD-R ne peut pas être effacée.
Après l’enregistrement d’un disque CD-R, la finalisation est
nécessaire afin de permettre la lecture sur un lecteur de CD
ordinaire.
2
Manipulation des disques
Eviter de toucher la surface du disque lors de son insertion et de son
retrait.
Faire attention aux traces
de doigt sur la surface
d’enregistrement du signal.
REMARQUES:
• Ne pas coller d’étiquette disponible dans le
commerce ou tout autre autocollant sur un disque.
Cela risque de rendre le disque impossible à
enregistrer ou à lire correctement.
Nettoyage du disque
2 Lorsque le disque est marqué de traces de doigt ou de la saleté,
l’essuyer avant son utilisation. La saleté n’affectera pas le signal
du disque, mais la qualité sonore risque de diminuer et le son
peut sautiller. Remarquer que lorsque la surface d’un disque CDR/RW est sale, l’enregistrement ne peut pas être fait
correctement.
2 Pour essuyer le disque, utiliser un kit de nettoyage de disque
disponible dans le commerce ou un chiffon doux.
• Ne pas utiliser des aérosols ou des produits antistatiques. Ne pas utiliser du benzène, un diluant ou
d’autres produits chimiques volatils.
Environ 3 secondes
Section vierge
Première plage
Deuxième
plage
Précautions de manipulation
Disque
CD-R/RW
REMARQUES:
• Lors d'enregistrements d'une source analogique contenant un niveau de signal trop faible dans le cours d'une piste ou
d'une source numérique autre que
CD/MD/DAT, désactivez la fonction de marquage automatique des pistes, effectuez alors un enregistrement manuel et
associez les numéros de piste manuellement.
• Lorsque le niveau d'enregistrement est réglé trop bas pendant l'enregistrement d'une source analogique ou d'une source
numérique autre que les CD/MD/DAT, les numéros de piste risquent de ne pas être associés au bon endroit. Veuillez
régler le niveau d'enregistrement à une valeur appropriée.
Essayer légèrement la surface
du disque en partant du centre
vers les bords.
Ne pas essuyer en faisant un
cercle.
Précautions de stockage
• S’assurer d’éjecter le disque après la lecture.
• Toujours retourner le disque dans son boîtier pour éviter la
poussière, des rayures, et une déformation.
• Ne pas laisser le disque dans des endroits suivants:
1. Endroits où il est exposé aux rayons directs du soleil pendant
de longues périodes.
2. Endroits très humides ou poussiéreux.
3. Endroits où il est exposé à la chaleur provenant d’un radiateur.
• Ne pas laisser des traces de doigt, de graisse ou de la saleté
sur la surface du disque.
• Veiller à ne pas rayer la surface, en particulier lors du retrait
ou en rangeant le disque dans son boîtier.
• Ne pas plier le disque.
• Ne pas chauffer le disque.
• Ne pas agrandir le trou au centre.
• Ne pas écrire sur la surface de l’étiquette (exple la face
imprimée) avec un stylo à bille ou un crayon.
• Des gouttelettes d’eau peuvent se former à la surface du
disque lorsqu’il est amené brusquement d’un endroit froid à
un endroit chaud. Si cela se produit, ne pas sécher le disque
avec un sèche-cheveux.
37
FRANCAIS
6 CONNEXIONS
Précautions lors du chargement des disques
• Charger uniquement un disque. L'empilement de deux
disques ou plus risque de causer une panne et de rayer les
disques.
• Les disques de 8 cm doivent être centrés avec soin sur
l'épaulement de guidage du disque et chargés sans utiliser
d'adaptateur. S'il n'est pas chargé correctement, le disque
peut tomber ou le tiroir porte-disque risque de ne plus
s'ouvrir.
• Prendre garde de ne pas se faire prendre les doigts lors de
la fermeture du tiroir porte-disque.
• Ne placer aucun autre objet, à part un disque, sur le tiroir
porte-disque.
• Ne pas utiliser de disques craqués, déformés ou réparés
avec de l'adhésif, etc.
• Ne pas utiliser de disques comportant du ruban adhésif en
cellophane, d'étiquette de location ou des restants d'adhésif
venant d'être retiré. Si un tel disque est utilisé, il risque
d'être impossible à éjecter ou bien de causer une panne.
5 RESTRICTIONS IMPOSEES PAR LES NORMES SUR LES
CD-R/RW
★ Les normes concernant la lecture avec graveur de CD ont été établies sur les normes existantes pour lecteurs CD ; cependant,
pour l'enregistrement, la méthode diffère de celle utilisée avec les platines magnétocassette et enregistreurs de MD, etc. Dans
cette optique, veuillez-vous familiariser avec les restrictions sur les disques CD-R/RW suivantes et profiter de ce support.
Restrictions sur les disques CD-R/RW audio
• Seuls les disques CD-R/RW audio peuvent être enregistrés avec cet appareil. Le message “Use Audio CD” (Disque
incorrect) s'affiche lorsque tout autre type de disque autre que audio est chargé, comme les CD-R/RW d'utilisation avec
ordinateur personnel par exemple (Voir “Disques pouvant être utilisés avec cet appareil”, page 36).
• Les disques CD-R ne peuvent être enregistrés qu'une seule fois. Les données enregistrées ne peuvent être effacées.
• Les données enregistrées sur les disques CD-RW peuvent être effacées. Lorsque ce type de disque est définalisé, l'opération
d'effacement des données de finalisation a été effectuée (Voir “Annulation de la finalisation de disques CD-RW”, page 59.
• Les erreurs d'enregistrement effectuées avec les disques CD-R ne peuvent être effacées; il est donc recommandé de ne pas
utiliser de disque CD-RW avant de s'être familiarisé avec l'opération d'enregistrement.
Restrictions sur l'enregistrement avec cet appareil
• La procédure d'enregistrement est la même que pour les disques CD-R et CD-RW.
• Lors d'enregistrement additionnel sur un disque enregistré précédemment, la fin de la dernière piste est détectée et
l'enregistrement commence à partir de ce point.
• Le mode attente d'enregistrement ne peut être activé avec les disques CD-R/RW dont le temps d'enregistrement restant est
d'environ 8 secondes ou moins.
Le message “Disc Full” (Disque plein) s'affiche à ce moment-là.
• 99 pistes peuvent être enregistrées au maximum sur un disque CD-R/RW. Lorsque l'enregistrement atteint la 99ème piste, le
message “Disc Full” (Disque plein) s'affiche il est impossible d'enregistrer au delà de cette piste.
• L'enregistrement numérique est impossible à partir de disques CD-R/RW déjà été enregistrés numériquement, l'enregistrement
normal est possible à partir de MD ou de DAT, etc. Lorsque l'on tente d'effectuer un enregistrement numérique à partir de
telles sources, le message “Copy Prohibit” s'affiche. Pour enregistrer ce type de sources numériques, effectuez
l'enregistrement à partir de l'entrée analogique (Voir “Copies numériques”, page 37).
• Cet appareil ne peut pas enregistrer les CD-ROM et les sources non audio. Lorsque l'on tente d'effectuer un enregistrement à
partir de telles sources, le message “Copy Prohibit” s'affiche.
• Lorsqu'un enregistrement effectué à partir d'un disque comprenant des données autres que des signaux audio tels que les CD
graphiques ou de textes, seul le signal audio est enregistré ; les autres données ne sont pas enregistrées.
• Les DVD (Les signaux Dolby Digital, DTS et autres signaux audio compressés) ne peuvent être enregistrés.
Compatibilité avec les autres lecteurs CD et disques
• Le procédé de finalisation des CD-R enregistrés avec cet appareil permet à ces disques de pouvoir être joués sur les lecteurs
CD ordinaires. (Voir “Finalisation de disques CD-R/RW”, page 58).
• Le procédé de finalisation des CD-RW enregistrés avec cet appareil permet à ces disques de pouvoir être joués sur des lecteurs
CD conçus pour être utilisés avec les disques CD-RW ou sur d'autres graveurs de CD. (Voir “Finalisation du traitement de
disques CD-RW”, page 37).
REMARQUES:
• Pour assurer un enregistrement précis, enregistrez à une température ambiante de 30 °C ou moins.
• Ne pas obstruer les ouïes de ventilation au-dessus.
• L'enregistrement peut s'arrêter si l'appareil est soumis à des chocs pendant l'enregistrement. Si l'enregistrement
s'arrête, il est possible que le disque ne soit plus utilisable normalement.
38
(1) Connexions des jacks d'entrée/sortie analogiques
• Utilisez le câble fourni à cet effet pour
effectuer les connexions aux jacks
d'entrée/sortie analogiques.
q Entrée:
Connectez les jacks d'entrée analogique
(ANALOG IN) de cet appareil avec les jacks
de sortie de l'amplificateur (MD ou TAPE).
w Sortie:
Connectez les jacks de sortie analogique
(ANALOG OUT) de cet appareil avec les
jacks d'entrée de l'amplificateur (MD ou
TAPE).
e Sortie vers CD uniquement:
Seul le son du côté CD est émis. Connectez
aux jacks d'entrée de l'amplificateur (CD,
etc.).
✽ En mode dual, seul le son du côté CD-R
est émis à partir des jacks de sortie
CD/CD-R, donc cette connexion est
nécessaire.
Sortie
alimentation
Amplificateur
120 V
60 Hz
SIGNAL
GND
SPEAKER SYSTEMS
R
PHONO
INPUTS
TUNER AUX
CD
PB
TAPE-1 TAPE-2
/MD /DAT
L
REC
TAPE-1 TAPE-2
/MD /DAT
A
L
L
R
R
B
q
Sortie
alimentation
e
CDR-W1500
120 V
60 Hz
ANALOG
CD/
CDR
OUT
CDR
IN
CD
OUT
DIGITAL IN
DIGITAL OUT
CD/CD-R
L
CD
R
COAXIAL
OPTICAL
COAXIAL
OPTICAL
COAXIAL
OPTICAL
w
(2) Connexion des jacks d'entrée/sortie numérique
• Veuillez utiliser des câbles à fibre optique
disponibles dans le commerce pour effectuer
les connexions aux jacks d’entrée/sortie
numérique (OPTICAL).
Utilisez un câble à connecteur de 75 Ω/ohms,
disponible sur le marché pour effectuer les
connexions aux jacks d'entrée/sortie
numérique (COAXIAL).
q Entrée:
Connexions à des équipements de lecture
tels que les lecteurs CD
Les jacks d'entrée numérique de cet appareil
(Entrée numérique optique "DIGITAL IN
OPTICAL" ou Entrée numérique coaxiale
"DIGITAL IN COAXIAL") doivent être
connectés aux jacks de sortie numérique du
lecteur CD (OPTIQUE ou COAXIAL).
w Sortie
Connexions à des équipements ayant une
entrée numérique telle qu'un enregistreur
de MD.
Les jacks de sortie numérique de cet
appareil (Sortie numérique optique "DIGITAL
OUT OPTICAL" ou Sortie numérique coaxiale
"DIGITAL OUT COAXIAL") doivent être
connectés aux jacks d'entrée numérique de
l'enregistreur de MD ou d'un autre appareil
(OPTICAL ou COAXIAL).
e Sortie CD uniquement:
Seul le son du côté CD est émis. Connectez
aux jacks d'entrée numérique d'un
enregistreur de MD, etc.
Enregistreur de MD
ANALOG
OUT
DIGITAL
OUT
IN
IN
IN
IN
L
R
OPTICAL
COAXIAL OPTICAL-1 OPTICAL-2
q
Sortie alimentation
CDR-W1500
CD/
CDR
OUT
CD
OUT
DIGITAL IN
DIGITAL OUT
CD/CD-R
L
120 V
60 Hz
e
ANALOG
CDR
IN
CD
R
COAXIAL
OPTICAL
COAXIAL
OPTICAL
COAXIAL
OPTICAL
w
LINE OUT
DIGITAL
OUT
R
L
Lecteur CD
OUT
COAXIAL OPTICAL
REMARQUES:
• Ne pas brancher le câble d'alimentation à une prise du secteur avant d'avoir effectué toutes les connexions.
• Connectez la fiche rouge du câble dans le jack du canal droit "R" et la fiche blanche dans le jack du canal gauche "L".
• Ne rien connecter au jack "PHONO" de l'amplificateur. Dans le cas contraire, l'appareil risque d'être endommagé.
• Branchez le câble d'alimentation à la prise du secteur avec fermeté. Une connexion imparfaite risque de produire du bruit.
• Le fait de rassembler tous les câbles de raccordement ensemble avec le câble d'alimentation produira un bourdonnement ou
d'autres bruits parasites.
• Lorsque la prise du câble d'alimentation est débranchée de la prise du secteur, attendez environ 5 secondes avant de la rebrancher.
FRANCAIS
7 NOMS DES COMPOSANTS ET LEURS FONCTIONS
!2
Panneau avant
q
Touche d'alimentation
w
Jack de sortie casque (PHONES)
e
Commande de niveau casque
(PHONES LEVEL)
• Met le graveur de CD sous tension (ON) et hors tension
(OFF).
• S'utilise pour régler le volume du casque.
r
Capteur de télécommande
(REMOTE SENSOR)
Tiroir porte-disque (CD)
y
Touche de sélection de l'affichage
(DISPLAY SELECT)
u
!4
Sélecteur multiple Jog (MULTI JOG)
• Les CD du commerce et les disques CD-R/RW finalisés
peuvent être lus.
• L'affichage se commute chaque fois que l'on appuie sur
cette touche.
Le temps est
affichéepour
CD
CD-R
1
1
1
le CD et le
uniquement
uniquement
CD-R
!6
!7
Touche d'entrée (INPUT)
• Sélectionne la source d'entrée.
• La commutation se fait de la façon suivante à chaque
pression sur cette touche.
1
CD
1
OPT
(OPTICAL)
✽ La commutation
l'enregistrement.
o
1
n'est
COAX
(COAXIAL)
pas
1
ANALOG
permise
pendant
Touches de commande de l'unité CD
: Utilisez cette touche pour lancer la lecture.
: Utilisez cette touche pour arrêter la lecture.
: Utilisez cette touche pour mettre la lecture en
pause.
8, 9 : Utilisez cette touche pour vous déplacer au
début des pistes.
5
: Utilisez cette touche pour ouvrir et refermer le
tiroir porte-disque.
TIME
: Utilisez cette touche pour passer de l'affichage
du temps écoulé au temps restant de la piste
et au temps total restant.
1
2
3
!0
!8
• Le mode se commute chaque fois que l'on appuie sur cette
touche.
Normal
Relais
1
(RELAY)
Mélangé
1
(MIX)
Double
1
(DUAL)
Touche d'enregistrement (4 REC)
• Appuyez sur cette touche pour enregistrer.
• Le mode attente d'enregistrement s'active lorsque l'on
appuie sur la touche d'enregistrement ( 4 REC)
uniquement.
• Appuyez sur la touche de lecture ( 1 PLAY) en mode
attente d'enregistrement pour lancer l'enregistrement.
• Pour arrêter l'enregistrement ou pour annuler le mode
attente d'enregistrement, appuyez sur la touche d'arrêt (2
STOP).
Touche de finalisation (FINALIZE)
• Appuyez sur cette touche pour effectuer la finalisation.
@1
Touches de commande CD-R
: Appuyez sur cette touche pour lancer la lecture
ou l'enregistrement.
2
: Appuyez sur cette touche pour arrêter la
lecture ou l'enregistrement.
3
: Appuyez sur cette touche pour mettre en
pause la lecture ou l'enregistrement.
8, 9 : Utilisez cette touche pour aller au début des
pistes.
5
: Utilisez cette touche pour ouvrir et refermer le
tiroir porte-disque.
✽ Si l'opération d'entrée de texte d'information
a été effectuée mais non finalisée, le tiroir
porte-disque ne peut être ouvert tant que
tout le texte d'information n'a pas été
supprimé. (Voir page 41).
TIME
: Pendant la lecture, utilisez cette touche pour
commuter entre temps écoulé, temps restant
de piste et temps total restant. Pendant
l'enregistrement, utilisez cette touche pour
commuter entre temps écoulé par piste et
temps d'enregistrement total restant.
Touche de mode de copie à vitesse normale
(DUBBING NORMAL)
1
Copie de disque
(Disc dubbing)
Copie
complète
1
de CD
(Make CD)
Copie sélective
(Scan record
dubbing)
Copie d'une
1 piste (1-track
dubbing)
0
Touche de mode de copie à double vitesse
(DUBBING HIGH)
• Le mode de copie à double vitesse se commute chaque
fois que l'on appuie sur cette touche.
1
Copie de disque
(Disc dubbing)
1
Copie
complète
de CD
(Make CD)
Copie sélective
(Scan record
dubbing)
1
Copie d'une
piste (1-track
dubbing)
Jacks de sortie analogique CD/CD-R
(ANALOG OUT CD/CD-R)
• Connectez cette sortie à l'entrée de ligne d'un amplificateur
(gauche et droite).
• En mode dual (double), seul le son côté CD-R est émis.
@2
Jacks d'entrée analogique
(ANALOG IN CD-R)
• Connectez cette sortie à la sortie de ligne d'un
amplificateur (gauche et droite).
@3
Jacks de sortie numérique CD/CD-R
(DIGITAL OUT CD/CD-R COAXIAL)
•
:
S'allume lorsque l'heure du graveur CD-R est affiché.
• SKIP:
S'allume lorsqu'une piste est réglée pour être sautée.
• ON:
S'allume lorsque le mode lecture avec saut de pistes est
activé.
• Connectez cette sortie à l'entrée numérique coaxiale de
l'amplificateur ou du dispositif d'enregistrement.
• En mode dual (double), seules les données numériques du
côté CD-R sont émises.
@4
Jacks de sortie numérique CD/CD-R
(DIGITAL OUT CD/CD-R OPTICAL)
• Connectez cette sortie à l'entrée numérique coaxiale de
l'amplificateur ou du dispositif d'enregistrement.
• En mode dual (double), seules les données numériques du
côté CD-R sont émises.
Tiroir porte-disque (CD-R)
• Le mode de copie se commute chaque fois que l'on appuie
sur cette touche.
!9
• Ecran d'information.
Panneau arrière
• Commande du niveau d'enregistrement (Recording).
• S'utilise pour sélectionner les réglages (Mode Menu).
Touche de mode relais (RELAY MODE)
1
!1
• Cette touche est utilisée lors de l'entrée des titres de
disque et de piste et pour des opérations d'édition telles
que l'effacement de disques CD-RW.
1
Touche titre/caractère
(TITLE/CHARACTER)
• Lorsque l’on appuie sur cette touche pendant que le mode
est réglé sur CD ou CD-R, le texte d’information du CD
s’affiche.
• Lorsque du texte est en cours de saisie, les caractères
changent.
i
• Utilisez cette touche pour supprimer des pistes
programmées ou entrer des caractères de texte.
• Lorsque l'on appuie sur cette touche en mode menu,
l'appareil revient au mode précédent.
Touche de menu (MENU)
!5
• Reçoit les signaux de la télécommande.
t
• 1 Tr, SYNC:
L'enregistrement synchronisé est activé.
• RAND:
Lit les pistes en ordre aléatoire.
• A.T.M.:
Indicateur de la fonction de marquage automatique des
pistes.
• D.in:
Cet indicateur s'allume lorsqu'une des entrées numériques
(digital) est sélectionnée.
Si cet indicateur clignote après avoir effectué l'opération
d'enregistrement, vérifiez les connexions des jacks
d'entrée numérique.
• FADE:
Clignote pendant l'opération de fondu de début ou de fin de
piste.
Affichage
Touche d'effacement (CLEAR)
!3
• Jack pour casque d'écouteurs.
@0
@5
w
Jacks d'entrée numérique
(DIGITAL IN COAXIAL)
• Connectez cette entrée à la sortie numérique coaxiale
d'une source numérique externe.
@6
Jacks d'entrée numérique
(DIGITAL IN OPTICAL)
:
S'allume lorsque l'heure du lecteur CD est affichée.
• HDCD:
S'allume lors de la lecture de disques enregistrés au format
HDCD.
Jacks de sortie analogique de CD
uniquement (ANALOG OUT CD)
• Dans tous les modes, seul le son côté CD-R est émis.
@8
Jack de sortie numérique de CD uniquement
(DIGITAL OUT COAXIAL)
• Dans tous les modes, seules les données numériques du
côté CD sont émises.
@9
Jack de sortie numérique de CD uniquement
(DIGITAL OUT OPTICAL)
• Dans tous les modes, seules les données numériques du
côté CD sont émises.
Indications d'affichage
q
Affichage du mode (CD-R)
• CD:
Un CD (disque CD préenregistré, disque CD-R ou CD-RW
finalisé) est chargé.
• CD-R:
Un CD-R non finalisé est chargé.
• CD-RW:
Un CD-RW non finalisé est chargé.
• 4:
S'allume pendant l'enregistrement.
• 1:
S'allume pendant la lecture et l'enregistrement.
• 3:
La fonction de pause est activée.
• PROG:
S'allume en mode programmation.
• CD:
S'allume lorsqu'un disque est chargé.
• RAND:
Indicateur de lecture aléatoire.
• PROG:
Indicateur de mode de programmation.
• 3:
Indicateur de pause.
• 1:
Indicateur de lecture.
•
• Connectez cette entrée à la sortie optique numérique d'une
source numérique externe.
@7
Affichage du mode (CD)
e
Affichage du mode partagé
• REPEAT, 1:
S'allume lorsqu'une piste ou un disque complet (ou un
programme) est lu à répétition.
✽ Désactivé (Off) lorsque le temps des unités CD et CD-R
sont affichés en même temps.
• REPEAT A-B:
S'allume en mode de lecture à répétition A-B.
✽ Désactivé (Off) lorsque les temps des unités CD et CD-R
sont affichés en même temps.
• SINGLE, TOTAL:
Indicateur de mode d'affichage du temps.
✽ Désactivé (Off) lorsque les temps des unités CD et CD-R
sont affichés en même temps.
• DUBB:
S'allume en mode de copie à vitesse normale.
• DUBB HIGH:
S'allume en mode de copie à double vitesse.
• MIX:
S'allume en mode de copie mixte (Unités CD et CD-R)
mode.
• RELAY:
S'allume en mode de copie relais entre les unités CD et
CD-R.
• DUAL:
S'allume en mode de copie double CD et CD-R.
0
39
FRANCAIS
r
Affichage de la source d'entrée
• Each press of the input switching button (INPUT)
causes the indicators to light as described below.
: S'allume lorsque la source d'entrée est
réglée sur le CD interne.
ª
OPT
La télécommande fournie (RC-278) peut être utilisée pour faire fonctionner le CDR-W1500 à distance.
Insertion des piles
ª
CD
8 TELECOMMANDE
2
q Retirez la trappe du compartiment des piles à l'arrière de la
télécommande.
Précautions à prendre avec les piles
• Utilisez des piles de type R6P (AA) dans la
télécommande.
• Les piles doivent être remplacées par des neuves au
bout d'environ un an, bien que cela dépende de la
fréquence d'utilisation de la télécommande.
• Même si les piles ont moins d'un an, remplacez-les
par des piles neuves si la télécommande ne
fonctionne pas même à courte distance de l'unité
principale.
• La pile fournie ne sert que pour la vérification du
fonctionnement. La remplacer par une neuve le plus
tôt possible.
• Lors de l'insertion de nouvelles piles, attendez
environ deux minutes après les avoir retirées avant
d'insérer les nouvelles.
• Veillez à respecter les polarités des piles “<” et “>”,
comme indiqué par les repères à l'intérieur du
compartiment des piles de la télécommande.
• Retirez les piles lorsque la télécommande ne doit pas
être utilisée pendant une longue période.
• Pour éviter les explosions et les fuites de fluide :
• Ne pas utiliser une des vieilles piles avec une
neuve.
• Ne pas mélanger deux types de piles différents .
• Ne pas court-circuiter les piles, les démonter, les
chauffer ou les jeter au feu.
• Si une fuite de fluide de pile se produit, essuyez toute
trace de fluide dans le compartiment et remplacez les
piles par des neuves.
: S'allume lorsque les jacks d'entrée
DIGITAL IN OPTICAL (Entrée
numérique optique) sont sélectionnés.
ª
COAX
: S'allume lorsque les jacks d'entrée
DIGITAL IN COAXIAL (Entrée
numérique optique) sont sélectionnés.
ª
ANALOG : S'allume lorsque les jacks d'entrée
ANALOG CD-R IN (Entrée CD-R
analogique) sont sélectionnés.
t
w Insérez les deux piles R6P (AA) dans le compartiment, en
respectant les polarités indiquées à l'intérieur.
Affichage du calendrier musical
• Pistes sur un disque ou dans un programme.
• Piste en lecture/enregistrement.
✽ Désactivé (Off) lorsque les temps des unités CD et
CD-R sont affichés en même temps.
y
Affichage multiple
• Cet affichage indique le nombre de pistes, numéro de
piste, temps de lecture, temps d'enregistrement,
diverses information de fonctionnement, message en
texte, etc.
• Lorsque les temps des CD et CD-R sont affichés
simultanément, le temps CD-R est affiché.
u
e Remettez en place la trappe du compartiment des piles.
Indicateur de niveau
• Barre indicatrice de niveau d'enregistrement, indique
le niveau du signal audio.
• Lorsque l'unité CD-R est réglée en mode
d'enregistrement, le niveau d'entrée est affiché.
i
Affichage du numéro de piste
Utilisation de la télécommande
• Lorsque le disque comporte du texte d'information, le
numéro de piste est affiché.
• Lorsque les temps des CD et CD-R sont affichés
simultanément, le numéro de piste du CD est affiché.
o
• Lors de l'utilisation de la télécommande, dirigez-la
vers l'unité principale comme illustré dans le
schéma.
• La télécommande peut fonctionner à une distance
en ligne droite d'environ 8 mètres de l'unité
principale. Cette distance peut être plus courte en
présence d'obstacles ou lorsque la télécommande
est utilisée à un angle par rapport à l'unité
principale.
(la télécommande fonctionne à un angle sur le
plan horizontal allant jusqu'à environ 30°).
Affichage du temps
• Lorsque le disque comporte du texte d'information, le
temps est affiché.
• Lorsque les temps des CD et CD-R sont affichés
simultanément, le temps du CD est affiché.
9
8
SE
PAU
C
4 RE
P
STO
ZE
ALI
FIN
UT
INP
Y
PLA
AR
CLE
E
TIM
EN
OP
ES
ON
PH
EL
LEV
NU
ME
E
OS
/CL
-
30°
30°
CD-R
CD
AY E
REL
MOD
G
_
BING HIGH
_ DUB
MAL
NOR
"
!
A
D
#
'
&
3
%
P
2
M
1
*
S
.
−
6
Y
5
{
[
=
>
9
AR
CLE
8
/
7
<
:;
V
4
,
+
)
J(
]
?
}
+ 10
7
REC
10
U
E
PAUS
9
MEN
R
3
ENTE
6
A
PLAY
8
1/
-B
ALL
E
P
STO
CALL
2
TIME
DOM
RAN
TER
RAC
CHA
LIZE
FINA
TITL
CT
/DIRE
PROG
Y SEL.
DISPLA
R
FADE
T
INPU
78
RC-2
L UNIT
TRO
B
CON
OTE
REM
Environ 8 mètres
REMARQUES:
• La télécommande peut ne pas fonctionner si le capteur
de télécommande est exposé directement au soleil ou à
une forte source de lumière artificielle ou encore si un
obstacle se trouve intercalé entre la télécommande et
son capteur sur l'unité principale.
40
• Ne pas appuyer sur les touches sur l'unité principale et la
télécommande en même temps. Cela provoquerait un
dysfonctionnement.
FRANCAIS
Noms et fonctions des touches de la télécommande
2 Les touches non expliquées ici fonctionnent de la même façon que les touches correspondantes de
l'unité principale.
2 Les touches marquées “✽” fonctionnent de la même manière quelle que soit la position du sélecteur
de fonction.
✽ Touche de mode de
copie à grande vitesse
(DUBBING HIGH)
✽
Touche de mode de copie
à vitesse normale
(DUBBING NORMAL)
✽
Touche de mode relais
(RELAY MODE)
Touche d'effacement (CLEAR)
Sélecteur de fonction
Touches numériques (1 à 10)
Commute la fonction de
ces touches entre CD et
CD-R.
Utilisez ces touches pour
effectuer une recherche directe et
la lecture programmée.
Touche d'enregistrement
(4 REC)
CD CD-R
_ DUBBING _
NORMAL
RELAY
MODE
HIGH
Touche de lecture (1 PLAY)
A ! "
D # %
1
)
4
Appuyez sur cette touche pour
commuter entre les modes
programmation et le mode de
recherche directe. Le réglage
normal est le mode de recherche
directe.
.
5
/
V
P
,
Y < >
7
8
9
[ = ]
{ ? }
CLEAR
10
+10
8
STOP
ENTER
Appuyez sur cette touche pour
effectuer une lecture à répétition
A-B.
Touche de lecture à
répétition d'une ou de toutes
les pistes (1/ALL)
9
PLAY
PAUSE
3
1 / ALL
A-B
Touche de rappel (CALL)
RANDOM
TIME
Appuyez sur cette touche pour
effectuer une lecture à répétition
d'une piste ou de toutes les
pistes.
TITLE CHARACTER
DISPLAY SEL. FADER INPUT
Touche
d'ouverture/fermeture
OPEN/CLOSE (5)
Tiroir porte-disque
REMARQUES
• Si vous vous prenez le doigt dans le tiroir porte-disque lors de sa fermeture, appuyez sur la touche OPEN/CLOSE (5).
• Seuls les CD audio sont acceptés. Si un disque non audio est inséré, l'affichage indiquera “Use Audio CD” (Disque
incorrect).
• Pour l'enregistrement, il est important que le disque vierge soit complètement exempt de particules de poussière ou de
rayures. Voir “Nettoyage des disques”, page 37.
• Lorsque du texte d'information a été entré mais non finalisé, le tiroir porte-disque ne pourra être ouvert tant que tout le
texte d'information n'a pas été supprimé.
Le message “Text Erase OK?” (Effacement du texte OK ?) sera affiché pendant 2 secondes. Lorsque l'on appuie
sur la touche d'entrée pendant cet intervalle, le texte d'information sera supprimé et le tiroir porte-disque pourra être
ouvert.
Touche de lecture à
répétition A - B (A - B)
7
MENU
PROG/DIRECT CALL
Touche de lecture aléatoire
(RANDOM)
Touche d'entrée (ENTER)
REC
6
2
Utilisez cette touche pour vérifier
les pistes programmées.
✽
Cavité
−
6
: ;
Touche de menu (MENU)
Touche de pause (3 PAUSE)
3
M*+
✽
G & '
2
J(
S
Touche de
programmation/directe
(PROG/DIRECT)
Utilisez cette touche pour entrer
un numéro de piste supérieur à 11
pour la recherche directe et la
lecture programmée.
Touches de recherche
manuelle en arrière et en
avant (6 et 7)
Touches de recherche
automatique avant et arrière
(8 et 9)
Touche d'arrêt (2 STOP)
Touche +10
2 Insertion de disque
q Appuyez sur la touche d'ouverture et de fermeture
OPEN/CLOSE (5) pour ouvrir le tiroir porte-disque.
w Insérez un disque dans la cavité du tiroir porte-disque avec
l'étiquette vers le haut.
e Appuyez sur la touche d'ouverture et de fermeture
OPEN/CLOSE (5) pour refermer le tiroir porte-disque.
• L'indication “Close” (Fermeture) s'allume suivie par
“TOC Reading” et l'affichage indique le type de
disque que vous avez introduit.
• Si vous introduisez un disque vierge, un CD-R
partiellement enregistré ou un disque CD-RW non
finalisé, le graveur de CD effectuera le calibrage pour
l'enregistrement optimal du disque. Pendant cette
opération, l'affichage indiquera d'abord “Now OPC” et
ensuite le nombre de pistes audio. Le calibrage peut
prendre jusqu'à 60 secondes. (CD-R/RW)
• Si un CD-R/RW est finalisé, l'indication “CD” apparaîtra à
l'affichage.
FINALIZE
q “Sync. Rec?”…………………………………………… Mode enregistrement synchronisé.
w “Sync. Level?” ……………………………………… Niveau d'enregistrement synchronisé.
e “A.T. Mark?”…………………………………………… Marquage automatique des pistes.
r “FadeIn Time?” ……………………………………… Durée du fondu de début d'enregistrement.
t “FadeOutTime?”
Touche de caractère
(CHARACTER)
B
…………………………………… Durée du fondu de fin d'enregistrement.
y “Intro Time?”………………………………………… Durée de lecture d'introduction de piste.
u “Custom Index” ……………………………………… Index personnalisé.
i “Skip Play?”…………………………………………… Lecture avec saut.
REMOTE CONTROL UNIT RC-278
Touche de finalisation
(FINALIZE)
Appuyer sur cette touche pour lire
les plages en ordre aléatoire.
(Voir page 53).
9 METHODE DE PARAMETRAGE
★ Les 9 éléments énumérés ci-dessous peuvent être réglés par le menu de paramétrage. Les messages suivants seront affichés
pour les divers éléments de réglage.
• Fermer les tiroirs de disque et régler les deux sections CD et CD-R en mode stop.
• Le contenu du menu réglé est enregistré, mais ces données risquent d'être perdues si l'appareil est débranché du secteur
pendant 2 à 3 jours.
o “Timer Play?”………………………………………… Temporisation de lecture.
Touche titre (TITLE)
✽
Appuyez sur cette touche pour
commuter entrel'affichage du
temps et l'affichage du titre.
Touche de sélection de
l'affichage (DISPLAY SEL.)
Touche de fondu de piste
(FADER)
Appuyez sur cette touche pour
effectuer un fondu de début ou de
fin d'enregistrement.
Touche de sélection d'entrée
(INPUT)
Touche d'affichage du temps
(TIME)
41
FRANCAIS
(1) Méthode de paramétrage
(Unité principale)
A ! "
D # %
1
.
S
DUBBING
NORMAL
HIGH
9
CDR-W1500
DISPLAY
TITLE /
SELECT CHARACTER
TIME
TIME
CLEAR
INPUT
4 REC
FINALIZE
8
PHONES
PLAY
STOP
PAUSE
1
2
3
RELAY MODE
OPEN / CLOSE
ON
PHONES LEVEL
/
OFF
OPEN /CLOSE
+
MENU
5
MAX
7
8
9
[ = ]
{ ? }
CLEAR
10
+10
9
PLAY
STOP
PAUSE
1
2
3
6
7
MENU
PUSH
ENTER
8
9
ENTER
PLAY
STOP
3
PROG/DIRECT CALL
2,3
2
(Unité principale)
(Télécommande)
A ! "
2
3
1 / ALL
PCM AUDIO TECHNOLOGY / COMPACT DISC RECORDER
A-B
2
9
8
CDR-W1500
DISPLAY SEL. FADER INPUT
/
7
8
9
{ ? }
CLEAR
10
+10
DUBBING
NORMAL
HIGH
PLAY
STOP
PAUSE
1
2
3
DISPLAY
TITLE /
SELECT CHARACTER
TIME
RELAY MODE
TIME
ON
OPEN / CLOSE
PHONES
PHONES LEVEL
CLEAR
INPUT
4 REC
FINALIZE
8
9
PLAY
STOP
PAUSE
1
2
3
REC
MULTI JOG
OFF
-
OPEN /CLOSE
+
5
MENU
5
FINALIZE
MAX
MIN
6
7
MENU
Activez l'alimentation.
Appuyez sur la touche de menu et faites tourner le sélecteur jog de l'unité principale ou appuyez sur les touches de
recherche automatique de la télécommande pour afficher “Setup Menu?”.
3
Appuyez sur la touche entrée et passer en mode de paramétrage.
1,2,3,4
PLAY
(Télécommande)
A ! "
D # %
G & '
1
2
3
J(
)
M*+
5
4
S
9
DUBBING
NORMAL
HIGH
TIME
CDR-W1500
DISPLAY
TITLE /
SELECT CHARACTER
TIME
CLEAR
INPUT
4 REC
FINALIZE
8
9
PLAY
STOP
PAUSE
1
2
3
.
/
V
POWER
STOP
PAUSE
1
2
3
RELAY MODE
OPEN / CLOSE
ON
PHONES
PHONES LEVEL
-
8
9
{ ? }
CLEAR
+10
OPEN /CLOSE
MENU
6
7
MENU
2,4
PUSH
ENTER
STOP
ENTER
PLAY
2
1,2,3,4
9
1,3
FINALIZE
1
Réglez l'appareil en mode paramétrage, faites ensuite tourner le sélecteur jog de l'unité principale ou appuyez sur la
touche de recherche automatique de la télécommande pour afficher “Sync. Level?”.
2
Appuyez sur la touche d'entrée (ENTER) et réglez le mode de sélection d'enregistrement synchronisé.
3
Faites tourner le sélecteur jog de l'unité principale ou appuyez sur la touche de recherche automatique de la
télécommande et ensuite, réglez le niveau d'enregistrement synchronisé.
• La valeur de réglage est affichée dans la zone d'affichage multiple. “Sync. -**dB”
✽ La fourchette de réglage s'étend de –54 dB à –30 dB, variable par pas de 6 dB.
4
Appuyez sur la touche d'entrée (ENTER) et réglez le niveau d'enregistrement synchronisé.
• Le message “Complete” (Terminé) s'affiche.
1 / ALL
(4) Réglage de la fonction de marquage automatique des numéros de piste ATM (Auto Track Mark)
(Unité principale)
(Télécommande)
PAUSE
3
PROG/DIRECT CALL
A-B
A ! "
D # %
1
1,3
)
TIME
TITLE CHARACTER
S
DISPLAY SEL. FADER INPUT
CDR-W1500
9
Réglez l'appareil en mode paramétrage, faites ensuite tourner le sélecteur jog de l'unité principale ou appuyez sur la
touche de recherche automatique de la télécommande pour afficher “Sync. Rec?”.
DUBBING
NORMAL
HIGH
TIME
DISPLAY
TITLE /
SELECT CHARACTER
TIME
CLEAR
INPUT
4 REC
FINALIZE
8
9
PLAY
STOP
PAUSE
1
2
3
5
/
POWER
STOP
PAUSE
1
2
3
RELAY MODE
OPEN / CLOSE
ON
PHONES
PHONES LEVEL
-
8
9
{ ? }
CLEAR
+10
REC
+
OPEN /CLOSE
5
MENU
6
STOP
3
Faites tourner le sélecteur jog de l'unité principale ou appuyez sur la touche de recherche automatique de la
télécommande et ensuite, sélectionnez le d'enregistrement synchronisé.
“Sync. Off?”.
“Disc Sync.?”.
“Make CD?”.
“1Tr Sync.?”.
4
Appuyez sur la touche d'entrée (ENTER) et réglez le mode d'enregistrement synchronisé.
“Synchro Off”.
“Disc Synchro”.
“Make CD”.
“1Tr Synchro”.
7
MENU
2,4
PUSH
ENTER
8
2
−
Y < >
7
MULTI JOG
OFF
5
MAX
,
6
: ;
10
REMOTE SENSOR
PLAY
MIN
Appuyez sur la touche d'entrée (ENTER) et réglez le mode de sélection d'enregistrement synchronisé.
V
P
[ = ]
FINALIZE
8
.
3
M*+
4
RANDOM
G & '
2
J(
PCM AUDIO TECHNOLOGY / COMPACT DISC RECORDER
ENTER
PLAY
2
1,2,3,4
RANDOM
9
PAUSE
3
PROG/DIRECT CALL
42
A-B
TITLE CHARACTER
−
7
8
1
1 / ALL
TIME
REC
+
5
MAX
,
Y < >
10
MULTI JOG
OFF
5
MIN
P
RANDOM
6
: ;
[ = ]
REMOTE SENSOR
PLAY
PAUSE
3
DISPLAY SEL. FADER INPUT
(2) Réglage du mode enregistrement synchronisé
★ Effectuez les réglages du mode enregistrement synchronisé. (Voir page 49).
8
9
ENTER
PROG/DIRECT CALL
2
2,4
PUSH
ENTER
2
(Unité principale)
−
Y < >
[ = ]
STOP
PCM AUDIO TECHNOLOGY / COMPACT DISC RECORDER
,
6
: ;
V
8
1
3
P
5
REMOTE SENSOR
TITLE CHARACTER
TIME
.
S
G & '
2
M*+
)
4
POWER
RANDOM
D # %
1
J(
PAUSE
2
1
−
Y < >
REC
5
MIN
,
6
: ;
V
MULTI JOG
-
P
5
REMOTE SENSOR
POWER
3
M*+
)
4
PCM AUDIO TECHNOLOGY / COMPACT DISC RECORDER
G & '
2
J(
8
(3) Réglage du niveau d'enregistrement synchronisé
★ S'utilise pour régler le niveau de départ de l'enregistrement synchronisé lorsque celui-ci est utilisé.
(Voir page 49).
★ Lors de l'utilisation de l'enregistrement synchronisé, l'enregistrement commencera lorsque le niveau du signal d'entrée
dépasse la valeur réglée. L'enregistrement s'arrêtera tant que le signal reste à un niveau inférieur à la valeur réglée pour 10
secondes ou plus.
(Télécommande)
TIME
1 / ALL
A-B
1,3
TITLE CHARACTER
DISPLAY SEL. FADER INPUT
FINALIZE
1
Réglez l'appareil en mode paramétrage, faites ensuite tourner le sélecteur jog de l'unité principale ou appuyez sur la
touche de recherche automatique de la télécommande pour afficher “A.T. Mark?”.
2
Appuyez sur la touche d'entrée (ENTER) et réglez le mode de sélection du marquage automatique des numéros de piste.
3
Faites tourner le sélecteur jog de l'unité principale ou appuyez sur la touche de recherche automatique de la
télécommande pour sélectionner l'activation ou la désactivation du marquage automatique des numéros de piste.
• L'indication du mode sélectionné se met à clignoter. “On/Off”
4
Appuyez sur la touche d'entrée (ENTER) et réglez l'activation ou la désactivation du marquage automatique des
numéros de piste.
• Le message “A.T.Mark On” (Marquage ATM activé) ou “A.T.Mark Off” (Marquage ATM désactivé)
s'affiche.
FRANCAIS
(7) Réglage de la durée de lecture d'introduction pour l'enregistrement sélectif
★ Pour effectuer un enregistrement sélectif, réglez d'abord la durée de lecture d'introduction. (Voir page 46).
(5) Réglage de la durée du fondu de début
★ Pour effectuer un enregistrement avec fondu de début, réglez la durée de ce dernier.
(Voir page 50).
(Unité principale)
(Unité principale)
A ! "
D # %
G & '
1
2
3
)
M*+
5
4
S
PCM AUDIO TECHNOLOGY / COMPACT DISC RECORDER
9
DUBBING
NORMAL
HIGH
TIME
CDR-W1500
DISPLAY
TITLE /
SELECT CHARACTER
TIME
POWER
STOP
1
2
G & '
M*+
P
CLEAR
INPUT
4 REC
FINALIZE
8
9
STOP
PAUSE
.
/
V
PAUSE
RELAY MODE
ON
OPEN / CLOSE
PHONES
PHONES LEVEL
OPEN /CLOSE
MENU
PLAY
5
MIN
MAX
−
: ;
Y < >
DUBBING
NORMAL
HIGH
9
8
TIME
DISPLAY
TITLE /
SELECT CHARACTER
TIME
CLEAR
INPUT
4 REC
FINALIZE
8
9
PLAY
STOP
PAUSE
1
2
3
.
5
/
V
8
9
{ ? }
CLEAR
+10
POWER
PLAY
STOP
PAUSE
1
2
3
RELAY MODE
ON
OPEN / CLOSE
PHONES
PHONES LEVEL
7
8
9
{ ? }
CLEAR
+10
REC
MULTI JOG
OFF
-
OPEN /CLOSE
+
5
MENU
5
MIN
MAX
6
7
MENU
1
2
PLAY
STOP
3
8
ENTER
2,4
9
PLAY
STOP
3
PROG/DIRECT CALL
RANDOM
1 / ALL
A-B
FINALIZE
1
Réglez l'appareil en mode paramétrage, faites ensuite tourner le sélecteur jog de l'unité principale ou appuyez sur la
touche de recherche automatique de la télécommande pour affiche “FadeIn Time?”.
2
Appuyez sur la touche d'entrée pour régler le mode de réglage de la durée du fondu de début.
3
Faites ensuite tourner le sélecteur jog de l'unité principale ou appuyez sur la touche de recherche automatique de la
télécommande pour régler la durée du fondu de début.
• Le réglage est affiché sur la section d'affichage multiple. “FadeIn **sec”
✽ Le réglage peut être effectué entre 1 et 15 secondes par pas de 1 seconde.
4
Appuyez sur la touche d'entrée pour régler la durée du fondu de début d'enregistrement.
• Le message “Complete” (Terminé) s'affiche.
3
PROG/DIRECT CALL
1,2,3,4
RANDOM
1,3
TITLE CHARACTER
TIME
DISPLAY SEL. FADER INPUT
TIME
DISPLAY SEL FADER INPUT
Appuyez sur la touche d'entrée pour activer le mode de réglage de la durée de lecture d'introduction.
3
Faites ensuite tourner le sélecteur jog de l'unité principale ou utilisez les touches de recherche automatique de la
télécommande pour régler la durée de lecture d'introduction de piste.
• Le réglage est affiché sur la section d'affichage multiple. “ScanTime **s”
✽ Le réglage peut être effectué entre 5 et 30 secondes par pas de 5 secondes.
4
Appuyez sur la touche d'entrée pour régler la durée de lecture d'introduction.
• Le message “Complete” (Terminé) s'affiche.
(Unité principale)
(Télécommande)
A ! "
D # %
1
S
PCM AUDIO TECHNOLOGY / COMPACT DISC RECORDER
A ! "
D # %
G & '
1
2
3
J(
)
M*+
P ,
−
9
8
4
S
CDR-W1500
.
5
/
V
7
DUBBING
NORMAL
HIGH
TIME
6
: ;
8
CDR-W1500
DISPLAY
TITLE /
SELECT CHARACTER
TIME
POWER
9
DISPLAY
TITLE /
SELECT CHARACTER
TIME
CLEAR
INPUT
4 REC
FINALIZE
8
[ = ]
{ ? }
PLAY
STOP
PAUSE
1
2
3
RELAY MODE
OPEN / CLOSE
ON
PHONES
PHONES LEVEL
PLAY
STOP
PAUSE
1
2
3
RELAY MODE
OPEN / CLOSE
ON
PHONES
PHONES LEVEL
10
+10
OFF
-
+
OPEN /CLOSE
5
MAX
OPEN /CLOSE
5
CLEAR
8
9
PLAY
STOP
PAUSE
1
2
3
MENU
V
MAX
,
−
6
: ;
Y < >
7
8
9
[ = ]
{ ? }
CLEAR
10
+10
MENU
6
7
MENU
2,4,5
PUSH
ENTER
8
STOP
ENTER
PLAY
2
PLAY
STOP
PAUSE
1
2
3
6
9
PAUSE
ENTER
2,4
PLAY
STOP
2
RANDOM
TIME
1 / ALL
A-B
RANDOM
TIME
1 / ALL
A-B
TITLE CHARACTER
FINALIZE
1,3,5
5
1
Réglez l'appareil en mode paramétrage, faites ensuite tourner le sélecteur jog de l'unité principale ou appuyez sur la
touche de recherche automatique de la télécommande pour afficher “Custom Index”.
2
Appuyez sur la touche d'entrée (ENTER) et activez le mode d'entrée d'index personnalisé.
3
Faites tourner le sélecteur jog de l'unité principale ou appuyez sur la touche de recherche automatique de la
télécommande pour sélectionner les jacks auquels un nom sera associé.
• L'indication des jacks sélectionnés se met à clignoter. “Opt/Coax/Ana”
4
Appuyez sur la touche d'entrée et sélectionnez les jacks auquels un nom sera associé. Cette opération active le mode
d'entrée de nom.
5
Sélectionnez le mode d'entrée avec la touche de caractère, faites ensuite tourner le sélecteur jog de l'unité principale
ou appuyez sur la touche de recherche automatique de la télécommande pour sélectionner les caractères. Entrez un
caractère à la fois avec la touche d'entrée.
• Voir “Edition de texte”, page 62 pour les détails sur la méthode d'entrée de caractère et effectuez ensuite les
opérations 7 et 8.
FINALIZE
1
Réglez l'appareil en mode paramétrage, faites ensuite tourner le sélecteur jog de l'unité principale ou appuyez sur la
touche de recherche automatique de la télécommande pour afficher “FadeOutTime?”.
2
Appuyez sur la touche d'entrée pour régler le mode de réglage de la durée du fondu de fin de piste.
3
Faites ensuite tourner le sélecteur jog de l'unité principale ou appuyez sur la touche de recherche automatique de la
télécommande pour régler la durée du fondu de fin de piste.
• Le réglage est affiché sur la section d'affichage multiple. “FadeOut**sec”
✽ Le réglage peut être effectué entre 1 et 15 secondes par pas de 1 seconde.
Appuyez sur la touche d'entrée pour régler la durée du fondu de fin d'enregistrement.
• Le message “Complete” (Terminé) s'affiche.
1,2,3,4,5
DISPLAY SEL. FADER INPUT
1,3
TITLE CHARACTER
DISPLAY SEL. FADER INPUT
5
PAUSE
3
PROG/DIRECT CALL
1,2,3,4
9
3
PROG/DIRECT CALL
7
MENU
PUSH
ENTER
8
4
4 REC
FINALIZE
/
P
REC
+
5
REC
MULTI JOG
5
MIN
INPUT
5
MULTI JOG
OFF
-
3
M*+
9
REMOTE SENSOR
POWER
CLEAR
.
G & '
2
)
REMOTE SENSOR
Y < >
MIN
TIME
FINALIZE
2
(Télécommande)
DUBBING
NORMAL
HIGH
1,3
1
4
9
A-B
TITLE CHARACTER
Réglez l'appareil en mode paramétrage, faites ensuite tourner le sélecteur jog de l'unité principale ou appuyez sur la
touche de recherche automatique de la télécommande pour afficher “Intro Time?”.
J(
8
1 / ALL
(8) Réglage de l'index personnalisé
★ Un nom peut être associé aux jacks d'entrée.
★ Cela est très pratique pour savoir quel équipement est connecté aux jacks d'entrée.
(6) Réglage de la durée de fondu de fin de piste
★ Pour effectuer un enregistrement avec fondu de fin de piste, réglez la durée de ce dernier.
(Voir page 50).
PCM AUDIO TECHNOLOGY / COMPACT DISC RECORDER
PAUSE
2
PAUSE
2
(Unité principale)
9
ENTER
7
MENU
PUSH
ENTER
1,2,3,4
2,4
PUSH
ENTER
8
6
−
Y < >
10
REMOTE SENSOR
7
,
6
: ;
[ = ]
REC
+
5
3
,
CDR-W1500
6
10
MULTI JOG
OFF
-
P
)
4
S
PCM AUDIO TECHNOLOGY / COMPACT DISC RECORDER
[ = ]
REMOTE SENSOR
PLAY
D # %
J(
(Télécommande)
J(
8
A ! "
(Télécommande)
43
FRANCAIS
(9) Réglage du mode de lecture avec saut de piste
★ Cette fonction permet à la lecture de sauter les pistes que vous ne souhaitez pas écouter.
(Voir “Enregistrement des pistes que vous ne souhaitez pas écouter”, page 60 pour les détails sur la sélection de telles pistes).
(Unité principale)
A ! "
D # %
G & '
J(
M*+
P
(Télécommande)
)
4
S
PCM AUDIO TECHNOLOGY / COMPACT DISC RECORDER
9
8
DUBBING
NORMAL
HIGH
TIME
CDR-W1500
DISPLAY
TITLE /
SELECT CHARACTER
TIME
CLEAR
INPUT
4 REC
FINALIZE
8
9
PLAY
STOP
PAUSE
1
2
3
.
5
/
V
POWER
STOP
PAUSE
1
2
3
RELAY MODE
ON
OPEN / CLOSE
PHONES
PHONES LEVEL
OPEN /CLOSE
MENU
5
MAX
Appuyez sur la touche d'entrée (ENTER) et activez le mode de sélection de lecture temporisée.
Y < >
9
[ = ]
{ ? }
CLEAR
3
Faites ensuite tourner le sélecteur jog de l'unité principale ou appuyez sur les touches de recherche de la
télécommande pour sélectionner l'activation ou la désactivation de la lecture temporisée.
• L'indicateur du mode sélectionné se met à clignoter. “On/Off”
10
+10
4
Appuyez sur la touche d'entrée (ENTER) pour activer ou la désactiver le mode de lecture temporisée.
• L'indication “TimerPlayOn” (Lecture temporisée activée) ou “TimerPlayOff” (Lecture temporisée
désactivée) sera affichée.
REC
+
5
MIN
2
6
: ;
8
MULTI JOG
OFF
-
Réglez l'appareil en mode paramétrage, faites ensuite tourner le sélecteur jog de l'unité principale ou appuyez sur la
touche de recherche automatique de la télécommande pour afficher “Timer Play?”.
−
7
REMOTE SENSOR
PLAY
,
1
6
7
MENU
2,4
PUSH
ENTER
8
ENTER
9
PLAY
STOP
PAUSE
2
3
PROG/DIRECT CALL
1,2,3,4
RANDOM
1 / ALL
A-B
1,3
10 PROCEDURE DE COPIE
TITLE CHARACTER
TIME
DISPLAY SEL. FADER INPUT
FINALIZE
Au sujet de la copie
★ La copie du lecteur CD au graveur CD-R s'effectue très facilement.
★ Deux vitesse de copie (normale et haute) et quatre modes de copie sont disponibles.
• Le mode se commute comme indiqué ci-dessous à chaque pression sur la touche de copie à vitesse normale (NORMAL) ou
sur la touche de copie à grande vitesse (HIGH).
1
Réglez l'appareil en mode paramétrage, faites ensuite tourner le sélecteur jog de l'unité principale ou appuyez sur la
touche de recherche automatique de la télécommande pour afficher “Skip Play?”.
2
Appuyez sur la touche d'entrée (ENTER) et activez le mode de sélection de lecture avec saut de piste.
3
Faites ensuite tourner le sélecteur jog de l'unité principale ou appuyez sur la touche de recherche de la télécommande
pour sélectionner l'activation ou la désactivation de la lecture avec saut de piste.
• L'indicateur du mode sélectionné se met à clignoter. “On/Off”
Copie de disque: Avec ce mode, des CD entiers peuvent être copiés sur CD-R/RW.
(“All Tr Dubb” est affiché.)
4
Appuyez sur la touche d'entrée (ENTER) et réglez l'activation ou la désactivation de la lecture avec saut de plage.
• L'indication “S.Play On” (Lecture avec saut activée) ou “S.Play Off” (Lecture avec saut désactivée) sera
affichée.
Copie complète de CD: Avec ce mode, des CD entiers peuvent être copiés sur CD-R/RW et ensuite finalisés
automatiquement.
(“Make CD Dubb” est affiché.)
ª
ª
REMARQUES:
• La finalisation du disque lorsque les pistes que vous ne souhaitez pas écouter ont été enregistrées déclenche
automatiquement l'activation du mode lecture avec saut.
• La lecture avec saut de plage est impossible sur les lecteurs CD qui ne sont pas équipés de cette fonction.
• La lecture programmée ou aléatoire est impossible lorsque des pistes que vous ne souhaitez pas écouter ont été
enregistrées.
(10) Réglage du mode de lecture temporisée
★ La lecture temporisée est possible. (Voir page 55).
(Unité principale)
A ! "
D # %
J(
M*+
(Télécommande)
)
4
S
PCM AUDIO TECHNOLOGY / COMPACT DISC RECORDER
9
8
DUBBING
NORMAL
HIGH
TIME
CDR-W1500
DISPLAY
TITLE /
SELECT CHARACTER
TIME
CLEAR
INPUT
4 REC
FINALIZE
8
9
PLAY
STOP
PAUSE
1
2
3
.
5
/
V
POWER
PLAY
STOP
PAUSE
1
2
3
RELAY MODE
OPEN / CLOSE
ON
PHONES
PHONES LEVEL
OPEN /CLOSE
5
MAX
−
7
8
9
{ ? }
CLEAR
+10
REC
+
5
MIN
,
Y < >
10
MULTI JOG
OFF
-
P
6
: ;
[ = ]
REMOTE SENSOR
MENU
6
7
MENU
2,4
PUSH
ENTER
8
STOP
ENTER
PLAY
2
RANDOM
9
PAUSE
3
PROG/DIRECT CALL
1,2,3,4
TIME
1 / ALL
A-B
TITLE CHARACTER
DISPLAY SEL. FADER INPUT
44
G & '
FINALIZE
1,3
ª
Copie d'une piste: Dans ce mode, des pistes seules de CD peuvent être copiées.
(“1Tr Dubbing” est affiché.)
ª
Copie sélective: Dans ce mode, les pistes souhaitées peuvent être sélectionnées sur le CD et copiées.
(“Scan Rec Dub” est affiché.)
• Le niveau d'enregistrement est automatiquement réglée à la valeur par défaut (0,0 dB).
• Les modes lecture à répétition et aléatoire sont annulés lorsque le mode de copie est activé.
• Pendant la copie à vitesse normale vous pouvez écouter le son tout en effectuant la copie.
• Pendant la copie à grande vitesse aucun son n'est produit.
• Acun signal est sorti de les sorties numériques pendant le copiage à haute vitesse.
• Pendant la copie, aucune touche hormis les touches d'arrêt CD ou CD-R ne fonctionne.
• Lorsque des CD compatibles texte sont copiés, les noms de disque et de piste sont aussi copiés.
★ Lors de la copie, commuter le mode relais au mode normal ou au mode double. Il n’est pas possible de copier en mode relais
ou en mode mixte.
★ Pour un enregistrement optimal, s’assurer qu’il n’y a pas de traces de doigts, de rayures ou de la poussière à la surface du
signal de la face source du CD ou du CD-R/RW.
★ La fonction de plage automatique est toujours activée en mode de copie. Il n’est pas possible d‘attribuer manuellement des
numéros de plage.
REMARQUES:
• La copie s’effectue normalement avec des signaux numériques, mais si la copie numérique est impossible à cause des
restrictions SCMS, la copie est effectuée avec des signaux analogiques. De plus, la copie s’effectue toujours à vitesse
normale. (Voir page 37).
• La copie analogique est toujours effectuée en mode à vitesse normale.
• Quand le mode de copie est activé et que le temps enregistrable du CD-R/RW est plus court que le la durée du CD
source que vous tentez de copier, “CD-R Short” (CD-R court) est affiché et les deux unités CD et CD-R sont mises
en mode stop. Si cela se produit, vérifiez la durée enregistrable du disque. (Toutefois, lors de l’enregistrement des
numéros de plage 21 ou plus à partir d’une source CD contenant plus de 20 plages, “CD-R Short” n’est pas affiché,
même si la durée de la source d’enregistrement est plus longue que la durée enregistrable du CD-R/RW.)
• Si le nom du disque a déjà été entrée sur le disque que vous enregistrez, seuls les titres de piste sont copiés.
• Avec certains CD, le texte ne peut être copié à cause de la protection des droits d’auteur. Dans ce cas l’indication “Text
Protect” s’affiche.
• Ne pas couper l’alimentation ou débrancher l’appareil du secteur pendant que l’indication “Now PMA Rec” s’affiche,
une fois l’enregistrement terminé. Cela risque de rendre le disque inutilisable.
FRANCAIS
(1) Copie de disques entiers
(2) Copie d'une piste à la fois
(Unité principale)
(Télécommande)
(Unité principale)
(Télécommande)
CD CD-R
3
1
_ DUBBING _
NORMAL HIGH
2
3
A ! "
D # %
1
)
S
PCM AUDIO TECHNOLOGY / COMPACT DISC RECORDER
9
8
DUBBING
NORMAL
HIGH
TIME
CDR-W1500
DISPLAY
TITLE /
SELECT CHARACTER
TIME
CLEAR
INPUT
4 REC
FINALIZE
8
9
PLAY
STOP
PAUSE
1
2
3
.
5
/
V
POWER
STOP
PAUSE
1
2
3
RELAY MODE
OPEN / CLOSE
ON
PHONES
PHONES LEVEL
-
OPEN /CLOSE
5
MENU
: ;
S
PCM AUDIO TECHNOLOGY / COMPACT DISC RECORDER
8
9
CLEAR
9
8
DUBBING
NORMAL
HIGH
TIME
CDR-W1500
DISPLAY
TITLE /
SELECT CHARACTER
POWER
7
MENU
ENTER
PLAY
2
2
5
5
RANDOM
TIME
CLEAR
INPUT
4 REC
FINALIZE
8
9
PLAY
STOP
PAUSE
1
2
3
REMOTE SENSOR
6
4
9
PLAY
STOP
PAUSE
1
2
3
RELAY MODE
OPEN / CLOSE
ON
PHONES
PHONES LEVEL
MULTI JOG
OFF
-
+
5
OPEN /CLOSE
5
MIN
MAX
MENU
5
TIME
2
)
3
M*+
5
/
V
PAUSE
−
Y < >
7
8
9
{ ? }
CLEAR
10
+10
REC
6
STOP
7
ENTER
PLAY
2
4
2
6
6
FINALIZE
RANDOM
9
PAUSE
4
3
PROG/DIRECT CALL
1
,
6
: ;
MENU
A-B
6
P
[ = ]
8
TITLE CHARACTER
DISPLAY SEL. FADER INPUT
.
G & '
PUSH
ENTER
3
1 / ALL
D # %
1
J(
Y < >
+10
PROG/DIRECT CALL
A ! "
RELAY
MODE
4
PUSH
ENTER
4
3
−
{ ? }
STOP
1
,
7
8
5
2
REC
+
MAX
1
6
10
MULTI JOG
OFF
5
MIN
P
[ = ]
REMOTE SENSOR
PLAY
3
_ DUBBING _
NORMAL HIGH
3
M*+
4
5
G & '
2
J(
5
CD CD-R
RELAY
MODE
TIME
1 / ALL
A-B
TITLE CHARACTER
DISPLAY SEL. FADER INPUT
FINALIZE
1
Chargez le CD que vous souhaitez copier dans le lecteur CD.
1
Chargez le CD que vous souhaitez copier dans le lecteur CD.
2
Chargez le CD-R/RW sur lequel vous souhaitez enregistrer dans l'unité CD-R.
2
Chargez le CD-R/RW sur lequel vous souhaitez enregistrer dans l'unité CD-R.
3
Appuyez sur la touche de copie à vitesse normale ou haute (NORMAL ou HIGH) pour afficher “All
(Copie de toutes les pistes) ou “Make CD Dubb” (Copie complète).
3
Appuyez sur la touche de copie à vitesse normale ou élevée (NORMAL ou HIGH) pour afficher “1Tr Dubbing”.
4
Appuyez sur la touche d'entrée (ENTER) pour régler le mode de copie.
• L'unité CD est réglée en mode pause, et l'unité CD-R en mode attente d'enregistrement.
4
Appuyez sur la touche d'entrée (ENTER) pour régler le mode de copie.
• L'unité CD est réglée en mode pause, et le l'unité CD-R en mode attente d'enregistrement.
5
Uilisez les touches de recherche automatique de l'unité CD pour sélectionner la piste que vous souhaitez enregistrer.
5
Appuyez sur la touche de lecture de l'unité CD ou CD-R.
• La copie démarre.
• Si le mode “Make CD” a été sélectionné, la finalisation commence automatiquement une fois la copie terminée.
(Voir page 58). Une fois que la finalisation est terminée, le mode stop est activé automatiquement.
• Pour arrêter en cours de copie, appuyez sur la touche stop de l'unité CD ou CD-R.
• Si les modes de lecture programmée ont été réglés auparavant pour l'unité CD, la copie est effectuée selon les
réglages effectués.
6
Appuyez sur la touche de lecture de l'unité CD ou CD-R.
• La copie démarre.
• Lorsque la copie est terminée, l'unité CD-R est arrêtée.
• Pour arrêter en cours de copie, appuyez sur la touche stop de l'unité CD ou CD-R.
Tr
Dubb”
REMARQUE:
• Si vous souhaitez entrer des données de texte, sélectionnez le mode “All Tr Dubb”. Avec les disques CD-R, les
données de texte ne peuvent être entrées qu'une fois le disque finalisé.
45
FRANCAIS
(3) Sélection des pistes à copier pendant la lecture des introductions du CD et copie des pistes sélectionnées
★ La durée de la lecture d'introduction peut être réglée par le menu de paramétrage (page 43).
(Unité principale)
(Télécommande)
5
CD CD-R
5
3
1
_ DUBBING _
2
NORMAL
3
A ! "
RELAY
MODE
HIGH
D # %
1
)
PCM AUDIO TECHNOLOGY / COMPACT DISC RECORDER
9
DUBBING
NORMAL
HIGH
TIME
CDR-W1500
DISPLAY
TITLE /
SELECT CHARACTER
TIME
CLEAR
INPUT
4 REC
FINALIZE
8
9
REMOTE SENSOR
POWER
PLAY
STOP
PAUSE
1
2
3
RELAY MODE
OPEN / CLOSE
ON
PHONES
PHONES LEVEL
MULTI JOG
OFF
-
+
5
OPEN /CLOSE
5
MIN
MAX
MENU
PLAY
STOP
PAUSE
1
2
3
5
.
3
M*+
5
4
S
/
V
,
−
6
: ;
Y < >
7
8
9
{ ? }
CLEAR
10
+10
Modes d'enregistrement
★ Votre graveur propose plusieurs modes d'enregistrement.
★ Son réglage est possible en utilisant la méthode "Paramétrage", page 42.
REC
6
7
MENU
PUSH
ENTER
STOP
ENTER
PLAY
2
4,5
2
6
6
RANDOM
9
PAUSE
4,5
3
PROG/DIRECT CALL
1
P
[ = ]
8
6
G & '
2
J(
8
11 ENREGISTREMENT A PARTIR DE SOURCES EXTERNES
• Lors d'un enregistrement sur un disque déjà enregistré, celui-ci commence automatiquement à partir de la fin de la section
enregistrée en dernier. Vérifier à ce moment-là le temps d'enregistrement restant.
• Pour enregistrer à nouveau sur la totalité du disque, effacez-le d'abord en totalité. "(2) Effacement des plages", page 59.
• Pour assurer un enregistrement précis, enregistrez à une température ambiante de 30 °C ou moins.
• L'enregistrement peut s'arrêter si l'appareil est soumis à des chocs pendant l'enregistrement. Si l'enregistrement s'arrête, il est
possible que le disque ne soit plus utilisable normalement. ("Disc Error")
• Réglez le mode sur normal ou double (dual) pour enregistrer. Cette opération est impossible en mode relais ou mixte.
TIME
1 / ALL
TITLE CHARACTER
DISPLAY SEL. FADER INPUT
Disc Synchro
A-B
ª
FINALIZE
Make CD
1
Chargez le CD que vous souhaitez copier dans le lecteur CD.
2
Chargez le CD-R/RW sur lequel vous souhaitez enregistrer dans l'unité CD-R.
3
Appuyez sur la touche de copie à vitesse normale ou double (NORMAL ou HIGH) pour afficher "Scan Rec Dub".
4
Appuyez sur la touche d'entrée (ENTER) pour régler le mode de copie.
• La lecture par balayage des introductions commence sur l’unité CD.
5
Sélectionnez les pistes que vous souhaitez enregistrer.
• Pour sélectionner les pistes que vous voulez enregistrer, appuyez sur la touche d'entrée (ENTER).
• Pour sauter les pistes que vous ne voulez pas enregistrer, appuyez sur la touche de recherche avant automatique.
✽ Une fois que toutes les pistes ont été balayées, l'unité CD passe en mode pause, "Choice OK?" (Choix OK ?)
s'affiche et l'indicateur "PROG" s'allume.
• Vérifiez les réglages sur le calendrier musical et si tout est correct, appuyez sur la touche d'entrée (ENTER).
• Si les réglages sont incorrects, appuyez sur la touche stop et ensuite, répétez les étapes 1 à 5.
6
Appuyez sur la touche de lecture de l'unité CD ou CD-R.
• La copie démarre.
• Lorsque la copie est terminée, l'unité CD-R est arrêtée.
• Pour arrêter en cours de copie, appuyez sur la touche d’arrêt de l'unité CD ou CD-R.
• Dans ce mode, la finalisation est effectuée automatiquement après
l'enregistrement synchronisé de toutes les pistes.
ª
1Tr Synchro
• Pour lancer manuellement un enregistrement en appuyant tout simplement sur
la touche d'enregistrement (REC).
ª
Synchro Off
REMARQUE:
• Un maximum de 30 pages peut être réglé pour enregistrement. La lecture d’introduction est effectuée même après que
les 30 plages ont été réglées mais aucune autre piste ne peut être ajoutée.
46
• Pour effectuer un enregistrement synchronisé d'un disque en totalité ou d'un
programme en démarrant tout simplement la source.
• Pour effectuer un enregistrement synchronisé d'une piste seule en démarrant
tout simplement la source.
REMARQUES:
• L'enregistrement analogique n'est pas possible en mode de copie
complète "Make CD".
• Utilisez le mode copie pour enregistrer les disques HDCD. Ces disques
risquent ne pas pouvoir être enregistrés correctement à partir de sources
externes.
• Ne pas couper l'alimentation ou débrancher l'appareil du secteur pendant
que l'indication "Now PMA Rec" s'affiche, une fois l'enregistrement
terminé. Cela risque de rendre le disque inutilisable.
Quelques remarques sur l'enregistrement:
• Lorsque le marquage automatique "Auto track" est activé (réglage par défaut), les numéros de piste sont automatiquement
incrémentés pendant l'enregistrement.
• En programmant d'abord la source, une compilation peut être enregistrée.
FRANCAIS
1. Enregistrement manuel
(1) Lancement d'un enregistrement analogique
(Unité principale)
(Télécommande)
(2) Lancement d'un enregistrement numérique
• Cet appareil est équipé d'un convertisseur de taux d'échantillonnage.
Lors d'enregistrement de DAT ou d'émissions satellite (32 ou 48 kHz) dont la fréquence d'échantillonnage diffère de celle des
CD (44,1 kHz), cette dernière est automatiquement convertie en 44,1 kHz.
(Unité principale)
(Télécommande)
Sélectionnez le côté CD-R.
CD CD-R
Sélectionnez le côté CD-R.
CD CD-R
4 2
_ DUBBING _
NORMAL HIGH
8
RELAY
MODE
D # %
G & '
1
2
3
J(
)
M*+
5
4
S
PCM AUDIO TECHNOLOGY / COMPACT DISC RECORDER
9
8
DUBBING
NORMAL
HIGH
TIME
1
2
PAUSE
3
RELAY MODE
OPEN / CLOSE
/
V
,
S
Y < >
7
8
9
TIME
CLEAR
INPUT
4 REC
FINALIZE
8
9
[ = ]
{ ? }
CLEAR
10
+10
ON
PHONES
PHONES LEVEL
STOP
PAUSE
MULTI JOG
OFF
-
+
5
OPEN /CLOSE
5
MENU
PLAY
1
2
8
9
DUBBING
NORMAL
HIGH
TIME
CDR-W1500
DISPLAY
TITLE /
SELECT CHARACTER
TIME
MAX
POWER
6
STOP
PAUSE
1
2
3
RELAY MODE
OPEN / CLOSE
ON
PHONES
PHONES LEVEL
8
STOP
ENTER
PLAY
2
-
+
5
9
2 5 10
RANDOM
OPEN /CLOSE
4 REC
FINALIZE
8
9
PLAY
STOP
PAUSE
1
2
3
8
/
V
,
−
6
: ;
Y < >
7
8
9
{ ? }
CLEAR
10
+10
REC
6
7
MENU
8
5
MAX
MENU
STOP
PUSH
ENTER
9
TIME
1 / ALL
PLAY
2
A-B
1
TITLE CHARACTER
DISPLAY SEL. FADER INPUT
ENTER
9
2 5 10
FINALIZE
B
REMOTE CONTROL UNIT RC-278
1
Activez l'alimentation.
2
Chargez le disque CD-R/RW à enregistrer.
3
Effectuez les opérations de la "Méthode de paramétrage (2) Réglage du mode enregistrement synchronisé", page 42 et
sélectionnez le mode de copie avec synchronisation désactivée (OFF).
4
Lors d'un enregistrement sur un disque déjà enregistré, appuyez sur la touche TIME pour vérifier le temps
d'enregistrement restant.
• L'affichage du temps commute entre temps total enregistré et temps enregistrable à chaque pression sur la touche
TIME.
5
Appuyez sur la touche de sélection d'entrée (INPUT) et sélectionnez la source analogique.
• L'indication "ANALOG" s'allume.
6
Effectuez les opérations de la "Méthode de paramétrage", page 42 et sélectionnez l'activation ou la désactivation de la
fonction de marquage de piste ATM.
• ATM Fonction activée
L'indication "ATM" s'allume. Lorsqu'une section vierge (d'environ 3 secondes ou plus) dans le signal d'entrée
d'enregistrement est détectée, le numéro de piste est automatiquement associé et enregistré.
• ATM Fonction désactivée
Est enregistré comme la piste suivante.
7
Lancez la lecture de la sélection que vous souhaitez enregistrer sur le lecteur CD, platine magnétocassette, etc.
8
Appuyez sur la touche d'enregistrement (4 REC).
• Le mode attente d'enregistrement est activé.
9
Réglez le niveau d'enregistrement avec le sélecteur Jog et appuyez sur la touche d'entrée (ENTER).
• Réglez la commande de réglage du niveau d'enregistrement (INPUT LEVEL) pour que l'indication "OVER" ne s'allume
pas même lorsque le volume est là son niveau le plus élevé. Après avoir effectué le réglage, réglez la source à
enregistrer en mode d'attente.
✽ Le niveau d'enregistrement peut être réglé d'avance par le mode menu.
• Le niveau d'enregistrement réglé sera enregistré en mémoire mais ces données peuvent être perdues si l'appareil
est débranché du secteur pendant 2 à 3 jours.
10
Appuyez sur la touche de lecture (1 PLAY).
• L'enregistrement démarre.
11
Lancez la lecture de la sélection que vous souhaitez enregistrer sur le lecteur CD, platine magnétocassette, etc.
10
4
5
RANDOM
9
PAUSE
3
PROG/DIRECT CALL
PAUSE
3
PROG/DIRECT CALL
1
5
P
MULTI JOG
OFF
7
MENU
3
PLAY
PUSH
ENTER
10
4
5
INPUT
3
M*+
REMOTE SENSOR
REC
MIN
MIN
CLEAR
.
G & '
2
)
[ = ]
6
: ;
D # %
1
J(
−
8
DISPLAY
TITLE /
SELECT CHARACTER
POWER
STOP
.
P
A ! "
8
RELAY
MODE
4
PCM AUDIO TECHNOLOGY / COMPACT DISC RECORDER
CDR-W1500
REMOTE SENSOR
PLAY
4 2
A ! "
_ DUBBING _
NORMAL HIGH
TIME
1 / ALL
A-B
TITLE CHARACTER
DISPLAY SEL. FADER INPUT
FINALIZE
B
REMOTE CONTROL UNIT RC-278
1
2
Activez l'alimentation.
3
Effectuez les opérations de la "Méthode de paramétrage (2) Réglage du mode enregistrement synchronisé", page 42 et
sélectionnez le mode de copie avec synchronisation désactivée (OFF).
4
Lors d'un enregistrement sur un disque déjà enregistré, appuyez sur la touche TIME pour vérifier le temps d'enregistrement
restant.
• L'affichage du temps commute entre temps total enregistré et temps enregistrable à chaque pression sur la touche TIME.
5
Appuyez sur la touche de sélection d'entrée (INPUT) et sélectionnez la source numérique optique ou coaxiale.
• L'indicateur pour la source d'entrée sélectionnée ("CD", "OPT" ou "COAX") s'allume.
6
Effectuez les opérations de la "Méthode de paramétrage", page 42 et sélectionnez l'activation ou la désactivation de la fonction de
marquage de piste ATM.
• ATM Fonction activée
L'indication "ATM" s'allume. Lorsqu'une section vierge (d'environ 3 secondes ou plus) dans le signal d'entrée d'enregistrement
est détectée, le numéro de piste est automatiquement associé et enregistré.
• ATM Fonction désactivée
Est enregistré comme la piste suivante.
7
Lancez la lecture de la sélection que vous souhaitez enregistrer sur le lecteur CD, enregistreur de MD, etc.
8
Appuyez sur la touche d'enregistrement (4 REC).
• Si l'indicateur "D. in" clignote, vérifiez les connexions aux jacks d'entrée numérique.
9
Réglez le niveau d'enregistrement avec le sélecteur Jog et appuyez sur la touche (ENTER).
• Réglez la commande de réglage du niveau d'enregistrement (INPUT LEVEL) pour que l'indication "OVER" ne s'allume pas même
lorsque le volume est à son niveau le plus élevé. Après avoir effectué le réglage, réglez la source à enregistrer en mode
d'attente.
✽ Le niveau d'enregistrement peut être réglé d'avance par le mode menu.
• Le niveau d'enregistrement réglé sera enregistré en mémoire mais ces données peuvent être perdues si l'appareil est
débranché du secteur pendant 2 à 3 jours.
Chargez le disque CD-R/RW à enregistrer.
10
Appuyez sur la touche de lecture (1 PLAY).
• L'enregistrement démarre.
11
Jouez la sélection à enregistrer sur le lecteur CD, etc.
REMARQUES:
• ”CD“ peut être sélectionné en appuyant sur la touche de sélection d'entrée mais l'enregistrement manuel à partir de l'unité CD
n'est possible qu'en mode double. (Veuillez-vous référer à ”Mode double“, page 57, 58).
• Lorsque vous ne souhaitez pas changer le niveau d'enregistrement numérique, réglez le sélecteur Jog pour que ” Level
00.0dB“ s'affiche. L'enregistrement sera effectué sans changer le niveau du signal d'entrée.
• Le niveau d'enregistrement peut être réglé sur un intervalle de – ∞ à +12 dB pour l'enregistrement d'entrée analogique et à partir de
– ∞ à 0 dB pour l'enregistrement d'entrée numérique. Notez que les valeurs de réglage affichées peuvent inclure un certain degré
d'erreur de calcul.
• Lorsque le niveau d'enregistrement est – ∞ l'indication ”Level---.-dB“ est affichée et aucun signal audio n'est envoyé en
sortie.
47
FRANCAIS
(4) Ajout de numéros de piste pendant l'enregistrement
3. Arrêt de l'enregistrement
(Unité principale)
(Télécommande)
(Unité principale)
(Télécommande)
Sélectionnez le côté CD-R.
Sélectionnez le côté CD-R.
CD CD-R
_ DUBBING _
NORMAL HIGH
A ! "
D # %
1
)
S
PCM AUDIO TECHNOLOGY / COMPACT DISC RECORDER
9
8
DUBBING
NORMAL
HIGH
TIME
CDR-W1500
DISPLAY
TITLE /
SELECT CHARACTER
TIME
CLEAR
INPUT
4 REC
FINALIZE
8
9
PLAY
STOP
PAUSE
1
2
3
.
5
/
V
POWER
STOP
PAUSE
1
2
3
RELAY MODE
OPEN / CLOSE
ON
PHONES
PHONES LEVEL
-
OPEN /CLOSE
MENU
Y < >
S
PCM AUDIO TECHNOLOGY / COMPACT DISC RECORDER
8
9
{ ? }
CLEAR
+10
9
8
DUBBING
NORMAL
HIGH
TIME
CDR-W1500
DISPLAY
TITLE /
SELECT CHARACTER
TIME
POWER
PLAY
STOP
PAUSE
1
2
3
RELAY MODE
OPEN / CLOSE
ON
PHONES
PHONES LEVEL
PUSH
ENTER
STOP
1
ENTER
PLAY
2
-
+
OPEN /CLOSE
MENU
5
MAX
4 REC
FINALIZE
8
9
PLAY
STOP
PAUSE
1
2
3
TIME
1 / ALL
P
5
/
V
,
−
6
: ;
Y < >
7
8
9
[ = ]
{ ? }
CLEAR
10
+10
REC
6
7
MENU
9
8
PAUSE
2
2
FINALIZE
9
ENTER
PLAY
STOP
2
A-B
TITLE CHARACTER
DISPLAY SEL. FADER INPUT
1
.
G & '
3
M*+
PUSH
ENTER
3
PROG/DIRECT CALL
RANDOM
INPUT
MULTI JOG
OFF
5
MIN
1
CLEAR
REMOTE SENSOR
7
MENU
8
)
4
7
6
D # %
2
J(
6
: ;
RELAY
MODE
1
−
REC
+
5
MAX
,
10
MULTI JOG
OFF
5
MIN
P
[ = ]
REMOTE SENSOR
PLAY
A ! "
3
M*+
4
_ DUBBING _
NORMAL HIGH
1
G & '
2
J(
CD CD-R
RELAY
MODE
PAUSE
2
3
PROG/DIRECT CALL
RANDOM
TIME
1 / ALL
A-B
TITLE CHARACTER
DISPLAY SEL. FADER INPUT
FINALIZE
• Des numéros de piste peuvent être ajoutés pendant l'enregistrement quel que soit le mode d'enregistrement.
1
Pendant l'enregistrement, appuyez sur la touche d’arrêt (2 STOP).
• Le mode d'arrêt est activé automatiquement une fois que la fin du temps enregistrable est atteinte.
REMARQUES:
• Lors de l'enregistrement numérique de CD ou de MD, les numéros de piste sont enregistrés automatiquement. (Voir
page 37).
• Lors de l'enregistrement de source numérique autre que les CD ou les MD, les numéros de piste sont automatiquement
ajoutés lorsque des sections vierges sont détectées. (Voir page 37).
• Pendant l'enregistrement numérique à partir de CD ou de MD, le numéro de piste peut ne pas changer si la même piste
est programmée deux fois de suite ou si le mode répétition d'une seule piste est activé.
• Il est impossible d'effectuer l'enregistrement numérique de disques ayant déjà reçu un enregistrement numérique. Le
CDR-W1500 incorpore le système de gestion de copies en série. Ce système limite la reproduction de signaux
numériques sur appareils numériques audio à "une génération". Utilisez l'enregistrement analogique pour enregistrer les
disques ayant déjà reçu un enregistrement numérique.
• Le CDR-W1500 est destiné à un usage domestique et risque de ne pas fonctionner correctement s'il est utilisé (pour
enregistrer, etc.) en combinaison avec de l'équipement professionnel ou tout autre appareil non conçu pour un usage
domestique.
• Pour éjecter le disque lorsque le message "Copy Prohibit" ou "Dig.Unlock" s'affiche pendant l'enregistrement
numérique et que le mode pause d'enregistrement est activé, appuyez d'abord sur la touche d’arrêt (2 STOP) et ensuite
sur la touche d'ouverture/fermeture (5 OPEN/CLOSE) pour éjecter le disque.
Appuyez sur la touche d'enregistrement (4 REC).
1
Pendant l'enregistrement, appuyez sur la touche
d'enregistrement (4 REC).
• Si l'on appuie sur la touche d'enregistrement (4 REC) pendant
l'enregistrement, un numéro de piste est ajouté à ce point.
• Un nouveau numéro de piste ne peut être ajouté pendant
environ 4 secondes après le dernier numéro de piste.
1ère piste
2ème piste
(L'enregistrement continue).
(5) Arrêt temporaire de l'enregistrement
• L'enregistrement peut être arrêté temporairement et repris ensuite à partir de ce même point.
q Appuyez sur la touche pause (3 PAUSE).
2
Pendant l'enregistrement, appuyez sur la touche pause ( 3
PAUSE).
• Si l'on appuie sur la touche pause ( 3 PAUSE) pendant
l'enregistrement, le mode pause est activé à ce point et le
numéro de piste change.
• Appuyez sur la touche de lecture (1 PLAY) pour terminer
l'enregistrement.
1ère piste
2ème piste
w Appuyez sur la touche de lecture (1 PLAY).
• Un blanc d'environ 2 secondes est inséré avant de reprendre l'enregistrement.
48
2
FRANCAIS
2 Enregistrement synchronisé de disque
(DISC SYNCHRO)
★ Ce mode est utilisé lors de l'enregistrement de toutes les pistes du CD ou MD du côté lecture.
★ Veuillez consulter aussi "Méthode de paramétrage (3) Réglages du niveau d'enregistrement synchronisé", page 42.
3. Enregistrement synchronisé d'une seule piste
(1Tr SYNCHRO)
★ Ce mode est utilisé pour enregistrer une seule piste.
★ Veuillez consulter aussi "Méthode de paramétrage (3) Réglages du niveau d'enregistrement synchronisé", page 42.
(Unité principale)
(Unité principale)
(Télécommande)
(Télécommande)
Sélectionnez le côté CD-R.
Sélectionnez le côté CD-R.
CD CD-R
_ DUBBING _
NORMAL HIGH
3
A ! "
D # %
1
)
S
PCM AUDIO TECHNOLOGY / COMPACT DISC RECORDER
9
8
DUBBING
NORMAL
HIGH
TIME
CDR-W1500
DISPLAY
TITLE /
SELECT CHARACTER
TIME
CLEAR
INPUT
4 REC
FINALIZE
8
9
PLAY
STOP
PAUSE
1
2
3
REMOTE SENSOR
POWER
PLAY
STOP
PAUSE
1
2
3
RELAY MODE
OPEN / CLOSE
ON
PHONES
PHONES LEVEL
MULTI JOG
OFF
-
+
5
OPEN /CLOSE
MENU
5
MIN
MAX
3
.
5
/
V
P
,
Y < >
S
PCM AUDIO TECHNOLOGY / COMPACT DISC RECORDER
7
8
9
{ ? }
CLEAR
+10
9
8
DUBBING
NORMAL
HIGH
TIME
CDR-W1500
DISPLAY
TITLE /
SELECT CHARACTER
TIME
POWER
7
PLAY
STOP
PAUSE
1
2
3
RELAY MODE
OPEN / CLOSE
ON
PHONES
PHONES LEVEL
ENTER
PLAY
2
-
RANDOM
TIME
1 / ALL
OPEN /CLOSE
5
MAX
MENU
4 REC
FINALIZE
8
9
PLAY
STOP
PAUSE
1
2
3
3
/
V
PAUSE
8
9
{ ? }
CLEAR
+10
REC
6
7
MENU
PUSH
ENTER
ENTER
PLAY
2
RANDOM
9
PAUSE
3
PROG/DIRECT CALL
FINALIZE
−
Y < >
7
STOP
A-B
,
6
: ;
10
8
TITLE CHARACTER
DISPLAY SEL. FADER INPUT
+
5
P
[ = ]
9
3
PROG/DIRECT CALL
INPUT
MULTI JOG
OFF
5
MIN
PUSH
ENTER
STOP
CLEAR
REMOTE SENSOR
REC
MENU
.
G & '
3
M*+
)
4
10
6
D # %
2
J(
6
: ;
RELAY
MODE
1
−
[ = ]
8
A ! "
3
M*+
4
_ DUBBING _
NORMAL HIGH
3
G & '
2
J(
CD CD-R
RELAY
MODE
TIME
1 / ALL
A-B
TITLE CHARACTER
DISPLAY SEL. FADER INPUT
FINALIZE
1
Effectuez les opérations de la section "Enregistrement manuel", page 47, réglez les jacks d'entrée et le niveau
d'enregistrement et activez le mode stop.
1
Effectuez les opérations de la section "Enregistrement manuel", page 47, réglez les jacks d'entrée et le niveau
d'enregistrement et activez le mode stop.
2
Effectuez la procédure "Méthode de paramétrage (2) Réglage du mode enregistrement synchronisé" page 42 et
sélectionnez le mode de copie synchronisée ou complète de CD.
• L'indication "SYNC" s'allume.
2
Effectuez les opérations de la "Méthode de paramétrage (2) Réglage du mode enregistrement synchronisé" page 42 et
sélectionnez le mode de copie synchronisée de piste.
• L'indication "1Tr SYNC" s'allume.
3
Appuyez sur la touche d'enregistrement.
• Le mode pause d'enregistrement est activé et l'indication "Disc
"Make CD" (Copie complète) est affichée.
3
Appuyez sur la touche d'enregistrement.
• Cette opération active le mode pause d'enregistrement et affiche l'indication "1Tr Synchro".
4
4
Utilisez un lecteur CD, une platine magnétocassette ou une autre source pour lire les pistes que vous souhaitez
enregistrer.
• L'enregistrement démarre automatiquement.
• En mode copie complète (Make CD), la finalisation est effectuée automatiquement en fin d'enregistrement.
✽ Veuillez consulter aussi "Méthode de paramétrage (3) Réglages du niveau d'enregistrement synchronisé", page 42.
Utilisez un lecteur CD, une platine magnétocassette ou une autre source pour lire les pistes que vous souhaitez
enregistrer.
• L'enregistrement démarre automatiquement.
✽ Veuillez consulter aussi "Méthode de paramétrage (3) Réglages du niveau d'enregistrement synchronisé", page 42.
Synchro" (Synchro de toutes les pistes) ou
• Pour arrêter l'enregistrement synchronisé, appuyez sur la touche stop.
• Pour arrêter l'enregistrement synchronisé, appuyez sur la touche stop.
• S’il y a une a section silencieuse de 3 secondes ou plus, l’enregistrement s’arrête lorsque la plage suivante commence.
• L’enregistrement s’arrête s’il y a une section silencieuse de 10 secondes ou plus.
REMARQUE:
• Si vous souhaitez entrer des données de texte, sélectionnez le mode “Disc Synchro” (Copie sync. de toutes les
pistes). Avec les disques CD-R, les données de texte ne peuvent être entrées qu'une fois le disque finalisé.
49
FRANCAIS
4. Enregistrement avec fondu de début et de fin d'enregistrement
★ Il est possible d'enregistrer en augmentant progressivement le volume (fondu de début) ou en le diminuant (fondu de fin).
(1) Enregistrement avec fondu de début
✽ Veuillez consulter aussi "Méthode de paramétrage (5) Réglage de la durée du fondu de début" (page 43).
1
Effectuez les étapes 1 à 8 de la procédure “Enregistrement manuel” (page 47).
2
Lancez la lecture de la sélection que vous souhaitez enregistrer sur le lecteur CD, platine magnétocassette, etc.
12 LECTURE NORMALE
1. Lancement de la lecture
Essayez d'abord de jouer les pistes dans l'ordre.
Sélectionnez la platine à être sélectionner.
(Télécommande)
3
Appuyez sur la touche de fondu de la télécommande.
• L'indication "Fade In" s'affiche et "FADE" clignote pendant l'opération de fondu.
• Le son enregistré est augmenté progressivement du niveau d'enregistrement de – ∞ jusqu'au niveau réglé, dans le
délai réglé.
CD CD-R
1
_ DUBBING _
NORMAL HIGH
1
A ! "
RELAY
MODE
D # %
J(
)
S
PCM AUDIO TECHNOLOGY / COMPACT DISC RECORDER
9
8
1
Pendant l'enregistrement, appuyez sur la touche de fondu de la télécommande.
• L'indication ”Fade Out” s’affiche et ”FADE” clignote pendant l’opération de fondu.
• Le son enregistré est diminué progressivement du niveau d’enregistrement réglé jusqu’au niveau de – ∞, dans le
délai réglé.
REMARQUE:
• La fonction d’enregistrement avec fondu en entrée/sortie ne fonctionne pas en mode synchro ou en mode
d’enregistrement de copie. Enregistrer manuellement si l’on veut utiliser la fonction de fondu en entrée/sortie.
DUBBING
NORMAL
HIGH
TIME
CDR-W1500
DISPLAY
TITLE /
SELECT CHARACTER
TIME
CLEAR
INPUT
4 REC
FINALIZE
8
9
PLAY
STOP
PAUSE
1
2
3
.
5
/
V
POWER
STOP
PAUSE
1
2
3
RELAY MODE
OPEN / CLOSE
ON
PHONES
PHONES LEVEL
-
7
8
9
{ ? }
CLEAR
+10
OPEN /CLOSE
MENU
6
STOP
3
1
7
MENU
PUSH
ENTER
8
2 3
−
Y < >
REC
+
5
MAX
,
6
: ;
10
MULTI JOG
OFF
5
MIN
P
[ = ]
REMOTE SENSOR
PLAY
3
M*+
4
(2) Enregistrement avec fondu de fin
✽ Veuillez consulter aussi "Méthode de paramétrage (6) Réglage de la durée de fondu de fin de piste" (page 43).
G & '
2
1
(Unité principale)
1
2 3
ENTER
PLAY
2
TIME
1 / ALL
Chargez le disque à jouer.
2
• Appuyez sur la touche de lecture (1) pour lancer la lecture du CD.
• L'indication "1" s'allume et le numéro de piste et la durée de lecture de la piste s'affichent.
• Appuyez sur la touche TIME, une, deux ou trois fois pour voir:
Le temps restant, le temps total restant, le temps écoulé.
A-B
2
TITLE CHARACTER
DISPLAY SEL. FADER INPUT
1
PAUSE
3
PROG/DIRECT CALL
RANDOM
9
FINALIZE
REMARQUE:
• L'indication "No Disc" (Pas de disque) s'affiche s'il n'y a pas de disque chargé, si celui-ci ne peut être lu correctement
en raison de rayures ou de saleté ou encore, s'il est chargé à l'envers.
2. Lancement de la lecture
3
50
Appuyez sur la touche d'arrêt (2 STOP).
• La lecture s'arrête.
• Le mode stop est activé automatiquement une fois que toutes les pistes du disque ont été jouées.
FRANCAIS
14 DIVERSES FONCTIONS DE LECTURE
(2) Recherche en arrière
Pendant la lecture, appuyez sur la touche de recherche manuelle Appuyez sur la touche de recherche
manuelle arrière (6) tout en la
arrière (6) tout en la maintenant enfoncée.
maintenant enfoncée.
• La lecture normale s'arrête à partir de l'instant où la touche
est relâchée.
4ème
5ème piste
piste
• La recherche manuelle s'arrête et la lecture démarre si le
début de la première piste du disque est atteinte pendant que
l'on appuie sur la touche de recherche manuelle arrière (6).
• Pour effectuer une recherche manuelle arrière à grande
vitesse sans écouter le son, appuyez sur la touche de
recherche manuelle arrière (6) en mode pause.
En plus de la lecture normale, le CDR-W1500 propose aussi les fonctions de lecture décrites ci-dessous.
1. Lecture d'une piste en particulier (télécommande uniquement) …………………………………………… Recherche directe
(Télécommande)
2
CD CD-R
Sélectionnez la platine à être sélectionner.
_ DUBBING _
NORMAL HIGH
RELAY
MODE
Saut
A ! "
D # %
1
)
.
−
6
: ;
V
,
P
5
/
Y < >
7
8
9
[ = ]
{ ? }
CLEAR
10
Saut
Saut
Saut
3
M*+
4
S
Saut
G & '
2
J(
6ème
piste
1
REMARQUE:
• Une petite coupure de son peut se faire entendre en retournant en lecture normale à partir du mode de recherche
manuelle.
+10
REC
6
7
MENU
8
PLAY
STOP
3. Repérage du début des plages pendant la lecture …………………………………………………… Recherche automatique
9
ENTER
PAUSE
2
(1) Déplacement avant au début de la piste suivante
3
PROG/DIRECT CALL
1 / ALL
A-B
(Télécommande)
1
Utilisez les touches numérotées (1 à 10) et la touche +10 pour entrer le numéro de la piste souhaitée.
• Par exemple:
Appuyez sur la touche, 4 pour écouter jusqu'à la 4ème piste, +10 et 2 pour écouter jusqu'à la 12ème piste et
+10 , +10 et 10 pour écouter jusqu'à la 30ème piste. La lecture commence à partir de cette piste.
CD CD-R
Sélectionnez la platine à être sélectionner.
_ DUBBING _
NORMAL HIGH
A ! "
RELAY
MODE
D # %
1
(Unité principale)
)
2. Repérage de la position désirée pendant l’écoute du son ……………………………………………… Recherche manuelle
• Utilisez cette fonction pour sauter rapidement les pistes du disque tout en écoutant le son.
Cette fonction est très pratique lorsque vous souhaitez trouver une section particulière à l'intérieur d'une longue piste.
PCM AUDIO TECHNOLOGY / COMPACT DISC RECORDER
9
8
DUBBING
NORMAL
HIGH
TIME
CDR-W1500
DISPLAY
TITLE /
SELECT CHARACTER
TIME
CLEAR
INPUT
4 REC
FINALIZE
8
9
PLAY
STOP
PAUSE
1
2
3
.
5
/
V
POWER
STOP
PAUSE
1
2
3
RELAY MODE
OPEN / CLOSE
ON
PHONES
PHONES LEVEL
-
7
8
9
{ ? }
CLEAR
+10
OPEN /CLOSE
MENU
6
7
MENU
8
STOP
ENTER
PLAY
2
1
A ! "
D # %
2
.
5
/
V
P
,
: ;
Y < >
8
9
{ ? }
CLEAR
10
+10
REC
6
7
MENU
ENTER
PLAY
2
PROG/DIRECT CALL
FINALIZE
Appuyez sur la touche de recherche automatique avant (9).
7
STOP
A-B
TITLE CHARACTER
−
6
[ = ]
8
1 / ALL
DISPLAY SEL. FADER INPUT
3
M*+
4
S
TIME
G & '
2
)
Sélectionnez la platine à être sélectionner.
RANDOM
PAUSE
RELAY
MODE
1
J(
1
9
3
PROG/DIRECT CALL
_ DUBBING _
NORMAL HIGH
1
PUSH
ENTER
(Télécommande)
CD CD-R
−
Y < >
REC
+
5
MAX
,
6
: ;
10
MULTI JOG
OFF
5
MIN
P
[ = ]
REMOTE SENSOR
PLAY
3
M*+
4
S
G & '
2
J(
1
1
Appuyez sur la touche de recherche automatique avant (9).
• Pendant l'opération de recherche, appuyez à nouveau sur la
touche de recherche automatique avant (9) pour aller en
avant au début de la piste suivante.
2ème piste
3ème piste
4ème piste
9
PAUSE
3
1 / ALL
A B
(1) Recherche avant
1
Appuyez sur la touche de recherche manuelle
Pendant la lecture, appuyez sur la touche de recherche manuelle
avant (7) tout en la maintenant enfoncée.
avant (7) tout en la maintenant enfoncée.
• La lecture normale s'arrête à partir de l'instant où la touche
est relâchée.
2ème
4ème
• La lecture s'arrête lorsque la fin de la dernière piste du disque
3ème piste
piste
piste
est atteinte pendant que l'on appuie sur la touche de
recherche manuelle avant (7).
• Pour effectuer une recherche manuelle avant à grande vitesse
sans écouter le son, appuyez sur la touche de recherche
Lecture
Saut Saut Saut Saut Saut
manuelle avant (7) en mode pause.
51
FRANCAIS
(2) Déplacement arrière au début de la piste actuelle
5. Lecture des pistes dans un certain ordre …………………………………………………………………… Lecture programmée
(Télécommande)
• Utilisez cette fonction pour sélectionner certaines pistes du disque et les programmer pour les lire dans un certain ordre.
• Jusqu'à 30 pistes peuvent être programmées.
CD CD-R
Sélectionnez la platine à être sélectionner.
_ DUBBING _
NORMAL HIGH
(Unité principale)
RELAY
MODE
D # %
G & '
1
2
3
J(
)
M*+
9
8
DUBBING
NORMAL
HIGH
TIME
CDR-W1500
DISPLAY
TITLE /
SELECT CHARACTER
TIME
CLEAR
INPUT
4 REC
FINALIZE
8
9
PLAY
STOP
PAUSE
1
2
3
.
/
PHONES
POWER
STOP
PAUSE
1
2
3
RELAY MODE
OPEN / CLOSE
ON
PHONES LEVEL
(Télécommande)
CD CD-R
8
9
[ = ]
{ ? }
CLEAR
10
+10
_ DUBBING _
NORMAL HIGH
REC
-
OPEN /CLOSE
+
MENU
5
MAX
−
Y < >
7
MULTI JOG
OFF
5
MIN
,
6
: ;
V
REMOTE SENSOR
PLAY
P
5
4
S
PCM AUDIO TECHNOLOGY / COMPACT DISC RECORDER
Sélectionnez la platine à être sélectionner.
A ! "
A ! "
6
7
(Unité principale)
MENU
1
PUSH
ENTER
PLAY
STOP
S
PAUSE
PCM AUDIO TECHNOLOGY / COMPACT DISC RECORDER
1
1
RANDOM
1 / ALL
5
/
V
8
9
{ ? }
CLEAR
10
+10
9
8
DUBBING
NORMAL
HIGH
TIME
DISPLAY
TITLE /
SELECT CHARACTER
TIME
POWER
FINALIZE
PLAY
STOP
PAUSE
1
2
3
RELAY MODE
OPEN / CLOSE
ON
PHONES
PHONES LEVEL
CLEAR
INPUT
4 REC
FINALIZE
8
9
PLAY
STOP
PAUSE
1
2
3
-
+
5
OPEN /CLOSE
MENU
5
MAX
6
7
MENU
PUSH
ENTER
STOP
ENTER
PLAY
2
Appuyez sur la touche de recherche automatique arrière (8).
3
3ème piste
4ème piste
5ème piste
4. Arrêt temporaire de la lecture …………………………………………………………………………………………………… Pause
2
REC
MULTI JOG
OFF
8
Appuyez sur la touche de recherche automatique arrière (8).
• Pendant l'opération de recherche, appuyez à nouveau sur la
touche de recherche automatique arrière (8) pour aller en
arrière au début de la piste précédente.
−
Y < >
7
MIN
1
,
6
: ;
[ = ]
REMOTE SENSOR
DISPLAY SEL. FADER INPUT
P
3
TITLE CHARACTER
TIME
.
3
M*+
A-B
2
PROG/DIRECT CALL
CDR-W1500
G & '
2
)
4
9
ENTER
D # %
1
J(
8
RELAY
MODE
3
1
PAUSE
3
PROG/DIRECT CALL
RANDOM
9
TIME
1 / ALL
A-B
3
TITLE CHARACTER
1
En mode stop, appuyez sur la touche PROG/DIRECT.
• L'indication "PROG" s'allume.
2
Utilisez les touches numérotées et la touche +10 pour sélectionner les pistes pour la lecture programmée.
• Par exemple, pour programmer les 3ème, 12ème et 7ème piste, Appuyez sur la séquence de touches PROG/DIRECT ,
3 , +10 , 2 et 7 .
3
Appuyez sur la touche de lecture (1 PLAY).
• Les pistes sont jouées dans l'ordre programmé.
• Utilisez cette fonction pour arrêter temporairement la lecture et la reprendre ensuite à partir du même point.
• Pour vérifier le contenu du programme, appuyez sur la touche de rappel (CALL). Les pistes programmées s'affichent
dans l'ordre programmé chaque fois que la touche de rappel (CALL) est enfoncée.
• Pour modifier le programme, appuyez sur la touche d'effacement (CLEAR) en mode stop et ensuite, programmez la piste
souhaitée. La dernière piste programmée est remplacée par la nouvelle piste programmée.
• Pour effacer le programme en totalité, appuyez sur la touche PROG/DIRECT ou d'ouverture/fermeture (5 OPEN/CLOSE)
en mode stop.
(Télécommande)
Sélectionnez la platine à être sélectionner.
CD CD-R
_ DUBBING _
NORMAL HIGH
A ! "
RELAY
MODE
D # %
1
(Unité principale)
)
S
9
8
DUBBING
NORMAL
HIGH
TIME
CDR-W1500
DISPLAY
TITLE /
SELECT CHARACTER
TIME
CLEAR
INPUT
4 REC
FINALIZE
8
.
5
/
V
PLAY
STOP
PAUSE
1
2
3
RELAY MODE
OPEN / CLOSE
ON
PHONES
PHONES LEVEL
-
−
Y < >
9
[ = ]
{ ? }
CLEAR
10
+10
9
REC
OFF
+
OPEN /CLOSE
MENU
5
MAX
,
6
: ;
8
MULTI JOG
5
MIN
P
7
REMOTE SENSOR
POWER
3
M*+
4
PCM AUDIO TECHNOLOGY / COMPACT DISC RECORDER
G & '
2
J(
PLAY
STOP
PAUSE
1
2
3
6
7
MENU
PUSH
ENTER
8
STOP
ENTER
PLAY
2
1
RANDOM
PAUSE
3
PROG/DIRECT CALL
1
9
TIME
1 / ALL
A-B
TITLE CHARACTER
q Appuyez sur la touche pause (3 PAUSE).
1
Pendant la lecture, appuyez sur la touche pause (3 PAUSE).
• Le mode pause est activé.
• Appuyez sur la touche de lecture (1 PLAY) pour reprendre
ensuite à partir du point où le mode pause a été activé.
4ème piste
5ème piste
6ème piste
w Appuyez sur la touche de lecture (1 PLAY).
52
1
REMARQUES:
• Le mode de lecture d'une seule piste ne peut être activé pendant la lecture programmée.
• Les programmes avec durée de lecture totale supérieure à 99 minutes peuvent être réglés mais la durée ne sera pas
affichée correctement.
• La lecture programmée est impossible avec les disques non finalisés.
• Il n’est pas possible d’effectuer la recherche directe pendant la lecture programmée.
• Les numéros de plage de 21 ou plus ne peuvent pas être programmés pour des disques contenant plus de 20 plages,
mais si cela est effectué, la durée n’est pas affichée correctement.
FRANCAIS
6. Lecture en ordre aléatoire …………………………………………………………………………………………… Lecture aléatoire
7. Lecture à répétition ……………………………………………………………………………………………… Lecture à répétition
• Utilisez cette fonction pour effectuer une fois la lecture de toutes les piste du disque en ordre aléatoire.
(1) Lecture à répétition d'une seule piste [Single Track Repeat]
Sélectionnez la platine à être sélectionner.
Sélectionnez la platine à être sélectionner.
(Télécommande)
(Télécommande)
CD CD-R
_ DUBBING _
NORMAL HIGH
A ! "
D # %
1
(Unité principale)
5
4
S
PCM AUDIO TECHNOLOGY / COMPACT DISC RECORDER
9
8
DUBBING
NORMAL
HIGH
TIME
CDR-W1500
DISPLAY
TITLE /
SELECT CHARACTER
TIME
CLEAR
INPUT
4 REC
FINALIZE
8
9
PLAY
STOP
PAUSE
1
2
3
.
/
V
POWER
STOP
PAUSE
1
2
3
RELAY MODE
OPEN / CLOSE
ON
PHONES
PHONES LEVEL
OPEN /CLOSE
MENU
5
MAX
A ! "
: ;
Y < >
S
PCM AUDIO TECHNOLOGY / COMPACT DISC RECORDER
8
9
CLEAR
+10
9
8
DUBBING
NORMAL
HIGH
TIME
CDR-W1500
DISPLAY
TITLE /
SELECT CHARACTER
TIME
POWER
PLAY
STOP
PAUSE
1
2
3
RELAY MODE
OPEN / CLOSE
ON
PHONES
PHONES LEVEL
-
ENTER
PLAY
2
2
1
RANDOM
4 REC
FINALIZE
8
9
PLAY
STOP
PAUSE
1
2
3
/
V
1 / ALL
MENU
PUSH
ENTER
7
8
9
[ = ]
{ ? }
CLEAR
10
+10
7
MENU
2
8
STOP
9
ENTER
PLAY
PAUSE
2
2
3
PROG/DIRECT CALL
3
FINALIZE
−
Y < >
6
PAUSE
A-B
TITLE CHARACTER
DISPLAY SEL. FADER INPUT
OPEN /CLOSE
5
MAX
,
6
: ;
REC
+
9
3
TIME
INPUT
3
P
5
MULTI JOG
OFF
5
MIN
PUSH
ENTER
PROG/DIRECT CALL
CLEAR
.
G & '
M*+
REMOTE SENSOR
7
MENU
STOP
D # %
2
)
4
{ ? }
6
RELAY
MODE
1
J(
6
7
8
2
2
−
REC
+
5
MIN
,
10
MULTI JOG
OFF
-
P
[ = ]
REMOTE SENSOR
PLAY
2
3
M*+
)
_ DUBBING _
NORMAL HIGH
G & '
2
J(
CD CD-R
(Unité principale)
RELAY
MODE
3
1
RANDOM
TIME
1 / ALL
A-B
3
TITLE CHARACTER
DISPLAY SEL. FADER INPUT
FINALIZE
B
1
En mode stop, appuyez sur la touche de lecture aléatoire (RANDOM).
• L'indication "RAND" s'allume.
1
Appuyez une fois sur la touche de lecture à répétition d’une ou de toutes les pistes (1/ALL).
• L'indication "REPEAT 1" s'allume à l'affichage et le mode de lecture à répétition d'une seule piste est activé.
2
Utilisez les touches de recherche automatique (8 et 9) pour sélectionner la piste à jouer à répétition.
2
Appuyez sur la touche de lecture (1 PLAY).
• Pendant la lecture normale:
Les pistes sont automatiquement jouées en ordre aléatoire.
• Pendant la lecture à répétition de toutes les pistes:
Toutes les pistes sont jouées une fois en ordre aléatoire et ensuite la lecture est répétée dans un autre ordre
aléatoire.
• Pour annuler le mode de lecture aléatoire, activez le mode stop ou appuyez à nouveau sur la touche de lecture
aléatoire (RANDOM).
3
Appuyez sur la touche de lecture (1 PLAY).
de toutes les pistes (1/ALL).
• La lecture démarre.
• Une fois que la piste sélectionnée est terminée, celle-ci est
rejouée à nouveau depuis le début.
• Le mode de lecture à répétition d'une seule piste peut aussi
être activé en appuyant sur la touche de lecture à répétition
2ème piste
3ème piste
d’une ou de toutes les pistes (1/ALL) pendant la lecture. La
piste actuelle est jouée à répétition.
• Pour annuler le mode de lecture à répétition d'une seule
piste, appuyez sur la touche de lecture à répétition d’une ou
de toutes les pistes (1/ALL) plusieurs fois jusqu'à ce que
l'indication "REPEAT" s'éteigne.
REMARQUES:
• Le mode de lecture à répétition d'une seule piste et A-B ne peut être activé pendant la lecture aléatoire.
• La lecture aléatoire n’est pas possible avec les disques non-finalisés.
Appuyez une fois sur la touche de lecture à répétition d’une ou
4ème piste
Cette opération
est répétée.
53
FRANCAIS
(2) Lecture à répétition de toutes les pistes [All Track Repeat]
(3) Lecture d'une section entre deux points A et B à répétition [A–B Repeat]
★ Cette fonction vous permet de jouer une certaine section de piste à répétition.
Sélectionnez la platine à être sélectionner.
CD CD-R
(Télécommande)
(Télécommande)
_ DUBBING _
NORMAL HIGH
A ! "
CD CD-R
RELAY
MODE
D # %
1
(Unité principale)
2
J(
)
S
9
8
DUBBING
NORMAL
HIGH
TIME
CDR-W1500
DISPLAY
TITLE /
SELECT CHARACTER
TIME
CLEAR
INPUT
4 REC
FINALIZE
8
9
PLAY
STOP
PAUSE
1
2
3
.
5
/
V
POWER
STOP
PAUSE
1
2
3
RELAY MODE
OPEN / CLOSE
ON
PHONES
PHONES LEVEL
-
−
P
5
/
V
: ;
−
Y < >
7
8
9
[ = ]
{ ? }
CLEAR
10
+10
REC
Y < >
6
8
9
{ ? }
CLEAR
10
+10
OPEN /CLOSE
MENU
7
MENU
8
STOP
9
ENTER
PLAY
PAUSE
2
6
3
7
MENU
PROG/DIRECT CALL
1 / ALL
1,2
A-B
PUSH
ENTER
8
STOP
ENTER
PLAY
9
RANDOM
TIME
TITLE CHARACTER
PAUSE
DISPLAY SEL. FADER INPUT
2
3
PROG/DIRECT CALL
2
,
6
: ;
REC
+
5
MAX
,
.
3
M*+
6
7
MULTI JOG
OFF
5
MIN
P
[ = ]
REMOTE SENSOR
PLAY
3
M*+
4
PCM AUDIO TECHNOLOGY / COMPACT DISC RECORDER
G & '
G & '
2
)
4
S
A ! "
D # %
1
J(
_ DUBBING _
NORMAL HIGH
Sélectionnez la platine à être sélectionner.
RELAY
MODE
2
1
1 / ALL
A-B
2
FINALIZE
B
REMOTE CONTROL UNIT RC-278
RANDOM
TIME
TITLE CHARACTER
DISPLAY SEL. FADER INPUT
FINALIZE
1
Appuyez deux fois sur la touche de lecture à répétition d’une ou de toutes les pistes (1/ALL).
• L'indication "REPEAT" s'allume à l'affichage et le mode de lecture à répétition de toutes les pistes est activé.
2
Appuyez sur la touche de lecture (1 PLAY).
• Le disque est joué à répétition.
• Le mode de lecture à répétition de toute sles pistes peut aussi être activé en appuyant deux fois sur la touche de
lecture à répétition d’une ou de toutes les pistes (1/ALL) pendant la lecture.
• Si l'on appuie sur la touche de lecture à répétition d’une ou de toutes les pistes (1/ALL) pendant la lecture
programmée, les pistes sont jouées à répétition dans l'ordre programmé.
• Pour annuler le mode de lecture à répétition de toutes les pistes, appuyez sur la touche de lecture à répétition d’une
ou de toutes les pistes (1/ALL) plusieurs fois jusqu'à ce que l'indication "REPEAT" s'éteigne.
REMARQUES:
• Le mode de lecture d'une seule piste ne peut être activé pendant la lecture programmée ou la lecture aléatoire.
• La lecture à répétition n’est pas possible avec les disques non-finalisés.
1
Pendant la lecture, appuyez sur la touche de lecture à répétition A-B au point où vous souhaitez commencer la lecture à
répétition (point A).
• L'indication “REPEAT A-” s'allume.
Appuyez à nouveau sur la touche de lecture à répétition A-B au point où vous souhaitez arrêter la lecture à répétition
(point B).
• L'indication “REPEAT A-B” s'allume, le capteur de lecture retourne au point A et la section est jouée à répétition.
(1) Appuyez à nouveau sur la
touche de lecture à
répétition A-B.
(2) Appuyez à nouveau sur la
touche de lecture à
répétition A-B.
(Point A)
2
2ème
piste
(Point B)
3ème piste
4ème
piste
Cette opération
est répétée.
• Pour arrêter la lecture à répétition A-B, appuyez sur la touche de lecture à répétition A-B sur la télécommande jusqu'à ce
que l'indication "REPEAT" s'éteigne. Le mode de lecture à répétition A-B est annulé et la lecture normale démarre depuis le
début de la piste actuelle.
• Si l'on appuie sur la touche stop (2 STOP), le mode de lecture à répétition A-B est annulé et le mode stop est activé.
REMARQUES:
• Il est impossible d'utiliser le mode de lecture à répétition A-B pendant la lecture programmée ou aléatoire.
• Les fonctions recherche automatique et manuelle ne peuvent être utilisées pendant la lecture à répétition A-B ou lors du
réglage du point B.
• Lorsque la lecture à répétition A-B est annulée si le point B est réglé sur une piste différente de celle du point A, la lecture
reprend depuis le début de la piste en cours quand le mode de lecture à répétition A-B est annulé.
• La lecture à répétition A-B n’est pas possible avec les disques non-finalisés.
54
FRANCAIS
8.
•
•
•
Lecture temporisée
Une temporisation audio vendue séparément peut être utilisée pour lancer la lecture ou l'enregistrement à une heure spécifiée.
Veuillez-vous référer aussi aux instructions d'utilisation de la temporisation audio et de l'amplificateur.
Le programme et le mode de relais peuvent être aussi utilisés.
CDR-W1500 (cet appareil)
PCM AUDIO TECHNOLOGY / COMPACT DISC RECORDER
9
DUBBING
NORMAL
HIGH
TIME
CDR-W1500
DISPLAY
TITLE /
SELECT CHARACTER
TIME
CLEAR
INPUT
4 REC
FINALIZE
8
9
PLAY
STOP
PAUSE
1
2
3
REMOTE SENSOR
PHONES
POWER
PLAY
STOP
PAUSE
1
2
3
RELAY MODE
OPEN / CLOSE
ON
PHONES LEVEL
MULTI JOG
OFF
-
+
5
OPEN /CLOSE
MENU
5
MIN
MAX
Mode relais
★ Différents types de lecture et d'enregistrement peuvent être effectués par opérations en relais entre les unités CD et CD-R de
l'ensemble.
★ Trois modes de lecture en relais sont disponibles.
★ Le mode réglé est enregistré en mémoire, mais les données peuvent être effacées si l'alimentation est coupée pendant 2 ou 3
jours.
• Le mode se commute à chaque pression sur la touche RELAY MODE comme indiqué ci-dessous.
(1) Connexions
8
14 MODE RELAIS
PUSH
ENTER
Amplificateur
ª
Mode relais:
ª
Mode mixte:
Sortie secteur AC 120 V/60 Hz
• Le disque dans l'unité CD et celui dans l'unité CDR sont joués l'un après l'autre.
“Relay Play”
• La lecture programmée et aléatoire du disque
dans l'unité CD et du disque dans l'unité CD-R
peut être effectuée comme s'il s'agissait d'un
seul disque.
“Mix Play”
• Les unités CD et CD-R peuvent être commandées
indépendamment.
“Dual Play”
• L'unité CD ou CD-R peut être commandée
indépendamment.
“Single Play”
ª
Temporisation audio
Mode double
Dual:
ª
(2) Lecture temporisée
Mode normal:
(Télécommande)
Sélectionnez la platine à être sélectionner.
CD CD-R
_ DUBBING _
NORMAL HIGH
A ! "
D # %
1
(Unité principale)
)
9
8
PAUSE
2
3
TIME
RELAY MODE
OPEN / CLOSE
TIME
ON
PHONES
PHONES LEVEL
7
8
9
[ = ]
{ ? }
CLEAR
10
+10
CLEAR
INPUT
4 REC
FINALIZE
8
9
PLAY
STOP
PAUSE
1
2
3
REC
MULTI JOG
OFF
-
+
5
OPEN /CLOSE
MENU
5
MIN
MAX
−
Y < >
CDR-W1500
POWER
STOP
1
,
6
/
V : ;
REMOTE SENSOR
PLAY
P
5
S .
DISPLAY
TITLE /
SELECT CHARACTER
3
M*+
4
DUBBING
NORMAL
HIGH
G & '
2
J(
PCM AUDIO TECHNOLOGY / COMPACT DISC RECORDER
REMARQUE:
• L'enregistrement, la finalisation et l'édition sont impossible en mode relais ou mixte.
RELAY
MODE
6
7
MENU
PUSH
ENTER
8
STOP
ENTER
PLAY
2
5
RANDOM
PAUSE
3
PROG/DIRECT CALL
5
9
TIME
1 / ALL
A-B
1
TITLE CHARACTER
1
Mettez sous tension le CDR-W1500 et les composants connectés.
2
Effectuez les opérations de la procédure "Méthode de paramétrage (10) Réglage du mode de lecture temporisée" (page
44) et effectuer la lecture temporisée sur le réglage.
3
Chargez le disque pour la lecture temporisée dans le CDR-W1500.
4
Réglez le sélecteur d'entrée de l'amplificateur sur "CD".
5
Appuyez sur la touche de lecture (1 PLAY).
• Lancez la lecture du disque pour vérifier le volume.
6
Réglez la temporisation audio sur l'horaire souhaité.
• L'alimentation des composants connectés à la temporisation audio se coupe.
• Lorsque l'heure de réglage est atteinte, l'alimentation des divers composants s'active automatiquement et la lecture
commence à partir de la piste une.
• Les réglages du mode de programme, du mode aléatoire, du mode relais, etc., sont mémorisés dans la mémoire avant que
l’appareil soit éteint.
• S’il n’y a pas de disque dans l’unité CD et un disque est chargé dans l’unité CD-R:
La lecture par minuterie ne fonctionne pas lorsque le mode relais est réglé en position normale ou double.
La lecture par minuterie fonctionne pour l’unité CD-R lorsque le mode relais est réglé en position relais ou mixte.
55
FRANCAIS
1. Lecture en relais
★ Avec le mode de lecture en relais, il est possible de jouer le disque dans le lecteur CD et celui dans le graveur CD-R en relais.
★ Les modes lecture programmée et aléatoire peuvent être préréglés pour les disques dans les unités CD et CD-R.
2. Mode mixte
★ En mode mixte, la lecture programmée et aléatoire du disque dans l'unité CD et de celui dans l'unité CD-R peut être effectuée
comme s'il s'agissait d'un seul disque.
(1) Lecture mixte programmée
(Télécommande)
Sélectionnez le côté CD.
(Télécommande)
CD CD-R
_ DUBBING _
NORMAL HIGH
CD CD-R
1
_ DUBBING _
NORMAL HIGH
1
(Unité principale)
RELAY
MODE
A ! "
D # %
G & '
1
2
3
J(
)
M*+
5
4
S
PCM AUDIO TECHNOLOGY / COMPACT DISC RECORDER
9
8
DUBBING
NORMAL
HIGH
TIME
CDR-W1500
DISPLAY
TITLE /
SELECT CHARACTER
TIME
CLEAR
INPUT
4 REC
FINALIZE
8
.
/
V
POWER
PLAY
1
STOP
2
PAUSE
3
RELAY MODE
OPEN / CLOSE
PHONES
PHONES LEVEL
Y < >
7
8
9
{ ? }
CLEAR
+10
)
9
8
DUBBING
NORMAL
HIGH
TIME
DISPLAY
TITLE /
SELECT CHARACTER
TIME
CLEAR
INPUT
4 REC
FINALIZE
8
9
PLAY
STOP
PAUSE
1
2
3
.
/
V
POWER
STOP
PAUSE
1
2
3
RELAY MODE
OPEN / CLOSE
ON
PHONES
PHONES LEVEL
,
−
6
: ;
Y < >
7
8
9
{ ? }
CLEAR
10
+10
4
REC
MULTI JOG
OFF
-
P
[ = ]
REMOTE SENSOR
PLAY
3
M*+
5
+
OPEN /CLOSE
MENU
6
5
5
7
MENU
9
+
OPEN /CLOSE
PLAY
MENU
STOP
1
2
PAUSE
6
7
MAX
PUSH
ENTER
8
MENU
3
STOP
PUSH
ENTER
8
STOP
ENTER
PLAY
2
2 1
1
3
1 / ALL
ENTER
PLAY
2
PAUSE
TIME
PAUSE
A-B
5
4
2 1
1
5
3
3
PROG/DIRECT CALL
RANDOM
TIME
1 / ALL
A-B
5
TITLE CHARACTER
DISPLAY SEL. FADER INPUT
RANDOM
9
9
3
PROG/DIRECT CALL
4
CDR-W1500
MIN
5
MAX
S
PCM AUDIO TECHNOLOGY / COMPACT DISC RECORDER
G & '
2
J(
4
2
REC
5
MIN
D # %
1
6
: ;
A ! "
(Unité principale)
−
10
MULTI JOG
OFF
-
,
1
4
[ = ]
REMOTE SENSOR
ON
P
2
1
RELAY
MODE
FINALIZE
TITLE CHARACTER
DISPLAY SEL. FADER INPUT
FINALIZE
B
REMOTE CONTROL UNIT RC-278
B
1
Chargez les disques que vous souhaitez jouer dans les unités CD et CD-R.
2
Appuyez sur la touche RELAY MODE et sélectionnez "Relay Play".
• L'indication "RELAY" s'allume.
Utilisez la touche de lecture à répétition d’une ou de toutes les pistes (1/ALL) de la section CD ou CD-R de la
télécommande pour activer ou désactiver le mode de lecture à répétition.
• Le mode de lecture à répétition d'une seule piste ne peut être activé en mode relais.
• L'opération de relais est effectuée comme illustré ci-dessous suivant la combinaison du relais et les modes de
lecture à répétition:
3
Mode répétition
Répétition activée :
L'indication "REPEAT"
s'allume
Répétition inactivée
4
Chargez les disques que vous souhaitez jouer dans les unités CD et CD-R.
2
Appuyez sur la touche RELAY MODE et sélectionnez "Mix Play".
• L'indication "MIX" s'allume.
3
Appuyez sur la touche PROG/DIRECT de l'unité CD ou CD-R de la télécommande pour activer le mode de
programmation.
• L'indication "PROG" s'allume.
4
Effectuer les opérations de la procédure "Lecture programmée" page 52 pour programmer les pistes dans l'ordre
d'écoute souhaité.
• Vous pouvez programmer les pistes des deux unités CD et CD-R en utilisant la touche de sélection CD/CD-R de la
télécommande pour commuter de l'un à l'autre.
• Jusqu'à 30 pistes peuvent être programmées.
5
La lecture programmée démarre en appuyant sur la touche de lecture des unités CD ou CD-R.
• Le son est émis aux jacks de sortie CD/CD-R.
• Pour quitter le mode de lecture mixte, appuyez sur la touche de mode de lecture en relais et sélectionnez "Single
Play".
Opération de relais
1
Lecture du côté
lecteur CD
Lecture du côté
lecteur CD
1
Lecture du côté
lecteur CD-R
Lecture du côté
lecteur CD-R
1
1 Arrêt
La lecture en relais démarre en appuyant sur la touche de lecture de l'unité CD.
• Le son est émis aux jacks de sortie CD/CD-R.
• Pour quitter le mode de lecture en relais, appuyez sur la touche de mode de lecture en relais et sélectionnez
"Single Play".
• Le disque se trouvant dans l'unité qui ne fonctionne pas peut être remplacé pendant la lecture en relais.
REMARQUE:
• Lors du relais entre un CD et un CD-R, les données numériques de la sortie CD/CD-R sont momentanément
interrompues. L'entrée numérique de l'appareil externe connecté est temporairement déverrouillée à ce moment là.
56
1
REMARQUE:
• Lors du relais entre un CD et un CD-R, les données numériques de la sortie CD/CD-R sont momentanément
interrompues. L'entrée numérique de l'appareil externe connecté est temporairement déverrouillée à ce moment là.
FRANCAIS
3.
★
★
★
(2) Lecture aléatoire mixte
(Télécommande)
Mode double (Dual)
En mode double, Les unités CD et CD-R peuvent être commandées indépendamment.
L'enregistrement manuel à partir de la section CD de l'unité principale est possible.
Il est possible d’enregistrer à partir d’une unité externe sur l’unité CD-R tout en lisant un disque dans l’unité CD.
CD CD-R
1
_ DUBBING _
1
NORMAL
A ! "
RELAY
MODE
HIGH
D # %
1
(Unité principale)
2
J(
)
9
8
DUBBING
NORMAL
HIGH
TIME
CDR-W1500
DISPLAY
TITLE /
SELECT CHARACTER
TIME
CLEAR
INPUT
4 REC
FINALIZE
8
9
PLAY
STOP
PAUSE
1
2
3
.
5
/
V
POWER
STOP
PAUSE
1
2
3
RELAY MODE
OPEN / CLOSE
ON
PHONES
PHONES LEVEL
OPEN /CLOSE
MENU
5
MAX
(1) Lecture double
(Télécommande)
−
Sélectionnez la platine à être sélectionner.
6
: ;
Y < >
9
[ = ]
{ ? }
CLEAR
10
+10
CD CD-R
1
_ DUBBING _
NORMAL HIGH
1
A ! "
REC
+
5
MIN
,
8
MULTI JOG
OFF
-
P
7
REMOTE SENSOR
PLAY
2
3
M*+
4
S
PCM AUDIO TECHNOLOGY / COMPACT DISC RECORDER
G & '
6
(Unité principale)
8
ENTER
2 1
1
4
PAUSE
3
PROG/DIRECT CALL
4
1 / ALL
A-B
PCM AUDIO TECHNOLOGY / COMPACT DISC RECORDER
3
TIME
CDR-W1500
4
9
8
RANDOM
DUBBING
NORMAL
HIGH
TIME
DISPLAY
TITLE /
SELECT CHARACTER
TITLE CHARACTER
TIME
CLEAR
INPUT
4 REC
FINALIZE
8
.
5
/
V
FINALIZE
PLAY
STOP
PAUSE
1
2
3
RELAY MODE
OPEN / CLOSE
ON
PHONES
PHONES LEVEL
-
6
: ;
9
CLEAR
10
+10
9
+
OPEN /CLOSE
MENU
5
PLAY
STOP
PAUSE
1
2
3
6
7
MENU
B
STOP
ENTER
PLAY
2
1
3
RANDOM
TIME
1 / ALL
2
Appuyez sur la touche RELAY MODE et sélectionnez "Mix Play".
• L'indication "MIX" s'allume.
3
Appuyez sur la touche RANDOM (Aléatoire) de l'unité CD ou CD-R de la télécommande pour activer le mode de lecture
aléatoire.
• L'indication "RAND" s'allume.
4
La lecture aléatoire mixte démarre en appuyant sur la touche de lecture des unités CD ou CD-R.
• Le son est émis aux jacks de sortie CD/CD-R.
• Pour quitter le mode de lecture mixte, appuyez sur la touche de mode de lecture en relais et sélectionnez "Single
Play".
REMARQUES:
• Si les modes de lecture programmée et aléatoire ne sont pas activés en mode mixte, le fonctionnement est le même
qu'en mode relais (avec le mode répétition inactif).
• Lors du relais entre un CD et un CD-R, les données numériques de la sortie CD/CD-R sont momentanément
interrompues. L'entrée numérique de l'appareil externe connecté est temporairement déverrouillée à ce moment là.
PAUSE
A-B
3
TITLE CHARACTER
DISPLAY SEL. FADER INPUT
Chargez les disques que vous souhaitez jouer dans les unités CD et CD-R.
9
3
PROG/DIRECT CALL
1
Y < >
8
{ ? }
PUSH
ENTER
REMOTE CONTROL UNIT RC-278
2 1
−
7
8
3
,
REC
OFF
MAX
P
[ = ]
MULTI JOG
5
MIN
2
3
M*+
REMOTE SENSOR
POWER
DISPLAY SEL. FADER INPUT
)
4
9
S
PLAY
G & '
2
J(
PUSH
ENTER
2
D # %
1
7
MENU
STOP
RELAY
MODE
FINALIZE
B
REMOTE CONTROL UNIT RC-278
1
Chargez les disques que vous souhaitez jouer dans les unités CD et CD-R.
2
Appuyez sur la touche RELAY MODE et sélectionnez "Dual Play".
• L'indication "DUAL" s'allume.
3
La lecture double démarre en appuyant sur la touche de lecture des unités CD ou CD-R.
• Le son du CD est émis aux jacks de sortie CD uniquement et le son du CD-R aux jacks de sortie CD/CD-R .
• Seul le son du CD-R est émis aux jacks de sortie casque.
• L'affichage peut être commuté avec la touche de sélection d'affichage DISPLAY SELECT pour vérifier le temps, etc.,
du CD et du CD-R.
• Pour quitter le mode de lecture double, appuyez sur la touche de mode de lecture en relais et sélectionnez "Single
Play.
57
FRANCAIS
(2) Enregistrement manuel à partir de la section CD
15 FINALISATION DE DISQUES CD-R/RW
(Télécommande)
CD CD-R
1
_ DUBBING _
NORMAL HIGH
2
(Unité principale)
RELAY
MODE
A ! "
D # %
G & '
1
2
3
J(
)
M*+
4
S
PCM AUDIO TECHNOLOGY / COMPACT DISC RECORDER
9
8
DUBBING
NORMAL
HIGH
TIME
CDR-W1500
DISPLAY
TITLE /
SELECT CHARACTER
TIME
CLEAR
INPUT
4 REC
FINALIZE
8
9
PLAY
STOP
PAUSE
1
2
3
.
5
/
V
POWER
STOP
PAUSE
1
2
3
RELAY MODE
OPEN / CLOSE
ON
PHONES
PHONES LEVEL
OPEN /CLOSE
MENU
5
MAX
9
[ = ]
{ ? }
CLEAR
10
+10
6
(1) Finalisation automatique
La finalisation automatique est possible lors de l'utilisation de la fonction de copie complète de CD "Make CD". Veuillez
consulter les sections "Procédure de copie" et "Enregistrement synchronisé de disque", page 44, 49.
7
MENU
PUSH
ENTER
8
STOP
ENTER
PLAY
2
2 4
RANDOM
9
(2) Finalisation manuelle
PAUSE
3
PROG/DIRECT CALL
3 1
Y < >
REC
+
5
MIN
6
: ;
8
MULTI JOG
OFF
-
3
−
7
REMOTE SENSOR
PLAY
P ,
★ La finalisation est une procédure simple nécessaire pour:
• Lire les enregistrements sur un lecteur CD,
• Eviter les enregistrements non souhaités sur un disque,
• Eviter l'effacement de pistes sur un CD-RW.
★ Cette opération est impossible en mode relais ou mixte. Passez en mode normal ou double (dual) pour effectuer cette
opération.
★ Fermer le tiroir de disque et régler la section CD en mode stop.
TIME
1 / ALL
A-B
(Télécommande)
TITLE CHARACTER
DISPLAY SEL. FADER INPUT
FINALIZE
B
CD CD-R
REMOTE CONTROL UNIT RC-278
4
_ DUBBING _
NORMAL HIGH
1
A ! "
D # %
1
(Unité principale)
Chargez le CD que vous souhaitez copier dans le lecteur CD.
2
Chargez le CD-R/RW sur lequel vous souhaitez enregistrer dans l'unité CD-R.
S
PCM AUDIO TECHNOLOGY / COMPACT DISC RECORDER
9
8
DUBBING
NORMAL
HIGH
TIME
CDR-W1500
DISPLAY
TITLE /
SELECT CHARACTER
TIME
CLEAR
INPUT
4 REC
FINALIZE
8
9
PLAY
STOP
PAUSE
1
2
3
.
)
POWER
STOP
PAUSE
1
2
3
RELAY MODE
OPEN / CLOSE
ON
PHONES
PHONES LEVEL
5
/
V
-
Appuyez sur la touche RELAY MODE et sélectionnez "Dual Play".
• L'indication "DUAL" s'allume.
7
8
9
{ ? }
CLEAR
+10
OPEN /CLOSE
MENU
5
6
7
MENU
PUSH
ENTER
8
STOP
ENTER
PLAY
5
Appliquez la procédure "Enregistrement a partir de sources externes", page 46 ~ 50 pour effectuer l'enregistrement.
• L'affichage peut être commuté avec la touche de sélection d'affichage DISPLAY SELECT pour vérifier le temps, etc.,
du CD et du CD-R.
• Pour quitter le mode de lecture double, appuyez sur la touche de mode de lecture en relais et sélectionnez "Single
Play".
3
2
RANDOM
TIME
1 / ALL
PAUSE
3
A-B
TITLE CHARACTER
DISPLAY SEL. FADER INPUT
REMARQUE:
• Seuls les signaux numériques peuvent être enregistrés manuellement à partir de l’unité CD.
9
3
PROG/DIRECT CALL
Appuyez sur la touche de sélection d'entrée et activez l'unité "CD".
−
Y < >
10
2
4
,
6
: ;
REC
+
MAX
P
[ = ]
MULTI JOG
OFF
5
MIN
3
M*+
REMOTE SENSOR
PLAY
G & '
2
J(
4
1
3
RELAY
MODE
FINALIZE
B
REMOTE CONTROL UNIT RC-278
2
1
Chargez le disque CD-R/RW à finaliser.
2
Le graveur à l'arrêt, appuyez sur la touche de finalisation (FINALIZE).
• L'indication "Finalize OK?" s'affiche.
3
Appuyez sur la touche ENTER.
• L'affichage décompte pendant le processus de finalisation.
• Une fois l'opération terminée, le nombre total de pistes et le temps total enregistré s'affichent.
• L'indication de disque à l'affichage devient "CD".
REMARQUES:
• Assurez-vous que le disque est totalement exempt de rayure ou de particules de poussière.
• La finalisation prend au moins 2 à 4 minutes.
• Pendant la finalisation, le graveur de CD n'accepte aucune commande.
• Les données de texte sont écrites sur le disque lors de sa finalisation. Si vous souhaitez entrer du texte, il est nécessaire
d'effectuer cette opération avant la finalisation.
• Pour les détails sur l'annulation de la finalisation de CD-RW, veuillez consulter la section "Annulation de la finalisation de
disques CD-RW", page 59.
• Ne jamais couper l'alimentation ou débrancher le câble d'alimentation pendant la finalisation. Cela risque de rendre le
disque inutilisable.
58
FRANCAIS
16 EDITION
★ Cette opération est impossible en mode relais ou mixte. Passez en mode normal ou double (dual) pour effectuer cette
opération.
★ Fermer le tiroir de disque et régler la section CD en mode stop.
1. Edition de CD-R/RW
(1) Annulation de la finalisation de disques CD-RW
★ Cette fonctionnement n'est valide que pour les disques CD-RW. La finalisation de disque CD-R ne peut être annulée.
★ Utilisez cette fonction pour annuler la finalisation et effectuer des enregistrements supplémentaires d'un CD-RW finalisé.
★ L'effacement s'effectue en plusieurs minutes.
(2) Effacement des plages
★ Cette opération n'est valable que pour les disques CD-RW.
★ Utilisez cette fonction pour annuler la finalisation et effectuer des enregistrements supplémentaires d'un CD-RW finalisé ou
effacer des pistes enregistrées.
★ L'effacement s'effectue en plusieurs minutes.
(Télécommande)
CD CD-R
_ DUBBING _
NORMAL
2
(Télécommande)
A ! "
RELAY
MODE
HIGH
D # %
(Unité principale)
J(
)
S
PCM AUDIO TECHNOLOGY / COMPACT DISC RECORDER
_ DUBBING _
NORMAL HIGH
2
9
8
A ! "
D # %
1
(Unité principale)
)
P
,
TIME
DISPLAY
TITLE /
SELECT CHARACTER
TIME
POWER
−
PLAY
STOP
PAUSE
1
2
3
RELAY MODE
OPEN / CLOSE
ON
PHONES
PHONES LEVEL
4
S
.
5
/
V
-
4 REC
FINALIZE
8
9
PLAY
STOP
PAUSE
1
2
3
MAX
7
8
9
DUBBING
NORMAL
HIGH
7
8
9
{ ? }
CLEAR
+10
OPEN /CLOSE
MENU
6
7
MENU
PUSH
ENTER
8
Y < >
ENTER
PLAY
TIME
DISPLAY
TITLE /
SELECT CHARACTER
TIME
POWER
STOP
PAUSE
1
2
3
RELAY MODE
OPEN / CLOSE
ON
PHONES
PHONES LEVEL
CLEAR
INPUT
4 REC
FINALIZE
8
9
PLAY
STOP
PAUSE
1
2
3
{ ? }
10
+10
-
+
OPEN /CLOSE
MENU
5
MIN
MAX
6
7
MENU
STOP
ENTER
PLAY
2
3,4,5,6,7 2 3
RANDOM
9
PAUSE
3
PROG/DIRECT CALL
1
PROG/DIRECT CALL
PUSH
ENTER
8
TIME
PAUSE
1 / ALL
A-B
TITLE CHARACTER
DISPLAY SEL. FADER INPUT
3
CLEAR
REC
MULTI JOG
OFF
5
9
9
[ = ]
REMOTE SENSOR
PLAY
−
Y < >
10
2
8
,
6
: ;
[ = ]
STOP
CDR-W1500
V
P
REC
+
5
6
: ;
INPUT
/
MULTI JOG
OFF
5
MIN
PCM AUDIO TECHNOLOGY / COMPACT DISC RECORDER
CLEAR
5
REMOTE SENSOR
3
M*+
DUBBING
NORMAL
HIGH
G & '
2
J(
CDR-W1500
RELAY
MODE
.
3
M*+
4
CD CD-R
G & '
2
1
3
4,5,
6,7
3,4,
5
FINALIZE
1 3,4,5,6,7 2 3
RANDOM
TIME
1 / ALL
A-B
TITLE CHARACTER
DISPLAY SEL. FADER INPUT
3
4,5,
6,7
3,4,
5
FINALIZE
B
REMOTE CONTROL UNIT RC-278
1
Activez l'alimentation.
2
Chargez le disque CD-R/RW à effacer.
3
Appuyez sur la touche MENU, faites tourner le sélecteur Jog de l'unité principale ou appuyez sur la touche de recherche
automatique de la télécommande et sélectionnez le mode d'édition de CD-R/RW.
• L'indication "CDR/RW Edit?" s'affiche.
4
Appuyez sur la touche ENTER, faites tourner le sélecteur Jog de l'unité principale ou appuyez sur la touche de
recherche automatique de la télécommande et sélectionnez le mode d'effacement de toutes les pistes.
• L'indication "CD-RW Erase?" s'affiche.
5
Maintenant, appuyez sur la touche ENTER, faites tourner le sélecteur Jog de l'unité principale ou appuyez sur la touche
de recherche automatique de la télécommande et sélectionnez le mode d'effacement de toutes les pistes.
• L'indication "All Erase?" s'affiche.
6
Appuyez sur la touche ENTER.
• L'indication "Erase OK?" s'affiche.
7
Appuyez à nouveau sur la touche ENTER.
• L’indication “All Erase” clignote.
• Lorsque l'effacement est terminé, le temps affiché sera "Blank Disc".
B
REMOTE CONTROL UNIT RC-278
1
Activez l'alimentation.
2
Chargez le disque CD-RW sur lequel vous souhaitez annuler la finalisation.
3
Appuyez sur la touche MENU, faites tourner le sélecteur Jog de l'unité principale ou appuyez sur la touche de recherche
automatique de la télécommande et sélectionnez le mode d'édition de CD-R/RW.
• L'indication "CDR/RW Edit?" s'affiche.
4
Appuyez sur la touche ENTER, faites tourner le sélecteur Jog de l'unité principale ou appuyez sur la touche de
recherche automatique de la télécommande et sélectionnez le mode d'annulation de finalisation.
• L'indication "CD-RW Erase?" s'affiche.
5
Maintenant, appuyez sur la touche ENTER, faites tourner le sélecteur Jog de l'unité principale ou appuyez sur la touche
de recherche automatique de la télécommande et sélectionnez le mode d'annulation de finalisation.
• L'indication "TOC Erase?" s'affiche.
6
Appuyez sur la touche ENTER.
• L'indication "Erase OK?" s'affiche.
7
Appuyez à nouveau sur la touche ENTER.
• L’indication “TOC Erase” clignote.
• Lorsque le processus d'annulation de la finalisation est terminé, le type de disque affiché sera "CD-RW".
59
FRANCAIS
(3) Effacement d'une ou plusieurs pistes éloignées de la dernière piste
★ Pour effacer un disque CD-RW finalisé, annulez d'abord la finalisation de disque.
(4) Enregistrement des pistes que vous ne souhaitez pas écouter
★ Les pistes que vous ne souhaitez pas écouter, telles que celles contenant des erreurs d'enregistrement, peuvent être
programmées pour être sautées pendant la lecture.
(Télécommande)
(Télécommande)
CD CD-R
_ DUBBING _
NORMAL HIGH
2
A ! "
D # %
1
(Unité principale)
)
S
PCM AUDIO TECHNOLOGY / COMPACT DISC RECORDER
9
8
DUBBING
NORMAL
HIGH
TIME
CDR-W1500
DISPLAY
TITLE /
SELECT CHARACTER
TIME
CLEAR
INPUT
4 REC
FINALIZE
8
9
PLAY
STOP
PAUSE
1
2
3
.
5
/
V
POWER
STOP
PAUSE
1
2
3
RELAY MODE
OPEN / CLOSE
ON
PHONES
PHONES LEVEL
OPEN /CLOSE
MENU
5
MAX
9
CLEAR
7
MENU
PUSH
ENTER
8
ENTER
PLAY
3,4,5, 2 3
6,7,8
RANDOM
9
PAUSE
3
PROG/DIRECT CALL
TIME
1 / ALL
A-B
TITLE CHARACTER
DISPLAY SEL. FADER INPUT
S
PCM AUDIO TECHNOLOGY / COMPACT DISC RECORDER
8
+10
2
1
Y < >
{ ? }
STOP
)
3
4,5,
6,8
3,4,
5,7
9
8
DUBBING
NORMAL
HIGH
TIME
CDR-W1500
DISPLAY
TITLE /
SELECT CHARACTER
TIME
CLEAR
INPUT
4 REC
FINALIZE
8
9
PLAY
STOP
PAUSE
1
2
3
.
5
/
V
POWER
STOP
PAUSE
1
2
3
RELAY MODE
OPEN / CLOSE
ON
PHONES
PHONES LEVEL
OPEN /CLOSE
MENU
5
MAX
7
8
9
{ ? }
CLEAR
+10
6
7
MENU
PUSH
ENTER
8
STOP
ENTER
PLAY
2
1
3,4,5,6, 2 3
7,8,9,10
RANDOM
9
PAUSE
3
PROG/DIRECT CALL
FINALIZE
−
Y < >
REC
+
5
MIN
,
6
: ;
10
MULTI JOG
OFF
-
P
[ = ]
REMOTE SENSOR
PLAY
G & '
3
M*+
4
7
6
D # %
2
J(
6
: ;
RELAY
MODE
1
(Unité principale)
−
REC
+
5
MIN
,
10
MULTI JOG
OFF
-
P
[ = ]
REMOTE SENSOR
PLAY
A ! "
3
M*+
4
_ DUBBING _
NORMAL HIGH
2
G & '
2
J(
CD CD-R
RELAY
MODE
TIME
1 / ALL
A-B
TITLE CHARACTER
DISPLAY SEL. FADER INPUT
3
4,5,6,7,
8,9,10
3,4,5,
7,8
FINALIZE
B
B
REMOTE CONTROL UNIT RC-278
REMOTE CONTROL UNIT RC-278
1
Activez l'alimentation.
1
Activez l'alimentation.
2
Chargez le disque CD-R/RW à effacer.
2
Chargez le disque CD-R/RW contenant les pistes que vous souhaitez sauter à la lecture.
3
Appuyez sur la touche MENU, faites tourner le sélecteur Jog de l'unité principale ou appuyez sur la touche de recherche
automatique de la télécommande et sélectionnez le mode d'édition de CD-R/RW.
• L'indication "CDR/RW Edit?" s'affiche.
3
Appuyez sur la touche MENU, faites tourner le sélecteur Jog de l'unité principale ou appuyez sur la touche de recherche
automatique de la télécommande et sélectionnez le mode d'édition de CD-R/RW.
• L'indication "CDR/RW Edit?" s'affiche.
4
Appuyez sur la touche ENTER, faites tourner le sélecteur Jog de l'unité principale ou appuyez sur la touche de
recherche automatique de la télécommande et sélectionnez le mode d'effacement d'une seule piste.
• L'indication "CD-RW Erase?" s'affiche.
4
Appuyez sur la touche ENTER, faites tourner le sélecteur Jog de l'unité principale ou appuyez sur la touche de
recherche automatique de la télécommande et sélectionnez le mode réglage de saut de piste.
• L'indication "Skip Track?" s'affiche.
5
Maintenant, appuyez sur la touche ENTER, faites tourner le sélecteur Jog de l'unité principale ou appuyez sur la touche
de recherche automatique de la télécommande et sélectionnez le mode d'effacement d'une seule piste.
• L'indication "1Tr Erase?" s'affiche.
5
Maintenant, appuyez sur la touche ENTER, faites tourner le sélecteur Jog de l'unité principale ou appuyez sur la touche
de recherche automatique de la télécommande et sélectionnez le mode réglage de saut de piste.
• L'indication "Skip Set?" s'affiche.
6
Appuyez sur la touche ENTER.
• L'indication "**-**Tr Erase" s'affiche.
6
Appuyez sur la touche ENTER.
• L'indication "Skip Set --Tr" s'affiche.
7
Faites tourner le sélecteur Jog de l'unité principale dans le sens contraire des aiguilles d'une montre ou appuyez sur la
touche de recherche arrière automatique de la télécommande et sélectionnez le numéro des pistes que vous souhaitez
effacer.
7
Faites tourner le sélecteur Jog de l'unité principale ou appuyez sur la touche de recherche automatique de la
télécommande et sélectionnez les pistes que vous souhaitez sauter. Appuyez sur la touche ENTER pour confirmer la
sélection.
• L'affichage du numéro de piste sélectionné clignote sur le calendrier musical.
8
Appuyez à nouveau sur la touche ENTER.
• L’indication “Tr Erase” clignote.
• Lorsque l'effacement est terminé, le nombre de pistes restant après l'effacement est affiché dans une partie du
calendrier musical.
8
Répétez l'étape 7 pour ajouter une autre piste.
9
Appuyez sur la touche pendant l'affichage de "Skip Set --Tr".
• L'indication "Skip Set OK?" s'affiche.
10
Appuyez sur la touche ENTER.
• L'indication "Now PMA Rec" est affichée et l'enregistrement est terminé.
• L'affichage du numéro de piste sélectionné sur le calendrier musical est désactivé.
• L’affichage du nombre total de plages et du temps total ne change pas, même si les plages sont réglées pour être sautées.
60
FRANCAIS
2. Edition de texte
(5) Annulation de l'enregistrement des pistes que vous ne souhaitez pas écouter
2
(Télécommande)
Jusqu'à 23 caractères peuvent être entrés pour les titres de plage et de disque.
(1) Ajout de titre de disque
(Télécommande)
CD CD-R
_ DUBBING _
NORMAL HIGH
2
A ! "
RELAY
MODE
D # %
1
(Unité principale)
)
S
9
8
DUBBING
NORMAL
HIGH
TIME
CDR-W1500
DISPLAY
TITLE /
SELECT CHARACTER
TIME
CLEAR
INPUT
4 REC
FINALIZE
8
9
STOP
PAUSE
.
5
/
V
POWER
1
STOP
2
PAUSE
3
RELAY MODE
OPEN / CLOSE
ON
PHONES
PHONES LEVEL
OPEN /CLOSE
MENU
5
MAX
: ;
9
CLEAR
10
+10
PLAY
1
2
6
7
MENU
3
PUSH
ENTER
8
ENTER
PLAY
2
RANDOM
PAUSE
3
PROG/DIRECT CALL
3,4,5,6, 2 3
7,8,9,10
9
TIME
1 / ALL
A-B
TITLE CHARACTER
DISPLAY SEL. FADER INPUT
A ! "
4,5,6,7
(Unité principale)
3
4,5,6,7,
8,9,10
3,4,5,
7,8
RELAY
MODE
D # %
1
S
PCM AUDIO TECHNOLOGY / COMPACT DISC RECORDER
9
8
DUBBING
NORMAL
HIGH
TIME
CDR-W1500
DISPLAY
TITLE /
SELECT CHARACTER
TIME
CLEAR
INPUT
4 REC
FINALIZE
8
9
PLAY
STOP
PAUSE
1
2
3
.
)
POWER
STOP
PAUSE
1
2
3
RELAY MODE
OPEN / CLOSE
ON
PHONES
PHONES LEVEL
5
/
V
-
,
−
6
: ;
Y < >
7
8
9
{ ? }
CLEAR
10
+10
REC
+
OPEN /CLOSE
MENU
5
MAX
P
[ = ]
MULTI JOG
OFF
5
MIN
3
M*+
REMOTE SENSOR
PLAY
G & '
2
J(
4
6
7
MENU
PUSH
ENTER
8
STOP
ENTER
PLAY
9
7
3,8
PAUSE
FINALIZE
2
B
1
Activez l'alimentation.
2
Chargez le disque CD-RW sur lequel vous souhaitez annuler les réglages de pistes indésirables.
3
Appuyez sur la touche MENU, faites tourner le sélecteur Jog de l'unité principale ou appuyez sur la touche de recherche
automatique de la télécommande et sélectionnez le mode d'édition de CD-R/RW.
• L'indication "CDR/RW Edit?" s'affiche.
4
Appuyez sur la touche ENTER, faites tourner le sélecteur Jog de l'unité principale ou appuyez sur la touche de
recherche automatique de la télécommande et sélectionnez le mode réglage de saut de piste.
• L'indication "Skip Track?" s'affiche.
5
Maintenant, appuyez sur la touche ENTER, faites tourner le sélecteur Jog de l'unité principale ou appuyez sur la touche
de recherche automatique de la télécommande et sélectionnez le mode d'annulation du réglage des pistes à sauter.
• L'indication "Skip Clear?" s'affiche.
6
Appuyez sur la touche ENTER.
• L'indication "S.Clear --Tr" s'affiche.
7
Faites tourner le sélecteur Jog de l'unité principale ou appuyez sur la touche de recherche automatique de la
télécommande et sélectionnez la piste dont vous souhaitez annuler le saut. Appuyez sur la touche ENTER pour
confirmer la sélection.
• L'affichage du numéro de piste sélectionné clignote sur le calendrier musical.
8
Répétez l'étape 7 pour ajouter une autre annulation.
9
Appuyez sur la touche ENTER pendant l'affichage de "S.Clear --Tr".
• L'indication "SkipClearOK?" s'affiche.
10
_ DUBBING _
NORMAL HIGH
2
7
Y < >
8
{ ? }
STOP
1
−
REC
+
5
MIN
,
6
7
MULTI JOG
OFF
-
P
[ = ]
REMOTE SENSOR
PLAY
CD CD-R
3
M*+
4
PCM AUDIO TECHNOLOGY / COMPACT DISC RECORDER
G & '
2
J(
1
3,4,5, 2
6,7
3,8
3,4,
5,7
3
PROG/DIRECT CALL
RANDOM
TIME
1 / ALL
A-B
TITLE CHARACTER
DISPLAY SEL. FADER INPUT
FINALIZE
7
B
REMOTE CONTROL UNIT RC-278
1
Activez l'alimentation.
2
Chargez le disque CD-R/RW auquel vous souhaitez donner un titre.
3
Appuyez sur la touche MENU, faites tourner le sélecteur Jog de l'unité principale ou appuyez sur la touche de recherche
automatique de la télécommande et sélectionnez le mode d'édition de texte.
• L'indication "Text Edit?" s'affiche.
4
Appuyez sur la touche ENTER, faites tourner le sélecteur Jog de l'unité principale ou appuyez sur la touche de
recherche automatique de la télécommande pour que l'indication "Text In?" s'affiche.
5
Maintenant, appuyez sur la touche ENTER, faites tourner le sélecteur Jog de l'unité principale ou appuyez sur la touche
de recherche automatique de la télécommande pour faire afficher "Disc Title?".
6
Appuyez sur la touche ENTER.
• Le curseur clignote, indiquant le mode d'attente d'entrée de titre.
Appuyez sur la touche ENTER.
• "Now PMA Rec" est affiché et l'enregistrement est terminé.
REMARQUES:
• La finalisation du disque lorsque les pistes que vous ne souhaitez pas écouter ont été enregistrées déclenche
automatiquement l'activation du mode lecture avec saut.
• La lecture avec saut de plage est impossible sur les lecteurs CD qui ne sont pas équipés de cette fonction.
• Les pistes que vous ne souhaitez pas écouter peuvent être enregistrées et annulées 21 fois.
• La lecture programmée ou aléatoire est impossible lorsque des pistes que vous ne souhaitez pas écouter ont été
enregistrées. (La lecture programmée et la lecture aléatoire sont possibles dès que la finalisation est effectuée.)
• Il n'est pas possible d'enregistrer ou d'annuler les pistes que vous ne souhaitez pas entendre sur les CD du commerce ou
les disques CD-R/RW finalisés.
61
FRANCAIS
(2) Ajout de titres de piste
Entrez le titre.
• Faites tourner le sélecteur Jog de l'unité principale ou appuyez sur les touches de recherche automatique (8 et
9) de la télécommande pour sélectionner le caractère souhaité.
• Certains caractères pouvant être entrés avec le CDR-W1500 ne peuvent être affichés sur d'autres modèles.
(Télécommande)
CD CD-R
2
8
• La forme du curseur change chaque fois que l'appuie sur la touche caractère.
_ DUBBING _
NORMAL HIGH
A ! "
4,5,6,7,8
(Unité principale)
RELAY
MODE
D # %
1
)
PCM AUDIO TECHNOLOGY / COMPACT DISC RECORDER
CDR-W1500
[Explication sur le curseur:]
9
8
DUBBING
NORMAL
HIGH
TIME
DISPLAY
TITLE /
SELECT CHARACTER
TIME
CLEAR
INPUT
4 REC
FINALIZE
8
9
PLAY
STOP
PAUSE
1
2
3
.
5
/
V
POWER
………Mode d'entrée de caractères spéciaux
PLAY
STOP
PAUSE
1
2
3
RELAY MODE
OPEN / CLOSE
ON
PHONES
PHONES LEVEL
OPEN /CLOSE
MENU
5
7
MAX
7
8
9
{ ? }
CLEAR
+10
8
1
• Pour effacer un caractère, déplacez le curseur jusqu'à ce caractère et appuyez alors sur la touche d'effacement (CLEAR).
• Pour corriger la saisie d'un caractère, effacez-le d'abord et entrez ensuite le caractère correct.
✽ Tourner la molette Jog pour entrer les nombres ou les caractères spéciaux qui ne sont
pas sur les touches numériques ou sur la touche +10.
62
1
2
3
4
5
6
7
8
9
10
+10
PLAY
Mode d’entrée de
majuscules
ABC
DEF
GHI
JKL
MNO
PQR
STU
VWX
YZ
–
–
3,4,5, 2
6,7,8
3,9
3,4,
5,6,8
PAUSE
3
PROG/DIRECT CALL
RANDOM
9
8
3,9
TIME
1 / ALL
A-B
TITLE CHARACTER
DISPLAY SEL. FADER INPUT
FINALIZE
8
B
REMOTE CONTROL UNIT RC-278
Appuyez sur la touche MENU pour confirmer l'entrée du titre.
Touche
ENTER
2
SPACE
[Exemple:]
Pour entrer “%” à l’aide des
touches numériques de la
télécommande, appuyer deux
fois sur la touche 2 en mode
d’entrée de caractères spéciaux.
7
MENU
STOP
• Lorsque l'on appuie sur la touche de recherche manuelle avant ( 7 ) ou sur la touche ENTER, le caractère
sélectionné est confirmé et l'appareil passe en mode d'attente d'entrée pour le prochain caractère.
• Le curseur peut être déplacé en arrière en appuyant sur la touche de recherche manuelle arrière (6). Utilisez cette
fonction pour corriger la saisie de caractères.
8
6
PUSH
ENTER
………Mode d'entrée de Minuscule/Chiffre
[Caractères et chiffres disponibles]
Mode d'entrée de Majuscule/Chiffre:
ABCDEFGHIJKLMNOPQRSTUVWXYZ0123456789
Mode d'entrée de Minuscule/Chiffre:
abcdefghijklmnopqrstuvwxyz0123456789
Mode d'entrée de caractères spéciaux:
−
Y < >
REC
+
5
MIN
,
6
: ;
10
MULTI JOG
OFF
-
P
[ = ]
REMOTE SENSOR
………Mode d'entrée de Majuscule/Chiffre
3
M*+
4
S
G & '
2
J(
Mode d’entrée de
minuscules
abc
def
ghi
jkl
mno
pqr
stu
vwx
yz
–
–
Mode d’entrée de
caractères spéciaux
!”
#%
&’
( )
*+
,–
./
:;
<>
[=]
{?}
1
Activez l'alimentation.
2
Chargez le disque CD-R/RW auquel vous souhaitez donner des titres de piste.
3
Appuyez sur la touche MENU, faites tourner le sélecteur Jog de l'unité principale ou appuyez sur la touche de recherche
automatique de la télécommande et sélectionnez le mode d'édition de texte.
• L'indication "Text Edit?" s'affiche.
4
Appuyez sur la touche ENTER, faites tourner le sélecteur Jog de l'unité principale ou appuyez sur la touche de
recherche automatique de la télécommande pour que l'indication "Text In?" s'affiche.
5
Maintenant, appuyez sur la touche ENTER, faites tourner le sélecteur Jog de l'unité principale ou appuyez sur la touche
de recherche automatique de la télécommande pour faire afficher "Track Title?".
6
Appuyez à nouveau sur la touche ENTER, faites tourner le sélecteur Jog de l'unité principale ou appuyez sur la touche
de recherche automatique de la télécommande et sélectionnez la piste à laquelle vous souhaitez donner un titre.
• L'indication "**Tr Title?" s'affiche.
7
Appuyez sur la touche ENTER.
• Le curseur clignote, indiquant le mode d'attente d'entrée de titre.
8
Entrez le titre.
• Pour les instructions sur l'entrée de titres, voir étape 7 de la section "(1) Ajout de titres de disque", pages 62.
9
Appuyez sur la touche MENU pour confirmer la saisie du titre de piste.
REMARQUES:
• L'édition de texte n'est pas possible avec les CD audio du commerce ou les disques CD-R/RW finalisés.
• Un maximum de 23 caractères peuvent être enregistré par éléments.
Approximativement 900 caractères peuvent être entrés par disque.
• Les données de texte d'information ne sont écrites sur le disque que lors de la finalisation.
• Sans finalisation, le texte d'information est conservé pendant 2 ou 3 jours après la saisie même si l'alimentation est
débranchée. Ce texte d'information risque d'être perdu si l'appareil est débranché du secteur pendant une longue
période.
FRANCAIS
(3) Effacement de titres de disque
★ Si les disques CD-RW sont finalisés, les définaliser d’abord.
(4) Effacement des titres de piste
★ Si les disques CD-RW sont finalisés, les définaliser d’abord.
(Télécommande)
(Télécommande)
CD CD-R
_ DUBBING _
NORMAL HIGH
A ! "
2,3,4
(Unité principale)
D # %
1
)
S
9
8
DUBBING
NORMAL
HIGH
TIME
CDR-W1500
DISPLAY
TITLE /
SELECT CHARACTER
TIME
CLEAR
INPUT
4 REC
FINALIZE
8
9
PLAY
STOP
PAUSE
1
2
3
.
5
/
V
POWER
STOP
PAUSE
1
2
3
RELAY MODE
OPEN / CLOSE
ON
PHONES
PHONES LEVEL
-
2,3,4,5
(Unité principale)
−
: ;
OPEN /CLOSE
MENU
Y < >
S
PCM AUDIO TECHNOLOGY / COMPACT DISC RECORDER
8
9
{ ? }
CLEAR
+10
9
8
DUBBING
NORMAL
HIGH
TIME
CDR-W1500
DISPLAY
TITLE /
SELECT CHARACTER
STOP
1,2,3,4
1
1,2,3
POWER
ENTER
PLAY
2
CLEAR
INPUT
4 REC
FINALIZE
8
9
1
9
PLAY
STOP
PAUSE
1
2
3
RELAY MODE
OPEN / CLOSE
ON
PHONES
PHONES LEVEL
TIME
5
PLAY
STOP
PAUSE
1
2
3
/
V
-
MAX
1 / ALL
DISPLAY SEL. FADER INPUT
−
Y < >
7
8
9
{ ? }
CLEAR
10
+10
OPEN /CLOSE
MENU
6
7
MENU
1
PUSH
ENTER
8
PAUSE
STOP
ENTER
PLAY
2
A-B
1,2,3,4,5
TITLE CHARACTER
,
6
: ;
REC
+
5
MIN
P
[ = ]
MULTI JOG
OFF
5
3
PROG/DIRECT CALL
RANDOM
TIME
.
G & '
3
M*+
REMOTE SENSOR
7
MENU
PUSH
ENTER
8
D # %
2
)
4
7
6
RELAY
MODE
1
J(
6
REC
+
5
MAX
,
10
MULTI JOG
OFF
5
MIN
P
[ = ]
REMOTE SENSOR
PLAY
A ! "
3
M*+
4
PCM AUDIO TECHNOLOGY / COMPACT DISC RECORDER
G & '
2
J(
CD CD-R
_ DUBBING _
NORMAL HIGH
RELAY
MODE
1
1,2,3,4
FINALIZE
PAUSE
3
PROG/DIRECT CALL
RANDOM
9
TIME
1 / ALL
A-B
TITLE CHARACTER
DISPLAY SEL. FADER INPUT
FINALIZE
B
B
REMOTE CONTROL UNIT RC-278
REMOTE CONTROL UNIT RC-278
1
Appuyez sur la touche MENU, faites tourner le sélecteur Jog de l'unité principale ou appuyez sur la touche de recherche
automatique de la télécommande et sélectionnez le mode d'édition de texte.
• L'indication "Text Edit?" s'affiche.
1
Appuyez sur la touche MENU, faites tourner le sélecteur Jog de l'unité principale ou appuyez sur la touche de recherche
automatique de la télécommande et sélectionnez le mode d'édition de texte.
• L'indication "Text Edit?" s'affiche.
2
Appuyez sur la touche ENTER, faites tourner le sélecteur Jog de l'unité principale ou appuyez sur la touche de
recherche automatique de la télécommande pour que l'indication "Text Erase?" s'affiche.
2
Appuyez sur la touche ENTER, faites tourner le sélecteur Jog de l'unité principale ou appuyez sur la touche de
recherche automatique de la télécommande pour que l'indication "Text Erase?" s'affiche.
3
Maintenant, appuyez sur la touche ENTER, faites tourner le sélecteur Jog de l'unité principale ou appuyez sur la touche
de recherche automatique de la télécommande pour faire afficher "Disc Title?".
3
Maintenant, appuyez sur la touche ENTER, faites tourner le sélecteur Jog de l'unité principale ou appuyez sur la touche
de recherche automatique de la télécommande pour faire afficher "Track Title?".
4
Appuyez sur la touche ENTER pour définir l'effacement du nom du disque.
• L'indication "Complete" s'affiche.
4
Appuyez à nouveau sur la touche ENTER, faites tourner le sélecteur Jog de l'unité principale ou appuyez sur la touche
de recherche automatique de la télécommande et sélectionnez la piste dont vous souhaitez effacer le titre.
• L'indication "**Tr Title?" s'affiche.
5
Appuyez sur la touche ENTER pour définir l'effacement du nom du disque.
• L'indication "Complete" s'affiche.
63
FRANCAIS
(5) Effacement de tous les titres de disque et de piste
★ Si les disques CD-RW sont finalisés, les définaliser d’abord.
17 MODE MENU
• Lorsque l'on appuie sur la touche MENU, le mode menu est activé et l'appareil peut être commandé comme indiqué sur le
schéma ci-dessous.
• Fermer les tiroirs de disque et régler les deux sections CD et CD-R en mode stop.
• “*” indique les valeurs par défaut.
• Faites tourner le sélecteur dans le sens des aiguilles d'une montre pour faire afficher l'indication “↓”. Appuyez sur la touche
ENTER pour faire afficher l'indication “→”.
(Télécommande)
CD CD-R
_ DUBBING _
NORMAL HIGH
2,3,4,5
(Unité principale)
A ! "
D # %
G & '
1
2
3
J(
)
M*+
5
4
S
PCM AUDIO TECHNOLOGY / COMPACT DISC RECORDER
9
8
DUBBING
NORMAL
HIGH
TIME
CDR-W1500
DISPLAY
TITLE /
SELECT CHARACTER
TIME
CLEAR
INPUT
4 REC
FINALIZE
8
9
PLAY
STOP
PAUSE
1
2
3
.
/
V
POWER
STOP
PAUSE
1
2
3
RELAY MODE
OPEN / CLOSE
ON
PHONES
PHONES LEVEL
-
1
Text In?
1
OPEN /CLOSE
MENU
8
9
{ ? }
CLEAR
10
+10
6
ª
Text Erase?
1
8
ENTER
1
9
PLAY
1,2,3,4,5
1
3
PROG/DIRECT CALL
RANDOM
TIME
1 / ALL
ª
Track Title?
PAUSE
2
1,2,3
A-B
Setup Menu?
1
Sync. Rec?
1
B
Appuyez sur la touche ENTER, faites tourner le sélecteur Jog de l'unité principale ou appuyez sur la touche de
recherche automatique de la télécommande pour que l'indication "Text Erase?" s'affiche.
3
Maintenant, appuyez sur la touche ENTER, faites tourner le sélecteur Jog de l'unité principale ou appuyez sur la touche
de recherche automatique de la télécommande pour faire afficher "All Erase?".
4
Appuyez sur la touche ENTER.
• L'indication "Erase OK?" s'affiche.
5
Appuyez sur la touche ENTER pour définir l'effacement.
• L'indication "Complete" s'affiche.
**Tr Title?
ª
1Tr Sync.?
Appuyez sur la touche MENU, faites tourner le sélecteur Jog de l'unité principale ou appuyez sur la touche de recherche
automatique de la télécommande et sélectionnez le mode d'édition de texte.
• L'indication "Text Edit?" s'affiche.
2
1
Disc Sync.?
ª
Make CD?
FINALIZE
REMOTE CONTROL UNIT RC-278
1
**Tr Title?
ª
TITLE CHARACTER
DISPLAY SEL. FADER INPUT
1
All Erase?
ª
Disc Title?
7
MENU
PUSH
ENTER
STOP
Disc Title?
ª
Track Title?
−
REC
+
5
MAX
,
Text Edit?
Y < >
7
MULTI JOG
OFF
5
MIN
P
e
6
: ;
[ = ]
REMOTE SENSOR
PLAY
MODE MENU
RELAY
MODE
ª
Sync. Off?*
ª
Sync. Level?
1
Sync. -54dB*
(–54 à –30 dB/par pas de 6 dB)
ª
A.T. Mark?
1
On*/Off
ª
FadeIn Time?
1
FadeIn 5sec*
(1 à 15sec/par pas de 1 s)
ª
FadeOut Time?
1
FadeOut 5sec*
(1 à 15sec/par pas de 1 s)
ª
Intro Time?
1
ª
Custom Index
1
Opt/Coax/Ana
ª
Skip Play?
1
On/Off*
ª
Timer Play?
1
On*/Off
CD-RW Erase?
1
All Erase?
ScanTime15s*
(5 à 30sec/par pas de 5 s)
REMARQUE:
• L'effacement de texte n'est pas possible avec les CD audio du commerce ou les disques CD-R/RW finalisés.
ª
CDR/RW Edit?
1
ª
TOC Erase?
ª
Skip Track?
ª
A. Rec Level?
(ou D.Rec Level?)
64
1
Level 00.0dB*
1
ª
1Tr Erase?
1
** - **TrErase
Skip Set?
1
Skip Set **Tr
ª
Skip Clear?
1
S. Clear **Tr
1
Changez le réglage avec le sélecteur Jog
¸
˝
˛
¸
Ô
˝
Ô
˛
¸
Ô
Ô
Ô
Ô
Ô
Ô
Ô
Ô
Ô
Ô
Ô
Ô
Ô
˝
Ô
Ô
Ô
Ô
Ô
Ô
Ô
Ô
Ô
Ô
Ô
Ô
Ô
Ô
˛
¸
Ô
Ô
Ô
˝
Ô
Ô
Ô
Ô
˛
Veuillez-vous référer à la
section“2. Edition de
texte (1) Ajout de titre de
disque, (2) Ajout de titres
de piste” (page 61, 62).
Veuillez-vous référer à la
section“2. Edition de
texte (3) Effacement de
titres de disque, (4)
Effacement des titres de
piste, (5) Effacement de
tous les titres de disque
et de piste” (page 63,
64).
Veuillez-vous référer à la
section “. METHODE
DE PARAMETRAGE”
(page 41 ~ 44).
Veuillez-vous référer à la
section “1. Edition de
CD-R/RW” (page 59 ~
61).
FRANCAIS
18 MESSAGES
Des messages peuvent apparaître à l'affichage pendant l'utilisation du CDR-W1500. La signification de ces messages est
expliquée ci-dessous.
Message
TOC Reading
Open
Close
No Disc
Use Audio CD
Now PMA Rec
Disc Full
Copy Prohibit
Finalize *.**
PlaybackOnly
Now OPC
Signification
Lecture des informations du disque.
Le disque ne fonctionne pas correctement.
Pendant la fermeture du tiroir porte-disque.
All Skip Tr
Toutes les pistes sont marquées pour être sautées.
Aucun disque inséré, disque illisible ou inséré à l'envers.
Le disque inséré n'est pas un CD audio.
Complete
TextEraseOK?
La réception du mode est terminée.
Si le disque est retiré, toutes les données de texte sont effacées.
CD-R Short
Le temps enregistrable sur le disque est plus court que le temps de la
source d'enregistrement que vous tentez de copier.
Impossible de poursuivre l'enregistrement.
Text Protect
Les données de texte d'information sont protégées contre la copie et
donc ne peuvent être copiées en mode de copie.
Aucun enregistrement numérique ne peut être effectué avec la source
connectée. Voir “Copies numériques”, page 37.
Des signaux de données autres que des signaux audio ont été
introduits.
Ces signaux ne sont pas enregistrés.
Now Tr Check
Les informations de piste côté CD sont en cours de vérification.
Mise à jour du contenu du disque.
(“*” indique une lettre ou caractère.)
Décompte du temps pendant la finalisation d'un disque.
Lors de tentative d'enregistrement sur un CD-R finalisé ou un CD
préenregistré.
Pendant le calibrage de la puissance du laser pour disques non
finalisés.
Rec Error
Une erreur s'est produite pendant l'enregistrement.
Disc Error
L'enregistrement ou la finalisation n'est pas possible à cause d'un
défaut du disque.
Blank Disc
Lors de tentative d'édition d'un disque qui n'a pas de piste.
Dig.Unlock
23 caractères de texte ou un total de 900 caractères ont déjà été
entrés pour ce disque.
Mecha Error
OPC pendant la procédure OPC
(OPC = calibrage de la puissance optimale)
Sync. -**dB
Name Full
Signification
Pendant l'ouverture du tiroir porte-disque.
OPC Error
No Name
Message
Pas de texte enregistré sur ce disque.
Réglage de la valeur du niveau du début de l'enregistrement
synchronisé.
Connexion incorrecte du jack d'entrée numérique pendant
l'enregistrement de l'entrée numérique ou le signal d'entrée n'entre
pas correctement à cause de certains autres facteurs.
65
FRANCAIS
19 DEPISTAGE DES PANNES
20 CARACTERISTIQUES PRINCIPALES
Vérifiez à nouveau ces indications avant d'en déduire qu'il s'agit d'un dysfonctionnement du lecteur
Est-ce que toutes les connexions sont correctes ?
Avez-vous bien suivi les instructions du manuel ?
2 L'amplificateur et les enceintes fonctionnent-ils correctement ?
Si le CDR-W1500 paraît ne pas fonctionner correctement, consultez le tableau ci-dessous. Si cela ne résoud pas le problème, il se
peut que le CDR-W1500 soit endommagé. Mettre hors tension, débrancher le câble d'alimentation du secteur, et contacter le
revendeur ou le service après-vente DENON le plus proche.
2
Audio:
Réponse en fréquence:
Gamme dynamique:
Rapport signal/bruit:
Distorsion harmonique:
Pleurage et scintillement:
Unité CD:
Unité CD-R (pour édition numérique)
2 Hz à 20 kHz:
2 Hz à 20 kHz
98 dB:
88 dB
105 dB:
100 dB
0,003 % (1 kHz):
0,01 % (1 kHz)
En-dessous des limites mesurables (± 0,001 % W en crêtes)
2
Disques utilisables:
CD de (12 cm/8 cm)
Disques CD-R audio enregistrés pour usage privé (Unité CD-R)
Disques CD-RW audio enregistrés pour usage privé (Unité CD-R)
2
Généralités:
Alimentation:
Consommation:
Dimensions hors-tout:
2
2
Check
Symptôme
Pas d'alimentation.
39
38
La fonction de marquage automatique de
piste ne fonctionne pas.
• Vérifiez si la fonction de marquage automatique de piste est activée.
• Vérifiez s'il y a un blanc de 3 secondes entre les pistes.
• Vérifiez si la source est une source utilisateur avec sortie numérique conforme à la
norme audio IEC.
42
37
–
Pas de son.
• Vérifiez les connexions audio.
• Si vous utilisez un amplificateur, essayez avec une autre source.
38
38
Le son de l'amplificateur est déformé.
• Vérifiez que la sortie analogique du graveur de CD n'est pas connectée à l'entrée Phono
de l'amplificateur.
38
La lecture ne démarre pas.
• Vérifier que le disque est inséré avec l'étiquette vers le haut.
• Nettoyez le disque.
41
37
La télécommande ne fonctionne pas.
• Diriger la télécommande directement vers le graveur de CD.
• Vérifiez les piles et remplacez-les si nécessaire.
40
40
•
•
•
•
37
–
36
38
N'enregistre pas.
•
•
•
•
Nettoyez le disque.
Vérifiez si le CD-R n'est pas finalisé.
Vérifiez que le disque est enregistrable et remplacez-le si nécessaire.
Vérifiez s'il reste du temps sur le disque.
(L'indication "Disc Full" s'affiche.)
Vérifiez que vous ne tentez pas l'enregistrement numérique d'une source déjà
enregistrée numériquement.
(L'indication "Copy Prohibit" s'affiche.)
Vérifiez si le réglage du niveau d'enregistrement est correct.
Le disque n'est pas du type audio (L'indication "Use Audio CD" s'affiche).
Source d'entrée choisie incorrecte. L'indicateur de l'entrée clignote.
37
47
37
39
L'enregistrement est déformé.
• Vérifiez que le réglage du niveau d'enregistrement est correct.
47
10 secondes de pause entre
enregistrements.
• Voir le réglage du niveau d'enregistrement synchronisé.
42
“Disc Error” s'affiche.
• Si apparaît ensuite à l'affichage, le disque ne peut plus recevoir d'enregistrement
supplémentaire et être finalisé. Mais il peut quand même être joué sur ce graveur de
CD ou un autre. "Disc Error"
Un disque CD-R enregistré ne peut être
joué sur un autre lecteur ou unité CD.
• Finalisez le disque.
• Est-ce que la lecture est possible sur un autre lecteur CD ?. Si c'est le cas, nettoyez le
capteur de lecture de lecteur sur lequel le disque ne peut être joué.
• Les disques CD-R ne peuvent être joués sur certains lecteurs CD.
La copie, l’enregistrement, la finalisation
ainsi que l’édition de CD-R/RW n’est pas
possible.
Le mode menu ne peut être sélectionné.
La finalisation est impossible.
66
Page
• Assurez-vous que la touche d'alimentation POWER est sur on.
• Assurez-vous que le câble d'alimentation secteur est branché correctement.
• Le mode relais est-il; réglé sur “RELAY” ou “MIX”?
Commuter au mode “SINGLE” ou “DUAL”.
• Est-ce que les tiroirs de disque des sections CD ou CD-R sont ouverts ? Fermer les
tiroirs des sections CD et CD-R.
• Est-ce que les sections CD et CD-R sont en cours d’utilisation ? Régler ces sections en
mode stop.
–
37, 58
–
–
55
58, 64
58, 64
2
Masse:
120 V, 60 Hz
29 W
434 (largeur) x 101 (hauteur) x 330 (profondeur) mm
(y compris les pieds, boutons et connecteurs)
5,5 kg
Télécommande:
Système de télécommande:
Alimentation:
RC-278
Impulsions infrarouges
3 V CC utilisant 2 piles R6P (AA)
✽ Par souci d'amélioration constante du produit, la conception et les caractéristiques peuvent être modifiées sans préavis.
ESPAÑOL
IMPORTANTE PARA LA SEGURIDAD
ADVERTENCIA:
CON EL OBJETO DE EVITAR PELIGROS DE
INCENDIO Y DESCARGAS ELÉCTRICAS NO
EXPONGA ESTE APARATO A LA LLUVIA O
LA HUMEDAD
PRECAUCIÓN:
1. Tenga cuidado al manipular el cable de alimentación
No dañe ni deforme el cable de alimentación.Si resultara dañado
o deformado podría causar descargas eléctricas o errores de
funcionamiento al usarse.Cuando lo extraiga de la toma de red de
una pared, procure coger por el enchufe y no tirar del cable.
2. No abra la cubierta superior.
Para evitar descargas eléctricas no abra la cubierta superior. Si se
produjera algún problema, póngase en contacto con el
DISTRIBUIDOR DENON.
3. No coloque nada en el interior.
No coloque objetos metálicos ni permita que se derramen
líquidos en el interior del grabador de CD.Podría producirse una
descarga eléctrica o una avería.
Rogamos que inscriba y guarde el nombre del modelo y el número
de serie del equipo que se indica en la etiqueta de capacidades
nominales.
Modelo Nº CDR-W1500
Nº de Serie
Enhorabuena por la adquisición de este Grabador de Discos
Compactos DENON. Lea atentamente las instrucciones de manejo
para familiarizarse con el grabador de CD y obtener así el máximo
rendimiento del mismo.
Procure guardar este manual para futuras referencias, en caso de
que surgiera cualquier pregunta o problema.
Compruebe los siguientes artículos para asegurarse de que
están inlcuidos en el embalaje junto con la unidad principal.
(1) Unidad principal …………………………………………………1
(2) Unidad de control remoto (RC-278) ……………………………1
(3) Pilas secas R6P(AA)………………………………………………2
(4) Cable de conexión ………………………………………………2
(5) Instrucciones de operación ……………………………………1
(6) Relacición de servicios técnicos ………………………………1
Índice
z
x
c
v
b
n
m
,
.
⁄0
⁄1
⁄2
⁄3
⁄4
⁄5
⁄6
⁄7
⁄8
⁄9
¤0
FUNCIONES …………………………………………………67
PRECAUCIONES DURANTE EL USO ………………………67
ACERCA DE LOS DISCOS CD-R/RW ……………………67, 68
MANIPULACIÓN DE DISCOS Y PRECAUCIONES ………68, 69
LIMITACIONES RELACIONADAS
CON LOS ESTÁNDARES DE CD-R/RW ………………………69
CONEXIONES
………………………………………………69
NOMBRES DE PIEZAS Y FUNCIONES …………………70, 71
UNIDAD DE MANDO A DISTANCIA ……………………71, 72
MÉTODO DE CONFIGURACIÓN
……………………72 ~ 75
PROCEDIMIENTO DE COPIA …………………………75 ~ 77
GRABACIÓN DESDE DISPOSITIVOS EXTERNOS
NOTA
Este grabador de CD utiliza un láser semiconductor.Para poder
disfrutar de la música con un funcionamiento estable, se recomienda
utilizar el aparato a una temperatura ambiente de 10 °C (50 °F) ~ 30
°C (86 °F).
• Sitio de instalación
Para poder disponer de una ventilación suficiente, deje un espacio
de al menos 10 cm. entre las partes frontal, posterior y laterales
de la unidad y las paredes u otros objetos que puedan obstruir la
ventilación.
1 FUNCIONES
1. Diversas funciones de copia
• Este aparato está equipado con una serie de cómodos modos
de copia: “Doblaje de disco” para copiar discos enteros,
“Realizar doblaje de CD” para copiar un disco entero y luego
finalizarlo automáticamente, “Doblaje de 1 pista” para copiar
pistas individuales, y "Doblaje de grabación por exploración"
para seleccionar las pistas que se desean grabar mientras se
exploran los CDs y se copian las pistas seleccionadas.
• Puede seleccionarse una de las dos velocidades de copia:
velocidad normal y velocidad doble.
2. Grabación desde dispositivos extrenos
• Este aparato está equipado con tres cómodas funciones de
grabación sincronizadas:“Grabación sincronizada de disco"
para grabar un álbum del lado fuente, "Realizar grabación de
CD" para finalizar automáticamente la grabación sincronizada
de un disco, y "Grabación sincronizada de pista" para grabar
una pista por vez. También es posible realizar una grabación
manual.
3. Gran variedad de funciones de reproduccón
• Gracias a la combinación de las unidades de CD y CD-R, este
equipo dispone de tres modos de reproducción diferentes:
“Repetición de reproducción" para repetir la reproducción
entre el disco de la unidad de CD y el disco de la unidad CD-R,
"Mezcla de reproducción" para la reproducción aleatoria o
programada del disco de la unidad de CD y del disco de la
unidad de CD-R como si se tratara de un sólo disco, y
"Reproducción dual" con la que se pueden manejar las
unidades de CD y de CD-R de forma independiente.
• Este aparato está equipado con modos de reproducción
programada, reproducción aleatoria, y todas las pistas, 1 pista
y repetición de reproducción A-B
4. Amplia variedad de conectores de entradas digitales
• Además de los conectores de entrada analógica, esta unidad
está equipada con dos conectores de entradas digitales.Se
dispone de un terminal de entrada digital para utilizar con
fuentes digitales tales como CD, MD y emisiones por satélite,
y un terminal de entrada digital coaxial.
5. Equipado con convertidor de frecuencia de muestreo
• Este convertidor permite grabaciones directas de entradas
digitales de DAT o emisiones por satélite (32kHz, 48 kHz) que
tienen frecuencias de muestreo distintas de los 44,1 kHz
utilizados en los CDs.
DIVERSAS FUNCIONES DE REPRODUCCIÓN ………82 ~ 86
MODO DE repetición …………………………………86 ~ 89
FINALIZACIÓN DE DISCOS CD-R/RW ………………………89
EDICIÓN ………………………………………………90 ~ 95
MODO DE MENÚ ……………………………………………95
MENSAJES ……………………………………………………96
SOLUCIÓN DE PROBLEMAS ………………………………97
ESPECIFICACIONES PRINCIPALES …………………………97
DURANTE EL USO
• Durante la selección de pistas, durante la búsqueda y
cuando el grabador es sometido a fuertes impactos, la
velocidad de giro cambia mucho, emitiendo un pequeño
ruido.Esto no constituye ninguna avería por parte del
grabador.
• Cuando se hace funcionar el grabador de CD durante la
recepción de emisiones de FM o AM, puede producirse
ruido en la recepción de FM o AM.En tales situaciones,
apague la alimentación del grabador de CD.
• El CDR-W1500 tiene un amplio margen dinámico. Tenga
cuidado al subir el volumen del amplificador cuando el
volumen de la reproducción sea bajo. Si se sube el volumen
demasiado, podrían dañarse los altavoces.
• La colocación del grabador o de sus cables de conexión
cerca de un televisor u otro dispositivo de audio puede
ocasionar zumbidos. Si ocurriera esto, sitúe el grabador en
otro lugar o cambie de sitio los cables de conexión.
• Asegúrese de extraer el disco del grabador antes de
moverlo.Si se deja el disco en el grabador mientras es
movido, el disco podría resultar dañado.
• No coloque ningún objeto en la bandeja, en el sitio de carga
del disco, ni abra ni cierre la bandeja con algo dentro. Los
objetos extraños en la bandeja podrían dañar el mecanismo
de reproducción.
• No traslade el grabador desde un sitio frío a otro caliente
brúscamente.Si el grabador estuviera frío al llevarse a un
ambiente cálido, podría formarse condensación, impidiendo
un funcionamiento correcto del grabador. Si se formara
condensación en el grabador al trasladarse a una habitación
cálida, espere por lo menos 30 minutos antes de usarlo.
individuales puede ser ingresado y visualizado para
discos grabados CD-R/RW.
® , HDCD ® (High
7. Equipado con decodificador
Definition Compatible Digital®) (Unidad de CD)
® , HDCD ® , High Definition Compatible
Las marcas:
Digital ® (Digital Compatible de Alta Resolución) y Pacific
MicrosonicsTM son marcas registradas o marcas registradas por la
compañia Pacific Microsonics, Inc. en los Estados Unidos de Norte
América y/o en otros paises.
Los sistemas HDCD son manufacturads bajo la autorización de
Pacific Microsonics, Inc. Este producto
está protegido bajo una o más de las siguientes patentes: en los
Estados Unidos de Norte América:5,479,168; 5,638,074;
5,640,161; 5,808,574; 5,838,274; 5,854,600; 5,872,531;
5,864,311. Y en Australia: 669114. Yotras patentes pendiente de
registro.
Discos CD
Esta unidad utiliza CDs (discos de audio digital
óptico) que lleven la marca situada a la derecha.
Observe que los CDs de forma especial, por
ejemplo con forma de corazón o hexagonales no
pueden ser reproducidos. No intente usar tales
CDs puesto que podrían causar averías en la
unidad.
C
Discos CD de Texto
Esta unidad puede mostrar información de texto
en la pantalla cuando se reproducen discos CD
de Texto que contengan información de texto en
la categoría de Inglés.
Los discos CD de Texto incluyen la marca
indicada a la derecha.
NOTA:
• Esta unidad puede mostrar visualizaciones de texto
de los siguientes tipos de caracteres.Otros tipos de
caracteres harán que se visualice “_” .
• Alfabeto
ABCDEFGHIJKLMNOPQRSTUVWXYZ
abcdefghijklmnopqrstuvwxyz
• Números
0123456789
• Símbolos
SPACE
3 ACERCA DE LOS DISCOS
CD-R/RW
Métodos de grabación de discos
Discos que pueden utilizarse con esta uinidad
2 Discos CD-R
• Los discos CD-R incorporan una capa de pigmento para la
grabación. Cuando se exponen al láser de grabación, se
Discos CD-R y discos CD-RW
produce un cambio de forma en los límites de esta capa y de
Asegúrese de utilizar discos que lleven una de la marcas
siguientes, con esta unidad.
6. Función de introducción y visualización de textos
• El título del álbum y el título de la pista para pistas
…77 ~ 81
REPRODUCCIÓN NORMAL …………………………………81
2 PRECAUCIONES
• Discos CD-R
• Discos CD-RW
la capa de plástico que producen la grabación de la señal. La
información grabada se mantiene hasta el final de la vida útil
del disco.
• Después de la grabación, los discos finalizados pueden ser
reproducidos en reproductores de CD normales.
2 Discos CD-RW
Recordable
ReWritable
• Los discos CD-RW incorporan una capa de cambio de fase.El
proceso de grabación produce un cambio de forma de esta
y una indicación como
"PARA EL CONSUMIDOR",
"PARA USO DEL
CONSUMIDOR" o "SÓLO
PARA USO MUSICAL".
capa de un estado de cristal (reflectante) a un estado amorfo
(no de cristal).
• La información grabada puede borrarse en los discos CD-RW.
El borrado puede tomar la forma de borrado de todas las
pistas del disco o sólo las pistas especificadas empezando
✽ La grabación no será posible en discos que no lleven las
marcas antes mencionadas.
hacia atrás desde la última pista del disco.
• Los discos CD-RW finalizados pueden ser reproducidos en
reproductores de CD diseñados para ser usados con discos
CD-RW así como en grabadores de CD.
67
ESPAÑOL
Copias digitales
Procedimiento de finalización de discos CD-R
Un disco CD-RW en el que se haya grabado mediante entrada digital no puede volver a grabarse de forma digital (v.gr. copiado) en
otro disco CD-RW o MD, etc. Esta es una norma establecida por SCMS (Sistema de Gestión de Copia en Serie).
Disco sin
grabar
La grabación no es posible.
Digital
Fuente
digital
Reproductor CD
de equipo digital,
etc.
Analógico
Grabación
digital
Digital
Fuente
analógica Grabación
Analógica
NOTAS:
• Una vez que se haya realizado la finalización de
un disco CD-R, ya no serán posible grabaciones
adicionales.
• La información que se ha grabado en un disco
CD-R no puede ser borrada.
Después de que concluya la grabación de un CD-R, es
necesario el procedimiento de finalización para que pueda ser
reproducido en un reproductor de CD normal.
Es posible la grabación.
Procedimiento de finalización de discos CD-RW
“Antes de la finalización”
La grabación Digital
es posible.
La grabación
es posible.
Es posible la grabación adicional.
La grabación es posible.
No es posible la reproducción en un
reproductor de CD normal. La
reproducción sólo es posible en un
grabador de CD.
Digital
La grabación no es posible.
Disco
grabado
Analógico
La grabación es posible.
“Después de la finalización”
Los discos CD-RW no pueden reproducirse en un
reproductor de CD normal, incluso con el procedimiento
de finalización.La reproducción sólo es posible en
grabadores de CD o reproductores diseñados para su uso
con discos CD-RW. Sólo pueden reproducirse en un
reproductor diseñado para ser utilizado con discos CDRW. Además, debe tener en cuenta que los discos CDRW pueden ser borrados después de su finalización.
No es posible la grabación adicional.
Es posible la reproducción en un
reproductor de CD normal.
Números de pista: Función de pista automática
4 MANIPULACIÓN DE DISCOS Y PRECAUCIONES
★ La grabación en el modo de grabación sincronizada (v.gr. grabación sincronizada de disco, grabación sincronizada de pista y
grabación con finalización automática) produce la asignación automática de números de pista. La forma en que se asocian los
números de pista será distinta para la grabación digital que para la grabación analógica según sean las condiciones.
2
Grabación desde una entrada digital
• Cuando se realiza la grabación digital de un CD, los números de pista son actualizados al detectarse el primer sonido
después del cambio de pista.
• Cuando se realiza la grabación digital desde un MD, se asignará automáticamente un número de pista que es igual al número
de pista original.
• Cuando se grabe desde un DAT, los números de pista serán asignados cuando se detecte el cambio de pista por medio de
las identificaciones (ID) de comienzo.
• Cuando se grabe desde emisiones por satélite o de otros equipos digitales, la detección de un espacio en blanco de un os 3
segundos o más, igual que cuando se realiza una grabación analógica desde una entrada analógica, activará la función de
pista automática y se producirá la asignación automática del número de pista.
• El número de pista puede que no cambie correctamente cuando haya mucho ruido en el espacio en blanco que hay entre
las pistas.
• El número de pista podría cambiar cuando el nivel de la señal sea muy bajo dentro de la pista.
Grabación desde una entrada analógica
Los números de pista se asignarán automáticamente cuando se detecte un
espacio en blanco de 3 segundos o más.
• Cuando la señal de entrada resulta afectada por ruidos o hay alguna
interferencia, el número de pista puede que no cambie en la posición correcta.
• El número de pista podría cambiar cuando el nivel de la señal sea muy bajo
dentro de la pista.
✽ En la grabación manual es posible la activación/desactivación de la función de pista
automática. (Véase "Ajuste de la marca de pistas automática" en la página 73).
2
Aproximadamente 3 segundos
Espacio
blanco
Primera pista
en
NOTAS:
• No pegue ninguna etiqueta de disco disponible en
comercios u otras en el disco. De lo contrario, podría
resultar imposible grabar o reproducir el disco
correctamente.
Tenga cuidado para no
dejar huellas de dedos en
la superficie de grabación
de señales.
Limpieza de discos
Cuando el disco tenga marcas de huellas de dedos o
suciedad, límpielo antes de usarlo. La suciedad no afectará
a la señal del disco, pero la calidad de sonido puede
disminuir y puede haber saltos de sonido. Tenga en cuenta
que cuando la superficie de un disco CDR/RW está sucia,
puede que no se grabe correctamente.
2 Para limpiar el disco utilice kits de limpieza de discos
disponibles en el mercado o un paño limpio.
2
• No utilice aerosoles para discos o productos para
evitar la electricidad estática. No utilice benzeno,
diluyente u otros productos químicos volátiles.
Segunda
pista
Precauciones con la manipulación
Discos CDR/RW
NOTAS:
• Cuando se grabe una fuente analógica que contenga una señal de bajo nivel en la pista, o una fuente digital que no sea
CD/MD/DAT, desactive la función de pista automática y luego realice la grabación manual y asigne los números de pista
manualmente.
• Cuando el nivel de grabación se ajusta muy bajo durante la grabación de una fuente analógica o una fuente digital que no
sean CD/MD/DAT, los números de pista puede que no se asignen en la posición correcta. Debe ajustar un nivel de
grabación adecuado.
68
Manipulación de discos
Evite tocar la superficie del disco al insertarlo o al extraerlo.
Limpie suavemente en la dirección que
va del centro hacia afuera, al borde.
No limpie en forma circular.
Precauciones con el almacenamiento
• Asegúrese de expulsar el disco después de la reproducción.
• Guarde siempre el disco en su estuche para evitar el polvo,
arañazos o deformaciones.
• No deje el disco en los siguientes sitios:
1. Donde quede expuesto a la luz solar directa durante
períodos de tiempo prolongados.
2. Donde haya mucha humedad y polvo.
3. Donde quede expuesto al calor, como el de un calefactor
• Trate de evitar que se adhieran huellas de dedos, aceite o
suciedad.
• Tenga cuidado de no producir arañazos en la superficie,
especialemente al extraer o guardar el disco en su estuche.
• No doble el disco.
• No caliente el disco.
• No agrande el orficio central.
• No escriba en la superficie de etiqueta (v.gr. el lado impreso)
con bolígrafos o lápices.
• Cuando se traslada súbitamente un disco desde un sitio frío
como el exterior, a otro cálido pueden formarse gotas de
agua en la superficie del disco. En casos como estos, no
intente secar el disco con un secador de pelo.
ESPAÑOL
6 CONEXIONES
Precauciones en la carga de discos
• Cargue sólo un disco. Si se cargan dos o más discos
apilados pueden romperse y además pueden producirse
arañazos en los discos.
• Los discos de 8 cm deben alinearse cuidadosamente con la
zona de guía del disco hundida y cargarse sin usar
adaptadores. Si no se carga correctamente, el disco puede
caerse o quizás no pueda abrirse el soporte de discos.
• Tenga cuidado de no pillarse los dedos al cerrarse el soporte
de discos.
• No coloque nada que no sea el disco en la bandeja de
discos.
• No utiilce discos agrietados, deformados o que hayan sido
reparados con cinta adhesiva, etc.
• No utilice discos con adhesivo de celo o la etiqueta de un
disco de alquiler despegados o con restos de adhesivo
después de quitar la etiqueta. Si se utiliza un disco en estas
condiciones, puede ocurrir que el disco no sea expulsado o
que se rompa.
5 LIMITACIONES RELACIONADAS CON LO ESTÁNDARES
DE CD-R/RW
★ Los estándares que tienen que ver con la reproducción de grabadores de CD se han establecido basándose en los estándares
existentes para reproductores de CD, sin embargo, para la grabación, el método difiere del utilizado para las pletinas de
cassettes y los grabadores MD, etc. A la vista de ésto, asegúrese de que comprende bien las siguientes limitaciones
relacionadas con los discos CD-R/RW y disfrute de este medio.
Limitaciones de los discos CD-R/RW de audio
• En esta unidad sólo pueden grabarse discos CD-R/RW de audio. Cuando se utilice un disco que no sea un disco CD-R/RW de
audio, como los discos CD-R/RW para uso con ordenadores u otro tipo de disco, se visualizará el mensaje “Use Audio
CD”. (Véase "Discos que pueden utilizarse con esta unidad" en la página 67).
• Los discos CD-R sólo pueden grabarse una vez. La información grabada no puede borrarse.
• La información grabada de los discos CD-RW puede ser borrada. Cuando este disco haya sido finalizado, se abrá realizado el
borrado después de la operación de extracción de finalización. (Véase "Cancelación de finalización de discos CD-RW" en la
página 90).
• Los errores de grabación cometidos con discos CD-R no pueden borrarse, por lo que se recomienda utilizar un disco CD-RW
hasta familiarizarse con la operación de grabación.
Limitaciones de grabación con esta unidad
• El procedimiento de grabación es el mismo para los discos CD-R que para los discos CD-RW.
• Cuando se realice una grabación adicional en un disco previamente grabado, se detectará el final de la última pista y la grabación
comenzará desde ese punto.
• El modo de grabación en espera no se puede ajustar para los discos CD-R-/RW con un tiempo de grabación restante de 8
segundos o menos.
En ese momento se visualizará el mensaje “Disc Full” (Disco lleno).
• En un disco CD-R/RW puede grabarse un máximo de 99 pistas. Cuando la grabación llegue a la pista 99, se visualizará el
mensaje “Disc Full”(Disco lleno) y no será posible grabar más allá de esta pista.
• La grabación digital no es posible desde discos CD-R/RW que hayan sido grabados digitalmente, es posible la grabación normal
desde un MD o DAT, etc. Cuando se intente grabar desde tales fuentes, se visualizará el mensaje “C o p y
Prohibit”(Protección contra copia). Para grabar desde estas fuentes digitales, realice la grabación desde la entrada
analógica. (Véase "Copias digitales" en la página 68).
• Esta unidad no puede grabar CD-ROM y otras fuentes de señales que no sean de audio. Cuando se intente grabar desde estas
fuentes, se visualizará el mensaje “Copy Prohibit”(No audio).
• Cuando se realice una grabación desde un disco que incluya datos que no sean señales de audio como un CD de gráficos o CDTEXT, sólo se grabará la señal de audio, los demás datos no se grabarán.
• DVD (Dolby Digital, DTS, y demás señales de audio comprimidas) no puede grabarse.
Compatibilidad con otros reproductores de CD y discos
• El proceso de finalización de un disco CD-R que haya sido grabado con esta unidad permite la reproducción del disco en un
reproductor de CD normal. (Véase ”Finalización de discos CD-R/RW” en la página 89).
• El proceso de finalización de un disco CD-RW que haya sido grabado con esta unidad permite la reproducción del disco sólo en
un reproductor de CD diseñado para su uso con discos CD-RW o en otro grabador de CD. (Véase ”Procedimiento de finalización
de discos CD-RW” en la página 68).
NOTAS:
• Para asegurar una grabación precisa, grabe a una temperatura ambiente de 30°C o inferior.
• No obstruya los orificios de ventilación de la parte superior.
• La grabación puede detenerse si la unidad es sometida a sacudidas o gólpes durante la grabación. Si la grabación se
detuviera puede que ya no sea posible usar el disco normalmente.
(1) Conexiones del terminal de entrada/salida analógica
• Utilice el cable de enchufe suministrado
al realizar las conexiones con terminales
de entrada/salida analógica.
q Entrada:
Conecte los terminales de entrada
analógica (ANALOG IN) de esta unidad
con los terminales de salida del
amplificador (MD o TAPE).
w Salida:
Conecete los terminales de salida
(ANALOG OUT) de esta unidad con los
terminales de entrada del amplificador
(MD o TAPE).
e Salida sólo de CD:
Sólo se emite el sonido del lado de CD.
Conecte a los terminales de entrada del
amplificador (CD, etc.).
✽ En el modo dual, sólo se emite el
sonido del lado del CD-R por los
terminales de salida CD/CD-R, por lo
que es necesaria esta conexión.
Toma de
fuente de
alimentación
Amplificador
120 V
60 Hz
SIGNAL
GND
SPEAKER SYSTEMS
R
PHONO
INPUTS
TUNER AUX
CD
PB
TAPE-1 TAPE-2
/MD /DAT
L
REC
TAPE-1 TAPE-2
/MD /DAT
A
L
L
R
R
B
q
Toma de
fuente de
alimentación
e
CDR-W1500
120 V
60 Hz
ANALOG
CD/
CDR
OUT
CDR
IN
CD
OUT
DIGITAL IN
DIGITAL OUT
CD/CD-R
L
CD
R
COAXIAL
OPTICAL
COAXIAL
OPTICAL
COAXIAL
OPTICAL
w
(2) Conexión de terminales de entrada/salida digital
• Cuando realice conexiones a los
terminales de entrada/salida digitales
(OPTICAL), utilice cables de fibra óptica,
los cuales están disponibles en el
Mercado.
Utilice el cable de enchufe de
75 Ω/ohmios contactos el cual está
disponible en el mercado, al realizar las
conexiones a los terminales de
entrada/salida digital (COAXIAL).
q Entrada:
Conexiones con equipos de reproducción
tales como reproductores de CD Los
lterminales de entrada digital de esta
unidad (tanto DIGITAL IN OPTICAL como
DIGITAL IN COAXIAL) deben conectarse
con los terminales de salida digital del
reproductor de CD (OPTICAL o
COAXIAL).
w Salida:
Conexiones con equipos que disponen
de entrada digital, tales como un
grabador de MD Los terminales de
salida digital (DIGITAL OUT OPTICAL o
DIGITAL OUT COAXIAL) de esta unidad
deben conectarse con los terminales de
entrada del grabador de MD u otro
equipo (OPTICAL o COAXIAL).
e Salida sólo de CD:
Sólo se emite el sonido del lado de CD.
Conecte a los terminales de entrada
digital de un grabador MD, etc.
Grabador MD
ANALOG
OUT
DIGITAL
OUT
IN
IN
IN
IN
L
R
OPTICAL
COAXIAL OPTICAL-1 OPTICAL-2
q
Toma de fuente de alimentación
CDR-W1500
e
ANALOG
CDR
IN
CD/
CDR
OUT
CD
OUT
DIGITAL IN
DIGITAL OUT
CD/CD-R
L
CD
120 V
60 Hz
R
COAXIAL
OPTICAL
COAXIAL
OPTICAL
COAXIAL
OPTICAL
w
LINE OUT
DIGITAL
OUT
R
L
Reproductor de CD
OUT
COAXIAL OPTICAL
NOTAS:
• No enchufe el conector de alimentacióin en la toma de red general hasta que haya realizado todas las conexiones.
• Conecte el conector del cable de enchufe rojo en el terminal R (derecho) y el blanco en el terminal L (izquierdo).
• No realice la conexión en el terminal PHONO del amplificador. De lo contrario se producirá una avería.
• Enchufe firmemente el conector de alimentación. Una conexión imperfecta generará ruidos.
• Si se unen en mazo los cables de alimentación con los de conexión se producirán ruidos o zumbidos.
• Cuando desconecte el enchufe de alimentación de la toma de red, espere unos 5 segundos antes de volver a insertarlo.
69
ESPAÑOL
7 NOMBRES DE PIEZAS Y FUNCIONES
!3
Panel frontal
q
Botón de encendido
w
Terminal de auriculares (PHONES)
e
• Activa y desactiva (ON/OFF) la alimentación del
grabador de CD.
• Conector para los auriculares.
Control del nivel de volumen de auriculares
(PHONES LEVEL)
!4
!5
• Ajusta el volumen de los auriculares.
r
Sensor de mando a distancia (REMOTE
SENSOR)
• Recibe las señales del mando a distancia.
t
Bandeja de discos (CD)
y
Botón de selección de visualización
(DISPLAY SELECT)
• CDs comprados en almacén y discos CD-R/RW
finalizados pueden ser reproducidos.
!6
!7
1
u
i
Visualización
de tiempo
tanto para el
CD como el
CD-R
1
Solame
nte CD
1
olamente
CD-R
Botón de título/caracter (TITLE/CHARACTER)
• Cuando pulse el botón mientras el modo de
visualización está ajustado a CD o CD-R, la información
de texto es visualizada.
• Cuando se introduzca texto, los caracteres cambiarán.
Botón de entrada (INPUT)
• Selecciona la fuente de entrada.
• Cada vez que se pulse el botón, el cambio será de la
manera siguiente:
1
CD
1
OPT
(ÓPTICO)
1
COAX
(COAXIAL)
1
ANALÓGICO
✽ No se permite el cambio durante la grabación.
o
Botones de funcionamiento de la unidad de CD
: Utilice este botón para dar comienzo a la
reproducción.
2
: Utilice este botón para detener la
reproducción.
3
: Utilice este botón para realizar la pausa de
grabación.
8, 9 : Utilice este botón para ir al comienzo de las
pistas.
5
: Utilice este botón para abrir y cerrar el
soporte de disco.
TIEMPO : Utilice este botón para cambiar entre el
tiempo transcurrido, el tiempo restante de
pista y el tiempo retante total.
1
!0
Normal
1
Repetición
(RELAY)
1
Mezcla
(MIX)
1
Botón de finalización (FINALIZE)
!2
Botón de borrado (CLEAR)
• Este botón se utiliza para la introducción de títulos de
disco y de pista y para operaciones de edición tales
como el borrado de discos CD-RW.
@2
Boton de grabación (4 REC)
• Pulse este botón para grabar.
• Cuando se pulse el botón de grabación (4 REC) solo,
se ajustará el modo de espera de grabación.
• Pulse el botón de reproducción (1 PLAY) en el modo
de espera de grabación para comenzar la grabación.
• Para detener la grabación o cancelar el modo de
espera de grabación, pulse el botón de detención
(2 STOP).
Bandeja de discos (CD-R)
: Utilice este botón para iniciar la
reproduccion o la grabación.
2
: Utilice este botón para detener la
reproducción o la grabación.
3
: Utilice este botón para realizar la pausa de
reproducción o de grabación.
8, 9 : Utilice este botón para ir al comienzo de las
pistas.
5
: Utilice este botón para abrir y cerrar el
soporte de disco.
✽ Si se hubiera realizado la operación de
entrada de información pero no se
finalizara, el soporte de discos no se
podrá abrir hasta que se borre la
información de texto. (Véase la página
72.)
TIEMPO : Durante la reproducción, utilice este botón
para cambiar entre el tiempo transcurrido,
el tiempo restante de pista y el tiempo
restante total. Durante la grabación, utilice
este botón para cambiar entre el tiempo
transcurrido por pista y el tiempo restante
total.
Terminales de entrada analógica (ANALOG
IN CD-R)
• Conecta a la salida de línea de un amplificador
(izquierdo y derecho).
@3
Terminal de salida digital CD/CD-R
(DIGITAL OUT CD/CD-R COAXIAL)
• Conecta a la entrada digital coaxial de un, por ejemplo,
amplificador o dispositivo de grabación.
• En el modo dual, sólo se emiten los datos digitales del
lado de CD-R.
@4
Botones de funcionamiento de la unidad de CD-R
Terminal de salida digital CD/CD-R
(DIGITAL OUT CD/CD-R OPTICAL)
• Conecta a la entrada digital coaxial de, por ejemplo, un
amplificador o dispositivo de grabación.
• En el modo dual, sólo se emiten los datos digitales del
lado de CD-R.
@5
!9
Doblaje
de copia
1
Realizar
doblaje de
CD
Doblaje
de 1 pista
1
Doblaje de
por
exploración
Terminal de entrada digital
(DIGITAL IN COAXIAL)
@6
Terminal de entrada digital
(DIGITAL IN OPTICAL)
• Conecta a la salida digital óptica de una fuente digital
externa.
@7
Terminales de salida analógica sólo para CD
(ANALOG OUT CD )
• En todos los modos, sólo se emite el sonido del lado
de CD.
@8
Terminal de salida digital sólo para CD
(DIGITAL OUT COAXIAL)
• En todos los modos, sólo se emiten los datos digitales
del lado de CD.
@9
Terminal de salida digital sólo para CD
(DIGITAL OUT OPTICAL)
• En todos los modos, sólo se emiten los datos digitales
del lado de CD.
• El modo de doblaje a doble velocidad cambia cada vez
que se pulsa este botón.
1
Doblaje
de copia
1
Realizar
doblaje de
CD
• Pulse este botón para realizar la finalización.
@0
Pantalla
• Pantalla de información.
Doblaje
de 1 pista
1
Indicaciones de pantalla
1 grabación
Botón de modo de copia a doble velocidad
(DUBBING HIGH)
Doblaje de
por
exploración
1 grabación
w
• Conecta a la salida digital coaxial de fuentes digitales
externas.
Botón de modo de copia a velocidad normal.
(DUBBING NORMAL)
1
Dual
(DUAL)
• Utilice este botón para borrar las pistas programadas o
los caracteres de texto introducidos.
• Cuando se pulsa en el modo de menú, la unidad
vuelve al modo anterior.
• Conecta a la entrada de línea de un amplificador
(izquierdo y derecho).
• En el modo dual, sólo se emite el sonido del lado de
CD-R.
Dial jog múltiple (MULTI JOG)
• Control de nivel de grabación (Grabación).
• Selecciona los ajustes (modo de menú).
Terminales de salida analógica CD/CD-R
(ANALOG OUT CD/CD-R)
• El modo de doblaje de copia cambia cada vez que se
pulsa el botón.
• Cada vez que se pulse el botón el modo cambiará.
!1
70
!8
Botón del modo de repetición (RELAY MODE)
1
@1
Botón de menús (MENÚ)
1
• La pantalla de visualización cambia cada vez que se
pulsa el botón.
• RAND:
Reproduce las pistas en orden aleatorio.
• A.T.M.:
Indicador de marca de pistas automática.
• D.in:
Este indicador se ilumina al seleccionar una de las
entradas digitales (digital).
Si este indicador parpadeara después de realizar la
operación de grabación, compruebe las conexiones de
los terninales de entrada digital.
• FADE:
Este indicador parpadea durante la operación de
grabación con fundido de entrada o de salida.
•
:
Este indicador se ilumina cuando se visualiza el tiempo
de la unidad de CD-R.
• SKIP:
Este se illumina cuando se ajusta una pista para que
sea pasada por alto.
• ON:
Este indicador se ilumina cuando se activa el modo de
reproducción de salto.
Panel posterior
q
Pantalla de modo (CD-R)
• CD:
CD (un CD pregrabado o un CD-R o CD-RW finalizado
disco) está cargado.
• CD-R:
Se ha cargado un disco CD-R sin finalizar.
• CD-RW:
Se ha cargado un disco CD-RW sin finalizar.
• 4:
Se ilumiina durante la grabación.
• 1:
Se ilumina durante la reproducción/grabación.
• 3:
Función de pausa activa.
• PROG:
Se ilumina en el mdo de programa.
• 1 Tr, SYNC:
Grabación sincronizada activa.
e
Pantalla de modo (CD)
• CD:
Este indicador se ilumina al cargar un disco.
• RAND:
Indicador de aleatorio
• PROG:
Indicador de programa.
• 3:
Indicador de pausa.
• 1:
Indicador de reproducción.
•
:
Este indicador se ilumina cuando se visualiza el tiempo
de la unidad de CD.
• HDCD:
Este indicador se ilumina cuando se reproducen discos
grabados en el formato HDCD.
Pantallas de modo compartidas
• REPEAT, 1:
Se ilumina cuando se repite una pista/disco completo
(o programa).
✽ Apagado cuando se visualiza el tiempo de las
unidades CD y CD-R.
• REPEAT A-B:
Este indicador se ilumina en el modo de repetición de
reproducción A-B.
✽ Apagado cuando se visualiza el tiempo de las
unidades CD y CD-R.
• SINGLE, TOTAL:
Indicador de modo de tiempos.
✽ Apagado cuando se visualiza el tiempo de las
unidades CD y CD-R.
• DUBB:
Este indicador se ilumina en el modo de doblaje a
velocidad normal.
• DUBB HIGH:
Este indicador se ilumina en el modo de doblaje (copia)
de doble velocidad.
• MIX:
Este indicador se ilumina en el modo de mezcla
(unidades CD y CD-R).
• RELAY:
Este indicador se ilumina en el modo de repetición de
reproducción entre las unidades CD y CD-R.
• DUAL:
Este indicador se ilumina en el modo dual de unidad
CD y CD-R.
ESPAÑOL
r
Visualización de fuente de entrada
• Cada vez que se pulsa el botón de conmutación de
entrada (INPUT) los indicadores se iluminan de la
manera siguiente.
8 UNIDAD DE MANDO A DISTANCIA
2 La unidad de mando a distancia incluida (RC-278) puede utilizarse para manejar el CDR-W1500 a
distancia.
Inserción de las pilas
ª
CD
: Este indicador se ilumina cuando la
fuente de entrada está ajustada al CD
interno.
ª
OPT
: TEste indicador se ilumina cuando se
seleccionan los terminales de entrada
DIGITAL IN OPTICAL.
ª
COAX : Este indicador se ilumina cuando se
seleccionan los terminales de entrada
DIGITAL IN COAXIAL.
ª
ANALÓGICO : Este indicador se ilumina cuando se
seleccionan los teminales de entrada
ANALOG CD-R IN.
t
q Extraiga la tapa posterior de la unidad de mando a distancia.
Precaución con las pilas
• En la unidad de mando a distancia debe utilizar pilas *R6P(AA).
• Las pilas deben cambiarse por otras nuevas
aproximadamente una vez al año, aunque esto
dependerá de la frecuencia con que se utiliza la
unidad de mando a distancia.
• Aunque las pilas tengan menos de un año, cámbielas
por otras nuevas si la unidad de mando a distancia ya
no fuenciona a corta distancia de la unidad principal.
• La pila incluida es sólo per verificare il funzionamento.
Cámbiela por otra nueva lo antes posible.
• Cuando ponga pilas nuevas, espere unos dos minutos
después de extraer las pilas agotadas antes de
insertar las nuevas.
• Asegúrese de colocar las pilas en la dirección correcta
“< ” y “> ”, tal como lo indican las marcas del
compartimiento de pilas de la unidad de mando a
distancia.
• Cuando no vaya a utilizar la unidad de mando a
distancia por prolongados períodos de tiempo,
extraiga las pilas.
• Para evitar explosiones y fugas del líquido:
• No utilice una pila nueva con otra usada.
• No utilice dos tipos distintos de pilas.
• No realice corto circuitos, no desmonte, caliente o
eche las pilas al fuego.
• Si hubiera fugas del líquido de la pila, limpie todo el
compartimiento de pilas y luego inserte pilas nuevas.
w Inserte dos pilas R6P (AA) en el compartimiento de pilas en
la dirección indicada por las marcas que hay dentro del
compartimiento.
Visualización de calendario de música
• Pistas de un disco o de un programa.
• Pista en reproducción/grabación.
✽ Apagado cuando se visualiza el tiempo de las unidades
CD y CD-R.
y
Pantalla múltiple
• Esta pantalla indica el número de pistas, el número de
la pista, el tiempo de reproducción, el tiempo de
grabación, información diversa sobre el
funcionamiento, mensajes de texto, etc.
• Cuando se visualizan los tiempos tanto de CD como
CD-R, se visualizará el tiempo de CD-R.
u
e Vuelva a colocar la tapa posterior.
Indicador de nivel
• Barra de nivel de grabación, indica el nivel de la señal
de audio.
• Cuando se ajusta la unidad CD-R al modo de
grabación, se visualizará el nivel de entrada.
i
Visualización de Nº de pista
• Cuando hay información de texto, se visualizará el
número de la pista.
• Cuando se visualizan los tiempos tanto de CD como
CD-R, se visualizará el número de la pista del CD.
o
Uso de la unidad de mando a disntacia
• Cuando utilice la unidad de mando a distancia
diríjala a la unidad principal tal como se ilustra en
el diagrama.
• La unidad de mando a distancia puede utilizarse
desde una distancia directa de aproximadamente
8 metros de la unidad principal. Esta distancia
puede acortarse, sin embargo, si hubiera algún
obstáculo o cuando se utiliza desde un ángulo.
(La unidad de mando a distancia funcionará en un
ángulo horizontal de hasta unos 30°).
Visualización de tiempos
• Cuando haya información de texto, se visualizará el
tiempo.
• Cuando se visualizan los tiempos tanto de CD como
CD-R, se visualizarán los tiempos de CD.
9
8
SE
PAU
C
4 RE
P
STO
ZE
ALI
FIN
UT
INP
Y
PLA
AR
CLE
E
TIM
EN
OP
ES
ON
PH
EL
LEV
NU
ME
E
OS
/CL
-
30°
30°
CD-R
CD
AY E
REL
MOD
G
_
BING HIGH
_ DUB
MAL
NOR
"
!
A
D
#
'
&
3
%
P
2
M
1
*
S
.
−
6
Y
5
{
[
=
>
9
AR
CLE
8
/
7
<
:;
V
4
,
+
)
J(
]
?
}
+ 10
7
REC
10
U
E
PAUS
9
MEN
R
3
ENTE
6
A
PLAY
8
1/
-B
ALL
E
P
STO
CALL
2
TIME
DOM
RAN
TER
RAC
CHA
LIZE
FINA
TITL
CT
/DIRE
PROG
Y SEL.
DISPLA
R
FADE
T
INPU
78
RC-2
L UNIT
TRO
B
CON
OTE
Aproximadamente 8
metros
NOTAS:
• La unidad de mando a distancia puede que no funcione
bien si el sensor de mando distancia está expuesto a la
luz solar directa o a luz artificial fuerte, o si hubiera un
obstáculo entre la unidad y el sensor de mando a
distancia.
REM
• No pulse los botones de la unidad principal y del mando a
distancia al mismo tiempo. De lo contrario puede
producirse una avería.
71
ESPAÑOL
Nombres y funciones de los botones de la unidad de mando a distancia
2 Los botones que no se explican en esta sección funcionan de la misma manera que los botones
correspondientes de la unidad principal.
2 Los botones marcados “✽”o funcionan independientemente del selector de función.
✽
✽
Botón de modo de doblaje
a velocidad normal
(DUBBING NORMAL)
Botón de modo de
doblaje a alta velocidad
(DUBBING HIGH)
✽
Botón de modo de
repetición (RELAY MODE)
Botón de borrado (CLEAR)
Selector de funciones
Botones numéricos (1 a 10)
Utilice estos botones para la
búsqueda directa y la reproducción
programada.
Conmuta el
funcionamiento de los
botones entre el CD y el
CD-R.
Botón +10
Utilice este botón par introducir
los números de pista 11 o más
para la búsqueda directa y la
reproducción programada.
Botón de grabación (4 REC)
Botones de búsqueda manual
inversa y hacia adelante (6
y 7)
Botones de búsqueda
automática inversa y hacia
adelante (8 y 9)
CD CD-R
Botón de reproducción
(1 PLAY)
_ DUBBING _
NORMAL
A ! "
Botón de detención
(2 STOP)
RELAY
MODE
HIGH
D # %
1
2
J(
)
Pulse este botón para cambiar
entre el modo de ajuste de
programa y el modo de búsqueda
directa.Normalmente esto está
ajustado al modo de búsqueda
directa.
S
.
5
/
✽
Botón de introducciòn
(ENTER)
,
−
Botón de pausa (3 PAUSE)
: ;
Botón de repetición A-B (A - B)
9
{ ? }
CLEAR
10
+10
Pulse este botón para realizar la
repetición de la reproducción AB.
REC
6
7
MENU
ENTER
PLAY
2
RANDOM
9
PAUSE
3
TIME
Botón OPEN/CLOSE
(5)
Bandeja portadiscos
NOTAS:
• Si se pillara un dedo en la bandeja de discos al cerrarla, pulse el boton OPEN/CLOSE (5).
• Sólo se aceptarán discos CD de audio. Si se insertara un disco que no sea de audio, la pantalla indicará “Use Audio
CD”.
• Para grabar es muy importante que el disco virgen esté totalmente libre de partículas de polvo o arañazos Véase
"Limpieza de discos" en la página 68.
• Cuando se introduzca información de texto y no sea finalizada, el soporte de discos no se abrirá hasta que se haya
borrado la información de texto.
En la pantalla se visualizará “Text Erase OK?” durante 2 segundos. Cuando se puilse el botón de introducción
durante este intervalo, la información de texto se borrará y el soporte de discos ya podrá abrirse.
Y < >
[ = ]
PROG/DIRECT CALL
Hueco
6
8
STOP
Utilice este botón para comprobar
las pistas programadas.
P
7
8
Botón de llamada (CALL)
V
Botón de menús (MENÚ)
3
M*+
4
Botón de programa/directo
(PROG/DIRECT)
G & '
✽
2 Inserción de discos
q Pulse el botón OPEN/CLOSE (5) para abrir la bandeja de
discos.
q Inserte un disco en el hueco adecuado de la bandeja con el
lado de etiqueta hacia arriba.
q Pulse el botón OPEN/CLOSE (5) para cerrar la bandeja.
• En la pantalla se iluminará “Close” seguido de “TOC
Reading” y la pantalla mostrará el tipo de disco que
se ha insertado.
• Si inserta un disco CD-R en blanco o parcialmente
grabado, o un CD-RW sin finalizar, el grabador de CD
calibrará el disco para conseguir una grabación óptima.
Durante este procedimiento, la pantalla primero mostrará
“Now OPC” y a continuación el número de pistas de
audio. La calibración puede tardar hasta 60 segundos.
(CD-R/RW)
• Si se realiza la finalización de un CD-R/RW, aparecerá
“CD”en la pantalla.
1 / ALL
Botón de repetición 1/ALL (1/ALL)
Pulse este botón para realizar la
repetición de reproducción de una
pista y la repetición de
reproducción de todas las pistas.
q “Sync. Rec?”…………………………………………… Modo de grabación sincronizada.
w “Sync. Level?” ……………………………………… Nivel de grabación sincronizada.
e “A.T. Mark?”…………………………………………… Marca de pistas automática.
A-B
TITLE CHARACTER
9 MÉTODO DE CONFIGURACIÓN
★ Los 9 ítems que figuran en la lista siguiente puede configurarse con el menú de configuración. Para los diversos ítems de ajuste
se visualizarán los siguientes mensajes.
• Cierre la bandeja portadiscos y ajuste el modo parada para la sección de CD y la sección de CD-R.
• El contenido del menú de configuración es guardado, pero estos datos pueden perderse si se desconecta la unidad de la fuente
de alimentación durante 2 o 3 días.
Botón de caracteres
(CHARACTER)
r “FadeIn Time?” ……………………………………… Tiempo de grabación con fundido de entrada.
t “FadeOutTime?”
…………………………………… Tiempo de grabación con fundido de salida.
y “Intro Time?”………………………………………… Tiempo de introducción de grabación por exploración.
DISPLAY SEL. FADER INPUT
Botón de aleatorio
(RANDOM)
Pulse este botón para reproducir
las pistas en un orden aleatorio.
(Véase la página 84).
✽
FINALIZE
B
u “Custom Index” ……………………………………… Índice personalizado.
Botón de finalización
(FINALIZE)
REMOTE CONTROL UNIT RC-278
Botón de títulos (TITLE)
Pulse este botón para cambiar la
visualización de tiempos y la
visualización de títulos.
Botón de selección de
visualización (DISPLAY
SEL.)
Botón selector de entrada
(INPUT)
Botón de tiempos (TIME)
Botón de fundido (FADER)
Pulse este botón para la grabación
con fundido de entrada o de salida.
72
i “Skip Play?”…………………………………………… Reproducción de salto.
o “Timer Play?”………………………………………… Reproducción por temporizador.
ESPAÑOL
(1) Método de configuración
(Unidad principal)
(Unidad de mando a distancia)
A ! "
D # %
1
.
S
DUBBING
NORMAL
HIGH
9
8
CDR-W1500
DISPLAY
TITLE /
SELECT CHARACTER
TIME
TIME
CLEAR
INPUT
4 REC
FINALIZE
8
PHONES
PLAY
STOP
PAUSE
1
2
3
RELAY MODE
OPEN / CLOSE
ON
PHONES LEVEL
/
OFF
OPEN /CLOSE
+
MENU
5
MAX
(Unidad principal)
7
8
9
[ = ]
{ ? }
CLEAR
10
+10
9
PLAY
STOP
PAUSE
1
2
3
6
7
MENU
PUSH
ENTER
8
9
ENTER
PLAY
STOP
3
PROG/DIRECT CALL
2,3
2
RANDOM
1 / ALL
A ! "
A-B
2
3
.
PCM AUDIO TECHNOLOGY / COMPACT DISC RECORDER
CDR-W1500
2
9
8
DUBBING
NORMAL
HIGH
DISPLAY
TITLE /
SELECT CHARACTER
TIME
TIME
POWER
STOP
PAUSE
1
2
3
RELAY MODE
ON
OPEN / CLOSE
PHONES
PHONES LEVEL
-
CLEAR
INPUT
4 REC
FINALIZE
8
9
PLAY
STOP
PAUSE
1
2
3
,
Y < >
7
8
9
[ = ]
{ ? }
CLEAR
10
+10
REC
OPEN /CLOSE
+
MENU
5
6
7
MENU
8
FINALIZE
9
ENTER
PLAY
PAUSE
2
3
PROG/DIRECT CALL
Active la alimentación.
1,2,3,4
RANDOM
1 / ALL
A-B
Pulse el botón de menú y gire el dial jog de la unidad principal o utilice los botones de búsqueda automática de la unidad
de mando a distancia para que se visualice “Setup Menu?”.
3
Pulse el botón de introducción y acceda al modo de configuración.
(Unidad de mando a distancia)
A ! "
D # %
1
Ajuste la unidad al modo de configuración y luego gire el dial jog de la unidad principal o pulse el botón de búsqueda
2
Pulse el botón de introducción y ajuste el modo de selección de grabación sincronizada.
3
Gire el dial jog de la unidad principal o pulse el botón de búsqueda automática de la unidad de mando a distancia y luego
ajuste el nivel de grabación sincronizada.
• El valor de configuración se visualizará en la zona de visualización múltiple. “Sync. -**dB”
✽ El margen de ajuste va de –54 dB a –30 dB, variable en pasos de 6 dB.
4
Pulse el botón de introducción y ajuste el nivel de grabación sincronizada.
• Se visualizará “Complete”.
automática del mando a distancia para visualizar “Sync. Level?”.
)
PCM AUDIO TECHNOLOGY / COMPACT DISC RECORDER
9
8
DUBBING
NORMAL
HIGH
TIME
CDR-W1500
DISPLAY
TITLE /
SELECT CHARACTER
TIME
CLEAR
INPUT
4 REC
FINALIZE
8
9
PLAY
STOP
PAUSE
1
2
3
.
5
/
V
POWER
STOP
PAUSE
1
2
3
RELAY MODE
OPEN / CLOSE
ON
PHONES
PHONES LEVEL
-
−
Y < >
8
9
{ ? }
CLEAR
10
+10
REC
+
5
OPEN /CLOSE
MENU
5
MAX
,
6
: ;
7
MULTI JOG
OFF
MIN
P
[ = ]
REMOTE SENSOR
PLAY
3
M*+
4
S
G & '
2
J(
6
7
MENU
2,4
PUSH
ENTER
8
STOP
ENTER
PLAY
2
1,2,3,4
9
1 / ALL
A-B
(4) Ajuste de la marca de pistas automática (ATM)
(Unidad principal)
PAUSE
3
PROG/DIRECT CALL
(Unidad de mando a distancia)
1,3
A ! "
TIME
TITLE CHARACTER
S
FINALIZE
Ajuste la unidad al modo de configuración y luego gire el dial jog de la unidad principal o pulse el botón de búsqueda
9
8
DUBBING
NORMAL
HIGH
TIME
CDR-W1500
DISPLAY
TITLE /
SELECT CHARACTER
TIME
CLEAR
INPUT
4 REC
FINALIZE
8
9
PLAY
STOP
PAUSE
1
2
3
.
POWER
PLAY
STOP
PAUSE
1
2
3
RELAY MODE
OPEN / CLOSE
ON
PHONES
PHONES LEVEL
5
/
V
OPEN /CLOSE
MENU
5
MAX
7
8
9
{ ? }
CLEAR
+10
6
7
MENU
Pulse el botón de introducción y ajuste el modo de selección de grabación sincronizada.
STOP
ENTER
PLAY
4
1,2,3,4
RANDOM
9
PAUSE
3
PROG/DIRECT CALL
Pulse el botón de introducción y ajuste el modo de grabación sincronizada.
“Synchro Off”.
“Disc Synchro”.
“Make CD”.
“1Tr Synchro”.
2,4
PUSH
ENTER
2
3
−
Y < >
10
8
Gire el dial jog de la unidad principal o pulse el botón de búsqueda automática de la unidad de mando a distancia y luego
seleccione el modo de grabación sincronizada.
“Sync. Off?”.
“Disc Sync.?”.
“Make CD?”.
“1Tr Sync.?”.
,
6
: ;
REC
+
5
MIN
P
[ = ]
MULTI JOG
OFF
-
3
M*+
REMOTE SENSOR
automática del mando a distancia para visualizar “Sync. Rec?”.
G & '
2
)
4
PCM AUDIO TECHNOLOGY / COMPACT DISC RECORDER
2
D # %
1
J(
RANDOM
DISPLAY SEL. FADER INPUT
1
FINALIZE
1
(2) Ajuste del modo de grabación sincronizada
★ Realice los ajustes del modo de grabación sincronizada. (Véase la página 80).
(Unidad principal)
1,3
TITLE CHARACTER
TIME
DISPLAY SEL. FADER INPUT
2
2,4
PUSH
ENTER
STOP
1
−
6
: ;
V
MULTI JOG
OFF
5
MAX
3
P
5
/
REMOTE SENSOR
PLAY
G & '
2
M*+
)
4
S
MIN
DISPLAY SEL. FADER INPUT
D # %
1
J(
TITLE CHARACTER
TIME
(Unidad de mando a distancia)
PAUSE
2
1
−
Y < >
REC
5
MIN
,
6
: ;
V
MULTI JOG
-
P
5
REMOTE SENSOR
POWER
3
M*+
)
4
PCM AUDIO TECHNOLOGY / COMPACT DISC RECORDER
G & '
2
J(
(3) Ajuste del nivel de grabación sincronizada
★ Este ajusta el nivel de comienzo de grabación sincronizada cuando se utiliza la grabación sincronizada. (Véase la página 80).
★ Cuando se utilice la grabación sincronizada, la grabación comenzará cuando el nivel de la señal de entrada sobrepase el valor
ajustado. La grabación se detendrá cuando la señal continúe en un nivel que sea más bajo que el valor ajustado para 10
segundos o más.
TIME
1 / ALL
A-B
1,3
TITLE CHARACTER
DISPLAY SEL. FADER INPUT
FINALIZE
1
Ajuste la unidad al modo de configuración y luego gire el dial jog de la unidad principal o pulse el botón de búsqueda
2
Pulse el botón de introducción y luego ajuste el modo de selección de marca de pistas automática.
3
Gire el dial jog de la unidad principal o pulse el botón de búsqueda automática del mando a distancia para seleccionar
marca de pistas automática o para desactivarlo.
• El indicador de modo seleccionado indicará un parpadeo de “On/Off”.
4
Pulse el botón de introducción para activar o desactivar la marca de pistas automática.
• A continuación se visualizará “A.T.Mark On” o “A.T.Mark Off”.
automática del mando a distancia para visualizar “A.T. Mark?”.
73
ESPAÑOL
(7) Ajuste del tiempo de reproducción de introducción para la grabación con exploración
★ Para realizar la grabación con exploración, ajuste el tiempo de reproducción de exploración de introducción.
(Véase la página 77).
(5) Ajuste de tiempo de fundido de entrada
★ Para realizar la grabación con fundido de entrada, ajuste el tiempo de fundido de entrada.
(Véase la página 81).
(Unidad principal)
(Unidad de mando a distancia)
(Unidad principal)
(Unidad de mando a distancia)
A ! "
A ! "
D # %
1
G & '
2
)
M*+
P
5
4
,
−
S
9
8
DUBBING
NORMAL
HIGH
TIME
CDR-W1500
DISPLAY
TITLE /
SELECT CHARACTER
TIME
CLEAR
INPUT
4 REC
FINALIZE
8
9
STOP
PAUSE
.
/
V
: ;
Y < >
7
8
9
[ = ]
{ ? }
CLEAR
10
+10
PCM AUDIO TECHNOLOGY / COMPACT DISC RECORDER
DUBBING
NORMAL
HIGH
9
8
TIME
CDR-W1500
DISPLAY
TITLE /
SELECT CHARACTER
TIME
POWER
POWER
STOP
1
2
PAUSE
RELAY MODE
ON
OPEN / CLOSE
PHONES
PHONES LEVEL
REC
MULTI JOG
OFF
-
+
5
3
OPEN /CLOSE
MENU
PLAY
5
MIN
MAX
1
2
6
7
MENU
3
ENTER
STOP
PAUSE
1
2
3
RELAY MODE
ON
OPEN / CLOSE
PHONES
9
PHONES LEVEL
CLEAR
INPUT
4 REC
FINALIZE
8
9
PLAY
STOP
PAUSE
1
2
3
/
V
-
MAX
7
8
9
{ ? }
CLEAR
10
+10
MENU
6
7
MENU
8
9
ENTER
PLAY
PAUSE
PAUSE
2
2
3
PROG/DIRECT CALL
1,2,3,4
RANDOM
1 / ALL
A-B
1,3
1,2,3,4
RANDOM
TIME
1 / ALL
A-B
TITLE CHARACTER
DISPLAY SEL. FADER INPUT
DISPLAY SEL. FADER INPUT
FINALIZE
FINALIZE
1
Ajuste la unidad al modo de configuración y luego gire el dial jog de la unidad principal o pulse el botón de búsqueda
Pulse el botón de introducción para ajustar el modo de ajuste de tiempo de fundido de entrada.
2
Pulse el botón de introducción para ajustar el modo de ajuste de tiempo de reproducción de exploración de
introducción.
3
Gire el dial jog de la unidad principal o utilice los botones de búsqueda automática de la unidad de mando a distancia
para ajustar el tiempo de fundido de entrada.
• El ajuste se visualizará en la sección de visualización múltiple. “FadeIn **sec”
✽ El ajuste puede hacerse entre 1 y 15 segundos en pasos de 1 segundo.
3
Gire el dial jog de la unidad principal o utilice los botones de búsqueda automática de la unidad de mando a distancia
para ajustar el tiempo de reproducción de exploración de introducción.
• El ajuste se visualizará en la sección de visualización múltiple. “ScanTime **s”
✽ El ajuste puede hacerse entre 5 y 30 segundos en pasos de 5 segundos.
4
Pulse el botón de introducción para ajustar el tiempo de grabación con fundido de entrada.
• Se visualizará “Complete”.
4
Pulse el botón de introducción para ajustar el tiempo de reproducción de exploración de introducción.
• Se visualizará “Complete”.
1
Ajuste la unidad al modo de configuración y luego gire el dial jog de la unidad principal o pulse el botón de búsqueda
2
automática del mando a distancia para visualizar “Intro Time?”.
automática del mando a distancia para visualizar “FadeIn Time?”.
(8) Ajuste del Índice Personalizado
★ Con los terminales de entrada puede asignarse un nombre deseado.
★ Esto resulta útil para comprobar qué equipo está conectado a los terminales de entrada.
(6) Ajuste de tiempo de fundido de salida
★ Para realizar la grabación con fundido de salida, ajuste el tiempo de fundido de salida.
(Véase la página 81).
(Unidad principal)
(Unidad de mando a distancia)
A ! "
D # %
G & '
1
2
3
J(
)
M*+
4
S
PCM AUDIO TECHNOLOGY / COMPACT DISC RECORDER
9
8
DUBBING
NORMAL
HIGH
TIME
.
5
/
V
P
,
(Unidad principal)
(Unidad de mando a distancia)
A ! "
S
Y < >
DISPLAY
TITLE /
SELECT CHARACTER
7
8
9
[ = ]
{ ? }
CLEAR
10
+10
9
8
TIME
CLEAR
INPUT
4 REC
FINALIZE
8
9
PLAY
STOP
PAUSE
1
2
3
DUBBING
NORMAL
HIGH
TIME
CDR-W1500
DISPLAY
TITLE /
SELECT CHARACTER
TIME
CLEAR
INPUT
4 REC
FINALIZE
8
9
PLAY
STOP
PAUSE
1
2
3
.
STOP
PAUSE
1
2
3
RELAY MODE
OPEN / CLOSE
ON
PHONES
PHONES LEVEL
-
+
OPEN /CLOSE
MENU
5
MIN
MAX
POWER
REC
MULTI JOG
OFF
5
6
2,4
PUSH
ENTER
8
STOP
ENTER
PLAY
2
RANDOM
9
TIME
1 / ALL
5
/
V
3
RELAY MODE
OPEN / CLOSE
ON
PHONES
PHONES LEVEL
A-B
7
8
9
{ ? }
CLEAR
+10
OPEN /CLOSE
5
MENU
6
2
Pulse el botón de introducción para ajustar el modo de ajuste de tiempo de fundido de salida.
ENTER
PLAY
2
5
2,4,5
1,2,3,4,5
RANDOM
9
PAUSE
3
PROG/DIRECT CALL
TIME
1 / ALL
A-B
TITLE CHARACTER
DISPLAY SEL. FADER INPUT
FINALIZE
Ajuste la unidad al modo de configuración y luego gire el dial jog de la unidad principal o pulse el botón de búsqueda
7
MENU
PUSH
ENTER
8
1,3
−
Y < >
REC
+
5
MAX
,
6
: ;
10
MULTI JOG
OFF
-
P
[ = ]
STOP
1
FINALIZE
1,3,5
5
1
Ajuste la unidad al modo de configuración y luego gire el dial jog de la unidad principal o pulse el botón de búsqueda
2
Pulse el botón de introducción y ajuste el modo de introducción de índice personalizado.
3
Gire el dial jog de la unidad principal o pulse el botón de búsqueda automática del mando a distancia para seleccionar los
terminales a los que se asignará un nombre.
• A continuación parapadeará el indicador de los terminales seleccionados. “Opt/Coax/Ana”
4
Pulse el botón de introducción y ajuste los terminales para los que se asignará un nombre. Esto ajustará el modo de
introducción de nombre.
5
Seleccione el modo de introducción con el botón de caracteres y luego gire el dial jog de la unidad principal o el botón
de búsqueda automática del mando a distancia para seleccionar los caracteres. Introduzca un carácter por vez con el
botón de introducción.
• Vea "Ediciones de texto" en la Página 93 para detalles del método de entrada de caracter, luego lleve a cabo las
operaciones 7 y 8.
automática del mando a distancia para visualizar “Custom Index”.
automática del mando a distancia para visualizar “FadeOutTime?”.
Gire el dial jog de la unidad principal o utilice los botones de búsqueda automática de la unidad de mando a distancia
4
PAUSE
2
MIN
TITLE CHARACTER
DISPLAY SEL. FADER INPUT
3
STOP
1
PAUSE
3
PROG/DIRECT CALL
1,2,3,4
PLAY
7
MENU
3
M*+
REMOTE SENSOR
POWER
PLAY
G & '
2
)
4
6
: ;
D # %
1
J(
−
PCM AUDIO TECHNOLOGY / COMPACT DISC RECORDER
CDR-W1500
REMOTE SENSOR
74
1,3
3
PROG/DIRECT CALL
TITLE CHARACTER
TIME
2,4
PUSH
ENTER
STOP
PLAY
STOP
−
Y < >
REC
OPEN /CLOSE
+
5
MIN
,
6
: ;
[ = ]
MULTI JOG
OFF
5
2,4
PUSH
ENTER
8
PLAY
3
P
5
REMOTE SENSOR
REMOTE SENSOR
PLAY
.
G & '
2
M*+
)
4
6
S
PCM AUDIO TECHNOLOGY / COMPACT DISC RECORDER
D # %
1
3
J(
J(
para ajustar el tiempo de fundido de salida.
• El ajuste se visualizará en la sección de visualización múltiple. “FadeOut**sec”
✽ El ajuste puede hacerse entre 1 y 15 segundos en pasos de 1 segundo.
Pulse el botón de introducción para ajustar el tiempo de grabación con fundido de salida.
• Se visualizará “Complete”.
ESPAÑOL
(9) Ajuste del modo de reproducción de salto
★ Este modo pemite que la reproducción salte las pistas que no desee escuchar. (Véase "Registro de las pistas que no se desean
escuchar" en la página 91 para información sobre el ajuste de tales pistas).
(Unidad principal)
A ! "
D # %
G & '
J(
M*+
P
(Unidad de mando a distancia)
)
4
S
PCM AUDIO TECHNOLOGY / COMPACT DISC RECORDER
9
8
DUBBING
NORMAL
HIGH
TIME
CDR-W1500
DISPLAY
TITLE /
SELECT CHARACTER
TIME
CLEAR
INPUT
4 REC
FINALIZE
8
.
5
/
V
PLAY
STOP
PAUSE
1
2
3
RELAY MODE
ON
OPEN / CLOSE
PHONES
PHONES LEVEL
9
[ = ]
{ ? }
CLEAR
10
+10
REC
OFF
+
5
OPEN /CLOSE
MENU
5
MIN
MAX
ª
Doblaje de discos: En este modo, se pueden copiar CD enteros en CD-R/RW.
9
MULTI JOG
-
−
Y < >
8
REMOTE SENSOR
POWER
,
6
: ;
7
10 PROCEDIMIENTO DE COPIADO
Acerca del copiado
★ La copia puede realizarse fácilmente desde la unidad de CD a la unidad de CD-R del equipo.
★ Se dispone de dos velocidades de copia (normal y alta) y cuatro modos de copia.
• Cada vez que se pulsa el botón de copia a velocidad normal (NORMAL) o el botón de copia a velocidad alta (HIGH), el modo
cambia de la manera siguiente.
PLAY
STOP
PAUSE
1
2
3
6
7
MENU
2,4
PUSH
ENTER
8
ENTER
9
PLAY
STOP
1,2,3,4
3
RANDOM
ª
PAUSE
2
PROG/DIRECT CALL
1 / ALL
A-B
(Se visualizará “All Tr Dubb”).
1,3
Realizar CD: En este modo se pueden copiar CD entreros en CD-R/RW y luego finalizarlos automáticamente.
(A continuación se visualizará “Make CD Dubb”).
TITLE CHARACTER
TIME
DISPLAY SEL. FADER INPUT
FINALIZE
ª
1
Ajuste la unidad al modo de configuración y luego gire el dial jog de la unidad principal o pulse el botón de búsqueda
2
Pulse el botón de introducción y ajuste el modo de selección de reproducción de salto.
3
Gire el dial jog de la unidad principal o pulse el botón de búsqueda automática del mando a distancia para seleccionar la
activación o desactivación de la reproducción de salto.
• A continuación parpadeará el indicador del modo seleccionado.“On/Off”
4
Pulse el botón de introducción y ajuste la reproducción de salto a activado o desactivado.
• A continuación se visualizará “S.Play On” o “S.Play Off”.
automática del mando a distancia para visualizar “Skip Play?”.
Doblaje de 1 pista: En este modo, se pueden copiar pistas individuales del CD.
(A continuación se visualizará “1Tr Dubbing”).
ª
Doblaje REC (grabación) por exploración: En este modo pueden seleccionarse las pistas deseadas del CD y copiarse
(A continuación se visualizará “Scan Rec Dub”).
NOTAS:
• La realización de la finalización del disco cuando se han registrado las pistas que no se desean escuchar, produce la
activación automática del modo de reproducción de salto.
• La reproducción de salto no es posible en reproductores de CD que no dispongan de la función de reproducción de salto.
• La reproducción de programa y la reproducción aleatoria no son posibles cuando se han registrado pistas que no se
desean escuchar.
(10) Ajuste del modo de reproducción por temporizador
★ Es posible la reproducción por temporizador. (Véase la página 86).
(Unidad principal)
A ! "
D # %
G & '
J(
M*+
P
(Unidad de mando a distancia)
)
4
S
PCM AUDIO TECHNOLOGY / COMPACT DISC RECORDER
9
8
DUBBING
NORMAL
HIGH
TIME
CDR-W1500
DISPLAY
TITLE /
SELECT CHARACTER
TIME
CLEAR
INPUT
4 REC
FINALIZE
8
.
5
/
V
PLAY
STOP
PAUSE
1
2
3
RELAY MODE
OPEN / CLOSE
ON
PHONES
PHONES LEVEL
8
9
[ = ]
{ ? }
CLEAR
10
+10
9
REC
MULTI JOG
OFF
-
+
5
OPEN /CLOSE
MENU
5
MIN
MAX
−
Y < >
7
REMOTE SENSOR
POWER
,
6
: ;
PLAY
STOP
PAUSE
1
2
3
6
7
MENU
2,4
PUSH
ENTER
8
ENTER
PLAY
STOP
2
RANDOM
PAUSE
3
PROG/DIRECT CALL
1,2,3,4
9
TIME
1 / ALL
A-B
1,3
TITLE CHARACTER
DISPLAY SEL. FADER INPUT
FINALIZE
1
Ajuste la unidad al modo de configuración y luego gire el dial jog de la unidad principal o pulse el botón de búsqueda
2
Pulse el botón de introducción y ajuste el modo de selección de reproducción por temporizador.
3
Gire el dial jog de la unidad principal o pulse los botones de búsqueda automática del mando a distancia para activar o
desactivar el modo de reproducción por temporizador.
• A continuación parpadeará el indicador del modo seleccionado. “On/Off”
4
Pulse el botón de introducción para activar o desactivar el modo de reproducción por temporizador.
• A continuación se visualizará “TimerPlayOn” o “TimerPlayOff”.
• El nivel de grabación es automáticamente ajustado al valor por defecto (0,0 dB).
• Los modos de reproducción repetida y aleatoria se cancelan cuando se ajusta el modo copia.
• Durante la copia a velocidad normal se puede escuchar el sonido mientras se realiza la copia.
• Durante la copia a alta velocidad no se produce ningún sonido.
• Durante el copiado de alta velocidad no salen señales de las salidas digitales.
• Durante la copia, los botones que no sean los botones de detención de CD o CD-R, no funcionan.
• Cuando se copian CDs compatibles con CD TEXT, los nombres de los discos y las pistas son también copiados.
★ Al copiar, cambie el modo relé al modo normal o dual. El copiado no es posible en el modo relé o en el modo mix.
★ Para una óptima grabación, asegúrese de que no hay huellas digitales o polvo en la superficie de señal del lado de fuente del CD
o del CD-R/RW.
★ La función de pistas automáticas está siempre activada en el modo de copiado. No es posible asignar números de pista
manualmente.
NOTAS:
• La copia normalmente se realiza con señales digitales, pero si la copia digital no es posible debido a limitaciones de
SCMS, la copia se realiza con señales analógicas. Además, el copiado siempre se lleva a cabo a velocidad normal. (Ver
página 68).
• La copia de señales analógicas siempre se realiza en el modo de velocidad normal.
• Si cuando se ajusta el modo de copia, el tiempo grabable del CD-R/RW es menor que el tiempo del CD fuente que se
está intentando copiar, se visualizará “CD-R Short” y las dos unidades, CD y CD-R, se ajustarán al modo de
detención. En este caso, compruebe el tiempo grabable del disco. (Sin embargo, cuando se graben 21 números de pista
o más de una fuente CD que contenga por encima de 20 pistas, no se visualiza “CD-R Short” aún si el tiempo de
fuente que quiere grabar es más largo que el tiempo grabable del CD-R/RW).
• Si el nombre del disco ha sido ya introducido en el disco sobre el cual usted está grabando, solo los nombres de las pistas
son copiados.
• Para algunos CDs, el texto no se puedo copiar debido a la protección de los derechos de copia. En este caso se visualiza
“Text Protect”.
• No desactive la alimentación o desconecte el cable de alimentación mientras “Now PMA Rec“ se visualice después
de que la grabación sea completada. Hacer esto puede volver el disco inutilizable.
automática del mando a distancia para visualizar “Timer Play?”.
75
ESPAÑOL
(1) Copia de discos enteros
(2) Copia de una pista por vez
(Unidad principal)
(Unidad de mando a distancia)
(Unidad principal)
(Unidad de mando a distancia)
CD CD-R
3
1
_ DUBBING _
NORMAL HIGH
2
3
A ! "
D # %
1
5
4
S
PCM AUDIO TECHNOLOGY / COMPACT DISC RECORDER
9
8
DUBBING
NORMAL
HIGH
TIME
CDR-W1500
DISPLAY
TITLE /
SELECT CHARACTER
TIME
CLEAR
INPUT
4 REC
FINALIZE
8
9
PLAY
STOP
PAUSE
1
2
3
.
/
V
POWER
STOP
PAUSE
1
2
3
RELAY MODE
OPEN / CLOSE
ON
PHONES
PHONES LEVEL
-
OPEN /CLOSE
MENU
5
: ;
S
PCM AUDIO TECHNOLOGY / COMPACT DISC RECORDER
8
9
CLEAR
DUBBING
NORMAL
HIGH
TIME
CDR-W1500
DISPLAY
TITLE /
SELECT CHARACTER
2
5
5
RANDOM
TIME
CLEAR
INPUT
4 REC
FINALIZE
8
9
PLAY
STOP
PAUSE
1
2
3
REMOTE SENSOR
POWER
7
MENU
ENTER
PLAY
2
4
9
PLAY
STOP
PAUSE
1
2
3
RELAY MODE
OPEN / CLOSE
ON
PHONES
PHONES LEVEL
MULTI JOG
OFF
-
+
5
OPEN /CLOSE
MENU
5
MIN
MAX
5
TIME
.
3
5
/
V
PAUSE
7
8
9
{ ? }
CLEAR
+10
REC
6
7
ENTER
PLAY
2
4
2
6
6
FINALIZE
RANDOM
TIME
1 / ALL
1
Cargue el CD que desee copiar en la unidad de CD.
2
Cargue el CD-R/RW en el que desee grabar en la unidad de CD-R.
2
Cargue el CD-R/RW en el que desee grabar en la unidad de CD-R.
Pulse el botón de copia a velocidad normal o alta (NORMAL o HIGH) para visualizar “All Tr Dubb” o “Make CD
3
Pulse el botón de copia a velocidad normal o alta (NORMAL o HIGH) para visualizar “1Tr Dubbing”
4
Pulse el botón de introducción para ajustar el modo de copia.
• La unidad de CD se ajusta al modo de pausa y la unidad de CD-R al modo en espera de grabación.
5
Utilice los botones de búsqueda automática de la unidad de CD para seleccionar la pista que desee grabar.
6
Pulse el botón de reproducción de la unidad CD o CD-R.
• Comienza la copia.
• Cuando la copia ha terminado, la unidad CD-R se detiene.
• Para parar en medio de la copia, pulse el botón de detencion de la unidad CD o CD-R.
4
Pulse el botón de introducción para ajustar el modo de copia.
• La unidad de CD se ajusta al modo de pausa y la unidad de CD-R al modo en espera de grabación.
5
Pulse el botón de reproducción de la unidad CD o CD-R.
• Comienza la copia.
• Si se ha seleccionado el modo “Make CD”, la finalización comenzará automáticamente después de que termine la
copia. (Véase la página 89). Una vez que ha terminado la finalización, se ajustará automáticamente el modo de
detención.
• Para parar en medio de la copia, pulse el botón de detencion de la unidad CD o CD-R.
• Si se ajustan los modos de programa para la unidad de CD de antemano, la copia se realizará en el modo
correspondiente.
NOTA:
• Si desea introducir datos de texto, seleccione el modo “All Tr Dubb”. Con los discos CD-R, no se puden introducir
datos de texto después de que el disco haya sido finalizado.
PAUSE
A-B
TITLE CHARACTER
DISPLAY SEL FADER INPUT
Cargue el CD que desee copiar en la unidad de CD.
Dubb”.
9
3
PROG/DIRECT CALL
1
3
−
Y < >
10
STOP
1
,
6
: ;
MENU
A-B
6
P
[ = ]
8
TITLE CHARACTER
G & '
2
M*+
)
PUSH
ENTER
3
1 / ALL
DISPLAY SEL FADER INPUT
76
9
8
6
D # %
1
J(
Y < >
+10
PROG/DIRECT CALL
A ! "
RELAY
MODE
4
PUSH
ENTER
4
3
6
{ ? }
STOP
1
2
−
7
8
5
1
REC
+
MAX
,
10
MULTI JOG
OFF
5
MIN
P
[ = ]
REMOTE SENSOR
PLAY
3
_ DUBBING _
NORMAL HIGH
3
M*+
)
5
G & '
2
J(
5
CD CD-R
RELAY
MODE
FINALIZE
4
ESPAÑOL
(3) Selección de las pistas a copiar durante la exploración de CD y copia de las pistas seleccionadas.
★ l tiempo de reproducción con exploración puede ajustarse en el menú de configuración (página 74).
(Unidad principal)
11 GRABACIÓN DESDE DSIPOSITIOVS EXTERNOS
(Unidad de mando a distancia)
5
CD CD-R
5
3
1
_ DUBBING _
NORMAL HIGH
2
3
A ! "
RELAY
MODE
D # %
1
)
PCM AUDIO TECHNOLOGY / COMPACT DISC RECORDER
9
8
DUBBING
NORMAL
HIGH
TIME
CDR-W1500
DISPLAY
TITLE /
SELECT CHARACTER
TIME
CLEAR
INPUT
4 REC
FINALIZE
8
9
REMOTE SENSOR
POWER
PLAY
STOP
PAUSE
1
2
3
RELAY MODE
OPEN / CLOSE
ON
PHONES
PHONES LEVEL
MULTI JOG
OFF
-
+
5
OPEN /CLOSE
MENU
5
MIN
MAX
PLAY
STOP
PAUSE
1
2
3
5
.
3
M*+
4
S
5
/
V
,
−
6
: ;
Y < >
7
8
9
{ ? }
CLEAR
10
+10
MModos de grabación
★ El grabador dispone de varios modos de grabación.
★ El ajuste es posible siguiendo el método de "Método de configuración", de la página 73.
REC
6
7
MENU
PUSH
ENTER
STOP
ENTER
PLAY
2
4,5
2
6
6
RANDOM
9
PAUSE
4,5
3
PROG/DIRECT CALL
1
P
[ = ]
8
6
G & '
2
J(
• Cuando grabe en un disco ya grabado, la grabación comenzará automáticamente al final de la sección grabada por última vez. Al
hacerlo, preste atención al tiempo restante.
• Para borrar todo el contenido del disco y grabar desde el principio, primero deberá borrar todo el disco. "(2) Borrado de todas las
pistas" página 90.
• Para asegurar una grabación precisa, grabe a una temperatura ambiente de 30°C o inferior.
• La grabación puede detenerse si la unidad es sometida a sacudidas o gólpes durante la grabación. Si la grabación se detuviera
puede que ya no sea posible usar el disco normalmente. (“Disc Error”)
• Cuando grabe cambie al modo normal o dual. La operación no es posible en el modo relé o mix.
TIME
1 / ALL
TITLE CHARACTER
DISPLAY SEL FADER INPUT
Disc Synchro
A-B
ª
FINALIZE
Make CD
1
Cargue el CD que desee copiar en la unidad de CD.
2
Cargue el CD-R/RW en el que desee grabar en la unidad de CD-R.
3
Pulse el botón de copia a velocidad normal o alta (NORMAL o HIGH) para visualizar “Scan Rec Dub”
• Para realizar una grabación sincronizada de un disco entero o de un programa con
sólo activar la fuente.
• En este modo, la finalización se realiza automáticamente después de la grabación
sincronizada de todas las pistas.
ª
1Tr Synchro
ª
Synchro Off
4
Pulse el botón de introducción para ajustar el modo de copia.
• La reproducción de exploración Intro comienza en la unidad de CD.
5
Ajuste las pistas que desee grabar.
• Para las pistas que desee grabar, pulse el botón de introducción.
• Para las pistas que no desee grabar, pulse el botón de búsqueda automática hacia adelante.
✽ Una vez que las pistas hayan sido exploradas, la unidad de CD se ajustará al modo de pausa y se visualizará el
mensaje “Choice OK?“.
• Compruebe los ajustes en el calendario de música y si fueran correctos (OK), pulse el botón de introducción.
• Si se equivocara con los ajustes, pulse el botón de detención y repita los pasos 1 a 5.
6
Pulse el botón de reproducción de la unidad CD o CD-R.
• Comienza la copia.
• Cuando la copia ha terminado, la unidad CD-R se detiene.
• Para parar en medio de la copia, pulse el botón de detencion de la unidad CD o CD-R.
• Para dar comienzo manualmente a una grabación sólo tiene que pulsar el botón
REC.
• Para realizar una grabación sincronizada de una sola pista con sólo activar la
fuente.
NOTAS:
• La grabación analógica no es posible en el modo de Realizar CD.
• Utilice el modo de copia para grabar CDs HD. Tales discos puede que no
sean grabados adecuadamente cuando se realizan grabaciones desde el
exterior.
• No desactive la alimentación o desconecte el cable de alimentación mientras
"Now PMA Rec" se visualice después de que la grabación sea
completada. Hacer esto puede volver el disco inutilizable.
Algunas observaciones sobre la grabación:
• Cuando pista automática está activada (ON) (ajuste de fábrica), los números de pista se incrementarán automáticamente
durante la grabación.
• Mediante la programación de la fuente primero, puede grabarse una compilación.
NOTA:
• Se pueden ajustar para ser grabadas un máximo de 30 pistas. La reproducción de exploración Intro se lleva a cabo aún
después de que 30 pistas han sido ajustadas, pero no se podrán ajustar más pistas.
77
ESPAÑOL
1. Grabación manual
(1) Comenzar grabación analógica
(Unidad principal)
(Unidad de mando a distancia)
(2) Comenzar grabación digital
• Este equipo incluye un convertidor de frecuencia de muestreo.
Cuando grabe DATs o emisiones por satélite (32 kHz o 48 kHz) cuya frecuencia de muestreo de señal de entrada digital sea
diferente a la del CD (44,1 kHz), la frecuencia de muestreo será convertida automáticamente a 44,1 kHz.
(Unidad principal)
(Unidad de mando a distancia)
Seleccione el lado del CD-R.
CD CD-R
Seleccione el lado del CD-R.
CD CD-R
4 2
_ DUBBING _
NORMAL HIGH
8
D # %
G & '
1
2
3
J(
)
M*+
5
4
S
PCM AUDIO TECHNOLOGY / COMPACT DISC RECORDER
9
8
DUBBING
NORMAL
HIGH
TIME
CDR-W1500
TIME
POWER
STOP
PAUSE
1
2
3
RELAY MODE
OPEN / CLOSE
.
/
V
P
,
CLEAR
INPUT
4 REC
FINALIZE
8
9
ON
PHONES
PHONES LEVEL
MULTI JOG
OFF
-
+
5
OPEN /CLOSE
5
MENU
PLAY
STOP
PAUSE
1
2
3
8
MAX
−
Y < >
7
8
9
[ = ]
{ ? }
CLEAR
10
+10
PCM AUDIO TECHNOLOGY / COMPACT DISC RECORDER
9
DUBBING
NORMAL
HIGH
TIME
CDR-W1500
DISPLAY
TITLE /
SELECT CHARACTER
TIME
POWER
6
PLAY
STOP
PAUSE
1
2
3
7
MENU
RELAY MODE
OPEN / CLOSE
ON
PHONES
PHONES LEVEL
8
ENTER
PLAY
2
78
10
4
5
4 REC
FINALIZE
8
9
OFF
-
+
5
RANDOM
OPEN /CLOSE
MENU
5
PLAY
STOP
PAUSE
1
2
3
8
/
V
P
,
−
6
: ;
Y < >
7
8
9
[ = ]
{ ? }
CLEAR
10
+10
REC
6
7
MENU
8
5
MAX
STOP
PUSH
ENTER
TIME
1 / ALL
PLAY
A-B
1
9
2 5 10
FINALIZE
B
REMOTE CONTROL UNIT RC-278
1
Encienda la alimentación.
2
Cargue el disco CD-R/RW que vaya a grabar.
3
Realice la operación de "Método de Configuración (2) Ajustes del Modo de Grabación Sincronizada" en la Página 73 y
seleccione el modo de Sincronizado desactivado.
4
Cuando utilice una disco ya grabado, pulse el botón TIME para comprobar el tiempo que queda de grabación.
• Cada vez que pulse el botón TIME, la visualización de tiempos cambiará entre el tiempo grabado total y el tiempo
grabable.
5
Pulse el botón de activación de entrada (INPUT) y seleccione la fuente analógica.
• A continuación se iluminará la visualización "ANALOG".
6
Realice la operación de "Método de configuración", página 73, y active/desactive la función ATM.
• Función ATM activada
A continuación se iluminará la visualización "ATM". Cuando se detecte una sección en blanco (de unos 3 segundos o
más) de la señal de entrada, se asignará y grabará automáticamente el número de pista.
• Función ATM desactivada
Esto se graba con pista siguiente.
7
Dé comienzo a la reproducción de la selección que desee grabar en el reproductor de CD, pletina de cassettes, etc.
8
Pulse el botón de grabación (4 REC).
• Se activará el modo de espera de grabación.
9
Ajuste el nivel de grabación con el dial jog y luego pulse el botón de introducción.
• Ajuste el control de nivel de entrada (INPUT LEVEL) de forma que el indicador "OVER" no se encienda ni siquiera al
volumen máximo. Después de la modificación, ajuste la fuente que va a ser grabada al modo de espera.
✽ El nivel de grabación puede ajustarse por adelantado mediante el modo de menú.
• El nivel de grabación ajustado se almacenará en memoria, pero los datos pueden perderse si la unidad no se conecta
a la fuente de alimentación en 2 o 3 días.
10
Pulse el botón de reproducción (1 PLAY).
• La grabación derá comienzo.
11
Dé comienzo a la reproducción de la selección que desee grabar en el reproductor de CD, pletina de cassettes, etc.
10
4
5
RANDOM
9
PAUSE
3
PROG/DIRECT CALL
PAUSE
TITLE CHARACTER
DISPLAY SEL. FADER INPUT
ENTER
2
9
3
PROG/DIRECT CALL
2 5 10
INPUT
3
M*+
MULTI JOG
PUSH
ENTER
9
CLEAR
.
G & '
2
)
REMOTE SENSOR
REC
STOP
1
D # %
1
J(
6
: ;
RELAY
MODE
4
MIN
MIN
A ! "
8
S
8
DISPLAY
TITLE /
SELECT CHARACTER
REMOTE SENSOR
PLAY
4 2
RELAY
MODE
A ! "
_ DUBBING _
NORMAL HIGH
TIME
1 / ALL
A-B
TITLE CHARACTER
DISPLAY SEL. FADER INPUT
FINALIZE
B
REMOTE CONTROL UNIT RC-278
1
Encienda la alimentación.
2
Cargue el disco CD-R/RW que vaya a grabar.
3
Realice la operación de "Método de Configuración (2) Ajustes del Modo de Grabación Sincronizada" en la Página 73 y
seleccione el modo de Sincronizado desactivado.
4
Cuando utilice una disco ya grabado, pulse el botón TIME para comprobar el tiempo que queda de grabación.
• Cada vez que pulse el botón TIME, la visualización de tiempos cambiará entre el tiempo grabado total y el tiempo
grabable.
5
Pulse el botón de activación de entrada (INPUT) y seleccione la fuente digital (óptica o coaxial).
• A continuación se iluminará la fuente de entrada seleccionada ("CD", "OPT" o "COAX").
6
Realice la operación de "Método de configuración", página 73, y active/desactive la función ATM.
• Función ATM activada
A continuación se iluminará la visualización "ATM". Cuando se detecte una sección en blanco (de unos 3 segundos o
más) de la señal de entrada, se asignará y grabará automáticamente el número de pista.
• Función ATM desactivada
Esto se graba con pista siguiente.
7
Dé comienzo a la reproducción de la selección que desee grabar en el reproductor de CD, pletina de MD, etc.
8
Pulse el botón de grabación (4 REC).
• Si parpadeara el indicador "D. in", compruebe las conexiones de los terminales de entrada digital.
9
Ajuste el nivel de grabación con el dial jog y luego pulse el botón de introducción.
• Ajuste el control de nivel de entrada (INPUT LEVEL) de forma que el indicador "OVER" no se encienda ni siquiera al
volumen máximo. Después de la modificación, ajuste la fuente que va a ser grabada al modo de espera.
✽ El nivel de grabación puede ajustarse por adelantado mediante el modo de menú.
• El nivel de grabación ajustado se almacenará en memoria, pero los datos pueden perderse si la unidad no se conecta
a la fuente de alimentación en 2 o 3 días.
10
Pulse el botón de reproducción (1 PLAY).
• La grabación derá comienzo.
11
Reproduzca la selección que vaya a grabar en el reproductor de CD, etc.
NOTAS:
• "CD" puede seleccionarse pulsando el botón selector de entrada, pero la grabación manual desde la unidad de CD del
equipo, sólo es posible en el modo dual. (Remítase al "Modo Dual" en la página 88, 89).
• Cuando no desee cambiar el nivel de grabación digital, ajuste el dial jog de forma tal que se visualice “Level
00.0dB“ La grabación se realizará sin cambiar el nivel de la señal de entrada.
• El nivel de grabación puede cambiarsee en un margen de – ∞ a +12 dB para la grabación de entrada analógica y de – ∞ a
0 dB para la grabación de entrada digital. Observe que los valores de ajustes visualizados pueden incluir un grado de error
en términos de proceso de cálculo.
• Cuando el nivel de grabación es de – ∞ , se visualizará “Level---.-dB” y no se emitirá el audio.
ESPAÑOL
(4) Adición de números de pista durante la grabación
(3) Detención de la grabación
(Unidad principal)
(Unidad de mando a distancia)
(Unidad principal)
(Unidad de mando a distancia)
Seleccione el lado del CD-R.
Seleccione el lado del CD-R.
CD CD-R
CD CD-R
_ DUBBING _
NORMAL HIGH
A ! "
RELAY
MODE
D # %
1
2
J(
)
S
PCM AUDIO TECHNOLOGY / COMPACT DISC RECORDER
CDR-W1500
.
5
/
DUBBING
NORMAL
HIGH
TIME
DISPLAY
TITLE /
SELECT CHARACTER
TIME
CLEAR
INPUT
4 REC
FINALIZE
8
9
STOP
PAUSE
V
POWER
1
STOP
2
PAUSE
3
RELAY MODE
OPEN / CLOSE
ON
PHONES
PHONES LEVEL
OPEN /CLOSE
5
MAX
A ! "
MENU
PLAY
1
2
9
CLEAR
S
PCM AUDIO TECHNOLOGY / COMPACT DISC RECORDER
CDR-W1500
7
9
8
DUBBING
NORMAL
HIGH
TIME
DISPLAY
TITLE /
SELECT CHARACTER
TIME
POWER
STOP
1
1
ENTER
PLAY
INPUT
4 REC
FINALIZE
8
9
PLAY
STOP
PAUSE
1
2
3
REMOTE SENSOR
PUSH
ENTER
8
CLEAR
9
PLAY
STOP
PAUSE
1
2
3
RELAY MODE
OPEN / CLOSE
ON
PHONES
PHONES LEVEL
-
+
OPEN /CLOSE
MENU
5
MIN
PAUSE
MULTI JOG
OFF
5
MAX
1
.
/
V
7
8
9
{ ? }
CLEAR
+10
REC
6
7
MENU
PUSH
ENTER
ENTER
PLAY
STOP
TIME
1 / ALL
2
A-B
TITLE CHARACTER
DISPLAY SEL FADER INPUT
2
FINALIZE
2
2
9
PAUSE
3
PROG/DIRECT CALL
RANDOM
TIME
1 / ALL
A-B
2
TITLE CHARACTER
DISPLAY SEL FADER INPUT
1
−
Y < >
3
PROG/DIRECT CALL
RANDOM
,
6
: ;
10
8
2
3
5
P
[ = ]
+10
MENU
3
G & '
2
M*+
)
4
8
6
D # %
1
J(
Y < >
REC
+
5
MIN
: ;
RELAY
MODE
−
{ ? }
MULTI JOG
OFF
-
,
6
7
REMOTE SENSOR
PLAY
P
[ = ]
10
9
8
3
M*+
4
_ DUBBING _
NORMAL HIGH
1
G & '
FINALIZE
Durante la grabación pulse el botón de detención (2 STOP).
• El modo de detención se ajustará automáticamente una vez que se llegue al final del tiempo grabable.
• Durante la grabación, pueden añadirse números de pista independientemente del modo de grabación.
Pulse el botón de grabación (4 REC).
NOTAS:
• Cuando realice grabaciones digitales de CD o MD, los números de pista se grabarán automáticamente. (Véase la página
68).
• Cuando grabe fuentes digitales que no sean CD o MD, los números de pista se añadirán automáticamente al detectarse
secciones en blanco. (Véase la página 68).
• Durante la grabación digital desde CD o MD, el número de pista puede que no cambie si se ha programado la misma
pista dos veces seguidas o si se ha ajustado el modo de repetición de pista individual.
• No es posible realizar grabaciones digitales de discos que ya hayan sido grabados digitalmente. El CDR-W1500 incluye un
sistema de gestión de copia serie. Este sistema limita la reproducción de señales digitales de dispositivos de audio digital
a "una generación". Utilice la grabación analógica para grabar discos originalmente grabados de manera digital.
• El CDR-W1500 ha sido diseñado para un uso doméstico, de forma privada, y puede que no funcione correctamente si se
utiliza (para grabar, etc.) junto con equipos profesionales u otros dispositivos no diseñados para un uso doméstico.
• Para expulsar el disco si se visualiza el mensaje “Copy Prohibit” o “Dig.Unlock” durante la grabación digital
y se ha ajustado el modo de pausa de grabación, primero deberá pulsar el botón de detención ( 2 STOP) y luego pulsar el
botón de apertura/cierre (5 OPEN/CLOSE) para expulsar el disco.
1
Durante la grabación pulse el botón de grabación ( 4 REC ).
• Cuando se pulsa el botón de grabación ( 4 REC ) durante la
grabación, se añadirá un número de pista en ese punto.
• No se puede añadir un nuevo número de pista en los 4
segundos posteriores al último número de pista.
1ª pista
2ª pista
(La grabación continua).
(5) Detención temporal de la grabación
• La grabación puede detenerse temporalmente y luego reanudarse desde el mismo punto.
q Pulse el botón de pausa (3 PAUSE).
2
Durante la grabación, pulse el botón de pausa (3 PAUSE).
• Cuando se pulse el botón de pausa (3 PAUSE) durante la
grabación, se ajustará el modo de pausa en ese punto y
cambiará el número de pista.
• Pulse el botón de reproducción ( 1 PLAY) para reanudar la
grabación.
1ª pista
2ª pista
w Pulse el botón de reproducción (1 PLAY).
• Antes de que se reanude la grabación, se insertará una sección en blanco de aproximadamente 2 segundos.
79
ESPAÑOL
2. Grabación sincronizada del disco
(DISC SYNCHRO)
★ Este modo se utiliza para grabar todas las pistas del CD o MD del lado de reproducción.
★ Consulte también "Método de configuración (3) Ajuste del nivel de grabación sincronizada", en la página 73.
3. Grabación sincronizada de pistas individuales
(1Tr SYNCHRO)
★ Este modo se utiliza para grabar una sola pista.
★ Consulte también "Método de configuración (3) Ajuste del nivel de grabación sincronizada", en la página 73.
(Unidad de mando a distancia)
(Unidad de mando a distancia)
(Unidad principal)
(Unidad principal)
Seleccione el lado del CD-R.
Seleccione el lado del CD-R.
CD CD-R
_ DUBBING _
NORMAL HIGH
3
A ! "
D # %
1
)
S
PCM AUDIO TECHNOLOGY / COMPACT DISC RECORDER
9
8
DUBBING
NORMAL
HIGH
TIME
CDR-W1500
DISPLAY
TITLE /
SELECT CHARACTER
TIME
CLEAR
INPUT
4 REC
FINALIZE
8
9
PLAY
STOP
PAUSE
1
2
3
REMOTE SENSOR
POWER
PLAY
STOP
PAUSE
1
2
3
RELAY MODE
OPEN / CLOSE
ON
PHONES
PHONES LEVEL
MULTI JOG
OFF
-
+
5
OPEN /CLOSE
MENU
5
MIN
MAX
3
.
5
/
V
P
,
Y < >
8
9
{ ? }
CLEAR
+10
9
8
DUBBING
NORMAL
HIGH
TIME
CDR-W1500
DISPLAY
TITLE /
SELECT CHARACTER
TIME
POWER
7
PLAY
STOP
PAUSE
1
2
3
RELAY MODE
OPEN / CLOSE
ON
PHONES
PHONES LEVEL
INPUT
4 REC
FINALIZE
8
9
PLAY
STOP
PAUSE
1
2
3
PLAY
2
MULTI JOG
OFF
-
+
5
OPEN /CLOSE
5
MIN
PUSH
ENTER
MAX
MENU
TIME
1 / ALL
3
P
5
/
V
,
−
6
: ;
Y < >
7
8
9
[ = ]
{ ? }
CLEAR
10
+10
REC
6
7
MENU
9
8
PAUSE
STOP
ENTER
PLAY
2
RANDOM
FINALIZE
9
PAUSE
3
PROG/DIRECT CALL
A-B
TITLE CHARACTER
DISPLAY SEL FADER INPUT
3
.
G & '
M*+
PUSH
ENTER
3
PROG/DIRECT CALL
RANDOM
CLEAR
REMOTE SENSOR
REC
MENU
STOP
TIME
1 / ALL
A-B
TITLE CHARACTER
DISPLAY SEL FADER INPUT
FINALIZE
1
Siga la operación de "Grabación Manual", de la página 78, realice los ajustes de los terminales de entrada y del nivel de
grabación y ajuste el modo de detención.
1
Siga la operación de "Grabación Manual", de la página 78, ajuste los terminales de entrada y del nivel de grabación y
ajuste el modo de detención.
2
Siga el procedimiento de "Método de configuración (2) Ajustes del modo de grabación sincronizada" (página 73) y
seleccione el modo de sincronización de disco o el modo de realizar CD.
• A continuación se iluminará el indicador "SYNC".
2
Siga el procedimiento de "Método de configuración (2) Ajustes del modo de grabación sincronizada" (página 73) y
seleccione el modo de sincronización de pista.
• A continuación se iluminará el indicador "1Tr SYNC".
3
Pulse el botón de grabación.
• A continuación se ajustará el modo de pausa y se visualizará “Disc Synchro” o “Make CD”.
3
Pulse el botón de grabación.
• Esto ajustará el modo de pausa de grabación y se visualizará “1Tr Synchro”.
4
Utilice un reproductor de CD, pletina de cassettes u otra fuente para reproducir las pistas que desee grabar.
• La grabación comenzará automáticamente.
• En el modo de realizar CD, la finalización se realiza automáticamente después de que se detenga la grabación.
✽ Consulte también "Método de configuración (3) Ajuste del nivel de grabación sincronizada", en la página 73.
4
Utilice un reproductor de CD, pletina de cassettes u otra fuente para reproducir las pistas que desee grabar.
• La grabación comenzará automáticamente.
✽ Consulte también "Método de configuración (3) Ajuste del nivel de grabación sincronizada", en la página 73.
• Para detener la grabación sincronizada, pulse el botón de detención.
NOTA:
• Si desea introducir datos de texto, seleccione el “Disc Synchro”. Con los discos CD-R, no se puden introducir
datos de texto después de que el disco haya sido finalizado.
80
S
PCM AUDIO TECHNOLOGY / COMPACT DISC RECORDER
7
ENTER
)
4
10
6
D # %
2
J(
6
: ;
RELAY
MODE
1
−
[ = ]
8
A ! "
3
M*+
4
_ DUBBING _
NORMAL HIGH
3
G & '
2
J(
CD CD-R
RELAY
MODE
• Para detener la grabación sincronizada, pulse el botón de detención.
• Si hay una sección sin ruido de 3 segundos o más, la grabación se detiene cuando la siguiente pista comienza.
• La grabación se detiene si hay una sección sin ruido de 10 segundos o más.
ESPAÑOL
4. Grabación con fundido de entrada y de salida
★ Es posible grabar con un aumento gradual del volumen (fundido de entrada) o disminución del mismo (fundido de salida).
(1) Grabación con fundido de entrada
✽ Consulte también "Método de configuración (5) Ajustes de tiempo de fundido de entrada" (página 74).
1
Realice el procedimiento en " Grabación manual” pasos 1 al 8, en la página 78.
2
Dé comienzo a la reproducción de la selección que desee grabar en el reproductor de CD, pletina de cassettes, etc.
12 REPRODUCCIÓN NORMAL
1. Comienzo de la reproducción
Primero intente reproducir las pista en orden.
Seleccione la plataforma que se va a operar.
(Unidad de mando a distancia)
3
Pulse el botón FADER de la unidad de mando a distancia.
• A continuación se visualizará "Fade In" y parpadeará "FADE" durante la operación de fundido de entrada.
• El sonido grabado aumentará gradualmente desde el nivel de grabación de – ∞ al nivel de grabación ajustado en el
tiempo de ajuste.
CD CD-R
1
_ DUBBING _
NORMAL HIGH
1
A ! "
RELAY
MODE
D # %
1
(Unidad principal)
)
S
PCM AUDIO TECHNOLOGY / COMPACT DISC RECORDER
9
8
1
Durante la grabación, pulse el botón FADER de la unidad de mando a distancia.
• A continuación se visualizará "Fade Out" y parpadeará "FADE" durante la operación de fundido de salida.
• El nivel del sonido grabado disminuirá gradualmente desde el nivel de grabación ajustado a un nivel de grabación de – ∞ en el tiempo ajustado.
NOTA:
• La función de grabación de fader in/out (aparición/desvanecimiento) no funciona en el modo sincrónico ni en el modo de
grabación de copia. Realice la grabación manualmente si usted quiere utilizar la función de fader in/out
(aparición/desvanecimiento).
DUBBING
NORMAL
HIGH
TIME
CDR-W1500
DISPLAY
TITLE /
SELECT CHARACTER
TIME
CLEAR
INPUT
4 REC
FINALIZE
8
9
PLAY
STOP
PAUSE
1
2
3
.
5
/
V
POWER
STOP
PAUSE
1
2
3
RELAY MODE
OPEN / CLOSE
ON
PHONES
PHONES LEVEL
OPEN /CLOSE
5
MAX
7
8
9
{ ? }
CLEAR
+10
MENU
6
STOP
3
1
7
MENU
PUSH
ENTER
8
2 3
−
Y < >
REC
+
5
MIN
,
6
: ;
10
MULTI JOG
OFF
-
P
[ = ]
REMOTE SENSOR
PLAY
3
M*+
4
(2) Grabación con fundido de salida
✽ Consulte también "Método de configuración (6) Ajustes de tiempo de fundido de salida" (página 74).
G & '
2
J(
1
2 3
ENTER
PLAY
2
PAUSE
3
PROG/DIRECT CALL
RANDOM
9
TIME
1 / ALL
A-B
2
TITLE CHARACTER
DISPLAY SEL. FADER INPUT
FINALIZE
1
Cargue el disco que vaya a reproducir.
2
• Pulse el botón PLAY (1) para comenzar la reproducción de CD.
• A continuación se iluminará “ 1 ” y aparecerá en la pantalla el número de pista y el tiempo de la pista en
reproducción.
• Pulse el botón TIME una vez, dos veces o tres veces para ver:
El tiempo restante de pista, tiempo restante total y tiempo de pista transcurrido.
NOTA:
• En casos tales como cuando no se ha cargado un disco, no se pueda leer correctamente el disco debido a arañazos o
suciedad, o se haya cargado el disco al revés, se visualizará “No Disc”.
2. Comienzo de la reproducción
3
Pulse el botón de detención (2 STOP).
• A continuación la reproducción se detendrá.
• Una vez que se hayan reproducido todas las pistas del disco, se ajustará automáticamente el modo de detención.
81
ESPAÑOL
13 DIVERSAS FUNCIONES DE REPRODUCCIÓN
(2) Búsqueda hacia atrás
Además de la reproducción normal, el CDR-W1500 también dispone de las siguientes funciones de reproducción.
1. Reproducción de una pista determinada (sólo desde la unidad de mando a distancia) ………………… Búsqueda directa
(Unidad de mando a distancia)
2
CD CD-R
Seleccione la plataforma que se va a operar.
_ DUBBING _
NORMAL HIGH
A ! "
RELAY
MODE
D # %
1
)
.
3
M*+
4
S
G & '
2
J(
−
6
: ;
V
,
P
5
/
Y < >
7
8
9
[ = ]
{ ? }
CLEAR
10
1
NOTA:
• Puede que se produzca una ligera interrupción de sonido al volver a la reproducción normal desde el modo de búsqueda
manual.
+10
REC
6
3. Búsqueda de los principios de las pistas durante la reproducción ……………………………………… Búsqueda automática
7
MENU
8
(1) Movimiento hacia adelante al comienzo de la pista siguiente
9
ENTER
PLAY
STOP
PAUSE
2
3
PROG/DIRECT CALL
1
Durante la reproducción, mantenga pulsado el botón de Mantenga pulsado el botón de búsqueda
búsqueda manual hacia atrás (6).
manual hacia atrás (6).
• La grabación normal se reanudará desde el punto en el que se
haya liberado el botón.
6ª pista
5ª pista
• La búsqueda manual se detendrá y la reproducción
4ª pista
comenzará cuando se llegue al comienzo de la primera pista
del disco mientras se mantenta pulsado el botón de búsqueda
manual hacia atrás (6).
• Para realizar la búsqueda hacia atrás a alta velocidad sin oír el
sonido, pulse el botón de búsqueda manual hacia atrás (6)
Salto Salto Salto Salto Salto
en el modo de pausa.
1 / ALL
(Unidad de mando a distancia)
A-B
Utilice los botones numéricos (1 a 10) y el botón +10 para introducir el número de la pista deseada.
• Por ejemplo:
Pulse el botón 4 para escuchar la pista 4ª, los botones +10 y 2 para oír la pista 12ª, +10 , +10 y 10 para oír la
pista 30ª. La reproducción comenzará desde esta pista.
CD CD-R
Seleccione la plataforma que se va a operar.
_ DUBBING _
NORMAL HIGH
A ! "
RELAY
MODE
D # %
1
(Unidad principal)
)
S
2. Búsqueda de la posición deseada mientras se escucha el sonido ………………………………………… Búsqueda manual
• Utilice esta función para pasar rápidamente por el disco mientras oye el sonido.
Esta función resulta útil para buscar una sección determinada dentro de una pista larga.
9
8
DUBBING
NORMAL
HIGH
TIME
CDR-W1500
DISPLAY
TITLE /
SELECT CHARACTER
TIME
CLEAR
INPUT
4 REC
FINALIZE
8
9
PLAY
STOP
PAUSE
1
2
3
.
5
/
V
POWER
STOP
PAUSE
1
2
3
RELAY MODE
OPEN / CLOSE
ON
PHONES
PHONES LEVEL
-
−
Y < >
7
8
9
{ ? }
CLEAR
+10
REC
+
OPEN /CLOSE
MENU
5
MIN
,
6
: ;
10
MULTI JOG
OFF
5
MAX
P
[ = ]
REMOTE SENSOR
PLAY
3
M*+
4
PCM AUDIO TECHNOLOGY / COMPACT DISC RECORDER
G & '
2
J(
6
7
MENU
1
PUSH
ENTER
8
(Unidad de mando a distancia)
STOP
ENTER
PLAY
2
1
RANDOM
PAUSE
3
PROG/DIRECT CALL
1
9
TIME
1 / ALL
A-B
TITLE CHARACTER
CD CD-R
Seleccione la plataforma que se va a operar.
_ DUBBING _
NORMAL HIGH
A ! "
D # %
1
)
2
.
5
/
V
P
,
−
6
: ;
Y < >
7
8
9
[ = ]
{ ? }
CLEAR
10
+10
REC
6
7
MENU
8
STOP
ENTER
PLAY
2
PROG/DIRECT CALL
1
1
9
PAUSE
3
1 / ALL
A B
(1) Búsqueda hacia adelante
1
82
FINALIZE
Pulse el botón de búsqueda automática hacia adelante (9).
3
M*+
4
S
G & '
2
J(
DISPLAY SEL. FADER INPUT
RELAY
MODE
Mantenga pulsado el botón de búsqueda
Durante la reproducción, mantenga pulsado el botón de
manual hacia adelante (7).
búsqueda manual hacia adelante (7).
• La grabación normal se reanudará desde el punto en el que se
haya liberado el botón.
2ª pista
3ª pìsta
4ª pista
• La reproducción se detendrá si se llega al final de la última
pista del disco mientras se mantiene pulsado el botón de
búsqueda manual hacia adelante (7).
• Para realizar la búsqueda hacia adelante a alta velocidad sin oír
el sonido, pulse el botón de búsqueda manual hacia adelante
Reproducción Salto Salto Salto Salto Salto
(7) en el modo de pausa.
Pulse el botón de búsqueda automática hacia adelante (9).
• Durante la operación de búsqueda, pulse el botón de
búsqueda automática hacia adelante (9) nuevamente para
ir al comienzo de la siguiente pista.
2ª pista
3ª pista
4ª pista
ESPAÑOL
(2) Movimiento hacia atrás al comienzo de la pista actual
5. Reproducción de pistas en un orden determinado …………………………………………………… Reproducción programada
(Unidad de mando a distancia)
• Utilice esta función para seleccionar pistars determinadas del disco y prográmelas en un orden determinado.
• Se pueden programar hasta 30 pistas.
CD CD-R
Seleccione la plataforma que se va a operar.
_ DUBBING _
NORMAL HIGH
A ! "
D # %
1
(Unidad principal)
PCM AUDIO TECHNOLOGY / COMPACT DISC RECORDER
CDR-W1500
/
DUBBING
NORMAL
HIGH
DISPLAY
TITLE /
SELECT CHARACTER
TIME
TIME
POWER
STOP
1
2
PAUSE
RELAY MODE
ON
OPEN / CLOSE
PHONES
PHONES LEVEL
CLEAR
INPUT
4 REC
FINALIZE
8
9
STOP
PAUSE
7
8
9
{ ? }
CLEAR
+
OPEN /CLOSE
PLAY
MENU
5
MAX
_ DUBBING _
NORMAL HIGH
1
2
A ! "
6
1
8
9
ENTER
S
PLAY
2
CDR-W1500
3
PROG/DIRECT CALL
1
PCM AUDIO TECHNOLOGY / COMPACT DISC RECORDER
PAUSE
1 / ALL
A-B
9
8
RANDOM
DUBBING
NORMAL
HIGH
TIME
DISPLAY
TITLE /
SELECT CHARACTER
)
TIME
POWER
PLAY
STOP
PAUSE
1
2
3
RELAY MODE
OPEN / CLOSE
ON
PHONES
PHONES LEVEL
5
CLEAR
INPUT
4 REC
FINALIZE
8
9
PLAY
STOP
PAUSE
1
2
3
/
V
OPEN /CLOSE
MENU
5
MAX
8
9
{ ? }
CLEAR
10
+10
6
7
MENU
STOP
ENTER
PLAY
2
3
4. Detención temporal de la reproducción
3ª pista
4ª pista
5ª pista
……………………………………………………………………………………… Pausa
• Utilice esta función para detener temporalmente la reproducción y luego reanudarla desde el mismo punto.
(Unidad de mando a distancia)
Seleccione la plataforma que se va a operar.
CD CD-R
_ DUBBING _
NORMAL HIGH
A ! "
RELAY
MODE
D # %
1
(Unidad principal)
)
4
S
PCM AUDIO TECHNOLOGY / COMPACT DISC RECORDER
9
8
DUBBING
NORMAL
HIGH
TIME
CDR-W1500
DISPLAY
TITLE /
SELECT CHARACTER
TIME
CLEAR
INPUT
4 REC
FINALIZE
8
9
PLAY
STOP
PAUSE
1
2
3
.
5
/
V
POWER
STOP
PAUSE
1
2
3
RELAY MODE
OPEN / CLOSE
ON
PHONES
PHONES LEVEL
OPEN /CLOSE
MENU
5
MAX
−
Y < >
7
8
9
{ ? }
CLEAR
+10
REC
+
5
MIN
,
6
: ;
10
MULTI JOG
OFF
-
P
[ = ]
REMOTE SENSOR
PLAY
3
M*+
6
7
MENU
PUSH
ENTER
8
STOP
ENTER
PLAY
2
1
1
RANDOM
9
PAUSE
3
PROG/DIRECT CALL
TIME
1 / ALL
3
1
PAUSE
3
PROG/DIRECT CALL
RANDOM
9
TIME
1 / ALL
A-B
3
TITLE CHARACTER
1
En el modo de detención, pulse el botón PROG/DIRECT.
• A continuación se iluminará el indicador "PROG".
2
Utilice los botones numéricos y el botón +10 para seleccionar las pistas de la reproducción programada.
• Por ejemplo, para programar las pistas 3ª, 12ª y 7ª, pulse PROG/DIRECT , 3 , +10 , 2 y 7 .
3
Pulse el botón de reproducción (1 PLAY).
• A continuación las pistas se reproducirán en el orden programado.
• Para comprobar el contenido del programa, pulse el botón CALL. Las pistas programadas aparecerán en la pantalla en el
orden programado cada vez que se pulse el botón CALL.
• Para cambiar el programa, pulse el botón CLEAR en el modo de detención y luego programe la pista deseada. La última
pista programada será reemplazada por la pista que se acaba de introducir.
• Para borrar todo el programa, pulse el botón PROG/DIRECT o el botón de apertura/cierre (5 OPEN/CLOSE) en el modo de
detención.
G & '
2
J(
2
PUSH
ENTER
Pulse el botón de búsqueda automática hacia atrás (8).
Pulse el botón de búsqueda automática hacia atrás (8).
• Durante la operación de búsqueda, pulse el botón de
búsqueda automática hacia atrás (8) nuevamente para ir al
comienzo de la pista anterior.
−
Y < >
7
8
1
,
6
: ;
REC
+
5
MIN
P
[ = ]
MULTI JOG
OFF
-
3
M*+
REMOTE SENSOR
TITLE CHARACTER
TIME
.
G & '
2
J(
4
STOP
1
D # %
1
(Unidad principal)
7
MENU
3
PUSH
ENTER
RELAY
MODE
+10
REC
-
MIN
CD CD-R
Y < >
[ = ]
MULTI JOG
OFF
5
3
(Unidad de mando a distancia)
−
6
: ;
V
REMOTE SENSOR
PLAY
,
P
5
10
9
8
3
M*+
)
4
.
G & '
2
J(
S
Seleccione la plataforma que se va a operar.
RELAY
MODE
A-B
1
NOTAS:
• El modo de repetición de pista individual y el modo de repetición A-B no se pueden ajustar durante la reproducción
programada.
• Se pueden ajustar programas con un tiempo de reproducción total de 99 minutos, pero el tiempo no se visualizará
correctamente.
• La reproducción programada no es posible con discos no finalizados.
• La operación de búsqueda directa no es posible durante la reproducción programada.
• Los números de pista de 21 o mayores pueden ser programados para discos que contengan más de 20 pistas, pero
cuando se hace esto el tiempo no se visualiza adecuadamente.
TITLE CHARACTER
q Pulse el botón de pausa (3 PAUSE).
1
Durante la grabación, pulse el botón de pausa (3 PAUSE).
• A continuación se ajustará el modo de pausa.
• Pulse el botón de reproducción ( 1 PLAY) para reanudar la
reproducción desde el punto en que se haya ajustado el modo
de pausa.
4ª pista
5ª pista
6ª pista
w Pulse el botón de reproducción (1 PLAY).
83
ESPAÑOL
6. Reproducción en orden aleatorio …………………………………………………………………………… Reproduccción aleatoria
7. Reproducción repetida ……………………………………………………………………………………Repetición de reproducción
• Utilice esta función para reproducir todas las pistas del disco una vez en orden aleatorio.
(1) Reproducción de una pista individual repetidamente (Repetición de pista individual]
Seleccione la plataforma que se va a operar.
Seleccione la plataforma que se va a operar.
(Unidad de mando a distancia)
(Unidad de mando a distancia)
CD CD-R
_ DUBBING _
NORMAL HIGH
A ! "
D # %
1
(Unidad principal)
)
PCM AUDIO TECHNOLOGY / COMPACT DISC RECORDER
9
8
DUBBING
NORMAL
HIGH
TIME
CDR-W1500
DISPLAY
TITLE /
SELECT CHARACTER
TIME
CLEAR
INPUT
4 REC
FINALIZE
8
9
PLAY
STOP
PAUSE
1
2
3
.
5
/
V
POWER
STOP
PAUSE
1
2
3
RELAY MODE
OPEN / CLOSE
ON
PHONES
PHONES LEVEL
OPEN /CLOSE
MENU
5
MAX
A ! "
Y < >
S
PCM AUDIO TECHNOLOGY / COMPACT DISC RECORDER
8
9
{ ? }
CLEAR
+10
9
8
DUBBING
NORMAL
HIGH
TIME
CDR-W1500
DISPLAY
TITLE /
SELECT CHARACTER
POWER
7
MENU
PLAY
STOP
PAUSE
1
2
3
RELAY MODE
OPEN / CLOSE
ON
PHONES
PHONES LEVEL
-
ENTER
PLAY
2
2
1
RANDOM
TIME
INPUT
4 REC
FINALIZE
8
9
PLAY
STOP
PAUSE
1
2
3
/
V
1 / ALL
MENU
PUSH
ENTER
7
8
9
[ = ]
{ ? }
CLEAR
10
+10
7
MENU
2
8
STOP
9
ENTER
PLAY
PAUSE
2
2
−
Y < >
6
PAUSE
A-B
3
PROG/DIRECT CALL
3
TITLE CHARACTER
DISPLAY SEL. FADER INPUT
OPEN /CLOSE
5
MAX
,
6
: ;
REC
+
9
3
PROG/DIRECT CALL
CLEAR
3
P
5
MULTI JOG
OFF
5
MIN
PUSH
ENTER
2
TIME
.
G & '
M*+
REMOTE SENSOR
6
STOP
)
4
7
8
D # %
2
J(
6
: ;
RELAY
MODE
1
−
REC
+
5
MIN
,
10
MULTI JOG
OFF
-
P
[ = ]
REMOTE SENSOR
PLAY
2
3
M*+
4
S
2
_ DUBBING _
NORMAL HIGH
G & '
2
J(
CD CD-R
(Unidad principal)
RELAY
MODE
3
1
FINALIZE
RANDOM
TIME
1 / ALL
A-B
3
TITLE CHARACTER
DISPLAY SEL. FADER INPUT
FINALIZE
B
1
En el modo de detención, pulse el botón RANDOM.
• A continuación se iluminará el indicador "RAND".
1
Pulse el botón de repetición 1/ALL una vez.
• A continuacion se iluminarán los indicadores "REPEAT 1" en la pantalla y se ajustará el modo de repetición de pista
individual.
2
Utilice los botones de búsqueda automática (8 y 9) para seleccionar la pista que desee reproducir repetidamente.
2
Pulse el botón de reproducción (1 PLAY).
• Durante la reproducción normal.
Las pistas se reproducirán automáticamente en orden aleatorio.
• Durante el modo de repetición de todas las pistas:
Se reproducirán todas las pistas una vez en orden aleatorio y luego se repetirán en otro orden aleatorio.
• Para cancelar el modo de reproducción aleatorio, ajuste el modo de detención o pulse el botón RANDOM otra vez.
3
Pulse el botón de reproducción (1 PLAY).
• A continuación comenzará la reproducción.
• Una vez que concluya la pista seleccionada, se reproducirá
otra vez desde el principio.
• El modo de repetición de pista individual también puede
ajustarse pulsando el botón de repetición 1/ALL durante la
reproducción. La pista actual se reproducirá repetidamente.
• Para cancelar el modo de repetición de pista individual, pulse
el botón de repetición 1/ALL repetidamente hasta que se
apague el indicador "REPEAT".
NOTAS:
• El modo de repetición de pista individual y el modo de repetición A-B no se pueden ajustar durante la reproducción
aleatoria.
• La reproducción aleatoria no es posible con los discos no finalizados.
84
Pulse el botón de repetición 1/ALL una vez.
2ª pista
3ª pista
4ª pista
Esta operación se
repite.
ESPAÑOL
(2) Reproducción de todas las pistas repetidamente [All Track Repeat]
(3) Reproducción de una sección entre dos puntos cualesquiera repetidamente [A–B Repeat]
★ Esta función le permite reproducir una sección determinada de una pista repetidamente.
Seleccione la plataforma que se va a operar.
CD CD-R
(Unidad de mando a distancia)
(Unidad de mando a distancia)
A ! "
CD CD-R
RELAY
MODE
D # %
1
(Unidad principal)
)
S
9
8
DUBBING
NORMAL
HIGH
TIME
CDR-W1500
DISPLAY
TITLE /
SELECT CHARACTER
TIME
CLEAR
INPUT
4 REC
FINALIZE
8
9
PLAY
STOP
PAUSE
1
2
3
.
5
/
V
POWER
STOP
PAUSE
1
2
3
RELAY MODE
OPEN / CLOSE
ON
PHONES
PHONES LEVEL
-
2
)
−
3
M*+
P
5
/
V
: ;
−
Y < >
7
8
9
[ = ]
{ ? }
CLEAR
10
+10
REC
Y < >
6
8
9
{ ? }
CLEAR
10
+10
OPEN /CLOSE
MENU
7
MENU
8
STOP
9
ENTER
PLAY
PAUSE
2
6
3
7
MENU
PROG/DIRECT CALL
1 / ALL
A-B
PUSH
ENTER
8
STOP
ENTER
PLAY
9
RANDOM
TIME
TITLE CHARACTER
3
PROG/DIRECT CALL
2
1
1 / ALL
1,2
PAUSE
DISPLAY SEL. FADER INPUT
2
2
,
6
: ;
REC
+
5
MAX
,
.
G & '
6
7
MULTI JOG
OFF
5
MIN
P
[ = ]
REMOTE SENSOR
PLAY
3
M*+
4
PCM AUDIO TECHNOLOGY / COMPACT DISC RECORDER
G & '
2
J(
D # %
4
S
A ! "
RELAY
MODE
1
J(
_ DUBBING _
NORMAL HIGH
Seleccione la plataforma que se va a operar.
_ DUBBING _
NORMAL HIGH
A-B
2
FINALIZE
B
REMOTE CONTROL UNIT RC-278
RANDOM
TIME
TITLE CHARACTER
DISPLAY SEL. FADER INPUT
FINALIZE
1
Pulse el botón de repetición 1/ALL dos veces.
• A continuacion se iluminarán los indicadores "REPEAT" en la pantalla y se ajustará el modo de repetición de todas las
pistas.
2
Pulse el botón de reproducción (1 PLAY).
• El disco actual se reproducirá repetidamente.
• El modo de repetición de todas las pistas también puede ajustarse pulsando el botón de repetición 1/ALL dos veces
durante la reproducción.
• Si se pulsa el botón de repetición 1/ALL durante la reproducción programada, las pistas se reproducirán
repetidamente en el orden programado.
• Para cancelar el modo de repetición de todas las pistas, pulse el botón de repetición 1/ALL repetidamente hasta que
se apague el indicador "REPEAT".
1
Durante la reproducción, pulse el botón de repetición A–B en la posición en la que desee comenzar la repetición (punto
(A).
• A continuación se iluminará el indicador “REPEAT A–”.
2
Pulse el botón de repetición A–B nuevamente en la posición en la que desee detener la repetición (punto B).
• A continuación se iluminará el indicador “REPEAT A–B”, la lente lectora volverá al punto A y la sección se reproducirá
repetidamente.
(1) Pulse el botón de repetición
A-B durante la reproducción
nuevamente.
(Punto A)
2ª pista
NOTAS:
• El modo de repetición de pista individual y el modo de repetición A-B no se pueden ajustar durante la reproducción
aleatoria.
• La repetición de reproducción no es posible con los discos no finalizados.
(2) Pulse el botón de repetición
A-B otra vez.
3ª pista
(Punto B).
4ª pista
Esta operación se
repite.
• Para detener la repetición de reproducción A–B, pulse el botón de repetición A–B de la unidad de mando a distancia hasta
que se apague el indicador "REPEAT". El modo de repetición A–B se cancelará y comenzará la reproducción normal desde
el principio de la pista actual.
• Si se pulsa el botón STOP(2), el modo de repetición A–B se cancelará y se ajustará el modo de detención.
NOTAS:
• La repetición de reproducción A–B no es posible durante la reproducción programada o la reproducción aleatoria.
• Las funciones de búsqueda automática y manual no se pueden utilizar durante la repetición de reproducción A–B o cuando
se ajusta el punto B.
• Cuando se cancela la repetición de reproducción A–B porque se ha ajustado el punto B en una pista distinta del punto A, la
reproducción se reanuda desde el comienzo de la pista que se esté reproduciendo cuando se cancela el modo de repetición
de reproducción A–B.
• La repetición de reproducción A–B no es posible con los discos no finalizados.
85
ESPAÑOL
8. Reproducción por temporizador
• Para dar comienzo a la reproducción o a la grabación a una hora específica puede utilizarse un temporizador de audio, de venta
aparte.
• Además, remítase a las instrucciones de funcionamiento del temporizador de audio y del amplificador.
• Los modos programa y relé puede ser utilizados.
(1) Conexiones
CDR-W1500 (este equipo)
PCM AUDIO TECHNOLOGY / COMPACT DISC RECORDER
9
8
DUBBING
NORMAL
HIGH
TIME
CDR-W1500
DISPLAY
TITLE /
SELECT CHARACTER
TIME
CLEAR
INPUT
4 REC
FINALIZE
8
9
PLAY
STOP
PAUSE
1
2
3
REMOTE SENSOR
POWER
PLAY
STOP
PAUSE
1
2
3
RELAY MODE
OPEN / CLOSE
ON
PHONES
PHONES LEVEL
MULTI JOG
OFF
-
OPEN /CLOSE
+
5
MENU
5
MIN
MAX
14 MODO DE REPETICIÓN
MModo de repetidor
★ Mediante el funcionamiento de repetidor entre el CD y el CD-R del equipo pueden realizarse diversos tipos de reproducción y
grabación.
★ Se dispone de tres modos de repetidor.
★ El modo ajustado se almacena en memoria, pero los datos pueden borrarse si no se enciende la alimentación en 2 o 3 días.
• Cada vez que se pulse el botón RELAY MODE, el modo cambiará de la manera siguiente.
PUSH
ENTER
Amplificador
ª
Toma de alimentación c.a. de 120V/60 Hz
Relay mode (Modo
de repetidor):
• El disco de la unidad de CD y el de la unidad de
CD-R se reproducirán uno tras otro.
“Relay Play”
ª
• La reproducción programada y la reproducción
aleatoria del disco de la unidad de CD y de la
unidad de CD-R puede realizarse como si los dos
discos fueran uno solo.
“Mix Play”
• La unidades de CD y de CD-R pueden manejarse
de manera independiente.
“Dual Play”
• Puede manejarse la unidad de CD o la unidad de
CD-R.
“Single Play”
Mix mode (Modo
de mezcla):
Temporizador de audio
ª
Dual mode
(Modo dual):
(2) Reproducción por temporizador
(Unidad de mando a distancia)
CD CD-R
_ DUBBING _
NORMAL HIGH
A ! "
RELAY
MODE
D # %
1
(Unidad principal)
)
PCM AUDIO TECHNOLOGY / COMPACT DISC RECORDER
9
8
DUBBING
NORMAL
HIGH
TIME
CDR-W1500
DISPLAY
TITLE /
SELECT CHARACTER
TIME
CLEAR
INPUT
4 REC
FINALIZE
8
9
PLAY
STOP
PAUSE
1
2
3
.
5
/
V
POWER
STOP
PAUSE
1
2
3
RELAY MODE
OPEN / CLOSE
ON
PHONES
PHONES LEVEL
-
NOTA:
• La grabación, finalización y edición no son posibles en los modos relé o mix.
−
Y < >
7
8
9
{ ? }
CLEAR
+10
REC
+
OPEN /CLOSE
MENU
5
MAX
,
6
: ;
10
MULTI JOG
OFF
5
MIN
P
[ = ]
REMOTE SENSOR
PLAY
3
M*+
4
S
G & '
2
J(
6
7
MENU
PUSH
ENTER
8
STOP
ENTER
PLAY
2
5
5
RANDOM
9
PAUSE
3
PROG/DIRECT CALL
TIME
1 / ALL
A-B
1
TITLE CHARACTER
1
Encienda el CDR-W1500 y los componentes conectados.
2
Siga el procedimiento de "Método de configuración (10) Ajustes del modo de reprpducción por temporizador" (página 75)
y realice el ajuste de activado de reproducción por temporizador.
3
Cargue el disco para reproducción por temporizador en el CDR-W1500.
4
Ajuste el selector de entrada del amplificador a "CD".
5
Pulse el botón de reproducción (1 PLAY).
• Reproduzca el disco para comprobar el volumen.
6
Ajuste el temporizador de audio a la hora deseada.
• La alimentación de los componentes conectados al temporizador de audio se desactivará.
• Cuando se llegue a la hora ajustada, la alimentación de los diversos componentes se activará automáticamente y la
reproducción comenzará desde la pista uno.
• Los ajustes para el modo de programa, modo aleatorio, modo relé, etc., son almacenados en la memoria antes de que la
alimentación sea desactivada.
• Si no hay ningún disco en el lado de CD y se carga un disco en el lado CD-R:
La reproducción de temporizador no funciona si el modo relé está ajustado a normal o dual.
La reproducción de temporizador funciona para el lado CD-R cuando el modo relé se ajusta a relé o mix.
86
ª
Normal mode
(Modo normal):
Seleccione la plataforma que se va a operar.
ESPAÑOL
1. Reproducción de repetidor
★ Con el modo de reproducción de repetidor es posible reproducir el disco del la unidad de CD y el de la unidad de CD-R, haciendo
un relevo entre ellos.
★ Los modos de reproducción programada y aleatorio pueden preajustarse para los discos de las unidades de CD y de CD-R.
Seleccione el lado del CD.
2. Modo de mezcla
★ En el modo de mezcla, la reproducción programada y la reproducción aleatoria del disco de la unidad de CD y de la unidad de
CD-R puede realizarse como si se tratara de un solo disco.
(1) Reproducción programada de mezcla
(Unidad de mando a distancia)
(Unidad de mando a distancia)
CD CD-R
CD CD-R
1
_ DUBBING _
1
NORMAL
A ! "
RELAY
MODE
HIGH
D # %
J(
)
PCM AUDIO TECHNOLOGY / COMPACT DISC RECORDER
9
8
DUBBING
NORMAL
HIGH
TIME
.
3
M*+
4
S
G & '
2
1
(Unidad principal)
P
5
/
V
,
1
2
1
7
DISPLAY
TITLE /
SELECT CHARACTER
: ;
CLEAR
INPUT
4 REC
FINALIZE
8
{ ? }
10
+10
)
S
CDR-W1500
CLEAR
.
5
/
1
STOP
2
PAUSE
3
RELAY MODE
OPEN / CLOSE
ON
PHONES LEVEL
DUBBING
NORMAL
HIGH
TIME
DISPLAY
TITLE /
SELECT CHARACTER
-
TIME
POWER
REC
MULTI JOG
PLAY
OFF
+
5
OPEN /CLOSE
MENU
5
PLAY
STOP
CLEAR
INPUT
4 REC
FINALIZE
8
9
STOP
PAUSE
1
2
PAUSE
6
MENU
3
STOP
PAUSE
RELAY MODE
OPEN / CLOSE
ON
PHONES
PHONES LEVEL
MAX
1
2
3
-
8
9
CLEAR
STOP
ENTER
PLAY
2
1
3
RANDOM
TIME
1 / ALL
MENU
PLAY
+10
5
MAX
1
Cargue los discos que desee reproducir en las unidades de CD y de CD-R.
2
Pulse el botón RELAY MODE y seleccione “Relay Play”.
• A continuación se iluminará el indicador "RELAY".
STOP
Modo de repetición
Repetición activada:
Indicador "REPEAT"
iluminado
5
2 1
1
5
REPEAT apagado
4
1Reproducción
de CD
Repetición del lado
de CD
del
3
RANDOM
9
PAUSE
3
TIME
1 / ALL
A-B
5
TITLE CHARACTER
FINALIZE
B
REMOTE CONTROL UNIT RC-278
1
Cargue los discos que desee reproducir en las unidades de CD y de CD-R.
2
Pulse el botón RELAY MODE y seleccione “Mix Play”.
• A continuación se iluminará el indicador "MIX".
3
Pulse el botón PROG/DIRECT de la unidad de CD o de CD-R en la unidad de mando a distancia para ajustar el modo de
programa.
• A continuación se iluminará el indicador "PROG".
4
Observe el procedimiento de "Reproducción programada" de la página 83 para programar las pistas en el orden que
desee reproducirlas.
• Es posible programar las pistas de las unidades de CD y de CD-R por medio del selector CD/CD-R de la unidad de
mando a distancia para cambiar entre las unidades.
• Se pueden programar hasta 30 pistas.
5
La reproducción programada de mezcla comenzará cuando se pulse el botón de reproducción de la unidad de CD o de
CD-R.
• El sonido se emitirá por los terminales de salida de CD/CD-R.
• Para salir del modo de mezcla, pulse el botón de modo de repetidor y seleccione “Single Play”.
lado de CD-R
1Reproducción del lado
PLAY
PROG/DIRECT CALL
DISPLAY SEL. FADER INPUT
FINALIZE
Funcionamiento de repetidor
1Repetición del lado
ENTER
2
4
Utilice el botón de repetición 1/ALL de la sección CD o CD-R de la unidad de mando a distancia para activar o desactivar
el modo de repetición.
• El modo de repetición de 1 pista no puede ajustarse en el modo de repetidor.
• La operación de relevo se realiza tal como se ilustra a continuación, de acuerdo con la combinación de los modos de
repetidor y de repetición:
3
3
PAUSE
A-B
7
MENU
PUSH
ENTER
B
1
2
6
8
TITLE CHARACTER
DISPLAY SEL. FADER INPUT
OPEN /CLOSE
9
3
PROG/DIRECT CALL
2 1
4
REC
+
5
PUSH
ENTER
8
4
−
Y < >
{ ? }
MULTI JOG
OFF
7
MIN
MIN
,
6
: ;
7
REMOTE SENSOR
PLAY
PHONES
P
[ = ]
10
9
V
4
2
9
REMOTE SENSOR
POWER
G & '
3
M*+
4
9
[ = ]
D # %
2
J(
Y < >
8
RELAY
MODE
1
(Unidad principal)
−
8
TIME
A ! "
6
PCM AUDIO TECHNOLOGY / COMPACT DISC RECORDER
CDR-W1500
_ DUBBING _
NORMAL HIGH
1 Detención
de CD-R
Cuando se pulse el botón de reproducción de la unidad de CD, la reproducción de repetidor dará comienzo.
• El sonido se emitirá por los terminales de salida de CD/CD-R.
• Para salir del modo de repetidor, pulse el botón de modo de repetidor y seleccione “Single Play”.
• Durante la reproducción de repetidor, el disco del lado que no esté funcionando puede reemplazarse.
NOTA:
• Cuando se realiza el relé entre un CD y un CD-R, los datos digitales del terminal de salida digital CD/CD-R se interrumpen
momentáneamente.La entrada digital del dispositivo externo conectado está temporalmente abierta en este momento.
NOTA:
• Cuando se realiza el relé entre un CD y un CD-R, los datos digitales del terminal de salida digital CD/CD-R se interrumpen
momentáneamente.La entrada digital del dispositivo externo conectado está temporalmente abierta en este momento.
87
ESPAÑOL
(2) Reproducción aleatoria de mezcla
(Unidad de mando a distancia)
3.
★
★
★
Modo dual
En el modo dual, la unidad de CD y la unidad de CD-R pueden manejarse de manera independiente.
Puede realizarse la grabación manual desde la la sección de CD de la unidad principal.
Es posible grabar desde una unidad externa en la unidad CD-R mientras que se reproduce un disco en la unidad de CD.
CD CD-R
1
_ DUBBING _
1
NORMAL
A ! "
RELAY
MODE
HIGH
D # %
1
(Unidad principal)
2
J(
)
9
8
DUBBING
NORMAL
HIGH
TIME
CDR-W1500
DISPLAY
TITLE /
SELECT CHARACTER
TIME
CLEAR
INPUT
4 REC
FINALIZE
8
9
PLAY
STOP
PAUSE
1
2
3
.
5
/
V
POWER
STOP
PAUSE
1
2
3
RELAY MODE
OPEN / CLOSE
ON
PHONES
PHONES LEVEL
OPEN /CLOSE
MENU
5
MAX
Seleccione la plataforma que se va a operar.
6
: ;
Y < >
[ = ]
{ ? }
CLEAR
10
+10
6
CD CD-R
1
7
_ DUBBING _
1
NORMAL
A ! "
ENTER
PLAY
4
S
PAUSE
1 / ALL
A-B
PCM AUDIO TECHNOLOGY / COMPACT DISC RECORDER
3
TIME
CDR-W1500
4
9
8
RANDOM
TITLE CHARACTER
DUBBING
NORMAL
HIGH
TIME
DISPLAY
TITLE /
SELECT CHARACTER
D # %
TIME
CLEAR
INPUT
4 REC
FINALIZE
8
.
PLAY
STOP
PAUSE
1
2
3
RELAY MODE
OPEN / CLOSE
ON
PHONES
PHONES LEVEL
5
/
V
-
+
OPEN /CLOSE
MENU
5
MAX
6
: ;
[ = ]
{ ? }
CLEAR
10
+10
9
PLAY
STOP
PAUSE
1
2
3
6
7
MENU
PUSH
ENTER
B
STOP
ENTER
PLAY
2
1
3
RANDOM
TIME
1 / ALL
2
Pulse el botón RELAY MODE y seleccione “Mix Play”.
• A continuación se iluminará el indicador "MIX".
3
Pulse el botón RANDOM de la unidad de CD o de CD-R en la unidad de mando a distancia para ajustar el modo
aleatorio.
• A continuación se iluminará el indicador "RAND".
4
88
3
FINALIZE
B
REMOTE CONTROL UNIT RC-278
1
Cargue los discos que desee reproducir en las unidades de CD y de CD-R.
2
Pulse el botón RELAY MODE y seleccione “Dual Play”.
• A continuación se iluminará el indicador "DUAL".
3
La reproducción dual comenzará cuando se pulse el botón de reproducción de la unidad de CD o de CD-R.
• El sonido del CD se emitirá por los terminales de salida de CD solamente y el sonido del CD-R se emitirá por los
terminales de salida de CD/CD-R.
• Sólo el sonido del CD-R se emitirá por la toma de auriculares.
• La pantalla puede cambiarse con el botón DISPLAY SELECT para que pueda comprobar la información de tiempos,
etc., del CD y del CD-R.
• Para salir del modo dual, pulse el botón de modo de repetidor y seleccione “Single Play”.
La reproducción programada de aleatoria comenzará cuando se pulse el botón de reproducción de la unidad de CD o de
CD-R.
• El sonido se emitirá por los terminales de salida de CD/CD-R.
• Para salir del modo de mezcla, pulse el botón de modo de repetidor y seleccione “Single Play”.
NOTA:
• Si el modo de programa y el modo aleatorio no se ajustan en el modo de mezcla, el funcionamiento será igual que el
modo de repetidor (con el modo de repetición desactivado).
• Cuando se realiza el relé entre un CD y un CD-R, los datos digitales del terminal de salida digital CD/CD-R se interrumpen
momentáneamente.La entrada digital del dispositivo externo conectado está temporalmente abierta en este momento.
PAUSE
A-B
TITLE CHARACTER
DISPLAY SEL. FADER INPUT
Cargue los discos que desee reproducir en las unidades de CD y de CD-R.
9
3
PROG/DIRECT CALL
1
Y < >
9
REMOTE CONTROL UNIT RC-278
2 1
2
−
8
8
3
,
REC
5
MIN
P
7
MULTI JOG
OFF
FINALIZE
G & '
3
M*+
REMOTE SENSOR
POWER
DISPLAY SEL. FADER INPUT
)
4
9
3
PROG/DIRECT CALL
1
HIGH
2
J(
PUSH
ENTER
8
RELAY
MODE
1
(Unidad principal)
MENU
2
2 1
(Unidad de mando a distancia)
−
9
STOP
4
(1) Reproducción dual
REC
+
5
MIN
,
8
MULTI JOG
OFF
-
P
7
REMOTE SENSOR
PLAY
2
3
M*+
4
S
PCM AUDIO TECHNOLOGY / COMPACT DISC RECORDER
G & '
ESPAÑOL
(2) Grabación manual desde la sección de CD
(Unidad de mando a distancia)
CD CD-R
1
_ DUBBING _
NORMAL HIGH
2
(Unidad principal)
RELAY
MODE
A ! "
D # %
G & '
1
2
3
J(
)
M*+
4
S
PCM AUDIO TECHNOLOGY / COMPACT DISC RECORDER
9
8
DUBBING
NORMAL
HIGH
TIME
CDR-W1500
DISPLAY
TITLE /
SELECT CHARACTER
TIME
CLEAR
INPUT
4 REC
FINALIZE
8
9
PLAY
STOP
PAUSE
1
2
3
.
5
/
V
POWER
STOP
PAUSE
1
2
3
RELAY MODE
OPEN / CLOSE
ON
PHONES
PHONES LEVEL
-
OPEN /CLOSE
MENU
9
[ = ]
{ ? }
CLEAR
10
+10
6
(1) Finalización automática
La finalización automática es posible cuando se utiliza la función de grabación Realizar CD. Véase "Procedimiento de Copiado
"Grabación sincronizada del disco", en la página 75, 80.
7
MENU
(2) Finalización manual
PUSH
ENTER
8
STOP
ENTER
PLAY
2
2 4
RANDOM
9
PAUSE
3
PROG/DIRECT CALL
3 1
★ La finalización es un procedimiento sencillo, necesario para:
• Poder reproducir grabaciones en un reproductor de CD,
• Evitar posteriores grabaciones indeseadas en un disco,
• Evitar el borrado de pistas de un CD-RW.
★ Esta operación no es posible en los modos relé o mix. Cambie al modo normal o dual para realizar esta operación.
★ Cierre la bandeja portadiscos y ajuste el modo parada para la sección de CD.
Y < >
REC
+
5
MAX
6
: ;
8
MULTI JOG
OFF
5
MIN
3
−
7
REMOTE SENSOR
PLAY
P ,
15 FINALIZACIÓN DE DISCOS CD-R/RW
TIME
1 / ALL
(Unidad de mando a distancia)
A-B
TITLE CHARACTER
DISPLAY SEL. FADER INPUT
FINALIZE
CD CD-R
B
REMOTE CONTROL UNIT RC-278
_ DUBBING _
NORMAL HIGH
1
4
A ! "
RELAY
MODE
D # %
1
(Unidad principal)
)
PCM AUDIO TECHNOLOGY / COMPACT DISC RECORDER
1
Cargue el CD que desee copiar en la unidad de CD.
2
Cargue el CD-R/RW en el que desee grabar en la unidad de CD-R.
9
8
DUBBING
NORMAL
HIGH
TIME
CDR-W1500
DISPLAY
TITLE /
SELECT CHARACTER
TIME
CLEAR
INPUT
4 REC
FINALIZE
8
9
PLAY
STOP
PAUSE
1
2
3
.
5
/
V
POWER
STOP
PAUSE
1
2
3
RELAY MODE
OPEN / CLOSE
ON
PHONES
PHONES LEVEL
OPEN /CLOSE
MENU
5
MAX
7
8
9
{ ? }
CLEAR
+10
6
4
7
MENU
PUSH
ENTER
8
3
−
Y < >
REC
+
5
MIN
,
6
: ;
10
MULTI JOG
OFF
-
P
[ = ]
REMOTE SENSOR
PLAY
3
M*+
4
S
G & '
2
J(
Pulse el botón RELAY MODE y seleccione “Dual Play”.
• A continuación se iluminará el indicador "DUAL".
STOP
ENTER
PLAY
2
3
2
RANDOM
PAUSE
3
3
PROG/DIRECT CALL
Pulse el botón selector de entrada y ajuste "CD".
9
TIME
1 / ALL
A-B
TITLE CHARACTER
DISPLAY SEL. FADER INPUT
FINALIZE
B
5
REMOTE CONTROL UNIT RC-278
Observe el procedimiento de "Grabación desde dispositivos externos" de la página 77~81 para grabar.
• La pantalla puede cambiarse con el botón DISPLAY SELECT para que pueda comprobar la información de tiempos,
etc., del CD y del CD-R.
• Para salir del modo dual, pulse el botón de modo de repetidor y seleccione “Single Play”.
NOTA:
• Solo señales digitales se pueden grabar manualmente desde la unidad de CD.
2
1
Cargue el disco CD-R/RW que vaya a finalizar.
2
Con el grabador detenido, pulse el botón FINALIZE.
• A continuación se visualizará “Finalize OK?”.
3
Pulse el botón ENTER (intro).
• La pantalla pasa por una cuenta atrás a través de la finalización.
• Al terminar, en la pantalla aparecerán el número total de pistas y el tiempo total de grabación realizada.
• El indicador de disco de la pantalla mostrará "CD".
NOTAS:
• Asegúrese de que el disco esté totalmente libre de arañazos y de partículas de polvo.
• La finalización tardará como mínimo de 2 a 4 minutos.
• Durante la finalización, el grabador de CD no aceptará ninguna orden de funcionamiento.
• Los datos de texto se escribirán en el disco cuando éste haya sido finalizado. Si desea introducir texto, deberá hacerlo
antes de la finalización.
• Para información sobre la cancelación de la finalización de CD-RW, consulte "Cancelación de finalización de discos CD-RW
(v.gr. Anulación de finalización)", en la página 90.
• Nunca desactive la alimentación o desconecte el cable de alimentación durante la finalización.Hacer esto puede volver el
disco inutilizable.
89
ESPAÑOL
(2) Borrar las pistas
★ Esta operación es valida solo para discos CD-RW.
★ Utilice esta operación para cancelar la finalización cuando se adicionen más grabaciones a un disco CD-RW finalizado y cuando
se borren pistas grabadas.
★ El borrado se completará en algunos minutos.
16 EDICIÓN
★ Esta operación no es posible en los modos relé o mix. Cambie al modo normal o dual para realizar esta operación.
★ Cierre la bandeja portadiscos y ajuste el modo parada para la sección de CD.
1. Edición de CD-R/RW
(1) Cancelación de finalización de discos CD-RW (v.gr. anulación de finalización)
★ Esta operación sólo es válida para discos CD-RW. La finalización no puede cancelarse desde discos CD-R.
★ Utilice esta operación para cancelar la finalización cuando se adicionen más grabaciones a un disco CD-RW finalizado.
★ El borrado se completará en algunos minutos.
(Unidad de mando a distancia)
CD CD-R
(Unidad de mando a distancia)
_ DUBBING _
NORMAL HIGH
2
A ! "
RELAY
MODE
D # %
1
(Unidad principal)
)
S
PCM AUDIO TECHNOLOGY / COMPACT DISC RECORDER
_ DUBBING _
NORMAL HIGH
2
A ! "
D # %
1
(Unidad principal)
)
S
9
8
DUBBING
NORMAL
HIGH
TIME
CDR-W1500
DISPLAY
TITLE /
SELECT CHARACTER
TIME
CLEAR
INPUT
4 REC
FINALIZE
8
9
PLAY
STOP
PAUSE
1
2
3
.
5
/
V
POWER
STOP
PAUSE
1
2
3
RELAY MODE
OPEN / CLOSE
ON
PHONES
PHONES LEVEL
OPEN /CLOSE
MENU
5
MAX
5
: ;
10
+10
6
RANDOM
7
PLAY
9
PAUSE
3
TIME
1 / ALL
A-B
TITLE CHARACTER
DISPLAY SEL. FADER INPUT
RELAY MODE
OPEN / CLOSE
ON
PHONES
PHONES LEVEL
CLEAR
INPUT
4 REC
FINALIZE
8
9
PLAY
STOP
PAUSE
1
2
3
8
9
{ ? }
CLEAR
+10
REC
MULTI JOG
OFF
-
+
5
OPEN /CLOSE
MENU
5
MAX
6
7
MENU
PUSH
ENTER
8
3
4,5,
6,7
3,4,
5
−
Y < >
7
ENTER
PLAY
2
RANDOM
PAUSE
3
PROG/DIRECT CALL
1 3,4,5,6,7 2 3
9
TIME
1 / ALL
A-B
TITLE CHARACTER
DISPLAY SEL. FADER INPUT
3
4,5,
6,7
3,4,
5
FINALIZE
B
REMOTE CONTROL UNIT RC 278
1
Active la alimentación.
2
Cargue el disco CD-R/RW que vaya a borrar.
3
Pulse el botón MENU, gire el disco de la unidad principal o pulse el botón de búsqueda automática de la unidad de
mando a distancia, y seleccione el modo de borrado para múltiples pistas.
• A continuación se visualizará “CDR/RW Edit?”.
FINALIZE
B
90
3
,
6
: ;
10
STOP
MENU
ENTER
TIME
V
P
[ = ]
Y < >
PUSH
ENTER
3,4,5,6,7 2 3
PAUSE
2
MIN
9
2
1
STOP
1
6
CLEAR
PROG/DIRECT CALL
DISPLAY
TITLE /
SELECT CHARACTER
POWER
8
8
TIME
/
REMOTE SENSOR
{ ? }
STOP
DUBBING
NORMAL
HIGH
PLAY
−
REC
+
5
MIN
,
7
MULTI JOG
OFF
-
P
[ = ]
REMOTE SENSOR
PLAY
9
8
3
M*+
4
PCM AUDIO TECHNOLOGY / COMPACT DISC RECORDER
G & '
2
J(
CDR-W1500
RELAY
MODE
.
3
M*+
4
CD CD-R
G & '
2
J(
1
Active la alimentación.
2
Cargue el disco CD-RW cuya finalización vaya a ser cancelada.
3
Pulse el botón MENU, gire el disco de la unidad principal o pulse el botón de búsqueda automática de la unidad de
mando a distancia, y seleccione el modo de borrado para múltiples pistas.
• A continuación se visualizará “CDR/RW Edit?”.
4
Pulse el botón ENTER, gire el dial jog de la unidad principal o pulse el botón de búsqueda automática de la unidad de
mando a distancia, y seleccione el modo de borrado de todas las pistas.
• A continuación se visualizará “CD-RW Erase?”.
4
Pulse el botón ENTER, gire el disco de la unidad principal o pulse el botón de búsqueda automática de la unidad de
mando a distancia, y seleccione el modo sincronizado para una pista.
• A continuación se visualizará “CD-RW Erase?”.
5
Ahora, pulse el botón ENTER, gire el dial jog de la unidad principal o pulse el botón de búsqueda automática de la unidad
de mando a distancia, y seleccione el modo de borrado de todas las pistas.
• A continuación se visualizará “All Erase?”.
6
5
Ahora pulse el botón ENTER, gire el disco de la unidad principal o pulse el botón de búsqueda automática de la unidad
de mando a distancia, y seleccione el modo sincronizado para una pista.
• A continuación se visualizará “TOC Erase?”.
Pulse el botón ENTER.
• A continuación se visualizará “Erase OK?”.
6
Pulse el botón ENTER.
• A continuación se visualizará “Erase OK?”.
7
Pulse el botón ENTER otra vez.
• A continuación parpadeará el mensaje “All Erase”.
• Cuando el borrado haya concluido, la visualización de tiempos será “Blank Disc”.
7
Pulse el botón ENTER otra vez.
• A continuación parpadeará el mensaje “TOC Erase”.
• Cuando la anulación de finalización haya terminado, la visualización de tipo de disco será "CD-RW".
ESPAÑOL
(3) Borrado de una o más pistas alejadas de la última pista
★ Cuando borre un disco CD-RW finalizado, primero deberá anular la finalización del disco.
(4) Registro de las pistas que no se desean escuchar
★ Las pistas que no desee oír, como las que contenien errores de grabación, pueden ajustarse para que sean pasadas por alto
durante la reproducción.
(Unidad de mando a distancia)
(Unidad de mando a distancia)
CD CD-R
_ DUBBING _
NORMAL HIGH
2
A ! "
D # %
1
(Unidad principal)
)
S
PCM AUDIO TECHNOLOGY / COMPACT DISC RECORDER
9
8
DUBBING
NORMAL
HIGH
TIME
CDR-W1500
DISPLAY
TITLE /
SELECT CHARACTER
TIME
CLEAR
INPUT
4 REC
FINALIZE
8
9
PLAY
STOP
PAUSE
1
2
3
.
5
/
V
POWER
STOP
PAUSE
1
2
3
RELAY MODE
OPEN / CLOSE
ON
PHONES
PHONES LEVEL
OPEN /CLOSE
MENU
5
MAX
9
CLEAR
7
MENU
PUSH
ENTER
8
ENTER
PLAY
3,4,5, 2 3
6,7,8
RANDOM
9
PAUSE
3
PROG/DIRECT CALL
TIME
1 / ALL
A-B
TITLE CHARACTER
DISPLAY SEL. FADER INPUT
S
PCM AUDIO TECHNOLOGY / COMPACT DISC RECORDER
8
+10
2
1
Y < >
{ ? }
STOP
)
3
4,5,
6,8
3,4,
5,7
9
8
DUBBING
NORMAL
HIGH
TIME
CDR-W1500
DISPLAY
TITLE /
SELECT CHARACTER
TIME
CLEAR
INPUT
4 REC
FINALIZE
8
9
PLAY
STOP
PAUSE
1
2
3
.
5
/
V
POWER
STOP
PAUSE
1
2
3
RELAY MODE
OPEN / CLOSE
ON
PHONES
PHONES LEVEL
OPEN /CLOSE
MENU
5
MAX
7
8
9
{ ? }
CLEAR
+10
6
7
MENU
PUSH
ENTER
8
STOP
ENTER
PLAY
2
1
3,4,5,6, 2 3
7,8,9,10
RANDOM
9
PAUSE
3
PROG/DIRECT CALL
FINALIZE
−
Y < >
REC
+
5
MIN
,
6
: ;
10
MULTI JOG
OFF
-
P
[ = ]
REMOTE SENSOR
PLAY
G & '
3
M*+
4
7
6
D # %
2
J(
6
: ;
RELAY
MODE
1
(Unidad principal)
−
REC
+
5
MIN
,
10
MULTI JOG
OFF
-
P
[ = ]
REMOTE SENSOR
PLAY
A ! "
3
M*+
4
_ DUBBING _
NORMAL HIGH
2
G & '
2
J(
CD CD-R
RELAY
MODE
TIME
1 / ALL
A-B
TITLE CHARACTER
DISPLAY SEL. FADER INPUT
3
4,5,6,7,
8,9,10
3,4,5,
7,8
FINALIZE
B
B
REMOTE CONTROL UNIT RC-278
REMOTE CONTROL UNIT RC-278
1
Active la alimentación.
1
Active la alimentación.
2
Cargue el disco CD-R/RW que vaya a borrar.
2
Cargue el disco CD-R/RW que contenga las pistas que desee saltar durante al reproducción.
3
Pulse el botón MENU, gire el disco de la unidad principal o pulse el botón de búsqueda automática de la unidad de
mando a distancia, y seleccione el modo de borrado para múltiples pistas.
• A continuación se visualizará “CDR/RW Edit?”.
3
Pulse el botón MENU, gire el disco de la unidad principal o pulse el botón de búsqueda automática de la unidad de
mando a distancia, y seleccione el modo de borrado para múltiples pistas.
• A continuación se visualizará “CDR/RW Edit?”.
4
Pulse el botón ENTER, gire el dial jog de la unidad principal o pulse el botón de búsqueda automática de la unidad de
mando a distancia, y seleccione el modo de borrado una pista.
• A continuación se visualizará “CD-RW Erase?”.
4
Pulse el botón ENTER, gire el dial jog de la unidad principal o pulse el botón de búsqueda automática de la unidad de
mando a distancia, y seleccione el modo de ajuste de salto de pista.
• A continuación se visualizará “Skip Track?”.
5
Ahora, pulse el botón ENTER, gire el dial jog de la unidad principal o pulse el botón de búsqueda automática de la unidad
de mando a distancia, y seleccione el modo de borrado de una pista.
• A continuación se visualizará “1Tr Erase?”.
5
Ahora, pulse el botón ENTER, gire el dial jog de la unidad principal o pulse el botón de búsqueda automática de la unidad
de mando a distancia, y seleccione el modo de ajuste de salto de pista.
• A continuación se visualizará “Skip Set?”.
6
Pulse el botón ENTER.
• A continuación se visualizará “**-**Tr Erase”.
6
Pulse el botón ENTER.
• A continuación se visualizará “Skip Set --Tr”.
7
Gire el jog dial de la unidad principal en sentido contrario a las agujas del reloj o pulse el botón de búsqueda automática
REV del mando a distancia y seleccione el número de pista que desee borrar.
7
Gire el jog dial de la unidad principal o pulse el botón de búsqueda automática del mando a distancia y seleccione las
pistas que desee saltar. Pulse el botón ENTER y set.
• A continuación, parpadeará la visualización del calendario musical del número de pista seleccionado.
8
Pulse el botón ENTER otra vez.
• A continuación parpadeará el mensaje “Tr Erase”.
• Cuando el borrado haya terminado, se visualizará en una parte del calendario musical el número de pistas que quedan
después del borrado.
8
Repita el paso 7 y añada otra pista.
9
Pulse el botón ENTER durante la visualización del mensaje “Skip Set --Tr”.
• A continuación se visualizará “Skip Set OK?”.
10
Pulse el botón ENTER.
• A continuación se visualizará “Now PMA Rec” y el registro habrá concluido.
• A continuación la visualización del calendario de música del número de pista seleccionado se desactivará.
• La visualización del número total de pistas y del tiempo total no cambia aún cuando las pistas están ajustadas para ser
saltadas.
91
ESPAÑOL
(5) Cancelación del registro de pista que no se desean escuchar
2. Ediciones de texto
2 Pueden introducirse hasta 23 caracteres para los títulos de pista y de disco.
(Unidad de mando a distancia)
(1) Adición de títulos de discos
(Unidad de mando a distancia)
CD CD-R
_ DUBBING _
NORMAL HIGH
2
A ! "
RELAY
MODE
D # %
1
(Unidad principal)
)
S
9
8
DUBBING
NORMAL
HIGH
TIME
CDR-W1500
DISPLAY
TITLE /
SELECT CHARACTER
TIME
CLEAR
INPUT
4 REC
FINALIZE
8
9
STOP
PAUSE
.
5
/
V
POWER
1
STOP
2
PAUSE
3
RELAY MODE
OPEN / CLOSE
ON
PHONES
PHONES LEVEL
OPEN /CLOSE
MENU
5
MAX
: ;
9
CLEAR
10
+10
PLAY
1
2
6
7
MENU
3
PUSH
ENTER
8
ENTER
PLAY
2
RANDOM
PAUSE
3
PROG/DIRECT CALL
3,4,5,6, 2 3
7,8,9,10
9
TIME
1 / ALL
A-B
TITLE CHARACTER
DISPLAY SEL. FADER INPUT
_ DUBBING _
NORMAL HIGH
2
7
Y < >
8
{ ? }
STOP
1
−
REC
+
5
MIN
,
6
7
MULTI JOG
OFF
-
P
[ = ]
REMOTE SENSOR
PLAY
CD CD-R
3
M*+
4
PCM AUDIO TECHNOLOGY / COMPACT DISC RECORDER
G & '
2
J(
A ! "
4,5,6,7
(Unidad principal)
3
4,5,6,7,
8,9,10
3,4,5,
7,8
RELAY
MODE
D # %
1
)
S
9
8
DUBBING
NORMAL
HIGH
TIME
CDR-W1500
DISPLAY
TITLE /
SELECT CHARACTER
TIME
CLEAR
INPUT
4 REC
FINALIZE
8
9
PLAY
STOP
PAUSE
1
2
3
.
5
/
V
POWER
STOP
PAUSE
1
2
3
RELAY MODE
OPEN / CLOSE
ON
PHONES
PHONES LEVEL
-
−
Y < >
7
8
9
{ ? }
CLEAR
+10
REC
+
OPEN /CLOSE
MENU
5
MAX
,
6
: ;
10
MULTI JOG
OFF
5
MIN
P
[ = ]
REMOTE SENSOR
PLAY
3
M*+
4
PCM AUDIO TECHNOLOGY / COMPACT DISC RECORDER
G & '
2
J(
6
7
MENU
PUSH
ENTER
8
STOP
ENTER
PLAY
9
7
3,8
PAUSE
FINALIZE
2
B
1
REMOTE CONTROL UNIT RC-278
1
Active la alimentación.
2
Cargue el disco CD-R/RW para el que desee cancelar los ajustes de pistas no deseadas.
3
Pulse el botón MENU, gire el disco de la unidad principal o pulse el botón de búsqueda automática de la unidad de
mando a distancia, y seleccione el modo de borrado para múltiples pistas.
• A continuación se visualizará “CDR/RW Edit?”.
4
Pulse el botón ENTER, gire el dial jog de la unidad principal o pulse el botón de búsqueda automática de la unidad de
mando a distancia, y seleccione el modo de ajuste de salto de pista.
• A continuación se visualizará “Skip Track?”.
5
Ahora, pulse el botón ENTER, gire el dial jog de la unidad principal o pulse el botón de búsqueda automática de la unidad
de mando a distancia, y seleccione el modo de cancelación de ajuste de salto de pista.
• A continuación se visualizará “Skip Clear?”.
3,4,5, 2
6,7
3,8
3,4,
5,7
3
PROG/DIRECT CALL
RANDOM
TIME
1 / ALL
A-B
TITLE CHARACTER
DISPLAY SEL. FADER INPUT
FINALIZE
7
B
REMOTE CONTROL UNIT RC-278
6
Pulse el botón ENTER.
• A continuación se visualizará “S.Clear --Tr”.
7
Gire el jog dial de la unidad principal o pulse el botón de búsqueda automática del mando a distancia y seleccione las
pistas que desee cancelar. Pulse el botón ENTER y set.
• A continuación, parpadeará la visualización del calendario musical del número de pista seleccionado.
8
Repita el paso 7 para añadir otra cancelación.
9
Pulse el botón ENTER durante la visualización de "S. Se visualizará “S.Clear --Tr”.
• A continuación se visualizará “SkipClearOK?“.
10
Pulse el botón ENTER.
• A continuación se visualizará “Now PMA Rec” y el registro habrá concluido.
NOTAS:
• La realización de la finalización del disco cuando se han registrado las pistas que no se desean escuchar, produce la
activación automática del modo de reproducción de salto.
• La reproducción de salto no es posible en reproductores de CD que no dispongan de la función de reproducción de salto.
• Las pistas que no desee oir, puede registrarse/cancelarse 21 veces.
• La reproducción de programa y la reproducción aleatoria no son posibles cuando se han registrado pistas que no se
desean escuchar. (Las reproducciones programada y aleatoria son posibles una vez que se lleve a cabo la finalización).
• No es posible registrar o cancelar pistas que usted no desea escuchar con CDs comprados en almacén o discos CDR/RW que han sido finalizados.
92
1
Active la alimentación.
2
Cargue el CD-R/RW cuyo nombre de disco desee asignar.
3
Pulse el botón MENU, gire el disco de la unidad principal o pulse el botón de búsqueda automática de la unidad de
mando a distancia, y seleccione el modo de edición de TEXTO.
• A continuación se visualizará “Text Edit?”.
4
Pulse el botón ENTER, gire el dial jog de la unidad principal o pulse el botón de búsqueda automática de la unidad de
mando a distancia para visualizar “Text In?”.
5
Ahora pulse el botón ENTER, gire el disco de la unidad principal o pulse el botón de búsqueda automática de la unidad
6
Pulse el botón ENTER.
• A continuación parpaderá el cursor, indicando el modo de espera de entrada de titulo
de mando a distancia para visualizar “Disc Title?”.
ESPAÑOL
(2) Adición de títulos de pistas
Introducción del título.
• Gire el jog dial del mando a distancia de la unidad prinicpal o utilice los botones (8 y 9) del mando a distancia
para seleccionar el carácter deseado.
• Algunos de los caracteres que pueden introducirse en el CDR-W1500 no pueden visualizarse en otros lmodelos.
(Unidad de mando a distancia)
CD CD-R
2
8
• Cada vez que se pulsa el botón CHARACTER, la forma del cursor cambia.
_ DUBBING _
NORMAL HIGH
A ! "
4,5,6,7,8
(Unidad principal)
RELAY
MODE
D # %
1
)
PCM AUDIO TECHNOLOGY / COMPACT DISC RECORDER
CDR-W1500
[Explicación del cursor:]
9
8
7
Modo de introducción de letras
………
mayúsculas/números
Modo de introducción de caracteres
………
especiales
DUBBING
NORMAL
HIGH
TIME
DISPLAY
TITLE /
SELECT CHARACTER
TIME
CLEAR
INPUT
4 REC
FINALIZE
8
9
PLAY
STOP
PAUSE
1
2
3
5
/
POWER
STOP
PAUSE
1
2
3
RELAY MODE
OPEN / CLOSE
ON
PHONES
PHONES LEVEL
-
MAX
7
8
9
{ ? }
CLEAR
+10
OPEN /CLOSE
MENU
6
8
SPACE
Pulse el botón MENU para realizar a la introducción de título.
ABC
DEF
GHI
JKL
MNO
PQR
STU
VWX
YZ
–
–
3,4,5, 2
6,7,8
3,9
3,4,
5,6,8
PAUSE
3
PROG/DIRECT CALL
RANDOM
9
TIME
1 / ALL
A-B
TITLE CHARACTER
DISPLAY SEL. FADER INPUT
FINALIZE
8
B
Active la alimentación.
2
Cargue el CD-R/RW cuyo nombre de pista desee asignar.
3
Pulse el botón MENU, gire el disco de la unidad principal o pulse el botón de búsqueda automática de la unidad de
mando a distancia, y seleccione el modo de edición de TEXTO.
• A continuación se visualizará “Text Edit?”.
5
✽ Gire el disco para introducir números o caracteres especiales no en las teclas de
números ni en la tecla +10.
1
2
3
4
5
6
7
8
9
10
+10
PLAY
1
4
• Para borrar un carácter, mueva el cursor al carácter y luego pulse el botón CLEAR.
• Para corregir un carácter, primero debe borrarlo y luego introducir el carácter correcto.
Modo de
introducción de
letras mayúsculas
ENTER
8
3,9
REMOTE CONTROL UNIT RC-278
• Cuando se pulsa el botón de búsqueda manual hacia adelante (7) o el botón ENTER, se ajusta el carácter y la
unidad se pone en el modo de espera de introducción para el siguiente carácter.
• El cursor puede moverse hacia atrás pulsando el botón de búsqueda manual hacia atrás (6). Utilice esta posibilidad
para corregir los caracteres introducidos.
Botón
7
MENU
PUSH
ENTER
2
1
−
Y < >
10
STOP
[Caracteres y números disponibles]
Modo de introducción de letras mayúsuculas/números:
ABCDEFGHIJKLMNOPQRSTUVWXYZ0123456789
Modo de introducción de letras minúsculas/números:
abcdefghijklmnopqrstuvwxyz0123456789
Modo de introducción de caracteres especiales:
,
6
: ;
REC
+
5
MIN
P
[ = ]
MULTI JOG
OFF
5
Modo de introducción de letras
minúsculas/números
[Ejemplo:]
Para introducir “%” utilizando
teclas numéricas en la unidad de
mando a distancia, pulse dos
veces el botón 2 estando en el
modo de caracteres especiales.
V
REMOTE SENSOR
PLAY
………
8
.
3
M*+
4
S
G & '
2
J(
Modo de
introducción de
letras minúsculas
abc
def
ghi
jkl
mno
pqr
stu
vwx
yz
–
–
Modo de
introducción de
caracteres
especiales
!”
#%
&’
( )
*+
,–
./
:;
<>
[=]
{?}
Pulse el botón ENTER, gire el dial jog de la unidad principal o pulse el botón de búsqueda automática de la unidad de
mando a distancia para visualizar “Text In?”.
Ahora pulse el botón ENTER, gire el disco de la unidad principal o pulse el botón de búsqueda automática de la unidad
de mando a distancia para visualizar “Track Title?”.
6
Pulse el botón ENTER otra vez, gire el dial jog de la unidad de principal o pulse el botón de búsqueda automática del
mando a disntacia y seleccione la pista a la que desee asignar un nombre de pista.
• A continuación se visualizará “**Tr Title?”.
7
Pulse el botón ENTER.
• A continuación parpaderá el cursor, indicando el modo de espera de entrada de titulo.
8
Introducción del título.
• Para instrucciones sobre la introducción de títulos, consulte el paso 7 de "(1) Adición de títulos de discos" en las
páginas 93.
9
Pulse el botón MENU para realizar a la introducción de título de pista.
NOTAS:
• La edición de texto no es posible con discos CD de audio comercial o con los dicos CD-R/RW finalizados.
• Se pueden almacenar un máximo de 23 caracteres por ítem. Se pueden introducir unos 900 caracteres aproximadamente
por disco.
• La información de texto introducida no se escribe en el disco hasta que éste haya sido finalizado.
• Aunque se desconecte la fuente de alimentacion, la información de texto se almacenará durante 2 o 3 días después de su
introducción cuando el disco no haya sido finalizado. Esta información de texto puede perderse si se desconecta la unidad
de la fruente de alimentación durante un período de tiempo prolongado.
93
ESPAÑOL
(3) Borrado de títulos de discos
★ Para discos CD-RW finalizados, primero sin concluir.
(4) Borrado de títulos de pistas
★ Para discos CD-RW finalizados, primero sin concluir.
(Unidad de mando a distancia)
(Unidad de mando a distancia)
CD CD-R
_ DUBBING _
NORMAL HIGH
A ! "
2,3,4
(Unidad principal)
D # %
1
)
S
9
8
DUBBING
NORMAL
HIGH
TIME
CDR-W1500
DISPLAY
TITLE /
SELECT CHARACTER
TIME
CLEAR
INPUT
4 REC
FINALIZE
8
9
PLAY
STOP
PAUSE
1
2
3
.
5
/
V
POWER
STOP
PAUSE
1
2
3
RELAY MODE
OPEN / CLOSE
ON
PHONES
PHONES LEVEL
-
: ;
OPEN /CLOSE
MENU
S
PCM AUDIO TECHNOLOGY / COMPACT DISC RECORDER
8
9
CLEAR
9
8
DUBBING
NORMAL
HIGH
TIME
CDR-W1500
DISPLAY
TITLE /
SELECT CHARACTER
1
1,2,3
POWER
ENTER
PLAY
2
CLEAR
INPUT
4 REC
FINALIZE
8
9
1
9
PLAY
STOP
PAUSE
1
2
3
RELAY MODE
OPEN / CLOSE
ON
PHONES
PHONES LEVEL
TIME
5
PLAY
STOP
PAUSE
1
2
3
/
V
-
MAX
1 / ALL
DISPLAY SEL. FADER INPUT
−
Y < >
7
8
9
{ ? }
CLEAR
10
+10
OPEN /CLOSE
MENU
6
7
MENU
1
PUSH
ENTER
8
PAUSE
STOP
ENTER
PLAY
2
A-B
1,2,3,4,5
TITLE CHARACTER
,
6
: ;
REC
+
5
MIN
P
[ = ]
MULTI JOG
OFF
5
3
PROG/DIRECT CALL
RANDOM
TIME
.
G & '
3
M*+
REMOTE SENSOR
7
MENU
PUSH
ENTER
1,2,3,4
94
Y < >
+10
STOP
D # %
2
)
4
{ ? }
6
RELAY
MODE
1
J(
6
7
8
1
2,3,4,5
(Unidad principal)
−
REC
+
5
MAX
,
10
MULTI JOG
OFF
5
MIN
P
[ = ]
REMOTE SENSOR
PLAY
A ! "
3
M*+
4
PCM AUDIO TECHNOLOGY / COMPACT DISC RECORDER
G & '
2
J(
CD CD-R
_ DUBBING _
NORMAL HIGH
RELAY
MODE
1
FINALIZE
1,2,3,4
PAUSE
3
PROG/DIRECT CALL
RANDOM
9
TIME
1 / ALL
A-B
TITLE CHARACTER
DISPLAY SEL. FADER INPUT
FINALIZE
B
B
REMOTE CONTROL UNIT RC-278
REMOTE CONTROL UNIT RC-278
Pulse el botón MENU, gire el disco de la unidad principal o pulse el botón de búsqueda automática de la unidad de
mando a distancia, y seleccione el modo de edición de TEXTO.
• A continuación se visualizará “Text Edit?”.
1
Pulse el botón MENU, gire el disco de la unidad principal o pulse el botón de búsqueda automática de la unidad de
mando a distancia, y seleccione el modo de edición de TEXTO.
• A continuación se visualizará “Text Edit?”.
2
Pulse el botón ENTER, gire el dial jog de la unidad principal o pulse el botón de búsqueda automática de la unidad de
3
Ahora pulse el botón ENTER, gire el disco de la unidad principal o pulse el botón de búsqueda automática de la unidad
de mando a distancia para visualizar “Disc Title?”.
3
4
Pulse el botón ENTER para definir el borrado del nombre del disco.
• Se visualizará “Complete”.
4
Pulse el botón ENTER otra vez, gire el dial jog de la unidad de principal o pulse el botón de búsqueda automática del
mando a disntacia y seleccione la pista cuyo nombre de pista vaya a borrar.
• A continuación se visualizará “**Tr Title?”.
5
Pulse el botón ENTER para definir el borrado del nombre del disco.
• Se visualizará “Complete”.
mando a distancia para visualizar “Text Erase?”.
2
Pulse el botón ENTER, gire el dial jog de la unidad principal o pulse el botón de búsqueda automática de la unidad de
mando a distancia para visualizar “Text Erase?”.
Ahora pulse el botón ENTER, gire el disco de la unidad principal o pulse el botón de búsqueda automática de la unidad
de mando a distancia para visualizar “Track Title?”.
ESPAÑOL
(5) Borrado de todos los títulos de pista y de todos los títulos de disco
★ Para discos CD-RW finalizados, primero sin concluir.
17 MODO DE MENÚ
(Unidad de mando a distancia)
CD CD-R
_ DUBBING _
NORMAL HIGH
2,3,4,5
(Unidad principal)
RELAY
MODE
A ! "
D # %
G & '
1
2
3
J(
)
M*+
5
4
S
PCM AUDIO TECHNOLOGY / COMPACT DISC RECORDER
9
8
DUBBING
NORMAL
HIGH
TIME
CDR-W1500
DISPLAY
TITLE /
SELECT CHARACTER
TIME
CLEAR
INPUT
4 REC
FINALIZE
8
9
PLAY
STOP
PAUSE
1
2
3
.
/
V
POWER
STOP
PAUSE
1
2
3
RELAY MODE
OPEN / CLOSE
ON
PHONES
PHONES LEVEL
-
1
Text In?
1
OPEN /CLOSE
MENU
8
9
{ ? }
CLEAR
10
+10
6
ª
Text Erase?
1
8
ENTER
PLAY
2
1,2,3,4,5
1
1,2,3
1
RANDOM
9
TIME
1 / ALL
ª
Track Title?
PAUSE
3
PROG/DIRECT CALL
A-B
Setup Menu?
1
Sync. Rec?
1
B
Pulse el botón ENTER, gire el dial jog de la unidad principal o pulse el botón de búsqueda automática de la unidad de
3
Ahora pulse el botón ENTER, gire el disco de la unidad principal o pulse el botón de búsqueda automática de la unidad
ª
Sync. Off?*
ª
Sync. Level?
de mando a distancia para visualizar “All Erase?”.
Pulse el botón ENTER.
• A continuación se visualizará “Erase OK?”.
5
Pulse el botón ENTER para definir el borrado total.
• Se visualizará “Complete”.
1
Sync. -54dB*
(–54~–30dB/paso de 6dB. )
mando a distancia para visualizar “Text Erase?”.
4
**Tr Title?
ª
1Tr Sync.?
Pulse el botón MENU, gire el disco de la unidad principal o pulse el botón de búsqueda automática de la unidad de
mando a distancia, y seleccione el modo de edición de TEXTO.
• A continuación se visualizará “Text Edit?”.
2
1
Disc Sync.?
ª
Make CD?
FINALIZE
REMOTE CONTROL UNIT RC-278
1
**Tr Title?
ª
TITLE CHARACTER
DISPLAY SEL. FADER INPUT
1
All Erase?
ª
Disc Title?
7
MENU
PUSH
ENTER
STOP
Disc Title?
ª
Track Title?
−
REC
+
5
MAX
Text Edit?
Y < >
7
MULTI JOG
OFF
5
MIN
,
e
6
: ;
[ = ]
REMOTE SENSOR
PLAY
P
• Cuando se pulse el botón MENU, se ajustará el modo de menús y el equipo podrá manejarse tal como se indica en el diagrama
siguiente.
• Cierre la bandeja portadiscos y ajuste el modo parada para la sección de CD y la sección de CD-R.
• “*” indica los valores por defecto.
• Gire el disco en sentido de las manecillas del reloj para proceder a la visualización del indicador “↓”. Pulse el botón ENTER para
proceder a la visualización del indicador “→”.
MODO DE MENÚ
ª
A.T. Mark?
1
On*/Off
ª
FadeIn Time?
1
FadeIn 5sec*
(1~15seg./paso de 1seg.)
ª
FadeOut Time?
1
FadeOut 5sec*
(1~15seg./paso de 1seg.)
ª
Intro Time?
1
ª
Custom Index
1
Opt/Coax/Ana
ª
Skip Play?
1
On/Off*
ª
Timer Play?
1
On*/Off
CD-RW Erase?
1
All Erase?
ScanTime15s*
(5~30seg./paso de 5seg.)
NOTA:
• El borrado de texto no es posible con discos CD de audio comercial o con los dicos CD-R/RW finalizados.
ª
CDR/RW Edit?
1
ª
TOC Erase?
ª
Skip Track?
ª
A. Rec Level?
1
Level 00.0dB*
1
ª
1Tr Erase?
1
** - **TrErase
Skip Set?
1
Skip Set **Tr
ª
Skip Clear?
1
S. Clear **Tr
1
¸
˝
˛
¸
Ô
˝
Ô
˛
¸
Ô
Ô
Ô
Ô
Ô
Ô
Ô
Ô
Ô
Ô
Ô
Ô
Ô
˝
Ô
Ô
Ô
Ô
Ô
Ô
Ô
Ô
Ô
Ô
Ô
Ô
Ô
Ô
˛
¸
Ô
Ô
Ô
˝
Ô
Ô
Ô
Ô
˛
Remitase a "2. Ediciones
de texto (1) Adición de
títulos de discos, (2)
Adición de títulos de
pistas" (página 92,93).
Remitase a "2. Ediciones
de texto (3) Borrado de
títulos de discos (4)
Borrado de títulos de
pistas (5) Borrado de
todos los títulos de pista
y de todos los títulos de
disco " (página 94,95).
Remítase a
". MÉTODO DE
CONFIGURACIÓN"
(página 72 ~ 75).
Remítase a
"1. Edición de
CD-R/RW"
(página 90 ~ 92).
Cambie el ajuste con el dial jog
(o D.Rec Level?)
95
ESPAÑOL
18 MENSAJES
Cuando se utiliza el CDR-W1500 pueden aparecer mensajes en la pantalla. El significado de estos mensajes se explica a
continuación.
Mensaje
Siginificado
Mensaje
TOC Reading
Lectura de información del disco.
Sync. -**dB
Open
Durante la apertura de la bandeja.
Dig.Unlock
Hay una conexión incompleta del terminal de entrada digital durante la
grabación de entrada digital, o la señal de entrada no llega
correctamente debido a alguna otra razón.
Name Full
Ya se han introducido 23 caracteres de texto o un total de 900
caracteres.
Close
No Disc
Use Audio CD
Now PMA Rec
Durante el cierre de la bandeja.
No se ha insertado ningún disco, disco ilegible o disco insertado al
revés.
Disc Full
Mecha Error
El disco no funciona correctamente.
All Skip Tr
Se ha ajustado el salto para todas las pistas.
Actualización del contenido del disco.
Finalize *.**
PlaybackOnly
No se pueden realizar grabaciones digitales de la fuente conectada.
(Véase "Copias digitales" en la página 68).
Las señales de datos diferentes a las señales de radio han sido
introducidas.
Estas señales no están grabadas.
Si se extrae el disco se borrará toda la información de texto.
CD-R Short
El tiempo de grabación del disco es menor que el tiempo de la fuente
de grabación que está intentando copiar.
Text Protect
La información de texto está protegida contra copia por lo que no se
puede copiar el texto en el modo de copia.
Now Tr Check
Se está comprobando la información de pista del lado del CD.
Cuenta atrás durante la finalización de un disco.
Al intentar grabar en un CD-R finalizado o en un CD pregrabado.
(“*” indica una letra o un carácter).
Now OPC
Durante la calibración de potencia del láser para discos cuya
finalización ha sido anulada.
OPC Error
Fallo de OPC durante el procedimiento de calibración de potencia
óptima (OPC).
(OPC = Calibración de Potencia Óptima)
Rec Error
Se ha producido un error durante la grabación.
Disc Error
La grabación o la finalización no son posibles debido a un fallo del
disco.
Blank Disc
Al intentar editar texto para un disco que no tiene ninguna pista.
No Name
La recepción de modo ha sido concluida.
No es posible seguir grabando.
TextEraseOK?
Copy Prohibit
Valor de ajuste del nivel de comienzo de grabación sincronizada.
El disco insertado no es un CD de audio.
Complete
96
Siginificado
No hay texo almacenado para el disco.
ESPAÑOL
19 SOLUCIÓN DE PROBLEMAS
20 ESPECIFICACIONES PRINCIPALES
Vuelva a realizar las comprobaciones antes de dar por sentado que el reproductor tiene problemas de
funcionamiento
¿Se han realizado correctamente todas las conexiones?
¿Ha seguido las instrucciones del manual?
2 Funcionan correctamente el amplificador y los altavoces?
Si el CDR-W1500 parece que no funciona correctamente compruebe la lista siguiente. Si no se resuelve el problema, el CDRW1500 puede estar dañado. Apague la alimentación, desenchufe el cable de alimentación de la toma de red, y póngase en
contacto con la tienda donde haya realizado la compra o con la oficina de ventas de DENON.
2
Audio
Respuesta de frecuencia:
Margen dinámico:
Relación S/R:
Distorsión armónica:
Trémolo y lloro:
Unidad de CD
Unidad de CD-R (para edición digital)
2 Hz a 20 kHz :
2 Hz a 20 kHz :
98 dB :
88 dB :
105 dB :
100 dB :
0,003% (1 kHz) :
0,01% (1 kHz) :
por debajo de límites mensurables (±0,001% W. de pico)
2
Discos compatibles:
CDs (12 cm/8 cm)
Discos CD-R de audio grabados para uso doméstico (unidad de CD-R)
Discos CD-RW de audio grabados para uso doméstico (unidad de CD-R)
2
General:
Alimentación:
Consumo de corriente:
Dimensiones externas máximas:
2
2
Comprobación
Síntoma
Página
No hay alimentación
• Fíjese si está encendido el botón POWER.
• Asegúrese de que el cable de alimentación está enchufado correctamente.
70
69
La pista automática no funciona.
• Compruebe si se ha seleccionado pista automática.
• Compruebe si hay 3 segundos de silencio entre las pistas.
• Compruebe si la fuente es una fuente de consumidor con entrada digital según la
norma de audio IEC.
73
68
–
No hay sonido.
• Compruebe las conexiones de audio.
• ISi utiliza un amplificador, pruebe con una fuente diferente.
69
69
• Compruebe que la entrada analógica del grabador de CD no esté conectada a la entrada
de Fono del amplificador.
69
La reproducción no da comienzo.
• Asegúrese de que la etiqueta del CD queda hacia arriba.
• Limpie el disco.
72
68
El mando a distancia no funciona.
• Dirija el mando a distancia directamente al grabador de CD.
• Compruebe las pilas y cámbielas si fuera necesario.
71
71
•
•
•
•
67
–
67
69
El sonido del
distorsionado.
amplificador
está
No grabará.
•
•
•
•
No grabará.
ompruebe si el CD-R es un disco con anulación de la finalización.
Compruebe que el disco es grabable y cámbielo si fuera necesario.
Compruebe si queda tiempo restante en el disco.
(Se visualiza “Disc Full”).
Compruebe si se está intentando grabar digitalmente una fuente ya grabada
digitalmente.
(Se visualiza “Copy Prohibit”).
Compruebe si el ajuste del nivel de grabación es adecuado.
El disco no es un disco de AUDIO (se visualiza “Use Audio CD”).
Se ha elegido una fuente de entrada inadecuada. Parpadeo de la etiqueta de entrada.
2
Masa:
c.a. 120V, 60 Hz
29 W
434 (ancho) x 101 (altura) x 330 (profundidad) mm
(incluyendo las patas, los mandos y los terminales)
5,5 kg
Unidad de mando a distancia:
Sistema de mando a distancia:
Alimentación:
RC-278
Pulso infrarrojo
c.c. 3V, por medio de dos pilas R6P(AA)
✽ El diseño y las especificaciones están sujetas a cambios sin previo aviso durante el curso de mejora del producto.
68
78
68
70
La grabación está distorsionada.
• Asegúrese de que el nivel de grabación es el correcto.
78
10 segundos de pausa entre las
grabaciones.
• Ver el ajuste del nivel de grabación sincronizado.
73
“Disc Error” en la pantalla.
• Si luego aparece "Disc Error" en la pantalla de visualización, el disco no puede grabarse
más, y no se puede finalizar.Pero este puede todavía ser reproducido en el grabador de
CD o en otro. "Disc Error"
Un disco CD-R grabado no se puede
reproducir en otro reproductor o unidad de
CD.
• Finalizar el disco.
• ¿Es posible la reproducción en otro reproductor de CD? Si es así, limpie la lente lectora
del reproductor en el que no se pudo reproducir el disco.
• Los discos CD-R no pueden ser reproducidos en algunos reproductores de CD.
No es posible la copia, grabación,
finalización y edición de CD-R/RW.
• Está ajustado el modo relé en “RELAY” o “MIX”?
Cambie a “SINGLE” o “DUAL”.
El modo menú no se puede ajustar.
No es posible finalizar.
• ¿Está abierta la bandeja portadiscos de la sección de CD o de la sección de CD-R?
Cierre las bandejas portadiscos de ambas secciones.
• ¿Está funcionando la sección de CD o la sección de CD-R? Ajuste el modo parada para
ambas secciones.
–
68, 89
–
–
86
89, 95
89, 95
97
14-14, AKASAKA 4-CHOME, MINATO-KU, TOKYO 107-8011, JAPAN
Telephone: (03) 3584-8111
Printed in Japan 511 3682 103
010