1
SCU224
1.
Installation
Warning!
Switch-off power supply before
opening the housing.
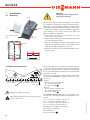
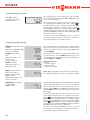
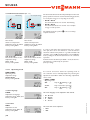
1.1 Mounting
display
pushbutton
cover
cable conduits with strain
relief
can fuse 4A
fastening
The unit must only be located internally. It is not suitable
for installation in hazardous locations and should not be
sited near to any electromagnetic field.The controller must
additionally be equipped with an all-polar gap of at least 3 mm
or with a gap according to the valid installaton regulations,
e.g. LS-switches or fuses. Please ensure sensor cables and
AC power supply are separated.
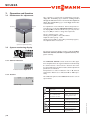
1. Unscrew the cross-recessed screw of the cover and
remove it from the housing.
2. Mark the upper fastening point on the wall and premount
the enclosed plug and screw.
3. Hang up the housing at the upper fastening point and
mark the lower fastening point on the subsurface (hole
depth 1/2"). Install the plug in the lower hole.
4. Fasten the housing at the top and attach it with the lower
fastening screw.
fixing
T4A
DE - 45527 Hattingen
DeltaSol BS Plus
115 V~
CU 72060171 01
UL 60730-1A:2002
CSA E60730.1:2002
Temp. Sensor Pt1000
S1
1
2
3
S2
4
fuse
S3
5
S4
6
7
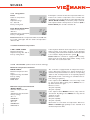
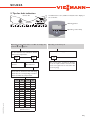
Sensor connections
VBus
®
8
VBus
9 10
12 13 14
R1 2 (1) A 115 V~
R2 2 (1) A 115 V~
N R2 N R1 N L
15 16 17 18 19 20
ground connections Relay connections
power connections
Dangerous voltage on contact!
Electrostatic discharge can lead to damages of electronic components!
|4
The power supply to the controller must only be made by
an external power supply switch (last step of installation!)
and the line voltage must be 115 Volt (60 Hz). Flexible
lines are to be fixed at the housing by enclosed strain relief
supports and screws.
The version the controller is equipped with 2 output relays
to which the consumers e.g. pumps, valves etc. can be
connected:
• Relay 1
18 = line power conductor R1
17 = neutral conductor N
13 = ground clamp
• Relay 2 16 = line power conductor R2
15 = neutral conductor N
14 = ground clamp
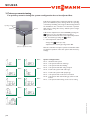
The temperature sensors (S1 up to S4) will be connected to the following terminals independently of the
polarity:
1 / 2 = Sensor 1 (e.g. Sensor collector 1)
3 / 4 = Sensor 2 (e.g. Sensor tank 1)
5 / 6 = Sensor 3 (e.g. Sensor collector 2)
7 / 8 = Sensor 4 (e.g. Sensor tank 2)
The 115V power supply is connected to:
19 = neutral conductor N
20 = conductor L
12 = ground clamp
© 08284 SCU224.monus.indd
1.2 Electrical connection