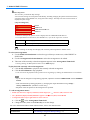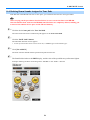
1
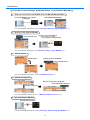
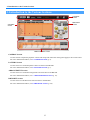
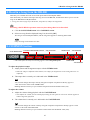
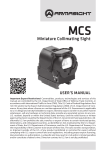
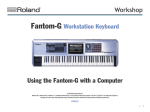
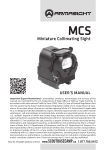
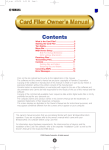
BR-800 Rhythm Editor Manual
Copyright © 2010 BOSS Corporation
All rights reserved. No part of this publication may be reproduced in any form without the written permission
of BOSS Corporation.
* Microsoft and Windows are registered trademarks of Microsoft Corporation.
* Apple and Macintosh are registered trademarks of Apple Inc.
* Mac OS is a trademark of Apple Inc.
* All product names mentioned in this document are trademarks or registered trademarks of their respective
owners.
* The SD logo (
) and SDHC logo (
) are trademarks of SD-3C, LLC.
* Unfortunately, it may be impossible to restore the contents of data once it has been lost. BOSS Corporation
assumes no liability concerning such loss of data.
* To avoid disturbing your neighbors, try to keep the unit’s volume at reasonable levels. You may prefer to
use headphones, so you do not need to be concerned about those around you.
* Unauthorized duplication, reproduction, hiring, and lending prohibited.
* In the interest of product improvement, the specifications and/or contents of this package are subject to
change without prior notice.
* The explanations in this manual include illustrations that depict what should typically be shown by the
display. Note, however, that your unit may incorporate a newer, enhanced version of the system (e.g.,
includes newer songs), so what you actually see in the display may not always match what appears in the
manual.
Conventions used in this document
This document applies to both the Windows version and the Mac version. Keyboard operations are described
using the Windows version as an example.
If using the Mac version, substitute the key names and procedures as follows.
Windows version
Ctrl key
Enter key
Esc key
Right click
Mac version
command key
return key
esc key
control key+click
1
1. Introduction
1. Introduction
BR-800 Rhythm Editor is a convenient tool that makes it easy to edit and create BR-800 rhythms using a
personal computer.
This Rhythm Editor can only work with rhythms. You can not use it to work on effects or data
recorded to audio tracks.
* A Step is a grouping composed of the same pattern repeated at the same tempo and beat.
For more detailed information, see What is Step ? (p. 14).
2
1. Introduction
~ Procedures from Starting Up Rhythm Editor to the Finished Rhythm ~
1. Make the connection to the BR-800, then start BR-800 Rhythm Editor.
Connect the BR-800 to your computer
via USB cable.
Start up BR-800 Rhythm Editor.
For more detailed information, see 2. Connecting / Disconnecting the BR-800 (p. 4).
2. Read in a song from the BR-800.
Read in a song from the BR-800.
Click the SONG READ button!
* This allows you to edit data
saved to the BR-800 with Rhythm Editor.
For more detailed information, see 4. Read in a Song from the BR-800 (p. 6).
3. Edit the pattern.
Edit the pattern.
Write the pattern to the BR-800.
Click the PATTERN WRITE button!
For more detailed information, see 6. PATTERN Section (p. 7).
4. Edit the arrangement.
Write the arrangement to the BR-800.
Click the ARRANGEMENT WRITE button!
Edit the arrangement.
For more detailed information, see 7. ARRANGEMENT Section (p. 14).
5. Disconnecting the BR-800.
Cancel the USB connection.
For more detailed information, see 2. Connecting / Disconnecting the BR-800 (p. 4).
3
2. Connecting / Disconnecting the BR-800
2. Connecting / Disconnecting the BR-800
Do not disconnect the USB cable connected to the BR-800 while BR-800 Rhythm Editor is
running.
Doing so may cause malfunction or loss of data.
2-1. Connecting with the BR-800
1. Turn on the power to the BR-800.
2. Connect the BR-800 and your computer with a USB cable according to the instructions
in the BR-800 Owner’s Manual, then select [MENU] - [USB] - [RHYTHM EDITOR].
3. Press the BR-800’s [ENTER] button.
4. (Mac version only)
Open “System Preferences” of Mac OS and click [Sound], then select “BR-800 44.1kHz”
for each of the following settings:
• “Play sound effects through” under the “Sound Effects” tab
• “Select a device for sound output” under the “Output” tab
5. Start up BR-800 Rhythm Editor.
The BR-800 and BR-800 Rhythm Editor are connected automatically.
6. (Windows version only)
Click “Setup” - “Set Up Audio Device,” and select “OUT (BR-800)” in “Output Device.”
When the BR-800 and computer are properly connected, the CONNECT button at the upper part of
the screen turn into [DISCONNECT]. If the BR-800 and computer are not properly connected
(if [CONNECT] continues to be shown), click [CONNECT] manually to connect the devices.
2-2. Disconnecting the BR-800
Once execute DISCONNECT operation, the connection cannot be made again by clicking the
CONNECT button.
Either disconnect and then reconnect the USB cable, or re-enter the USB RHYTHM EDITOR
mode on the BR-800.
Severing the connection to the BR-800 causes any data not yet saved on the BR-800 to be discarded.
1. Click the DISCONNECT button at the upper part of the screen.
* A confirmation message is displayed; click [OK].
2. Press the BR-800’s [EXIT] button.
* When the message “Are you sure?” appears on the BR-800, press the [ENTER] button.
3. The connection between the BR-800 and BR-800 Rhythm Editor is terminated.
* After the connection is terminated, the DISCONNECT button turn into [CONNECT].
4
3. Introduction to the Various Sections
3. Introduction to the Various Sections
COMMON
Section
DRUM KIT
Section
PATTERN
Section
ARRANGEMENT Section
COMMON Section
Use this section to adjust the playback volume and tempo and make other settings that apply to the overall sound.
For more detailed information, see 5. COMMON Section (p. 6).
PATTERN Section
Use this section to create/edit patterns and write them to the BR-800.
For more detailed information, see 6. PATTERN Section (p. 7).
ARRANGEMENT Section
Use this section to create/edit arrangements and write them to the BR-800.
For more detailed information, see 7. ARRANGEMENT Section (p. 14).
DRUM KIT Section
Use this section to edit drum kits and write them to the BR-800.
For more detailed information, see 8. DRUM KIT Section (p. 20).
5
4. Read in a Song from the BR-800
4. Read in a Song from the BR-800
Data that you’ve edited cannot be saved in the preset data in this Rhythm Editor.
This means that you need to first import the song saved on the BR-800, and this then allows you to save the
song on the BR-800 from Rhythm Editor.
* A song can consist of up to five drum kits, 100 patterns, and five arrangements.
Executing a SONG READ operation causes any data being edited to be discarded.
1. Click the SONG READ button in the COMMON section.
2. Select one song from the displayed Song List, then click [OK].
The song is read into Rhythm Editor, and the song name appears in the Song Name field.
Only one song can be read in at a time.
5. COMMON Section
SONG READ button
CONNECT/DISCONNECT button
Song Name field
* The name of the currently selected song appears in the Song Name field.
TEMPO knob
VOLUME knob
TEMPO field
VOLUME field
To adjust the playback tempo:
1. Adjust pattern and arrangement tempos with the TEMPO knob.
* When the tempo is adjusted in this manner, the tempos for all patterns in the arrangement are set
uniformly.
2. The tempo that is currently set is indicated in the TEMPO field.
You can also change the tempo value by using the computer’s keyboard to directly type in a
value from 25.0 to 250.0 in the TEMPO field.
Holding down the Ctrl key as you click the Tempo knob sets the default value (120).
To adjust the volume:
1. Adjust the volume during playback with the VOLUME knob.
* This adjusts the volume for the sounds played using the tone pads as well as the volume of pattern
and arrangement playback.
2. The volume that is currently set is indicated in the VOLUME field.
You can also change the volume value by using the computer’s keyboard to directly type in a value
from 0 to 100 in the VOLUME field.
Holding down the Ctrl key as you click the Volume knob sets the default value (100).
6
6. PATTERN Section
6. PATTERN Section
6-1. Basic Operation
Preset pattern data cannot be saved.
Never rename, move, or delete any file being used by BR-800 Rhythm Editor.
Doing so will make it impossible to perform operations such as Save within BR-800 Rhythm Editor.
The total number of drum sounds that you can input into song patterns is a maximum of 4,999 per song.
Exceeding this upper limit makes it impossible to save the edited data.
This means you should save your data on the BR-800 as frequently as possible.
Bank field
Pattern Name field
Bank Selection button
Pattern Selection butto
LENGTH field
VELOCITY field
TIME SIGNATURE
Selection button
TIME SIGNATURE field
IMPORT button
CLEAR button
PATTERN WRITE button
Zoom bar
Pattern View
PLAY button STOP button
DRAG Symbol
What is Pattern View?
This is where patterns are edited.
Here is where you edit patterns, such as by inputting drum sounds at the specified timing or adjusting
the velocity of drum sounds that have been input.
* The button displayed in each respective square represents the size of the velocity of the drum sound
that has been input.
To select a pattern:
1. Use the Bank Selection button to select the type of data you want to use, either PRESET or
SONG data.
2. Use the Pattern Selection button to select the pattern to be edited.
3. The name of the currently selected pattern appears in the Pattern Name field.
* During editing, the Bank field switches to the EDIT display.
7
6. PATTERN Section
To play back the currently selected pattern:
1. Click the PLAY button; playback of the currently selected pattern repeats.
2. Click the STOP button to stop playback.
Clicking the STOP button a second time returns the playback-start position to the beginning of either
the leftmost measure currently visible, or the measure immediately following the leftmost one.
Clicking the STOP button yet again returns the playback-start position to the beginning of the pattern.
* In the case of the figure below, the leftmost measure currently visible refers to the area inside the red box.
* In the figure below, the leftmost measure currently visible is the second measure.
・If you want to change the tempo during playback, adjust this with the TEMPO knob in the
COMMON section.
・If the sound breaks up during playback, try changing the output destination using “Setup” “Set Up Audio Device” (Windows version only).
To input drum sounds and edit patterns:
In the Pattern View, the vertical axis indicates the tone (drum sound) used for input, and the horizontal axis
indicates the entry location.
Clicking on a square specifies the input timing for the drum sound that is input.
Example: Adding the CROSS STICK sound at the third beat of the first measure and the TOM1 sound at the
first beat of the second measure
1. Double-click on the square, then input the CROSS STICK sound at the third beat of the first measure.
2. Without making any other changes, use the arrow keys on the computer to move to the TOM1
location at the first beat of the second measure, then use the Enter key to apply it.
You can input the drum sound by right-clicking and selecting “Add” from the menu that appears.
8
6. PATTERN Section
To delete a drum sound that has been input:
1. Right-click on the desired square and select “Delete” from the menu that appears.
2. The drum sound is deleted.
* You can also press your computer’s Delete key to delete the drum sound.
To adjust the velocity of the drum sound input in the currently selected square:
* Immediately after Rhythm Editor has been started, the velocity of newly input drum sounds will have
the default value (100).
* After the velocity for any drum sound has been adjusted, the velocity for any newly input drum sound
uses the same setting as the drum sound last edited.
1. Click on the desired square.
2. When the shape of the cursor changes to
, rotate the mouse wheel to adjust the velocity.
The size of the buttons displayed in Pattern View changes according to the values.
The drum will be played at a high volume.
The drum will be played at a moderately high volume.
The drum will be played at a medium volume.
The drum will be played at a moderately low volume.
The drum will be played at a low volume.
Multiple drum sounds contain; you cannot adjust the velocity for these squares.
* You can use the Zoom bar to set a higher resolution, which then allows you to set the
velocity for each sound.
You can also change the velocity value by using the computer’s keyboard to directly type in a value
from 1 to 127 in the VELOCITY field.
You can also individually adjust the velocity value for each drum sound you input.
You cannot set the velocity in squares in which “---” appears.
To confirm the setting for the currently selected pattern:
1. The number of measures in the currently selected pattern appears in the LENGTH field.
* You can also change the number of measures by using the computer’s keyboard to directly type in a
value in the LENGTH field.
* You can make settings from 1 to 999 measures.
2. Use the TIME SIGNATURE Selection button to select the time signature for the currently
selected pattern.
3. The time signature for the currently selected pattern appears in the TIME SIGNATURE field.
9
6. PATTERN Section
To set the resolution:
What is Resolution?
This is a value that shows the precision of the timing with which sounds are played.
In Rhythm Editor, you can divide a single beat into as many as 96 segments as required.
1. Use the Zoom bar to set the resolution.
Each click on [+] makes the resolution finer, and each click on [-] makes it coarser.
2. The resolution that has been set is displayed to the left of the Zoom bar.
Example: To input a sixteenth note at the first beat of the third measure:
1. Adjust the Zoom bar to set the resolution to 1/16.
2. Click on the square for the first beat of the third measure, then input the selected drum sound.
A sixteenth note is input at the first beat of the third measure.
Holding down the Ctrl key as you click the Zoom bar sets the default value (1/16).
To edit pattern names:
* Double-byte characters, single-byte katakana, and the single-byte “ ” character (tilde) cannot be used.
* The \ (Backslash) displayed in Rhythm Editor appears as the \ (Yen Symbol) on the BR-800.
* Pattern names of up to eight characters can be entered.
1. Click the
in the Pattern Name field.
2. Change the name, then use the Enter key to set the change.
For more detailed information about other functions, refer to the related section.
PATTERN WRITE button
CLEAR button
IMPORT button
DRAG Symbol
6-4. Writing Created Patterns to the BR-800 (p. 13)
6-5. Deleting Patterns During Editing (p. 13)
6-3. Importing SMFs and Creating Patterns (p. 12)
7-2. Using Drag & Drop to Insert Patterns (p. 16)
10
6. PATTERN Section
6-2. Entering Drum Sounds and Creating Patterns
Use this procedure to create patterns, entering drum sounds in individual squares in Pattern View and
specifying the timing for the input drum sounds.
1
2
Select the drum kit to be input.
Set the number of measures.
Click on the LENGTH field, then use the computer’s keyboard to directly type in a value from 1 to 999.
3
Set the time signature.
Select the pattern’s time signature with the TIME SIGNATURE Selection button.
4
Set the resolution.
Adjust the Zoom bar to set the resolution.
5
Input a drum sound.
You cannot input or delete drum sounds for squares in which
appears.
Adjusting the Zoom bar to make the resolution finer makes the displayed drum sound change to
enabling you to adjust the velocity value or delete the drum sound.
6
Adjust the velocity.
Adjust the velocity (the loudness of the sound) for the input drum sound in the VELOCITY field.
You can also individually adjust the velocity value for each drum sound you input by using the
computer’s keyboard to directly type in a value from 1 to 127.
For more information about adjusting velocity values, refer to “To adjust the velocity of the drum
sound input in the currently selected square” (p. 9).
7
Repeat Steps 5 and 6 as needed.
You can delete unneeded drum sounds.
For more detailed information, see “To delete a drum sound that has been input” (p. 9)
You can also change the number of measures, the time value, the resolution, and the velocity value
during pattern playback.
11
,
6. PATTERN Section
6-3. Importing SMFs and Creating Patterns
Before attempting use as a pattern, be sure to save them on the BR-800.
When importing GM/GS/XG-compatible SMFs, MIDI Channel 10 is generally assigned as the
channel used for rhythm performances. Thus, only the data on MIDI Channel 10 in the SMF is
isolated and imported by the Rhythm Editor.Note that the data on other channels is disregarded.
You cannot import SMFs containing more than 999 measures.
SMFs containing more than a total of 4,999 drum sounds cannot be imported.
SMFs in format 0 or 1 can be imported.
Note On messages are the only supported events.
The corresponding note numbers are as shown in the chart below.
Drum sound
Note number
Drum sound
Note number
TOM 4
41
RIDE CYMBAL
51
TOM 3
45
CRASH CYMBAL
49
TOM 2
48
OPEN HIHAT
46
TOM 1
50
CLOSED HIHAT
42
COWBELL
56
SNARE
38 (40)
CROSS STICK
31 (37)
KICK
36 (35)
* The note numbers in parentheses “( )” also correspond to the respective drum sounds.
1
2
Click the IMPORT button in the PATTERN section.
Select the SMF you want to import, then click [open].
* To cancel the import, click [cancel].
3
The Bank field switches to the EDIT display.
12
6. PATTERN Section
6-4. Writing Created Patterns to the BR-800
Preset pattern data cannot be saved.
You cannot use a pattern in an arrangement before the pattern is saved.
1
Click the PATTERN WRITE button.
* If a song is protected, an overwrite confirmation message is displayed.
To go ahead and overwrite, click [OK]. To cancel the save operation, click [CANCEL].
The Pattern Selection screen for the save destination appears.
2
Select the save destination and click [OK].
* You can also establish the save destination by double-clicking on it.
* To cancel writing, click [CANCEL].
The Pattern Selection screen closes.
3
When the save operation has finished, the Bank field switches to the SONG display.
6-5. Deleting Patterns During Editing
When you want to redo input of a drum sound from the start, you can use this delete operation to delete all
drum sounds.
1
2
Click the CLEAR button in the PATTERN section.
This deletes all of the drum sounds entered in the pattern and clears the Pattern View.
Patterns cannot be restored to their original condition once they have been deleted.
13
7. ARRANGEMENT Section
7. ARRANGEMENT Section
7-1. Basic Operation
Preset arrangement data cannot be saved.
Never rename, move, or delete any file being used by BR-800 Rhythm Editor.
Doing so will make it impossible to perform operations such as Save within BR-800 Rhythm Editor.
Bank field
Arrangement Name field
Bank Selection button
ARRANGEMENT WRITE button
Arrangement Selection button
CLEAR button
PLAY button
STOP button
Pattern
Arrangement View
Step area
What is Arrangement View?
This is where arrangements are edited.
Edit arrangements by shifting Step areas, changing the patterns used, and making other changes.
What is Step ?
This sets the tempo and number of measures for each individual pattern used in an arrangement.
You can arrange up to 50 Steps for a single arrangement.
You assign one pattern to a single Step.
When you use a different pattern you need to assign another Step, but within the same pattern, you can repeat up to 999
measures with only a single Step.
* For the final pattern, the highest-numbered starting measure that can be set is 999.
Example:
STEP 1
Pattern A
( 2 measures )
STEP 2
Pattern B
( 1 measure )
STEP 3
Pattern C
( 5 measures )
STEP 4
Pattern D
( 1 measure )
When you want to stop the performance for a specific measure (that’s to say, when you want to input
a rest measure), insert a BREAK.
14
7. ARRANGEMENT Section
What is Step area?
This is where you make the Step settings.
You can make settings for each pattern individually, including changing the pattern used in the Pattern,
setting the tempo in the TEMPO row, along with other settings. The Step area at the current location is
displayed in pale orange.
(Step area diagram)
Pattern
TEMPO row
TIME SIGNATURE row
STEP row
* The beat value for the pattern used is displayed in the TIME SIGNATURE row.
* For information on the Pattern, the TEMPO row, refer to the respective sections.
Pattern
7-4. Changing the Pattern To Be Used (p. 17)
TEMPO row
7-9. Setting the Tempo for Individual Steps (p. 19)
Double clicking on the Step area displays the currently selected pattern in Pattern View.
To select an arrangement:
1. Use the Bank Selection button to select the type of data you want to use, either PRESET or
SONG data.
2. Use the Arrangement Selection button to select the arrangement to be edited.
3. The name of the currently selected arrangement appears in the Arrangement Name field.
* During editing, the Bank field switches to the EDIT display.
To play back the currently selected arrangement:
1. Click the PLAY button to play back the currently selected arrangement.
2. Click the STOP button to stop playback.
* You can return the playback-start position to the beginning by clicking the STOP button a second time.
・If you want to change the tempo during playback, adjust this with the TEMPO knob in the COMMON
section.
・If the sound breaks up during playback, try changing the output destination using “Setup” “Set Up Audio Device” (Windows version only).
・Playback of the last pattern in the arrangement is repeated.
To edit arrangement names:
• Double-byte characters, single-byte katakana, and the single-byte “
” character (tilde) cannot be used.
• The \ (Backslash) displayed in Rhythm Editor appears as the \ (Yen Symbol) on the BR-800.
• Arrangement names of up to eight characters can be entered.
1. Click the
in the Arrangement Name field.
2. Change the name, then use the Enter key to set the change.
For more detailed information about other functions, refer to the related section.
ARRANGEMENT WRITE button
7-8. Writing Created Arrangements to the BR-800 (p. 19)
CLEAR button
7-10. Deleting Arrangements During Editing (p. 19)
15
7. ARRANGEMENT Section
7-2. Using Drag & Drop to Insert Patterns
You can drag and drop a pattern to directly insert it at the desired point in Arrangement View.
You cannot use a pattern in an arrangement before the pattern is saved.
1
Select a pattern in the PATTERN section.
The content of the currently selected pattern is shown in Pattern View.
2
Click the DRAG symbol, and then drag and drop the pattern on the desired point in Arrangement View.
The currently selected pattern is then inserted.
When the Bank field in the PATTERN section is not in EDIT display, the DRAG symbol is enabled.
When the Bank field in the PATTERN section is in EDIT display, inserting patterns into Arrangement
View is not possible. The DRAG symbol is disabled.
7-3. Adding Step Areas and Inserting Patterns in Them
You cannot use a pattern in an arrangement before the pattern is saved.
1
2
Right-click on the desired Step area in Arrangement View.
Select “Insert” from the menu that appears.
A Step area with the same content is added immediately before the selected Step area.
* The length of the Step added by this procedure must be one measure.
You can also insert the pattern by pressing the Insert key (Windows version only).
3
Change the pattern number and tempo or step length as needed.
* For more detailed information, refer to the relevant section.
Changing the Pattern Number
7-4. Changing the Pattern To Be Used (p. 17)
Changing the Tempo
7-9. Setting the Tempo for Individual Steps (p. 19)
Changing the Length of a Step
7-7. Changing the Length of a Step (p. 18)
When you want to stop the performance for a specific measure (that’s to say, when you want to input
a rest measure), insert a BREAK.
The length of the last Step within an arrangement is equal to the number of measures in the pattern used.
16
7. ARRANGEMENT Section
7-4. Changing the Pattern To Be Used
This procedure changes the patterns used in arrangements.
1
Double click the desired Pattern in Arrangement View.
* Click the part within the Pattern that is surrounded by the frame.
2
Enter the desired pattern number using the computer’s keyboard, then press the Enter key to set the
pattern.
* The ranges in which you can change patterns are as follows.
• For preset patterns, P001 through P327
• For song patterns, S001 through S100
・The Pattern View in the PATTERN section is refreshed, and the content of the newly selected
pattern is displayed.
・The length of the last Step within an arrangement is equal to the number of measures in the pattern used.
7-5. Rearranging the Sequence of the Patterns
1
2
Click the desired Step area in Arrangement View.
You can then drag the area and drop it in the desired location.
The selected Step area then moves.
3
Repeat Steps 1–2 to rearrange the pattern sequence.
・Step numbers are refreshed when Step areas are moved.
・The length of the last Step within an arrangement is equal to the number of measures in the pattern used.
17
7. ARRANGEMENT Section
7-6. Deleting Patterns
This procedure deletes unneeded patterns from the currently selected arrangement.
1
2
Right-click on the desired Step area in Arrangement View.
Select “Delete” from the menu that appears.
The pattern is deleted.
* At this point, the arrangement after the deleted Step area is moved forward, filling in the space
previously occupied by the deleted Step area, and then all step numbers are updated.
You can also press your computer’s Delete key to delete the pattern.
・Patterns are deleted only from Arrangement View; the patterns themselves are not deleted.
・The length of the last Step within an arrangement is equal to the number of measures in the pattern used.
7-7. Changing the Length of a Step
The length of the last Step within an arrangement cannot be changed.
Also, playback of the pattern used in the final Step is repeated until you stop the performance.
1
2
Move the cursor to the right end of the desired Step area.
When the shape of the cursor changes to
location.
, you can then drag the area and drop it in the desired
The length of the step then changes.
18
7. ARRANGEMENT Section
7-8. Writing Created Arrangements to the BR-800
Preset arrangement data cannot be saved.
1
Click the ARRANGEMENT WRITE button.
* If a song is protected, an overwrite confirmation message is displayed.
To go ahead and overwrite, click [OK]. To cancel the save operation, click [CANCEL].
The Arrangement Selection screen for the save destination appears.
2
Select the save destination and click [OK].
* You can also establish the save destination by double-clicking on it.
* To cancel writing, click [CANCEL].
The Arrangement Selection screen closes.
3
When the save operation has finished, the Bank field switches to the SONG display.
7-9. Setting the Tempo for Individual Steps
You can set the tempo individually in each of the steps making up the arrangement.
1
2
3
Click the desired Step area in Arrangement View.
Double click the TEMPO row in the selected Step area.
* Click the part that is surrounded by the frame.
Enter the value you want using the computer’s keyboard, then press the Enter key to apply the value.
* Any value from 25.0 through 250.0 can be set.
If you adjust the tempo with the TEMPO knob in the COMMON section, then the tempos for all
patterns in the arrangement are set uniformly.
7-10. Deleting Arrangements During Editing
You can use this delete operation to delete all Steps from Step 2 and after when you want to redo Step formation
from the beginning.
1
2
Click the CLEAR button in the ARRANGEMENT section.
All Steps of the currently selected arrangement from Step 2 and after in the Step area are deleted.
* Step 1 is set at “P314 (metronome).”
Arrangements cannot be restored to their original condition once they have been deleted.
19
8. DRUM KIT Section
8. DRUM KIT Section
8-1. Basic Operation
Preset drum kit data cannot be saved.
Never rename, move, or delete any file being used by BR-800 Rhythm Editor.
Doing so will make it impossible to perform operations such as Save within BR-800 Rhythm Editor.
Bank Selection button
Drum Kit Name field
Bank field
Drum Kit Selection button
Tone Selection button
TONE COPY button
Tone Name field
TONE LOAD button
PAN knob
PAN field
Tone Pad field
WRITE button
* A tone pad that has no assigned drum sound is displayed using faint text, as “COWBELL” and “CROSS
STICK” are in the figure shown above.
To select a drum kit:
1. Use the Bank Selection button to select the type of data you want to use, either PRESET or
SONG data.
2. Use the Drum Kit Selection button to select the drum kit to be edited.
3. The name of the currently selected drum kit appears in the Drum Kit Name field.
* Changing the drum kits that are used also changes the tones (drum sounds) played when patterns
and arrangements are played back.
・When you change the drum kit that is used, the Bank field in the ARRANGEMENT section
switches to EDIT display.
・By changing the arrangement that is used, you switch to the drum kit used by the arrangement.
* This is because the setting for the drum kit used is made individually for each arrangement.
20
8. DRUM KIT Section
To check the sounds of each tone pad in the currently selected drum kit:
1. Click the desired tone pad in the Tone Pad field.
The name of the currently selected tone appears in the Tone Name field.
2. The sound of the clicked tone pad is played.
If drop-out occurs during sound generation, go to the “Setup” menu, and under “Audio Device
Settings,” try changing the output destination (Windows version only).
To adjust the stereo position of the sounds played using the tone pads:
1. Click the desired tone pad in the Tone Pad field.
The name of the currently selected tone appears in the Tone Name field.
2. Use the Pan knob to adjust the stereo position of the sound.
The value currently set is displayed in the Pan field.
You can also change the panning by using the computer’s keyboard to directly type in a value in the Pan
field.
Holding down the Ctrl key as you click the Pan knob sets the default value (C00).
* Set the position on the left to a value within the range of “L01–L50,” and the position on the right
to a value within the range of “R01–R50.”
Entering only a value changes the setting to “C00 (center).”
For more detailed information about other functions, refer to the related section.
TONE COPY button
8-3. Copying Drum Sounds from Other Drum Kits (p. 23)
TONE LOAD button
8-2. Loading Drum Sounds from WAV/AIFF Files (Tone Load) (p. 22)
WRITE button
8-5. Writing Created Drum Kits to the BR-800 (p. 25)
21
8. DRUM KIT Section
8-2. Loading Drum Sounds from WAV/AIFF Files (Tone Load)
You can import WAV and AIFF files on your computer and load these as drum sounds.
When the file loaded using Tone Load is large, saving it on the BR-800 may take several dozen
seconds.
Depending on the amount of free space on the SD card in the BR-800, you may not be able to execute
Tone Load.
Wave data in the following formats can be imported.
• File format:
WAV or AIFF (Only uncompressed PCM data is supported)
• Channel:
1 (mono) or 2 (stereo)
• Bits:
8 or 16
• Sampling Rate: 44.1 kHz
• Length:
100 ms or more
You can load drum sounds (including Preset sounds) of up to 13 seconds for a single drum kit.
(Example) Kick: 3 seconds, snare: 3 seconds, crash cymbal: 7 seconds → Total 13 seconds
1
2
Select a drum kit.
Click the desired tone pad to specify the load destination.
The name of the tone for the clicked tone pad appears in the Tone Name field.
3
Click the TONE LOAD button.
The WAV File Selection screen appears.
4
Select the WAV file to be loaded, then click [open].
* To cancel the load, click [cancel].
The WAV File Selection screen closes.
5
The Bank field switches to the EDIT display.
You can delete the drum sound assigned to a tone pad from the dialog box that appears when you
click the TONE COPY button.
For more detailed information, see “8-4. Deleting Drum Sounds Assigned to Tone Pads” (p. 24).
22
8. DRUM KIT Section
8-3. Copying Drum Sounds from Other Drum Kits
You can copy drum sounds from other drum kits and assign them to tone pads in the currently selected drum kit.
The drum sounds that you can copy are limited to a maximum total of approximately 13 seconds per
drum kit.
1
2
Select a drum kit.
Click the desired tone pad to specify the copy destination.
The name of the tone for the clicked tone pad appears in the Tone Name field.
3
Click the TONE COPY button.
The Drum Kit Selection screen appears.
* A total of 14 drum kits can be shown in the list; 9 PRESET types and 5 SONG types.
4
Select the drum kit to be copied, then click [OK].
* To cancel the copy, click [CANCEL].
The Drum Kit Selection screen closes.
5
The Bank field switches to the EDIT display.
A drum sound with the same tone name as the specified drum sound is copied to the copy destination.
You can delete the drum sound assigned to a tone pad from the dialog box that appears when you
click the TONE COPY button.
For more detailed information, see “8-4. Deleting Drum Sounds Assigned to Tone Pads” (p. 24).
23
8. DRUM KIT Section
8-4. Deleting Drum Sounds Assigned to Tone Pads
If the SD card in the BR-800 runs low on free space, you can delete tones that are no longer needed.
After carrying out the procedures described below, be sure to write the data to the BR-800.
Once the data has been written to the BR-800, unneeded tones are completely deleted, enabling you
to increase the amount of free space on the SD card memory.
1
Click the desired tone pad in the Tone Pad field.
The name of the tone for the clicked tone pad appears in the Tone Name field.
2
Click the TONE COPY button.
The Drum Kit Selection screen appears.
* A total of 14 drum kits can be shown in the list; 9 PRESET types and 5 SONG types.
3
Click [NO ASSIGN].
The drum sound is deleted and the specified tone pad becomes free.
4
The Bank field switches to the EDIT display, and the color of the specified tone pad becomes lighter.
Example: Deleting the drum sound assigned to “SNARE” in the “STD 1” drum kit
24
8. DRUM KIT Section
8-5. Writing Created Drum Kits to the BR-800
Preset drum kit data cannot be saved.
You cannot use a drum kit in a pattern or arrangement before the kit is saved.
1
Click the WRITE button in the DRUM KIT section.
* If a song is protected, an overwrite confirmation message is displayed.
To go ahead and overwrite, click [OK]. To cancel the save operation, click [CANCEL].
The Drum Kit Selection screen for the save destination appears.
2
Select the save destination and click [OK].
* You can also establish the save destination by double-clicking on it.
* To cancel writing, click [CANCEL].
The Drum Kit Selection screen closes.
3
When the save operation has finished, the Bank field switches to the SONG display.
25
Error Messages
Error Messages
Not connected to the BR-800.
Cause:
An attempt was made to import a song without being connected to the BR-800.
Solution 1: Press the CONNECT button and make the connection to the BR-800.
Solution 2: Redo the connection to the BR-800.
Could not connect to the BR-800.
Cause:
Connection to the BR-800 failed.
Solution 1: Check whether songs can be imported on the BR-800.
Solution 2: Redo the connection to the BR-800.
Multiple connections are available. Use the [CONNECT] button to select one.
Cause:
Solution:
Multiple connection destinations were found.
Specify the BR-800 drive as the connection target.
The file could not be loaded.
Cause:
Song import failed.
Solution 1: Check whether the connection to the BR-800 is correct.
Solution 2: Check whether the original song data to be imported is corrupt.
The song list could not be loaded.
Cause:
Acquisition of the Song List failed.
Solution 1: Check whether the connection to the BR-800 is correct.
Solution 2: Check whether the original song data to be imported is corrupt.
No song has been loaded.
Cause:
Solution:
An attempt was made to use song data or save it on the BR-800 without first loading any songs.
Make sure the connection to the BR-800 is correct, then import the song you want.
Specify a name.
Cause:
Solution:
An attempt was made to save a file on the BR-800 without giving the file a name.
Assign a name, then save it on the BR-800.
The file could not be saved.
Make sure that the media is not write protected, and that there is sufficient free space.
Cause:
Solution:
Saving on the BR-800 failed.
Check the setting for the destination to save the file.
The audio device cannot be used.
Cause:
Solution:
No device was found.
Check the settings on the computer.
Only numerical values and values starting with “P” (Preset Pattern) or “S” (Song Pattern) can be input.
Cause:
Solution:
A letter of the alphabet other than “P” or “S” or another character or symbol was input.
Redo the input using a value within the range of “P001?P327” or “S001?S100.”
26
Error Messages
Up to 50 steps can be handled.
Cause:
Solution:
The upper limit for the number of Steps that can be included in an arrangement was exceeded.
Delete any unneeded steps.
Too many drum sounds.
Delete any unneeded song patterns.
Cause:
Solution:
The total number of drum sounds input into the respective song patterns exceeded the upper limit
(4,999).
Delete unneeded song patterns to reduce the total number of drum sounds.
The SMF could not be imported.
SMF data in the following formats can be imported.
• Format:
0 or 1
• Number of measures: 999 or fewer
• Drum sounds:
Cause:
Solution:
4,999 or fewer
You have attempted to load an incompatible SMF to the BR-800 Rhythm Editor.
Check the format of the SMF.
The tone load operation failed.
Make sure that the media is not write protected, and that there is sufficient free space.
Wave data in the following formats can be imported.
• File format:
WAV or AIFF (Only uncompressed PCM data is supported)
• Channel:
1 (mono) or 2 (stereo)
• Bits:
8 or 16
• Sampling Rate: 44.1 kHz
• Length:
100 ms or more (total of approximately 13 seconds or less per drum kit)
Cause:
You have attempted to load an incompatible WAV or AIFF file to the BR-800 Rhythm Editor.
Solution 1: Check the format of the WAV or AIFF file.
Solution 2: Check the setting for the destination to save the file.
Tone Copy failed.
The maximum that can be copied using Tone Copy is a total of approx. 13 seconds per drum kit.
Cause:
Solution:
An attempt was made to copy tones that exceed the capacity that can be copied using Tone Copy.
Click the tone pad and check the length of the sound played for its tone.
For the final pattern, the highest-numbered starting measure that can be set is 999.
Cause:
Edits made to an arrangement resulted in an attempt to set the starting measure at the 1,000th measure or later.
Solution 1: Delete unneeded patterns (Steps) from the arrangement being edited.
Solution 2: Shorten the patterns (Steps) used in the arrangement being edited.
Solution 3: Reduce the number of measures in the pattern you’re inserting into the arrangement.
The amount of data is too large and cannot be imported.
Cause:
An attempt was made to import more data than is possible.
Solution 1: Modify the file you want to import to make it suitable.
Solution 2: Select a different file.
1PS
27