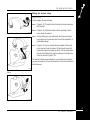
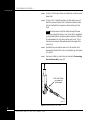
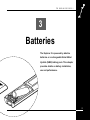
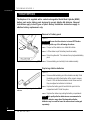
1
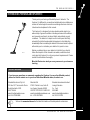
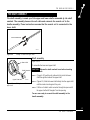
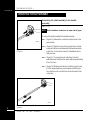
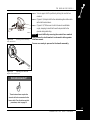
THE MINELAB EXPLORER II
™
Minelab Explorer II
!
P0591-A
"
1
4901-0047 Rev 1.0
THE MINELAB EXPLORER II
www.minelab.com
© Minelab Electronics Pty Ltd
This document contains proprietary information which is protected by
copyright. Apart from any use as permitted under the Copyright Act
1968, no part may be reproduced by any process without written
permission from Minelab Electronics Pty Ltd, 118 Hayward Avenue,
Torrensville, SA 5031, Australia.
WARNING. This document contains Minelab Electronics Pty Ltd rights,
technical data or restricted rights data, or both. Patents and trademarks
apply.
Since there may be a range of options available in this detector
type, equipment may vary according to the model or items ordered
with your detector. Certain descriptions and illustrations may differ
(in this manual) from the exact model that you purchased. In
addition, Minelab reserve the right to respond to ongoing technical
progress by introducing changes in design, equipment and
technical features at any time.
2
THE MINELAB EXPLORER II
TABLE OF CONTENTS
1
contents
INTRODUCTION ................................................................................................................... 1
About this manual ..................................................................................................................................... 2
Introducing the Minelab Explorer II ......................................................................................................... 3
Minelab’s unique technology .................................................................................................................... 4
2
ASSEMBLY ............................................................................................................................ 9
Unpacking your Explorer II [easy reference] ....................................................................................... 10
Unpacking your Explorer II .................................................................................................................... 11
Assembling the detector ......................................................................................................................... 12
Connecting the search coil ..................................................................................................................... 13
The shaft assembly ................................................................................................................................ 15
Connecting the shaft assembly .............................................................................................................. 16
The handle assembly ............................................................................................................................. 18
Headphones ............................................................................................................................................ 20
Replacing and fitting the search coil ....................................................................................................... 21
3
BATTERIES .......................................................................................................................... 23
The battery pack ..................................................................................................................................... 24
Battery performance ............................................................................................................................... 27
4
THE CONTROL PANEL ....................................................................................................... 29
The control panel [easy reference] ........................................................................................................ 30
Power and Backlight buttons ................................................................................................................. 31
Menu and Back buttons ......................................................................................................................... 32
Shortcut buttons ...................................................................................................................................... 33
Shift buttons ............................................................................................................................................ 35
3
THE MINELAB EXPLORER II
www.minelab.com
TABLE OF CONTENTS
5
contents
QUICKSTART ...................................................................................................................... 37
Getting started ......................................................................................................................................... 38
Beginner use .......................................................................................................................................... 39
Quickstart display [easy reference] ....................................................................................................... 40
Quickstart’s Smartfind display ............................................................................................................... 42
The Iron Mask ........................................................................................................................................ 45
Quickstart’s Digital display .................................................................................................................... 47
Modifying the display ............................................................................................................................. 48
Adjusting sensitivity ............................................................................................................................... 49
Adjusting threshold ................................................................................................................................. 50
Audio response ....................................................................................................................................... 51
Audio menu ............................................................................................................................................. 52
Audio: adjusting the volume ................................................................................................................... 53
Audio: adjusting the tone ........................................................................................................................ 55
Audio: adjusting the sounds ................................................................................................................... 56
Testing target audio responses [tutorial] ................................................................................................ 58
Pinpointing the object .............................................................................................................................. 59
Recovering the object ............................................................................................................................. 61
Selecting targets ..................................................................................................................................... 62
Selecting targets [easy reference] ......................................................................................................... 63
Accepting and rejecting targets [tutorial] ............................................................................................... 64
Advanced mode option ........................................................................................................................... 65
4
THE MINELAB EXPLORER II
TABLE OF CONTENTS
6
contents
ADVANCED USE ................................................................................................................. 67
Advanced mode’s Main Menu [easy reference] ................................................................................. 68
Starting in Advanced mode .................................................................................................................... 69
Advanced Mode’s displays [easy reference] ...................................................................................... 70
Advanced mode’s Learn display [easy reference] ............................................................................... 71
Learning targets ...................................................................................................................................... 72
Learn’s target selection [tutorial] ............................................................................................................ 73
Advanced mode’s Edit display [easy reference] ................................................................................. 75
Editing patterns ....................................................................................................................................... 76
Editing and saving target patterns [tutorial] .......................................................................................... 77
Advanced mode’s Select menu ............................................................................................................. 79
Saving targets ......................................................................................................................................... 80
Audio menu ............................................................................................................................................. 81
Options menu ......................................................................................................................................... 82
Options: noise ......................................................................................................................................... 83
Options: response .................................................................................................................................. 84
Options: recovery .................................................................................................................................. 86
Settings menu ......................................................................................................................................... 87
5
THE MINELAB EXPLORER II
www.minelab.com
TABLE OF CONTENTS
7
contents
USER INFO ......................................................................................................................... 89
Helpful hints ............................................................................................................................................ 90
Battery performance comparisons ......................................................................................................... 92
User preferences .................................................................................................................................... 93
Control Panel button functions ............................................................................................................... 95
Quickstart menu structure ...................................................................................................................... 96
Advanced menu structure ...................................................................................................................... 97
Troubleshooting ....................................................................................................................................... 98
Service repair form ................................................................................................................................. 99
Warranty ............................................................................................................................................... 101
Technical specifications for the Minelab Explorer II ............................................................................ 102
Explorer model features ....................................................................................................................... 103
Glossary of terms ................................................................................................................................. 104
Detector care and safety ...................................................................................................................... 108
6
THE MINELAB EXPLORER II
1
Introduction
!
The Explorer II is the most
technologically advanced detector ever
produced.
It is possible to start treasure hunting as
soon as you have assembled the detector,
but it is worth familiarizing yourself with
its many features.
7
THE MINELAB EXPLORER II
www.minelab.com
ABOUT THIS MANUAL
This manual is designed to introduce the detector’s features, give you step-by-step
directions for everything from assembling and adjusting your detector to basic
detector use and customizing your own advanced settings.
!
1. INTRODUCTION
Basic overview of the Explorer II
and this User’s Manual.
5. QUICKSTART
However experienced you are at
using a metal detector, it is important
that you read this chapter to
understand how to use the Explorer II
in Quickstart mode.
2. ASSEMBLY
This chapter provides details and
instructions on assembling and
adjusting the Explorer II.
3. BATTERIES
The Explorer II is powered by
alkaline batteries or a rechargeable
Nickel Metal Hydride (NiMH) battery
pack. This chapter provides details
on battery installation, use and
performance.
MI
NE
LA
B
Ex
PO
WE
plo
R
NO
CA ISE
NC
EL
ME
NU
ON
IRON / OF
F
MA
SK
IIr o
n
ON
/
PIN OFF
PO
INT
DE
TE
CT
BA
BA
CK
CK
LIG
HT
rer
II
4. CONTROL PANEL
This chapter is designed to familiarize
you with the various features of the
Explorer II control panel. A few
minutes spent reading this chapter will
be a worthwhile preliminary to basic
or advanced detecting.
8
ABOUT THIS MANUAL
6. ADVANCED USE
Once you are comfortable with basic
detector use and Quickstart it is time to
investigate the more advanced
features of the Explorer II.
"
7. USER INFO
This chapter provides a glossary of
terminology, user guides, technical
specifications, warranty and repair
details and troubleshooting tips.
THE MINELAB EXPLORER II
INTRODUCING THE MINELAB EXPLORER II
Thank you for purchasing a Minelab Explorer II detector. The
Explorer II is different to conventional metal detectors and features a
number of technological innovations and design features which are
introduced and explained in this manual.
The Explorer II is designed to locate valuable metal objects in a
wide variety of ground conditions including extreme salt conditions
and sea water, wet beach sand and highly mineralized ground
conditions. The detector’s simple-to-use control panel and fully
automatic Quickstart mode enable the beginner to start detecting
immediately after assembling the detector. Advanced mode’s options
will enable you to customize your detector for years to come.
P0591-A
Before you attempt to use your detector in the field, you should
follow the chapters of this manual to assemble, understand and
customize the Explorer II to suit your personal requirements. Please
read all the information thoroughly.
Minelab Electronics wish you every success in your treasure
hunting.
Contact Minelab
If you have any questions or comments regarding the Explorer II or any other Minelab product,
please feel free to contact us via your local Authorized Minelab dealer, or write to us:
#
Minelab Electronics Pty Ltd
PO Box 537 Torrensville Plaza
South Australia 5031
AUSTRALIA
email: [email protected]
tel: 61-8-8238 0888
Minelab USA
2700 E Patrick Lane, Suite 11
Las Vegas, Nevada 89120
UNITED STATES OF AMERICA
email: [email protected]
tel: 1-702-891 8809
Minelab International Limited
Laragh, Bandon
Co. Cork
IRELAND
email: [email protected]
tel: 353-23 52101
Visit our site www.minelab.com for the latest information on Minelab products and services.
9
INTRODUCING THE MINELAB EXPLORER
THE MINELAB EXPLORER II
www.minelab.com
MINELAB’S UNIQUE TECHNOLOGY
The Explorer II is one of a new generation of detectors from Minelab. Its sleek, sturdy
design, innovative control panel and comprehensive targeting options set it apart from
any other detector available today.
Two mode detecting
The Explorer II is so feature-packed that the research team at
Minelab decided to offer two modes of operation: fully automated
detection (Quickstart mode) and personally customized precision
detecting (Advanced mode).
All of the detector’s vital functions are common to Quickstart and
Advanced mode. Because the Explorer II is such an innovative
machine, even the seasoned treasure hunter will benefit from
beginning in Quickstart mode.
Quickstart mode
Smartfind display
Main Menu
Figure 1.1
Quickstart mode
As soon as you have assembled the Explorer II, you are ready to
start detecting. When it leaves the factory, the detector is
programmed to start in Quickstart.
Quickstart settings are optimized to provide you with accurate
detection in most conditions you will encounter in the field, so you
can concentrate your attention on the objects you discover.
This manual’s Chapter 4: Control Panel, outlines all of the control
panel features needed to use your detector in Quickstart (or
Advanced mode) including shortcut buttons, special functions like
Pinpoint and adjusting your detector settings.
Chapter 5: Quickstart, explains basic use in detail and provides tips
on everything from sweeping the detector coil to digging up objects.
Advanced mode
10
MINELAB’S UNIQUE TECHNOLOGY
THE MINELAB EXPLORER II
Smartfind display
Main Menu
Figure 1.2
Advanced mode
Once you are familiar with the feel and functions of the detector, it is
a simple matter to move into Advanced mode. This will enable you to
change the appearance of the display, modify audio responses,
specify custom targets and edit and save personal settings. Chapter
6: Advanced Use provides all of the information you need to
personalize your Explorer for specialized targeting.
Getting Lost?
Factory Reset Power On Tune
If at any time you become a little confused with the settings for your
detector, or just want to brush up on basic detector use, it is simple to
reset the Explorer II to its original factory settings.
Turn the detector off and then PRESS AND HOLD THE POWER BUTTON
until a six-note musical tune is sounded (rising C-major chord). The
Minelab logo and the words ‘FACTORY PRESETS’ will be briefly displayed
on the screen (as shown above).
This will return you to the original Quickstart mode settings. You can
resume basic detecting or make selections from the Main Menu.
11
MINELAB’S UNIQUE TECHNOLOGY
THE MINELAB EXPLORER II
www.minelab.com
Discrimination
Discrimination is the ability of a
metal detector to identify the user’s
desired target (e.g. jewelry) and
eliminate signals from undesirable
material (e.g. nails).
Full Band Spectrum (FBS)
When developing Full Band Spectrum (FBS) technology, Minelab’s
scientists looked at improving the already successful Broad Band
Spectrum (BBS) technology used in previous Minelab detectors.
Discussions with seasoned treasure hunters from around the world
identified a number of possible enhancements for operators. The
improvements to the Explorer II detectors include:
The Explorer II can be programmed
•
increased detection depth;
in a number of ways to discriminate
•
accurate identification of targets to greater depth;
•
enhanced detection of desired targets amidst iron trash;
•
adjustments to improve operation for searching salt-water
beaches.
against unwanted targets in different
types of ground.
Figure 1.3. Metal detector comparisons
Most detectors on the market
operate on a single (or dual)
frequency, ranging from 1 to 70
kilohertz (kHz). Although this
technology has served the industry
well for years, Minelab’s scientists
found that a frequency that worked
well in one area would often offer
only marginal performance when
used in another location. Ground
mineralisation, trash content, and
target size all had an effect on how
effective a detector transmitting a single frequency would operate.
Full Band Spectrum technology combines Minelab’s existing multiple
frequency BBS technology with a powerful new microprocessor to
give:
12
MINELAB’S UNIQUE TECHNOLOGY
•
greater detecting depth;
•
consistent sensitivity over a wide range of targets;
•
less interference from electromagnetic sources;
•
more accurate identification of target characteristics.
THE MINELAB EXPLORER II
Operating Frequencies
A metal detector’s
electromagnetic operating
frequencies are measured in
kiloHertz (kHz).
Low signal frequencies
The Full Band Spectrum (FBS) circuit automatically transmits 28
frequencies simultaneously. This increased frequency range means
that the signal received from the detector coil is analyzed from a
wide range of responses. This information is relayed to the operator
via the speaker or headphones and the control panel’s liquid crystal
display as an audio or visual target response.
Put simply, Minelab’s unique FBS technology means deep, sensitive,
accurate detecting.
(e.g. 1.5 kHz) penetrate deepest,
but sensitivity to smaller targets
is low.
On the other hand, higher
frequencies have a more
shallow depth of penetration
Ground Compensation
The Explorer II uses a sophisticated approach to the elimination of
ground mineralisation. It uses advanced digital filtering to eliminate
the influence of ground signals.
but high sensitivity to small
targets.
The Explorer II’s multiplefrequency operation provides
the advantage of both.
!
You are now ready to proceed to Chapter 2: Assembly.
13
MINELAB’S UNIQUE TECHNOLOGY
THE MINELAB EXPLORER II
www.minelab.com
14
THE MINELAB EXPLORER II
2
Assembly
This chapter provides details and
instructions on assembling and
adjusting the Explorer II.
15
THE MINELAB EXPLORER II
www.minelab.com
UNPACKING YOUR EXPLORER II
easy reference
RECHARGEABLE
BATTERY PACK
DOCUMENTATION
ACCESSORY BOX CONTAINING
CAR CHARGER & MAINS CHARGER
UPPER SHAFT ASSEMBLY
LOWER SHAFT ASSEMBLY
SEARCH COIL
HANDLE ASSEMBLY
P0592-A
MAIN CARTON
•
HANDLE ASSEMBLY
(CONTAINING ALKALINE
BATTERY PACK)
•
UPPER SHAFT ASSEMBLY
•
LOWER SHAFT ASSEMBLY
•
SEARCH COIL (NUT & BOLT FOR
COIL)
•
HEADPHONES
•
RECHARGEABLE BATTERY PACK
16
UNPACKING YOUR EXPLORER
ACCESSORY BOX
DOCUMENTATION PACK
•
ARMREST STRAP AND BUCKLES •
MANUAL
•
CAR CHARGER
•
FIELD GUIDE
•
MAINS CHARGER
•
WARRANTY CARD
THE MINELAB EXPLORER II
UNPACKING YOUR EXPLORER II
List of Parts
The box in which the Explorer II is shipped should contain the items
illustrated on the facing page. Please check that all of these items are
in the box. If any of these components are missing, contact your
Minelab dealer immediately.
Accessories
The following items are available for purchase separately:
•
NiMH Battery Pack (spare)
•
NiMH Battery Pack (high capacity)
•
8” Coil with Lower Shaft
•
Weatherproof Control Box Cover
•
Spare Coil Covers
•
Carry Bag
•
Minelab Cap, Minelab Poloshirt.
For further information on these and other Minelab
products, contact your Minelab dealer.
You can also visit us on the web
17
UNPACKING YOUR EXPLORER
THE MINELAB EXPLORER II
www.minelab.com
ASSEMBLING THE DETECTOR
Handle assembly
Shaft assembly
Search coil
P0591-A
Please follow these instructions to assemble the Explorer II. Refer to
the drawings to identify parts and how they are positioned. The
detector’s components are organized into three categories:
•
the search coil;
•
the shaft assembly, made up of the upper shaft and lower
shaft;
•
the handle assembly, made up of the handle, armrest and
control box.
NOTE To avoid difficulties or damage to the detector’s
electronic components, it is strongly recommended you
follow the sequence of instructions for assembly.
Please contact your Minelab dealer for further instructions should
any difficulties arise.
18
ASSEMBLING THE DETECTOR
THE MINELAB EXPLORER II
CONNECTING THE SEARCH COIL
The search coil transmits electromagnetic signals into the ground and receives
the response.
Rubber Washer
Coil Cable
Coil Yoke
Yoke Nut
Yoke Bracket
Yoke Bolt
Search Coil
P0608-A
Figure 2.1
Connecting the search coil
to the lower shaft
Connecting the search coil to the lower shaft
Figure 2.1–2.3
CAUTION DO NOT attempt to disconnect the coil cable
where it enters the search coil itself. They are shipped
pre-assembled and any attempt to disconnect will void your
detector warranty.
To attach the search coil to the lower shaft:
STEP 1
Place the search coil on a flat surface close to the coil yoke.
STEP 2
(Figure 2.2, following page) Plug the two black plastic
washers into the recesses provided on either side of the coil
yoke.
(Continued next page)
19
CONNECTING THE SEARCH COIL
THE MINELAB EXPLORER II
www.minelab.com
P0605-A
Figure 2.2
bracket
Inserting coil yoke into
P0606-A
Figure 2.3
coil
Securing yoke to search
20
CONNECTING THE SEARCH COIL
STEP 3
Check the orientation of the search coil and shaft ensuring
that the open side of the yoke faces the ground.
STEP 4
(Figure 2.2) To join the shaft to the search coil, slide the
yoke into the yoke bracket on top of the coil.
STEP 5
(Figure 2.3) Insert yoke bolt through the search coil’s yoke
bracket and the coil yoke. Fasten with the yoke nut
provided, being careful not to damage the thread of the nut
by over-tightening. This may need to be loosened to adjust
the coil to a comfortable detecting angle.
You are now ready to proceed to the shaft assembly.
THE MINELAB EXPLORER II
THE SHAFT ASSEMBLY
The shaft assembly is made up of the upper and lower shafts connected by the shaft
camlock. The assembly houses the coil cable and connects the search coil to the
handle assembly. These instructions assume that the search coil is connected to the
lower shaft.
Camlock Released
P0601-A
Figure 2.4
Feeding coil cable into upper shaft
Shaft assembly
Search Coil
Figure 2.4, 2.5
To assemble the lower and upper shaft:
Shaft Camlock
Upper Shaft
Figure 2.5
upper shaft
CAUTION Release the shaft camlock lever before inserting
the lower shaft.
STEP 1
(Figure 2.4) Feed the coil cable which is inside the lower
shaft through the inside of the upper shaft.
STEP 2
(Figure 2.5) Slide the lower shaft entirely into the upper shaft
until the camlock rests against the yoke.
STEP 3
Pull the coil cable’s metal connector through the open end of
the upper shaft until it ‘dangles’ from the opening.
P0602-A
Sliding lower shaft into
You are now ready to connect the shaft assembly to the
handle assembly.
21
THE SHAFT ASSEMBLY
THE MINELAB EXPLORER II
www.minelab.com
CONNECTING THE SHAFT ASSEMBLY
Connecting the shaft assembly to the handle
assembly
Figure 2.6–2.9
NOTE Shaft orientation: camlock is on lower side of upper
shaft.
To connect the shaft assembly to the handle assembly:
STEP 1
(Figure 2.6) Release the control box camlock lever to the
open position.
STEP 2
(Figure 2.6) Align the connections and push the coil cable
connector into the socket underneath the handle assembly
control box. Ensure the connector’s threaded bracelet is
firmly secured.
STEP 3
(Figure 2.7) To prevent the coil cable from ‘bunching’,
extend the lower shaft from the upper shaft by approximately
15cm (6 inches).
STEP 4
(Figure 2.8) Making sure that the control box camlock lever
is in the released position, push the upper shaft firmly into
the control box until you feel it has reached the back of the
control box.
P0597-A
Figure 2.6
control box
Attaching coil cable to
P0614-A
22
Figure 2.7
‘bunching’
Preventing the coil cable
CONNECTING THE SHAFT ASSEMBLY
THE MINELAB EXPLORER II
STEP 5
Secure upper shaft in position by locking the control box
camlock.
STEP 6
(Figure 2.9) Adjust shaft to the desired length and then lock
with shaft camlock lever.
STEP 7
(Figure 2.9) Tilt the search coil to the most comfortable
angle, keeping in mind it will need to be parallel to the
ground during detecting.
P0598-A
Figure 2.8
Inserting shaft assembly
into control box
NOTE To avoid difficulty securing the control box camlock
lever, ensure the shaft camlock is released to allow greater
shaft movement.
You are now ready to proceed to the handle assembly.
P0599-A
Figure 2.9
Adjusting the shaft and
angle of the search coil
Coil not connected?
$
These instructions require the
search coil to be connected to the
lower shaft. For directions on this
procedure, refer to page 13.
23
CONNECTING THE SHAFT ASSEMBLY
THE MINELAB EXPLORER II
www.minelab.com
THE HANDLE ASSEMBLY
The handle assembly is made up of the armrest, straps and the control box. It is
connected to the shaft assembly by the control box camlock.
Adjusting the armrest assembly
Figure 2.10
To adjust armrest:
STEP 1
Loosen the screw in the center of the armrest (turn counterclockwise). Use a screwdriver or the edge of a coin.
STEP 2
Slide armrest to your desired position. Your hand should
comfortably grip the angled neck of the handle assembly,
with the detector feeling like an extension of your forearm.
STEP 3
Gently remove your arm.
STEP 4
Tighten screw (clockwise) to lock into position.
P0268-C
Figure 2.10
Armrest adjustment
24
THE HANDLE ASSEMBLY
THE MINELAB EXPLORER II
Fitting the armrest strap
Figure 2.11–2.13
To fit and adjust the armrest strap:
Figure 2.11
STEP 1
(Figure 2.11) Thread the strap through the buckle openings
as illustrated.
STEP 2
(Figure 2.12) Clip both buckles into the openings at each
outer side of the armrest.
STEP 3
Test by sliding your arm underneath the strap and resting
your forearm on the armrest (which should be adjusted to a
comfortable setting).
STEP 4
(Figure 2.13) Loosen strap by tilting the edge of the buckle
out to release it from the armrest. Undo the velcro and pull
the buckle outwards (towards yourself). Clip the buckle back
into place and tighten the strap by pulling up (in the direction
of the top arrow in Figure 2.13).
Fitting buckle to armrest strap
The armrest should now be adjusted to your satisfaction. Next time
you use your detector, all you will need to do is click the buckle back
into the armrest.
Figure 2.12
armrest
Fitting armrest strap to
Figure 2.13
Tightening armrest strap
25
THE HANDLE ASSEMBLY
THE MINELAB EXPLORER II
www.minelab.com
HEADPHONES
Attaching headphones
Figure 2.14
Headphone
Socket
The use of headphones when treasure hunting with the Explorer II
will avoid disturbing others in the area. The reduced power
demands of the headphones will also extend the battery life.
The socket for the headphone plug is located in the top right of the
rubber seal at the top of the handle assembly. The headphones may
be plugged into this socket or unplugged at any stage of operation.
P0595-A
Figure 2.14 Inserting headphone
Congratulations! Your Explorer II is now assembled. You are
now ready to proceed to Chapter 3: Batteries.
!
Should you wish to remove the search coil, instructions
follow on the next two pages.
26
HEADPHONES
THE MINELAB EXPLORER II
REPLACING AND FITTING THE SEARCH COIL
Rubber Washer
Coil Cable
Coil Yoke
Yoke Nut
Yoke Bracket
Yoke Bolt
Search Coil
P0608-A
Figure 2.14 Replacing the search coil
Replacing the search coil
Figure 2.14–2.16
CAUTION DO NOT attempt to remove the coil cable from the
search coil. Any attempt to disconnect will void your
detector warranty.
To replace the search coil:
STEP 1
Disconnect the shaft assembly from handle assembly by
reversing the procedure outlined in Connecting the shaft
assembly on page 16.
CAUTION DO NOT attempt to remove the shaft assembly
without disconnecting the coil cable from the control box.
Pull cable down
from inside
shaft/yoke
Figure 2.15 Removing cable
STEP 2
Separate the two shaft assemblies by releasing the shaft
camlock and sliding the lower shaft out.
STEP 3
(Figure 2.14) Loosen the yoke nut and carefully remove the
bolt from the yoke bracket. This removes the yoke from the
search coil. Be careful not to lose the two plastic washers.
P0607-A
(Continued next page)
REPLACING AND FITTING THE SEARCH COIL
27
THE MINELAB EXPLORER II
www.minelab.com
STEP 4
(Figure 2.15) Gently pull the coil cable from inside the yoke/
lower shaft.
STEP 5
(Figure 2.16). Carefully feed the coil cable of the new coil
back into yoke and lower shaft. Continue to feed the cable
into the shaft unitl the connector is visible at the top of the
shaft.
Note: It may be easier to pull the cable through the lower
shaft using a length of string or cord. Once this is completed
you should be able to see approximately 4 inches (100mm)
of cable between the coil yoke and the search coil. This is
the slack necessary to allow adjustment to the angle of the
search coil.
STEP 6
Re-attach the yoke and the search coil. Be careful not to
damage the thread of the nut by over-tightening. See Figure
2.2 and 2.3.
STEP 7
Reconnect cable to control box (as directed in Connecting
the shaft assembly, page 16).
Pull Coil Cable
up inside of
yoke/shaft
P0613-A
Figure 2.16 Removing the coil cable
28
REPLACING AND FITTING THE SEARCH COIL
THE MINELAB EXPLORER II
29
THE MINELAB EXPLORER II
www.minelab.com
30
THE MINELAB EXPLORER II
3
Batteries
The Explorer II is powered by alkaline
batteries or a rechargeable Nickel Metal
Hydride (NiMH) battery pack. This chapter
provides details on battery installation,
use and performance.
31
THE MINELAB EXPLORER II
www.minelab.com
THE BATTERY PACK
The Explorer II is supplied with a sealed rechargeable Nickel Metal Hydride (NiMH)
battery pack and a battery pack designed to accept alkaline AA batteries. Removal
instructions apply to both types of pack. Battery installation instructions apply to
alkaline battery replacement only.
Removal of battery pack
Figure 3.1
CAUTION Ensure that the detector is turned OFF before
proceeding with any of the following directions.
Figure 3.1
Removal of battery pack
STEP 1
Prop or rest the detector on a stable flat surface.
STEP 2
Lift the rubber cap of the battery handle assembly.
STEP 3
Raise the yellow tab. This releases the spring loaded battery
pack.
STEP 4
Remove battery pack entirely from handle assembly.
Replacing alkaline batteries
Figure 3.2
Figure 3.2
batteries
STEP 1
Remove alkaline battery pack from handle assembly. Slide
the battery pack lid in the direction of the arrow to remove.
Place 8 x ‘AA’ cell alkaline batteries inside. Make sure that
they are aligned as indicated on the label.
STEP 2
Replace the battery pack lid and slide the pack into the
compartment until it ‘clicks’ into place.
STEP 3
Replace the rubber cap, sealing the battery compartment.
Replacing alkaline
NOTE High quality alkaline batteries are recommended to
optimise detector usage time. Rechargeable alkaline
batteries may be used but must be removed and recharged
separately.
NOTE
32
THE BATTERY PACK
THE MINELAB EXPLORER II
Recharging NiMH battery pack with the mains
charger
Figure 3.3
The Explorer II is provided with a sealed Nickel Metal Hydride
(NiMH) battery pack and a charger which plugs into a conventional
wall socket.
Figure 3.3
pack
Recharging NiMH battery
Safety Tip
Do not attempt to disassemble the
NOTE The NiMH battery pack supplied with your detector
comes in the discharged condition. It is necessary to charge
it as explained below before operating the detector. The
batteries will reach their full capacity after several charge/
discharge cycles.
STEP 1
Remove battery pack as per instructions on previous page.
STEP 2
Insert the mains charger plug into the socket at the tapered
end of the battery pack.
STEP 3
Plug the mains charger into the wall socket and turn on the
switch (if switch available). Leave for about 18 hours to fully
recharge.
STEP 4
Remove the battery charger plug from the battery pack.
Slide the pack back into the handle assembly battery
compartment until it clicks into place.
NiMH battery pack. If disposing of
pack, do not incinerate. Contact your
local authorities to enquire about
disposal or recycling facilities.
Recharging
$
Minelab’s batteries can be left on the
battery charger indefinitely without
harming the battery.
33
THE BATTERY PACK
THE MINELAB EXPLORER II
www.minelab.com
Recharging
$
Minelab’s battery chargers are
Recharging NiMH battery pack with the car charger
The Explorer II is provided with a car charger that boosts the
voltage of the car battery (usually about 12V) to a voltage sufficiently
high to charge the NiMH battery pack.
STEP 1
Remove battery pack as per instructions on page 24.
STEP 2
Insert the car charger plug into the cigarette lighter socket.
STEP 3
Insert the car charger plug into the socket at the tapered end
of the battery pack. A small light on the car charger
illuminates indicating that the car charger is in operation.
suitable for the Explorer NiMH
battery pack only. The battery
chargers will not recharge
rechargeable alkaline batteries. Using
a non-Minelab charger with the
battery pack may damage it and will
void the product warranty.
NOTE Some vehicles will need the ignition to be switched on
to ‘accessories’ for power to be supplied to the charger.
STEP 4
Leave the battery to charge for about 18 hours for a
complete recharge. If the battery was not completely
discharged, the charging time will be shorter.
The car charger is provided with a 3AG 2Amp fast fuse for short
circuit protection that can be accessed by unscrewing the tip of the
cigarette lighter plug.
NOTE Charging the battery beyond full capacity will not
damage the NiMH battery pack, but it could gradually
discharge your car battery.
34
THE BATTERY PACK
THE MINELAB EXPLORER II
BATTERY PERFORMANCE
Battery life indications
Figure 3.4
Figure 3.4
Battery life indicator
Battery Life
Full
battery power
Low
battery power
Visual indication – The battery life indicator appears on all of the
Explorer detect screens. The battery will be fully shaded at
maximum battery charge. When this shaded area nears the bottom,
the detector will begin to sound its low battery warning.
Audio indication – When the alkaline or NiMH batteries approach
the point at which they do not supply enough power to operate the
Explorer II, a falling extended chord is emitted from the speaker (or
headphones). When this low battery warning is heard, there will be
only a few minutes of life left in the batteries. It is recommended that
the batteries be replaced or recharged as soon as possible to avoid
missing any targets. When the battery symbol is completely empty,
the detector will sound an extended ‘dropping’ tune and display a
message immediately before turning itself off.
Battery Performance
ALKALINE
NiMH 1600 mAh
NiMH 1800 mAh
14
Notes supporting performance figures
hours Alkaline batteries will power the Explorer II for up to 14 hours of
12.5 hours constant use. The NiMH 1600 battery pack will power the detector
for up to 12.5 hours of constant use and the NiMH 1800 battery pack
14 hours for 14 hours. Battery performance is charted in Chapter 7: User
Info.
More detecting time?
To extend battery life:
•
use headphones
•
turn off the backlight
•
turn the detector off when not
in use
NOTE Unlike Nickel Cadmium batteries, the NiMH battery
pack DOES NOT have to be flattened to be recharged.
Whenever the detector has been unused for a lengthy
period, recharge the battery pack to ensure full performance.
There is no limit to the time the battery pack can be left on
charge.
You are now ready to proceed to Chapter 4: Control Panel.
!
BATTERY PERFORMANCE
35