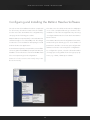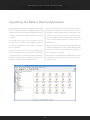
1
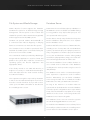
LINUX OS SYSTEM CONFIGURATIONS
July 2014 Edition
DAVINCI RESOLVE FOR LINUX - CERTIFIED CONFIGURATION GUIDE
Table of Contents
DaVinci Resolve for Linux
Platform Specifics
3
4
UHD and 4K-DCI Image Processing
5
GUI Monitor
5
Connecting a Calibrated Edit, Client and Color Grading Monitor
6
PCIe Expanders
6
File System and Media Storage
7
Database Server
7
System Connection Diagram
8
Before Installing the Operating System
Jumpers and Bios
9
9
Installing Linux
GUI Server #1
11
12
Core Server #2
12
Database Server #3
12
Configuring and Installing the DaVinci Resolve Software
13
DaVinci Resolve Ethernet Network Connections
15
Connecting the Resolve Database server
16
Upgrading the DaVinci Resolve Application
17
Testing the Installation
18
Storage Subsystem Connection and Installation
19
System Configurations
20
Shopping List
24
DaVinci Resolve Control Surface
Dimensions and Weights
28
28
Warranty29
2
DAVINCI RESOLVE FOR LINUX - CERTIFIED CONFIGURATION GUIDE
DaVinci Resolve for Linux
If you have experience in configuring Linux and installing a SAN
storage file system then building the world’s highest performing
color grading system is simple with this easy to follow guide.
DaVinci Resolve combines the world’s most advanced
DaVinci Resolve for Linux operates on current Intel
color corrector and image enhancement system with
based server computers.
powerful multitrack online editing, so now you can edit,
The hardware configuration you select has a significant
color correct, finish and deliver all from one application!
impact on the performance of the overall system. To
Whether you are just starting your editing or grading
achieve the best possible experience it is essential
career, building a post production facility or upgrading
to build your DaVinci Resolve system with high
your existing DaVinci Resolve suite, this guide contains
performance computer hardware including at least
important information which will help you buy, build
one high performance graphics processor (GPU).
and configure your system.
As DaVinci Resolve will use all the available resources
The system you select or build may be based on
to provide the fastest possible processing the
what you already have and can update, or a specific
configuration defines not only the speed which you
operational or technical requirement.
can edit, playback and grade but also the time to
render your finished timeline.
As a guide, if your projects are SD or low resolutions
for the web, you could use a lower powered system
For your client or grading monitor/projector, DaVinci
compared to the needs of a client supervised 2K or
Resolve also supports the range of Blackmagic Design
4K grading session for a TVC or feature film. For low
video I/O cards to provide a SDI output to your
to medium budget HD projects quite often the mid-
calibrated grading display.
range powered systems are sufficient.
3
DAVINCI RESOLVE FOR LINUX - CERTIFIED CONFIGURATION GUIDE
Platform Specifics
This guide defines a number of cer tified
configurations and also lists components you may
consider if you don’t need guaranteed performance
but have a tight budget.
With so many workflow, resolution and speed
demands in today’s post facilities we recommend
you discuss the operational requirements with the
end user before ordering the hardware to configure
a DaVinci Resolve system.
There are hardware configurations detailed below
starting from a single dedicated GPU for image
With the addition of a PCIe expansion chassis multiple
processing up to an eight GPU system and when
configured with the more powerful GPUs this system
GPUs can be connected to the SuperServer.
is suitable for stereoscopic grading and 4K video.
The new 2014 Linux Configuration Generator permits
Supermicro SuperServer 7047GR-TRF
GPU configurations from 1 to 8 and therefore a new
6+1 configuration using a single server and expander.
The Supermicro SuperServer 7047GR-TRF is
currently the only hardware platform certified for
Additional image processing power can also be
DaVinci Resolve on Linux. It can be used as a desktop
added using a second SuperServer. These two servers
tower or rack-mounted and contains redundant
are connected together via an InfiniBand interface.
power supplies.
The PCIe expansion chassis with up to eight GPUs is
then connected to the second SuperServer.
It provides very fast image processing using up to four,
double-width, PCIe3.0 x16 slots that do not share bus
This computer is generally available from resellers
resources for greater throughput and flexibility. One
who specialize in server configurations. The table
of these slots is used for the GUI and the remainder
found later in this document will guide you to the
can be used for image processing.
configuration you need for your operation.
4
DAVINCI RESOLVE FOR LINUX - CERTIFIED CONFIGURATION GUIDE
UHD and 4K-DCI Image Processing
With the increasing use of digital cameras projects
Assuming your system has sufficient GPU RAM to
now often include camera clips at UHD, 4K-DCI or
play UHD and 4K-DCI images, one way to improve
higher resolutions. While some cameras provide
your editing and grading experience is to use a HD
UHD or 4K or higher capture resolutions they usually
resolution timeline and displayed on a HD monitor.
store the images as compressed data as this takes
After you have completed your edit and grade
less storage space and bandwidth.
simply change the timeline resolution for a UHD or
4K-DCI render.
However for editing and grading, the compressed
data needs to be decompressed to the full RGB per
There are many potential speed limits within this 4K
pixel bit depth which will use four or more times the
pipeline so depending on the clip codec, CPU speed
processing power of a HD image for the same real
and number of cores, system RAM, the number of
time grading performance. The GPU RAM therefore
GPUs, their core count and GPU RAM, motherboard
becomes a very important factor when dealing with
slot speed, disk speed, etc. each of these can affect
UHD and 4K-DCI timelines.
the full 4K playback grade and display in real time.
GUI Monitor
The Resolve GUI is optimized for 2560 x 1440 screen
resolution but will work down to 1920 x 1080. Dual
GUI monitors are also supported and these can be
different resolutions within the specs listed above.
5
DAVINCI RESOLVE FOR LINUX - CERTIFIED CONFIGURATION GUIDE
Connecting a Calibrated Edit, Client and Color Grading Monitor
All editors and colorists grading for TV or film
Alternatively you can use the BMD demultiplexer
deliverables will need to use a proper calibrated
to convert these 3G SDI connections to four 1.5G
grading monitor connected to a SDI video I/O card
SDI feeds.
for 2D or 3D monitoring. This device will occupy a
Depending on the specific card, these DeckLink
PCIe slot on the motherboard.
capture and playback devices support SD, HD, 2K,
DaVinci Resolve supports the Blackmagic Design
UHD and 4K SDI video with up to 16 channels of
range of DeckLink video I/O devices for SDI video
audio. Many also feature HDMI and analog audio
and embedded audio ingest and playback. The
and video outputs, external sync and VTR control
same device is used for connecting your calibrated
via a RS-422 connection.
grading monitor. Users can loop a single feed from
For DaVinci Resolve to use the DeckLink you will
the VTR to the grading monitor or connect the
need to install the latest Desktop Video drivers,
second SDI output directly to the grading monitor.
which are available from the support page at www.
DaVinci Resolve also supports the DeckLink 4K
blackmagicdesign.com.
Extreme video card and if your facility has a UHD/4K
DaVinci Resolve for Linux also supports the
display that accepts a single 6G SDI or two 3G SDI
DVS Atomix card. Details can be found in the
cables you can use this DeckLink card to connect to
shopping list.
your monitor.
PCIe Expanders
The SuperServer offers connection to an external
expander chassis via its PCIe interface. This permits
extra GPUs to be installed for use by the unique
processing controller in DaVinci Resolve.
While there are a number of expanders available on
the market only a few have been tested and certified
for use with DaVinci Resolve.
Please refer to the PCIe Expander details later in
this guide.
6
DAVINCI RESOLVE FOR LINUX - CERTIFIED CONFIGURATION GUIDE
File System and Media Storage
Database Server
DaVinci Resolve for Linux supports the Quantum
DaVinci Resolve uses a file based project database or
StorNext file system for its default image storage
full database server to hold all the metadata relating
management. This has proven to be a robust and
to every grade for every clip for all the projects. You
reliable file system for direct attached storage (DAS)
can operate with either system.
and storage area network (SAN) systems.
As this data is critical, many facilities back up their
StorNext can provide realtime 4K bandwidth on
Resolve databases daily and some use a separate
a continuous basis without dropping or delaying
Resolve Database server.
frames as sometimes seen with other file systems.
Facilities with full license versions of DaVinci Resolve,
The StorNext license should be purchased from
including a mix of Linux, Mac OS X and Windows
Quantum for a DAS system or ensure the facility has
systems, can share the projects or split projects across
the license if connected to a SAN.
many configurations. Sometimes projects are started
in one suite and finished in another. Often grading
The automated installer provided by Blackmagic
work follows job preparation, image scene detection
Design with the application is used to format and
and conforming performed in an offline suite.
partition the system disk, install the CentOS 6.4
operating system, the Resolve application and
The Resolve Database Server enables facilities to
appropriate drivers.
use a central server to hold each of the databases
used by Resolve. It also provides a single source for
If the facility intends to use DAS with Resolve, it
daily backups.
might be necessary to install Red Hat Enterprise
Linux v6.4 rather than the usual CentOS used by
The database server can be constructed using the
most Resolve facilities.
same Supermicro SuperServer used for DaVinci
Resolve. Alternatively you can build a database
This requirement might be imposed by Quantum
server using the Mac OS X or Windows installer
in which case the Red Hat Enterprise Linux license
DVDs that come with your DaVinci Resolve Panel.
must be sourced elsewhere and you will need to
create your own RHEL 6.4 installer as described in
As long as the machine is a modern multi-core
the “Installing Linux” section.
system and can be dedicated to act as the database
server the specific configurations are not specialized.
A top of the line Mac Mini is a popular choice. Setup
details are in the section ”Connecting the Resolve
Database Server” later in this guide.
The Database Server connects to Resolve systems
via a dedicated gigabit Ethernet connection.
To install the Linux Database Server software, follow
the install procedure listed in the “Installing Linux”
section and select the ‘Database Server’ option.
7
DAVINCI RESOLVE FOR LINUX - CERTIFIED CONFIGURATION GUIDE
System Connection Diagram
Basic Configuration
RESOLVE CHASSIS A
PCIe EXPANSION
SPEAKERS
GUI MONITOR
GRADING MONITOR
FC STORAGE
RESOLVE CONTROL SURFACE
Advanced Configuration
RESOLVE CHASSIS A
RESOLVE CHASSIS B
SPEAKERS
PCIe EXPANSION
FC STORAGE
GUI MONITOR
RESOLVE CONTROL SURFACE
Thunderbolt
Storage Connection
8
GRADING MONITOR
DAVINCI RESOLVE FOR LINUX - CERTIFIED CONFIGURATION GUIDE
Before Installing the Operating System
After selecting your hardware there are just a few
A one chassis configuration is setup simply as a GUI
steps starting with the motherboard VGA jumper
server. A two chassis configuration consists of a GUI
and Bios settings. Then you can commence with
server and a CORE server.
the DaVinci Resolve installer.
In addition to the most important GUI and CORE
Follow the instructions below to set up the
servers, a Database server can be added to the
computer servers before installing the OS and the
standard Resolve configuration.
DaVinci Resolve application. Note that if there are
Before commencing the installation of the operating
multiple chassis in your configuration the setup for
system please install all specified hardware into
each will differ.
each server chassis. A keyboard, mouse, monitor
Every Resolve configuration with 1 to 8 GPUs
and blank system hard drive must be connected to
needs a GUI server so you’ll always need to build
the server.
one of these. More powerful Resolve configuration
With the exception of the blank system hard drive,
may need an additional 1 or 2 additional servers
disconnect all connections to storage including:
containing extra GPUs for faster performance.
SATA, fiber channel, Ethernet and USB.
Jumpers and Bios
Follow the instructions below to set up the display
jumper and system BIOS before installing DaVinci
Resolve. Note that if there are multiple chassis in
your configuration the setup for each will differ.
Follow the procedure for each chassis.
The Resolve GUI and CORE servers must have the
onboard VGA jumper (JPG1) set to ‘disable’. The
Resolve Database server must have the onboard
VGA jumper set to ‘enable’.
1. To change the JPG1 jumper setting on.. the
Remove the jumper from pins 1 and 2 and
motherboard to disable the onboard VGA
install it over pins 2 and 3 as shown in the
graphics, locate the JPG1 group of 3 pins which
accompanying illustration.
is near the PCI-E slot 2 on the motherboard.
9
DAVINCI RESOLVE FOR LINUX - CERTIFIED CONFIGURATION GUIDE
2. Unplug all hard disks except the one where you
6. Use the down arrow key to go to the SATA
want to install Linux and Resolve
configuration page. Press enter. The SATA
Configuration panel opens.
3. Power up the machine. Press Delete when the
SuperMicro logo appears on the screen in order
7. Set the SATA Mode by pressing enter, scrolling
to go into BIOS.
to select AHCI and press enter again. Select Esc
to exit out of SATA Configuration.
4. You will see the Main BIOS page shown below.
Set the date and time correctly for each server.
8. Insert the Linux Resolve DVD into the drive.
9. Press the right arrow key 5 times to go to the
Save & Exit page shown below:
5. Use the right arrow key to go to the Advanced
page shown below:
10. Press the down arrow key to go to “Save
Changes and Reset”. Press Enter. Press Enter
again at the pop up dialog to confirm saving
changes and resetting.
10
This completes the jumper and bios setup.
DAVINCI RESOLVE FOR LINUX - CERTIFIED CONFIGURATION GUIDE
Installing Linux
In this section you will create a Linux DVD, either
2. Mount the BMD supplied Resolve SD Card to a
using the BMD supplied SD card to make a
folder (for example /mnt/Resolve_SDcard)
CentOS 6.4 DVD or a RedHat DVD if required by
3. Open Terminal and type
your storage file system vendor. Then using the DVD
> cd /RHEL_IMAGE
install the OS in a specific configuration based on
> select return, then type
the type of server you are building.
>
During the installation the application may erase
/ m n t / R e s o l v e _ S D c a r d /c o p y _
postinstall_files.sh/RHEL_RESOLVE_
and format any attached storage drives, load the OS
DVD.iso
and configure a number of drivers.
This installation process is the same for all Resolve
Note: /RHEL_RESOLVE_DVD.iso will become
the new RHEL 5.4 or 6.4 ISO image of the
servers and can easily take an hour for each server
Resolve installer DVD.
so please be patient.
4. Burn that ISO to a DVD.
If you are using the BMD supplied CentOS 6.4 DVD
go directly to step 5.
Now to the install.
If you need to install a RHEL 6.4 or older 5.4 system
5. Insert the BMD supplied Resolve DVD, or the
to comply with a storage OS requirement, you need
RHEL version if you require that OS, into the DVD
to start at step one and make a new installer DVD.
drive of your new DaVinci Resolve hardware and
restart the server.
1. On another CentOS/RHEL system, extract your
third party supplied RHEL 6.4 or 5.4 ISO image
If the server fails to boot from the DVD drive,
change the boot sequence in the BIOS settings
to a directory (for example /RHEL_IMAGE)
to ‘DVD then primary hard drive’. Once the
server has successfully booted from the DVD
you should see the screen below.
11
DAVINCI RESOLVE FOR LINUX - CERTIFIED CONFIGURATION GUIDE
GUI Server #1
6. Read through the descriptions to the right and
select your server type using the corresponding
The GUI server hosts the main Resolve application
number, 1,2,3, 4 or 5 and then ‘enter’ or ‘return’
and always has the control surface and GUI monitor
to build your server OS.
connected in the finished system. Select option ‘1’
7. Continue as require for all the servers you need.
and press ‘enter’ or ‘return’ to build Resolve chassis
When the installation for each server is finished,
A, which is the GUI server.
remove the DVD, restart the server and verify it
The primary drive will be formatted, the OS and drivers
starts without reporting errors.
loaded and then a number of applications and files
Perform a “cold boot” test by completely shutting
will be installed on the primary drive.
down the server, wait a few seconds and then
Core Server #2
power it up again. Make sure it starts without
errors or lengthy boot delays. Check the mouse
If your Resolve configuration requires an additional
and keyboard work.
CORE server please use the same installation DVD
NOTE: For a single server configuration, after the
and proceed just as you did for the GUI server. The
OS install and check you can choose to proceed
only difference is that you will need to select option
with the Resolve configuration and application
‘2’ to build Resolve Chassis B.
installer or load the disk storage file system.
Remember that the primary drive will be formatted,
If the disk storage file system is loaded next, you
and the OS and drivers loaded on each server, so
can test this with the GUI server or you can load
nothing will remain on the existing drives.
the Resolve application and install the disk storage
Database Server #3
file system later. It does not matter in which order
these tasks are performed.
Some facilities with multiple Resolve systems use a
If you have GUI and CORE servers, check each of
common server to hold each of the databases they
the servers separately then connect them together
use and so there is a Resolve Database server. The
using the Infiniband cable prior to configuring and
Resolve Database server supports connections from
installing the Resolve application.
Mac OS X, Windows and Linux systems. Select option
During the installation of the OS, the Resolve
‘3’ to build a Resolve Database server.
application installer was copied to the primary
drive but installation will only proceed when
you follow the instructions in the next section
of the guide.
This concludes the OS installation phase of
the servers.
12
DAVINCI RESOLVE FOR LINUX - CERTIFIED CONFIGURATION GUIDE
Configuring and Installing the DaVinci Resolve Software
Once the Linux OS installation has been completed
The GUI server should show the Resolve wallpaper
for all servers, the Resolve GUI server should be
once it has completed booting. Commence the
used to select the desired Resolve configuration by
installation of the Resolve application by selecting
carrying out the following procedure.
“Configure DaVinci Resolve” from the home DaVinci
Resolve menu.
With the GUI server powered off, connect the Resolve
software dongle to one of the USB ports. The dongle
The ‘DaVinci Resolve Linux Configuration Generator’
needs to be connected before attempting to install
window will open allowing you to set a number of
and run the Resolve application.
parameters and also review any preconfigured IP
addresses from the selected system configuration.
For a multi server system, it is essential to connect all the
servers together via InfiniBand, except for the Resolve
To configure the system, select the desired number
Database server which does not have InfiniBand and
of image processing GPUs from the Type pop-up
does not require any special configuration.
menu, e.g. 1 GPU, 2 GPUs up to 8 GPUs.
Start all of the servers and verify they have
booted correctly.
13
DAVINCI RESOLVE FOR LINUX - CERTIFIED CONFIGURATION GUIDE
Then select the DaVinci Resolve panel type your
Some facilities have a dozen or more file systems so
system will use, i.e. a new Resolve Control Surface
please enter each of the mount points on page 1 and
with USB or a legacy DaVinci 2K+ panel.
then select page 2, or more pages, for additional
mount points.
Leave the text entry ‘Advanced’ field blank. This
may be required for a special configuration at the
direction of BMD support.
If your colorist works with RED r3d files and wants
realtime hardware support select the number of
cards installed from the “Number of RED Rocket
cards” popup menu.
Now that you have completed these steps, click
‘Save’. The Resolve configuration will be saved
immediately and the window will continue to display
the saved settings. Any further changes made to
Next is the number of file system mounts. Most
these settings will only take effect once the ‘Save’
systems with direct attached storage (DAS) will have
one but some will have two or more.
button has been clicked.
Once the number of file system mounts has been
For a multi server configuration, clicking ‘Save’ also
verifies the connections to all servers which have
selected, the next step is to specify the path to
these. You will find a few DPX and QuickTime files on
been powered on and connected via InfiniBand.
the primary hard drive so you can test the Resolve
Clicking ‘Save’ also causes the ‘DaVinci Resolve
application even if you do not have your high-speed
Configuration Generator’ to check if the Resolve
disk storage ready. Unless you are setting up the
application software is installed on the GUI server. If
final file system now, type “/vol0” into the first file
not, a dialog box will offer to install the software.
system text box.
Choose to ‘Install now” and the Resolve application
At such a time as the Resolve GUI server is
will be installed in a few minutes. Software will also
subsequently attached to high speed disk storage,
be installed on any servers connected via InfiniBand.
the first file system mount path should promptly be
If you reopen ‘Configure DaVinci Resolve’ in the
changed from “/vol0” to the mount path of the high
future, such as when you wish to add or change
speed disk storage.
a file system mount point, the last saved
If you have or will have a StorNext file system, type
configuration will be shown. Make any desired
the path in the text box, e.g. ‘/mnt/nl01’. Keep adding
changes to the settings and then save again before
mount points for each file system.
exiting the application.
14
DAVINCI RESOLVE FOR LINUX - CERTIFIED CONFIGURATION GUIDE
Upgrading the DaVinci Resolve Application
Upgrading DaVinci Resolve is as simple as downloading
The ‘Releases’ folder contains all software versions
the new software release from the Blackmagic Design
available for installation. Most people will only use
website, extracting the software and placing it into the
the latest software installer but you may wish to keep
‘Releases’ folder. Then double-click the new release
earlier versions in case of any technical issues with
to install.
the latest update. Double-click the desired software
version and installation should complete in just a
For a multi server system, it is essential to connect
few minutes.
all the servers together via InfiniBand, except for
the Resolve Database server, before installing a
Updates to the DaVinci Resolve application will load
Resolve update.
in quite a similar manner to the initial installation, with
the exception that colorist configuration and project
Double-click the ‘Home’ icon on the desktop and,
files will not be overwritten.
in the resulting window, open the ‘Resolve’ folder to
reveal the ‘Releases’ folder. Any future updates to
Nevertheless, it is always wise to backup the colorist
the Resolve application should also be put into the
configuration and project files. Please refer to the
‘Releases’ folder to make installation easy.
Installer notes.
15
DAVINCI RESOLVE FOR LINUX - CERTIFIED CONFIGURATION GUIDE
Testing the Installation
Once the application installation is complete, please
Log in as a guest user by double clicking on guest
reboot the server(s).
and Resolve will open on the Project Manager. Leave
all the settings as they are. On the media page, look
Each system should be tested prior to deployment.
for vol0 or whichever file system mount was specified
Testing can be performed at this stage, prior to
in the DaVinci Resolve Configuration Generator.
installing the StorNext file system.
Select the QuickTime or DPX files with a single click
You will find four icons on the GUI server desktop:
and then play them in the viewer. You can add clips
‘Home’ will take you to the top directory, which is a
to the media pool with a double click. These clips
helpful place to be when you want to move files such
are QuickTime or DPX from the system disk and
as EDLs and audio.
are just for testing. Realtime performance is not
‘DaVinci Resolve’ launches the Resolve application
expected. For normal operation you will need to
with a double-click. When the application is open,
have images stored on your high-speed disk array
choose ‘Quit’ to exit the application.
using the StorNext file system.
‘Storage’ quickly provides a graphical listing of all
Go to the color page and verify the system adjusts
connected drives, including USB flash drives.
the grade by using the mouse to control the lift,
‘Shutdown’ commands the Linux OS to cleanly turn
gamma or gain RGB settings and/or the master gain
off the system.
setting. While using the system with the Resolve
panels is far quicker and more intuitive, all operations
To test the system, double-click the DaVinci Resolve
are controllable using a mouse.
icon to launch the application.
16
DAVINCI RESOLVE FOR LINUX - CERTIFIED CONFIGURATION GUIDE
Storage Subsystem Connection and Installation
The StorNext image file system and the storage should
In a SAN configuration, Resolve is a client and
now be installed and tested. Please consult your local
the metadata controller (MDC) holds the license
StorNext distributor and/or your storage subsystem
information. Resolve must have the IP address of
vendor for installation and configuration guidance.
the MDC(s) which was previously entered during
We have certified StorNext version 4.3 and legacy
the configuration and installation of the StorNext
3.5.2 systems.
file system.
In a DAS configuration, Resolve hosts the server and
If your facility has CXFS file system storage, select
client for StorNext. Your IT engineer can open a shell
the Direct I/O checkbox in the ‘DaVinci Resolve
and run the StorNext installer following the guidelines
Configuration Generator’.
set by Quantum. Please seek guidance from your
local Quantum support office. You will also need to
enter the StorNext license which can be obtained
from Quantum.
17
DAVINCI RESOLVE FOR LINUX - CERTIFIED CONFIGURATION GUIDE
DaVinci Resolve Ethernet Network Connections
There are several types of DaVinci Resolve servers
2. From the Devices tab, select eth0 or eth1 and click
but only the GUI and Database servers require
Edit to open the Ethernet Device window. From
Ethernet connections. All other servers are
the General tab, enable ‘Activate device when
networked together via InfiniBand.
computer starts’ and leave the other options
disabled. The Ethernet port should be configured
This section provides Ethernet configuration
with suitable settings for the house network. If a
instructions for the GUI server and assumes that
static IP address is being used, ensure the default
the USB-based DaVinci Resolve Control Surface is
gateway address and DNS server information is
being used.
set so that updates to the Resolve software can
Network configuration instructions for the Database
be downloaded from the Internet. Click ‘OK’.
server are included in the following section of this
3. If the other Ethernet port will be connected to
document named ‘Connecting the DaVinci Resolve
a SAN MDC, select the port from the Devices
Database server’.
tab and click Edit to open the Ethernet Device
The Resolve GUI server (Resolve chassis A) has two,
window. From the General tab, enable ‘Activate
built-in, 1Gb Ethernet ports: eth0 and eth1.
device when computer starts’ and leave the
> One
Ethernet port should be connected to the
house network switch.
other options disabled. Click on ‘Statically set
> The other Ethernet port can be connected to a SAN
subnet mask to the settings provided by the
metadata controller (MDC) to carry SAN metadata.
SAN documentation or from your SAN vendor.
IP addresses’ and then set the IP address and
Click ‘OK’.
When using a Resolve Control Surface which connects
via USB, it does not matter which Ethernet ports
4. Deactivate and activate both Ethernet devices to
are used as long as they are configured correctly.
ensure they are working with the new settings.
The network system settings must be configured by
Close the Network Configuration tool and save
performing the following procedure:
changes when prompted.
1. On the Resolve GUI server, go to the start menu,
Your Resolve GUI server is now configured with
choose System Settings and then Network. When
Ethernet connections to the SAN MDC and the
the ‘Query’ window appears, enter the root
house network switch.
password ‘DaVinci’ and then click OK to open
the Network Configuration tool.
18
DAVINCI RESOLVE FOR LINUX - CERTIFIED CONFIGURATION GUIDE
Connecting the Resolve Database server
While other DaVinci Resolve servers connect to
By default, DaVinci Resolve uses a database on the
each other via InfiniBand, the Database server
GUI server unless you change to a new database on
simply uses 1Gb Ethernet to connect to the facility’s
a Database server.
network switch. In order for the GUI server to
To create a new database on the Database server,
connect to the Database server, a static IP address
click on ‘Create New’ to open the ‘Add Database’
must be manually set on the Database server.
window. Enter a label for the new database, in the
Start by connecting an Ethernet cable from the
‘Label’ field, and enter the IP address of the Database
facility’s network switch to the eth0 back panel
server. Enter a database name, username and
connector on the Database server.
password. Click ‘OK’ to return to the ‘DB’ window.
On the Database server, go to the home menu,
Testing the Resolve Database server
choose System Settings and then Network. When
Testing the DaVinci Resolve Database server is easy.
the ‘Query’ window appears, enter the root
Select the new database in the ‘Database Manager’
password ‘DaVinci’ and then click OK to open the
window and click ‘Select’. You will have successfully
Network Configuration tool.
connected to the new database, on the Database
From the Devices tab, select eth0 and click Edit to
server, unless you encounter an error message
open the Ethernet Device window. From the General
stating, “Failed to connect to database”.
tab, enable ‘Activate device when computer starts’
Click ‘delete’ or ‘Cancel’ to dismiss the ‘Database
and leave the other options disabled. Click on
Manager’ window. The new database will be used
‘Statically set IP addresses’ and then set the desired
to store your projects.
IP address, subnet mask, default gateway address
and DNS server information for the facility. Click
Updating DaVinci Resolve Database server
‘OK’ and then close the Network Configuration
Updates to the Database server are easy and are
tool. Make a note of the static IP address.
independent to any updates for all other DaVinci
Ensure the GUI server is also connected via 1Gb
Resolve servers. Updates may become available on
Ethernet to the facility’s network switch. On the GUI
DVD or as a download from the Blackmagic Design
server, launch the DaVinci Resolve application and
website. The software updater needs to be run
then select ‘Database Manager’ from within the
locally on the Database server itself but can be run
User Login page.
from any location on the server.
19
DAVINCI RESOLVE FOR LINUX - CERTIFIED CONFIGURATION GUIDE
System Configurations
The following tables show multiple hardware configurations and where to install the PCIe cards. Use the
Shopping List on the following pages to order the quantity as indicated in the table.
Single Chassis; 1 GUI GPU + 1 Image Processing GPU
Slot
Spec
Server Chassis
1
-
2
PCI 3.0 x16
3
-
4
PCI 3.0 x16
5
-
6
PCI 3.0 x16
7
-
8
PCI 3.0 x16
9
PCI 3.0 x8
HDMI Bracket
10
PCI 3.0 x8 (x16)
Storage Interface
11
PCI 2.0 x4 (x8)
BMD DeckLink
GUI GPU
Optional DVS Atomix
Image Processing GPU
Single Chassis; 1 GUI GPU + 2 Image Processing GPUs
Slot
Spec
Server Chassis
1
-
2
PCI 3.0 x16
3
-
4
PCI 3.0 x16
5
-
6
PCI 3.0 x16
7
-
8
PCI 3.0 x16
Image Processing GPU
9
PCI 3.0 x8
HDMI Bracket
10
PCI 3.0 x8 (x16)
Storage Interface
11
PCI 2.0 x4 (x8)
BMD DeckLink
GUI GPU
Optional DVS Atomix
Image Processing GPU
Note; An Optional Red Rocket card should be installed in slot 8
Note; that the Motherboard slot 11 is closest to the CPU.
20
DAVINCI RESOLVE FOR LINUX - CERTIFIED CONFIGURATION GUIDE
Single Chassis; 1 GUI GPU + 4 Image Processing GPUs in PCIe Expander
Slot
Spec
Server Chassis
PCIe Expander
1
-
2
PCI 3.0 x16
GUI GPU
Image Processing GPU
3
-
4
PCI 3.0 x16
Optional DVS Atomix
Image Processing GPU
5
-
6
PCI 3.0 x16
7
-
8
PCI 3.0 x16
9
PCI 3.0 x8
HDMI Bracket
10
PCI 3.0 x8 (x16)
Storage Interface
11
PCI 2.0 x4 (x8)
BMD DeckLink
PCI-E expander HIC
Image Processing GPU
Image Processing GPU
Single Chassis; 1 GUI GPU + 6 Image Processing GPUs in PCIe Expander
Slot
Spec
Server Chassis
PCIe Expander
1
-
2
PCI 3.0 x16
GUI GPU
Image Processing GPU
3
-
4
PCI 3.0 x16
5
-
6
PCI 3.0 x16
7
-
8
PCI 3.0 x16
PCI-E expander HIC
Image Processing GPU
9
PCI 3.0 x8
HDMI Bracket
Image Processing GPU
10
PCI 3.0 x8 (x16)
Storage Interface
Image Processing GPU
11
PCI 2.0 x4 (x8)
BMD DeckLink
Image Processing GPU
Optional DVS Atomix
Image Processing GPU
PCI-E expander HIC
Note; An Optional Red Rocket card should be installed in slot 8
Note; that the Motherboard slot 11 is closest to the CPU.
21
DAVINCI RESOLVE FOR LINUX - CERTIFIED CONFIGURATION GUIDE
Dual Chassis; 1 GUI GPU + 8 Image Processing GPUs in PCIe Expander
8+1 GPU 2K-3D/4K
Slot
Spec
1
-
2
PCI 3.0 x16
3
-
4
PCI 3.0 x16
5
-
6
PCI 3.0 x16
7
-
8
PCI 3.0 x16
9
PCI 3.0 x8
HDMI Bracket
Image Processing GPU
10
PCI 3.0 x8 (x16)
Storage Interface
Image Processing GPU
11
PCI 2.0 x4 (x8)
BMD DeckLink
Server Chassis 1
Server Chassis 2
PCIe Expander
Image Processing GPU
GUI GPU
Image Processing GPU
Optional DVS Atomix
PCI-E expander HIC
Image Processing GPU
Image Processing GPU
InfiniBand
InfiniBand
Image Processing GPU
PCI-E expander HIC
Note; An Optional Red Rocket card should be installed in slot 8
Note; that the Motherboard slot 11 is closest to the CPU
22
Image Processing GPU
DAVINCI RESOLVE FOR LINUX - CERTIFIED CONFIGURATION GUIDE
PCIe Expansion Chassis
In all system configurations, additional image
Note: There are multiple PCIe expander options listed
processing GPUs or even a RED Rocket card can be
below. Not all offer Gen 3.0 x16 speed to every slot
added using a PCIe expansion chassis.
and the power supply limits on some expanders make
them suitable for only one or two GPUs especially if
If you use one of the chassis recommended below,
a RED Rocket card is also installed.
install the expander HBA in the PCIe slot indicated and
then your image processing GPUs in the expander.
The expander tables below show the ideal slot to
The GUI GPU should remain in the main computer as
use for the GPUs. Use the spare slots for other cards
should the DeckLink and a RAID controller if installed.
if needed.
CUBIX GPU-Xpander Desktop Elite
Cyclone PCIe2-2707
Slot
Board
Slot
Board
1
Image Processing GPU
1
Image Processing GPU
2
Image Processing GPU
2
Image Processing GPU
3
Image Processing GPU
3
Image Processing GPU
4
Image Processing GPU
4
Spare x8 slot
5
Spare x8 slot
CUBIX GPU-Xpander Rackmount Elite
NetStor NA255A-XGPU
Slot
Board
1
Spare x8 slot
Slot
Board
2
Spare x8 slot
1
Image Processing GPU
3
Image Processing GPU
2
Image Processing GPU
4
Image Processing GPU
3
Image Processing GPU
5
Image Processing GPU
4
Image Processing GPU
6
Image Processing GPU
While this expander used x8 slots, in testing its
performance has shown to be acceptable.
CUBIX GPU-Xpander Rackmount 8
Slot
Board
1
Image Processing GPU
2
Image Processing GPU
3
Image Processing GPU
4
Image Processing GPU
5
Image Processing GPU
6
Image Processing GPU
7
Image Processing GPU
8
Image Processing GPU
23
DAVINCI RESOLVE FOR LINUX - CERTIFIED CONFIGURATION GUIDE
Shopping List
Software
Computers and Chassis
DaVinci Resolve for Linux
DaVinci Resolve GUI and CORE Server(s)
http://www.blackmagicdesign.com
Computer: Supermicro SuperServer 7047GR- TRF
Black 4RU Rackmountable/Tower
Where to Buy
CPU: 2 x Intel Xeon 10 Core E5-2680v2 2.8GHz or
faster
Included with DaVinci Resolve Control Surface
Control Panel
RAM: 32GB (8x4GB) or more ECC DDR3-1866
SDRAM
DaVinci Resolve Control Surface
(Note: includes the DaVinci Resolve software)
Hard Disk: Seagate Barracuda ES.2. 500GB or Intel
520 SSD, 240GB
http://www.blackmagicdesign.com/davinciresolve
DVD Drive: DVD-RW drive, SATA, Black
Where to Buy
http://www.supermicro.com/products/
system/4U/7047/SYS-7047GR-TRF.cfm
http://www.blackmagicdesign.com/resellers/
Capture Card
Please note that dual chassis configurations have
two of the above configuration.
Blackmagic Design DeckLink 4K Extreme
Where to Buy
Alternatives with a different feature set
http://www.supermicro.com.tw/wheretobuy/
index.cfm
Blackmagic Design DeckLink Studio 4K
(Note: HD-SDI I/O and HDMI output is supported
by Resolve)
Optional DaVinci Resolve Database Server
Computer: Supermicro SuperServer 7047GR- TRF
Black 4RU Rackmountable/Tower
http://www.blackmagicdesign.com/products/
Where to Buy
http://www.blackmagicdesign.com/resellers/
CPU: 1 Intel Xeon 6C E5-2620 2.0 GHz 2 15M
7.2GT/s QPI, or faster
Alternative with Additional features
RAM: 16GB or more ECC DDR3-1333 SDRAM
DVS Atomix
Hard Disk: Seagate Barracuda ES.2. 500GB or Intel
520 SSD, 240GB
Model: Atomix HDMI
DVD Drive: DVD-RW drive, SATA, Black
http://www.dvs.de/products/video-boards/atomixhdmi.html
http://www.supermicro.com/products/
system/4U/7047/SYS-7047GR-TRF.cfm
Where to Buy
Where to Buy
[email protected]
http://www.supermicro.com.tw/wheretobuy/
index.cfm
24
DAVINCI RESOLVE FOR LINUX - CERTIFIED CONFIGURATION GUIDE
Shopping List
GUI Monitor
USB 2.0 Extender
HP DreamColor Z27x Professional Display
ICRON USB 2.0 Ranger 2204
Single or Dual as required
http://www.icron.com/products/icron-brand/usbextenders/cat5/usb-2-0-ranger-2204/
http://www8.hp.com/us/en/campaigns/
workstations/dreamcolor-displays.html
Where to Buy
http://www.icron.com/where-to-buy/
Where to Buy
http://www8.hp.com/us/en/campaigns/
workstations/dreamcolor-displays.html
RED R3D Processing Card
Alternatives with a different feature set
http://www.red.com/
Any high quality computer monitor with a
2560x1440 screen resolution. 1920 x 1080 and
higher screen resolutions are also supported.
Where to Buy
RED Rocket
http://www.red.com/store/775-0001
InfiniBand Interconnect
Where to Buy
The InfiniBand interconnect is applicable
for dual chassis systems - two cards
and one cable are required
Your local computer supplier
USB Keyboard and Mouse
Microsoft Model: APB-00018 USB Desktop 600 KB
& Mouse
Mellanox InfiniBand card (QSFP)
http://www.microsoft.com/hardware/en-us/p/
wired-desktop-600
http://www.mellanox.com/page/products_
dyn?product_family=119&mtag=connectx_3_vpi
Where to Buy
Where to Buy
Your local computer supplier
http://www.mellanox.com/page/buy_overview
Alternatives with a different feature set
Mellanox InfiniBand cable (QSFP to QSFP)
Model: MCX353A-FCBT
Model: MCC4Q26C-002 (or
MC2207130-002 for CentOS 6.3)
Logickeyboard Apple DaVinci Resolve
Model: LKBU-RESOLVE-AM89-US
http://www.logickeyboard.com/shop/
apple-davinci-resolve-2952p.html
http://www.mellanox.com/relateddocs/prod_cables/DS_FDR_56Gbs_
Passive_Copper_Cables.pdf
Where to Buy
Where to Buy
http://www.logickeyboard.com/shop/
apple-davinci-resolve-2952p.html
http://www.mellanox.com/page/buy_overview
25
DAVINCI RESOLVE FOR LINUX - CERTIFIED CONFIGURATION GUIDE
Shopping List
PCI Express Expansion
processes might not be available or operation
could be restricted on GPUs with limited memory
Multiple Options Shown
so consider this when selecting your GPU from
CUBIX GPU-Xpander Desktop Elite Model:
the options below.
XPDT-G3-ELDHE5 (Hi-flow exhaust)
For processing UHD or 4K-DCI images we
http://www.cubixgpu.com/gpu-xpander-desktop
recommend 4GB or more of GPU memory (RAM).
CUBIX GPU-Xpander Rackmount Elite
NVIDIA GPUs
Model: XPRM-G3-ELRHE
NVIDIA Quadro K6000; 12GB GDDR5 SDRAM
http://www.cubixgpu.com/xpander-rackmount-elite
http://www.nvidia.com/object/quadro-desktopgpus.html
CUBIX GPU-Xpander Rackmount 8
Model: XPRM-G3-82A
NVIDIA Quadro K5000; 4GB GDDR5 SDRAM
http://www.cubix.com/gpu-xpander-rackmount
http://www.nvidia.com/object/quadro-desktopgpus.html
Where to Buy
Recommended for GUI GPU Only
http://www.cubixgpu.com/catalog
NVIDIA Quadro K4000, 3GB GDDR5 SDRAM
http://www.nvidia.com/object/quadro-desktopgpus.html
Cyclone PCIe2-2707 (five slot)
http://www.cyclone.com/products/expansion_
systems/600-2707.php
Alternative NVIDIA GPUs
NVIDIA GeForce GTX TITAN Black; 6GB GDDR5
SDRAM
Where to Buy
http://www.cyclone.com/purchase/process.php
http://www.geforce.com/hardware/desktop-gpus/
geforce-gtx-titan-black
NetStor NA255A-XGPU
http://www.netstor.com.tw/_03/03_02.php?MTEx
NVIDIA GeForce GTX 780ti with 3GB GDDR5
SDRAM
Where to Buy
http://www.netstor.com.tw/_06/06.php
http://www.geforce.com/hardware/desktop-gpus/
geforce-gtx-780-ti
Graphics Processor
NVIDIA GeForce GTX 780 with 3GB GDDR5
SDRAM
Important note for GPU selection
DaVinci Resolve performs all image processing in
http://www.geforce.com/hardware/desktop-gpus/
geforce-gtx-780
the GPU so selection is important based on the
clip type, resolution of the clips and timeline,
Where to Buy
and of course render resolution.
http://www.nvidia.com/object/workstation-wtb.html
Some of the image processing operations in
http://www.geforce.com/hardware/desktop-gpus/
geforce-gtx-780/buy-online
DaVinci Resolve, for example RAW clip debayer,
temporal noise reduction, optical flow speed
(Select the GPU and then ‘Compare and Buy’)
changes, motion effects and OpenFX plugins,
need large GPU memory for operation. These
26
DAVINCI RESOLVE FOR LINUX - CERTIFIED CONFIGURATION GUIDE
Shopping List
Storage File System
HBA for Fiber Channel
SAN External Storage
Quantum StorNext v4.3
http://www.quantum.com/products/software/
stornext/index.aspx
ATTO 8Gbps Dual Channel PCIe Fiber Channel HBA
Where to Buy
http://www.quantum.com/wheretobuy/index.aspx
http://www.attotech.com/products/product.
php?cat=1&scat=1&prod=2&sku=CTFC-82EN-000
Fiber Channel SAN
External Storage
ATTO 16Gbps Dual Channel PCIe Fiber
Channel HBA
Model: CTFC-82EN-000
Model: CTFC-162E-000
Multiple alternative options shown
http://www.attotech.com/products/product.php?ca
t=1&scat=33&prod=108&sku=CTFC-162E-000
Scale Logic Genesis
RX RAID Series Genesis RX 12
http://www.scalelogicinc.com/images/pdf/2014/
SLI%20Genesis%20RX%2012Bay%2001-25-14.pdf
Where to Buy
Genesis RX 24
Direct Attached External Storage
http://www.scalelogicinc.com/images/pdf/2014/
SLI%20Genesis%20RX%2024Bay%2001-25-14.pdf
Multiple alternative options shown
http://www.attotech.com/store/
Accusys A08S-PS, 8 Bay RAID
Genesis RX 36
http://www.accusys.com.tw/products/storage/
a08s3-ps-new.html
http://www.scalelogicinc.com/images/pdf/2014/
SLI%20Genesis%20RX%2036Bay%2001-25-14.pdf
Accusys A12S2-PS, 12 Bay RAID
Note: Scale Logic offer OS agnostic SAN operation
and support for StorNext or the HyperFS file system.
http://www.accusys.com.tw/products/storage/
a12s2-ps.html
http://www.scalelogicinc.com/html/san.php
Accusys SWF16, PCIe Switch
Where to Buy
[email protected]
http://www.accusys.com.tw/products/switch/
swf16-v2.html
Oxygen Tec O2 24 bay enclosure
Where to Buy
Model: 4K24FS
http://www.accusys.com.tw/where-to-buy/reselleragent.html
http://www.oxygentec.com/products/250/node
Where to Buy
http://oxygentec.com/foot/contactus/finden
27
DAVINCI RESOLVE FOR LINUX - CERTIFIED CONFIGURATION GUIDE
DaVinci Resolve Control Surface
Dimensions and Weights
WIDTH
DEPTH
WEIGHT
CENTER PANEL
195.5mm (7.69in)
574.1mm (22.60in)
460.7mm (18.14in)
12.2kg (26.9lb)
LEFT PANEL
195.5mm (7.69in)
333.5mm (13.13in)
421.8mm (16.60in)
4.8kg (10.6lb)
RIGHT PANEL
195.5mm (7.69in)
333.5mm (13.13in)
421.8mm (16.60in)
4.8kg (10.6lb)
195.5mm [7.69in]
HEIGHT
1238mm [48.75in]
590.57mm [23.25in]
470mm [18.49in]
373.93mm [14.72in]
28
DAVINCI RESOLVE FOR LINUX - CERTIFIED CONFIGURATION GUIDE
Warranty
12 Months Limited Warranty
Blackmagic Design warrants that DaVinci Resolve control surface
caused by the use of non Blackmagic Design parts or supplies,
will be free from defects in materials and workmanship for a
or d) to service a product that has been modified or integrated
period of 12 months from the date of purchase. If a product
with other products when the effect of such a modification
proves to be defective during this warranty period, Blackmagic
or integration increases the time or difficulty of servicing the
Design, at its option, either will repair the defective product
product. THIS WARRANTY IS GIVEN BY BLACKMAGIC DESIGN
without charge for parts and labor, or will provide a replacement
IN LIEU OF ANY OTHER WARRANTIES, EXPRESS OR IMPLIED.
in exchange for the defective product. Periodical updates to
BLACKMAGIC DESIGN AND ITS VENDORS DISCLAIM ANY
the operational software are not included under this warranty.
IMPLIED WARRANTIES OF MERCHANTABILITY OR FITNESS
In order to obtain service under this warranty, you the Customer,
FOR A PARTICULAR PURPOSE. BLACKMAGIC DESIGN’S
must notify Blackmagic Design of the defect before the expiration
RESPONSIBILITY TO REPAIR OR REPLACE DEFECTIVE
of the warranty period and make suitable arrangements for the
PRODUCTS IS THE WHOLE AND EXCLUSIVE REMEDY
performance of service. The Customer shall be responsible for
PROVIDED TO THE CUSTOMER FOR ANY INDIRECT, SPECIAL,
packaging and shipping the defective product to a designated
INCIDENTAL OR CONSEQUENTIAL DAMAGES IRRESPECTIVE
service center nominated by Blackmagic Design, with shipping
OF WHETHER BLACKMAGIC DESIGN OR THE VENDOR HAS
charges pre paid. Customer shall be responsible for paying
ADVANCE NOTICE OF THE POSSIBILITY OF SUCH DAMAGES.
all shipping changes, insurance, duties, taxes, and any other
BLACKMAGIC DESIGN IS NOT LIABLE FOR ANY ILLEGAL USE
charges for products returned to us for any reason.
OF EQUIPMENT BY CUSTOMER. BLACKMAGIC IS NOT LIABLE
FOR ANY DAMAGES RESULTING FROM USE OF THIS PRODUCT.
This warranty shall not apply to any defect, failure or damage
USER OPERATES THIS PRODUCT AT OWN RISK.
caused by improper use or improper or inadequate maintenance
and care. Blackmagic Design shall not be obligated to furnish
Copyright 2014 Blackmagic Design. All rights reserved.
service under this warranty: a) to repair damage resulting
‘Blackmagic Design’, “DaVinci’, ‘Resolve’, ‘DeckLink’, ‘HDLink’,
from attempts by personnel other than Blackmagic Design
‘Videohub’, ‘DeckLink’, and ‘Leading the creative video revolution’
representatives to install, repair or service the product, b) to
are registered trademarks in the US and other countries. All
repair damage resulting from improper use or connection to
other company and product names may be trade marks of their
incompatible equipment, c) to repair any damage or malfunction
respective companies with which they are associated.
29