1
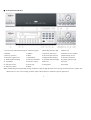
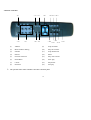
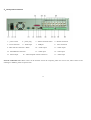
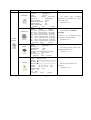
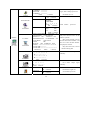
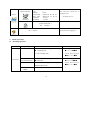
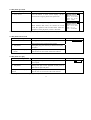
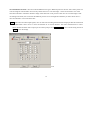
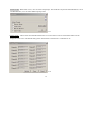
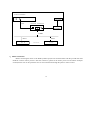
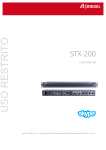
*Operation manual for MPEG4 series DVR1204/DVR1604/DVR1204RW/DVR1604RW Digital Video Recorder* *This manual takes DVR1604RW as an example* Operation precautions All the safety and operating instructions should be read before the appliance is operated. The improper operation may cause irreparable damage to the appliance. 1. Installation condition 1.1 Put away from extreme hot places and humid places 1.2 Avoid direct sunlight 1.3 Be horizontally installed 1.4 Avoid violent vibrating ,lifts and place gently 1.5 Do not place other devices upon 1.6 Put in well ventilation places, not block the radiator fan in the back of the recorder 2. Installation and operation precautions 2.1 Please check the main power switch and voltage of power supply to avoid voltage mismatch. Attach the power cable to the unit and connect it to your local mains supply, then open the power 2.2 At the first use, assure the installation of hard disk, and the master-slave jumper wire should be set. MAXTOR hard disk is strongly recommend 2.3 Do not unplug the power connector before turn the power off correctly and switch the Power On & Off within short period 2.4 Unauthorized repair or parts substitutions may result in fire, electric shock or other hazards. 2.5 Do not attempt to service this equipment by yourself. Refer all servicing to qualified service personnel. 3. Open Cabinet And Check Inventory Check the items supplied against the list below after open the case: 3.1 One power cord 3.2 One Ethernet cable (positive cable), one serial port cable 3.3 One package of installation kit 3.4 One user’s manual 3.5 One CD for installation 3.6 Certification of the product 3.7 Product warranty card 1 Table Of Contents Operation precautions ························································································· 1 1. Installation condition ·················································································· 1 2. Installation and operation precautions ························································· 1 3. Open Cabinet and Check Inventory····························································· 1 Chapter 1: Product Features and Specifications ·················································· 4 1. Technical Specifications ··········································································· 4 2. Product Features························································································· 5 Chapter 2: Installation ························································································· 6 1. Hard disk installation ················································································ 9 2. Front panel introduction ··········································································· 14 3. Remote controller ····················································································· 12 4. Back panel introduction ············································································ 13 4.1 Serial port connection and extension ·················································· 14 4.2 10-pin port connection ······································································ 14 4.3 Alarm operation instructions······························································ 16 Chapter 3: Operating Instructions ····································································· 21 1. Turn on / off the recorder ·········································································· 21 2. Recording operation ················································································· 23 3. Alarm connection operation ······································································ 24 4. Pan-tilt control operation ·········································································· 24 5. Network connection operation ·································································· 24 Chapter 4: Front panel and remote controller operation ····································· 25 1. Operation menu introduction ···································································· 25 1.1 Menu items’ shifting and setting ························································ 25 1.2 Menu Overview ················································································ 26 2. Menu Operation······················································································ 30 2.1 Recording Operation ········································································· 30 2.2. Playback operation ··········································································· 31 2 2.3. Playback fast forward ······································································· 31 2.4. Playback slow forward ····································································· 31 2.5. Control of Pan-tilt and Lens······························································ 32 2.6. Menu operation ················································································ 32 Chapter 5: Operations over Network ································································ 38 1. Setting on the Client End ·········································································· 38 2. Login and Logout ····················································································· 38 3. Operation of the Right Click Menu(Video)················································ 42 4. Record Search and Playback ····································································· 46 5. Config (System setting) ············································································ 49 6. Assistant ·································································································· 54 Chapter 6 Serial port operation ···································································· 61 1. Super Terminal’s software upgrading ························································ 61 2. Serial port upgrading operation ································································· 61 3. Control keyboard······················································································ 62 4. Matrix connection ···················································································· 63 Chapter 7 Frequent Asked Questions······························································· 64 3 Chapter 1 Product Features And Specifications 1. Technical Specifications Parameter 16 Channel 12 Channel Model DH-DVR1604RW DH-DVR1604 DH-DVR1204RW DH-DVR1204 Operation system Real-time operation system(RTOS) Processor AMD ELANSC520/133 embedded microprocessor Video input 16 Channel (NTSC/PAL)BNC(1.0VP- P , 75Ω) 12 Channel (NTSC/PAL) BNC(1.0VP- P ,75Ω) Video output 1 Channel PAL/NTSC,BNC(1.0VP- P , 75Ω)video signal Audio input 16 Channel 4 Channel 12 Channel 4 Channel 200-3000mv10KΩ 200-3000mv10KΩ 200-3000mv10KΩ 200-3000mv10KΩ (RCA) (RCA) (RCA) (RCA) Audio output 1 Channel 2000mv 1KΩ(RCA) Video display 1,4,16 window display 1,4,16 window display 1,4,16 window display 1,4,16 window display Video standard NTSC(525 line, 60f/s),PAL(625 line, 50f/s) System resource 16 channels real-time recording, one channel 12 channels real-time recording, one channel playback and network operation simultaneous playback and network operation simultaneous Image resolution Real-time monitor 704×576, playback 352×288, VGA output 720×576 Motion detection Area setting: 396 detection areas on the screen; detection sense setting: 3 levels detection sense for each area Video compression MPEG-4 CBR (Constant bit rate); MPEG-4 VBR (Variable bit rate) Audio compression Audio:ADPCM Image compression rate 352×288 CIF format, 704×576 4CIF format Video recording speed MPEG mode: PAL 1frame/10second-25f/s for each channel adjustable; NTSC 1frame/10second-30f/s for each channel adjustable Image quality 6 levels selectable Hard disk 4 IDE ports able to install 8 build-in HDDs, expand with external HDD case for another 12 HDDs HDD space used Audio:ADPCM 28.8Mbyte/hour Video:40-460Mbyte/hour Alarm input 16 channel voltage alarm input (+5~+15V D. C. Needed for the alarm input) Alarm output 6 channels output, (output in open/close contact) Alarm relay 24VDC 1A,220VAC 0.15A(relay output) MODEM connection RS232 Network connection RJ45 10M/100M Ethernet connection Pan-tilt control RS485 Backup CD-R、USB、HDD PC HDD CD-R、USB、HDD PC HDD Power 110VAC/220VAC Power consumption 60W 70W Working temperature -10℃-+55℃ Working humidity 10℅-90℅ Barometric pressure 86kpa-106kpa Size 2U standard industrial case,441 (W)x430 (L)x89mm (H) Weight Approx 11KG(Without HDD weight) Installation method Shelf installation; Desk installation 4 2. Product Features Real-time Monitor ・Video output port and VGA port, able to realize monitoring on the monitor or PC Type monitor ・Single window/4 windows/16 windows monitor ・Multi window /single window patrol sequentially on pre-determined intervals ・Display real time data stream and HDD occupying space per hour Compression Method ・Multiple video compression modes: MPEG4 Constant bit rate、MPEG4 variable bit rate ・16-channel audio/video real-time compression, independent hardware compression for each channel, stable synchronization of sound and image Storage ・4 IDE port support up to 8 large capacity built-in HDD ・Alternate HDD working method, Hard disks can be put into idle mode if not accessed for a period of time. Greatly reduces the power consuming and heat emission, hard disks can be used for much longer time. ・Choose overwrite or stop modes with HDD full-covered situation Back-up ・Support CD-RW drive to back up records onto CD through IDE port ・USB port support Multi-backup Device include removable HD, Flash disk ・Download the files on DVR to local PC through network Play and record ・Support multiplex operation: Real time display/ record in all channels, one channel play-back, search for downloading, remote operations simultaneously while recordings are in progress ・Multiple recording mode: manual、schedule、alarm、motion detection, among which alarm recording and motion recording are with pre-recording function ・Playback: PIP or multi-channel function realize real-time monitoring during playback Display the records on DVR through network 5 ・Fast search and playback for schedule recording and alarm recording ・Multiple play-back modes: X2、X4、X12ast play, stop, 15F/S, 5F/S slow play and frame by frame playback ・Display the original event time when playback Alarm relay ・16 channels external alarm input, video lost alarm and motion detection alarm ・Multi channel alarm output relay switch realize quick alarm relay and on-spot light control ・Protection circuit for Alarm input and output assure the intactness of the main device Pan-tilt Control ・Support the pan-tilt decoder using RS485 communication ・Able to integrate multiple decoding protocol so as to control various pan-tilt and speed dome Communication connection port ・10-pin special port to realize alarm input and pan-tilt-zoom control ・RS232 port support multiplex function: Connecting a Modem for the dial-up to the net; with keyboard for central control; connect to the computer serial port for system upgrading and debugging; or link to different matrix ・Standard Ethernet port for remote control via TCP/IP or HTTP Network function ・Remote real-time monitor and operate ・Pan-tilt-zoom control ・Recording search and real-time playback (The image quality depends on the network condition), downloading through network ・System setting modification and system software upgrading ・Remote alarm process and system log review ・Embedded TCP/IP protocol and operation system supports Web server direct visit to realize all the functions above ・Administration mode: Support 3 levels user password protection, to prevent any unauthorized use of the product ・With 16 windows surveillance simultaneously at the customer end 6 Chapter 2 Installation 1.Hard disk installation Since there is no built-in hard disc in the machine, please install HDD first refer to the below installation instructions. Up to eight 10G-infinite capacity hard discs can be installed internally. The installed HDD number can be decided according to the required image quality, recording time and HDD capacity. Installation steps ①Dismantle the top cover, ②Dismantle the HD bracket open the cabinet ⑤Combine the two parts of the bracket ⑧Connect HD data line to IDE port ③Separate the up and down ④Install HD part of the bracket ⑥Set the master-slave jumper wire ⑦Fix the HD bracket (refer to the clue on the back of the HD) ⑨Plug in HD power line Note: It is not necessary to dismantle the HD bracket when less than 4 HDs are installed Recommend to use Maxtor HDD 7 ⑩Close the cover and fix it CD-RW Installation ①Dismantle the HD bracket ④Fix the 5th HDD on the upside of the bracket ②Remove the baffle of CD driver ⑤Fix two pieces of planks on each side of the CD-RW Note: ①Only can hold 5 HDDs if with a CD-RW installed ②Support CD-RWs of current brands in the market. 8 ③Installed 4 HDDs ⑥Fix the CD-RW with bolts on the bracket 2. Front panel introduction 1.Power switch and indication light 2. Numeric Keypad 3.Recording indicator light 4.Plastic veil 5.CD-RW 6. Address 7. Direction (left arrow) 8. Remote receiver window 9. ESC key (Cancel) 10.Enter 11.Direction (down arrow) 12.Direction(up arrow) 13.Direction (right arrow) 17. Multi-window splitting 14.Information 15.Single window display 18. Function assistant 1 19.Assistant indication light 16. Function assistant 2 20. Standby indication light 21. Jog Shuttle 22. Windows shift key 23.Record 24.Cancel 25. Play last section 26. Slow play 27. Play/pause 28.Forward 29. Play next section 30.Enter Note: Outside Ring of the jog shuttle turning clockwise is equal to right direction arrow, turning counterclockwise is equal to left direction arrow; inner circle turning clockwise equal to down direction, otherwise equal to up direction. 9 Keys functions Order 1 Key name Power switch and indication light Logo POWER 2 Numeric Keypad 1, 2, 3 etc. 3 Recording light 4 Plastic veil Black plastic 5 CD-RW CD-RW 6 Address ADD 7、13 Left / right arrow WX 11、12 Up down ST 8 Remote receiver 9、24 Cancel ESC 10 Enter ENTER 14 Information INFO 15 Single window display □ Green on numbers Function Remark Power switch(Power off by pressing the key 4 seconds) Indication light Password input, window shift or number input 10 equals to 0 in number input If the light is on green, it means under recording Dust-proof Back-up records Set address for remote control of the DVR Left / Right on screen Cursor control; shifting level 1 and level 2 menus; PTZ control. Up and Down on screen Cursor control; change setup; change number; PTZ control. Used to receive the remote signal Escape or cancel Go back to real time monitor from playback Enter Cursor Selection Enter main menu Press to show the system information Shift the display to single window To display the PTZ and the camera control menu under full 16 Function assistant 1 Fn1 screen mode To enable Cursor field selection with the arrow keys when set the MD area To display the playback state bar during playback 17 Multi-window splitting During monitor shift to multi-window display 10 Fn2 During playback realize PIP for the playback and real-time 18 Function assistant 2 19 Function indicator light Indicator light for the Function assistant 20 Standby indication light Light on when DVR stands by monitor with number key Direction: Outer: left/right; Inner: up/down; 21 Jog Shuttle Outer circle control fast forward/reverse when playback, Inner circle for frame by frame forward when playback Multi-window shifting during real-time monitor; during 22 Multi-window shifting MULT 23 Record REC 25 Play last section Play the recording file before the current file Slow play I► 3 levels of slow play speed(15f/S、5f/S、frame by frame) 27 Play/pause f/ 28 Forward 3 levels of forward speed(X2、X4、X8) 29 Play next section Play the record next to the current file 30 Enter ENTER 26 playback, shift between playback and monitor window Start/stop recording, work with arrow keys or Num keys Play/pause When in real time mode, press to enter record search menu Enter Cursor Selection Enter the main menu 11 3. Remote controller (5)(7) (1) (2) (3) (8) (9) (11) (16) (10) (12) (13) (14)(15) (4)(6) (1) Address (9) Jump forwards (2) Multi-window shifting (10) Play last sections (3) Number (11) Jump backwards (4) Record (12) Pause (5) Function Assistant (13) Play next sections (6) Enter/Menu (14) Slow play (7) Cancel (15) Play/Pause (8) Direction (16) Fast play The operation of the remote controller is the same as the front panel. 12 4.Back panel introduction 1、 power switch 2、power plug 3、220V/110V shift switch 4、RS232 connection 5、VGA connection 6、Audio input 7、USB port 8、1394 connection 9、NET network connection(RJ45) 10、Audio output 11、Vedio output 12、Alarm-RS485 connection 13、Vedio input 14、Vedio input 15、Alarm output 16、Alarm output & control connection 17、Alarm input Network connection note: When connect to the network card of the computer, please use reverse line; when connect to the exchanger or Modem, please use positive line. 13 4.1 Serial port RS232 connection and extension Note: ①The connection for program upgrading or debugging through serial port ②The connection for dial-up login through MODEM ③The connection for DVR control through keyboard 4.2 10-pin port connection If you want to control pan-tilt, lens and process the relay of the alarming signals by the DVR, the 10-pin port can realize. The four 10-pin port can control various pan-tilt decoders, and the specific type of the decoder can be selected from the Control of the System setting in the menu. On plug the foot’s serial number is marked. A: Alarm input: ALARM1~ALARM8 B: Alarm input: ALARM9~ALARM16 C: Alarm OUTput: ALARM1~ALARM5 D:ALARM6 output and 12V controllable pressure AB line port 14 ・Instruction of the controllable +12V: Able to be the alarm output; also able to be used to restore the power of the smoke alarm sensor. ・Instruction of A、B line: Used to connect the A and B line of the pan-tilt decoder ・Module sketch of the alarm input end ・Module sketch of the alarm output end ALARM1—ALARM5 ALARM6 15 4.3 Alarm operation instructions: 1、Alarm input: ・16 channel alarm inputs, voltage input (Both Normal on / Normal close type) ・Please short connect between the alarm input end(COM) and the power (The power of the alarm sensor should be provided by outside power, the DVR afford +12V power, but if it provide power for more than two alarm sensors, it may affect the normal working of the DVR.). ・Please parallel connect the Ground of the DVR and alarm sensor ・Please connect the NC port of the alarm sensor to the DVR alarm input(ALARM) ・If you need to restore the touched-off alarm remotely, you have to supply the controllable 12 V power of the DVR to the alarm sensor, such as the smoke sensor. Please short connect between the alarm input end and the power the connection end of the alarm device +12V GND Com NC ◎ ◎ ◎ ◎ ◎ALARMIN ┇ ◎GND The connection of the DVR +12V GND 2、Alarm output: ・6 channel alarm outputs(5 channel normally open , 1 channel NO/NC optional touch). ・In order to avoid the overwork of the DVR, please refer to the related parameter of the relay, and see the attached form for the related relays’ parameter. ・1 channel controllable 12 V power output: Restore the touched-off alarm remotely such as the smoke sensor. 3、Example: 16 Exam1: Infrared alarm sensor (Inside power and NC) and Alarm light output (please see PIC 1) 1、 Connect the sensor(NC) to the DVR alarm input(e.g.: connect to port 1) 2、 Connect the ‘+’of the alarm light to the ‘+’of the outside power, and ‘-’ to the alarm output of the DVR(e.g.: connect to OUT2); Connect the cathode of the power to another port of OUT2 3、Menu Setting Alarm input from CH1 (Total 16 channel alarm input for choose) ALARM CH 01 TYPE NORMAL CLOSE No. 1 2 3 4 5 6 7 8 9 10 11 12 13 14 15 16 OUT○ ● ○ ○ ○ ○ ○ REC ●○●○○○○○○○○○○○○○ SLOT1 08:00-24:00 ON SLOT2 00:00-24:00 OFF PRE-RECORDE ON DELAY 30SEC TIP OFF DEFAULT SAVE CANCEL Normal close port Alarm output from CH2 (Be able to double choose according to the needs, it means 1 alarm input trigger several alarm output) Startup alarm recording (Be able to double choose according to the needs, two period a day for choose) Pre-record: Choose On means to save the monitoring image about 5SEC before alarming Delay: Lengthen the recording time after receiving alarm signals Tip: Choose ON means to pop up alarm notification in the screen Choose SAVE to save all the settings 17 4、Purpose During (8:00-24:00), when alarm input from Channel 1, the alarm output Channel2 was triggered and the alarm light on; The screen display: Alarm input from CH1;The cameras CH1 and CH3 start recording simultaneity and save the monitoring image about 5SEC before alarm in;30 seconds after the alarm input be over ,the system stop alarm output and all the relative operation. When alarm input out of (8:00-24:00),the alarm output is not triggered and do nothing Exam2: Ele-lock (Without power inside and NO) and Buzzer output (please see PIC 2) 1、 Need afford ‘+12V’ power outside; Connect the ‘+’of the lock to the cathode of the power and ‘-’ to the alarm input of the DVR (e.g.: connect to port 1); Connect the Ground port of the power and the DVR. 2、 Connect the ‘+’of the Buzzer to the ‘+’of the outside power, and ‘-’ to the alarm output of the DVR(e.g.: connect to OUT1); Connect the cathode of the power to another port of OUT1 18 3、Menu Setting Alarm input from CH2 (Total 16 channel alarm input for choose) ALARM CH 02 TYPE NORMAL OPEN No. 1 2 3 4 5 6 7 8 9 10 11 12 13 14 15 16 OUT○ ● ○ ○ ○ ○ ○ REC ●○●○○○○○○○○○○○○○ SLOT1 00:00-24:00 ON SLOT2 00:00-24:00 OFF PRE-RECORDE OFF DELAY 30SEC TIP OFF DEFAULT SAVE CANCEL Normal open port Alarm output from CH1 (Be able to double choose according to the needs, it means 1 alarm input trigger several alarm output) Startup alarm recording (Be able to double choose according to the needs, two period a day for choose) Pre-record: Choose OFF means not to save the monitoring image before alarming Delay: Lengthen the recording time after receiving alarm signals Tip: Choose OFF means no alarm notification in the screen Choose SAVE to save all the settings 4、Purpose When alarm input from Channel 2 anytime, the alarm output Channel 1 was triggered and the Buzzer sound; The cameras CH3 start recording simultaneity; 30 seconds after the alarm input is over, the system stop alarm output and all the relative operation. 19 ・Relays’ parameter of the alarm output end Model: G6H Material of the touch Sliver Rating ( resistance Rated switch capacity 30VDC 1A, 125VAC 0.5A load) Maximum switch power 62.5VA 33W Maximum switch voltage 125VAC, 110VDC Maximum switch electric currency 1A between touches with same polarity 750VAC 1minute 50/60Hz between 1000VAC 1minute 50/60Hz Insulation touches with different polarity Surge voltage between touch and loop 1000VAC 1minute 50/60Hz between touches with same polarity 1500V (10×160us) Length of open time 3ms max Length of close time 3ms max Longevity Temperature Mechanical 100×106 times (10Hz) Electric 200×103 times (0.5Hz) -40~+70℃ 20 Chapter 3 Operating Instructions 1. Turn on / off the recorder 1.1 Turn on the recorder Plug in the power cable; switch on the power button at the back of the recorder; power indicator light on; DVR on; default single window for the video output display; press Enter the Log-in screen appears on Monitor; If the starting time is within the programmed recording time, the system will start recording function automatically. Channel indicator lights on and system work in a normal manner. Note: if the system stops during HDD Boot detection, the HDD may not be installed right and please check the HDD connections (Ribbon and Power Connections). 1.2 Enter the setting menu Before entering the menu, the user must input the password. There are two levels of password—User password and Administrator password. User password 666666 Administrator password 888888 With user password, you are also not allowed to enter system setting and admin setting. Note: For the consideration of security, please change the setting in admin setting refer to Chapter 4——Menu operation. 1.3 Turn off the recorder *Please unplug the 220VAC power supply during HDD installation* Press the POWER key on the front panel for 4 seconds to stop the current operations. Then switch off the power button at the back panel of the DVR to turn off the power. 1.4 Power off recovery When the power is cut off abnormally, the recorder will recall its last state and continue where it left off. The state indicator light is the same as it was before the power off. 1.5 Change the battery of the DVR Change the battery of the DVR, recommend to the same type of Lithium fastener batteries Note: Please check the system time in time and generally change the battery each year to ensure the veracity time. 21 1.6 System menu structure General Search List Search SEARCH File information Alarm Search HDD information IFORMATION General setting Version Schedule setting M E Version SETTING Image setting N U Alarm setting PTZ setting Motion detection RS 232 Password setting File management ADMIN Backup Record Output mode Alarm in BACKUP Backup clearing LOGOUT Default Default 22 2. Recording operation The default recording mode after the startup of DVR is 24 continuous recording for each channel. Users can program customized recording modes due to the necessity. Instructions for the different recording modes are as follows: a) Schedule recording ·Enter the menu, and set the timing period for the recording. See details at Menu>System setting>Schedule b) Manual recording ·Press “Rec” button on the remote controller or “●” on the front panel (Need input the administrator password) ·Check the status of each channel in the recording menu; “●” channels are in recording, while “○” means the channel is not in recording ·Select the channel to be recorded, please press the related number key(or use “S T” key / Jog shuttle choosing) make the channel “●” on the screen then press Enter to start the recording. ·Repeat above steps and make the channel “○” to stop the camera from recording. ·Press ESC to return and press ENTER to save the recording setting c) Alarm recording ·Connect the alarm input according to the device connection and the instructions ·Made the related setting in the menu to start Alarm recording. See details at Menu>Setting>Alarm setting d) Motion detection recording · Record the channel only in need of motion detection. First confirm whether this channel is in schedule recording; if it is, please turn off schedule recording. ·Made the related setting in the menu to start Motion detection recording,See details at Menu>Setting>Motion detection 23 3.Alarm connection operation ·Connect the alarm input according to the device connection and the instructions ·Connect the related alarm output of DVR to associated alarm device (Example: light、beeper, etc.) ·Made the related setting in the menu,See details at Menu>Setting>Alarm setting 4.Pan-tilt-zoom control operation ·Confirm the proper connection of PTZ and Communication Protocol. Set the Camera address ·Confirm the proper connection between the PTA and the A、B lines of DVR’s RS485 port. ·Set the related items in the menu,See details at Menu>System setting>Control ·Select full screen call-up of associated PTZ Camera ·Press “Assistant” on the remote controller or “Fn1” on the front panel to shift the items on the screen ·Use direction key to move and control the selections on the screen 5.Network connection operation ·Confirm the correct network connection between DVR and computer ·Set the IP address, subnet mask and gateway of the computer and DVR separately(If there is no router in the network only the IP address is needed, if there is routers in the network, please set the related gateway and subnet mask) ·Open IE browser and input the IP address of the DVR you want to log in ·Network operation see details at Chapter 5 24 Chapter 4 Front panel and remote controller operation 1. Operation menu introduction 1.1 Menu items’ shifting and setting Operation step Enter main menu and level 1 submenu Enter level 2 submenu Set menu contents Exit the current menu *Flashing item is the current selectable one* Button-pressing order 1、 Confirm Enter Instruction 2、Direction(Jog shuttle)STXW 3、Confirm Enter During real-time monitor, press to open the password prompt, input the correct password (default six 6 or six 8), then enter the menu. Use arrows to select the main menu Icon Choice. Enter the selected level 1 submenu 4、Direction(Jog shuttle)STXW Use arrows again to select level 2 submenu choice 5、Confirm Enter Press Enter to select level 2 submenu 1、Direction(Jog shuttle) X 2、Direction ST Select the option to be revised, flashing means being chosen Press to revise the settings 3、Confirm Enter Save is flashing, choose to confirm whether you want to keep the revised setting. Direction(Jog shuttle) W Return to the last option of the current menu Cancel ESC Exit to the last level menu Screen display Menu RECORDd SEARCH CONTROL SETTING CH 1 PROTOCOL DH-CC440 BAUDRATE 9600 ADDR 000 CANCEL SAVE RECORD SEARCH You can set the multiple channels and save the settings together before exiting the current menu 25 1. 2 Menu Overview Main menu SEARCH Menu level 1 RECORD LIST ALARM FILE INFO CH DATE TIME PLAY Menu level 2 01 24-10-2002 02:20:20 PM START CH 01 TYPE ALARM DATE 24-10-2002 TIME 02:20:20 PM LIST START CH 01 DATE 24-10-2002 TIME 02:20 SEARCH START START TIME END TIME FREE SPACE Remarks Prepare for accurate playback according to the channel and time. See details at 2.6.1 List the results for choosing the wanted file to playback(R-General, A-Alarm, M-Motion detection).See details at 2.6.1 Not able to search motion detection records. See details at 2.6.1 24-10-2002 09:20 24-10-2002 20:20 00028318M Display the the record starting/ending time and total free space of DVR’s HDD. See details at 2.6.2 HDD INFO INFORMATION VERSION BPS HDD NUM 01 HDD CAPACITY 0 1 6 0 0 8 6M FREE SPACE 00028318M INDEX 12345678 √- - - - - - MASTER SLAVE √- - - - - - CDR STATE NO USB STATE NO BIOS VERSION 2.46 FILE VERSION 4.01 WEB VERSION 1.69 ISSUE DATE 08-16-2004 CH.1 CH.2 CH.3 CH.4 0538Kb 0302 Kb 0267 Kb 0112 Kb 256M/H 132M/H 117 M/H 49M/H CH.5 CH.6 CH.7 CH.8 0663 Kb 0227 Kb 0050 Kb 0283 Kb 291M/H 99M/H 21M/H 124M/H CH9 CH.10 CH.11 CH12 0663 Kb 0227 Kb 0050 Kb 0283 Kb 291M/H 99M/H 21M/H 124M/H CH13 CH.14 CH.15 CH16 0663 Kb 0227 Kb 0050 Kb 0283 Kb 291M/H 99M/H 21M/H 124M/H 26 Displayed the IDE ports’ state, the total and free space for each HDD. “ ” means the current working HDD See details at 2.6.2 Display the information about operation system version, issue date and so on See details at 2.6.2 Display the current BPS and the estimate for HDD space occupy per hour See details at 2.6.2 Main menu Menu level 1 GENERAL SCHEDULE SYSTEM SETTING IMAGE ALARM Menu level 2 DATE 2003-07-13 FORMAT DD-MM-YY TIME 08:30:30 FORMAT AM/PM SAVE TIME HDD FULL OVERWRITE REC-LENGTH 60 MIN REMOTE ADDRESS 008 VIDEO MODE PAL SHUT PASSWORD OFF DEFAULT SAVE CANCEL CH 01 WEEK TIME1 TIME2 SUN 00:00-24:00 ON00:00-24:00 OFF MON 00:00-24:00 ON 00:00-24:00 OFF TUE 00:00-24:00 ON 00:00-24:00 OFF WED 00:00-24:00 ON 00:00-24:00 OFF THU 00:00-24:00 ON 00:00-24:00 OFF FRI 00:00-24:00 ON 00:00-24:00 OFF SAT 00:00-24:00 ON 00:00-24:00 OFF ALL 00:00-00:00 ON 00:00-00:00 OFF DEFAULT SAVE CANCEL CH 01 NAME CHANNEL 01 QUALITY 06 FRAMERATE 25F/S BITRATE VBR VIDEO LOSS ALARM SHUT ALARM ALARM TIP NO TIP COVER SET OFF DEFAULT SAVE CANCEL CH 01 TYPE NORMAL OPEN SERIAL 1 2 3 4 5 6 7 8 9 10 11 12 13 14 15 16 OUTPUT ●○○○○○○○○○○○○○○ RECORD ●○○○○○○○○○○○○○○ TIME1 00:00-24:00 ON TIME2 00:00-24:00 OFF PRE-RECORD OFF DELAY 30S TIP OFF DEFAULT SAVE CANCEL 27 Remarks Set system time, recording parameter, the machine No., video format and so on See details at 2.6.3 Set schedule for Schedule recording, be able to set 2 different period everyday in a week separately. See details at 2.6.3 Set image quality, frame rate, coding format and so on See details at 2.6.3 Set Alarm output and the relay parameters See details at 2.6.3 Main menu Menu level 1 PTZ CONTROL NETWORK SYSTEM SETTING MOTION DETECTION RS 232 Menu level 2 Remarks CH 1 PROTOCOL NONE ADDRRESS 008 BAUDRATE 4800 DATABIT 8 BIT STOPBIT 1 BIT VERIFY NONE DEFAULT SAVE CANCEL HOSTNAME DVR1600 IP 192.168.000.111 SUBNETMASK 255.255.255.000 GATEWAY 192.168.000.001 WEB PORT 00080 TCPPORT 37777 MONITOR TCP DEFAULT SAVE CANCEL CH 01 No 1 2 3 4 5 6 7 8 9 10 11 12 13 14 15 16 ALMOUT ●○○○○○○○○○○○○○○ RECORD ●○○○○○○○○○○○○○○ DELAY 30 SEC TIP OFF PRECORD ON LEVEL HIGH AREA SET TIME1 10:00AM—02:00PM OFF TIME2 10:00AM—02:00PM OFF DEFAULT SAVE CANCEL COMFUNC BAUDRATE DATA BIT STOP BIT VERYIFY DEFAULT HYPETERM 115200 8 BIT 1 BIT NULL SAVE 28 CANCEL Set PTZ protocol and relative parameter See details at 2.6.3 Set the network parameter See details at 2.6.3 See details at 2.6.3 the PASSWORD FILE MANAGE ADMIN OUT MODE GUEST ****** CONFIRM * * * * * * MANAGE * * * * * * CONFIRM * * * * * * SAVE CANCEL DELETE ALL FILES ? FILE DEL OK CANCEL HDD 01 HDD SET SETTING WORK-HDD No. 1 2 3 4 STATE w - - OK CANCEL SUN OFF MAINTENACE MON OFF …… ALL OFF SAVE CANCEL FONT COLOR WHITE TIME-OSD ON TITLE WHITE CHAN-OSD ON POINT-CX 003 POINT-CY 003 MONHEIGHT 530 PLAYHEIGHT 530 VGA-MODE 1024*768*60 LOGO OFF ROTATE OFF INTERVAL 005S INDEX 1 2 3 4 5 6 7 8 9 10 11 12 13 14 15 16 OUTPUT1●○○○○○○ OUTPUT2●○○○○○○○○○○○○○○○○○○○○ DEFAULT SAVE CANCEL ALARM IN 1 2 3 4 ALARM IN 5 6 7 8 ● ○ ○ ○ ○ ○ ○ ○ If use manage password to log in, able to change password. See details at 2.6.4 Need Admin password May select the font color on the menu as you like. May set the original point on the real time monitor window,and the size of the real-time monitor and playback window. May select font color , and set channel rotating state Enabled the alarm input manually 9 10 11 12 13 14 15 16 ● ○ ○ ○ ○ ○ ○ ○ SAVE ALARM OUT CANCEL ALARM OUT 1 2 3 4 5 6 Give alarm output signal 7 manually ● ○ ○ ○ ○ ○ ○ ○ DEFAULT SAVE CANCEL NETUSER RESUME NETUSER? OK CANCEL DEFAULT SURE TO LOAD? OK CANCEL 29 Restore the original set Need Admin password. BACKUP RECORDS BACKUP DEVICE CH SPEED START TIME END TIME SEARCH BACKUP DEVICE DEL BACKUP HDD 1 FAST 2003-3-18 18:18:16 2003-3-18 19:18:16 START START Choose the backup device and select the wanted file to backup records See details at 2.6.5 HDD SURE TO DELETE ? OK CANCEL SURE TO LOGOUT? LOGOUT Exit the menu and need input the OK CANCEL password on next logging in 2. Menu Operation 2.1 Recording Operation Model Button-pressing order 1、Record REC Instruction Press to enter screen display. Diplay Record:1 2 3 4 5 6 7 8 ● recording state ●○○○○●●● ○ non-recording state 9 10 11 12 13 14 15 16 ●●○○○○●● DH-DVR1604 2、Direction ST or Press to shift the recording state on/off. the related number key ● means On. ●○○○○●●● Press to shift recording channels. The 9 10 11 12 13 14 15 16 shadowed means On. ●●○○○○●● 3、Direction 4、Record REC WX Press to save the setting. or Enter 30 Record:1 2 3 4 5 6 7 8 2.2 Playback operation Button-pressing order 1、Play/Pause Instruction Press the button to enter screen display. (If the current state is logout, please enter password) 2、Play/Pause Press twice to begin the playback (on the screen shows channel, date, time). If it shows no record found, the operation will not take effect. After the completion of the playback, it shows “The End”. Display RECORD SEARCH CH 1 DATE 03-03-2003 TIME 09:10 AM PLAY START RECORD SEARCH CH 1 DATE 03-03-2003 TIME 09:10 PLAY NO RECORD Record information display: during playback, press Fn to display or hide the playback state bar. 2.3 Playback fast forward Button-pressing order Instruction 1、Fast forward During playback press this key to shift between 2 times speed, 4 times speed, 8 times speed. 2、Play/Pause During fast play press this key to shift between play and pause. 3、Play next section, play last section During playback state it takes effect. Press to view the next or last record of the same channel. 2.4 Playback slow play Button-pressing order 1、Slow forward I► 2、Play/Pause Instruction During playback press to shift among X1/2、X1/4、 X1/25 speed. During slow play of the playback record press to shift between play and pause. 3、Play next section, play last During playback state it takes effect. Press to section view the next or last record of the same channel. 1f/s speed slow forward is playing frame by frame. 31 Display CH1 PLAY X2 Display CH1 PLAY 15F/S 2.5 Control of Pan-tilt and Lens *The current image must be shifted to the input image of the controlling camera* Button-pressing order Instruction 1、Refer to menu operation In Control setting,select the related Channel and Protocol, see the right picture. Set the conformed Baud rate and Address with the decoder. DATABIT with selection 4 to 8, STOPBIT with selection 1、 1.5、2 Press SAVE to save. Under the state of single window monitor, press to enter the screen display. Press continuously to shift among PT CONTROL (DIRECTION)、 LENS CONTROL (ZOOM、 FOCUS、IRIS)、LIGHT CONTROL(OFF ON). Control the related pan-tilt, lens and light. at 2.6.4 2、Assistant function Fn1 3、Direction STW X Press Fn to display CONTROL SETTING CH 1 PROTOCOL DH-CC440 BAUDRATE 9600 ADDR 000 SAVE CANCEL PT CONTROL S WDIRECTIONX T LIGHT CONTROL W OFF ONX 2.6 Menu operation *Please refer to“Menu option schedule”; Button operation refers to the above form.* *All the below settings of the menu must be saved before taking effect.* 2.6.1 Record search RECORD SEARCH The menu for record search is as the right picture: Record First set the channel、date and time you want to search, then select START, the playback begins. 32 RECORD SEARCH CH 1 DATE 2002-12-08 TIME 08:18AM PLAY START List First set the channel、date and time you want to search, then select SEARCH, the screen shows the 8 recording files following the searching time. LIST SEARCH CH 1 DATE 24-12-2002 TIME 10:10AM LIST SEARCH Use ST to select the file to be played. Press ENTER to begin the playback. Note:the letters before the record are equal to following: R—Record;M—Motion detection;A—Alarm ALARM SEARCH Alarm First set the searching date, then select START, all the alarm records will be displayed. Press ST to select the record. Press ENTER to play the alarm record. Note:motion detection alarm can not be searched in this category, but can be searched in RECORD and LIST. CH 01 DATE 24-10-2002 TIME 02:20:20 PM PLAY START INFORMATION 2.6.2 Information Menu of Information see the right picture: FILE INFORMATION File Info Recording start time(the earliest recording time among all the HDDs) and recording end time. All the information is not changeable. START TIME 24-10-2002 09:20 END TIME 24-10-2002 20:20 FREE SPACE 00028318M HDD INFORMATION HDD Info Display HDD number, HDD capacity, remaining space, HDD index and the conditions of master drive and slave drive. If the HDD is in working, it will show as “W” HDD NUM 01 HDD CAPACITY 0160086M FREE SPACE 00028318M INDEX 12345678 MASTER √- - - - - - SLAVE √- - - - - - CDR STATE NO USB STATE NO Version Bios version, File version, Web version and Issue date are showed. The information is not modifiable. 33 VERSION INFORMATION BIOS VERSION 2.46 FILE VERSION 4.01 WEB VERSION 1.69 ISSUE DATE 08-16-2004 BPS Real time display bit rate of current channel (Kb/s) and space occupied. (MB/H) 2.6.3 System setting Menu of the system setting as the right picture: General DATE/TIME are used to modify the current system date and time; after the modification reserve the change by selecting SAVETIME; in HDDFULL if selecting OVERWRITE system covers the previous recording files; REC- LENGTH can set the length of each recording file(15 mins、30 mins、60 mins or 120mins), VIDEO MODE :PAL and NTSC; SHUT PASSWORD :protect the system ,when ON,an advanced password is needed to shut off the system,when OFF,just press the power key for 4s to shut off the system. Note:System time cannot be changed freely; otherwise it would cause the malfunction of recording search. CH.1 0538Kb 256M/H CH.5 0663Kb 291M/H CH9 0663Kb 291M/H CH13 0663Kb 291M/H CH.2 CH.3 CH.4 0302Kb 0267Kb 0112Kb 132M/H 117 M/H 49M/H CH.6 CH.7 CH.8 0227Kb 0050Kb 0283Kb 99M/H 21M/H 124M/H CH.10 CH.11 CH12 0227Kb 0050Kb 0283Kb 99M/H 21M/H 124M/H CH.14 CH.15 CH16 0227Kb 0050Kb 0283Kb 99M/H 21M/H 124M/H SYSTEM SETTING GENERAL SETTING DATE 2003-07-13 FORMAT DD-MM-YY TIME 08:30:30 FORMAT AM/PM SAVE TIME HDDFULL OVERWRITE REC-LENGTH 60 MIN REMOTE ADDRESS 008 VIDEO MODE PAL SHUT PASSWORD OFF DEFAULT SAVE CANCEL SCHEDULE CH 01 WEEK TIME1 TIME2 SUN 00:00-24:00 ON 00:00-24:00 OFF MON00:00-24:00 ON 00:00-24:00 OFF TUE 00:00-24:00 ON 00:00-24:00 OFF WED 00:00-24:00 ON 00:00-24:00 OFF THU 00:00-24:00 ON 00:00-24:00 OFF FRI 00:00-24:00 ON 00:00-24:00 OFF SAT 00:00-24:00 ON 00:00-24:00 OFF ALL 00:00-24:00 ON 00:00-24:00 OFF DEFAULT SAVE CANCEL Schedule Select the corresponding channel in CH. WEEK you can choose each day or setting the same with the 7days of one week by the key ALL. TIME1 and TIME2 express the timed recording period of the current channel. TIME2 should be after the ending time of TIME1. The setting range is 00:00-00:00。STATE:ON means the time setting is on;OFF means the time setting is OFF. Note:If you need record all day long, set TIME1 as 00:00-00:00,state is on; set TIME2 as off. 34 Image In CH option select the related channel.QUALITY you can shift 6levels circularly, in which the 6th level is the best quality. Framerate 1f/s-25f/s are selectable. BITRATE there are CBR(audio/video) and VBR(audio/video).VIDEOLOST :select port 1-6for alarm output, prompting to select OFF means non-alarm output when video lost, meanwhile the prompt ON/OFF for the outside equip(port1-6) of alarm relay port means if pop-up alarm information or not. Select SAVE when finish the setting ,ESC for exit current setting. If you want to resume to the default, move the cursor to select DEFAULT and then select SAVE. Alarm Select the relevant channel in CH(this recorder has 16-Ch alarm input).TYPE has normal on/normal close(electric output method).No. If the number in RECORD is selected, recording would be started automatically when there is alarm input. If the alarm output port is chosen, it will trigger corresponding equipment when there is alarm input.CH7 is 12Vcontrollable output. DELAY means to lengthen the recording time after receiving alarm signals(1/6、1/2、1、3……30min). When the outside alarm is canceled, the system will lengthen the recording time automatically before closing alarm and relay output. When Time 1、Time 2 are open, within the time of the setting the recording will be triggered by alarm signals. The beginning time should be earlier than the ending time; the setting in Time 2 should be later than the setting in Time 1. PRE-RECORD: Save the monitoring image for sometime before alarming. TIP: ON/OFF alarm prompt. PTZ control Select the corresponding channel in CH, and choose the protocol of the brand name of corresponding pan-tilt decoder in PROTOCOL. ADDRESS is the address of the corresponding platform decoder DATABIT: selection4-8; STOP BIT: selection 1, 1.5, 2; VERIFY: odd, even and null 35 IMAGE SETTING CH 01 NAME CHANNEL 01 QUALITY 06 FRAMERATE 25F/S BITRATE VBR VIDEO LOSS ALARM SHUT ALARM ALARM TIP NO TIP COVER SET OFF DEFAULT SAVE CANCEL ALARM SETTING CH 01 TYPE NORAML OPEN No 1 2 3 4 5 6 7 8 9 10 11 12 13 14 15 16 OUTPUT●○○○○○○○○○○○○○○ RECORD●○○○○○○○○○○○○○○ TIME1 00:00-24:00 ON TIME2 00:00-24:00 OFF PRE-RECORD OFF DELAY 30S TIP OFF DEFAULT SAVE CANCEL PTZ CONTROL CH 1 PROTOCOL NONE ADDRESS 008 BAUDRATE 4800 DATA BIT 8 BIT STOP BIT 1 BIT VERIFY NULL DEFAULT SAVE CANCEL Network HOST NAME display the name of the recorder .IP is set by using NETWORK ST or input the exact numbers to change the IP address(IP address setting HOSTNAME DVR1604 can only be realized in this term),and then set the correspond IP 192.168.000.111 SUBNETMASK 255.255.255.000 SUBNETMASK and GATEWAY WEB PORT、TCP PORT :in GATEWAY 192.168.000.001 WEB PORT 00080 accordance with the user’s network condition, the default port is 00080 and TCP PORT 37777 TCP 37777.MONITOR can be selected by using ST(TCP/IP、UDP).Reserve MONITOR DEFAULT SAVE CANCEL the setting in SAVE, and restart the recorder. Note: UDP:The users with manage can monitor each channel freely, and other users can only view after them. Max 5 users can log in. TCP Protocol:All users are able to monitor any channel. User shall select according to necessity. If the transmission is under Internet, TCP should be chosen. 2 users at maximum MOTION DETECTION CH 01 No 1 2 3 4 5 6 7 8 9 10 11 12 13 14 15 16 ALMOUT●○○○○○○○○○○○○○○ RECORD ●○○○○○○○○○○○○○○ DELAY 30 SEC TIPS OFF PRECORD ON LEVEL HIGH AREA SET TIME1 10:00AM—02:00PM OFF TIME2 10:00AM—02:00PM OFF DEFAULT SAVE CANCEL Motion Detection Select the relevant channel in CH. OUTPUT “●” means startup alarm relay when detect the motion image; “○” means non alarm relay. Open or close the function in DELAY Choose how long you want to continue the recording(1/6、 1/2、1、3……30min)after motion detection is finished. PRERECORD save the motion detection. SENS has three levels: LOW, NORMAL, HIGH .TIMING1 、TIMING2 the way of setting the period of time is the same as the setting of ALARMSETTING. AREA can be accessed by pressing ENTER. The setting area can be divided in 192 sections. Red section means the current cursor position, and green section is the motion detection area. The no color area is no motion detection area. Press Fn to locate the current section, then move the cursor to RS232 cover the MD needed area; press Fn again to choose the MD area. RS232 COMFUNC select super terminal or Keyboard. BAUDRATE select correspond baud rate. DATA BIT selection 1-8. STOP BIT three selection 1、1.5 and 2. COMFUNC HYPETERM BAUDRATE DATA BIT STOP BIT VERYIFY 115200 8 BIT 1 BIT NULL DEFAULT SAVE CANCEL VERIFY odd and even 36 2.6.4 Admin Menu of Admin setting is as the right picture: ADMIN SETTING Password Select GUEST and MANAGE. Press ST or the number key to change the password, then confirm the change by inputting the password again. Press ESC to go back to the sub menu. Only MANAGE level user can change the password. PASSWORD GUEST CONFIRM MANAGE CONFIRM ****** ****** ****** ****** SAVE CANCEL Manage FILE DEL Input advanced password, and enter FILE DELETE. If you are sure to clear the files on the HDD, click OK. HDD SET Set working state of HDD. W means working HDD FILE DELETE DELETE ALL FILES? OK CANCEL HDD SET HDD 01 SETTING WORK-HDD No. 1 2 3 4 …… STAT W - - - …….. Out mode FONT COLOR: default color, green, orange, blue and red, pressSTto select. POINT X、POINT Y :adjust the origination of the real-time monitoring window. OUT MODE The numerical range of POINT X and POINT Y : 0—352 and 0—288. FONT COLOR WHITE TIME-OSD ON MONITOR HEIGHT、PLAYBACK HEIGHT: Set the numerical range by TITLE WHITE CHAN-OSD ON POINT-CX 003 POINT-CY 003 using the direction key to zoom the window of real-time monitoring video MONHEIGHT 530 PLAYHEIGHT 530 VGA-MODE 1024*768*60 and playback video. The range is 288-576. LOGO OFF CYCLE OFF INTERVAL 005S OUTPUT1, it can rotate in a SPLIT 1/4/9/16 mode. Those channels marked No.1 2 3 4 5 6 7 8 9 10 11 12 13 14 15 16 with ● can be showed circularly after a certain interval. OUTPUT1●○○○○○○ OUTPUT2●○○○○○○○○○○○ OUTPUT2 ,it can rotate in a single window by window mode. Those ○○○○○○○○○ DEFAULT SAVE CANCEL channels marked with ● can be showed circularly after a certain interval. Input the advanced password and press ENTER to confirm to select the default setting. 37 Alarm in Set Alarm input connection Alarm out Set Alarm output connection ALARM IN 1 2 3 4 5 6 7 8 ● ○ ○ ○ ○ ○ ○ ○ 9 10 11 12 13 14 15 16 ● ○ ○ ○ ○ ○ ○ ○ SAVE CANCEL ALARM 1 2 3 ● ○ ○ SAVE Default Net user Default OUT 4 5 6 7 ○ ○ ○ CANCEL RESUME NETUSER? OK CANCEL SURE TO LOAD OK CANCEL 2.6.5 Backup Menu of Backup is as the right picture: Backup records Move the cursor to select the backup device, channel number, backup speed, starting data and time, ending date and time, and then BACKUP RECORDS select to start the backup, and system will display the backup DEVICE HDD CH 1 processing. If the user does not connect the backup device right, SPEED FAST system will give the hint: No backup disk; if the device is full, it will START TIME 2003-3-18 18:18:16 hint: Disk is full。During the backup, it will display the left time. For END TIME 2003-3-18 19:18:16 SEARCH START the backup device you can choose among HDD/USB/CDR. If the BACKUP START HDD is chosen as the device, the backup speed can be selected between Fast and Normal. If the backup speed is Fast, system will stop the current recording. When finishing backup, the system will get back to record automatically. Delete backup Select the backup device (HDD/USB/CDR) you want to delete the records from first, and then confirm the deletion by selecting OK. DELETE BACKUP DEVICE HDD SURE TO DELETE ? OK CANCEL SURE TO LOGOUT? 2.6.6 Logout Press OK to confirm logout. OK 38 CANCEL Chapter 5 Operation over Network 1. Setting on the client end No software needs to be pre-installed. Please check the connection of the network, for example, ping the IP address of the DVR. If you can not ping through, please check the connection. 2. Login and logout Please input the IP address of the DVR in the address column of the browser. Take DVR’s IP address: 192.168.0.168 as an example: Input http://192.168.0.168. At the first time of visiting this DVR the system will pop up the dialogue box to ask whether you accept ActiveX or not, and please choose Yes, then the system will install the software automatically. 5-1 39 In this interface there are monitor video window, login、logout、Video、search、config(system setting)、 Assistant(assistant setting) and so on. Login:Please click login, and the following dialogue box will pop up. 5-2 Input username and password. There are three types of users: Administrator, User, and Guest. For the detailed introduction please refer to User manage in Assistant setting. The default username is admin password is admin. Please change the administrator password on time. If after the input of the username and password, the following box pops up (5-3). The system is warning that some other user has used this name and logged in. Please use another name to log in. 5-3 If after the input of the username and password, the following box pops up (5-4). The system warns that the username just be inputted is unauthorized user or the password is wrong, and please tries again. 40 5-4 Log out: if the logged in user need to log out, please click logout button. After the popup of the following dialogue box, please choose Yes. See (5-5) 5-5 41 3.Operation of the right key menu (Video) After you log in as Administrator, the buttons like login、logout、search、video、config、Assistant and so on are activated. Click the right key or click Video and the following interface will show: 5-6 If the DVR is 16 Channel, the real-time monitor will show 16 channel options; if 12 channel, it will show 12 channel options. The right key/Viedo menu includes: Real time monitor, Decode quality, Video windows, Playback control bar, Pan-tilt control, Set volume, Net data flux, Full screen, Resize video and Video windows. 42 Real time monitor:Among the displayed channels, (5-7) you may select the channel you want to see, or press the numeric key to select the channels. 5-7 Decode Quality User can choose the decode quality according the needs, there are 4 levels quality for choose. (5-8) 5-8 Playback control bar:Please refer to Records playback. 43 Pan-tilt control:Control the direction moving of the pan-tilt and the zooming, aperture, focus of the lens. See 6-8. Press the related buttons to control. Note:Before the realization of the pan-tilt control you must set right the protocol of the pan-tilt on the DVR. 5-9 Set volume:It is for user to control the audio’s volume. User can drag the bar to adjust or tick Mute to cancel the sound. 5-10 Net data flux:Display the statistics of the network transmission data flux. When no network data transmit the statistics shows zero. 5-11 44 Full screen:There are two way to realize full screen monitor: one is to double click the window directly; the other is to select Full screen among the right key menu. During multi-window state, choose one of the windows and make it full screen in the same ways. Resize Video User can select different ratio to show different size of the video picture. 5-12 Video windows User can choose the display windows mode according the needs 5-13 45 4.Records Search and playback Click on search, then pop up the dialogue box of records search 5-14 Input From and To recording time, channel number and searching type(Record or Alarm), and the records during the searching time will show in the dialogue box (If only input the From time it show the records in 24 hours after the searching time). Click Pageup and Pagedown to display the next records. Double click the wanted record, and system will play the selected record, which can be played at full screen. At the same time you can also perform records download, and the record will be automatically saved in your PC’s “C:\Download” folder. Save record stop save capture picture 46 full screen During the playback, you can operate by the buttons in the playback bar like save record, stop save, capture picture, fast play, pause, and full screen. During the playback on the video screen it shows the channel number, time and data flux of the record. Download:See (5-15), select the wanted record and click Download. 5-15 It supports the downloading of several records simultaneously. The default format of the downloaded records’ names is as:file name +Channel N +date +time,extension name is .mp4(Example: a-0120021205071028.mp4, 01 means channel 1, 20021205 means December 5th of 2002, 071028 means 7 o’clock 10 minutes 28 seconds). 47 5-16 Saved under Download file clip. Input the file name and choose Save. The screen shows the processing of the downloading until the completion. (User can use the Ctrl key to double choose several records and down load as a whole file as well) 5-17 48 5. Config(System setting) Click Config button,and pop up the dialogue box. There are General、Schedule、Alarm、Motion detection、Video parameter six setting menus. Note:The gray part of the menus you have to set on the local DVR. General:Include the recording length setting. In Control Column select the channel number and its pan-tilt decoder’s protocol, as well as the related address so as to realize the control of the lens and pan-tilt. 5-18 49 Schedule:(5-19)Able to select the different channel and date to perform the recording at the different period of time. There are two time periods for setting. The set time in Time 1 and Time 2 is independent with the set time in Motion detection. There is no week setting for Motion detection. Motion detection time: User can set two time periods of the motion detection time and the state of the motion detection so as to activate the recording during the time period. Only when Motion detection is On, the set time period is taking effect. If the state of the two time period is both Off,the system view it as 24 hours motion detection Off. 5-19 50 Image:This menu can select the image quality and network transport protocols for each channel. Press SAVE aside the channel after finishing setting the property of the image. The user can continue setting the image property and press SAVE at the bottom of the dialog box to save all the settings. 5-20 Style: Among the options of the coding styles there are:VBR(variable baud rate)、CBR(consistent baud rate)、f/10s、 f/5s、f/2s、1f/s、2f/s、3f/s、4f/s、5f/s、6f/s、8f/s、10f/s、12f/s、15f/s、20f/s. Select one of the styles and save. For VBR and selectable frames there are 1、2、3、4、5、6 level of image quality. Please choose due to the actual need. 5-21 Level 1:data flux 128Kb/S;Level 2: 256Kb/S;Level 3: 384Kb/S;Level 4:512Kb/S;Level 5:768 Kb/S;Level 6: 1Mb/S. The different data flux demands on the related bandwidth and the transmission image quality is also different. Among them Level 6 demands on the widest band and has the best image quality. Video lost alarm: when OFF, non-alarm for video lost; when ON, alarm. Frame rate selection: 1—25f/s. 51 Net transmission Protocol:there are TCP and Multicast two types. Multicast protocol: the user with control power can view the image at will and other users can only follow this user to view the image. 5 users are allowed to view at the same time. Be able to transmit 4 channels’ image at the same time. TCP protocol: each user can view the image at will. According to the need, user can choose the different protocol. If it is through outer Ethernet you must choose TCP. 2 users are allowed to view at the same time. Alarm:When there are alarm input signals, user can select the recording channel and the output port due the actual need. ALATM PORT: select ch1-16 or select all channels to set record channels. Tick off in channel boxes to select alarm channels and then select output port for alarm prompt. Click SAVE PORT to save current setting and click SAVE to save all settings. 5-22 52 Motion detection:When user set the time period outside the time setting in Schedule, motion detection will take effect. The blue area is the selectable motion detection area. User can move the dialogue box to choose the area and can also set the sensitivity of the area due to the need. Click Full screen or press right key on the area to display the motion detection area at full screen. After setting the area user can Save channel or Clear the area. If you want to set this channel fully as motion detection recording, you have to turn off the timing recording of this channel. 5-23 53 Video parameter Set the video parameter of the recording picture: image tinge, contrast, brightness and saturation. Press reset to get back default. 5-24 6. Assistant Assistant :Click on Assistant setting, as following, there are User manage、Record control、Apply for control right、 Log information、System information、Alarm Prompt、Channel name、Upgrade BIOS and so on. 54 5-25 User manage:display the user information of the DVR. The right buttons can let user save, add, modify, delete and cancel the information Three levels users:Administrator―fully set the system and modify the user information; User―can not set system parameter and modify other users’ information; Guest―can not set system parameter and records search, can only modify personal information. 5-26 55 Add:Click Add to show the following dialogue box: 5-27 User can add user information in this dialogue box, select your power. There is only one administrator allowed. Modify:Select this button to show the following. User modify the filled-in information. 5-28 Record control:Control the recording of each channel by hand 5-29 56 Apply for control power:Web client software can supply the login of multiple users. If you want to have the control power, you can click this option and confirm to have the control power (5-30). If user wants to have the control power, user has to apply and gain the authorization of the user with control power. If the logged-in users are all normal user, the first logged-in user gains the control power automatically. If Administrator logs in later, he or she can gain the control power by force. If only one user logs in or the logged-in user is the user with control power, the box is gray. 5-30 The following picture is other user is sending request to the user with control power. 5-31 Log information:The operations on the system are all recorded in log information (5-32). If choose Save Log, the Log will be saved automatically in the root directory of your PC’s“C:\ as a text file (e.g.: C:\ 10.1.27.193-log.txt) 5-32 57 System information:Be able to check the basic information of the system. When sound is not needed, you can turn off the audio. Due to the bandwidth user can select the different Video transport mode, and after choose non real-time transmission, the mode is Extract I frame. Video type PAL or NTSC has to be selected right. If Auto recycles monitoring is on, system will shift among all the channels automatically and the time interval can be set. Net data flux:During real-time monitor it shows the statistics of the network data flux. 5-33 58 Alarm Prompt When alarm occurs, user can select sound prompt .The sound file is System32>AlarmSound.wav. Click ALARM SELECT, user can select different prompt sound. 5-34 Channel name:Able to name each channel and the letters are no more than 12. The revised channel names will be displayed on the screen. The default setting of the channel name is Channel No.1 to Channel No.16 5-35 59 Upgrade BIOS: Able to upgrade the BIOS,WEB and BOOT program remotely. Open the related BIOS or Web file (example: DVR1604.BIN or Multi-webfile.bin), and click on Send BIOS. After the upgrading, it will show the clue about the upgrading. 5-36 About:Version information 5-37 60 Chapter 6 Serial port operation 1. Super Terminal’s software upgrading The system’s operation can also be done through RS232 port. The specific operation is as following:First, copy “Terminal” and “system upgrade program” to the computer. Connect the computer with the DVR through RS232 port. Run “Terminal” program and create the connection between the computer and the DVR. The setting information for the connection is: Baud rate— 115200bps Data bit— 8 digits Stop bit— 1 digit Check — no need Control on data flow— no You can log in by username admin (default user with administrator power) for the serial port login. Login steps: Press any key to enter the login interface,which showing as following: _Username:admin Input the name; press the “enter” key. Then, input the password as following: _Password:admin . If the username and password are correct, system enter serial port management menu interface. The detailed functions are the same as the menu setting. 61 2.Serial port upgrading operation After the setting of above operation, please follow the below operation: Press any key to enter login interface as following: _Username:admin Enter username and press Enter. System hint to enter password as following: _Password:admin System gets into the DEBUG> state, and input BIOS and press Enter. Click Communication in the menu——Send file, and open upgrading program file(DVR1604_PAL.BIN—16 Channel DVR BIOS program, please complete this operation within 20 seconds, otherwise overtime). System begins to upgrade automatically and after the upgrading system will restart automatically. 3. Control keyboard The keyboard can be applicable to link multiple DVRs for uniform control and set the menu for single or multiple DVR,and also can realize pan-tilt control.The operation as following:First,select KEYBOARD CONTROL in MENU>SYSTEM SETTING>SERIALPORT CONTROL-SERIALPORT FUNC,and set the property (e.g.control protocol),and then connect the 25-pin RS232port conversion to the RS232 port on the DVR and at last set different remote IP addresses for the DVRs.When using the control keyboard,first input the remote IP of the DVR which the user wants to control,then the user can set the menu or operate the pan-tilt by S T W X and other buttons. 62 CONTROL KEYBOARD 220V POWER OUT PROTOCOL CONVERSION TRANSFORMER 25 PIN RS232 RS232 D V R D V R 4.Matrix connection Before connecting the matrix to the DVR by RS232 port,the user should confirm with the provider that if the DVR has a matrix control protocol. After the connection, please set the matrix protocol to the DVR’s serialport control,then the user can do operations such as control and switch through the panel or remote control. 63 Chapter 7 1. Frequent Asked Questions What the sound of buzzer mean when normally start the machine When the machine is started successfully, it would burst out a short ring. When the HD could not be identified, it would burst out a long ring. When communication with the controller panel is abnormal, it would burst out a voice of one long ring and two short in serial. 2. Uncontrollable of the recording time? The recording time unit is one day. Besides schedule recording, there are other recording manners as dynamic detection recording, manure recording, external event triggering recording. Confirm each setting of them is correct. 3. The indicator light is flashing while recording? Check the external video inputting signal first. Such phenomena would happen when the inputting signal is not standard. If it is not the problem of the inputting signal, it must be caused by that the reading speed of HD is too slow. In this situation, the current HD should be changed. 4. How to dispose with the broken sectors of the hardware? If the broken sector of HD is not too large, the machine would ignore and jump over it. Otherwise, system would eliminate this HD and output corresponding information. 5. What kind of external equipment could match the recorder? It could work together with various matrix and decoders. 6. What is the standard for setting different picture quality in the recorder? It is not differed by resolution but by image quality. 64