1
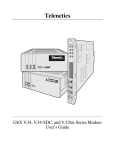
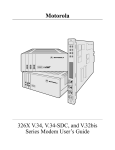
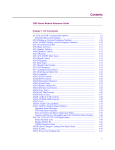
Part No. T0009-16, Rev A
June 1998
Page 1 of 18
326X V.34 Series Modem
Release 7.3/8.1 Software Upgrade Instructions
Overview
Introduction
This notice explains how to upgrade 326X V.34 Series Modem software by
replacing the unit’s programmable read-only memory (PROM) chips. This upgrade
is for stand-alone and Modulus Enclosure card modems.
The software releases are as follows:
• Release 7.3 is for 4-PROM modems running Release 7.1 or 7.2 software
• Release 8.1 is for 2-PROM modems running release 7.01 or 7.5 through 8.0
Do not upgrade modems that are running software Releases lower than 7.0 with this
kit.
Motorola recommends that:
• You read this notice completely before beginning to upgrade equipment
• If you plan to upgrade more than one unit, you complete one upgrade before
proceeding to the next
• You obtain the updated 326X Series V.34, V.34SDC, and V.32bis Series Modem
User Guide, (Part No. T0009), which documents software enhancements up to the
present.
In this Notice
Topic
See Page
In This Release .............................................................................................
PROM Installation Overview .......................................................................
Preparing to Upgrade a Stand-Alone Modem ...............................................
Upgrading a Stand-Alone Modem.................................................................
Reassembling a Stand-Alone Modem ..........................................................
Testing PROM Installation in a Stand-Alone Modem ..................................
Preparing to Upgrade an Enclosure Card Modem.........................................
Upgrading a Modulus Enclosure Card Modem ............................................
Reassembling and Testing a Modulus Enclosure Card Modem ...................
Reconfiguring Modem Options (Stand-Alone and Enclosure-Card) ...........
T0009-16 A
4
5
6
8
11
12
13
14
17
18
Part No. T0009-16, Rev A
June 1998
Page 2 of 18
Obtaining
Documentation
To order 326X modem documentation, including the 326X Series V.34 Modem
User’s Manual and Reference Guide, call the Motorola ISG publications order
department at (508) 261-5933, or download viewer files from the Motorola
World-Wide Web site (http://www.mot.com/MIMS/ISG/).
Warning!
Only qualified service personnel should perform the upgrade procedure. A qualified
service person is one who is familiar with the 326X product line operation, trained in
the technology of electrically powered information processing and business
equipment and adequately aware of the hazards associated with this equipment. Use
of this procedure by unqualified personnel could result in personal injury or
equipment damage, which could jeopardize your warranty and maintenance
agreement.
Users who are not qualified to perform an upgrade themselves should contact
Motorola or an authorized distributor regarding available upgrade services.
Caution!
Some components in the modem are sensitive to static electric discharges; such
discharges can damage these components. Use proper handling and grounding
precautions (described in this document) when handling components.
Compatibility
Warranty
Warranties for Motorola 326X V.34 modems upgraded with this PROM Upgrade Kit
are as follows.
Warranty Information
Motorola 326X V.34 Modem
Warranty Status
Still under factory warranty
Modem is covered under the warranty of
the original purchased modem.
Out of factory warranty
PROM Upgrade Kit is warranted for 90
days from date of shipment. Support is
limited to Factory Return and Repair.
Part No. T0009-16, Rev A
June 1998
Page 3 of 18
Upgrade Kit
Contents
Figure 1 shows the contents of the Upgrade Kit.
Some Modulus Enclosure card units have two modems on one card; to upgrade
these, use two upgrade kits.
A
Replacement PROMs
Two-PROM set shown. Some
kits include four PROMs.
B
PROM Puller
C
ESD Strap
Figure 1. Upgrade Kit Contents
Part No. T0009-16, Rev A
June 1998
Page 4 of 18
In This Release
In This Release
Software Functions Release 7.3/8.1 enables 326X modems to operate with V.90 modems in dial-up
connections. With this software, 326X modems can communication with V.90
modems and negotiate V.34 rates. The release does not provide 56K rates for 326X
modems, nor 326X rates higher than the V.34 33.6 KBPS standard.
The upgrade is not required for modems used only in leased-line applications.
Part No. T0009-16, Rev A
June 1998
Page 5 of 18
PROM Installation Overview
PROM Installation Overview
Installation
Overview
Upgrading a 326Xmodem is accomplished by replacing PROMs on a circuit card.
PROM access and positioning varies between the stand-alone and enclosure card
modem. This document provides separate instructions for each type.
Both types of modems require:
• Inspection of new PROMS (described in this section)
• Reconfiguration after PROM replacement (described in the final section)
Inspecting New
PROMs
(All Modems)
Before beginning any other procedures, inspect the new PROMs as follows.
This applies to stand-alone and enclosure card modems.
Inspecting New PROMs
Step
Action
Result
1
Verify that the PROMs are marked:
• G01 and G02, in a 2-PROM
kit
• G01, G02, G03, and G04, in a
4-PROM kit
2
Remove the new PROMs from the If any PROMs are damaged,
package. Inspect them for damage. arrange for replacement as follows:
The pins must be straight--not
• In the U. S. A., call Motorola
bent.
Customer Support at
(800) 544-0062
• Outside the U. S. A., call your
Motorola distributor
3
Replace the PROMs in the
package.
Part No. T0009-16, Rev A
June 1998
Page 6 of 18
Preparing to Upgrade a Stand-Alone Modem
Preparing to Upgrade a Stand-Alone Modem
Recording Modem
Configuration
Settings
The first step in preparing to upgrade is to write down or electronically save any
non-default settings and telephone numbers, so you can reconfigure them after the
upgrade. This data is lost during PROM installation.
The way to record this data varies with the modem configuration, as follows.
Recording Modem Configuration Settings
For:
Perform These Steps:
All modems:
Write down configuration settings; stored telephone
numbers; and any changes made to the four default
option sets. (Use AT ST to display current options.)
Use the Configuration Worksheets in the 326X V.34
Series Modem User’s Manual.
*
Disconnecting
Stand-Alone
Modem Hardware
Modems managed by a
Motorola 9000-UX or
9000-PC:
Write down the modem’s NC Address and NC port
rate. Use the Upload command to copy the modem’s
active configuration to the NMS.
Modems managed by a
Motorola 9110 NMS:
Copy the modem’s active configuration to a template,
using the 9110’s Config Copy command.
Modems managed by a
Motorola 9300 NMS or
9800 NMS:
Write down the modem’s NC Address and NC port
rate. Use the Upload command to copy the modem’s
active configuration to the NMS.
Refer to the following table for the remaining stand-alone-modem upgrade
preparation steps.
Disconnecting Stand-Alone Modem Hardware
Step
Action
Result
1
Obtain a flathead screwdriver.
2
Attach the ESD strap to your wrist
and to a grounded item.
Any electrostatic energy is
discharged from you.
3
Turn the modem power OFF.
Disconnect the power cord from the
modem.
Power is removed from the unit.
4
Disconnect all cables from the
modem.
5
Open the modem front panel door.
Hold it at a 90˚ angle to the front
panel. Push down to disengage the
snap hinges from the base.
The door can be set aside.
Part No. T0009-16, Rev A
June 1998
Page 7 of 18
Preparing to Upgrade a Stand-Alone Modem
Disconnecting Stand-Alone Modem Hardware (continued)
Step
Action
Result
6
Insert a screwdriver into an
The cover can be removed and set
enclosure slot at a 45˚ angle as
aside. Preparation is complete.
shown in Figure 2. Gently press
upward and twist to release the clip
from the cover. Repeat for all clips.
Pry the cover off
7
Go on to Upgrading a Stand-Alone
Modem.
Caution!
Use care when inserting the screwdriver into the modem enclosure slots. If inserted
too deeply, the tool may damage the enclosure base.
Repeat For All Six Latches
Insert at a 45º angle
and twist to pry open.
Release Locking
Latches One Side at a Time
Figure 2. Opening a Stand-Alone Modem Enclosure
Part No. T0009-16, Rev A
June 1998
Page 8 of 18
Upgrading a Stand-Alone Modem
Upgrading a Stand-Alone Modem
Introduction
To upgrade a standalone modem, you replace the old PROMs with new ones.
To remove the PROMs, use the following procedure.
PROM Removal for a Stand-Alone Modem
Step
Result
1
Turn the modem to face you.
2
Verify that the ESD strap is attached
to your wrist and a grounded point.
3
Hold the PROM puller at a 90˚ angle
to PROM G01. Gently loosen the
PROM pins by pulling up as shown in
Figure 3 and rocking the PROM from
end to end. You may press down on
the unit to brace it.
The PROM is removed. Note
the notch on the top of the
PROM; it indicates the position
of Pin 1.
4
Remove PROMs G01 and G02 from
the modem. In a four-PROM kit, also
remove G03 and G04.
PROM removal is complete.
Set aside old PROMS until the
upgrade is complete; then you
may dispose of them.
5
Go on to PROM Installation for a
Stand-Alone Modem.
(Top)
PROM Pin 1 Position
Action
Gently Pull Up
at a 90˚ Angle
G01
Location
Power
Supply
Optional
Circuit Board
G02
G03
G04
Figure 3. Removing PROMs From a Modem–Pull Straight Up
Part No. T0009-16, Rev A
June 1998
Page 9 of 18
Upgrading a Stand-Alone Modem
Installing New
PROMs
After removing the old PROMs from the modem, you install the new PROMS.
Caution!
Ensure that the PROM is properly aligned with the card, and that all PROM pins are
properly aligned with the socket receptacles before pressing on the PROM. If a
PROM is not correctly aligned before inserting, it will be damaged. Press gently,
with equal pressure on both sides, until pins are seated in the sockets.
To install the new PROMs, use the following procedure.
Installing PROMS in a Stand-Alone Modem
Step
Action
1
Attach the ESD strap to your wrist
and a grounded point.
2
Remove PROM G01 from its
package. Note the notch on the top;
it indicates Pin 1’s position.
3
Note PROM orientation (with
modem front panel toward you):
the notches face the back of the
modem, away from you.
4
The pins are aligned with the
Lay the PROM on its socket; be
sure that Pin 1 is oriented correctly receptacles.
and the pins are properly aligned.
5
Press the PROM into its socket.
6
With a two-PROM unit, install
G02.
With a four-PROM kit, install G02,
G03 and G04.
7
Ensure that the PROMs are
located, aligned and oriented
correctly and that all the pins are
fully seated in the receptacles.
PROMs are installed and oriented
correctly.
If a PROM is incorrectly installed,
contact Motorola Customer
Support, as described in PROM
Installation Overview.
8
Attach the large upgrade label to
the front panel (Figure 4).
The modem can be identified as
upgraded.
9
Go on to Reassembling a
Stand-Alone modem.
(Top)
PROM Pin 1 Position
Result
The PROM is oriented as shown in
Figure 4.
The PROM is installed.
Part No. T0009-16, Rev A
June 1998
Page 10 of 18
Upgrading a Stand-Alone Modem
Carefully Align the PROM
Pins with the Sockets,
then Press Down Gently
Upgrade-label
Location
Note Cut-Out Notch Orientation
G01
G02
G03
G04
(Top)
PROM Pin 1 Position
Four-PROM unit shown. Some units
have only two PROMS, G01 & G02.
Figure 4. Placing New PROMs in Modem
Part No. T0009-16, Rev A
June 1998
Page 11 of 18
Reassembling a Stand-Alone Modem
Reassembling a Stand-Alone Modem
Introduction
After installing the PROMs, you reassemble the modem.
Stand-Alone
Modem Assembly
The modem cover must be replaced and cables must be reconnected before the unit
is ready for test. To reassemble the modem, perform the following steps.
Assembling a Stand-Alone Modem
Step
Action
Result
1
Align the modem-cover notches
with the modem-base guides, and
position the modem-cover groove
with the backplane edge. Push
down to lock the cover into place.
2
Position the front door against the
front panel at a 90˚ angle.
3
Press on the door hinges to snap
them into place.
The door snaps into place.
4
Connect the power cord.
The unit is assembled.
5
Go on to Testing PROM
Installation in a Stand-Alone
Modem.
The cover snaps into place.
Part No. T0009-16, Rev A
June 1998
Page 12 of 18
Testing PROM Installation in a Stand-Alone Modem
Testing PROM Installation in a Stand-Alone Modem
Introduction
After replacing the PROMs, you test for proper operation, as follows.
PROM Replacement Test Procedure
Step
Action
1
Turn the modem power ON.
2
If the LCD displays correctly, turn
the modem power OFF.
3
Reconnect cables to the modem.
4
Turn the modem power ON.
5
Go on to Reconfiguring Modem
Options.
Result
After 15 seconds, the LCD
displays 326X Fast Init. If it
doesn’t, see the checklist below. If
it still does not display, contact
Motorola Customer Support, as
described in PROM Installation
Overview. Provide the error-code,
if one displays.
The unit is ready for configuration.
No-Initialization Checklist (From Step 1 Above)
Power
Ensure that the power cord is firmly plugged in to the modem
and the power source. If it is not, correct it and repeat the test
procedure.
PROM Order,
Orientation, and
Seating
Using the procedure in PROM Installation for a Stand-Alone
Modem, ensure that all PROMs are:
• Positioned in the correct order on the card
• Oriented correctly
• Seated flat on the receptacles, with all pins straight
If a PROM is wrong, contact Motorola Customer Support, as
described in PROM Installation Overview.
Part No. T0009-16, Rev A
June 1998
Page 13 of 18
Preparing to Upgrade an Enclosure Card Modem
Preparing to Upgrade an Enclosure Card Modem
Recording Modem
Configuration
Settings
The first step in preparing for the upgrade procedure is to write down and/or
electronically save any non-default settings and telephone numbers, so you can
reconfigure them after the upgrade. This data is lost during PROM installation.
Record this data depending on the modem configuration as follows.
Recording Modem Configuration Settings
For:
Perform These Steps:
All modems:
Write down configuration settings; stored telephone
numbers; and any changes made to the four default
option sets. (Use AT ST to display current options.)
Use the Configuration Worksheets in the 326X V.34
Series Modem User’s Manual.
*
Write down the modem’s NC Address and NC port
Modems managed by a
Motorola 9000-UX or PC rate. Use the Upload command to copy the modem’s
active configuration to the NMS.
Preparing to
Upgrade an
Enclosure Card
Modem
Modems managed by a
Motorola 9110 NMS:
Copy the active configuration to a template, using the
9110’s Config Copy command.
Modems managed by a
Motorola 9300 NMS or
9800 NMS:
Write down the modem’s NC Address and NC port
rate. Use the Upload command to copy the modem’s
active configuration to the NMS.
Perform the following steps to prepare for the PROM upgrade.
Preparing to Upgrade a Modulus Enclosure Modem
Step
Action
Result
1
Attach the ESD strap to your wrist
and to a grounded item.
Any electrostatic energy is
discharged from you.
2
Remove the card from the
enclosure.
Preparation is complete.
3
Go on to PROM Replacement for a
Modulus Enclosure Modem.
Part No. T0009-16, Rev A
June 1998
Page 14 of 18
Upgrading a Modulus Enclosure Card Modem
Upgrading a Modulus Enclosure Card Modem
Introduction
To upgrade a Modulus Enclosure modem, you replace the old PROMs with new
ones. To remove the PROMs, use the following procedure.
PROM Removal for a Modulus Enclosure Modem
Step
Action
1
Verify that the ESD strap is
attached to your wrist and a
grounded point.
2
Hold the PROM puller at a 90˚
angle to PROM G01. Gently
loosen the PROM pins by pulling
up as shown in Figure 5 and
rocking the PROM from end to
end. You may press down on the
unit to brace it.
3
Remove PROMs G01 and G02
from the modem. In a four-PROM
kit, remove G03 and G04.
4
On cards that have two modems,
repeat Step 3 for the second set of
PROMs.
5
Go on to PROM Installation for
Modulus Enclosure Modems.
Result
PROM removal is complete. Set
aside old PROMS until the upgrade
is complete; then you may dispose
of them.
Part No. T0009-16, Rev A
June 1998
Page 15 of 18
Upgrading a Modulus Enclosure Card Modem
Installing New
PROMs
After removing the old PROMs from the modem, you install the new PROMS.
Caution!
Ensure that the PROM is properly aligned with the card, and that all PROM pins are
properly aligned with the socket receptacles before pressing on the PROM. If a
PROM is not correctly aligned before inserting, it will be damaged. Press gently,
with equal pressure on both sides, until pins are seated in the sockets.
Modem B PROMS
(Sometimes present)
NOTE G01 position!
Modem A PROMS
(Always present)
NOTE G01 position!
Figure 5. Dual-Modem Card, Four PROMs Per Modem Shown
Part No. T0009-16, Rev A
June 1998
Page 16 of 18
Upgrading a Modulus Enclosure Card Modem
To install the new PROMs, use the following procedure.
Installing PROMS in a Modulus Enclosure Modem
(Top)
PROM Pin 1 Position
Step
Action
Result
1
Attach the ESD strap to your wrist
and a grounded point.
2
Remove PROM G01 from its
In case of damage, call Motorola
package. Note the notch on the top; Customer Support, as described in
it indicates Pin 1’s position.
PROM Installation Overview.
3
Lay the PROM on its socket; be
The PROM is oriented as shown in
sure that Pin 1 is oriented correctly Figure 5, and the pins are aligned
and the pins are properly aligned. with the receptacles.
4
Press the PROM into its socket.
5
With a two-PROM unit, install
G02.
With a four-PROM kit, install G02,
G03 and G04.
6
Ensure that the PROMs are
located, aligned and oriented
correctly and that all the pins are
fully seated in the receptacles.
PROMs are installed and oriented
correctly.
If a PROM is incorrectly installed,
contact Motorola Customer
Support.
7
Attach the small upgrade label on
the card edge (Figure 5).
The modem can be identified as
upgraded.
8
For cards that have two modems
PROM installation is complete for
(A and B), repeat Steps 2-6 on the two modems on card.
second set of PROMs (Modem B).
9
Go on to Reassembling a Modulus
Enclosure Modem.
The PROM is installed.
Reassembling and Testing a Modulus Enclosure Card Modem
Part No. T0009-16, Rev A
June 1998
Page 17 of 18
Reassembling and Testing a Modulus Enclosure Card Modem
Introduction
After replacing PROMs, you replace the modem card in the Modulus enclosure, and
then test for proper PROM installation.
Reassembling and To reassemble and test a modem, follow the procedure below.
Testing a Modem
Reassembling and Testing a Modulus Enclosure Card Modem
Step
Action
Result
1
Place the card back into the
Modulus enclosure.
After 15 seconds, the LCD
displays 326X Fast Init. If it
doesn’t, see the checklist below.
For dual-modem cards: the first
display refers to the currentlyselected modem.
2
For dual-modem cards: change the After 15 seconds, the LCD
modem-selector switch.
displays 326X Fast Init. If it
doesn’t, see the checklist below.
If there is a problem, contact
Motorola Customer Support.
Provide the error-code, if one
displays.
Installation test is complete.
3
Go on to Reconfiguring Modem
Options.
No-Initialization Checklist (From Step 1 and 2 Above)
Power
Ensure that the power cord is firmly plugged in to the modem
enclosure and the power source. If it is not, correct it and
repeat the test procedure.
PROM Order,
Orientation, and
Seating
Using the procedure in PROM Installation for a Modulus
Enclosure Modem, ensure that PROMs are:
• Positioned in the correct order on the card
• Oriented correctly
• Seated flat on the receptacles, with all pins straight
If a PROM is wrong, contact Motorola Customer Support.
Reconfiguring Modem Options (Stand-Alone and Enclosure-Card)
Part No. T0009-16, Rev A
June 1998
Page 18 of 18
Reconfiguring Modem Options (Stand-Alone and Enclosure-Card)
Overview
You reconfigure parameter options, telephone numbers and option sets after testing
the PROMs. This applies to stand-alone and Modulus enclosure card modems.
Reconfiguring the
Modem
Reconfiguring the modem means programming it with the options it had before the
PROM upgrade. Configuration varies with the network-management environment.
Reconfiguring a Modem That is Not Managed by a Network
Management System
Step
Action
Result
1
Enter the non-default option-set
options recorded before the
upgrade.
2
Enter the active configuration
recorded before the upgrade.
Configuration is loaded to
modem(s).
3
Enter the telephone number(s)
recorded before the upgrade.
Modem is ready for operation.
Reconfiguring a Modem That is Managed by a Network Management
System
Step
Action
Result
1
Enter the telephone number(s)
recorded before the upgrade.
2
Enter the non-default option-set
options recorded before the
upgrade.
3
Ensure that the network manager
re-attaches to the modem.
4
Restore (download) the saved
Configuration is loaded to
modem configuration from the
modem(s).
network manager to the modem(s),
if applicable.
5
Invoke new features as needed.
Modem is ready for operation.