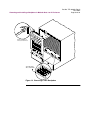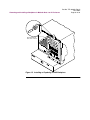
1
Part No. TEL–09949, Rev A
June 2001
Page 1 of 34
326X SERIES MODEM
Modem Cards, Backplanes, and Modular Nest 9 and 21 Enclosures
In This Notice
Topic
See Page
Introduction ...............................................................................................
About the 326X Series Modem Documentation Set.............................
For More Details on the 326X Modem’s... ...........................................
Safety Information.........................................................................................
Warning Description .................................................................................
Connecting Port Warning ..........................................................................
Installation Warning ..................................................................................
Pre-Installation Information and Activities ...................................................
326X Series Modem Cards and Backplanes .............................................
326X Series Modem Cards ...................................................................
326X Series Modem Card Backplanes .................................................
Stand-alone Modems and Enclosure Cards: Differences..........................
A/B Switching and the A/B LED .........................................................
ALM LED.............................................................................................
Telephone Company Compliance—U.S.A. Models .................................
Backplane Jumpers for the Busy Out Feature...........................................
Hong Kong and the United Kingdom ...................................................
Countries That Support Busy Out.........................................................
How and When is Make Busy Activated? ............................................
Setting the Modem Card DIP Switch........................................................
Cabling the 3262 and the 3267 (Dual Dial) Modem Cards ......................
Cabling the 3263 and the 3268 (Leased Line, Dial Restoral) Modem Cards
Attaching Ferrite Beads (U.S.A., Canada, and Japan Only) .....................
Removing Audio Cable Connectors From a Modem Backplane..............
326X Series Modem—Cabling to a Network Manager............................
Setting Control Across Groups .............................................................
Example ................................................................................................
Cautions and Limitations for Network Management Cabling..............
Daisy-Chaining NC Ports: Card Modems to Stand-alone Modems .....
Preparing the 9110 DMS for 326X Series Card Modems ....................
326X Modem Card Power Supply Requirements in 21-Card Enclosure..
Removing and Installing a Backplane in Modular Nest 9 or 21 Enclosure ..
Removing a 326X Backplane....................................................................
Installing or Replacing a 326X Backplane................................................
2
2
2
3
3
3
4
5
5
5
5
6
6
6
7
7
7
8
8
12
14
15
16
16
18
22
22
23
24
26
26
27
28
30
Part No. TEL–09949, Rev A
June 2001
Page 2 of 34
Overview
This document covers:
• Information you need and activities you must complete before installing and
operating 326X Series Modem card(s) in the Modular Nest 9 and 21
Enclosure
• Procedures for removing and replacing a backplane installed in a Modular
Nest 9 or 21 enclosure
• A procedure for testing a backplane for proper installation and connection
Use this information with the Modular Nest 9 and 21 Operations and Installation
Guide (Part No. TEL–09564), shipped with the Modular Nest 9 and 21 enclosure,
which explains how to install, operate and maintain the enclosure. It also provides
instructions for installing and removing product cards from the enclosure.
Introduction
This notice provides information about new features and enhancements available
with 326X Series Modem cards and backplanes.
About the 326X Series Modem Documentation Set
The following documentation is shipped with your 326X Series Modem
(stand-alone and card units):
• 326X Series Modem User’s Guide (Part No. TEL–T0009)
• 326X Series Modem Reference Card (Part No. TEL–T0009-01)
For More Details on the 326X Modem’s...
• Configuration options (and equivalent AT commands)
• V.25 bis Automatic-Calling Unit
• NetView’s LPDA-2 dialing commands
• Diagnostic tests
...refer to the 326X Series Modem Reference Guide, which you can order through
your Telenetics sales representative or local distributor.
Part No. TEL–09949, Rev A
June 2001
Page 3 of 34
Safety Information
Safety Information
This section explains how Warning Notices are used in Telenetics’ documentation,
and it provides such notices for users of the 326X Series Modem.
Warning Description
The following notice emphasizes certain information. In documentation, it is
displayed in the format shown:
Warning
Warning is the most serious notice, indicating that you can be physically hurt.
Un avertissement constitue le message le
plus sérieux, indiquant que vous pouvez
subir des blessures corporelles.
Eine Warnung ist der ernsthafteste
Hinweis auf Körperverletzungsgefahr.
Connecting Port Warning
Warning
Ports that are capable of connecting to other apparatus are defined as SELV. To
ensure conformity with EN60950, ensure that these ports are only connected to ports
of the same type on other apparatus.
Les ports qui sont susceptibles d’être
connectés à des équipements sont
désignés comme TBTS. Pour garantir la
conformité à la norme EN 60950,
n’interconnecte ces ports qu’avec des
ports du même type sur des autres
matériels.
Anschlüsse, die mit anderen Geräten
verbunden werden können, sind als
SELV beschrieben. Um Konformität mit
EN 60950 zu versichern, versichern Sie,
daß diese Anschlüsse nur mit denen der
selben Type auf anderen Geräten
verbunden werden.
Part No. TEL–09949, Rev A
June 2001
Page 4 of 34
Safety Information
Installation Warning
Warning
All Telenetics devices should be used in environments designed for computers and
electronic equipment. In areas susceptible to lightning, take precautions to prevent
damage to electronic equipment. Contact your telephone company, or an electronic
accessories vendor, for information on lightning protection equipment. Customers
experiencing problems caused by surges from lightning have eliminated such
problems by installing appropriate surge suppressors on power and data lines
connected to Telenetics devices.
Tous les dispositifs Telenetics doivent être
utilisés dans des environnements conçus pour
des ordinateurs et du matériel électronique.
Dans les zones susceptibles d’être frappées
par la foudre, prenez des précautions pour
éviter que le matériel électronique soit
endommagé. Contactez votre compagnie
téléphonique, ou un vendeur d’accessoires
électroniques, pour obtenir des
renseignements concernant les systèmes de
protection contre la foudre. Certains usagers
confrontés à des problèmes causés par des
sautes de tension dues à la foudre ont éliminé
ces problèmes en installant des régulateurs de
tension appropriés sur les câbles électriques et
les câbles de données reliés aux dispositifs
Telenetics.
Telenetics-Geräte sind grundsätzlich in für
Rechner und elektronische Anlagen
vorgesehenen Umgebungen zu verwenden. In
unwettergefährdeten Bereichen ist jegliche
Elektronik gegen Blitzeinwirkung zu
schützen. Näheres über entsprechende
Schutzeinrichtungen erfahren Sie von Ihrer
Telefongesellschaft oder einem
Elektrohändler. Probleme mit
Spannungsstößen durch Blitzeinwirkung
lassen sich durch Einbau von
Überspannungsableitern in die zu TeleneticsGeräten führenden Netz- und Datenleitungen
beheben.
Pre-Installation Information and Activities
Part No. TEL–09949, Rev A
June 2001
Page 5 of 34
Pre-Installation Information and Activities
This section provides information about 326X Series Modem card models 3262,
3263, 3267 and 3268. It describes activities you must complete before installing and
operating 326X Series Modem card(s) in a Modular Nest enclosure.
326X Series Modem Cards and Backplanes
This section describes 326X Series Modem cards and backplanes, and items shipped
with them.
326X Series Modem Cards
326X Series Modem cards can be:
• Dial modem —two modems on a card, 2-wire leased line or dial
(Model 3262 or 3267)
• Leased line modem with dial restoral—2-/4- wire leased line or 2-wire dial
(3263 or 3268)
With each modem card, you receive:
• Audio cables for connecting to the dial and leased line
Optionally, you receive:
• Two audio cables with ferrite beads (U.S.A., Japan, and Canada only)
• Modular connector blocks (Japan only)
Refer to the 326X Series Modem User’s Guide, Appendix C, Country-Specific
Information, for a description of the cables that meet your country’s requirements.
326X Series Modem Card Backplanes
326X Series Modem card backplanes can be:
- 1-card/2-slot
- 9-card/10-slot
- 21-card/21-slot (for 21-slot enclosure only)
With each 326X Series Modem card backplane, you receive:
- One 326X Series Modem User’s Guide (Part No. TEL–T0009)
- One 326X Series Modem Reference Card (Part No. TEL–T0009-01)
- Four cable clamps
Part No. TEL–09949, Rev A
June 2001
Page 6 of 34
Pre-Installation Information and Activities
Stand-alone Modems and Enclosure Cards: Differences
The 326X Series Modem card front panel differs from that of the stand-alone 326X
Series Modem. As shown in Figure 1, the 3262, 3263, 3267, and 3268 Modem cards
have eight front-panel LEDs. Stand-alone 326X Series Modems do not have two of
these:
125
A/B ALM
109 108
RC/NC RI/OH
104 103
CD TR
RD TD
• A/B LED
• ALM LED
These two LEDs are described here.
326x Ready
RETURN
DOWN
ACROSS
ENTER
The A/B and ALM LED's are not featured in stand-alone modems.
Figure 1. 326X Series Modem Card Front Panel
A/B Switching and the A/B LED
With the 3262 and the 3267 Modem card (dial-only), two modems (A and B) share a
single card and front panel. One modem controls the front panel display and LEDs at
a time. The A/B LED indicates which front panel display and LEDs you are
currently viewing. When the A/B LED is:
• Lit (green), modem A front panel information is being displayed
• Not lit, modem B front panel information is being displayed
To toggle between the displays, hold down , and press .
Since the 3263 and the 3268 Modem cards (leased line with dial restoral) contain
only one modem, the A/B LED is always lit (green).
ALM LED
The ALM LED lights (yellow) when a test is in progress or a modem failure occurs.
With the Dual Dial Modem card, if one modem fails or is being tested, the ALM
LED lights and remains lit regardless of which modem front panel is displayed.
To find out which modem failed, toggle between the front panels of modems A and
B by holding down , and pressing . The failed modem displays:
ERRORxxx
Note
If modem A has control and the network manager puts modem B into test mode,
modem B’s ALM LED lights.
Pre-Installation Information and Activities
Part No. TEL–09949, Rev A
June 2001
Page 7 of 34
Telephone Company Compliance—U.S.A. Models
The Telenetics 326X Series Modem complies with Part 68 of the FCC rules. The
modem card includes a label with the FCC registration number for this equipment. If
requested by the telephone company, you must provide this information. Generally,
the ringer equivalence number (REN) is also requested for telephone equipment. The
REN is listed on the FCC registration label.
The REN is used to determine the number of devices that can be connected to the
telephone line. Excessive RENs on the telephone line may result in the devices not
ringing in response to an incoming call. The sum of the RENs should not exceed
five. To be certain of the number of devices that can be connected to the line, contact
the telephone company to determine the maximum REN for the calling area.
NOTE: The telephone company may make changes in its facilities, equipment,
operations, or procedures that could affect equipment operation. If this happens, the
telephone company will notify you in advance so that you can make the necessary
modifications to maintain uninterrupted service.
This equipment uses the following USOC jacks: RJ11C, RJ16C, RJ45S, RJ4MB,
and for the leased line, JM8.
Refer to the 326X Series Modem User’s Guide, Appendix C, Country-Specific
Information, for regulatory agency information for your country.
Backplane Jumpers for the Busy Out Feature
This section applies to countries that use the “Universal International” (UI) Modular
Nest enclosure backplane.
This section also is of interest to users in Hong Kong and the United Kingdom.
Hong Kong and the United Kingdom
IMPORTANT: In Hong Kong and the United Kingdom, do not install a 3268 or
3268FAST Modem (leased line with dial restoral) in a Busy Out backplane.
The modem will not function.
In Hong Kong and the United Kingdom, Busy Out backplanes are hard-wired for
Busy Out operation. These backplanes do not use pin jumpers.
Part No. TEL–09949, Rev A
June 2001
Page 8 of 34
Pre-Installation Information and Activities
Countries That Support Busy Out
Some backplanes have a Busy Out feature and are intended for use with dial modems
(models 3262 and 3267). In some countries, leased modems (models 3263 and 3268)
use Busy Out for dial restoral. The following table shows which countries use the
Busy Out feature.
Countries that Support the Busy Out Option
Country
Australia
Belgium
Canada
Denmark
Hong Kong
Ireland
Sweden
Switzerland
United Kingdom
United States
All Others
3262 and
3267
Yes
Yes
Yes
Yes
Yes
Yes
Yes
Yes
Yes
Yes
No
3263 and
3268
Yes
Yes
No
Yes
No*
Yes
Yes
Yes
Yes*
Yes
Yes
How and When is Make Busy Activated?
Make Busy versions of Modular Nest 9 and Modular Nest 21 backplanes (which
install in a Modular Nest enclosure with card modems) come equipped with the
Busy Out feature. This feature causes a Busy Out modem to “appear busy” to the
central office when:
• Power is disconnected from the Modular Nest enclosure
• The modem card is not present in its slot
• Busy Out=ON (the option is set through the front panel menu, the AT ACU,
or a network manager)
Busy Out is intended for use with Model 3262 and 3267 dial modems. In some
countries, it is also used in dial-restoral mode on Model 3263 and 3268 leased line
modems.
Pre-Installation Information and Activities
Part No. TEL–09949, Rev A
June 2001
Page 9 of 34
Make Busy backplanes are factory configured for Busy Out operation in their
destination country, as indicated in Table 1 or Table 2.
Table 1. Backplane Pin Settings for Busy Out, Modular Nest 9
Pin Pair
Function
1
Left
TIP and RING
1
Right
Make Busy and
Make Busy 1
1Inner
U. S. A. and Canada: Other UI Countries:
No jumper connector
Connected with jumper
Connected with jumper No jumper connector;
not applicable
backplane surface, as viewed from the rear of the Modular Nest.
Table 2. Backplane Pin Settings for Busy Out, Modular Nest 21
Pin Pair
Function
1
Left
Make Busy and
Make Busy 1
1
Right
TIP and RING
1Inner
U. S. A. and Canada: Other UI Countries:
Connected with jumper No jumper connector;
not applicable
No jumper connector
Connected with jumper
backplane surface, as viewed from the rear of the Modular Nest.
Warning
Only qualified service personnel should remove pin jumpers. A qualified service
person is one who is familiar with product operation, trained in the technology of
electrically powered information processing and business equipment and adequately
aware of the hazards associated with this equipment. Removal by unqualified
personnel could result in personal injury or equipment damage, which could
jeopardize your warranty and maintenance agreement. Users who are not qualified to
perform this action themselves should contact Telenetics or an authorized distributor
regarding available upgrade services.
Seul un personnel qualifié est autorisé à enlever
les cavaliers. Nous appelons qualifiée toute
personne familière avec le fonctionnement du
produit, ayant suivi une formation dans la
technique du traitement de l’information et des
équipements de bureau par système électrique et
connaissant les dangers liés à ces équipements.
Le recours à un personnel non qualifié pour cette
opération risque d’entraîner des dommages
corporels et matériels ainsi que l’invalidité
éventuelle du contrat de garantie et de
maintenance. Nous conseillons aux utilisateurs
non qualifiés pour effectuer cette procédure de
contacter Telenetics ou un distributeur agréé pour
obtenir une liste des services de mise à jour
disponibles.
Pre-Installation Information and Activities
Part No. TEL–09949, Rev A
June 2001
Page 10 of 34
Kontaktstiftüberbrückungen sollten nur von
qualifiziertem Kundendienstpersonal entfernt
werden. Ein qualifizerter Kundendiensttechniker
ist vertraut mit dem Betrieb des Produkts,
ausgebildet für die Technologie der mit Strom
versorgten Datenverarbeitung und
Unternehmensgeräten sowie informiert über die
Gefahren, die von diesen Geräten ausgehen
können. Werden diese Komponenten von unqualifiziertem Personal entfernt, kann dies Verletzungen von Personen oder Geräteschäden zur
Folge haben und Ihre Garantie- und Wartungsvereinbarung gefährden. Anwender, die keine
Berechtigung zum Durchführen dieses Vorgangs
besitzen, sollten Upgradedienste von Telenetics
oder einem autorisierten Händler anfordern.
Part No. TEL–09949, Rev A
June 2001
Page 11 of 34
Pre-Installation Information and Activities
Refer to Figure 2, which shows pin locations on Modular Nest 21 backplanes.
Modular Nest 9s have a similar layout.
Modem A
Modem B
Pins
Jumpers on
Left Pin Pairs
Pins
Modular Nest 21
Enclosure, Rear View
Figure 2. Modular Nest Backplane Pin Locations (Modular Nest 21
Shown)
Caution
If you use a 3263 or 3268 (leased line with dial restoral) modem card with a Busy
Out backplane, remove jumpers from all four pins, or the modem in that slot will not
operate properly. These cards do not support Busy Out.
Part No. TEL–09949, Rev A
June 2001
Page 12 of 34
Pre-Installation Information and Activities
Setting the Modem Card DIP Switch
An 8-position DIP (Dual Inline Package) switch on the modem card functions the
same as the rear panel DIP switch on stand-alone modems.
The switches are numbered from left to right on the card (Figure 3). You must set the
DIP switch before installing the card. Table 3 lists the switches and explains their
use. Open (Off) is the factory default for the switches.
The references “Modem A” and “Modem B” in refer to the dual modem capability of
models 3262 and 3267. See “A/B Switching and the A/B LED.”
NOTE: Switches 7 and 8 apply only to Models 3262 and 3267 (dial-only). Though
Switches 7 and 8 appear on Models 3263 and 3268 (leased line with dial restoral),
they are not connected and have no function.
1 2 3 4 5 6 7 8
Switches 7 and 8
Apply to Models
3262 and 3267
(Dial Only)
The factory default for the
326X Series Modem
switch is open (off).
Front Panel
Figure 3. Locating Eight-Position DIP Switch
Pre-Installation Information and Activities
Part No. TEL–09949, Rev A
June 2001
Page 13 of 34
Table 3. Modem Rear Panel DIP Switch Functions
Switch Number
1 (Modem A only)
7 (Modem B only)
2 (Modem A only)
8 (Modem B only)
3 (Modems A and B)
4 (Modems A and B)
5 (Modems A and B)
6 (Modems A and B)
Setting
Function
Off
EIA/TIA 232-D pin 23 is set for data rate input.
Setting Switch 1 or 7 to this position has no
effect on modem operation.
On
EIA/TIA 232-D pin 23 is set as a data indicator.
Off
Busy Out Select. A signal on EIA/TIA 232-D
Pin 25 makes the modem appear busy to
incoming calls.
On
Test Indicator Signal (V.24 Circuit 142) Select.
The modem sends a signal to the terminal on
EIA/TIA 232-D Pin 25 (V.24 Circuit 142) when
a test is in progress.
Off
Front panel enable. The front panel functions
normally.
On
Front panel disable. You can check only status
displays. NOTE: If your modem is under remote
configuration control by another 326XSeries
Modem, the controlling modem retains frontpanel control of your modem.
Off
Normal password protection applies.
On
This reinitializes the modem to its factory
settings. Use this when you forget your
password, to unlock the modem from password
protection.
Off
AT and V.25 bis command sets can be used from
an attached terminal.
On
AT and V.25 bis command sets cannot be used
from an attached terminal. NOTE: If your
modem is under remote configuration control by
another 326X Series Modem, the controlling
modem retains AT ACU control.
Off
Factory use only.
Part No. TEL–09949, Rev A
June 2001
Page 14 of 34
Pre-Installation Information and Activities
Cabling the 3262 and the 3267 (Dual Dial) Modem Cards
Refer to Figure 4 for cabling of 3262 and 3267 (dual dial) Modem cards. Interface
and cabling pin-outs vary by country.
Refer to the 326X Series Modem User’s Guide, Appendix C, Country-Specific
Information, for interface and cable pin-outs. For DTE and Network Control Port
interface pin-outs, refer to Appendix B, Interface Pin-outs, of that guide.
A8
A6
A4
A2
DIAL LINE A
2W LEASE
A9
A7
B8
B6
DIAL LINE B
2W/4W LEASE
B9
SLOT9
A5
B7
8
7
A3
B4
5
Ferrite bead (in countries
that require it)
B2
B5
6
A1
B3
4
B1
3
2
1
A
A
A
A
A
A
A
A
A
DTE
DTE
DTE
DTE
DTE
DTE
DTE
DTE
DTE
B
B
B
B
B
B
B
B
B
NC
MSTR
2
NC BUS
IN
OUT
OUT
NC
MSTR
1
To Dial Line
or Leased Line
for Modem A
To Dial Line
or Leased Line
for Modem B
To DTE
for Modem A
COMM +5V +12V -12V
AC POWER
To DTE B
for Modem B
Figure 4. Cabling the 3262 and the 3267 (Dual Dial) Modem Cards
Part No. TEL–09949, Rev A
June 2001
Page 15 of 34
Pre-Installation Information and Activities
Cabling the 3263 and the 3268 (Leased Line, Dial Restoral) Modem
Cards
Refer to Figure 5 for cabling of 3263 and 3268 (leased line with dial restoral)
Modem cards. Interface and cabling pin-outs vary by country.
Refer to the 326X Series Modem User’s Guide, Appendix C, Country-Specific
Information, for interface and cable pin-outs. For DTE and Network Control Port
interface pin-outs, refer to Appendix B, Interface Pin-outs, of that guide.
A8
A6
A4
A2
DIAL LINE A
2W LEASE
A9
A7
B8
A5
B6
DIAL LINE B
2W/4W LEASE
B9
B7
SLOT9
8
7
A3
B4
B5
6
5
A1
Ferrite bead (in countries
that require it)
B2
B3
4
B1
3
2
1
To Dial Line
A
A
A
A
A
A
A
A
A
DTE
DTE
DTE
DTE
DTE
DTE
DTE
DTE
DTE
B
B
B
B
B
B
B
B
B
NC
MSTR
2
NC BUS
IN
COMM
OUT
OUT
NC
MSTR
1
To Leased Line
To DTE
+5V +12V -12V
AC POWER
Figure 5. Cabling the 3263 and the 3268 (Leased Line with Dial
Restoral) Modem Cards
Part No. TEL–09949, Rev A
June 2001
Page 16 of 34
Pre-Installation Information and Activities
Attaching Ferrite Beads (U.S.A., Canada, and Japan Only)
A cable with an attached ferrite is included in the accessory kit for U.S.A., Canada,
and Japan 326X Series Modem cards. In order to meet FCC Class A and CISPR
requirements, the ferrite side of the dial and leased line cables must be attached as
close to the backplane as possible (Figure 6).
.
A8
DIAL LINE A
2W LEASE
A9
A6
A7
B8
DIAL LINE B
2W/4W LEASE
B9
SLOT9
A5
B6
B7
8
A4
7
A3
B4
B5
6
A2
5
A1
B2
B3
4
3
The ferrite side of the cable
should be located on the end
closest to the modem backplane.
B1
2
Ferrites
Figure 6. Attaching Ferrite Bead to Cable
Removing Audio Cable Connectors From a Modem Backplane
For compliance with safety standards, audio connectors (for dial and leased line
connections) on the 326X Series Modem backplane are recessed approximately
4 cm behind the sheet metal on the backplane (Figure 7).
Figure 7. Releasing Backplane Audio Connectors
Pre-Installation Information and Activities
Part No. TEL–09949, Rev A
June 2001
Page 17 of 34
To release the connector:
1) Insert a small screwdriver beneath the clip on the bottom of the
connector (Figure 7).
2) Press down on the screwdriver to release the clip and gently pull
to remove the connector from its receptacle on the backplane.
Pre-Installation Information and Activities
Part No. TEL–09949, Rev A
June 2001
Page 18 of 34
326X Series Modem—Cabling to a Network Manager
This section describes how to set the 326X Series Modem backplane NMS Bus DIP
switches for network management. It also describes the proper sequence for
connecting to a Network Management System (NMS).
When cabling 326X Series Modem enclosure cards to a network manager:
• The network control (NC) master is a modem that receives network
management polls and responds over the digital NC interface. NC polls are
generated by the manager and passed to the local or remote site. NC responses
are generated:
- By the modems at the local site and passed to the manager site
- By the modems at the remote site and passed to the manager site
• The NC slave is a modem that receives NC polls and responds over the audio
interface (dial or leased line).
• When you divide an enclosure into groups, each group represents a single NC
channel. The enclosure can operate with some slots empty, but at least one
card must be in the “master slot” of each group to allow NC signaling for
other slots in that group. The master slot corresponds to the NC IN/NC OUT
connectors.
The network manager regards all 326X Series Modems included in a group and their
associated slaves as operating on a single NC channel. For proper network
management operation on a single NC channel, each modem and its associated
slaves must have a unique NC address. The total number of 326Xs on one NC
channel must not exceed the maximum number of devices per channel supported by
the network manager. See your NMS documentation for details.
Part No. TEL–09949, Rev A
June 2001
Page 19 of 34
Pre-Installation Information and Activities
Figure 8 shows a single NC command flow path. In the figure, the local masters
receive network control from a single network manager source.
Network
Manager
Modular Nest 9 or 21 Enclosure
Backplane
Modular Nest 9 or 21 Enclosure
Backplane
Local
Master
In-Connector
from Backplane.
In-Connector
from Backplane:
Not Used.
Remote
Master
For Any
Daisy-Chained
Device.
Local
Slave
For Any
Daisy-Chained
Device.
Out-Connector
from Backplane.
Remote
Slave
Digital NC Bus
Notes: (1) The dotted lines indicate the NC command flow path.
(2) The network manager regards all 326X Series Modems in a
group and their associated slaves as operating on a single NC channel.
Out-Connector
from Backplane.
Figure 8. Leased or Dial Line Network Managed Command Flow Path
Each 326X Series Modem backplane provides network control (NC) ports for
connection to a Network Manager:
• The 21-card backplane has four NC ports (NC 1 - NC 4)
• The 9-card backplane has two NC ports (NC 1 and NC 2)
• The 1-card backplanes each have one NC port
With the 1-card backplane, the NC port is only for the modem occupying that slot,
but with the 9-, and 21-card backplanes, one NC port is assigned to serve a group of
4, 5, or 6 modem cards as outlined in Table 4.
Table 4.
Number of Groups vs. Number of Modem Cards per Slot
Backplane
Size
1 Card
9 Card
21 Card
Number of
Groups
1
2
4
Number of Modem Cards in a
Group
1
5 and 4
5, 5, 5, and 6
Part No. TEL–09949, Rev A
June 2001
Page 20 of 34
Pre-Installation Information and Activities
A group’s network management signaling is passed along a multi-drop bus in the
backplane to each NC port. One slot of each group is the Bus Master slot (NC 1 for
group 1, NC 2 for group 2, etc.). The group number is identified by the Bus Master
slot number (e.g., Group 1 uses Bus 1 Master slot). For a group’s NC port to work, its
Bus Master slot must be occupied. Figures 9 and 10 show this for each backplane.
1-Card
1-Card
1-Card
Backplane Backplane Backplane
Filler
Panels
OUT
OUT
NC
IN
COMM
OUT
NC
IN
9-Card
Backplane
NC
MSTR
2
NC
NC BUS
IN
OUT
OUT
NC
MSTR
1
IN
+5V +12V -12V
AC POWER
NC Port and Bus Master Slots
Are within Shaded Areas
Network Control Group 1 Network Control Group 2
Figure 9. NC Port and Bus Master Locations, and Groups
(1- and 9-Card Backplanes)
Part No. TEL–09949, Rev A
June 2001
Page 21 of 34
Pre-Installation Information and Activities
NC Port and Bus Master Slots
Are within Shaded Areas
NC
MSTR
2
NC BUS
IN
COMM
OUT
NC
MSTR
2
NC BUS
IN
OUT
+5V +12V -12V
NC BUS
NC
MSTR
2
IN
OUT
OUT
NC
MSTR
1
AC POWER
Network Control Group 4 Network Control Group 3
Network Control Group 2
Network Control Group 1
Figure 10. NC Port Locations, Bus Master Locations, and Groups
(21-Card Backplane)
Pre-Installation Information and Activities
Part No. TEL–09949, Rev A
June 2001
Page 22 of 34
Setting Control Across Groups
You can use cables to daisy-chain NC ports on 326X Series Modem cards, as you can
with stand-alone modems. With 9- and 21-card backplanes, you can also set NMS
Bus DIP switches on the backplane so that all NC signaling is bussed to one NC Port.
To bus two or more groups’ NC signaling to one NC Port using Bus DIP switches:
• Groups must be contiguous (Group 3 to Group 2 to Group 1)
• The NC port you plan to use must be the lowest-numbered NC port, and it
must have its Bus Master slot occupied
• The NMS Bus DIP switch between groups whose signals are to be bussed to a
common NC port must have all six positions set to the low number (if all six
positions are set to the high number, daisy-chaining is disabled)
Caution
Do not mix switch settings to high and low numbers. This causes interference with
Network Control signaling.
Example
For example, to bus signals from group 2 to group 1’s NC port:
1) Ensure that Bus 1 Master slot is occupied. Other slots in groups 1
and 2 need not be (because the backplane uses a “multi-drop bus,”
successful bussing of NC signaling along the backplane takes place
even when slots are unoccupied).
2) On the backplane, locate the NMS Bus DIP switch between Bus 1
Master slot and Bus 2 Master slot (Figure 11). Set all six NMS Bus
DIP switches to 1.
3) Connect the network management cable (supplied with your
network manager) from the Bus 1 Master slot NC IN port to the
network manager.
Figure 11 illustrates this example.
Part No. TEL–09949, Rev A
June 2001
Page 23 of 34
Pre-Installation Information and Activities
A8
A6
A4
A2
DIAL LINE A
2W LEASE
A7
A5
B8
B6
DIAL LINE B
2W/4W LEASE
B9
SLOT9
A3
B4
B7
8
B2
B5
7
6
A1
B3
5
4
B1
3
2
1
A
A
A
A
A
A
A
A
A
DTE
DTE
DTE
DTE
DTE
DTE
DTE
DTE
DTE
B
B
B
B
B
B
B
B
B
Bus Master
Switch
NMS BUS
2
1
1
1
1
1
NC
MSTR
2
NC BUS
IN
COMM
OUT
OUT
+5V +12V -12V
AC POWER
1 2 3 4 5 6
A9
1
2
2
2
2
2
NC
MSTR
1
NC Port and
Bus Master Locations
Are within Shaded Areas
Figure 11. Combining NC Ports With Backplane NMS Bus DIP Switches
Cautions and Limitations for Network Management Cabling
The enclosure daisy-chain (leased line) interface and the multi-drop (dial line) bus
features do not support certain NC cabling applications. You can connect multiple
NC Master modems to operate in a daisy-chain or operate in a multi-drop bus
configuration. However, there can be only one NC slave configured in an enclosure
multi-drop bus group or daisy-chain.
Check your NMS documentation for the maximum number of modems per channel.
Do not bus more modem NC signals to a single NC port than the network manager
can handle on a single channel.
Some applications require multiple NC slaves in an enclosure using the multi-drop
NC bus. In this case, use the larger backplanes to accommodate multiple groups. For
example, one NC slave is allowed for each group. For the number of groups that
each backplane can accommodate and the number of modem cards in those slots,
refer to Table 4.
Part No. TEL–09949, Rev A
June 2001
Page 24 of 34
Pre-Installation Information and Activities
If the application requires more NC slaves than the larger backplanes have groups,
connect multiple backplanes in the enclosure using the 1-card backplane.
When combining backplanes in an enclosure, one modem card slot is lost for each
type of backplane that is used. For example, two 9-modem card backplanes in an
enclosure occupy 19 slots. Therefore, two 9-modem card backplanes and one 1modem card backplane results in the use of only 19 326Xs in a 21-modem card
enclosure. The maximum number of backplanes that can be combined in a 21modem card enclosure is 11 1-modem card backplanes.
Daisy-Chaining NC Ports: Card Modems to Stand-alone Modems
When daisy-chaining NC ports between a modem card and a stand-alone modem, be
aware of the following condition.
If a 326X Series Modem card is located between a Network Manager and a
stand-alone modem, the modem must have software revision level 3.0 or higher
(Figure 12).
326X Series Modem Card in Enclosure
Network
Manager
(Must Have Revision 3.0 Software or Higher)
326X Series
Stand-alone Modem
OUT IN
NC
NC
OUT
IN
Figure 12. Daisy-Chaining NC Ports: Enclosure Between Network
Manager and Stand-Alone
Part No. TEL–09949, Rev A
June 2001
Page 25 of 34
Pre-Installation Information and Activities
There are two ways to determine your modem’s software revision number.
From the modem front panel:
1) Press the appropriate front panel control key (from your location in the
configuration menu structure) until the following (for example) appears:
Data 9600 T/D?
2) Press
until the Operating Status appears (for example):
DTE 19.2 RELIABL
3) Press
until the following appears:
Display Modem ID
4) Press
. The following appears:
SWPart=xxxxxxxx
The rightmost two digits indicate the software revision level. Ensure that they are
“30” (meaning software revision level 3.0) or higher.
Using an AT Command:
Enter AT&IO from the control terminal. The 8-digit software part number appears.
The software revision number is indicated by the rightmost two digits.
If a stand-alone modem is located between a Network Manager and a card modem,
software revision levels are not an issue. Figure 13 illustrates this condition.
326X Series Modem Card in Enclosure
Network
Manager
(Must Have Revision 3.0 Software or Higher)
326X Series
Stand-alone Modem
OUT IN
NC
NC
OUT
IN
Figure 13. Daisy-Chaining NC Ports: Stand-Alone Between Network
Manager and Enclosure
Pre-Installation Information and Activities
Part No. TEL–09949, Rev A
June 2001
Page 26 of 34
Preparing the 9110 DMS for 326X Series Card Modems
When managing 326X Series Modems in an enclosure using the 9110 Dial
Management System (DMS), set the Use option (in the 9110 Comm Port Definition
screen) to Complete. This configures the 9110 to poll all modems (see “Polling” in
Chapter 1 of the 9110 DMS User's Guide) even if one modem is not responding.
Change the Use option to Complete as follows:
1) Shut down the 9110.
2) Start up the Setup Program, log on, and select the Setup File Editor
Option.
3) Open SETUP.WIN from the File menu.
4) Select Edit from the Comm menu. The Comm Port List Window is
displayed.
5) Select a Comm port that is cabled to a 326X Series modem enclosure.
6) Select the Use option and select Complete in the popup window. Ensure
the setting next to Use changes to Complete.
7) Press F1 to save the change in memory.
8) Repeat Steps 4 through 7 for each Comm port cabled to a 326X Series
modem enclosure.
9) Select Save from the File menu and save SETUP.WIN.
10)Exit the Setup Program and restart the 9110.
326X Modem Card Power Supply Requirements in 21-Card
Enclosure
If you are using more than nine 326X cards in a Modular Nest 21 enclosure, you
must have two power supplies. A third power supply can be added for redundancy.
Removing and Installing a Backplane in Modular Nest 9 or 21 Enclosure
Part No. TEL–09949, Rev A
June 2001
Page 27 of 34
Removing and Installing a Backplane in Modular Nest 9 or 21
Enclosure
This section explains how to remove and install a 326X backplane attached to a
Modular Nest 9 and 21 enclosure. Use this information with the Modular Nest 9 and
21 Installation and Operation Guide (Part No. TEL–09564).
Warning
Only qualified service personnel should perform the procedure described in this
section. Use of this procedure by unqualified personnel could result in personal
injury or equipment damage, and could jeopardize your warranty and maintenance
agreement.
Seules des personnes qualifiées peuvent mettre
en pratique les procédures décrites dans cette
section. Dans le cas contraire, des risques de
blessures ou d’endommagement du matériel
sont possibles, ce qui pourrait annuler votre
garantie et votre contrat de maintenance.
Die in diesem Abschnit aufgeführten Vorgänge
sollten ausschließlich von geschultem und
qualifiziertem Servicepersonal durchgeführt
werden. Wenn diese Vorgänge von
unqualifiziertem Personal durchgeführt
werden, kann dies zu Personenschäden oder
einer Beschädigung des Gerätes führen und
darüber hinaus Ihren Anspruch auf
Garantieleistung und Kundendienst gefährden.
Removing and Installing a Backplane in Modular Nest 9 or 21 Enclosure
Part No. TEL–09949, Rev A
June 2001
Page 28 of 34
Removing a 326X Backplane
Caution
Power down the unit before you begin.
To remove a backplane from a Modular Nest 9 or 21 enclosure (Figure 14):
1) Ensure that the enclosure is powered down.
2) Remove all cards from the front of the enclosure.
3) Using a flat-blade screwdriver, unfasten the backplane connectors.
4) Pushing up from beneath the connectors near the top of the
backplane, lift the backplane vertically, very slightly, to disconnect it
from the power distribution connector (A).
5) Tilt the top of the backplane away from the enclosure (B), and
remove the backplane (C).
6) Power up the enclosure.
Removing and Installing a Backplane in Modular Nest 9 or 21 Enclosure
B
Push and Turn in
Direction of Arrow
A
Avoid Bending
These Male Pins
Figure 14. Removing a 326X Backplane
Part No. TEL–09949, Rev A
June 2001
Page 29 of 34
Removing and Installing a Backplane in Modular Nest 9 or 21 Enclosure
Part No. TEL–09949, Rev A
June 2001
Page 30 of 34
Installing or Replacing a 326X Backplane
Caution
Power down the unit before you begin.
To install or replace a backplane in a Modular Nest 9 or 21 enclosure (Figure 14):
1) Ensure the enclosure is powered down.
2) Using the alignment guides on the backplane and enclosure to line up
the backplane between the screw holes on the top and bottom of the
enclosure, first insert the bottom of the backplane (A), and then rotate
the top of the backplane into position (B). Do not to bend any pins on
the connector.
3) Push down slightly on the base of the backplane (C), ensuring that the
backplane connectors are aligned.
4) Using a flat-blade screwdriver, secure the backplane to the enclosure
with the fasteners supplied. Fasten the base first, then the top.
5) Remove all cards and power supplies from the front of the enclosure.
6) Set an Ohm-meter a minimum 20 Ω range. Measure the resistance
between the following pairs of J2 test-connector pins:
Pin
1
1
1
4
4
5
Description
Digital ground
Digital ground
Digital ground
+5V to
+5V
+12V
Pin
4
5
6
5
6
6
Description
+5V
+12V
-12V
+ +12V
-12V
-12V
• If all readings register as open circuits, the backplane connectors are not
short-circuited. Go on to the next step.
• If any reading registers resistance, the backplane connectors are shortcircuited. Remove the backplane (using the procedure above), and
carefully straighten any bent or broken pins. Reinsert the backplane
(using this procedure).
If you cannot resolve a problem, call the Telenetics Customer Support
Center.
7)Re-install the cards and power supplies that were removed when you
removed the backplane.
8)Power up the enclosure.
Removing and Installing a Backplane in Modular Nest 9 or 21 Enclosure
Part No. TEL–09949, Rev A
June 2001
Page 31 of 34
A
Push and Turn in
Direction of Arrow
B
Figure 15. Installing or Replacing a 326X Backplane
Removing and Installing a Backplane in Modular Nest 9 or 21 Enclosure
Part No. TEL–09949, Rev A
June 2001
Page 32 of 34
Index
Numerics
3262 5, 8, 12, 14, 15
3263 5, 8, 11, 15
3267 5, 8, 12, 14, 15
3268 5, 8, 11, 15
9110 DMS and the 326X Series Modem 26
A
A/B LED 6
A/B switching 6
ALM LED 6
audio cables 5
audio connector 16
Australia 8
Avertissement 3, 4
B
backplane jumper 7
backplane, modem card 5
backplane, Modular Nest 11
Belgium 8
Bus Master slots 19
Busy Out 7, 8, 11
busy out backplanes
and supported countries 7
C
cable clam p5
cables 5
cabling 14, 15
card models to a network manager 19
models 3262/3267 14
Canada 5, 8, 16
card modem 6
Caution 11
central office 8
CISPR 16
connecting port Warning 3
D
daisy-chaining NC (network control) signals 24
Denmark 8
dial restoral 5
DIP switch
modem card 12
Dual Inline Package (DIP) switch 12
Removing and Installing a Backplane in Modular Nest 9 or 21 Enclosure
E
EN60950 3
F
FCC 16
FCC Part 68 7
ferrite 5, 14, 15, 16
ferrite cable
attaching to card models 16
front panel 6
H
Hong Kong 7, 8
I
installation warning 4
interface 14, 15
Ireland 8
J
jack 7
Japan 5, 16
jumper 7, 11
L
leased line 5
LED 6
LEDs
A/B 6
ALM 6
ALM LED 6
lightning 4
M
Make Busy 8
modular connector block 5
Modulus 9 and 21 enclosure 2, 8
N
NC (network control)
card groupings for NC signal bussing 19
ports 19
signal bussing 19
signal daisy-chaining 24
network manager
cabling card models to 19
configuring 9110 DMS for 326X Series Mode m26
P
power 8
Part No. TEL–09949, Rev A
June 2001
Page 33 of 34
Removing and Installing a Backplane in Modular Nest 9 or 21 Enclosure
R
ringer equivalence number (REN) 7
S
safety information 3
safety standard 16
SELV 3
slot 5
stand-alone modem 6
surge 4
Sweden 8
Switzerland 8
T
TBTS 3
test mode 6
U
U.S.A. 5, 8, 16
United Kingdom 7, 8
Universal International 7
USOC 7
W
Warning 3
Warnung 3, 4
Part No. TEL–09949, Rev A
June 2001
Page 34 of 34