1
CMS1002W
REMOVAL AND REPLACEMENT
/////////////////////////////////WARNING/////////////////////////////
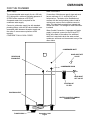
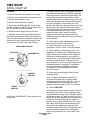
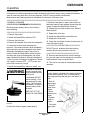
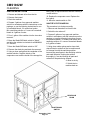
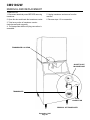
Inlet Water Solenoid Valve Assembly
Disconnect electrical power before beginning.
To remove the inlet water solenoid valve assembly:
///////////////////////////////////////////////////////////////////////////////
1. Shut OFF water supply to machine.
Cube Size Control
ELECTRICAL CORD
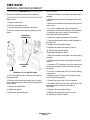
To remove the cube size control:
1. Remove front panel.
SOLENOID
VALVE
2. Remove cover from control box.
3. Trace capillary tube, from the cube size control
to the refrigerant suction line.
4. Remove the coiled capillary tube bulb from the
tube well on the suction line.
5. Remove electrical leads from the cube size
control.
6. Remove screws and the cube size control. To
replace the cube size control, reverse the removal
procedure. Be certain to re-insulate the cube size
control bulb.
OUTLET
TUBE
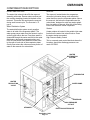
Water Distributor Tubes And Manifold Tubes To
remove the water distributor tube and manifold
tube:
1. Pull out to unsnap catches and remove the front
panel.
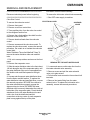
REMOVAL OF THE INLET WATER VALVE
2. Remove the evaporator cover.
3. Slide the water distributor tube to the front about
1/8-inch along the top of the evaporator plate, until
the water distributor tube can be unsnapped from
the flexible notch and lifted upward to the right
side.
4. Unsnap and disconnect water distributor tubes
from the water manifold section. To replace the
water distributor tubes and manifold tubes, reverse
the removal procedure. BE SURE the notches in
the water manifold tubes properly engage the
alignment keys in the tee. BE SURE the water
distributor tube is securely fastened at the notch at
both sides of the evaporator plate. Check identical
attachment for the left water distributor tube and
notch; also, that the distributor/manifold
connections at the top center of each evaporator
plate is snug against the top of the plate.
2. Loosen and remove outlet water line from the
inlet water solenoid valve assembly.
3. Remove screws and pull the water solenoid
valve out to gain access.
4. Pull electrical cord connection from solenoid coil
terminals.
4. Remove inlet water fitting from the water
solenoid valve. To replace the inlet water valve
assembly, reverse the removal procedures.
September, 1993
Page 21