1
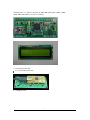
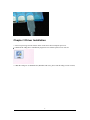
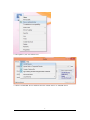
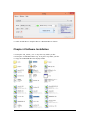
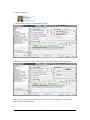
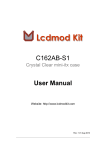
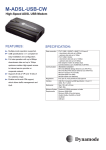
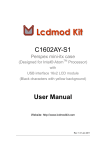
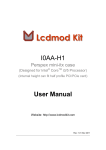
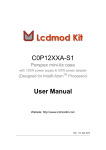
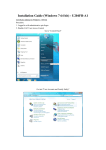
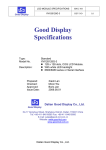
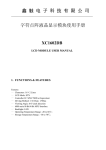
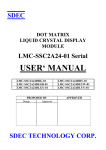
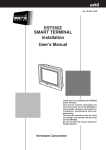
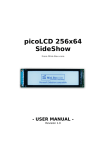
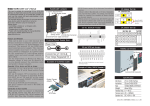
BPU162A-1
USB LCD interface board
Work with HD44780, KS0066, SPLC780D or equivalent LCD controller
User Manual
Website: http://www.lcdmodkit.com
Rev: 1.01 Dec. 2012
CHAPTER 1 INTRODUCTION............................................................................................................2
CHAPTER 2 SOLDERING GUIDE & HARDWARE SETUP ............................................................................2
CHAPTER 3 DRIVER INSTALLATION .......................................................................................................4
CHAPTER 4 SOFTWARE INSTALLATION ..................................................................................................6
Chapter 1 Introduction
1.1 Package Contents
1.2 Specifiaction
Data Transfer
USB 1.1 compliant
Driver
For Windows 98, Windows XP, Vista, Windows 7/8 (32 & 64 bits)
Work with
16x1, 16x2, 16x4, 20x4 LCD
Dimensions
44x22x5.5mm
Application
Lcd Smartie / Linux Lcdproc / Linux LCD4Linux
USB connection
mini USB
USB ID
VID : 0403, PID: C630
Note: Computer cannot control more than one USB LCD with same USB VID/PID pairs at the
same time. It only communicate one of them only. If you want to control more than one USB LCD
by a computer, you must make sure that its USB VID/PID pair are not same. We have provide
different USB VID/PID pair USB LCD, please see the specification of them.
Chapter 2 Soldering guide & Hardware Setup
2.1 Soldering pads
2
Soldering pins: Vss, Vdd, Vo, RS, R/W, E, DB4, DB5, DB6, DB7, LEDA, LEDK
(DB0, DB1, DB2, DB3 no need to be soldered)
2.2 Connecting USB cable
2.1.1 USB LCD module side
2.1.2 USB port side
3
Chapter 3 Driver Installation
3.1 Power up message will be shown on the LCD screen when computer power on.
3.2 Find out the zadig driver installation program in our software packs in our web site.
3.3 Run the zadig.exe as administrator (Windows XP users, please run the zadig.exe XP version)
4
3.4 In "Options", tick "List All Devices"
3.5 Select "LCD2USB" device and then select the "libusb-win32" or "libusbK" driver
5
3.6 Click "Install Driver"/"Replace Driver"/"Reinstall Driver" button
Chapter 4 Software Installation
4.1 Unzip the “lcd_smartie_v5.4” to any drive any folder you like.
4.2 Unzip the “LCD2USB-smartie.zip” to any drive any folder you like.
4.3 Copy the LCD2USB.dll to the displays folder.
6
4.4 Run “LCDSmartie”
4.5 Set the display plugin to “LCD2USB.dll” in setup
4.6 Change the LCD size to “2x16” and tune the LCD contrast and brightness of backlight
Note: For more details about LCDSmartie, please go through the official site of LCDSmartie
http://lcdsmartie.sourceforge.net/
7
8