1
HOMER
HOMER
Page 2 of 53
Contents
1. Introduction ....................................................................................................................... 4
2. Application Basics ............................................................................................................. 5
2.1. Logging On.............................................................................................................................. 5
2.2. Application Exit ....................................................................................................................... 6
2.3. Navigation ............................................................................................................................... 6
2.3.1. Menu Navigation ............................................................................................................... 6
2.3.2. Mouse Navigation ............................................................................................................. 6
2.3.3. Keyboard Navigation ......................................................................................................... 6
2.3.4. Standard Screen Navigation ............................................................................................... 7
3. Screens Basics.................................................................................................................. 9
3.1. Screen Items ............................................................................................................................ 9
3.2. Standard Screen Types ........................................................................................................... 10
3.2.1. Maintenance Screens ....................................................................................................... 10
3.2.2. Report Screens ................................................................................................................ 10
3.2.3. Letter Screens.................................................................................................................. 11
4. Security........................................................................................................................... 12
4.1. The Supervisor Role............................................................................................................... 12
4.2. The Administrator Role .......................................................................................................... 12
4.3. The Guest Role ...................................................................................................................... 13
5. Data Manipulation............................................................................................................ 14
5.1. Querying Information............................................................................................................. 14
5.1.1. Standard Queries ............................................................................................................. 14
5.1.2. Advanced Queries ........................................................................................................... 14
Arithmetic Operators .......................................................................................................... 15
Logical Operators ............................................................................................................... 15
Comparison Operators ....................................................................................................... 15
Useful Functions................................................................................................................. 16
5.2. Inserting Data......................................................................................................................... 16
5.3. Updating Data........................................................................................................................ 16
5.4. Deleting Data......................................................................................................................... 16
6. Report Preview Basics..................................................................................................... 17
7. Word Basics .................................................................................................................... 18
8. Backup Utility .................................................................................................................. 19
Appendix I - Troubleshooting ............................................................................................... 21
Word cannot find its data source, DATASOURCE ........................................................................ 21
Appendix II - Homer Menu Map ........................................................................................... 22
Appendix III – Reference Data............................................................................................. 24
Appendix IV – Coordinate Reference Systems and Distance Calculations ........................... 26
Appendix V - Screen Layouts .............................................................................................. 27
Analyse Tables.................................................................................................................... 27
Additional Information.............................................................................................................. 27
Backup Log .................................................................................................................................. 27
Backup Type Maintenance ............................................................................................................ 28
Calculate Distance ........................................................................................................................ 28
Additional Information.............................................................................................................. 28
Calendar ....................................................................................................................................... 29
Additional Information.............................................................................................................. 29
Change Password.......................................................................................................................... 30
Additional Information.............................................................................................................. 30
Club Maintenance......................................................................................................................... 30
Club Secretary Maintenance.......................................................................................................... 31
Contact Maintenance .................................................................................................................... 32
Additional Information.............................................................................................................. 32
Coordinate Transformation ........................................................................................................... 33
Additional Information.............................................................................................................. 33
Delegate Maintenance................................................................................................................... 33
Distance Report ............................................................................................................................ 34
Additional Information.............................................................................................................. 34
Tuesday, 23 June 2009
HOMER
Page 3 of 53
Federation Maintenance ................................................................................................................ 35
Additional Information.............................................................................................................. 35
Federation Secretary Maintenance................................................................................................. 35
Fee Maintenance........................................................................................................................... 36
Invoice Maintenance ..................................................................................................................... 36
Invoice Reports (General) ............................................................................................................. 38
Additional Information.............................................................................................................. 38
Join Individual’s Rings ................................................................................................................. 39
Additional Information.............................................................................................................. 39
Letter Maintenance ....................................................................................................................... 39
Loft Maintenance.......................................................................................................................... 40
Lost and Found Birds.................................................................................................................... 40
Additional Information.............................................................................................................. 40
Lost Bird Deletion ........................................................................................................................ 41
Additional Information.............................................................................................................. 41
Mailing List Maintenance ............................................................................................................. 41
Measurement and Location Maintenance....................................................................................... 42
Member Maintenance ................................................................................................................... 42
Non Member Maintenance ............................................................................................................ 43
Notes ............................................................................................................................................ 43
Additional Information.............................................................................................................. 43
Race Validation ............................................................................................................................ 44
Additional Information.............................................................................................................. 44
Race Point Maintenance................................................................................................................ 44
Reference Maintenance................................................................................................................. 45
Ring Batch Deletion...................................................................................................................... 45
Additional Information.............................................................................................................. 45
Ring Log Deletion ........................................................................................................................ 46
Additional Information.............................................................................................................. 46
Ring Log Query............................................................................................................................ 46
Ring Registration.......................................................................................................................... 47
Additional Information.............................................................................................................. 47
Ring Search .................................................................................................................................. 47
Ring Transfer................................................................................................................................ 48
Additional Information.............................................................................................................. 48
Ring Transfer Log Deletion........................................................................................................... 49
Additional Information.............................................................................................................. 49
Ring Transfer Log Query .............................................................................................................. 49
Additional Information.............................................................................................................. 49
Ring Type Maintenance ................................................................................................................ 50
Tape Maintenance......................................................................................................................... 50
Union Explorer ............................................................................................................................. 51
Additional Information.............................................................................................................. 51
Union Maintenance....................................................................................................................... 51
Union Secretary ............................................................................................................................ 52
User Maintenance ......................................................................................................................... 52
Additional Information.............................................................................................................. 52
VAT Maintenance ........................................................................................................................ 53
Tuesday, 23 June 2009
HOMER
Page 4 of 53
1. Introduction
HOMER is a Racing Pigeon Administration and Measurement System. HOMER provides the
flexibility to allow the Union to store all of its data in one source and keep it inline with any
changes as these occur.
HOMER can store information at all levels from the Union and Federations through Clubs to
the Lofts and Members as well as additional information that may be useful to the Union.
It also provides the facility to record loft coordinates and race point coordinates. HOMER can
produce several reports for distances between lofts and race points. Any changes to loft
coordinates and any requests for distance reports are logged on the system, so that these
can be easily invoiced through HOMERS Invoice facilities.
In addition to HOMERs report facilities, it also provides a link to Microsoft Word to create
simple as well as complex letters and documents based on data extracted from HOMER.
These Letters can be sent out to their recipient via post, email or fax.
HOMER provides a working calendar, so that specific diary events can be logged and
actioned on the system. A complex note facility is also included so that notes can be
associated to almost all entities held within HOMER.
HOMER offers a high level of security by providing different levels of access to different
users; it also has its own backup facilities and is built on an ORACLE Database to ensure
database continuity, security and availability.
Tuesday, 23 June 2009
HOMER
Page 5 of 53
2. Application Basics
2.1. Logging On
To access the functionality of Homer, one must first Logon. To Logon one must place the
mouse cursor over the Homer Icon (fig.1) on the Desktop and double-click with the left mouse
button to initiate the application. If the Desktop is not visible due to other applications being
open, press the Windows Key+”M” to minimize all applications to make the Desktop visible.
Double-Click
to Initiate
Fig.1
After a short period of time (an egg-timer may appear while the application loads) a new
window will appear with another smaller window inside. This smaller window is used to
Logon to Homer (fig.2). The cursor will appear in the Username Field, enter your username,
and then press the “Tab” key to navigate to the Password Field (you can also use the Mouse
to navigate between fields and buttons). Once you have entered your password tab again to
the Database Field and enter “HOMER” (none of the above is case-sensitive). Once all the
above has been entered click or “Enter” on the “Connect” Button to access the application.
Fig.2
Tuesday, 23 June 2009
HOMER
Page 6 of 53
If the Username, Password or Database is entered incorrectly then you will be prompted to
re-enter your details. You will receive three chances to get these details correct, if on the
third attempt you still get these details incorrect, the application will shutdown and you will
have to initiate the Logon Sequence again.
2.2. Application Exit
To exit from the Homer Application, activate the item “File” on the Toolbar Menu and then
select the “Exit” option.
2.3. Navigation
2.3.1. Menu Navigation
Once you have successfully logged on you will be presented with the main screen (fig.3).
Toolbar
Menu
Fig.3
To navigate around the menu you can either use the mouse or the keyboard.
2.3.2. Mouse Navigation
Click on the Menu Item on the Toolbar Menu you wish to expand with the left mouse button.
The menu will expand giving the options available under this menu. To choose one of these
options you can click on these once to activate the desired option.
If the menu option is a sub-menu it will have a small arrowhead to the right hand side of the
menu item, clicking on this will expand the sub-menu.
If you wish to alter your choice, moving you cursor to another menu item will cause this item
to be expanded and you original choice will collapse.
2.3.3. Keyboard Navigation
If you press the “Alt” key, the Hot Key for each menu item will appear. A Hot Key underlines a
character in the menu that can be used for navigating. If you press a Hot Key, the first Menu
Item with that Hot Key will appear highlighted, by pressing it again it will highlight the next
Item that shares that key, and so on.
Once the desired item is highlighted, press the “Enter” key and the Toolbar Menu will be
expanded. You can continue to use the Hot Keys to navigate further, if only one option has
Tuesday, 23 June 2009
HOMER
Page 7 of 53
that specific Hot Key on a menu, by pressing the Hot Key the menu option will be activated.
However if more than one menu option shares the same Hot Key, pressing that key will
navigate between these, and you will have to press the “Enter” key to activate the highlighted
option.
To collapse a menu press the “Esc” key and the menu will be closed and the focus will be
given back to the parent menu.
Once the Toolbar Menu has been activated you can also use the cursor keys to navigate the
menus.
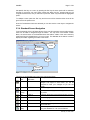
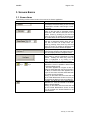
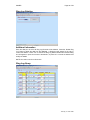
2.3.4. Standard Screen Navigation
From the example of the Loft Report Screen (fig.4) one will note there are two toolbar menus;
these can be used to navigate through the screen. The top menu is the Default Toolbar
Menu; the second menu is the Smartbar Menu that holds a subset of the most commonly
used items from the Default Menu in an iconic format. The Statusbar at the bottom is used to
display information regarding the status of the screen.
Default
Toolbar
Smartbar
Block
Statusbar
Fig.4
The items on the Smartbar menu from left to right are as follows:
Icon Smartbar Keyboard
Description
Item
Equivalent
Save
F10
Save all changes to the database. If you make any
changes and forget to save these, you will be
prompted to save your changes as you exit the
screen.
Print
SHIFT+F8
Sends a copy of the screen to the printer.
Printer
Set-up
Allows you to modify options relating to the set-up of
the printer.
Exit
CTRL+q
Exits from the screen to the previous screen or menu.
Cut
CTRL+x
Cuts the highlighted text item contents.
Copy
CTRL+c
Copies the highlighted text item contents.
Paste
CTRL+v
Enter
Query
F7
Pastes the previously “Cut” or “Copied” text into the
current text item
Enter Query Mode, allows the user to enter text to
query the database on. Use % as a wildcard.
Tuesday, 23 June 2009
HOMER
Page 8 of 53
Execute
Query
F8
Cancel
Query
CTRL+q
Previous
Block
CTRL+PGUP
Previous
Record
Next
Record
Next
Block
Insert
Record
Remove
Record
Lock
Record
SHIFT+PGUP
Executes a query based on the items populated
during “Enter Query”. If no items were entered or
“Execute Query” was executed without any “Enter
Query”, then all items from the database are returned.
If in Enter Query Mode and “Execute Query” returns
no rows “Cancel Query” takes you out of Enter Query
Mode.
Moves control from one block to the previous block.
Blocks are usually identified as being contained within
a Frame (fig. 4 contains only one block).
Moves control to the previous record.
SHIFT+PGDOWN
Moves control to the next record.
CTRL+PGDOWN
Moves control to the next block.
F6
Inserts a new record.
SHIFT+F6
Deletes the current record.
F1
Locks the current record so no other session can
make changes to it. The lock is only removed if the
block is saved, cleared or you exit from the screen.
Brings up the properties of the current Text Item.
Help
Other Notable Keys:
Smartbar Keyboard
Item
Equivalent
List of
F9
Values
Change
CTRL+TAB
Tab Page
Notes
ALT+n
Contacts
ALT+c
Description
If the Text Item has a button to the right with a downward
pointing arrow and a line. Then the item has a List of Values.
Moves control to the next Tab Page.
If the screen has a “Notes” button then you can also navigate to
the Notes Screen using the button or the keyboard equivalent.
If the screen has a “Contacts” button then you can also navigate
to the Contacts Screen using the button or the keyboard
equivalent.
Tuesday, 23 June 2009
HOMER
Page 9 of 53
3. Screens Basics
3.1. Screen Items
The following is a list of items found on the screen of the Homer Application:
Screen Item
Description
Text Item: A text item is an interface control
that displays and allows editing of text. The text
is displayed in a field in either single or multiline format.
Text Item with LOV: If the Text Item has a
button to the right with a downward pointing
arrow and a line, then the item has a List of
Values. Either by pressing key F9 when this
item is in focus or by clicking on the button the
list of valid values for this Text Item will appear.
List Item: If the Text Item has a button to the
right with a downward pointing arrow and no
line, then the item has a Drop Down List.
Either by pressing down arrow key when this
item is in focus or by clicking on the button the
Drop Down List for this List Item will appear.
Display Item: Display items are similar to text
items with the exception that display items only
store and display fetched or assigned values.
Button: Buttons are interface items that end
users select to execute commands or initiate
actions. Pressing the Enter Key while the
button is highlighted or by clicking on the
button with the mouse will activate the button.
Notes: If a Block has one of these buttons
attached to it, then it is possible to attach notes
Fig. a
Fig. b
to the associated records.
If the button appears as in Figure a, then no
Notes are associated with the current record in
the Block, if however the button appears as in
Figure b, then there are Notes associated with
the current record in the Block.
Clicking on the button with the mouse will call
up the Note Maintenance Screen so that you
can maintain the Notes for the current Record.
Contacts: If a Block has one of these buttons
attached to it, then the records in the Block
relate to Contact Details.
Clicking on the button with the mouse will call
up the Contact Maintenance Screen so that
you can maintain the Contact Details for the
current Record.
Tuesday, 23 June 2009
HOMER
Page 10 of 53
3.2. Standard Screen Types
The majority of screens in the homer application fit into the following three categories:
Maintenance, Report and Letter, which are described in more detail below. Those screens
that are dedicated to specific purposes are explained separately later in this document.
3.2.1. Maintenance Screens
The Maintenance Screens are used to maintain (Query, Insert, Update and Delete) the core
data of Homer Application i.e. Member, Loft, Club and Federation Data. The majority of
screens on Homer serve this purpose and have the word “Maintenance” in their Screen Title.
How to perform Queries, Inserts, Updates and Deletes are discussed in Section 5. Data
Manipulation.
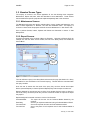
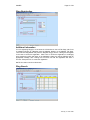
3.2.2. Report Screens
All reports are based on the principle of Query by Example. Using the Loft Report (fig.5) for
example one will note there are two blocks; the first is the Query Block, the second the
Control Block.
Query
Block
Control
Block
Fig.5
The user will enter a query in the Query Block and execute the query (See Section 5.1. Query
Information for more information on how to build a query). This will return the rows that match
the query condition.
Once the user is content with the result of the query they can then choose what Output
Device (Internal Reports) or Channel (External Reports) they wish the report to written too.
Reports designed for internal use have a choice of two Output Devices: Sreen or directly to
the Printer, if they choose the printer they can then choose the number of copies of the report
they require.
Reports designed for external use have a choice of six Channels:
Preferred Media:
The report will be sent via the Preferred Media dictated by the
recipient.
Email Only:
Sent only to recipients marked as having a Preferred Media of Email.
Force as Email:
Sent to all recipients who have an Email Address recorded.
Force as Post:
Sent to the printer for all recipients even if their Preferred Media is
Email
Tuesday, 23 June 2009
HOMER
Post Only:
Screen:
Page 11 of 53
Sent to the printer only for those recipients marked as having a
Preferred Media of Post.
Sent to the screen for all recipients regardless of their Preferred
Media.
Once they have chosen all these details if they press the “Run Report” the report will be
written to the Output Device requested.
After running a report, if the user wishes to re-run the same report but for a different query,
the control must be returned to the Query Block before attempting to enter a new query.
NOTE: One will not be able to run a report unless a valid query has been entered in the
Query Block.
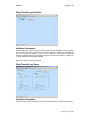
3.2.3. Letter Screens
Like Reports all Letters are based on the principle of Query by Example. Using the Loft
Letter (fig.6) for example one will note there are again two blocks; the first is the Query Block,
the second the Control Block.
Query
Block
Control
Block
Fig. 6
The user will enter a query in the Query Block as in the Report Screen and execute the query.
This will return the rows that match the query condition.
Once the user is content with the result of the query they can then choose what Letter they
wish to use by pressing the button against the Letter List Item and choosing the appropriate
letter.
Once they have chosen all these details if they press the “Run Letter”. If “Manual” Process is
chosen Microsoft Word will be initiated and the selected letter will be loaded. While in Word
the letter can be manipulated and printed (See Section 7. Word Basics for more details). If
“Automatic” Processing is chosen Word will be opened and the Letters will be sent as a
background process/
If the user wishes to re-run the same letter but for a different query the control must be
returned to the Query Block before attempting to enter a new query.
NOTE: One will not be able to run a letter unless a valid query has been entered in the Query
Block.
Tuesday, 23 June 2009
HOMER
Page 12 of 53
4. Security
There are three levels of access to the Homer Application and these have been defined as by
the following roles:
• Supervisor
• Administrator
• Guest
Each user of the Homer Application will be assigned one of these roles depending on their
responsibility within the business. If a User does not have security rights to execute a menu
option that option will appear greyed out.
4.1. The Supervisor Role
The Supervisor Role has the highest level of access and this role should be restricted to the
minimum number of users. The Supervisor Role has QUERY, INSERT, UPDATE and
DELETE rights on all entities relating to the Homer Application, only excluding the Union
Table where they do not have DELETE rights as one set of Union Details should exist on the
system at all times.
4.2. The Administrator Role
The Administrator Role will be the most common role used, this gives the user the right to
QUERY, INSERT, UPDATE and DELETE the following:
1. Club Secretaries
2. Contacts
3. Delegates
4. Federation Secretaries
5. Federation Race Points
6. Invoice Items
7. Lofts
8. Loft Members
9. Mailing Lists
10. Mailing List Members
11. Measurements and Locations
12. Members/Non Members
13. Notes
14. Ring Types
QUERY, INSERT and UPDATE on the following:
• Fees
• Invoices
• Letters
• Lost and Found Birds
• Race Points
• References
• Rings
• Ring Types
• Value Added Tax
QUERY and INSERT on the following:
• Ring Log
And QUERY on the following:
• Clubs
• Federations
• Unions
• Union Secretaries
Tuesday, 23 June 2009
HOMER
Page 13 of 53
4.3. The Guest Role
The Guest Role has the lowest level of access rights to all the entities on the Homer
Application. The Guest Role allows the user SELECT access only to all entities, there is a
default user that is associated with this role with a username and password of “GUEST”.
NOTE: Usernames and passwords on the Homer Application are NOT case sensitive.
Tuesday, 23 June 2009
HOMER
Page 14 of 53
5. Data Manipulation
5.1. Querying Information
5.1.1. Standard Queries
If one wishes to query (or browse) information on a screen, one must first either click the
Enter Query Icon on the Smartbar or press the “F7” key.
NOTE: Queries cannot be executed in all blocks. If a query cannot be executed the error
“FRM-41003: This function cannot be performed here” will appear on the Statusbar at the
bottom of the screen.
When in Enter-Query Mode the Enter Query Icon will appear greyed out and the words ‘EnterQuery’ will appear on the Statusbar.
Once in Enter-Query Mode, one can populate items with the information that one wishes to
base their query on.
The following wildcards can be used when populating items:
“_” - An underscore in the pattern matches exactly one character in the value. Consider
entering “Smith_” in the Surname Text Item on the Contact Maintenance Screen, the following
Surnames may be returned: “Smithe”, “Smithy” and “Smiths”.
“%” - A percent sign in the pattern can match zero or more characters in the value. Consider
entering “Ma%” in the Surname Text Item on the Contact Maintenance Screen, the following
Surnames may be returned: “Mallin”, “Markle”, “Marlow”, “Marvins”, “Marvis” and “Matos”.
Once the details of the query have been entered, one will either click the Execute Query Icon
on the Smartbar or press the “F8” key, and details relating to query will be displayed.
NOTE: if no data matches the query that was entered then the screen will return to Enter
Query Mode, so that one can redefine the query. However if one wishes to cancel the Query
as no data was returned then one can either press the Cancel Query Icon on the Smartbar or
press the “Ctrl” and “q” Keys
NOTE: if one wishes to modify and re-execute the last query then if one presses the Enter
Query Icon or the “F7” Key twice then the last query will be redisplayed ready to be modified
and executed.
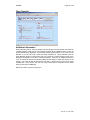
5.1.2. Advanced Queries
More advanced queries can be performed on a screen if one has knowledge of the underlying
Item Name.
To find what the underlying Item Name of a Text Item is then do the following: Place the
cursor on the Text Item of interest, then select “Help” from the “Help” option on the Toolbar
Menu. A new widow will appear with a title “Properties of Item [Item Name]”: in this window
are properties of the current item; one property that is important is the “Data Type” Number,
Character or Date. Now armed with this information one can now perform more advanced
queries. To exit from this pop-up window back to the main window press the “OK” button.
To initiate an advanced query one must first either click the Enter Query Icon on the Smartbar
or press the “F7” key. Once in Enter Query Mode insert an “&” into one of query able Text
Items, click the Execute Query Icon on the Smartbar or press the “F8” key and a pop-up
window with the title “Query/Where” will appear as in figure 7.
Tuesday, 23 June 2009
HOMER
Page 15 of 53
Fig. 7
Using this window, the underlying Item Names of the Text Items and the following Operators
one can build advanced queries:
Arithmetic Operators
Operator
+ - (one operand)
*/
+ - (two operands)
Function
Denotes a positive or negative expression.
Multiplication and division.
Addition and subtraction.
Logical Operators
Operator
NOT
AND
OR
Function
Reverses a logical expression’s result.
Combines two or more logical expressions: TRUE if all are true;
otherwise False.
Combines two or more logical expressions: TRUE if any are
true; otherwise False.
Comparison Operators
Operator
=
!= <>
> >= < <=
[NOT] IN (set)
[NOT] BETWEEN x AND y
[NOT] LIKE p
IS [NOT] NULL
Function
Test for equality.
Test for inequality.
Greater than, greater than or equal to, less than, less than or
equal to.
[Not] equal to any member of a set
e.g. club_key IN (‘A+D’, ‘A+I’, ‘AAD’)
[Not] greater than or equal to x and less than or equal to y.
Matches [does not match] a specific pattern. ‘%’ matches any
sequence of characters; ‘_’ matches any single character.
Is [not] null.
Tuesday, 23 June 2009
HOMER
Page 16 of 53
Useful Functions
Function
SUBSTR(char, m, [n])
Return
value
Numeric
Character
Depends
on
expr1
and expr2
Character
SYSDATE
UPPER(char)
Date
Character
LENGTH(char)
LOWER(char)
NVL(expr1, expr2)
Value Returned
Length of char in characters.
char, with all letters in lowercase.
expr2, if expr1 is null; otherwise returns
expr1.
A substring of char, beginning at character
m, n characters long (if n is omitted, to the
end of char).
Current date and time.
char, with all letters in uppercase.
Once one has entered their Advanced Query, if one presses the “OK” button and all rows that
match the current query will be returned.
For example:
1/ If one wishes to see all lofts relating to the clubs “Alexandria”, “Beith” and “Wigtown”, one
would enter the following:
club_key IN (‘ALE’, ‘BEI’, ‘WIG’)
or:
club_key = ‘ALE’ OR club_key = ‘BEI’ OR club_key = ‘WIG’
2/ If one wishes to see all lofts that are currently valid, one would enter the following:
SYSDATE BETWEEN start_dt AND NVL(end_dt, SYSDATE)
or:
start_dt <= SYSDATE AND (end_dt IS NULL OR end_dt >= SYSDATE)
3/ If one wishes to see all lofts with the word “smith” in it then one would enter the following:
UPPER(loft_nm) like ‘%SMITH%’
NOTE: If character values are included these should be enclosed in single quotes, and dates
should also be presented as follows: ‘DD-MON-YYYY’
e.g.
01/01/2002 :
’01-JAN-2002’
31/04/1996 :
’31-APR-1996’
5.2. Inserting Data
Data can almost be added at anytime except while in Enter Query Mode, or if the screen does
not allow data input. Either click the Create Record Icon or press the “F6” Key and a blank
record will be created. Enter all of the required fields, or the application will not allow you to
navigate off the field or commit the record Key “F10”. Commit data regularly so that it is not
lost, and new data is not visible to other users until it has been committed.
5.3. Updating Data
Perform a query to bring back the record(s) to be modified. Change the fields as required,
note that not all fields/records are updateable. Commit data regularly so that it is not lost, and
updated data is not visible to other users until it has been committed.
5.4. Deleting Data
Like updating data perform a query to bring back the record(s) to be deleted. Either click the
Remove Record Icon or press the “SHIFT” and “F6” Key to delete a record. Note one must
have the required privileges to delete records. Commit data regularly so that it is not lost, and
deleted records are visible to other users until these have been committed.
Tuesday, 23 June 2009
HOMER
Page 17 of 53
6. Report Preview Basics
If one runs a report and selects “SCREEN” as the output device, when one presses the “Run
Report” Button a Report Progress Window will appear. Once the Report has been Initiated
and Formatted the Report Progress Window will disappear and the Report Preview Window
will appear. The Report Preview Window is similar to the standard screen with a Default
Toolbar Menu and a Smartbar Menu that holds a subset of the most commonly used items
from the Default Menu in an iconic format as in figure 8.
fig. 8
The items on the Smartbar menu from left to right are as follows:
Icon
Smartbar
Keyboard
Description
Item
Equivalent
Print
Sends the report to the printer.
Page
Setup
Mail
Modifies the page setup for the report.
New
Previewer
Close
Previewer
Zoom In
F9
Send the report as an email (if this option is
setup).
Open the report in another Report Previewer. May
be useful for comparing different pages.
Exits from the Report Previewer back to the
Report Screen.
Enlarge the report.
Zoom Out
F10
Reduce the size of the report.
First Page
Jumps to the first page of the report.
Previous
Page
Next
Page
Last Page
Jumps to the previous page of the report.
Jumps to the last page of the report.
Go to
Page
Help
Jumps to specified page of the report, in this
example page three.
Brings up the properties of the current Text Item.
Jumps to the next page of the report.
Tuesday, 23 June 2009
HOMER
Page 18 of 53
7. Word Basics
Microsoft Word has extensive help facilities, just press “F1” to access Microsoft Word Help.
Microsoft Word has many toolbars on top of the default toolbar; the main one that will be used
in conjunction with HOMER is the Mail Merge Toolbar. This tool should appear automatically
when Microsoft Word is called from HOMER
The items on the Mail Merge Toolbar from left to right are as follows:
Icon
Toolbar
Description
Item
Insert
Allows the user to add additional data fields to a
Merge
document. Pressing the button will provide a list of data
Field
fields available; when one of these is selected it will be
inserted into the document at the cursor position.
Insert
By inserting word fields in a merge document, you can
Word
include additional information in the resulting merged
Field
documents and control how Microsoft Word merges the
data (See Microsoft Word Help for more information).
View
Populates the merge document with data from the data
Merge
source, so one can view the results
Data
First
Used in conjunction with “View Merge Data”. Displays the
Record
data from the first record.
Previous
Used in conjunction with “View Merge Data”. Displays the
Record
data from the previous record to the current record.
Go to
Used in conjunction with “View Merge Data”. Displays
Record
data from the record number specified.
Next
Used in conjunction with “View Merge Data”. Displays the
Record
data from the next record to the current record.
Last
Used in conjunction with “View Merge Data”. Displays the
Record
data from the last record.
Mail
Mail Merge Helper is used to build or modify existing
Merge
merge documents.
Helper
Check for Checks for errors when merging data from the data
Errors
source with the merge document.
Merge to
Merges the data source with the merge document and
New
creates a new document.
Document
Merge to
Merges the data source with the merge document and
Printer
sends the output to the printer.
Start Mail Allows the user to perform more complex data merges.
Merge
Find
Allows the user to search the data source for specific data
Record
within a specific data field.
Edit Data
Allows the user to modify the data source.
Not
Source
recommended for beginners.
To exit from Microsoft Word back to HOMER, select “File” from the Standard Toolbar, and
then “Exit” from the sub-menu.
NOTE: Control will not be returned to the HOMER Application until the Microsoft Word
Session is closed.
Tuesday, 23 June 2009
HOMER
Page 19 of 53
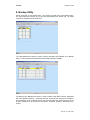
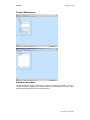
8. Backup Utility
Homer comes with it’s own backup utility. Two screens are used to set up the Backup Utility:
the Tape Maintenance Screen (fig. 9) and the Back Maintenance Screen (fig. 10), these
screens are available from the main menu.
fig. 9
The Tape Maintenance Screen is used to identify what tapes are available to the Backup
Utility. Homer allocates the Tape Numbers sequentially starting at 100000.
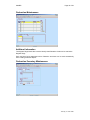
fig. 10
The Backup Type Maintenance Screen is used to identify what Batch Files are associated
with each Backup Frequency. The Batch Files are Command Files that can be modified to
accommodate a range of backup devices and methods; these files should be stored in the
directory identified on the Reference Data Sreen: ‘SYSTEM’ (Domain), ‘BACKUP_PATH’
(Code).
Tuesday, 23 June 2009
HOMER
Page 20 of 53
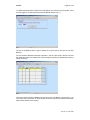
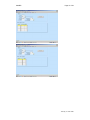
To initiate the Backup Utility double click on the Backup Icon and login when prompted. Once
one has logged in one will be presented with the Backup Screen (fig. 11).
fig. 11
The title of the Backup Utility is type of backup to be performed (in this case a Year End
Backup).
The next sentence identifies what tape is expected. Use the ‘Tape Used’ List Item to choose
the actual tape used in the backup then insert the tape and press the ‘Start Backup’ button to
initiate the backup.
fig 12
The final screen that is also available from the main menu is the Backup Log Screen (fig. 12).
This screen gives information on what backups have been performed, what tape have been
used and the duration of the backup.
Tuesday, 23 June 2009
HOMER
Page 21 of 53
Appendix I - Troubleshooting
Word cannot find its data source, DATASOURCE
When creating letters the mail merge document may loose its association with its data source
(this is most likely to happen if the letter is not read-only).
When this error occurs perform the following steps:
1. Ensure the letter with the issue does not have the File Attribute “Read-Only” ticked. To
see this Attribute Right-Click on the File and select the last option “Properties”.
2. Now run the letter in question via the Homer Application. Run in Manual Mode and not
Automatic and ensure there is data available. For Lost Bird or Transfer Letters, uncheck
a sent item so that it will be picked up.
3. When the letter is opened via Microsoft Word you may get a dialog box titled “Microsoft
Word” will appear saying “[Document Name] is a mail merge main document. Word
cannot find its data source, DATASOURCE”, two buttons will also appear one labelled
“Find Data Source…” the other “Options…”. Press the button labelled “Find Data
Source…” and another window titled “Open Data Source” will appear, this window can be
used to navigate to the location of the data source.
Else:
If the dialog box does not appear then click on the “Open Data Source” icon on the Mail
Merge Toolbar.
4. As a result of Step 3 another window titled “Open Data Source” will appear, this window
can be used to navigate to the location of the data source, which by default is set to
“C:\PROGRAM FILES\HOMER\TEMP”.
5. Click on the file to highlight it and then press the button labelled “Open”, and a final
window will appear titled “Header Record Delimiters”. In this window there are two list
items one labelled “Field delimiter”, the other “Record delimiter”. In the Field Delimiter
List Item select the value “|” and in the Record Delimiter List Item choose the “~”, then
press the button labelled “OK”.
6. Now your document will once again be linked to its data source, remember to save your
document to save the link and then check the File Attribute “Read-Only” again.
Tuesday, 23 June 2009
HOMER
Page 22 of 53
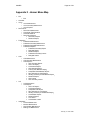
Appendix II - Homer Menu Map
•
•
•
•
•
•
•
•
File
o Exit
Calendar
Union
o Union Maintenance
o Union Secretary Maintenance
o Union Explorer
Race Points
o Race Point Maintenance
o Coordinate Transformation
o Calculate Distance
o Race Point Reports
Race Point Report
Distance Report†
Federation
o Federation Maintenance
o Federation Secretary Maintenance
o Federation Delegate Maintenance
o Federation Reports
Federation Secretary Report
Delegate Report
Distance Report†
Federation Secretary Letters
Delegate Letters
Club
o Club Maintenance
o Club Secretary Maintenance
o Club Reports
Club Secretary Report
Club Loft Report†
Loft Season Report†
Club Member Report†
Primary Club Member Report†
Suspended Club Member Report†
Ring Allocation by Club Report†
All Ring owned by a Club Member Report†
Distance Report†
Club Letters
Club Secretary Letters
Loft
o Loft Maintenance
o Loft Reports
Club Loft Report†
Loft Season Report†
Suspended Loft Report
Ring Allocation by Loft Report†
All Ring owned by a Loft Member Report†
Loft Member Report†
Distance Report†
Loft Letters
Loft Member Letters
Individuals
o Contact Maintenance
o Member Maintenance
o Non Member Maintenance
o Mailing List Maintenance
Tuesday, 23 June 2009
HOMER
o
•
•
•
•
†
o
o
Ring
o
o
o
o
o
o
o
o
o
o
o
o
o
Page 23 of 53
Member Reports
Club Member Report†
Primary Club Member Report†
Loft Member Report†
Suspended Club Member Report†
All Rings owned by a Club Member Report†
All Rings owned by a Loft Member Report†
Loft Member Letters
Member Letters
Non Member Letters
Mailing List Letters
Ring Registration
Ring Transfer
Ring Search
Ring Validation
Join Individual’s Rings
Lost and Found Birds
Ring Transfer Log Query
Ring Log Query
Ring Batch Deletion
Lost Bird Deletion
Ring Log Deletion
Ring Transfer Log Deletion
Ring Reports
Ring Allocation by Club Report†
Ring Allocation by Loft Report†
All Ring owned by a Club Member Report†
All Ring owned by a Loft Member Report†
Ring Log Report
Unused Ring Report
Lost and Found Bird Letters
Transfer Lettes
Invoices
o Measurement and Location Maintenance
o Invoice Maintenance
o Invoice Reports
Invoice Report
Invoice Summary Report
Unpaid Invoice Report
Paid Invoice Report
Utilities
o Reference Maintenance
o Ring Type Maintenance
o VAT Maintenance
o Fee Maintenance
o Letter Maintenance
o Tape Maintenance
o Backup Maintenance
o Backup Log Query
o User Maintenance
o Change Password
o Analyse Tables
About
This Item appears on more than one menu.
Tuesday, 23 June 2009
HOMER
Page 24 of 53
Appendix III – Reference Data
The following Table gives a breakdown of the Reference Data, which can be viewed via the
Reference Maintenance Screen:
Domain
BACKUP_FREQ
Code
-
CHANNEL
-
FED_OPTIONS
-
FEE_CATEGORY
-
FEE_TYPE
-
HEADER
-
INVOICE
-
ITEM_TYPE
-
MEDIA
-
OUTPUT
-
REPORT
-
REPORT_DESC
-
REP_CHANNEL
-
RING_LOG_TYPE
-
ROLES
-
SEASON
START
SYSTEM
SYSTEM
SYSTEM
BACKUP_DEVICE
BACKUP_PATH
COORDINATES
SYSTEM
COUNTRY
SYSTEM
DEBUG
Description
List of Backup Frequencies. Do not modify used
internally.
List of methods of sending Letters. Do not
modify used internally.
List of Options for whether the Federation Code
is required as part of the Ring Number. Do not
modify used internally.
List of Fee Categories. Fee can be categorised
for accounting purposes, this list can be
extended.
List of Fee Types, mostly used for invoicing.
May be added to, but use caution.
List used to identify how to order the Distance
Reports. Do not modify used internally.
List used to identify what level to create
measurement invoice items at. Do not modify
used internally.
List used to identify the purpose of measure and
location items. Do not modify used internally.
Mediums by which letters can be sent. Do not
modify used internally.
List of available Output Devices, used by the
Internal Reports. Do not modify used internally.
Report level for Invoices. Do not modify used
internally.
List of Report Descriptions associated with
Homers Reports. These Descriptions will appear
in the “Subject” if sent by email. Do not modify
used internally.
List of methods of sending External Reports. Do
not modify used internally.
List used to identify the purpose of a ring log
item. Do not modify used internally.
Security Roles available for assigning to users.
Do not modify used internally.
The Day and Month of the start of the racing
season as displayed on the Loft Season Report.
Default: 1st of March.
The drive associated with the backup device
The path of the backup scripts.
Identifies what coordinate system to use for
storing the position of a loft.
Once set it should not be changed
Values: “NORTHINGS” or “EASTINGS” for
National Grid,
“LONGITUDE”
or
“LATITUDE”:
Polar
Coordinates.
Default: EASTINGS
Identifies which country constants to use in
converting coordinates.
“Y”: runs the application in debug mode where
pop-up widows appear to identify the
Tuesday, 23 June 2009
HOMER
Page 25 of 53
SYSTEM
DESFORMAT
SYSTEM
DISTANCE
SYSTEM
EARTH_MODEL
SYSTEM
EMAIL_BODY
SYSTEM
FILE_TYPE
SYSTEM
LAST_TAPE
SYSTEM
LETTER_PATH
SYSTEM
MAX_DELEGATES
SYSTEM
REPORT_PATH
SYSTEM
RING_ALLOCATION
SYSTEM
TEMP_PATH
SYSTEM
WINDOW_STATE
SYSTEM
VAT_REG_NO
SYSTEM
WORD_EXE
TITLE
-
VISABLE
-
applications navigations through its routines.
“N”: (Default) runs the application in normal
mode.
The format the External Reports will be saved
as:PDF, HTML, RTF and XML, the default is
PDF.
Unit of measurement used to display distances
calculated (‘N’ – Nautical Miles, ‘M’ – Statute
Miles, ‘K’ – Kilometres, ‘X’ – Twelfths).
Earth Model to use in calculating distances and
coordinates (‘AIRY1830’ or ‘GRS80’).
The path to the file to use as the body of any
email created for the External Reports.
The file type to create as a Datasource for MS
Word, can be XML or TXT, default is TXT. Do
not modify used internally.
Do not modify used internally to identify the tape
used in the last backup.
The path on the Server to the Directory that
contains all of the standard letters.
The maximum number of Delegates that can be
associated to a Federation
Default: 5
The path on the Server to the Directory that
contains all of the Report Executables.
The default ring allocation, either “LOFT”
(Default) or “MEMBER”.
The path on the Clients used as a temporary
storage area. The path must exist.
The default window state of each screen when
initiated, either “MINIMIZED”, “NORMAL” or
“MAXIMIZED” (Default).
The VAT Registration Number that will appear
on the invoices.
The path and executable of Microsoft Word on
the Clients.
List of Titles used by the Title List Item on many
of the Screens (add as required).
List of Communication types that have to be sent
manually via MS Word, currently Email only. Do
not modify used internally.
Tuesday, 23 June 2009
HOMER
Page 26 of 53
Appendix IV – Coordinate Reference Systems and
Distance Calculations
Homer uses two Coordinate Reference Systems:
• Eastings and Nothings (OSGB36: Ordnance Survey Great Britain 1936 -National Grid).
Eastings and Nothings can be used to define the location of a Loft.
• Latitude and Longitude (GRS80: a Global Reference Ellipsoid used in the WGS84 {World
Geodetic System 1984, used to describe the position of GPS satellites and ground
stations}). Latitude and Longitude are used to define the location of Race Points and
optionally the Lofts.
Distances are calculated between two points of a given latitude and longitude using the
Vincenty’s Formula (Inverse Method), which is also based on the GRS80 Ellipsoid. As
Vincenty’s Formula uses two points of a given latitude and longitude then any Loft Location
that has been entered in Eastings and Northings has to be transformed into Latitude and
Longitude. This is done by first transforming OSGB36 Coordinates to ETRS89 (European
Terrestrial Reference System 1989) Coordinates, these coordinates are then transformed into
Latitude and Longitude using the GRS80 Ellipsoid, all this is done using datum and
calculations provided by the Ordnance Survey.
Tuesday, 23 June 2009
HOMER
Page 27 of 53
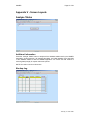
Appendix V - Screen Layouts
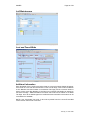
Analyse Tables
Additional Information
Press the “Analyse Tables” button to analyse all the database tables used by the HOMER
Application, do this frequently. By analysing the tables, one builds statistics on the data held
in the database tables so that the HOMER Application can choose the best method of
retrieving data promptly for reports and screen queries.
NOTE: No need to commit on this screen.
Backup Log
Tuesday, 23 June 2009
HOMER
Page 28 of 53
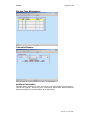
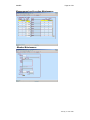
Backup Type Maintenance
Calculate Distance
Additional Information
Calculate distance between two points, both points can be either Eastings and Northings or
Latitude and Longitude. Results are given in Kilometres, Statute Miles, Nautical Miles and
Sixtieths (Calculations and transformations as per Appendix IV).
Tuesday, 23 June 2009
HOMER
Page 29 of 53
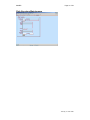
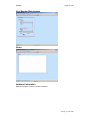
Calendar
Additional Information
Double click on a text item with a calendar date on it to view or modify the calendar entries for
that date. If the background of a text item is yellow (or red if it is today’s date) then this is
active date. If the text of the text item is bold then calendar entries exist on this date.
The follow table outlines the other key features of the calendar:
Button/Item
Description
Enter a date in the text item and press the “Go” button to take you
directly to that date.
Press this button to move the current date back one month.
Press this button to move the current date back one day.
Press this button to move the current date forward one day.
Press this button to move the current date forward one month.
Tuesday, 23 June 2009
HOMER
Page 30 of 53
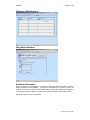
Change Password
Additional Information
Allows the current user to reset their password.
Club Maintenance
Tuesday, 23 June 2009
HOMER
Page 31 of 53
Club Secretary Maintenance
Tuesday, 23 June 2009
HOMER
Page 32 of 53
Contact Maintenance
Additional Information
The Contact Explorer Screen shows where a contact is used within the system. Are they a
Federation Secretary, Delegate, Club Secretary, Member or Non Member and when? It also
shows what mailing lists this person is associated with.
Tuesday, 23 June 2009
HOMER
Page 33 of 53
Coordinate Transformation
Additional Information
Converts Eastings and Northings to Latitude and Longitude and vice versa as per calculations
and transformations in Appendix IV.
Delegate Maintenance
Tuesday, 23 June 2009
HOMER
Page 34 of 53
Distance Report
Additional Information
Report Level: Level at which to choose what lofts to report; LOFT: Choose individual Lofts;
CLUB: All Lofts for the chosen Clubs; FEDERATION: All Lofts for the Clubs of the chosen
Federations.
Report by: Choose whether to report results by LOFT or RACE POINT.
Use Federations Race Points: Use Race Points associated with a Lofts Federation.
Invoice: If checked, creates invoice entries for this report.
Invoicing Level: Create invoice entries either at CLUB or LOFT or FEDERATION Level.
This also dictates who receives the email.
Tuesday, 23 June 2009
HOMER
Page 35 of 53
Federation Maintenance
Additional Information
The Register Rings Check Box is used to identify what Federation Codes can be used when
Register Rings
Enter the Race Points associated with a Federation and these can be used automatically
when creating a Distance Report.
Federation Secretary Maintenance
Tuesday, 23 June 2009
HOMER
Page 36 of 53
Fee Maintenance
Invoice Maintenance
Tuesday, 23 June 2009
HOMER
Page 37 of 53
Tuesday, 23 June 2009
HOMER
Page 38 of 53
Invoice Reports (General)
Additional Information
In any of the Invoice Reports, you can select a date range, enter your date range in the first
block, and then perform a query as normal in the second block, before requesting the report
in the third block. If you change your dates you must then re-query the second block.
If you only enter a start date then the query will return all invoices on or after the date entered,
if you only enter a end date then the query will return all invoices on or before the date
entered.
Tuesday, 23 June 2009
HOMER
Page 39 of 53
Join Individual’s Rings
Additional Information
Enter either the Loft or Member Number from which one will be transferring the rings. Enter
either the Loft or Member Number to which one will be transferring the rings. Enter the date
on which the transfer will be effective and press the “Transfer all Rings”. A dialog box will
appear for the user to confirm the transfer. Press “Yes” to confirm the transfer and the details
will be validated and another dialog box will appear to report the success of the transfer.
Press “No” to cancel the transfer and modify the details.
NOTE: No need to commit on this screen.
Letter Maintenance
Tuesday, 23 June 2009
HOMER
Page 40 of 53
Loft Maintenance
Lost and Found Birds
Additional Information
Enter the details of the Lost Ring and when these are correct the Owner Details will appear.
If the Finder is a Loft enter their Loft Number on the Loft Tab Page, if the Finder is a Member
or Non Member enter their Number on the Member Tab Page (use the “Contacts” button to
search or enter a new Non Member). If the finder is a non-fancier their details can entered on
the Other Tab Page. Additional Notes to the Owner and Finder can be entered on the Notes
Tab Page. Once all the details regard the Lost Bird has been entered this information can be
committed to the database.
NOTE: if the “Print Status” has a tick, it cannot be re-printed from the “Lost and Found Bird
Letters” Screen until the tick is removed.
Tuesday, 23 June 2009
HOMER
Page 41 of 53
Lost Bird Deletion
Additional Information
Enter the date prior to which all Lost Bird Records will be deleted. Press the “Delete Lost
Birds” button to delete the data from the database. A dialog box will appear for the user to
confirm the deletion. Press “Yes” to confirm the Lost Bird Record deletion and another dialog
box will appear to report the success of the deletion, or press “No” to cancel the deletion and
modify the date.
NOTE: No need to commit on this screen.
Mailing List Maintenance
Tuesday, 23 June 2009
HOMER
Page 42 of 53
Measurement and Location Maintenance
Member Maintenance
Tuesday, 23 June 2009
HOMER
Page 43 of 53
Non Member Maintenance
Notes
Additional Information
Notes are limited to a maximum of 2048 characters.
Tuesday, 23 June 2009
HOMER
Page 44 of 53
Race Validation
Additional Information
Enter the Ring Details one wishes to validate, press the “Validate Ring” button and if the Ring
exists the Owner Details will appear in the Owner Block, else a dialog box will be displayed
informing one that the Ring does not exist.
NOTE: No need to commit on this screen.
Race Point Maintenance
Tuesday, 23 June 2009
HOMER
Page 45 of 53
Reference Maintenance
Ring Batch Deletion
Additional Information
Enter the details of the Ring Batch to be deleted. Press the “Delete Ring Batch” button to
delete the data from the database. A dialog box will appear for the user to confirm the
deletion. Press “Yes” to confirm the Ring Batch deletion and another dialog box will appear to
report the success of the deletion, or press “No” to cancel the deletion and modify the date.
NOTE: No need to commit on this screen.
Tuesday, 23 June 2009
HOMER
Page 46 of 53
Ring Log Deletion
Additional Information
Enter the date prior to which all Ring Log Records will be deleted. Press the “Delete Ring
Log” button to delete the data from the database. A dialog box will appear for the user to
confirm the deletion. Press “Yes” to confirm the Ring Log Record deletion and another dialog
box will appear to report the success of the deletion, or press “No” to cancel the deletion and
modify the details.
NOTE: No need to commit on this screen.
Ring Log Query
Tuesday, 23 June 2009
HOMER
Page 47 of 53
Ring Registration
Additional Information
If one is registering Ring(s) to a Loft enter the Loft Number on the Loft Tab Page, else if one
is registering Ring(s) to a Member enter the Member Number on the Member Tab Page.
Then enter the Ring Details and press the “Register Ring(s)” button, a dialog box will appear
for the user to confirm the registration. Press “Yes” to confirm the registration, if the Ring(s)
being registered conflict with those on the database a dialog box will be displayed with an
appropriate message, else a dialog box will inform one that the registration has been a
success. Else press “No” to cancel the registration.
NOTE: No need to commit on this screen.
Ring Search
Tuesday, 23 June 2009
HOMER
Page 48 of 53
Ring Transfer
Additional Information
When transferring Rings, enter the details of the first Ring(s) to be transferred, then press the
“Validate Ring(s)” button and the Ring Details entered will be validated and if correct the
Owner Details will be displayed. If the Ring(s) are being transferred to a Loft enter the Loft
Number on the Loft Tab, else if these are being transferred to a (Non) Member enter the
(Non) Member Number on the Member Tab, then press the “Transfer Ring(s)” button and a
dialog box will appear for the user to confirm the transfer. Press “No” to cancel the transfer or
“Yes” to confirm the transfer and another dialog box will appear to report the success of the
transfer. The user will also be prompted if they wish to transfer more rings from the same
Loft/Member, if they choose “Yes” the next rings entered will be checked to ensure these
belong to the same Loft/Member.
NOTE: No need to commit on this screen.
Tuesday, 23 June 2009
HOMER
Page 49 of 53
Ring Transfer Log Deletion
Additional Information
Enter the date prior to which all Ring Transfer Log Records will be deleted. Press the “Delete
Ring Transfer Log” button to delete the data from the database. A dialog box will appear for
the user to confirm the deletion. Press “Yes” to confirm the Ring Transfer Log Record
deletion and another dialog box will appear to report the success of the deletion, or press “No”
to cancel the deletion and modify the details.
NOTE: No need to commit on this screen.
Ring Transfer Log Query
Additional Information
Allows the user to query recent Ring Transfers and re-request Letters if and when necessary.
Tuesday, 23 June 2009
HOMER
Page 50 of 53
Ring Type Maintenance
Tape Maintenance
Tuesday, 23 June 2009
HOMER
Page 51 of 53
Union Explorer
Additional Information
Click on a “+” to expand a branch of the tree or click on a “-“ to collapse a branch.
Double-click on a branch to jump to a screen to view the associated details. If one doubleclicks on a generic branch like Federations, Clubs or Lofts, one will jump to the associated
screen and will be able to view either all Federations, all Clubs relating to the Parent
Federation or all Lofts relating to the Parent Club (in that order). If one double-clicks on a
specific entity one will jump to the associated screen and only the details of the chosen entity
will be viewable.
If one is using the Explorer for extended periods of time the information being displayed may
become out of date due to the actions of other users. Press the “Refresh Display” button to
refresh the explorer with data in its current state.
Union Maintenance
Tuesday, 23 June 2009
HOMER
Page 52 of 53
Union Secretary
User Maintenance
Additional Information
This form allows users with the correct authority to create new users and drop old ones.
Tuesday, 23 June 2009
HOMER
Page 53 of 53
VAT Maintenance
Tuesday, 23 June 2009