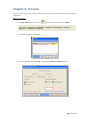
1
EZ-GL
Installation and User’s Guide
Copyright
Copyright
©
1992-2008 Employee Based Systems, LLC. All rights reserved.
Portions of the software described in this document copyright © Employee Based Systems,
Inc., a wholly owned subsidiary of Employee Based Systems, Inc. All rights reserved.
Information in this document is subject to change without notice. The software described in
this document is furnished under a license agreement or non-disclosure agreement. The
software may be used or copied only in accordance with the terms of those agreements. No
part of this publication may be reproduced, stored in a retrieval system or transmitted in any
form or any means electronic or mechanical, including photocopying and recording for any
purpose other than the purchaser’s personal user without written permission of Employee
Based Systems.
Employee Based Systems
7991 Shaffer Parkway, Suite 202
Littleton, CO 80127
U.S.A.
http://www.getebs.com
Trademarks
EZ-GL®, EZ-Track®, EZ-Web Time Sheet®, EZ-Web Punch®, EZ-Tele Punch®, EZ-Scheduler®,
EZ-Integrate®, EZ-401K®, EZ-Archive®, EZ-GARN®, EZ-Positive Pay®, EZ-Reciprocity®, EZACH(Header)®, EZ-Time Import®, EZ-FOXPACK®, EZ-Tip®, EZ-Wage & Tax® and EZ-Expat®
are registered trademarks of Employee Based Systems, LLC. Other brands and their products
are trademarks or registered trademarks of their respective holders and should be noted as
such.
Software License Agreement
IMPORTANT - READ CAREFULLY: This Software License Agreement for EZ-GL is a legally binding agreement between
you and Employee Based Systems, L.L.C. (“EBS”) and supersedes any purchase order placed by you. All of the terms and
conditions applicable to your rights and EBS’ rights are set forth in the attached computer software and this agreement.
By opening, installing, copying, or otherwise using this software, you agree to accept this agreement and agree to be
bound by the terms of this agreement. If you do not agree to the terms of this agreement, you may not use or copy the
software, and you should promptly contact EBS for instructions on returning the unused product for a refund or credit. By
opening the diskette package for this program or using this program, you acknowledge that you have received and read
this Software License Agreement (the “Agreement”), and that you agree to be bound by it.
LICENSE: By acquiring this software license, you are granted a nontransferable non-exclusive license (the “License”) to
use the enclosed program and all enhancements, modifications, and updates to the program and all related written
materials (the “Software”) on a single computer, at a single location, solely in accordance with this agreement. You may
make a single back-up copy of the software for archival purposes.
OWNERSHIP: EBS owns the software and all trade secrets, copyrights, patents and other intellectual property rights
therein, which you agree to preserve. This software is protected by copyright laws and international copyright treaties, as
well as intellectual property laws and treaties. YOU MAY NOT, AND YOU MAY NOT PERMIT OTHERS TO, MODIFY,
DISASSEMBLE, REVERSE, DECOMPILE, OR OTHERWISE DERIVE SOURCE CODE FROM THE SOFTWARE; RENT, LEASE, OR
DISTRIBUTE THE SOFTWARE, ANY COPY, OR ANY RELATED WRITTEN MATERIALS, IN WHOLE OR PART; REVISE,
ENGINEER THE SOFTWARE; OR USE THE SOFTWARE IN ANY MANNER THAT INFRINGES THE INTELLECTUAL PROPERTY
OR OTHER RIGHTS OF ANOTHER PARTY; EXCEPT AS EXPRESSLY PERMITTED IN THE LICENSE AGREEMENT. FAILURE TO
COMPLY WITH THE TERMS OF THIS AGREEMENT MAY SUBJECT YOU TO CIVIL DAMAGES, REASONABLE ATTORNEYS’
FEES, AND MAY BE A SERIOUS CRIME.
TERM: You may terminate the license at any time by destroying the software together with the authorized backup copy.
This agreement is automatically terminated if you violate any portion of the Agreement or do not pay the initial license
fee when it becomes due. You agree upon any such termination to destroy the software together with all copies. Upon
termination, there will be no refund of monies paid by you.
LIMITED WARRANTY AND DISCLAIMERS OF WARRANTY: EBS warrants that (a) the software will perform
substantially in accordance with the written material, and (b) the software shall be free of defects that prevent you from
loading the software onto your computer for a period of sixty (60) days from date of purchase. The sole obligation of EBS
and your sole remedy under this Limited Warranty is replacement of any defective software, provided that you give EBS
written notice of the defect within the sixty (60) day period.
EBS does not warrant that the operation of the Software will be uninterrupted or error free or that the Software will
operate or function properly on your computer. EBS makes no representations or warranties whatsoever as to the date it
will deliver any Software updates to you. You assume the risk that the Software will not be available when you need it.
You assume the sole responsibility for the selection of the Software for your purposes. You understand and agree that (1)
you are solely responsible for the content, calculation, and accuracy of all reports and documents prepared in whole or in
part by using the Software; (2) using the Software does not relieve you of any professional obligation concerning the
preparation and review of such reports and documents (3) you do not rely upon EBS or the Software for any advice or
guidance regarding compliance with federal and state laws or the appropriate tax treatment of items reflected on such
reports or documents; and (4) you will review any calculations made by using the Software and satisfy yourself that
those calculations are correct.
THE SOFTWARE AND RELATED MATERIALS ARE PROVIDED “AS IS” WITHOUT WARRANTY OF ANY KIND, EITHER EXPRESS
OR IMPLIED, INCLUDING WARRANTIES OF MERCHANTABILITY OR FITNESS FOR ANY PARTICULAR PURPOSE OR ANY
OTHER STATUTORY OR COMMON LAW WARRANTIES. NO WARRANTY IS MADE REGARDING THE PERFORMANCE OF THE
SOFTWARE OR THE RESULTS THAT MAY BE OBTAINED BY USING THE SOFTWARE, THE ENTIRE RISK AS TO THE
INSTALLATION, USE, QUALITY, AND PERFORMANCE OF THE SOFTWARE IS WITH YOU. Some states do not allow the
limitation or exclusion of implied warranties, so the above limitation or exclusion may not apply to you. This warranty
gives you specific legal rights and you may also have other rights that vary from state to state. This disclaimer of
warranties and the limitation of liability below shall not be modified, diminished or affected by and no obligation or
liability will arise or grow out of the rendering of technical, programming, or other advice or service or the provision of
support for the Software by EBS. LIABILITY, LIMITATIONS AND EXCLUSIVE REMEDIES: EBS’ entire liability to you and
your exclusive remedy shall be the replacement of any defective diskette, as set forth above. IN NO EVENT WILL EBS BE
LIABLE TO YOU FOR ANY DIRECT, INDIRECT, SPECIAL, INCIDENTAL OR CONSEQUENTIAL DAMAGES (INCLUDING BUT
NOT LIMITED TO LOST REVENUES, DATA, PROFITS OR SAVINGS) ARISING OUT OF THE USE OF OR INABILITY TO USE
THE SOFTWARE OR ANY DELAY IN THE DELIVERY OF THE SOFTWARE, EVEN IF EBS IS APPRISED OF THE POSSIBILITY
OF SUCH DAMAGES OR OF ANY CLAIM BY ANY OTHER PARTY. IN NO EVENT SHALL THE LIABILITY OF EBS ARISING
FROM YOUR USE OR INABILITY TO USE THE SOFTWARE EXCEED THE FEE PAID BY YOU FOR THIS LICENSE. The
remedies available to you against EBS are exclusive. Some states do not allow the limitation or exclusion of liability for
incidental or consequential damages so the above limitation or exclusion may not apply to you.
GENERAL: This Agreement will insure the benefit of EBS, its successors and assigns and will be construed under the laws
of the State of Colorado, except for the body of laws dealing with conflict of laws. The Agreement supersedes any prior
agreements between the parties regarding the same subject matter. If any provision of the Agreement is deemed invalid
by a court of competent jurisdiction, such provisions shall be enforced to the maximum extent permitted and the
remainder will remain in full force.
Contents
Chapter 1: Getting Started ......................................................................................5
1.1- EZ-GL Overview...........................................................................................................5
1.2- Using this Guide ..........................................................................................................5
Chapter 2: Installation & Access .............................................................................6
2.1- System Requirements...................................................................................................6
2.2- Install EZ-GL ...............................................................................................................7
Chapter 3: Product Registration ............................................................................11
3.1- Register EZ-GL .......................................................................................................... 11
Chapter 4: Security Setup .....................................................................................13
4.1- Security Setup with Advanced Toolkit............................................................................ 13
4.2- Security Setup without Advanced Toolkit ....................................................................... 14
Chapter 5: EZ-GL Setup .........................................................................................17
Chapter 6: Process ................................................................................................25
FAQ's.....................................................................................................................30
Glossary ................................................................................................................31
Chapter 1: Getting Started
1.1- EZ-GL Overview
EZ-GL posts payroll transactions from Sage Abra Payroll directly into your accounting system's
general ledger. EZ-GL creates a report and output file in any account format which includes,
ACCPAC, MAS 90, Solomon, SBT, PeopleSoft, TURNS and more. In addition, you can design
an output file for any other accounting system according to your specifications.
Key Features:
•
Allocates split-month payrolls automatically or accrues future payroll and creates
necessary reversing entry according to your accounting procedures
•
Posts accrued benefit liabilities from Sage Abra to the GL
•
Automatically archive and purge GL data Auto restore process
•
Unique edit feature allows for easy modification of inaccurate GL entries
•
Posts selected GL accounts as consolidated or detailed transactions
•
Creates a check output file
•
Payroll transactions are posted automatically in the correct format for your
accounting system
•
Produces comprehensive reports that show you all your general ledger postings and
corrections
•
Eliminates the need for time-consuming double data entry
•
Integrates completely with Sage Abra Payroll
1.2- Using this Guide
This user guide gives you a detailed description of how to install and use EZ-GL in the
following chapters:
Chapter 1: ‘Getting Started’- gives a brief description of the product
Chapter 2: ‘Installation and Access’- describes how to install EZ-GL
Chapter 3: ‘Product Registration’- describes how to register EZ-GL with Employee
Based Systems
Chapter 4: ‘Security Setup’- describes how to configure the security for users to access EZGL
Chapter 5: ‘EZ-GL Setup’- describes how to setup EZ-GL
Chapter 6: ‘Process’ – describes how to process the information and to view report
FAQ’s: contains a list of Frequently Asked Questions and Answers
Glossary: contains a list of terms and their definitions
Page 5 of 34
Chapter 2: Installation & Access
2.1- System Requirements
Before you install ‘EZ-GL’ in Sage Abra application, verify if your system has the following
requirements:
1.
Sage Abra software version 7.X: The EZ-GL application is installed inside Sage
Abra and can be installed from any workstation that runs Abra or has Abra installed.
This makes it simple for the end-user to install any of the ‘EZ applications’ from
‘Employee Based Systems’
Note: No user must be inside Abra at the time of install.
2.
Installation Requirements for Workstation Configuration:
•
Microsoft® Windows 2000 or Windows XP Professional and Sage Abra HRMS
•
Pentium processor 266MHz or higher
Recommended: 400MHz or higher
•
RAM 128MB
Recommended: 256MB or higher
•
500MB of hard disk space
•
SVGA color monitor
•
100Mbps network card for network installations (10Mbps minimum)
•
Internet access using Internet Explorer Version 5.0 or higher
3.
Installation Requirements for Program and Database Server Configuration:
•
Windows 2000 Server, Windows Server 2003 or Novell NetWare 6.5 or higher
•
Pentium or Pentium PRO processor 1.3 GHz or higher
Recommended: 2 GHz or higher
•
RAM 256 MB
Recommended: 512MB or higher
•
4+ GB hard disk
Recommended: 8 GB hard disk
•
100Mbps network card, data hub and cabling
•
CD-ROM drive plus 3.5” disk drive
•
SVGA color monitor
•
Streaming tape or other backup device
•
Uninterruptible Power Supply (UPS)
Page 6 of 34
EZ-GL Installation and User’s Guide
4.
Compatible Networks:
•
Novell Netware 6.5 or higher
•
Microsoft Networks
•
Microsoft Windows Terminal Server
Note: The above configuration recommendations are guidelines. Actual memory and
Hard drive requirements may vary based on the number of simultaneously running
applications, simultaneous network users and amount of data being processed. You
must periodically monitor and optimize Sage Abra workstation, server and network
resource utilization using operating system utilities.
2.2- Install EZ-GL
1.
Double click ‘Installation Executable’ provided either through the download page
from http://www.getebs.com/ website or from your CD
2.
EZ-GL installation wizard pops-up, click ‘OK’
3.
Click ‘Setup’
4.
‘EBS Products Install’ screen appears
Page 7 of 34
Installation & Access
Information displayed in this screen:
Field Label
Install/Update
Field Descriptions
If ‘EZ-GL’ is a new install, this option will read ‘Install’.
If ‘EZ-GL’ is already installed, the label displays as ‘Update’
Select this option to Install/Update EZ-GL.
Live Data
Select this option to work with Live or Real Time Data.
Sample
Select this option to work with Sample data.
Uninstall
Select ‘Uninstall’, if the product is already installed and you
wish to remove it from your system.
5.
Click ‘Next’
6.
‘EBS License Agreement’ screen appears
7.
Select the checkbox to accept the ‘License Agreement’ and click ‘Next’
Note: To read the Software License Agreement in detail, refer the ‘Software
License’ page of the EZ-GL User Manual.
8.
With Sage Abra ‘Advanced Toolkit’ feature, the ‘Activity Center Options’ screen
appears
Page 8 of 34
EZ-GL Installation and User’s Guide
Information displayed in this screen:
Field Label
9.
Field Descriptions
Product
Product Name - ‘EZ-GL’
Category
Indicates under which Abra product the task is installed, once
it is inside Sage Abra.
Section
Indicates what type of activity the task is.
Step
Shows how the step name appears in Sage Abra task menu (if
applicable).
Option Name
Shows how the task name (‘EZ-GL’) appears in Sage Abra
‘Activity Center’.
Select ‘Install’ and click ‘Next’
Note: This screen appears if you have the ‘Advanced Toolkit’ installed. If you
do not have the Advanced Toolkit installed, you can still access EZ-GL under EBS
Programs Quick Launch option. For more information on the Advanced Toolkit,
please contact your Abra reseller.
10. ‘Quick Launch Toolbar’ screen appears
Page 9 of 34
Installation & Access
11. Select ‘Install’ check box and click ‘Next’
Note: This step creates a shortcut for 'EZ-GL' inside Sage Abra under a selection
button called ‘EBS’
12. ‘Installation Complete’ dialog box appears. Click ‘OK’
Page 10 of 34
Chapter 3: Product Registration
3.1- Register EZ-GL
Once EZ-GL is installed in your system, you are automatically given a 30 day full evaluation
program period for your software. During this period, whenever you use EZ-GL the following
message is displayed, asking whether you would like to register or not for the product at that
time.
1.
Click ‘Yes' to Register your software or Click ‘No’ to use the Trial Version
Note: EZ-GL will no longer function after the trial period expires. Please contact
‘EBS’ or your reseller to receive your registration key.
2.
Click ‘Yes’. The ‘Registration’ screen appears
3.
Enter ‘Abra Serial Number’ and ‘Installation Code’
Note: To view Abra Serial Number and Installation Code, go to Help>>About
Abra >>Installed Products.
4.
Enter appropriate ‘EBS Product Serial Number’ and click ‘Register’
Note: To get the product serial number for the EZ-GL application, you may either
contact your reseller or ‘EBS’ at 303-991-3500.
5.
Click ‘Get Register No’ to send an e-mail to EBS and get your product serial number
6.
‘Get Registration’ screen appears
Page 11 of 34
EZ-GL Installation and User’s Guide
7.
Enter your ‘Company’, ‘Contact’, ‘Phone No’ and ‘Email ID’ in the appropriate fields
8.
Click ‘Send Mail’. EBS representative will get back to you with a serial number
9.
Once you receive your product serial number, Enter ‘EBS’ product serial number in the
‘Registration’ screen
10. Click ‘Register’ to register your software
Page 12 of 34
Chapter 4: Security Setup
Once EZ-GL is installed, all tasks are automatically added to the ‘Master’ User Group in Abra
Group Security. If a user is assigned to a group different from ‘Master Group’, you must
then assign access to EZ-GL for that group to show up as an option for the user.
The Security feature of EZ-GL is based on ‘Sage Abra Group Security’ feature.
Note: Security setup for EZ-GL depends on whether Sage Abra has ‘Advanced
Toolkit’ installed or not.
4.1- Security Setup with Advanced Toolkit
Steps:
1.
In ‘Sage Abra’ program Activity Center screen go to System > Rules > Group
Security
2.
The ‘Security Groups’ screen appears with a list of security groups that are already
defined
3.
Select a group and click ‘More’ to install 'EZ-GL' option for this predefined security
group
Note: To add additional security groups, click ‘Add’ and follow the steps as
explained in the Sage Abra Training Manual.
4.
In the following screen, you must define security access for EZ-GL with ‘Advanced
Toolkit’
Page 13 of 34
EZ-GL Installation and User’s Guide
5.
Select relevant information in this screen
Employer
Appropriate
company
(example
‘EBS’)
6.
Product
‘Payroll’
option
Activity
‘Process’
option
Task
‘GL Report
and Export’
option
Step
‘GL Report
and Export’
option
Click ‘Apply’ and then ‘OK’ to finish the task
The user who belongs to selected ‘Security Group’ can access EZ-GL with Advanced
Toolkit under Payroll > Process > GL Report and Export
Note: Repeat the above steps for each location where the EZ-GL needs to be
installed i.e. Payroll > Reports > GL Report and Export, Payroll > Rule > GL
Export Setup and Payroll > Reports > Standard Payroll Reports
4.2- Security Setup without Advanced Toolkit
Steps:
1.
In ‘Sage Abra’ program Activity Center screen go to System > Rules >Group
Security
2.
The ‘Security Groups‘ screen appears with a list of security groups that are already
defined
3.
Click ‘More’ to install 'EZ-GL' option for predefined security groups
Page 14 of 34
Security Setup
Note: To add additional security groups, click ‘Add’ and follow the steps as
explained in the Sage Abra Training Manual.
4.
In the following screen, you will define security access for EZ-GL without ‘Advanced
Toolkit’
5.
Select relevant information in this screen
Employer
Appropriate
company
(example
‘EBS’)
6.
Product
‘Payroll’
option
Activity
‘Report’
option
Task
‘Standard
Payroll
Reports’
option
Step
‘General
Ledger Dist
File’ option
Click ‘Apply’ and then ‘OK’ to finish the task
The user who belongs to the selected ‘Security Group’ can access EZ-GL without
Advanced Toolkit under Payroll > Reports > Standard Payroll Reports
7.
In the following screen, you will define 'Quick Launch' option for 'EZ-GL'
Note: ‘N/A’ is selected for Quick Launch option.
Page 15 of 34
EZ-GL Installation and User’s Guide
8.
Select relevant information in this screen
Employer
‘N/A’ option
9.
Product
‘System’
option
Activity
‘Quick
Launch’
option
Task
‘EBS’ option
Step
‘EZ-GL’
option
Click ‘Apply’ and then ‘OK’ to finish the task
The user who belongs to the selected ‘Security Group’ can access EZ-GL under ‘EBS’
programs quick launch tool bar.
Page 16 of 34
Chapter 5: EZ-GL Setup
Before you process your data, you need to set up EZ-GL to process and export your
information.
Steps for EZ-GL Setup:
1.
In ‘Sage Abra’ program, go to Payroll > Rules > GL Export Setup
Note: If you do not have Advanced Toolkit installed in Sage Abra, you can then
open 'EZ-GL' program by clicking on
selection button and selecting ‘EZ-GL’.
EZ-GL screen appears, click Setup button to continue.
2.
The ‘EZ-GL’ setup screen appears. By default, The ‘Export Setup’ tab is selected
Information displayed in this screen:
Field Label
Company
Field Descriptions
Select appropriate company from the dropdown list for which
you wish to export data.
For Example: Employee Based Systems-EBS
Output File Details
Export File Type
Select appropriate ‘Export File Type’ in accordance with your
current accounting system software.
When you export GL details during Process, the export format
of the file depends on the option selected in this field.
Note: EZ-GL supports a wide variety of accounting systems.
Incase your format is not listed; EBS can create a custom
format for your company. Contact EBS at (303)991-3500
Export Location
This is usually the location where the report can easily be
accessed to import into your accounting software or GL
System.
Enter the destination where you want the GL Report to be
exported.
Page 17 of 34
EZ-GL Installation and User’s Guide
Browse
File Name
This button allows you to select a destination, where you want
the GL Report to be exported.
Enter appropriate Name for the file.
Note: For People Soft user’s this field is inactive as they
require the file to be labeled in a specific manner
(MMDDYYYY_Pay.txt). EZ-GL will automatically fill in the
appropriate information.
SBT user’s need to enter appropriate Company Code and
Sys Data File Location.
Enter Extension
Type
Select appropriate file extension from the dropdown list.
Note: This option is available only for specific Export File
Type.
3.
Click ‘GL Posting Numbers’ tab. You need to setup this tab, if you are allocating
funds
Information displayed in this screen:
Field Label
Field Descriptions
Accrued Payroll
Number
Enter the account number where you wish to receive all the
accrued payroll data.
Rounding Acct
Number
EZ-GL rounds down to two decimal places while separating funds
by percent value, often small percentage is either left over or
needed to make all things equal.
Enter the account number, to which the extra percentage either
left over or needed from rounding of allocated fund will be
posted.
Note: EBS recommends you to enter the account with the
largest dollar value, usually your daily operating account. This
way the small amount will be almost negligible.
Page 18 of 34
EZ-GL Setup
Account Positions
Start and
Positions
Enter Start and Positions, for export file to display GL number at
specified position.
For Example: If you enter Start as ‘1’ and Positions as ‘3’ for
GL component 1, then the GL account number (123-45-67) is
displayed as 123 for GL Component 1.
Note: Similarly, enter ‘Start’ and ‘Positions’ for various GL Components. This is
basically to split your GL account number into various components in export file.
4.
Click ‘Payroll GL Accruals’ tab. You need to setup this tab, if you are allocating funds
Information displayed in this screen:
Field Label
Field Descriptions
Activate Allocations
by Month
Select ‘Yes’ to activate allocations by month feature.
Type of Allocation
Select appropriate option.
Note: Select ‘No’ to avoid allocation by month feature.
•
Allocation based on Actual Dollars: This option
allocates funds to the previous month.
Select this option and enter the correct percentage
to be allocated to the previous month in GL Report
Options screen. The remaining percentage will
automatically be applied to the current month.
•
Future allocation based on Percent: This option
estimates the value for the next month. This
feature places all the data to the last day of the
current month and then does a reversing entry on
the first day of the next month.
Enter the percentage to allocate for future period in
GL Report Options screen.
Page 19 of 34
EZ-GL Installation and User’s Guide
Checkbox
Select the check box for the account that you wish to split.
Note: By default, all the accounts are selected except the
cash account, which cannot be allocated.
5.
Click ‘PTO Accruals’ tab; It displays three tabs. By default Vacation Accruals tab is
active. You are required to setup this tab if your are allocating funds
Information displayed in this screen:
Field Label
Field Descriptions
Activate PTO
Accruals
Select this check box to activate PTO Accrual feature.
Activate Vacation
Select this check box to activate accrual features for vacation.
Vacation Earning
Code
Select appropriate Earning Code from the dropdown list for
particular accrual type.
Accrued Vacation
Payable
This is the Account where you want to accrue the balance.
Enter appropriate Account Number.
Override check
box
Select the checkbox for desired GL component, if you wish to
send this information to different account number other than
the primary account for that level.
G/L Equivalent
Override
Enter the account number, where you wish to get the selected
G/L Component details.
Page 20 of 34
EZ-GL Setup
6.
Select Illness Accruals tab
Information displayed in this screen:
Field Label
7.
Field Descriptions
Activate PTO
Accruals
Select this check box to activate the feature.
Activate Illness
Select this check box to activate accrual features for illness.
Illness Earning
Code
Select appropriate Earning Code from the dropdown list for
particular accrual type.
Accrued Illness
Payable
This is the Account where you want to accrue the balance.
Override check
box
Select the checkbox for desired GL component, if you wish to
send this information to different account number other than the
primary account.
G/L Equivalent
Override
Enter the account number, where you wish to get the selected
G/L Component details.
Enter appropriate Account Number.
Select Personal Accruals tab
Page 21 of 34
EZ-GL Installation and User’s Guide
Information displayed in this screen:
Field Label
8.
Field Descriptions
Activate PTO
Accruals
Select this check box to activate the feature.
Activate Personal
Select this check box to activate accrual features for personal.
Personal Earning
Code
Select appropriate Earning Code from the dropdown list for
particular accrual type.
Accrued Personal
Payable
This is the Account where you want to accrue the balance.
Override check box
Select the checkbox for desired GL component, if you wish to
send this information to different account number other than
the primary account.
G/L Equivalent
Override
Enter the account number, where you wish to get the selected
G/L Component details.
Enter appropriate Account Number.
Click ‘Detail Records’ tab
Information displayed in this screen:
Field Label
Field Descriptions
Create Check Output
File
Select this check box to create the check output file and
enter default destination file name.
Include Direct
Deposit
Select this check box, if you want to include direct deposits.
Post Detail GL
Records
Select this check box to get the details of various accounts.
Detail check box
Select Account numbers for which you wish to get the
details.
Page 22 of 34
EZ-GL Setup
9.
Click ‘General’ tab
The ‘Last Start Date’ and ‘Last End Date’ should be blank. You can enter these fields in
accordance with the selected pay period, when you actually run the report.
10. Click ‘Purge Archive Data’, Purge/Archive Data screen appears. Purge/Archive Data
function allows you to store your old data in a special database in your system for a
specified amount of time
Information displayed under this screen
Field Label
Field Descriptions
Archive Data
Select the check box to activate the archive data function.
Archive Data Text
Box
Enter the number of months you want your data to be
retained in the system before it is sent to archive database.
Note: Data must be at least 3 months old, before it can be
sent to archive database.
Purge Data
Select the check box to activate the purge data function.
Purge Data Text Box
Enter the number of months you want your data to be
retained in the system before it is purged from the system.
Note: Data must be at least 12 months old, before it is
purged from the system.
Recall
Click this button to recall the data that is stored in the
Archive Database.
Cancel
Click this button to exit Purge/Archive data screen.
Ok
Click this button to save the entered information.
Page 23 of 34
EZ-GL Installation and User’s Guide
11. Once you enter appropriate information for all tab of EZ-GL setup screen, Click ‘OK’
12. The information entered is saved. You can now Process the information and view the
report.
Page 24 of 34
Chapter 6: Process
EZ-GL is simple to process, once you have setup your clock import file and all your processing
information.
Steps to process:
1.
In ‘Sage Abra’ program, click on
selection button and select ‘EZ-GL’
Note: If you have Advanced Toolkit installed in Sage Abra, you can then open 'EZGL' program in Payroll > Processes > GL Report and Export or Payroll >
Reports > GL Report and Export
2.
The following screen is displayed
3.
Select a Company and click ‘OK’, to open the GL Report Options screen
Page 25 of 34
EZ-GL Installation and User’s Guide
Information displayed in this screen:
Field Label
Start Date
Field Descriptions
Enter the start date, i.e. the date from which you want to view
the report.
Note: You can also select the date by right clicking on the Start
Date textbox and selecting date from the calendar.
End Date
Enter the end date, i.e. the date till which you want to view the
report.
Note: You can also select the date by right clicking on the End
Date textbox and selecting date from the calendar.
Fiscal Year Reporting
Month and Year
Enter appropriate Month and Year.
Note: Enter this information, if you want to apply the financial
information to a different fiscal period than the one that
corresponds to the entered start and end dates.
GL Options
Attendance
Accruals
Select this option, for EZ-GL to post all attendance liabilities to
the general ledger.
Check Detail
Select this check box to get the check details.
General Ledger Allocations
Split Months
Select this checkbox to activate split months feature.
Allocate by Actual Dollars: If you are allocating funds to
previous month, enter the desired date and percentage to be
applied to the previous month in the first row fields
respectively. EZ-GL will automatically apply the remaining
percentage to the current month.
Future Allocations Based on Percent: If you are doing
future allocations, enter appropriate date and the percentage to
allocate to the future period in second row fields respectively.
EZ-GL automatically applies 100% to the current period.
Export Separate
Files
Select this check box to export files separately based on split
months.
Print
Click this button to print a hard copy of the report.
Preview
Click this button to review the report before you send as a file.
Cancel
Click this button to exit Report Options screen.
Page 26 of 34
Process
4.
Click ‘Validate Account Numbers’ , Account Number Validation screen appears
5.
Click ‘+’ , to validate that particular account number details
Following is the information displayed in the screen:
Field Label
GL Main
Field Descriptions
Displays a list of account number and its code.
Select appropriate GL Main account from the drop down list.
Department
Displays a list Departments.
Select appropriate Department from the drop down list.
Location
Displays a list of Locations.
Select appropriate Location from the drop down list.
Change
Select the check box under ‘Change’ column header, for the
accounts that you wish to edit.
Page 27 of 34
EZ-GL Installation and User’s Guide
Account Number
Displays Account Number
Debit
Displays Debit Amount
Credit
Displays Credit Amount
Empno
Displays Employee Number
Select All
Click this button to select all the account numbers at once to
edit.
Ok
Click this button to save the changes made and then view
report.
Note: Once you close the report window, you will be asked if
you are sure that you want to update the GL Numbers. Click
Ok, to proceed.
Cancel
6.
Click this button to exit the validation screen.
Click ‘Report’ , the following screen displays the report with Debit and Credit details
Note: You can even view the report without validating the account numbers.
7.
Click ‘Export’ in Report Options screen, to export the file having GL details. The type
of exported file depends on the ‘Export File Type’ chosen in EZ-GL Setup screen
Page 28 of 34
Process
Below is a sample Generic Export Output file:
Sample Generic Export General Ledger Output File
EBS, Employee Based Systems,1110-00-000-00,12/31/2006,Operating
Account,0.00,290722.03,111,0-00-0,501001,Abraham Christopher, Chk Date :12/31/2006
EBS, Employee Based Systems,1130-00-000-00,12/31/2006,Payroll Account,0.00,13221.97,113,000-0,581881,Suzan Lobo, Chk Date :12/31/2006
EBS, Employee Based Systems,2300-00-000-00,12/31/2006,Commissions
Payable,17390.67,0.00,230,0-00-0,561662,Karen Rego, Chk Date :12/31/2006
The above sample file contains GL details exported in CSV (Comma Delimited) format.
Note: The details displayed here can be viewed in CSV, SDF, XLS, DBF and Tab Delimited formats.
The following table details each of the above sequence lines
FIELD NAME
SAMPLE RESULT/DESCRIPTION
Detail Record: EBS, Employee Based Systems,1110-00-000-00,12/31/2006,Operating
Account,0.00,290722.03,111,0-00-0,501001,Abraham Christopher, Chk Date :12/31/2006
Company Code
EBS
Company Name
Employee Based Systems
GL Number
1110-00-000-00
Transaction Date
12/31/2006
Account Description
Operating Account
Debit
0.00
Credit
290722.03
GL Component 1
111
Note: The GL Component 1 is displayed based on account positions specified
under GL Position Number tab during EZ-GL Setup. For Example: If you
enter Start as 1 and Position as 3 for GL Component 1, then GL Number
(1110-00-000-00) is split to display GL Component 1 as ‘111’. Refer Setup
for more details.
GL Component 2
0-00-0
Note: The GL Component 2 is displayed based on account positions specified
under GL Position Number tab during EZ-GL Setup. For Example: If you
enter Start as 4 and Position as 6 for GL Component 2, then GL Number
(1110-00-000-00) is split to display GL Component 2 as ‘0-00-0’. Refer
Setup for more details.
Employee ID
501001
Employee Name
Abraham Christopher
Check Date
Chk Date :12/31/2006
Page 29 of 34
FAQ's
1.
Is the interface installed on the server or just on the client computers?
EZ-GL is installed inside Sage Abra and can be installed from any workstation that runs
Abra or has Abra installed. This was designed to make it simple for the end user to install
our applications. Only requirement is that no users can be inside Abra at the time of the
install. Please refer to Installation and Access -To install EZ-GL for install instructions.
2.
Why use Allocations?
There are two basic methods used in accounting: Accrual-Based Accounting and CashBased Accounting. The Allocation feature is used for the Accrual method.
Cash-Based Accounting: A company that uses the cash-based method of accounting
records revenue when it is received. That means when you sell goods or services, you
record the revenue once you receive the customer’s payment. Likewise, all expenses are
recognized when they are paid.
Accrual-Based Accounting: Companies that use the accrual-based method of accounting
record revenue at the time a sale is made, regardless of when the customer actually pays
for the goods and services. Expenses are recorded when they are incurred, not when they
are paid. The accrual-based method lets businesses match revenues with expenses for the
accounting cycle. The Allocations feature in EZ-GL allows you to do this before the data is
exported to GL.
Allocations:
Pay period do not always start and end in the same month. If you are using the accrualbased method, you will want to allocate part of the expense to the previous month and the
remainder to the current month.
For Example: Say a pay period begins on 8/24 and ends on 9/7. The entire expense was
incurred in neither month. Part of it was in August and part of it was in September. The
allocations feature allows you to record part of expense to the previous month and the
remainder to the current month.
3.
Why use PTO Accruals?
When using accrual-based accounting, businesses will often want to accrue the expense
incurred for vacation, illness and/or personal time earned by the employee at the time
when it is earned and not necessarily when it is used.
Page 30 of 34
Glossary
A
Accounts Payable - Debts currently owed by a person or a company, typically to the
company’s suppliers. Accounts payable are subtracted from the sales or revenue amounts on a
balance sheet in order to calculate net income and net worth.
Account Receivable – Money owed to a company by its customers. A large amount of
accounts receivable in comparison to the company’s sales may indicate that the company is
low on cash.
Accrual Basis Accounting – Accounting system in which income is recorded when it is
earned rather than when it is paid, and expenses are recorded when an obligation is
established rather than when the money is paid.
Activity Centre - The Activity Center provides access to all activities and includes the same
options as the main menu.
Admin – Refers to the administrative user. The Admin user has full access to all aspects tf EZGL system.
Allocate – To spread the cost of an item systematically among other items; for example, a
check written to replenish petty cash can be allocated among several expense accounts.
Archive Database – The place where old data is stored until it is either recalled or purged
from the system.
ASCII – Acronym for American Standard Code for information interchange, a 7-bit code that
represents the most basic letters of the Roman alphabet, numbers, and other characters used
in computing.
B
Balance Sheet – An official financial statement that includes company assets and liabilities.
To determine a company’s net worth, subtract its liabilities from its assets.
C
Cash basis accounting – Method of accounting that measures revenue when cash is received
and measures expenses when they are paid.
Check Box - A small box within a dialog box representing an option you can turn off or on. A
check in the box indicates you have selected the option.
Code – A representation of a word or phrase used to provide speed and accuracy while
entering data.
Command Center - The main page of EZ-GL, it enables access of all the program’s tasks and
utilities.
Credit – Backbone of the accounting system; depending on the type of accounting system, it
will either increase or decrease the account balance; all credits must equal debits.
Page 31 of 34
EZ-GL Installation and User’s Guide
D
Database – A set of similar data stored within the computer in an organized manner. A
database consists of one or more records.
Debit – Backbone of the accounting system. Depending on the type of accounting system it
will either increase or decrease the account balance. All debits must be equal to credits.
Default – The pre-set values established by EZ-GL. Default values may be changed by the
user to preferred values.
Drop-Down List - A special kind of field within a screen which, when clicked, displays a
number of option from which you can make a choice.
E
Export – Send data from the system to an outside source.
F
Field – In EZ-GL, an area in a panel or screen where you enter database information either by
typing in the field box or selecting from the list.
G
General Ledger – The core of your company’s financial records, the central “books” of your
system through which every transaction flows.
I
Import – Bring data into the system from an outside source.
L
Liabilities – Opposite of asset, any debt or obligation due now or potentially in the future.
Liability is synonymous with legal responsibility.
List Box - A dialog box displaying a long or multi-column list of items from which to select.
M
Menu - A list of available commands in an application window. Open the menu by selecting
the menu name.
Page 32 of 34
Glossary
O
Owners Equity – It is the difference between assets and liabilities called as ‘Capital’. It is any
debt owed to the business owners.
P
Panel – A window in EZ-GL where database information can be viewed, added, modified or
deleted. A panel is also sometimes referred to as a screen.
Password – A string of characters unique to each user that enables access to a software
application.
Pay Group – Allows you to group employees together under specific pay-related criteria for
reporting and processing purposes.
Pay Period – The frequency with which payroll is processed and paychecks are issued.
Payroll - Payroll is one of a series of accounting transactions dealing with the process of
paying employees for services rendered, after processing of the various requirements for
withholding of money from the employee for payment of withholding payroll taxes, insurance
premiums, employee benefits, garnishments, and other deductions.
Process - A process involves one step or a series of steps that lead to the completion of a
task.
Q
Quick Launch – Allows user to start a program with a single click.
R
Rule – A control that governs any part of the EZ_GL system. Rules can control how
information is processed, what information appears in individual panels or how certain groups
of employees are handled in a system.
S
Sage Abra – Payroll Integration application.
Security Group - A security group is a collection of one or more users with the same access
rights.
T
Task – A job you can complete in EZ-GL, which can be a process, rule, panel or report. It may
have one or more steps and you can complete it immediately or schedule it for someone else
or yourself to do it later.
Text Box – The area in a field, you fill in by typing information.
Page 33 of 34
EZ-GL Installation and User’s Guide
Trial Period - A trial version of software or a product that is valid only for a specific period or
time.
Page 34 of 34