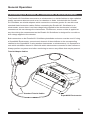
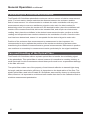
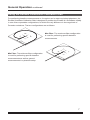
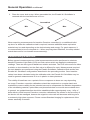
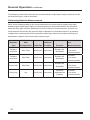
1
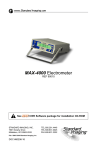
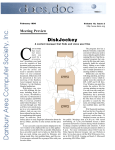
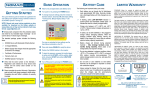
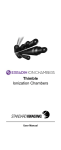
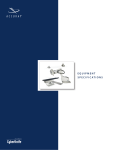
WWW.
.COM
REF 92739
STANDARD IMAGING, INC.
3120 Deming Way
Middleton, WI 53562-1461
TEL 800.261.4446
TEL 608.831.0025
FAX 608.831.2202
Aug / 2012 ©2012 Standard Imaging, Inc.
DOC #80643-01
#80XXX-00
General Precautions
Warnings and Cautions alert users to dangerous conditions that can occur if instructions
in the manual are not obeyed. Warnings are conditions that can cause injury to the
operator, while Cautions can cause damage to the equipment.
WARNING: Proper use of this device
depends on careful reading of all
instructions and labels.
WARNING: Where applicable, Standard
Imaging products are designed to be used
with the versions of common radiation
delivery devices, treatment planning
systems and other products or systems
used in the delivery of ionizing radiation,
available at the time the Standard Imaging
product is released. Standard Imaging does
not assume responsibility, liability and/or
warrant against, problems with the use,
reliability, safety or effectiveness that arise
due to the evolution, updates or changes to
these products or systems in the future. It is
the responsibility of the customer or user to
determine if the Standard Imaging product
can be properly used with these products
or systems.
WARNING: The Exradin W1 Scintillator
is intended for quality assurance and
calibration measurements. It is not intended
to be connected to a patient for real-time
dosimetry measurements.
CAUTION: For valid measurement results
using the Exradin W1 Scintillator, the
spectral filtration method described in this
manual must be used.
CAUTION: Do not drop, mishandle, or
disassemble the Exradin W1 Scintillator.
Refer all servicing to qualified individuals.
CAUTION: The Exradin W1 Scintillator
can be used with non-Standard Imaging
electrometers with sub-pA resolution.
However, do not apply HV bias to the
Scintillator triaxial connectors or damage to
the electrometer may result.
CAUTION: The Exradin W1 Scintillator
is optimized for use with the SuperMAX
Electrometer (ref 90018). If using the
Exradin W1 Scintillator with electrometers
other than the SuperMAX, measurement
performance may vary.
ii
CAUTION: When using the Exradin W1
Scintillator with two separate electrometers,
timing differences between electrometers
can affect measurement results.
CAUTION: The photodiode enclosure
or triaxial connectors should never be
submerged in any liquid, scrubbed with an
abrasive cleaner, or be stored or placed
where liquids could be spilled or splashed
onto it.
CAUTION: Do not apply high voltage (HV)
bias voltage to the Exradin W1 Scintillator.
Damage to the device or the electrometer
may occur.
CAUTION: Keep photodiode enclosure
away from beam during measurements.
CAUTION: Ensure the channels of the
Exradin W1 Scintillator are always properly
connected to the electrometer(s). Inaccurate
measurements will occur if the channels are
swapped.
CAUTION: Signal degradation can
occur - with accumulated dose. Ensure
detector readings are within the desired
measurement certainty.
CAUTION: Do not kink or subject the optical
fiber to a bend radius smaller than that of
the calibration slab. Damage to the fiber or
alteration of the measurement signal may
occur.
CAUTION: Do not attempt to remove the
optical fiber from the photodiode enclosure.
CAUTION: Do not sharply bend triaxial
cable. Damage to the cable may result in
high leakage currents.
Table of Contents
1 Product Overview
1Introduction
2 Theory of Operation
3 Physical Description
4 Use with SuperMAX Electrometer
5 General Operation
5
3120 DEMING WAY
Connecting the Exradin W1 Scintillator
MIDDLETON, WI 53562-1461 USA
to an Electrometer
WWW.STANDARDIMAGING.COM
6 Positioning the Photodiode Enclosure
6 Care and Handling of the Optical Fiber
7 Using the Exradin Scintillator Calibration Slab
9 Establishing Baselines
12 Calculating Baseline CLR and Gain Values
13 Applying Baseline Values to General Measurements
14Bibliography
16Maintenance
17 Triaxial Connector Cleaning Procedure
18 Parts and Accessories
18 Features and Specifications
21 Service Policy
21 Customer Responsibility
22Warranty
Product Overview
Introduction
The Exradin W1 Scintillator is a plastic scintillating fiber-based detector designed for highly
accurate measurement of small radiotherapy fields used in patient plan verification and
machine commissioning and QA procedures. The benefits of this type of detector are well
documented1,2,3,4 and include near water equivalence, linear dose as well as dose rate
response, energy independence within the MV range and above 125 keV and temperature
independence within the operating range (see Features and Specifications section). The
geometry of the Exradin W1 Scintillator in particular provides excellent spatial resolution and
is ideal for characterizing and measuring fields used for stereotactic radiosurgery (SRS) and
stereotactic body radiation therapy (SBRT).
1
Product Overview continued
Theory of Operation
The passage of ionizing radiation through a scintillating material excites the atoms of that
material to a short-lived excited state. When the atoms decay to their ground state, they emit
photons, which in this case are in the visible light spectrum. These photons are collected by a
photodetector and that signal is measured by an electrometer.
However, Čerenkov emissions5 are also created when the optical fiber used to couple
the scintillating material to the photodiode is irradiated. The amount of light produced is
proportional to the irradiated length of the optical fiber, and measurement results must be
corrected to account for this phenomenon.
While it has been shown6 that spectral filtration will not completely remove the Čerenkov
light, this filtration method nevertheless provides a high level of accuracy in correcting
measurements for the effect of Čerenkov radiation7.
To achieve this correction, baseline measurements must be performed using a large fixed
field and two different optical fiber configurations. As proposed by Fontbonne et al8, explicitly
formulated by Frelin et al9, and specifically demonstrated for plastic scintillating fibers by
Guillot et al7, Gain and Čerenkov Light Ratio (CLR) values are calculated from this baseline,
and these can be applied to subsequent measurements to compensate effectively for the
Čerenkov effect.
Furthermore, additional scintillator and reference ion chamber measurements can
be incorporated into the baseline to facilitate conversion of relative scintillator readings
to dose units.
2
Product Overview continued
Physical Description
Exradin W1 Scintillator
Exradin Scintillator Calibration Slab
Alignment Cap
The Exradin W1 Scintillator is comprised of three main components:
1. Plastic scintillating fiber
2. Optical fiber
3. Shielded enclosure housing a photodiode with two discrete triaxial connectors
The sensitive portion of the detector is a 1 mm diameter x 3 mm length of polystyrene-based
scintillating fiber that has been carefully optimized for ideal scintillation, optical, radiationresistance, and dosimetric characteristics. The photodiode is mounted within a shielded
enclosure designed to minimize noise created from ambient radiation present during typical
use. Two triaxial connectors provide the current output from the blue and green spectral
measurement regions of the photodiode.
While other electrometers can be used, the Exradin W1 Scintillator is specifically designed and
optimized for use with the SuperMAX Electrometer (ref 90018) available from Standard Imaging.
The SuperMAX Electrometer features software to assist in management of baseline values as
well as real-time corrections for display of relative measurements or dose readings from the
Exradin W1 Scintillator. As the SuperMAX is a synchronized two channel instrument, timing
issues that can result from the use of multiple discrete electrometers are effectively eliminated.
3
Product Overview continued
The Exradin Scintillator Calibration Slab is provided in acrylic or Virtual Water™ material,
depending on the configuration purchased. The Calibration Slab ensures repeatable
baseline positioning of the Exradin W1 Scintillator, and enables the most accurate
subtraction of Čerenkov light from Scintillator light in typical use situations. Purchase of either
the acrylic or Virtual Water version of the Scintillator Calibration Slab is therefore required
when purchasing the Exradin W1 Scintillator.
Finally, an alignment cap is included to assist users in accurately locating the center of the
scintillating fiber when positioning the Exradin W1 Scintillator in air or in a water phantom.
Note that this cap is designed solely for alignment and not intended for use as build-up for
any specific energy.
Virtual Water is a trademark of Med Cal.
Use with SuperMAX Electrometer
Version 2.0 and later of Standard Imaging SuperMAX Electrometer software greatly
enhances use of the Exradin W1 Scintillator. The 2 channel SuperMAX incorporates a
baseline creation and database tool as well as a dedicated measurement mode to display
real-time, merged and corrected readings from the Exradin W1 Scintillator. For specific
operating instructions on using these modes, see the SuperMAX user manual. For more
information about upgrading a pre-version 2.0 SuperMAX to the latest version, contact
Standard Imaging.
4
General Operation
Connecting the Exradin W1 Scintillator to an Electrometer
The Exradin W1 Scintillator connects to an electrometer in a similar fashion to other radiation
quality assurance detectors such as an ion chamber or diode. Included with the Exradin
W1 Scintillator are triaxial adapters which convert the connector gender for use with most
standard triaxial extension cables. Before connecting the Exradin W1 Scintillator to an
electrometer, ensure there is no bias voltage being applied to the electrometer’s triaxial
connector as this can damage the electrometer. Furthermore, ensure no bias is applied at
any time during the measurement as the Exradin W1 Scintillator is designed for use with no
bias voltage applied to the detector.
Both connectors on the Exradin W1 Scintillator photodiode enclosure must be used. If using
a SuperMAX Electrometer, connect each channel of the scintillator to the corresponding
channel on the SuperMAX. If using another electrometer or electrometers, it is imperative to
note which scintillator channel is used with which electrometer connector for later reference.
Always perform a system zero before continuing to remove any offsets that may be present.
Triaxial Adapter Cables
Standard Triaxial Cables
SuperMAX Electrometer
5
General Operation continued
Positioning the Photodiode Enclosure
The Exradin W1 Scintillator photodiode enclosure can be a source of relative measurement
noise. For best results, always maximize the distance between the enclosure and the
field of measurement. It is recommended to evaluate the noise contribution with any new
measurement setup to ensure a satisfactory signal to noise ratio. An ideal method for
determining noise is to place the enclosure in the desired location, place the scintillator well
outside of the measurement field, deliver the intended field, and acquire an electrometer
reading. Next, place the scintillator in the desired measurement location, perform a similar
reading and compare the two results to determine the contribution of noise. Once the noise
level has been determined, ensure it is acceptable for the desired signal to noise ratio.
Position of the enclosure from measurement to measurement is also important. It is
recommended to try to replicate the position of the enclosure relative to the beam when
transitioning from baseline measurements to general measurements. Differences in position
can contribute to uncertainty in measurement results, particularly for low signal conditions.
Care and Handling of the Optical Fiber
The Exradin W1 Scintillator utilizes a plastic optical fiber to transfer the scintillating signal
to the photodiode. This optical fiber is robust; however it is sensitive to crushing, kinking, or
small bend radii. Avoid circumstances where these perils could occur as permanent damage
to the fiber will result.
The optical fiber makes use of the property of total internal reflection to transmit light along
its length, and the transmission efficiency is dependent on the bend radius of the fiber. The
plastic optical fiber used in the Exradin W1 Scintillator was carefully chosen to minimize this
effect, however it is important to avoid bend radii smaller than that on the Calibration Slab to
minimize measurement perturbation.
6
General Operation continued
Using the Exradin Scintillator Calibration Slab
For performing baseline measurements or for regular use in water equivalent phantoms, the
Exradin Scintillator Calibration Slab is designed to position the Exradin W1 Scintillator reliably
in one of two repeatable configurations, for which the only difference is the magnitude of
Čerenkov emissions. The two configurations are as follows:
Max Fiber: The maximum fiber configuration
is used for performing specific baseline
measurements.
Min Fiber: The minimum fiber configuration
is used for performing specific baseline
measurements as well as general
measurements in a phantom setup.
7
General Operation continued
Setting Up the Calibration Slab
1. Place the Exradin W1 Scintillator into the base slab using the desired configuration: min
or max fiber.
2. Use the crosshairs and 10 cm alignment lines on the base slab to position it in the field.
10 cm
10 cm
8
General Operation continued
3. Place the cover slab on top. When assembled the, the Exradin W1 Scintillator is
centered with the total thickness of 2 cm..
Assembled
MinMax
When acquiring measurements for baseline Čerenkov correction(s), no additional buildup above or below the calibration slab is required, however additional water equivalent
material may be used depending on the desired setup and energy. For good response, it
is recommended to be at or beyond dmax. When acquiring dose baselines, the setup should
match that used for ion chamber measurement(s).
Establishing Baselines
Before general measurement use, initial measurements must be performed to calculate
baseline Čerenkov Light Ratio (CLR) and Gain values which are applied to subsequent
readings. There are two types of baselines: relative and dose. The CLR is the same for either
a relative or dose baseline, but the Gain value is different for each. Measurements required
for each baseline are performed using the Exradin Scintillator Calibration Slab and the two
Exradin W1 Scintillator configurations described in the preceding section. Once baseline
values have been calculated using the calibration slab, the Exradin W1 Scintillator may be
used for general measurements in air or in plastic or water phantoms.
The validity of baselines over a period of time or exposure to dose can vary depending
on usage. Čerenkov correction calibrations should be completed on a regular basis and
evaluated to ensure validity for the intended use and to compensate for radiation degradation
of the scintillating material, optical fiber, and photodiode that occurs with accumulated dose.
In general, an updated baseline should be established after approximately every 1 kGy of
dose delivery. With frequent Čerenkov correction calibrations, the effects on the accuracy of
the device can be managed, however the signal-to-noise ratio will decrease with long term
or extremely high dose exposure. Please contact Standard Imaging for replacement of the
sensor assembly if needed.
9
General Operation continued
The following instructions describe the recommended configurations and procedures for the
two baseline types, relative and dose.
Performing Baseline Measurements
Refer to the following table for the measurements to be performed for relative and dose
baseline types. Both types require measurements to be acquired at 40x40 cm² field size,
while the dose type requires additional 10x10 cm² field size measurements. A 10x10 cm²
measurement should also be acquired with a calibrated ion chamber placed in a phantom
configuration matching that of the assembled calibration slab and any other build-up and
backscatter material used for the dose baseline type.
Calibration
Slab
Configuration
Field Size
Detector
Position
Relative
and Dose
Max Fiber
40x40 cm²
Isocenter
Exradin W1
Scintillator
At least 1
(3 or more
recommended)
Relative
and Dose
Min Fiber
40x40 cm²
Isocenter
Exradin W1
Scintillator
At least 1
(3 or more
recommended)
Dose only
Min Fiber
10x10 cm²
Isocenter
Exradin W1
Scintillator
At least 1
(3 or more
recommended)
Dose only
n/a
10x10 cm²
Isocenter
Absolute
calibrated ion
chamber
At least 1
(3 or more
recommended)
Baseline
Type
10
Detector
# of
Measurements
General Operation continued
1. Insert the Exradin W1 Scintillator into the calibration slab using the desired configuration
and place the assembled slab at isocenter with the desired field size, either 10x10 cm²
or 40x40 cm². When the electrometer and cables are set up, follow the electrometer
manufacturer’s recommended settling time, warm-up and zeroing procedures. Do not
apply bias to the Exradin W1 Scintillator.
2. Perform a simultaneous acquisition on each Exradin W1 Scintillator channel. The
amount of delivery should be enough to account for the desired measurement certainty:
at least 100 MU is recommended. Additional acquisitions can be performed and
averaged to increase certainty. NOTE: When using the SuperMAX Electrometer, the
Scintillator Baseline Library mode can be used to automate the process of recording and
organizing these values. See the SuperMAX Electrometer user manual for additional
information. If not using the SuperMAX Electrometer, record all measurement values for
performing the baseline calculations outlined in the “Calculating Baseline CLR and Gain
Values” section of this manual.
3. Repeat steps 1 and 2 until the desired measurements are acquired for all field size
and calibration slab configurations. Use the same delivery and acquisition parameters
for all measurements to be used in the baseline calculation. Additional build-up and
backscatter material can be added for the 10x10 cm² field, Min Fiber configuration.
4. Dose type only - Setup a calibrated ion chamber in a phantom configuration matching
that of the assembled calibration slab and any other build-up and backscatter
material used. When the electrometer and cables are set up, follow the electrometer
manufacturer’s recommended settling time, warm-up and zeroing procedures.
5. Dose type only - Deliver an MU quantity matching that used for the scintillator
measurements. Additional acquisitions can be performed and averaged to increase the
measurement certainty.
6. Dose type only - Using the desired protocol and measurement standard, convert the
measurement from step 5 to dose. NOTE: When using the SuperMAX Electrometer, the
calculated dose value can be entered in the Scintillator Baseline Library mode using the
following units: MU, Gy, cGy, R and mR. See the SuperMAX Electrometer user manual
for additional information.
11
General Operation continued
Calculating Baseline CLR and Gain Values
If using the SuperMAX Electrometer, these values are calculated automatically using the
Scintillator Baseline Library interface. For specific operating instructions describing use of this
mode, see the SuperMAX user manual.
Algorithms Used by SuperMAX Electrometer
Once measurements have been acquired using the preceding procedures, calculate the
Čerenkov Light Ratio (CLR) and Gain values using the following formulas:
••
CLR = (SC1MAX40 – SC1MIN40) / (SC2MAX40 – SC2MIN40)
••
Gain (relative) = 1 / (SC1MIN40 – SC2MIN40 * CLR)
••
Gain (dose) = Dose10 / (SC1MIN10 – SC2MIN10 * CLR)
Variable Definition:
••
CLR: Čerenkov Light Ratio
••
Gain (relative): Gain value used for performing relative measurements
••
Gain (dose): Gain value used for performing dose measurements
••
SC1MAX40: Scintillator Channel 1 measurement, max fiber configuration, 40x40 cm² field size
••
SC2MAX40: Scintillator Channel 2 measurement, max fiber configuration, 40x40 cm² field size
••
SC1MIN40: Scintillator Channel 1 measurement, min fiber configuration, 40x40 cm² field size
••
SC2MIN40: Scintillator Channel 2 measurement, min fiber configuration, 40x40 cm² field size
••
SC1MIN10: Scintillator Channel 1 measurement, min fiber configuration, 10x10 cm² field size
••
SC2MIN10: Scintillator Channel 2 measurement, min fiber configuration, 10x10 cm² field size
••
Dose10: Dose measurement, 10x10 cm² field size
12
General Operation continued
Applying Baseline Values to General Measurements
If using the SuperMAX Electrometer, baseline values are applied automatically using the
Scintillator Measurement interface. For specific operating instructions describing use of this
mode, see the SuperMAX user manual.
Algorithm Used by SuperMAX Electrometer
Once baseline values have been established, resultant gain and CLR values can be applied
to general measurements using the following formula:
Measurement = Gain * (SC1 – SC2 * CLR)
Variable Definition:
••
Gain: Relative or dose baseline gain value
••
CLR: Čerenkov Light Ratio
••
SC1: Reading from Scintillator Channel 1
••
SC2: Reading from Scintillator Channel 2
13
Bibliography
References
Lacroix F, Archambault L, Gingras L, Beddar AS, and Beaulieu L. Clinical prototype of
a plastic water equivalent scintillating fiber dosimeter matrix for IMRT QA applications,
Med. Phys. 35: 3682-3690, 2008.
Archambault L, Beddar S, Gingras L, Lacroix F, Roy R, Beaulieu L, “Water-equivalent
dosimeter array for small-field external beam radiotherapy”, Med Phys 34: 1583–1592,
2007.
Archambault L, Arsenault J, Gingras L, Beddar A S, Roy R, Beaulieu L, “Plastic
scintillation dosimetry: Optimal selection of scintillating fibers and scintillators“, Med.
Phys. 32: 2271-2278, 2005.
Beddar S, Kinsella T J, Ikhlef A, Sibata C H, “Miniature ‘Scintillator-Fiberoptic-PMT’
detector system for the dosimetry of small fields in stereotactic radiosurgery”, IEEE
Trans. Nucl. Sci. 48: 924-928, 2001.
A. S. Beddar, T.R. Mackie, and F.H. Attix, “Cerenkov light generated in optical fibres and
other light pipes irradiated by electron beams,” Phys. Med. Biol. 37: 925–935, 1992.
de Boer S F, Beddar A S Rawlinson J F, “Optical filtering and spectral measurement
of radiation induced light in plastic scintillator dosimetry“, Phys Med Biol 38: 945-958,
1993.
M. Guillot, L. Gingras, L. Archambault, S. Beddar, and L. Beaulieu, “Spectral method for
the correction of the Cerenkov light effect in plastic scintillation detectors”, Med. Phys.
38: 2140-2150, 2011.
J.M. Fontbonne, G. Iltis, G. Ban, A. Battala, J. C. Vernhes, J. Tillier, N. Bellaize, C. Le
Brun, B. Tamain, K. Mercier, and J. C. Motin, “Scintillating fiber dosimeter for radiation
therapy accelerator,” IEEE Trans. Nucl. Sci. 49: 2223–2227, 2002.
A.M. Frelin, J.M. Fontbonne, G. Ban, J. Colin, M. Labalme, A. Batalla, A. Isambert,
A. Vela, and T. Leroux, “Spectral discrimination of Cerenkov radiation in scintillating
dosimeters,” Med. Phys. 32: 3000–3006, 2005.
1
2
3
4
5
6
7
8
9
14
Bibliography continued
Additional Information
Gagnon JC, Theriault D, Guillot M, Archambault L, Beddar S, Gingras L, Beaulieu
L. Dosimetric performance and array assessment of plastic scintillation detectors for
stereotactic radiosurgery quality assurance. Med Phys 39(1):429-436, 1/2012
Beddar AS, Mackie TR, Attix FH. Water-equivalent plastic scintillation detectors for highenergy beam dosimetry: I. Physical characteristics and theoretical consideration. Phys
Med Biol 37(10):1883-900, 1992.
Beddar AS, Mackie TR, Attix FH. Water-equivalent plastic scintillation detectors for highenergy beam dosimetry: II. Properties and measurements. Phys Med Biol 37(10):190113, 1992.
Archambault L, Arsenault J, Gingras L, Beddar AS, Roy R, and Beaulieu L. Plastic
scintillation dosimetry: optimal selection of scintillating fibers and scintillators. Med Phys
32:2271-2278,2005.
Lacroix F, Beaulieu L, Archambault L, Beddar AS. Simulation of the precision limits of
plastic scintillation detectors using optimal component selection. Med Phys 37(2):412418, 2/2010.
Lacroix F, Guillot M, McEwen M, Cojocaru C, Gingras L, Beddar AS, Beaulieu L.
Extraction of depth-dependent perturbation factors for parallel-plate chambers in elecron
beams using plastic scintillation detector. Med Phys 37(8):4331-4342, 8/2010.
15
Maintenance
Exterior cleaning of the Exradin W1 Scintillator and accessories can be performed with a
soft brush or cloth. Gently brush all surfaces to remove dirt and dust. Be especially careful
that this is an external cleaning only and do not permit any liquid to seep into the Exradin
W1 Scintillator photodiode enclosure in any manner during cleaning. To clean the triaxial
connectors, refer to the procedure in the following section.
There are no user serviceable parts on the Exradin W1 Scintillator. Under no circumstance
should the user attempt to repair or disassemble the scintillator, photodiode enclosure, and/or
connectors, as the warranty will become void.
Radiation degradation of the scintillating material, optical fiber, and photodiode will occur
with accumulated dose. With timely Čerenkov correction calibrations, the effects on the
accuracy of the device can be managed, however the signal-to-noise ratio will decrease with
accumulated dose. The Exradin W1 Scintillator was designed for replacement of the sensor
assembly. Please contact Standard Imaging for more information.
If assistance is desired in the proper disposal or recycling of this product (including
accessories and components), after its useful life, please return to Standard Imaging.
16
Maintenance continued
Triaxial Connector Cleaning Procedure
This procedure should be periodically completed or whenever there are concerns of drift or
leakage. Heavier product use may require more frequent cleanings.
Prior to cleaning a triaxial connector, ensure:
••
The scintillator is disconnected from the electrometer.
••
There is no water or moisture visible in the triaxial connector.
To clean a dirty triaxial connector:
••
Remove the connector cap (if applicable).
••
Use only a dry and oil free compressed air source, such as Chemtronics® Ultra Jet.
••
Gently blow dirt and contaminants from the inside of the connector, moving the air
source in a circular manner a few inches from the connector.
After cleaning a dirty triaxial connector:
••
Use the connector cap when not in use (if applicable).
Do not:
••
Use sharp objects to attempt to clean a dirty triaxial connector.
••
Use a compressed gas other than air.
••
Use a compressed gas source that may have moisture or oil in the source or lines.
••
Use your mouth to blow on the connector.
••
Disassemble the connector.
••
Touch the internal parts of the connector with your finger.
If this procedure does not resolve the drift or leakage issues, contact the Standard Imaging
for further assistance.
17
Parts and Accessories
REFDescription
92739
Exradin W1 Scintillator
31456
Exradin W1 Scintillator Alignment Cap
75011
Exradin Scintillator Calibration Slab (acrylic)
75012
Exradin Scintillator Calibration Slab (Virtual Water)
R320-Cd
Virtual Water Phantom, 30x30x2 cm with drilled cavity for ion chamber
70096-C34 Lucy 3D QA Phantom Exradin W1 Scintillator Dosimetry Insert
70006-AA
BNC 2-lug Triaxial Adapter Cable
70006-AC
TNC 2-lug Triaxial Adapter Cable
80643
Exradin W1 Scintillator User Manual
90018
SuperMAX Electrometer
Features and Specifications
Exradin W1 Scintillator
Dimensions:
Scintillating fiber:
1.0 mm diameter x 3.0 mm long
Scintillator housing:
2.8 mm diameter x 42 mm long
Optical fiber:
Photodiode enclosure (LxWxH):
Weight:
1.0 mm diameter core x 2.2 mm diameter
jacket x 3 m long
80 x 46 x 30 mm
0.34 kg (0.75 lbs)
Materials:
Scintillating fiber:
Polystyrene with fluorescent dopants
Optical fiber:
Scintillator enclosure:
Optical fiber minimum bend radius:
Scintillating fiber physical density:
1.05 g/cm³
Nominal response:
60 pC / Gy
Radiation degradation:
~ 2% / kGy
18
Acrylic (PMMA) with Polyethylene jacket
Epoxy potted within an ABS plastic tip and
polyimide stem
6 cm
Features and Specifications continued
Exradin Scintillator Calibration Slab
Dimensions:
Lid (LxWxH):
Base (LxWxH):
Assembled (LxWxH):
Crosshair alignment lines:
Weight (assembled):
Materials:
300 x 300 x 8.5 mm
300 x 300 x 11.5 mm
300 x 300 x 20 mm
10 x 10 cm
2.15 kg (4.75 lbs)
Acrylic or Virtual Water
General
Operating parameters:
Pressure:
Temperature:
Relative humidity:
Storage parameters:
Pressure:
Temperature:
Relative humidity:
Patent:
Product standards:
650 to 770 mm Hg
15 to 30 °C
20 to 80%
600 to 800 mm Hg
-15 to 50 °C
10 to 95%, non-condensing
US Patent Number 8183534
IEC 60601-11,
1
-
Authorized representative for the EU is
AMA, Ltd., St. Felix House, Flitcham,
King’s Lynn, Norfolk, United Kingdom,
PE31 6BU.
-
Competent Authority for the EU is the
Medical Products Agency, Sweden.
-
Notified Body for the EU is Semko,
Sweden.
Designed to meet
19
Notes
20
Service Policy
Customer Responsibility
If service, including recalibration, is required,
please contact Standard Imaging’s Customer
Service department by phone or email prior
to shipping the product. Standard Imaging’s
Customer Service and Technical Service staff
will attempt to address the product issue via
phone or email. If unable to address the issue, a
return material authorization (RMA) number will
be issued. With the RMA number, the product
can be returned to Standard Imaging. It is the
responsibility of the customer to properly package,
insure and ship the product, with the RMA number
clearly identified on the outside of the package.
The customer must immediately file a claim
with their carrier for any shipping damage or
lost shipments. Return shipping and insurance
is to be pre-paid or billed to the customer, and
the customer may request a specific shipper.
Items found to be out of warranty are subject to
a minimum service fee of 1 hour labor (excluding
recalibrations) for diagnostic efforts and require a
purchase order (PO) before service is performed.
With concurrence from customer, the product may
be replaced if it is unserviceable or if the required
service is cost prohibitive. Products incurring
service charges may be held for payment.
Standard Imaging does not provide loaner
products. See the Standard Imaging Warranty and
Customer Responsibility for additional information.
This product and its components will perform
properly and reliably only when operated and
maintained in accordance with the instructions
contained in this manual and accompanying
labels. A defective device should not be used.
Parts which may be broken or missing or are
clearly worn, distorted or contaminated should be
replaced immediately with genuine replacement
parts manufactured by or made available from
Standard Imaging Inc.
Serialization Information
Standard Imaging products that are serialized
contain coded logic in the serial number
which indicates the product, day and year of
manufacture, and a sequential unit number for
identification:
A YY DDD X
A
YY
Unique product ID
Last two digits of the year
(e.g. 1999 = 99, 2000 = 00)
DDD Day of the year (1< DDD < 365)
X
Unique unit ID Number (1 < X < 9)
CAUTION: Federal law in the U.S.A. and
Canadian law restrict the sale, distribution,
or use of this product to, by, or on the
order of a licensed medical practitioner.
The use of this product should be
restricted to the supervision of a qualified
medical physicist. Measurement of high
activity radioactive sources is potentially
hazardous and should be performed by
qualified personnel.
CAUTION: As desired by IAEA, English
is the default language for labeling
and manuals. If translated versions are
available, resolve any differences in favor
of the English versions.
WARNING: Proper use of this device
depends on careful reading of all
instructions and labels.
WARNING: Where applicable, Standard
Imaging products are designed to be used
with the versions of common radiation
delivery devices, treatment planning
systems and other products or systems
used in the delivery of ionizing radiation,
available at the time the Standard Imaging
product is released. Standard Imaging
does not assume responsibility, liability
and/or warrant against, problems with
the use, reliability, safety or effectiveness
that arise due to the evolution, updates
or changes to these products or systems
in the future. It is the responsibility of
the customer or user to determine if the
Standard Imaging product can be properly
used with these products or systems.
Should repair or replacement of this product
become necessary after the warranty period,
the customer should seek advice from Standard
Imaging Inc. prior to such repair or replacement.
If this product is in need of repair, it should not
be used until all repairs have been made and
the product is functioning properly and ready for
use. After repair, the product may need to be
calibrated. The owner of this product has sole
responsibility for any malfunction resulting from
abuse, improper use or maintenance, or repair by
anyone other than Standard Imaging Inc.
The information in this manual is subject to
change without notice. No part of this manual may
be copied or reproduced in any form or by any
means without prior written consent of Standard
Imaging Inc.
21
Warranty
Standard Imaging, Inc. sells this product under the warranty herein set forth. The warranty is extended
only to the buyer purchasing the product directly from Standard Imaging, Inc. or as a new product from an
authorized dealer or distributor of Standard Imaging, Inc.
For a period provided in the table below from the date of original delivery to the purchaser or a distributor,
this Standard Imaging, Inc. product, provided in the table is warranted against functional defects in design,
materials and workmanship, provided it is properly operated under conditions of normal use, and that
repairs and replacements are made in accordance herewith. The foregoing warranty shall not apply to
normal wear and tear, or if the product has been altered, disassembled or repaired other than by Standard
Imaging, Inc. or if the product has been subject to abuse, misuse, negligence or accident.
Product
Warranty Period
ADCL Product Calibration
(Standard Imaging uses the UW-ADCL for
recalibrations required under warranty, unless
otherwise requested)
0 - 90 days = 100% of ADCL Calibration Costs
91 - 182 days = 75% of ADCL Calibration Costs
183 – 365 days = 50% of ADCL Calibration Costs
366 – 639 days = 25% of ADCL Calibration Costs
(days from date of shipment to customer)
Standard Imaging Ionization Chambers
Standard Imaging Well Chambers
Standard Imaging Electrometers
Standard Imaging BeamChecker Products
Standard Imaging Software Products
All Other Standard Imaging Products
Standard Imaging Custom Products
Standard Imaging Remanufactured Products
Standard Imaging Custom Select Products
Consumables
Serviced Product
Resale Products
2 years
2 years
5 years
2 years
1 year
1 year
1 year
180 days
90 days
90 days
90 days
As defined by the Original Equipment Manufacturer
Standard Imaging’s sole and exclusive obligation and the purchaser’s sole and exclusive remedy under the
above warranties are, at Standard Imaging’s option, limited to repairing, replacing free of charge or revising
labeling and manual content on, a product: (1) which contains a defect covered by the above warranties;
(2) which are reported to Standard Imaging, Inc. not later than seven (7) days after the expiration date
of the warranty period in the table; (3) which are returned to Standard Imaging, Inc. promptly after
discovery of the defect; and (4) which are found to be defective upon examination by Standard Imaging
Inc. Transportation related charges, (including, but not limited to shipping, customs, tariffs, taxes, and
brokerage fees) to Standard Imaging are the buyer’s responsibility. This warranty extends to every part of
the product excluding consumables (fuses, batteries, or glass breakage) or material reactions. Standard
Imaging, Inc. shall not be otherwise liable for any damages, including but not limited to, incidental
damages, consequential damages, or special damages. Repaired or replaced products are warranted for
the balance of the original warranty period, or at least 90 days.
This warranty is in lieu of all other warranties, express or implied, whether statutory or otherwise, including
any implied warranty of fitness for a particular purpose. In no event shall Standard Imaging, Inc. be liable
for any incidental or consequential damages resulting from the use, misuse or abuse of the product or
caused by any defect, failure, malfunction or material reactions of the product, whether a claim of such
damages is based upon the warranty, contract, negligence, or otherwise.
This warranty represents the current standard warranty of Standard Imaging, Inc. Please refer to the
labeling or instruction manual of your Standard Imaging, Inc. product or the Standard Imaging, Inc. web
page for any warranty conditions unique to the product.
22