1
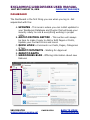
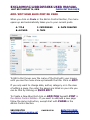
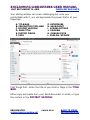
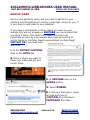
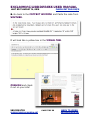
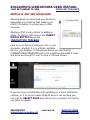
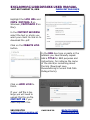
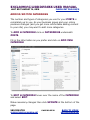
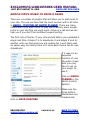
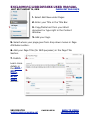
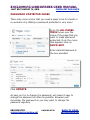
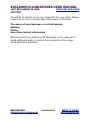
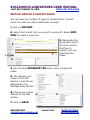
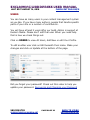
Exclaiming WordPress User Manual
Last Edit August 14, 2012
Check out our FAQ’s
Thank you for choosing Exclaim Media for your online marketing
needs!
We like Wordpress because we think you will like how super easy
it is to use...once you get the hang of it...Don’t worry we are here
to help when you get stuck!
You are on your way to online success and we are glad to help
you along the way. Step one will include logging into your site.
You can do
this using
the
information
from your
Welcome
Email. We
try to keep
copies of
Welcome
Emails but
we suggest
you do
too...
To log into
your site,
the
address
will always
be:
http://YourDomain.com/wp-admin
Your Username and Password are included in the Welcome Email;
We can always adjust them for you. Just give us a call.
360.353.3745
[email protected]
page 1 of 32
Back to Index
exclaimmedia.net
Exclaiming WordPress User Manual
Last Edit August 14, 2012
Check out our FAQ’s
If you are using this as a pdf...just click on the topic and watch it jump
straight to the right spot...Isn’t that EXCLAIMATIOUS?
Logging in..................................................................page 1
Dashboard.................................................................page 3
Posts - Otherwise known as your blog............................page 4
Add/Edit Your Blog Post............................................page 5
Your Formatting Tool Bar...........................................page 9
Adding Images.........................................................page 10
Insert a Link............................................................page 15
Adding Video............................................................page 16
Adding A PDF for Download......................................page 18
Adding/Editing Categories.......................................page 20
Adding MP3’s (Music) To Posts or Pages..................page 21
Adding Anchors........................................................page 30
Pages/Where to Put Your Pages..............................page 24
Add/Edit Pages..........................................................page 5
Your Formatting Tool Bar...........................................page 9
Adding Images.........................................................page 10
Insert a Link............................................................page 15
Adding Video............................................................page 16
Adding A PDF for Download......................................page 18
Password Protected Pages.......................................page 26
Adding MP3’s (Music) To Posts or Pages..................page 21
Contact....................................................................page 26
Editing/Add New Contact Form................................page 27
Update Passwords, Profiles & Email & Add New User......page 28
Theme Options.........................................................page 29
Plugins We Like........................................................page 32
We hope you are having a great editing experience! If you haven’t fill
it out yet, we would like to invite you to take our Customer Service
Survey. Thank you!!!
360.353.3745
[email protected]
page 2 of 32
Back to Index
exclaimmedia.net
Exclaiming WordPress User Manual
Last Edit August 14, 2012
Check out our FAQ’s
Dashboard
The Dashboard is the first thing you see when you log in. Get
acquainted with the:
A. Updates - This area is where you can install updates to
your Wordpress Database and Plugins that will keep your
security ready to rock & everything working in proper
order.
B. Admin Control Section - This section will always
be here to make it easy to Add or Edit Pages or Posts,
Update your Contact Forms and more!
C. Quick Links to Comments on Posts, Pages, Categories
& Tags
D. Recent Comments - Waiting for Approval
E. Recent Drafts
F. Wordpress Blog - Offering information about new
features
A
B
C
D
E
F
360.353.3745
[email protected]
page 3 of 32
Back to Index
exclaimmedia.net
Exclaiming WordPress User Manual
Last Edit August 14, 2012
Posting an Article in your Blog
...or Creating a Page
Check out our FAQ’s
Blogs are a really great way to keep your website updated since
the information on your pages doesn’t change often. There is
very little difference in how you Add a Page or a Post, except you
have to decide visually Where To Put Your Page...so we
are going to use this section to describe both.
It is possible to construct a site and never look at it again but to
have a viable online presence that commands the attention of
clients and search engines you must continue to build on your
foundation. We recommend that you utilize your blog for that
very purpose; adding articles at least one time per month or
more.
Need suggestions? Contact Us to talk about different
categories and how we can showcase them.
>>>Check out this video for a quick tutorial
360.353.3745
[email protected]
page 4 of 32
Back to Index
exclaimmedia.net
Exclaiming WordPress User Manual
Last Edit August 14, 2012
Check out our FAQ’s
Add/Edit Your Blog Post or page
When you click on Posts in the Admin Control Section, the menu
opens up and automatically takes you to your current posts.
A. Title
B. Author
A
C. Categories
D. Tags
B
C
E. Date Created
D
E
To Edit a Post hover over the name of the Post with your mouse
until you see the menu show up beneath the title. Click on Edit.
If you only want to change date, author, category or in the case
of editing a page, the order the pages are listed on your site you
can do that by clicking on Quick Edit.
To Create a New Blog Post click on Add New beneath Post in
the Admin Control Section. If you want to edit/add a new page
follow the same instruction, except start with Pages in the
Admin Control Section.
360.353.3745
[email protected]
page 5 of 32
Back to Index
exclaimmedia.net
Exclaiming WordPress User Manual
Last Edit August 14, 2012
Check out our FAQ’s
Your editing window can seem challenging but once your
comfortable with it, you will appreciate the power that is at your
fingertips!
A. Title Bar
B. Formatting Tool Bar
C. Content Window
D. Page Title
E. Custom Fields
F. Tags
G. Categories
H. Save Draft
I. Screen Options
J. Preview
K. Publish Date
L. PublisH/Update
I
A
H
J
B
K
L
C
G
D
E
F
First things first - Enter the title of your Post or Page in the Title
Bar.
Either copy and paste from your Word document or email, or type
the content in the Content Window.
360.353.3745
[email protected]
page 6 of 32
Back to Index
exclaimmedia.net
Exclaiming WordPress User Manual
Last Edit August 14, 2012
Check out our FAQ’s
To add a custom title for Search Engine Optimization enter
desired text in the Page Title area. As in this picture, if
HeadSpace or the Wordpress SEO box (depending on
which plugin worked with your theme) is closed, click on it to
have the menu drop down to allow you to fill in the Page Title.
Your website has been programmed to have default page titles so
if you don’t do this, you are ok, but if you want to be specific and
an SEO pro this is important.
Beneath Tags you will see a few links...click on Yahoo
Suggest to have suggested tags chosen from the text
administered by your plugin. Then click on Add All. You may
also type in specific tags in the box above those links; separate
with a comma.
If you are adding a Post make sure to choose a Category
unless you don’t want this post to automatically be assigned to
your default category. If you have questions about this Contact
Us.
Did you run out time, or would you like a second set of eyes look
at your work before you publish your Blog Post or Page? Click on
Save Draft. When you come back you will find it ready for
review with all your other Posts or Pages.
Would you like more options on your screen; like Author (in the
case there is more than one author in your site)? Click on
Screen Options to see what is available.
Want to see what your Post or Page will look like when it is live?
Click Preview.
Would you like your Post or Page to go live at 6:24 pm tomorrow?
Set your date and time and then click on Schedule and it will
happen.
360.353.3745
[email protected]
page 7 of 32
Back to Index
exclaimmedia.net
Exclaiming WordPress User Manual
Last Edit August 14, 2012
Check out our FAQ’s
When you are finished click Publish. If you have already
published and are editing that same button will say Update.
You must update for changes to show on the site. If you are not
ready for changes to show, click on Save Draft and come
back later to Update.
>>Check out this video to help with saving and continuing
with drafts.
360.353.3745
[email protected]
page 8 of 32
Back to Index
exclaimmedia.net
Exclaiming WordPress User Manual
Last Edit August 14, 2012
Check out our FAQ’s
Your Formatting Tool Bar
You probably recognize this tool. It is similar to what you find in
your Word Processing Program, Email and more!
1. Upload/Insert Media
2. Bold
3. Italics
4. Strike Through
5. Bullets
6. Numbered List
7. Quote
8. Justification
9. Create Link
10. Remove Link
11. Text Cut-Off (Read More)
12. Spell Check
13. Full Screen
1.
2. 3.
15.
4. 5.
6. 7.
16. 17. 18.
8.
14. Kitchen Sink
15. Format (H Tags & More)
16. Underline
17. Justify
18. Text Color
19. Paste from Plain Text
20. Paste from Word
21. Remove Formatting
22. Special Character
23. Add/Decrease Indent
24. Undo/Redo
25. Help
9. 10. 11. 12.
19. 20. 21 22. 23.
13. 14.
24.
25.
The beautiful thing about Wordpress besides it’s ease of use is the
fact that if you are attached to the idea of working in HTML you
can by clicking on the HTML tab...or like most of the rest of us,
remain in Visual mode. It is your choice.
Have questions? Contact Us!
360.353.3745
[email protected]
page 9 of 32
Back to Index
exclaimmedia.net
Exclaiming WordPress User Manual
Last Edit August 14, 2012
Check out our FAQ’s
Inserting Images
Although Search Engine’s can’t see photos,
your clients can and we are visual people! Let
the Images be uploaded!
To add an image click on the Insert
Media Button above the Formatting
Toolbar.
Click on your file from wherever it is in your
computer, whether it is in a folder, portable
drive or you desktop. In the picture below you
see the file CrochetHawaiianFlowers.jpg on
the desktop and what it looks like while we brought it over to
drop in the box shown.
If you are more comfortable with uploading in a more traditional
method, or if for some reason Drag N’ Drop is not working you
can click on Select Files and search your computer for the file
you want to upload.
360.353.3745
[email protected]
page 10 of 32
Back to Index
exclaimmedia.net
Exclaiming WordPress User Manual
Last Edit August 14, 2012
Check out our FAQ’s
In the screen that pops up when the file is uploaded you can click
on Insert into Post and be done or you have a few options.
In the Alternate
Text line we
suggest you tell the
Search Engines what
your picture is, even
if the name of the
file is specific. You
can also add some
keywords. For
instance if I were
updating Knotty
Ware’s website with
this picture I might
say: Crochet
Hawaiian Flowers,
Knotty Wares Yarn &
Fiber Art Co-Op,
Longview,
Washington.
Alternate Text will show when someone hovers over the
picture on the published page or post and also tell the Search
Engines what you want them to know about it.
You can go even further and fill in a description which will show if
some searches similar text and finds your picture.
By default the Link URL is the address of where the picture can
be found on the server & if someone were to click on the picture
it will open in another window, but if you would like this to go to
another website. For instance we were updating Exclaim Media’s
site about Knotty Wares, we would link this picture to the page on
Knotty Ware’s site we wanted to send people to.
360.353.3745
[email protected]
page 11 of 32
Back to Index
exclaimmedia.net
Exclaiming WordPress User Manual
Last Edit August 14, 2012
Check out our FAQ’s
If you don’t want the picture to go anywhere or even open in a
new window, click on None beneath the Link URL and it will be
removed.
Alignment is how the text responds to your image. You may
choose whether this picture is in the Left, Center or Right of the
screen by choosing any of these options. If you don’t want any
text to wrap around the picture than choose None. Some
themes don’t allow any wrapping (luckily, not all). If your site is
like that it wont matter which selection you make.
We recommend that you resize your pictures to the size you want
them to be on your site. When you go to a site that it takes
forever for pictures to upload, it is because their webmaster
didn’t resize their pictures. Please resize your pictures for web
(72 dpi if you get to choose). If your photo program lets you
choose the pixel size, keep in mind that 100 pixels is about an
inch.
You can use several different programs to manage your photos. If
you plan to go shopping for a program, an easy program that is
offered for both Windows and Mac computers is Photoshop
Elements. It is an inexpensive program that is simple enough for
most people to have an easy time with it, but powerful enough to
do nearly anything you can think of with it.
If you are on the fly and just need to get the post or page up and
plan to come back later to resize or you don’t have the option to
resize your pictures yet you can choose a few options on the
Add Media Screen.
If you are using this picture as a Featured Image click on
Use as featured image, otherwise, Insert into Post is your
best option.
When you are back in the Content Window you are not
360.353.3745
[email protected]
page 12 of 32
Back to Index
exclaimmedia.net
Exclaiming WordPress User Manual
Last Edit August 14, 2012
Check out our FAQ’s
done. You still have a few more steps...and yes as much text you
see here makes it seem so much
more complicated than it actually
is...
Click on the image. You can
remove the picture from the page
by clicking on the red circle, or
control a bit more about the
layout of the picture by choosing
the picture of the mountain.
You can resize your pictures more by choosing a percentage; as
you see down the side of the screen.
To the right of Image
Properties you will see
3 boxes: Border, Vertical
Space and Horizontal Space.
If you don’t want a border
around your picture put a 0
in the box. The larger the
number you put in the box,
the larger the border.
Type 10 in the other two
boxes to keep the words
from bumping up against
the photo.
Especially if you are linking your photo to another webpage you
should click on the box beside Target: Open link in a new
window. This keeps people from leaving your website.
Click on Update to finish.
360.353.3745
[email protected]
page 13 of 32
Back to Index
exclaimmedia.net
Exclaiming WordPress User Manual
Last Edit August 14, 2012
Check out our FAQ’s
In many themes you want to upload a featured image to show up
on your categories page.
To add a
Featured
Image click on
Set featured
image.
Follow all the
instructions
above.
360.353.3745
[email protected]
page 14 of 32
Back to Index
exclaimmedia.net
Exclaiming WordPress User Manual
Last Edit August 14, 2012
Check out our FAQ’s
Insert a Link
Links are a wonderful thing that
helps Search Engines, but more
importantly they help your clients
get to the resources you would
like to make available to them.
To create a link in your post or
text, choose the text or image in
the Content Window that
want to link to another page.
Either by highlighting the text or
clicking on the picture and then
clicking on the Create Link button in the Formatting
Toolbar.
In the URL box type or paste in the address you have already
copied. Add a Title for SEO purposes; for instance the name of
the site &/or something
about the link (Exclaim
Media - Videography,
Marketing & Event
Promotion Cowlitz
County, Washington).
When sending someone
out of your site ALWAYS
click on Open link in
a new window/
tab. You never want to
send someone out of your site without making it easy for them to
come back. When they close out the page they went to they will
be looking right at your site at least one more time.
Click on Add Link to finish.
360.353.3745
[email protected]
page 15 of 32
Back to Index
exclaimmedia.net
Exclaiming WordPress User Manual
Last Edit August 14, 2012
Check out our FAQ’s
Adding Video
We are a bit partial to video, but you have to admit it is eyecatching and the best way to convey a message. Lucky for you, it
is very easy to add video to your website!
If you have a commercial or other videos you want on your
website that are not already on YouTube, we recommend that
you store it there. This saves your space but it also can
potentially be seen by more people who might be looking for
similar topics on YouTube. Need a personalized YouTube Page?
Contact Us if you need help
with that.
1.
1. In the Content Window,
click on the HTML tab.
2. Choose where you want to
place your video and put your
cursor there.
2.
3. At YouTube click on the
Share button.
3.
4. Select Embed.
4.
5.
360.353.3745
[email protected]
5. In the box that opens, select
all code and Copy it
(Control C on Windows;
Command C on Mac)
page 16 of 32
Back to Index
exclaimmedia.net
Exclaiming WordPress User Manual
Last Edit August 14, 2012
Check out our FAQ’s
6. Go back to the Content Window and Paste the code from
YouTube.
6.
It will look like a yellow box in the Visual Tab.
Publish and check
it out on your site!
360.353.3745
[email protected]
page 17 of 32
Back to Index
exclaimmedia.net
Exclaiming WordPress User Manual
Last Edit August 14, 2012
Check out our FAQ’s
Adding A .PDF for Download
Allowing people to download your brochure,
applications or anything that makes your
client’s life better is a great way to offer
resoures.
Adding a .PDF is very similar to adding a
photo. To add an .pdf click on the Insert
Media Button above the
Formatting Toolbar.
Click on your file from wherever it is in your
computer, whether it is in a folder, portable
drive or you desktop. In the picture below you see the file
CURRENTDLEOUTAGEITEMS.pdf on the desktop and what it looks
like while we brought it over to drop in the box shown.
If you are more comfortable with uploading in a more traditional
method, or if for some reason Drag N’ Drop is not working you
can click on Select Files and search your computer for the file
you want to upload.
360.353.3745
[email protected]
page 18 of 32
Back to Index
exclaimmedia.net
Exclaiming WordPress User Manual
Last Edit August 14, 2012
Check out our FAQ’s
Highlight the Link URL and
Copy (Control C on
Windows; Command C on
Mac).
In the Content Window
select the text or photo you
want your client to click on to
download the .pdf.
Click on the Create Link
button.
In the URL box type or paste in the
address you have already copied.
Add a Title for SEO purposes and
instructions; for instance the name
of the site &/or something about
the link (Download Love
Overwhelming’s Current DLE Cafe
Outage Items).
Click on Add Link to
finish.
If your .pdf file is too
large you will need to
upload this file via ftp.
Contact Us if you
need help with this.
360.353.3745
[email protected]
page 19 of 32
Back to Index
exclaimmedia.net
Exclaiming WordPress User Manual
Last Edit August 14, 2012
Check out our FAQ’s
Adding/Editing Categories
The number and types of categories you use for your Posts is
completely up to you. As your business grows and your online
presence changes (and you get more comfortable adding content
to your site) you may want to add more categories.
To Add a Category click on Categories underneath
Posts.
Fill in the information as you prefer and click on Add New
Category.
To Edit a Category hover over the name of the Category
and select Edit.
Make necessary changes then click Update at the bottom of the
page.
360.353.3745
[email protected]
page 20 of 32
Back to Index
exclaimmedia.net
Exclaiming WordPress User Manual
Last Edit August 14, 2012
Check out our FAQ’s
Adding MP3’s (Music) to posts & Pages
There are a number of plugins that will allow you to add music to
your site. The one we have had the most success with in all sites
is Haiku - minimalist audio player. There are many
others and if you want music to play automatically when people
come to your site this one wont work...Give us a call and we can
help you if you don’t feel confident experimenting.
The first rule of thumb: If your site worked before you uploaded a
plugin and then it doesn’t is to deactivate it and delete it and try
another until you find what you are looking for. I wish there was
an easier way, but really there isn’t since each theme has its own
stipulations.
If it was not an
expected
function of your
site when it was
built you may
have to set up
your plugin to
use it.
Click on Haiku
Player in the
Admin Control
Section.
Make sure the
three bottom
checkboxes are
checked and
click on Save Changes.
360.353.3745
[email protected]
page 21 of 32
Back to Index
exclaimmedia.net
Exclaiming WordPress User Manual
Last Edit August 14, 2012
Check out our FAQ’s
Most audio player plugins will require your sound file to be in MP3
format; not all files will begin as an MP3 so you will need to find a
file converter. Google for a free one; there are plenty to choose
from.
On a Windows computer we have had success with
FREESTUDIO Free Audio Converter.
On a Mac we have had success with Switch.
Both programs are relatively easy to download and use. It will be
simple to find instructions for both programs online.
Once your file is in MP3 format you can uploaded. You this just
like Uploading a Picture...up until the step where you
Insert Into Post. You can stop there.
360.353.3745
[email protected]
page 22 of 32
Back to Index
exclaimmedia.net
Exclaiming WordPress User Manual
Last Edit August 14, 2012
Check out our FAQ’s
Pages
The pages of your website help your client find the answers and
resources they are looking for. Page layout can be helpful or
hindering. We have built your site with that thought in mind and
would love to help you if you have questions about Where to
Put Your Pages.
The information on most pages will not change frequently once
they are built. Like your business/organization the needs of your
website may change. When it is time to add on to your site you
should start first by looking at your site and asking yourself
where your new page fits.
Pages that fit together in category will help your client manipulate
your site easily and make it a better resource...the reason you
built your site anyway...
360.353.3745
[email protected]
page 23 of 32
Back to Index
exclaimmedia.net
Exclaiming WordPress User Manual
Last Edit August 14, 2012
Check out our FAQ’s
1. Select Add New under Pages
2. Enter your Title in the Title Bar.
3. Copy/Paste text from your Word
document or type right in the Content
Window.
1.
4. Add your tags.
5. Select where your page goes from drop down menus in Page
Attributes section.
6. Add your Page Title (for SEO purposes) in the Page Title
Section.
7. Publish.
Learn more
details in
the Add/
Edit
Your
Blog
Post
section.
360.353.3745
2.
4.
3.
7.
5.
6.
[email protected]
page 24 of 32
Back to Index
exclaimmedia.net
Exclaiming WordPress User Manual
Last Edit August 14, 2012
Check out our FAQ’s
Password Protected Pages
There may come a time that you need a page to be for clients or
co-workers only. Making a password protected is very easy!
From the All Pages
Menu hover over the
name of the page that you
want to make password
protected. From the menu
that appears click on
Quick Edit.
Enter desired Password in
the box provided.
Click Update.
As easy as it is to change the password, will make it easy to
change the password as often as possible. Browsers will
remember the password so you may want to change the
password regularly.
360.353.3745
[email protected]
page 25 of 32
Back to Index
exclaimmedia.net
Exclaiming WordPress User Manual
Last Edit August 14, 2012
Check out our FAQ’s
Contact
The ability to contact you is very important for your client. Please
make sure to have a contact page that is easy to find with:
The name of your business or contact person
Address
Phone
Any other contact information
We recommend not putting email addresses on the web site to
avoid additional spam. A contact form directed to the proper
email address is advisable.
360.353.3745
[email protected]
page 26 of 32
Back to Index
exclaimmedia.net
Exclaiming WordPress User Manual
Last Edit August 14, 2012
Check out our FAQ’s
Editing/Adding a Contact Form
You can have any number of types of contact forms. Contact
forms can even be used to administer surveys!
1. Click on Contact.
2. Select the Contact Form you want to work with. Select Add
New to create a new form.
3. Manipulate the
words and code in
the Form section.
Feel free to
contact us if you
need help the
codes.
2.
7.
1.
3.
4. Use the drop Generate Tag down menu to help with
codes.
4.
5. The changes you
make in the Form
Section, must also be
addressed in the
Message Body Section.
6. Change your email
address in the Mail
section.
5.
6.
7. Click on Save.
360.353.3745
[email protected]
page 27 of 32
Back to Index
exclaimmedia.net
Exclaiming WordPress User Manual
Last Edit August 14, 2012
Check out our FAQ’s
Users
You can have as many users in your content management system
as you like. If you have many authors, people that handle specific
parts of your site or a number of contributors.
You will have at least 2 users after our build. Admin is support at
Exclaim Media. Please don’t edit that user. When you need help
that is how we check things out.
Click on Users to view All Users, Add New or edit Your Profile.
To edit another user click on Edit beneath their name. Make your
changes and click on Update at the bottom of the page.
Did you forget your password? Check out this video to help you
update your password. Recovering and Changing your Password
360.353.3745
[email protected]
page 28 of 32
Back to Index
exclaimmedia.net
Exclaiming WordPress User Manual
Last Edit August 14, 2012
Check out our FAQ’s
Theme Options
Some themes offer specific options. Each theme is different and
so we can’t really give you general instructions.
In your training we addressed if you have a control panel for your
theme. If you need to make changes and are having trouble
remembering how, contact us and we will be glad to help out.
360.353.3745
[email protected]
page 29 of 32
Back to Index
exclaimmedia.net
Exclaiming WordPress User Manual
Last Edit August 14, 2012
Check out our FAQ’s
Anchors
Anchors are a great way to make it easy to find links for more
information about a Keyword within the text of your site.
You can create anchors to link to a specific place on another page
in your site.
Another way to use anchors is to create a menu at the top of a
page that has a tremendous amount of information, allowing
users to click on the menu item and jump to the section of the
page that talks about that topic. This allows readers to only read
about what they are looking for, instead of having to search
through an abundant amount of information.
Remember, a website that is a good
resource and easy to use, brings
more traffic to your site and may
bring new clients and business
relationships.
Creating anchors will require you to
use the HTML tab at the top of the
Content Window. You do
that by clicking on it.
Then place your cursor above
the Text that will explain the
anchor and add this code <a
name=”MyAnchor”></a>.
(Change the text MyAnchor to
whatever you want to name
your anchor. In this example we
360.353.3745
[email protected]
page 30 of 32
Back to Index
exclaimmedia.net
Exclaiming WordPress User Manual
Last Edit August 14, 2012
Check out our FAQ’s
called it top.)
If you are linking to an anchor on another page select the text
you want to link to your anchor and type <a href=”The-PageName/#MyAnchor”>The Text You Selected </a>. (The-PageName is the name of the page in your site you are linking to. The
Text you Selected needs to be the words you selected to be your
link.)
The name of the page can be found at the top of the Editing
Area; it can also be found in the address bar on your website.
The name of the page you see here is marketing.
If you are linking to a specific spot on the same page, click on the
Visual Tab in the Formatting Toolbar. Next go to the
text that you want to link to that anchor. Click on Create a
Link. In place of a URL type #MyAnchor (using the name of your
anchor) and click on Add Link.
This is what the code might look like if you are linking to a spot
on the same page. If you are overwhelmed, give us a call!
360.353.3745
[email protected]
page 31 of 32
Back to Index
exclaimmedia.net
Exclaiming WordPress User Manual
Last Edit August 14, 2012
Check out our FAQ’s
Plugins We Like
Plugins are programs that add functionality to your website. Not
all of the plugins listed here have been used for your site. We
have chosen plugins that fit what you asked for before your site
was built. Some plug-ins work better than other depending on the
make-up of your theme. You may see what plugins are being
used in your website by clicking on Plugins in the Admin
Control Section.
You can also find new plugins by clicking on Add New under
Plugins and searching by functionality. If you don’t like one, try
another...or call us for website maintenance and we will keep
building for you.
If you have downloaded and saved this to your computer, you
may want to check our site for the latest version of this list.
Beauty Orange WordPress Comment Captcha
Contact Form 7
Exclude Pages from Navigation
Flickr Set Slideshows
Gwolle Guestbook
Haiku - minimalist audio player
Headspace2 SEO
Jetpack by WordPress.com
NextGEN Gallery
Page Links To
Subscribe to Author Posts Feed
WP Simple Paypal Shopping Cart
Wordbooker
WordPress SEO
360.353.3745
[email protected]
page 32 of 32
Back to Index
exclaimmedia.net