1
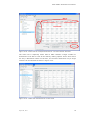
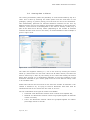
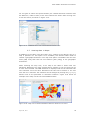
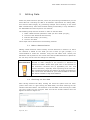
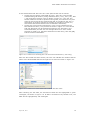
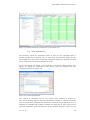
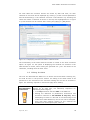
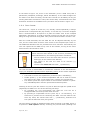
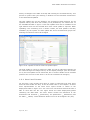
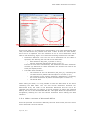
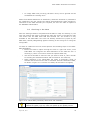
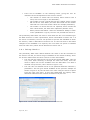
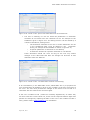
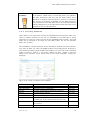
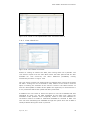
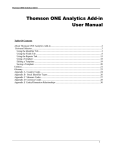
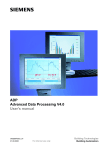
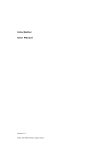
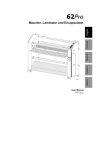
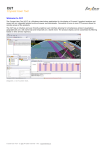
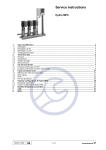
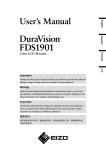
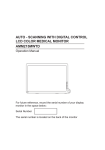
Multi-dimensional Data Viewer and Editor : DATA-VIEW and DATA-EDIT User Manual Version 1.0 Delft, the Netherlands, August 2012 Multi -dimen si onal Data Viewer and Editor: DATA-VIEW and DATA - EDIT User Manu al Poul Grashoff, Fred van der Wouden, Michiel Benjamins DEMIS BV Version 1.0 Delft, The Netherlands, August 2012 DATA-VIEW & DATA-EDIT User Manual Contents 1 INTRODUCTION 4 1.1 Definition of basic concepts 4 1.2 Getting started with the data table tools 5 1.3 User Requirements and Support 5 1.4 Overview of this User Manual 6 2 VIEWING AND EXPORTING DATA 7 2.1 Selecting a data table 8 2.2 Making selections within a table 2.3 Working with the menu 11 2.4 Extracting data 12 2.4.1 Copying data 12 2.4.2 Exporting data 13 2.5 Flat Table View and Cube View 14 2.5.1 Flat Table View 15 2.5.2 Cube View 15 2.6 Viewing data in Charts 17 2.7 Viewing data in Maps 18 3 EDITING DATA 3.1 Make a data selection 20 3.2 Checking out the data 20 3.3 View Checkouts 22 3.4 Undo check-out 23 3.5 Editing the data 24 3.5.1 Access format 25 3.5.2 Text format 26 3.5.3 Excel 2007 format 27 3.5.4 Older versions of Microsoft Office 28 3.5.5 Other file formats 29 3.5.6 General remarks on data editing 29 3.6 Checking in the data 30 3.6.1 Failing Check-in 31 3.6.2 Providing Metadata 33 3.6.3 View check-ins 35 4 REFERENCES August 22, 2012 8 20 36 3 DATA-VIEW & DATA-EDIT User Manual 1 Introduction This User Manual describes the online applications DATA-VIEW and DATA-EDIT which were developed for the EC ETISPlus and RETRACK projects. The applications are designed to support the construction and extension of a multidimensional data model. The data contained within the applications will be multidimensional and zone-based in nature. Bulk data up- and downloads have been made possible by way of text files. DATA-EDIT is specifically designed for data that is collected and manipulated by (multiple) users. This chapter gives a definition of the basic concepts as these are used within the DATA-VIEW and DATA-EDIT tools and which are imperative for understanding how to work with the tools and data. The tools are designed to support viewing and editing of a multi-dimensional data model, as shown in Figure 1-1. Location e.g. 3 dimensional cube Parameter Figure 1-1: Multi-dimensional data cube 1.1 Definition of basic concepts The following definitions will be used throughout this User Manual and should be fully understood before working with the applications and the data contained therein: Data Dictionary: contains the full definition of all available dimensions, dimension elements, tables and parameters for a specific data collection; Collection: a self-describing, harmonized and fully consistent data set; Dimension: the dimension that makes up the parameter, for instance as TIME (in years) or GEO (country level); Dimensions element: all available values for a specific dimension; Parameter: the variable for which data is collected; Table: the structure containing the actual data. The inter relationship of these concepts is illustrated in Figure 1.2. A full description of the multi-dimensional data model construction and all concepts involved can be found in the ETISPlus D2 Annex Report. This Manual will describe the actions that can be performed to view, export and edit data within the data table view and edit tools. August 22, 2012 4 DATA-VIEW & DATA-EDIT User Manual 1. Define each dimension __Dimensions •ID •Name •Description •etc 2. For each dimension define the elements _dimElements _DimensionID •ID_DimensionID •ElementID •Name •ElementID •ElementName •Description •ElementName • •etc • • • 3. Define parameters __Parameters • ID • Name • Unit • Description • Remark • NrofDimensions • ParameterType • NrOfCharacters • Dimension1_ID • Dimension2_ID • Dimension3_ID • Dimension4_ID • etc. • Table_ID 5. For each parameter or group of parameters define a table for storage parTable • Dimension1_ID • Dimension2_ID • etc • parID • parID2 • parID3 • etc Defines table name Defines field name 4. Define tables __Tables •ID •Name •Description •Category etc (metadata!) Figure 1-2: Construction of a multi-dimensional data model 1.2 Getting started with the data table tools The DATA-VIEW application allows users to browse and export data contained within the collections on the website (described in chapter 2). DATA-VIEW is an online data viewing tool that can be accessed by the following URL: http://retrack.demis.nl (no login is required) The full viewing functionality is identically available within the DATA-EDIT application, where also editing of the data is available through a data check-outcheck-in mechanism as described in chapter 3. The DATA-EDIT tool is available at the same address as above, however a user account is required to login. 1.3 User Requirements and Support For the proper working of the full functionality of the data table tools, the user needs to conform to the minimal requirements of having: Microsoft Office 2003: o For using the .xlsx (Excel 2007 format) export / check-out at least Excel 2003 is required, but Excel 2007 is recommended; August 22, 2012 5 DATA-VIEW & DATA-EDIT User Manual o For using the .mdb (Access format) export at least Office 2000 is needed, but Access 2003 (or up) is recommended; An up to date web browser: working with Mozilla Firefox (3 or up) or Google Chrome delivers the most stable results, but an up to date version of MS Internet Explorer (7 and up) is also feasible; Flash player plug in (9 or up, 10 is recommended) for your browser: since the data table tools are flash based applications, the Adobe flash player is required. When opening the site, the download will automatically be suggested if the flash player is not available; please follow the download process and install the flash player when requested; A screen setting of minimal 600 by 800 pixels is required; using a smaller setting or very small screen may result in inability to view or use the full application. If you require any support concerning the data table applications, on technical or organisational issues, please contact Demis: [email protected] 1.4 Overview of this User Manual Chapter 2 contains the description of the view and export functionality of the application. This basic functionality is available in DATA-VIEW and operates similarly in the DATA-EDIT application. Chapter 3 describes the editing functionality that enables working with the check-out-check-in mechanism and provides guidelines for working with the (downloaded) data. It describes the steps that need to be taken to check -out data from the DATA-EDIT application, to work with the downloaded data and to check-in the updated data again. The editing functionality is only available in the DATA-EDIT application, which requires a user account to log on to. Chapter 4 provides some useful links and references. August 22, 2012 6 DATA-VIEW & DATA-EDIT User Manual 2 Viewing and Exporting Data The data viewing functionality is available in both the DATA-VIEW and DATAEDIT tools. The data viewing functionality allows users to browse and export data contained within the data collections on the website. In Figure 2.1 an overview is given of the main screen, distinguishing: 1. The menus File, Edit and View: these pull-down menus provide functions for export, check-out / check-in and viewing of the data; 2. The selected collection (from a pull down list); 3. The blue highlighted selection is the table name, for which the corresponding data table is shown on the right side; 4. The table browser area, where the table is shown according to the selections that are made: 5. The parameter and dimension element selections: here a specific (sub) selection can be made to be shown in the table browser area. 1 2 3 4 5 Figure 2-1: DATA-VIEW general structure For effectively browsing through the data, the next steps need to be followed: Select a data collection; this is shown as [2] in Figure 2-1; Select a table by clicking one from the list, if necessary by opening the containing directory first. The selected table is shown as the blue highlighted area marked as [3], the resulting data table is in area [4]; Make a more detailed selection within the table if required: by selecting a subset of the available dimension elements, a more specific view of the table can be acquired. In [5] the buttons support making the changes. August 22, 2012 7 DATA-VIEW & DATA-EDIT User Manual These steps will be described in more detail in the next two sections. Section 2.3 describes the options of the main menu shown as [1] in Figure 2-1. Section 2.4 discusses options for extracting data from the application. In section 2.5 the flat table and the cube view are described. Section 2.6 and 2.7 respectively discuss the graph view and the map view. 2.1 Selecting a data table To start working with the data, first a data table needs to be selected (see Figure 2-2 for an example from ETIS-VIEW). This is done by following the next steps: Select a data collection: in the example this is ETISPlus - 2005; Select a folder: some data collections can be very large and have been divided into multiple folders. The navigation is similar to Windows Explorer. In the example the folder Socio-economic is selected; Select a table (which will be shown in a blue highlight): in the example the table Population is selected; The contents of the data table are shown to the right. Figure 2-2: Selecting and viewing a table The table will show the full contents up to a maximum of 10000 records. The user will usually want to look at only a portion of this data; therefore it is useful to make sub selections in the table, which is described in the next section. 2.2 Making selections within a table To make selections within a table, for each dimension (including the parameter set) specific elements can be (de)selected through the […] button as shown in Figure 2-3. For each dimension that is contained within the table and the parameter list making sub selections is available. When clicking the [] button, the full list of dimension elements is shown, but no selection is possible here. Figure 2-3 also shows the buttons for listing all elements of a dimension ([*]) and selecting only those elements of a dimensions that actually contain data ([<>]). The axis list next to each dimension allows for the various viewing August 22, 2012 8 DATA-VIEW & DATA-EDIT User Manual options: flat table ([none]), cube view ([Column (cube)] / [Row (cube)], chart ([Category (chart)] / [Series (chart)] and map ([Geo (map)]) which are also available from the main menu. The various viewing options will be disc ussed in sections 2.5 to 2.7. Figure 2-3: Initializing editing the selection of dimension elements After clicking the Edit Selection button […] next to a dimension, the following selection dialog appears for the chosen dimension as shown in Figure 2-4. Available Selection elements Figure 2-4: Making a detailed dimension selection Making a more detailed selection is shown in Figure 2-4, where for sake of simplicity the set of parameters is also considered as a dimension: Dimension Elements: in the highlighted red circle on the left, the full set of available dimension elements (for this table) is shown, from which elements can be chosen; Selected sub-set: in the highlighted red circle on the right, the selected sub-set is shown, that will be displayed in the table view; The blue highlighted dimension element (’25-29 years’) is the selected element on which a specific action can be performed. The selection can be made in either of the two lists; The following actions are available: o >: add the selected element (on the left) to the selected subset . This also works when double clicking an element on the left; o >>: add all elements to the selected subset; August 22, 2012 9 DATA-VIEW & DATA-EDIT User Manual <: remove the selected element from the selected subset. This also works when double clicking an element (on the right); o <<: remove all elements from the selected subset; o ><: list used elements only: since the dimension can contain a great number of elements that have no data, it can be very useful to show only those elements that have data for this table; o Show ID: also shows the dimension element ID of the left and / or right hand side window. The Cancel / OK buttons will close the dialogue, either discarding the changes with [Cancel] or applying the selection with [OK]. o Figure 2-5: Selecting elements of the GEO dimension For the GEO dimension, apart from the selection of single or specific elements, additionally a selection by country is available. This selection option is available by clicking the ‘Select by Country’ checkbox, as shown in Figure 2-5. This will reduce the Dimension Elements list to include entries at the country level. Figure 2-6: Result of selecting 3 countries: 84 ETIS level 3 regions are loaded Selecting a country will now result in selecting all elements of the country on the available NUTS level of the table (for socio-economic data in the example this is August 22, 2012 10 DATA-VIEW & DATA-EDIT User Manual ETIS Zone level 3). The result of the action is shown in Figure 2-6; the selection of 3 countries has resulted in selecting 84 (regional) elements on ETIS Zone level 3. When viewing dimension elements, this can also be done in the dimension pull down list also as shown in Figure 2-7. This will also link to the detailed dimension element selection list. In the pull down list elements for which no data is available, are shown in grey, indicating these are unavailable. Figure 2-7: Viewing dimension elements; grey elements are unavailable 2.3 Working with the menu Within the data table applications there are two menu options: the main menu on top of the screen ([1] in Figure 2-1) and right clicking the mouse when the user is in the table browser area. The menu options of both menus are similar; the main menu options are summarized in Table 2-1. Please note that some menu items are unavailable in DATA-VIEW, but become active when logging in to DATA-EDIT. Menu Menu item VIEW Log In File Edit Export Data EDIT Logout [username] Checkout Undo Checkout Check in View checkouts View checkins August 22, 2012 Description Log in with a username and password (DATA-EDIT only) Export the current selection of the data as a file (see section 2.4) Log out from the application (DATAEDIT only) Check-out the current selection of the data (see section 3.2) Undo checkout of the current selection (see section 3.4) Check-in a data file (see section 3.6) Display an overview of check-outs of this table / collection (EDIT only) Display an overview of check-ins of this table / collection (EDIT only) 11 DATA-VIEW & DATA-EDIT User Manual Menu Menu item VIEW EDIT Flat Table Cube View () () Chart Map View Description Flat table view, similar to a record view (such as in Access format) 2-dimensional view, available only when the table has 2(+) dimensions Viewing of the data by way of a chart (see section 2.6) Viewing of the data by way of a map (see section 2.7) Table 2-1: Main Menu options The right click menu appears when the user moves over the table browser area and right clicks the mouse. Several of the edit options from the main menu in Table 2-1 are also available here, such as check-out and export. The following options are additionally available when right clicking on a specific cell: Select / Unselect element: clicking this will select the single element (when all elements are available) or select all elements (when a single element is selected); Display changes: this applies to a specific cell. The display changes will show the full history of user changes made to the specific cell. A summary of changes is shown in tooltip form when hovering with the mouse over the cell; Copy data: copies the currently displayed data in the table browser area. Since there is a maximum of 10000 records displayed, this might not cover all records in the selection. For a complete copy of all selected data, the export data function can be used. Extracting data and viewing data as flat table, cube, chart or map are discussed in the next sections. All editing related check-out-check-in options are discussed in Chapter 3. 2.4 Extracting data Extracting data can be accomplished through the copy option and the export data function. Please note that the copy and paste shortcuts ([CTRL]-C and [CTRL]-V) are not available from the data table. 2.4.1 Copying data Using the copy option from the menu works similar to copy and paste in MS Office applications. The range of the selection to be copied is determined by the selection in the (displayed) table. To change this range, the data selection in the table needs to be adjusted. When copying the data, the data selection from the data table is copied to the clipboard and available for pasting in other applications, such as MS Excel and Word. Please note that only the displayed data (with a maximum of 10000 elements) will be copied to the clipboard. August 22, 2012 12 DATA-VIEW & DATA-EDIT User Manual 2.4.2 Exporting data The export data function from the menu allows for exporting the data table selection to a file. The user is first requested to select one out of five available file formats (Figure 2-8) after which the preparation of the download is performed: Access (.mdb), text (.txt, comma delimited), Excel (.xlsx), XML (.xml) or binary (.bin). After that the user is presented with a file dialog in which the filename and location can be chosen and the actual download will start. Figure 2-8: Exporting a data slice to a file In case of the Microsoft Excel 2007 (.xlsx) format, the table may be split up in multiple tables on the data sheet when 2 or more dimensions are available. For this file type, the user is allowed to choose the dimensions on the row and column axis, including the parameter (see Figure 2-9). Figure 2-9: Selecting a row dimension for an .xlsx file August 22, 2012 13 DATA-VIEW & DATA-EDIT User Manual The text format (comma delimited .txt file) allows for downloading very large datasets that one would be unable to handle through Access or Excel format. The resulting .txt files are actually comma (“,”) separated in the application and when downloading are provided in a zip file to make download even faster. The zip file will include the following .txt files (the files are similar to the tables that are included in the Access file format, as will be described in section 3.5.1): The dimension, parameter and table definitions in the __Dimensions, __Parameters and __Tables files respectively; The dimension element definitions in the dimension name files (preceded by a single “_”); The data file, which bears the ID of the table. Figure 2-10: Download progress of zipped text file A few notes on the text data file download: Period of downloading time (progress is shown as displayed in Figure 2-10): depending on the speed of your internet connection, it may take a few minutes or much more to download the zip file because of the great size of the files. Even when the files are packed, the size may get up to 50 Mb, taking a 10 Mb connection about 5-10 minutes to download; The large text data files can be best opened with a plain text editor (such as Textpad). The default program for opening these files on your PC may be Excel, but due to the row limitations (especially in earlier versions like Office 2003) Excel may not be able to show the (full) data file; Opening a .txt file in MS Excel requires the file to be imported by selecting import data and the text file. Here the delimiter (“,”) will need to be assigned (if not done automatically) by following the steps through the import dialogue. 2.5 Flat Table View and Cube View There are two ways of viewing the data in a tabled view: by way of a flat table (record) view and by way of a cube (2-dimensional) view. Please note that the cube view is only available when the table contains 2 or more dimensions. Choosing the Flat Table or Cube View can be done from the View menu. August 22, 2012 14 DATA-VIEW & DATA-EDIT User Manual 2.5.1 Flat Tabl e Vi ew The Flat Table View shows a record like structure: for each combination of dimension elements one row is shown with the available parameter(s), such as illustrated in Figure 2-11. Take note that a combination of dimension elements is only shown if at least one parameter has a value for this combination. Parameter Dim 1 Dim 2 (no) Axis selection Figure 2-11: Flat table view - no axis selected When the table is shown in flat table view, additional table options are available such as sorting the table by dimension value. For this the dimension header of the column needs to be clicked, after which the icon for sorting ( up or down) is available in the column. Please note that the sorting will be performed based on the ID of the dimension elements, not the name. 2.5.2 Cube View The Cube View is available from the top View menu, but also can be activated when selecting a dimension for the row- or column-axis, as illustrated in Figure 2-12. Other than the parameter, the table needs to contain at least 2 dimensions for the cube view to be available. For the cube view to take effect, both dimensions need to be assigned to an axis. This is automated: with 2 dimensions, when one is selected, the other is automatically assigned. When there are more than 2 dimensions, assigning one dimension to an axis will result in selection of the first other available dimension as the other axis which the user can change if so desired. Sorting the columns as in the flat table view is not possible here. The sorting of the column dimension can be organised by dragging one column to another location and thus arranging the sort manually. August 22, 2012 15 DATA-VIEW & DATA-EDIT User Manual Dim 2 Parameter Dim 1 Axis selection Figure 2-12: Cube view for multiple dimensions: row and column selected The cube view is especially useful when a table contains a larger number of dimensions to be able to look at the data by making specific slices. Since there are only 2 dimensions shown on the axis, for the other dimensions only a single element can be selected as shown in Figure 2-13. Figure 2-13: Table with 4 dimensions in cube view August 22, 2012 16 DATA-VIEW & DATA-EDIT User Manual 2.6 Viewing data in Charts The viewing functionality offers the possibility to view selected data by way of a chart. This is done by selecting the Chart option from the View Menu or the [Category (chart)] or [Series (chart)] from the axis list next to the dimension. This automatically positions the selected dimension elements on the axis: by default the Geo level on the category-axis and the parameter on the series-axis. However, since the area of showing data in the chart is limited, usually only a part of the data will be directly visible (depending on the number of selected elements and the zoom level in the chart). An accommodations chart example is given in Figure 2-14. Figure 2-14: Chart view of Accommodations Facilities The chart tool supports zooming in / out on the chart by scrolling the mouse wheel up / down when over the chart. When not all data is shown, the chart can also be moved up or down by left clicking on the chart and holding the mouse down while moving. It is nonetheless important to limit the selection of the dimension elements to get a useful graph since too much data will easily result in an unusable chart. Please note that for the series axis for the chart the number of elements it can contain is limited to 20, so trying to select a dimension with more than 20 selected elements on the series axis will result in an error. For the visualization three types of charts are available: Clustered: each dimension element value is shown as a separate bar; Stacked: the dimension element values are grouped together as absolute values in one bar; 100%: the dimension element values are grouped together as relative percentage values in one bar. August 22, 2012 17 DATA-VIEW & DATA-EDIT User Manual For all types of charts the specific details (the related dimension elements and the absolute / relative value) of the chart element are shown when moving over it with the mouse, as shown in Figure 2-15. Figure 2-15: Stacked chart view with detailed element view 2.7 Viewing data in Maps In addition to the table views and chart view, viewing of the data by way of a map is possible. For this option to be available, the selected table ne eds to contain a geographic dimension. The map view option is available from the View menu [Map view] and from the axis selection [Geo (map)] of the geographic dimensions. When selecting the map view, a full map of the table is shown with one parameter displayed: the (last) selected active element or the first from the list if more were selected. The GEO dimension is displayed with all the elements that were selected. From the other dimensions the last active element or the first from the list is selected. The elements can be changed by clicking the [<] or [>] buttons next to the parameter or dimension selection. Figure 2-16 shows an example of the map view of the accommodation table. Figure 2-16: Map view of Accommodation table for ETIS level 3 zones August 22, 2012 18 DATA-VIEW & DATA-EDIT User Manual On the right of the map view of Figure 2-16 the legend is shown; the coloring of the legend is performed automatically based on the range of the valu es that is available and cannot be changed. The map view allows for a few standard map functions such as zoom in / out (using the mouse wheel) and move map (drag and drop with left mouse button). When hovering over a single GEO zone details of the zone are shown: the dimension name, the GEO name and the name and value of the parameter for that zone. For tables with more than one GEO dimension, only one GEO dimension can be shown on the map (the first mentioned when selecting from the menu). The other GEO dimension can be changed by right clicking on any available GEO dimension, such as country, region, port or other. This is shown in Figure 2-17 where the parameter [EU Trade by Tonnage] for the dimension [Reporting country] is shown in the map and the dimension [Partner country] can be changed by right clicking a country and clicking “change Partner country to [country]”. Figure 2-17: Map view of EU-trade with 2 GEO dimensions August 22, 2012 19 DATA-VIEW & DATA-EDIT User Manual 3 Editing Data Within any data collection process, users may be working simultaneously on the same data set. Checking out data is an absolute requirement for editing data; this ensures data integrity by preventing multiple users working on the same data simultaneously. Note that the data editing functionality is only available in the DATA-EDIT tool and requires a user account. The following steps need to be taken in order to edit the data: 1. Make a data selection (based on ‘what you see is what you get’); 2. Check out the data that was selected; 3. Edit the data locally (not online); 4. Check in the data. These steps will be described in the following sections. 3.1 Make a data selection Making a data selection works similarly as was described in section 2.2. Since the checkout is based on the ‘what you see is what you get’ principle, it is recommended to make the selection using the Flat Table View. Usually the Parameter will be placed on the column axis and the GEO dimension is placed on the row axis, but the user can change this manually. Note on the Take care when making your selection, because it is not data selection allowed to make changes to the structure or definition of checked out data!! Please take great care in the selection of the dimension elements and (if applicable) the row- and column dimension, especially when exporting as an Excel file. We recommend choosing the selection as closely as possible to the current form and format of your collected data to minimize the actions needed to align both datasets. 3.2 Checking out the data After having selected the data, clicking the check-out option from the menu (either main menu or right clicking the data table) will allow checking out the selection that was chosen. The selection in the flat table view works by the ‘what you see is what you get’ principle. After this the file format selection box will appear as shown in Figure 3-1. Figure 3-1: Check-out: choice of download format August 22, 2012 20 DATA-VIEW & DATA-EDIT User Manual In the download format box there are a few options that can be chosen: Choose the file format (‘Download as type’): there are 5 file formats available being MS Access (.mdb), MS Excel 2007 (.xlsx), text (.txt), XML (.xml) and binary format (.bin) as shown in Figure 3-1. The user can choose whatever format he prefers working with; this selection only has effect on the format of the exported file that is provided to the user. A description of working with the file formats is provided in section 3.5, where also alternative formats such as ASCII are discussed ; Choose the column and row dimension. This is only available for the Microsoft Excel 2007 (.xlsx) format as shown in Figure 3-2. The column and row dimension will be selected according to the selection in the actual data table, but the user can change these here. If an invalid selection is made (e.g. the same dimension on both axis), then the [OK] button becomes unavailable. Figure 3-2: Check-out: choosing the row and column dimension (.xlsx only) After the file format has been chosen, the user can indicate the location and file name of the downloaded data file through the file menu as shown in Figure 3-3. Figure 3-3: Check-out: select download location and file name After checking out the data, the checked out data will be highlighted in green rectangles, as shown in Figure 3-4. If data is checked out by another user, the data will be highlighted by red rectangles. August 22, 2012 21 DATA-VIEW & DATA-EDIT User Manual Figure 3-4: Data marked as checked out by the same user 3.3 View Checkouts The checkout cannot be performed when (a part of) the requested data is already checked out by another user. In such cases the Checkout option will not be available from the menus. Acquiring information about the checked-out data slices using the View checkouts options is useful. In the View menu the option ‘View Checkouts’ is available. When clicking this option, by default all checkouts by the current user are displayed for this collection as shown in Figure 3-5. Figure 3-5: Viewing Checkouts The viewing of checkouts can be very useful when wanting to acquire an overview of the data that the user has checked out. Details of a specific checkout such as checked out parameters or dimension elements can be displayed here. A checkbox is available that enables including the checkouts of other users to the overview. Especially when checking-out is not possible because (a part of) the August 22, 2012 22 DATA-VIEW & DATA-EDIT User Manual data table is checked out by (an)other user(s), it can be valuable to retrieve information on which the users are working with the data. As can be seen from Figure 3-5 when floating over a specific checkout, it is possible to display the specific selection of a checkout in the Table browser by clicking the relevant line. This means that when clicking on a checkout, the table will show the exact selection of the checked out data in the Table browser. This can enable acquiring a good idea of which data is checked out, either by you or by another user. Check-ins can be viewed in a similar fashion, but these offer some more options as will be discussed in section 3.6.3. 3.4 Undo check-out It may be desirable to ‘Undo’ a checkout rather than checking in a data file. This can happen for instance when no data has changed in comparison to the original (checked-out) data or because the data part was checked out in error, for instance because of selecting the wrong country. The option Undo check-out will perform the action of cancelling the checkout of data; there will be no data or history changes and no metadata need to be assigned. After clicking the option in the main menu, the window will show all checkouts of the user for the current collection including other data tables, as shown in Figure 3-6. The Undo checkout option is available from the main menu when a user has checked out some part of the collection, not necessarily in the current table. Figure 3-6: The undo checkout window allows selecting checked out datasets When selecting the Undo checkout option through the right click menu, the range for the undo checkout options is limited to the selected table. Please note that the Undo checkout option is not available when right clicking a cell that is checked out by another user. It is only available when right clicking a free cell (showing all your checkouts for this table) or a checked out cell b y the same user (showing only your specific checkout that includes the cell). August 22, 2012 23 DATA-VIEW & DATA-EDIT User Manual For each table the checkout actions are shown by date and time; for each checkout an overview can be displayed (by clicking) of the involved parameters and the dimension(s) if the checkout concerns a sub selection. By checking the check box before a checkout as shown in the top blue highlighted line in Figure 3-6, this checkout will be undone after clicking the [Apply] or [OK] button. Figure 3-7: Displaying checked out data in Table browser The functionality of the Undo checkout window is similar to the View checkouts option. In Figure 3-7 the option of displaying the checked out selection in the table browser is shown, when clicking the [checked out…] line. This works for all checkouts, including those of other users. 3.5 Editing the data The user can download the data file in a chosen file format when checking out, as could be seen in the previous section. All editing to the data needs to be performed in the checked out file and after editing the file can be checked in again. The following imperative restrictions apply when editing: Note on the The following restrictions to editing the downloaded file are data definition general for all data type, but absolutely imperative for restrictions maintaining data integrity: It is only allowed to edit the data in the data file! Editing the definition of parameters, dimensions and dimension elements is not allowed in any way. When attempting to check in a file that is not conforming to the exact same data definitions, the file will not be accepted. Only files that conform exactly to the checked out definition will be accepted upon check-in! August 22, 2012 24 DATA-VIEW & DATA-EDIT User Manual In this section examples of editing data in Access, text and Excel are given, since these are the formats anticipated to be used the most. Also some guidelines are given for handling older versions of Excel and for extracting ASCII format. 3.5.1 Access format For the Access format, any version of Access 2000 and newer is suitable to handle the exported / checked-out files. Figure 3-8: Access file: overview of Tables of the Accommodation file In Figure 3-8 the Access (2000) format of the Accommodation download is presented. Here the definition is given of the dimensions (__Dimensions), parameters (__Parameters), table (__Tables) and for each dimension the dimension elements (in the example only the GEO dimension _EZ2003_3). These definitions are not to be changed in any way, otherwise the resulting file will not match the checked out selection! Only values can be changed in the data table (Accommodation_ETIS3), see Figure 3-9. Figure 3-9: Accommodation (data) table of the Access format August 22, 2012 25 DATA-VIEW & DATA-EDIT User Manual In the table of Figure 3-9, there is one dimension (Level 3 ETIS zone) and 4 parameters (Campsites, Dwellings, Hotels and Others). In the table changes can be made to the data of existing records. New records can be added, as long as existing dimension elements are used; this can be easily controlled since all valid dimension elements are available from a pull down list as shown in Figure 3-9. 3.5.2 Text format The check-out / export of a text file (.txt, actually comma separated) is always performed as a compressed file (zip format). To use the file, it must be unzipped and is recommended to be opened in a plain text editor such as the Textpad application. Alternatively it could be opened in Excel but with the risk of the file being too large and thus losing data. This process was described in section 2.4.2. After the initial download, the text data file can be adjusted manually by the user, but the exact same structure must remain to be accepted upon check -in. The additional definition files are provided more as a reference. Alternatively the user can replace the full data file by a file of his creation, as long as the exact same structure and format is used. Notes on user When the user is creating his own version of the text data file file creation (which should be done based on the structure provided by the downloaded data file) the following should be considered: The file needs to have the exact same structure (columns, data type) as the checked-out data file; The values in the text file need to be comma (“,”) separated; The file name must not start with “_“(underscore). The text file that is downloaded or checked-out conforms to the wiki definition (http://en.wikipedia.org/wiki/Comma-separated_values) of the comma separated format, which means: The fields in the file are separated by a comma (this is mandatory); Double quotes (“ ”) are used as encapsulator and can be used to enclose the values of any field; in the export this is used for any textual field; The double quotes are required when a field contains commas or quotes. Any embedded quotes must be represented as double quotes. Checking in the file (see also section 3.6) can be done through the upload of the (adjusted) text data file in one of the following two ways: By providing the (not compressed) text data file. This will be a straightforward but slower process than the next: By providing a compressed text file (with .zip or .rar extension); it is sufficient to provide the file containing the data. The text data file can have any name, but cannot start with “_” (underscore), because such files (like the definition files) are ignored. The text format provides an additional option when checking in the data, which is to perform a bulk update whereby removing all previous data (although the August 22, 2012 26 DATA-VIEW & DATA-EDIT User Manual history of changes to the table is saved) and inserting the new data directly. This process is quicker than just checking in because not all individual records have to be checked and updated. The bulk update can only be applied if the checked out data selection can be replaced entirely and when full records (so all parameters) are checked out. In the metadata window in Figure 3-10 a bulk update check box is available at the right bottom which can be selected when such a bulk update is required. When uploading a file containing over a million records, the bulk update is actually mandatory by the system: the bulk update box will be checked and ‘greyed out’ meaning the selection cannot be changed. Figure 3-10: Upload of text file with bulk update option The bulk update is a form of checking in data, but not all individual changes will be visible through the change history. In the Display Changes (also see section 3.6.3) the bulk update will be mentioned, but no further details will be recorded (both for the overview of the check-in as for the individual cell changes). 3.5.3 Excel 2007 format For the Excel (.xlsx) format, Excel 2007 or newer is preferred to be used. Excel 2003 can also handle the files, as will be shown later in this chapter. An Excel 2003 representation of the Excel 2007 export format is shown of the Employment table in Figure 3-11: the .xlsx file is converted so that Excel 2003 is able to work with the file. The figure shows the sheet Employment_ETIS3 containing the data table. The other sheets contain the definitions of the dimensions and elements (__Dimensions), the parameters (__Parameters) and the table (__Tables). These definition sheets are not to be changed in any way. August 22, 2012 27 DATA-VIEW & DATA-EDIT User Manual Dimension definition Column dimension elements Row dimension elements Data Data and definition sheets Figure 3-11: Excel 2003 view of the .xlsx download of Employment table Since Excel data is a 2-dimensional representation of a multi-dimensional data cube, the data sheet may contain more than 1 table. If there are more tables, there will be a repetition over the elements of one or more dimensions. Each table is self-describing; Figure 3-11 shows the following elements for one table: Dimension definition: here the full set of dimensions for the table is specified, also defining the row and column dimension : o Row dimension EZ_2003_3 (shown in row 2); o Column dimension Parameters (shown in row 3). If there are more than 2 dimensions, the dimensions and their dimension element (by definition for these dimensions the element will need to be fixed) are displayed also. The table itself consists of: o The elements of the row dimension (EZ_2003_3), containing the row dimension ID, Name and Description in columns A, B, C; o The elements of the column dimension (Parameters), containing the column dimension ID, Name and Description in rows 5-7; o The actual data. When editing the data, it is only possible to edit the data fields of the sheet containing the data table. The row and column dimension elements are determined as by the order in the dimension definitions and are not to be changed in the Excel file. In practice, it will be necessary to match the collected data by the user to the downloaded data file. This again shows the importance of thoughtfully choosing the row and column dimension when making the data selection. 3.5.4 Ol der versions of Microsoft Office Since the provided .xslx format is basically an Excel 2007 format, there are some issues with older versions of Excel. August 22, 2012 28 DATA-VIEW & DATA-EDIT User Manual Excel 2003 supports the use of 2007 files, but applies a file conversion to able to use the file; a message as shown in Figure 3-12 will appear. The user will experience no problem when working with this converted file; it can be edited and saved as usual, just take note that the file extension will remain .xslx. Figure 3-12: Office 2003 File conversion message MS Excel 2000 and older versions are not supported. There are converters available on the internet to cope with this problem and we expect users of Excel 2000 to have experienced more issues when using old versions of Excel and to be familiar with the converters. If this should pose a large problem, the user can always rely on the Access 2000 or the other formats to export / check out data. 3.5.5 Oth er file formats Formats such as ASCII are not available directly in DATA-EDIT since the free editing nature of the formats makes them very sensitive to errors during the check-out-check-in process. If required, the user can convert these formats from the Excel or txt file and use them at his discretion. Keep in mind that when checking in the file, it needs be in one of the supported formats and the definitions need to conform precisely to the check out! For acquiring a wide range of alternative formats Excel supports saving the file as another format by using the ‘Save as’ option where a dialogue will be presented as in Figure 3-13. From this dialogue the user can select a wide range of text or other type formats. Figure 3-13: Save Excel file as other format 3.5.6 Gen eral remarks on data editing A remark on filling in data values (in general for any file format): A data field filled with a “0” (zero value) is considered to be a value and will be entered to the database as such; August 22, 2012 29 DATA-VIEW & DATA-EDIT User Manual An empty data field (no filling, DB NULL value) will be ignored and be considered as a missing value. When the available definitions of dimensions, dimension elements or parameters are insufficient, the user cannot just change these definitions. When changes or extensions to the data dictionary are required, the user can make a request to the database administrator. 3.6 Checking in the data Once the editing of data is completed and the data is ready for checking in, the user can perform the check-in through the main File menu or through the right click menu from the data table that was checked out. The check-in is only available in the data table if the user has actually checked out (a part of) the data table, thereby safeguarding against checking in the wrong file or using the wrong table. To check-in a data file the user should perform the following steps in the DATAEDIT application: Select the Check-in option through the main or right click menu; since DATA-EDIT will recognize the data definitions of the data the user is checking in, there is no need to select the specific table first; Use the file window to select the file you want to check in; this is similar to selecting the download location and file name for the checkout; When assigning a file, DATA-EDIT will make a preliminary check of whether the structure of the file is consistent with the checked out data, as shown in Figure 3-14. The file can always be checked in as zipped; Figure 3-14: DATA-EDIT preliminary data check and metadata Any file (no matter the format) that is checked-in by the user may be offered as zipped (.zip) file, which will speed up the upload process. August 22, 2012 30 DATA-VIEW & DATA-EDIT User Manual There will be feedback on the following issues, giving the user an indication of the consequences of the check-in action: o The number of values that are cleared; these used to have a value, but are no longer in the data table; o The number of new records that will be created; these records did not have a value before, but have been filled out now. Please note that one record can contain values for multiple parameters; o The number of values that will be replaced; these records did have values before, but have been replaced by another value; o Some process information: when the notification ‘Ready to check in the uploaded file’ is given, the user can proceed with check-in. The preliminary data check can result in a fail when the file is not conforming to the data structure or other requirements, which is described in section 3.6.1. If the check is successful, the user can proceed to provide the metadata to finish the check-in, which is described in section 3.6.2. To view the check-in and make changes to the metadata if so required, the view check -ins option is available from the main menu, which will be discussed in section 3.6.3. 3.6.1 Failing Ch eck -in The preliminary data check detects whether the check-in will be successful. If the check-in will fail, the check will give feedback on the reason of failing. There are several reasons that can cause a check-in to be unsuccessful: The user has not checked out any part of the specific data table. This will only occur when checking in through the main File menu, since the check-in option will not be available from the data table if no data is checked out by the user; this is shown in Figure 3-15; The user has not checked-out all of the specified dimension elements / parameters. This will give similar feedback as the previous example as shown in Figure 3-16, but can also occur when using the check-in option from the right click menu. In this case DATA-EDIT will specify which dimension elements have not been checked out by the user. Figure 3-15: Check-in fail: the data table was not checked out August 22, 2012 31 DATA-VIEW & DATA-EDIT User Manual Figure 3-16: Check-in fail: part of the data table was not checked out The user is checking in a file for which the parameters or dimension elements do not match with the checked out file. An example of the feedback is given in Figure 3.17. The failing check-in can be caused by a number of deviations, among which: o The dimension elements of the row or column dimension are not in the predefined order (such as defined in the __Dimension sheet); an example of the feedback is shown in Figure 3-17; o A specific parameter or dimension is not defined; o A dimension element of a specific dimension is not defined. These deviations should not occur as long as the user only makes changes to the data itself and does not change the structure of and definition within the data file. Figure 3-17: Check-in fail: row dimension element not matching If an inconsistency in the data table occurs, DATA-EDIT will try to pinpoint the error as accurately as possible by given a line (number) of the first occurrence of the error. The user must perform the changes to the check -in file so that it is consistent with the checked-out structure again. If the user is unable to find / make the necessary adjustments, an easier way can be to undo the current check-out, check-out the required selection again and perform the changes by replacing the data. If the user is still unable to make it work, please contact [email protected] for assistance. August 22, 2012 32 DATA-VIEW & DATA-EDIT User Manual Note on check- A fail when checking in data can be caused by a great number in failure of deviations. Please keep in mind that when you maintain the same definitions and only edit the data values, there should be no problem with the check-in process. In a checked out .xlsx file for instance, by default only the data values are not ‘protected’ on the data table sheet. This should stimulate making changes only to the data within these files and not to the data structure and definitions. 3.6.2 Provi ding Metadata Upon check-in it is required to provide the metadata for the checked-in data. The check-in window contains the full set of metadata for the data that is being checked in. In Figure 3-18 an overview of the metadata fields is shown. The bold fields are all required to be filled out (the [OK] button will not be available before this is done). The metadata is a formal definition of the information needed to trace the history of a piece of data, for which the SPQR Pedigree Form Requirement proposal is used (based on ETIS recognized data and models). An overview of the metadata fields is shown in Table 3-1; for further details see D5.1, chapter 6 and the Dublin Core reference (from which most of the fields originate, except the pedigree). Figure 3-18: Check-in window with metadata Element Description Type Title A name given to the resource Free text Title.Alternative Alternative name, if applicable Free text Creator An entity responsible for making the resource Free text Subject The topic of the resource Free text Description An account (e.g. abstract) of the resource Free text Description.Notes Notes on the description Free text Publisher An entity responsible for making the resource Free text available (set by the system to the current user) Contributor An entity responsible for making contributions to Free text the resource Date.Created August 22, 2012 The date when the resource was created Date 33 DATA-VIEW & DATA-EDIT User Manual Element Description Type Date.Issues Date of formal issuance (e.g., publication) of the Date resource Date.Modified Date of last modification (set by the system) Date Type The nature or genre of the resource (DMCI Type Free text Vocabulary) Identifier An unambiguous reference to the resource within a given context Source A related resource from which the described Free text resource is derived. Relation A related resource Coverage.Spatial The spatial or temporal topic of the resource, the Coverage.Temporal spatial applicability Free text of the resource, or Free text the jurisdiction under which the resource is relevant Rights Information about rights held in and over the Free text resource Accruel Method The method by which resources are added to the Free text collection. Accruel Period The period in which resources are added to the Free text collection. Pedigree Choose from {OBSERVED, MODELLED, UNKNOWN, Choice NOT_APPLICABLE} Pedigree.Model In case of modelled data, this refers to the used Free text model. Table 3-1: Overview of Dublin Core Metadata Elements (bold is required field) It is recommended to submit all available metadata at the moment that the check-in is performed. When for some reason not all metadata con be provided, the view check-ins option described in the next section also allows users to adjust their metadata after the check-in is performed. The file location (for instance by means of an URL) can contain a link or reference to the metadata of the checked-in data. Note on metadata In order to provide the link to the metadata, this link needs to be created before checking in the actual data (i.e. when it is an URL). Preferably the metadata is uploaded on the relevant site for better managing and searching of the metadata. After clicking [OK] in the check-in window, the check-in will be performed. After this the updated data will be shown in the data table and the green highlights of the checked out data will have disappeared, as is shown in Figure 3-19. August 22, 2012 34 DATA-VIEW & DATA-EDIT User Manual Figure 3-19: Check-in: the updated table after successful check-in 3.6.3 Vi ew ch eck-ins Figure 3-20: View Check-ins window Similar to viewing of checked out data, also viewing check-ins is possible. The view check-in option from the main Menu offers the basic options that are also available for view check-out, but offers additional (metadata) viewing functionality as shown in Figure 3-20. The view check-in offers the options that are available with viewing the checked out data: viewing the list of checked-in data, details of the check-in and the option of making the selection of the check-in visible in the table browser. In case of a bulk update no details of the update are registered; for these actions it is only mentioned that a bulk update has been performed. In addition the view check-in offers the option to view the metadata that was submitted by users. For the data submitted by the same user, editing the metadata is also possible. This is especially useful in case some additions or corrections need to be made to submitted metadata for checked in data. The user can finish submitting the metadata through this option when not all data is readily available during the check-in process. August 22, 2012 35 DATA-VIEW & DATA-EDIT User Manual 4 References Comma separated values article in Wikipedia: http://en.wikipedia.org/wiki/Comma-separated_values Dublin Core Metadata Model: http://dublincore.org/documents/dces/ ETISplus D2 Draft Specification Report - Main report (Ming, Newton et al): v3 R20100326 available on (restricted access to project members): http://www.etisplus.eu/documents/restricted/Restricted%20Documents/Forms/ ETISplus D2 Annex Report – ETISplus Architecture (Smith, Grashoff, van der Wouden), available in WP5 folder on (restricted access to project members): http://www.etisplus.eu/documents/restricted/Restricted Documents General_concept_for_ETIS_BASE_data, available in the (restricted) WP 11 folder on: http://www.etisplus.eu/documents/restricted/Restricted Documents Spotlights SPQR http://gtf.mkm.de/dl/SPQR-Dcode-FINAL13-May-2001.doc August 22, 2012 36