1
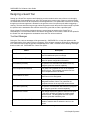
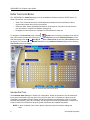
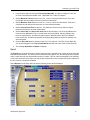
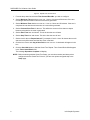
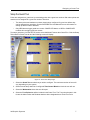
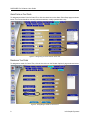
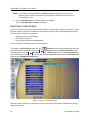
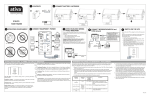
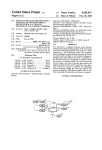
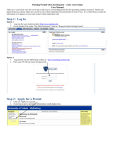
MANUAL NUMBER
October 23, 2002
Guard Tour
Setup Procedure
InfoGraphic Systems • 7373 Lincoln Way • Garden Grove • California • 92841 • (714) 890-0083 • Fax (714) 890-0093
www.Infographicsystems.com
SAPPHIRE Pro Software User Guide
This Page Intentionally Left Blank
II
InfoGraphic Systems
Table of Contents
Overview . . . . . . . . . . . . . . . . . . . . . . . . . . . . . . . . . . . . . . . . . . . . . . . . . . . . . . . . . . . . .1
Guard Tour Reports. . . . . . . . . . . . . . . . . . . . . . . . . . . . . . . . . . . . . . . . . . . . . . . . . . . .1
Designing a Guard Tour . . . . . . . . . . . . . . . . . . . . . . . . . . . . . . . . . . . . . . . . . . . . . . . .2
Tour Event Messages . . . . . . . . . . . . . . . . . . . . . . . . . . . . . . . . . . . . . . . .2
Define Time Control Blocks . . . . . . . . . . . . . . . . . . . . . . . . . . . . . . . . . . . . . . . .4
Individual Start Time. . . . . . . . . . . . . . . . . . . . . . . . . . . . . . . . . . . . . . . . . .4
Repeat . . . . . . . . . . . . . . . . . . . . . . . . . . . . . . . . . . . . . . . . . . . . . . . . . . . .5
Setup the Guard Tour . . . . . . . . . . . . . . . . . . . . . . . . . . . . . . . . . . . . . . . . . . . . .7
Alarm Points as Tour Points. . . . . . . . . . . . . . . . . . . . . . . . . . . . . . . . . . . .8
Readers as Tour Points . . . . . . . . . . . . . . . . . . . . . . . . . . . . . . . . . . . . . . .8
Designating Cards for Guard Tour . . . . . . . . . . . . . . . . . . . . . . . . . . . . . . .9
Report Event Codes Handling . . . . . . . . . . . . . . . . . . . . . . . . . . . . . . . . . . . . .10
InfoGraphic Systems
III
Software User Guide
This Page Intentionally Left Blank
IV
InfoGraphic Systems
Guard Tour
Overview
The Guard Tour Program is a software option that enables SAPPHIRE Pro to monitor tours walked by
guards. A guard tour is a set of tour points (alarms points or card readers), all of which must be visited
within defined time intervals by a guard who makes a round of the points on the tour.
Using the SAPPHIRE Pro software to monitor guard tours creates a real-time monitor of guard tour activity.
That is, the system reports when a tour is supposed to start, the guard’s progress along the tour and tour
completion.
Guard tour activities are reported to the SAPPHIRE Pro software that logs these events and creates guard
tour reports for display and/or printing, as configured by the user.
As part of guard tour setup, both alarm points and readers can be configured as guard tour points.
Employee cards flagged for use on guard tours are assigned to guards who have access points on their
tours.
NOTE: There is no special hardware installation required to enable the Guard Tour option to
function properly. If you need further information regarding the setup of Security
Areas, Readers, and Alarm Points see the SAPPHIRE Pro User Manual.
Guard Tour Reports
Guard tour points are alarm points and/or card readers that have been designated for use on a guard tour.
The guard walking the tour will trigger an alarm point or slide his or her access card in a card reader to
record the location of the point and the time the Guard activated it. If the card reader is a keypad reader the
guard may also be required to enter a number if the keypad is enabled.
From the SAPPHIRE Pro software’s point of view, guard tour points are like other alarm points and access
points. When an event occurs at one of these points, an event message is created, the same as at any
alarm or access point. Figure 1 illustrates a guard tour report. This is the report created when the
SAPPHIRE Pro software automatically starts a guard tour.
EVENT
#
2001/05/20
Sun 09:09:09
REQUESTOR:
STATUS:
TOUR NUMBER:
1110
GUARD TOUR REPORT
TIME SCHEDULE ON-LINE
TOUR STARTED
(AUTO-TIMER)
2
Figure 1: Guard Tour Illustrated Report.
If necessary for company protocol, the workstation operator may have to acknowledge the report.
InfoGraphic Systems
1
SAPPHIRE Pro Software User Guide
Designing a Guard Tour
Setting up a Guard Tour requires careful planning to make certain that the area of the tour is thoroghly
covered by the Guard walking the tour area. This means laying out the route of the tour so that all areas
are visited and so that it can be completed in the designated time. Time parameters must also be carefully
thought out so that enough time is allowed for the guard to move from point to point without triggering a
warning. The time should be long enough to allow the guard to reach the point and short enough to provide
the operator at the workstation with sufficient notice if the guard fails to make a specified point.
Once a Guard Tour has been designed, there are several steps to setting up the Guard Tour in
SAPPHIRE Pro. You will need to define Time Blocks during which a Tour is active, select the tour points for
the Guard Tour and designate the workstation where the Tour will be monitored.
Tour Event Messages
During the Tour, various messages will be generated by SAPPHIRE Pro to keep the operator at the
workstation aware of the status of the tour progress. Some of these messages will simply be added to the
tour, others will require that the operator acknowledge them. Table 1 contains a list of warning messages
that are used in the SAPPHIRE Pro Guard Tour option.
Status
Description
Tour Point Reached
The guard has reached the tour point within the time
interval established by the tour design.
Tour Started (Auto Timer)
The SAPPHIRE Pro SOFTWARE has started a tour
based on preset configuration information.
Tour Started (Override)
An operator at a workstation has started a tour by
using the guard tour override capability.
Tour Completed Successfully
The guard has completed the tour in the expected
amount of time. This message means the tour has
been completed with an OK status.
Tour Finished Too Soon
The guard has completed the tour earlier than the
minimum tour time designated.
Tour Time Expired
Tour design requires the tour to be completed in a
designated amount of time. The guard has not
completed the tour in the expected amount of time.
Tour Halted (Override)
An operator at a workstation has halted an in-progress
tour using the guard tour override capability.
Point-to-Point Timeout
Tour design requires the guard to walk from one point
in the tour to another point within a predetermined
amount of time. The designated time has expired
since the guard last reached a point.
Cannot Start Tour, Disk File Error
The computer has attempted to start the tour but was
unable to read the disk file where the tour is to be
stored.
Table 1: Guard Tour Report Messages
2
InfoGraphic Systems
Cannot Start Tour, Memory Unavailable
The computer has attempted to start the tour but there
is not enough RAM memory on the computer.
Attempt to Start Active Tour
This event message indicates the time that the
computer began to start an active tour
Attempt to Close Inactive Tour
This event message indicates the time that the
computer began to shut down a tour that has become
inactive.
Point-to-Point Timeout on Inactive Tour
The designated time allowed between two tour points
has expired since the last point was triggered by the
guard. However, the tour has become Inactive.
Table 1: Guard Tour Report Messages (Continued)
InfoGraphic Systems
3
SAPPHIRE Pro Software User Guide
Define Time Control Blocks
The SAPPHIRE Pro Guard Tour page is one of the Additional Features under the SETUP button. To
setup a Guard Tour, you will need to:
•
Setup Time Control Blocks which control Maximum and Minimum time parameters and the
days and times when the tour will be performed.
•
Select the Alarm Points and Readers that will be used as part of a specific Tour and route the
tour information to a specific workstation routing group.
•
Designate how the various tour messages must be handled for each tour.
To navigate to the Guard Tour page, click the
Setup button in the main navigation bar at the left
side of the browser window then click on the
Blue Eye button next to Additional Features on the
main Setup page. Click the
Blue Eye button next to Guard Tour the following Time Control screen
will display. You can also click the Guard Tour tab from any Additional Features page and the following
Time Control screen will display.
Figure 2: Individual Start Time Control Block
Individual Start Time
The Individual Start Time type of Guard Tour configuration, allows the operator to vary the actual time
that a guard is expected to trip any given Tour point on a given day. For example, the guard could be
scheduled to trip the Main Entrance reader at 6:00 PM on Monday and Wednesday, 6:30 on Tuesday,
Thursday and Saturday, and 7:00 on Sundays. By varying the times that the guard trips the various Tour
Points, it makes it more difficult to study the guards movements and establish the pattern.
NOTE: If there are already Time Control blocks configured, press Clear before adding new
ones.
4
InfoGraphic Systems
Designing a Guard Tour
1. From the drop down list select the Time Control Block No. you wish to configure. There are
64 Time Control Blocks available in the SAPPHIRE Pro Guard Tour Option.
2. Set the Maximum Time that the tour can run, 1 hour to 3 hours and 59 minutes. If the tour
runs longer than the maximum time an event will be generated.
3. Set the Minimum Time that the tour can run, 1 hour to 3 hours and 59 minutes. If the tour is
completed in less than the minimum time an event will be generated.
4. Set the Point-to-Point Time for the tour. This will be the amount of time that can elapse
between points before an event is generated.
5. Set the time of day and days of the week that the tour will begin. The Hours and Minutes are
in 24-hour time designation. Up to 16 start times can be configured. Chosing different start
times for a specific tour, will mean the guard will be in different parts of the tour at different
times of each day. This prevents people from studying the guards movements so that they can
avoid the guard.
6. Click the Save/Add button to add the Guard Tour Time Controls. The Time Control Block No.
you chose will appear in the Time Control Blocks field with the words Time Control Block ##.
7. The message Operation Complete will display.
Repeat
The Repeat type guard tour provides a simple guard tour that is repeated a set number of times during the
selected time perameters. The security can be increased in this type of tour, but having the guard vary the
order in which she trips the required alarm points or readers. This can either be designed by the manager
or left to the descretion of the guard. As long as each selected tour point is tripped during each repitition of
the tour, it will be considered completed.
Select Repeat from the drop down list and the following screen will be displayed.
InfoGraphic Systems
5
SAPPHIRE Pro Software User Guide
Figure 3: Repeat Time Control Block
1. From the drop down list select the Time Control Block No. you wish to configure.
2. Set the Maximum Time that the tour can run, 1 hour to 3 hours and 59 minutes. If the tour
runs longer than the maximum time an event will be generated.
3. Set the Minimum Time that the tour can run, 1 hour to 3 hours and 59 minutes. If the tour is
completed in less than the minimum time an event will be generated.
4. Set the Point-to-Point Time for the tour. This will be the amount of time that can elapse
between points before an event is generated.
5. Set the Start Time hour and minute. This is the time the tour will start.
6. Set the Stop Time hour and minute. This is the time the tour will end.
7. Set the time for the tour Repeat Interval. For example, if set for 1 hour 30 minutes the tour will
start over every 90 minutes until the Stop Time is reached.
8. Click the box next to each day of the week the tour is to run. A checkmark will appear in the
box.
9. Click the Save/Add button to Add the Guard Tour Repeat. Time Control Block ## will appear
in the Time Control Block field.
The message Operation Complete will display.
NOTE: Before continuing with the Guard Tour Setup, you must have readers and alarm points
configured to be the Guard Tour Points. If you have tour points configured skip to the
Setup page.
6
InfoGraphic Systems
Designing a Guard Tour
Setup the Guard Tour
Points are assigned to a guard tour by associating points with a guard tour number. Both alarm points and
readers can be assigned to a guard tour number. Note that:
•
The alarm points and readers must have already been configured for guard tour before they
can be assigned to a guard tour. See the SAPPHIRE Pro User Manual for more information on
setting up Alarm Points or Readers.
•
Only NEW alarms trigger guard tour events. CANCELLED alarms or NEW or CANCELLED
troubles will not trigger guard tour events.
To setup a guard tour, from the SETUP section select Additional Features then Guard Tour. Click the Setup
Tab under the Guard Tour tab and the following screen will display.
Figure 4: Guard Tour Setup Page.
1. Select the Guard Tour number that you wish to configure. The maximum number of tours will
very depending on your system.
2. Select from the drop down list of configured Time Control Block the block the tour will use.
3. Select the Workstation where the tour will report.
4. Select the Tour Points that will be included in this Guard Tour. The Tour points that are in this
list are the Alarm Points and Readers that have been designated as a Guard Tour Point.
InfoGraphic Systems
7
SAPPHIRE Pro Software User Guide
Alarm Points as Tour Points
To designate an Alarm Point for Guard Tour, click the check box on the Alarm Point Setup page as shown
below. Tour Points should be manually activated switches, usually operated with a key.
Figure 5: Designating an Alarm Point for Guard Tour
Readers as Tour Points
To designate a reader for Guard Tour, click the check box on the Reader Options 2 page as shown below.
Figure 6: Designating a Reader for Guard Tour
8
InfoGraphic Systems
Designing a Guard Tour
5. Select from the list of Available Tour Points all of the points that will be used in this Guard
Tour, then click the
Right Red Arrow to move them to the Selected Tour Points list. This
can be done one at a time, or by holding the control key while clicking on the various points,
you can highlight several points and move them to the Selected Tour Points box together.
Once the tour points are moved to the selected box, they will report a new alarm or reader swipe
as a tour event to the designated workstation group after the assigned start of the Guard Tour.
They can be triggered in any order during the period of the tour. The events will be reported in the
order that they are triggered. It is recommended that tour points be triggered in different
sequences for each tour to minimize the possiblity that a tour pattern can be discovered by unauthorized persons.
6. Now select the Guards who will be performing this Guard Tour. Only the card holders who
have been designated for Guard Tour will appear in the Available Cards box.
Designating Cards for Guard Tour
To designate a cardholder for Guard Tour duty, click the check box on the Employee Access page as
shown below.
Figure 7: Designating a Cardholder for Guard Tour.
7. Select from the list of Available Tour Cards all of the Guards (cardholders) that are going to be
walking this Guard Tour, then click the
Right Red Arrow to move them to the Selected
Tour Cards list. This can be done one at a time, or by holding the control key while clicking on
the various cards, you can highlight several cards and move them to the Selected Tour
Cards box together.
InfoGraphic Systems
9
SAPPHIRE Pro Software User Guide
NOTE: If a card that is not designated as a Guard Tour Card is swiped through a selected
reader during the period of a guard tour, that event will be reported as an access event
not a guard tour event.
8. Click the Save/Add button to save the Guard Tour Settings.
The message Operation Complete will display.
Report Event Codes Handling
There are 13 event codes used for guard tour (See Table 1 for descriptions of these event codes). You can
set each of them to require any combination of the three processing options: Acknowledgemen, Display,
Print. By default, all guard tour events are:
•
Displayed in the log event window.
•
Printed at the log printer.
•
Do not require operator acknowledgement.
You can change any of these Guard Tour Report Options.
To navigate to the Event Codes page, click the
Setup button in the main navigation bar at the left
side of the browser window then click on the
Blue Eye button next to Additional Features on the
main Setup page. Click the
Blue Eye button next to Guard Tour then click the Event Codes button
and the following screen will display. You can also click the Guard Tour tab and then the Event Codes tab
button from any Additional Features page.
Figure 8: Guard Tour Event Codes page
Select the desired options by clicking the box next to each event code under the desired action placing a
checkmark in the box.
10
InfoGraphic Systems
Designing a Guard Tour
After all the report events have been configured, click the Save/Add button.
The message Operation Complete will display.
You have now completed the Guard Tour Setup process.
InfoGraphic Systems
11
InfoGraphic Systems • 7373 Lincoln Way • Garden Grove • California • 92841 • (714) 890-0083 • Fax (714) 890-0093
www.Infographicsystems.com