1
netcam
W A T C H E R
PROFESSIONAL
USER MANUAL
Contents
Getting Started..............................................................................................................................................................................................1
Overview.....................................................................................................................................................................................................1
Main Features.........................................................................................................................................................................................2
Installing Netcam Watcher Professional.........................................................................................................................3
Registering Netcam Watcher Professional....................................................................................................................4
System Requirements......................................................................................................................................................................5
Cameras Supported.........................................................................................................................................................................5
New in version 2.0.............................................................................................................................................................................6
Main Screen...................................................................................................................................................................................................7
Configuring Cameras......................................................................................................................................................................... 10
Selecting a Camera Folder..................................................................................................................................................... 10
New Camera / Edit Camera Dialog................................................................................................................................ 10
Camera Details........................................................................................................................................................................... 11
Setting Up a Video for Windows Device............................................................................................................... 11
Monitoring Type......................................................................................................................................................................... 12
Security............................................................................................................................................................................................... 12
Recording and Saving.......................................................................................................................................................... 12
Motion Detection Settings................................................................................................................................................. 13
Disk and CPU Usage Limits .............................................................................................................................................. 13
Scheduling and Patrolling................................................................................................................................................ 13
Patrolling........................................................................................................................................................................................... 14
Advanced Tab.............................................................................................................................................................................. 14
Extra Functions............................................................................................................................................................................ 16
FTP Settings..................................................................................................................................................................................... 16
Preset Names.............................................................................................................................................................................. 16
Defining Camera Types.............................................................................................................................................................. 17
Monitoring and Recording............................................................................................................................................................ 18
MJPEG Player............................................................................................................................................................................................. 19
Motion Detection ................................................................................................................................................................................... 20
Motion Detection Mask .................................................................................................................................................................... 21
Searching...................................................................................................................................................................................................... 22
The CamBar................................................................................................................................................................................................ 23
Alarms .............................................................................................................................................................................................................. 24
Schedules..................................................................................................................................................................................................... 26
Printing............................................................................................................................................................................................................. 27
Proxy Setup.................................................................................................................................................................................................. 28
Preferences.................................................................................................................................................................................................. 29
Security............................................................................................................................................................................................................ 31
Captions on Pictures........................................................................................................................................................................... 32
Automatic Backups and Archiving.......................................................................................................................................... 33
Remote Access......................................................................................................................................................................................... 34
Importing and Exporting Cameras......................................................................................................................................... 34
Using FTP........................................................................................................................................................................................................ 35
Command Line Switches................................................................................................................................................................ 36
Help and Support .................................................................................................................................................................................. 37
LICENCE AGREEMENT FOR NETCAM WATCHER PROFESSIONAL
Installing the software indicates your acceptance of these terms and conditions. If you do not agree to these terms
and conditions, then you should not install the software. This agreement applies to the software contained on the
CD-Rom, in downloadable form via electronic delivery and any updates to such software that you may download
from the Internet.
1.
Copyright
You acknowledge that you are receiving a limited license to use Netcam Watcher Professional (“the Software”) and
documentation, and that you shall obtain no ownership, title nor any other rights in or to the Software and related
documentation, all and any portion of which title and rights shall remain with Beausoft Ltd. The Software is
protected by copyright and other intellectual property laws and by international treaties.
2.
Restriction
The software is licensed according to the numbers of cameras and;
You may:
•
Use the Software on any single computer;
•
Use the Software on a second computer so long as only one copy is used at a time;
You may not:
•
Use the Software on more than one computer at a time;
•
Copy the Software, except as reasonably necessary for back-up purposes provided that you
reproduce all proprietary notices on the copy;
•
Modify, translate, attempt to reverse engineer, de-compile, disassemble the Software or any
portion of the software or create derivative works based on the Software;
•
Rent, lease, grant a security interest in, or otherwise transfer rights to the Software; or
•
Distribute the software in anyway, or make it available for downloading on the internet;
•
Remove any proprietary notices or labels on the Software.
•
Disclose your license code(s) to 3rd parties
3.
Term
This license is effective until terminated. You may terminate this Agreement at any time by uninstalling and
destroying the Software and related documentation and all copies thereof. This license will also terminate if you fail
to comply with any term or condition of this Agreement. Upon such termination, you agree to destroy the Software
and related documentation and all copies thereof.
4.
Limitation of Liability
NETCAM WATCHER IS PROVIDED "AS IS" WITHOUT ANY WARRANTY. EXCEPT AS EXPRESSLY PROVIDED HEREIN, BEAUSOFT
DOES NOT MAKE OR PASS ON TO YOU OR ANOTHER THIRD PARTY, ANY WARRANTY OR REPRESENTATION INCLUDING,
BUT NOT LIMITED TO, THE IMPLIED WARRANTIES OF MERCHANTABILITY AND FITNESS FOR A PARTICULAR PURPOSE.
WITHOUT LIMITING THE GENERALITY OF THE FOREGOING, BEAUSOFT DOES NOT WARRANT THAT THE SOFTWARE WILL
BE ERROR FREE OR THAT IT WILL MEET YOUR REQUIREMENTS. BEAUSOFT SHALL NOT BE LIABLE FOR ANY DAMAGE
SUFFERED BY YOU INCLUDING, BUT NOT LIMITED TO, CONSEQUENTIAL, INCIDENTAL, INDIRECT, SPECIAL, EXEMPLARY
OR PUNITIVE DAMAGES. THE ABOVE LIMITATIONS SHALL APPLY REGARDLESS OF THE FORM OF ACTION, WHETHER IN
CONTRACT, TORT (INCLUDING NEGLIGENCE), AND STRICT PRODUCT LIABILITY OR OTHERWISE, EVEN IF SUCH PARTY
HAS BEEN ADVISED OF THE POSSIBILITY OF SUCH DAMAGES.
The Software is not fault-tolerant and is not designed, manufactured or licensed for use as on-line control
equipment in hazardous environments requiring fail-safe performance, such as in the operation of nuclear facilities,
aircraft navigation or communication systems, air traffic control, direct life support machines, or weapons systems, in
which the failure of the Software could lead directly to death, personal injury, or severe physical or environmental
damage ("High Risk Activities") . Beausoft and its suppliers specifically disclaim any express or implied warranty of
fitness for High Risk Activities.
Version 2.0.1 5-March-2007
Netcam Watcher Professional is Copyright © 1998-2007 Beausoft Ltd. Pukekohe New
Zealand
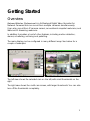
Getting Started
Overview
Netcam Watcher Professional is a full-featured Digital Video Recorder for
Network Cameras that can record from multiple cameras simultaneously.
It can also record from IP camera servers, conventional snapshot webcams, and
Webcam32 streaming webcams.
In addition it provides a host of other features, including motion detection,
alarms, scheduling, archiving and patrolling.
The main display can be configured in many different ways. See below for a
couple of examples
The left view shows the selected cam on the left, with small thumbnails on the
right.
The right view shows the multi cam screen, with larger thumbnails. You can also
turn off the thumbnails completely.
1
Main Features
Here is a summary of the Main Features of Netcam Watcher Professional:
•
•
•
•
•
•
•
•
•
•
•
•
•
•
•
•
•
•
•
•
•
•
Easily reconfigurable display lets you see as many cameras as you like.
Includes a new multi-camera display (previously a 2x2 display, but now
can be configured any way you like.)
Masked motion detection allows precise control over frame recording
and alarms.
Cameras can operate according to easily defined schedules (e.g. “Office
Hours”).
Alarm facility that lets you, for example, e-mail image when alarm occurs
or camera goes offline.
Patrol function lets you automatically pan the camera to preset points at
certain intervals. This can also be scheduled.
Multi-cam display can rotate cameras automatically, to show first set,
second set, and so on.
Remote access supported via Netcam Watcher Remote Control
program.
Disk space management optionally removes (or archives) old recordings
to allow for continuous operation.
Archive facility to save images before they are overwritten.
Backup facility to save all your configuration and recordings at fixed
times (e.g. daily or weekly)
CamBar lets you keep a subset of cameras on screen at all times.
Print utility allows multiple images per page to be printed.
Pan/Tilt/Zoom support.
Built-in MJPEG player lets you view recorded images and display each
frame’s timestamp.
Stand- alone MJPEG player also available as a free download.
Programmable captions can be put on pictures
FTP latest images or alarms to a remote host.
Administrator and / or User level security settings.
Convert recorded MJPEG files to AVI format.
Image enhancer for poor quality or lighting.
Search archived images and display motion graphically.
Instantly jump to a particular motion event.
2
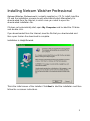
Installing Netcam Watcher Professional
Netcam Watcher Professional is normally supplied on CD. To install, insert the
CD and the installation process should automatically start. Alternatively it is
downloaded from the Internet, in which case you need to open the
downloaded installation file.
If it does not automatically start, open My Computer and located the CD drive
and double click.
If you downloaded from the Internet, save the file that you downloaded and
then open it when the download is complete.
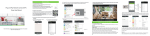
Installation is straightforward.
This is the initial screen of the Installer. Click Next to start the installation and then
follow the on-screen instructions.
3
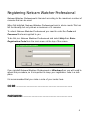
Registering Netcam Watcher Professional
Netcam Watcher Professional is licensed according to the maximum number of
cameras that can be used.
When first installed, Netcam Watcher Professional runs in demo mode. This has
full functionality but only allows a maximum of 4 cameras.
To unlock Netcam Watcher Professional you need to enter the Code and
Password that was supplied to you.
To do this, run Netcam Watcher Professional and select Help then Enter
Registration Code from the main menu at the top of the screen.
If you reinstall Netcam Watcher Professional or Windows then you will need to
repeat this procedure, so it is important to keep your registration code in a safe
place.
It is recommended that you make a note of your codes here:
CODE:……………………………………………………………………………………………..
PASSWORD:…………………………………………………………………………………..
4
System Requirements
Netcam Watcher Professional requires Windows 98, ME, XP,2000, 2003 or Vista
with a minimum of 256MB of RAM and SVGA display (1024x768) or better.
For serious use you should consider using Windows 2000, XP or Vista with
512MB or more of RAM.
The amount of disk space required depends entirely on how much you want to
record, how many cameras you have, what frame rates you use, and many
other factors. For assistance in determining your disk space requirements, contact
your distributor.
Cameras Supported
This is a partial list of cameras that have been tested with Netcam Watcher
Professional:
•
•
•
•
•
•
•
•
•
•
•
•
•
•
•
•
•
•
•
•
•
Axis Network Cameras (eg 2100) and Servers (eg 2400)
Intellinet Network IP Cameras
VivoTek Network Cameras and Camera Servers including MPEG4
Panasonic WV-NP472, WJ-NT104, WV-NS324 and HCM Range
Toshiba IK-WB range
Canon VB-C10
VEO Observer
Mobotix
Linudix Wisecam
D-Link DCS -1000, 2000, 5300, etc
IP Kamera 9000 and IP Kamera servers
JVC VN-C2WU
Stardot Netcam
Orite network camera
Sony SNC- RZ30
TRC network cameras
Yoko video server
Webcam32 streaming format cameras.
Video for Windows devices like standard webcams and video
capture cards. Note that only one VFW device can be used.
Any Netscape-style Motion JPEG streaming camera.
Any network snapshot camera that uses JPEG images. This includes
most webcams on the Internet.
5
We are adding new cameras all the time, so please check with us if your device
is not on this list.
Netcam Watcher Professional has the ability to define new camera types, so
some cameras can be supported simply by defining the correct URLs.
New in version 2.0
Here is a list of the main changes in this version:
•
Pre-triggering Now you can record for a specified amount of time
before motion occurs (as well as after motion ceases)
•
Random Patrolling makes patrolling hard to second guess. When
enabled, camera moves from one patrol position to another in a
random manner.
•
AlwaysUp Included with registered version. When you register (ie
purchase) a licence for Netcam Watcher Professional, a full copy of the
AlwaysUp utlity is included free.
See www.coretechnologies.com/products/AlwaysUp/ for details.
AlwaysUp allows you to run Netcam Watcher as a windows service, and
helps ensure that Netcam Watcher is “always up”
AlwaysUp can:
-- start Netcam Watcher on system start
-- monitors Netcam Watcher and restarts it if it fails, becomes
unresponsive, hogs the CPU or otherwise misbehaves
-- dismiss any error dialogs
-- restart at regular intervals
Note that AlwaysUp does not currently work with Vista. This is more a
limitation of Vista, in that it does not allow Windows Services to interact
with the desktop.
6
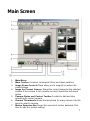
Main Screen
1.
2.
3.
4.
5.
6.
7.
Main Menu.
Main Toolbar. Common commands. Timer and Alarm switches.
Image Zoom Controls. These allow you to magnify or reduce the
current image
Image for Current Camera. Shows the current image for the selected
camera. If the camera is not currently running it shows the last saved
picture.
Camera Status and Control Toolbar. Controls to start and stop
recording the current camera.
Camera Thumbnails. Shows the last picture for every camera. Use this
panel to select a camera.
Motion Detection Bar Shows the amount of motion detected. Click
here to alter the motion settings
7
8.
Camera Access Buttons Allows one-click access to the current
camera’s homepage and admin page.
9. Image Enhancer Dynamically enhances images. Special enhancement
for low light conditions. Right click to adjust.
10. User Defined Controls On/Off
11. Patrolling On/Off
12. Pan/Tilt/Zoom Shows or Hides the Pan/Tilt/Zoom control panel.
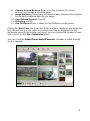
Clicking the Multi Cam tab shows the Multi Cam View. Initially this shows the first
four cameras but you can select any cameras you like by dragging from the
thumbnails panel to the location you want. You can change the number of rows
and columns on the F ile > Preferences dialog
You can check the Rotate Pictures Every XX seconds checkbox to rotate through
all your cameras.
8
Clicking the Recordings tab shows the recorded MJPEG files for the current
camera. You can view a recording by double- clicking it.
You can change the size of the Camera Thumbnails by clicking the button at
the top of the panel.
You can also turn off the thumbnails entirely by selecting View > Show
Thumbnails from the main menu. This can improve performance if you have
lots of cameras.
9
Configuring Cameras
Selecting a Camera Folder
Netcam Watcher Professional uses a Camera Folder to store details of your
cameras, and to store recordings. You can select the location of the camera
folder by using File > Select Camera Folder from the main menu.
Initially the camera folder is set to be the same as the program folder. Unless
you want to store your camera database here, it is a good idea to change this
before creating any cameras.
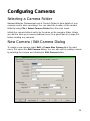
New Camera / Edit Camera Dialog
To create a new camera, select Edit > Create New Camera from the main
menu. This opens the Edit Camera dialog. You can also edit an existing camera
by selecting the camera and clicking the Edit Camera button.
10
Camera Details
This section lets you define the Camera’s and characteristics:
•
•
•
•
•
•
Camera Name: A short name used for tagging the thumbnails. Also
used for camera sub-folder name.
Description: Optional longer description.
Location: Optional location string.
Camera Address: IP address of camera. This can be a dotted IP
address like:
192.168.0.253 or it can be a named address:
camera1.mydomain.com. …or a non- standard port:
camera.mydomain.com:8080
Camera Type: Select from one of the predefined types or choose User
Defined (in which case you can click the Define button to define the
camera’s URLs)
Camera Channel: For camera servers, select the channel number here.
Setting Up a Video for Windows Device
Select one of the Video for Windows supported devices, like Standard Webcam
or Video for Windows Device.
Three new buttons will appear that allow you to configure the device:
•
•
•
VFW Driver lets you select which of the available drivers to use
VFW Source lets you select the device to be used if more than one
VFW device is installed. There may also be other options on this dialog
depending on the actual device in use.
VFW Format lets you select the size of the image and other properties
of the device.
All three of these dialog may vary depending on which VFW devices are
installed.
NOTE: Only one Video for Windows device can be used. Attempting to use more
than one will lead to unpredictable results.
11
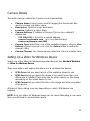
Monitoring Type
This section lets you specify how the image is fetched from the camera, and the
image size and quality.
•
•
•
Full Motion means that the camera is sending a stream of images.
Snapshot means that Netcam Watcher Professional fetches a
snapshot at regular intervals. The interval can be less than a second, or
even zero.
Flip if checked displays the image upside down
Note that some on cameras, only Full Motion or Snapshot will be available. This
depends on how the camera operates and communicates.
On cameras that only support Snapshot mode, setting an Interval of zero will
often produce results similar to Full Motion (i.e. several frames per second)
Security
If the camera needs a Username and Password to view the image, you need
to enter them here, and check the Use Authentication box.
Recording and Saving
12
When you Start All cameras, the camera is started in the mode specified here:
•
•
•
•
Monitor: The camera is running (in other words, Netcam Watcher
Professional is fetching pictures) but no pictures are saved.
Motion Detect: The camera is running and saving frames where
motion is detected.
Record Every Frame: The camera is running and every frame is
recorded.
Data Folder Path specifies where you want to store the recordings. If
you leave this blank the recordings are stored in a sub-folder in your
main camera folder.
Motion Detection Settings
This lets you configure settings relating to motion detection:
•
•
•
Use Mask : If checked then the motion detection mask for this camera is
used.
Edit Mask : Click to edit the mask
Record for XX seconds: You can specify how long recording
continues after motion has stopped being detected, or before motion
has started.
Disk and CPU Usage Limits
Netcam Watcher Professional can limit the amount of Disk and CPU that a
camera uses.
If you enable automatic disk space management (by checking the Limit Disk
Usage checkbox) then Netcam Watcher Professional will delete old MJPEG
files if the limit specified here is exceeded.
You can either specify a number of days, or a number of megabytes
If you specify a non-zero value for CPU Throttle then Netcam Watcher
Professional will sleep for this period of time after each frame is received from
this camera.
Scheduling and Patrolling
You can specify a Schedule to use for this camera. See the section on
Schedules to see how this works.
13
Patrolling
Patrolling works by panning the camera from one preset position to the next,
with a defined interval in between. For this function to be available, your camera
must support pan/tilt presets. Most cameras that can pan also have presets.
You specify here the Interval and the Number of presets that you want to
patrol. To start Patrolling, click the Patrol button on the lower toolbar (the rightmost button).
Patrol Button
You can also specify a Patrol Schedule to use for this camera. See the section
on Schedules to see how this works. Basically, the patrol schedule specifies
when patrolling is on or off. Note that Patrol Schedules (like regular schedules)
only operate when the Timer button is down.
You can also specify a preset location to go to for a particular half-hour slot, so
for example you can have the camera on preset #2 from 9am to 5pm, then
preset #3 from 5pm to midnight.
Note that whenever patrolling is finished, either by schedule or by clicking the
Patrol button, the camera returns to preset #1.
If Random Patrolling is checked, the camera does not move from preset #1 to
#2 to #3 in a regular manner, but instead selects a random preset after the
patrol interval expires.
Advanced Tab
This lets you set up TCP Port Activated Motion Detection. This is used by some Axis
devices such as the 241Q Video Server.
In this scheme, motion detection is performed by the device rather than by
Netcam Watcher. The device sends a TCP message to a specific port when
motion starts and stops. Netcam Watcher can start and stop recording on receipt
of these messages.
14
Some points to note when using this feature:
•
•
•
•
•
Each camera must use a seperate TCP port, and this must match the
server port defined in the device.
The messages set up in the device must match the messages in this
dialog. Suggest you use messages like CAM1 ON...CAM1 OFF, etc
When Use TCP Motion Detection is checked, this is activated when the
camera is in motion detection mode. In this case, no current image is
shown, but the Netcam Watcher waits for a TCP control message to start
and stop recording.
When the camera is in Monitor or Record All Frames mode it operates
normally
It is advisable to use this feature in conjunction with the Record for XX
seconds after motion stops (on the Recording and Saving tab). This
prevents dropped frames when the motion starts and stops rapidly.
If you check Monitor when no motion then snapshots are retrieved at the
interval specified here. This is useful to keep an eye on the camera when there is
no motion, also it acts as a watchdog, producing offline notifications if
communication with the camera is lost.
Please contact support if you need help getting this feature to work.
15
Extra Functions
User-defined Extra functions can be useful for providing additional functions like
activating switches or browsing to a related web page.
You can specify up to 16 extra User Defined Functions for a camera. These are
URLs that can be accessed by clicking the User Defined Functions button on
the Camera Status and Control Toolbar.
For each extra function you can specify a Name, URL and Hint. The name is
displayed on the extra function button.
If the URL starts with “http” then a direct address is assumed. Otherwise the URL is
constructed by appending the string to the camera’s Address. Note : No leading
“/” is required.
If Browse To is checked, a Browser window is opened to the specified URL.
Otherwise Netcam Watcher Professional simply fetches the URL internally (i.e. it
issues a http GET). Any errors are ignored.
FTP Settings
This opens the FTP settings dialog that allows you to set up this camera to send
pictures or alarm pictures to a remote host. See the Using FTP section for more
information.
Preset Names
Click the Preset Names tab on the main Edit Camera dialog to associate
names with preset positions. This tab will only be visible if the camera supports
preset positions.
Some cameras allow you to also enter preset names into the camera. Netcam
Watcher Professional does not retrieve these names, so it is up to you to make
sure that any names in the camera match the names you set up here.
Some newer Axis products (eg 213, 241) use preset names instead of numbers.
For these devices it is important that you set up the preset names here to be
exactly the same as the preset names in the Axis device, otherwise they will not
work.
Note: For these Axis devices, if a preset name (in the camera) contains spaces,
you should replace the spaces with a plus sign (+), for example:
Axis Name : Back Yard should be specified as Back+Yard
16
Defining Camera Types
You can add new camera types to Netcam Watcher Professional using the Edit
Camera Definitions dialog.
Load Definition loads an existing Camera Definition.
Save Definition lets you save a definition. This then becomes available on the
Edit Camera dialog.
Camera Definitions are stored in files with the extension .CDF
For detailed information about how to define camera types, contact Beausoft
Technical Support, [email protected]
17
Monitoring and Recording
The Camera Control Toolbar lets you control the current camera.
1
1.
2
3 4 5
6 7 8
9 10 11
Motion Detection Bar shows the amount of motion currently detected.
Clicking on this allows you to adjust the motion detection settings for the
current camera.
Then there are four VCR- style buttons to control the camera:
2.
3.
4.
5.
Stop button
Monitor button – show live images, but don’t record
Motion-Detection button – record on motion
Recording button – record every frame
And some other buttons:
6.
7.
8.
9.
10.
11.
Camera Home Page button
Camera Admin Page button
Image Enhancer On/Off. Right click to Adjust
Show / Hide User Defined Functions
Show / Hide Pan/Tilt/Zoom controls
Start and Stop Patrolling
When Netcam Watcher Professional records images, it records into MJPEG files
(Motion JPEG).
One file is created per hour. All frames recorded for that hour go into that file.
You can see the MJPEG files saved using the Recordings tab. If you double click
on a recording it plays it in the MJPEG Player.
18
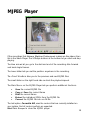
MJPEG Player
If the recordings that Netcam Watcher Professional makes are like videos, then
this is the Video Player. The VCR-style buttons at the bottom let you start and stop
playing.
The blue arrows let you go to the start and end of the recording. Also forward
and back single frames.
The lower slider lets you set the position anywhere in the recording.
The < and
> buttons take you to the previous and next MJPEG files.
The small slider on the right hand side controls the playback speed.
The Main Menu on the MJPEG Player lets you perform additional functions:
•
•
•
•
•
Save the current MJPEG file
Copy or Save the current frame
Print the current frame
Extract the individual JPEGs from the MJPEG file
Convert the MJPEG file into an AVI file
The last option, Convert to AVI, uses the codecs that are currently installed on
your system. Not all codecs perform as expected.
Hint: Press Escape to close the MJPEG player.
19
Motion Detection
When a camera is running, Netcam Watcher Professional is constantly
comparing frames, looking for motion. It displays the amount of motion on the
Motion Detection Bar at the bottom of the screen.
You can adjust the motion detection settings by clicking on the bar graph.
There are three sliders that let you control three parameters:
•
•
•
Cell Size. The picture is divided into square cells, and each cell is
compared. This slider controls how large the cells are. This can range
from 4x4 pixels to one large cell that covers the whole picture. Smaller
cell sizes mean more CPU required, but better motion discrimination.
Percentage of cells changed determines how many cells need to be
changed before the picture is considered different. This slider adjusts the
position of the red and green bars on the Motion Detection Bar Graph.
Sensitivity controls how sensitive to motion the bar graph is.
20
Motion Detection Mask
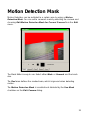
Motion Detection can be restricted to a certain area by using a Motion
Detection Mask . You can edit a camera’s mask by selecting the camera and
choosing Edit Motion Detection Mask for Current Camera from the Edit
menu.
The Mask Editor is easy to use. Select either Mask or Unmask and the brush
size.
The Red area defines the masked area, which is ignored when detecting
motion.
The Motion Detection Mask is enabled and disabled by the Use Mask
checkbox on the Edit Camera dialog.
21
Searching
Netcam Watcher Professional lets you search for motion graphically. Click the
Search button to open the Search dialog.
The Green area (below the line) shows the presence or absence of MJPEG files
that cover the time period. Note that if motion recording is used and no motion
is detected in a particular hour then no recording will be present.
The Red area (above the line) shows where frames have been recorded. If
Motion Detection recording was used, this gives a graph of the motion detected.
Select the Endpoint for the search, Select the period, Hour, Day or Week, and
click Do Search. The results are displayed. (Note: this may take some time).
You can double click on the results to open the corresponding MJPEG file at the
correct place.
Right clicking opens a menu that lets you:
• Open in MJPEG Viewer (same as double clicking)
• Set Endpoint Here – sets the end of a subsequent search where you
click.
You can also click the < and > buttons to perform searches for the previous and
next periods.
22
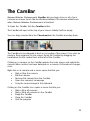
The CamBar
Netcam Watcher Professional’s CamBar lets you keep some or all of your
cameras on-screen (much like the Windows taskbar). This remains visible even
when Netcam Watcher Professional is minimized.
To Open the CamBar click the CamBar button.
The CamBar will open at the top of your screen. Initially it will be empty.
You can drag cameras from the Thumbnails to the CamBar and drop them.
The CamBar can be dragged to dock on any edge of the screen. It can also be
made to float anywhere on the screen. Move the CamBar by dragging the
handlebars, the thin vertical bars at the left of the CamBar.
Clicking on a camera on the CamBar restores the main screen and selects the
camera. When motion has been detected on a camera, it’s thumbnail changes
color.
Right click on a camera and a menu opens that lets you:
• Start or Stop the camera
• Edit the camera
• Remove the camera from the CamBar
• Open the camera’s homepage
• Copy the current image to the clipboard
Clicking
•
•
•
•
•
on the CamBar Icon opens a menu that lets you:
Start or Stop all cameras
Start or Stop all cameras on the CamBar
Empty the CamBar
Close the CamBar
Quit the program
23
Alarms
Netcam Watcher Professional includes an Alarm facility. Alarms are generated
when more than a certain amount of motion occurs and/or when a camera
goes offline (i.e., communications is lost). The Alarms for a camera are
configured by clicking the Alarms button on the Edit Netcam dialog, or by
selecting Edit Alarms for Current Camera from the Edit menu.
The top panel, Global or Individual Alarm Settings selects whether you use
the default settings for this camera, or use individual settings.
You can Copy the current global settings by clicking the button in this panel.
The Alarm Filter panel enables single event filtering. If enabled, more than one
motion event is required to trigger an alarm. The time box lets you specify how
far motion events must be apart to be considered single events.
The Generate Alarm if Camera Offline checkbox enables the alarm when
communications with the camera is lost.
The Local Alarm panel lets you configure alarms that produce actions on the
PC that Netcam Watcher Professional is running on:
•
•
•
Log to Alarm Log
Play a sound
Select the camera
You can view the Alarm Log using Show Alarm Log on the Alarms menu.
24
The Remote Alarm panel lets you configure alarms that can send messages,
etc:
• Email Alarm Notification to a specified e-mail address. To send to
multiple recipients, separate the different email addresses by commas.
The default message sent is
Motion detected on <CAMNAME> at <SHORTTIME> on <SHORTDATE>
(Note the replaceable parameters; the same as used on Captions). You
can change the message if you like.
•
•
•
Attach the last image to the e- mail message
Send GET request to a particular web address. The URL specified can
have expandable parameters: %CAMNAME% for the camera name.
%CAMNUM% for the camera number.
Run an external program, passing the camera name and camera
number as parameters.
For Email Alarms to work you must set up an SMTP mail server on the main
Preferences dialog.
There is a Maximum Rate that can be set for remote alarms, to prevent too
many being generated.
Note that Alarms are only generated when the Alarms button on the main
Toolbar is down.
Alarms can be set according to an Alarm Schedule. This operates similarly to
regular schedules. Edit this using Edit Alarm Schedule on the Alarms menu.
This defines a schedule of when the Alarms (local and/or remote) should be
Enabled or Disabled. Like regular schedules, the Alarm Schedule only
operates when the Timer button on the main toolbar is down.
25
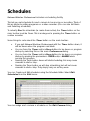
Schedules
Netcam Watcher Professional includes a scheduling facility.
This lets you set schedules for each camera to be running or recording. Think of
this as similar to setting programs on a video recorder. (You can also set Alarm
and Patrolling schedules).
To actually Run the schedules (i.e. make them active), the Timer button on the
main toolbar must be Down. This is analogous to pressing the Timer button on
a video recorder.
Some things to note about the Timer button on the main toolbar:
•
•
•
•
•
If you quit Netcam Watcher Professional with the Timer button down, it
will be down when the program next starts.
You can force the Timer and/or Alarm buttons to be down on program
start-up by selecting this on the main Preferences dialog.
You can force the Timer and/or Alarm buttons to be down on program
start-up by passing the parameters –TIMER and/or –ALARMS when
running the program.
Pressing the Timer button down will start scheduling; this may cause
cameras to start or stop.
Pressing the Timer button up will stop scheduling, but will not cause
cameras to start or stop. They simply carry on as they were.
You can Create and Edit schedules using the Schedule Editor. Select Edit
Schedules from the Edit menu.
You can assign each camera a schedule on the Edit Camera dialog.
26
Printing
Netcam Watcher Professional includes a printing utility.
You can print up to 6 rows and 6 columns of pictures per page, allowing a
maximum of 36 pictures per page. You select the page layout using the Page
Setup dialog on the Print menu.
When printing, the page is filled left to right, top to bottom. When a page is full it
is printed. You can see the current status of a page by using the Print Status
dialog on the Print menu
You can print pictures either from the current camera by using Print Current
Image from the Print menu, or you can print frames from within the MJPEG
player.
The Print menu also has options to print or cancel an incomplete page.
27
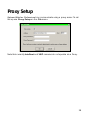
Proxy Setup
Netcam Watcher Professional can communicate using a proxy server. To set
this up use Proxy Setup on the File menu.
Note that currently Intellinet and VEO cameras do not operate via a Proxy.
28
Preferences
Set program preferences and options using the Preferences dialog on the File
menu.
•
•
•
•
•
•
•
•
•
•
Show Icon in System Tray: The program minimizes to a small icon in
the system tray.
Use Black/White thumbnails: For improved performance
Outgoing Email Server: You need to specify an email (SMTP) server to
use if you want to send e-mail alarms.
SMTP Username, SMTP Password: Enter these here if your email
server requires them. Otherwise leave blank.
Email From Address: Used to identify outgoing email alarm
messages.
Global CPU Throttle: Number of milliseconds paused between each
frame received.
Autotune CPU: If checked, Netcam Watcher will constantly monitor it’s
CPU usage and attempt to keep to the target CPU usage specified on
the slider.
Minimum Darkness Level for Motion Detect. You can specify a value
here for the lowest pixel value (1..255) that is considered for motion
detection. Often cameras make excessive noise when there is little or no
light and this can falsely trigger motion detection. Use a value here to
prevent false alarms.
Force Alarms, Timer On: If checked forces these buttons to be down
on program start-up.
AVI frame rate: When converting MJPEG to AVI this specifies the frame
rate.
29
•
•
•
•
Automatically check for new version: An automatic new version
check is performed and you are notified on program shutdown if one is
available.
Use Joystick for Pan/Tilt/Zoom: If checked you can use a standard
USB joystick for Pan/Tilt/Zoom functions. Use buttons 1 and 2 to zoom in
and out.
Use HKEY_LOCAL_MACHINE key: If checked this registry key will be
used instead of HKEY_CURRENT_USER. This is useful if you want to run
Netcam Watcher as a service as the run- as-service program and the
normally run program will both use the same registry data. If you select
this key it will prompt you to copy the current registry setup from the old
to the new keys. Normally click Yes.
MultiCam Display Rows and Columns- you can specify the number
of rows and columns on the Multi Cam display. Maximum is 10 rows
and 10 columns.
30
Security
Netcam Watcher Professional can be set up to require Admin and/or User
passwords.
If an Admin password is set, the following functions require the Admin password
to be entered:
•
•
•
•
•
Editing Cameras or Motion Detection Masks
Editing Schedules
Editing Alarm Schedules
Changing Preferences
Changing Proxy Setup
If a User password is set then either this or the Admin password must be
entered to run the program.
If Password required to do anything is checked then any action (including
starting and stopping cameras, playing recordings or quitting the program)
require a password.
Set and configure the Security settings on the Program Security tab on the
global Preferences dialog.
31
Captions on Pictures
Netcam Watcher Professional can be set up to write captions onto pictures. The
captions can contain the date and time stamps, camera name as well as fixed
text. Use the Captions on Pictures dialog on the File menu.
If you want to write a caption onto your pictures, select Custom Caption and
enter the caption that you want into the edit box. You can click the buttons
provided to enter fields such as dates and times.
32
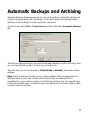
Automatic Backups and Archiving
Netcam Watcher Professional can be set up to perform automatic backups of
camera configurations and recordings. It can also archive recordings before
deleting old recordings to make space for new ones.
To set this up, select File > Preferences and then click the Automatic Backup
tab
This lets you specify whether you want Automatic Backups and/or Archiving. Also
you can specify the location to back up (or archive) to.
This also lets you set the frequency, Daily, Weekly or Monthly, and various other
settings.
Note that the Archiving function only controls whether files are saved prior to
deleting them. It does not actually control when files are deleted. This is
controlled on a per-camera basis on the Edit Cam dialog. You can specify here
is files are deleted when a certain amount of disk space has been used or after
a certain amount of time.
33
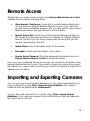
Remote Access
This tab lets you enable remote access using Netcam Watcher Remote Control
software. You can set the following fields:
•
Allow Remote Client Access : check this to enable Netcam Watcher to
act as a server for Netcam Watcher Remote Control. If you check this
you will need to restart the program. Also you may need to give Netcam
Watcher permission with your firewall to act as a server.
•
Remote Access Port : This is the port that Netcam Watcher will listen on.
This needs to be the same as the port configured on Netcam Watcher
Remote Control. If you are using a router and are using NAT you will
need to “pass through” this port.
•
System Name. Give a descriptive name for the system.
•
Description : (Optional) A description of the system.
•
Remote Access Password: This is the password that needs to be set in
Netcam Watcher Remote Control to access this system.
Once you have configured remote access you can connect to this system using
Netcam Watcher Remote Control. If you want to access the system from across
the Internet you need to make sure that your router is configured to make this IP
address and port visible.
Importing and Exporting Cameras
You can save your current camera definitions (i.e., the current cameras that you
have configured) by using Tools > Export Camera Definitions. This creates a
coded file with the default name webcams.def
You can also load cameras from a .def file, using Tools > Import Camera
Definitions. In this case any cameras in the def file that you open are added to
the current set of cameras.
34
Using FTP
Netcam Watcher Professional can use FTP (File Transfer Protocol) to send
cameras latest pictures and/or alarm pictures to a remote host. If the remote
host is an Internet web server then you can then view these images from across
the Internet.
There are two parts to getting this working. Firstly you configure the remote host
by using File > FTP Settings
This opens a simple dialog that lets you specify details about the remote host:
•
•
•
•
•
•
•
Remote Host e.g. www.myserver.com or 192.111.333.123
Username
Password
Remote Path you can put the pathname here to store the pictures or
leave blank for the default folder.
Alarm Remote Path similar to Remote Path but for alarm images.
Use Passive Mode often this works best if you have a firewall
Write FTP Log file writes a log file to FTPLOG.TXT in the Netcam Watcher
Program Folder.
The second part is set up on a per-camera basis, by clicking the FTP button on
the Edit Camera dialog.
You can select whether to send pictures at regular intervals, or when an alarm
occurs, also the frequency and filenames to use. You can also check a box to
ensure that the camera returns to home position (preset #1) before a regular
FTP.
35
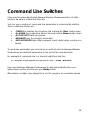
Command Line Switches
If you want to automatically start Netcam Watcher Professional then it’s often
useful to be able to enable the timer, etc.
You can use a number of command line parameters to automatically start the
Timer, enable the alarms, etc.
•
•
•
•
•
-TIMER this enables the scheduler, like pushing the Timer button down
-ALARMS this enables the Alarms, like pushing the Alarms button down
-AUTOSTART starts all cameras
-MINIMIZE runs the program minimized
-NOPASSWORD skips initial password check. Useful when running as a
service.
To use these parameters you must set up an extra shortcut to Netcam Watcher
Professional and add the parameters to the end of the command line.
For example, a command line in a shortcut might look like this:
"E:\Program Files\BeauSoft\ncwpro\ncw.exe" –TIMER –MINIMIZE
If you want Netcam Watcher Professional to start automatically when your
system starts, put the shortcut into your Startup folder.
Alternatively, consider using AlwaysUp to run the program as a windows service.
36
Help and Support
Netcam Watcher Professional can send an email message directly to the
support center. Use Send Us a Comment on the Help menu.
You can send technical support or other questions and we will get back to you
as soon as possible.
You can also use this dialog to join our mailing list. This list is never shared with
anyone. It is only used to give news about Netcam Watcher Professional.
37


![UK User`s Manual [ Notebook ]](http://vs1.manualzilla.com/store/data/005694610_1-ad8e24898a53e900e9c2a73fa8f500a7-150x150.png)