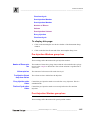
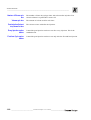
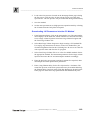
1
TRACE GC
AS 2000 Autosampler
User’s Manual
Published by Technical Publications, Thermo Finnigan Italia S.p.A
Strada Rivoltana
20090 Rodano-Milan
Italy
Printing History: Revision D printed March 2002.
Xcalibur™ and TRACE GC ™ are trademarks and/or product names of Finnigan Corporation. Microsoft® is a registered trademark of
Microsoft Corporation.
Technical information contained in this publication is for reference purposes only and is subject to change without notice. Every effort
has been made to supply complete and accurate information; however, Thermo Finnigan Corporation assumes no responsibility and
will not be liable for any errors, omissions, damage, or loss that might result from any use of this manual or the information contained
therein (even if this information is properly followed and problems still arise).
This publication is not part of the Agreement of Sale between Thermo Finnigan Corporation and the purchaser of a Thermo Finnigan
system. In the event of any conflict between the provisions of this document and those contained in Thermo Finnigan Corporation’s
Terms and Conditions, the provisions of the Terms and Conditions shall govern. Reference to System Configuration and Specifications
supersede all previous information and are subject to change without notice.
The GC/MS and LC/MS products of the Thermo Finnigan Division are produced under VISION 2000 accredited quality management
systems.
U.S.A.: Thermo Finnigan Corporation • 355 River Oaks Parkway • San Jose, CA 95134-1991 • [1] (408) 965-6000
Thermo Finnigan Technical Support • 3661 Interstate Park Road North • Riviera Beach, FL 33404 • (800) 685-9535, (561) 844-5241 • Fax (561) 8818431
Australia: Thermo Finnigan • P.O. Box 239 Rydalmere• Unit 20, Metro Centre • 38 – 46 South Street • Rydalmere, N.S.W. 2116 • [61] (02) 9898-9000
Austria: Thermo Finnigan GmbH • Wehlistrasse 27b • A-1200 Wein • [43] (01) 333 50 34-0 • [email protected]
Belgium: Thermo Finnigan BVBA • Groenenbrogerlaan 84 • B-2610 Wilrijk (Antwerpen) • [32] (03) 825 0670
Canada: Thermo Finnigan Canada • 5716 Coopers Avenue, Unit 1 • Mississauga, Ontario • L4Z2E8 • [1] (905) 712-2258
France: Thermo Finnigan France SA • Parc Hightec Sud • 12 Avenue des Tropiques • Z.A. de Courtaboeuf BP141 •
F-91944 Les Ulis Cédex • [33] (01) 69 18 88 10
Germany: Thermo Finnigan Analytische Systeme GmbH • Boschring 12 • D-63329 Egelsbach • [49] (06103) 408 0
Italy: Thermo Finnigan Italia S.p.A. • Strada Rivoltana • I-20090 Rodano (Milano) • [39] (02) 95059 1
Japan: Thermo Finnigan K.K. • Nishi-Shinjuku Toyokuni Bldg. 3F • 2-5-8 Hatsudai, Shibuya-ku • Tokyo 151-0061 •
[81] (03) 3372-3001
Japan: Thermo Finnigan K.K. • Esaka Grand Building • 2-3-1 Esaka-cho, Suita City • Osaka 564-0063 •
[81] (06) 6387-6681
Netherlands: Thermo Finnigan BV • Druivenstraat 33 • NL – 4816 KB Breda • [31] (076) 587 8722
P.R. China: Thermo Finnigan China • Suite 912-916, Ping An Mansion. • No. 28, Jin Rong Street • Xicheng District • Beijing 100032 • [86] (010) 6621
0839
Spain: Thermo Finnigan SA • Acer 30 – 32 • Edificio Sertram – Planta 2, Modulo 3 • ES-08038 Barcelona •
[34] (093) 223 0918
Spain: Thermo Finnigan SA • Avenida de Valdelaparra 27 • Edificio Alcor – Planta 2a • ES-28108 Alcobendas (Madrid) • [34] (091) 657 4930
Sweden: Thermo Finnigan AB • Pyramidbacken 3 • S-141 75 Kungens Kurva (Huddinge) • [46] (08) 680 0101
United Kingdom: Thermo Finnigan Ltd. • Paradise • Hemel Hempstead • Herts HP2 4TG • [44] (01) 442 233 555
Notes: The country code is enclosed in square brackets [ ]. The city code or area code is enclosed in parenthesis ( ). For countries
other than the U.S.A., when you are dialing from within the specified country, dial the 0 of the city code. For countries other than Italy,
when you are dialing from outside the country, do not dial the 0 of the city code.
Copyright© 2002 Thermo Finnigan, a member of the Thermo Electron family of companies. All rights reserved.
Printed in Italy
____________________________________________________________________________________________
Contents
Chapter 1
AS2000 AS SETUP .......................................................................................................................5
Autosampler Configuration ...................................................................................................................6
Configuration Window ..........................................................................................6
Autosampler Menu 8
AutoSampler Setup View - Injection Events Page ................................................................................9
Injection Events Page .............................................................................................9
To display this page: ............................................................................................10
Setting Up Injection Event Parameters ...............................................................................................13
AutoSampler Setup View - Pre/Post Events Page 14
Pre/Post Events Page ............................................................................................14
To display this page: ............................................................................................15
Setting Up Pre/Post Events Parameters ...............................................................................................17
Setting Up Parameters for an LVOCI .................................................................................................18
Operating Precautions for the LVOCI ................................................................................................20
AutoSampler Glossary ........................................................................................................................21
____________________________________________ AS 2000 Autosampler User’s Manual
_______________________iii
____________________________________________________________________________________________
iv
_________________________________________ AS 2000 Autosampler User’s Manual _____________________________________
Chapter 1
AS2000 AS SETUP
This chapter contains information to configure and to set your AS 800,
AS 2000 or AS 9000 Autosampler.
This chapter contains these topics:
Autosampler Configuration
6
Autosampler Menu
8
AutoSampler Setup View - Injection Events Page
9
Setting Up Injection Event Parameters
13
AutoSampler Setup View - Pre/Post Events Page
14
Setting Up Pre/Post Events Parameters
17
Setting Up Parameters for an LVOCI
18
Operating Precautions for the LVOCI
20
AutoSampler Glossary
21
__________________________________________ AS 2000 Autosampler User’s Manual
______________________ 1-5
AS2000 AS SETUP
____________________________________________________________________________________________
1.1 Autosampler Configuration
Items listed under this heading contain definitions to each control you see
listed in this Instrument Configuration window.
Configuration Window
Figure 1-1. AS 2000, AS 800, AS 9000 Configuration Screen
Serial Port
On the back of your CPU are two 9-pin COM ports (A and B). Select the
COM port in which your autosampler cable connects. The other end of this
cable connects to your autosampler’s RS 232 C connection.
Autosampler Type
Specify if your autosampler is one of two options: left-hand mount or righthand mount. A left-hand mount has a sample tray on the left side of the
tower. A right-hand mount has a sampler tray on the right side of the tower.
Number of Vials
Maximum Syringe
Volume
1-6
The number of vial positions your autosampler tray contains.
The maximum amount of volume your syringe can contain. This is the total
volume of sample to be pulled up into the syringe and injected into the GC.
This is limited by the syringe volume and barrel size. For example, a value
between 1 and 10 µL can be set for the CTC A200Sand a value between 1
and 250 µL can be set for the AS 800, AS 2000 (depending on the installed
syringe size). and AS 9000 autosamplers. Entering a value in this text box
controls the maximum amount you can set in the Sample Volume control
located on your AS Injection Events page.
______________________________________ AS 2000 Autosampler User’s Manua______________________________________
AS2000 AS SETUP
____________________________________________________________________ _______________________
Large Volume Injection
Internal Standard
Check this box if you will do large volume injections with this autosampler
and to activate Run and Load LVI menu items from the autosampler pulldown menu.
A component added to a sample primarily to correct for injection errors and
sample preparation errors. It can also be used to correct for instrumental
changes. The concentration or amount of an internal standard in any solution
used in quantitation remains constant. An internal standard is often a
structural analog or deuterated analog of one of the target compounds. (A
deuterated analog has a deuterium atom in place of a hydrogen atom.
Hydrogen has an atomic weight of 1 amu; deuterium has an atomic weight
of 2 amu.)
Click OK after you are satisfied with your selection. Click Cancel if you
would like to exit without saving your changes. Click Help for this page to
display.
___________________________________________AS 2000 Autosampler User’s Manual ________________________________
1-7
AS2000 AS SETUP
____________________________________________________________________________________________
1.2 Autosampler Menu
Take your choice in using your mouse to access the autosampler menu
commands or use your keyboard for even faster shortcuts. In this list are
autosampler menu commands and related keyboard shortcuts.
Menu Command
Keyboard Shortcut
Send Method to
Autosampler
Alt+A, S
Get Method from
Autosampler
Alt+A, G
Run Large Volume
Program
Alt+A, R
Load Large Volume
Alt+A, L
Import
Alt+A, I
Send Method to
Autosampler command
Downloads the current method from the Instrument Setup window to the
autosampler.
Get Method from
Autosampler command
Uploads the current method from the autosampler to the Instrument Setup
window.
Run Large Volume
Program
Load Large Volume File
command
Import command
1-8
Starts the Large Volume Injection (LVI) optimization program. Launches the
large volume program to automatically make a Large Volume File which
calculates the appropriate oven temperature, injection speed and pressure
setting required for desolvation and analysis.
Downloads parameters from a saved large volume injection program
following LV-MS method development. Actually downloads the file made
during the Run Large Volume Program.
Loads an autosampler method (.as) from an earlier version of GCQ software
(2.1 or earlier).
______________________________________ AS 2000 Autosampler User’s Manua______________________________________
AS2000 AS SETUP
____________________________________________________________________ _______________________
1.3 AutoSampler Setup View - Injection Events Page
Injection Events Page
Figure 1-2. Injection Events Page
Use the Injection Events page allows to set up injection parameters. The
available parameters are:
Information On Screen Element
Information on Parameter
Injector Control
Injector Control
Sample Volume
Sample Volume
Air Volume
Air Volume
Injection Delay
Pull-Out Delay
Injection Speed
Sample Cleans
Sample Cleans
___________________________________________AS 2000 Autosampler User’s Manual ________________________________
1-9
AS2000 AS SETUP
____________________________________________________________________________________________
Number of Cleans
Pull-Ups
Pull-Ups
Number of Pull-Ups
Volume
Delay
IS / Solvent Flush
IS / Solvent Flush
IS / Solvent Vial
IS / Solvent Volume
Air Volume Separator
Air Before IS / Solvent
To display this page:
1. Click on the AS2000 icon in the viewbar of the Instrument Setup
window
2. Click on the Injector Events tab of the AS2000 Setup view.
Injector Control group box
The settings in this group box affect injector controls:
Sample Volume spin
box
Specify how much sample volume to draw into the syringe and subsequently
inject into the GC. Values can be set between 1 and 10 µL in 1 µL
increments. The total volume of the syringe is 10.0 µL. Remember that the
sum of the sample, air volume , and any IS /solvent flush cannot exceed this
total volume. For example, if the sample volume is 2.0 µL, the sum of the
other volumes cannot exceed 8.0 µL.
See Information on Parameters
Air Volume spin box
1-10
The amount of air drawn into the syringe after the sample. This control can
ensure that the sample completely pulls up into the syringe barrel and out of
the needle preventing some types of needle discrimination. Remember that
the sum of all volumes cannot exceed 10 µL. The specified sample volume is
represented in red on the syringe display. The specified air volume is
represented in blue on the syringe display.
See Information on Parameters
____________________________________ AS 2000 Autosampler User’s Manua______________________________________
AS2000 AS SETUP
____________________________________________________________________ _______________________
Injection Delay spin box
The amount of time the needle stays in the injection port before the syringe
plunger pushes down to inject the sample. The Injection Delay time
determines whether you are performing a “cold needle (no delay or very
short delay) or a “hot needle (longer delay) injection.
Pull-Out Delay spin box
Specify how long the syringe needle stays in the injection port after the
sample is injected. Pull out delay allows time for the sample to distill from
the syringe needle.
Injection Speed spin
box
The rate at which the syringe plunger injects sample into the injector port.
Sample Cleans group box
The setting in this group box determines the number of times the syringe will
be rinsed with sample The setting is Number of Cleans.
Number of Cleans spin
box
The number of times to rinse the syringe with the sample. The sample clean
cycle is performed after the solvent wash cycle and before the analytical
sample is drawn into the syringe. The sample solution is expelled into a
waste vial.
Pull-Ups group box
The settings in this group box are those that affect the way the syringe is used
to draw samples. The settings are Number of Pull-Ups, Volume, and Delay.
Number of Pull-Ups
spin box
Volume spin box
Delay spin box
The number of times the syringe plunger is pulled up and pushed down as the
needle is held in the sample vial. This expels air from the syringe, thereby
clearing it of bubbles.
The amount of liquid to draw into the syringe during a pull-up.
The delay between pull-ups. This is useful if the sample viscosity is high.
IS/Solvent Flush check box and group box
The IS/Solvent Flush group box is only available when the autosampler is
configured for right-side, split/splitless injection . Use the controls in this
group box to flush the sample out using either an internal standard or solvent.
IS/Solvent Vial option
buttons and spin boxes
The internal standard vial (1-4) position or the position of the solvent wash
bottle (A-D).
___________________________________________AS 2000 Autosampler User’s Manual _______________________________
1-11
AS2000 AS SETUP
____________________________________________________________________________________________
IS/Solvent Volume spin
box
The volume of the internal standard or solvent flush in µL.
Air Volume Separator
spin box
The air gap between the sample and the internal standard or solvent flush in
µL.
Air Before IS/Solvent
check box
An air gap before the internal standard or solvent flush, closest to the plunger.
It will be the same volume as the Air Volume in Injector Control.
Information on Parameters
Sample Volume
A parameter located in Instrument Setup for the autosampler. This is the total
volume of sample to be pulled up into the syringe and injected into the GC. A
value between 1 and 10 mL can be set for the AS 800, AS 2000, or AS 9000
autosampler.
Air Volume
A parameter in the Autosampler Instrument Setup window. This is the
volume of air (the air gap) to be pulled into the syringe after the sample
volume. The value can be between 0 to 10 mL
1-12
____________________________________ AS 2000 Autosampler User’s Manua______________________________________
AS2000 AS SETUP
____________________________________________________________________ _______________________
1.4 Setting Up Injection Event Parameters
Use the following procedure to set up injection events.
1. Open the Instrument Setup window.Choose one (AS2000, AS 800, AS
9000) setup button.
2. Select the Injection Events tab.
3. In the Injector Control group, specify the sample volume , air volume ,
injection delay, pull-out delay, and injection speed.
4. In the Sample Cleans group, specify the number of cleans.
5. In the Pull-Ups group, specify the number of pull-ups, the volume to be
pulled up, and how much time between pull-ups.
___________________________________________AS 2000 Autosampler User’s Manual ______________________________
1-13
AS2000 AS SETUP
____________________________________________________________________________________________
1.5 AutoSampler Setup View - Pre/Post Events Page
Pre/Post Events Page
Figure 1-3. Pre/Post Events Page
Use the Pre/Post Events page allows you to set up pre-injection and postinjection events. The parameters are:
Information On Screen Element
Information on Parameter
Pre-Injection Washes
Pre-Injection Washes
Number of Rinses
Volume
Pre-Injection Solvent
Every Injection
1-14
____________________________________ AS 2000 Autosampler User’s Manua______________________________________
AS2000 AS SETUP
____________________________________________________________________ _______________________
First/Last Cycle
Post-Injection Washes
Post-Injection Washes
Number of Rinses
Volume
Post-Injection Solvent
Every Injection
First/Last Cycle
To display this page:
1. Click on the autosampler icon in the viewbar of the Instrument Setup
window
2. Click on the Pre/Post Events tab of the Autosampler Setup view.
Pre-Injection Washes group box
These settings affect the method for pre-injection washes:
Number of Rinses spin
box
Volume spin box
Pre-Injection Solvent
drop down list box
Every Injection option
button
First/Last Cycle option
button
The number of times the syringe rinses with the solvent before the syringe
moves to the sample or IS/Solvent. The solvent solution is expelled into a
waste vial.
The amount of solvent used for each rinse in µL.
The solvent to rinse with before the injection.
Control the pre-injection wash to occur before every injection. This is a
standard mode.
Control the pre-injection wash to occur only before the first and last
injection.
Post-Injection Washes group box
These settings affect the method for post-injection washes:
___________________________________________AS 2000 Autosampler User’s Manual ______________________________
1-15
AS2000 AS SETUP
____________________________________________________________________________________________
Number of Rinses spin
box
Volume spin box
The number of times the syringe rinses with solvent after injection. The
solvent solution is expelled into a waste vial.
The amount of solvent used for each rinse.
Post-Injection Solvent
drop down list box
The solvent to rinse with after the injection.
Every Injection option
button
Control the post-injection wash to occur after every injection. This is the
standard mode.
First/Last Cycle option
button
1-16
Control the post-injection wash to occur only after the first and last injection.
____________________________________ AS 2000 Autosampler User’s Manua______________________________________
AS2000 AS SETUP
____________________________________________________________________ _______________________
1.6 Setting Up Pre/Post Events Parameters
Use the following procedure to set up pre-injection and post-injection events
1. Open the Instrument Setup window
2. Select the AS 2000 setup button.
3. Select the Pre/Post Injection tab.
4. In the Pre-Injection Group Box, select the number of rinses, volume, and
pre-injection solvent.
5. Choose whether you want these events to occur for every injection or
only the first/last injection
6. In the Post-Injection Group Box, select the number of rinses, volume,
and post-injection solvent.
7. Choose whether you want these events to occur for every injection or
only the first/last injection
___________________________________________AS 2000 Autosampler User’s Manual ______________________________
1-17
AS2000 AS SETUP
____________________________________________________________________________________________
1.7 Setting Up Parameters for an LVOCI
Setting up parameters for an LVOCI method is a three-step process:
configuring instruments for LVI, calculating optimum parameters and then
downloading parameters to the autosampler and GC. Mass spectrometer
parameters download with the GC.
Configuring for LVI
Configure the autosampler, TRACE or TOP GC, and MS for LVOCI.
1. Open the autosampler method editor and create a new method for the
LVI method.
2. Configure your autosampler to use the Large Volume Program. Select
Left for the Autosampler Placement and Large Volume and enter the
maximum volume for the syringe that is installed. Select OK. The system
configures for EPC gas control for the left LVI injector.
3. Calculating Optimum Parameters
When using the TRACE
1. Select the left carrier and set the flow mode to constant flow or
programmed pressure with vacuum compensation.
2. Next, select LVOCI and select Temperature On. Enter 200°C for the SVE
valve temperature to prevent residue accumulating from the solvent
during desolvation.
3. Enter the required ramped pressure setting for downloading the two
pressures that the LVI software calculates for the two step process of
desolvation and then analyte analysis. The first pressure is high for
solvent evaporation and the second pressure setting is lower for analytes
enhanced resolution through the capillary column.
4. Do not enter the oven ramps for the analysis at this time; they are entered
after loading the parameters for the LVI. You may also setup parameters
for isobaric operations.
When using the GCQ Plus Mass spectrometer:
1. Press the mass spectrometer icon button. Select the first line for the first
segment and double click the left mouse button. The dialog box for the
MS opens. Enter the appropriate values and set the start time to 5.0
minutes or longer. You will have a residual amount of solvent going
through the detector and want to delay the filament ignition until after
this solvent has passed through. Select a time that provides detection of
the first analyte but not the solvent.
1-18
____________________________________ AS 2000 Autosampler User’s Manua______________________________________
AS2000 AS SETUP
____________________________________________________________________ _______________________
2. Look at the fore-pressure (located on the homepage Status page) during
the first run to verify the time for the solvent to pass out of the mass
spectrometer. The fore pressure may be monitored during filament delay.
3. Save the method.
4. Set the mass spectrometer to a high-pressure operation mode by selecting
the CI mode from the GCQ Plus front panel.
Downloading LVI Parameters into the GC Method
1. From Instrument Setup, click on the autosampler icon. The autosampler
menu displays on the menu bar, which contains two selections necessary
to run a large volume injection select Run Large Volume Program and
the Load Large Volume File.
2. Select Run Large Volume Program to begin creating a LVI method file.
For step-by-step instructions on how to create LVI method files, just
click the Help button listed in the LVI dialog box. Be sure to save the file
with a specific name and close the LV program.
3. Select Load Large Volume File to see a list of available methods. Select
the appropriate method. The instrument parameters for the large volume
injection insert into the GC and autosampler methods accordingly.
4. Enter the desired oven program, analytical column flow required, other
autosampler and mass spectrometer parameters.
5. Enter a long filament delay for the first injection for 5-8 minutes. The
actual fore pressure to the mass spectrometer may be monitored during
the filament delay. Just look at the GCQ Plus Status page located on the
home page for desolvation step optimization and filament delay time.
___________________________________________AS 2000 Autosampler User’s Manual ______________________________
1-19
AS2000 AS SETUP
____________________________________________________________________________________________
1.8 Operating Precautions for the LVOCI
To conserve air consumption, install a step-down single stage regulator to use
secondary coolant set at 10 psi or 70 kPa. Stop all sequence runs not using
secondary coolant and do not have a vial located in the tray. This is because
the GC begins using initial conditions when not using secondary coolant and
will stop the run when it does not detect a vial in the autosampler tray.
Set the GCQ Plus to the CI mode (press the GCQ Plus EI/CI button located
on the GCQ front panel) to operate in high pressure mode.
Tips for Performing Large Volume Injections
1-20
•
Read the LVI Manual.
•
Select the smallest retained volume when optimizing your large volume
injection method. You can choose larger retained volumes if the smallest
amount is not adequate.
•
During the filament delay process, the GCQ extends the filament delay
until adequate vacuum has been detected (the blue blinking light on the
front panel of the GCQ-MS will turn off and the green light will be on).
This is completely normal. You can increase your filament delay time in
the MS method to match the actual time it takes for the vacuum system to
recover from the large volume injection.
•
Get the best pressure value results by using the LVI Assistant program to
select the Injected Volume option. Then use the LVI calculated pressure
values to download to the instruments.
•
Before loading an LVI method from the AS method editor, make sure the
GC is configured for pressure program mode. This will download the
pressure values from the LVI optimization program and ensure that the
correct times and flows are present to evaporate the solvent from the precolumn. Using the constant-flow or constant-pressure modes results in
too much flow into the mass spectrometer during the run analysis. Using
programmed flow will cause too little flow to be present during the
desolvation period, overloading the vacuum system of the mass
spectrometer.
•
Some parameters will be grayed out in the GC and autosampler method
parameter after downloading the LVI method. These values are
calculated and automatically set by the LVI software.
•
If you are using a TRACE GC, check to see that the initial pressure time
is equal to the inject time plus the SVE delay time. You may need to
change this manually.
•
If you are using a CE 8000 Top, and you note residual solvent in the
background spectrum throughout the run, shorten the fused silica line on
the SVE valve. For injection of 100 uL of Hexane, remove 15 cm.
____________________________________ AS 2000 Autosampler User’s Manua______________________________________
AS2000 AS SETUP
____________________________________________________________________ _______________________
1.9 AutoSampler Glossary
Air Volume
A parameter in the Autosampler Instrument Setup window. This is the
volume of air (the air gap) to be pulled into the syringe after the sample
volume. The value can be between 0 to 10 µL
analyte
Any chemical component to be analyzed. Internal standards, external
standards, target components, quality control samples, knowns, and
unknowns can all be considered analytes.
Autosampler
An optional device that automatically injects samples into the inlet of a
chromatograph.
get method
This command uploads the Autosampler method from the autosampler to
Instrument Setup. This command is available in the GC and Autosampler
views of Instrument Setup.
import
This choice allows you to import information from an autosampler method
created in an earlier version (2.11 or earlier) of GCQ software. Appears as a
choice under the Autosampler menu located in Instrument Setup window.
Note: the name of the menu is specific to the Autosampler that is configured for
your instrument.
injection volume
The actual volume in microliters of a sample injected into the gas
chromatograph. With an autosampler, the minimum and maximum injection
volumes that you can use depend upon the type of autosampler and the size
of the syringe.
internal standard
A component added to a sample primarily to correct for injection errors and
sample preparation errors. It can also be used to correct for instrumental
changes. The concentration or amount of an internal standard in any solution
used in quantitation remains constant. An internal standard is often a
___________________________________________AS 2000 Autosampler User’s Manual ______________________________
1-21
AS2000 AS SETUP
____________________________________________________________________________________________
structural analog or deuterated analog of one of the target components. (A
deuterated analog has a deuterium atom in place of a hydrogen atom.
Hydrogen has an atomic weight of 1 amu; deuterium has an atomic weight
of 2 amu.)
Large Volume Injection
LVI allows 100 sample µLs to be injected into the GC, without overloading
the column by venting the solvent bulk. During the injection, the temperature
of the injector is held slightly above the boiling point of the solvent, but
below the boiling points of the analytes, with the split vent open. After most
of the solvent evaporates, the split vent is closed, and the temperature of the
injector is ramped quickly to a high enough temperature to cause the analytes
to vaporize and be swept onto the analytical column. During the injection, the
oven temperature is held below the solvent’s boiling point during desolvation
while the vent valve is open. A high carrier gas flow rate sweeps the more
volatile solvent out the vent valve while the analytes remain coated on the
pre-column. The vent valve is then closed and the oven temperature
programmed up to vaporize the analytes for transfer into the analytical
column.
sample
A solution containing an unknown to be analyzed. In contrast, a standard is
solution containing a known component at a set concentration level, which is
used to calibrate your Xcalibur data system. During injection, you typically
run the standards to calibrate the instrument before analysing an unknown
sample.
sample amount
The amount of sample injected into the GC.
sample volume
A parameter located in Instrument Setup for the autosampler. This is the total
volume of sample to be pulled up into the syringe and injected into the GC. A
value between 1 and 10 mL can be set for the AS 800, AS 2000, or AS 9000
autosampler.
send method
This command downloads the current method from the data system to
autosampler. This command is available in the Autosampler views of the
Instrument Setup window.
1-22
____________________________________ AS 2000 Autosampler User’s Manua______________________________________
AS2000 AS SETUP
____________________________________________________________________ _______________________
solvent
Pure liquid component used to rinse the inside of the syringe.
split/splitless injector
A type of injector available on a gas chromatograph. The SSL Injector is
made up of a septum nut, a septum, a liner, a metal body, an influent line for
the carrier gas, a septum purge vent, and a split vent that allows a portion of
the carrier gas to be vented into the atmosphere.
standard sample
A sample with a known amount of calibration reference material.
vial
A value appearing in the sequence list, which represents the position of the
corresponding sample vial in the autosampler tray.
___________________________________________AS 2000 Autosampler User’s Manual ______________________________
1-23