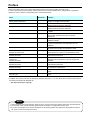
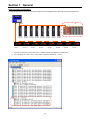
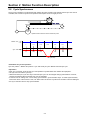
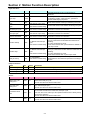
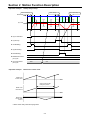
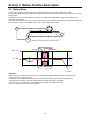
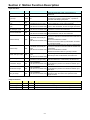
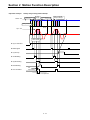
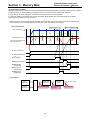
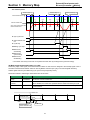
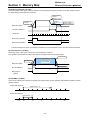
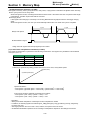
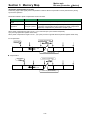
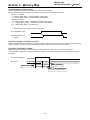
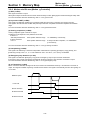
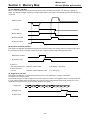
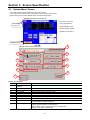
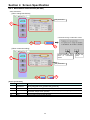
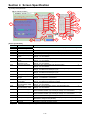
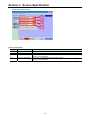
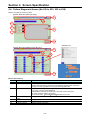
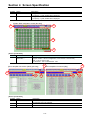
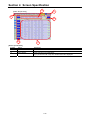
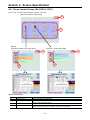
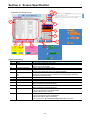
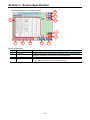
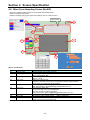
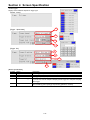
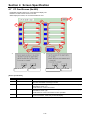
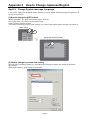
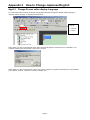
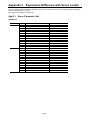
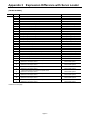
1
Display Attached Controller @E.Terminal for MC USER’S MANUAL <Functions> FEH301b Preface This function edition of the user’s manual describes functions and usage of the @E.Terminal for MC. In order to operate the product properly, please read this user’s manual carefully. When using modules or peripheral devices, be sure to read the corresponding user’s manuals listed below. Name Manual No. @E.Terminal for MC User's Manual <Hardware> V8 Series Hardware Specifications FEH300 Contents Describes system composition, specifications, and handling of the @E.Terminal for MC. 2016Nex Hardware specifications and handling procedures of the MONITOUCH V8 series are explained. V8 Series Hardware Specifications 2017Nex Hardware specifications and handling procedures of the MONITOUCH V8 series are explained. V8 Series Reference Manual 1055Nex Functions of the MONITOUCH V8 series are explained in details. V Sereis Macro Reference 1056Nex An overview of macros of V-SFT version 5 as well as macro editor operations and macro command descriptions. V8 Series Introduction Manual 1057Nex The basic operating procedure of V-SFT version 5 is explained in detail. V8 Series Operation Manual 1058Nex The operations about the composition of V-SFT version 5, how to edit each items, and restrictions etc. are explained. V8 Series Connection Manual 2201NE The connection and communication parameters for the V8 series and controllers are explained in detail. User's Manual Hardware, FEH201 Describes the system configuration, the specifications MICREX-SX series SPH and operations of modules in the MICREX-SX series. User's Manual Instruction (Standard Loader), FEH588 Describes the memory, language and system definitions MICREX-SX series of the MICREX-SX series. User's Manual SX-Programmer Standard FEH590 Describes the menu and icon of the SX-Programmer <Reference>, Standard all of the operations of the SX-Programmer MICREX-SX series Standard. User's Manual Instruction (D300win), FEH200 Describes the memory, language and system definitions MICREX-SX series of the MICREX-SX series. User's Manual D300win <Reference>, FEH257 Describes the menu and icon of D300winV3 and all of MICREX-SX series the operations of D300winV3. FALDIC α series User’s Manual, RYS-V Type MHT258(Eng) Describes the specifications and operations of FALDIC α series. ALPHA 5 series User's Manual, MEHT301 Describes the specifications and operations of ALPHA 5 RYT-SX Type series. * In addition to the above manuals, the following Fuji Electric Systems Co., Ltd. site offers various manuals and technical documents associated with MICREX-SX. URL http://www.fesys.co.jp/eng/ Notes 1. This manual may not be reproduced in whole or part in any form without prior written approval by the manufacturer. 2. The contents of this manual (including specifications) are subject to change without prior notice. 3. If you find any ambiguous or incorrect descriptions in this manual, please write them down (along with the manual No. shown on the cover) and contact FUJI. Safety Precautions Be sure to read the “Safety Precautions” thoroughly before using the product. Here, the safety precautions items are classified into “Warning” and “Caution”. ! Warning : Incorrect handling of the device may result in death or serious injury. ! Caution : Incorrect handling of the device may result in minor injury or physical damage. Even some items indicated by “Caution” may result in a serious accident. Both safety instruction categories provide important information. Be sure to strictly observe these instructions. ! Warning z Never use the output signal of @E.Terminal for operations that may threaten human life or damage the system, such as signals used in case of emergency. Please design the system so that it can cope with the malfunctions of a touch switch. A malfunction of a touch switch will result in machine accident or damage. z Turn off the power supply when you set up the unit, connect new cables or perform maintenance or inspections. Otherwise, electrical shock or damage may occur. z Never touch any terminals while the power is on. Otherwise, electric shock may occur. z You must put a cover on the terminals on the unit when you turn the power on and operate the unit. Otherwise, electric shock may occur. z The liquid crystal in the LCD panel is a hazardous substance. If the LCD panel is damaged, do not ingest the leaked liquid crystal. If the liquid crystal spills on skin or clothing, use soap and wash off thoroughly. z Never disassemble, recharge, deform by pressure, short-circuit, reverse the polarity of the lithium battery, nor dispose of the lithium battery in fire. Failure to follow these conditions will lead to explosion or ignition. z Never use a lithium battery that is deformed, leaks, or shows any other signs of abnormality. Failure to follow these conditions will lead to explosion or ignition. z The power lamp flashes when the backlight is at the end of life or is faulty. However, the switches on the screen are operable at this time. Do not touch the screen when the screen becomes dark and the power lamp flashes. Otherwise, a malfunction may occur and result in machine accident or damage. Safety Precautions ! Caution z Check the appearance of the unit when it is unpacked. Do not use the unit if any damage or deformation is found. Failure to do so may lead to fire, damage or malfunction. z For use in a facility or for a system related to nuclear energy, aerospace, medical, traffic equipment, or mobile installations, please consult your local distributor. z Operate (or store) @E.Terminal under the conditions indicated in this manual and related manuals. Failure to do so could cause fire, malfunction, physical damage or deterioration. z Understand the following environmental limits for use and storage of @E.Terminal. Otherwise, fire or damage to the unit may result. - Avoid locations where there is a possibility that water, corrosive gas, flammable gas, solvents, grinding fluids or cutting oil can come into contact with the unit. - Avoid high temperature, high humidity, and outside weather conditions, such as wind, rain or direct sunlight. - Avoid locations where excessive dust, salt, and metallic particles are present. - Avoid installing the unit in a location where vibration or physical shock may be transmitted. z Equipment must be correctly mounted so that the main terminal of @E.Terminal will not be touched inadvertently. Otherwise, an accident or electric shock may occur. z Check periodically that terminal screws on the power supply terminal block and fixtures are firmly tightened. Loosened screws may result in fire or malfunction. z Tighten terminal screws on the power supply terminal block of display part equally to a torque of 0.8 N·m for the NP5M0101-5H4/NP5M0101-4H4, or 1.2 N·m for the NP5M0101-3H4. And tighten terminal screws on the power supply terminal block of the controller unit equally to a torque of 0.5 to 0.6 N·m. Improper tightening of screws may result in fire, malfunction, or trouble. z Tighten mounting screws on the unit equally to a torque of 0.5 to 0.7 N·m. Excessive tightening may distort the panel surface. Loose tightening may cause @E.Terminal to come off, malfunction or be short-circuited. z @E.Terminal has a glass screen. Do not drop or give physical shock to the unit. Otherwise, the screen may be damaged. z Connect the cables correctly to the terminals of @E.Terminal in accordance with the specified voltage and wattage. Over-voltage, over-wattage, or incorrect cable connection could cause fire, malfunction or damage to the unit. z Be sure to establish a ground of @E.Terminal. The FG terminal must be used exclusively for the unit with the level of grounding resistance less than 100∧. Otherwise, electric shock or a fire may occur. z Prevent any conductive particles from entering into @E.Terminal. Failure to do so may lead to fire, damage, or malfunction. z After wiring is finished, remove the paper used as a dust cover before starting to operate @E.Terminal. Operation with the cover attached may result in accident, fire, malfunction, or trouble. z Do not attempt to repair @E.Terminal at your site. Ask us or the designated contractor for repair. z Do not repair, disassemble or modify @E.Terminal. We are not responsible for any damages resulting from repair, disassembly or modification of @E.Terminal that was performed by an unauthorized person. z Do not use a sharp-pointed tool when pressing a touch switch. Doing so may damage the screen. Doing so may damage the screen. z Only experts are authorized to set up the unit, connect the cables or perform maintenance and inspection. z Lithium batteries contain combustible material such as lithium or organic solvent. Mishandling may cause heat, explosion or ignition resulting in fire or injury. Read related manuals carefully and handle the lithium battery correctly as instructed. z When using @E.Terminal that has analog switch resolution with resistance film, do not press two or more points on the screen at the same time. If two or more positions are pressed at the same time, the switch located between the pressed positions activates. z Take safety precautions during such operations as setting change during running, forced output, start, and stop. Any misoperation may cause unexpected machine motions, resulting in machine accident or damage. z In facilities where a failure of @E.Terminal could lead to accident threatening human life or other serious damage, be sure that the facilities are equipped with adequate safeguards. z At the time of disposal, @E.Terminal must be treated as industrial waste. z Before touching @E.Terminal, discharge static electricity from your body by touching grounded metal. Excessive static electricity may cause malfunction or trouble. z The LED lamp on the CF card interface cover illuminates in red when the power is supplied to the CF card. Never remove the CF card or turn off the power of @E.Terminal while the LED lamp is lit. Doing so may destroy the data on the CF card. Check that the LED lamp has gone off before removing the CF card or turning off the power of @E.Terminal. Safety Precautions [General Notes] • Never bundle control cables nor input/output cables with high-voltage and large-current carrying cables such as power supply cables. Keep these cables at least 200 mm away from the high-voltage and large-current carrying cables. Otherwise, malfunction may occur due to noise. • When using @E.Terminal in an environment where a source of high-frequency noise is present, it is recommended that the FG shielded cable (communication cable) be grounded at its ends. However, the cable may be grounded only at one end if this is necessary due to unstable communication conditions or for any other reason. • Plug connectors or sockets of @E.Terminal in the correct orientation. Failure to do so may lead to damage or malfunction. • If a LAN cable is inserted into the MJ1 or MJ2 connector on @E.Terminal, the counterpart device may be damaged. Check the indication on the unit and insert a cable into the correct position. • Do not use thinners for cleaning because they may discolor @E.Terminal surface. Use alcohol or benzene commercially available. • If a data receive error occurs when @E.Terminal and the counterpart (PLC, temperature controller, etc.) are started at the same time, read the manual for the counterpart unit and remove the error correctly. • Avoid discharging static electricity on the mounting panel of @E.Terminal. Static charges can damage the unit and cause malfunctions. Otherwise, malfunction may occur due to noise. • Avoid prolonged display of any fixed pattern. Due to the characteristics of the liquid crystal display, an afterimage may occur. If a prolonged display of a fixed pattern is expected, use the auto OFF function of the backlight. [Notes on LCD] Note that the following conditions may occur under normal circumstances. • The response time, brightness and colors of @E.Terminal may be affected by the ambient temperature. • Tiny spots (dark or luminescent) may appear on the display due to the liquid crystal characteristics. • There are variations in brightness and colors on each unit. • Cold cathode tubes are incorporated into the LCD display for backlights. Optical properties (brightness, irregular colors, etc.) may change in a low-temperature environment or over time of operation. Revisions Printed on Manual No. Revision contents Oct. 2008 FEH301 First edition Nov. 2008 FEH301a Display unit is changed from UG40 series to V8 series. Jun. 2009 FEH301b The contents are reconsidered. Contents Preface Safety Precautions Revisions Contents Section 1 General ........................................................................................................ 1-1 1-1 Over view of @ E.Terminal for MC ........................................................................................ 1-1 1-2 Motion Function Specifications .............................................................................................. 1-2 1-3 System Composition .............................................................................................................. 1-3 1-4 Motion Operation Setting Procedure...................................................................................... 1-5 1-5 FALDIC Parameter Setting .................................................................................................... 1-6 1-6 Resources used by Contents ................................................................................................. 1-7 1-7 Precautions for Use ............................................................................................................... 1-8 Section 2 Motion Function Description......................................................................... 2-1 2-1 Ratio Synchronous ................................................................................................................ 2-1 2-2 Cycle Synchronous ................................................................................................................ 2-3 2-3 Rotary Shear.......................................................................................................................... 2-6 2-4 Flying Shear .......................................................................................................................... 2-10 Section 3 Memory Map ................................................................................................ 3-1 3-1 Memory Map Outline ............................................................................................................. 3-1 3-2 General-purpose Interface Area ............................................................................................ 3-2 3-2-1 External/Virtual master axis Bit area[Controller->Motion] ................................................ 3-4 3-2-2 External/Virtual master axis Bit area [Motion->Controller] ............................................... 3-9 3-2-3 External/Virtual master axis Data area [Controller -> Motion] ......................................... 3-12 3-2-4 External/Virtual master axis Data area [Motion->Controller] ........................................... 3-13 3-2-5 Motion axis Bit area [Controller->Motion] ........................................................................ 3-15 3-2-6 Motion axis Bit area [Motion->Controller] ........................................................................ 3-25 3-2-7 Motion axis Data area [Controller->Motion] ..................................................................... 3-32 3-2-8 Motion axis Data area[Motion->Controller] ...................................................................... 3-33 3-3 System are ............................................................................................................................ 3-35 3-3-1 Controller->Motion application ........................................................................................ 3-37 3-3-2 Motion application->Controller ........................................................................................ 3-38 3-4 Data Interface Area ................................................................................................................ 3-40 3-4-1 External/Virtual master axis ............................................................................................ 3-43 3-4-2 External/Virtual master axis [Controller->Motion] ............................................................ 3-44 3-4-3 External/Virtual master axis [Motion->Controller] ............................................................ 3-46 3-4-4 Motion axis [Controller->Motion] ..................................................................................... 3-47 3-4-5 Motion axis [Motion->Controller] ..................................................................................... 3-50 Section 4 Screen Specification .................................................................................... 4-1 4-1 System menu screen ............................................................................................................. 4-1 4-2 Configuration definition .......................................................................................................... 4-2 4-2-1 Mechanism change screen ............................................................................................. 4-3 4-2-2 Select servo screen ........................................................................................................ 4-4 Contents 4-2-3 Mechanism select screen ............................................................................................... 4-5 4-2-4 Select motion screen ...................................................................................................... 4-8 4-2-5 Parameter setting screen ................................................................................................ 4-9 4-2-6 Master axis setting screen .............................................................................................. 4-14 4-2-7 I/O definition screen ........................................................................................................ 4-19 4-3 Test run screen ...................................................................................................................... 4-21 4-4 Failure diagnosis screen ........................................................................................................ 4-26 4-5 Servo loader screen............................................................................................................... 4-30 4-6 Wave form sampling screen .................................................................................................. 4-33 4-7 CF card screen ...................................................................................................................... 4-35 4-8 Date and time setting screen ................................................................................................. 4-36 Section 5 System install procedure .............................................................................. 5-1 5-1 System configuration example ............................................................................................... 5-1 5-2 System setting procedure ...................................................................................................... 5-2 5-3 FALDIC ALPHA5 parameter setting ....................................................................................... 5-2 5-4 Configuration definition .......................................................................................................... 5-3 5-5 Communication setting with PLC ........................................................................................... 5-5 5-5-1 PLC communication setting ............................................................................................ 5-5 5-5-2 PLC device memory map setting .................................................................................... 5-6 Appendix 1 How to use backup CD ............................................................................. App1-1 App1-1 About backup CD ............................................................................................................ App1-1 App1-2 Template registration procedure by SX-Programmer Standard ....................................... App1-3 App1-3 Template Registration Procedure by SX-Programmer Expert ......................................... App1-4 App1-4 Restore Screen data ...................................................................................................... App1-5 App1-5 Restore controller data .................................................................................................... App1-8 App1-6 Handling of old version screen data file (*.U4) ................................................................ App1-9 Appendix 2 How to change Japanese/English ............................................................. App2-1 App2-1 Change Screen data Language ...................................................................................... App2-1 App2-2 Change System message Language .............................................................................. App2-5 App2-3 Change Screen editor display Language ........................................................................ App2-6 Appendix 3 Expression difference with Servo Loader .................................................. App3-1 App3-1 Servo parameter list ........................................................................................................ App3-1 App3-2 Servo alarm list................................................................................................................ App3-5 Appendix 4 Memory map ............................................................................................. App4-1 Section 1 General 1-1 Overview of @E.Terminal for MC The @E.Terminal for MC Display Attached Controller is an all-in-one programmable operation display and motion controller. Features: 1) The guidance function of the display screen allows you to easily set up parameters and positioning data previously set up by a dedicated machine. Also, it enables easy equipment maintenance. 2) The SX bus allows one-touch connection of up to eight servo amplifiers (axes) (FALDIC-α and ALPHA5 VS type), minimizing the need for wires. (5.7 inch model can connect up to 4 of ALPHA5 VS type) 3) The upper level controller can be connected by Ethernet and the like. 4) The lineup includes four different display screen sizes. 5.7 inch, 8 inch, 10 inch and 12 inch models are available. 5) The content corresponding to motion is supplied in the standard package. Content for PTP control and synchronous control (ratio synchronization, cycle synchronization, flying shear, and rotary shear) are provided. 6) Screen supports two languages (Japanese/English). (* 5.7 inch model is available for only Japanese.) Product types Display size Specifications NP5M0101-5H4 NP5M0101-4H4 NP5M0101-3H4 NP5M0101-2S4 NP5M0101-2L4 12.1 inch 10.4 inch 8.4 inch 5.7 inch 5.7 inch TFT color TFT color TFT color TFT color STN color Language Japanese English - 800 x 600 dots, Max. 8 axes - Servo: FALDC-α, ALPHA5 - 320 x 240 dots, Max. 4 axes - Servo: FALDC ALPHA5 Ethernet, etc. @E.Terminal for MC Contents for motion control • Screen data • Controller built-in software Motion functions (Setting/Display) SX bus (Note) Note: The SX bus is a MICREX-SX series dedicated high-speed serial bus. 1- 1 Available Available Abailable Not available Section 1 General 1-2 Motion Function Specifications @E.Terminal for MC has the following functions. Item Specification No. of controllable axes Max. 8 Single operation Manual operation, Homing, PTP (Point To Point) positioning, Interrupt positioning Synchronous Control Ratio synchronous, Cycle synchronous, Rotary shear, Flying shear operation method Master axis External pulse (connected to axis 1), Virtual master axis, Axis 1 selection 5ms (SX bus tact) Control cycle Execution bandwidth proportion setting 3:5:2 [Application : Contents : System] Mechanism selection Timing belt, Ball screw, Sealer/Cutter, Feed roll Unit of control PLS, mm Unit of speed Unit of control/s, r/min (velocity of servo motor) Interpolation operation 2-axis linear interpolation (1-2 axes, 3-4 axes, 5-6 axes, 7-8 axes) PTP operation: ABS (absolute position), INC (relative position) Interrupt method Interrupt operation: INC (relative position) Interpolation operation: ABS (absolute position), INC (relative position) Max. travel amount -2147483648 to 2147483647 [pulses] = Max. travel amount at a time FALDIC ALPHA5:6000r/min FALDIC-α: 5000r/min * The max. velocity varies depending on the servomotor. Max. speed For more information, refer to the user’s manual of FALDIC ALPHA5 or FALDIC-α. Acceleration/deceleration Sync axis: 0 to 3000ms time Virtual master axis: 0 to 65535ms Sync axis: 0 to 100% S-curve ratio Virtual master axis: None Mark Provided (Cycle synchronous, Rotary shear, Flying shear) compensation Sync Sync timing Provided (Cycle synchronous, Rotary shear, Flying shear) auxiliary adjustment function Master axis (External pulse, Virtual master axis): Provided Cycle stop Sync axis: Provided (Cycle synchronous, Rotary shear, Flying shear) Configuration registration Mechanism setting of 8 axes, Master axis setting, I/O terminal registration Manual operation, Homing, PTP (Point To Point) positioning, interrupt positioning, Test run synchronous operation Controller Fault RAS indication, CF card backup function Failure Servo amplifier I/O status indication, Alarm indication diagnosis Motion contents Alarm indication FALDIC parameter reading/writing function Servo loader CF card reading/writing function Obtains speed frequencies of 8 axes at a time. Sampling cycle (5 to 495ms) Waveform sampling Max. sampling points: 500 points/axis Trigger function (speed data, zero deviation, zero speed, torque limit detection, deviation overflow) CF card Reading/writing of registered configuration data (Max. 10) 1- 2 Section 1 General 1-3 System Composition The following illustration shows the system composition of @E.Terminal for MC. PLC/general purpose computer Ethernet/RS-232C or RS-485 LAN/CN1/MJ1/MJ Up to 8 servos and I/O terminals each can be connected. USB-B SX bus MJ1/MJ2 “V-CP” Screen editor “V-SFT-5” (V5.4.2.0 or later) External PG (only No. 1 axis) @E.Terminal for MC FALDIC ALPHA5 FALDIC-α [No. 1 axis] SX bus station No.: “201” “NW0H-CNV + NW0H-CA3” or commercially available USB cable [No. 2 axis] SX bus station No.: “202” FALDIC ALPHA5 FALDIC-α Programming support tool SX-Programmer Standard “NP4H-SWN” (V2.3.5.1 or later) SX-Programmer Expert (D300win) “NP4H-SEDBV3” (V3.4.4.0 or later) Notes: 1) Set the SX bus station Nos. of FALDIC at 201 to 208, those of I/O terminals at 221 to 228. 2) The system definition of the controller unit is registered at the maximum and the system is configured for fail-soft startup. Therefore, use FALDIC and I/O terminals that support fail-soft startup. 3) The maximum number of I/O points of @E.Terminal for MC is 256W. The number of I/O points that users can adittionally connect is “256W - 144W (above max. composition) = 122W”. 4) If screen data is transferred to the display unit by using a CF card with an old version of screen editor, the old version of communication driver will be transferred. Be sure to use a specified or later version of screen editor. 5) Use the touch panel to assign I/O terminal of SX bus station No. 221 to 228. You cannot directly use it by program. 1- 3 [No. 3 axis] SX bus station No.: “208” FALDIC ALPHA5 FALDIC-α Starting up signal etc. SX bus station No.: “221” I/O terminal Input 8 points/ Output 8 points (NR1SW-16T65DT) RDY etc. SX bus station No.: “228” I/O terminal Input 8 points/ Output 8 points (NR1SW-16T65DT) Section 1 General Notes on system configuration The following illustration shows the connection method of servo amplifiers and I/O terminals connected to the SX bus. IN OUT Station No.201 Station No.221 *1 *2 *2 Station No.202 Station No.222 Station No.203 Station No.223 Station No.204 Station No.205 Station No.224 Station No.206 Station No.225 Station No.207 Station No.208 Station No.226 Station No.227 Connect I/O terminals to the IN side of the controller and servo amplifiers to the OUT side. You can add up to 112W of I/O. In case of this, use SX bus station No. 1 to 200. 1- 4 Station No.228 Section 1 General 1-4 Motion Operation Setting Procedure You can set motion operations on the display with ease, as shown below. Select FALDIC to use. Select a mechanism of the synchronous axis. Select a motion function. Set the parameters regarding motion operations. Set the parameters regarding motion operations of the master axis. Now, setting has been completed. Set the synchronous command to ON to operate the master axis, and motion operation will start. * For more information about screen operations, refer to “Section 4. Screen Specification” 1- 5 Section 1 General 1-5 FALDIC Parameter Setting You need to set the following parameters of FALDIC to use @E.Terminal for MC. The parameters whose initial values are required to change are shown below. FALDIC ALPHA5 1) PA1-06: Numerator of electrical gear 2) PA2-72: Station number 3) PA3-01: CONT1 signal assignment 4) PA3-02: CONT2 signal assignment 5) PA3-03: CONT3 signal assignment 6) PA3-04: CONT4 signal assignment 7) PA3-05: CONT5 signal assignment FALDIC-α 1) Standard parameter 91: Command pulse correction α 2) System parameter 01: CONT1 signal assignment 3) System parameter 02: CONT2 signal assignment 4) System parameter 03: CONT3 signal assignment 5) System parameter 04: CONT4 signal assignment 6) System parameter 05: CONT5 signal assignment 7) System parameter 96: Station No. 16 J 1 00 J SX bus station No. of servo (201-208) 49 J 49 (Interrupt input) Initial value 00 J 10 (Forced stop) 00 J 7 (+OT) ・・・No need to set if OT is not used. 00 J 8 (-OT) ・・・No need to set if OT is not used. 00 J 6 (Home position LS) ・・・No need to set if homing is not used. 8J1 49 J 49 (Interrupt input) Initial value 00 J 10 (Forced stop) 00 J 7 (+OT) ・・・No need to set if OT is not used. 00 J 8 (-OT) ・・・No need to set if OT is not used. 00 J 6 (Home position LS) ・・・No need to set if homing is not used. 00 J SX bus station No. of servo (201 to 208) * Insert, forced stop, +OT, -OT, and homing LS are connected to FALDIC. 1- 6 Section 1 General 1-6 Resources Used by Contents The contents of @E.Terminal for MC use the following resources of the display unit and controller unit. (1) Display unit Resource Screen Attribute table Internal memory Resource for @E.Terminal for MC 800 to 1023 240 to 255 $u0 to 16383 Resource open to users 0 to 799 0 to 239 $u16384 to 32767 In addition, the following common settings are required. Do not change. • [System setting] – [Main body setting] – [Overlap] J [Dot] • [System setting] – [Font] J [Gothic] • [System setting] – [Connected device setting] – [PLC1] setting * Use the resource open to users for user-created screens. (2) Controller unit Item SX bus station No. System definition Program Usage in user application 1 to 200 are available. Fail-soft startup setting SX bus tact Execution bandwidth proportion setting 5ms Cannot be changed to 201 or lower No. Not changeable 3:5:2 Not changeable I/O group setting FALDIC and I/O terminals are assigned to “Built-in application”. Assignable other than “Built-in application” ON Not changeable 5s Changeable Fault status display mask Configuration check waiting time Memory assignment Template for @E.Terminal for MC 201 and higher Nos. are used. System configuration definitions are set as follows: 201 to 208 for FALDIC、 221 to 228 for I/O terminal Memory assignment Program area Set for 201 or higher. Used as an interface. Standard memory: 20K Retain memory: 10K Not used * Do not delete FALDIC and I/O terminal registered in system definition of template. 1- 7 Not changeable Available Section 1 General 1-7 Precautions for Use 1) Be sure to match the servo amplifier selected in the configuration definition to that in the actual configuration. 2) If an error occurs in the controller unit due to low battery voltage, replace the battery immediately. Without battery replacement, set data such as system configuration will be lost. It is recommended to back up (CF card function of the menu) the data in a CF card. 3) When the servomotor is operated by the PLC using the 8WAY function or from the display unit, even if a communication error occurs between the display unit and controller unit, the servomotor continues operation. If you want to stop the operation upon detection of a communication error, add the following application. z Communication error between display unit and control unit <Sample software for communication error detection> Make the following settings on the screen editor. Set the event timer macro on the [Macro setting] dialog in the [System setting]. Set the cycle time to “1 sec” and the macro No. to “920”. Create macro block 920. After completing the above settings, transfer the data to the display unit. If communication between the display unit and controller unit is not performed for three seconds, all the servo axes make emergency stops. *Note: Depending on the screen data, the communication cycle of the display unit may become 3 seconds or more. In this case, make the monitoring time longer. (3000 in the second line = 3 seconds). 1- 8 Section 1 General If a communication error is detected, an error message appears on the top left of the screen. After recovering from the error, the following message appears on the menu screen. Reset it on the “Failure Diagnosis” screen. Press the reset switch. 1- 9 Section 1 General z Communication error detection between display unit and PLC A communication error can be detected by communicating with the system memory from the PLC in a given cycle. If the data in the @E.Terminal is not updated from the PLC for a given period of time, all the servo axes make emergency stops. PLC to @E.Terminal WM11054 Toggle error reset (for PLC) 1: Contents toggle error is reset WM11055 Toggle error monitoring timer (ms) (for PLC) A toggle error occurs if the contents toggle bit does not change for the period of time set here. Toggle is not monitored if set to 0. All the axes make emergency stops upon occurrence of an error. WM11056 Contents toggle bit (for PLC) Commands as follows: 0 J 1 J 2…..65534 J 65535 J 0 J 1 @E.Terminal to PLC WM11028 Contents toggle error (for PLC) 1: Toggle error, 0: Reset 4) In case of FALDIC-α system, if @E.Terminal is powered on with the the servo amplifier powered off, it takes 30 seconds or more to start up (time required for CPU to start running). To reduce the time, take the following measures on the servo amplifier. 3 phase 200V Supply control power to L1C and L2C. 5) Multi-CPU system is not available. 1- 10 Section 1 General 6) When encoder communication error occurs, it doesn’t communicate between controller and servo in FALDIC-α. 7) If you add and start up the divice on degeneracy setting; such as servo or I/O terminal, the lack of the tact happens. And it occurs non fatal error of the contents detective error. Do not add and start up servo and I/O terminal. 1- 11 Section 2 Motion Function Description 2-1 Ratio Synchronous The sync axis operates in synchronization with master axis pulse. Ratio synchronous is used for control of winding, etc. Sync axis Master axis PG Operates with a fixed ratio to the master axis pulse. Master axis Sync axis The speed same as or higher than the master axis can be set. <Calculation of sync axis position> Sync axis position = Master axis position × Ratio_Sync axis / Ratio_Master axis <Operation> • After “sync command” is set ON, the sync axis operates with respect to the master axis pulse. • “Ratio_Master axis” and “Ratio_Sync axis” can be changed during synchronization. • Synchronization in which the master axis reverses is also possible. • Set “sync command” OFF to stop synchronization. <Input interface> Name Sync command Size BOOL Range 0/1 Ratio_Master axis DINT 1 to 2147483647 Ratio_Sync axis DINT 0 to 2147483647 Name Size Range Synchronizing BOOL 0/1 Name Size Range Incremental value error BOOL 0/1 Description While this parameter is ON, synchronization is performed. The synchronous ratio for the master axis is set. If set to 0, it is assumed to be 1 and operation is started. Set the synchronous ratio for the sync axis. <Output interface> Description This parameter is set ON when the sync command is set ON without errors. <Error> Description An error occurs if the sync axis speed exceeds the max. velocity during synchronization. Recover from the error with the alarm reset. 2- 1 Section 2 Motion Function Description <Operation example> Master axis Sync axis z Sync command z Synchronizing z Master axis ratio 1000 z Sync axis ratio 500 750 <Operation example Sync axis error> z Sync command z Synchronizing z Sync axis error z Alarm reset 2- 2 Section 2 Motion Function Description 2-2 Cycle Synchronous The sync axis operates in synchronization with master axis pulse. Phases of the master axis and sync axis can be controlled; this is used for synchronous operations that require control of length per work. Sync axis PG Master axis Operates with a fixed ratio to the master axis pulse. Master axis n n+1 n+2 n n+1 n+2 n+3 n+4 n+5 Sync axis n+4 n+5 Cycle stop <Calculation of sync axis position> Sync axis position = Master axis position × Sync axis travel per cycle / Master axis travel per cycle <Operation> • After “sync command” is set ON, the sync axis operates in synchronization with “master axis input pulse”. • The sync axis can make a cycle stop. • “Master axis travel per cycle” and “Sync axis travel per cycle” can be changed during synchronization. However, changes are reflected after the master axis cycle is completed. • If an error such as “setting error” occurs during synchronization, synchronization stops. To restart synchronization, remove the cause of the error first. Then, set “alarm reset” ON and set “synchronous command” OFF and ON again. • Set “sync command” OFF to stop synchronization. 2- 3 Section 2 Motion Function Description <Input interface> Name Size Sync command BOOL 0/1 Cycle stop BOOL 0/1 Sync axis travel per cycle Master axis travel per cycle Min. value of master axis travel per cycle Min. value of sync axis travel per cycle DINT DINT DINT DINT Range Description While this parameter is ON, synchronization is performed. When this parameter is set ON, the sync axis stops at the reference position. When set OFF, operation is resumed while keeping the phase. 1 to 2147483647 [Unit amount of sync axis] 1 to 2147483647 [Unit amount of master axis] 0 to 2147483647 [Unit amount of master axis] 0 to 2147483647 [Unit amount of sync axis] 0 to 2147483647 [Unit amount of master axis] Reverse feed limiter DINT Travel at startup DINT 0 to Master axis travel per cycle [Unit amount of master axis] Travel at stop DINT 0 to Master axis travel per cycle [Unit amount of master axis] Delay at startup DINT 0 to 2147483647 [Unit amount of master axis] Set the travel amount of the sync axis during one cycle. Set the travel amount of the master axis during one cycle. Set the min. value of master axis travel per cycle. This parameter is used for error detection. Set the min. value of sync axis travel per cycle. This parameter is used for error detection. Set the limit value for master axis reverse rotations. This parameter is used for error detection. This function prevents the sync axis from overshooting if the sync command is set ON while the master axis is operating. Sin-curve acceleration is made. Set the travel amount after synchronization is started or cycle stop is reset. This function prevents the sync axis from undershooting if the sync command is set OFF while the master axis is operating. Sin-curve deceleration is made. Set the travel amount after a cycle stop is made. The sync axis starts operation after synchronization is started and then the master axis operates for the length set here. <Output interface> Name Synchronizing Accelerating Decelerating Size BOOL BOOL BOOL Range 0/1 0/1 0/1 Description This parameter is set ON during synchronization. This parameter is set ON while the sync axis is accelerating. This parameter is set ON while the sync axis is decelerating. Name Size Range Master axis cycle setting error BOOL 0/1 Sync axis cycle setting error BOOL 0/1 Incremental value error BOOL 0/1 Reverse rotation error BOOL 0/1 Description This error occurs if “master axis travel per cycle is smaller than min. value of master axis travel per cycle.” Recover from the error with the alarm reset. This error occurs if “sync axis travel per cycle is smaller than min. value of sync axis travel per cycle.” Recover from the error with the alarm reset. This error occurs if the incremental value of the master axis pulse input for one tact exceeds one-half of the master axis travel per cycle. This error also occurs if the sync axis speed exceeds the max. velocity during synchronous operation. Recover from the error with the alarm reset. This error occurs if “master axis counter feed exceeds Reverse feed limiter. Recover from the error with the alarm reset.” <Error> 2- 4 Section 2 Motion Function Description <Operation example Startup & Cycle stop> Travel at startup × 2 Travel at stop × 2 Travel at startup × 2 Master axis n n+1 n+2 n+3 n n+1 n+2 n+3 n+4 n+5 Sync axis n+5 z Sync command z Cycle stop z Accelerating z Synchronizing z Decelerating z Master axis travel per cycle 1000 z Sync axis travel per cycle 1000 <Operation example 900 Master axis counter feed> Master axis counter value Time Output value is held during this period. Master axis feed amount Time Master axis counter feed amount Time * Same as the rotary shear and flying shear. 2- 5 Section 2 Motion Function Description 2-3 Rotary Shear The sync axis operates in synchronization with master axis pulse for a fixed section making rotary motion. Phases of the master axis and sync axis can be controlled; this is used for synchronous operations that require control of length per work. The difference from the cycle synchronous is that the sync width is determined within a cycle and the speed can be changed at other sections. Even if the circumference of the sync axis (sync axis travel per cycle) is different from that of the master axis (master axis travel per cycle), control is also possible. This can be used for various types of work. Sync axis PG Master axis Operates with a fixed ratio to the master axis pulse. Master axis sync width Acc Dec length Master axis Synchronizing n Sync axis n Synchronizing Sync axis sync width Cycle stop <Operation> • After “synchronous command” is set ON, the sync axis operates in synchronization with “master axis input pulse”. • The sync axis can make a cycle stop. • Parameters such as “Master axis travel per cycle” and “Sync axis travel per cycle” can be changed during synchronization. However, changes are reflected after the master axis cycle is completed. • If an error such as “set value error” occurs during synchronization, synchronization stops. • Set “sync command” OFF to stop synchronization. 2- 6 Section 2 Motion Function Description <Input interface> Name Size Range Sync command BOOL 0/1 Cycle stop BOOL 0/1 Sync axis travel per cycle Master axis travel per cycle Min. value of master axis travel per cycle DINT DINT DINT 1 to 2147483647 [Unit amount of sync axis] 1 to 2147483647 [Unit amount of master axis] 0 to 2147483647 [Unit amount of master axis] 0 to 2147483647 [Unit amount of master axis] Reverse feed limiter DINT Travel at startup DINT 0 to Master axis travel per cycle [Unit amount of master axis] Travel at stop DINT 0 to Master axis travel per cycle [Unit amount of master axis] Master axis sync width DINT Sync axis sync width DINT Acceleration length DINT Deceleration length DINT Delay at startup DINT 0 to Master axis travel per cycle [Unit amount of master axis] 0 to 2147483647 [Unit amount of sync axis] 0 to 2147483647 [Unit amount of master axis] 0 to 2147483647 [Unit amount of master axis] 0 to 2147483647 [Unit amount of master axis] Description While this parameter is ON, synchronization is performed. When this parameter is set ON, the sync axis stops at the reference position. When set OFF, operation is resumed while keeping the phase. Set the travel amount of the sync axis during one cycle. In this mechanism, set the cutter perimeter. Set the travel amount of the master axis during one cycle. In this mechanism, set the cut length of the work. Set the min. value of master axis travel per cycle. This parameter is used for error detection. Set the limit value for master axis reverse rotations. This parameter is used for error detection. This function prevents the sync axis from overshooting if the sync command is set ON while the master axis is operating. Sin-curve acceleration is made. Set the travel amount after synchronization is started or cycle stop is reset. This function prevents the sync axis from undershooting if the sync command is set OFF while the master axis is operating. Sin-curve deceleration is made. Set the travel amount after a cycle stop is made. Set the length in which the master axis synchronizes with the sync axis. In this section, the work is cut. Set the length in which the sync axis synchronizes with the master axis. In this section, the work is cut. Set the master axis travel amount during acceleration (or deceleration) made in the transition between sync and async. Set the master axis travel amount during acceleration (or deceleration) made in the transition between sync and async. The sync axis starts operation after synchronization is started and then the master axis operates for the length set here. <Output interface> Name Synchronizing Accelerating Decelerating Size BOOL BOOL BOOL Range 0/1 0/1 0/1 Description This parameter is set ON during synchronization. This parameter is set ON while the sync axis is accelerating. This parameter is set ON while the sync axis is decelerating. 2- 7 Section 2 Motion Function Description <Error> Name Size Range Master axis cycle setting error BOOL 0/1 Incremental value BOOL error 0/1 Reverse rotation error BOOL 0/1 Sync axis width setting error BOOL 0/1 Description This error occurs if “master axis travel per cycle” is smaller than “min. value of master axis travel per cycle”. Recover from the error with the alarm reset. This error occurs if the incremental value of the master axis pulse input for one tact exceeds one-half of the cut length, or if the sync axis speed exceeds the max. velocity during synchronous operation. Recover from the error with the alarm reset. This error occurs if “master axis counter feed” exceeds “Reverse feed limiter”. Recover from the error with the alarm reset. This error occurs under the following conditions: Master axis sync width + Acc length + Dec length >= Master axis travel per cycle Or, Sync axis sync width > Sync axis travel per cycle Or, Master axis sync width × 2 + Acc length + Dec length > Master axis sync width Sync axis sync width × 2 × Sync axis travel per cycle Recover from the error with the alarm reset. 2- 8 Section 2 Motion Function Description <Operation example Master axis Startup & Cycle stop> Dec length Master axis sync width Travel at startup × 2 Dec length Travel at stop × 2 Travel at startup × 2 Sync axis Master axis sync width Sync axis sync width z Sync command z Cycle stop z Accelerating z Synchronizing z Decelerating z Master axis travel per cycle 1000 z Sync axis travel per cycle 1000 900 <Differences in synchronous operation depending on the difference between master axis travel per cycle and sync axis travel per cycle> Sync axis travel per cycle > Master axis travel per cycle Sync axis travel per cycle < Master axis travel per cycle Sync axis Master axis Master axis Sync axis * When “sync axis travel per cycle” equals “master axis travel per cycle”, the master axis and sync axis operate at the same speed. 2- 9 Section 2 Motion Function Description 2-4 Flying Shear The sync axis operates in synchronization with master axis pulse for a fixed section making reciprocating motion. After synchronization is completed, the sync axis returns to the initial position and waits for the next cycle. PG Sync axis Master axis Operates with a fixed ratio to the master axis pulse. Travel at acc × 2 Cut length Travel at dec × 2 Master axis Sync section Sync axis Cycle stop Return operation <Operation> • After “synchronous command” is set ON, the sync axis operates in synchronization with “master axis input pulse”. After synchronization is completed, the sync axis performs return operation for the length it has traveled. • The sync axis can make a cycle stop. • Parameters such as “Master axis travel per cycle” and “Sync axis sync width” can be changed during synchronization. However, changes are reflected after the master axis cycle is completed. • If an error such as “sync width setting error” occurs during synchronization, synchronization stops. • Set “synchronous command” OFF to stop synchronization. • There are the following two timings for the start of the next cycle: Mark detection disabled: If the master axis has operated for the length set in “master axis travel per cycle”, the next cycle automatically starts. Mark detection enabled: Even if a cycle has been completed, the next cycle does not start until the mark signal is set ON. 2- 10 Section 2 Motion Function Description <Input interface> Name Size Sync command BOOL 0/1 Cycle stop BOOL 0/1 Master axis travel per cycle Min. value of master axis travel per cycle DINT DINT Reverse feed limiter DINT Travel at startup DINT Travel at stop DINT Master axis sync width DINT Sync axis sync width DINT Cut command delay DINT Cut command time DINT Home position return speed DINT Delay at startup DINT Range 1 to 2147483647 [Unit amount of master axis] 0 to 2147483647 [Unit amount of master axis] 0 to 2147483647 [Unit amount of master axis] 0 to 2147483647 [Unit amount of master axis] 0 to 2147483647 [Unit amount of master axis] 0 to 2147483647 [Unit amount of master axis] 0 to 2147483647 [Unit amount of sync axis] 0 to 2147483647 [ms] 0 to 2147483647 [ms] 0 to 2147483647 [Unit amount of sync axis] 0 to Master axis travel per cycle [Unit amount of master axis] Description While this parameter is ON, synchronization is performed. When this parameter is set ON, the sync axis stops at the reference position. When set OFF, operation is resumed while keeping the phase. Set the travel amount of the master axis during one cycle. In this mechanism, set the cut length of the work. Set the min. value of master axis travel per cycle. This parameter is used for error detection. Set the limit value for master axis reverse rotations. This parameter is used for error detection. Set the master axis travel amount while the sync axis is accelerating. Set the master axis travel amount while the sync axis is decelerating. Set the length in which the master axis synchronizes with the sync axis. In this section, the work is cut. Set the length in which the sync axis synchronizes with the master axis. In this section, the work is cut. Set the value of cut output delay time. * Set the value of cut output ON time. * Set the speed of return operation. The sync axis starts operation after synchronization is started and then the master axis operates for the length set here. * Minimum unit is 1 takt (5ms). Actual Cut command time becomes maximum 5ms longer than setting time. Actual Cut command delay becomes maximum 4ms shorter than setting time. <Output interface> Name Synchronizing Accelerating Decelerating Size BOOL BOOL BOOL Range 0/1 0/1 0/1 Cut command BOOL 0/1 Description This parameter is set ON during synchronization. This parameter is set ON while the sync axis is accelerating. This parameter is set ON while the sync axis is decelerating. After synchronous operation is completed, this is set ON for set the period of time. <Error> Name Size Range Master axis cycle setting error BOOL 0/1 Incremental value error BOOL 0/1 Description This error occurs if “master axis travel per cycle” is smaller than “min. value of master axis travel per cycle”, or an attempt is made to start the next cycle during synchronous operation (incl. return operation). This error occurs if the incremental value of the master axis pulse input for one tact exceeds one-half of the cut length, or if the sync axis speed exceeds the max. velocity during synchronous operation. Recover from the error with the alarm reset. 2- 11 Section 2 Motion Function Description Name Size Range Reverse rotation error BOOL 0/1 Sync axis width setting error BOOL 0/1 <Operation example Description This error occurs if “master axis counter feed” exceeds “Reverse feed limiter”. Recover from the error with the alarm reset. This error occurs under the following condition: “Master axis sync width” + “Travel at startup” × 2 + “Travel at stop” × 2 >= “Master axis travel per cycle” Recover from the error with the alarm reset. Startup & Cycle stop (mark disabled)> Travel at acc × 2 Cut length Travel at dec × 2 Master axis Delay at startup Sync axis Home position return speed z Sync command z Cycle stop z Accelerating z Synchronizing z Decelerating z Cut command Cut output delay Cut output time <When the cut command time is longer than the sync time> Cut output delay Set OFF here. z Cut command Cut output time 2- 12 Section 2 Motion Function Description <Operation example Startup & Cycle stop (mark enabled)> Travel at acc × 2 Master axis Cut length Travel at dec × 2 Delay at startup 2-13 Sync axis Home position return speed z Sync command z Mark signal z Cycle stop z Accelerating z Synchronizing z Decelerating z Cut command Cut output delay Cut output time 2- 13 Every cycle has “delay at startup”. Section 2 Motion Function Description <Details of main parameters> z Min. value of master axis travel per cycle Set the minimum value of “master axis travel per cycle”. This parameter is also used for a mask of the mark sensor when mark detection is performed. When the master axis has not operated for the length set in “master axis travel per cycle”, sensor is ignored. Valid sensor *1 Mark signal Min. value of master axis travel per cycle * This is a valid sensor, however an error occurs since it is set ON during operation. If the delay at startup is long, an error does not occur. z Master axis cycle setting error If an attempt is made to start the next cycle during synchronous operation, an error occurs as follows. An error occurs since sync operation is continued after a sensor has been detected and a period of time set in "delay at startup" has been elapsed. Mark signal Delay at startup An error does not occur since the “delay at startup” is long. 2- 14 Section 3 Memory Map Memory Map Outline 3-1 Memory Map Outline The memory map of the controller unit is divided into @E.Terminal area and user area as shown below. Users can use the user area freely. Motion control is exercised by accessing the @E.Terminal area. Standard memory (Non-retained) 64kW Retain memory 22kW WM0 to WM9999 %MW1.0 to %MW1.9999 User area Approx. 10Kw WM10000 to WM30719 %MW1.10000 to %MW1.30719 @E.Terminal area Approx. 20Kw WM30720 to WM65535 %MW1.30720 to %MW1.65535 User area 34Kw WL0 to WL9999 %MW3.0 to %MW3.9999 User area Approx. 10Kw WL10000 to WL20479 %MW3.10000 to %MW3.20479 @E.Terminal area Approx. 10Kw WL20480 to WL22527 %MW3.20479 to %MW3.22527 User area 2Kw User FB memory 4kW System FB memory 6kW @E.Terminal area is divided as follows. Standard memory 1) General-purpose interface area 2) System area : This area performs manual operation, homing, PTP operation or sync command. Change is updated in real time. : This area is an interface area with motion control part. (processing time, etc.) Change is updated in real time. Retain memory 1) Parameter area (not open to the public) : This area is a data setting area such as mechanism configuration that is not changed during operation. 2) Data interface area : This area is a parameter area for acceleration/deceleration data or sync-related data. Change is updated in real time. 3-1 Section 3 Memory Map General-purpose Interface Area 3-2 General-purpose Interface Area <Outline> [When using SX-Programmer Standard] Address WM10000 to WM10049 WM10050 to WM10099 WM10100 to WM10149 WM10150 to WM10199 WM10200 to WM10249 WM10250 to WM10299 WM10300 to WM10349 WM10350 to WM10399 WM10400 to WM10449 Size Name 50W External/Virtual master axis 50W Axis 1 50W Axis 2 50W Axis 3 50W Axis 4 50W Axis 5 50W Axis 6 50W Axis 7 50W Axis 8 [When using SX-Programmer Expert (D300win)] Address %MW1.10000 to %MW1.10049 %MW1.10050 to %MW1.10099 %MW1.10100 to %MW1.10149 %MW1.10150 to %MW1.10199 %MW1.10200 to %MW1.10249 %MW1.10250 to %MW1.10299 %MW1.10300 to %MW1.10349 %MW1.10350 to %MW1.10399 %MW1.10400 to %MW1.10449 3-2 Size Name 50W External/Virtual master axis 50W Axis 1 50W Axis 2 50W Axis 3 50W Axis 4 50W Axis 5 50W Axis 6 50W Axis 7 50W Axis 8 Section 3 Memory Map General-purpose Interface Area <Details> External/Virtual master axis F E D +0 C B A 9 8 7 6 5 4 3 2 1 0 Position data (lower) [unit amount/pulse] - Virtual/External common +1 Position data (upper) [unit amount/pulse] - Virtual/External common +2 Speed data [unit amount/unit speed] (lower) - Virtual/External common +3 Speed data [unit amount/unit speed] (upper) - Virtual/External common +4 Alarm status Motion +5 +6 +7 Virtual M axis running Virtual Virtual Ext. PG Virtual M axis M axis M axis selection selection acc dec Sync Synchro- Sync Data read Making Mark accelerat- deceleratnizing complete cycle stop detection ing ing Controller Incremental Reverse rotation value error error Setting error Mark error Mechanical calculation overflow +8 Unit. conv. overflow (sync) +9 +10 Target speed [unit amount/unit speed] (lower) +11 Target speed [unit amount/unit speed] (upper) Error Summary +12 +13 +14 Controller +15 +16 Sync cycle start Virtual M axis run Ext. pulse input inhibit Alarm reset Current pos. pulse display Motion Mark length measure start Cycle stop +17 Virtual M axis emer. stop +18 +19 Data IF Data IF display edit inhibit read inhibit Motion axis F E D C B +0 A 9 8 7 6 5 4 3 +1 Feedback position (upper) [unit amount] +2 Feedback speed [unit amount/s] (lower)/Parameter read value (lower) +3 Feedback speed [unit amount/s] (upper)/Parameter read value (upper) +4 Alarm status +7 +8 Positioning Homing RDY completion completion PSET Sync Synchro- Sync Data read Making acceleratdecelerat- completion cycle nizing ing stop ing SV para SV para SV SV write read parameter parameter completion completion write error read error Interpolating Cut output Emer. Deviation stop +OT -OT error detection Compen- Continue Master axis Sync axis Incremental Reverse sating cycle cycle length rotation phase accepted set error set error error error SV para Mechanical mode calculation response overflow l ti +10 Target position (lower)/Write parameter setting (lower) +11 Target position (upper)/Write parameter setting (upper) +12 Feedback speed [unit amount/unit speed] (lower)/Parameter No. +13 Feedback speed [unit amount/unit speed] (upper) +14 Preset data (lower) [unit amount] +15 Preset data (upper) [unit amount] +17 +18 +19 0 Motion Manual Homing PTP PTP Preset Alarm Emergency Positioning Suspend Deviation reverse cancel clear reset stop rotation command command ABS Mark 2-axis linear Interrupt Continue Phase Sync Cycle detection compeninterpolation command stop selection sation command positioning mode SV para SV para SV write read parameter command command mode Data IF Data IF display edit disable read inhibit Servo ON Toggle Unit. conv. Interrupt FALDIC overflow alarm error overrun detection (PTP) Manual forward rotation 3-3 Controller Sync width setting error Unit. conv. overflow (Sync) +9 +16 1 FALDIC external counter +5 +6 2 Feedback position (lower) [unit amount] Error Summary Controller Current pos. pulse display Motion External/Virtual master axis Section 3 Memory Map Bit area [Controller 3-2-1 External/Virtual master axis Bit area [Controller Motion] Motion] (1) Sync cycle start (+16 Fbit) When this signal is set ON, cycle control of the master axis is started. When this signal is set OFF, synchronization without cycle control is performed. (2) Virtual master axis run (+16 Ebit) While this signal is ON, the virtual master axis operates. When this signal is set OFF, it stops. Set the speed in the [Target speed]. It is possible to perform motion operation using position data of the virtual master axis as a master axis. Target speed Acc/dec time Acc/dec time Current speed Virtual master axis start Virtual master axis running Virtual master axis accelerating Virtual master axis decelerating (3) External pulse input inhibit (+16 Dbit) While this signal is ON, pulse count value does not change even if external pulses are input. Pulse input Pulse count value External pulse input inhibit In the case of external pulses, an encoder that is connected to the servo amplifier of axis 1 becomes the master axis. The max. frequency for FALDIC-α is 500kHz (differential input) and that for ALPHA5 is 1MHz (differential input) or 200kHz (open collector). 3-4 External/Virtual master axis Section 3 Memory Map Bit area [Controller Motion] Master axis prediction is executed based on measured counter value, and output to position data. Master axis Feed amount Pos. A’ Pos. A Sync axis Pos. B T’ T Time t • Pos. A of the master axis feed position for time T is measured. • Pos. B of sync axis position corresponding to Pos. A of master axis position is calculated and then the current value is calculated. • At the point of time T’ when the sync axis reaches Pos. B with the motor rotating, the master axis has reached Pos. A. (“Delay time t” is caused by controller computing time, amplifier computing time, or rotations of a slave axis motor.) (4) Alarm reset (+16 8bit) At the rising edge of this signal, a generated alarm is reset. Alarm reset Alarm (5) Virtual master axis emergency stop (+16 7bit) This signal forcefully stops the master axis. Emergency stop is different in deceleration time from normal stop. Forced dec time Current speed Virtual master axis start Virtual master axis emergency stop (6) Current position pulse display (+16 0bit) When this signal is set ON, the current position (Motion Controller Data area +0, +1) is displayed in pulse number and the current speed (Motion Controller Data area +2, +3) in r/min. When set OFF, a value after pulse correction is displayed in the current position/current speed. This signal is used to monitor pulse control values that are internally used. 3-5 External/Virtual master axis Section 3 Memory Map Bit area [Controller Motion] (7) Cycle stop (+17 Ebit) While this signal is ON, the master axis (for virtual master axis/external pulse) makes a cycle stop. When set OFF, operation is resumed. During cycle stop, [Making cycle stop] is set ON. The sync axis stops due to master axis stop. If [Cycle stop] is set ON at startup, the master axis is instantly placed in a cycle stop state. In cycle stop operation, the master axis stops at the position where [Master axis cycle setting] feed is completed. Cycle stop cannot made in ratio synchronous. * “Master axis stop” means that the master axis stops in the controller. Even if the actual master axis is operating with external pulses input, it is assumed that the master axis in the controller unit has stopped. <For virtual master> Travel at stop × 2 Travel at startup × 2 Virtual master axis n n+1 n+2 n+3 n n+1 n+2 n+3 n+4 n+5 Internal master axis Sync axis synchronizes with internal master axis. n+5 Sync cycle start Virtual master axis run Cycle stop Making cycle stop Master axis accelerating Master axis synchronizing Master axis decelerating Control block Virtual master axis External pulse input + Master axis cycle control Master axis pulse 3-6 Sync axis control Internal master axis pulse To servo motor Sync axis pulse External/Virtual master axis Section 3 Memory Map Bit area [Controller Motion] <For external pulse> Travel at stop × 2 Travel at stop × 2 Travel at startup × 2 Virtual master axis n n+1 n+2 n+3 n n+1 n+2 n+3 n+4 n+5 Internal master axis Sync axis synchronizes with internal master axis. n+5 Sync cycle start Virtual master axis run Cycle stop Making cycle stop Master axis accelerating Master axis synchronizing Master axis decelerating * The master axis and sync axis are out of phase with each other by the length set in [travel at startup]. (8) Mark length measurement start (+17 7bit) At the rising edge of this signal, mark measurement is started. A mark sensor is assigned to the interrupt signal of axis 1. The data of measurement between marks is used as [Master axis travel per cycle] of an axis with [Mark selection] enabled. [Mark selection] is available in [Cycle synchronous] and [Rotary shear]. Parameters related to mark length measurement are shown below. Item Mark detection range Disabled mark number Mark error count Setting range 0 to 2147483647 0 to 99 1 to 99 Description This parameter is used for timing when FALDIC interrupt position detection is set ON and for mark error detection. The set number of marks are not measured when synchronization is started. When disabled, the master axis operates with the master axis travel per cycle. The set number of mark errors are detected, a mark error occurs to stop synchronization. Master axis Master axis travel per cycle Mark detection range Mark FALDIC interrupt position detection ON Mark error 3-7 External/Virtual master axis Section 3 Memory Map Bit area [Controller Motion] (9) Data IF display edit disable (+19 Fbit) While this signal is ON, the data interface area (WL11000 to 11049) is not changed from display unit. This is used when you want to set the data interface area from the user PLC but not from display unit. (10) Data IF read inhibit (+19 Ebit) While this signal is ON, data in the data interface area (WL11000 to 11049) cannot be read. This is used when uniqueness of data is required, for example when writing data from the PLC using 8WAY function of display unit. Data IF read inhibit Data IF Data update timing Data is not updated. Determine ON time depending on the communication time. 3-8 Section 3 Memory Map External/Virtual master axis Bit area [Motion Controller] 3-2-2 External/Virtual master axis Bit area [Motion Controller] (1) Virtual master axis running (+6 Fbit) This signal is set ON while the virtual master axis is running. For more information about the detail timing, refer to “3-2-1 (2) Virtual master axis run”. (2) Virtual master axis accelerating (+6 Ebit) This signal is set ON while the virtual master axis is accelerating. For more information about the detail timing, refer to “3-2-1 (2) Virtual master axis run”. (3) Virtual master axis decelerating (+6 Dbit) This signal is set ON while the virtual master axis is decelerating. For more information about the detail timing, refer to “3-2-1 (2) Virtual master axis run”. (4) External encoder selection (+6 9bit) This signal is set ON when the external encoder is selection for “virtual/external selection” in the parameter area. (5) Virtual master axis selection (+6 8bit) This signal is set ON when the virtual master axis is selection for “virtual/external selection” in the parameter area. (6) Synchronizing (+7 Fbit) This signal is set ON when the internally controlled master axis reaches the target speed (sync speed). For more information about the detail timing, refer to “3-2-1 (7) Cycle stop”. (7) Sync accelerating (+7 Ebit) This signal is set ON when the internally controlled master axis is accelerating to the target speed (sync speed). For more information about the detail timing, refer to “3-2-1 (7) Cycle stop”. (8) Sync decelerating (+7 Dbit) This signal is set ON when the internally controlled master axis is decelerating from the target speed (sync speed). For more information about the detail timing, refer to “3-2-1 (7) Cycle stop”. (9) Data read completion (+7 12bit) This signal is set ON for one scan period at the timing when the internally managed master axis cycle chenged to zero. Master axis pulse Master axis pulse for each cycle Sync start Data read completion (10) Making cycle stop (+7 Bbit) This signal is set ON while the master axis is making a cycle stop. For more information about the detail timing, refer to “3-2-1 (7) Cycle stop”. 3-9 External/Virtual master axis Bit area [Motion Controller] Section 3 Memory Map (11) Mark detection (+7 Abit) This signal is set ON when a mark sensor is detected during mark length measurement. (12) Setting error (+7 7bit) This error is caused by the following causes. The master axis stops operation. Recover from the error with the alarm reset. • Tact time×3 < FALDIC sampling time (13) Incremental value error (+7 5bit) This error is caused by the following cause while the master axis is operating during sync cycle. The master axis stops operation. Recover from the error with the alarm reset. • Incremental value of master axis pulse input for one tact >= Half of master axis travel per cycle (14) Reverse rotation error (+7 4bit) This error is caused by the following cause while the master axis is operating during sync cycle. The master axis stops operation. Recover from the error with the alarm reset. • Master axis counter feed < Reverse feed limiter (15) Mark error (+7 3bit) This error is cause by the following cause during mark length measurement. Recover from the error with the alarm reset. • Master axis counter feed < Reverse feed limiter (16) Mechanical calculation overflow (+8 7bit) Internal calculation overflowed during pulse correction operation. Check the mechanical data and enter a small value. Then, change the mechanical data again. If the calculation does not overflow, the signal is set OFF. Error detection timing 1) When mechanical data is changed 2) At the rising edge of [PTP reference] 3) At power-on Error occurrence condition Pulse correction α/β is obtained by the following formulas. Then, the pulse correction α/β is reduced and the result is controlled as an interim calculated value. No mechanism: Pulse correction calculation is not performed. Belt: Pulse correction α: Number of gears on the mechanism side × Number of pulses per encoder rotation Pulse correction β: Number of gears on the motor side × Number of pulley teeth × Travel per tooth × Decimal point position Ball screw: Pulse correction α: Number of gears on the mechanism side × Number of pulses per encoder rotation Pulse correction β: Number of gears on the motor side × Lead × Decimal point position Sealer/Cutter: Pulse correction α: Number of gears on the mechanism side × Number of pulses per encoder rotation × 113 Pulse correction β: Number of gears on the motor side × Roll dia. × Decimal point position × 355 Feed roll: Pulse correction α: Number of gears on the mechanism side × Number of pulses per encoder rotation × 113 Pulse correction β: Number of gears on the motor side × Roll dia. × Decimal point position × 355 3-10 External/Virtual master axis Bit area [Motion Controller] Section 3 Memory Map (17) Unit conversion overflow (+9 2bit) This error is caused by an attempt to perform operation with the set value of 2147483648 pulses or more. This error is output upon setting the data. The target parameters are as follows. • Mark detection range • Travel at startup • Travel at stop • Master axis travel per cycle Data IF Alarm detection Alarm reset (18) Error summary (+9 0bit) This is an “OR flag” of the following errors. • Unit conversion overflow • Setting error • Incremental value error • Reverse rotation error • Mark error • Mechanical calculation overflow 3-11 External/Virtual master axis Data area [Controller Motion] Section 3 Memory Map 3-2-3 External/Virtual master axis Data area [Controller Motion] (1) Target speed (+10, +11) Set the target speed of the virtual master axis. Setting range: 0 to 2147483647 [unit travel/unit speed time] or [r/min] If a value smaller than 0 is set, it is assumed to be 0 and operation is not performed. 3-12 External/Virtual master axis Data area [Motion Controller] Section 3 Memory Map 3-2-4 External/Virtual master axis Data area [Motion Controller] (1) Position data (+0, +1) The current position of the virtual master axis or external encoder input is displayed. The unit is [Unit amount] or [Pulse] considering pulse correction. This is a ring counter whose display range is –2147483648 to 2147483647. 2147483647 Current position -2147483648 <Note> The current position is internally managed with 32-bit pulse data. When pulse correction value is displayed, the range is not –2147483648 to 2147483647. Internally controlled value 2147483647 pulses Current position -2147483648 pulses <When pulse correction is set to “1/3”> Displayed value 2147483647 pulses Current position ×1/3 715827882 pulses -715827882 pulses ×1/3 -2147483648 pulses * The fractional part is discarded when displayed. 3-13 External/Virtual master axis Bit area [Motion Controller] Section 3 Memory Map <When pulse correction is set to “2/3”> 2147483647 pulses Current position -2147483648 pulses Red line indicates the current position. If the current position overflows using a pulse correction value, no correct value is displayed. In this case, refer to “Master axis current position in a cycle”. (2) Speed data (+2, +3) The current speed of the virtual master axis or external encoder input is displayed. This data is the moving average speed for 50ms. (3) Alarm status (+4) The alarm status is displayed. Currently, it is not used. 3-14 Motion axis Bit area [Controller Section 3 Memory Map 3-2-5 Motion axis Bit area [Controller Motion] Motion] (1) Servo ON (+16 Fbit) This signal locks the servo amplifier. When set ON, alarm reset is performed at the same time. Servo operation cannot be performed unless this bit is set ON. When set OFF, the motor free-run. If the motor is ready to operate after [Servo ON] is set ON, [RDY] is set ON. After power ON of @E.Terminal, [+OT] and [-OT] is not detected until this signal is set ON. Servo ON RDY (2) Manual forward (+16 Ebit) When this signal is set ON, the current position moves in the direction of addition. When set OFF, it stops. Specify the speed in the [Manual speed]. Manual speed Acc/dec time Acc/dec time Current speed Manual forward In-position (PSET) (3) Manual reverse (+16 Dbit) When this signal is set ON, the current position moves in the direction of subtraction. When set OFF, it stops. Specify the speed in the [Manual speed]. Current speed Acc/dec time Manual speed Acc/dec time Manual reverse In-position (PSET) 3-15 Motion axis Bit area [Controller Section 3 Memory Map Motion] (4) Homing command (+16 Cbit) At the rising edge of this signal, homing is started. Homing is performed using the function of FALDIC, therefore, make the detail settings in the parameter of FALDIC. Homing speed FALDIC Creep speed FALDIC Acc/dec time FALDIC Home position shift unit amount Current speed Home position LS Z-phase Homing command Homing completion The above timing chart shows one example of operation. For more information, refer to the user’s manual of FALDIC. (5) PTP reference (+16 Bbit) At the rising edge of this signal, PTP (Point To Point) operation is started. The operation is performed according to the settings of [Target position] and [Target speed]. Target speed Acc/dec time Target position Current speed Acc/dec time PTP reference In-position (PSET) (6) PTP ABS (+16 Abit) There are the following two methods of specifying the target position of PTP operation: ABS (absolute position) and INC (relative position). <When ABS selected> -100 Target position -80 40 0 40 100 0 40 100 <When INC selected> -100 Target position 40 -80 -40 3-16 Motion axis Bit area [Controller Section 3 Memory Map Motion] (7) Preset (+16 9bit) At the rising edge of this signal, the current position is changed to [Preset data]. In FALDIC, the preset range is limited as follows: FALDIC-α :-79999999 to 79999999 FALDIC ALPHA5 :-2000000000 to 2000000000 * When preset is done, it overwrites parameter of the FALDIC. There is the overwriting limit which is up to 100,000 times. If it is frequently overwritten, change paremeter to RAM. [Preset position data] FALDIC-α :Standard parameter80 FALDIC ALPHA5 :PA2-19 *However, if you choose ABS (absolute position) system, parameter cannot be changed to RAM. To change RAM, refer to “how to change to RAM” in FALDIC manual. Preset command Preset data Current position 0 1000 500 1000 (8) Alarm reset (+16 8bit) At the rising edge of this signal, a generated alarm is reset. Alarm reset Alarm detection Alarm status 1234 0 (9) Emergency stop (+16 7bit) At the rising edge of this signal, positioning is stopped. The speed instantly becomes 0. Current speed Emergency stop In-position (PSET) Emergency stop detection 3-17 Motion axis Bit area [Controller Section 3 Memory Map Motion] (10) Positioning cancel (+16 6bit) At the rising edge of this signal, positioning is stopped. Controlled stop is caused. Current speed Positioning cancel In-position (PSET) (11) Pause (+16 5bit) At the rising edge of this signal, positioning is stopped. When this signal is set OFF, positioning is resumed. Current speed Pause In-position (PSET) (12) Deviation clear (+16 4bit) The deviation clear function of FALDIC is used. While this signal is ON, the difference (deviation) between the command and homing positions is assumed to be 0. In ALPHA5, edge setting is also possible in the parameter. (13) Current position pulse display (+16 0bit) When this signal is set ON, the current position (Motion Controller Data area +0, +1) is displayed in pulse number and the current speed (Motion Controller Data area +2, +3) in r/min. When set OFF, a value after pulse correction is displayed. Use this signal when you want to monitor the pulse control values that are internally used. 3-18 Motion axis Bit area [Controller Section 3 Memory Map Motion] (14) Sync command (+17 Fbit) While this signal is ON, the sync axis operates in synchronization with the master axis. Set the synchronous operation in the [Select motion function] in the parameter area. Motion operation varies depending on the setting of [Select motion function]. Master axis speed Sync axis speed Sync command Synchronizing Sync accelerating Sync decelerating In-position (PSET) *If the signal is set OFF during synchronization, sync axis causes controlled stop. (15) Sync command (+17 Ebit) While this signal is ON, the sync axis makes a cycle stop. When set OFF, operation is resumed. During a cycle stop, [Making cycle stop] is set ON and output of [Feedback position] does not change. If [Cycle stop] is set ON at startup, the sync axis is instantly placed in a cycle stop state. During cycle stop operation, the sync axis stops at the position where [sync axis cycle setting] feed is completed. Even while [Making cycle stop], [Data read completion] is set ON for one scan period if the master axis travels for the length set in [Master axis cycle setting]. Travel at stop × 2 Travel at stop × 2 Travel at startup × 2 Master axis n n+1 n+2 n+3 n n+1 n+2 n+3 n+4 n+5 Sync axis n+5 Sync cycle start Cycle stop Making cycle stop *The master axis and sync axis are out of phase with each other by the length set in [Travel at startup]. 3-19 Motion axis Bit area [Controller Section 3 Memory Map Motion] (16) Mark detection selection (+17 Dbit) This signal is used only when cycle synchronous, rotary shear, or flying shear is selected in the [Select motion function]. For cycle synchronous or rotary shear When this signal is set ON, mark length measurement data is used. If the master axis does not perform mark length measurement, operation is performed with the set value. For flying shear If this signal is ON when [Sync command] is set as ON, [Mark detection signal] becomes the start trigger of flying shear. When this signal is set OFF, the next cycle is automatically started when one master axis cycle is completed. 1 cycle 1 cycle Sync axis speed Mark detection signal Assign the mark signal to the interrupt signal input of FALDIC. (17) 2-axis linear interpolation command (+17 Abit) Two-axis linear interpolation is performed in the following combinations. This signal is only enabled for odd-numbered axes (axis 1,3,5 or 7). Combination 1 Combination 2 Combination 3 Combination 4 X axis Axis 1 Axis 3 Axis 5 Axis 7 Y axis Axis 2 Axis 4 Axis 6 Axis 8 Positioning is performed by setting position data of the X and Y axes, and synthetic speed. (2000,1000) Y axis Synthetic speed (500) X axis <Speed calculation> X-axis speed = (Synthetic speed * X-axis travel) / √(X-axis travel2 + Y-axis travel2) Y-axis speed = (Synthetic speed * Y-axis travel) / √(X-axis travel2 + Y-axis travel2) In the case of the above example, the speeds are as follows. X-axis speed = (500 * 2000) / √(20002 + 10002) ≓ 447 Y-axis speed = (500 * 1000) / √(20002 + 10002) ≓ 223 <Operation> • When [2-aixs linear interpolation command] is set ON, interpolation is started. • In addition, the following signals are enabled: [PTP_ABS], [Emergency stop], [Positioning cancel], and [Pause]. (for the X axis only) • The target position is set in the X and Y axes, however, the speed is set in the X axis. • Acceleration/deceleration speed and S-curve settings of interpolation depends on the settings of the X axis. 3-20 Motion axis Bit area [Controller Section 3 Memory Map Motion] (18) Interrupt positioning (+17 9bit) At the rising edge of this signal, operation is started at the set speed. When the interrupt signal is set ON, the master axis stops after operating to the target position. Target position Target speed Current speed Interrupt signal Interrupt positioning In-position (19) Continue mode (+17 8bit) When this signal is set ON, [PTP positioning] and [2-axis linear interpolation command] can be executed in succession. Either INC or ABS can be selected. While [Continue accepted] signal is ON, this signal is not accepted. While this bit is ON, changes of [Speed data] are ignored. Note: Operation is performed using the data at first startup for acceleration/deceleration time. Therefore, the acceleration time of the second and the subsequent times are different from the first one. 1st travel 2nd travel Current speed PTP reference Position/speed data Continue mode Continue accepted 3-21 Motion axis Bit area [Controller Section 3 Memory Map Motion] (20) Phase compensation (+17 6bit) At the rising edge of this signal, phase compensation is started. Phase compensation can be performed only during synchronous operation. Parameters related to phase compensation are shown below. Item Phase compensation length Phase compensation upper limit Setting range 0 to 2147483647 Description Set the travel of the sync axis for phase compensation. 0 to Master axis travel per cycle/10 Set the upper limit of phase compensation performed during one cycle. If the phase compensation length is higher than phase compensation upper limit, compensation is performed in multiple cycles. When phase compensation length is set as +, sync axis travel per cycle increases temporarily. Sync point lags (backward against master axis). When phase compensation length is set as -, sync point procees to opposite direction (forward against master axis). +Compensation Phase compensation Sync point Master axis Delay (Long interval) -Compensation Phase compensation Sync point S i t Master axis Advance (Short interval) 3-22 Motion axis Bit area [Controller Section 3 Memory Map Motion] (21) SV parameter write command (+18 Fbit) At the rising edge of this signal, parameters are written into the servo amplifier. Set parameter No. and parameter set value to write. For each setting range, refer to the user’s manual of FALDIC. SV parameter write command SV parameter write completion SV parameter write error Parameter No. Parameter set value to write 500 10 1000 0 1000 1000 <Parameter No.> Set value 0 to 99 100 to 199 200 to 299 FALDIC-α Standard parameter System parameter - FALDIC ALPHA5 Parameter PA1 Parameter PA2 Parameter PA3 * The last two digits of the set value become the actual parameter No. (22) SV parameter read command (+18 Ebit) At the rising edge of this signal, parameters are read from the servo amplifier. Set parameter No. and parameter set value to read. For each setting range, refer to the user’s manual of FALDIC. SV parameter read command SV parameter read completion SV parameter read error 500 Parameter No. Read parameter value 10 0 1000 <Parameter No.> Set value 0 to 99 100 to 199 200 to 299 FALDIC-α Standard parameter System parameter - FALDIC ALPHA5 Parameter PA1 Parameter PA2 Parameter PA3 * The last two digits of the set value become the actual parameter No. 3-23 1000 1000 Motion axis Bit area [Controller Section 3 Memory Map Motion] (23) SV parameter mode (+18 8bit) To write or read SV parameters, “SV parameter mode” must be enabled. When placed in SV parameter mode, the general-purpose interface area changes as follows. <Motion Controller> +2 : Homing speed (lower) Read parameter value (lower) +3 : Homing speed (upper) Read parameter value (upper) <Controller Motion> +10 : Target position (lower) Parameter set value to write (lower) +11 : Target position (upper) Parameter set value to write (upper) +12 : Target speed (lower) Parameter No. * In SV parameter mode, preset cannot be performed. SV parameter mode SV parameter mode response (24) Data IF display edit disable (+19 Fbit) While this signal is ON, the data interface area (WL11050 to 11099 in the case of axis 1) is not changed from the display. This is used when you want to set the data interface area from the user PLC but not from the display. (25) Data IF read inhibit (+19 Ebit) While this signal is ON, data in the data interface area (WL11050 to 11099, etc.) is not read to the contents. This is used when uniqueness of data is required, for example when writing data from the PLC using 8WAY function of the display. Data IF read inhibit Data IF Data update timing Data is not updated. Determine ON time depending on the communication method. 3-24 Motion axis Bit area [Motion Section 3 Memory Map 3-2-6 Motion axis Bit area [Motion Controller] Controller] (1) RDY (+6 Fbit) RDY signal of FALDIC is output. When [Servo ON] is set ON and the servomotor becomes ready to rotate, [RDY] signal is set ON showing the ready state. For more information about the detail timing, refer to “3-2-5 (1) Servo ON”. (2) In-position PSET (+6 Ebit) This signal is set ON when positioning is completed. While the servomotor is operating, this signal is set OFF. This signal is set ON under the condition that pulse output has been completed and the servo amplifier zero deviation range. For more information about the detail timing, refer to “3-2-5 (2) Manual forward”. (3) Homing completion (+6 Dbit) Homing completion signal of FALDIC is output. Conditions for ON depends on the parameter of FALDIC. <FALDIC-α> Standard parameter 66 Home position detection range <FALDIC ALPHA5> PA2. 17 Home position detection range 1 to 79999999 [× unit amount] 0: Always ON after completion, 1 to 2000000000 [× unit amount] For more information about the detail timing, refer to “3-2-5 (4) Homing command”. (4) Interpolating (+6 Abit) This signal is set ON during 2-axis linear interpolation. While this bit is operating, [Emergency stop], [Pause], and [Positioning cancel] of axis 1, 3, 5, or 7 are enabled for axis 2. For axis 2, 4, 6 or 8, they are disabled. (5) Emergency stop detection (+6 7bit) This signal is set ON when [Emergency stop] is ON or emergency stop of input of FALDIC is detected. If emergency stop is reset, this signal is automatically set OFF. Emergency stop detection of FALDIC is output. For more information about the detail timing, refer to “3-2-5 (9) Emergency stop”. (6) +OT detection (+6 6bit) When +OT limit is detected, this signal is set ON, and the motor decelerates and stops. +OT detection of FALDIC is output. This signal is enabled only during manual reverse rotation. This signal is automatically set OFF when getting out of +OT limit. Motor speed +OT limit +OT detection Manual forward Manual reverse 3-25 Motion axis Bit area [Motion Section 3 Memory Map Controller] (7) -OT detection (+6 5bit) When -OT limit is detected, this signal is set ON, and the motor decelerates and stops. -OT detection of FALDIC is output. This signal is enabled only during manual forward rotation. This signal is automatically set OFF when getting out of -OT limit. Motor speed -OT limit -OT detection Manual forward Manual reverse (8) Deviation overflow (+6 4bit) This signal is set ON when the difference between the command position and homing position exceeds the value set in the parameter of FALDIC. Deviation overflow of FALDIC is output. Reset this signal with [Deviation clear]. Deviation overflow Deviation clear <FALDIC-α> Standard parameter 54 <FALDIC ALPHA5> PA2. 69 Deviation overflow width 10 to 65536 [× 100 pulses] Deviation overflow detection value 0.1 to 100.0 [rev] (9) Toggle error (+6 3bit) This signal is set ON when a communication (SX bus) error occurs between the controller and FALDIC. A toggle error of FALDIC is output. The controller changes two bits of toggle bit every tact to output to FALDIC. If the toggle bit does not change three tacts in a row, FALDIC judges that a communication error has occurred and decelerates and stops the servomotor. How to decelerate and stop the servomotor is set in the parameter of FALDIC. Toggle data 00 01 10 11 00 01 Toggle error Alarm reset 3-26 10 11 11 11 11 11 Motion axis Bit area [Motion Section 3 Memory Map Controller] (10) Unit conversion overflow (+6 2bit) This error occurs if an attempt is made to perform during PTP operation or preset action exceeding 2147483647 pulses. Max. travel in one PTP operation (preset) is 2147483647 pulses. Note: In FALDIC, the preset range is limited as follows. If the following range is exceeded but not 2147483648, “position data out-of-range” occurs in FALDIC. FALDIC-α :-79999999 to 79999999 FALDIC ALPHA5 :-2000000000 to 2000000000 PTP reference (preset) Alarm detection Alarm reset (11) Interrupt overrun (+6 1bit) This error occurs if the servomotor cannot stop at the target position from interrupt sensor detection during interrupt operation. Increase the travel after interrupt or decrease the acceleration/deceleration time. (12) FALDIC alarm overrun (+6 0bit) When the servo amplifier detects an alarm, this signal is set ON and held on the servo amplifier side. After the cause of the alarm is removed, this signal is set OFF on the rising edge of [Alarm reset]. Alarm detection of FALDIC is output. Alarm detection Alarm reset 3-27 Motion axis Bit area [Motion Section 3 Memory Map Controller] (13) Synchronizing (+7 Fbit) This signal is set ON when the master axis and sync axis are in synchronization. (14) Sync accelerating (+7 Ebit) This signal is set ON when the sync axis is accelerating to synchronize with the master axis. (15) Sync decelerating (+7 Dbit) This signal is set ON when the sync axis is decelerating to stop. Master axis speed Sync axis speed Synchronizing Sync accelerating Sync decelerating (16) Data read completion (+7 Cbit) This signal is set ON for one scan period at the timing when the internally controlled master axis cycle monitor reads pulses for one master axis cycle. Master axis pulse Master axis pulse for each cycle Sync start Data read completion When “travel at startup” is set Travel at startup Position in a cycle with respect to sync start Master axis pulse Master axis pulse for each cycle Sync start Data read completion Sync start is used as the reference. 3-28 Actual position in a cycle Motion axis Bit area [Motion Section 3 Memory Map Controller] (17) Making cycle stop (+7 Bbit) This signal is set ON when the sync axis has stopped by [Cycle stop] signal. For more information about the detail timing, refer to “3-2-5 (15) Cycle stop”. (18) Cut command (+7 Abit) The timing when the cutter is set ON during flying shear operation is output. (19) Compensating phase (+7 9bit) This signal is set ON while compensating phase. While this bit is ON, [Phase compensation] is not accepted. (20) Continue accepted (+7 8bit) This signal is set ON when the next startup is accepted in [Continue mode]. This signal is set OFF when ready to accept the start signal again. (21) Master axis cycle setting error (+7 7bit) This error is caused by the following cause during motion operation. The sync axis stops operation. Recover from the error with the alarm reset. • Master axis travel per cycle < Min. value of master axis travel per cycle In the case of flying shear, this error is also caused by an attempt to start the next cycle during synchronous operation. This error occurs in [Cycle synchronous], [Rotary shear], or [Flying shear]. (22) Sync axis ratio setting error (+7 6bit) This error is caused by the following cause during motion operation. The sync axis stops operation. Recover from the error with the alarm reset. • Sync axis travel per cycle < Min. value of sync axis travel per cycle This error occurs in [Cycle synchronous]. (23) Incremental value error (+7 5bit) This error is cause by the following cause during motion operation. The sync axis stops operation. Recover from the error with the alarm reset. • Incremental value of master axis pulse input for one tact >= Half of master axis travel per cycle This error occurs in [Cycle synchronous], [Rotary shear], or [Flying shear]. (24) Reverse rotation detection (+7 4bit) This error is cause by the following cause during motion operation. The sync axis stops operation. Recover from the error with the alarm reset. • Master axis counter feed < Reverse feed limiter This error occurs in [Cycle synchronous], [Rotary shear], or [Flying shear]. (25) Synchronization width setting error (+7 2bit) This error is cause by the following causes during motion operation. The sync axis stops operation. Recover from the error with the alarm reset. • Master axis sync width + Acceleration length + Deceleration length >= Master axis travel per cycle Or, • Sync axis travel per cycle < Cutter axis sync width This error occurs in [Rotary shear], or [Flying shear]. 3-29 Motion axis Bit area [Motion Section 3 Memory Map Controller] (26) SV parameter write completion (+8 Fbit) This is a response signal to [SV parameter write command]. When the write is completed successfully, this signal is set ON. Overwrite complete signal of FALDIC is output. For more information about the detail timing, refer to “3-2-5 (21) SV parameter write command”. (27) SV parameter read completion (+8 Ebit) This is a response signal to [SV parameter read command]. When the read is completed successfully, this signal is set ON. Reading complete signal of FALDIC is output. For more information about the detail timing, refer to “3-2-5 (22) SV parameter read command”. (28) SV parameter write error (+8 Dbit) This is an erroneous response signal to [SV parameter write command]. Error check is performed in FALDIC. For more information about the detail timing, refer to “3-2-5 (21) SV parameter write command”. (29) SV parameter read error (+8 Cbit) This is an erroneous response signal to [SV parameter read command]. Error check is performed in FALDIC. For more information about the detail timing, refer to “3-2-5 (22) SV parameter read command”. (30) SV parameter response (+8 8bit) This is a response signal to [SV parameter mode]. For more information about the detail timing, refer to “3-2-5 (23) SV parameter mode”. (31) Mechanical calculation overflow (+8 7bit) Internal calculation overflowed during pulse correction operation. Check the mechanical data and enter a small value. Then, change the mechanical data again. If the calculation does not overflow, the signal is set OFF. Error detection timing 4) When mechanical data is changed 5) At the rising edge of [PTP reference] 6) At power-on Error occurrence condition Pulse correction α/β is obtained by the following formulas. Then, the pulse correction α/β is reduced and the result is controlled as an interim calculated value. No mechanism: Pulse correction calculation is not performed. Belt: Pulse correction α: Number of gears on the mechanism side × Number of pulses per encoder rotation Pulse correction β: Number of gears on the motor side × Number of pulley teeth × Travel per tooth × Decimal point position Ball screw: Pulse correction α: Number of gears on the mechanism side × Number of pulses per encoder rotation Pulse correction β: Number of gears on the motor side × Lead × Decimal point position Sealer/Cutter: Pulse correction α: Number of gears on the mechanism side × Number of pulses per encoder rotation × 113 Pulse correction β: Number of gears on the motor side × Roll dia. × Decimal point position × 355 Feed roll: Pulse correction α: Number of gears on the mechanism side × Number of pulses per encoder rotation × 113 Pulse correction β: Number of gears on the motor side × Roll dia. × Decimal point position × 355 3-30 Motion axis Bit area [Motion Section 3 Memory Map (32) Unit conversion overflow [Sync] (+9 2bit) This error occurs if sync-related data set in the data IF area internally exceeds 2147483647 pulses. The allowable value during synchronous operation is 2147483647 pulses. Sync command Alarm detection Alarm reset (33) Error summary (+9 0bit) This is an “OR flag” of the following errors. • Emergency strop • +OT • -OT • Deviation overflow • Toggle error • Unit conversion overflow (PTP) • Interrupt overrun • FALDIC alarm detection • Master axis cycle setting error • Sync axis cycle setting error • Incremental value error • Reverse rotation error • Synchronization width setting error • Mechanical calculation overflow • Unit conversion overflow (Sync) 3-31 Controller] Motion axis Data area [Controller Section 3 Memory Map 3-2-7 Motion axis Data area [Controller Motion] Motion] (1) Target position/Parameter set value to write (+10, +11) This parameter is used as a target position data for [PTP reference]. The unit set in the mechanical data is used. This is 32-bit signed data. The range varies depending on the data of unit conversion. This parameter is used as a parameter set value to write for [SV parameter write command]. (2) Target speed (+12, +13)/Parameter No. (+12) This parameter is used as target speed data for [PTP reference]. The unit set in the mechanical data is used. The range varies depending on the data of unit conversion. This parameter is used as a parameter No. for [SV parameter write command] or [SV parameter read command]. Set as follows depending on the servo amplifier or parameter type. <Parameter NO.> Set value 0-99 100-199 200-299 FALDIC-α Standard parameter System parameter - FALDIC ALPHA5 Parameter PA1 Parameter PA2 Parameter PA3 * The last two digits of the set value become the actual parameter No. (3) Preset data (+14, +15) At the rising edge of [Preset] signal, the current position is overwritten with this data. This is 32-bit signed data. The range varies depending on the data of unit conversion. Preset is performed using the function of FALDIC. 3-32 Motion axis Data area [Motion Section 3 Memory Map 3-2-8 Motion axis Data area [Motion Controller] Controller] (1) Feedback position (+0, +1) The current position of the servo is displayed. The unit is [Unit amount] or [Pulse] considering pulse correction. This is a ring counter whose display range is –2147483648 to 2147483647. 2147483647 Current position -2147483648 <Note> The current position is internally managed with 32-bit pulse data. When pulse correction value is displayed, the range is not –2147483648 to 2147483647. Internally controlled value 2147483647 pulses Current position -2147483648 pulses <When pulse correction is set to “1/3”> Displayed value Current position 2147483647 pulses ×1/3 715827882 pulses -715827882 pulses ×1/3 -2147483648 pulses * The fractional part is discarded when displayed. <When pulse correction is set to “2/3”> 2147483647 pulses Current position -2147483648 pulses Red line indicates the current position. If the current position overflows using a pulse correction value, no correct value is displayed. In this case, refer to “Master axis current position in a cycle”. 3-33 Motion axis Data area [Motion Section 3 Memory Map Controller] (2) Speed data (+2, +3) The speed of the servomotor is displayed. This data is the moving average speed for 50ms. (3) Alarm status (+4) The alarm status when FALDIC alarm is detected is displayed. <Alarm list> [FALDIC-α] Code 01h 02h 03h 04h 05h 06h 07h 08h 09h 0Ah 0Bh 0Ch 0Dh 0Eh 0Fh Content Overload Amplifier overheat Breaking resistor Deviation overflow Overcurrent Overspeed Overvoltage Control / Main power undervoltage Encoder trouble Circuit trouble Memory error Fuse broken Code 10h 11h 12h 13h 14h 15h 16h 17h 18h 19h 1Ah 1Bh 1Ch 1Dh 1Eh 1Fh Content Encoder communication error Motor combination error Braking transistor error CONT (control signal) error Encoder overheat Absolute data lost Absolute data over Flow Terminal error Address error (BCD error) Address error (Out-of-range error) Data error (BCD error) Data error (Out-of-range) Data error (Negative sign) System error Code 10h 11h 12h 13h 14h 15h 16h 17h 18h 19h 1Ah 1Bh 1Ch 1Dh 1Eh 1Fh Content Encoder communication error Motor combination error Braking transistor error CONT (control signal) Error Encoder overheat Absolute data lost 1 / 2 / 3 Multi-turn data over flow Battery warning Life warning Address error (BCD error) Address error (Out-of-range error) Data error (Command rejection) Data error (BCD error) Data error (Out-of-range, 0 written) Data error (Negative sign) - [FALDIC-ALPHA5] Code 01h 02h 03h 04h 05h 06h 07h 08h 09h 0Ah 0Bh 0Ch 0Dh 0Eh 0Fh Content Overload1 / Overload2 Pulse command frequency error Amplifier overheat Breaking resistor / transistor error Deviation overflow Overcurrent1 / Overcurrent2 Overspeed Overvoltage Control / Main power undervoltage Encoder trouble1 / trouble2 Initial error Circuit trouble Memory error Fuse broken (4) FALDIC external counter (+5) The external counter value of FALDIC is displayed. 3-34 Section 3 Memory Map System Area 3-3 System Area <Outline> [When using SX-Programmer Standard] Address WM11000 to WM11029 WM11030 to WM11059 Size WM11011 WM11012 WM11013 WM11014 WM11015 WM11016 WM11017 WM11018 WM11019 WM11020 WM11021 WM11022 WM11023 WM11024 WM11025 WM11026 WM11027 Name Motion application Address %MW1.11000 to %MW1.11029 %MW1.11030 to %MW1.11059 30W Controller Controller 30W Motion application <Details> • Motion application Address WM11000 WM11001 WM11002 WM11003 WM11004 WM11005 WM11006 WM11007 WM11008 WM11009 WM11010 [When using SX-Programmer Expert (D300win)] Size Name Motion application 30W Controller Controller 30W Motion application Controller Name Contents type Contents version Bit status Contents status Contents execution cycle latest value Contents execution time latest value Contents execution cycle max. value Contents execution time max. value %MW1.11000 %MW1.11001 %MW1.11002 %MW1.11003 %MW1.11004 %MW1.11005 %MW1.11006 %MW1.11007 %MW1.11008 %MW1.11009 %MW1.11010 Contents operation check counter %MW1.11011 %MW1.11012 %MW1.11013 %MW1.11014 %MW1.11015 %MW1.11016 %MW1.11017 %MW1.11018 %MW1.11019 %MW1.11020 %MW1.11021 %MW1.11022 %MW1.11023 %MW1.11024 %MW1.11025 %MW1.11026 %MW1.11027 I/O terminal 1 I/O terminal 2 I/O terminal 3 I/O terminal 4 I/O terminal 5 I/O terminal 6 I/O terminal 7 I/O terminal 8 Remark 1: Motion Version Error code of contents level (µs) (µs) (µs) (µs) Counter behaves as follows: 0 1 2…65534 65535 input/output status input/output status input/output status input/output status input/output status input/output status input/output status input/output status Contents toggle error (for controller unit) WM11028 %MW1.11028 Contents toggle error (for PLC) WM11029 %MW1.11029 Contents toggle error (for display unit) 1: When toggle error occurs. 0: When reset 1: When toggle error occurs. 0: When reset 1: When toggle error occurs. 0: When reset 3-35 0 1 Section 3 Memory Map • Controller System Area Motion application Address WM11030 WM11031 WM11032 WM11033 WM11034 WM11035 WM11036 WM11037 WM11038 WM11039 WM11040 WM11041 WM11042 WM11043 WM11044 WM11045 WM11046 WM11047 WM11048 WM11049 WM11050 WM11051 Name %MW1.11030 Execution cycle max. value clear %MW1.11031 %MW1.11032 %MW1.11033 %MW1.11034 %MW1.11035 %MW1.11036 %MW1.11037 %MW1.11038 %MW1.11039 %MW1.11040 %MW1.11041 %MW1.11042 %MW1.11043 %MW1.11044 %MW1.11045 %MW1.11046 %MW1.11047 %MW1.11048 %MW1.11049 %MW1.11050 %MW1.11051 Toggle error reset (for controller unit) WM11052 %MW1.11052 Toggle error monitoring timer (ms) (for controller unit) WM11053 %MW1.11053 Contents toggle bit (for controller unit) WM11054 %MW1.11054 Toggle error reset (for PLC) WM11055 %MW1.11055 Toggle error monitoring timer (ms) (for PLC) WM11056 %MW1.11056 Contents toggle bit (for PLC) WM11057 %MW1.11057 Toggle error reset (for display unit) WM11058 %MW1.11058 Toggle error monitoring timer (ms) (for display unit) WM11059 %MW1.11059 Contents toggle bit (for display unit) *Even one toggle error causes emergency stop. 3-36 Remark Cleared at the rising edge of 0 to 1. 1: Resets contents toggle error. Toggle error occurs if the contents toggle bit does not change for the set period of time. 0: Not monitored Commands as follows: 0 1 2…65534 65535 0 1 1: Resets contents toggle error. Toggle error occurs if the contents toggle bit does not change for the set period of time. 0: Not monitored Commands as follows: 0 1 2…65534 65535 0 1 1: Resets contents toggle error. Toggle error occurs if the contents toggle bit does not change for the set period of time. 0: Not monitored Commands as follows: 0 1 2…65534 65535 0 1 System Area [Controller Motion application] Section 3 Memory Map 3-3-1 Controller Motion application (1) Execution cycle max. value clear (WM11030, %MW1.11030) At the rising edge of this signal, [Contents execution cycle max. value] and [Contents execution time max. value] are cleared. (2) Toggle error reset (for controller unit) (WM11051, %MW1.11051) When this signal is set to 1, a contents toggle error is reset (3) Toggle error monitoring timer (for controller unit) (WM11052, %MW1.11052) This is the time to monitor the contents toggle error. If “contents toggle bit” is not changed for the period of time set here, a contents toggle error occurs. The unit is “ms”. (4) Contents toggle bit (for controller unit) (WM11053, %MW1.11053) This bit monitors system toggle errors. If this signal is not changed for the period of time set in “Toggle error monitoring timer”, a contents toggle error occurs. (5) Toggle error reset (for PLC) (WM11054, %MW1.11054) When this signal is set to 1, a contents toggle error is reset. (6) Toggle error monitoring timer (for PLC) (WM11055, %MW1.11055) This is the time to monitor the contents toggle error. If “contents toggle bit” is not changed for the period of time set here, a contents toggle error occurs. The unit is “ms”. (7) Contents toggle bit (for PLC) (WM11056, %MW1.11056) This bit monitors system toggle errors. If this signal is not changed for the period of time set in “Toggle error monitoring timer”, a contents toggle error occurs. (8) Toggle error reset (for display unit) (WM11057, %MW1.11057) When this signal is set to 1, a contents toggle error is reset. (9) Toggle error monitoring timer (for display unit) (WM11058, %MW1.11058) This is the time to monitor the contents toggle error. If “contents toggle bit” is not changed for the period of time set here, a contents toggle error occurs. The unit is “ms”. (10) Contents toggle bit (for display unit) (WM11059, %MW1.11059) This bit monitors system toggle errors. If this signal is not changed for the period of time set in “Toggle error monitoring timer”, a contents toggle error occurs. 3-37 System Area [Motion application Section 3 Memory Map 3-3-2 Motion application Controller] Controller (1) Contents type (WM11000, %MW1.11000) The contents application type built into the controller unit is output. 1: Motion application (2) Contents version (WM11001, %MW1.11001) The contents application version built into the controller unit is output. If the version is V01.00, “100” is output. (3) Bit status (WM11002, %MW1.11002) Operation status of the contents program is output. F E D C B A 9 8 7 6 5 4 3 2 1 0 Contents error • Contents error Set ON if an error occurs. [Contents status] is also set ON. (4) Contents status (WM11003, %MW1.11003) An error code is output when an error occurs in the contents. Code Status 0 No error (Error at startup of @E.Terminal system -1 to –9) -1 Initial processing error (OS) (Error during processing –100 to –32768) -101 Missing processing (processing exceeding tact period) (5) Contents execution cycle latest value (WM11004, %MW1.11004) The latest value of the execution cycle of the contents (synchronous control) is output. The unit is [µs]. The tact time is also taken into consideration. (6) Contents execution time latest value (WM11005, %MW1.11005) The latest value of the execution time of the contents (synchronous control) is output. The unit is [µs]. This is the actual execution time but not the control cycle. (7) Contents execution cycle max. value (WM11006, %MW1.11006) The maximum value of the execution cycle of the contents (synchronous control) is output. The unit is [µs]. (8) Contents execution time max. value (WM11007, %MW1.11007) The maximum value of the execution time of the contents (synchronous control) is output. The unit is [µs]. (9) Contents operation check counter (WM11010, %MW1.11010) This a 16-bit ring counter that changes during contents operation. If this bit does not change when checked from the PLC, take a necessary measure such as stopping the system. (10) I/O terminal n input/output status (WM11012 to WM11019, %MW1.11012 to %MW1.11019) Input/output status of the I/O terminal is displayed. 3-38 System Area [Motion application Section 3 Memory Map (11) Contents toggle error (for built-in PLC) (WM11027, %MW1.11027) This bit is set to 1 when a contents toggle error occurs. Axes in operation make emergency stop. This bit is set to 0 by [Toggle error reset]. (12) Contents toggle error (for PLC) (WM11028, %MW1.11028) This bit is set to 1 when a contents toggle error occurs. Axes in operation make emergency stop. This bit is set to 0 by [Toggle error reset]. (13) Contents toggle error (for display unit) (WM11029, %MW1.11029) This bit is set to 1 when a contents toggle error occurs. Axes in operation make emergency stop. This bit is set to 0 by [Toggle error reset]. 3-39 Controller] Section 3 Memory Map Data Interface Area 3-4 Data Interface Area <Outline> [When using SX-Programmer Standard] Address WL11000 to WL11049 WL11050 to WL11099 WL11100 to WL11149 WL11150 to WL11199 WL11200 to WL11249 WL11250 to WL11299 WL11300 to WL11349 WL10350 to WL10399 WL11400 to WL11449 Size Name 50W Virtual/External PG 50W Axis 1 50W Axis 2 50W Axis 3 50W Axis 4 50W Axis 5 50W Axis 6 50W Axis 7 50W Axis 8 [When using SX-Programmer Expert (D300win)] Address %MW3.11000 to %MW3.11049 %MW3.11050 to %MW3.11099 %MW3.11100 to %MW3.11149 %MW3.11150 to %MW3.11199 %MW3.11200 to %MW3.11249 %MW3.11250 to %MW3.11299 %MW3.11300 to %MW3.11349 %MW3.10350 to %MW3.10399 %MW3.11400 to %MW3.11449 3-40 Size Name 50W Virtual/External PG 50W Axis 1 50W Axis 2 50W Axis 3 50W Axis 4 50W Axis 5 50W Axis 6 50W Axis 7 50W Axis 8 Section 3 Memory Map Data Interface Area <Details> External/virtual master axis F +0 +1 E D C B A 9 8 7 6 5 4 3 2 1 0 External pulse input value [Pulse] +2 +3 Motion +4 Controller +5 +6 +7 +8 +9 +10 Mark measurement length value (Processing of measuring length between marks for external PG) Virtual master axis acceleration time [ms] +11 +12 Virtual master forced deceleration time [ms] +13 +14 +15 +16 +17 +18 +19 +20 +21 +22 +23 +24 +25 Mark detection range (Processing of measuring length between marks Disabled error count (Processing of measuring length between marks for external PG) Range: 0 to 99 times +27 +28 +29 +31 +32 +33 +34 +35 +36 +37 for external PG) Disabled mark number (Processing of measuring length between marks for external PG) Range: 0 to 99 times +26 +30 Controller Travel at startup Travel at stop Master axis travel per cycle Reverse feed limiter +38 +39 3-41 Motion Section 3 Memory Map Data Interface Area Motion axis F +0 +1 +2 +3 +4 +5 +6 E D C B A 9 8 7 6 5 4 3 2 1 0 Command position [unit amount] Master axis position in a cycle [unit amount] Motion Sync axis position in a cycle [unit amount] Controller Sync mode No. response +7 +8 +9 +10 Acceleration/deceleration time [ms] +11 S-curve ratio [%] +12 +13 +14 +15 +16 +17 +18 +19 +20 +21 +22 +23 +24 +25 +26 +27 +28 +29 +30 +31 +32 +33 +34 +35 +36 +37 +38 +39 Manual speed [unit amount/unit speed] Sync axis cycle setting [unit amount] Master axis cycle setting [unit amount] Master axis min. cycle setting [unit amount] Reverse feed limiter [unit amount] Travel at startup [unit amount] Travel at stop [unit amount] Master axis sync width [unit amount] Sync axis sync width [unit amount] Motion-specific parameter 1 Motion-specific parameter 2 Motion-specific parameter 3 Motion-specific parameter 4 Motion-specific parameter 5 +40 +41 +42 +43 +44 +45 +46 +47 +48 +49 Phase compensation length Phase compensation processing Phase compensation upper limit Phase compensation processing 3-42 Controller Motion Section 3 Memory Map External/Virtual master axis 3-4-1 External/Virtual master axis Either virtual axis or external PG is used as a master axis. (Select in the parameter area.) In addition, FALDIC can be a master axis. Virtual master axis In a PLC, a master axis is made to virtually operated to operate a sync axis with respect to it. If an actual axis is made a master axis or sync axis, the sync axis lags behind the master axis and cannot synchronize with it. In contrast, if a virtual master axis and sync axes 1 and 2 are set, sync axes 1 and 2 also lag behind the virtual master axis, but they operate in the same manner. <Control of actual master axis sync axis> Master axis Sync axis <Control of virtual master axis Delayed because sync axis is output after loading master axis. sync axis × 2 > Virtual master axis Sync axis 1 Sync axis 2 Sync axes lag behind virtual master axis. Sync axes keep up with each other. External encoder Connect an external PG to FALDIC to make it a master axis. This is used, for example when the master axis is an inverter. External encoder External encoder Sync axis Sync axis lags behind the external encoder. 3-43 External/Virtual master axis [Controller Section 3 Memory Map 3-4-2 External/Virtual master axis [Controller Motion] Motion] (1) Virtual master axis Acceleration time (+10) This is the acceleration time of the master axis. Set the time to reach [Max. velocity]. The unit is [ms]. It is not possible to set the acceleration and deceleration time separately. Setting range: 0 to 65535 [ms] Max. velocity 100 ms when Max. velocity: 6000r/min Target speed: 2000r/min Acc/dec time: 300ms Target speed Virtual master axis speed Acc/dec time (ms) Acc/dec time (ms) (2) Virtual master axis Forced deceleration time (+12) This is the deceleration time for emergency stop of the virtual master axis. Set the time from [Max. velocity]. The unit is ms. Setting range: 0 to 65536 [ms] Forced deceleration time (ms) Virtual master axis speed (3) Mark detection range (+20, +21) This is the deceleration time for emergency stop of the virtual master axis. Set the time from [Max. velocity]. The unit is ms. Setting range: 0 to 2147483647 [unit amount of master axis] A value lower than 0 is assumed to be 0 and a value exceeding 2147483647 to be 2147483547 Interrupt detection ON timing: [Master axis travel per cycle] – [Mark detection range] to [Master axis travel per cycle] + [Mark detection range] * If a mark is detected out of the above range, it is ignored. Mark error timing: [Master axis travel per cycle] + [Mark detection range] > Master axis position in a cycle Master axis Master axis travel per cycle Mark detection range Mark Mark error Interrupt position detection of FALDIC is ON. (4) Disabled mark number (+22, +23) The set number of marks are not measured after [Mark length measurement start]. When disabled, the master axis operates with the master axis travel per cycle. Cycles are counted when read mark sensor or master axis travel per cycle. Setting range: 0 to 99 [cycles] A value lower than 0 is assumed to be 0 and a value exceeding 99 to be 99. 3-44 External/Virtual master axis [Controller Section 3 Memory Map Motion] (5) Mark error count (+24, +25) The set number of mark errors are detected, a mark error occurs to stop synchronization. Setting range: 0 to 99 [times] A value lower than 0 is assumed to be 0 and a value exceeding 99 to be 99. (6) Travel at startup (+30, +31) When the master axis operates twice the length set here after [Sync cycle start] is set ON, the internal master axis synchronizes with the input pulse. The acceleration of [Cycle stop] of the master axis is also determined by this setting. Setting range: 0 to 2147483647 [unit amount of master axis] A value lower than 0 is assumed to be 0 and a value exceeding 2147483647 to be 2147483647. (7) Travel at stop (+32, +33) The deceleration of [Cycle stop] of the master axis is determined by this setting. Setting range: 0 to 2147483647 [unit amount of master axis] A value lower than 0 is assumed to be 0 and a value exceeding 2147483647 to be 2147483647. External pulse None for virtual master axis n n+1 n+2 n+3 n n+1 n+2 n+3 n+4 n+5 Internal master axis The sync axis synchronizes with internal master axis. n+5 (8) Master axis travel per cycle (+34, +35) Set the master axis travel per cycle. This parameter is required for cycle stop of the master axis. It is required when using [Sync cycle start]. Setting range: 0 to 2147483647 [unit amount of master axis] A value lower than 0 is assumed to be 0 and a value exceeding 2147483647 to be 2147483647. (9) Reverse feed limiter (+36, +37) If the master axis reverses within the length set here, the internal feed does not change. If exceeding the set length, a [Reverse rotation error] occurs. It is required when using [Sync cycle start]. Setting range: 0 to 2147483647 [unit amount of master axis] A value lower than 0 is assumed to be 0 and a value exceeding 2147483647 to be 2147483647. Master axis counter value Time Output value is held during this period. Master axis feed amount Time Master axis counter feed amount Time 3-45 External/Virtual master axis [Motion Section 3 Memory Map 3-4-3 External/Virtual master axis [Motion Controller] Controller] (1) External pulse input value (+0, +1) The external pulse count value is displayed when the external pulse is selected for the master axis. This is a 32-bit ring counter. Even while the master axis is placed in a cycle stop state, this counts when there is a counter input. Display range: -2147483648 to 2147483647 [pulses] (2) Mark length measurement value (+8, +9) During mark length measurement, the measured data is displayed. During mark compensation, this value becomes [Master axis travel per cycle]. Display range: 0 to 2147483647 [unit amount of master axis] 3-46 Section 3 Memory Map 3-4-4 Motion axis [Controller Motion axis [Controller Motion] Motion] (1) Acceleration time (+10) This is an acceleration /deceleration time of the motion axis during [Manual forward], [Manual reverse], or [PTP reference] operation. Set the time to reach the [Max. velocity]. It is not possible to set the acceleration and deceleration time separately. Setting range: 0 to 3000 (ms) Max. velocity 100 ms when Max. velocity: 6000r/min Target speed: 2000r/min Acc/dec time: 300ms Target speed Speed Acc/dec time (ms) Acc/dec time (ms) The acceleration/deceleration time uses the moving average processing and internally has 600 levels of buffers. The max. acceleration/deceleration time to reach the max. velocity is 600 levels × 5ms = 3000ms When you want to make the acceleration gentler, decrease the max. velocity. Note: If the travel is too small, the target speed may not be reached. Target speed Speed 3-47 Section 3 Memory Map Motion axis [Controller Motion] (2) S-curve ratio (+11) S-curve acceleration/deceleration can be set. When the S-curve ratio is set to 100%, the acceleration/deceleration time is doubled. Setting range: 0 to 100 (%) Speed When the S-curve ratio is set to 100%, acc/dec time (ms) × 2 <Calculation example> When acceleration time is set to 100ms and S-curve ratio to 20% Acc time: 100ms-(100ms*0.2) (decreased by 20%) Virtual master axis speed 80ms 20ms Acc time: 100ms × 0.2 20ms Acc time: 100ms × 0.2 120ms Acc time: 100ms × 0.2 (increased by 20%) (3) Manual speed (+12, 13) This is the target speed of [Manual forward] and [Manual reverse]. Data can be changed during operation. Setting range: 0 to 2147483647 (unit amount/s) Speed Acc/dec time 1) Manual forward Manual reverse Acc/dec time 3) Acc/dec time 2) 1000 500 The acceleration/deceleration times 1), 2), and 3) are the same. The acceleration speed varies. 3-48 Section 3 Memory Map Motion axis [Controller Motion] (4) Motion control parameter (+14, to +39) These parameters are related to motion operation. The setting items are different depending on the motion function. For more information, refer to “Section 2 Motion Function Description.” The setting items for each function are listed below. Ratio sync Sync axis cycle setting Master axis cycle setting Master axis min. cycle setting Ratio_Sync axis Ratio_Master axis Reverse feed limiter Travel at startup Travel at stop Master axis sync width Sync axis sync width Motion specific parameter 1 Motion specific parameter 2 Motion specific parameter 3 Motion specific parameter 4 Motion specific parameter 5 Cycle sync Rotary shear Flying shear Sync axis travel per cycle Master axis travel per cycle Min. value of master axis travel per cycle Reverse feed limiter Travel at startup Travel at stop Sync axis travel per cycle Master axis travel per cycle Min. value of master axis travel per cycle Reverse feed limiter Travel at startup Travel at stop Master axis sync width Sync axis sync width Master axis travel per cycle Min. value of master axis travel per cycle Reverse feed limiter Travel at startup Travel at stop Master axis sync width Sync axis sync width Delay at startup Delay at startup Delay at startup Min. value of sync Acceleration length axis travel per cycle Deceleration length Cut command delay Cut command time Home position return speed (5) Phase compensation length (+46, +47) Set the travel for phase compensation. When [Phase compensation] is set ON, phase compensation is performed for the length set here. Setting range: -2147483648 to 2147483647 [unit amount of master axis] (6) Phase compensation upper limit (+48, +49) Set the upper limit of phase compensation. For example, if the set value is 100 and [Phase compensation length] is 1000, compensation is performed in 10 cycles. Setting range: 1 to Master axis cycle setting [unit amount of master axis] A value lower than 1 is assumed to be 1 and a value exceeding master axis cycle setting/10 to be master axis cycle setting/10. 3-49 Section 3 Memory Map 3-4-5 Motion axis [Motion Motion axis [Motion Controller] Controller] (1) Command position (+0, +1) The command position of FALDIC is displayed. The unit is [Unit amount] or [Pulse] taking pulse correction into consideration. This is a ring counter whose display range is –2147483648 to 2147483647. 2147483647 Current position -2147483648 <Note> The current position is internally controlled with 32-bit pulse. When pulse correction value is displayed, the range is not –2147483648 to 2147483647. Internally controlled value 2147483647 pulses Current position -2147483648 pulses Displayed value <When pulse correction is set to “1/3”> Current position 2147483647 pulses × 1/3 715827882 pulses -715827882 pulses × 1/3 -2147483648 pulses * The fractional part is discarded when displayed. <When pulse correction is set to “2/3”> 2147483647 pulses Current position -2147483648 pulses Red line indicates the current position. If the current position overflows using a pulse correction value, no correct value is displayed. In this case, refer to “Master axis current position in a cycle”. 3-50 Section 3 Memory Map Motion axis [Motion Controller] (2) Master axis position in cycle (+2, +3) The master axis position during motion control except ratio synchronous. The unit is [Unit amount] or [Pulse] considering pulse correction. Master axis speed Sync axis speed Master axis cycle setting Master axis position in cycle (3) Sync axis position in cycle (+4, +5) The sync axis position during motion control except ratio synchronous. The unit is [Unit amount] or [Pulse] considering pulse correction. Master axis speed Sync axis speed Sync axis cycle setting Sync axis position in cycle (4) Sync mode No. response (+6) The currently selected motion function is displayed. 0: Single (PTP) 1: Ratio synchronous 2: Cycle synchronous 3: Rotary shear 4: Flying shear 3-51 Section 4 Screen Specification 4-1 System Menu Screen This screen is kind of home position to move to other screen. If you make user operation screen, place SW to move to System menu screen. [System menu] SW on below sample screen is used for this purpose. [Sample operation screen (No.0)] * If you turn on new unit, “Language selection” SW to move to System menu screen displayed. After select language, sample operation screen (No.0) Language change SW [System menu screen (No.910)] S8 S1 S4 S5 S2 S3 S6 D1 S7 D2 [Screen specification] Position S1 S2 S3 S4 S5 S6 S7 S8 D1 Name Configuration definition Test run Failure diagnosis Servo loader Waveform sampling CF card Operation Screen Time setting Alarm display D2 Version display Description Move to Configuration definition screen (No.900). Move to Test run screen (No.945). Move to failure diagnosis screen (No.930). Move to Servo loader screen (No.1020). Move to Waveform sampling screen (No.925). Move to CF card screen (No.955). Move to Operation screen (No.0). Move to Date and time setting screen (No.915). Message appear when alarm occurred. For more detail, see failure diagnosis. Display version of the built-in contents System: System definition of controller unit Motion: Built-in soft for controlling motion of controller unit Display: screen data of display part 4-1 Section 4 Screen Specification 4-2 Configuration Definition Make configuration definition used for @E.Terminal for MC. When move from System menu password entry is required. (Password initial value is [0000]. (Enter [0] [0] [0] [0] [ENT]) screen, [Configuration definition screen (No.900)] S1 S2 S4 L1 S3 Current setting status Undefined indication [Screen specification] Position S1 S2 S3 S4 L1 Name System menu Configuration definition screen selection Selection status display (For each axis) Master axis selection status Configuration display Description Move to System menu screen (No.910). Select Configuration definition screen. [Mechanism], [I/O assignment] Status for each axis setting are shown. Touch screen that is alredy defined. ->Move to Mechanism setting screen (No.905), Touch screen that is not defined. ->It is considered to create new definition, and move to Select servo screen (No.960). Master axis selection status is shown. If you touch screen, move to Master axis setting screen (No.901). Lamp goes ON when servo is connected. * To change password, change open macro program of screen No.910. Password can be set up to 8 digits with numerical value 0 to 9. 4-2 Section 4 Screen Specification 4-2-1 Mechanism change screen (No.905) Change mechanism or parameter that is alredy defined. Or you can delete mechanism. S1 S2 S5 S4 S3 S6 S7 S9 S8 [Screen specification] Position S1 S2 S3 S4 Name Mechanism list Axis change Servo select Mechanism select S5 S6 Motion select Parameter S7 S8 Change setting Copy screen to CF S9 Undefine axis Description Move to configuration definition screen (No.900). Change axis to be displayed. Only defined axis can be selected. Display selected servo. If you touch it, move to Select servo screen (No.960). Display selected mechanism. If you touch it, move to Select mechanism screen (No.963). Display selected motion. If you touch it, move to Select motion screen (No.961). Display selected parameter setting. If you touch it, move to Parameter setting screen (No.964). Execute wizard again. Move to Select servo screen (No.960). Copy displayed screen into CF card. Confirmation screen appear (*1), If you push [YES], save to CF card. Saved to MOTION8 HDCOPY HD905~**.JPG folder (** is axis No.). Delete definition of selected axis. Confirmation screen appear (*2). *2 *1 Save to CF card. Delete definition of selected axis, then move to configuration definition. Cancel and close. 4-3 Cancel and close. Section 4 Screen Specification 4-2-2 Select servo screen (No.960) Select servo. [When change servo] *1 Data entry screen D1 S1 S2 *2 Parameter change confirmation screen S3 S4 [When create new setting] D1 Change parameter, then move to mechanism screen. S1 Cancel and close. S2 S6 S5 [Screen specification] Position S1 Name Set servo type D1 S2 Max. verocity Select Max. RPM S3 S4 Cancel Confirm S5 Back S6 Next Description Select servo encorder type from next. [ALPHA5 20bit], [ALPHA5 18bit], [α16bit(VSS)], [α 16bit(VSK)] Input maximum verocity. Touch here to open data entry screen (*1). In case of ALPHA5, maximum RPM is automatically set by selecting servo motor. Back to mechanism change screen (No.905). Parameter change confirmation screen displayed (*2). If you select [YES], back to mechanism change screen (No.905). Back to Configuration definition screen (No.900) or Mechanism change screen (No.905). Move to Select mechanism screen (No.963). 4-4 Section 4 Screen Specification 4-2-3 Mechanism select screen (No.963) Select mechanism. [When change mechanism] Set parameters. S1 * Parameter change confirmation screen S2 S3 [When create new setting] Change parameter, then move to mechanism screen. S1 Cancel and close. Set parameters. S5 S4 [Screen specification] Position S1 S2 S3 Name Select mechanism Cancel Confirm S4 S5 Back Next Description Select mechanism from next. [Timing belt], [Ball screw], [Sealer/cutter], [Feed roll] Back to mechanism change screen (No.905). Parameter change confirmation screen displayed (*). If you select [YES], back to mechanism change screen (No.905). Back to Select servo screen (No.960). Move to Select motion screen (No.961). 4-5 Section 4 Screen Specification [Timing belt] D4 D1 D5 D2 D3 D6 [Ball screw] D1 D4 D5 D6 D7 [Sealer/cutter] D1 D4 D5 D6 D8 D9 4-6 Section 4 Screen Specification [Feed roll] D1 D4 D5 D6 D1 [Screen specification] Position D1 D2 D3 D4 Name Gear ratio Pitch Tooth number Unit of travel Description Set gear ratio. Range : [1 to 999] / [1 to 999] Set travel per tooth. Range : 1 to 999(mm) Set tooth number. Range : 1 to 999 Select unit of travel from below. [mm], [PLS] D5 Decimal point Select decimal point of travel from below. [1], [0.1], [0.01], [0.001] D6 Unit of speed Select unit of speed from below. [unit/s], [r/min] D7 Lead Set travel per rotation. Range : 1 to 999 (mm) D8 Sealer diameter Set sealer diameter. Range : 1 to 999 (mm) D9 Blade number Set blade number. Range : 1 to 999 D10 Roll diameter Set roll diameter. Range : 1 to 999 (mm) *1 If you touch screen, data entry screen appears. *2 If you touch screen, select screen appears. 4-7 *1 *1 *1 *2 *2 *2 *1 *1 *1 *1 Section 4 Screen Specification 4-2-4 Select motion screen (No.961) Select motion function [When change motion] S1 * Parameter change confirmation screen S2 S3 [When create new setting] Change parameter, then move to mechanism screen. S1 Cancel and close. S5 S4 [Screen specification] Position S1 Name Select motion function S2 S3 Cancel Confirm S4 S5 Back Next Description Select motion function from below. [PTP position], [Ratio sync], [Cycle sync], [Rotary shear], [Flying shear] Back to mechanism change screen (No.905). Parameter change confirmation screen displayed (*). If you select [YES], back to mechanism change screen (No.905). Back to Mechanism select screen (No.963). Move to parameter setting screen (No.964). 4-8 Section 4 Screen Specification 4-2-5 Parameter setting screen (No.964) Set parameters related to selected motion. (1) PTP positioning parameter [When change parameter] S1 D2 D3 D1 D4 *2 Parameter change confirmation screen S2 S3 [When create new setting] S1 D2 D3 D1 Change parameter, then Cancel and move close. to mechanism screen. D4 S5 S4 [Screen specification] Position S1 D1 D2 D3 D4 S2 S3 Name Parameter HELP message Acc/Dec time S-curve ratio Manual speed Cancel Confirm Description Touch a parameter name or select an item to display the HELP message. Set Acceleration/Deceleration time. Range : 0 to 3000(ms) *1 Set S-curve ratio. Range : 0 to 100(%) *1 Set manual speed. Range : 0 to 2147483647(mm/s) *1 Back to mechanism change screen (No.905). Parameter change confirmation screen displayed (*2). If you select [YES], back to mechanism change screen (No.905). S4 Back Back to Select motion screen (No.961). S5 Complete setting Parameter change confirmation screen displayed (*2). If you select [YES], back to Mechanism change screen (No.905). *1 If you touch screen, data entry screen appears. 4-9 Section 4 Screen Specification (2) Ratio synchronization parameter [When change motion] S1 D2 D3 D4 D1 D5 D6 S3 S2 [Screen specification] Position S1 D1 D2 D3 D4 D5 D6 S2 S3 Name Parameter HELP message Acc/Dec time S-curve ratio Manual speed Ratio Sync axis Ratio Master axis Cancel Confirm Description Touch a parameter name or select an item to display the HELP message. Set Acceleration/Deceleration time. Range : 0 to 3000(ms) *1 Set S-curve ratio. Range : 0 to 100(%) *1 Set manual speed. Range : 0 to 2147483647(mm/s) *1 Set Ratio on Sync axis. Range : 0 to 2147483647(mm) *1 Set Ratio on Master axis. Range : 1 to 2147483647(mm) *1 Back to mechanism change screen (No.905). Parameter change confirmation screen displayed. If you select [YES], back to mechanism change screen (No.905). *1 If you touch screen, data entry screen appears. 4-10 Section 4 Screen Specification (3) Cycle syncronization parameter [When change motion] D9 S1 D2 S1 D10 D11 D3 D12 D4 D1 D13 D7 D14 D8 D15 D16 S6 S3 S2 S7 [Screen specification] Position S1 D1 D2 D3 D4 D7 Name Parameter HELP message Acc/Dec time S-curve ratio Manual speed Sync axis travel per cycle Master axis travel per cycle Min value of master travel per cycle Reverse feed limiter Description Touch a parameter name or select an item to display the HELP message. Set Acceleration/Deceleration time. Range : 0 to 3000(ms) *1 Set S-curve ratio. Range : 0 to 100(%) *1 Set manual speed. Range : 0 to 2147483647(mm/s) *1 Set Sync axis travel per cycle. *1 Range : 1 to 2147483647 D8 Set Master axis travel per cycle. *1 Range : 1 to 2147483647 D9 Set Min value of master travel per cycle. *1 Range : 0 to 2147483647 D10 Set limiter value when Master axis reverse rotation. *1 Range : 0 to 2147483647 D11 Travel at startup Set travel length when start sync or after release cycle stop. *1 Range : 0 to Master axis travel per cycle. D12 Travel at stop Set travel length after cycle stop. *1 Range : 0 to Master axis travel per cycle. D13 Delay at startup Set delay at startup. Range : 0 to 2147483647 *1 D14 Min value of sync axis Set min value of sync axis travel per cycle. *1 travel per cycle Range : 0 to 2147483647 D15 Phase compensation Set phase compensation travel length. *1 length Range : -2147483648 to 2147483647 D16 Phase compensation Set upper limit of phase compensation per cycle. *1 upper limit Range : 0 to master axis travel per cycle/10 S2 Cancel Back to mechanism change screen (No.905). S3 Complete setting Parameter change confirmation screen displayed. If you select [YES], back to Mechanism change screen (No.905). S6 Details Changes to Detail parameter screen. S7 General Changes to General parameter screen. *1 If you touch screen, data entry screen appears. 4-11 Section 4 Screen Specification (4) Rotary shear parameter [When change motion] D9 D2 S1 D10 S1 D3 D11 D4 D1 D12 D7 D13 D8 D18 D19 D20 D17 D15 S6 D16 S3 S2 S7 [Screen specification] Position S1 D1 D2 D3 D4 D7 Name Parameter HELP message Acc/Dec time S-curve ratio Manual speed Sync axis travel per cycle Master axis travel per cycle Min value of master travel per cycle Reverse feed limiter Description Touch a parameter name or select an item to display the HELP message. Set Acceleration/Deceleration time. Range : 0 to 3000(ms) *1 Set S-curve ratio. Range : 0 to 100(%) *1 Set manual speed. Range : 0 to 2147483647(mm/s) *1 Set Sync axis travel per cycle. *1 Range : 1 to 2147483647 D8 Set Master axis travel per cycle. *1 Range : 1 to 2147483647 D9 Set Min value of master travel per cycle. *1 Range : 0 to 2147483647 D10 Set limiter value when Master axis reverse rotation. *1 Range : 0 to 2147483647 D11 Travel at startup Set travel length when start sync or after release cycle stop. *1 Range : 0 to Master axis travel per cycle. D12 Travel at stop Set travel length after cycle stop. *1 Range : 0 to Master axis travel per cycle. D13 Delay at startup Set delay at startup. Range : 0 to 2147483647 *1 D15 Phase compensation Set Phase compensation length travel. *1 length Range : -2147483648 to 2147483647 D16 Phase compensation Set Phase compensation upper limit per cycle. *1 upper limit Range : 0 to Master axis travel per cycle/10 D17 Master axis Set length of synchronization of Master axis with Sync axis. *1 synchronization width Range : 0 to 2147483647 D18 Sync axis Set length of synchronization of Sync axis with Master axis. *1 synchronization width Range : 0 to 2147483647 D19 Acceleration length Set the master axis travel amount during acceleration (or deceleration) made in the transition between sync and async. Range : 0 to 2147483647 *1 D20 Deceleration length Set the master axis travel amount during acceleration (or deceleration) made in the transition between sync and async. Range : 0 to 2147483647 *1 S2 Cancel Back to mechanism change screen (No.905). S3 Complete setting Parameter change confirmation screen displayed. If you select [YES], back to Mechanism change screen (No.905). S6 Detail Changes to Detail parameter screen. S7 General Changes to General parameter screen. *1 If you touch screen, data entry screen appears. 4-12 Section 4 Screen Specification (5) Flying shear parameter [When change motion] D9 D2 S1 S1 D3 D10 D4 D13 D8 D22 D1 D11 D23 D12 D15 D16 D17 D18 D21 S6 S2 S7 S3 [Screen specification] Position S1 D1 D2 D3 D4 D8 D10 Name Parameter HELP message Acc/Dec time S-curve ratio Manual speed Master axis travel per cycle Min value of master travel per cycle Reverse feed limiter D11 Travel at startup D12 Travel at stop D13 D15 Delay at startup Phase compensation length Phase compensation upper limit Master axis synchronization width Sync axis synchronization width Home position return speed D9 D16 D17 D18 D21 D22 Description Touch a parameter name or select an item to display the HELP message. Set Acceleration/Deceleration time. Range : 0 to 3000(ms) Set S-curve ratio. Range : 0 to 100(%) Set manual speed. Range : 0 to 2147483647(mm/s) Set Master axis travel per cycle. Range : 1 to 2147483647 Set Min value of master travel per cycle. Range : 0 to 2147483647 Set limiter value when Master axis reverse rotation. Range : 0 to 2147483647 Set the master axis travel amount while the sync axis is accelerating. Range : 0 to 2147483647 Set the master axis travel amount while the sync axis is decelerating. Range : 0 to 2147483647 Set delay at startup. Range : 0 to 2147483647 Set Phase compensation length travel. Range : -2147483648 to 2147483647 Set Phase compensation upper limit per cycle. Range : 0 to Master axis travel per cycle/10 Set length of synchronization of Master axis with Sync axis. Range : 0 to 2147483647 Set length of synchronization of Sync axis with Master axis. Range : 0 to 2147483647 Set the speed of return operation. Range : 0 to 2147483647 *1 *1 *1 *1 *1 *1 *1 *1 *1 *1 *1 *1 *1 *1 Set the value of cut output delay time. *1 Range : 0 to 2147483647 D23 Set the value of cut output ON time. *1 Cut command time Range : 0 to 2147483647 S2 Cancel Back to mechanism change screen (No.905). S3 Complete setting Parameter change confirmation screen displayed. If you select [YES], back to Mechanism change screen (No.905). S6 Detail Changes to Detail parameter screen. S7 General Changes to General parameter screen. *1 If you touch screen, data entry screen appears. Cut command delay 4-13 Section 4 Screen Specification 4-2-6 Master axis setting screen (No.901) Set parameters related to Master axis. [Master axis setting (External PG) screen] S1 D1 *1 S2 S3 S4 Set parameters *2 S5 S6 S7 S8 S9 [Screen specification] Position S1 S2 Name Mechanism list Copy screen to CF S3 Master axis D1 Pulses/encorder rev. S4 Mechanism S5 Set M axis. S6 S7 S8 S9 Cycle stop Mark comp. Cancel Confirm Description Move to configuration definition screen (No.900). Copy displayed screen into CF card. Confirmation screen appear. If you push [YES], save to CF card. Saved to MOTION8 HDCOPY HD901~**.JPG folder. ** is 00 : Master axis, 01 : Cycle stop, 02 : Mark comp. Select master axis from below. [Undefined], [Ext.PG], [Virtual Master], [Axis 1] Set number of pulse of encorder one rotation. If you touch, data entry screen will appear (*1). Range : 1 to 1048576(PLS) Select mechanism from below. [Timing belt], [Ball screw], [Sealer/Cutter], [Feed roll] Back to Master axis setting screen from Cycle stop screen or Mark compensation setting screen. Move to Cycle stop setting screen. Move to Mark compensation screen. Back to Configuration definition screen (No.900). Parameter change confirmation screen displayed (*2). If you select [YES], back to Configuration definition screen (No.900). 4-14 Section 4 Screen Specification [Each mechanism setting of external PG] [Timing belt] D4 D1 D5 D2 D3 D6 [Ball screw] D1 [Sealer/Cutter] D4 D1 D4 D5 D5 D6 D6 D8 D7 D9 [Feed roll] D1 D4 D5 D6 D10 [Screen specification] Position D1 D2 D3 D4 Name Gear ratio Pitch Tooth number Unit of travel Description Set gear ratio. Range : [1 to 999] / [1 to 999] Set travel per tooth. Range : 1 to 999(mm) Set tooth number. Range : 1 to 999 Select unit of travel from below. [mm], [PLS] D5 Decimal point Select decimal point of travel from below. [1], [0.1], [0.01], [0.001] D6 Unit of speed Select unit of speed from below. [unit/s], [r/min] D7 Lead Set travel per rotation. Range : 1 to 999 (mm) D8 Sealer diameter Set sealer diameter. Range : 1 to 999 (mm) D9 Blade number Set blade number. Range : 1 to 999 D10 Roll diameter Set roll diameter. Range : 1 to 999 (mm) *1 If you touch screen, data entry screen appears. *2 If you touch screen, select screen appears. 4-15 *1 *1 *1 *2 *2 *2 *1 *1 *1 *1 Section 4 Screen Specification [Master axis (Virtual master axis) setting screen] D11 D12 D13 [Screen specification] Position D11 D12 Name Acc/Dec. time Forced Dec. time Description Set Acceleration/Deceleration of Virtualmaster axis. Range : 0 to 65535(ms) *1 Set forced stop deceleration time of Virtual master axis. *1 Range : 0 to 65535(ms) D13 Match mechanism Virtual master axis operates as same mechanism data of selected axis. *1 Range : 1 to8(axis) Note)If you select undefined axis, mechanism data is unsettled and virtual master axis operation also become unsettled. Therefore, make sure to select defined axis. *1 If you touch screen, data entry screen appears. 4-16 Section 4 Screen Specification [Cycle stop setting screen] D14 D15 D16 D17 [Screen specification] Position D14 D15 D16 Name Travel at startup Travel at stop Master axis travel Description Set travel at startup. Range : 0 to 2147483647 Set travel at stop. Range: 0 to 2147483647 Set Master axis travel per cycle. Range : 0 to 2147483647 D17 Reverse feed limiter Set limiter value when Master axis reverse rotation. Range : 0 to 2147483647 *1 If you touch screen, data entry screen appears. 4-17 *1 *1 *1 *1 Section 4 Screen Specification [Mark setting screen] D18 D19 D20 [Screen specification] Position Name D18 Mark detection range Description This parameter is used for timing when FALDIC interrupt position detection is set ON and for mark error detection. Range : 0 to 2147483647 *1 D19 Invalid mark count The set number of marks are not measured from [Mark length measurement start]. Range : 0 to 99(cycle) *1 D20 Mark error count The set number of mark errors are detected, a mark error occurs to stop synchronization. Range : 0 to 99(times) *1 *1 If you touch screen, data entry screen appears. 4-18 Section 4 Screen Specification 4-2-7 I/O definition screen (No.902, 971) Define signal to I/O terminal. Input defined on this screen operates with General-purpose interface area as OR condition. S1 S2 L1 S3 Defined Undefined *1 S5 S4 S7 S6 *2 *3 S9 S8 S5 S4 S10 S6 S11 S12 S13 4-19 *4 Section 4 Screen Specification [Screen Specification] Position S1 S2 S4 Name System menu Configurarion definition select I/O terminal select Configuration indication I/O assign menu S5 S6 I/O terminal select Signal select S7 Copy screen to CF S8 Confirm S9 Undefine I/O S10 S11 S12 S13 Select axis Function select Confirm Close S3 L1 Description Move to System menu screen (No.910). Select configuration definition screen. [Mechanism], [I/O assignment] Select I/O terminal. Lamp indicates ON if I/O terminal is connected. Move to I/O definition screen (No.902). If you touch while editing, confirmation screen to discard contents of edit (*1) will appear. Select I/O terminal. Function assigned to signal (bit) of I/O terminal displayed. If you touch signal (bit) of I/O terminal, Select axis screen will appear. Copy displayed screen into CF card. Confirmation screen displayed (*2), If you push [YES], save to CF card. Saved to MOTION8 HDCOPY HD971~**.JPG folder. ** is I/O terminal No. (01 to 08) Parameter change confirmation screen (*3) displayed. If you select [YES], back to I/O definition screen (No.902). Change selected I/O to undefined. Undefined change confirmationscreen (*4) displayed. Select axis to be assigned to selected signal (bit). Select function to be assigned to selected signal (bit). Assign selected axis and function to selected signal (bit). Close Select axis screen. 4-20 Section 4 Screen Specification 4-3 Test Run Screen (No.945 to 949) Execute individual operation for each axis. It is used for Test run when start system. *1 When move from System menu, confirmation screen to switch control to Display unit displayed. *2 Switch confirmation screen S2 [Manual screen (No.945)] S3 S1 S4 S5 S6 D2 S7 L3 L2 D1 L1 [Screen Specification] Position S1 Name System menu S2 Test run item select S3 S4 S5 S6 S7 L1 L2 L3 D1 Wave form sampling Servo ON Manual forward Manual reverse Homing RDY In-position Homing finish Current position Current speed Manual speed D2 Description Move to System menu screen (No.910). If you touch, switch confirmation screen (*2) will shown. Select Test run item. [Manual], [PTP], [Other], [Sync], [Alarm] Move to wave form sampling screen. Servo amplifire is servo locked (Alternative SW). Current position moves to forward. Current position moves to reverse. Start Homing. Lamp goes ON when servo ON and possible to rotate. Lamp goes ON when In-position. Lamp goes ON by FALDIC homing completion signal. Display servo current position. Display servo current speed. Set manual speed. * Notes on Test run When operate with [Manual] or [PTP], make sure [Servo ON] button to ON in [Manual] screen. It is not possible to operate without [Servo ON] state. 4-21 Section 4 Screen Specification S2 [PTP screen (No.946)] S3 S1 S8 S9 S10 S11 D2 L2 D1 L1 [Screen Specification] Position S8 S9 S10 S11 Name PTP command Interpolation Interrupt ABS/INC Description Start PTP (Point To Point) run. Start 2 axis interpolation. Valid for 1,3,5,7 axis. Start interrupt positioning. Switch ABS(Absolute position) and INC(Relative position). (Alternative SW) D2 Target position Input target position * target speed Input target speed. * If you touch screen, data entry screen appears. 4-22 Section 4 Screen Specification S2 [Other screen (No.947)] S3 S1 S12 S13 S14 S15 S16 D3 L2 L1 D1 [Screen Specification] Position S12 Name Emergency stop Description At the rising edge of this signal, positioning is stopped. The speed instantly becomes 0. S13 Positioning cancel At the rising edge of this signal, positioning is stopped. Controlled stop is caused. S14 Suspend At the rising edge of this signal, positioning is stopped. When this signal is set OFF, positioning is resumed. S15 Deviation clear While this signal is ON, the difference (deviation) between the command and homing positions is assumed to be 0. S16 Preset At the rising edge of this signal, the current position is changed to [Preset data]. D3 Preset position Input preset position data. * * If you touch screen, data entry screen appears. 4-23 Section 4 Screen Specification [Syncronous screen (No.948)] S17 S18 S19 S20 S21 S22 S2 S3 S1 D4 S23 S24 S25 S26 L4 L5 L6 L7 L8 L1 D1 [Screen Specification] Position S17 S18 S19 S20 S21 S22 S23 S24 S25 Name Description Cycle start Master axis cycle start (Alternative SW). Cycle stop Master axis cycle stop (Alternative SW). Mark detection Start mark measurement. (Alternative SW). Emergency stop Virtual master axis emergency stop. External PG When disabled, stop to read external PG. (Alternative SW). Virtual start Run virtual master axis. (Alternative SW). Syncronous command Start synchronization (Alternative SW). Cycle stop Cycle stop. If you press, operation resumed. (Alternative SW). Mark detection Select mark detection Enable/Disable. (Alternative SW). selection S26 Phase compensation Start phase compensation. L4 Synchronizing ON while in synchronization. L5 Sync accelerating ON while sync accelerating. L6 Sync decelerating ON while sync decelerating. L7 Cycle stop ON while cycle stop. L8 Compensating phase ON while compensating phase. D4 Target speed Set target speed of virtual master axis. * * If you touch screen, data entry screen appears. 4-24 Section 4 Screen Specification L9 [Alarm screen (No.949)] S1 S28 S27 L9 [Screen Specification] Position S27 S28 L9 Name Alarm reset Alarm reset Alarm display Description Reset servo alarm. Reset alarm of motion toggle error. Lamp goes ON of occurred alarm. If you press alarm with Lamp ON, detailed information displayed. 4-25 Section 4 Screen Specification 4-4 Failure Diagnosis Screen (No.930 to 932, 935 to 938) Monitor controller unit and servo status. [System RAS fault status (No.930)] S1 S2 L1 L2 D1 L3 S3 * Detailed factor [System RAS fault details screen (No.931)] S1 S2 S5 S4 S3 [Screen Specification] Position S1 S2 Name System menu Select diagnosis item S3 Save RAS L1 Resource running status Fatal fault status Nonfatal fault status Fault occurrence L2 L3 D1 Description Move to System menu screen (No.910). Select diagnosis item. [System RAS fault status], [System RAS fault details], [System RAS config info], [SV amp I/O monitor], [Motion IF area], [I/O terminal], [Alarm list] Save controller unit system memory. If you touch, CF write screen displayed. Y/M/D/H/M/S is saved at top of file, then 512 words memory aresaved. File name should be within 8 characters. File is saved under MOTION8 RECIPE RAS folder in CF card. Lamp goes ON when controller unit is in Run status. Lamp goes ON when controller unit is in Fatal fault status. Lamp goes ON when controller unit is in Nonfatal fault status. Display controller unit status. 4-26 Section 4 Screen Specification Position S4 Name Fatal fault factor S5 Nonfatal fault factor Description Lamp goes ON for Fatal fault factor. If you press [ >>] SW, detailed factor displayed. Lamp goes ON for Nonfatal fault factor. If you press [ >>] SW, detailed factor displayed. [System RAS configration screen (No.932)] S1 S2 D2 S3 [Screen specification] Position D2 Name SX bus configuration information Description SX bus configuration information displayed. (Upper section : SX bus Configuration, Lower section : SX bus fault) Axis 1 : 201 to Axis 8 : 208 I/O terminal 1 : 221 to I/Oterminal 8 : 228 S1 S1 [Servo amplifier I/O monitor (Bit)] [Servo amplifier I/O monitor (Word) (No.935)] S2 S6 S6 S7 [Screen specification] Position S6 Name Select axis S7 S8 Bit monitor Word monitor Description Select servo amplifier axis to be monitored. Unused axis cannot be selected. Switch to Bit monitor. Switch to Word monitor. 4-27 S8 Section 4 Screen Specification [Motion general-purpose IF area monitor (No.936)] S1 Motion output S2 Motion input S2 S6 S6 S9 S10 [Screen specification] Position S6 Name Select axis S9 S10 Motion input Motion output Description Select axis to be monitored. Unused axis cannot be selected. Switch to Motion input screen. Switch to Motion output screen. [I/O terminal monitor (No.938)] S1 S2 S11 [Screen Specification] Position S11 Name Select I/O terminal Description Select I/O terminal to be monitored. Unused axis cannot be selected. 4-28 S1 Section 4 Screen Specification L4 [Alarm list (No.937)] S1 S2 S13 S12 L4 [Screen specification] Position S12 S13 L4 Name Alarm reset Alarm reset Alarm display Description Reset servo alarm. Reset alarm of motion toggle error. Lamp goes ON of occurred alarm. If you press alarm with Lamp ON, detailed information displayed. 4-29 Section 4 Screen Specification 4-5 Servo Loader Screen (No.1000 to 1021) Read J Edit J Write FALDIC parameter. (FALDIC-α/ALPHA5) [Servo No. selection (No.1020)] S1 S2 [Menu] [FALDIC ALPHA5 screen (No.1021)] [FALDIC-α screen (No.1000)] S3 S3 S4 S4 [Screen specification] Position S1 S2 Name System menu Select axis S3 S4 Back Select parameter group Description Move to System menu (No.910). Select servo amplifier parameter to be edit. Move to menu (No.1000,1021). Back to servo No. select screen (No.1020). Select parameter group to be edit. Read parameter from servo amplifier, and move to List editing. 4-30 Section 4 Screen Specification S5 [Parameter list editing screen] S6 D1 D2 S7 S8 S9 S14 S10 S11 S12 S13 [Screen specification] Position S5 S6 Name Menu HELP S7 D1 Comparison/Initialize Parameter table display D2 S8 S9 S10 S11 Max. Min. Set Initialize Setting value enter key Reload Send changes S12 Send all S13 Read CF S14 Write CF Description Move to menu screen (No.1000,1021). HELP screen displayed for each parameter. Close screen by touch again. Move to Comparison/Initialize screen. Display servo amplifier parameter table. Change colum show blue color if you change parameter. Show Max./Min./Setting value of cursor positioned parameter. Entered value by setting value enter key is shown at Set area. By pressing [ENT], this data is transferred to parameter table. Initialize cursor positioned parameter. Used to enter parameter value. Read parameter from servo amplifier. Send modified parameter to servo amplifier. Write confirmation screen will displayed. Send all parameter to servo amplifier. Write confirmation screen will displayed. Read servo amplifier parameter from CF card. If you touch, Read CF screen will displayed. Double click file name to be read. Write servo amplifier parameter to CF card. If you touch, Write CF screen will displayed. File name should be within 8 characters. File is saved under MOTION8 RECIPE SVPRM folder in CF card. 4-31 Section 4 Screen Specification [Parameter comparison/Initialization screen] S5 S6 D1 S15 S16 S17 S10 S11 S12 S13 S14 [Screen specification] Position S15 S16 Name List editing Comparison S17 D1 Initialize Parameter table display Description Move to Parameter list editing screen. Compare current editing parameter and parameter in servo amplifier. Result of comparison is displayed as red color for unmached parameter. Initialize current editing parameter. Display servo amplifier parameter table. Change colum show blue color if you change parameter. 4-32 Section 4 Screen Specification 4-6 Wave Form Sampling Screen (No.925) Wave form sampling display maximum 8 axis speed data simultaneously. Minimum sampling cycle is 5ms. Maximum sampling point is 500. When 5ms sampling, total 2.5 s data is stored. Trigger setting S2 S1 S3 S4 G1 D1 S5 D2 S6 [Screen specification] Position S1 S2 Name System menu Select trigger Description Move to System menu screen (No.910). Select trigger to start sampling from below. [None], [Speed data], [Bit] S3 Sampling cycle Set sampling cycle to an integral multiple of takt (5ms). * Range : 1 to 99 S4 Select axis Select axis of speed wave. Sampling is executed even if axis is not selected. Therefore, select axis and graph display is possible after finish sampling. S5 Sampling start Start sampling according to trigger condition. After finish sampling, display [Reading] and read data from PLC. S6 Save to CF Save sampling wave data. If you touch, Write CF screen will displayed. File name should be within 8 characters. File is saved under MOTION8 RECIPE TRACE folder in CF card. D1 Max. value Set maximum value of graph. Range : -9999 to 9999(r/min) * D2 Min. value Set minimum value of graph. Range :-9999 to 9999(r/min) * G1 Speed wave display Display maximum 8 axis speed wave. Graph color is same as axis select SW. * If you touch screen, data entry screen appears. 4-33 Section 4 Screen Specification <Select trigger> Display content different depends on trigger type. [Trigger : None] S7 [Trigger : Speed data] S8 S9 S10 [Trigger : Bit] S7 S8 S11 S10 [Screen specification] Position S7 S8 S9 S10 Name Trigger channel Trigger direction Trigger level Trace No. from trigger S11 Trigger bit Description Select trigger Ch (Master axis, Axis1 to 8) Select trigger direction ([Rising edge]/[Falling edge]). Set trigger speed. (r/min) Set number of trace from trigger. Range : 0 to 499 If you set 100, execute 400 point sampling before trigger and 100 point sampling after trigger. Select trigger bit from following FALDIC signal. [Zero deviation], [Zero speed], [Torque limiter], [Deviation overflow] 4-34 Section 4 Screen Specification 4-7 CF Card Screen (No.955) Read/Write operation data to CF card inserted to display unit. Maximum 10 data can be stored to CF card. While display this screen, do not remove/insert CF card. S1 S2 S2 D1 D1 S3 S4 *1 *2 Write to CF card. Cancel write. Read from CF card. Cancel read. [Screen specification] Position S1 S2 Name System menu Select No. S3 Write S4 Read D1 Name Description Move to System menu screen (No.910). Select number to access to CF card. File name is decided according to number. Write [Parameter area][Data interface area] in controller to CF card after display confirmation screen (*1). Invalid when CF card is not inserted. Write [Parameter area][Data interface area] in CF card to controller after display confirmation screen (*2). Invalid when CF card is not inserted or servo operation. Set name in accordance to number. Name should be within 20 characters. If you touch screen, name entry screen will display. 4-35 Section 4 Screen Specification [File name] File is stored in [ MOTION8 RECIPE] folder. File name is as shown below. Number Parameter area Data interface area 1 2 3 4 5 6 7 8 9 10 REC9000.CSV REC9010.CSV REC9020.CSV REC9030.CSV REC9040.CSV REC9050.CSV REC9060.CSV REC9070.CSV REC9080.CSV REC9090.CSV REC9001.CSV REC9011.CSV REC9021.CSV REC9031.CSV REC9041.CSV REC9051.CSV REC9061.CSV REC9071.CSV REC9081.CSV REC9091.CSV Future expand area REC9002.CSV REC9012.CSV REC9022.CSV REC9032.CSV REC9042.CSV REC9052.CSV REC9062.CSV REC9072.CSV REC9082.CSV REC9092.CSV File name area REC9009.CSV REC9019.CSV REC9029.CSV REC9039.CSV REC9049.CSV REC9059.CSV REC9069.CSV REC9079.CSV REC9089.CSV REC9099.CSV 4-8 Date and time setting screen (No.915) Set Date and time of controller unit. S1 D1 S2 D2 [Screen specification] Position S1 D1 D2 Name System menu Current time Set time S2 Set Description Move to System menu screen (No.910). Display current time. Enter time to set. If you touch Year/Month/Day/Hour/Min/Sec, data entry screen displayed. Range : 2006-01-01 00:00:00 to 2069-12-31:23:59:59. Set time to controller unit. 4-36 Section 5 System Install Procedure 5-1 System Configuration Example Here explains @E.Terminal installation procedure with below system (Two axis ball screw mechanism). PLC (NP1PM-48E) @E.Terminal for MC Ethernet CN3 CN3 FALDIC ALPHA5 [18bit] FALDIC ALPHA5 [18bit] CN1 CN2 -OT Home position LS +OT +OT Home position LS -OT M1 M2 [Mechanism] Reduction gear Ball screw lead [Mechanism] Reduction gear 1/10 Ball screw lead 10mm 1/10 10mm For detail of wiring, please see [FALDIC ALPHA5 User’s manual (MEHT301)] - [Chapter2 Wiring]. 5-1 Encorder TB3 Motor cable TB3 Motor cable Encorder cable CN1 Emergency stop CN2 Section 5 System Install Procedure 5-2 System Setting Procedure [Flow overview] FALDIC ALPHA5 Parameter setting FALDIC setting [Chapter 5-3] Configuration definition Display screen setting [Chapter 5-4] Communication setting Editor setting [Chapter 5-5] with PLC Below is user application. Create user screen Create PLC user program Create by editor Create by PLC loader. Operation interlock is set here. 5-3 FALDIC ALPHA5 Parameter Setting Set below parameter to all axis of servo amplifier. 1)PA1-06: Numerator of electronic gear 2)PA2-72:Station number 3)PA3-02:CONT2 Signal assignment 4)PA3-03:CONT3 Signal assignment 5)PA3-04:CONT4 Signal assignment 6)PA3-05:CONT5 Signal assignment 16J1 00JServo SX bus station No.(201-208) 00J10(Forced stop) 00J7(+OT) 00J8(-OT) 00J6(Home position LS) In this example, set M1 station [201], M2 station [202]. For detail of parameter setting, please see [FALDIC ALPHA5 User’s manual (MEHT301)] [Chapter6 Keypad] or [Chapter13 PC Loader]. 5-2 Section 5 System Install Procedure 5-4 Configuration Definition Set as shown below from @E.Terminal for MC menu screen. Press Configuration definition Enter password. Default value is [0000]. Define for axis1 and axis2. Press axis1. Select [ALPHA5 18bit]. Then press [Next]. Select [Ball screw]. Set [Gear ratio] 1/10. Set [Lead] 10mm. Then press [Next]. 5-3 Section 5 System Install Procedure Select [PTP position]. Then press [Next]. Set [Acc/Dec time] 100ms. Set [Manual speed] 10mm/s. Then press [Complete setting]. Parameter write confirmation screen displayed. If you press [Yes], setting complete. Then move to configuration definition screen. Set axis2 in same manner. After setting, below screen displayed. 5-4 Section 5 System Install Procedure 5-5 Communication Setting with PLC Communication with PLC is executed using 8way communication function of display unit. Here explains setting method of editor software. 5-5-1 PLC communication setting This example explains setting method of MICREX-SX Ethernet communication. Use PLC Ethernet in default setting. IP address : 192.168.0.1, Port No. : 507 Open editor software, select [System setting] – [Device connection setting]. Set item as shown below. 2) Check [Use PLC2] 3) Click [Change] and select MICREX-SX (Ethernet) F mode 1) Select PLC2 [Important] 4) Select Comm. error handling : Disconnect. If other item selected, when communication error occur between PLC and display, communication between @E.Terminal and display stops. 5) Set IP address and port No. of PLC. For other item, change setting depending on user system requirement. 5-5 Section 5 System Install Procedure 5-5-2 PLC device emory map setting Comminicate between @E.Terminal and PLC using Device memory map of display. Use PLC2 Device memory map Device memory map overview [@E.Terminal] [PLC] WM10050 to 10059 (10word) Axis1 Servo information area (Servo current position, etc.) WM0 to 9 (10word) * Use arbitrary memory. WM10100 to 10109 (10word) Axis2 Servo information area (Servo current position, etc.) WM10 to 19 (10word) * Use arbitrary memory. WM10060 to 10069 (10word) Axis1 Servo information area (Servo current position, etc.) WM100 to 109 (10word) * Use arbitrary memory. WM10110 to 10119 (10word) Axis2 Servo information area (Servo current position, etc.) WM110 to 119 (10word) * Use arbitrary memory. @E.Terminal memory is fixed. 5-6 Device memory map No.0 Device memory map No.1 Device memory map No.8 Device memory map No.9 Section 5 System Install Procedure Editor setting method Select [System setting] - [Device connection setting] - [PLC2]. Set device memory map as shown below. Device memory map No.0 Double click Select Periodical writing Set 100ms Set WM10050 Device memory map No.1 Double click Select Periodical writing Set 100ms Set WM10100 5-7 Section 5 System Install Procedure Device memory map No.8 Double click Select Periodical reading Set 100ms Set WM10060 Device memory map No.9 Double click Select Periodical reading Set 100ms Set WM10110 For more detail of editing, refer to [V8 Series Connection Manual (2201NE)] [Appendix1 Device memory map]. 5-8 Appendix 1 App1-1 How to Use Backup CD About Backup CD Backup CD (accessory) contains @E.Terminal factory setting data, and data to customize by user.It is used to restore @E.Terminal to factory setting status, or add screen/control program by user. If you insert backup CD to PC, license agreement dialog displayed. Confirm contents and close. Copy data in backup CD to PC using explore, and use it. Folder configuration in backup CD is as shown below. (1) Screen data folder to edit by user Screen data files which user can edit are stored. It have two folders [Expert] and [Standard]. Select folder depending on what loader you use for controller. Under those folders, there are three folders. Each folder is used depending on screen size. Each folder contains screen data file (*.V8). (2) Screen data folder to restore Screen data to restore Display unit to factory setting are stored. Restore screen data is made for SX-Programmer Standard. Data are prepared for each screen size of @E.Terminal. App.1-1 Appendix 1 How to Use Backup CD (3) System definition folder System definition (Program) flies which user can edit are stored. It have two folders [Expert] and [Standard]. Select folder depending on what loader you use for controller. *1 SX-Programmer Standard file is made in template format. Before use it, register it as template in Loader. *2 In case of English file, system definition is written in English. It is used to edit by English version Loader. (4) System definition folder to restore System definition data to restore Controller unit to factory setting are stored. Restore data is made for SX-Programmer Standard. App.1-2 Appendix 1 App1-2 How to Use Backup CD Template Registration Procedure by SX-Programmer Standard This procedure is used when create controller unit program using SX-Programmer Standard. [File] – [New]. [Template selection] screen displayed. Right click mouse under description area, select [Import]. Select template file at [Import] dialog, then click [Open]. Template of @E.Terminal for MC is registered at Template selection screen. App.1-3 Appendix 1 App1-3 How to Use Backup CD Template Registration Procedure by SX-Programmer Expert This procedure is used when create controller unit program using SX-Programmer Expert. (1) [File] - [Open project/ Extract project]. [Open project/ Extract project] screen is displayed. Select a compressed project file, and extract the project file. *When it has already been complete to extract a compressed project file for template, the confirmation screen for overwriting the library is displayed. If you want to overwrite it to new version, click [Yes]. (2) [File] - [Save as template]. [Save as template] screen is displayed. Enter “Template name” and click [OK]. (3) [File] – [New project]. [New project] screen is displayed. After completing the above procedure, it is available to select the registed template. App.1-4 Appendix 1 App1- 4 How to Use Backup CD Restore Screen Data This section explains procedure to set Display unit screen data to factory setting. Transfer screen data in backup CD to Display unit using CF card. (1) Transfer screen data to CF card Attach CF card to CF card adapter, and attach to PC. Copy [ MOTION8] folder that is under [ Display_CF Standard] folder in backup CD to CF card. CF card adapter (2) Insert CF card to CF slot of display unit Open CF card cover of Display unit, and insert CF card. CF card CF card cover CF card Note) After insert CF card, close CF cardcover to lock. (If cover is not locked, CF card is not recognized.) * Do not remove/insert CF card after this procedure. (3) Display [Card Transfer] screen Press [SYSTEM] – [F1] and change screen to local menu. Press [Card menu] SW in [Main menu]. [Card transfer] screen is displayed. [Main menu] (4) Select CF card location, Data, Transfer direction Select items as shown below. CF card inserted to: Built-in Socket Data Selection: Screen Data Transfer Menu: Display <-- Card App.1-5 Appendix 1 How to Use Backup CD [Card Transfer] screen CF card location [Built-in Socket] Direction [Display <-- Card] Data [Screen Data] Blink when access to CF card Current folder name Information of selected folder Select folder name Select data / Start transfer Return to previous menu (5) Confirm access folder Confirm current folder name. If folder name is [MOTION8], go to (7). If you want to select other folder, go to (6). (6) Change access folder If you change folder, press [Select Folder]. [Select Folder] screen displayed. Select [MOTION8] folder, then press [OK]. [Select Folder] screen Move cursor [K], [L] Display folder in CF by Show inside folder After select folder, settle by this SW App.1-6 Appendix 1 How to Use Backup CD (7) Select Transfer Data After selecting a folder, press [Select data] SW. The [Data selection] dialog is displayed. At the same time, [Select Data] SW changes to [Start ] SW. Data Selection [Data Selection] dialog [Start] SW (8) Start transfer Select data, and then press [Start] SW. SW name changes to [Transferring...] Before transfer During transfer (9) Finish transfer After finishing transferring, the following dialog displayed. Press [OK] SW. However, if you select [Sys. Program] or [Select All] SW at [Card Transfer] menu, the screen automatically goes to [Main Menu] after transferring. Finish transfer App.1-7 Appendix 1 App1-5 How to Use Backup CD Restore Controller Data This section explains procedure to set Display unit screen data to factory setting. Transfer screen data in backup CD to Display unit using CF card. (1) Transfer system definition data to CF card Attach CF card to CF card adapter, and attach to PC. Copy all files and folders under [ System_CF Standard] folder in backup CD to CF card. CF card adapter (2) Insert CF card to CF slot of controller unit. CF card (3) Set Key SW of controller unit to “3”(U-TERM). Key SW (4) Turn ON power of @E.Terminal. Data transfer automatically starts. After finish transferring, “UROM” LED stop blinking, then start operation. App.1-8 Appendix 1 App1-6 How to Use Backup CD Direction of old version screen data file (*.U4) If you have screen data that is edited using V1.1.0.0 or before version backup CD file (*.U4 file), and transfer this data to V8 series Display unit, please convert *.U4 file to *.V8 file using screen editor V-SFT-5. Below shows convert procedure. (1) Open screen data (*.U4 file) using Screen editor V-SFT-5. (2) [System setting] – [Edit Model Selection]. Select “V series”, then click [OK]. Edit Model table @E.Terminal types UG series V series NP5M0101-5H4 UG540V V812S NP5M0101-4H4 UG440V V810S NP5M0101-3H4 UG340V V808S (3) Please save to create V8 series file (*.V8). If you have screen data that is edited using V1.1.1.0 or later version backup CD file (*.V8 file), and transfer this data to UG40 series Display unit, please convert (*.V8) file to (*.U4) file using screen editor V-SFT-5. App.1-9 Appendix 2 How to Change Japanese/English @E.Terminal can change display language - Japanese/English. Language data is pre-installed in @E.Terminal. To change language, you have to change two items – “Screen data” and “System message”. App2-1 Change Screen data Language If new product, change screen data language by Language selection switch on “Language selection” screen or “Operation screen (Sample screen)”. Below explains method to create Japanese/English changeover screen using user-edit screen data in Backup CD. First (Japanese) and second (English) languages are registered in user-edit screen data. This changeover is operated by users as following two ways. (1) How to change by Macro <SYS (CHG_LANG)> User needs to create the Macro to change language. Following is an example of the changeover Macro on sample operation screen. Power on new product *There is no language change function as a standard function of contents. * The language change does not have retain function. The information is kept by setting up initial Macro when it is powered on. App.2-1 Appendix 2 How to Change Japanese/English Initial Macro setting For initial Macro setting, select [System Setting] – [Macro Setting] on screen editor. Example: Setup Macro block 0. Entry following Macro on Macro block 0. Selection language status is recorded to WL9999. 1: Japanese 2: English (2) How to change initial interface language. Displayed language can be changed on screen editor. This is used when it is not necessary to change Language on user screen. (When user needs to use only one language.) Select [System Setting] – [Font Setting] on screen editor. Do not change number of Interface language. If you change to “1”, English message on screen will be erased. 1: Japanese 2: English App.2-2 Appendix 2 How to Change Japanese/English [Language change : advanced example] <Overview> System screen data provided by Fuji (screen number 800 to 1023) is made - 1st Language (Japanese) and 2nd Language (English). Generally, we recommend to make user screen data (screen number 0 to 799) also same setting. If you need only English screen, and would like to design user screen data in English and use 1st Language - English, please use below technique. <Method> To show only English, use Language change Macro at screen change SW. @E.Terminal 巻取り運転 巻返し運転 テンションピックアップ M テンションピックアップ M コイラ (巻取り) アンコイラ (巻出し) st 1 Language (English) nd 2 Language (English) System screen (Screen 800 to 1023) User screen (Screen 0 to 799) Pre-installed 1st Language : English 1st Language : Japanese 2nd Language : Unused 2nd Language : English App.2-3 Appendix 2 How to Change Japanese/English <Macro setting> 1) User screen Macro setting Add below Macro at [System menu] SW. This SW change screen to System menu screen (No.910). This is existing Macro. This Macro change screen to 910. nd With this Macro, change to 2 Language. 2) System menu screen Macro setting Add below Macro at [Operation screen] SW. This SW change screen to User screen. Note It is not possible to change menu of @E.Terminal. However, [Operation screen] SW is possible to edit. This is existing Macro. This Macro change screen to 0. st With this Macro, change to 1 Language. App.2-4 Appendix 2 App2-2 How to Change Japanese/English Change System message Language If new product, Japanese is displayed in System message. To change System message language to English, there is two way as shown below. (1) How to change by @E.Treminal Press [SYSTEM] – [F1]. [Main menu] will displayed in Japanese. Press screen SW by 1-2-3 order as shown below pictures. System message changed to English. * This setting is cleared by power off of @E.Terminal. If you want to keep English System message, use method (2). [Main menu] 1 2 [Language selection] screen 3 (2) How to change by screen data setting Open user-edit screen data in backup CD, change Main Menu language to English, then transfer screen data to @E.Terminal. Select [System Setting] – [Font Setting] on screen editor. App.2-5 Appendix 2 App2-3 How to Change Japanese/English Change Screen editor display Language If you edit screen data in backup CD, please change display language to English as default display language is Japanese. Select Language “2” (English) as shown below. Language 1: Japanese 2 : English Note1) When you open screen data file, below Alarm message will appear if Japanese font is not installed in your computer. Please ignore this message, click [Yes] to continue. Note2) When you open screen data file, system menu screen character may garble if Japanese font is not installed in your computer. However, it will shown correctly on Display unit. App.2-6 Appendix 3 Expression Difference with Servo Loader There is message difference between @E.Terminal and Servo Loader that have same meaning but different expression because of limited space on screen. Below table shows different message list. App3-1 Servo Parameter List [FALDIC-α] Item No. Servo Loader @E.Terminal Standard 25 37 38 39 41 44 45 55 56 57 58 59 72 S-curve(NL) filter coefficient Torque filter time constant Speed regulator integ. time Position regulator gain Speed setting filter time cons Vibration suppression T.C. Vibration suppression gain * Positioning end output form Positioning end output time Positioning end judgment time Overload ealy warning level Maximum torque limit level * Origin return direction S-curve time Torque filter time Speed integral time Position regu. gain Speed setting filter Vib. suppression time Vib. suppression gain * In-pos. output format In-pos. output time In-pos. judgment time Overload warning level Max torque limit value * Origin ret. direction 76 Origin detection creep speed System 22 23 24 25 26 27 28 29 30 73 76 77 80 * Parameter in RAM storag 1 * Parameter in RAM storag 2 * Parameter in RAM storag 3 * Parameter in RAM storag 4 * Parameter in RAM storag 5 * Parameter in RAM storag 6 * Parameter in RAM storag 7 * Parameter in RAM storag 8 * Parameter in RAM storag 9 Monitor1.2 output form Plus Soft OT detected position Minus Soft OT detected position * Rotational dir. Changeover * Parameter in RAM 1 * Parameter in RAM 2 * Parameter in RAM 3 * Parameter in RAM 4 * Parameter in RAM 5 * Parameter in RAM 6 * Parameter in RAM 7 * Parameter in RAM 8 * Parameter in RAM 9 Monitor1/2 output form + Soft OT position - Soft OT position * Rotation direction 84 * Opration at undervoltage * Opration at U.V. App.3-1 Creep speed at homing Appendix 3 Expression Difference with Servo Loader [FALDIC-ALPHA5] Item No. Servo Loader @E.Terminal PA1 2 3 4 5 6 7 8 9 10 11 12 20 21 22 23 25 26 27 28 29 31 32 33 34 35 36 INC / ABS system selection Command pulse form selection Rotation direction selection Number of command input pulses per revolution Numerator 0 of electronic gear Denominator of electronic gear Number of output pulses per revolution Numerator of electric gear for output pulses Denominator of electric gear for output pulses Output pulse phase selection at CCW rotation Z-phase position offset Easy tuning: stroke setting Easy tuning: speed setting Easy tuning: timer setting Easy tuning: direction selection Max. rotation speed (for position and speed) Max. rotation speed (for torque control) Forward rotation torque limit Reverse rotation torque limit Speed coincidence range Deviation unit selection Zero deviation range / in-position range In-position output format In-position output time In-position judgment time Acceleration / deceleration selection at speed control * INC/ABS system select * Command pulse form * Rotation direction * CMD pulse/revolution Numerator 0 of e-gear Denominator of e-gear * Out pulse/revolution * Numerator of encoder * Denominator of encoder * Pulse phase at CCW * Z-phase pos. offset Easy tuning(stroke) Easy tuning(speed) Easy tuning(timer) Easy tuning(direction) Max speed (pos, speed) Max speed (torque) For. torque limit Rev. torque limit Speed coinci. range Deviation unit Zero dev./In-pos range * In-position output In-pos output time In-pos judge time Accel/decel selection 41 Manual feed speed 1 for position and speed control / speed limit 1 for torque control Manual feed speed 1 42 Manual feed speed 2 for position and speed control / speed limit 2 for torque control Manual feed speed 2 43 Manual feed speed 3 for position and speed control / speed limit 3 for torque control Manual feed speed 3 44 Manual feed speed 4 for position and speed control / speed limit 4 for torque control Manual feed speed 4 45 Manual feed speed 5 for position and speed control / speed limit 5 for torque control Manual feed speed 5 46 Manual feed speed 6 for position and speed control / speed limit 6 for torque control Manual feed speed 6 47 Manual feed speed 7 for position and speed control / speed limit 7 for torque control Manual feed speed 7 continued to next page App.3-2 Appendix 3 Expression Difference with Servo Loader continued from previous page 51 52 53 54 57 59 60 66 68 70 71 72 73 74 75 76 77 78 Moving average S-curve time Low-pass filter (for S-curve) time constant Command pulse smoothing function Position command response time constant Speed loop integration time constant 1 Torque filter time constant for position and speed control Torque filter time constant for torque control Speed loop integration time constant 2 Acceleration compensation gain for position control Automatic notch filter selection Notch filter 1 / frequency Notch filter 1 / attenuation Notch filter 1 / width Notch filter 2 / frequency Notch filter 2 / attenuation Notch filter 2 / width Automatic vibration suppression selection Vibration suppressing anti resonance frequency 0 S-curve time Low-pass filter time CMD pulse smoothing Pos CMD response time Speed integral time 1 Torque filter time Torque setting filter Speed integral time 2 Accel. compensation Automatic notch filter Notch filter 1 freq. Notch filter 1 attenu. Notch filter 1 width Notch filter 2 freq. Notch filter 2 attenu. Notch filter 2 width Vibration suppressing Anti resonance freq 0 79 80 Vibration suppressing workpiece inertia ratio (vibration suppressing resonance frequency) 0 Vibration suppressing anti resonance frequency 1 Workpiece inertia 0 Anti resonance freq 1 81 82 Vibration suppressing workpiece inertia ratio (vibration suppressing resonance frequency) 1 Vibration suppressing anti resonance frequency 2 Workpiece inertia 1 Anti resonance freq 2 83 84 Vibration suppressing workpiece inertia ratio (vibration suppressing resonance frequency) 2 Vibration suppressing anti resonance frequency 3 Workpiece inertia 2 Anti resonance freq 3 85 86 87 88 89 91 92 93 94 95 Vibration suppressing workpiece inertia ratio (vibration suppressing resonance frequency) 3 Vibration suppressing damping coefficient Model torque filter time constant Position loop integration time constant Position loop integration limiter P/PI automatic change selection Speed range for friction compensation Coulomb friction torque for friction compensation Torque filter setting mode Model torque calculation selection / speed observer selection Workpiece inertia 3 damping coefficient Model torq filter time Pos. integration time Pos. integration limit P/PI automatic change Friction compensation Friction torque Torque filter setting Model torque calc. 96 Speed limit gain for torque control Speed limit gain continued to next page App.3-3 Appendix 3 Expression Difference with Servo Loader continued from previous page PA2 PA3 1 8 9 10 11 12 13 14 15 16 17 18 20 24 25 56 59 61 62 63 64 65 66 67 68 69 72 74 77 78 89 90 91 Decimal point position of positioning data Starting direction for homing Reverse traveling unit amount for homing Homing direction after reference signal detection Reference signal for shift operation Reference signal for homing (Deceleration starting signal) Home position LS signal edge selection Home position shift unit amount Deceleration operation for creep speed Home position after homing completion Home position detection range Deceleration time at OT during homing Interrupt traveling unit amount Selection of operation at OT during homing Software OT selection Speed limit selection at torque control Deviation hold selection at torque limit Action sequence at servo-on OFF Action sequence at alarm Action sequence at main power shutoff Torque keeping time to holding brake Braking resistor selection Flying start at speed control Alarm detection at undervoltage Main power shutoff detection time Deviation detection overflow value Station number for communication Parameter write protection Initial display of the keypad Display transition at warning detection Sequence test mode: mode selection Sequence test mode: encoder selection Position command delay time (for VS) 92 SX extension function (for VS) 36 51 52 81 82 87 88 Deviation clear input form OUT1 signal assignment OUT2 signal assignment Monitor 1 signal assignment Monitor 2 signal assignment Monitor 1/2 output format Command pulse frequency sampling time for monitor 89 Feedback speed sampling time for monitor Decimal point position * Homing direction Reverse travel amount Homing direction * Ref. signal for shift * Ref. signal for homing * LS signal edge select Home pos. shift amount * Deceleration for creep Home position Home position detect Decel. time at OT Interrupt travel * Selection of OT * Software OT selection * Speed limit selection * Deviation hold select * Servo ON-OFF sequence * Alarm action sequence * Power off sequence Holding time to brake * Braking resistor * Flying start * Alarm at undervoltage * Power down detection Deviation overflow * Station number Para. write protect * Initial display * Display at warning * Sequence test mode * Encoder selection Position command delay SX extension function App.3-4 * Deviation clear input * OUT 1 signal assign * OUT 2 signal assign Monitor1 signal assign Monitor2 signal assign Monitor1/2 output form CMD pulse sampl time Speed FB sampling time Appendix 3 App3-2 Expression Difference with Servo Loader Servo Alarm List [FALDIC-α] No. Servo Loader @E.Terminal 03h 04h 05h 06h 07h 08h 09h 11h 12h 1Dh Amp Heat resistor Heat Over Flow Over current Over speed High voltage Low voltage Combination error resistor Heat 2 Data error Negative sign designation Amplifier overheat Braking resistor Deviation overflow Overcurrent Overspeed Overvoltage Control / Main power undervoltage Motor combination error Braking transistor error Data error Negative sign [FALDIC-ALPHA5] No. 04h 09h 1Dh 1Eh Servo Loader Internal braking resistor overheat / External braking resistor overheat Control power undervoltage / Main power undervoltage Data error OUT-of range, 0 data written Data error Negative sign designation @E.Terminal Breaking resistor / transistor error Control / Main power undervoltage Data error OUT-of-range, o written Data error Negative sign App.3-5 5 Virtual M axis running App.4-1 Making Mark Virtual M axis run Ext. pulse input inhibit Incremental value error 10019 +19 10018 +18 10017 +17 10016 +16 Data IF display edit inhibit Data IF read inhibit Cycle stop Alarm reset Mark length measure start Virtual M axis emer. Stop run Reverse rotation error I/0 write error Mark error 3 1 0 I/O write command Unit. conv. overflow (sync) Parameter write command Current pos. pulse display Error Summary Parameter Parameter I/O write write write completion error completion 2 Controller 10015 +15 10014 +14 10013 +13 10012 +12 Target speed [unit amount/unit speed] (lower) Mechanical calculation overflow Setting error Target speed [unit amount/unit speed] (upper) Virtual M axis selection 10011 +11 Sync cycle start Data read Ext. PG selection 10010 +10 10009 +9 10008 +8 Sync Sync accelerating decelerating completion cycle stop detection Virtual M axis dec Virtual M axis acc 4 Motion 10007 +7 Synchronizing 10006 +6 10005 +5 Alarm status 6 Speed data [unit amount/unit speed] (upper) - Virtual/External common 7 10004 +4 8 10003 +3 9 Speed data [unit amount/unit speed] (lower) - Virtual/External common A 10002 +2 B Position data (lower) [unit amount/pulse] - Virtual/External common C WM10000 to WM10049 Position data (upper) [unit amount/pulse] - Virtual/External common D 10001 +1 E 10000 +0 F z External/Virtual master axis Genaral-purpose Interface Area Appendix 4 Memory map Controller Motion z Motion axis E D C WM10050 to WM10449 B A 9 8 7 6 Sync Data read SV parameter read error Sync App.4-2 SV parameter write error Homing command Homing command Cycle stop SV para read command Data IF read inhibit Sync command SV para write command Data IF display edit disable 10067 10117 10167 10217 10267 10317 10367 10417 +17 10068 10118 10168 10218 10268 10318 10368 10418 +18 10069 10119 10169 10219 10269 10319 10369 10419 +19 2-axis linear interpolation command Interrupt positioning Preset SV parameter model Continue mode Alarm reset Phase compensation Emergency Positioning stop cancel Suspend Deviation clear Unit. conv. overflow (Sync) Sync width setting error Unit. conv. overflow (PTP) 2 FALDIC alarm detection 0 Parameter write command Current pos. pulse display Error Summary Parameter Parameter write write error completion Interrupt overrun 1 Controller Mark detection selection PTP ABS 10065 10115 10165 10215 10265 10315 10365 10415 +15 Manual forward rotation Preset data (lower) [unit amount] Preset data (upper) [unit amount] 10064 10114 10164 10214 10264 10314 10364 10414 +14 Servo ON Feedback speed [unit amount/unit speed] (upper) 10063 10113 10163 10213 10263 10313 10363 10413 +13 Toggle error 3 Controller 10066 10116 10166 10216 10266 10316 10366 10416 +16 Feedback speed [unit amount/unit speed] (lower)/Parameter No. 10062 10112 10162 10212 10262 10312 10362 10412 +12 Reverse rotation error Incremental length error Target position (lower)/Write parameter setting (lower) Manual reverse rotation Master axis Sync axis cycle cycle set error set error SV para Mechanical mode calculation response overflow completion Continue accepted Target position (upper)/Write parameter setting (upper) SV para read completion Compensating phase 10061 10111 10161 10211 10261 10311 10361 10411 +11 SV para write completion Cut output 10060 10110 10160 10210 10260 10310 10360 10410 +10 10059 10109 10159 10209 10259 10309 10359 10409 +9 10058 10108 10158 10208 10258 10308 10358 10408 +8 Making cycle stop Deviation error -OT 4 Motion 10057 10107 10157 10207 10257 10307 10357 10407 +7 Synchronizing accelerating decelerating completion +OT 10055 10105 10155 10205 10255 10305 10355 10405 +5 Emer. stop detection 10054 10104 10154 10204 10254 10304 10354 10404 +4 Interpolating Alarm status FALDIC external counter 10053 10103 10153 10203 10253 10303 10353 10403 +3 Positioning Homing completion completion PSET Feedback speed [unit amount/s] (upper)/Parameter read value (upper) 10052 10102 10152 10202 10252 10302 10352 10402 +2 10056 10106 10156 10206 10256 10306 10356 10406 +6 Feedback position (upper) [unit amount] Feedback speed [unit amount/s] (lower)/Parameter read value (lower) 5 10051 10101 10151 10201 10251 10301 10351 10401 +1 RDY Feedback position (lower) [unit amount] F 10050 10100 10150 10200 10250 10300 10350 10400 +0 1 axis 2 axis 3 axis 4 axis 5 axis 6 axis 7 axis 8 axis Genaral-purpose Interface Area Appendix 4 Memory map Motion +0 +1 +2 +3 +4 +5 +6 +7 +8 +9 +10 +11 +12 +13 +14 +15 +16 +17 +18 +19 +20 +21 +22 +23 +24 +25 +26 +27 +28 +29 +30 +31 +32 +33 +34 +35 +36 +37 +38 +39 11010 App.4-3 11039 11038 11037 11036 11035 11034 11033 11032 11031 11030 11029 11028 11027 11026 11025 11024 11023 11022 External pulse input value [Pulse] Reverse feed limiter Master axis travel per cycle Travel at stop Travel at startup Disabled error count (Processing of measuring length between marks for external PG) Range: 0 to 99 times Disabled mark number (Processing of measuring length between marks for external PG) Range: 0 to 99 times Mark detection range (Processing of measuring length between marks for external PG) Virtual master forced deceleration time [ms] Virtual master axis acceleration time [ms] Mark measurement length value (Processing of measuring length between marks for external PG) WM11000 to WM11049 Motion J Controller 11021 11020 11019 11018 11017 11016 11015 11014 11013 11012 11011 11009 11008 11007 11006 11005 11004 11003 11002 11001 11000 z External/Virtual master axis Data Interface Area Appendix 4 Memory map Controller J Motion 2 axis 11100 11101 11102 11103 11104 11105 11106 11107 11108 11109 11110 11111 11112 11113 11114 11115 11116 11117 11118 11119 11120 11121 11122 11123 11124 11125 11126 11127 11128 11129 11130 11131 11132 11133 11134 11135 11136 11137 11138 11139 11140 11141 11142 11143 11144 11145 11146 11147 11148 11149 11060 11061 11062 11063 11064 11065 11066 11067 11068 11069 11070 11071 11072 11073 11074 11075 11076 11077 11078 11079 11080 11081 11082 11083 11084 11085 11086 11087 11088 11089 11090 11091 11092 11093 11094 11095 11096 11097 11098 11099 11160 11161 11162 11163 11164 11165 11166 11167 11168 11169 11170 11171 11172 11173 11174 11175 11176 11177 11178 11179 11180 11181 11182 11183 11184 11185 11186 11187 11188 11189 11190 11191 11192 11193 11194 11195 11196 11197 11198 11199 3 axis 11150 11151 11152 11153 11154 11155 11156 11157 11158 11159 11210 11211 11212 11213 11214 11215 11216 11217 11218 11219 11220 11221 11222 11223 11224 11225 11226 11227 11228 11229 11230 11231 11232 11233 11234 11235 11236 11237 11238 11239 11240 11241 11242 11243 11244 11245 11246 11247 11248 11249 4 axis 11200 11201 11202 11203 11204 11205 11206 11207 11208 11209 11260 11261 11262 11263 11264 11265 11266 11267 11268 11269 11270 11271 11272 11273 11274 11275 11276 11277 11278 11279 11280 11281 11282 11283 11284 11285 11286 11287 11288 11289 11290 11291 11292 11293 11294 11295 11296 11297 11298 11299 5 axis 11250 11251 11252 11253 11254 11255 11256 11257 11258 11259 z Motion axis 1 axis 11050 11051 11052 11053 11054 11055 11056 11057 11058 11059 11310 11311 11312 11313 11314 11315 11316 11317 11318 11319 11320 11321 11322 11323 11324 11325 11326 11327 11328 11329 11330 11331 11332 11333 11334 11335 11336 11337 11338 11339 11340 11341 11342 11343 11344 11345 11346 11347 11348 11349 6 axis 11300 11301 11302 11303 11304 11305 11306 11307 11308 11309 11360 11361 11362 11363 11364 11365 11366 11367 11368 11369 11370 11371 11372 11373 11374 11375 11376 11377 11378 11379 11380 11381 11382 11383 11384 11385 11386 11387 11388 11389 11390 11391 11392 11393 11394 11395 11396 11397 11398 11399 7 axis 11350 11351 11352 11353 11354 11355 11356 11357 11358 11359 11410 11411 11412 11413 11414 11415 11416 11417 11418 11419 11420 11421 11422 11423 11424 11425 11426 11427 11428 11429 11430 11431 11432 11433 11434 11435 11436 11437 11438 11439 11440 11441 11442 11443 11444 11445 11446 11447 11448 11449 8 axis 11400 11401 11402 11403 11404 11405 11406 11407 11408 11409 +10 +11 +12 +13 +14 +15 +16 +17 +18 +19 +20 +21 +22 +23 +24 +25 +26 +27 +28 +29 +30 +31 +32 +33 +34 +35 +36 +37 +38 +39 +40 +41 +42 +43 +44 +45 +46 +47 +48 +49 +0 +1 +2 +3 +4 +5 +6 +7 +8 +9 Cycle sync App.4-4 Motion-specific parameter 5 Motion-specific parameter 4 Motion-specific parameter 3 Motion-specific parameter 2 Motion-specific parameter 1 Deceleration length Acceleration length Delay at startup Phase compensation length Phase compensation processing Phase compensation upper limit Phase compensation processing Min. value of sync axis travel per cycle Delay at startup Master axis sync width Master axis sync width Home position Cut command time Cut command delay Delay at startup Sync axis sync width Travel at stop Travel at stop Sync axis sync width Travel at startup Travel at startup Motion J Controller Sync axis sync width [unit amount] Reverse feed limiter Min. value of master axis travel per cycle Min. value of master axis travel per cycle Reverse feed limiter Master axis travel per cycle Flying shear Master axis travel per cycle Sync axis travel per cycle Manual speed [unit amount/unit speed] Rotary shear Acceleration/deceleration time [ms] S-curve ratio [%] Sync mode No. response Sync axis position in a cycle [unit amount] Master axis position in a cycle [unit amount] Command position [unit amount] Sync axis cycle setting [unit amount] Ratio_Sync axis Sync axis travel per cycle Master axis cycle setting [unit amount] Ratio_Master axis Master axis travel per cycle Master axis min. cycle setting [unit amount] Min. value of master axis travel per cycle Reverse feed limiter [unit amount] Reverse feed limiter Travel at startup [unit amount] Travel at startup Travel at stop [unit amount] Travel at stop Master axis sync width [unit amount] Ratio sync WM11050 to WM11449 Data Interface Area Appendix 4 Memory map Controller J Motion Gate City Ohsaki, East Tower, 11-2, Osaki 1-chome, Shinagawa-ku, Tokyo 141-0032, Japan E-mail: [email protected] URL: http://www.fujielectric.com/ Materials covered in this document are subject to revision due to the modification of the product. Issued as FE consolidated edition, June 2011