1
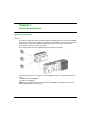
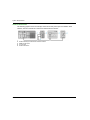
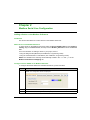
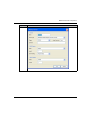
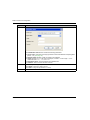
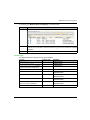
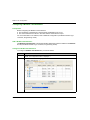
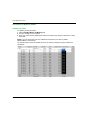
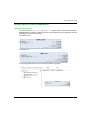
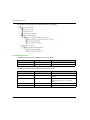
SoMachine EIO0000001868 04/2014 SoMachine Scan for Buttons Linked to ZBRN Modules Harmony ZBRN Library Guide EIO0000001868.03 04/2014 www.schneider-electric.com The information provided in this documentation contains general descriptions and/or technical characteristics of the performance of the products contained herein. This documentation is not intended as a substitute for and is not to be used for determining suitability or reliability of these products for specific user applications. It is the duty of any such user or integrator to perform the appropriate and complete risk analysis, evaluation and testing of the products with respect to the relevant specific application or use thereof. Neither Schneider Electric nor any of its affiliates or subsidiaries shall be responsible or liable for misuse of the information contained herein. If you have any suggestions for improvements or amendments or have found errors in this publication, please notify us. No part of this document may be reproduced in any form or by any means, electronic or mechanical, including photocopying, without express written permission of Schneider Electric. All pertinent state, regional, and local safety regulations must be observed when installing and using this product. For reasons of safety and to help ensure compliance with documented system data, only the manufacturer should perform repairs to components. When devices are used for applications with technical safety requirements, the relevant instructions must be followed. Failure to use Schneider Electric software or approved software with our hardware products may result in injury, harm, or improper operating results. Failure to observe this information can result in injury or equipment damage. © 2014 Schneider Electric. All rights reserved. 2 EIO0000001868 04/2014 Table of Contents Safety Information . . . . . . . . . . . . . . . . . . . . . . . . . . . . . About the Book. . . . . . . . . . . . . . . . . . . . . . . . . . . . . . . . Chapter 1 System Requirements . . . . . . . . . . . . . . . . . . . . . . . . . . System Requirements . . . . . . . . . . . . . . . . . . . . . . . . . . . . . . . . . . . . . Chapter 2 Modbus Serial Line Configuration . . . . . . . . . . . . . . . . Adding a Device on the Modbus IOScanner . . . . . . . . . . . . . . . . . . . . Chapter 3 Modbus TCP Configuration . . . . . . . . . . . . . . . . . . . . . . Configuring a Modbus TCP IOScanner . . . . . . . . . . . . . . . . . . . . . . . . Configuring a Generic Device on the Modbus TCP IOScanner . . . . . Chapter 4 Quick Reference Guide . . . . . . . . . . . . . . . . . . . . . . . . . Verification of Buttons States . . . . . . . . . . . . . . . . . . . . . . . . . . . . . . . Identifying Buttons Linked to ZBRN Module . . . . . . . . . . . . . . . . . . . . Glossary Index EIO0000001868 04/2014 ......................................... ......................................... 5 9 11 11 13 13 21 22 24 27 28 29 31 33 3 4 EIO0000001868 04/2014 Safety Information Important Information NOTICE Read these instructions carefully, and look at the equipment to become familiar with the device before trying to install, operate, or maintain it. The following special messages may appear throughout this documentation or on the equipment to warn of potential hazards or to call attention to information that clarifies or simplifies a procedure. EIO0000001868 04/2014 5 PLEASE NOTE Electrical equipment should be installed, operated, serviced, and maintained only by qualified personnel. No responsibility is assumed by Schneider Electric for any consequences arising out of the use of this material. A qualified person is one who has skills and knowledge related to the construction and operation of electrical equipment and its installation, and has received safety training to recognize and avoid the hazards involved. BEFORE YOU BEGIN Do not use this product on machinery lacking effective point-of-operation guarding. Lack of effective point-of-operation guarding on a machine can result in serious injury to the operator of that machine. WARNING UNGUARDED EQUIPMENT Do not use this software and related automation equipment on equipment which does not have point-of-operation protection. Do not reach into machinery during operation. Failure to follow these instructions can result in death, serious injury, or equipment damage. This automation equipment and related software is used to control a variety of industrial processes. The type or model of automation equipment suitable for each application will vary depending on factors such as the control function required, degree of protection required, production methods, unusual conditions, government regulations, etc. In some applications, more than one processor may be required, as when backup redundancy is needed. Only you, the user, machine builder or system integrator can be aware of all the conditions and factors present during setup, operation, and maintenance of the machine and, therefore, can determine the automation equipment and the related safeties and interlocks which can be properly used. When selecting automation and control equipment and related software for a particular application, you should refer to the applicable local and national standards and regulations. The National Safety Council’s Accident Prevention Manual (nationally recognized in the United States of America) also provides much useful information. In some applications, such as packaging machinery, additional operator protection such as pointof-operation guarding must be provided. This is necessary if the operator’s hands and other parts of the body are free to enter the pinch points or other hazardous areas and serious injury can occur. Software products alone cannot protect an operator from injury. For this reason the software cannot be substituted for or take the place of point-of-operation protection. 6 EIO0000001868 04/2014 Ensure that appropriate safeties and mechanical/electrical interlocks related to point-of-operation protection have been installed and are operational before placing the equipment into service. All interlocks and safeties related to point-of-operation protection must be coordinated with the related automation equipment and software programming. NOTE: Coordination of safeties and mechanical/electrical interlocks for point-of-operation protection is outside the scope of the Function Block Library, System User Guide, or other implementation referenced in this documentation. START-UP AND TEST Before using electrical control and automation equipment for regular operation after installation, the system should be given a start-up test by qualified personnel to verify correct operation of the equipment. It is important that arrangements for such a check be made and that enough time is allowed to perform complete and satisfactory testing. CAUTION EQUIPMENT OPERATION HAZARD Verify that all installation and set up procedures have been completed. Before operational tests are performed, remove all blocks or other temporary holding means used for shipment from all component devices. Remove tools, meters, and debris from equipment. Failure to follow these instructions can result in injury or equipment damage. Follow all start-up tests recommended in the equipment documentation. Store all equipment documentation for future references. Software testing must be done in both simulated and real environments. Verify that the completed system is free from all short circuits and temporary grounds that are not installed according to local regulations (according to the National Electrical Code in the U.S.A, for instance). If high-potential voltage testing is necessary, follow recommendations in equipment documentation to prevent accidental equipment damage. Before energizing equipment: Remove tools, meters, and debris from equipment. Close the equipment enclosure door. Remove all temporary grounds from incoming power lines. Perform all start-up tests recommended by the manufacturer. EIO0000001868 04/2014 7 OPERATION AND ADJUSTMENTS The following precautions are from the NEMA Standards Publication ICS 7.1-1995 (English version prevails): Regardless of the care exercised in the design and manufacture of equipment or in the selection and ratings of components, there are hazards that can be encountered if such equipment is improperly operated. It is sometimes possible to misadjust the equipment and thus produce unsatisfactory or unsafe operation. Always use the manufacturer’s instructions as a guide for functional adjustments. Personnel who have access to these adjustments should be familiar with the equipment manufacturer’s instructions and the machinery used with the electrical equipment. Only those operational adjustments actually required by the operator should be accessible to the operator. Access to other controls should be restricted to prevent unauthorized changes in operating characteristics. 8 EIO0000001868 04/2014 About the Book At a Glance Document Scope This library guide explains how to read the status of the Harmony XB5R wireless and batteryless push-button used with ZBRN access points. This document focuses on the application part of the project: How to configure a project for ZBRN modules. How to configure the ZBRN module with SoMachine. A quick way to read Harmony XB5R push-button states. Validity Note This document has been updated with the release of SoMachine V4.1. Related Documents Title of Documentation Reference Number SoMachine Programming Guide EIO0000000067 (ENG); EIO0000000069 (FRE); EIO0000000068 (GER); EIO0000000071 (SPA); EIO0000000070 (ITA); EIO0000000072 (CHS) M251 Logic Controller Programming Guide EIO0000001462 (ENG); EIO0000001463(FRE); EIO0000001464 (GER); EIO0000001465 (SPA); EIO0000001466 (ITA); EIO0000001467 (CHS) Harmony XB5R ZBRN1/ ZBRN2 User Manual EIO0000001177 (ENG); EIO0000001178 (FRE); EIO0000001181 (GER); EIO0000001179 (SPA); EIO0000001180 (ITA); EIO0000001182 (CHS) You can download these technical publications and other technical information from our website at www.schneider-electric.com. EIO0000001868 04/2014 9 Product Related Information WARNING LOSS OF CONTROL The designer of any control scheme must consider the potential failure modes of control paths and, for certain critical control functions, provide a means to achieve a safe state during and after a path failure. Examples of critical control functions are emergency stop and overtravel stop, power outage and restart. Separate or redundant control paths must be provided for critical control functions. System control paths may include communication links. Consideration must be given to the implications of unanticipated transmission delays or failures of the link. Observe all accident prevention regulations and local safety guidelines.1 Each implementation of this equipment must be individually and thoroughly tested for proper operation before being placed into service. Failure to follow these instructions can result in death, serious injury, or equipment damage. 1 For additional information, refer to NEMA ICS 1.1 (latest edition), "Safety Guidelines for the Application, Installation, and Maintenance of Solid State Control" and to NEMA ICS 7.1 (latest edition), "Safety Standards for Construction and Guide for Selection, Installation and Operation of Adjustable-Speed Drive Systems" or their equivalent governing your particular location. WARNING UNINTENDED EQUIPMENT OPERATION Only use software approved by Schneider Electric for use with this equipment. Update your application program every time you change the physical hardware configuration. Failure to follow these instructions can result in death, serious injury, or equipment damage. 10 EIO0000001868 04/2014 SoMachine System Requirements EIO0000001868 04/2014 Chapter 1 System Requirements System Requirements System Requirements Overview The Harmony XB5R push-buttons are both wireless and batteryless. They are used with ZBRN access points allowing more flexibility and simplicity in the installation. The access point converts radio frequency inputs from the Harmony XB5R push-buttons into various communication protocols that can then be sent to a controller. The following graphic shows the ZBRN module connected to a controller: This document helps you to configure and use the ZBRN module in your application based on either: Modbus Serial Line (ZBRN2) Modbus TCP (ZBRN1) NOTE: For the configuration of your ZBRN, refer to the ZBRN documentation (see Harmony XB5R, ZBRN1/ZBRN2, User Manual). EIO0000001868 04/2014 11 System Requirements Hardware Architecture The following graphic shows an example, where the access point is part of a Modbus serial network, with the controller as a master and other devices as slaves: 1 2 3 4 5 12 Controller as master Modbus Advantys OTB network interface module ZBRN access point ATV12 drive Modbus serial line EIO0000001868 04/2014 SoMachine Modbus Serial Line Configuration EIO0000001868 04/2014 Chapter 2 Modbus Serial Line Configuration Modbus Serial Line Configuration Adding a Device on the Modbus IOScanner Introduction This section describes how to add a device on the Modbus IOScanner. Add a Device on the Modbus IOScanner To add a device on the Modbus IOScanner, select the Generic Modbus Slave in the Hardware Catalog, drag it to the Devices tree, and drop it on the Modbus_IOScanner node of the Devices tree. For more information on adding a device to your project, refer to: • Using the Drag-and-drop Method (see SoMachine, Programming Guide) • Using the Contextual Menu or Plus Button (see SoMachine, Programming Guide) NOTE: The variable for the exchange is automatically created in the %IWx and %QWx of the Modbus Serial Master I/O Mapping tab. Configure a Device Added on the Modbus IOScanner To configure the device added on the Modbus IOScanner, proceed as follow: Step Action 1 In the Devices tree, double-click Generic Modbus Slave. Result: The configuration window is displayed. 2 Enter a Slave Address value for your device (choose a value from 1 to 247). 3 Choose a value for the Response Timeout (in ms). EIO0000001868 04/2014 13 Modbus Serial Line Configuration To configure the Modbus Channels, proceed as follow: 14 Step Action 1 Click the Modbus Slave Channel tab: EIO0000001868 04/2014 Modbus Serial Line Configuration Step Action 2 Click the Add Channel button: EIO0000001868 04/2014 15 Modbus Serial Line Configuration Step Action 3 Configure an exchange: In the field Channel, you can add the following values: Channel: Enter a name for your channel. Access Type: Choose the exchange type: Read or Write or Read/Write multiple registers (i.e. %MW) (see page 19). Trigger: Choose the trigger of the exchange. It can be either CYCLIC with the period defined in Cycle Time (ms) field or started by a RISING EDGE on a boolean variable (this boolean variable is then created in the Modbus Master I/O Mapping tab). Comment: Add a comment about this channel. In the field READ Register (if your channel is Read or Read/Write one), you can configure the %MW to be read on the Modbus slave. Those will be mapped on %IW (see Modbus Master I/O Mapping tab): Offset: Offset of the %MW to read. 0 means that the first object that will be read will be %MW0. Length: Number of %MW to be read. For example, if ’Offset’ = 2 and ’Length’ = 3, the channel will read %MW2, %MW3 and %MW4. Error Handling: choose the behavior of the related %IW in case of loss of communication. In the fieldWRITE Register (if your channel is Write or Read/Write one), you can configure the %MW to be written to the Modbus slave. Those will be mapped on %QW (see Modbus Master I/O Mapping tab): Offset: Offset of the %MW to write. 0 means that the first object that will be written will be %MW0. Length: Number of %MW to be written. For example, if ’Offset’ = 2 and ’Length’ = 3, the channel will write %MW2, %MW3 and %MW4. 16 4 Click the Delete button to remove a channel. Click the Edit button to change the parameters of a channel. 5 Click OK to validate the configuration of this channel. EIO0000001868 04/2014 Modbus Serial Line Configuration To configure your Modbus Initialization Value, proceed as follow: Step Action 1 Click the Modbus Slave Init tab: EIO0000001868 04/2014 17 Modbus Serial Line Configuration Step Action 2 Click New to create a new initialization value: The Initialization Value window contains the following parameters: Access Type: Choose the exchange type: Read or Write or Read/Write multiple registers (that is, %MW) (see page 19). Register Offset: Register number of register to be initialized. Length: Number of %MW to be read. For example, if ’Offset’ = 2 and ’Length’ = 3, the channel will read %MW2, %MW3 and %MW4. Initialization Value: Value the registers are initialized with. Comment: Add a comment about this channel. 18 3 Click Move up to change the position of a value in the list. Click Delete to remove a value in the list. Click Edit to change the parameters of a value. 4 Click OK to create a new Initialization Value. EIO0000001868 04/2014 Modbus Serial Line Configuration To configure your Modbus Master I/O Mapping, proceed as follow: Step Action 1 Click the Modbus Master I/O Mapping tab: 2 Double-click in a cell of the Variable column to open a text field. Enter the name of a variable or click the browse button [...] and chose a variable with the Input Assistant. 3 For more information on I/O mapping, refer to SoMachine Programming Guide. Access Types This table describes the different access types available: Function Function Code Availability Read Coils 1 ModbusChannel Read Discrete Inputs 2 ModbusChannel Read Holding Registers (default setting for the channel configuration) 3 ModbusChannel Read Input Registers 4 ModbusChannel Write Single Coil 5 ModbusChannel Initialization Value Write Single Register 6 ModbusChannel Initialization Value Write Multiple Coils 15 ModbusChannel Initialization Value Write Multiple Registers (default 16 setting for the slave initialization) ModbusChannel Initialization Value Read/Write Multiple Registers EIO0000001868 04/2014 23 ModbusChannel 19 Modbus Serial Line Configuration 20 EIO0000001868 04/2014 SoMachine Modbus TCP Configuration EIO0000001868 04/2014 Chapter 3 Modbus TCP Configuration Modbus TCP Configuration What Is in This Chapter? This chapter contains the following topics: Topic Page Configuring a Modbus TCP IOScanner 22 Configuring a Generic Device on the Modbus TCP IOScanner 24 EIO0000001868 04/2014 21 Modbus TCP Configuration Configuring a Modbus TCP IOScanner Prerequisites Before configuring the Modbus TCP IOScanner: The IP address of the Ethernet 2 must be fixed and different from 0.0.0.0 The connected devices must be in the same subnet as the Ethernet 2 port For more information on IP address, refer to Ethernet Configuration (see Modicon M251 Logic Controller, Programming Guide). Add a Modbus TCP IOScanner The Modbus TCP IOSCanner node is automatically added when a slave is added on the Ethernet 2 node (see Modicon M251 Logic Controller, Programming Guide). Configure a Modbus TCP IOScanner To configure a Modbus TCP IOScanner, proceed as follows: Step 22 Action 1 In the Devices tree, double-click Modbus_TCP_IOScanner. Result: The configuration window is displayed. 2 Select the IOScanner I/O Mapping tab. EIO0000001868 04/2014 Modbus TCP Configuration Step 3 Action Select the Bus cycle task in the dropdown list: Use parent bus cycle setting (by default), MAST, or any task previously created in the project. NOTE: The Bus cycle task parameter inside the IO Mapping editor of the Modbus IO scanner device defines the task responsible for the refresh of the IO image (%Q, %I). NOTE: When the TCP IOScanner is configured, post configuration files for the Ethernet 2 network are ignored. EIO0000001868 04/2014 23 Modbus TCP Configuration Configuring a Generic Device on the Modbus TCP IOScanner Overview To configure the generic device added on the Modbus TCP IOScanner, fill in the parameters in these two tabs: Modbus TCP Slave Configuration IO Scanner Channel Configuration Modbus TCP Slave Configuration Tab To configure the parameters in the Modbus TCP Slave Configuration tab, proceed as follows: Step 24 Action 1 In the Devices tree, double-click Generic_Modbus_TCP_Slave. Result: The configuration window is displayed. 2 Enter a Slave IP Address value for your device (by default 192.168.0.1). 3 Enter a Health Timeout (ms) value for your device (by default 1000). It represents the maximum time between a request by the Modbus IO scanner and a response from the slave. When the health timeout expires, the associated health bit value changes to 0. Health bit values can be visualized in the IOScanner I/O Mapping tab (see page 22). EIO0000001868 04/2014 Modbus TCP Configuration IO Scanner Channel Configuration Tab To configure the parameters in the IO Scanner Channel Configuration tab, proceed as follows: Step 1 Action Click the IO Scanner Channel Configuration tab: Use the Delete button to remove a channel and the Edit button to change the parameters of a channel. 2 EIO0000001868 04/2014 Click the Add Channel button. This dialog box is displayed: 25 Modbus TCP Configuration Step 3 Action In the Channel area, you can define: Name: optional string for naming the channel Unit-ID [1..255]: unit ID of the Modbus TCP slave device (by default 255) Repetition Rate: polling interval of the Modbus request (by default 20 ms) Comment: optional field to describe the channel Function Code: type of Modbus request: Read/Write Multiple Registers (Function code 23) (by default) Read Holding Registers (Function code 03) Write Multiple Registers (Function code 16) In the READ register area, you can define: Offset: starting register number to read from 0 to 65535 Length: number of the registers to be read (depending on the function code). Error Handling: define the fallback value in the case of a communication interruption: Keep LastValue (by default) holds the last valid value SetToZero resets all values to 0 In the WRITE register area, you can define: Offset: starting register number to write from 0 to 65535 Length: number of the registers to be written (depending on the function code). 26 4 Click OK to validate the configuration of the channel. 5 Repeat the steps 2 to 4 to create other channels that define the Modbus communication with the device. For each Modbus request, you must create a channel. EIO0000001868 04/2014 SoMachine Quick Reference Guide EIO0000001868 04/2014 Chapter 4 Quick Reference Guide Quick Reference Guide What Is in This Chapter? This chapter contains the following topics: Topic Page Verification of Buttons States 28 Identifying Buttons Linked to ZBRN Module 29 EIO0000001868 04/2014 27 Quick Reference Guide Verification of Buttons States Validation Procedure To validate, proceed as follows: 1. Click the Modbus Master I/O Mapping tab. 2. Connect and login to the controller. 3. Press one of the Harmony XB5R push-buttons and observe the change of state in the current value field. NOTE: For more information refer to the ZBRN documentation (see Harmony XB5R, ZBRN1/ZBRN2, User Manual). The following figure shows the related values for the Harmony XB5R push-buttons within the variable list: 28 EIO0000001868 04/2014 Quick Reference Guide Identifying Buttons Linked to ZBRN Module Function Block Description The function blocks ZBRNx_Serial and ZBRNx_TCP get information to identify buttons linked to the ZBRN module. Therefore, a MAST task must include a POU (Program Organization Unit) that instantiates the required function block. For Modbus serial: For Modbus TCP: The following graphic shows the function block from library repository: EIO0000001868 04/2014 29 Quick Reference Guide The graphic shows the devices in use with instances of each type: I/O Variable Description The table describes the input variables of the function blocks: Input Data Type Description b_iExecute BOOL Starts the buttons ID scan process. Transmitter_ID DWORD Decimal value of the push-button ID to find. The table describes the output variables of the function blocks: 30 Output Data Type Description b_qDone BOOL TRUE when scan process is achieved. b_qBusy BOOL TRUE while processing: no request is accepted. b_qError BOOL Indicates an error is detected. When TRUE: refer to Errmsg for more details. B_qButton_index BYTE Index of the push-button. Starts at 0. Errmsg MESSAGES_CONSTANTS Type of error detected EIO0000001868 04/2014 SoMachine Glossary EIO0000001868 04/2014 Glossary M MAST A processor task that is run through its programming software. The MAST task has 2 sections: IN: Inputs are copied to the IN section before execution of the MAST task. OUT: Outputs are copied to the OUT section after execution of the MAST task. P POU (program organization unit) A variable declaration in source code and a corresponding instruction set. POUs facilitate the modular re-use of software programs, functions, and function blocks. Once declared, POUs are available to one another. EIO0000001868 04/2014 31 Glossary 32 EIO0000001868 04/2014 SoMachine Index EIO0000001868 04/2014 Index H Harmony XB5R, 11 M Modbus TCP IOScanner adding and configuring, 22 configuring a generic device, 24 Z ZBRN, 11 ZBRNx_Serial, 29 EIO0000001868 04/2014 33 Index 34 EIO0000001868 04/2014