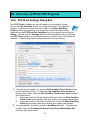
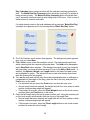
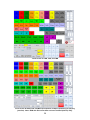
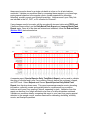
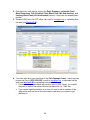
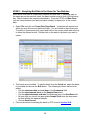
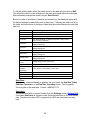
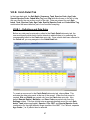
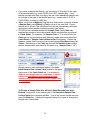
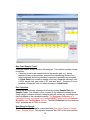
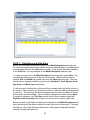
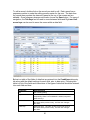
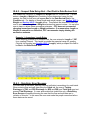
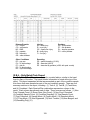
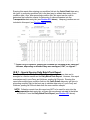
1
Smolt Monitoring Program
Protocol and FPC32.net Data Entry
Program User's Manual
Manual Version – 2015 Season
Produced by: The Fish Passage Center (Last updated 2/25/2015)
Table of Contents
I. Smolt Monitoring Program (SMP) Protocol............................................................. 1
I.A. Introduction to the SMP ........................................................................................ 1
I.B. Summary of Data to be Collected for the SMP ..................................................... 2
I.B.1 – Target Species and Species Identification ................................................ 2
I.B.2 – Species-Specific Data to Collect ............................................................... 2
Age Code ................................................................................................... 2
Special Species Code ................................................................................ 2
Clipping, Marking, and Tagging Data ......................................................... 3
Descaling Data .......................................................................................... 3
Mortality Data ............................................................................................. 3
I.B.3 – Fish Sampling at Main-stem Monitoring Sites ........................................... 4
Sample Size Targets.................................................................................. 4
Recommended Sample Rates ................................................................... 4
Anesthetic .................................................................................................. 5
Fry Handling Protocol ................................................................................ 5
II. Introduction to FPC32.net ....................................................................................... 7
II.A. The Fish Passage Center (FPC) .......................................................................... 7
II.B. Remote SMP Site Data Entry Program (FPC32.net) ............................................ 7
III. FPC Contacts & Correspondence .......................................................................... 9
III.A. Personnel to Contact for Technical Help .............................................................. 9
III.B. Correspondence ................................................................................................... 9
III.C. SMP Remote Site Facilities and 2015 Dates ...................................................... 10
IV. Glossary ................................................................................................................ 11
V. Site by Site SMP Overview .................................................................................... 15
V.A. Bonneville Dam Powerhouse 1........................................................................... 15
V.B. Bonneville Dam Powerhouse 2........................................................................... 15
V.C. Grande Ronde River Trap .................................................................................. 16
V.D. Imnaha River Trap .............................................................................................. 16
V.E. John Day Dam .................................................................................................... 16
V.F. Lewiston Trap ..................................................................................................... 16
V.G. Little Goose Dam ................................................................................................ 16
V.H. Lower Granite Dam ............................................................................................ 17
V.I. Lower Monumental Dam .................................................................................... 17
V.J. McNary Dam....................................................................................................... 17
V.K. Rock Island Dam ................................................................................................ 17
V.L. Whitebird Trap .................................................................................................... 18
-i-
VI. System Requirements & Program Installation ................................................... 19
VI.A. Hardware and Software ...................................................................................... 19
1. PC Requirements ................................................................................ 19
2. Software............................................................................................... 19
3. Communication Devices ...................................................................... 19
VI.B. Procedure to Install the FPC32.net Program (including the fish condition
touch screen) ...................................................................................................... 19
VI.C. Procedure to Install New Version of FPC32.net and Uninstall an Old Version ... 22
VI.C.1 – Windows XP ......................................................................................... 22
VI.C.2 – Windows 7 ............................................................................................ 23
VI.D. Troubleshooting FPC32.net ................................................................................ 25
VI.D.1 – Windows 7 – Procedure to Allow Full Control ....................................... 25
VI.D.2 – Problems with SQL Express ................................................................. 26
MS SQL Server Database Could Not Open ............................................. 27
Problem with SQL Express Service Run.................................................. 28
Other Error Messages Related to SQL Express Service ......................... 29
VI.D.3 – Default Display Settings........................................................................ 30
VII. Overview of FPC32.NET Program....................................................................... 31
VII.A. FPC32.net Settings Dialog Box .......................................................................... 31
VII.B. Entering Fish Condition Data Via the Touch Screen .......................................... 34
VII.B.1 – Brief Overview of Steps to Entering Fish Condition Data via the Fish
Condition Touch Screen .......................................................................... 34
VII.B.2 – Exporting Daily Fish Condition Records from the Wet Lab Computer . 37
VII.C. Importing a Batch From the Condition Sample or Creating a New Batch ........... 38
VII.C.1 – Importing Daily Fish Condition Records into FPC32.NET Main Form . 39
VII.C.2 – Creating a New Batch Record Directly from the FPC32.net Main
Form (for sites where no condition data are collected) ............................ 40
VII.D. Entering Non-Condition Fish Data (Catch Detail) ............................................... 41
VII.E. Entering Incidental Catch Data ........................................................................... 43
VII.F. Entering Mark Recapture Data ........................................................................... 44
VII.G. Validating Condition Data ................................................................................... 45
VII.H. Promoting Condition Data into the Batch ............................................................ 46
VII.I. Entering Transportation Data.............................................................................. 48
VII.I.1 – Manual Entry of Transportation Data..................................................... 49
VII.I.2 – UPDATED: Importing Data from Catch Detail for Transportation Data
Entry Tab ................................................................................................. 50
VII.I.2a – Importing Species Data Only .................................................... 51
VII.I.2b – Importing Species and Collection Data..................................... 51
VII.J. Validating Batch.................................................................................................. 51
VII.K. End and Send ..................................................................................................... 53
VII.L. Reposts .............................................................................................................. 55
VII.M. Special Situations ............................................................................................... 55
- ii -
VII.M.1 – Daylight Savings Time Transitions ...................................................... 55
VII.M.2 – Sampling End Date is the Same for Two Batches............................... 56
VIII. Detailed Data Entry Instructions........................................................................ 57
VIII.A. Catch Tab ........................................................................................................... 57
VIII.A.1 – Definitions and Data Entry .................................................................. 58
Start Date................................................................................................. 59
Start Hour ................................................................................................ 59
End Date .................................................................................................. 60
End Hour.................................................................................................. 60
Trap Location ........................................................................................... 60
Gear Code ............................................................................................... 60
Sample Code ........................................................................................... 60
Sample Hours .......................................................................................... 61
Total Discharge ........................................................................................ 62
PH 1 Flow or Turbine Discharge .............................................................. 62
PH 2 Flow ................................................................................................ 62
Total Spill ................................................................................................. 63
Comments1 and Comments2 .................................................................. 63
VIII.A.2 – Editing Records in the Catch Data Entry Tab ..................................... 63
Adjusting Batch Numbers and Creating Batches for Past Dates ............. 63
Editing Older Batches .............................................................................. 64
Removing a Batch Record from the Local Database ............................... 65
VIII.B. Catch Detail Tab ................................................................................................. 67
VIII.B.1 – Definitions and Data Entry .................................................................. 67
Sub-Batch ................................................................................................ 69
Tank/Trap ................................................................................................ 69
Species Code .......................................................................................... 70
Age Code ................................................................................................. 70
Fin Clipped............................................................................................... 71
CWT......................................................................................................... 71
Special Species Code .............................................................................. 72
Gear Code ............................................................................................... 73
Multiplier and Sample Rate ...................................................................... 73
Non-Cond Sample Count ......................................................................... 75
Est. Collection .......................................................................................... 75
Num Exam for Descal .............................................................................. 75
Num Descaled ......................................................................................... 76
Sample Morts........................................................................................... 76
Facility Morts ............................................................................................ 77
Research Morts ....................................................................................... 78
PIT Tag Morts .......................................................................................... 78
Promoted Summary Condition Fish ......................................................... 78
VIII.B.2 – Editing or Deleting Catch Detail Records ............................................ 79
VIII.C. Incidental Catch Tab........................................................................................... 79
VIII.C.1 – Definitions and Data Entry .................................................................. 79
- iii -
Species Code .......................................................................................... 80
Sample Count .......................................................................................... 81
Sample Morts........................................................................................... 81
Promoted Summary Condition Fish ......................................................... 82
VIII.C.2 – Editing or Deleting Incidental Catch Records ..................................... 82
VIII.D. Mark Recaptures Tab ......................................................................................... 82
VIII.D.1 – Definitions and Data Entry .................................................................. 83
Sub-Batch ................................................................................................ 84
Tank/Trap ................................................................................................ 84
Species Code .......................................................................................... 84
Age Code ................................................................................................. 85
Mark Type ................................................................................................ 85
Brand Location......................................................................................... 85
Brand Code.............................................................................................. 85
Brand Orientation ..................................................................................... 85
Tag Number ............................................................................................. 86
Tag Color ................................................................................................. 86
Clip Code ................................................................................................. 86
Supplemental Code ................................................................................. 86
Tally Total ................................................................................................ 86
Promoted Summary Condition Fish ......................................................... 86
VIII.D.2 – Editing or Deleting Mark Recaptures Records .................................... 86
VIII.E. Transportation Tab ............................................................................................. 87
VIII.E.1 – Definitions and Data Entry .................................................................. 87
Tank ......................................................................................................... 89
Species Code .......................................................................................... 89
Special Species Code .............................................................................. 89
Age Code ................................................................................................. 89
Fin Clipped............................................................................................... 89
CWT......................................................................................................... 89
Num Bypassed ........................................................................................ 89
Num Trucked ........................................................................................... 90
Num Barged............................................................................................. 90
VIII.E.2 – Editing or Deleting Transportation Records ........................................ 90
VIII.F. Conditions Tab ................................................................................................... 90
VIII.F.1 – Definitions and Data Entry .................................................................. 90
Site and Batch ......................................................................................... 92
Sub-Batch ................................................................................................ 92
Tank ......................................................................................................... 92
CWT......................................................................................................... 92
Species Code .......................................................................................... 92
Miscellaneous Incidental .......................................................................... 93
Special Species Code .............................................................................. 94
Mark Type ................................................................................................ 94
Elas. Code ............................................................................................... 94
Color Code............................................................................................... 94
- iv -
Descaling ................................................................................................. 94
Weight...................................................................................................... 95
Length ...................................................................................................... 95
Predator Checkboxes .............................................................................. 96
Injury Checkboxes ................................................................................... 97
Disease Checkboxes ............................................................................... 97
Other Conditions Checkboxes ................................................................. 98
General Comment ................................................................................... 99
VIII.F.2 – Editing or Deleting Condition Records ................................................ 99
VIII.G. Summary Cond. Tab ........................................................................................ 100
VIII.G.1 – Definitions......................................................................................... 100
Site and Batch ....................................................................................... 101
Catch Detail Sub-Batches ...................................................................... 101
Conditions Sub-Batches ........................................................................ 102
VIII.H. Fish Condition Touch Screen ........................................................................... 102
VIII.H.1 – Data Entry Sequence for the Fish Condition Touch Screen ............. 103
VIII.H.2 – Fish Condition Touch Screen – Function Buttons............................. 105
Number Pad........................................................................................... 106
Exit Panel............................................................................................... 106
New........................................................................................................ 106
Save/New .............................................................................................. 107
Edit......................................................................................................... 107
Delete .................................................................................................... 107
Next ....................................................................................................... 107
Previous ................................................................................................. 107
Cancel.................................................................................................... 107
Export .................................................................................................... 107
VIII.H.3 – Fish Condition Touch Screen - Record Browsing Panel ................... 108
Tank/Trap .............................................................................................. 108
Species Code ........................................................................................ 108
Special Species ..................................................................................... 108
Clip Code ............................................................................................... 108
Elastomer............................................................................................... 109
Color ...................................................................................................... 109
CWT....................................................................................................... 109
General Comment ................................................................................. 109
Special Comment .................................................................................. 109
Predator ................................................................................................. 109
Injury ...................................................................................................... 110
Other Cond ............................................................................................ 110
Disease .................................................................................................. 110
Weight.................................................................................................... 110
Length .................................................................................................... 110
Site......................................................................................................... 110
Batch...................................................................................................... 110
Date ....................................................................................................... 111
-v-
Sub-batch .............................................................................................. 111
Sequence............................................................................................... 111
VIII.H.4 – Fish Condition Touch Screen - Tallies .............................................. 111
“Tank A and None” and “Tank B” Tallies................................................ 111
Special Species Tallies .......................................................................... 111
Total Incidental Tally .............................................................................. 111
Total Sampled Tally ............................................................................... 111
VIII.H.5 – Fish Condition Touch Screen – Condition, Species, and Mark Type
Buttons................................................................................................... 112
Elastomer Location and Color................................................................ 114
General Comments, Sub-batch, Tank, and Special Comments............. 114
Disease/Parasite Conditions .................................................................. 115
Injury Conditions .................................................................................... 115
Miscellaneous Conditions ...................................................................... 116
Descaling ............................................................................................... 116
Predator Conditions ............................................................................... 116
Mark Types ............................................................................................ 116
Weight and Length ................................................................................. 117
Species, Special Species, and Miscellaneous Incidental Species ......... 117
IX. Validation ............................................................................................................. 121
IX.A. Automatic Data Validation and Alerts ............................................................... 121
IX.A.1 – Suspect Data Entry Alert – Red Dot ................................................... 121
Example 1: Improper Gear Code, Sample Code, Sample Hours
Combination....................................................................................... 121
Example 2: Improper Species, Special Species Combination ............... 121
Example 3: Invalid Length (Touch Screen): ........................................... 122
Example 4: Improper Sample Code, Sub-batch Combination................ 122
IX.A.2 – Suspect Data Entry Alert – Red Field in Data Review Grid................. 123
Example 1: Anomalous Length Entry ..................................................... 123
IX.A.3 – Data Entry Error Message .................................................................. 123
Example 1: Flow and Spill Data Entry .................................................... 124
IX.A.4 – Data Reminders .................................................................................. 124
Example 1: Entering a Tank................................................................... 124
IX.B. FPC32.net Validation Reports .......................................................................... 125
IX.B.1 – Daily Summary Report ........................................................................ 125
IX.B.2 – Mark Recapture Report....................................................................... 127
IX.B.3 – Incidental Catch Report ...................................................................... 127
IX.B.4 – Fish Condition Report ......................................................................... 128
IX.B.5 – Individual Fish Condition Report ......................................................... 128
IX.B.6 – Daily Batch/Tank Report ..................................................................... 129
IX.B.7 – Special Species Daily Batch/Tank Report........................................... 130
IX.B.8 – Lamprey Batch/Tank Report ............................................................... 131
IX.C. FPC Weekly Validation ..................................................................................... 132
IX.D. FPC Validation Spreadsheets........................................................................... 132
IX.E. End of Year Validation ...................................................................................... 132
- vi -
IX.F. Project by Project Details for SMP Reporting Requirements ............................ 133
X. Printing Daily Reports and Sending Data to FPC.............................................. 141
X.A. Generating and Printing Reports ...................................................................... 141
Next/Previous Page ............................................................................... 142
Printing Reports ..................................................................................... 142
Save Report As ...................................................................................... 142
Percent Zoom ........................................................................................ 143
X.B. Sending SMP Data and Hand Logs to the FPC ................................................ 143
Sending New Batches Via E-mail .......................................................... 143
Uploading New Batches or Hand Logs Via HTTP.................................. 144
Sending Hand Logs to the FPC ............................................................. 146
XI. What’s New with FPC32.net (2015) .................................................................... 147
XI.A. Red Length and Weight “Caution” Dot.............................................................. 147
XI.B. Added Functionality to Transportation Import Feature...................................... 148
XII. Notes ................................................................................................................... 151
XIII. FPC32.NET Manual Acknowledgement Form ................................................. 153
- vii -
I. Smolt Monitoring Program (SMP) Protocol
I.A.
Introduction to the SMP
There are two primary goals of the Smolt Monitoring Program (SMP): (1) to provide
real-time data on juvenile fish migration to support in-season fisheries management
decisions, and (2) to provide a long-term time series of consistently collected data that
allow for comparison of the impacts of changing river conditions among years,
particularly with respect to juvenile fish survival. To achieve these goals, there are three
components to the SMP: (1) PIT-tag marking at hatcheries, (2) PIT-tag marking and
monitoring at Snake River Basin traps and Rock Island Dam, and (3) fish sampling
at Corps of Engineers (COE) bypass facilities at Lower Snake River, and Columbia
River dams.
This Protocol addresses the data that are collected for the SMP at COE bypass facilities
at Lower Snake River and Columbia River dams and at the mainstem traps throughout
the Snake River Basin. The sampling sites covered by this protocol include: Lower
Granite Dam (LGR), Little Goose Dam (LGS), Lower Monumental Dam (LMN), McNary
Dam (MCN), John Day Dam (JDA), Bonneville Dam (BON), Rock Island Dam (RIS), the
Snake River Trap at Lewiston (LEW), the Salmon River Trap at Whitebird (WTB), and
the Grande Ronde River Trap (GRN). For the remainder of the document these
sampling sites will be referred to as Main-stem Monitoring Sites or Trap Sites. This
protocol is meant to complement the Condition Sampling Protocol and provides
overall guidelines for sampling and data to collect.
The primary data gathered at these SMP sites are count data on juvenile salmonids and
lamprey that are sampled from the bypass system or trap. These target species are
identified by species and any clips and marks/tags are also recorded. Based on these
count data (i.e., sample counts), an estimate of daily collection can be generated at
each project. From estimates of collection, passage and population indices can be
generated if the sample data are representative, based on 24-hour sampling that is
systematic, and sample rates are known throughout that period. Estimates of passage
and population indices will not be done for lamprey juveniles or at traps.
In addition to sample counts, data on fish condition are also collected. Two levels of
condition data are collected based on the level of detailed information that is needed
from a particular site. For the full sample, at all sites, fish are examined for descaling
based on FTOT criteria. A subsample of the full sample is examined for detailed
condition information, including descaling, injury, and disease. Salmonid fry are NOT
examined for descaling or detailed condition information. All COE mainstem monitoring
sites conduct detailed condition monitoring on salmonid species. In addition, BON,
JDA, and MCN conduct detailed condition monitoring on juvenile and larval lamprey.
The protocol for examination of fish for detailed condition monitoring can be found in a
separate document entitled Condition Sampling Protocol.
1
I.B.
Summary of Data to be Collected for the SMP
I.B.1 – Target Species and Species Identification
The target species for the SMP include juvenile salmonids and larval and juvenile
lamprey. Among the juvenile salmonids that are considered target species are:
(1) yearling (age 1) and subyearling (age 0) Chinook (Oncorhynchus tshawytscha),
(2) Sockeye (O. nerka), (3) Coho (O. kisutch), and (4) Steelhead (O. mykiss).
Among the larval and juvenile lamprey that are considered target species are:
(1) pacific lamprey (Lampetra tridentatus) ammocoetes, (2) pacific lamprey
(L. tridentatus) macropthalmia, (3) brook lamprey (Lampetra richardsoni)
ammocoete, (4) unknown ammocoetes, and (5) unidentified lamprey.
The above species make up the majority of the fish that are collected for the SMP.
However, incidental species are also of interest. Incidental species should also be
identified and counted.
The Fish Passage Center recommends using the “Columbia River Basin Juvenile
Fish Field Guide” published by Pacific States Marine Fisheries Commission for
identifying juvenile fish and incidental species.
I.B.2 – Species-Specific Data to Collect
For each of the target species, there are additional species-specific data that are to
be collected for the SMP. Below is a brief explanation of each of these pieces of
species-specific data.
Age Code:
Age Code is used for Chinook only. Chinook are to be assigned an age of “1”
or “0” based on morphology and size. A discussion of the morphological
criteria can be found in Section VIII.B.1. Chinook fry are age 0.
Special Species Code:
There are four possible Special Species Codes that are to be recorded for
particular target species of the SMP. These four Special Species Codes
correspond to salmonid juveniles only. Below is a brief explanation of each of
the Special Species Codes, along with details as to which target species
apply.
Eroded Fin (EF) for unmarked steelhead with eroded fins. This Special
Species Code is used to identify hatchery steelhead that are otherwise
unmarked.
Lyons Ferry Yearling Fall Chinook (LF) for yearling fall Chinook that are
known to have been reared at Lyons Ferry hatchery
Holdover Fall Chinook (HO) for yearling fall Chinook that are identified as
being holdovers, based on size and morphology. See Section VIII.B.1 for
detailed description of how to identify holdover fall Chinook.
Fry (FR) for Chinook , coho, and sockeye fry based on size (60mm or less).
See Section I.B.3 below for fry handling protocol.
2
Clipping, Marking, and Tagging Data:
In order to aide in the identification of origin, the SMP collects information on
the clipping, marking, and/or tagging of target salmonid species. Below is a
brief explanation of the various clipping, marking, and tagging information that
are to be collected for the SMP. See Section VIII.B.1 and Section VIII.D.1 for
more information on these categories.
Fin Clips are recorded on all target salmonid species at all sites. Fin clips
include Adipose, Left Vent, and/or Right Vent clips (or any combination of
the three. If a fish has any of these clips, that fish is considered
“Clipped”.
Elastomer Tags are to be recorded on all target salmonid species at all sites.
For fish that have Elastomer tags, sites are expected to record tag location
and tag color, in addition to species, special species, and clipping
information.
Coded-Wire Tags are to be recorded for all unclipped Chinook (age 0 & 1),
unclipped coho, and unclipped sockeye that are sampled at LGR, LGS,
LMN, WTB, LEW, and GRN. This request was based on the increasing
proportion of hatchery releases that are otherwise unclipped or unmarked.
By including CWT data, SMP can differentiate many unmarked hatchery
fish from wild origin fish. This is important for use in run-reconstruction,
wild fish population estimates, timing data, and other analyses of wild
origin stocks.
Descaling Data:
Descaling data will be collected on all target salmonid species in the sample
(except Fry and those salmonids that are sampled as part of the Gas
Bubble Trauma program). Larval and juvenile lamprey will not be examined
for descaling. Fish that are part of the detailed condition sample will be
examined for descaling as well as other indices of fish health status (see the
Condition Sampling Protocol for more information). Other fish that are
sampled but are not part of the detailed condition subsample, are considered
non-condition fish. These non-condition fish will be examined for descaling,
based on the FTOT protocol. A fish will be recorded as descaled if at least
20% of either side of the fish is descaled.
Descaling is defined as areas of the fish where scales have been removed by
mechanical or other means (including predators) and it cannot be determined
that scales have regenerated or healing has occurred. When in doubt
examiner should report the fish as descaled. Consistency is important since
changes in descaling rate are what triggers management action.
Mortality Data:
Fish that are found dead in the sample or die during or after handling should
be recorded as mortalities in the non-condition sample. See Section VIII.B.1
for more details about what data to record.
3
I.B.3 – Fish Sampling at Main-stem Monitoring Sites
Sample Size Targets:
Fish Passage Center recommends collecting between 300 and 500 fish for
the Smolt Monitoring Program at main-stem sites. These target sample sizes
correspond with the goal of achieving accurate and precise estimates of total
collection at the dams. These sample sizes have been reduced from historic
sampling targets in an attempt to reduce fish handling. The above target
includes fish that are examined for detailed condition monitoring.
Recommended Sample Rates:
Sites should use the table below to determine sample rates. Use a sample rate
that achieves the target sample sizes of 300 to 500 fish (when possible).
Typically, Lower Columbia sites should limit sample rates to at or below 25%
except when increased numbers of fish may be needed for research or to
address immediate management needs. Avoid using sample rates between
12% and 25% whenever possible to avoid impacts to sample accuracy as
well as to minimize impacts to PIT-tag studies near the divert during
sample (DDS) trigger of 20%. When possible, sites should try to avoid the
0.6%, 0.67%, 0.7%, 1.5%, 3.0%, 7.0%, and 15% sample rates as much as
possible, as they have the highest probability of causing rounding errors in
data reports. Sites should attempt to minimize the number of times per season
sample rates switch from above to below 20%, or from below to above 20% to
minimize the number of times the DDS is turned on or off.
Estimated
Daily
Sample
Collection
Rate (%)
Emergency
0.5
50,000-75,000
0.7
35,000-50,000
1.0
20,000-35,000
1.5
15,000-20,000
2.0
10,000-15,000
3.0
7,500-10,000
4.0
6,500-7,500
5.0
4,500-6,000
7.0
3,000-4,500
10.0
2,500-3,000
12.5
1,500-2,500
20.0
1,000-1,500
25.0
600-1,000
50.0
<600
100.0
Equivalent
Subsample
Estimated
Multiplier
Sample
Subsamples Duration Number of Fish
(1/sample rate) Seconds/Hour Per Hour
(sec.)
in Sample
200
18
2
9
143
25.2
2
12.6
350-525
100
36
3
12
350-500
66.6
54
4
13.5
300-525
50
72
6
12
300-400
33.3
108
6
18
300-450
25
144
6
24
300-400
20
180
6
30
300-375
14.3
252
6
42
315-420
10
360
6
60
300-450
8
450
6
75
313-375
5
720
6
120
300-500
4
900
6
150
250-375
2
1,800
6
300
300-500
1
3,600
1
3,600
< 600
* Carry multipliers to 3 digits total, then round (1/multiplier,3) will provide a sample rate to nearest 10th place that is
correct. For custom sample rates, it may be necessary to carry to 6 digits beyond the decimal place if rate results in
longer than 6 digits.
** During periods of peak juvenile shad passage, lower sample rates than needed to meet salmonid sample goals may
be used to reduce handling and mortalities of shad.
4
Anesthetic:
Research funded by COE has shown that MS-222 can degrade relatively
rapidly causing added stress to fish as a result. Degradation was found to
occur within a few weeks of mixing the dry powder with water. In order to
minimize stress to fish it is recommended that batches of MS-222 be mixed in
quantities to assure that these mixed (i.e., liquid) batches will be used within
one to two weeks of being prepared. It is unclear what impacts degradation
will have on fish, but to be conservative, mix as small a batch as is practical to
avoid impacts of anesthetic. Sites should try to minimize the amount of time
that fish are in anesthetic to approximately 15 minutes or less.
Fry Handling Protocol:
It is recommended that fry (Chinook, Sockeye, or Coho ≤ 60mm TL) not be
handled more than is necessary to collect information on the species and
counts. It is preferred that sites avoid anesthetizing fry by netting them directly
from the sample tank, if this is possible. In this case a sanctuary net should be
used to remove these fish only if it is possible with minimal disruption to other
fish. Chasing fish to capture them would increase stress to the fry and other
fish in the holding tank so only net those individuals that can be easily
captured with a sanctuary net.
If fry are anesthetized, sites should work them up immediately but only for
species identification and count purposes. Fry are not to be examined as
part of the condition monitoring, as this would mandate anesthetic and
increase the time that they are handled. In general, sites should begin working
up the smallest fish and fish that are deepest in anesthetic first and move to
larger fish.
5
6
II. Introduction to FPC32.net
II.A.
The Fish Passage Center (FPC)
The Fish Passage Center (FPC) provides current and historic data on salmon and
steelhead passage in the main stem Snake and Columbia River Basins. Data from the
Smolt Monitoring Program (SMP) are intended to provide the information basis for
federal, state and tribal recommendations for fish passage in the Federal Columbia
River Hydro-electric System. In addition to real-time access to SMP data, the FPC provides data about river conditions, hatchery releases, smolt migration and adult returns.
The FPC plans and implements the annual Smolt Monitoring Program (SMP) that
provides daily information for in-season management decisions. The FPC also provides
the agencies and tribes, and the FPC Board of Directors, with reservoir operation
information and analysis, including current and historical data.
During the in-river migration season, FPC summarizes current conditions in a Weekly
Report. FPC also provides web distribution of System Operation Requests (SORs)
made by the Salmon Managers. SORs are requests to the U.S. Army Corps of
Engineers to operate the federal hydrosystem to protect or enhance in-river fish
passage and survival conditions.
If you would like more information or to view Weekly Reports and SORs please visit our
web page www.fpc.org, or contact our office at (503) 833-3900.
II.B.
Remote SMP Site Data Entry Program (FPC32.net)
The FPC32.net data entry program was originally designed as an organized method of
obtaining fish and water flow data from remote Smolt Monitoring Program sites. The
software program has changed names slightly over the years, beginning with RSDEP
(Remote Site Data Entry Program). Later it was ported to Windows and named FPC32.
The current version is FPC32.net, Version 3.14.0.1. It has many improvements
including a touch screen for entering fish condition data and the batch data entry is now
done through forms.
This manual has been provided for the biologist who input the data as a reference
to assist in the operation of the FPC32.net program. It is essential that all SMP
personnel who are responsible for entering fish data into the FPC32.net program and
corresponding with the FPC read and understand this manual. If any questions arise,
please call Brandon Chockley at the Fish Passage Center (503-833-3907). After the
manual is read by each individual SMP remote site staff member, please sign the form
on the last page of the manual, which acknowledges that you have read the manual,
and return the signed form to Brandon Chockley at the FPC.
7
8
III. FPC Contacts & Correspondence
III.A.
Personnel to Contact for Technical Help
•
Brandon Chockley – SMP Manager (503) 833-3907
[email protected]
Weekend number: 503-521-0184
Contact Brandon for questions about definition of a specific fish
condition, change / addition to procedures, GBT questions, and
questions on how to enter data or information using FPC32.net
and how to run or use specific commands. Brandon is the principle contact for
the SMP program.
•
Jerry McCann – CSS Coordinator (503) 833-3909 [email protected]
Weekend number: 503-432-0676
Contact Jerry for questions about definition of a specific fish condition, change /
addition to procedures, GBT questions, etc.
•
Christopher McCarty - Computer Specialist (503) 833-3902
[email protected].
Weekend number: 503-851-1549.
Contact Chris for computer hardware / windows and software setup technical
problems (i.e., problems with computer hardware errors and issues).
•
Lynnae Sutton – Data Management Specialist (503) 833-3904
[email protected]
Weekend number: 503-720-8205
Contact Lynnae for questions about how to enter data or information about using
FPC32.net and about how to use site-specific database management tools.
•
Main Line / Voice (503) 833-3900
Leave a message at the front desk for other questions not identified here.
III.B.
•
•
•
•
•
•
•
Correspondence
Fax for hand logs – (503) 232-1259.
Main SMP E-mail for batches and hand logs – [email protected].
Reposting E-mail – [email protected].
GBT E-mail – [email protected]
FTP site – ftp.fpc.org.
Web site – www.fpc.org.
Mailing Address – 847 NE 19th Ave., Suite 250, Portland, OR 97232.
9
III.C.
•
•
•
•
•
•
•
•
•
•
•
•
SMP Remote Site Facilities and 2015 Dates
Bonneville Dam Powerhouse 1 (BO1) – Pacific States Marine Fisheries
Commission
Bonneville Dam Powerhouse 2 (BO2) – Pacific States Marine Fisheries
Commission
Grande Ronde River Trap (GRN) – Oregon Dept. of Fish and Wildlife
Imnaha River Trap (IMN) – Nez Perce Tribe
John Day Dam (JDA) – Pacific States Marine Fisheries Commission
Lewiston Snake River Fish Trap (LEW) – Idaho Dept. of Fish and Game
Little Goose Dam (LGS) – Oregon Dept. of Fish and Wildlife
Lower Granite Dam (LGR) – Washington Dept. of Fish and Wildlife
Lower Monumental Dam (LMN) – Washington Dept. of Fish and Wildlife
McNary Dam (MCN) – Washington Dept. of Fish and Wildlife
Rock Island Dam (RIS) – Chelan Public Utility District
Whitebird Salmon River Trap (WTB) – Idaho Dept. of Fish and Game
Smolt Monitoring Dates for 2015
BO2
March 2 - October 31
GRN
March 5 - May 26
IMN
March 5 - May 26
JDA
April 2- September 17
LEW
March 1 - May 31
LGS
April 2- October 31
LGR
March 26- October 31
LMN
April 2 - September 30
MCN
April 2 - September 30
RIS
April 2 - August 31
WTB
March 1 - May 31
Send in your daily batch via e-mail and your daily batch hand logs via fax or e-mail.
Send this information into FPC prior to the end of the business day or early the next
morning. FPC should lag only one day behind the current day’s batch information.
10
IV. Glossary
Bypass Facilities – Smolt bypass facilities, smolt bypass/collection facilities. These
terms refer collectively to the mainstream dam remote SMP sites of BO1, BO2,
JDA, MCN, RIS, LMN, LGS, and LGR.
Coded-Wire Tag – A small piece of wire inserted into the surface of a fish’s nose, which
has been coded with information about the origin of the fish.
COE Daily Report – The U.S. Army Corps of Engineers produces many hydrological
reports containing measurements of various hydro system parameters.
Descaled – For SMP basin-wide purposes, when a fish is at more than 20% descaled
on either side as determined by ocular measurement, the fish is considered
descaled, even if descaling was clearly caused by predation in which case it would
be considered descaled “with predation marks present.” Descaled fish tagged
with PIT tags that are entered into PTAGIS are segmented into three descaling
categories: at least 10% descaled, between 10%–20% descaled, and greater than
20% descaled. This last PTAGIS descaling category is similar to the basin-wide
SMP definition of a “descaled” fish.
Electronic Batch – The (.xml) file, which is sent from the remote SMP sites to FPC
each sampling day of the fish migration season. This file is a text file formatted in
xml notation.
External Mark – Fish tags or marks, which are readable through simple visual
inspection. Floy Tags, Freeze Brands, Elastomer Tags, and Visual Implant tags are
examples of External marks. PIT tags and Coded-Wire Tags are not considered
external marks, since they are not readable through simple visual inspection.
FPC32.net – The current Windows version of the Fish Passage Center’s Remote Site
Data Entry Program for the Smolt Monitoring Project (SMP). This program can run
under these operating systems: Windows XP or Windows 7.
Freeze Brands – A form of external mark whereby a fish is branded with a mark using a
super-cold branding iron.
FTP client – A program installed on a computer that enables the user to download files
from FTP sites on the Internet using File Transfer Protocol (FTP).
Gas Bubble Trauma Monitoring Program – Also referred to as GBT monitoring. This
is a monitoring program, which examines fish after they pass through dams to
monitor and measure biological effects from dissolved gas.
Incidental Catch – Fish that are caught in the sample tanks at Remote SMP sites that
are not one of the four main anadromous fish species whose passage is monitored
in the Smolt Monitoring Program. The target species for the SMP are Chinook
Salmon, Sockeye Salmon, Coho Salmon, Steelhead, and juvenile lamprey (both
Pacific and Brook Lamprey).
11
Julian Date – In Basin biological terms, the number of the day of the year, from 1–365.
In computer software terms, the number of days after Julius Caesar changed the
Roman calendar from the old Roman lunar calendar to the new Julian Sun calendar
in 44BC.
KCFS – Kilo (or thousands of) cubic feet per second--a quantity measurement of liquid
flow. A commonly used measurement scale at main-stem dams in the Columbia
and Snake River basin.
Major Species – The four anadromous salmonid species that are monitored in the
Columbia/Snake River basin, Chinook (Oncorhynchus tshawytscha), sockeye (O.
nerka), coho (O. kisutch), and steelhead (O. mykiss).
Mark Recapture – When an externally marked fish is recaptured and observed at an
SMP remote sample site, it is called a “Mark recapture” or “Mark recap”. The
marks that are considered “external” are elastomer tags, freeze brands, floy tags,
and visual implants. PIT tags and coded-wire tags and blank cheek tags are not
considered external marks.
Multiplier – The mathematical inverse of the sample rate (i.e., one over the sample rate
or 1/sr).
Pick List – Drop-down menu, List Box, or any pop-up menu, which uses a scrolling
highlighted bar to mark the desired choice.
PIT tag – Passive Integrated Transponder Tag. This is an internal mark, which is used
in the SMP predominately to measure travel time down the hydro system. SMP
PIT-tag marking sites are generally Rock Island, Whitebird, Lewiston, Imnaha, and
Grand Ronde. The PIT tag is a small glass cylinder approximately 1mm in diameter
and 10 mm in length, which contains a small coil and chip which transmit a tiny
134.7 kHz radio signal when excited by a 134.7 kHz radio frequency signal.
Raceway – Part of the juvenile bypass system at main-stem dams that are
transportation sites (LMN, LGS, LGR, and MCN). Raceways are large water
troughs where the fish are stored awaiting transportation by truck or barge after
they have passed through the bypass system and/or the sample tanks and recovery
tanks.
Rearing disposition – A fish is reared in the wild, or it is reared in a hatchery, or where
it was reared is unknown.
Remote site – The locations (remote to FPC) where SMP sampling takes place. There
are currently four remote sites that are fish traps in rivers, and seven remote sites at
main-stem dams on the Snake and Columbia Rivers.
Repost – (revise and resend) – When an SMP batch of data is resent to FPC from a
remote site for any reason, it is called a repost. Reasons for reposting a batch of
data can vary widely and include such things as intermittent Internet e-mail failure
and erroneous data entry that was not picked up by the error checking algorithms.
12
Separator – This is part of the juvenile bypass system at main-stem dams, which have
a juvenile bypass system. The separator is designed to let small fish pass through,
and keep mini-jacks, jacks, and adults out of the juvenile bypass system. The
separator is also part of the dewatering system in the juvenile bypass systems that
removes water and increases the statistical density of fish within a given volume of
water passing through the system.
Smolt – An anadromous fish that is migrating down river toward the ocean. In the
SMP, the use of the term smolt almost always refers to the four monitored
anadromous fish species. As a juvenile, anadromous fish begin to move down
river, morphological changes can occur to the juvenile fish. For example, some
species will “silver up” or become more silver in color. As another example, fall
Chinook will become more “football shaped” as they reach the time to migrate
downstream.
SMP – Smolt Monitoring Program, the program to monitor and evaluate the four main
anadromous fish species in the Columbia/Snake River basin.
Sub-batch – Each batch of electronic data sent from the remote sites to FPC can
contain multiple sub-batches, but not all batches do. Some batches use only the
default sub-batch number for the entire batch, which is “01”. Usually, one creates a
sub-batch for each change in the sample rate during a 24-hour sample. Up to 99
sub-batches can be made for each batch of submitted SMP data.
Transportation – At LGR, LGS, LMN, and MCN, sometimes referred to as the four
collector sites, juvenile anadromous fish headed downstream are collected and
transported via barge or truck to a place in the river downstream from Bonneville
Dam, where they are unloaded back into the river. The transportation program was
created to attempt to mitigate the negative health effects on anadromous fish of inriver passage through the hydro system.
Trap Facilities – This refers collectively to the remote site SMP river traps of LEW,
WTB, IMN, and GRN.
Validation process – In terms of the SMP, there are multiple levels of the “validation
process.” First of all, a statistical quality control process is applied to the submitted
electronic batches and hand logs, and any discrepancies and possible errors are
brought to the attention of the remote site that submitted the batch for possible
correction by the remote site. Secondly, each week during fish migration season a
spreadsheet containing all of the data submitted year-to-date from a remote site is
sent to the remote site to ensure that what FPC has in its database matches what
the remote site has in its database.
Wire Tag – A wire tag can be a coded-wire tag (CWT) or a blank wire tag.
NOTE: FISH CONDITION terminology is located in a separate manual.
13
14
V. Site by Site SMP Overview
A detailed site-by-site overview is provided below which outlines what type(s) of data
are being collected. Also, below is a brief step-by-step outline of how the various types
of data will be entered and processed using the FPC32.net data entry program.
1. For the remote data entry sites (BO2, JDA, MCN, LMN, LGS, and LGR), once
fish are in hand, site personnel will use the FPC32.net fish condition touch
screen to enter detailed condition data (Section VIII.H). Trap sites (LEW, GRN,
WTB) and RIS do not collect fish condition data and, therefore, will not use the
condition touch screen. A more detailed description of sample sizes, target
species, and condition definitions with examples is provided in Section I of this
manual.
2. Simultaneously, all SMP site personnel will continue to tally information on noncondition fish in the sample, by species and clip code using existing counting
stations. These data will be recorded onto hand logs.
3. Once sampling is completed, detailed condition data will be transferred from
the wet lab computer and imported into the office computer (Section VII and
Section VIII).
4. Non-condition data will be entered from hand logs using FPC32.net (Section VII
and Section VIII). Entry of non-condition data begins with the Catch screen,
followed by the Catch Detail, Incidental Catch, and Mark Recaptures. After
non-condition data have been entered into FPC32.net, these data are validated
(Section IX).
5. Condition data are then validated via the Conditions tab and/or Individual Fish
Condition Report. After validation, condition fish are incorporated into the
overall batch via promotion from the Summary Cond. tab.
6. Where applicable, after entering non-condition data and promoting condition
data, transportation data are entered via the Transportation tab.
7. Reports are printed (Section X) and data are sent to FPC for posting into the
central database (Section VII.K) and the FPC website.
V.A.
Bonneville Dam Powerhouse 1
No sampling will be conducted at Bonneville Powerhouse 1 this year.
V.B.
Bonneville Dam Powerhouse 2
Smolts will be examined for various factors including species, fin clips, marking data,
and detailed fish condition data, including descaling. Fish from the general population
are obtained from a timed sub-sample of fish diverted from the bypass channel during a
24-hour interval between 7:00 AM and 7:00 AM daily. Examination of fish may occur
throughout the 24-hour sample interval, as necessary.
15
GBT monitoring is conducted at this site. See Gas Bubble Trauma Monitoring
Protocol and GBT.net Data Entry Program User’s Manual.
V.C.
Grande Ronde River Trap
Operate a scoop trap on the lower Grande Ronde River 5 km upstream of the mouth
seven days per week for a 12-week period. The primary function of this site for SMP is
to PIT-tag out-migrating smolts.
V.D.
Imnaha River Trap
Operate the screw trap in the lower Imnaha River seven days per week. The primary
function of this site for SMP is to PIT-tag out-migrating smolts. The Nez Perce Tribe
provides data on fish collection based on a prior agreement. No funding is provided by
the SMP.
V.E.
John Day Dam
Smolts will be examined for various factors including species, fin clips, marking data,
and detailed fish condition data, including descaling. Fish from the general population
are obtained from a timed sub-sample of fish diverted from the bypass channel during
a 24-hour interval between 7:00 AM and 7:00 AM daily. Examination of fish may occur
throughout the 24-hour sample interval, as necessary.
V.F.
Lewiston Trap
Operate a dipper trap on the lower Snake River at Lewiston for a 12-week period. The
primary function of this site for SMP is to PIT-tag out-migrating smolts.
V.G.
Little Goose Dam
Smolts will be examined for various factors including species, fin clips, marking data,
and detailed fish condition data, including descaling. Fish from the general population
are obtained from a timed sub-sample of fish diverted from the bypass channel during a
24-hour interval between 7:00 AM and 7:00 AM daily. Smolts from the collection are
sampled for counts by species and clipped/unclipped status. All unclipped yearling
Chinook, subyearling Chinook, sockeye, and coho are examined for coded-wire tags.
GBT monitoring is conducted at this site. See Gas Bubble Trauma Monitoring
Protocol and GBT.net Data Entry Program User’s Manual.
16
V.H.
Lower Granite Dam
Smolts will be examined for various factors including species, fin clips, marking data,
and detailed fish condition data, including descaling. Fish from the general population
are obtained from a timed sub-sample of fish diverted from the bypass channel during a
24-hour interval between 7:00 AM and 7:00 AM daily. Smolts from the collection are
sampled for counts by species and clipped/unclipped status. All unclipped yearling
Chinook, subyearling Chinook, sockeye, and coho are examined for coded-wire tags.
GBT monitoring is conducted at this site. See Gas Bubble Trauma Monitoring
Protocol and GBT.net Data Entry Program User’s Manual.
V.I.
Lower Monumental Dam
Smolts will be examined for various factors including species, fin clips, marking data,
and detailed fish condition data, including descaling. Fish from the general population
are obtained from a timed sub-sample of fish diverted from the bypass channel during a
24-hour interval between 7:00 AM and 7:00 AM daily. Smolts from the collection are
sampled for counts by species and clipped/unclipped status. All unclipped yearling
Chinook, subyearling Chinook, sockeye, and coho are examined for coded-wire tags.
GBT monitoring is conducted at this site. See Gas Bubble Trauma Monitoring
Protocol and GBT.net Data Entry Program User’s Manual.
V.J.
McNary Dam
Smolts will be examined for various factors including species, fin clips, marking data,
and detailed fish condition data, including descaling. Fish from the general population
are obtained from a timed sub-sample of fish diverted from the bypass channel during a
24-hour interval between 7:00 AM and 7:00 AM daily. Smolts from the collection are
sampled for counts by species and clipped/unclipped status. All unclipped yearling
Chinook, subyearling Chinook, sockeye, and coho are examined for coded-wire tags.
GBT monitoring is conducted at this site. See Gas Bubble Trauma Monitoring
Protocol and GBT.net Data Entry Program User’s Manual.
V.K.
Rock Island Dam
Smolts will be examined for various factors including species, fin clips, marking data,
and detailed fish condition data, including descaling. Fish from the general population
are obtained from the bypass channel during a 24-hour interval between 7:00 AM and
7:00 AM daily. Smolts are sampled for counts by species and clipped/unclipped status.
In additional another primary function of this site for SMP is to PIT-tag out-migrating
smolts.
17
GBT monitoring is conducted at this site. See Gas Bubble Trauma Monitoring
Protocol and GBT.net Data Entry Program User’s Manual.
V.L.
Whitebird Trap
Operate a scoop trap on the lower Salmon River above Whitebird for a 12-week period
five days per week. The primary function of this site for SMP is to PIT-tag out-migrating
smolts.
18
VI. System Requirements & Program Installation
The FPC32.net program was designed and tested on Windows XP. It has not been
tested on newer Windows operating systems, but should operate properly in those
environments. FPC32.net will not operate in Windows 2000 or older operating systems.
VI.A. Hardware and Software
1. PC Requirements:
A PC running Windows XP with Service Pack 2 or later, with at
least 512MB of RAM to run the FPC32.net program (1 GB
recommended) and at least 1 GB of hard drive space (2 GB are
recommended).
2. Software:
A. FPC32.net runs on Windows XP and Windows 7.
B. An internet e-mail connection capable of sending files attached with base 64
encoding.
3. Communication Devices:
A. A printer (preferably a laser printer that understands PCL 4
or above) to print the daily reports.
B. Access to a Fax machine or e-mail account to send daily
hand logs to FPC.
C. An appropriate modem or other types of communication hardware for other
types of internet connections such as a cable modem, DSL or ISDN.
D. A thumb drive or other portable device for carrying batch files (.XML files)
from wet lab touch screen computer to data entry computer.
VI.B. Procedure to Install the FPC32.net Program (including
the fish condition touch screen)
1.
2.
3.
To install this program you will need to have Windows XP or Windows 7
(FPC32.net has not been tested on anything newer than Windows 7).
NOTE: If you already have Windows XP with Service Pack 3 (or a more recent
version of Windows), you do not need to install Microsoft .NET
Framework 3.5 (or higher).
Within File Explorer make a temporary directory to save the installation program
files. In this procedure, this directory is referred to as c:\installfpc32net.
Open Internet Explorer and go to ftp://ftp.fpc.org/FPC32.net/.
•
LGR, LGS, LMN, RIS, WTB, LEW, and GRN – Right-click on
TouchScreenSetup3.msi and choose Save Target As… Navigate to
c:\installfpc32net and save this file to this directory.
19
•
4.
5.
6.
BON, JDA, MCN – Right-click on TouchScreenSetup3_lamprey.msi and
choose Save Target As… Navigate to c:\installfpc32net and save this file
to this directory
Once the files have been saved to your local hard drive, using File Explorer,
navigate to c:\installfpc32net and double-click on the TouchScreenSetup3.msi
(or TouchScreenSetup3_lamprey.msi) file to begin the installation process
Note: If you are installing this from a CD, open File Explorer and navigate to
the directory of the CD and double-click on the TouchScreenSetup3.msi or
TouchScreenSetup3_lamprey.msi.
This program requires .NET Framework Version 3.5 (or better) and Microsoft
2005 SQL Express edition software packages to be installed. After you doubleclick on the .msi file, you will be prompted to install .NET Framework Version 3.5
(if you don’t already have it).
Choose Yes.
20
7.
8.
Once the installation of this software is complete, you will also be required to
install Microsoft SQL 2005 Express.
Download Microsoft SQL 2005 Express from the FPC website
ftp://ftp.fpc.org/FPC32.net/ by right-clicking on the file SQLEXPR.EXE and
choosing Save Target as. Navigate to a temporary file on your hard drive and
save the file.
9.
Double-click on the SQLEXPR.EXE file to begin the installation. Follow all
prompts and accept all default settings.
10. Once the .NET Framework 3.5 and the Microsoft SQL 2005 Express edition
have been installed on your local computer, open File Explorer and navigate
back to C:\installfpc32.net. Double-click on the TouchScreenSetup3.msi (or
TouchScreenSetup3_lamprey.msi) file.
11. Follow the prompts and accept all default settings. The program will place an
icon on your desktop called Fish Condition. This is the FPC32.net program,
which includes the batch data entry and the fish condition touch screen.
21
NOTES:
• The .NET Framework 3.5 and the Microsoft SQL 2005 Express edition only
need to be downloaded and installed once.
• If you already have Windows XP with Service Pack 3 (or a newer version of
Windows), you do not need to install Microsoft .NET Framework 3.5.
VI.C. Procedure to Install New Version of FPC32.net and
Uninstall an Old Version
VI.C.1 – Windows XP
1. If you want to install a newer version of FPC32.net, you must first uninstall the
old version.
2. To uninstall the older version of FPC32.net, choose Start | Settings | Control
Panel.
3. From within the Control Panel, select Add Remove Programs
4. From within Add Remove Programs, select Fish Condition3 and choose
Remove.
22
5. A dialog box appears asking you to confirm the removal of FishCondition3;
choose Yes to uninstall FishCondition3. Follow the prompts to uninstall the
program.
6. After the program has been uninstalled, follow the instructions for installing
FPC32.net (Section VI.B above).
VI.C.2 – Windows 7
1. If you want to install a newer version of
FPC32.net, you must first uninstall the old
version.
2. To uninstall the older version of FPC32.net,
choose Start | Control Panel.
3. From within the Control Panel, select Programs
and Features
23
4. From within Programs and Features, select FishCondition3 and choose
Uninstall.
5. A dialog box appears asking you to confirm the removal of FishCondition3;
choose Yes to uninstall FishCondition3. Follow the prompts to uninstall the
program.
6. After the program has been uninstalled, follow the instructions for installing
FPC32.net (Section VI.B above).
24
NOTE:
Uninstalling FPC32.net and installing a newer version can sometimes lead
to an Error message stating that the MS SQL Server Database could not
open and that the user should contact their system administrator. See
Section VI.D.2 below if you encounter this problem.
VI.D. Troubleshooting FPC32.net
VI.D.1 – Windows 7 – Procedure to Allow Full Control
When FPC32.net is installed on a machine with a Windows 7 operating system, the
user may experience problems when trying to save new records. These problems
may occur each time FPC32.net is uninstalled and reinstalled. The FPC staff have
found that this is often a permissions issue that can affect whether SQL Express
database files can be written to by the current user. If this is the case, the user will
typically get one of the following two error messages when trying to create a new
batch.
The first error message appears to be an “Unhandled Exception Error” with a
message that appears when the user attempts to save a new record. This error
message states something to the effect of:
C:\Program Files (x86)\Fish Passage Center\FishCondition3\Data\fpcFish.dbf is
read only
or
C:\Program Files\Fish Passage Center\FishCondition3\Data\fpcFish.dbf is read
only
A similar error may occur when starting the program after it is installed or reinstalled.
This error states:
Catch Info Table not found…Unable to open the physical file C:\Program
Files (x86)\Fish Passage Center\FishCondition3\Data\fpcFish_log.ldf.”
Operating system error 5: “5(Access is denied)”.
Cannot open user default database. Login failed.
Login failure for user ‘………………….’.
File activation failure. The physical file name “C:\Program Files (x86)\Fish
Passage Center\FishCondition3\Data\fpcfish_log.ldf” may be incorrect.
Below is a brief description of how to remedy both these errors.
1. Navigate to the directory: C:\Program Files (x86)\Fish Passage
Center\FishCondition3\ or C:\Program Files\Fish Passage
Center\FishCondition3\
25
2. Right-click on the folder named Data and select Properties. This will open the
Data Properties dialog box.
3. Click on the Security tab and choose Users among the list of Group or User
Names.
4. Once Users has been selected, look to see if Full Control has a check mark
next to it in the list of Permissions for Users.
5. If it does NOT, select the Edit button. Select Users again and check the Full
Control box. Click Apply and then OK.
VI.D.2 – Problems with SQL Express
Occasionally, uninstalling and reinstalling FPC32.net can occasionally lead to
problems with SQL Express. Over the years, two different issues with SQL Express
have occurred. This section outlines procedures on how to remedy these two
issues. As usual, the FPC data staff is available to support users should you need
to use either of these procedures.
26
MS SQL Server Database Could Not Open
After uninstalling FPC32.net and installing a newer version, a user may
encounter an Error message stating that the MS SQL Server Database could
not open and that the user should contact their system administrator. Below is a
procedure to properly uninstall Microsoft SQL 2005 Express. A simple uninstall
of Microsoft SQL 2005 Express is not enough and will not remedy this problem.
1. Via the Control Panel, uninstall FPC32.net and mssql server express.
2. Download and install the MS Installer Clean Up Utility (MS Installer Clean Up
Utility (msicuu2.exe) can be downloaded from FPC FTP website:
ftp://ftp.fpc.org/FPC32.net/
3. Run the utility to completely remove MS SQL Express (MSXML 6.0).
4. Download and install MS SQL Express (see Section VI.B, Step 8 for
instructions).
5. Download and install FPC32.net (see Section VI.B, Step 10 for instructions).
27
Problem with SQL Express Service Run
On rare occasions, SQL Express will not terminate when FPC32.net is closed.
If this happens, the user will get the following Error message: SQL Express
Service not found. Failed to generate a user instance of SQL Server due
to a failure in starting the process for the user instance when trying to open
FPC32.net. Follow the procedure below if you encounter this error message.
1. Open the Windows Task Manager to make sure all user instances of SQL
Server are stopped. To stop an instance of SQL Server, browse the
Processes tab of the Windows Task Manager for sqlsrv.exe. If you see
this listed, select it and select End Process.
2. Click on My Computer and open your C:\Drive. Search your C:\Drive for
SQLEXPRESS. The search should come up with a folder in a directory like
%\AppData\Local\Microsoft\Microsoft SQL Server Data\SQLEXPRESS.
Delete all the contents from the SQLEXPRESS folder.
3. You should now be able to start FPC32.net error free.
28
Other Error Messages Related to SQL Express Service
If you experience any of the following error messages while using FPC32.net,
please reboot your machine and re-open FPC32.net. If, upon reboot, you
continue to experience these or related error messages, please take a screen
shot (Ctrl+PrtScn) of your error message and send it to Brandon Chockley
([email protected]). The FPC data staff will investigate the error and try to
remedy it as soon as possible.
29
VI.D.3 – Default Display Settings
In order for FPC32.net to display properly, you must use the default “Smaller” text
size in your Display Settings. To change these settings in Windows 7, select
Control Panel\Display and make sure the “Smaller – 100% (default)” setting is
selected.
In order for the touch screen to display properly, the resolution on the wet lab
computers must be set to 1024x768.
30
VII. Overview of FPC32.NET Program
VII.A. FPC32.net Settings Dialog Box
Once FPC32.net is installed an icon will appear on your desktop. Doubleclick on the Fish Condition icon on your computer desktop. This opens the
program. By default, the program is set to open to the Batch Data Entry
Screen and an icon is placed in your system tray (lower right hand corner).
Right-click on the FPC32.net/Fish Condition icon in the system tray and choose
Setting. This will open the Settings dialog box which allows the user to customize
how FPC32.net operates on a particular machine and what some of the values will
default to. These settings can be changed whenever the user wishes.
1. You must choose whether you want the Fish Condition Touch Screen as the
primary data entry screen. To make the Fish Condition Touch Screen the
primary entry screen, select the Fish Condition Touch Screen Only checkbox
(see figure above).
i.
Computers located in the wet lab should be set to have the Fish Condition
Touch Screen as the primary data entry screen upon opening the program.
ii. Computers located in the office should be set to have the Batch Data Entry
Screen as the primary data entry window upon opening the program.
2. You must decide if you want to enable to AutoExport function. To enable this
function, select the Automatically Export Last Selected Batch When Exit
checkbox (see figure above).
31
i.
When this function is enabled, all data that are stored in the SQL Express
database will automatically be written to the XML file for the last selected
batch and the program will close when exiting FPC32.net, either from the
Main Form or Touch Screen.
ii. If this function is not enabled, the user will be prompted with a pop-up
asking them whether they want to exit without writing data to the XML file.
This prompt will only appear if newly entered data have not been written to
an XML file prior to trying to exit FPC32.net.
3. FPC32.net has built-in sounds that prompt users when certain functions have
been performed or need attention. To hear these messages, the Play Sound
Checkbox must be checked.
NOTE: To hear messages, speakers need to be connected to the
computer.
4. Set your default settings for your particular SMP site. Default settings can be
entered for Site, Gear Code, Sample Rate(s), Start Hour, and End Hour.
i.
Site: enter your site in the Site box by choosing a value from the Site Code
drop-down list.
ii. Gear Code: enter a default gear code by selecting a value from the
Default Gear Code drop-down menu. A gear code of MT will not be
allowed at the dams, and a gear code of GC will not be allowed at the traps.
iii. Sample Rate(s): enter the default sample rates for your site and subbatches, by choosing a value from the Select Default Sample Rate dropdown menu for Sub-batch 1 and Sub-batch 2. Sample rates for additional
sub-batches will be entered later in the data entry process. A sample rate
of greater than 1 and less than 0 will not be allowed.
iv. Start and End Hour: enter the default start and stop hours, in military time,
ranging from 0000 to 2400.
v. Trap Location: if you are at a trap location, the trap location field appears
in the site configuration screen, otherwise it does not.
vi. The Batch Export Directory button is used to specify where your batch
records (i.e., .XML file) will be stored on your PC. Use the Browse button
to browse to the directory where you want these files to be saved.
NOTE: Regardless of whether the wet lab or office computer is
being used to generate the XML file, the file is named in the same
convention. It is imperative that the sites recognize this and do
not confuse the two files.
The file that is generated by the wet lab computer can be renamed if site
personnel choose (see Section VII.B.2 below). The XML file that is
generated by the office computer is the only file that will be processed by
the FPC (see Section VII.K below).
vii. The Batch Import Directory button is used to specify which directory
FPC32.net will look in for XML files to be imported. If you want to use the
same directory as the Batch Export, press the Same as Export button.
Otherwise, use the Browse button to browse to the directory where you
want these files to be imported from.
viii. If desired, sites can have their batch files (i.e., XML files) sent directly to
FPC upon completion. To do this, site personnel must enter [email protected]
32
in the e-mail dialog box in the settings screen. It is NOT mandatory that
sites do this.
ix. FPC32.net allows for up to three user-defined comments that can be
incorporated in the Comments2 drop-down menu of the Catch data entry
tab. These comments are labeled as Custom Comment 1, Custom
Comment 2, and Custom Comment 3 in the Setting screen. If you have a
comment that you want to enter repeatedly (that is not already in the dropdown menu) you can type that comment in one of these three text boxes.
Any text that is entered into these text boxes will automatically show up in
the Comment2 drop-down menu.
x. Sites can enable a warning pop-up when the Cancel button on the touch
screen is pushed. Since Cancel and Save/New buttons on the touch
screen are close together, it is possible that a user may accidently press
Cancel when he/she meant to hit the Save/New button. Depending on the
sequence of data entry, this could lead to the loss of data for the most
recent condition fish. To prevent this potential loss of data, we now allow
the user to decide if he/she would like to see a warning pop-up when the
Cancel button is pushed. To enable this pop-up, simply check the Warning
Popup when Cancel Button is selected check box in the Settings dialog
box.
xi. NEW: We have added a Transportation Import Settings section to the
Settings dialog box. These settings are important for those transportation
sites that wish to use the Import button in the Transportation tab of the
Main Form. Below is a brief explanation of what each of these settings
does.
i.
Import Species Only – imports different combinations of Species
Code, Age Code, Tank, Special Species, Clipped/Unclipped, and CWT
from the Catch Detail tab. If this option is checked, no collections will
be imported to the Transportation tab.
ii.
Import to Bypass – imports all species information (as above) from
Catch Detail plus the total collections for these species combinations.
If this option is checked, all collections will be imported to the Number
Bypassed field.
iii.
Import to Truck – imports all species information (as above) from
Catch Detail plus the total collections for these species combinations.
If this option is checked, all collections will be imported to the Number
Trucked field.
iv.
Import to Barge – imports all species information (as above) from
Catch Detail plus the total collections for these species combinations.
If this option is checked, all collections will be imported to the Number
Barged field.
v.
Include Previous Day – if checked, this button will import all species
information from Catch Detail for the current and previous batch plus
the total collections for these species combinations. Where the
collections are imported to will be dependent on which of the Bypass,
Trucked, or Barge options is checked. It is intended that this button
will be checked during every-other-day transportation.
33
5. The Delete Prev Year and Delete Old buttons delete the batches stored in the
local database (except the current day’s batch). These buttons should be
used only to clean the database. The Delete All button deletes all of the
records in the local database.
6. Once you are finished with the Settings dialog box, choose Save Setting to
save the settings you have entered. A dialog box appears prompting the user to
restart the application for the setting changes to take effect. Select Yes and the
application will Exit.
VII.B. Entering Fish Condition Data Via the Touch Screen
Species, Length, and Sub-batch data are required in the Fish Condition touch screen
in order for records to be saved successfully. Weight is not required, however some of
the sites collecting fish condition data will collect weight as a part of the fish condition
dataset (except for incidental species).
By default, the sub-batch number on the first record is set to 1. To change sub-batch
for the first record press the Sub-batch button as many times as is necessary to get to
the desired sub-batch number. If the sub-batch number is incorrect, choose Clr. Subbatch. The sub-batch number is carried forward from the previous record until it is
changed. To enter a Tank, press the appropriate Tank button (either Tank A or
Tank B). The tank letter is carried forward to the next record from the previous record
until it is changed by the user. Sites that do not have separate tanks will not see a Tank
button. To enter a Species and Clip type, choose the appropriate Species-Clip button.
For example, CH1 is for unclipped yearling Chinook, CH1-AD is for an adipose fin
clipped yearling Chinook. If the species is an incidental species choose Miscellaneous
Incidental Species and choose the appropriate button from the pop-up menu.
To enter specific fish condition data, press the appropriate button on the touch screen.
For a detailed description of each of these buttons and what types of data should be
entered, see Section VIII.H below. The data are saved to the database behind the
touch screen and appear on the bottom left corner of the touch screen. Most of the
buttons are toggle buttons, which means that pressing the button once adds the
selected condition to the fish record and pushing the same button again removes
the condition from the fish record. There are some buttons where only one
choice can be selected. These include: Species or Species Clip, Special Species,
Descaling, and Elastomer Tag Orientation/Color buttons.
VII.B.1 – Brief Overview of Steps to Entering Fish Condition Data
via the Fish Condition Touch Screen
1. To enter fish condition data with the Fish Condition touch screen, double-click on
the FishCondition icon on the desktop on the wet lab computer. A dialog box
appears with three buttons. The Batch End Day Today button creates a batch
with the end date matching today’s date, the Batch End Day Tomorrow button
creates a batch with the end date matching tomorrow’s date, and the Batch End
34
Day Yesterday button creates a batch with the end date matching yesterday’s
date. The Batch End Day Tomorrow button should be used only if a sample is
being worked up early. The Batch End Day Yesterday button should be used
only if a sample is being worked up after being held for 24 hours. Click on one of
these buttons to create a new batch.
If a batch already exists in the local database with a particular “Batch End Day,”
a pushpin icon appears next to the corresponding “Batch End Day” button.
2. The Fish Condition touch screen then appears. The background panel appears
gray until you select New.
3. Select New to enter a new fish condition record. The background panel turns
white, meaning that the computer will accept data. The New button disappears
and a Save/New button appears. If the background panel is gray, the computer
will beep when you press a button because it is not in the New or Edit mode. In
addition, the Species, Weight, and Length fields in the lower left hand corner
are highlighted in yellow. This allows the user to see more clearly when these
data are entered into the program.
4. Turn on the scale and add the tray (the scale automatically tares or calibrates to
compensate for the weight of the tray), place the fish in the tray, and press the
Print button on the scale.
• It is important that you press the Print button on the scale only once.
• Once a weight has been entered, the weight field will turn from yellow to white
and the corresponding weight will appear.
• If this weight is incorrect, press the Clear Weight button on the touch screen
and then press the Print button on the scale.
5. Enter the fish length using the touch screen number pad. Using the number pad
on the touch screen automatically shifts the focus to the length field.
• Once a length has been entered, the length field will turn from yellow to white
and the corresponding length will appear.
• If this length is incorrect, press the Clear Length button on the touch screen
and then re-enter the correct length.
35
Touch screen for LGR, LGS, and LMN
Touch screen for BON, JDA, and MCN (incorporates condition monitoring for lamprey
juveniles). Note: BON and JDA screen does not have Tank B Clip/Unclip Tally.
36
6. Press the appropriate Species, Clip, and Other Condition buttons.
• Once a species has been selected, the species field will turn from yellow to
white and the corresponding species code will appear.
7. For those sites with tanks, the Please Enter Tank/Trap warning will disappear
once a tank is chosen. Records cannot be saved until a tank is chosen.
8. If a comment needs to be entered, press the General Comment button and type
the comment using the touch screen keyboard pop-up. The user can enter up to
two comments or codes in this field separated by a semicolon.
9. Press Save/New to save the individual fish record. The Save/New button also
automatically starts a new record for the next fish.
• Follow steps 4 through 8 for each subsequent fish in the condition sample.
NOTE: The scale will occasionally need to be zeroed between fish by
pressing the Tare button.
10. Once the last fish has been entered and the Save/New button has been pushed,
push the Cancel button to end data entry.
VII.B.2 – Exporting Daily Fish Condition Records from the Wet Lab
Computer
Typically, condition records are entered on the wet lab computer and the batch
records are entered on a different computer in the office. Therefore, the daily
condition records must be saved to an .XML file on the wet lab computer which is
then imported into the office computer.
1. After completing the fish condition records, press the Export button on the lower
right corner of the touch screen. This action creates an .XML file for the current
batch that contains all of the fish condition records. This file is saved in the
location specified under the Setting dialog box for this computer. FPC32.net
uses the following naming convention for these exported .XML files: the first
three characters are the site code, followed by a two digit year and three
characters corresponding to the Julian day of the batch sample end date (1–366
days).
2. From the wet lab computer, open Windows Explorer and navigate to where the
daily batch .XML files are saved.
3. Insert a portable storage device (e.g., thumb drive or floppy disk) into the wet lab
computer. The computer may open a directory for the portable storage device.
4. Highlight the current day’s batch or the batch you want to transfer to the office
computer by clicking on the file name. Choose Edit | Copy.
37
5. Within Windows Explorer, navigate to the portable storage device and choose
Edit | Paste. The current day’s fish condition data are now stored on the
portable storage device.
• At this point, you can rename the fish condition XML file in order to avoid
confusing it with the final batch file that will later be saved and sent to FPC.
• To rename the fish condition XML file in the portable storage device, right
click on the file and choose Rename. You must leave the first eight characters of the original file name intact and on the left hand side. For example,
the file named BO211100.XML could be renamed BO211100Cond.XML.
6. The portable storage device needs to be removed from the wet lab computer. If
the portable storage device is a thumb drive, right click on the Safely Remove
Hardware icon in the system tray, and choose Safely Remove Hardware. A
dialog box appears; highlight USB mass storage device and press Stop. After
another dialog box appears, again highlight USB mass storage device and press
OK. A system message appears stating that it is alright to remove the USB
device. Remove the USB drive and go to the office computer.
VII.C. Importing a Batch From the Condition Sample or
Creating a New Batch
Creating a new batch in the Catch Data Entry Tab Form (i.e., Main Form) depends
on whether condition data were collected or not. If condition data were collected (as
described in Section VII.B above), the batch data from the condition sample is imported
into the Batch Data Entry Screen (i.e., Main Form) for editing and entering noncondition data (see Section VII.C.1 below). If no condition data were collected, a new
batch record can be created from within the Main Form (see Section VII.C.2 below).
38
VII.C.1 – Importing Daily Fish Condition Records into FPC32.NET
Main Form
1. From the office computer, double click on the Fish Condition icon on the
desktop. The office computer should be configured so that the Main Form
opens by default. The Main Form window opens with the Catch tab forward.
2. Choose the button Import from Batch. An open dialog box appears. Navigate
to your portable storage device and choose the batch you want to import data
from. Click on Open (see picture on next page).
3. The Main Form displays the batch from which fish condition records were just
imported in the Catch tab. Select the batch with the fish condition records you
just imported by clicking on the record in the data grid. Selected records have an
arrow beside the batch.
4. Choose Edit. This puts the selected record into the form at the top of the page,
allowing the user to edit the data fields in the upper portion of the screen.
5. From this point, users should enter basic Catch data, including: (1) Start Time,
(2) End Time, (3) Gear Code, (4) Sample Code, (5) Sample Hours, (6) Total
Discharge, (7) Powerhouse 1 flow, (8) Powerhouse 2 flow (if applicable),
(9) Total Spill, and (10) any Comments (Comments 1 or Comments 2) that
pertain to the entire batch.
Note: The start time, end time, and gear code will automatically set to
the default values that were entered into the Settings dialog box.
• For a detailed description of each of these fields and what types of data
should be entered, see Section VIII.A.1 below.
39
6. Choose Save Record button.
7. Data entered into the Catch tab should be reviewed and validated at this point.
8. Proceed to Section VII.D.
VII.C.2 – Creating a New Batch Record Directly from the FPC32.net
Main Form (for sites where no condition data are collected)
1. From the office computer, double click on the Fish Condition icon on the
desktop. The office computer should be configured so that the Main Form
opens by default. The Main Form window opens with the Catch tab forward.
2. From within the Catch tab, choose New Batch End Day Today to create a new
batch with the End Date matching today’s date. To create a new batch with the
end date matching tomorrow’s date, select New Batch End Day Tomorrow. To
create a new batch with the End Date matching yesterday’s date, select New
Batch End Day Yesterday.
40
•
For all sites except LEW and WTB, the batch number and site are automatically generated based on the information selected in the Settings dialog
box and by the current date on your computer. The LEW and WTB sites will
have to select the Site for which data are to be entered. To do this, select the
Site from the Site Drop-down menu (located on the right-hand side).
3. From this point, users should enter the remaining Catch data, including: (1) Start
Time, (2) End Time, (3) Gear Code, (4) Sample Code, (5) Sample Hours,
(6) Total Discharge, (7) Powerhouse 1 flow, (8) Powerhouse 2 flow (if
applicable), (9) Total Spill, and (10) any Comments (Comment 1 or
Comment 2) that pertain to the entire batch.
Note: The start time, end time, and gear code will automatically set to
the default values that were entered into the Settings screen.
4. Choose Save Record.
5. Proceed to Section VII.D.
VII.D. Entering Non-Condition Fish Data (Catch Detail)
If all fish sampled that day were condition fish (and no mortalities were encountered),
you may skip this step and move onto Section VII.E. Otherwise, once the Catch data
have been entered, the next step is to enter the non-condition sample data via the
Catch Detail tab. To select the Catch Detail screen for data entry, first select the
record for the batch you want to add data to by clicking on the batch record in the data
grid at the bottom of the Catch screen. A selected record has an arrow beside it.
Second, select the Catch Detail tab. For a detailed description of data entry fields in
the Catch Detail tab, see Section VIII.B below.
41
Below is a brief overview of how to enter a single record of non-condition sample data:
1. From the Catch Detail tab click on the New button.
2. Fill in the correct sub-batch and tank information for the record you wish to enter.
3. Choose the appropriate Species, Age, Clip, Coded Wire Tag, and Special
Species information for the record you wish to enter.
4. When entering the first record of a sub-batch, the program applies the default
sample rate for that sub-batch. If this is not the sample rate that was used, you
must change the sample rate/multiplier to the correct value. Use the Multiplier
drop-down menu to choose from the list of standard sample rates/multipliers. If
a non-standard sample rate was used, you may enter this value directly into the
Sample Rate field (this value must be between 0 and 1).
• The sample rate for a single sub-batch is carried forward to the next record
from the previous record until the sub-batch number is changed by the user.
• Given this, it is critical that you verify that the sample rate for each sub-batch
is correct before saving the first record of each sub-batch. Section VIII.B
provides detailed information for correcting the sample rate if you find that the
wrong sample rate was entered for a sub-batch.
5. Enter Non-Cond. Sample Count, Num Exam for descaling, Num descaled,
Sample Morts, Facility Morts, Research Morts, and PITTag Morts (where
appropriate).
• When sample code is NOT GB, the field for Num Exam for Descaling will
calculate automatically based on what is entered into the Non-Cond. Sample
Count and Sample Morts fields for all species and special species
combinations (except for lamprey juveniles and fry) using the following
equation:
Num. Exam for Descaling = Non-Cond. Sample Count – Sample Morts
6.
7.
8.
9.
This assumes that 100% of non-condition fish were examined for descaling.
If this is not the case, you may over-ride the calculated value of Num. Exam
for Descaling after entering the Non-Cond. Sample Count and Sample
Morts.
• Descaling is not assessed on GBT fish, lamprey juveniles, or fry, so the
Num. Exam for Descaling for these records is assumed to be 0.
When the entry is complete, choose Save/New. The Save/New button also
automatically starts a new record for this batch.
Follow steps 4 through 6 for each subsequent record to be entered.
Once the last record has been entered and the Save/New button has been
pushed, push the Cancel button to end data entry for this screen.
Once all non-condition records have been entered, these data should be
validated from the hand logs by printing or viewing the Daily Batch/Tank Report
and/or the Lamprey Batch/Tank Report. To view these reports, chose Reports
and select Daily Batch/Tank Report and/or Lamprey Batch/Tank Report. A
separate report can be generated for each sub-batch that was entered. It’s best
to do this level of validation prior to incorporating the condition data into the
Catch Detail tab via promotion (see Section VII.H).
42
Note: There are several fields on the Catch Detail tab that are inactive (i.e.,
grayed out). These are fields that are either calculated (e.g., Est.
Collection, Cond. Collection) or are incorporated into the batch upon
promotion of the Condition Data. (e.g., Cond. Sample Count, Num.
Cond. Exam for Descaling, etc.).
VII.E. Entering Incidental Catch Data
Once the Catch Detail data have been entered, the next step is to enter the noncondition incidental species data via the Incidental Catch tab. For a detailed
description of data entry fields in the Incidental Catch tab, see Section VIII.C below.
To create a new record in Incidental Catch click on the New button to add a record.
Only incidentals collected as part of the non-condition data are entered into the
Incidental Catch tab at this point. Data to enter for each incidental species include:
(1) Species, (2) Sample Count, and (3) Sample Morts. When the entry of a single
species is complete, choose Save Record.
Note: Cond. Count will be filled in automatically when Condition Data are incorporated
into the batch (see Section VII.H).
43
Incidental Catch data should be validated by printing or viewing the Incidental Catch
summary report. To view this report, chose Reports and select Incidental Catch. If
Condition Data include incidental species, this validation step should be done prior to
incorporating the condition data into the Incidental Catch tab via promotion (see
Section VII.H).
VII.F. Entering Mark Recapture Data
Once the Incidental Catch data have been entered, the next step is to enter the noncondition Mark Recapture data by selecting the Mark Recaptures data entry tab. For
a detailed description of data entry fields in the Mark Recaptures tab, see Section
VIII.D below.
To create a new record in Mark Recaptures click on the New button to add a record.
Only mark recapture data for non-condition fish are entered into the Mark Recaptures
tab at this point. Mandatory data for each mark recapture record include: (1) Tank
(where applicable), (2) Species, (3) Age, (4) Mark Type, (5) Tag Color, (6) Clip Code
(chose N/A if fish is unclipped and not CWT), and (7) Tally Total.
Location for Elastomer Tags is part of the Mark Type code, so Tag/Brand Loc is NOT
required for Elastomer Tags. Tag/Brand Loc, Brand Code, Brand Orientation, Tag
Number, Supplemental Code, and Length are NOT mandatory.
44
When the entry is complete, choose Save Record. Mark Recapture data should be
validated by printing or viewing Mark Recapture Summary Report. To view this
report, chose Reports and select Mark Recapture. If Condition Data include Mark
Recapture data, this validation step should be done prior to incorporating the condition
data into the Mark Recaptures tab via promotion (see Section VII.H).
Note: Cond. Count and Total Count will be filled in automatically when
Condition Data are incorporated into the batch (see Section VII.H).
VII.G. Validating Condition Data
Once the Mark Recaptures data have been entered, the next step is to validate the
condition data by selecting the Conditions data entry tab. For a detailed description
of data entry fields in the Conditions tab, see Section VIII.F below.
Validation of condition data can be done in two ways:
1. Individual fish condition records can be viewed for validation directly from the
data grid in the Conditions tab. By clicking on the column header, records can
be sorted for easier viewing. Sorting by multiple columns is also possible, simply
hold the Shift key while selecting the sequence of columns you wish to sort by.
If errors are found, records can be edited directly from the Conditions tab (see
Section VIII.F for more details on editing and instructions on group editing).
45
2. Individual condition can also be viewed via the Individual Fish Condition
Report. To validate condition data in this manner, choose Reports and select
the Individual Fish Condition Report from the drop-down menu. This report
may be reviewed or printed for validation. If errors are found, records can be
edited directly from the Conditions tab (see Section VIII.F for more details on
editing).
VII.H. Promoting Condition Data into the Batch
Once the Condition data have been validated and edited (when applicable), the next
step is to incorporate condition sample data into the batch (Catch Detail, Incidentals,
Mark Recaptures) by selecting the Summary Cond. data entry tab. For a detailed
description of the Summary Cond. tab and its functions see Section VIII.G below.
To incorporate condition sample data into the batch, select the Summary Cond. tab
and click on the Promote All button. When condition sample data are incorporated into
the Catch Detail tab, the sample counts for condition fish will appear in the Cond.
Sample Count column.
Note: If all fish sampled were condition fish, before promoting, the user must first enter
the sample rate for each sub-batch that was entered using the touch screen. The
46
default sample rate(s) are listed but need to be checked and corrected (when
applicable). To do this, right click in the Sample Rate cell in the Condition
Sub-batches box at the top of the Summary Cond screen (A in figure below). This
allows you to manually enter the sample rate for each individual sub-batch that was
entered into the touch screen. Once this is done, click on the Promote All button.
When condition sample data are incorporated into the Catch Detail tab, the sample
counts for condition fish will appear in the grayed area of Catch Detail tab and the
Cond. Sample Count column of the data grid (Red boxes in figure below).
A
47
IMPORTANT: The Cond. Sample Count, Num Cond. Exam., Num Cond. Descaled,
and Cond. Collection fields cannot be edited. If an error was made in the fish
condition records, these data need to be edited in the Conditions tab and then repromoted (from Summary Cond.) for edits to take effect.
VII.I.
Entering Transportation Data
Once the Condition sample data have been incorporated into the batch, the next step
is to enter the Transportation data via the Transportation tab. For a detailed
description of data entry fields in the Transportation tab, see Section VIII.E below.
There are two ways to enter data using the Transportation tab. The first is manual
data entry where each Tank, Species, Age, Clip, CWT, and Special Species (EF and
Fry) combinations from that day’s batch are manually entered, one-by-one. Lamprey
Juveniles are NOT to be entered into the Transportation Data Entry Tab.
The other is to import the Tank, Species, Age, Clip, CWT, and Special Species (EF
and Fry) combinations (and potentially their associated collections) from the Catch
Detail data entry screen, using the Import button. For a more detailed discussion of
each of these methods, see Section VII.I.1 and Section VII.I.2 below.
Regardless of whether you use the manual entry or import function, you must know
what your collection counts were for each Tank, Species, Clip, CWT, and Special
48
Species code (EF and FR) combination. This information is summarized for the entire
batch in the Daily Batch/Tank Report, which can be generated by selecting Reports
and choosing Daily Batch/Tank Report (All – Sub-batches) from the drop-down
menu. This report should be printed. The data that are to be entered into the
Transportation tab can be found in the rows labeled “Total Collection” and “Sample,
Facility, Research Morts” (i.e., mortalities) (see figures below). NEW: Although
FPC32.net can now import collection counts into the Transportation tab, it is still the
responsibility of SMP personnel to verify that the collection counts match what is in the
Daily Batch/Tank Report.
NOTE: For each tank, all columns should be entered into the Transportation tab
as separate records. Holdovers and Lyons Ferry fish are included in the UC, CWT,
or CL columns for Chinook 1.
Due to the collection of fish for NOAA marking, LGR is the only transportation site that
cannot enter EF Steelhead separately. Unclipped steelhead should be entered as a
single record at LGR.
VII.I.1 – Manual Entry of Transportation Data
1. To create a new record in the Transportation data entry screen click on the New
button to add a record.
2. Enter the Tank, Species, Clip, CWT, and Special Species code (EF and FR)
combination for the record you wish to create
49
3. Enter the Num. Bypassed, Num. Trucked, and/or Num. Barged for each new
record. These numbers are derived from the “Total Collection” minus total
“mortalities” in the Daily Batch/Tank Report (All – Sub-batches).
• In the case when two day’s samples are being transported together, the
Daily Batch/Tank Report (All – Sub-batches) for each of these
batches will have to be collectively entered in to the Transportation tab.
4. To validate these data, re-run the Daily Batch/Tank Report (All – Sub-batches)
and verify that the Num. Bypassed, Num. Trucked, and Num. Barged are
correct.
VII.I.2 – UPDATED: Importing Data from Catch Detail for
Transportation Data Entry Tab
If a user wishes to import data from Catch Detail to the Transportation tab, they
must first decide what data they want to import. Users can choose to import only
species data (i.e., Tank, Species, Age, Clip, CWT, and Special Species [EF
and Fry] combinations) or species data and collection totals (see Section VII.A,
Step 4.xi on the possible settings for this Import function). Regardless of which
option a user chooses, the user can import data from Catch Detail to the
Transportation tab by pushing the Import button on the Transportation tab.
• Only target salmonid species are imported from Catch Detail. Lamprey
juveniles are NOT to be entered into the Transportation tab.
50
•
•
•
If condition data have not been promoted to Catch Detail, these Tank,
Species, Age, Clip, CWT, and Special Species (EF and Fry) combinations
may not be present.
Eroded fin steelhead at LGR will be imported as Unclipped steelhead, as LGR
cannot know how many EF steelhead were collected.
It is possible to import species information and/or collections from the current
batch or from the current and previous batch (i.e., every-other-day
transportation). If you wish to have these data imported from both the current
and previous batches, select Include Previous Day in the Transportation
Import Settings portion of the Settings dialog box
VII.I.2a – Importing Species Data Only
This option works only if Import Species Only is selected in the Transportation
Import Settings portion of the Settings dialog box.
1. Push Import to import the different combinations of Tank, Species, Age,
Clip, CWT, and Special Species from the Catch Detail tab to the
Transportation tab.
2. Enter the Num. Bypassed, Num. Trucked, and/or Num. Barged for each
Tank, Species, Age, Clip, CWT, and Special Species (EF and Fry)
combination. To do this, select each record and enter the corresponding
Num. Bypassed, Num. Trucked, and/or Num. Barged for that record,
followed by the Save Record button.
• These collection counts can be found in the Daily Batch/Tank Report.
3. To validate these data, re-run the Daily Batch/Tank Report (All – Subbatches) and the Lamprey Batch/Tank Report (All – Sub-batches) and
verify that the Num. Bypassed, Num. Trucked, and Num. Barged are
correct.
VII.I.2b – Importing Species and Collection Data
This option works when Import to Bypass, Import to Truck, or Import to Barge
are selected in the Transportation Import Settings portion of the Settings
dialog box.
1.
Push Import to import the different combinations of Tank, Species, Age,
Clip, CWT, and Special Species and their collections from the Catch
Detail tab to the Transportation tab.
2. To validate the collection data, run the Daily Batch/Tank Report (All –
Sub-batches) and the Lamprey Batch/Tank Report (All – Sub-batches)
and verify that the Num. Bypassed, Num. Trucked, and Num. Barged
are correct.
VII.J. Validating Batch
The Daily Batch/Tank Report and the Lamprey Batch/Tank Report that were
generated and printed for Section VII.I above can be used for final data validation.
These reports summarize sample counts, descaling information, collection counts and
mortality data for condition and non-condition fish, separately by tank. Validation from
51
these reports can be done for a single sub-batch at a time or for all sub-batches
combined. Validate non-condition data by comparing these reports to your hand logs,
paying special attention to the sample counts, number examined for descaling,
descaling, mortality counts, and flow/spill quantities. Holdovers and Lyons Ferry fish
are included in the UC, CWT, or CL columns for Chinook 1.
If any changes need to be made, edit the records with incorrect data using FPC32.net.
If data have been edited, run the Daily Batch/Tank Report and Lamprey Batch/Tank
Report again. Once all of the data are entered and validated, follow the End and Send
(Section VII.K) instructions below.
A separate report (Special Species Daily Tank/Batch Report) can be used to validate
the entry of holdover and Lyons Ferry yearling Chinook data at the unclipped, clipped,
and CWT level. Select Reports and choose Special Species Daily Batch/Tank
Report from the drop-down menu. This report summarizes sample counts, descaling
information, collection counts and mortality data for condition and non-condition
holdover and Lyons Ferry yearling Chinook, separately by tank. Validation from this
report can be done for a single sub-batch at a time or for all sub-batches combined.
Validate non-condition data by comparing this report to your hand logs, paying special
attention to the sample counts, number examined for descaling, descaling, mortality
counts, and flow/spill quantities.
52
VII.K. End and Send
Once data have been validated, the next step is to print reports for your records and
create an XML file that will be sent to The Fish Passage Center.
1. Navigate to the Catch tab and click on Save as Batch.
• This writes the data in the local database to an XML file in the directory
specified in the Settings (see Section VII.A).
• If an XML file already exists for that batch, you may be prompted with a
message asking if you want to overwrite the existing batch. Select Yes.
53
2. End data entry each day by printing the Daily Summary, Incidental Catch,
Mark Recaptures, Fish Condition, Daily Batch/Tank (All–Sub-batches), and
Lamprey Batch/Tank (All–Sub-batches) reports, if they have not already been
printed.
3. Send the XML file to the FPC office via e-mail to [email protected] or uploading from
the web (see Section X.B).
4. You must also send your hand logs to the Fish Passage Center. Hand logs can
be sent via Fax to (503) 232-1259, e-mail to [email protected], or uploaded via the
web (see Section X.B for uploading instructions).
• E-mailed and uploaded hand logs must be sent in PDF format. If e-mailed,
they can be sent in the same e-mail as the batch file (i.e., XML file).
• If you cannot send the batches in on time, be sure to call a member of the
data center staff and let us know the reason and when you expect to get
the batch in.
54
VII.L. Reposts
If you need to revise and resend a batch, you must edit the batch that was previously
created (see instructions for editing a batch in Section VIII below). If you wish to
resend a batch, you must document why you are changing the batch and submit
this documentation along with the batch, preferably via FAX or e-mail. FPC WILL
NOT UPDATE BATCHES UNLESS PROPER DOCUMENTATION IS RECEIVED. You
should also send a copy of this documentation to your project leader. If FPC has
already posted the original batch, a reposted batch will not be allowed to overwrite the
old batch. FPC staff must first delete the old batch before data from the newly updated
batch can be posted. Call Chris McCarty (503) 833-3902 if you have any questions
about reposting. Reposted batches must be sent via email.
When you send a batch for reposting, attach it to an e-mail sent to [email protected],
along with an explanation memo of why this batch is being resubmitted for reposting. If
you use Microsoft Exchange, configure your mail client to send a return receipt back to
you, acknowledging that the mail arrived.
To edit a pre-existing batch for reposting:
• Open the FPC32.net Main Form. Under the Catch tab, select the batch that
needs editing (selected records have an arrow next to them) from the data grid by
clicking on the record.
• Select the appropriate tab for the data that need to be edited (e.g., Catch Detail).
Under that tab, select the record that needs to be edited. Choose the Edit button.
Make the appropriate changes to the record and then choose Save Record.
• If changes are made to individual condition records, these changes must be repromoted into the Catch Detail, Incidental, and Mark Recap records. To repromote, choose the Summary Condition tab and choose Promote All to rewrite
or change the daily batch condition records in the Catch Detail, Incidental and
Mark Recap tables.
• Once you have made all the required changes, select the Catch tab and press the
Save As Batch button. A dialog box will prompt you to overwrite the previous
batch record. Choose Yes. This creates a new daily batch XML file for the day
you have edited.
• Send the changed batch along with the appropriate documentation to the FPC via
e-mail to [email protected] (see above for further documentation).
VII.M. Special Situations
VII.M.1 – Daylight Savings Time Transitions
•
•
In the Spring, the start and end times will be recorded normally, but on the day
when daylight savings time begins, the sampling hours will be 1 hour less and
the flows averaged for 23 hours.
In the Fall, the start and end times will be recorded normally, but on the day
when daylight savings time ends, the sampling hours will be 1 hour more and the
flows averaged for 25 hours.
55
VII.M.2 – Sampling End Date is the Same for Two Batches
Each batch must have a unique batch number and end date. If sampling ends on
the same day as the previous batch, the batch number must be that of the following
day. Batch numbers are created automatically. From the FPC32.net Main Form
you can create batches (and hence a batch number) for dates prior to the current
date.
•
Select File and click on Create Older Days Batch. A calendar will appear from
which you may choose your batch end date. You are limited to the current year.
To switch to a previous month, press and hold on the current month and move up
to select the desired month. Double-click on the date for the batch you want to
create.
•
This batch must be edited. To edit the batch from the Catch tab, select the batch
to be edited and choose the Edit button. The following are items that must be
edited:
o Put the actual end date and end hour in the Comments field.
o Put the actual sample hours in the Sample Hours field.
o Put the adjusted sample end date (the following day) in the End Date field.
o Be sure that you choose the appropriate Sample Code from the drop-down
list that reflects this adjusted sample.
o Choose Save Record.
Follow instructions for sending the batch to FPC found in Section VII.K.
•
56
VIII. Detailed Data Entry Instructions
The purpose of this section is to provide detailed information on the types of data that
are entered into FPC32.net and how to enter these data. This section also provides
instructions on how data can be edited if/when errors are found during data entry and
validation.
For convenience, all data entry tabs in the FPC32.net Main Form have similar layouts.
The fields found in each of the data entry tabs are presented in two ways. The upper
portion of each data entry tab is a data entry panel. This panel is the location where
new data are entered or existing data are edited. It provides an ordered list of metrics
to be entered for each record. Many of the fields in this panel have data validation and
integrity rules that check the data being entered to assist the user in determining if the
entry is valid for the specified field. Although some fields have built in validation, not
every field has validation checking routines. For clarification, this section of the manual
provides information about suitable data entry for each field in each of the data entry
tabs. Also, there is a glossary of the various terminology used throughout this manual
(see Section IV).
The lower portion of each data entry tab is a data grid for display of entered data. From
this data grid, data can be browsed (scrolling up and down and left and right) and sorted
(by header). As mentioned earlier, sorting by multiple headers is possible. To do this,
simply hold down the Shift key while selecting the column headers in the order you
wish to sort them by. This data grid allows the user to view all entered data for a single
batch for error checking and/or validation. For each of the data entry tabs, one or more
of the left-most columns are frozen to help the user identify the row as they scroll to the
right. Column headers can also be resized and can be wrapped. To resize a column
header, click and drag a column separator (the line between two columns). Maximizing
the data entry window, allows the user to see more of the column headers. Data cannot
be entered or edited directly from the data grid.
To hide the Main Form, click on the X in the upper right hand corner. The program
remains running in the background and can be re-opened by right-clicking on the
FPC32.net icon in the system tray. To exit the FPC32.net program from the Main
Form, choose File | Exit. If the Main Form is hidden, you may exit the FPC32.net
program by right-clicking on the FPC32.net icon in the system tray and choosing Exit.
VIII.A. Catch Tab
In the lower data grid, the Batch field is frozen on the left to help the user identify the
row as they scroll to the right.
57
VIII.A.1 – Definitions and Data Entry
To view the Catch tab of the FPC32.net Main Form, either double-click on the
FPC32.net icon on your desktop (if the program is not already running) or right-click
on the FPC32.net icon in the system tray and choose Open Main Form. The Main
Form window opens with the Catch tab forward.
Upon being opened, the Catch tab displays the batch records that are in the
temporary database in the data grid near the bottom. Each batch is represented by
a single row in this data grid. Creating a new batch in the Catch tab depends on
whether condition data were collected or not. If condition data were collected, the
batch data from the condition sample are imported into the Main Form for editing
and entering non-condition data. A detailed description of how to import condition
data is provided in Section VII.C.1 above. If no condition data were collected, a
new batch record can be created from within the Catch tab of the Main Form. A
detailed description of how to create a new batch from within the Catch tab is
provided in Section VII.C.2 above.
58
To edit an existing batch select the batch record in the data grid and choose Edit.
This allows the user to make changes via the data entry panel above the data grid.
After necessary changes are made, choose Save Record.
Below is a table of the fields of data that are entered into the Catch tab along with
the default settings for each field, prior to data entry. Following this table is a list of
the fields and instructions of the types of data that should be entered into each field
and how.
Field Name
Site
Start date
Batch
End date
Start hour
End hour
Trap location
Gear code
Sample code
Sample
hours
River flow
PH1 flow or
Turbine
Discharge
PH2 flow
Total Spill
Comments
Default Settings
Set in Settings dialog box
Typically 24 hours prior to the end date
Computed based on system date and sample end date
User defined based on whether End Date Today or End
Date Tomorrow selected
Default start hour is set to 0700; can be edited in the
Settings dialog box
Default end hour is set to 0700; can be edited in the
Settings dialog box
Trap location is left blank
Default gear code is set to GC; can be edited in the
Settings dialog box
Default sample code is set to 01; can be edited in the
Settings dialog box
Default sample hours is set to 24
River flow default is zero
Power house 1 flow default is set to zero
Power house 2 flow default is set to zero
Total spill default is set to zero
Comments are left blank
Start Date:
Start date is calculated based on whether the user chose the End Date Today,
End Date Tomorrow, or the End Date Yesterday button. This is typically
24 hours prior to the end date. Format = MM/DD/YYYY.
Start Hour:
The default start hour is carried forward from the Settings screen (Section VII.A).
If the listed Start Hour is incorrect, enter the actual start hour in 24-hour military
time. Numbers less than 0000 or greater than 2400 are restricted from entry
here.
59
End Date:
End date is determined by the user when he/she selects the End Date Today,
End Date Tomorrow, or the End Date Yesterday button. Format =
MM/DD/YYYY.
End Hour:
The default end hour is carried forward from the Settings screen (Section VII.A).
If the listed End Hour is incorrect, enter the actual end hour in 24-hour military
time. Numbers less than 0000 or greater than 2400 are restricted from entry
here.
Trap Location:
This field is used only by the SMP trap sites and not visible for other non-trap
sites.
• Imnaha River Trap – enter “1, 2, 3, or 4” for trap positions 1–4.
• Lewiston Trap – enter “0” or “east” when the trap is in its normal position.
• Whitebird Trap – enter the number of meters the trap is from the northern
cable tower (e.g., 10m, 30m, 50m or 10, 30, 50).
• Grande Ronde River Trap – enter the number of feet from the east tower
that the trap is located at (e.g., 175 or 175).
Gear Code:
The default Gear Code is carried forward from the Settings screen (Section
VII.A). If the listed Gear Code is incorrect, click on the Gear Code drop-down
list and select the correct Gear Code.
• SMP Traps must use Gear Code “MT” or “00”
• SMP Sites at Dams can use all Gear Codes, except “MT”
• Gear Code = “00” must be used when there is no sample conducted in a
collection period.
Sample Code:
The default Sample Code is “1”, which means "Normal Complete Sample." If
you wish to change this, click on the Sample Code drop-down list and select the
desired Sample Code. Below is a list of the various Sample Codes, their
meanings, and appropriate Gear Codes (in italics when applicable).
60
1 = Normal Complete Sample (24 hours).
2 = Two or more samples taken during a day with separator clean out.
3 = No sample/biased sample due to abnormal flows or in-operation of
sample unit. (GC = 00 if no sample; GC = GC if bias sample)
4 = No sample/biased sample due to weather conditions. (GC = 00 if no
sample; GC = GC if bias sample)
5 = No sample/biased sample due to equipment failure/maintenance/
repair. (GC = 00 if no sample; GC = GC if bias sample)
7 = Incomplete sample, no code provided, cause explained in
comments.
8 = No fish counts were entered for this sample period; fish accumulated
and were sampled at a later date.
9 = Incomplete/biased sample; counts are modified to estimate a normal
sample.
10 = Multiple sample rates used throughout the day (not including sample
rate for GBT sample).
≥ 12 = Sample of fish accumulated 2 or more days. The sample code
minus 10 is the number of days that fish accumulated before being
sampled.
Sample Hours:
Enter the actual number of hours sampled, rounded to the nearest 100th place
(e.g., 4 hours and 43 minutes = 4.72 hours). When daylight savings time begins
and ends, the sample hours will need to be adjusted. The only time Sample
Hours should be ≥ 24 is when Sample Code is ≥ 12. For detailed instruction on
these changes see Section VII.M.1 above. If Sample End Date is the same for
two batches see Section VII.M.2 above.
61
Total Discharge:
Total Discharge is the average hourly river flow (Kcfs) during the sampling
period. This value is mandatory for the SMP sites at dams (BO2, JDA, MCN, RIS,
LMN, LGS, and LGR) but is optional at the SMP trap sites (GRN, IMN, LEW,
WTB). If a trap site chooses to enter this value, it is acceptable to use either
KCFS or CFS units. Total Discharge is obtained from the COE’s Crohms
System Daily Report or from online COE data reports such as Report 96
(ftp://ftp.nwd-wc.usace.army.mil/pub/project_data). A copy of this report should
be sent to FPC along with your daily hand-logs. When daylight savings time
begins and ends, the period for calculating the Total Discharge will need to be
adjusted. For detailed instruction on these changes see Section VII.M.1 above.
• On days when no sample is conducted, sites are still expected to send in a
batch with flow and spill information only, using a Gear Code of “00” and a
Sample Code of “3”.
PH 1 Flow or Turbine Discharge:
For all sites except BO2 and RIS, PH1 Flow/Turbine Discharge is the average
hourly flow (in Kcfs) through the powerhouse during the sampling period of the
batch. For BO2 and RIS, PH1 Flow is the average hourly flow (in Kcfs) through
Powerhouse 1 during the sampling period of the batch.
• This field is mandatory for BO2, JDA, MCN, RIS, LMN, LGS, and LGR.
o Obtain this daily number from the COE at the project.
o For BO2, obtain this value by subtracting BON 2 AVG DISCH from AVG
TURB DISCH on the COE daily report.
• This field is not displayed at WTB, IMN, LEW, and GRN.
• When daylight savings time begins and ends, the period for calculating the
PH1 Flow or Turbine Discharge will need to be adjusted. For detailed
instruction on these changes see Section VII.M.1 above.
• At JDA, MCN, LGS, LMN and LGR, the sum of the Turbine Discharge and
Total Spill cannot be greater than the Total Discharge. If this occurs, an
error message is displayed.
• At BO2 and RIS, the sum of PH1 Flow, PH2 Flow, and Total Spill cannot
be greater than the Total Discharge. If this occurs, an error message is
displayed.
PH 2 Flow:
This field only appears in the Catch data entry tab of the FPC32.net Main Form
at BO2 and RIS. PH2 Flow is the average hourly flow (in Kcfs) through
Powerhouse 2 during the sampling period of the batch. This number is found on
the COE daily report BON 2 AVG DISCH. When daylight savings time begins
and ends, the period for calculating the PH2 Flow will need to be adjusted. For
detailed instruction on these changes see Section VII.M.1 above.
• At BO2 and RIS, the sum of PH1 Flow, PH2Flow, and Total Spill cannot
exceed the Total Discharge. If this occurs, an error message is displayed.
62
Total Spill:
Total Spill is the average hourly spill (Kcfs) during the sampling period.
• This field is mandatory for BO2, JDA, MCN, RIS, LMN, LGS, and LGR.
o This value is in row SPILL in the COE daily report.
• This field is not displayed at LEW, WTB, GRN, or IMN.
• When daylight savings time begins and ends, the period for calculating the
Total Spill will need to be adjusted. For detailed instruction on these
changes see Section VII.M.1 above.
• At JDA, MCN, LGS, LMN and LGR, the sum of the Turbine Discharge and
Total Spill cannot be greater than the Total Discharge. If this occurs, an
error message is displayed.
• At BON and RIS, the sum of PH1 Flow, PH2 Flow, and Total Spill cannot
be greater than the Total Discharge. If this occurs, an error message is
displayed.
Comments1 and Comments2:
Comments are used primarily to explain problems in getting the daily sample, as
described in Section VII.M.2 above. Observations of fish condition or abnormal
size should also be included in the comments. Extraordinary events impacting
fish passage should be noted in the comments field(s). The comments field
should NOT be used to indicate data entry updates. Such comments as water
turbidity, lamprey, kokanee, etc. should not be included. If Sample End Date is
the same for two batches see Section VII.M.2 above.
Comments2 has a drop-down menu that allows for entry of common comments
during certain periods. FPC32.net allows for up to three user-defined comments
that can be edited throughout the season by the users. These user-defined
comments are available in the Comment2 drop-down menu. These user-defined
comments can be edited in the Settings dialog box of FPC32.net (see Section
VII.A.4 above).
VIII.A.2 – Editing Records in the Catch Data Entry Tab
Adjusting Batch Numbers and Creating Batches for Past Dates:
To create a batch that corresponds to another date other than Today’s Date or
Tomorrow’s Date, choose File | Create Older Days Batch from the FPC32.net
Main Form. A calendar appears. Select the date you want to create the batch
for by double-clicking on the End Date of the batch you want to create. You are
limited to creating a batch for a date in the present year. The batch for the End
Date you selected is automatically created. From the Catch tab, choose Edit
and begin entering the flow, spill, and other important information.
63
Editing Older Batches:
You can edit only one batch at a time. Each batch is stored on the local
computer in a database, unless it has been deleted by the user. If a batch has
been deleted by the user, it can be re-imported into the database. To do this
from the Catch tab, choose Import From Batch and navigate to the directory
where the final XML files are being saved to the office computer hard drive.
Select the XML file for the batch you want to import and choose Open.
To edit a batch, you must first select the Catch data entry tab from the
FPC32.net Main Form. Using the scroll bars in the data grid at the bottom of the
page, scroll down to the batch you want to edit. Click on the record to highlight it.
The selected record will turn yellow and have an arrow next to it. A batch is not
selected until the record is selected by clicking the mouse (even though it
appears yellow). The arrow next to the record is the best indicator of the
selected record.
Once a batch has been selected, you may navigate to the data entry tab that
requires editing (Catch, Catch Detail, Incidental Catch, Mark Recaptures,
Transportation, or Conditions). Once you select the appropriate tab, navigate
to the record (from the data grid) and choose the record that requires editing.
You may activate a record for editing by selecting that record and pressing Edit
or by double-clicking on the record you wish to edit. This populates the data
entry panel at the top of the screen for the selected record. You may now edit
any of the fields in this data entry panel. When you have completed making the
necessary corrections to the record, choose Save Record.
64
Removing a Batch Record from the Local Database:
You may choose to delete batch records from the local database. To do this,
select the batch record you wish to delete (from the Catch tab) and choose
Delete. This will delete all records entered into the local computer
database for that batch (including condition, incidental catch,
transportation, mark recap, and catch detail records.
A dialog box appears asking you if you really want to delete the batch, choose
Yes if you want to delete the batch along with all of its supporting records.
NOTE: Do not delete the current day’s batch record created when entering
condition records; edit it instead.
65
A second dialog box appears, again asking if you want to delete the batch
including all fish condition records. Choose Yes if you want to delete the batch
along with all of its supporting records.
NOTE: This does not delete the records from the FPC database, it deletes
the batch and it’s supporting records only from your local database on
your hard drive. If a batch has been deleted by the user, it can be reimported into the local database. To do this from the Catch tab, choose
Import From Batch and navigate to the directory where the final XML files
are being saved. Select the XML file for the batch you want to import and
choose Open.
To make changes to the FPC database, the reposting procedure must be
followed.
66
VIII.B. Catch Detail Tab
In the lower data grid, the Sub Batch, Sequence, Tank, Species Code, Age Code,
Special Species Code, Coded-Wire Tag, and Clip fields are frozen on the left to help
the user identify the row as they scroll to the right. Data are entered for each Subbatch, Tank, Species Code, Age Code, Special Species Code and Coded-Wire Tag
combination that were tallied as part of non-condition sampling.
VIII.B.1 – Definitions and Data Entry
Before any data can be entered or edited in the Catch Detail data entry tab, the
user must specify which batch he/she intends to add/edit data to by selecting the
corresponding batch in the Catch data entry tab. Once a batch has been selected in
the Catch tab, you may navigate to the Catch Detail tab.
To create a new record in the Catch Detail data entry tab, choose New. This
activates the data entry panel at the top of the screen. When the first record is
created, Site and Batch are carried over from the Catch data entry tab. Also,
default Sample Rate(s), Multiplier, and Gear Code are carried over from the
Settings screen. The user should enter a separate detailed record for each Subbatch, Tank (where applicable), Species, Clip, CWT, and Special Species Code
combination for the eight different target species of the SMP. For Chinook, separate
Age Codes (1 or 0) should also be entered.
67
To edit a record, select the record from the data entry grid at the bottom of the
screen. Each record has a sequence number to make the editing process easier for
the user. A selected record has an arrow on the left. The user may scroll to the
right to evaluate the data to make sure it is the correct record for editing. If the data
need to be edited, either click on the record (i.e., row) of data to be edited and
choose Edit or double-click on the record to be edited. The data from the record
then populate the data entry panel at the top of the screen and are editable. Once
necessary changes are made, choose Save. For ease of navigation, the Tab Keys
can be used to move between fields and Right and Left arrow keys can be used to
move the cursor within a data field.
Below is a table of the fields of data that are entered into the Catch Detail tab along
with the default settings for each field. Following this table is a list of the fields and
instructions of the types of data that should be entered into each field and how.
Field Name
Default Settings
Site
Set in Settings dialog box.
Sequence
For each sub-batch, sequence starts at 1 and continues
sequentially. When a new sub-batch is started,
sequence starts over at 1.
Sub Batch
Starts at 1. The value of sub-batch for the next record
is the same as the previous entry, until the user
changes the value.
Tank
Default is none. The value of tank for the next record is
the same as the previous entry, until the user changes
the value.
Species Code
Default is none. Species is a required field. The value of
species code is the same as the previous entry, until the
user changes the value.
Age
Default is none. This field is used only for Chinook.
Fin clipped
Default is none.
Coded-Wire Tag
Default is none.
Special species
code
Default is none.
Gear code
Default is none. The value of gear code is the same as
the previous entry, until the user changes the value.
Multiplier
Default is set from the Settings dialog box. The value of
multiplier is the same as the previous entry, until the
user changes the value.
Sample rates
Default is set from the Settings dialog box. The value of
sample rate is the same as the previous entry, until the
user changes the value. There is only one sample rate
per sub-batch.
All number fields
All number fields are initially set to zero.
68
Sub-Batch:
The default for the first record is 1. If the sample rate changes during sample
day, create a new sub-batch for each period with a different sample rate. Enter 2
for second sub-batch, 3 for third, etc. Examples where separate sub-batches
are appropriate include: (1) multiple sample rates are used within a single day
(Note: in this case, Sample Code in Catch tab should have value of 10), (2) a
GBT sample from the separator should be entered as a separate sub-batch,
(3) separator mortalities should be entered as a separate sub-batch, (4) lamprey
juveniles are encountered during separator clean-out procedures, etc.
• If lamprey juveniles are sampled above the sample gate (e.g., during
separator clean-out procedures, removed from dewatering screens, etc.),
these individuals should be identified to species (if possible) and recorded in
Catch Detail (non-condition sample count) as a separate sub-batch, with a
100% sample rate, gear code of GC, and tank “none”. Any mortalities
associated with these lamprey should also be recorded. If species ID is not
possible, use species code LU when recording in Catch Detail.
FPC32.net now validates whether the Sample Code (from Catch tab) matches
the number of sub-batches and sample rate data that are entered in Catch
Detail. For example, if a Sample Code of “1” is entered into the Catch tab but
two sub-batches with different sample rates are entered into Catch Detail, a
“Sample Code Validation Alert” will appear. If/when this happens, simply finish
the current record and choose Save/New followed by Cancel. Switch back to
the Catch tab and edit the Sample Code to reflect that two sample rates were
used for this batch (e.g., Sample Code = “10”).
Tank/Trap:
The Tank field is available for editing at LGS, LMN and MCN. Choose either
“A”, “B”, or “None”. For these sites, “None” denotes a group of fish that were
sampled from the separator and NOT from Tank “A” or “B”. Tank “None” for
BO2, JDA, LGR, and RIS indicates that these sites have only a single tank. At
MCN use Tank “None” to denote raceway 10. The Trap code pertains only to
site IMN. Choose either “A” or “B” to designate trap.
69
Species Code:
Click on the drop-down list under Species Code and select the appropriate
species code. These are the only species codes that are allowed to be entered
here.
Target Species Codes:
CH = Chinook
CO = Coho
SO = Sockeye
ST = Steelhead
AB = Ammocoete (Brook)
AP = Ammocoete (Pacific)
AS = Ammocoete (Unknown)
MP = Macropthalmia (Pacific)
LU = Lamprey sp. (Unidentified)
NOTE:
• Exclude Chinook mini-jacks (150–300mm) that are obvious precocious
males to the extent possible from the Chinook smolt count. Enter them
in the Incidental Catch data entry tab.
• Be aware that in April and May a significant number of Holdover Fall
Chinook could be encountered in samples. These should be entered
as Age 1 Chinook with a Special Species Code of “HO” (see below
for further information on identifying holdover fall Chinook).
• All clipped sockeye/kokanee are to be recorded as sockeye, except at
RIS. In general, sockeye/kokanee ≥200mm are to be recorded as
kokanee in the Incidental Catch data entry tab unless it is clipped, has
a CWT, and/or is PIT-tagged, in which case it is entered as a sockeye
in Catch Detail. Use 450mm as the threshold for adult sockeye
fallbacks.
• Use the less streamlined shape and the non-silvery color
characteristics of rainbow trout to exclude them from the steelhead
smolt count and enter them in the Incidental Catch data entry tab.
• AS (Ammocoete Unknown) should be used for ammocoetes that are
less than 70mm or that cannot be positively identified as AB or AP.
Age Code:
For Chinook choose “0” for subyearlings or “1” for yearlings. For all other
species, the Age Code radio buttons are inactive. Age is useful for distinguishing Spring/Summer Chinook migrants (typically yearling) from fall Chinook
migrants (typically subyearlings). Below is a series of diagrams to help users
distinguish between yearling and subyearling Chinook, based on their
morphology.
In recent years a large number of yearling fall Chinook have been released into
the Snake River from Lyons Ferry Hatchery and acclimation ponds above Lower
Granite Dam, and thus should be assigned a “1” even though their morphology is
70
consistent with the “fall Chinook” shown below. Additionally, holdover fall
Chinook should be assigned as age 1.
Fall Chinook/Subyearling
Fall Chinook/Subyearling
1.
2.
3.
4.
5.
1.
2.
3.
4.
5.
Fall Chinook (subyearling)
Caudal fin forked, with outer margin usually black.
Parr marks large, vertical oblong shapes centered on lateral line and wider than interspaces
Anal fin rays short, wedge shapes, usually not pigmented.
Large spots on back
Body wider, eyes smaller, nose more sharp than yearling Spring/Summer Chinook
(football shaped)
Spring/Summer Chinook (yearling)
Caudal fin forked, usually edged in black.
Parr marks large, vertical oblong shapes centered on lateral line and wider than interspaces
Anal fin rays short, wedge shapes, usually not pigmented.
Large spots on back
Body narrower, eyes larger, nose more rounded than subyearling fall Chinook
Fin Clipped:
Choose “Y” for those fish that have a fin clip, either
an adipose or ventral fin clipped. Choose “N” for
those fish that do not have a fin clip.
CWT:
LGR, LGS, LMN, WTB, LEW, and GRN are to
examine all unclipped Chinook (subyearling and
yearlings), coho, and sockeye for coded-wire tags.
For unclipped Chinook, coho, and sockeye, choose
“Y” for those with CWT and “N” for those without CWT. If fish were not examined
for CWT than choose “N/A”. The default for clipped Chinook, coho, and sockeye
at these sites is “N/A”. The default for RIS, MCN, JDA and BON is “N/A”.
71
Special Species Code:
Click on the Special Species dropdown list and choose one of the
following codes: FR, EF, LF, or HO.
At all sites, choose “FR” for Fry if the
fish is 60mm or less. This code should
be used only for Chinook, coho, or
sockeye, as these are the only species that have fry. If Chinook is the species
code, then the Age Code must be entered as “0”, since only age “0” Chinook can
be fry. Steelhead fry should be entered as an incidental species (Rainbow trout)
in the Incidental Catch data entry tab.
The “EF” code for Eroded Fin(s) is for use only with unclipped steelhead. If the
dorsal fin or paired fins of the unclipped steelhead are clearly eroded as a result
of being from a hatchery (and is clearly not the result of wear and tear from
passing through the juvenile bypass system) use this code.
The “LF” code is for Lyons Ferry Hatchery yearling fall Chinook that are
released either from Lyons Ferry Hatchery or at acclimation sites above Lower
Granite Dam. This code should only be used at Snake River sites.
The “HO” code is for Holdover yearling fall Chinook which can be identified
by morphologic characteristics at the Snake and Lower Columbia River dams.
Those morphologic characteristics include downturned eye, deep body, deeply
forked tail, and relatively little descaling (to differentiate from recently released
hatchery fish). A photograph comparing yearling spring/summer Chinook to a
holdover fall Chinook is shown below. Size can partly be used to identify a
holdover fall Chinook, as these fish are typically greater than 160mm. However,
a few holdover fall Chinook may be as small as 135mm. These fish may be
smaller than some spring releases of hatchery yearling fall Chinook. Size alone
is not a fool proof indicator. Finally, holdover fall Chinook are typically observed
in April and May.
The figure below compares a yearling Sp/Su Chinook (top) to a holdover yearling
fall Chinook (bottom). Size, morphology and timing are useful for identifying
“HO” fish.
72
NOTE: If fish do not meet the above-mentioned criteria, contact FPC for
instructions as to which code is appropriate.
Gear Code:
Gear Code will be carried forward
into the Catch Detail data entry tab
from the Catch data entry tab. Most
often, it will not need to be edited on
the Catch Detail data entry tab.
However, some sub-batches will
require a separate Gear Code (e.g.,
GBT samples). To change the Gear
Code, click on the drop-down menu
and select the appropriate Gear Code. The Gear Code of “MT” cannot be
entered at the SMP sites at dams, an error message will display. The Gear
Code of “00” should be used only on days when no sample was taken.
Multiplier and Sample Rate:
For each sub-batch, you may
choose the sample rate in one of
two ways. First, the Multiplier
drop-down list provides a list of
some of the more common
sample rates from which users
may choose the appropriate
multiplier (i.e., sample rate) for a
given sub-batch. The multiplier’s
corresponding sample rate will automatically appear in the Sample Rate field.
Alternatively, users may enter the sample rate directly into the Sample Rate
field.
73
•
•
•
If you enter a sample rate directly, use a minimum of four digits to the right
of the decimal point (e.g. enter 0.0083 for a 0.83% sample rate). If your
sample rate has more than four digits, the user must round their sample rate
to six digits to the right of the decimal point (e.g., sample rate of 45.2% is
0.022123894, rounded to 0.022124).
When you choose a Multiplier from the drop-down menu or directly entered
a Sample Rate, press [Enter] or [Tab] to move to the next field. Once a
sample rate is chosen, the collection counts will be automatically calculated
(as integers) when sample counts are entered (see below).
FPC32.net now validates whether the Sample Code (from Catch tab)
matches the number of sub-batches and sample rate data that are entered
in Catch Detail. For example, if a Sample Code of “1” is entered into the
Catch tab but two sub-batches with different sample rates are entered into
Catch Detail, a “Sample Code Validation Alert” will appear. If/when this
happens, simply finish the current record and choose Save/New followed by
Cancel. Switch back to the Catch tab and edit the Sample Code to reflect
that two sample rates were used for this batch (e.g., Sample Code = “10”).
Sample rates for each sub-batch appear in the Subbatch Sample Rate Lookup Table located in the upper
right corner of the Catch Detail tab. If a mistake is
made on the sample rate for a sub-batch, it can be
edited, but only after all of the records for that
subbatch have been entered using the Catch Detail
data entry tab (see instructions below).
To Change a Sample Rate after all Catch Detail Records have been
Entered: single-click on the sample rate in the Sub-batch Sample Rate
Lookup Table and it becomes editable. Type in the correct sample rate and
press the Enter key. A dialog box appears asking if you want to change the
sample rate. Choose Yes.
74
Non-Cond Sample Count:
Enter the number of non-condition fish sampled. This number includes sample
mortalities.
• If lamprey juveniles are sampled above the sample gate (e.g., during
separator clean-out procedures, removed from dewatering screens, etc.),
these individuals should be identified to species (if possible) and recorded
in Catch Detail (non-condition sample count) as a separate sub-batch, with
a 100% sample rate, gear code of GC, and tank “none”. If species ID is not
possible, use species code LU when recording in Catch Detail.
Est. Collection:
FPC32.net automatically calculates this field by dividing Sample Rate into
Sample Count. This number is then rounded to the nearest hundredth place.
Using integer multipliers instead of sample rates will reduce any rounding errors
that may appear in the calculated quantity. The Estimated Collection is a
calculated number and should not be edited EXCEPT when entering Separator
Mortalities (see Facility Morts. below). The Est. Collection can be overwritten
only if a sample rate of 100% is chosen.
Num Exam for Descal:
The Num Exam for Descal is a calculated field (Num Exam Descal = Sample
Count - Sample Morts). This equation assumes that 100% of the non-condition
75
sample (excluding sample mortalities) was examined for descaling. If this is not
the case, you may enter the correct Num Exam for Descaling after entering the
Sample Count and Sample Morts.
• If you overwrite the calculated value for Num Exam for Descaling, this must
be the last entry before hitting the Save/New button.
• The automatic field validation logic displays an error message if the Sample
Count minus Sample Morts is less than the number examined for descaling.
• Fish collected for GBT (Gear Code = “GB”) are not to be examined for
descaling. For sub-batches with Gear Code “GB”, the default Num. Exam
for Descal is 0.
• Fry and Lamprey juveniles are not to be examined for descaling. The default
Num Exam for Descal is 0 when (1) Species Codes are AB, AP, AS, or MP
or (2) when Special Species is “FR”.
Num Descaled:
Enter the number of fish descaled from the non-condition fish that were
examined for descaling. A fish that has greater than 20% descaling on one
side is considered descaled.
• The auto field validation logic checks to see if Number Descaled is greater
than Num Exam for Descal. If so, an error message is displayed.
Sample Morts:
For each sub-batch, enter the number of SMP-related sampling mortalities for
each species/age/rearing disposition. This includes all fish that are dead in the
sample tank(s) or those GBT fish that died after being sampled from the
separator.
• Separator mortalities get entered in a special way (see Facility Morts.
section below).
• Do NOT enter a single mortality in more than one place. This quantity is
subtracted from Sample Count, and the result is the Num Exam for
Descaling.
• Mortalities are NOT examined for descaling.
NOTES:
• If a mortality is externally marked (elastomer tagged or freeze branded)
the following steps must be taken:
o Enter the mort as a regular mortality.
o Enter a comment in the comment field (Catch data entry tab)
describing the external mark of the mort. Use the following format for
the comment in the Catch data entry tab: CH1-AD EL-RE 3 mort.
(This indicates that three of the clipped yearling Chinook that had a red
elastomer tag on the left side were mortalities).
o Enter the marked mort as a marked live fish in the Mark / Recaptures
data entry tab.
• At BON and JDA, all mortalities should be considered sample mortalities
EXCEPT when it is clear that the fish has been dead for a significant
period of time prior to entering the sample tank. These fish should be
76
•
entered as Facility Mortalities. Assigning these mortalities as Facility
Mortalities should be approved by The Fish Passage Center.
NEW: All sample mortalities should be scanned for PIT tags. If a PIT tag
is present, these records should be submitted to PTAGIS as a mortality.
Dead PIT-tagged fish should not be disposed of in a route that has PIT-tag
detection capabilities. If this is not possible, the PIT tag should be
removed prior to disposal.
Facility Morts:
In a sub-batch, enter the daily number of facility-related mortalities (e.g., transportation raceways, separator morts.), for each species/age/rearing disposition.
For raceway and other non-separator mortalities, enter the number of mortalities
directly into the Facility Morts field for the appropriate species/age/rearing
disposition combination. For Separator Morts, use the following protocol.
Separator Mortalities should be entered as a separate sub-batch. For this
sub-batch, enter a Sample Rate of “1”. For each Species/Age/Clip/CWT
combination, enter a Non-Cond. Sample Count of “0” and enter the number of
mortalities in the Estimated Collection and the Facility Mortality fields. This
way, the separator mortalities will be considered facility mortalities and included
in the collection count, but not in the sample count. This field does not appear at
the SMP trap sites.
NOTES:
• If a mortality is externally marked (elastomer tagged or freeze branded)
the following steps must be taken:
o Enter the mort as a regular mortality.
o Enter a comment in the comment field (Catch data entry tab)
describing the external mark of the mort. Use the following format for
the comment in the Catch data entry tab: CH1-AD EL-RE 3 mort.
(This indicates that three of the clipped yearling Chinook that had a red
elastomer tag on the left side were mortalities).
o Enter the marked mort as a marked live fish in the Mark / Recaptures
data entry tab.
• COE biologists do not identify lamprey facility mortalities (e.g., raceway
mortalities) to species and life-stage. Therefore, SMP personnel should
not report these mortalities in FPC32.net. If a facility mortality is entered
for any of the lamprey species (AP, AS, AB, MP, or LU), a red “warning”
dot will appear next to the Facility Morts text box to alert the user to this
entry. FPC32.net will still allow the user to save this record but the
erroneous facility mortality will be overwritten as 0 in the saved record.
• At BON and JDA, all mortalities should be considered sample mortalities
EXCEPT when it is clear that the fish has been dead for a significant
period of time prior to entering the sample tank. These fish should be
entered as Facility Mortalities. Assigning these mortalities as Facility
Mortalities should be approved by The Fish Passage Center.
77
Research Morts:
For each Species/Age/Clip/CWT combination, enter the daily number of fish
taken out of the SMP sample and sacrificed by non-SMP researchers. For
example, mortalities from USGS radio telemetry marking should be entered
as Research Mortalities.
PIT-Tag Morts:
This field is used only at RIS, WTB, LEW, IMN, and GRN. Enter the number
of mortalities due to SMP PIT-tagging operations.
Promoted Summary Condition Fish:
Individual fish examined for fish condition that have been entered through the
touch screen and/or edited through the Condition tab need to be Summarized
and Promoted to the Catch Detail, Incidental Catch, and Mark Recaptures tab.
This is done by using the Promote All button found in the Summary Cond. tab.
To learn more about the Summary Condition tab and the promotion of condition
fish into the Catch Detail data entry tab see Section VIII.G.
The Condition Summary tab summarizes the condition fish by Species/Subbatch groups (Sub-batch/Tank/Species/Age/Mark type/CWT). The Promote All
button adds the total condition fish sample to Catch Detail under the fields
Cond. Sample Count, Num Cond. fish examined for descaling, and Num.
Cond. fish descaled. These fields cannot be edited. To change the number
of condition fish sampled or descaled, the fish condition sub-batch records must
be edited in the Conditions tab. When data are entered into Catch Detail prior
to promotion, the Sample Rate(s) for the condition fish sub-batch(es) are
automatically assigned based on what was entered into Catch Detail. If data
were not entered into Catch Detail prior to promotion, the sample rate(s)
assigned to the condition fish sub-batch(es) are the default sample rate(s) from
the Settings screen. If these sample rates were not used, you must edit the
sample rates for the condition sub-batches prior to promotion. The sample rate
for each of the sub-batches in the review panel is applied to the Cond. Sample
Count to produce the Estimated Cond. Collection (this field cannot be edited).
The program adds the Cond. Sample Count and Non-Cond Sample Count
together to produce the Total Count. After promoting, the Total Collection is
estimated. This estimate is based on the Total Sample Count and the Sample
Rate. Depending on what Sample Rate is used, there are times when this Total
Collection is NOT equal to the sum of the Condition and Non-Condition
Collections, due to rounding. The program then adds the fields Num.
Examined for Descal and Num. Cond. Exam for Descal., producing Total
Num. Exam. for Descal. The program also adds the Num. Descaled and the
Num. Cond. Descaled, producing Total Num. Descaled.
NOTE: None of these Condition fields or TOTAL fields can be edited. In order
to change the numbers, the individual fish records for condition fish must be
edited using the Conditions data entry tab and re-promoted via the
Condition Summary data entry tab.
78
VIII.B.2 – Editing or Deleting Catch Detail Records
You can edit only one record from the Catch Detail data entry tab at a time. To edit
a record, you must first select the record from the data grid at the bottom of the
screen by double-clicking on the record. The data from the selected record will
populate the data entry panel and can be edited. The arrow next to the record is the
best indicator of the selected record. At this point, edits can be made to the record.
Once edits are made, choose the Save Record button.
To delete a record, single-click on the record you wish to delete and choose the
Delete button. If Delete is chosen, you will get a prompt confirming that the record
is to be deleted, select Yes and that record will be removed from the local database.
VIII.C. Incidental Catch Tab
The Incidental Catch tab is for recording daily sample counts and mortalities of
incidental species (i.e., non-target species). SMP target species are to be entered
using the Catch Detail tab. Since the data grid has so few columns, there are no
frozen fields in the Incidental Catch data entry tab.
VIII.C.1 – Definitions and Data Entry
Before any data can be entered or edited in the Incidental Catch data entry tab,
the user must specify which batch they intend to add/edit data to by selecting the
corresponding batch in the Catch data entry tab. Once a batch has been selected
in the Catch tab, you may navigate to the Incidental Catch tab.
To create a new record in the Incidental Catch data entry tab, choose New. This
activates the data entry panel at the top of the screen. When the first record is
created, Site and Batch are carried over from the Catch data entry tab. The user
79
should enter a separate detailed record for each incidental species that was
identified in the sample.
To edit a record, select the record from the data entry grid at the bottom of the
screen. Each record has a sequence number to make the editing process easier for
the user. A selected record has an arrow on the left. The user may scroll to the
right to evaluate the data to make sure it is the correct record for editing. If the data
need to be edited, click on the record (i.e., row) of data to be edited and choose
Edit. The data from the record then populate the data entry panel at the top of the
screen and are editable. Once necessary changes are made, choose Save. For
ease of navigation, the Tab Keys can be used to move between fields and Right
and Left arrow keys can be used to move the cursor within a data field.
Below is a table of the fields of data that are entered into the Incidental Catch tab
along with the default settings for each field, prior to data entry. Following this table
is a list of the fields and instructions of the types of data that should be entered into
each field and how.
Field Name
Site
Batch
Sequence
Species Code
All number fields
Default Settings
Set in Settings dialog box.
Computed based on system date.
For each batch, the first incidental catch record sequence
starts at 1 and continues sequentially.
Default is none. Species is a required field.
All number fields are initially set to zero. These fields
include sample count, condition count, total count and
sample mortalities.
Species Code:
Click on the Species Code drop-down list within the cell and select the
appropriate species and species code. The list is sorted alphabetically by
Incidental Species Name, NOT Incidental Species Code.
80
Incidental
Code
BM
BS
BL
BH
CP
CC
A1
A5
A9
J1
J5
J4
J0
J3
J2
CM
UM
A2
A6
AA
CR
LD
SD
AD
AE
AF
BK
KO
LK
LP
LR
MA
OT
Incidental Species
Name
Bass, Large Mouth
Bass, Small Mouth
Bluegill and Pumpkinseed
Bullhead
Carp
Channel Cat
Adult Chinook
Adult Hatchery Chinook
Adult Wild Chinook
Chinook Jack (12-22 in.)
Chinook Jack – Hatchery
Chinook Jack – Wild
Chinook Minijack (6-12 in.)
Chinook Minijack – Hatchery
Chinook Minijack - Wild
Chiselmouth
Chum
Coho Adult
Coho Adult – Hatchery
Coho Adult – Wild
Crappie species
Dace – Long Nose
Dace – Speckled
Kelt Adult
Kelt Adult - Hatchery
Kelt Adult – Wild
Killifish, Banded
Kokanee
Lamprey Adult (Brook)
Lamprey Adult (Pacific)
Lamprey Adult (River)
Madtom, Tadpole
Other species not listed
Incidental
Code
PM
PE
SQ
PI
SR
SC
SA
SJ
RS
SP
A4
A8
AC
A3
A7
AB
SK
SN
SG
BU
LU
MU
SU
TT
BT
NT
LT
CT
RT
WE
WA
LW
MW
Incidental Species
Name
Peamouth
Perch
Pike Minnow, Northern
Salmon, Pink (juv)
Sand Roller
Sculpin species
Shad Adult
Shad Juvenile
Shiner, Redside
Siberian Prawn
Sockeye Adult
Sockeye Adult – Hatchery
Sockeye Adult - Wild
Steelhead Adult
Steelhead Adult – Hatchery
Steelhead Adult – Wild
Stickleback, 3 Spine
Sturgeon, Green
Sturgeon, White
Sucker, Bridgelip
Sucker, Largescale
Sucker, Mountain
Sucker, Other
Tench
Trout – Brook
Trout – Brown
Trout – Bull
Trout – Cutthroat
Trout – Rainbow
Walleye
Warmouth
Whitefish – Lake
Whitefish - Mountain
Notes:
• If you see a Bull Trout (LT), it is important that you minimize handling and
return it to the river as soon as possible.
• If you enter Other Species (OT), be sure to indicate what this was in your
comment(s) for the batch (Catch Tab).
Sample Count:
Enter the number of incidental fish of each particular Species Code found in the
sample tank.
Sample Morts:
Enter the number of incidental mortalities found in the sample. Only required for
lamprey adults (“LP”, “LK”, and “LR”).
81
Promoted Summary Condition Fish:
Individual incidental species that were examined as part of the condition sample
and entered with the Touch Screen (and/or edited through the Condition tab)
need to be Summarized and Promoted to the Incidental Catch data entry tab.
This is done by using the Promote All button found in the Summary Cond. Tab.
This button, when selected, summarizes the incidental condition fish by
Species/Sub-batch groups and populates the total sample count for each
incidental fish species under the field Cond. Count. This field cannot be edited.
To change this Cond. Count field, individual records must be edited in the
Conditions data entry tab and re-promoted via the Summary Cond. data entry
tab. To learn more about the Summary Condition tab and the promotion of
condition fish into the Incidental Catch data entry tab see Section VIII.G.
VIII.C.2 – Editing or Deleting Incidental Catch Records
You can edit only one record from the Incidental Catch data entry tab at a time. To
edit a record, you must first select the record from the data grid at the bottom of the
screen by double-clicking on the record. The selected record automatically
populates the data entry panel. The arrow next to the record is the best indicator of
the selected record. At this point, edits can be made to the record. Once edits are
made, choose the Save button. If no edits are necessary, choose the Cancel
button.
To delete a record, single-click on the record you with to delete (make sure the
record is highlighted and has an arrow next to it) and choose the Delete button. You
will get a prompt confirming that the record is to be deleted. Select Yes and that
record will be removed from the local database.
VIII.D. Mark Recaptures Tab
In the lower data grid, the Sub-batch, Sequence, Tank, Species Code, and Age Code
fields are frozen on the left to help the user identify the row as they scroll to the right.
Data are entered for each Sub-batch, Tank, Species Code, Age Code, and Mark
Type combination that were tallied as part of non-condition sampling.
82
VIII.D.1 – Definitions and Data Entry
Before any data can be entered or edited in the Mark Recaptures data entry tab,
the user must specify which batch she/he intends to add/edit data to by selecting the
corresponding batch in the Catch data entry tab. Once a batch has been selected
in the Catch tab, you may navigate to the Mark Recaptures data entry tab.
To create a new record in the Mark Recaptures data entry tab, choose New. This
activates the data entry panel at the top of the screen. When the first record is
created, Site and Batch are carried over from the Catch data entry tab. The user
should enter a separate detailed record for each Sub-batch, Tank, Species Code,
Age Code, and Mark Type combination.
To edit a record, double-click on the record from the data entry grid at the bottom of
the screen. Each record has a sequence number to make the editing process easier
for the user. The data from the record then populate the data entry panel at the top
of the screen and are editable. Once necessary changes are made, choose Save.
For ease of navigation, the Tab Keys can be used to move between fields and
Right and Left arrow keys can be used to move the cursor within a data field.
Below is a table of the fields of data that are entered into the Mark Recaptures data
entry tab along with the default settings for each field, prior to data entry. Following
this table is a list of the fields and instructions of the types of data that should be
entered into each field and how.
83
Field Name
Site
Sequence
Sub-batch
Tank
Species Code
Age
Mark type
Brand location
Brand code
Brand orientation
Tag number
Tag color
Clip code
Supplemental code
Length
All number fields
Default Settings
Set in Settings dialog box.
For each sub-batch, sequence starts at 1 and
continues sequentially. When a new sub-batch is
started, sequence starts over at 1.
Starts at 1. The value of sub-batch for the next
record is the same as the previous entry, until the
user changes the value.
Default is none. The value of tank for the next
record is the same as the previous entry, until the
user changes the value.
Default is none. Species is a required field. The
value of species code is the same as the previous
entry, until the user changes the value.
Default is none. This field is used only for
Chinook.
Default is none.
Default is none.
Default is none.
Default is none.
Field is blank.
Default is none.
Default is none.
Field is blank.
Field is blank.
Most number fields are initially set to zero. These
fields include tally, condition count, and total count.
Sub-Batch:
This field facilitates the reporting of marked fish in samples carried out using
different sample rates and/or mechanisms, within one batch or sampling period.
The default is “1”. Make sure you are aware of which sub-batch the marked fish
were sampled in for each entry in the Mark Recaptures data entry tab. When
entering records in the Mark Recaptures tab, the sub-batch will be carried
forward for each new record, until it is changed by the user.
Tank/Trap:
The Tank field only appears at LGS, LMN, and MCN. Enter “A” or “B” to
designate the tank from which the marked fish was sampled. The Trap field is
to be used only by the IMN Trap. Enter “A” or “B” to designate trap.
Species Code:
Click on the Species Code drop-down list and
select the appropriate species code from the list
box. Only choose “RT” for Rainbow Trout if you
encounter marked rainbow trout.
84
Age Code:
This field is to be used for Chinook only. Click on “0” for subyearling Chinook or
“1” for yearling Chinook. See Section VIII.B.1 for a morphological diagram and
methodology to distinguish between yearling and subyearling Chinook.
Mark Type:
Click on the Mark Type drop-down list and select the
type of external mark observed on a fish or group of
fish with identical mark types/attributes. Current valid
mark types are:
Notes:
• The location of Elastomer tags are built into the Mark Type code (“EL” or
“ER”). You do NOT need to enter a Tag/Brand Location for Elastomer tags
(see below).
• Coded Wire tags and PIT tags are internal marks that are not included in this
entry screen. Recaptured PIT tagged fish are reported directly to PTAGIS
and not entered into FPC32.net.
Brand Location:
Click on the Brand Loc drop-down menu and select a
location code for Freeze Brand and Photonic Tags
only. The location of Elastomer tags is now
designated in the Mark Type drop-down list (see
above).
• Field validation logic checks to see what mark
type was entered. An error message is displayed
if the wrong location codes are used for the wrong
mark type.
• An error message is also displayed if Mark Type
is a Floy tag or a Visual Implant tag and data
entry is attempted in this field.
Brand Code:
This is for Freeze Brands (i.e., Mark Type = “FB”) only. Select the brand from
the drop-down list.
Brand Orientation:
This field is only used with Freeze Brands (i.e., Mark Type = “FB”). Click on the
drop-down list and select an orientation. Examples include: 12 o’clock = 1,
3 o’clock = 2, 6 o’clock = 3, 9 o’clock = 4.
• An error message is displayed if the mark type is anything other than “FB”,
and data entry is attempted here.
85
Tag Number:
This field is for Floy and Visual Implant Tags only (i.e., Mark Type = “FL” or
“VI”). If it is discernible; enter the tag number in this field.
• An error message is displayed if Mark Type is FB, EL or ER, and data entry
is attempted here.
Tag Color:
This field is for Elastomer Tags only (i.e., Mark
Type = “EL” or “ER”). Click on the Tag Color
drop-down list and select the appropriate color
code. Leave blank for numbered VI tags.
• If a color code entry is attempted for any other
mark type, an error message is displayed.
Clip Code:
Click on the Clip Code drop-down list and
select the appropriate code for the clipped
fins, and clipped fin combinations on marked
fish.
• Select N/A when the fish is unclipped.
Supplemental Code:
Leave blank.
Tally Total: For each Sub-batch, Tank, Species Code, Age Code, and Mark
Type combination, enter total number sampled (non-condition sample only). If
entering individual fish records (e.g. individual freeze brand fish) then enter “1”.
Promoted Summary Condition Fish:
Individual Mark Recapture records from fish that were examined as part of the
condition sample and entered with the Touch Screen (and/or edited through the
Condition tab) need to be Summarized and Promoted to the Mark Recaptures
data entry tab. This is done by using the Promote All button found in the
Summary Cond. Tab. This button, when selected, summarizes the Mark
Recaptures into Subbatch/Tank/Species Code/Age Code/and Mark Type
groups and populates the Cond. Count field in the Mark Recaptures data entry
tab This field cannot be edited. To change this Cond. Count field, individual
records must be edited in the Conditions data entry tab data and re-promoted
via the Summary Cond. data entry tab. To learn more about the Summary
Condition tab and the promotion of condition fish into the Mark Recaptures
data entry tab see Section VIII.G.
VIII.D.2 – Editing or Deleting Mark Recaptures Records
You can only edit one record from the Mark Recaptures data entry tab at a time.
To edit a record, first double-click on the record you wish to edit. The data entry
panel (top of screen) will automatically be populated with that record’s data. At this
86
point, edits can be made to the record. Once edits are made, choose the Save
button. If no edits are necessary, choose the Cancel button.
To delete a record, single-click on the record you with to delete and choose the
Delete button. You will get a prompt confirming that the record is to be deleted,
select yes and that record will be removed from the local database.
VIII.E. Transportation Tab
The Transportation data entry tab is for transportation sites only (i.e., LGR, LGS, and
LMN) and is intended for target salmonid species only. Each record entered into the
Transportation data entry tab is broken into groups, based on Species Code, Age
Code, Tank, Special Species (EF and FR), Clipped/Unclipped, and Coded Wire Tag
combinations. The numbers for Bypassed, Trucked, and Barged are derived from
the Collection Totals minus total mortalities (sample, facility, and research) for each
Species Code, Age, Tank, Special Species (EF and FR), Clipped/Unclipped, and
Coded Wire Tag combination. Since the data grid has so few columns, there are no
frozen fields in the Transportation data entry tab.
VIII.E.1 – Definitions and Data Entry
Before any data can be entered or edited in the Transportation data entry tab,
the user must specify which batch they intend to add/edit data to by selecting the
corresponding batch in the Catch data entry tab. Once a batch has been selected
in the Catch tab, you may navigate to the Transportation data entry tab.
To manually create a new record in the Transportation data entry tab, choose New.
This activates the data entry panel at the top of the screen. When the first record is
created, Site and Batch are carried over from the Catch data entry tab. The user
should enter a separate detailed record for each Species Code, Age Code, Tank,
Special Species (EF and FR only), Clipped/Unclipped, and Coded Wire Tag
combination.
UPDATED: FPC32.net allows users to import the different Species Code, Age
Code, Tank, Special Species (EF and Fry), Clipped/Unclipped, and CWT
combinations from the Catch Detail tab into the Transportation tab. In addition,
collection counts can also be imported from the Catch Detail tab to the
Transportation tab. This saves time, as it is no longer necessary to enter every
possible combination again. However, the user must specify whether data should
be imported from the currently selected batch or from the current and previous
batches (i.e., every-other-day transportation). See Section VII.A., Step 4.xi for
more details on how to import species information and collection counts from Catch
Detail to the Transportation tab.
If condition data have not been promoted to Catch Detail, some Species Code,
Age Code, Tank, Special Species (EF and Fry), Clipped/Unclipped, and CWT
combinations may not be present.
87
To edit a record, double-click on the record from the data entry grid at the bottom of
the screen. Each record has a sequence number to make the editing process easier
for the user. The data from the record then populate the data entry panel at the top
of the screen and are editable. Once necessary changes are made, choose the
Save button. For ease of navigation, the Tab Keys can be used to move between
fields and Right and Left arrow keys can be used to move the cursor within a data
field.
Below is a table of the fields of data that are entered into the Transportation data
entry tab along with the default settings for each field, prior to data entry. Following
this table is a list of the fields and instructions of the types of data that should be
entered into each field and how.
Field Name
Site
Batch
Sequence
Tank
Species code
Default Settings
Set in setting dialog
Computed based on system date
For each batch, the first incidental catch record sequence starts
at 1 and continues sequentially.
Default is none. The value of tank for the next record is the
same as the previous entry, until the user changes the value.
Default is set to Chinook (CH). The value of species code for
the next record is the same as the previous entry, until the user
changes the value. Species code is a required field.
88
Field Name
Age code
Fin clipped
Coded wire tag
Special species
code
All number fields
Default Settings
Default is set to 1. The value of age code for the next record is
the same as the previous entry, until the user changes the
value.
Default is none.
Default is none.
Default is none.
All number fields are initially set to zero. These fields include
number bypassed, number trucked, number barged.
Tank:
At LGS, LMN, and MCN choose “A” or “B” to designate the correct tank. Choose
“N/A” to designate fish from the separator. The Tank toggle has been turned off
for LGR.
Species Code:
Click on the Species Code drop-down
list and choose the appropriate species
code from the list.
Special Species Code:
Click on the Special Species drop-down list and choose one of the following
codes:
• “FR” and “EF”. See Section VIII.B.1 for a detailed discussion of each of
these Special Species Codes.
• Due to NOAA sampling at LGR, entering separate records for Eroded Fin
“EF” steelhead is not possible. The only Special Species Code to be used
at LGR is “FR” for Fry.
Age Code:
Age Code is used for Chinook only. Choose “0” for subyearlings and “1” for
yearlings. For other species this field is unavailable.
Fin Clipped:
Choose “Y” if the fish has an adipose or ventral fin clip. Choose “N” if there are
no adipose or ventral fin clips.
CWT:
Choose “Y” if there is a coded wire tag and you have been requested by FPC
to check for a coded wire tag on that particular species. Choose “N” only if you
have checked for a coded wire tag and there is there is not a tag. Otherwise
choose “N/A”.
Num Bypassed:
Enter the number of fish bypassed for each Species Code, Age Code, Tank,
Special Species (EF and Fry), Clipped/Unclipped, and CWT combination. See
89
Section VII.I for a detailed discussion of how to get these numbers from
FPC32.net reports.
Num Trucked:
Enter the number of fish trucked for each Species Code, Age Code, Tank,
Special Species (EF and Fry), Clipped/Unclipped, and CWT combination.
See Section VII.I for a detailed discussion of how to get these numbers from
FPC32.net reports.
Num Barged:
Enter the number of fish barged for each Species Code, Age Code, Tank,
Special Species (EF and Fry), Clipped/Unclipped, and CWT combination.
See Section VII.I for a detailed discussion of how to get these numbers from
FPC32.net reports.
VIII.E.2 – Editing or Deleting Transportation Records
You can only edit one record from the Transportation data entry tab at a time. To
edit a record, double-click on the record you with to edit. The data entry panel (top
of screen) is populated with that record’s data. At this point, edits can be made to
the record. Once edits are made, choose the Save button. If no edits are necessary,
choose the Cancel button.
To delete a record, single-click on the record you wish to delete and choose the
Delete button. You will get a prompt confirming that the record is to be deleted,
select Yes and that record will be removed from the local database.
VIII.F. Conditions Tab
The Conditions data entry tab allows users to edit/browse individual fish from the
condition sub-sample that were entered through the touch screen. For convenience,
the Sub-batch, Sequence, Tank, Species/Age Code, Special Species Code, Coded
Wire Tag, Mark Type (clip code), and Elastomer Code are frozen on the left side of
the data grid to help the user identify the row as they scroll to the right.
VIII.F.1 – Definitions and Data Entry
Before any data can be entered or edited in the Conditions data entry tab, the user
must specify which batch they intend to add/edit data to by selecting the corresponding batch in the Catch data entry tab. Once a batch has been selected in the Catch
tab, you may navigate to the Conditions data entry tab.
To enter new fish condition records through the Conditions tab, choose New. Enter
a fish condition record for an individual fish and choose the Save/New button.
Upon entering your last entry, you must choose the Cancel button after choosing
Save/New for that record. Subbatch, Species and Length are required for each
individual fish condition record.
90
To edit a record, double-click on the record you wish to edit. Each record has a
sequence number to make the editing process easier for the user. The data from
the record then populate the data entry panel at the top of the screen and are
editable. Once necessary changes are made, choose the Save button. For ease of
navigation, the Tab Keys can be used to move between fields and Right and Left
arrow keys can be used to move the cursor within a data field.
Below is a table of the fields of data that are entered into the Conditions data entry
tab along with the default settings for each field, prior to data entry. Following this
table is a list of the fields and instructions of the types of data that should be entered
into each field and how.
Field Name
Default Settings
Site
Set in setting dialog
Sequence
For each subbatch, sequence starts at 1 and continues
sequentially. When a new subbatch is started, sequence
starts over at 1
Sub-batch
Starts at 1. The value of subbatch for the next record is
the same as the previous entry, until the user changes
the value.
Tank/Trap
Default is none. The value of tank for the next record is
the same as the previous entry, until the user changes
the value.
91
Field Name
Default Settings
Species Code
Default is none. Species code is populated when the
user chooses a value from the Species or Miscellaneous
Incidental pull down menus.
Age
Default is none. This field is only used for Chinook.
Mark type
Default is none.
Coded Wire Tag
Default is none.
Special species
code
Default is none.
Elastomer code
Default is none.
Color code
Default is none.
Descaling
Default is none.
Weight
Weight is a number field and is initially set to blank. The
user may enter a weight to the nearest 10th of a gram
(up to 100 grams)
Length
Length is a number field and is initially set to blank. The
user may enter a fork length to the nearest millimeter (up
to 1,000 millimeters)
Comment Fields
General Comment and Special Comment are text fields.
Users can put up to two comments into these fields, with
a semicolon separating the different comments.
Site and Batch:
The Site and Batch fields cannot be edited. They are set in the Settings dialog
box. Site contains the three character code for the remote site entering the daily
batch, sub batch and fish condition data. The batch number contains: two digits
for the year and three digits for the day of the year 1–366 (YYDDD).
Sub-Batch:
This is the sub-batch number associated with each individual fish. Each subbatch has an individual sample rate. Sample rates for each sub-batch are
entered under the Catch Detail tab.
Tank:
At LGS, LMN, and MCN choose “A” or “B” to designate the correct tank. Choose
“N/A” to designate fish from the separator.
CWT:
At those sites that examine Chinook, coho, and sockeye for coded-wire tags,
select Y when unclipped fish has a CWT, N when an unclipped fish does not
have a CWT. CWT will default to N/A for all clipped fish.
Species Code:
Click on the Species Code drop-down list and choose the appropriate Species
Code from the list and the Species Code field will be populated. Species Code
is a required field and is intended to be used for target salmonid species. For
Chinook, the species code includes the age of the individual sampled, with “CH1”
for Chinook yearling and “CH0” for Chinook subyearling.
92
Species list for LGR, LGS, and LMN
Species list for BON, JDA, and MCN
(incorporating lamprey juveniles)
Miscellaneous Incidental:
The Miscellaneous Incidental codes
include several non-salmonid
incidental fish codes. This drop-down
menu options are listed alphabetically
by incidental species name, NOT
incidental species code.
Incidental
Code
BM
BS
BL
BH
CP
CC
CM
UM
CR
LD
SD
BK
LK
LP
LR
MA
OT
PM
PE
SQ
PI
SR
Incidental Species
Name
Bass, Large Mouth
Bass, Small Mouth
Bluegill and Pumpkinseed
Bullhead
Carp
Channel Cat
Chiselmouth
Chum
Crappie species
Dace – Long Nose
Dace – Speckled
Killifish, Banded
Lamprey Adult (Brook)
Lamprey Adult (Pacific)
Lamprey Adult (River)
Madtom, Tadpole
Other species not listed
Peamouth
Perch
Pike Minnow, Northern
Salmon, Pink (juv)
Sand Roller
93
Incidental
Code
SC
SA
SJ
RS
SP
SK
SN
SG
BU
LU
MU
SU
TT
BT
NT
LT
CT
RT
WE
WA
LW
MW
Incidental Species
Name
Sculpin species
Shad Adult
Shad Juvenile
Shiner, Redside
Siberian Prawn
Stickleback, 3 Spine
Sturgeon, Green
Sturgeon, White
Sucker, Bridgelip
Sucker, Largescale
Sucker, Mountain
Sucker, Other
Tench
Trout – Brook
Trout – Brown
Trout – Bull
Trout – Cutthroat
Trout – Rainbow
Walleye
Warmouth
Whitefish – Lake
Whitefish - Mountain
Notes:
• If you see a Bull Trout (LT), it is important that you minimize handling and
return it to the river as soon as possible.
• If you encounter an Other Species (OT), be sure to indicate what this was
in your comment(s) for the batch (Catch Tab).
Special Species Code:
Click on the Special Species dropdown list and choose one of the
following codes: “EF”, “LF” or “HO”.
See Section VIII.B.1 for a detailed
discussion of each of these Special
Species Codes.
Note: SMP sites no longer take condition data for Fry (FR). Therefore, “FR” is
no longer an option in this drop-down list. All Fry sampled should be entered
as non-condition fish, using the Catch Detail tab.
Mark Type:
The Mark Type drop-down list includes choices for
what type of clip a fish has (adipose, adipose and
left ventral, etc.). Use “N/A” if individual condition
fish does not have any type of clip.
Elas. Code:
The Elas. Code drop-down list includes choices
for a fish with an Elastomer tag and its location.
Color Code:
The Color Code drop-down list allows the user
to choose the color of the Elastomer tag.
Descaling:
The Descaling drop-down list includes three choices for descaling including:
• Partial Descale for fish with descaling greater than background levels
(2%-5%) but less than 20%.
• Descale for fish that are >20% descaled.
• Descale Predator for fish that are descaled and have clear predator marks.
NOTE: If Descale Pred is chosen, at least one of the Predator checkboxes should be checked (see Predator Checkboxes below)
94
Weight:
Enter the weight of the fish in the Weight field. Weight is NOT a mandatory field
for condition fish. Weight is measured in grams and can range from 0.1 to 999.9
grams. Weights are accepted to the nearest tenth of a gram.
Species Code
CH0
CH1
ST
SO
CO
MP, AP, AS, AB
Weight Range
0 to 150
0 to 150
0 to 375
0 to 199
0 to 175
0 to 20
FPC32.net has pre-defined weight ranges for each of the condition monitoring
target species. If a weight is entered that is outside of this range, the record can
still be saved. However, when these data are imported into the Condition tab,
the suspect value will appear Red in the Data Review Grid. This is intended to
alert the user to an anomalous weight. It is up to the user to decide if this weight
is wrong or acceptable. The table above provides the pre-defined weight ranges
that are used for data validation for each of the target species.
Length:
Enter the fork length of the fish in the Length field. Length is a required field
for condition fish (except miscellaneous incidentals). Length is measured to
the nearest millimeter and can range from 1 to 999 mm FL (no decimal place is
allowed for length).
95
Species
Code
CH0
CH1
ST
SO
CO
MP, AP, AB
AS
Length
Range
61 to 250
61 to 250
61 to 350
61 to 200
61 to 250
70 to 250
30 to 75
FPC32.net has pre-defined length ranges for each of the condition monitoring
target species. If a length is entered that is outside of this range, the record can
still be saved. However, when these data are imported into the Condition tab,
the suspect value will appear Red in the Data Review Grid. This is intended to
alert the user to an anomalous length. It is up to the user to decide if this length is
wrong or acceptable. The table above provides the pre-defined length ranges
that are used for data validation for target species.
• If an anomalous length is identified for an individual record as part of the
validation process, delete this anomalous length and leave the length field
blank (as opposed to attempting to correct the length). Once the length is
deleted, a Length-value Alert Button will flash Red next to the length field.
• If anomalous lengths are deleted from condition fish, the field will have a
value of 0. If your on-site databases use these length data, you will need to
be sure to filter these 0’s out before calculating summary statistics.
Predator Checkboxes:
There are three checkboxes found near the Predator label. These include:
Bird, Fish, and Lamprey. If a fish has marking due to a predator or predators,
check all of the boxes that apply.
96
NOTE: Detailed definitions of each of these predator
conditions are provided in a separate manual.
Injury Checkboxes:
There are five checkboxes found near the Injury label. These include: Head,
Eye, Operc., Body, and Fin. Check all of the boxes that apply for an injured
fish. If a fish has specific and/or other injuries that site personnel want to record,
use the Special Comment field.
TIP: To save time, when entering a comment into the Special Comment
field, use predefined codes for particular conditions. Also, up to two
comments can be entered into this field, as long as they are separated by
a semicolon.
NOTE: Detailed definitions of each of these injuries are
provided in a separate manual.
Disease Checkboxes:
There are six checkboxes found near the Disease label. These include:
Fungus, Columnaris, BKD, Parasite, Deformity, and Other. Check all boxes
97
that apply for a diseased fish. If the fish has a disease other than one of these,
check the Other box and type in a comment in the Special Comment field.
TIP: To save time, when entering a comment into the Special Comment
field, use predefined codes for particular conditions. Also, up to two
comments can be entered into this field, as long as they are separated
by a semicolon.
NOTE: Detailed definitions of each of these diseases are
provided in a separate manual.
Other Conditions Checkboxes:
There are five checkboxes that are designated as Other Conditions. These
include: Pop Eye, Fin Hemm., Pink Fin, Fin Discol, and Eye Hemm. Check
all of the boxes that apply.
NOTE: Detailed definitions of each of these diseases are
provided in a separate manual.
98
General Comment:
Enter any specific comments about the fish that you may think are important and
have not been entered into the Special Comment field.
TIP: To save time, when entering a comment into the General Comment
field, use predefined codes for particular conditions. Also, up to two
comments can be entered into each comment field, as long as they
are separated by a semicolon.
VIII.F.2 – Editing or Deleting Condition Records
To edit a single record in the Conditions data entry tab, double-click on the record
you wish to edit. The data entry panel (top of screen) is populated with that record’s
data. At this point, edits can be made to the record. Edits should be made to these
records only when you are absolutely sure that there was an error in data entry. For
example, if an anomalous length is identified for an individual record, delete this
anomalous length and leave the length field blank (as opposed to attempting to
correct the length). Once edits are made, choose the Save button. If no edits are
necessary, choose the Cancel button.
FPC32.net also allows the user to edit the Sub-batch number and/or Tank for
multiple records at once. To do this, first check the box in the Edit column of the
data grid for all the records you wish to edit. Second, select the Edit button.
Change the Sub-batch and/or Tank to the correct value for the records to be edited.
Press the Update Sub-batch button to edit the sub-sub-batch for the records and/or
the Update Tank/Trap button to edit the Tank/Trap for the records.
99
To delete a record, single-click on the record you wish to delete and choose the
Delete button. You will get a prompt confirming that the record is to be deleted,
select Yes and that record will be removed from the local database.
VIII.G. Summary Cond. Tab
The Summary Cond. tab allows users to view summarized fish condition records that
are grouped by key fields (listed below) for promotion into the Catch Detail, Incidental
Catch, and Mark Recaptures tabs. The condition fish in the data grid are grouped by:
Sub-batch, Tank, Species, Clip Code, CWT, Special Species, Elastomer tags, and
Elastomer tag colors. Upon promotion, the Catch Detail, Incidental Catch, and Mark
Recaptures tabs all receive different subsets of these summarized condition data. For
example, the records for the incidental species are promoted only to the Incidental
Catch tab. Clicking the Promote All button adds the summarized records to the
appropriate data entry tab. For convenience, the Sub-batch, Tank, Species, Clip
Code, CWT, Special Species, Elast., and Color codes are frozen on the left to help
the user identify the row as they scroll to the right.
VIII.G.1 – Definitions
No data are entered or edited into the Summary Cond. tab. This tab is specifically
used to promote the condition fish data into the Catch Detail, Incidental Catch, and
Mark Recaptures data entry tabs. Before promoting, the user must specify which
batch they intend to promote data for by selecting the corresponding batch in the
Catch data entry tab. Once a batch has been selected in the Catch tab, you may
navigate to the Summary Cond. data entry tab. Upon successful promotion, the
user will hear a prompt and see a red push-pin icon in the upper-right of the screen.
100
Below is a list of the fields and instructions regarding the types of data that can be
found in each field.
Site and Batch:
The Site and Batch fields cannot be edited. Site is set in the Settings dialog
box. Batch is set when data entry for the batch is first started, generally with
the touch screen. Site contains the three character code for the remote site.
The Batch number contains: two digits for the year and three digits for the day
of the year 1-366 (YYDDD).
Catch Detail Sub-Batches:
The current selected batch’s sub-batch numbers and associated sample rates
are displayed in this small data grid at the top of the tab window. These data are
not editable. It is for reference only. During entry of the non-condition samples
into Catch Detail, the user entered a sample rate for each of the sub-batches
from which data were entered. This data grid allows the user to see these noncondition sub-batches and their corresponding sample rates. This is helpful
because it indicates what sample rate(s) will be applied to the condition records
upon promotion. This data grid will be populated only if data for non-condition
fish were entered into Catch Detail; it is otherwise blank.
101
Conditions Sub-Batches:
When entering condition data via the touch screen, the user enters a sub-batch
number for each fish condition record. The sub-batch numbers for the condition
fish are listed in this data grid, along with the corresponding default sample rate
that was assigned to these sub-batches, as entered in the Settings tab. If data
for non-condition fish were entered into Catch Detail, the sample rate(s) entered
into Catch Detail will automatically overwrite these condition sample rates.
Note: If all fish sampled were condition fish, the user must check to make
sure the default sample rates from the Settings tab were correct for this
batch before promoting condition fish into the Catch Detail, Incidental
Catch, and Mark Recap tabs. To correct them, right-click in the Sample
Rate cell in the Condition Sub-Batches box at the top of the screen
(A in the figure below). This allows you to manually enter the sample rate
for that particular sub-batch (must be between 0.0 and 1.0). You will be
prompted with a message asking if you want this sample rate to be
applied to all records of this sub-batch. Click Yes. Once this is done for
each of the sub-batches, click on the Promote All button. When condition
sample data are incorporated into the Catch Detail tab, the sample counts
for condition fish will appear in the Cond. Sample Count field of the data
grid.
If data were entered in Catch Detail, the sample rates in the two review grids
must match for each of the sub-batches. If you notice that the sample rate in
either of these two data grids does not match, you must change the sample rate
in Catch Detail. See Section VIII.B.1 above for instructions on how to do this.
A
VIII.H. Fish Condition Touch Screen
The Fish Condition Touch Screen allows users to enter individual fish condition data.
Double-click on the FPC32.net icon to open the touch screen to enter fish condition
records for a new batch (with the Settings dialog Fish Condition Touch Screen Only
checkbox checked). The touch screen will open on the computer’s desktop.
102
To open the touch screen to enter fish condition records using an existing batch record
(with the Settings dialog Fish Condition Touch Screen Only checkbox unchecked),
double-click on the FPC32.net icon. Right click on the FPC32.net icon in the system
tray and choose Open Main Form. From the Main Form, choose the Catch data entry
tab and select the batch you want to work with. Choose File | Open Condition Touch
Screen.
VIII.H.1 – Data Entry Sequence for the Fish Condition Touch Screen
1. Open the fish condition touch screen. A dialog box appears with three buttons:
(1) The Batch End Day Today button creates a batch with the end date
corresponding to today’s date, (2) the Batch End Day Tomorrow button creates
a batch with the end date corresponding to tomorrow’s date, and (3) the Batch
End Day Yesterday creates a batch with the end date corresponding to
yesterday’s date.
2. Click on the appropriate Batch End Day button to create the desired batch. If a
batch already exists with any of these end dates, a push-pin icon appears next to
the already existing batch’s Batch End Day button. Once you have done this,
the Fish Condition Touch Screen will appear.
103
Touch screen for LGR, LGS, and LMN
Touch screen for BON, JDA, and MCN (incorporates condition monitoring
for lamprey juveniles).
104
3.
4.
5.
6.
7.
8.
9.
10.
11.
12.
13.
Press New. The background panel turns white, meaning that the computer will
accept data. If the background panel is gray, the computer will beep when you
press a button because it is not in the New or Edit mode.
Where applicable, select the Tank for the sub-batch you are currently sampling.
Turn On the scale and add the tray (the scale automatically tares or calibrates to
compensate for the weight of the tray), place the fish in the tray, and press the
Print button on the scale.
Note: You do not need to place the tray on the scale between fish but you
may need to Tare the scale occasionally between fish.
Enter the fish Length using the touch screen number pad.
Press the appropriate Species, Clip, Condition, and Tagging buttons.
If a Special Comment needs to be entered, press the Special Comment
button and type the comment using the touch screen keyboard. The user can
only enter two comments or codes in this field, each separated by a semicolon.
If a General Comment needs to be entered, press the General Comment
button and type the comment using the touch screen keyboard. The user can
enter only two comments or codes in this field, each separated by a semicolon.
Press the Save/New button to save the individual fish record and start on the
next fish.
Return the fish to the bypass or to wherever it needs to go.
Repeat Steps 4 through 9 for each subsequent fish.
After the record for the last fish is saved, you must choose the Cancel button
prior to exporting data.
VIII.H.2 – Fish Condition Touch Screen – Function Buttons
These function buttons appear in the lower center and right corner of the touch
screen. The following describes the functions of each of the buttons in this section
of the touch screen.
105
Number Pad:
The focus of the number pad is automatically set to the length field for entering
fish lengths. To change the focus of this number pad to the weight field, the user
must select either Enter Weight or Clear Weight. If a comment button is
chosen, numbers can be entered into the comment field by using this number
pad. The CE button clears the number that is in the field that is currently in
focus.
Exit Panel:
When the Exit Panel button is chosen, a pop-up menu will
appear. This pop-up menu has three options: Exit, Hide
Screen, and Return. Choose Exit to exit the touch screen and
close the FPC32.net program. Choose Hide Screen to close
the touch screen and return to the Main Form. Choose
Return to return to the touch screen for additional data entry.
If newly entered records have not been exported to the XML
file before the Exit Panel button is pressed, the pop-up menu
will have a warning message informing the user that newly
entered records have not been exported to the XML file. In this case, if Exit is
pressed the touch screen and program will close and newly entered records will
not be exported to the XML file. However, if the user wishes to export newly
entered records to the XML file, simply press the Return button. This will return
the user to the touch screen where the Export button can be pushed to save all
records to the XML file.
New:
The New button allows the user to enter new records. After pressing the New
button, the background panel turns white and the New button disappears,
indicating that data entry is allowed. Once the first record has been entered
the user must press the Save/New button to save the record.
106
Save/New:
The Save/New button allows the user to save the current record and
automatically starts a new record for the next fish. The Sub-batch and Tank of
the previous record automatically appear for each new record. You must change
the Sub-batch and/or Tank each time you switch Sub-batches or Tanks.
Edit:
The Edit button allows the user to edit the record shown in the record browsing
panel (found in the lower left corner of the touch screen). After pressing the Edit
button, the background panel turns white, indicating that data entry is allowed.
Once editing is complete the user must press the Save button to save the
changes to the record.
Delete:
The Delete button allows the user to delete the current record shown in the
record browsing panel.
Next:
The Next button allows the user to navigate to the next record in the fish
condition record set (each record is shown in the record browsing panel). The
Next button cannot be used if a record is active (i.e., data entry/editing is
allowed).
Previous:
The Previous button allows the user to navigate to the previous record in the fish
condition record set (each record is shown in the record browsing panel). The
Previous button cannot be used if a record is active (i.e., data entry/editing is
allowed).
Cancel:
The Cancel button is used to cancel entering a new record or to cancel editing a
record.
Export:
The Export button saves the condition records to an XML file named with the
site and batch number. The location where this file is saved is specified in the
Settings dialog box for your wet lab computer. Upon successful export, the user
will hear a prompt and see an icon under the data review panel.
107
VIII.H.3 – Fish Condition Touch Screen - Record Browsing Panel
The Record Browsing Panel of the Fish Condition Touch Screen is found in the
lower left corner of the touch screen. This form displays the current record being
entered (or edited) or it shows the last record entered.
A
B
C
The Top Section (A in above figure) of the Record Browsing Panel displays the
Tank/Trap, Species, Special Species, Clip Codes, Elastomer Code, Elastomer
Color, CWT, General Comment, and Special Comment.
Tank/Trap:
This will be either “A” or “B”, where applicable. If no Tanks are present, this field
will be blank.
Species Code:
Species Code is a Required Field for condition fish. Therefore, the text box for
Species Code will appear yellow when a new record is created, until a Species
Code is chosen by the user. When a Species Code is chosen, this field will
have the two letter code of that species. If the individual fish is a Chinook, there
will be a third digit corresponding to the Age Code (“0” for subyearlings and “1”
for yearlings). This field is used for target species and incidentals that are
entered with the Fish Condition Touch Screen. For a detailed explanation
of each of the Species Codes, see Section VIII.B.1 (Target Species) and
Section VIII.C.1 (Incidental Species) above.
Special Species:
This field is where the Special Species Code is displayed. There are three
possible Special Species Codes for condition fish: (1) “HO” for yearling Chinook
holdovers, (2) “EF” for eroded fish steelhead, and (3) “LF” for Lyons Ferry
yearling fall Chinook.
Clip Code:
This field is where any clip codes will be displayed. There are five possible clip
codes: (1) “AD” for adipose clip, (2) “LV” for left ventral clip, (3) “RV” for right
ventral clip, (4) “AR” for adipose and right ventral clip, and (5) “AL” for adipose
and left ventral clip. This field is blank if the fish is not clipped.
108
Elastomer:
This field is where any Elastomer tag information is displayed. There are two
possible codes for this field: (1) “ER” for an Elastomer tag on the right, or (2) “EL”
for an Elastomer tag on the left. This field is blank if the fish does not have an
Elastomer tag.
Color:
This field is where the Elastomer Tag Color is displayed. Below is a list of the
different color codes. This field is blank if the fish does not have an Elastomer
tag.
BL – blue
PU – purple
GR – green
RE – red
OR – orange
YE – yellow
PI – pink
OT – other
CWT:
This field indicates the presence (Y) or absence (N) of a Coded-Wire Tag.
Currently, only LGR, LGS, and LMN examine all unclipped Chinook, coho, and
sockeye for CWT. For these sites, the default value for CWT is blank for clipped
Chinook, coho, and sockeye. The default value for CWT is “N” for unclipped
Chinook, coho, and sockeye, unless the user enters “Y”. For steelhead, the
default CWT is blank, regardless of clip status.
General Comment:
The user can enter General Comments about the fish when entering fish
condition records. This is where these General Comments are displayed. Two
separate comments can be entered, each separated by a semicolon.
Special Comment:
The user can enter Special Comments about the fish when entering fish
condition records. This is where these Special Comments are displayed. Two
separate comments can be entered, each separated by a semicolon.
The Middle Section (B in above figure) of the Record Browsing Panel is where
the fish condition information is displayed. Fish condition information is divided into
four types of conditions, including: (1) Predator, (2) Injury, (3) Other Condition,
and (4) Disease. In addition to these conditions, there are fields for the Weight and
Length of each condition fish.
Predator:
This row is where any Predator data are displayed. If any of the predator
buttons are pushed, that predator type is displayed in this row. Possible entries
in this row include: (1) Bird, (2) Fish, and (3) Lamprey.
109
Injury:
This row is where any Injury data are displayed. If any of the injury buttons are
pushed, that injury will be displayed in this row. Possible entries in this row
include: (1) Head Injury, (2) Eye Injury, (3) Operculum Injury, (4) Body Injury,
and (5) Fin Injury.
Other Cond:
This row is where any Miscellaneous Injuries are displayed. If any of the misc.
injury buttons are pushed, that misc. injury will be displayed in this row. Possible
entries in this row include: (1) Pop Eye, (2) Fin Hemorrhage, (3) Pink Fin, (4)
Fin Discoloration, and (5) Eye Hemorrhage.
Disease:
This row is where any Disease data are displayed. If any of the disease buttons
are pushed, that disease will be displayed in this row. Possible entries in this row
include: (1) Fungus, (2) Columnaris, (3) BKD, (4) Parasite, (5) Deformity, and
(6) Other.
Weight:
The Weight field holds the weight (grams) of the fish that was entered via the
scale. Even though Weight is NOT a Required Field for condition fish, the text
box for Weight will appear yellow when a new record is created, until a weight is
entered by the user. There can be 5 digits in the weight field including three
numbers before the decimal point, a decimal point, and one number after the
decimal point. The weight field can have data values in the hundreds (up to
999.9 grams). Weight is not mandatory at BO2 or JDA.
Length:
The Length field holds the length (in millimeters) of the fish, which was entered
via the number pad. Length is a Required Field for condition fish. Therefore,
the text box for Length will appear yellow when a new record is created, until a
length is entered by the user. There can be 3 digits in the length field. There are
no decimals in this field. Length can have data values in the hundreds (up to
999 mm). Length is mandatory at all sites where condition data are collected.
The Bottom Section (C in above figure) of the Record Browsing Panel displays
the Site, Batch, Date, S/batch, and Sequence number.
Site:
This site field is where the Site is displayed. Site was chosen in the Settings
dialog box.
Batch:
The Batch field is where the Batch number is displayed. This batch number is a
five digit number where the first two digits correspond to the year (e.g., 09) and
the last three digits correspond to the sample end date in Julian Days. This
number was generated based on which Batch End Day button that was selected
when initially opening the touch screen.
110
Date:
The Date field is where the batch end date is displayed. The batch end date
corresponds to which Batch End Day button was selected when initially opening
the touch screen.
Sub-batch:
This field is where the Sub-batch number is displayed. Up to 999 sub-batches
can be displayed in this field.
Sequence:
This field is where the Sequence number of the individual fish record is
displayed. Each sub-batch starts with a sequence number of 1 and each record
is incremented by one. If a record is deleted, that sequence number is deleted
with it. The deleted sequence number cannot be used again in the current subbatch.
VIII.H.4 – Fish Condition Touch Screen - Tallies
The Touch Screen Tallies are found in the upper right corner of the touch screen.
These are the total number of condition fish that have been sampled. Condition fish
are broken into several categories based on: (1) Species, (2) Clipped/Unclipped,
(3) Tank, (4) Special Species, and (5) Incidentals
“Tank A and None” and “Tank B” Tallies (A in figure below): Each of the
target salmonid species are tallied based on whether they were sampled in
Tank A (or None) or Tank B and whether they were Clipped (AD, RV, LV, AR,
AL) or Unclipped. If the site does not have a tank, the species/clip type tallies
are displayed in the Tank A and None display.
Special Species Tallies (B in figure below):
Each of the Special Species are tallied based on whether they were sampled in
Tank A, Tank B, or None (for those sites without tanks). These fish are included
in the “Tank A and None” and “Tank B” tallies above.
Total Incidental Tally (C in figure to below):
This tally is the total number of Miscellaneous Incidental Species that are
entered via the touch screen.
Total Sampled Tally (D in figure below):
This tally is the total number of fish (Salmonids and Miscellaneous Incidentals)
that have been entered via the touch screen for a single batch.
111
A
B
C
D
Touch screen tallies for BON,
JDA, and MCN (incorporates
lamprey juveniles)
Touch screen tallies
for LGR, LGS, and
LMN
VIII.H.5 – Fish Condition Touch Screen – Condition, Species, and
Mark Type Buttons
The condition, species, and mark type buttons on the Fish Condition Touch
Screen are found in the upper left and central portion of the touch screen. These
buttons are grouped in sections and some are also grouped by color. These buttons
have many functions. Some of the buttons toggle on and off, some move the
computer focus to a specific field, some clear a field or fields, some open a pop-up
screen with additional selections, and some select the appropriate sub-batch and
tank. The condition button groupings include: (1) Elastomer Location and Color,
(2) General Comments, Sub-batch, and Tank, (3) Disease/Parasite conditions,
(4) Injuries, (5) Miscellaneous Conditions, (6) Descaling, (7) Predation, (8) Mark
Types, (9) Length and Weight functions, (10) Species, Special Species, and
Incidental Species codes.
112
Touch screen species and conditions for LGR, LGS, and LMN.
Note – LGR does not have Tank Buttons
Touch screen species and conditions for BON, JDA, and MCN
(incorporating condition monitoring for lamprey juveniles).
Note – MCN touch screen has buttons for Tank A and Tank B.
113
Elastomer Location and Color:
If the condition fish has an Elastomer tag, the user presses the appropriate
Color/Location button. These buttons toggle on and off. If a user selects
a wrong button, simply select the correct button or select the same button to
remove that Elastomer tag location and tag color.
General Comments, Sub-batch, Tank, and Special Comments:
These buttons allow the user to enter the appropriate Sub-batch, Tank, and
Comments for each individual fish.
When the user selects Gen. Comments a pop-up appears with the general
comment text field and a keyboard. Users are allowed to enter two comments
per field separated by a semicolon. Pressing Submit enters the comments into
the database. The Clr. Gen. Comments button clears the General Comments
text field.
When the user begins entering data, Sub-batch defaults to “1”. To change
the Sub-batch, the user should push the Sub-batch button. Each time the
Sub-batch button is pressed, the Sub-batch number increases by 1. If the
user presses the Sub-batch button too many times, the user can press the
Clr Sub-batch button to return the Sub-batch number to 1.
Where applicable, the user selects the Tank A or Tank B button for the
appropriate tank. The Tank A and Tank B buttons toggle on and off. Once
114
Tank A or Tank B is selected for a single fish, that tank is carried on to
subsequent fish until a different tank or sub-batch is chosen by the user. These
Tank buttons are hidden for BO2, JDA, and LGR.
When the user selects Special Comments a pop-up appears with the general
comment text field and a keyboard (see General Comments keyboard above).
The intent of this field is for sites to use it for other conditions that they
would like to keep track of, but don’t have buttons for. It is recommended
that sites come up with two-letter codes for these conditions and let FPC know
what these codes are and what they stand for. FPC will use these codes with
developing the site-specific tools for site-specific databases. Users are allowed
to enter two comments per field separated by a semicolon. Pressing Submit
enters the comments into the database.
Disease/Parasite Conditions:
These buttons allow the user to enter the following Diseases/Parasites:
Fungus, Columnaris, BKD, Parasite, Deformity and Other. These condition
buttons toggle on and off. If a button is pressed by mistake, simply press it
again to make that disease/parasite go away. Users are allowed to choose as
many Diseases as the fish has. Definitions and examples of each of these
Disease/Parasite conditions can be found in Condition Sampling Protocol
document.
Injury Conditions:
These buttons allow the user to enter the following Injuries: Head Inj., Eye Inj.,
Operc, Body Inj., and Fin Inj. These condition buttons toggle on and off. If a
button is pressed by mistake, simply press it again to make that injury go away.
Users are allowed to choose as many Injuries as the fish has. Definitions and
examples of these Injury conditions can be found in the Condition
Sampling Protocol document.
115
Miscellaneous Conditions:
These buttons allow the user to enter the following Miscellaneous Conditions:
Eye Hemm., Pop Eye, Fin Hemm., Pink Fin, and Fin Discol. These condition
buttons toggle on and off. If a button is pressed by mistake, simply press it
again to make that miscellaneous injury go away. Users are allowed to choose
as many Miscellaneous Conditions as the fish has. Definitions and
examples of these Other conditions can be found in the Condition
Sampling Protocol document.
Descaling:
These buttons allow the user to enter the following Descaling Conditions:
Partial Descale (2%–5% to 19% descaled), Descaled (≥20% descaled),
Descale Pred (descaled ≥20% and clear predator marks). If the wrong
descaling button is pressed by mistake, simply press it again to make that
descaling go away or push a different descaling button to overwrite the
erroneous selection with the correct selection. Only one descaling type is
allowed per fish record. Definitions and examples of these Descaling
categories can be found in the Condition Sampling Protocol document.
Predator Conditions:
These buttons allow the user to enter the following Predation conditions: Bird,
Fish, and Lamprey. These condition buttons toggle on and off. If a button is
pressed by mistake, simply press it again to make that Predator type go away.
Users are allowed to choose as many Predator types as the fish has.
Definitions and examples of these Predation conditions can be found in the
Condition Sampling Protocol document.
Mark Types:
These buttons allow the user to enter the following mark types: LV (left ventral),
RV (right ventral), and CWT (coded wire tag).
116
For those sites that examine Chinook, coho, and sockeye for coded-wire tags,
the CWT button is pressed only when an unclipped fish has a CWT. This will
place a “Y” in the Record Browsing Panel. For these species, the default CWT
in the Record Browsing Panel is “N”. If the CWT button is pressed by mistake,
simply press it again to toggle it to the off (N) position.
The LV and RV buttons are pressed with a fish has a Left Ventral Clip (LV) or
a Right Ventral Clip (RV). If a fish has both a ventral clip and an adipose clip,
the user would first select the adipose clip by selecting the corresponding
Species-AD button (see below). Then the user would select the corresponding
Ventral Clip button (LV or RV). When this is done, the Clip Code in the Record
Browsing Panel will display an “AR” (Adipose-Right Vent) or “AL” (AdiposeLeft Vent). For example, for a subyearling Chinook with an adipose clip and a
left ventral clip, the user would press CH0-AD and then press the LV button
The Clr. Mark button clears Clip Code and CWT fields. At sites where condition
fish are examined for CWT, the 1st click of Clr. Mark clears the Clip Code while
the 2nd click of Clr. Mark makes CWT “blank”.
Weight and Length:
The Enter Weight and Enter Length buttons allow the user to return focus of
the number key pad to the corresponding field. This allows the user to use the
number pad to enter in the data into the desired field. The Clr. Weight and
Clr. Length buttons clear the values in the weight or length fields and also return
focus of the number key pad to the corresponding field.
Species, Special Species, and Miscellaneous Incidental Species:
These buttons allow the user to enter the following Species data: (1) CH1-AD
for yearling Chinook with an adipose clip, (2) CH1 for unclipped yearling Chinook,
(3) CH0-AD for subyearling Chinook with an adipose clip, (4) CH0 for unclipped
subyearling Chinook, (5) ST-AD for steelhead with an adipose clip, (6) ST for an
unclipped steelhead, (7) CO-AD for a coho with an adipose clip, (8) CO for an
unclipped coho, (9) SO-AD for a sockeye with an adipose clip, and (10) SO for
an unclipped sockeye. In addition to these, BON, JDA, and MCN will be doing
condition monitoring for lamprey juveniles. The species codes for juvenile
lamprey are: (1) AB for Ammocoete (Brook), (2) AP for Ammocoete (Pacific),
(3) AS for Ammocoete (Unknown), and (4) MP for Macropthalmia (Pacific). The
Species Code is a required field and only one species button can be selected
for each fish. If the wrong species button is pressed, simply press the correct
species button to overwrite the mistake.
117
Fish Condition Touch Screen species codes for ALL sites
Additional species codes
for lamprey juveniles at
BON, JDA, and MCN
The Special Species buttons include: (1) HO for yearling Chinook holdovers,
(2) EF for eroded fin steelhead (unclipped only), and (3) LF for Lyons Ferry
yearling fall Chinook. These buttons toggle on and
off. The user is only allowed to enter one special
species code for each fish. If a Special Species
button is pressed by mistake, simply press it again to
make that Special Species value go away, or push a
different Special Species button to overwrite the
erroneous selection with the correct selection. Only
one Special Species type is allowed per fish
record.
In addition to the five target salmonid species, the user can also choose the
Misc. Incidental Species button. For a list of the species codes see the species
code listings in Section VIII.F.1. When this button is
pressed, a pop-up appears with a button for each of the
Miscellaneous Incidental Species, listed in alphabetical
order of the common name (not the species code). The
user simply presses the appropriate species button and the
pop-up disappears, returning the user to the main touch
screen. The selected incidental species code appears in
the Species field on the Record Browsing Panel.
118
119
120
IX. Validation
IX.A. Automatic Data Validation and Alerts
Throughout FPC32.net, there are many automatic data validation process that occur
for several fields when data are entered. Many of these validation process result in
Alert/Error Messages that alert the user to a possible error in data entry. It’s important
to note, however, that FPC32.net was designed to allow the user to save all data that
are entered by the user, regardless of whether the data were entered in error. The
details for many of the various data checking algorithms are explained in the detailed
instructions for entering data in Section VIII. However, there are too many validation
procedures throughout FPC32.net to guarantee that we have covered them all.
The Alert/Error Messages fall into a couple of basic categories. Below is a detailed
explanation of the various Alert/Error Messages that a user may encounter when
entering data with FPC32.net, followed by examples of each.
IX.A.1 – Suspect Data Entry Alert – Red Dot
When a user is entering a combination of data that are outside of the validation
criteria, a Red Dot will appear on the suspect data entry. This alerts the user that
something on the current data entry screen does not agree with the current
validation criteria and warrants further investigation.
Example 1: Improper Gear Code, Sample Code, Sample Hours
Combination:
When creating a record in the Catch tab, this user entered a Gear Code of “GC”,
a Sample Code of “1”, and a Sample Hours of “2”. The data validation process
assumes that Sample Hours would be “24” when Gear Code “GC” and Sample
Code “1” are entered. Therefore, an alert Red Dot is provided to alert the user
to the suspect combination.
Example 2: Improper Species, Special Species Combination:
When creating a record in the Catch Detail tab, this user entered a record with
a Species of “CH” and Special Species of “EF”. Since Special Species “EF”
is limited to steelhead, a Red Dot appears, along with a Special Species
121
Validation Alert to alert the user of the suspect combination. For more details on
which Species, Special Species combinations are valid, see Section VIII.B.1 –
Special Species Code.
Example 3: Invalid Length (Touch Screen):
NEW: When creating a new record via the Touch Screen, a Red Dot appears
next to the length field in the Data Review Panel. This Red Dot will linger until
the length being entered falls within the criteria outlined in Section VIII.F.1
(Length). This Red Dot is intended to serve only as a warning, as all lengths
entered can still be saved.
Example 4: Improper Sample Code, Sub-batch Combination:
When creating a record in the Catch tab, this user entered a Sample Code of
“1”. However, when entering data in the Catch Detail tab, the user created a
second sub-batch with a different sample rate. This prompted a Red Dot and a
Sample Code Validation Alert to alert the user of the suspect combination. In
this case, the user should continue data entry for this record and save the record.
Then, before entering the next record, the user should navigate back to the
Catch tab and edit Sample Code to “10”.
122
IX.A.2 – Suspect Data Entry Alert – Red Field in Data Review Grid
FPC32.net has validation on Length and Weight data for condition fish. If a user
enters a Length or Weight that is outside of a pre-determined range for that
species, the field for that entry will appear Red in the Data Review Grid of the
Condition tab. For details on these length and weight ranges, see Section VII.F.1Weight and Section VIII.F.1-Length above. These alerts are intended to alert the
user to anomalous Length and Weight estimates that warrant review. It is up to the
user to keep or delete these anomalous estimates. FPC does not recommend
changing anomalous Length or Weight estimates. If an anomalous Length or
Weight is entered for an individual, FPC recommends simply deleting the
anomalous estimate.
Example 1: Anomalous Length Entry:
When creating a record for a condition fish, the user entered a Length of “500”
for a yearling Chinook. This length is outside the expected range for yearling
Chinook fork lengths (see Section VIII.F.1-Length), which prompted this field to
be Red in the Data Review Grid.
IX.A.3 – Data Entry Error Message
For SMP sites at the dams, entering flow and spill data is mandatory for each batch.
When entering flow and spill data using the Catch tab, the sum of Turbine
Discharge (or PH1 and PH2 Discharge for BO2 and RIS) and Total Spill must not
exceed Total Discharge. If a user enters data that violate this rule, a Data Entry
Error Screen will appear informing the user that the flow and spill data are in
violation of this rule. In this case, the user must make the proper correction before
these data can be saved.
123
Example 1: Flow and Spill Data Entry:
This user entered a Total Discharge of “200”, a Turb Discharge of “199” and a
Total Spill of “10”, which prompted a Data Entry Error Message (see figure
below). In this case, the user must click on the OK button and makes the proper
correction before the record can be saved.
IX.A.4 – Data Reminders
When entering data with FPC32.net, there are some pieces of data that are entered
once by the user and are automatically repeated for subsequent entries by the
program. If the user forgets to enter these pieces of data on the first entry, it can
become cumbersome to correct the data. In order to avoid this, FPC32.net has
built-in Data Reminders that alert users to enter these data when entering their initial
records.
Example 1: Entering a Tank:
At LGS, LMN, and MCN, each time a user starts data entry for a new sub-batch
in Catch Detail, a Data Reminder will appear reminding them to enter a Tank.
This is because Tank is repeated for all subsequent records, until the sub-batch
is changed or the user changes to a new Tank. This message is also used in the
Condition Touch Screen for these sites.
124
IX.B. FPC32.net Validation Reports
It is important that you validate your data before
sending anything to the FPC. There are several
reports that can be generated to validate data entry.
Data can be validated by comparing these reports to
your hand logs. Below is a brief description of each of
the reports that can be generated with FPC32.net and
how they can be used validation. Some validation
information is also provided in Section VII.J above.
IX.B.1 – Daily Summary Report
This report is two pages, with a landscape page layout. The batch header
information is found at the top of the Daily Summary Report. This report does
not separate condition and noncondition fish. Target species (salmonids and
lamprey) are split into four groups: (1) CLIPPED TOTALS, (2) UNCLIPPED
TOTALS, (3) LAMPREY TOTALS, and (4) COMBINED TOTALS. Each Species is
represented by a separate column in the report. The UNCLIPPED TOTALS section
of this report includes a fry column for subyearling Chinook, coho, and sockeye fry.
Each column has several rows of data. These rows are as follows: (1) Sample
Count, (2) Collection Count, (3) Num Exam for Desc, (4) Num Descaled, (5) Facility
Morts, (6) Sample Morts, (7) Research Morts, (8) PIT-tag Morts, (9) Num Bypassed,
(10) Num Trucked, (11) Num Barged, and (12) Descaling Pctg. (%).
125
126
IX.B.2 – Mark Recapture Report
The Mark Recapture Report is the same as has been generated by previous
versions of FPC32. This report summarizes all fish that had Elastomer tags and
does not separate condition and non-condition fish. Running this report after
entering non-condition fish with Elastomer tags (prior to promoting condition fish)
is the best way to validate data entry into the Mark Recaptures data entry tab.
IX.B.3 – Incidental Catch Report
The Incidental Catch Report is the same as has been generated by previous
versions of FPC32. This report summarizes all incidental fish, regardless of whether
they were collected as part of the condition or non-condition sample. Running this
report after entering non-condition incidentals (prior to promoting incidental fish from
the condition sample) is the best way to validate data entry into the Incidental
Catch data entry tab.
127
IX.B.4 – Fish Condition Report
The Fish Condition Report is designed similarly to the Daily Summary Report.
This report summarizes the prevalence of each of the conditions from the condition
sample. Target salmonid species are split into three groups: (1) Clipped,
(2) Unclipped, and (3) Combined. Each species represents a column in the report.
Each column has several rows of data. These rows are as follows: (1) Num
Sampled, (2) Descaling 20% or greater, (3) Injury, (4) Predation, (5) Disease or
Parasite, and (6) Total With Conditions. This report is NOT meant to be used for
validation, it is simply a summary of the conditions seen for a particular day’s
sample. Condition fish with the Other Conditions (Eye Hemm, Pop Eye, Fin Hemm.,
Pink Fin, and Fin Discol.) are NOT included in the Injury row.
IX.B.5 – Individual Fish Condition Report
The Individual Fish Condition Report lists each fish that was sampled as part of
the condition sample via the touch screen. This report was intended for review of
condition data in order to determine obvious errors from data entry (e.g., anomalous
lengths or weights, incorrect species, etc.). Condition fish are sorted by sub-batch,
tank, and sequence. The condition data are divided into five groups: (1) Disease/
Parasite, (2) Injuries, (3) Predator, (4) Other Conditions, and (5) Descaling. The
report uses codes for each of the conditions within these groupings. A detailed
listing of these codes and their meaning can be found below.
128
Disease/Parasite
FU – fungus
CO – columnaris
KD – BKD
PA – parasite
DE – deformity
OD – other disease
Injuries:
HI – head injury
EI – eye injury
OP – operculum injury
BI – body injury
FI – fin injury
Predator:
PB – bird predator
PF – fish predator
PL – lamprey predator
PO – other predator
Other Conditions
PE – pop eye
FH – fin hemorrhage
FP – pink fin
FD – fin discoloration
EH – eye hemorrhage
Descaling:
PD – partial descaling (5-19%)
DS – descaled (≥20%)
DP – descaled by predator (≥20% with pred. marks)
IX.B.6 – Daily Batch/Tank Report
The Daily Batch/Tank Report is arranged in a matrix fashion, similar to the hand
logs for many of the sites. The batch header information is found at the top of the
report. This report separates fish that were sampled as part of the condition sample
from those that were sampled as part of the non-condition sample. There are four
summary sections to the report, including: (1) Tank A, (2) Tank B, (3) Tank None,
and (4) Combined. Each Species/Clip combination represents a column in the
report. Each column has several rows of data. These rows are as follows: (1) NonCond. Sample Count, (2) Exam Desc (Non-Cond), (3) Non-Cond. Descaled,
(4) Condition Sample Count, (5) Condition Descaled, (6) Total Sample Count,
(7) Total Collection, (8) Sample Morts, (9) Facility Morts, (10) Research Morts,
(11) PIT-tag Morts, (12) Num Bypassed, (13) Num Trucked, (14) Num Barged, and
(15) Descaling Pctg. (%).
129
Running this report after entering non-condition fish into the Catch Detail data entry
tab (prior to promoting condition fish) is the best way to validate data entry of noncondition data. Also, after promoting condition fish, this report can be used to
determine final collection counts for data entry of salmonid species into the
Transportation data entry tab (see Section VII.I above). Lamprey juveniles are not
included in this report (see Section IX.B.8 below).
** Lyons Ferry or Holdover yearling fall Chinook are included in the Chinook 1
columns, depending on whether they were unclipped, CWT, or clipped.**
IX.B.7 – Special Species Daily Batch/Tank Report
The Special Species Daily Batch/Tank Report has all the same data and is
arranged in a similar manner as the Daily Batch/Tank Report. However, this report
summarizes only Lyons Ferry and Holdover yearling fall Chinook. Running this
report after entering non-condition fish into the Catch Detail data entry tab (prior to
promoting condition fish) is the best way to validate data entry of Lyons Ferry and
Holdover yearling fall Chinook data from the non-condition sample.
NOTE: Collection counts from this report are NOT to be used for entry into the
Transportation data entry tab, as these fish are already included in the tallies
of Chinook 1 from the Daily Batch/Tank Report (see Section VII.I above).
130
IX.B.8 – Lamprey Batch/Tank Report
The Lamprey Batch/Tank Report is arranged in a similar fashion as the Daily
Batch/Tank Report. However, this report summarizes data only for lamprey
juveniles, separated by tank (Tank A, Tank B, Tank None, and Combined).
Running this report after entering/promoting lamprey juveniles into the Catch Detail
data entry tab is the best way to validate these data.
131
IX.C. FPC Weekly Validation
The FPC validates two random batches from every week by comparing the hand logs
with the electronic batch reports for any discrepancies. For every batch with a
discrepancy the FPC validates two additional batches for the same week. The FPC
then contacts the appropriate site via e-mail requesting that necessary corrections be
made and corrected batches be reposted. See Section VII.L for reposting instructions.
When reposting batches sites are required to include a description of what data have
been changed and why. FPC WILL NOT UPDATE BATCHES UNLESS PROPER
DOCUMENTATION IS RECEIVED.
IX.D. FPC Validation Spreadsheets
In addition to weekly validation, the FPC will send all sites a set of validation
spreadsheets generated from our SQL database. This will be done weekly. These
spreadsheets should be checked against the data in your electronic batches. If
discrepancies are found, then follow normal reposting procedures (see Section VII.L).
Rows for days with no data are included, and batch numbers are included in each row
to facilitate the use of pivot tables in spreadsheet programs to subtotal and grand total
the counts by species rearing disposition, batch number, etc.
IX.E. End of Year Validation
When sampling for the year is completed, each site must send an e-mail to notify
the FPC staff that the sample season has ended. This e-mail should state the final
batch number. If necessary this e-mail will also request a yearly validation spreadsheet
including the data from the site for the entire year, which should match the site’s own
data records. After you have validated your end-of-year data against the FPC validation
spreadsheets and all corrections have been made, you must send us an e-mail stating
that your data are finalized.
132
IX.F.
Project by Project Details for SMP Reporting
Requirements
The Statement of Work Report for the contract Smolt Monitoring by Non-Federal
Entities (Project # 1987-127-00) includes several milestones that pertain to the use of
the FPC32.net data entry program. Below is a summary of these milestones for the
various SMP projects.
1. For Bonneville Dam (Work Elements N–Q) and John Day Dam (Work Elements
R–T) the Statement of Work Report for the contract Smolt Monitoring by NonFederal Entities (Project # 1987-127-00) states the following:
• Milestone N-E. Sample Fish Daily and Collect Data. [SMP personnel at
Bonneville Dam will] sample fish daily throughout the monitoring season at
the JMF. Collect species, condition, and external mark detail from all
sampled fish. Collect detailed condition and length data from a subsample of
the sample. Count and identify all incidental species caught in the samples.
Tally, review, enter into computer and transmit all data to FPC daily. During
periods of low fish collection, August to October, 24-hour daily samples may
be held and sampled every other day.
• Milestone N-F. Project Operations and Flow Data Collection. [SMP
personnel at Bonneville Dam will] collect, record, and verify daily USACE
project operations and flow data and facility fish mortality within the
bypass/collection system.
• Milestone N-G. Collect 100 smolts for fish condition studies. 100 smolts
to be collected for fish condition studies for ongoing USACE assessment.
• Milestone N-H. Summarize and Verify All Sample Data on Days
Collected [at Bonneville Dam].
• Milestone O-A. Transmission of Project Operations. [SMP personnel at
Bonneville Dam will] transmit daily Corps project operations, flow data, fish
transport numbers, facility mortalities, percent descaling and average fork
length data daily or every other day during low collections periods from
August to October. Ensure prompt transfer of data. Notify FPC by phone
whenever we cannot transmit data by 1400 hours on weekdays and/or critical
weekends via FPC32. Advise and discuss problems with FPC when they
occur.
• Milestone P-G. Monitor for Signs of GBT Trauma. Collect samples and
conduct exams according to the FPC-GBT program protocols. Samples
should be taken one to two times per week depending on site. Collect PITtag recapture information.
• Milestone R-E. Sample Fish Daily and Collect Data. [SMP personnel at
John Day Dam will] sample fish daily throughout the monitoring season at the
JMF. Collect species, condition, and external mark detail from all sampled
fish. Collect detailed condition and length data from a subsample of the
sample. Count and identify all incidental species caught in the samples.
Tally, review, enter into computer and transmit all data to FPC daily. During
periods of low fish collection, August to October, 24-hour daily samples may
be held and sampled every other day.
133
•
•
•
•
Milestone R-F Summarize and Verify All Sample Data on Days Collected
[at John Day Dam].
Milestone R-G. Collect 100 smolts for fish condition studies. 100 smolts
to be collected for fish condition studies for ongoing COE assessment.
Milestone R-H. Project Operations and Flow Data Collection. [SMP
personnel at John Day Dam will] collect, record, and verify daily USACE
project operations and flow data and facility fish mortality within the
bypass/collection system.
Milestone S-A. Transmission of Project Data. [SMP personnel at John
Day Dam will] transmit daily Corps project operations, flow data, fish transport
numbers, facility mortalities, percent descaling and average fork length data
daily or every other day during low collections periods from August to
October. Ensure prompt transfer of data. Notify FPC by phone whenever we
cannot transmit data by 1400 hours on weekdays and/or critical weekends via
FPC32. Advise and discuss problems with FPC when they occur.
2. For Rock Island Dam (Work Elements V–X) the Statement of Work Report for
the contract Smolt Monitoring by Non-Federal Entities (Project #1987-127-00)
states the following:
• Milestone V-E. Collect Fish for Examination. Fish will be collected
continuously during the monitoring period. Fish will be examined during
regular work hours (0800–1630 hrs), unless large numbers of fish are
entering the flume of the bypass trap, in which case fish would be removed
and recorded as the appropriate sample days catch. Fish will be delivered via
the bypass elevator in a 12’ x 4’ x 3/5’ aluminum holding talk which will be
plumbed for continuous flow of river water. Small samples of fish will be reanesthetized using a light buffered solution of MS-222 before being moved
into the sampling trailer and placed in a full strength buffered solution of
MS-222. Fish will be identified by species and examined for marks indicating
hatchery origin and descaling. Anesthetized fish will recover in a separate
holding tank and be released after they have recovered from anesthesia.
• Milestone V-F. Collect Biological Data. Collect biological data from
salmonid migrants captured in the collection facility from 1 April to 31 August
2015. Data will be recorded daily to include by species, total count, adipose
fin-clipped/unclipped status, CWT presence/absence, other external or
internal marks or tags, smolt condition, and descaling.
• Milestone V-G. Examine juvenile salmonid emigrants for symptoms of
GBT. Examine juvenile salmonid emigrants for symptoms of GBT twice
weekly. The unpaired fins and eyes will be examined for the presence of
bubbles. Absence or presence of GBT symptoms as well as the location and
severity of symptoms will be reported to FPC daily throughout the sample
season.
• Milestone W-B. Transmit Data. Transmit daily project operations, flow
data, fish transport numbers, facility mortalities, percent descaling and
average fork length data daily. Ensure prompt transfer of data. Notify FPC
by phone whenever we cannot transmit data by 1400 hours on weekdays
and/or critical weekends via FPC32. Advise and discuss problems with FPC
when they occur.
134
•
Milestone X. Mark/Tag Animals. Insert PIT tags into between 200 and 600
unclipped Chinook yearlings, unclipped subyearling Chinook, unclipped
sockeye, hatchery steelhead, and wild steelhead weekly.
3. For Lower Granite Dam (Work Elements AI and AK), Lower Monumental Dam
(Work Elements AO and AQ), and McNary Dam (Work Elements AL and AN)
the Statement of Work Report for the contract Smolt Monitoring by Non-Federal
Entities (Project #1987-127-00) states the following:
• Milestone AI-E. Sample Fish Daily and Collect Data. [SMP personnel at
Lower Granite Dam will] sample fish daily throughout the monitoring season
at the JMF. Collect species, condition, and external mark detail from all
sampled fish. Collect detailed condition and length data from a subsample of
the sample. Count and identify all incidental species caught in the samples.
Tally, review, enter into computer and transmit all data to FPC daily. During
periods of low fish collection, August to October, 24-hour daily samples may
be held and sampled every other day.
• Milestone AI-F. Summarize and Verify All Sample Data on Days
Collected [at Lower Granite Dam].
• Milestone AI-G. Project Operations and Flow Data Collection. [SMP
personnel at Lower Granite Dam will] collect, record, and verify daily USACE
project operations and flow data and facility fish mortality within the bypass/
collection system.
• Milestone AJ-A. Transmission of Project Data. [SMP personnel at Lower
Granite Dam will] transmit daily Corps project operations, flow data, fish
transport numbers, facility mortalities, percent descaling and average fork
length data daily or every other day during low collections periods from
August to October. Ensure prompt transfer of data. Notify FPC by phone
whenever we cannot transmit data by 1400 hours on weekdays and/or critical
weekends via FPC32. Advise and discuss problems with FPC when they
occur.
• Milestone AK-G. Monitor for signs of GBT Trauma. Collect samples and
conduct exams according to FPC GBT program protocols. Samples should
be taken one to two times per week depending on site. Collect PIT-tag
recapture information.
• Milestone AO-E. Sample Fish Daily and Collect Data. [SMP personnel
at Lower Monumental Dam will] sample fish daily throughout the monitoring
season at the JMF. Collect species, condition, and external mark detail from
all sampled fish. Collect detailed condition and length data from a subsample
of the sample. Count and identify all incidental species caught in the
samples. Tally, review, enter into computer and transmit all data to FPC
daily. During periods of low fish collection, August to October, 24-hour daily
samples may be held and sampled every other day.
• Milestone AO-F. Summarize and Verify All Sample Data on Days
Collected [at Lower Monumental Dam].
• Milestone AO-G. Project Operations and Flow Data Collection. [SMP
personnel at Lower Monumental Dam will] collect, record, and verify daily
USACE project operations and flow data and facility fish mortality within the
bypass/collection system.
135
•
•
•
•
•
•
•
Milestone AP-A. Transmission of Project Data. [SMP personnel at Lower
Monumental Dam will] transmit daily Corps project operations, flow data, fish
transport numbers, facility mortalities, percent descaling and average fork
length data daily or every other day during low collections periods from
August to October. Ensure prompt transfer of data. Notify FPC by phone
whenever we cannot transmit data by 1400 hours on weekdays and/or critical
weekends via FPC32. Advise and discuss problems with FPC when they
occur.
Milestone AQ-F. Monitor for signs of GBT trauma. Collect samples and
conduct exams according to FPC GBT program protocols. Samples should
be taken one to two times per week depending on site. Collect PIT-tag
recapture information.
Milestone AL-E. Sample Fish Daily and Collect Data. [SMP personnel at
McNary Dam will] sample fish daily throughout the monitoring season at the
JMF. Collect species, condition, and external mark detail from all sampled
fish. Collect detailed condition and length data from a subsample of the
sample. Count and identify all incidental species caught in the samples.
Tally, review, enter into computer and transmit all data to FPC daily. During
periods of low fish collection, August to October, 24-hour daily samples may
be held and sampled every other day.
Milestone AL-F. Summarize and Verify All Sample Data on Days
Collected [at McNary Dam].
Milestone AL-G. Project Operations and Flow Data Collection. [SMP
personnel at McNary Dam will] collect, record, and verify daily USACE project
operations and flow data and facility fish mortality within the bypass/collection
system.
Milestone AM-A. Transmission of Project Data. [SMP personnel at
McNary Dam will] transmit daily Corps project operations, flow data, fish
transport numbers, facility mortalities, percent descaling and average fork
length data daily or every other day during low collections periods from
August to October. Ensure prompt transfer of data. Notify FPC by phone
whenever we cannot transmit data by 1400 hours on weekdays and/or critical
weekends via FPC32. Advise and discuss problems with FPC when they
occur.
Milestone AN-G. Monitor for signs of GBT trauma. Collect samples and
conduct exams according to FPC GBT program protocols. Samples should
be taken one to two times per week depending on site. Collect PIT-tag
recapture information.
4. For Little Goose Dam (Work Elements D–F) the Statement of Work Report for
the contract Smolt Monitoring by Non-Federal Entities (Project #1987-127-00)
states the following:
• Milestone D-E. Sample Fish Daily and Collect Data. [SMP personnel at
Little Goose Dam will] sample fish daily throughout the monitoring season at
the JMF. Collect species, condition, and external mark detail from all
sampled fish. Collect detailed condition and length data from a subsample of
the sample. Count and identify all incidental species caught in the samples.
Tally, review, enter into computer and transmit all data to FPC daily. During
136
•
•
•
•
periods of low fish collection, August to October, 24-hour daily samples may
be held and sampled every other day.
Milestone D-F. Summarize and Verify All Sample Data on Days
Collected [at Little Goose Dam].
Milestone D-G. Project Operations and Flow Data Collection. [SMP
personnel at Little Goose Dam will] collect, record, and verify daily USACE
project operations and flow data and facility fish mortality within the
bypass/collection system.
Milestone E-A. Transmission of Project Data. [SMP personnel at Little
Goose Dam will] transmit daily Corps project operations, flow data, fish
transport numbers, facility mortalities, percent descaling and average fork
length data daily or every other day during low collections periods from
August to October. Ensure prompt transfer of data. Notify FPC by phone
whenever we cannot transmit data by 1400 hours on weekdays and/or critical
weekends via FPC32. Advise and discuss problems with FPC when they
occur.
Milestone F-G. Monitor for signs of GBT trauma. Collect samples and
conduct exams according to FPC GBT program protocols. Samples should
be taken one to two times per week depending on site. Collect PIT-tag
recapture information.
5. For Lower Grande Ronde River Trap (Work Elements J–L) the Statement of
Work Report for the contract Smolt Monitoring by Non-Federal Entities (Project
#1987-127-00) states the following:
• Milestone J-E. Operate Trap for Collection of Data. [SMP personnel at
the Lower Grande Ronde River Trap will] operate trap 7 days/week March 5–
May 26. Collect data on daily catch, hatchery and wild population composition, descaling, recaptures of PIT-tagged parr and average length by species.
Collect limited species data on incidental fish captured. Monitor fish injury
rates and mortality due to trapping and sampling procedures and modify as
necessary to minimize injury and mortality rates.
• Milestone J-F. Transmit Collection Data. [SMP personnel at the Lower
Grande Ronde River Trap will] electronically transmit salmonid collection data
to FPC daily in a standard format determined by FPC. This will be done from
a site several miles upriver that has standard phone access.
• Milestone K. Mark/Tag Animals. PIT-tag wild steelhead, hatchery
steelhead, wild Chinook, and hatchery Chinook over the fish collection period
at the Grande Ronde Trap.
• Milestone L-A. Transmit of Project Data. [SMP personnel at the Lower
Grand Ronde Trap will] transmit electronically PIT-tag tagging files within
24 hours. Transmit flow data, facility mortalities, percent descaling daily.
Notify FPC by phone whenever we cannot transmit data by 1400 hours on
weekdays and/or critical weekends via FPC32. Advise and discuss problems
with FPC when they occur.
137
6. For the Salmon River Trap (Work Elements AB, AD, and AF) and Snake River
Trap (Work Elements AC, AE, and AG) the Statement of Work Report for the
contract Smolt Monitoring by Non-Federal Entities (Project #1987-127-00) states
the following:
• Milestone AB-E. Operate Trap for Collection of Data. [SMP personnel at
the Salmon River Trap will] operate the trap 5 nights/week March 5–May 26.
This will mean lowering the trap to begin the sample period at 6:00 PM on
Sunday and cessation on Friday morning at 9:00 AM. Collect data on daily
catch, hatchery and wild population composition, descaling, recaptures of
PIT-tagged parr and average length by species. Collect limited species data
on incidental fish captured. Monitor fish injury rates and mortality due to
trapping and sampling procedures and modify as necessary to minimize injury
and mortality rates.
• Milestone AB-F. Transmit Collection Data. [SMP personnel at the Salmon
River Trap will] electronically transmit salmonid collection data to FPC daily in
a standard format determined by FPC. This will be done from a site several
miles upriver that has standard phone access.
• Milestone AD. Mark/Tag Animals. Operate a dipper trap on the Salmon
River at Twin Bridge at Whitebird. Put the trap in sampling mode by 6:00 PM
Sunday nights and process collections at 7:00 AM Mondays through Fridays.
Operate trap until finished processing fish sample on Friday. Begin Trap
operations in early March and end operations in late May for SMP purposes.
For purposes of survival estimation, in weeks when large numbers of smolts
are passing, PIT-tag weekly blocks of 600 fish for each species and rearing
type.
• Milestone AF-A. Transmit of Project Data. [SMP personnel at the Salmon
River Trap will] transmit electronically PIT-tag tagging files within 24 hours.
Transmit flow data, facility mortalities, percent descaling daily. Notify FPC by
phone whenever we cannot transmit data by 1400 hours on weekdays and/or
critical weekends via FPC32. Advise and discuss problems with FPC when
they occur.
• Milestone AC-E. Operate Trap for Collection of Data. [SMP personnel at
the Snake River Trap will] operate the trap 7 nights/week March 5–May 26.
Collect data on daily catch, hatchery and wild population composition,
descaling, recaptures of PIT-tagged parr, and average length by species.
Collect limited species data on incidental fish captured. Monitor fish injury
rates and mortality due to trapping and sampling procedures and modify as
necessary to minimize injury and mortality rates.
• Milestone AC-F. Transmit Collection Data. [SMP personnel at the Snake
River Trap will] electronically transmit salmonid collection data to FPC daily in
a standard format determined by FPC. This will be done from a site several
miles upriver that has standard phone access.
• Milestone AE. Mark/Tag Animals. Operate a scoop trap on the Snake River
at Lewiston. This trap is operated 7 days/week. Begin trap operations in
early March and end operations in late May for SMP purposes. For purposes
of survival estimation, in weeks when large numbers of smolts are passing,
PIT-tag weekly blocks of 600 fish for each species and rearing type possible.
138
•
Milestone AG-A. Transmit of Project Data. [SMP personnel at the Snake
River Trap will] transmit electronically PIT-tag tagging files within 24 hours.
Transmit flow data, facility mortalities, percent descaling daily. Notify FPC by
phone whenever we cannot transmit data by 1400 hours on weekdays and/or
critical weekends via FPC32. Advise and discuss problems with FPC when
they occur.
139
140
X. Printing Daily Reports and Sending Data to FPC
X.A.
Generating and Printing Reports
There are several different reports available with the FPC32.net remote data entry
program (see Section IX.B for a detailed discussion of each).
To generate a report, click on the Catch tab and select a batch. Choose Reports and
choose the report you want to generate from the drop-down list. Once a report is
selected it may take a few moments for the report to open. A report will open in a
separate Report Viewing Window.
Percent Zoom
Next/Previous
Page
Save Report As
Print
The Report Viewing Window has several buttons at the top
that allow the user to perform different functions. Below is a
brief description of these buttons and their functions.
141
Next/Previous Page – The Next/Previous Page buttons allows the user to
view the next or previous report pages. In addition, this section of the Report
Viewing Window informs the user how many pages the chosen report is. If
the arrow buttons are blue, then the report consists of more than one page.
• The Single Arrow buttons advance the report to the next
or previous page
•
The Skip buttons advance the report to the beginning or
end pages
Printing Reports – The Print button allows the user to print the report. The
Print button opens the Print Dialog Box. From here, the user can select a
printer, choose a print range, and choose the number of copies to be printed.
Save Report As – Clicking the Save Report As button opens a drop-down list.
This drop-down lists the formats that are available for saving the report. These
include: (1) Adobe (PDF), (2) Comma Separated Value (CSV), (3) Excel (XLS),
(4) Rich Text Format (RTF), (5) Image (TIFF), or (6) Web Archive (html). Once
the user has chosen a format for the exported report, a Save as dialog box
appears. From this dialog box, navigate to where you want to save the report
and name the report.
142
Percent Zoom – The Percent Zooms allows the user to select a zoom
percentage to view report details on screen.
X.B.
Sending SMP Data and Hand Logs to the FPC
New batch data (i.e., XML files) are sent to the FPC in one of two ways: (1) through
e-mail or (2) via http upload. Copies of the hand logs must also be submitted (via fax or
e-mail) to the FPC.
Sending New Batches Via E-mail
New batches should be sent via e-mail to [email protected] with the appropriate XML
file attached. The FPC will not receive this e-mail unless your e-mail address
has been cleared by the FPC data center staff. Contact the FPC Data Staff if
you need to add a new e-mail address from which batches may be sent.
If users do not want to send the final XML file to the FPC by navigating to their
e-mail program and attaching it to an e-mail, FPC32.net has a feature that allows
users to send the final XML file with the push of a button. However, this feature
143
works only with users who have Microsoft Outlook configured in their office
computers and have constant internet access. If you are not using Microsoft
Outlook, you will need to send the XML files using the procedure above.
To use this feature, you must type [email protected] into the e-mail field in the
Settings tab (see picture below). Once this feature has been activated, a Send
button will be added to the Catch data entry tab on the Main Form. Once the
Save as Batch button has been pressed and the final XML file is written, you
may choose to send the batch automatically through FPC32.net by clicking on
the Send button. A prompt will appear asking you if you want to send an e-mail;
choose Yes.
Uploading New Batches or Hand Logs Via HTTP – Instead of e-mail, new
batches and hand logs can also be uploaded via the web. To upload a new batch or
hand log, you must first navigate to http://www.fpc.org/smpupload/uploadfile.aspx
with your internet browser. To log in, enter Login: guest and password:
niceguest.
The password authentication requires you to accept cookies, but you can set
Internet Explorer to accept just cookies from FPC if you wish. To change the
privacy settings in Internet Explorer, go to Tools/Internet/Privacy then click on
the Edit button under Web Sites. Add the domain fpc.org and select Always
Allow.
144
Once you have logged in, you will be directed to the SMP Batch Upload Page
where you may upload up to 4 files at once.
145
Choose Select to browse to the location of the files you wish to upload and click
the OK button. Once you have uploaded all the files you wish to upload, click on
the Upload File(s) button. You will receive a message about the number of files
that were successfully uploaded. You can select the Refresh List button to
check which files were uploaded.
• Note: Only two types of files can be uploaded to this site, FPC32.net files
with the suffix XML and hand logs in PDF format. If you accidentally attempt
to upload a file in a format other than these two, only the XML and PDF files
will load and the results page will show you the number of XML and PDF files
that uploaded successfully, along with an error message for the incorrect file
type(s).
• Note: Although up to 4 files can be uploaded at one time, there is a limit to
the total size of the files that are uploaded. Currently, the total upload is
limited to 32 Mb. If you are having trouble uploading an XML or PDF file,
check the file sizes. If the file is larger than 32 Mb, contact the data staff
at FPC.
• Note: If you are having trouble uploading files via the web, try sending the file
to the FPC via e-mail ([email protected]). See above for instructions.
Sending Hand Logs to the FPC – After batches (i.e., XML file) have been
submitted to the FPC, SMP personnel must also send a copy of their hand log.
There are three ways to do this:
• Fax: Hand logs can be faxed to FPC at 503-232-1259.
• E-mail: Hand logs can be e-mailed as an attachment to the FPC. E-mailed
hand logs must be in PDF format and should be sent to [email protected].
E-mailed hand logs can be sent in the same e-mail as the batch file (i.e.,
XML).
• Upload: Hand logs can be uploaded via the web at
http://www.fpc.org/smpupload/SMP_Posting.asp. The procedure for uploading hand logs is the same as that outlined for uploading XML batches
(see Section X.B). Uploaded hand logs must be in PDF format.
146
XI. What’s New with FPC32.net (2015)
In 2015, the FPC will continue to support two editions of FPC32.net for SMP data entry.
These editions are TouchScreenSetup3.msi and TouchScreenSetup3_lamprey.msi.
The TouchScreenSetup3.msi edition will be used by site personnel at LGR, LGS,
LMN, RIS, WTB, LEW, and GRN. To make sure you are running the most up-to-date
version (and edition), we suggest that all sites uninstall FPC32.net from their machines
and download the newest version of TouchScreenSetup3.msi from the FTP site
(ftp://ftp.fpc.org/FPC32.net/). See Section VI.C. for instructions on how to do this. If
you are using a computer with Windows 7 operating system, you may need to follow
instructions that allow the user to gain Full Control of SQL Express. These instructions
have been added to this manual (see Section VI.D.1.).
The TouchScreenSetup3_lamprey.msi edition will be used by SMP site personnel
at BON, JDA, and MCN. To make sure you are running the most up-to date version
(and edition), we suggest that all sites uninstall FPC32.net from their machines and
download the newest version of TouchScreenSetup3_lamprey.msi from the FTP site
(ftp://ftp.fpc.org/FPC32.net/). See Section VI.C. for instructions on how to do this. If
you are using a computer with Windows 7 operating system, you may need to follow
instructions that allow the user to gain Full Control of SQL Express. These instructions
have been added to this manual (see Section VI.D.1.).
XI.A. Red Length and Weight “Caution” Dot
The fish condition touch screen has an added feature that alerts users when an entered
length or weight is outside the range of “valid” estimates. For length, this red “caution”
dot will linger next to the length field in the data review screen until a valid length is
entered. However, all lengths entered can still be saved. The red dot is meant to serve
only as a “caution” that the currently entered length is not in the range of valid estimates
(see table for valid length estimates by species).
Species
Code(s)
CH0, CH1, CO
ST
SO
MP, AP, AB
AS
Length
Range
61 to 250
61 to 350
61 to 200
70 to 250
30 to 75
For weight, the red “caution” dot appears if an invalid weight is entered. As with
lengths, all weights entered can still be saved. The red dot is meant to serve only as a
147
“caution” that the currently entered weight is outside the range of valid estimates (see
table for valid weight estimates by species).
Species
Code(s)
CH0, CH1
ST
SO
CO
MP, AP, AB, AS
Weight
Range
0 to 150
0 to 375
0 to 199
0 to 175
0 to 20
XI.B. Added Functionality to Transportation Import Feature
In previous versions of FPC32.net, the Import button on the Transportation tab only
imported summaries of species information from the current batch (i.e., Tank, Species,
Age, Clip, CWT, and Special Species). FPC2.net (3.15.0.1) has added functionality to
add summarized collections to these data as well. In addition, collection and species
information can now be summarized from two sample days, to accommodate everyother-day transportation. The use of the Import button is still optional, as is the
importing of collection data. The default destination for collection data is determined in
the Setting dialog box of FPC32.net. Below is a brief explanation of what each of these
settings does.
148
Import Species Only – imports different combinations of Species Code, Age Code,
Tank, Special Species, Clipped/Unclipped, and CWT from the Catch Detail tab.
If this option is checked, no collections will be imported to the Transportation
tab.
Import to Bypass – imports all species information (as above) from Catch Detail
plus the total collections for these species combinations. If this option is
checked, all collections will be imported to the Number Bypassed field.
Import to Truck – imports all species information (as above) from Catch Detail
plus the total collections for these species combinations. If this option is
checked, all collections will be imported to the Number Trucked field.
Import to Barge – imports all species information (as above) from Catch Detail
plus the total collections for these species combinations. If this option is
checked, all collections will be imported to the Number Barged field.
Include Previous Day – if checked, this button will import all species information
from Catch Detail for the current and previous batch plus the total collections
for these species combinations. Where the collections are imported to will be
dependent on which of the Bypass, Trucked, or Barge options is checked. It is
intended that this button will be checked during every-other-day transportation.
149
150
XII. Notes
______________________________________________________________________
______________________________________________________________________
______________________________________________________________________
______________________________________________________________________
______________________________________________________________________
______________________________________________________________________
______________________________________________________________________
______________________________________________________________________
______________________________________________________________________
______________________________________________________________________
______________________________________________________________________
______________________________________________________________________
______________________________________________________________________
______________________________________________________________________
______________________________________________________________________
______________________________________________________________________
______________________________________________________________________
______________________________________________________________________
______________________________________________________________________
______________________________________________________________________
______________________________________________________________________
______________________________________________________________________
______________________________________________________________________
______________________________________________________________________
______________________________________________________________________
______________________________________________________________________
______________________________________________________________________
______________________________________________________________________
______________________________________________________________________
______________________________________________________________________
151
______________________________________________________________________
______________________________________________________________________
______________________________________________________________________
______________________________________________________________________
______________________________________________________________________
______________________________________________________________________
______________________________________________________________________
______________________________________________________________________
______________________________________________________________________
______________________________________________________________________
______________________________________________________________________
______________________________________________________________________
______________________________________________________________________
______________________________________________________________________
______________________________________________________________________
______________________________________________________________________
______________________________________________________________________
______________________________________________________________________
______________________________________________________________________
______________________________________________________________________
______________________________________________________________________
______________________________________________________________________
______________________________________________________________________
______________________________________________________________________
______________________________________________________________________
______________________________________________________________________
______________________________________________________________________
______________________________________________________________________
______________________________________________________________________
______________________________________________________________________
______________________________________________________________________
______________________________________________________________________
152
XIII. FPC32.NET Manual Acknowledgement Form
------------------------------------------------------------------------------------------------------------
FPC32.NET MANUAL ACKNOWLEDGEMENT FORM
I, the undersigned, acknowledge that I have read the FPC32.net manual.
Name: (Please Print) ____________________________________
Signature: ______________________________ Date:__________
Please copy this form and mail or fax a completed and signed form to:
Fish Passage Center
Attn: Brandon Chockley
847 NE 19th Ave, Suite 250
Portland OR 97213
Fax: 503-232-1259
------------------------------------------------------------------------------------------------------------
153