1
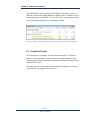
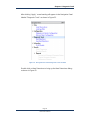
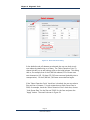
Program TribPit Cohort Analysis of Juvenile Salmonid Movement and Survival in Tributaries Developed by: James Lady, John R. Skalski, and Rebecca Buchanan Columbia Basin Research School of Aquatic & Fishery Sciences University of Washington 1325 Fourth Avenue, Suite 1820 Seattle, Washington 98101-2509 Prepared for: U.S. Department of Energy Bonneville Power Administration Division of Fish and Wildlife P.O. Box 3621 Portland, Oregon 97208-3621 Project No. 1989-107-00 Contract No. 59002 May 2014 Program TribPit Acknowledgments This project is funded by the Bonneville Power Administration (BPA), US Department of Energy, under Contract No. 55454, Project No. 1989-10700, as part of the BPA's program to protect, mitigate, and enhance fish and wildlife affected by the development and operation of hydroelectric facilities on the Columbia River and its tributaries. Page i TribPit User’s Manual Program TribPit Page ii TribPit User’s Manual Program TribPit Table of Contents Acknowledgments .............................................................................................................. i Chapter 1: Overview......................................................................................................... 1 1.1 Motivation................................................................................................................ 1 1.2 The TribPit Model.................................................................................................. 1 1.3 Auxiliary Releases .................................................................................................. 3 1.4 Model Parameterization ..................................................................................... 4 1.4.1 Scenario One: One Release Only ........................................................... 5 1.4.2 Scenario Two: Multiple Releases from the Same Site But in Different Years .............................................................................................. 5 1.4.3 Scenario Three: Multiple Releases in the Same Year But from Different Sites................................................................................................ 5 1.4.4 Scenario Four: Releases from Different Sites and in Different Years ................................................................................................................. 6 Chapter 2: Using TribPit.................................................................................................. 7 2.1 Menus ........................................................................................................................ 8 2.2 Settings .................................................................................................................. 10 2.2.1 General Settings ......................................................................................... 10 2.2.2 Sites Configuration Settings .................................................................. 11 2.2.3 Advanced Settings ..................................................................................... 12 Chapter 3: Data – TribPit Input Files ....................................................................... 13 3.1 Sites Configuration File .................................................................................... 13 3.2 Observations File ................................................................................................ 14 3.3 Age Data ................................................................................................................ 18 3.4 Loading the Data ................................................................................................ 19 Chapter 4: Study Configuration ................................................................................ 23 4.1 Configuring Releases and Cohorts .............................................................. 23 4.2 Configure Sites and Years ............................................................................... 24 4.2.1 Interpreting the Diagrams ...................................................................... 25 4.2.2 Changing the Sites and Years Configuration................................... 33 4.2.3 Resetting the Sites and Years Configuration ................................... 42 Chapter 5: Estimation and Results ........................................................................... 43 5.1 Model Comparison Window .......................................................................... 44 5.2 Graphical Results ................................................................................................ 45 5.3 Reports ................................................................................................................... 47 5.3.1 Report Header ............................................................................................. 47 5.3.2 Survival and Movement Parameter Estimates................................. 48 5.3.3 Capture Parameter Estimates ................................................................ 49 5.3.4 Performance Measures Report ............................................................. 49 5.4 Expert Mode......................................................................................................... 52 Page iii TribPit User’s Manual Program TribPit Chapter 6: Diagnostic Tools ....................................................................................... 55 Appendix A: Performance Measures Calculations ............................................. 59 Page iv TribPit User’s Manual Chapter 1: Overview 1.1 Motivation Traditional release-recapture models have been used on the Columbia River system to estimate survival with the assumption that from release to a detection point, or from one detection point to the next, an individual fish either (1) migrates downstream or (2) dies. Studies of Chinook salmon and steelhead, however, show that many juvenile salmon and steelhead stay upstream (“residualize”) in the tributaries for one or more years before migrating downstream. A traditional release-recapture analysis, which assumes all released fish migrate downstream in the release year, would treat the fish that residualize as mortalities. Program TribPit provides cohort-based survival estimates that account for the possibility of an individual fish overwintering for multiple years during the downstream migration process. 1.2 The TribPit Model Figure 1 illustrates the TribPit model for a hypothetical study with a release in year 1 and detections at three downstream locations. The parameters of the model are: = the probability of survival and movement from site in year to site in year , given that the individual was alive at site in year . = the probability of detection at site in year , given that an individual was alive at site in year . = the probability of survival and movement and detection from the penultimate site in year to the final site in year , given that the individual was alive at the penultimate site in year . Page 1 TribPit User’s Manual Chapter 1: Overview Figure 1. Illustration of the TribPit model for a hypothetical study For the sake of clarity, Figure 1 does not show all possible overwintering possibilities of a release (the diagonals on the diagram). For example, if fish detected at site 2 in year 1 were next detected at site 3 in year 3, Program TribPit would include the parameter in the model; TribPit only includes the overwintering-related parameters in the model for which there are observations. Note that for the final reach, from the penultimate site to the final site, the probability of survival and movement cannot be separately estimated from the probability of detection. For this reason, TribPit models the final parameter as the product of the two. A consequence of this is that a study must have an additional downstream detection site beyond the site at which an estimate of survival and movement is desired. Page 2 TribPit User’s Manual Chapter 1: Overview 1.3 Auxiliary Releases Program TribPit allows for multiple releases of a given cohort in other years and/or sites for the purpose of increasing the precision of the resulting parameter estimates. For example, continuing with the hypothetical study of Figure 1, another release from the same cohort and from the same site might be performed one year later, as shown in Figure 2. Figure 2. An auxiliary release for a hypothetical study of the same cohort as in Figure 1 in the following year There are several parameters that might be in common across the two releases: , , , , , , , and . Program TribPit provides hypotheses testing via the AIC to see if it is possible to equate the equivalent parameters across the releases. The release process depicted in Figures 1 and 2 may be repeated for a number of years. Program TribPit assumes that the earliest release in time and the most upstream release is the primary release; all other releases are assumed to be auxiliary releases. Page 3 TribPit User’s Manual Chapter 1: Overview 1.4 Model Parameterization As explained in the previous example, auxiliary releases may be used to increase the precision of parameter estimates by equating equivalent parameters across releases. The possibilities include: 1. Keeping all parameters unique across releases, in which case the auxiliary releases do not provide additional precision for the estimates of the primary release. 2. Equating only the detection parameters ( ) across releases. 3. Equating both the detection parameters and the survival and movement parameters ( and ) across releases. In addition, parameters may be combined: 1. Across all releases released from the same release site. 2. Across all releases released in the same year. 3. Across all releases regardless of release site and release year. Although the previous discussion referred to the TribPit model, from here on out the term “model” will be used to refer to the parameterization used in estimating the parameters. The available models are dependent on the number of and the nature of the releases. The four possible scenarios are: 1. One release only. 2. Multiple releases all released from the same site but in different years. 3. Multiple releases all released in the same year but from different sites. 4. Multiple releases from different sites and in different years. The tables in Sections 1.4.1 to 1.4.4 show what models are available in Program TribPit for each of these four scenarios. Note that in some cases some available models may not be estimable due to the sparseness of the data. The “Model ID” is a unique identifier assigned to each model for ease of reference. Page 4 TribPit User’s Manual Chapter 1: Overview 1.4.1 Scenario One: One Release Only Model ID Equivalent Capture Parameters Equivalent Survival and Movement Parameters M.n.1A Unique Unique 1.4.2 Scenario Two: Multiple Releases from the Same Site But in Different Years Model ID Equivalent Capture Parameters Equivalent Survival and Movement Parameters M.y.1A Unique Unique M.y.2A Equated across release years Unique M.y.2B Equated across release years Equated across release years 1.4.3 Scenario Three: Multiple Releases in the Same Year But from Different Sites Model ID Equivalent Capture Parameters Equivalent Survival and Movement Parameters M.s.1A Unique Unique M.s.2A Equated across release sites Unique M.s.2B Equated across release sites Equated across release sites Page 5 TribPit User’s Manual Chapter 1: Overview 1.4.4 Scenario Four: Multiple Releases from Different Sites and in Different Years Model ID Capture Parameters Equivalent Survival and Movement Parameters M.ys.1A Unique Unique M.ys.2A Equated across release years, release sites unique Unique M.ys.2B Equated across release years, release sites unique Equated across release years, release sites unique M.ys.3A Equated across release sites, release years unique Unique M.ys.3B Equated across release sites, release years unique Equated across sites, release years unique M.ys.4A Equated across all releases Unique M.ys.4B Equated across all releases Equated across release years, release sites unique M.ys.4C Equated across all releases Equated across release sites, release years unique M.ys.4D Equated across all releases Equated all releases Page 6 TribPit User’s Manual Chapter 2: Using TribPit Figure 3 below shows the main dialog of Program TribPit at startup. The main components are: The Navigation Panel is on the left-hand side. It lists all commands available to the user organized in a hierarchical way, from top to bottom in the order that the user would generally access them. The Releases Summary is on the right-hand side. It summarizes the releases for all data currently loaded into Program TribPit. The Output is at the bottom. All status messages and error messages that occur during program execution are displayed here. The Workspace occupies the center portion of the main dialog. This is where all user dialogs and reports are displayed. Menus across the top of the main dialog, described below. Page 7 TribPit User’s Manual Chapter 2: Using TribPit Figure 3. Main dialog of Program TribPit at startup with main components highlighted 2.1 Menus The File menu commands are shown in Figure 4. The Exit command causes Program TribPit to exit. The other commands – “Save As,” “Print” and “Print Preview” - are available when reports and graphs are active, allowing reports to be saved to a file or sent to a printer. Figure 4. File Menu Page 8 TribPit User’s Manual Chapter 2: Using TribPit The Data menu has one command – “Clear All Data.” It clears all data currently loaded and returns Program TribPit to its initial state. The user will be asked to confirm this request before performing this destructive command. The View menu, shown in Figure 5, allows the user to control whether or not the Navigation Panel, Output, or the Releases Summary is visible or not. Figure 5 shows the default state with all three components having a checkmark, indicating they are visible. Clicking on a component will “uncheck” it and hide it from view; clicking on an “un-checked” item will cause the hidden component to be visible again. Figure 5. View Menu The Window menu has three actions: “Tile Windows,” “Cascade Windows,” and “Close All,” allowing the user to organize the currently open windows in the workspace. The Edit menu has one item, “Settings” as described below. Page 9 TribPit User’s Manual Chapter 2: Using TribPit 2.2 Settings The settings dialog, shown in Figure 6, has three tabs across the top: “General,” “Sites Configuration,” and “Advanced.” These three tags define the computing environment and are described in detail below. Figure 6. General Settings Dialog 2.2.1 General Settings The general settings dialog is shown in Figure 6. The top part allows the user to control the number of decimal places displayed in reports, both for estimates and the standard errors of estimates. In the User Interface Settings, the user may turn on “Use expert mode – allow model selection.” This is described in detail in Section 5.4. Page 10 TribPit User’s Manual Chapter 2: Using TribPit 2.2.2 Sites Configuration Settings As will be explained in Chapter 3, a sites configuration file is necessary before loading observations data. The Sites Configuration tab, shown in Figure 7, allows the user to select an alternate sites configuration file. If the user changes the sites configuration file, a warning will appear as shown in Figure 8, which the user must acknowledge by pressing the “OK” button. The sites configuration file is used only when data are loaded; if the user wants to apply an alternate sites configuration file to data already loaded, then the File->Clear All Data command must be invoked, and the observations must be reloaded after specifying the desired sites configuration file. Figure 7. Sites Configuration Settings tab Figure 8. Warning Message when the user changes the sites configuration file Page 11 TribPit User’s Manual Chapter 2: Using TribPit When the user selects “Use alternate sites configuration file,” the dialog appears as shown in Figure 9, with both the “Apply” and “Done” buttons disabled. The user must specify the alternate configuration file before proceeding by pressing the tool button shown in Figure 9. Figure 9. Sites Configuration Setting after selecting “Use alternate sites configuration file” Note that when the user exits Program TribPit and then restarts it, it defaults to using the default configuration file; if the user desires an alternate sites configuration file, the user must explicitly select it each time at startup. 2.2.3 Advanced Settings The Advanced Tab has one item – a checkbox for “Show Diagnostic Tools.” Enabling this will cause a “Diagnostic Tools” section to be added to the Navigation Panel, as explained in detail in the Appendix B. Page 12 TribPit User’s Manual Chapter 3: Data – TribPit Input Files 3.1 Sites Configuration File The sites configuration file is maintained on the Columbia Basin Research (CBR) website, and is updated as the configuration of PIT-tag arrays on the Columbia River and Snake River systems changes. Program TribPit requires the sites configuration file to be loaded before loading observations in order to be able to convert PIT-tag detections to capture histories. A version of the sites configuration file is loaded when Program TribPit is installed. The first time an observations file is loaded, Program TribPit accesses the CBR website to see if a newer version of the sites configuration file exists. If so, it is downloaded and loaded into Program TribPit before loading the observations file. Subsequently, whenever the user loads an observations file, if the sites configuration has not already been loaded, and it has been more than a day since the CBR site was queried, Program TribPit queries the CBR website for a newer version, and downloads the newer version and loads it. The sites configuration file is always loaded before loading an observations file. The loading of the sites configuration file described above is all done in the background without the user needing to intervene. The user may, however, load an alternate sites configuration file if desired, as explained is Chapter 2. A new sites configuration file will only apply to subsequently loaded observations; it will not affect observations already loaded into Program TribPit. Page 13 TribPit User’s Manual Chapter 3: Data 3.2 Observations File The observations file contains all of the actual PIT-Tag detections of the tags in the study. It is created via the Columbia Basin Research (CBR) website at the DART TribPit Observations File (http://www.cbr.washington.edu/dart/query/pit_basin_branching). Figure 10 shows a portion of the start page at this web address. Figure 10. Portion of the start page for the query to create the observations file Page 14 TribPit User’s Manual Chapter 3: Data The user specifies the desired 1. Release year 2. Species 3. Run Type 4. Rear Type 5. Release Location 6. Tag Capture Method 7. Tag Coordinator 8. Date Range for the Release Date and Release End After making the selections, press the “Generate Tag File List” button at the bottom of page. Once the “Generate Tag File List” button has been pressed, it may take several minutes to process the query. Once complete, the results will be displayed as show in Figure 11. Page 15 TribPit User’s Manual Chapter 3: Data Figure 11. Portion of an example of the results of a query to create the observations file Page 16 TribPit User’s Manual Chapter 3: Data The user then reviews the tag files in the results and selects the ones to be used to create the observations file. The user may select all of them by select the “All” checkbox in the first row of the first column (circled in Figure 11), or by simply not selecting anything. Alternatively, a subset of the tag files may be included by selecting the checkbox next to each desired tag file. When ready, the user then presses the “Generate TribPit Observations File” button to continue. Figure 12 shows the results of the query. The user then presses “Download TribPit Observations File” to download the observations file which can be loaded directly into Program TribPit. Figure 12. Final page of the dart query for downloading the observations file Page 17 TribPit User’s Manual Chapter 3: Data Figure 13 shows the top portion of an observations file, as displayed in Microsoft Excel (2013). Figure 13. Top portion of an example of a TribPit observations file 3.3 Age Data Program TribPit depends on the tagged fish in a study being of a known age. The age data file provides the age for all aged fished in the study. The age data file is a commas separated value (CSV) text file. All lines beginning with a hash mark (“#”) are ignored. Otherwise, each line is a record for one fish. Each record may be in one of two formats: 1. A record consisting of two fields: (1) tag ID, followed by (2) brood year. A brood year of “NA” indicates that the age of the fish is unknown. 2. A record consisting of three fields: (1) tag ID, (2) release year, (3) age at release. The brood year is then calculated by subtracting the age from the release year. A value of “NA” for the age at release indicates that the age of the fish is unknown. Analysis can be performed in Program TribPit without loading any age data by assuming that all individuals are of the same brood year. However, pooling the age-class data can seriously bias the survival analysis and is not recommended. Page 18 TribPit User’s Manual Chapter 3: Data 3.4 Loading the Data At initial startup with no observations loaded, the Navigation Panel of Program TribPit appears as shown in Figure 14 with only the “Load Observations” command enabled; no analysis can be done until the observations are loaded. Figure 14. The Navigation Panel at initial startup with no observations loaded When the user double-clicks on “Load Observations,” TribPit will prompt the user to select the observations data file to be loaded. While loading the data, all status messages will appear in the Output at the bottom of the screen. For this example, we load a file with one release: “FISTRP 2008.” Page 19 TribPit User’s Manual Chapter 3: Data Once the data are loaded, the Releases Summary will be updated as shown in Figure 15. A “release” is defined as all fish released from a given site in a given year. One observation file may contain more than one release. Figure 15. Releases Summary after loading observations file fistrp2008.csv Multiple observation files may be loaded into TribPit. In this case, we will load another file with a release named “FISTRP 2009”—fish released from the same site in the year 2009. After loading this observations file, the Releases Summary appears as shown in Figure 16. Figure 16. Releases Summary after loading observations files for 2008 and 2009 Page 20 TribPit User’s Manual Chapter 3: Data After loading the observation files, the user may continue with Configuration if all the releases are from the same brood year. If not, an age data file must be loaded, assigning brood years to the tag IDs. This is done by double clicking on “Load Age Data” on the Navigation Panel and selecting the age data file to be loaded. As with the loading of observations data, all status messages appear in the Output. The user may see error messages such as shown in Figure 17, indicating tag IDs are in the age data file but not in the observations data; in this case, tags that are found in the observations data will still have the brood year assigned to them. Figure 17. Output when loading age data Page 21 TribPit User’s Manual Chapter 3: Data Page 22 TribPit User’s Manual Chapter 4: Study Configuration 4.1 Configuring Releases and Cohorts Figure 18 shows the dialog for configuring releases and cohorts. Figure 18. Dialog for configuring releases and cohorts On the left are the releases. By default, they are all selected to be included in the analysis. On the right are the cohorts, as determined by the age data. By default none of the cohorts are selected. The user can select one (and only one) cohort at a time to be included in the analysis. The analysis will assume all fish to be of the same cohort. Page 23 TribPit User’s Manual Chapter 4: Configuration When any changes are made to the releases and cohorts to be used, the “Apply” button must be pressed to save those changes. The Releases Summary will then be updated to reflect the subset of fish to be used in subsequent analysis. For this example, the 2007 cohort is selected. 4.2 Configure Sites and Years Section 1.4 describes the models created by Program TribPit for given scenarios of the data loaded in TribPit. Sometimes, even though TribPit creates a model, the data are too sparse to actually estimate the parameters for the model. The Sites and Years Configuration section of Program TribPit allows the user to change the configuration to allow for parameter estimation. This is done by: 1. Removing detection sites, causing all detections at the sites to be ignored. 2. Removing detection years, causing all detections in those years to be ignored. 3. Setting an upstream site to be the last detection site. This causes all downstream detections to be pooled and treated as detections at the last site set by the user. The parameter estimate for this final reach will lack biological significance, but the reduction in the number of parameters to be estimated may improve the ability of TribPit to estimate upstream parameters of interest to the user. Page 24 TribPit User’s Manual Chapter 4: Configuration 4.2.1 Interpreting the Diagrams Figure 19 gives an example of the Sites and Years Configuration dialog. Note that the Sites and Years Configuration dialog always references a single cohort. Figure 19 references a 2007 cohort with two releases: (1) a release of yearlings in 2008 from location FISTRP labeled “FISTRP 2008” and (2) a release of two-year-olds in 2009 from the same location labeled “FISTRP 2009.” Figure 19. Example of a Sites and Years Configuration Dialog for a 2007 cohort The tabs along the top allow the user to look at each individual release, or the user can look at both releases together by selecting the “AllReleases” tab. In Figure 19, the “FISTRP 2008” tab is selected, illustrating the yearling release in 2008. Since this is the initial release, it considered the primary release and the “FISTRP 2009” is considered an auxiliary release. Page 25 TribPit User’s Manual Chapter 4: Configuration Some things to notice in this example: If the release name is in red, it indicates that any model that estimates unique parameters for this release will not be estimable. In Figure 19, both the individual release names are in red, but the “AllReleases” is not. This means that the only model that may be estimable is the one that combines parameters across both releases (both the capture parameters and the survival and movement parameters). The “FISTRP 2008” tab is selected, showing the configuration for that release. Each row represents a year, and each shaded vertical bar represents a detection site. In this example, the years 2008 through 2011 are present in the data as either release years and/or detection years. The first detection site is labeled “LGR” (Lower Granite Dam), the second “LGS” (Little Goose Dam), and so on. Notice that the final fourth and final detection site is labeled “IHR+.” The “+” indicates that there are downstream detection sites after Ice Harbor Dam that the user has already configured to be pooled with detections at Ice Harbor. The narrow diagonal and horizontal lines represent paths that fish were observed to follow. The number in the center of the paths indicates the number of individuals known to have traveled that path and were detected at the end site of the path. For example, two fish were known to survive and migrate from LGR to LGS and were detected at LGS in 2010 (circled in Figure 19). The bold, italicized numbers at each detection site show the number detected at that site and year. For example, six fish were detected at the site LGS in the year 2009 (circled in Figure 19). The path from LGS to LMN in 2010 has zero counts, making the survival and movement parameter for that path unestimable. Program TribPit thus highlights this path by making it thicker and in red. This is why any model that that has unique parameters for this release is unestimable. There are no paths for the year 2008. This is because there were no detections for this release in 2008, and Program TribPit thus removes that branch from the model. The same is true for the year 2011. 2011 is included because even though there are no detections in 2011 for this particular release, there were detections in 2011 for other data currently loaded in TribPit. Page 26 TribPit User’s Manual Chapter 4: Configuration The numbers in the paths indicate the number of fish “known” to have traveled that path and were detected at the end site of the path—“known” according to the assumptions of the models. In the example in Figure 19, the diagram indicates that six fish traveled from LGR to LGS in 2009. This does not mean that all six fish were necessarily detected at LGR and then at LGS in 2009. It is possible that some of those six fish were released in 2008 and then next detected at LGS. It’s also theoretically possible that they traveled through LGR in 2008 undetected, and then migrated and survived to LGS in 2009. But since we did not observe any fish along that path, we cannot estimate the parameters for that path. Thus, Program TribPit must assume that they traveled along the only observed paths to arrive at LGS in 2009. Figure 20 shows another example of a study with three releases of a cohort in three consecutive years: 2009, 2010, and 2011. Figure 20. Sites and Years Configuration illustrating removals at detection sites Page 27 TribPit User’s Manual Chapter 4: Configuration In the case of Figure 20, the “Show Removals” checkbox is checked, thus showing the number of removals after the colon (“:”) at each detection site and year. For example, at LMR in 2009, 50 fish were detected, none of which were removed. The counts at RRH and RIA+ in 2011 are in red, because there is no observed path to these sites and years. No counts were observed from release to LMR in 2011, or from LMR in 2010 to RRH in 2011. Program TribPit cannot estimate parameters for unobserved paths and, thus, cannot create a model that includes the 2011 counts. The counts are in red, because they cause any model that estimates unique parameters for the TWISPR 2009 release to be unestimable. The path from RRH to RIA+ in 2009 is grayed out. This is because the 87 fish detected at RRH were also detected at RIA+ and trying to estimate the survival and movement parameters along that route would cause numerical problems. Program TribPit thus removes the final survival and movement and detection parameter and uses a fixed value of 1.0 (with standard error of 0.0) to avoid estimation problems. Figure 21 shows the same cohort and releases with the “AllReleases” tab selected. This shows the counts for all of the releases of the given cohort. Figure 21. Sites and Configuration showing the “AllReleases” tab for combined releases Page 28 TribPit User’s Manual Chapter 4: Configuration Figure 22 shows another example where a path indicates a parameter is fixed to 1.0. Figure 22. Sites and Years Configuration illustrating pathways with parameters fixed at 1.0 In Figure 22, there are no detections at MCN in 2010, but there are detections downstream at BON+. Due to the configuration of this model, we know that the two fish detected at BON+ had to travel from LGR to MCN in 2010. Thus, Program TribPit fixed the survival and movement parameter at 1.0, and the detection parameter at MCN in 2010 at 0.0, and the model is still theoretically estimable (disregarding the sparse data in this case). Page 29 TribPit User’s Manual Chapter 4: Configuration In the example in Figure 23, there are 65 detections at TWR in 2010, but no observations downstream of that in 2010. However, this does not make the parameters in the releases unestimable because there is another path downstream from TWR in 2010—the path to RRH in 2011. Thus, Program TribPit simply removes the downstream paths for year 2010. Figure 23. Sites and Years Configuration illustrating unnecessary downstream paths removed Page 30 TribPit User’s Manual Chapter 4: Configuration Contrast the last example with Figure 24. In this case, there are 34 fish detected at TWR in 2009, and there are no downstream detections in 2009. But since there are no other paths downstream from TWR in 2009, Program TribPit leaves the downstream paths in 2009, and makes them thicker and in red to indicate that they render any model that estimates unique parameters for this release unestimable. Figure 24. Sites and Years Configuration illustrating missing downstream counts Page 31 TribPit User’s Manual Chapter 4: Configuration Finally, we look at a hypothetical example where there are multiple releases of a single cohort, both from different sites and different years. This is a 2007 cohort with two releases of yearlings in 2008—one from FISTRP (“FISTRP 2008”) and another from LGR (“LGR 2008”)—and one release of two-year-olds in 2009 from LGR (“LGR 2009”). Since the “FISTRP 2008” is the earliest and most upstream release, it is considered the primary release, and the others are auxiliary releases. Figure 25 shows the Sites and Years Configuration for the data. As with the other examples, there is a tab for each release and an “AllReleases” tab for the combined releases. With multiple release sites and multiple release years, however, there are additional tabs with label beginning with “AllRelSites_” and “AllRelYears_.” For example, the tab, “AllRelSites_2008” shows the configuration and combined counts for all releases in the year 2008. Similarly, the tab “AllRelYears_LGR” shows the configuration and combined counts for all releases from the LGR site. This allows the user to see if models that combine parameters across sites and across years are estimable. Figure 25. Sites and Years Configuration with simulated releases from multiple sites and multiple years Page 32 TribPit User’s Manual Chapter 4: Configuration 4.2.2 Changing the Sites and Years Configuration Figure 26 shows the left portion of the Sites and Years Configuration dialog after some data are loaded with the “AllReleases” tab selected. Notice that there are no detections at the LTP site, and only four detections at LMR. The ability to estimate parameters will be improved by removing these two sites. Figure 26. Sites and Years Configuration in initial state Page 33 TribPit User’s Manual Chapter 4: Configuration Right click anywhere on the gray column representing LTP and select “Remove site LTP” from the popup menu, as shown in Figure 27. The diagram will then be updated with LTP removed. In the same way, rightclick on the LMR site and select “Remove site LMR.” Figure 27. Removing a site in the Sites and Years Configuration dialog The diagram should now appear as shown in Figure 28. Page 34 TribPit User’s Manual Chapter 4: Configuration Figure 28. Sites and Years Configuration after removing two sites All the tabs are still red, showing that there are no estimable models. The problem is the one detection in 2013, circled in Figure 28. There is a detection there, but no observed paths leading to that detection. This can be rectified by removing the year 2013 from the analysis. Page 35 TribPit User’s Manual Chapter 4: Configuration Right-click on the “2013” label on the left and select “Remove year 2013” from the popup menu, as shown in Figure 29. Figure 29. Removing a year in the Sites and Years Configuration dialog Page 36 TribPit User’s Manual Chapter 4: Configuration At this point, the “AllReleases” tab should appear as shown in Figure 30. The “AllReleases” tab and the “TWISPR 2011” are no longer in red, but the “TWISPR 2010” is in red. This indicates that the model combining parameters across releases will be estimable, but the models that use unique parameters for individual releases will not be estimable. Figure 30. Sites and Years Configuration after removing sites and years If we select the “TWISPR 2010” tab and scroll all the way to the right, it appears as shown in Figure 31. Page 37 TribPit User’s Manual Chapter 4: Configuration Figure 31. Sites and Years Configuration Dialog with empty paths downstream Notice that the paths for year 2012 between TD1 and BON, and between PD7 and TWX have zero counts and are in red. In this case, the user is not interested in estimates this far downstream—only in survival to the first site, TWR. To get survival and movement estimates to TWR, we need one detection site beyond TWR—namely, RRH. So now scroll back to the left portion of the diagram, click on the RRH site and select “Set RRH as the last site” from the popup menu as shown in Figure 32. Page 38 TribPit User’s Manual Chapter 4: Configuration Figure 32. Setting the last detection site in the Sites and Years Configuration The diagram should now appear as shown in Figure 33 with no red tabs, indicating all available models should now be estimable. Page 39 TribPit User’s Manual Chapter 4: Configuration Figure 33. Sites and Years Configuration dialog after setting the last site The “+” after “RRH” indicates that this site includes detections from multiple sites downstream of RRH. Page 40 TribPit User’s Manual Chapter 4: Configuration Figure 34 shows an example of another situation that may occur. There are no detections at the first site CLJ; thus, no observable paths to any of the downstream detection sites. The CLJ site appears because it is in the data that has been loaded, but not in the cohort data selected for analysis. This situation can be remedied by simply removing the CLJ site, and the diagram will appear as in Figure 35. Figure 34. Sites and Years Configuration with no detections at the first site Note that release sites cannot be removed, nor can release years be removed. Also, the initial detection site cannot be set as the last detection site because Program TribPit requires at least two downstream detection sites. Page 41 TribPit User’s Manual Chapter 4: Configuration Figure 35. Sites and Years Configuration after removing the first site with no detections 4.2.3 Resetting the Sites and Years Configuration If the user wants to undo any changes made to the configuration, the user simply presses the “Reset” button in the lower right of the Sites and Years Configuration dialog to restore the configuration to the initial state. Page 42 TribPit User’s Manual Chapter 5: Estimation and Results Once the user has finished configuring the sites and years, the user can double-click on “Fit All Models” on the Navigation Panel to estimate the parameters. The output from the estimation process is displayed in the Output portion of the TribPit dialog (Figure 36). “Fletch” refers to the optimization routine used to maximize the log-likelihood and obtain the parameter estimates. Figure 36. Example of output during the “Fit All Models” process Information displayed in the output includes: The model ID currently being fitted. The beginning and ending negative log-likelihood function values. The number of iterations used to converge to a maximum likelihood value. Page 43 TribPit User’s Manual Chapter 5: Estimation and Results Whether or not the covariance matrix is available. In Figure 36, the text “Error estimating covariance matrix” indicates that the standard errors will not be available for the estimates for model M.s.1A. For model M.s.2A, there is no such message, and the standard errors will be available. Once the estimation process is complete, the Model Comparison window will be displayed. It can also be displayed at any time subsequent to fitting the models by double-clicking on “Model Comparison.” 5.1 Model Comparison Window Figure 37 shows the Model Comparison window for multiple releases from different sites. The headings in bold describe the parameterizations of the capture parameters for all models beneath the heading. Figure 37. Model Comparison Window for releases from different sites The columns in the Model Comparison window are: 1. The name of the model (the Model ID), followed by a brief description of the model. 2. The delta AIC, which is the deviation of the AIC from the best model. The best model—the one with the lowest AIC — is given the value 0.0, and all other AICs are presented as deviations from that model. In Figure 37, model M.s.2B has the best AIC. Note the actual AIC can be found in the headers of the reports as shown in Section 5.3.1. 3. The number of parameters 4. The log likelihood The model with the best AIC is highlighted with a yellow background. All subsequent reports and graphical results will be for the best model. Page 44 TribPit User’s Manual Chapter 5: Estimation and Results Figure 38 shows another example of the Model Comparison window. In this case, there were multiple releases in different years. However, two of the models were not estimable. The text “Non-Est.” is used when models are not estimable, typically due to sparseness of data. Figure 38. Model Comparison Window with some available models not estimable 5.2 Graphical Results Once estimation is complete, the user can double-click on “Graphical Results” on the Navigation Panel to bring up a graphical display of the survival and movement parameters estimates for the best model (the one with delta AIC of 0.0). The user may look at the results of the suboptimal models by turning on “Expert Mode,” as explained in Section 5.4. Page 45 TribPit User’s Manual Chapter 5: Estimation and Results An example of the Graphical Results dialog from simulated data is shown in Figure 39. The tabs at the top allow the user to select the release of interest. The point estimates are given on the path lines on the diagram. On the bottom half are the point estimates with their standard errors in parentheses. Figure 39. Graphical Results window The user may hover the mouse pointer over any result on the diagram, and the corresponding value in the table will be highlighted with bold text and yellow background. In addition, a description of the parameter will appear below the table. Page 46 TribPit User’s Manual Chapter 5: Estimation and Results 5.3 Reports Three reports are available after the estimates have been obtained and the model with the best AIC selected (or possibly a suboptimal model if “Expert Mode” is turned on): (1) Survival and Movement Parameter Estimates, (2) Capture Parameter Estimates, and (3) Performance Measures. 5.3.1 Report Header At the top of each of the reports is information about the currently selected model. An example is shown in Figure 40. Figure 40. Header Information at the top of each report The information in the report header includes in order: 1. The names of the releases used for the estimates. 2. The Model ID. 3. A description of the model. 4. The number of releases. 5. The number of sites. 6. The number of years. 7. The number of parameters. 8. The log-likelihood. 9. The actual AIC value, not the AIC value. Page 47 TribPit User’s Manual Chapter 5: Estimation and Results 5.3.2 Survival and Movement Parameter Estimates Figure 41 shows the body of the Survival and Movement Parameter Estimates report (excluding the header information at the top). Figure 41. Body of Survival and Movement Parameter Estimates Report There is a table for each of the releases, showing all survival and movement parameter estimates for the selected model with the standard errors in parentheses. For example in Figure 41, the probability of a fish in the FISTRP 2008 release surviving and migrating to LGR in 2010 is 0.0525 with a standard error of 0.0054. Page 48 TribPit User’s Manual Chapter 5: Estimation and Results 5.3.3 Capture Parameter Estimates Figure 42 shows the body of a Capture Parameter Estimates Report. Figure 42. Body of Capture Parameter Estimates Report As with the Survival and Movement Parameter Estimates report, there is a table for the detection probabilities for each release with the associated standard errors in parentheses. For example, for a fish of the FISHTRP 2009 release, alive at LGS in 2009, the probability of being detected at LGS in 2009 is 0.5457 with a standard error of 0.0199. 5.3.4 Performance Measures Report The Performance Measures report gives several different meaningful metrics that are functions of the estimated survival and movement parameters, and capture parameters. Page 49 TribPit User’s Manual Chapter 5: Estimation and Results 5.3.4.1 Overall Cohort Survival and Cohort Survival by Site Location Figure 43 shows the section of the Performance Measures Report that reports the overall cohort survival and the cohort survival by site location. Figure 43. Overall Cohort Survival and Cohort Survival by Site location section of the Performance Measures Report The overall cohort survival is the probability that an individual from the primary release survives and migrates over time to the “furthest downriver” site. The primary release is the earliest and furthest upstream release. We can only estimate survival to the penultimate site—the site upstream from the furthest downstream site. In the example in Figure 43, there is one site downstream from LGS; thus, we can estimate survival only to LGS. Therefore, the “furthest downriver” site is LGS, and survival from release to LGS is reported as the overall cohort survival. The table under the “Cohort survival by site location gives the survival probability for each release to each downstream site. The overall cohort survival is emphasized in bold with yellow background (circled in Figure 43). The calculations for survival to a site are shown in Appendix A. Page 50 TribPit User’s Manual Chapter 5: Estimation and Results 5.3.4.2 Age Composition of Migrants by Site Figure 44 shows the age composition of a cohort as they migrate past a detection site. For those migrants that pass by each detection site, this table shows the estimated proportion by age class. Figure 44. Age Composition of migrants by Site section of the Performance Measures Report The calculations for age composition are shown in Appendix A. 5.3.4.3 Downriver Survivals Below Residualization Figure 45 shows the downriver survival estimates for each age class that passed the site of the last “residualizing,” or overwintering. In the example in Figure 45, there was no residualization beyond LGR. This table will only be displayed if there are at least two detection sites beyond the site of the most downstream residualization. Figure 45. Downriver Survival Below Residualization section of the Performance Measures Report Page 51 TribPit User’s Manual Chapter 5: Estimation and Results 5.4 Expert Mode By default, after fitting the models, the model with the best AIC is selected, indicated by the yellow background in the Model Comparison report, as shown in the example in Figure 46, where there are multiple releases in different years. All graphical results and reports are for the model highlighted in yellow. Figure 46. Model Comparison dialog for multiple releases in different years If the user would like to look at the results for other models besides the one with the best AIC, the user can do so by turning on expert mode. Go to the Edit menu, select Settings, and select the General tab. Then check the box labeled “Use expert mode – allow model selection” as shown in Figure 47. Figure 47. Turning on expert mode in the Settings dialog Page 52 TribPit User’s Manual Chapter 5: Estimation and Results Then click the Apply button, and then the Done button. A new heading will appear in the Navigation Panel labeled “Model Selection,” as shown in Figure 48. Figure 48. Navigation Panel with expert mode enabled A green check mark is next to the M.y.2B model—the one with the best AIC. To look at the estimates for one of the other models, say M.y.1A, simply double-click on it in the Navigation Panel, and green check mark will now be by M.y.1A, indicating that it is the currently selected model, as shown in Figure Figure 49. Page 53 TribPit User’s Manual Chapter 5: Estimation and Results Figure 49. Navigation Panel with expert mode enabled and an alternative model selected The Model Comparison Dialog will now appear as shown in Figure 50. The best model will still be highlighted in yellow, and the currently selected model will be highlighted in green. The graphical results and all the reports will now pertain to model M.y.1A. Figure 50. Model Comparison dialog with an alternative model selected Page 54 TribPit User’s Manual Chapter 6: Diagnostic Tools Next Detections Program TribPit provides some diagnostic tools used mainly for debugging the program. Go to the Edit menu, select “Settings,” and select the “Advanced” tab and check the checkbox labeled “Show Diagnostic Tools” as shown in Figure 51. Figure 51. Turning on the Diagnostic Tools Page 55 TribPit User’s Manual Chapter 6: Diagnostic Tools After clicking “Apply,” a new heading will appear in the Navigation Panel labeled “Diagnostic Tools.” as shown in Figure 52. Figure 52. Navigation Panel with Diagnostic Tools enabled Double-click on Next Detections to bring up the Next Detections dialog as shown in Figure 53. Page 56 TribPit User’s Manual Chapter 6: Diagnostic Tools Figure 53. Next Detections Dialog In the default mode, all releases are selected; the user can look at only one release by deselecting on of them. The “Select Detection Point” is cleared (circled), so we are looking at fish at the initial release. This dialog tells us, for example, that of the 9,248 fish released, 552 of these were next detected at LGS. Of these 552, 505 were removed (probably due to transportation). Of the 9,248 fish, 5,494 were never detected again. If the “Select Detection Point” check box is checked, the user can select a Site and Year of interest. To look at detections at Little Goose Dam in 2009, for example, check the “Select Detection Point” check box, choose “Little Goose Dam” for the Site and “2009” for the Year and press the “Apply” button. The result is shown in Figure 54. Page 57 TribPit User’s Manual Chapter 6: Diagnostic Tools Figure 54. Next Detections Dialog with a detection point selected This tells us that of the 201 fish detected and “re-released” (not removed) from Little Goose Dam in 2009, 71 were never detected again, 60 were next detected at LMN, 30 of which were removed; and 70 were next detected at IHR+. The “Save Next Detections” action on the Navigation Panel allows the user to save the next detections data to a text file. Page 58 TribPit User’s Manual Appendix A: Performance Measures Calculations This appendix shares the calculations of the performance measures in the Performance Measures Report (Section 5.3.4). The variances of these performance measures are calculated using the delta method. A.1 Overall Cohort Survival and Cohort Survival by Location Let be the probability of survival to site k in year j for a given cohort. Let be the release year, , the release site, and using the parameter definitions from Section 1.2, for ∑ Now let for be the probability of survival to site k for a given cohort ∑ where J is the last observed detection year. Page 59 TribPit User’s Manual Appendix A: Performance Measures Calculations A2. Age Composition of Migrants by Site Let = the age composition of a cohort at site k in year . . A3. Downriver Survival Below Residualization Let = the first downriver site beyond all observed residualization, and be the furthest downriver site for which we can estimate survival (the penultimate detection site), and be the survival from site in year , ∏ Page 60 TribPit User’s Manual