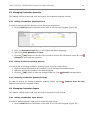
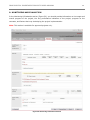
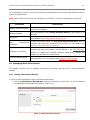
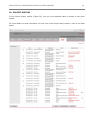
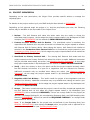
1
IRAQ DEVELOPMENT
MANAGEMENT
SYSTEM (IDMS)
CAPITAL INVESTMENT PROJECTS APPLCATION
USER MANUAL
Version 2.5
COPYRIGHT © 2001-2014
SYNERGY INTERNATIONAL SYSTEMS INC
ALL RIGHTS RESERVED
IDMS CAPITAL INVESTMENT PROJECTS USER MANUAL
1
TABLE OF CONTENTS
1.
INTRODUCTION ........................................................................................................... 6
2.
OVERVIEW ................................................................................................................... 6
3.
GENERAL INFORMATION .............................................................................................. 8
3.1
MANAGING DONORS .................................................................................................... 12
3.1.1
Adding a Donor Record ...................................................................................... 12
3.1.2
Editing Donor Records ....................................................................................... 13
3.1.3
Removing Donor Records ................................................................................... 13
3.2
MANAGING LOCATIONS ................................................................................................. 13
3.2.1
Adding a Location Record................................................................................... 13
3.2.2
Editing Location Records .................................................................................... 13
3.2.3
Removing Location Records ............................................................................... 14
3.3
MANAGING NDP ALIGNMENTS ......................................................................................... 14
3.3.1
Adding an NDP Alignment Record ....................................................................... 14
3.3.2
Editing NDP Alignment Records .......................................................................... 14
3.3.3
Removing NDP Alignment Records ...................................................................... 14
4.
FINANCIAL INFORMATION ......................................................................................... 15
4.1
MANAGING EXPENSE TYPES ............................................................................................ 18
4.1.1
Adding an Expense Type Record ......................................................................... 18
4.1.2
Removing Expense Type Records ........................................................................ 20
4.1.3
Providing Breakdown by Type of Expense ............................................................ 20
4.2
MANAGING PAYMENTS .................................................................................................. 22
4.2.1
Adding a Payment Record .................................................................................. 22
4.2.2
Editing Payment Records ................................................................................... 23
4.2.3
Removing Payment Records ............................................................................... 23
4.3
MANAGING EXPENSES ................................................................................................... 24
4.3.1
Adding an Expense Record ................................................................................. 24
4.3.2
Editing Expense Records .................................................................................... 25
4.3.3
Removing Expense Records ............................................................................... 25
5.
PROCUREMENT ........................................................................................................... 26
5.1
MANAGING PROCUREMENT PLAN....................................................................................... 27
5.1.1
Adding a Procurement Plan Record...................................................................... 27
5.1.2
Editing Procurement Plan Records ....................................................................... 28
5.1.3
Removing Procurement Plan Records .................................................................. 29
5.2
MANAGING CONTRACTS................................................................................................. 29
5.2.1
Adding a Contract Record .................................................................................. 29
5.2.2
Editing Contract Records.................................................................................... 31
5.2.3
Removing Contract Records ............................................................................... 31
6.
IMPACT ANALYSIS ..................................................................................................... 32
6.1
MANAGING SOCIAL INDICATORS ...................................................................................... 33
6.1.1
Adding a Social Indicator Record ........................................................................ 33
IDMS CAPITAL INVESTMENT PROJECTS USER MANUAL
2
6.1.2
Editing Social Indicator Records .......................................................................... 34
6.1.3
Removing Social Indicator Records ..................................................................... 34
6.2
MANAGING EXPECTED QUANTITATIVE INDICATORS ................................................................. 34
6.2.1
Adding an Expected Quantitative Indicator Record ................................................ 34
6.2.2
Editing Expected Quantitative Indicator Records ................................................... 35
6.2.3
Removing Expected Quantitative Indicator Records ............................................... 35
6.3
MANAGING PRODUCTION QUANTITY .................................................................................. 36
6.3.1
Adding a Production Quantity Record .................................................................. 36
6.3.2
Editing Production Quantity Records .................................................................... 36
6.3.3
Removing Production Quantity Records ............................................................... 36
6.4
MANAGING PRODUCTION INPUTS ...................................................................................... 36
6.4.1
Adding a Production Input Record ....................................................................... 36
6.4.2
Editing Production Input Records ........................................................................ 37
6.4.3
Removing Production Input Records .................................................................... 37
7.
REQUIRED RESOURCES .............................................................................................. 38
7.1
MANAGING CONSTRUCTION MATERIALS .............................................................................. 39
7.1.1
Adding a Material Record ................................................................................... 39
7.1.2
Editing Material Records .................................................................................... 39
7.1.3
Removing Material Records ................................................................................ 40
7.2
MANAGING MAN-POWER RESOURCES ................................................................................. 40
7.2.1
Adding a Man-power Resource Record ................................................................. 40
7.2.2
Editing Man-Power Resource Records .................................................................. 40
7.2.3
Removing Man-Power Resource Records .............................................................. 41
7.3
MANAGING ENERGY RESOURCES ...................................................................................... 41
7.3.1
Adding an Energy Resource Record ..................................................................... 41
7.3.2
Editing Energy Resource Records ........................................................................ 41
7.3.3
Removing Energy Resource Records .................................................................... 41
8.
MONITORING AND EVALUATION ................................................................................ 42
8.1
MANAGING WORK PLAN RECORDS .................................................................................... 43
8.1.1
Adding a Benchmark Record .............................................................................. 43
8.1.2
Editing Benchmark Records ................................................................................ 44
8.1.3
Removing Benchmark Records ........................................................................... 44
8.2
MANAGING ACTIVITY RECORDS ........................................................................................ 44
8.2.1
Adding an Activity Record .................................................................................. 44
8.2.2
Editing Activity Records ..................................................................................... 46
8.2.3
Removing Activity Records ................................................................................. 46
8.3
MANAGING KEY PERFORMANCE INDICATORS......................................................................... 46
8.3.1
Adding a KPI Record ......................................................................................... 46
8.3.2
Providing KPI Progress Information ..................................................................... 47
8.3.3
Editing KPI Progress Information ........................................................................ 48
8.3.4
Removing KPI Progress Information .................................................................... 48
8.3.5
Removing KPI Records ...................................................................................... 48
8.4
MANAGING DELAY FACTORS............................................................................................ 49
8.4.1
Adding a Delay Factor Record ............................................................................. 49
8.4.2
Editing Delay Factor Records .............................................................................. 49
IDMS CAPITAL INVESTMENT PROJECTS USER MANUAL
8.4.3
9.
3
Removing Delay Factors .................................................................................... 49
NOTES AND ATTACHMENTS ........................................................................................ 50
9.1
MANAGING ATTACHMENTS.............................................................................................. 50
9.1.1
Adding an Attachment ....................................................................................... 50
9.1.2
Viewing Attachments ......................................................................................... 51
9.1.3
Removing Attachments...................................................................................... 51
10.
PROJECT HISTORY .................................................................................................. 52
11.
PROJECT SUBMISSION ........................................................................................... 54
11.1 MANAGING REVISION COMMENTS ..................................................................................... 58
11.1.1
Adding a Comment ........................................................................................... 58
11.1.2
Editing Comments ............................................................................................ 59
11.1.3
Removing Comments ........................................................................................ 59
11.2 FORWARDING TO OTHER SECTORAL UNIT ............................................................................ 59
11.3 PROVIDING PROJECT CODE............................................................................................. 59
11.4 SUBMITTING REALLOCATION REQUEST ............................................................................... 60
11.5 MANAGING GRANTS ..................................................................................................... 63
11.5.1
Adding a Grant Record ...................................................................................... 63
11.5.2
Editing Grant Records........................................................................................ 63
11.5.3
Removing Grant Records ................................................................................... 63
11.6 MANAGING TRANSFER SOURCES....................................................................................... 63
11.6.1
Adding a Transfer Source................................................................................... 63
11.6.2
Defining Transfer Amount .................................................................................. 65
11.6.3
Removing Transfer Sources................................................................................ 65
11.7 MANAGING TRANSFER ALLOCATION ................................................................................... 65
11.7.1
Adding a Transfer Allocation ............................................................................... 65
11.7.2
Removing Transfer Allocation ............................................................................. 66
11.8 ADJUSTING REALLOCATION REQUEST ................................................................................. 66
12.
SAVING DATA ......................................................................................................... 68
13.
REFERENCES ........................................................................................................... 68
IDMS CAPITAL INVESTMENT PROJECTS USER MANUAL
4
TABLE OF FIGURES
FIGURE 1: GENERAL INFORMATION SECTION (PART 1) ........................................................................... 8
FIGURE 2: GENERAL INFORMATION SECTION (PART 2) ........................................................................... 9
FIGURE 3: CALENDAR ................................................................................................................ 12
FIGURE 4: ADDING A DONOR RECORD ............................................................................................ 13
FIGURE 5: ADDING A LOCATION RECORD ......................................................................................... 13
FIGURE 6: SPECIFYING ALIGNMENT WITH NDP .................................................................................. 14
FIGURE 7: FINANCIAL INFORMATION SECTION ................................................................................... 15
FIGURE 8: REALLOCATION HISTORY PAGE ........................................................................................ 16
FIGURE 9: MODIFIED BREAKDOWN BY TYPE OF EXPENSE FIELD IN FINANCIAL INFORMATION SECTION .................. 18
FIGURE 10: MODIFIED BREAKDOWN BY TYPE OF EXPENSE IN THE REQUEST REALLOCATION FORM ....................... 19
FIGURE 11: ADDING A TYPE OF EXPENSE RECORD .............................................................................. 20
FIGURE 12: PROVIDING FINANCIAL INFORMATION FOR THE TYPE OF EXPENSE .............................................. 21
FIGURE 13: REVISING REALLOCATION FINANCIAL INFORMATION FOR THE TYPE OF EXPENSE ............................. 21
FIGURE 14: PAYMENTS FIELD ....................................................................................................... 22
FIGURE 15: ADDING A PAYMENT RECORD......................................................................................... 23
FIGURE 16: EXPENSES FIELD ....................................................................................................... 24
FIGURE 17: ADDING AN EXPENSE RECORD ....................................................................................... 25
FIGURE 18: PROCUREMENT SECTION .............................................................................................. 26
FIGURE 19: ADDING A PROCUREMENT PLAN RECORD ........................................................................... 27
FIGURE 20: ADDING A CONTRACT RECORD ....................................................................................... 29
FIGURE 21: IMPACT ANALYSIS SECTION .......................................................................................... 32
FIGURE 22: ADDING A SOCIAL INDICATOR RECORD............................................................................. 33
FIGURE 23: ADDING AN EXPECTED QUANTITATIVE INDICATOR RECORD...................................................... 35
FIGURE 24: ADDING A NEW PRODUCTION QUANTITY RECORD................................................................. 36
FIGURE 25: ADDING A NEW PRODUCTION INPUT RECORD ..................................................................... 37
FIGURE 26: REQUIRED RESOURCES SECTION .................................................................................... 38
FIGURE 27: ADDING A CONSTRUCTION MATERIAL RECORD .................................................................... 39
FIGURE 28: ADDING A MAN-POWER RESOURCE RECORD ....................................................................... 40
FIGURE 29: ADDING AN ENERGY RESOURCE RECORD ........................................................................... 41
FIGURE 30: MONITORING & EVALUATION SECTION ............................................................................. 42
FIGURE 31: ADDING A BENCHMARK RECORD ..................................................................................... 43
FIGURE 32: ADDING AN ACTIVITY RECORD ....................................................................................... 45
FIGURE 33: SELECTING KEY PERFORMANCE INDICATORS FOR THE PROJECT ................................................. 47
FIGURE 34: UPDATING KPI PROGRESS INFORMATION .......................................................................... 48
FIGURE 35: ADDING FACTORS CAUSING DELAYS ................................................................................ 49
FIGURE 36: NOTES AND ATTACHMENTS SECTION ................................................................................ 50
FIGURE 37: ADDING AN ATTACHMENT ............................................................................................. 51
FIGURE 38: PROJECT HISTORY SECTION .......................................................................................... 52
FIGURE 39: ADDING FUNDING REQUEST COMMENTS............................................................................ 58
FIGURE 40: FORWARD TO OTHER SECTORAL UNIT FORM ....................................................................... 59
FIGURE 41: PROJECT CODE FORM ................................................................................................. 60
FIGURE 42: REALLOCATION REQUEST FORM ...................................................................................... 61
FIGURE 43: REQUEST REALLOCATION ACTION IN THE REALLOCATION REQUEST FORM ..................................... 62
FIGURE 44: ADD GRANT FORM ..................................................................................................... 63
IDMS CAPITAL INVESTMENT PROJECTS USER MANUAL
5
FIGURE 45: TRANSFER SOURCES FORM ........................................................................................... 64
FIGURE 46: ADD PROJECT FOR TRANSFER FORM................................................................................. 64
FIGURE 47: TRANSFER ALLOCATION FORM ....................................................................................... 65
FIGURE 48: ADD TRANSFER ALLOCATION FORM ................................................................................. 66
FIGURE 49: ADJUST REALLOCATION FORM........................................................................................ 67
IDMS CAPITAL INVESTMENT PROJECTS USER MANUAL
6
1. INTRODUCTION
This document describes the Capital Investment Projects application of the Iraq Development
Management System (IDMS). It provides the necessary instructions that a user should follow during
the data entry process. The document is addressed to those who will use the IDMS application to add
or modify project information.
2. OVERVIEW
The Iraq Development Management System (IDMS) is an automated information management
system which is designed to improve efficiency and coordination of donor activities in Iraq. It is also
a powerful tool for tracking and analyzing aid flows. The system serves as the main database and
data collection and reporting system as it ensures effective access to aid data.
The main objective of IDMS is to serve as a reliable and credible source of information on overall
donor contributions to Iraq’s reconstruction, economic recovery and socio-economic development,
as well as to support the Government in effectively managing development assistance and
promoting the accountable and transparent use of resources.
In the current version of IDMS, the following applications are present:
•
•
•
•
•
External Assistance Projects
Donor Profile
Capital Investments Projects
Iraq Development Projects
NDP Indicators
The Capital Investment Projects application in IDMS is designed to track the investment projects
that are financed from the national budget. Once you have accessed this application, you can view
project details, track investment flows to the country, and create analytical reports in the List, Chart,
Map, and Report modules. Moreover, the Capital Investment Projects application contains a built-in
on-line data entry subsystem, which is designed to allow entering the project related data remotely
via Internet. The on-line data entry module allows for entering new and modifying the existing
information.
In the current design, the Capital Investment Projects application consists of the following sections:
•
General Information section is used to provide basic information on the project. This
includes the project title, the sector of economy supported by the project, the project start
and end dates, project locations, executing body, project beneficiary, etc.
•
Financial Information section is used to enter information related to the total project cost,
payments, and expenses. All fund allocations by implementation years, location and type of
expense should also be recorded here.
IDMS CAPITAL INVESTMENT PROJECTS USER MANUAL
7
•
Procurement section provides procurement related information on the project. This includes
the procurement plans and contracts details.
•
Impact Analysis section is used to provide information on competitive advantages,
environmental impacts, social indicators and expected quantitative indicators.
•
Required Resources section is used to add information related to construction materials, as
well as man-power and energy resources required during the project implementation.
•
Monitoring and Evaluation section is used to provide information on overall progress of the
project, the key performance indicators of the project, progress on the contracts, and factors
that may be delaying the project implementation.
•
Notes and Attachments section is used to enter additional notes and comments on the
project as well as attach project documents such as the project proposal and reports.
•
Project History section is used to view statistical data on access to the given project.
To navigate from one section to another, use the respective tab controls found at the top of the
screen. Also, click the respective Next / Previous button at the bottom of the screen to go to the
next / previous section.
The Capital Investment Projects application provides a web-based user interface and requires a web
browser (Internet Explorer) pre-installed.
Note: To ensure more flexibility and a more user-friendly environment, IDMS has been
implemented as a bi-lingual system allowing the users to view the data presented in the system in
two languages: English and Arabic.
IDMS CAPITAL INVESTMENT PROJECTS USER MANUAL
8
3. GENERAL INFORMATION
In the General Information section (Figure 1 and Figure 2), you can provide basic information on the
project. This includes the project title, sector supported by the project, project start and end dates,
locations, executing body, project beneficiary, etc.
Figure 1: General Information Section (Part 1)
IDMS CAPITAL INVESTMENT PROJECTS USER MANUAL
9
Figure 2: General Information Section (Part 2)
For more details on what information is requested in the General Information section, refer to the
table below:
Note: Some fields in this section are mandatory to be filled in. They are marked with an asterisk.
Field Name
Project Title
Instructions
Indicate here the official Project Title used in project documents and
approved by the competent agency in the English and Arabic
languages. This field is mandatory. In case that a pre-determined
official title does not exist, please create a one-line synopsis of the
project.
Please note that the title is the information that users see when
IDMS CAPITAL INVESTMENT PROJECTS USER MANUAL
10
displaying the search results.
Yearly Project
Indicate whether this is a Yearly Project or not by activating the
respective radio button. This field is mandatory. Please note that all
projects having duration of twelve months or less are considered
yearly projects. They are intended for funding maintenance activities
only and are transferred to the next year automatically preserving the
same project code and same title. However, cumulative expenses are
not calculated for yearly projects and, respectively, they are not a part
of overall cumulative expenses.
Please note that the yearly allocation of this type of projects is equal
to the project total cost.
Provide information on the Funding Type by selecting the respective
instance from the drop-down list. This field is mandatory.
Funding Type
Please note that depending on the funding type selected, you may be
required to provide additional information in the Partnership Details
and/or Donors fields. You can provide the information requested by:
• Adding partnership details in the English and Arabic languages.
• Providing Donor information. For more details, see Managing
Donors.
Indicate the Chapter of the economy to which the project contributes
by selecting the appropriate instance from the Chapter drop-down list.
Also, specify the Subject and Subject Type related to the selected
Chapter. These fields are mandatory.
Sector
Project Type
Project Code
Please note that selection of the Chapter/Subject/Subject Type is
carried out in a Step-by-Step way. Once the appropriate chapter is
selected, the list of all subjects and subject types pertaining to the
selected chapter becomes available in the Subject and Subject type
fields.
This is an automatically generated field which may have the New or
Ongoing values. The project which is not yet started, i.e. not
approved, or it is approved for the first year is of a New type. When
submitting the request of an existing project for the next year, the
new request will have an Ongoing project type.
Also, both new and ongoing projects can be either of Regular or
Emergency type. Requests are considered as Regular if they are
created within the regular request submission period. Requests
created after the regular request submission deadline has expired are
considered as Emergency.
Provide information about the Project Code assigned to the project.
For more details, see Providing Project Code.
Note: The project code should be unique in the system. If an existing
code is entered, the system will prevent saving the project.
IDMS CAPITAL INVESTMENT PROJECTS USER MANUAL
11
Project Nature
Provide information about the Project Nature by activating the
respective radio button (Production or Service). This field is
mandatory.
Start Date
Define the date on which the implementation of project activities is
supposed to begin (planned) and begins (actual). Provide the date
when the first contract started. This field is mandatory.
Actual date reflects when the
first contract started
Note: The project planned start date should be a date later than the
project creation date.
A calendar popup is available for date input, see Figure 3: Calendar.
End Date
Actual date reflects when the
last contract completed
Indicate the date by which the implementation of project activities is
supposed to be completed (planned) and the actual date of completion
(actual). Provide the date when the last contract was completed. This
field is mandatory.
A calendar popup is available for date input, see Figure 3: Calendar.
Duration
Indicate the planned and actual time-span for the project
implementation.
Note: If you specify the project end date, the project duration is
automatically calculated by the system. If the project duration is
provided first, the project end date is automatically calculated by the
system as soon as you navigate away from the field.
Specify the geographic Locations in the recipient country that are
intended to benefit from the project activities. This field is mandatory.
Locations
Please note that selection of the project location is carried out in a
Step-by-Step way. Once the appropriate governorate is selected, the
list of all qadhas pertaining to the selected governorate becomes
available in the Qadha field. The same refers to the qadha/nahia
selection.
For more details, see Managing Locations.
Executing Body
Beneficiary
Provide information about the Executing Body by selecting the
respective instance from the Government Entity drop-down list. This
field is mandatory. Also, specify the Agency within the selected
Government Entity.
Please note that selection of the Government Entity/Agency is carried
out in a Step-by-Step way. Once the appropriate Government Entity is
selected, the list of all agencies pertaining to the selected entity
becomes available in the Agency field.
Add information about the Beneficiary by selecting the respective
instance from the Government Entity drop-down list. This field is
mandatory. Also, specify the Agency within the selected Government
Entity.
IDMS CAPITAL INVESTMENT PROJECTS USER MANUAL
12
Please note that selection of the Government Entity/Agency is carried
out in a Step-by-Step way. Once the appropriate Government Entity is
selected, the list of all agencies pertaining to the selected entity
becomes available in the Agency field.
Implementation Status
Indicate the current status of the project in terms of implementation.
In order to set the project status, select the year for which you are
providing the status information and then specify the project
Implementation Status. Please note that if multiple status changes
occur during a year, the project will be transferred into the new year
with the most recent status assigned to it.
Note: The status of stopped and canceled projects cannot be changed
from the Project form.
Alignment with NDP
Indicate how the project is aligned with the National Development Plan
(NDP). For more details, see Managing NDP Alignments.
Objectives
Provide the description of the Objectives that the project seeks to
achieve in the English and Arabic languages.
Description
Provide the project Description in the English and Arabic languages.
This can be several paragraphs of a free text.
Notes
Enter additional Notes about the project in the English and Arabic
languages.
Figure 3: Calendar
3.1 Managing Donors
This chapter outlines how to add, edit and remove donor records.
3.1.1 Adding a Donor Record
In order to add a new record, follow the steps below:
1. Click the Add button at the bottom of the field. A new record will appear (Figure 4).
IDMS CAPITAL INVESTMENT PROJECTS USER MANUAL
13
Figure 4: Adding a Donor Record
2. Select the Donor from the respective drop-down list. The Type field information will
automatically be generated.
3. Provide the Project Ref. # (project reference number).
(OK) button to the left of the record to confirm the information input. Or, click
4. Click the
(Cancel) to terminate the operation.
3.1.2 Editing Donor Records
In order to edit an existing donor record, follow the steps below:
1. Click the record that needs to be modified. This will activate the selected record.
2. Make the appropriate changes in the data displayed.
(OK) button to save the changes made. Or, click
(Cancel) to discard them.
3. Click the
3.1.3 Removing Donor Records
In order to remove an existing donor record, use the
the selected record.
(Remove from the list) button to the left of
3.2 Managing Locations
This chapter outlines how to add, edit and remove location records.
3.2.1 Adding a Location Record
In order to add a new location record for the project, follow the steps below:
1. Click the Add button at the bottom of the field. A new record will appear (Figure 5).
Figure 5: Adding a Location Record
2.
3.
4.
5.
Select the appropriate Governorate from the drop-down list.
Indicate the appropriate Qadha by selecting the respective instance from the drop-down list.
Select the appropriate Nahia from the drop-down list.
(OK) button to the left of the record to confirm the information input. Or, click
Click the
(Cancel) to terminate the operation.
3.2.2 Editing Location Records
IDMS CAPITAL INVESTMENT PROJECTS USER MANUAL
14
In order to edit an existing location record, follow the steps below:
1. Click the location record that needs to be modified. This will activate the selected record.
2. Make the appropriate changes in the data displayed.
(OK) button to save the changes made. Or, click
(Cancel) to discard them.
3. Click the
3.2.3 Removing Location Records
In order to remove an existing location record, use the
of the selected record.
(Remove from the list) button to the left
3.3 Managing NDP Alignments
This chapter outlines how to add, edit and remove NDP alignment records.
3.3.1 Adding an NDP Alignment Record
In order to add a new NDP alignment record, follow the steps below:
1. Click the Add button at the bottom of the field. A new record will appear (Figure 6).
Figure 6: Specifying Alignment with NDP
2. Select the Sector and Sub Sector from the appropriate drop-down lists.
3. Select the appropriate Objective.
(OK) button to the left of the record to confirm the information input. Or, click
4. Click the
(Cancel) to terminate the operation.
3.3.2 Editing NDP Alignment Records
In order to edit an existing NDP alignment record, follow the steps below:
1. Click the record that needs to be modified. This will activate the selected record.
2. Make the appropriate changes in the data displayed.
(OK) button to save the changes made. Or, click
(Cancel) to discard them.
3. Click the
3.3.3 Removing NDP Alignment Records
In order to remove an existing NDP alignment record, use the
the left of the selected record.
(Remove from the list) button to
IDMS CAPITAL INVESTMENT PROJECTS USER MANUAL
15
4. FINANCIAL INFORMATION
In the Financial Information section (Figure 7), you may enter information about project costs,
allocations by implementation years, location and type of expense, etc.
Figure 7: Financial Information Section
IDMS CAPITAL INVESTMENT PROJECTS USER MANUAL
16
Note: Some fields in this section are available for ongoing or approved projects only.
All amounts in the Financial Information section can be viewed either in IDQ (Iraqi Dinar) or USD (US
Dollar). To switch between these options, select the appropriate value from the All amounts are
displayed in: drop-down list at the top of the screen.
Note: For all total amount fields in this section, you may see the amount converted to IDQ or USD
by hovering the mouse cursor on the corresponding amount. If IDQ amount is displayed, the tooltip
will show the USD equivalent; and vice versa, if USD amount is displayed, the tooltip will show the
IDQ equivalent.
The Reallocation History link in the right upper side of this section leads to the Reallocation History
page (Figure 8), where details on the project reallocation status, type, attachments and users
responsible for the changes can be viewed. The page content is different depending on the
reallocation type. For details, see PROJECT SUBMISSION.
Figure 8: Reallocation History Page
IDMS CAPITAL INVESTMENT PROJECTS USER MANUAL
17
For more details on how to provide the information requested in the Financial Information section,
refer to the table below:
Note: Some fields in this section are mandatory to be filled in. They are marked with an asterisk.
Field Name
Instructions
First, select the year for which the Project Cost should be defined. Then,
define the amount requested for the project implementation in the selected
year. This field is mandatory.
Note: When accessing this section for a new project request, you may provide
the Project Cost for the current year only.
Project Cost
First, select the year for which the project Yearly Allocation should be
defined. Then, select the Foreign Currency in which the foreign funds are
defined in the corresponding field.
Note: Once the appropriate currency is selected, the default exchange rate
per 1 USD is provided in accordance with the project start date. However,
you can change it, if this is necessary. The exchange rate is used when
converting the amounts into USD.
Yearly Allocation
In the Local Amount field, provide the project expenses made in the local
currency and in the Foreign Amount field, provide expenses made in the
selected foreign currency. The Total Amount field value will automatically be
calculated based on the provided local and foreign amounts.
This field is mandatory.
Note: When accessing this section for a new project request, you may
provide the Yearly Allocation for the current year only.
Specify how the recorded project cost is allocated throughout all project
implementation locations.
Modified
Breakdown
Location
by
Modified
Breakdown by Type
of Expense
Payments
by MoF to Ministry/
Governorate
Enter both local and foreign amounts allocated (it should be entered in the
currency indicated). The value in the Total Amount field will automatically
be calculated.
Note: You need to specify locations in the GENERAL INFORMATION tab
before you can indicate the Modified Breakdown by Location. For more
details, see Managing Locations.
Break down the allocated amount according to the type of expense (local,
foreign, and rollover). The value in the Total Amount field will automatically
be calculated. For more details, see Managing Expense Types.
This field is available for approved projects only and is used to provide
information about the transfer of funds from the Ministry of Finance to
another Ministry or Governorate. The values in the % out of Yearly
Allocation and % out of Total Project Cost will automatically be
calculated.
IDMS CAPITAL INVESTMENT PROJECTS USER MANUAL
18
Please note that the payment information should be provided for the budget
year specified above. For more details, see Managing Expense Types.
Expenses
by
Ministry/
Governorate
to
Implementer
This field is available for approved projects only and is used to provide
information about the transfer of funds from the Ministry or Governorate to
the entity directly involved in the project implementation. The value in the
TOTAL field will automatically be calculated. The information on the
Cumulative Expenses up to the Current Year is displayed in the upper
part of the Expenses table. It shows the total of all project expenses for the
previous years, including the current year.
Please note that the expense information should be provided for the budget
year specified above. For more details, see Managing Expenses.
4.1 Managing Expense Types
This chapter outlines how to add and remove types of expenses in the FINANCIAL INFORMATION and
the Request Reallocation Form, which appears when an approved project is requesting reallocation
(see PROJECT SUBMISSION). This chapter also explains how to break down the funds among the
selected expense types.
4.1.1 Adding an Expense Type Record
In order to add a new expense type record, follow the steps below:
1. Click the Add Expense Type button at the bottom of the Modified Breakdown by Type of
Expense field (Figure 9 or Figure 10). The Add Type of Expense form will appear (Figure 11).
Figure 9: Modified Breakdown by Type of Expense Field in Financial Information Section
IDMS CAPITAL INVESTMENT PROJECTS USER MANUAL
19
Figure 10: Modified Breakdown by Type of Expense in the Request Reallocation Form
2. Locate the expense type to add information for.
Note: To make it easier to locate the appropriate expense type in the long list, the system
has a search capability. To find the relevant expense type, enter the expense type name or ID
in the appropriate field, indicate the section and level to search in and click the GO button.
Use the look-up controls of Section, Level 1, Level 2, Level 3, Level 4, and Level 5 to find the
appropriate type of expense. The list of all expense types matching the criteria will be
displayed in the Types of Expense table.
3. Add the selected expense type(s) as one(s) relevant to the project by ticking the check-box to
the left of the appropriate record and clicking the Add Selected button. The selected expense
type(s) will appear in the Selected Expense Types table.
4. Click the OK button to return to the FINANCIAL INFORMATION section (or to the Request
Reallocation Form if the form was accessed from there), where the selected expense types
will appear in the respective field. Or, click Cancel to terminate the operation.
IDMS CAPITAL INVESTMENT PROJECTS USER MANUAL
20
Figure 11: Adding a Type of Expense Record
4.1.2 Removing Expense Type Records
(Remove from the list) button to the left of
In order to remove an expense type record, use the
the selected record. The same operation can be done from the Add Type of Expense form (see
Adding an Expense Type Record).
Note: You cannot remove the To be specified type of expense.
4.1.3 Providing Breakdown by Type of Expense
In order to provide the breakdown for the selected types of expense, follow the steps below:
1. If you have accessed the Modified Breakdown by Type of Expense field from the FINANCIAL
INFORMATION section, then in that section, click the expense type record to add financial
information for. This will activate the selected record (Figure 12). Provide the following
information for each expense type:
• Local Amount - this is the expended amount in the local currency.
• Foreign Amount - this is the expended amount in the foreign currency.
IDMS CAPITAL INVESTMENT PROJECTS USER MANUAL
•
21
Rollover Amount - this is the remaining amount over the previous years’ allocations and
actual expenses.
Note: The value in the Rollover Amount field should not exceed the amount remaining
after you subtract actual expenses amount from the previous years’ allocations.
Figure 12: Providing Financial Information for the Type of Expense
2. If you have accessed the Modified Breakdown by Type of Expense field from the Request
Reallocation Form (see Submitting Reallocation Request), then in that form, click the expense
type record to add financial information for. This will activate the selected record (Figure 13).
Provide the following information for each expense type:
• Revised Local Amount - this is the revised amount in the local currency.
• Revised Foreign Amount - this is the revised amount in the foreign currency.
• Rollover Amount - this is the remaining amount over the previous years’ allocations and
actual expenses.
Note: The value in the Rollover Amount field should not exceed the amount remaining
after you subtract actual expenses amount from the previous years’ allocations.
Note: For emergency funding requests, instead of revised amounts, requested amounts should
be defined here.
Figure 13: Revising Reallocation Financial Information for the Type of Expense
IDMS CAPITAL INVESTMENT PROJECTS USER MANUAL
22
3. Click the
(OK) button to the left of the record to confirm the information input. Or, click
(Cancel) to terminate the operation.
4.2 Managing Payments
This chapter outlines how to add, edit and remove payment records.
4.2.1 Adding a Payment Record
In order to add a new payment record, follow the steps below:
1. Select the Year to display the payments for.
2. Click the Add Payment button at the bottom of the field (Figure 14). The Add/Edit Payment
form will appear (Figure 15).
Figure 14: Payments Field
3. Type the Transaction Code in the respective field. This field is mandatory.
4. Specify the date when the ministry or governorate placed the request for payment in the
Request Date field. A calendar popup is available for this input, see Figure 3: Calendar.
5. Indicate the date when the funds were released in the Release Date field. This field is
mandatory. A calendar popup is available for this input, see Figure 3: Calendar.
6. Enter the Requested Amount. This is the amount that has been requested by the
Ministry/Governorate for the project implementation.
IDMS CAPITAL INVESTMENT PROJECTS USER MANUAL
23
Figure 15: Adding a Payment Record
7. Enter the Released Amount. This field is mandatory. This is the amount that has been
allotted to the Ministry/Governorate by the Ministry of Finance.
Note: The total released amount for all payments recorded should not exceed the
corresponding yearly allocation amount defined in the Yearly Allocation field. See FINANCIAL
INFORMATION for details.
8. Click the OK button to confirm the information input and to return to the FINANCIAL
INFORMATION section.
In order to add another payment record, click the Add Another Payment button and provide the
information requested as described in the paragraphs above.
Note: The new payment record appears under the project budget year when the money transfer was
made. The information on the payment record becomes available when the appropriate year is
selected.
4.2.2 Editing Payment Records
In order to edit an existing payment record, follow the steps below:
1. Click the record that needs to be modified. You will be directed to the Add/Edit Payment subsection where the details of the selected record will be displayed.
2. Make the appropriate changes in the data displayed.
3. Click the OK button to save the changes made and return to the FINANCIAL INFORMATION
section.
4.2.3 Removing Payment Records
In order to remove an existing payment record, use the
left of the selected record.
(Remove from the list) button to the
IDMS CAPITAL INVESTMENT PROJECTS USER MANUAL
24
4.3 Managing Expenses
This chapter outlines how to add, edit and remove expense records.
4.3.1 Adding an Expense Record
In order to add a new expense record, follow the steps below:
1. Select the Year to display the expenses for.
2. Click the Add Expenses button at the bottom of the field (Figure 16). The Add/Edit Expenses
form will appear (Figure 17).
Figure 16: Expenses Field
3. Indicate the Type of Expenses by selecting the appropriate instance from the drop-down
list. This field is mandatory.
4. Indicate the Date when the expense was made. This field is mandatory. A calendar popup is
available for this input, see Figure 3: Calendar.
5. Select the Contract Reference Number from the drop-down list. This is the ID of the
contract associated with the given expense.
6. Enter the Expended Amount. This is the amount that has been used to purchase services,
goods or cover other project-related costs.
7. Enter the Predecessor Amount. This is the amount left from the previous year’s budget and
available in the current one.
8. Enter the Credit Amount. This is the amount that has been provided as credit.
9. Click the OK button to confirm the information input and return to the FINANCIAL
INFORMATION section.
In order to add another expense record click the Add Another Expense button and provide the
information requested as described in the paragraphs above.
Note: The new expense record appears under the project budget year when the expense was made.
The information on the expense record becomes available when the appropriate year is selected.
IDMS CAPITAL INVESTMENT PROJECTS USER MANUAL
25
Figure 17: Adding an Expense Record
4.3.2 Editing Expense Records
In order to edit an existing expense record, follow the steps below:
1. Click the record that needs to be modified. You will be directed to the Add/Edit Expenses subsection where the details of the selected record will be displayed.
2. Make the appropriate changes in the data displayed.
3. Click the OK button to save the changes made and return to the FINANCIAL INFORMATION
section.
4.3.3 Removing Expense Records
In order to remove an existing expense record, use the
of the selected record.
(Remove from the list) button to the left
IDMS CAPITAL INVESTMENT PROJECTS USER MANUAL
26
5. PROCUREMENT
In the Procurement (Figure 18) section, you can provide procurement related information on the
project. This includes the procurement plans and contracts details.
Note: This section is available for ongoing and approved projects only.
All amounts in the Procurement section can be viewed either in IDQ (Iraqi Dinar) or USD (US Dollar).
To switch between these options, select the appropriate value from the All amounts are displayed
in: drop-down list at the top of the screen.
Note: For all total amount fields in this section, you may see the amount converted to IDQ or USD
by hovering the mouse cursor on the corresponding amount. If IDQ amount is displayed, the tooltip
will show the USD equivalent; and vice versa, if USD amount is displayed, the tooltip will show the
IDQ equivalent.
Figure 18: Procurement Section
For more details on how to provide the information requested in the Procurement section, refer to
the table below:
Field Name
Procurement Plan
Instructions
Indicate here the detailed procurements plans for each selected
year of the project activity. You should first select the Year to
display the procurement plans for. For more details, see Managing
IDMS CAPITAL INVESTMENT PROJECTS USER MANUAL
27
Procurement Plan.
Contracts
Define here any project procurement related contracts for each
selected year of the project activity. You should first select the
Year in the Procurement Plan section to display the procurement
contracts for. For more details, see Managing Contracts.
5.1 Managing Procurement Plan
This chapter outlines how to add, edit and remove procurement plan records.
5.1.1 Adding a Procurement Plan Record
In order to add a new procurement plan record, follow the steps below:
1. Click the Add button in the Procurement Plan section. You will be directed to the Add/Edit
Procurement Plan sub-section (Figure 19).
Figure 19: Adding a Procurement Plan Record
2. Provide the following information:
Note: Some fields in this section are mandatory to be filled in. They are marked with an asterisk.
IDMS CAPITAL INVESTMENT PROJECTS USER MANUAL
Field Name
28
Instructions
Indicate the Contract Name in the English and Arabic languages. This
field is mandatory.
Contract Name
Indicate the procurement Type by selecting the appropriate instance
from the drop-down list. The following values are available:
• Goods
• Services
• Works
Type
This field is mandatory.
Method
Procurement
of
Indicate the Method of Procurement by selecting the appropriate
instance from the drop-down list. This field is mandatory.
Indicate the Foreign Cost Currency by selecting the appropriate
instance from the drop-down list. This field is mandatory.
Foreign Cost Currency
Note: Once the appropriate currency is selected, the default exchange
rate per 1 USD is provided in accordance with the project start date.
However, you can change it, if this is necessary. The exchange rate is
used when converting the amounts into USD.
Estimated Cost
In the Local Cost field, provide the procurement expenses made in the
local currency. In the Foreign Cost field, provide expenses made in the
foreign currency. The Total cost will automatically be calculated. This
field is mandatory.
Planned Start Date
Indicate the procurement Planned Start Date. A calendar popup is
available for this input, see Figure 3: Calendar. This field is mandatory.
Planned End Date
Indicate the procurement Planned End Date. A calendar popup is
available for this input, see Figure 3: Calendar. This field is mandatory.
3. Click the OK button to confirm the information input. Or, click Cancel to terminate the
operation.
In order to add another procurement plan record click the Add Another Procurement Plan button
and provide the information requested as described in the paragraphs above.
5.1.2 Editing Procurement Plan Records
In order to edit an existing procurement plan record, follow the steps below:
1. Click the record that needs to be modified. You will be directed to the Add/Edit Procurement
Plan sub-section.
2. Make the appropriate changes in the data displayed.
3. Click the OK button to save the changes made. Or, click Cancel to discard them.
IDMS CAPITAL INVESTMENT PROJECTS USER MANUAL
29
5.1.3 Removing Procurement Plan Records
In order to remove an existing procurement plan record, use the
to the left of the selected contract record.
(Remove from the list) button
5.2 Managing Contracts
This chapter outlines how to add, edit and remove project contracts.
5.2.1 Adding a Contract Record
In order to add a new contract record, follow the steps below:
1. Click the Add button in the Contracts section. You will be directed to the Add Contract subsection (Figure 20).
Figure 20: Adding a Contract Record
IDMS CAPITAL INVESTMENT PROJECTS USER MANUAL
30
2. Provide the following information:
Note: Some fields in this section are mandatory to be filled in. They are marked with an asterisk.
Field Name
Instructions
Contract Ref. #
Indicate the Contract Reference number. This field is mandatory.
Contract Name
Indicate the Contract Name in the English and Arabic languages. This
field is mandatory.
Type
Indicate the contract Type by selecting the appropriate instance from the
drop-down list. The following values are available:
• Goods
• Services
• Works
This field is mandatory.
Contractor
Indicate the Contractor agency responsible for the procurement. This
field is mandatory.
Indicate the currency in which the Foreign Cost below will be defined. This
field is mandatory.
Foreign Cost Currency
Note: Once the appropriate currency is selected, the default exchange
rate per 1 USD is provided in accordance with the project start date.
However, you can change it, if this is necessary. The exchange rate is
used when converting the amounts into USD.
Cost
In the Local Cost field, provide the contract expenses made in the local
currency and in the Foreign Cost field, provide expenses made in the
foreign currency. The Total cost will automatically be calculated. This
field is mandatory.
Implementation Style
Indicate the type of the implementation. The following values are
available:
• Contract
• Direct
• Final hand-over
• Secretariat
Start Date
Indicate the contract Start Date. A calendar popup is available for this
input, see Figure 3: Calendar. This field is mandatory.
End Date
Indicate the contract End Date. A calendar popup is available for this
input, see Figure 3: Calendar. This field is mandatory.
Status
Indicate the contract status by selecting the appropriate instance from the
drop-down list.
IDMS CAPITAL INVESTMENT PROJECTS USER MANUAL
31
3. Click the OK button to confirm the information input. Or, click Cancel to terminate the
operation.
In order to add another contract record click the Add Another Contract button and provide the
information requested as described in the paragraphs above.
5.2.2 Editing Contract Records
In order to edit an existing contract record, follow the steps below:
1. Click the record that needs to be modified. You will be directed to the Add Contract subsection.
2. Make the appropriate changes in the data displayed.
3. Click the OK button to save the changes made. Or, click Cancel to discard them.
5.2.3 Removing Contract Records
In order to remove an existing contract record, use the
of the selected contract record.
(Remove from the list) button to the left
IDMS CAPITAL INVESTMENT PROJECTS USER MANUAL
32
6. IMPACT ANALYSIS
In the Impact Analysis section (Figure 21), you can provide information on the competitive
advantages, environmental impacts, social indicators and expected quantitative indicators of the
project.
Figure 21: Impact Analysis Section
IDMS CAPITAL INVESTMENT PROJECTS USER MANUAL
33
For more details on how to provide the information requested in the Impact Analysis section, refer to
the table below:
Note: Some fields in this section are mandatory to be filled in. They are marked with an asterisk.
Field Name
Instructions
Provide information about the competitive advantages of the project.
Competitive Advantages
In order to do so, provide information about the availability of natural
resources and raw materials, man-power, market needs, service needs
(for service projects only) in the English and Arabic languages.
Note: At least one field should be provided.
Provide information about project environmental impacts.
Environmental Impacts
In order to do so, provide information about the positive and negative
environmental effects, means used to address negative effects, if such
exist, their cost, and the effect of this cost on economic and technical
feasibility in the English and Arabic languages.
Note: At least one field should be provided.
Social Indicators
at completion of project
Expected
Indicators
Quantitative
at completion of project
At completion of the project, provide information about social indicators
for the project. For more details, see Managing Social Indicators.
At completion of the project, provide information about the expected
quantitative indicators. For more details, see Managing Expected
Quantitative Indicators.
6.1 Managing Social Indicators
This chapter outlines how to add, edit and remove social indicators.
6.1.1 Adding a Social Indicator Record
In order to add a new indicator record, follow the steps below:
1. Click the Add button at the bottom of the field. A new record will appear (Figure 22).
Figure 22: Adding a Social Indicator Record
2. Select the Sector and Indicator from the respective drop-down lists.
IDMS CAPITAL INVESTMENT PROJECTS USER MANUAL
34
Please note that selection of Social Indicators is carried out in a Step-by-Step way. Once the
appropriate sector is selected, the list of all indicators pertaining to the selected sector
becomes available in the Indicator field.
3. Specify the Expected Output for the Indicator selected.
(OK) button to the left of the record to confirm the information input. Or, click
4. Click the
(Cancel) to terminate the operation.
6.1.2 Editing Social Indicator Records
In order to edit an existing indicator record, follow the steps below:
1. Click the record that needs to be modified. This will activate the selected record.
2. Make the appropriate changes in the data displayed.
(OK) button to save the changes made. Or, click
(Cancel) to discard them.
3. Click the
6.1.3 Removing Social Indicator Records
In order to remove an existing indicator record, use the
left of the selected record.
(Remove from the list) button to the
6.2 Managing Expected Quantitative Indicators
This chapter outlines how to add, edit and remove expected quantitative indicators.
6.2.1 Adding an Expected Quantitative Indicator Record
In order to add a new quantitative indicator record, follow the steps below:
1. Click the Add/Edit Indicators button at the bottom of the field. You will be directed to
Add/Edit Expected Quantitative Indicator sub-section (Figure 23).
2. Provide the following information:
Note: Some fields in this section are mandatory to be filled in. They are marked with an asterisk.
Field Name
Instructions
Specify the Currency the indicator is expressed in by selecting the
appropriate instance from the drop-down list. This field is mandatory.
Currency
Note: Once the appropriate currency is selected, the default exchange
rate per 1 USD is provided in accordance with the project start date.
However, you can change it, if this is necessary. The exchange rate is
used when converting the amounts into USD.
Design Capacity
Provide information about the Design Capacity by filling in the Unit,
Quantity and Value fields.
Availability
Provide information on the Availability of the requested Unit, Quantity
and Value.
IDMS CAPITAL INVESTMENT PROJECTS USER MANUAL
35
Production Quantity by
Production Unit
Provide Production Quantity by Production Unit. For more details,
see Managing Production Quantity.
Production Inputs
Provide Production Inputs details. For more details, see Managing
Production Inputs.
3. Click the OK button to confirm the information input. Or, click Cancel to terminate the
operation.
Figure 23: Adding an Expected Quantitative Indicator Record
6.2.2 Editing Expected Quantitative Indicator Records
In order to edit an existing indicator record, follow the steps below:
1. Click the Add/Edit Indicators button at the bottom of the field. You will be directed to
Add/Edit Expected Quantitative Indicator sub-section.
2. Make the necessary changes in the data displayed.
3. Click the OK button to save the changes made. Or, click Cancel to discard them.
6.2.3 Removing Expected Quantitative Indicator Records
In order to remove an existing indicator record, use the
left of the selected record.
(Remove from the list) button to the
IDMS CAPITAL INVESTMENT PROJECTS USER MANUAL
36
6.3 Managing Production Quantity
This chapter outlines how to add, edit and remove the production quantity records.
6.3.1 Adding a Production Quantity Record
In order to add a production quantity record, follow the steps below:
1. Click the Add button at the bottom of the field. A new record will appear (Figure 24).
Figure 24: Adding a New Production Quantity Record
2. Enter the Production Unit name in the English and Arabic languages.
3. Specify the Unit, Quantity and Value.
(OK) button to the left of the record to confirm the information input. Or, click
4. Click the
(Cancel) to terminate the operation.
6.3.2 Editing Production Quantity Records
In order to edit an existing production quantity record, follow the steps below:
1. Click the record that needs to be modified. This will activate the selected record.
2. Make the appropriate changes in the data displayed.
(OK) button to save the changes made. Or, click
(Cancel) to discard them.
3. Click the
6.3.3 Removing Production Quantity Records
In order to remove an existing production quantity record, use the
button to the left of the selected record.
(Remove from the list)
6.4 Managing Production Inputs
This chapter outlines how to add, edit and remove production input records.
6.4.1 Adding a Production Input Record
In order to add a production input record, follow the steps below:
1. Click the Add button at the bottom of the field. A new record will appear (Figure 25).\
IDMS CAPITAL INVESTMENT PROJECTS USER MANUAL
37
Figure 25: Adding a New Production Input Record
2. Select the Input from the respective drop-down list.
3. Specify the Unit, Quantity and Value for the selected input.
(OK) button to the left of the record to confirm the information input. Or, click
4. Click the
(Cancel) to terminate the operation.
6.4.2 Editing Production Input Records
In order to edit an existing production input record, follow the steps below:
1. Click the record that needs to be modified. This will activate the selected record.
2. Make the appropriate changes in the data displayed.
(OK) button to save the changes made. Or, click
(Cancel) to discard them.
3. Click the
6.4.3 Removing Production Input Records
In order to remove an existing production input record, use the
to the left of the selected record.
(Remove from the list) button
IDMS CAPITAL INVESTMENT PROJECTS USER MANUAL
38
7. REQUIRED RESOURCES
In the Required Resources section (Figure 26), you can provide information about construction
materials, as well as man-power and energy resources required during the project implementation.
Figure 26: Required Resources Section
For more details on how to provide the information requested in the Required Resources section,
refer to the table below:
IDMS CAPITAL INVESTMENT PROJECTS USER MANUAL
Field Name
39
Instructions
Construction Materials
Provide information about the required Construction Materials. For
more details, see Managing Construction Materials.
Man-power Resources
Provide detailed information about the Man-power Resources. For
more details, see Managing Man-power Resources.
Energy Resources
Electricity and Fuel
Provide detailed information about the Energy Resources. For more
details, see Managing Energy Resources.
7.1 Managing Construction Materials
This chapter outlines how to add, edit and remove construction material records.
7.1.1 Adding a Material Record
In order to add a new material record for the project, follow the steps below:
1. Click the Add button at the bottom of the field. A new record will appear (Figure 27).
Figure 27: Adding a Construction Material Record
2.
3.
4.
5.
Select the Material (unit of measure) from the respective drop-down list.
Add Notes in the English and Arabic languages.
Specify the Quantity of the selected material.
(OK) button to the left of the record to confirm the information input. Or, click
Click the
(Cancel) to terminate the operation.
7.1.2 Editing Material Records
In order to edit an existing material record, follow the steps below:
1. Click the record that needs to be modified. This will activate the selected record.
2. Make the appropriate changes in the data displayed.
(OK) button to save the changes made. Or, click
(Cancel) to discard them.
3. Click the
IDMS CAPITAL INVESTMENT PROJECTS USER MANUAL
40
7.1.3 Removing Material Records
In order to remove an existing material record, use the
of the selected record.
(Remove from the list) button to the left
7.2 Managing Man-power Resources
This chapter outlines how to add, edit and remove man-power resources.
7.2.1 Adding a Man-power Resource Record
In order to add a new man-power resource record, follow the steps below:
1. Click the Add button at the bottom of the field. You will be directed to the Add/Edit Manpower Resources sub-section (Figure 28).
Figure 28: Adding a Man-power Resource Record
2. Specify the Skill Level of the man-power resource by selecting it from the respective dropdown lists. This field is mandatory.
3. Specify the man-power resources Quantity during the construction and during operation.
This field is mandatory.
4. Click the OK button to confirm the information input. Or, click Cancel to terminate the
operation.
In order to add another man-power resource record, click the Add another Man-power Resource
button at the bottom of the page.
7.2.2 Editing Man-Power Resource Records
In order to edit an existing man-power resource record, follow the steps below:
1. Click the man-power resource record that needs to be modified. You will be directed to the
Add/Edit Man-power Resources sub-section.
2. Make the appropriate changes in the data displayed.
3. Click the OK button to save the changes made. Or, click Cancel to discard them.
IDMS CAPITAL INVESTMENT PROJECTS USER MANUAL
41
7.2.3 Removing Man-Power Resource Records
In order to remove an existing man-power resource record, use the
button to the left of the selected record.
(Remove from the list)
7.3 Managing Energy Resources
This chapter outlines how to add, edit and remove energy resources.
7.3.1 Adding an Energy Resource Record
In order to add a new energy resource record for the project, follow the steps below:
1. Click the Add button at the bottom of the field. A new record will appear (Figure 29).
Figure 29: Adding an Energy Resource Record
2. Select the Energy Type (unit of measure) from the respective drop-down list.
3. Specify the Quantity of the selected energy resource during construction and operation.
(OK) button to the left of the record to confirm the information input. Or, click
4. Click the
(Cancel) to terminate the operation.
7.3.2 Editing Energy Resource Records
In order to edit an existing energy resource record, follow the steps below:
1. Click the energy resource record that needs to be modified. This will activate the selected
record.
2. Make the appropriate changes in the data displayed.
(OK) button to save the changes made. Or, click
(Cancel) to discard them.
3. Click the
7.3.3 Removing Energy Resource Records
In order to remove an existing energy resource record, use the
the left of the selected record.
(Remove from the list) button to
IDMS CAPITAL INVESTMENT PROJECTS USER MANUAL
42
8. MONITORING AND EVALUATION
In the Monitoring & Evaluation section (Figure 30), you should provide information on the target and
overall progress of the project, the key performance indicators of the project, progress on the
contracts, and factors that may be delaying the project implementation.
Note: This section is available for approved projects only.
Figure 30: Monitoring & Evaluation Section
IDMS CAPITAL INVESTMENT PROJECTS USER MANUAL
43
For more details on how to provide the information requested in the Monitoring & Evaluation section,
refer to the table below:
Note: Some fields in this section are mandatory to be filled in. They are marked with an asterisk.
Field Name
Instructions
Overall Planned Progress
Enter percentage of the Overall Planned Progress made by the
project as of the date.
Overall Progress
Enter percentage of the Overall Progress Made by the project as of
the date.
Work Plan
Provide information about the project activities and benchmarks. For
more details, see Managing Work Plan Records.
Key
Indicators
Performance
Provide information about the Key Performance Indicators used to
evaluate and monitor the progress of the project. For more details, see
Managing Key Performance Indicators.
Progress on Contracts
The information in this section is generated according to the
procurement plan and contract records defined in the PROCUREMENT
section. To update the contract progress information, indicate the
Weight (%) and Percent of Completion.
Factors Causing Delays
Provide information about the Factors Causing Delays in the project
implementation. For more details, see Managing Delay Factors.
8.1 Managing Work Plan Records
This chapter outlines how to manage benchmarks and assign activity(-ies) to each benchmark
created.
8.1.1 Adding a Benchmark Record
In order to add a benchmark record, follow the steps below:
1. Click the Add/Remove Benchmarks button at the bottom of the field. You will be directed
to Add/Remove Benchmarks sub-section (Figure 31).
Figure 31: Adding a Benchmark Record
IDMS CAPITAL INVESTMENT PROJECTS USER MANUAL
44
2. Insert a name for the Benchmark in the English and Arabic languages. This field is
mandatory.
(OK) button to the left of the record to confirm the information input. Or, click
3. Click the
(Cancel) to terminate the operation.
4. Click the OK button to confirm the information input and return to the MONITORING AND
EVALUATION section. Or, click Cancel to terminate the operation.
8.1.2 Editing Benchmark Records
In order to edit an existing benchmark record, follow the steps below:
1. Click the Add/Remove Benchmarks button at the bottom of the field. You will be directed
to Add/Remove Benchmarks sub-section where all benchmarks added for the project will be
listed.
2. Click the benchmark record that needs to be modified. This will activate the selected record.
3. Make the appropriate changes in the data displayed.
(OK) button to the left of the record to save the changes made. Or, click
4. Click the
(Cancel) to discard them.
5. Click the OK button to return to the MONITORING AND EVALUATION section. Or, click Cancel
to terminate the operation.
8.1.3 Removing Benchmark Records
In order to remove an existing benchmark record, follow the steps below:
1. Click the Add/Remove Benchmarks button at the bottom of the field. You will be directed
to Add/Remove Benchmarks sub-section where all benchmarks added for the project will be
listed.
2. Click the (Remove from the list) button to the left of the selected record.
8.2 Managing Activity Records
This chapter outlines how to add, edit and remove activity records.
8.2.1 Adding an Activity Record
In order to add an activity record, follow the steps below:
1. Expand the benchmark record that you want to add an activity to.
2. Click the Add Activity button at the bottom of the field. You will be directed to Add/Edit
Activity sub-section (Figure 32).
IDMS CAPITAL INVESTMENT PROJECTS USER MANUAL
45
Figure 32: Adding an Activity Record
3. Provide the following information:
Note: Some fields in this section are mandatory to be filled in. They are marked with an asterisk.
Field Name
Instructions
Activity
Insert a name for the Activity in the English and Arabic languages. This
field is mandatory.
Start Date
Indicate the activity Start Date. This field is mandatory. A calendar
popup is available for this input, see Figure 3: Calendar.
End Date
Indicate the activity End Date. This field is mandatory. A calendar
popup is available for this input, see Figure 3: Calendar.
Status
Indicate the activity Status by selecting the appropriate instance from
the drop-down list. The following values are available:
• Not Started
• Ongoing
• Completed
• Delayed
This field is mandatory.
Responsible Organisation
Indicate the organisation responsible for the activity from Responsible
Organisation drop-down list.
4. Click the OK button to confirm the information input. Or, click Cancel to cancel the operation.
IDMS CAPITAL INVESTMENT PROJECTS USER MANUAL
46
5. In the MONITORING AND EVALUATION section, select the Verified checkbox if the project
manager approves all the data provided for the benchmark.
8.2.2 Editing Activity Records
In order to edit an existing activity record, follow the steps below:
1. Click the activity record that needs to be modified. You will be directed to Add/Edit Activity
sub-section.
2. Make the appropriate changes in the data displayed.
3. Click the OK button to save the changes made. Or, click Cancel to discard them.
8.2.3 Removing Activity Records
In order to remove an existing activity record, use the
of the selected record.
(Remove from the list) button to the left
8.3 Managing Key Performance Indicators
This chapter outlines how to add, edit and remove Key Performance Indicators (KPI).
8.3.1 Adding a KPI Record
In order to add a new KPI record, follow the steps below:
1. Click the Add/Remove KPIs button at the bottom of the field. You will be directed to the
Add/Remove KPIs sub-section (Figure 33).
Note: You must first add a sector and location for the project in the GENERAL INFORMATION
section in order to be able to record relevant KPIs.
IDMS CAPITAL INVESTMENT PROJECTS USER MANUAL
47
Figure 33: Selecting Key Performance Indicators for the Project
2. Search for the KPI to add to the project by entering the keyword in the search field and
clicking the GO button. All the KPIs that match the search criteria will be displayed in the Key
Performance Indicator table.
Note: Selecting the appropriate instance from the Sector drop-down list in the GENERAL
INFORMATION section will display only the KPIs that match the selection.
3. Specify the desired KPI(s) for the project by selecting the checkbox to the left of the
respective KPI(s).
4. Click the Add Selected button. The selected KPI(s) will appear in the Selected KPIs table.
5. Click the OK button to confirm the information input and return to the MONITORING AND
EVALUATION section, where the selected KPI(s) will appear in the respective field.
8.3.2 Providing KPI Progress Information
In order to provide the information requested, follow the steps below:
1. Expand the KPI record for which you want to provide the progress information.
2. Click the Update KPI Progress button at the bottom of the KPI record. You will be directed
to the Update KPI Progress sub-section where the list of locations defined in the GENERAL
INFORMATION section is displayed (Figure 34).
IDMS CAPITAL INVESTMENT PROJECTS USER MANUAL
48
Figure 34: Updating KPI Progress Information
4.
5.
6.
7.
8.
Provide additional information about the KPI in the Comment field.
Enter the total number of targets set by the project.
Indicate the number of targets reached as of the date.
Specify the number of targets that have been verified.
Click the OK button to save the information input and return to the MONITORING AND
EVALUATION section. Or, click Cancel to terminate the operation.
8.3.3 Editing KPI Progress Information
In order to update project progress information, follow the steps below:
1. Expand the KPI record for which you want to edit the progress information.
2. Click the Update KPI Progress button at the bottom of the KPI record to modify information
for. You will be directed to the Update KPI Progress sub-section where the information
previously indicated for the KPI is displayed.
3. Make the necessary changes.
4. Click the OK button to save the changes made and return to the MONITORING AND
EVALUATION section. Or, click Cancel to terminate the operation.
8.3.4 Removing KPI Progress Information
In order to remove a KPI progress record, follow the steps below:
1. Expand the KPI record for which you want to remove the progress information.
2. Click the (Remove from the List) button to the left of the selected record.
8.3.5 Removing KPI Records
In order to remove a KPI record, follow the steps below:
1. Click the Add/Remove KPIs button at the bottom of the field. You will be directed to the
Add/Remove KPIs sub-section.
IDMS CAPITAL INVESTMENT PROJECTS USER MANUAL
49
2. Click the
(Remove from the list) button to the left of the selected record in the Selected
KPIs table.
8.4 Managing Delay Factors
This chapter outlines how to add, edit and remove factors causing delays in the project schedule.
8.4.1 Adding a Delay Factor Record
In order to add a new delay factor record, follow the steps below:
1. Click the Add Factor button at the bottom of the field. A new record will appear (Figure 35).
Figure 35: Adding Factors Causing Delays
2. Select the appropriate instance from the Factor drop-down list.
3. Provide additional Comments if it is necessary in the appropriate field.
4. Click the
(OK) button to the left of the respective row to confirm the information input. Or,
click
(Cancel) to terminate the operation.
8.4.2 Editing Delay Factor Records
In order to edit an existing delay factor record, follow the steps below:
1. Click the delay factor record that needs to be modified. This will activate the selected record.
2. Make the necessary changes.
3. Click the
(OK) button to save the changes made. Or, click
(Cancel) to discard them.
8.4.3 Removing Delay Factors
In order to remove an existing delay factor record, use the
left of the selected record.
(Remove from the list) button to the
IDMS CAPITAL INVESTMENT PROJECTS USER MANUAL
50
9. NOTES AND ATTACHMENTS
In the Notes & Attachments section (Figure 36), you can enter additional notes and comments on the
project as well as attach project documents such as proposals and reports.
Figure 36: Notes and Attachments Section
For more details on how to provide the information requested in the Notes and Attachments section,
refer to the table below:
Field Name
Notes / Comments
Instructions
Provide any additional comments that are relevant to the given
project in the English and Arabic languages.
Attach Document
(e.g. project document,
monitoring reports, and
other)
Attach documents which may contain project-related information. For
details on managing attachments, see Managing Attachments.
9.1 Managing Attachments
This chapter outlines how to add, view and remove project attachments.
9.1.1 Adding an Attachment
In order to attach a document, follow the steps below:
IDMS CAPITAL INVESTMENT PROJECTS USER MANUAL
51
1. Click the Add Attachment button. You will be directed to the Add Attachment sub-section
(Figure 37).
Figure 37: Adding an Attachment
2. Click the Browse button to locate the file that needs to be attached. The attachment size is
limited to 3MB.
Note: In order to remove a wrongly attached file, click the Reset button.
3. Enter the name for the document to be attached in the Title field in the English and Arabic
languages. This field is mandatory.
4. Provide a brief Description for the document in the English and Arabic languages.
5. Click the OK button to attach the file. The attached file will appear in the respective table in
the NOTES AND ATTACHMENTS section.
In order to attach another file, click the Add Another Attachment button and provide the
information requested as described in the paragraphs above.
9.1.2 Viewing Attachments
Click the title of the corresponding attachment. The attached file will be displayed in your browser.
9.1.3 Removing Attachments
In order to remove an existing attachment, use the
the selected attachment.
(Remove from the list) button to the left of
IDMS CAPITAL INVESTMENT PROJECTS USER MANUAL
52
10. PROJECT HISTORY
In the Project History section (Figure 38), you can view statistical data on access to the given
project.
For more details on what information you can view in the Project History section, refer to the table
below:
Figure 38: Project History Section
IDMS CAPITAL INVESTMENT PROJECTS USER MANUAL
Field Name
Project History
53
Instructions
Provides information about the recent changes made to the
corresponding project. Identifies the user who performed the changes
and the date/time when the modifications were made.
IDMS CAPITAL INVESTMENT PROJECTS USER MANUAL
54
11. PROJECT SUBMISSION
Depending on the user permissions, the Project Form provides specific actions to manage the
request/project.
For details on the project revision cycle, see IDMS Analytics User Manual in REFERENCES.
Depending on the approval stage the project is in, and the permissions you have, the following
actions may be available in the top toolbar of the Project Form:
1. Review – The MoP Sectoral Unit takes this action when they are ready to review the
submitted project request. At this stage the project request status in My Workspace of IDMS
Analytics (see REFERENCES) will be marked as UNDER PRIMARY REVIEW.
2. Forward to Other Sectoral Unit for Review - If a specialized review is necessary, the
responsible MoP Sectoral Unit may take this action to forward the project request to another
MoP Sectoral Unit for further advice. When taking this action, MoP Sectoral Unit should be
selected in the Forward to Other Sectoral Unit form to forward the project request to (see
Forwarding to Other Sectoral Unit). At this stage the project request status will be marked as
UNDER SPECIALIZED REVIEW.
3. Send Back to Primary Sectoral Unit – The revising MoP Sectoral Unit sends back the
project request to the Primary Sectoral Unit when the revision is made. Additional comments
may be provided when taking this action (see Managing Revision Comments). At this stage
the project request status in My Workspace will be marked as UNDER PRIMARY REVIEW.
4. Verify – Once the revision is done, this action
the MoP Sectoral Unit before it is gone for a
Additional comments may be provided when
Comments). At this stage the project request
VERIFICATION.
verifies the project request internally within
negotiation with the relevant Line Ministry.
taking this action (see Managing Revision
status in My Workspace will be marked as
5. Negotiate with Line Ministry – This action sends the project to the negotiation with the
relevant Line Ministry. Additional comments may be provided when taking this action (see
Managing Revision Comments). At this stage the project request status in My Workspace will
be marked as NEGOTIATION.
6. Accept – This action is used to accept the project in case it was fully revised and agreed with
the MoP Sectoral Unit. At this stage the project request status in My Workspace (see
REFERENCES) will be marked as PROCESSED, if there are enough funds for the project (as
defined in the Budget Ceilings for the corresponding Executing Body, see IDMS Analytics User
Manual in REFERENCES), and will be marked as REQUIRING FUNDING if no enough funds
are available for the project.
Note: If the Project Code for the project was not defined by the Executing Body (see
GENERAL INFORMATION), when taking the Accept action, the project code is required to be
provided in the opened form (see Providing Project Code).
IDMS CAPITAL INVESTMENT PROJECTS USER MANUAL
55
7. Reject – This action rejects the project request. Additional comments may be provided when
taking this action (see Managing Revision Comments). At this stage the project request status
in My Workspace will be marked as REJECTED.
8. Request Revisions – When during negotiation additional information is required, this action
is used to send the project request back for an additional revision to the MoP Sectoral Unit.
Additional comments may be provided when taking this action (see Managing Revision
Comments). At this stage the project request status in My Workspace will be marked as
UNDERGOING REVISIONS.
9. Check for Funding – This action is available when the funds requested in the project are
more than those dedicated to the corresponding Executing Body. With this action, the project
will be sent to the revision of the requested funds. At this stage the project request status in
My Workspace will be marked as REQUIRING FUNDING.
10. Create Draft for the Current Year – This action is available when the project is in the
ABANDONED or REJECTED state and is used to create a new draft project with all the data
of the corresponding project for the current year.
Note: This action is not available if the project already exists in the current year.
11. Create Draft for the Next Year - This action is available when the project is in the
ABANDONED or REJECTED state and is used to create a new draft project with all the data
of the corresponding project for the next year.
Note: This action is not available if the project already exists in the next year.
12. Move to Draft for the Next Year - This action is available when the project is in the
CREATED state and additionally, for emergency funding requests only, in the EMERGENCY
FUNDING REJECTED state. This action is used by Executing Body for moving the funding
request to the next year. The funding request will appear in the My Draft Funding Requests
list for the next year and will disappear from the same list for the current year.
13. Abandon – This action is used in case the project needs to be abandoned due to other
allocation adjustments made at any stage by either the Council of Ministers or the Parliament.
For such a scenario, the system will send an email notification to the user submitting the
request notifying about the project request status. At this stage the project request status in
My Workspace will be marked as ABANDONED.
14. Process – This action is available for abandoned projects and is used to process the project
again. After taking this action, the funding availability will be checked for the project and if
the funding is available, the project request status in My Workspace will be changed to
PROCESSED, otherwise if no enough funds are allocated to the project, the status will be
changed to REQUIRING FUNDING.
15. Approve – This action is used to approve the submitted projects in case it was fully approved
in full by the Council of Ministers and the Parliament. For such a scenario, the system will
send an email notification to the user submitting the request notifying about the approval. At
this stage the project request status in My Workspace of IDMS Analytics (see REFERENCES)
will be marked as APPROVED.
IDMS CAPITAL INVESTMENT PROJECTS USER MANUAL
56
16. Update Financial Progress – This action appears for approved projects only and is used to
update the project’s financial progress, i.e. Payments and Expenses fields in the FINANCIAL
INFORMATION section.
17. Update Physical Progress - This action appears for approved projects only and is used to
update the project’s physical progress data in the MONITORING AND EVALUATION section.
18. Update Attachments - This action appears for approved projects only and is used to update
the project related attachments. When taking this action, it will be necessary to provide
additional Notes/Comments about the project and Attach Document(s) in the Notes &
Attachments form (see NOTES AND ATTACHMENTS).
19. Stop – This action is only available for approved projects and is used to stop the approved
project. At this stage the project request status in My Workspace will be marked as
STOPPED. For stopped projects, you can provide the project Stop Date and Government
Resolution Number in the project data entry form.
20. Cancel – This action is only available for approved projects and is used to cancel the
approved project. At this stage the project request status in My Workspace will be marked as
CANCELLED.
21. Continue – This action is only available for stopped projects and is used to resume their
implementation. Once the project is continued, it is checked for the availability of funding for
its implementation. If the appropriate funds are detected, the project status will be set to
APPROVED. In case there is shortage of financial means, the project will move to the
REQUIRING FUNDING stage and will remain in this state until the appropriate funds
become available.
22. Copy to Draft for the Next Year – This action will copy the project to the next year. The
project draft will appear in the My Draft Funding Requests list for the next year. Copied
project will have the same project ID as the original project. However, all other details of the
copied project will be individual.
23. Request Reallocation – This action appears to Executing Body or Assigned MoP Sectoral
Unit users when the project is in the APPROVED state and to Executing Body user only when
the project is in a REALLOCATION REVISION REQUESTED state. With this action,
additional funding is requested for the project. Reallocation details should be provided in the
Reallocation Request Form (see Submitting Reallocation Request). At this stage the project
request status in My Workspace will be marked as REALLOCATION REQUESTED.
Note: At this stage, the project from which the reallocation was requested will also change its
status to REALLOCATION REQUESTED.
24. Verify (during reallocation) - This action appears to the MoP Sectoral Unit users when the
project is in the REALLOCATION REQUESTED state. With this action, the Reallocation
Request Form (see Submitting Reallocation Request) will appear in the read-only mode.
o
If all the reallocation data is checked to be correct, then the MoP Sectoral Unit user
verifies the reallocation request by choosing the Verified action from the Process list in
the right upper side of the Reallocation Request Form. At this stage the project request
status in My Workspace will be marked as REALLOCATION VERIFIED.
IDMS CAPITAL INVESTMENT PROJECTS USER MANUAL
o
57
If the data in the reallocation request is missing or incorrect, then the MoP Sectoral Unit
user may send back the reallocation request by choosing the Request Reallocation
Revision from the Process list. This will result in changing the project request status to
REALLOCATION REVISION REQUESTED. Additional comments may be provided when
taking this action (see Managing Revision Comments).
25. Review (during reallocation) - This action appears to the MoP Investment Unit users when
the project is in the REALLOCATION VERIFIED state and is used to approve the reallocation
revision. With this action, the Reallocation Request Form (see Submitting Reallocation
Request) will appear in the read-only mode.
o
The MoP Investment Unit may approve the reallocation by choosing the Approve
Reallocation action from the Process list in the right upper side of the Reallocation
Request Form. If enough funds are available for reallocation, then at this stage the project
request status in My Workspace will be marked as REALLOCATION APPROVED.
However, if there are no enough funds the project will appear in the REALLOCATION
REQUIRING FUNDING state.
o
The MoP Investment Unit may approve the reallocation by choosing the Reject
Reallocation action from the Process list. This will result in changing the project request
status back to APPROVED.
26. Adjust Reallocation – This action appears to the Executing Body users when the project is
in the REALLOCATION APPROVED state and is used to adjust reallocation funds. With this
action, the Adjust Reallocation Request Form (see Adjusting Reallocation Request) will
appear. After submitting this form, the project status will be changed back to APPROVED
and the yearly allocation and breakdown amounts will be adjusted with the received
reallocation funds. The reallocation history will be kept and accessible in the PROJECT
HISTORY.
Additionally, for emergency projects only the following actions are available:
1. Request Emergency Funding – This action is available when the emergency funding
request in the REQUIRING EMERGENCY FUNDING state enters reallocation phase. After
providing reallocation details in the Reallocation Request Form (see Submitting Reallocation
Request), this action will move the draft to the EMERGENCY FUNDING REQUESTED state.
2. Verify (for emergency funding requests) - This action appears to the MoP Sectoral Unit users
when the emergency funding request is in the EMERGENCY FUNDING REQUESTED state.
With this action, the Reallocation Request Form (see Submitting Reallocation Request) will
appear in the read-only mode.
o
If all the emergency funding data is checked to be correct, then the MoP Sectoral Unit
user verifies the emergency funding request by choosing the Verified action from the
Process list in the right upper side of the Reallocation Request Form. At this stage the
emergency funding request status in My Workspace will be marked as EMERGENCY
FUNDING VERIFIED.
o
If the data in the emergency funding data is missing or incorrect, then the MoP Sectoral
Unit user may send back the emergency funding request by choosing the Request
Revision from the Process list. This will result in changing the project request status to
IDMS CAPITAL INVESTMENT PROJECTS USER MANUAL
58
EMERGENCY FUNDING REVISION REQUESTED. Additional comments may be provided
when taking this action (see Managing Revision Comments).
3. Review (for emergency funding requests) - This action appears to the MoP Investment Unit
users when the emergency funding request is in the EMERGENCY FUNDING VERIFIED
state and is used to approve the emergency funding. With this action, the Reallocation
Request Form (see Submitting Reallocation Request) will appear in the read-only mode.
1. The MoP Investment Unit may approve the emergency funding by choosing the Approve
action from the Process list in the right upper side of the Reallocation Request Form. At
this stage the project request status in My Workspace will be marked as EMERGENCY
FUNDING APPROVED.
2. The MoP Investment Unit may approve the reallocation by choosing the Reject action
from the Process list. This will result in changing the project request status back to
EMERGENCY FUNDING REJECTED.
11.1 Managing Revision Comments
This chapter outlines how to add, edit and remove comments made during the revision of the capital
investment projects/requests. The Comments Form appears automatically when selecting the certain
actions in the toolbar of the Project Form (see PROJECT SUBMISSION).
11.1.1 Adding a Comment
In order to add a project/request revision comment, follow the steps below:
1. Click the Add Comment button at the bottom of the Comments form. A new record will
appear (Figure 39).
Figure 39: Adding Funding Request Comments
2. Select the field the revision was made on from the Field drop-down list. This list contains all
fields available in the Project Form.
3. Provide Comments in the English and Arabic languages.
4. Click the
(OK) button to the left of the record to confirm the information input. Or, click
(Cancel) to terminate the operation.
IDMS CAPITAL INVESTMENT PROJECTS USER MANUAL
59
11.1.2 Editing Comments
Note: Only comments made before submitting the Comments form can be edited. Once the revision
comments are submitted, they cannot be edited again.
In order to edit an existing comment, follow the steps below:
1. Click the comment that needs to be modified. This will activate the selected record.
2. Make the necessary changes.
3. Click the
(OK) button to save the changes made. Or, click
(Cancel) to discard them.
11.1.3 Removing Comments
Note: Only comments made before submitting the Comments form can be removed. Once the
revision comments are submitted, they cannot be removed.
In order to remove an added comment, use the
selected record.
(Remove from the list) button to the left of the
11.2 Forwarding to Other Sectoral Unit
When the Forward to Other Sectoral Unit for Review action is taken in the Project Form (see
PROJECT SUBMISSION), the Forward to Other Sectoral Unit form appears.
Figure 40: Forward to Other Sectoral Unit Form
1. Select a MoP Sectoral Unit to transfer the project to. This field is mandatory.
2. Provide any accompanying Comments/Questions. This field is mandatory.
3. Click the OK button to submit the form. Or, click Cancel to close this form without
submitting.
11.3 Providing Project Code
The Project Form appears when Accept action is taken in the Project Form (see PROJECT
SUBMISSION).
IDMS CAPITAL INVESTMENT PROJECTS USER MANUAL
60
Figure 41: Project Code Form
1. Provide the unique identification number of the project in the Project Code field. This field is
mandatory.
To make the project codes informative and easy-to-understand, the following principles are
standing behind the code number generation:
• The Project Code should consist of exactly 19 digits.
• The system generates the project code automatically for the first 14 digits according to
the following divisions:
o The first three digits of the code refer to the Code of the Executing Body of the
Government Entity.
o The second three digits of the code refer to the Code of the Executing Body of the
Government Agency.
o The third two digits of the code refer to the Code of the Chapter. This can be edited in
the approved phase of the project only.
o The fourth three digits of the code refer to the Code of the Subject. This can be edited
in the approved phase of the project only.
o The fifth three digits of the code refer to the Code of the Subject Type. The MoP user
can edit this in the approved phase of the project only.
• MoP user inputs the remaining three digits manually. The MoP user can edit this in the
approved phase of the project only.
• The system automatically generates the last 2 digits of the project code to indicate the
project funding type. The project funding type code (01 – 10) is provided by the
administrator in the IDMS Administration Center (see IDMS Administration Center User
Manual in REFERENCES).
For example:
Project Code
Executing Body /
Gov Entity
Executing Body /
Gov Agency
Chapter
Subject
Subject
Type
Sequence
Funding
Type
012
100
03
001
011
056
05
2. Click the OK button to submit the form. Or, click Cancel to close this form without
submitting.
11.4 Submitting Reallocation Request
The Reallocation Request Form appears when Request Reallocation action is taken in the
Project Form (see PROJECT SUBMISSION).
To submit a reallocation request, follow the steps below:
IDMS CAPITAL INVESTMENT PROJECTS USER MANUAL
61
1. Expand the project for which the reallocation request should be submitted (Figure 42). If you
have selected multiple projects to request a reallocation for, the Reallocation Request Form
will list the data for all those projects.
2. In the Yearly Allocation section, define the revised amount for the project in the Local
Currency and Foreign Currency fields. The revised amount represents additional funding
required for the implementation of the project. Reallocation request is dedicated for obtaining
those funds from other projects of the ministry current project is cared by.
Note: For regular projects, the revised amount is pending revision of MoP Sectoral Unit and
approval by MoP Investment Unit. For emergency funding requests, instead of revised
amounts, requested amounts should be defined here.
3. Choose a Reallocation Funding Type which will describe the source of the funds where the
reallocation is requested from. Following values are available:
• Grant – reallocation requires funds from grant(s).
• Transfer – reallocation requires funds from another project.
• Emergency Budget – reallocation requires funds from ministry’s emergency budget.
• Oil Revenue – reallocation requires funds from oil revenue budget.
• Petro Dollar – reallocation requires funds from petro dollar budget.
• Border Crossing – reallocation requires funds from border crossing budget.
Depending on the selected Reallocation Funding Type, different data is required in the
Request Reallocation Form.
4. If Grant was selected as a reallocation funding type, grants from which reallocation funds are
required should be defined. For details, see Managing Grants. At least one grant should be
defined in this field.
Figure 42: Reallocation Request Form
IDMS CAPITAL INVESTMENT PROJECTS USER MANUAL
62
5. If Transfer was selected as a reallocation funding type, the following information should be
provided:
• Breakdown by Type of Expense – this field requires the breakdown of the transferred
amount among the selected types of expense of the project. For details on adding the
types of expenses and defining the breakdowns, see Managing Expense Type Records.
This field is mandatory.
Note: For regular projects, revised amounts are pending revision of MoP Sectoral Unit and
approval by MoP Investment Unit. For emergency funding requests, instead of revised
amounts, requested amounts should be defined here.
• Transfer From – this field requires sources from which the required amount is required
to reallocate. For details on defining funding sources for reallocation, see Managing
Transfer Sources. This field is mandatory.
• Transfer To – in the details of the project that has provided funds to another project
requested reallocation, this field shows the destination project to which selected funds
were reallocated.
• Transfer Allocation – this field indicates the breakdowns from which the funds should be
transferred to the project that has requested reallocation. For details, see Managing
Transfer Allocation. This field is mandatory for emergency funding requests only.
6. For all reallocation funding types except Transfer, documents verifying reallocation request
may be attached in the Attachments section. For details on managing attachments, see
Managing Attachments.
7. When all the required data is provided in the Request Reallocation Form, choose the Request
Reallocation action from the Process list available in the right upper side of the form (Figure
43).
Figure 43: Request Reallocation Action in the Reallocation Request Form
IDMS CAPITAL INVESTMENT PROJECTS USER MANUAL
63
11.5 Managing Grants
This chapter outlines how to add, edit and remove grants in the Request Reallocation Form which
appears when an approved project is requesting reallocation (see PROJECT SUBMISSION).
11.5.1 Adding a Grant Record
In order to add a grant record, follow the steps below:
1. Click the Add button at the bottom of the Grant field. A new record will appear (Figure 44).
Figure 44: Add Grant Form
2. Choose a Donor provided the grant. Donor Type will be defined automatically once the record
is submitted.
3. In the Project Ref. # indicate the project number according to which the grant was made.
4. Provide the Grant Amount to be requested for the reallocation.
5. Click the
(OK) button to the left of the respective row to confirm the information input. Or,
click
(Cancel) to terminate the operation.
11.5.2 Editing Grant Records
In order to edit an existing grant record, follow the steps below:
1. Click the grant record that needs to be modified. This will activate the selected record.
2. Make the necessary changes.
3. Click the
(OK) button to save the changes made. Or, click
(Cancel) to discard them.
11.5.3 Removing Grant Records
In order to remove an added grant record, use the
the selected record.
(Remove from the list) button to the left of
11.6 Managing Transfer Sources
This chapter outlines how to add and remove sources for funds reallocation and define the transfer
amount.
11.6.1 Adding a Transfer Source
In order to add a transfer source, follow the steps below:
IDMS CAPITAL INVESTMENT PROJECTS USER MANUAL
64
1. Click the Add button at the bottom of the field (Figure 45). The Add Project for Transfer form
will appear (Figure 46).
Figure 45: Transfer Sources Form
2. Locate the project(s) to request the funds transfer from.
Note: To make it easier to locate the appropriate project in the long list, the system has a
search capability. To find the relevant Project Title, enter the Project ID or Project Code
in the appropriate field, indicate the section and level to search in and click the GO button.
The list of all projects matching the criteria will be displayed in the Projects table.
3. Add the selected project(s) by ticking the check-box to the left of the appropriate record and
clicking the Add Selected button. The selected project(s) will appear in the Selected Project
table.
4. Click the OK button to return to the Request Reallocation Form, where the selected projects
will appear in the respective field. Or, click Cancel to terminate the operation.
Figure 46: Add Project for Transfer Form
IDMS CAPITAL INVESTMENT PROJECTS USER MANUAL
65
11.6.2 Defining Transfer Amount
To indicate the transfer amount for reallocation, follow the steps below:
1. In the Request Reallocation Form, press on the added project. This will activate the record.
2. Indicate the Transfer Amount requested from the selected project (Figure 45).
Note: The sum of the Transfer Amount and Already Requested Amount fields cannot
exceed the Approved Amount for the selected project.
3. Do the same for all other projects added in the Transfer From field, if any.
4. Click the
(OK) button to the left of the respective row to confirm the information input. Or,
click
(Cancel) to terminate the operation.
11.6.3 Removing Transfer Sources
(Remove from the list) button to the left
In order to remove an added transfer source, use the
of the selected project. The same operation can be done from the Add Project for Transfer form (see
Adding a Transfer Source).
11.7 Managing Transfer Allocation
This chapter outlines how to add and remove sources for funds reallocation and define the transfer
amount.
11.7.1 Adding a Transfer Allocation
In order to add a transfer source, follow the steps below:
1. Expand the type of expense listed in the Transfer Allocation field for which allocation should
be made (Figure 47).
2. Click the Add button. The Adding Transfer Allocation form will appear (Figure 48).
Figure 47: Transfer Allocation Form
IDMS CAPITAL INVESTMENT PROJECTS USER MANUAL
66
Figure 48: Add Transfer Allocation Form
3. Press the Add button in the Adding Transfer Allocation form. A new record will appear.
4. In the Project / From: Type of Expense, choose a project/type of expense from which the
funding should be transferred.
5. In the To: Type of Expense, choose the type of expense for the project requesting a
reallocation the funding should be dedicated to.
6. Click the
(OK) button to the left of the respective row to confirm the information input. Or,
click
(Cancel) to terminate the operation. The Transfer Allocation column will
automatically display the funds available for the selected type of expense of the source
project, and the transfer amount required for the selected type of expense of the project
which requested the reallocation, as defined in Breakdown by Type of Expense field (see
Submitting Reallocation Request).
Note: The allocation is pending approval by MoP Sectoral Unit user.
7. Click the OK button to return to the Request Reallocation Form, where the selected transfer
allocation will appear in the respective field. Or, click Cancel to terminate the operation.
11.7.2 Removing Transfer Allocation
In order to remove a transfer allocation, follow the steps below:
1. Expand the type of expense listed in the Transfer Allocation field for which allocation should
be made (Figure 47).
2. Click the Add button. The Adding Transfer Allocation form will appear (Figure 48).
3. Click the (Remove from the list) button to the left of the selected allocation.
4. Click the OK button to apply the changes made.
11.8 Adjusting Reallocation Request
The Adjust Reallocation Form (Figure 49) appears when Adjust Reallocation action is taken in
the Project Form (see PROJECT SUBMISSION).
IDMS CAPITAL INVESTMENT PROJECTS USER MANUAL
67
Figure 49: Adjust Reallocation Form
To adjust the reallocation request, follow the steps below:
1. Revise and, if necessary, provide new values of Local Amount and Foreign Amount in the
Breakdown by Location field and Local Amount, Foreign Amount and Rollover Amount in
the Breakdown by Type of Expense field.
Note: The Breakdown by Type of Expense field is not editable for the transfer reallocation
type.
2. When all the adjustments are done, click the OK button to process the reallocation request,
or press Cancel to discard the changes. The status for the processed reallocation requests
will be changed to APPROVED and the reallocation amount will be added to the existing
amount. However, PROJECT HISTORY will show the history of the reallocation.
IDMS CAPITAL INVESTMENT PROJECTS USER MANUAL
68
12. SAVING DATA
When you have finished with data input or modification, you should save your changes before you
leave the page. The following options for saving the data are available both at the top and bottom of
the page:
•
•
Save - to save the data entered and to remain on the opened page.
Note: In forms and sub-forms, clicking the OK button saves the changes made and navigates
you to the previous screen.
Save and Close - to save the information input and leave the opened page.
If you wish to cancel your changes, use the Cancel button.
13. REFERENCES
Please refer to the following IDMS related document:
•
•
•
•
•
IDMS
IDMS
IDMS
IDMS
IDMS
External Assistance Projects Application User Manual
Donor Profile Application User Manual
NDP Indicators Application User Manual
Analytics User Manual
Administration Center User Manual