1
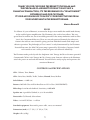
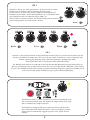
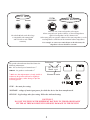
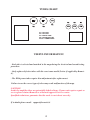
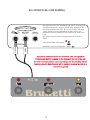
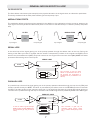
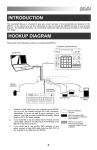
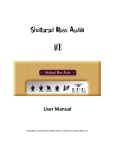
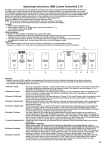
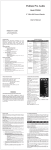
USER
MANUAL
This manual contains a lot of information required to have in-depth knowledge of
the equipment. Therefore we recommend that you read this manual carefully in
order to use its potentials to the very best. All of our products are made on an
artisan basis and therefore you may find some small acoustic and/or structural
differences. This is the very best guarantee of a truly hand-made product.
THANK YOU FOR CHOOSING THE BRUNETTI PLEXIMAN AMP.
THE PURCHASE OF A BRUNETTI PRODUCT IS NOT JUST A
FINANCIAL TRANSACTION, IT’S THE BEGINNING OF A “RELATIONSHIP”
BETWEEN US AND OUR CUSTOMER.
IT’S OUR MISSION IN LIFE TO SATISFY YOUR EXEPCTATIONS FROM
YOUR INVESTMENT IN THE BRUNETTI BRAND.
Marco Brunetti
PLEXI
To celibrate 25 years of Brunetti, we wanted to design a new model that would make history
in the world of guitar amplification. The Pleximan is the result of our efforts. This very
special head is small in size, but is incredibly powerful. It has many similarities with its older
‘sister’, the Customwork Mercury. There are two tube powered channels plus other new
features that add two extra channels, giving you four individual sounds with simple and
effective operation. The philosophy of "less is more" is truly demonstrated by the Pleximan.
Powerful but tame, the 50W/5W power amp is powered by EL34 tubes. Gorgeous, british
rock sounds to suit a variety of musical genres are delivered effortlessly.
The Pleximan works perfectly with the Singleman 1x12 Vintage 30 Cab or the more powerful
Customwork CW212 2x12 Vintage 30 Cab. Connect your choossen cabinet to the Pleximan,
switch the power on and read this manual. You will then be ready to play and experience the
emotion of Brunetti!
CONTROLS & SPECIFICATIONS
CH 1: Volume, Tone, Dense
CH 2: Gain, Bass, Middle, Treble, Volume, Hotrod, Extra, Mellow
Solo Volume: + 10dB (x3)
Potenza: 50W AB Class 2xEL34 fixed bias or 5W A Class (POWERLIMIT)
Effect loop: Serial & tube buffered. Sensitivity -10dB/0dB
Speaker out: 2 paralleled (linked) 4, 8, 16 Ω switchable
Footswitch: Ch, Hotrod, Solo volume
Tubes: 4 x 12AX7/ECC83 - 2 x EL34
Standard equipment: Footswitch, power cable, cover, user manual
Dimension (inch): 17,7” (W), 7,5” (H), 8,7”(D)
Weight: 18lb (8,5Kg)
1
CH 1
volume
Mellow
treble
middle
bass
a
Nor m
Dense
gain
Hotrod
Extra
tone
ch
CH 2
Channel 2 is designed with smooth or heavy distortion in mind. We have created it to be dynamic, but also
with the right amount of compression. This is not a hi-gain ‘metal’ channel, but it can be ‘cranked up’ high
without generating any annoying sharp or dissonant harmonics. Incomparable timbre,
from smooth blues rock to crunchy and defined full-bodied tones.
The ‘Hotrod’ mode delivers a true 80’s/90’s sound. The hot and fluid distortion previously delivered by the
Mercury Customwork range is evident in this mode. The classic stack EQ with the ‘MELLOW’ switch softens
the tone. The ‘EXTRA’ function boosts a broad spectrum of midrange frequencies giving an incredible ‘punch’
to the overall sound. Simple and full of energy as per the Brunetti philosophy.
solo
power
active
W
a
t
t
off
standby
50
5
The Pleximan also has a ‘SOLO’ function as seen on the Customwork series.
This convenient function more than doubles the output volume of the amp
and is controlled via a simple footswtich.
The Pleximan is equipped with a power limit switch that steps down the
power from 50W to 5W. When this mode is selected, a frequency compensation system is automatically engaged to give the same ‘punch’ at lower
volumes.
2
n
r il li a t
volume
l
B
Channel 1 is able to give many tonal nuances. Its characteristic is to add
harmonics to the dynamic without distorting the basic sound.
It can generate very clean tones, but also compressed and emphasised
harmonics (Dense mode). Warm and full-bodied, it is a classic British Plexi
style channel, but with a new Brunetti shape. Simple, yet
effective with very intuitive controls, this channel works perfectly with the
range of stomp pedals. A real ‘all-rounder’ channel.
ch
effect loop
send
total
impedance
return
speaker outputs
(linked)
The tube/buffered serial effect loop
is compatible with stomp/pedal
and rack effects with -10dB
sensitivity.
16
4
8
There are two, connected speaker jack outputs.
When using only one speaker cabinet, set the total impedance
equal to the impedance of the cabinet itself.
When using only two speaker cabinets of the same impedance, set the
total impedance to half that of the nomainal cabinet impedance.
The product identification data label shows the
following information:
For example, to connect two 16Ω cabinets to the Pleximan, the
impedance selector should be set to 8Ω.
Settimana
FUSE
VOLTAGE
PD ## ####
Serial ####
PD - the week and year of manufacture *
SERIAL - the product serial number *
* Make sure this information is clearly visible as
Anno
Numero di serie
without it, the product will not be eligible for
technical assistance, either during or after the
warranty period.
HT FUSE
T 0,5A
FUSE – the main fuse rating
VOLTAGE – voltage of mains input power for which the device has been manufactured.
HT FUSE - high voltage tubes fuse rating. Follow the indicated rating.
CAUTION !!!
DO NOT USE FUSES WITH DIFFERENT RATINGS TO THOSE ORIGINALLY
FITTED AS THIS MAY RESULT IN SERIOUS DAMAGE TO THE DEVICE!
3
TUBES CHART
EL34
EL34
12AX7
V3
V2
V1
12AX7
12AX7
12AX7
V4
V6
V5
V1 = CH1/CH2
V2 = CH1/CH2
V3 = EFFECT LOOP
V4 = PHASE SPLITTER
V5/V6 = POWER TUBES
USEFUL INFORMATION
- Each tube is selected and matched to the amp during the electrical and sound testing
procedure.
- Only replace defective tubes with the exact same model (better if supplied by Brunetti).
- The EL34 power tubes require bias adjustment after replacement.
Failure to use the correct type of valve may result malfunction of the amp.
CAUTION!
Inside the amplifier there are potentially lethal voltages. If your unit requires repair or
service please contact Brunetti or a Brunetti approved service centre.
Qualified technicians guarantee that the work is carried out correctly.
If in doubt please email: [email protected]
4
FOOTSWITCH e SWITCHING
remote switching
ch
solo
tip
ring
stereo jack
hotrod
dense
mono jack
remote jack
footsw
The main functions ‘CH’, ‘HOTROD’ and ‘SOLO’ are footswitch
controlled and must be connected to the jacks ‘FOOTSW’. The
footswitch pedal has two jacks. The stereo jack is for ‘CH’ and
‘SOLO’ and the mono for ‘HOTROD’. In order to have the
footswitch correctly working the two jacks must be connected
both.
The manual switches on the front panel must be selected as
follow:
CH switch in CH2 (red led ON)
Hotrod
MONO
STEREO
HOTROD switch in OFF position
ch
Ensure that connection of the two footswitch jacks corresponds to
STEREO and MONO as shown on the diagram to the rear of the unit.
Inverted connection will not cause any damage, but the switching will not
function correctly. Each function will be switched on when the jack tip is
connected to ground.
ch
hotrod
5
solo
SWITCHING REMOTO
remote switching
ch
solo
tip
ring
stereo jack
hotrod
dense
mono jack
remote jack
The functions ‘CH’, ‘HOTROD’, ‘SOLO’ and ‘DENSE’ can also be
switched by remote jack by connecting an ON/OFF contact (relay)
or pedal. Take care to use a stereo jack with two mono jacks for CH
and SOLO as shown on the diagram.
MONO
MONO
MONO
MONO
MONO
MONO
STEREO
footsw
REMOTE SWITCHER
The functions will be switched on when the jack’s tip
will be grounded
6
MIDI controls
GENERAL INFO ON EFFECTS & LOOP
FILTER EFFECTS
The filter effects main feature (see example) is the physical alteration of the signal wave, as a distortion pedal does.
This family of effects finds its best place between guitar and preamp input.
MODULATION EFFECTS
The modulation effects main feature (see example) is the addition or the overlapping of other curves or waves to the
input signal. This family of effects finds its best place in connection to the effects loop, i.e. between preamp and power
amp.
FILTER
MODULATION
EFX
EFX
Output Signal
Input Signal
Output Signal
Input Signal
SERIAL LOOP
In the serial loop all the signal getting out of the preamp passes through the effects chain of the loop. During the
setting of the effect you have to consider that the sound is composed by a share of the original sound (DRY) and a
share of the processed sound (WET). They both come from the original sound and are mixed (MIX) INSIDE the effect
processor before being sent to the outputs.
SERIAL LOOP
GUITAR
IN
PRE
POWER
RETURN
SEND
IN
OUT
OUT
DIRECT
MIX
EFFECT
This connection is good for stomp
effects or fx-processors that act on
the dynamics like compressors or
equalizers. Do not put distortion fx in
the loop.
EFFECT
PARALLEL LOOP
In a parallel loop a share of the signal getting out of the preamp passes unaltered through the loop circuit (DRY) and
a share reaches directly the SEND. The latter is processed by the effects, sent to the RETURN and then mixed with
the DRY. The effect quality is less important here than in the serial loop because the original DRY signal will be not
“colored” when it passes through the loop or the effect and the WET signal will be pleasantly added to the DRY signal.
PARALLEL LOOP
GUITAR
IN
DIRECT
MIX
PRE
SEND
In order to achieve a great sound you
MUST exclude the DRY SIGNAL from
the fx-processor (by using its internal
mixer).
IN
POWER
OUT
RETURN
DIRECT=0%
DIRECT
MIX
EFFECT
EFFECT=100%
EFFECT
7
OUT
This connection is good only for
modulation effects (chorus, phaser
etc..) or ambient effects (delay, reverb
etc..)
WARNING!!
Before any kind of cleaning/manteinance operation, disconnect the appliance from the electric
supply
WARNINGS
- Do not EVER throw water jets directly on the appliance.
- Do not use water steams to clean the appliance.
- Do not use solvents to clean the appliance.
- The manufacturer declines all responsibility for any kind of damage to persons, things and/or
animals resulting from a wrong use of the appliance.
- The appliance conformity is proved by CE symbol on the rear side.
- The manufacturer reserves the right to make any useful and essential change to the products
without compromise the main safety and working features.
- Do not use the appliance barefoot.
- Do not touch the appliance with wet or moist hands or feet.
- Do not leave the appliance exposed to rain, sun, dust, umidity, etc...
- Do not allow children or incompetents to use the appliance.
- Do not leave inflammable materials near the appliance.
- Do not pull up the appliance by control knobs.
- Read carefully, compile and deliver the warranty attached to the appliance.
- The appliance repair may be done during the warranty period only by us, in our laboratory, or by
authorized staff, in conformity to the national previsions in force.
- Control periodically all cables supplied with the appliance, if they result damaged, you have to replace
them immediately with another one with the same characteristics.
- In case of damage contact the shop where you bought the appliance.
- The appliance must be earthed in conformity to the national previsions in force.
Please fill out the warranty form you find on
www.brunetti.it
to validate your warranty
WARNING!! Please refer to the manufacturer for all repairs and tubes replacement to insure
the correct working of the preamplifier. It does not exist service centres licensed by Brunetti
Marco & C. The manufacturer declines all responsibility for malfunctioning due to assistance
not provided or authorized by Brunetti & C.
Brunetti Marco & C. S.a.s
Via De’ Bonomini, 25/27
41100 MODENA ITALIA
Telefono: +39 059 243404
Fax: +39 059 216464
e-mail: [email protected] (commercial)
e-mail: [email protected] (technical)
www.brunetti.it
www.brunetti.it/forum
8