1
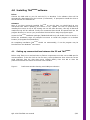
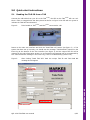
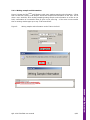
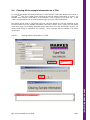
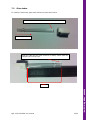
TubeTAG
User Manual
Version 1.2
2012
QUI-1038
Table of contents
QUI-1038 TubeTAG user manual
2/23
www.markes.com
www.markes.com
1.0
Warnings: .......................................................................................................... 3
1.1
General: ......................................................................................................... 3
1.2
TAGs on ¼”-metal tubes (stainless steel, Silcosteel® and glass) ............................. 3
2.0
Software compatibility.......................................................................................... 3
3.0
Introduction........................................................................................................ 4
3.1
TAGSCRIBE ......................................................................................................... 4
4.0
Installing TAGSCRIBE software.................................................................................. 5
4.1
Setting up communications between the PC and TAGSCRIBE ..................................... 5
5.0
Quick-start instructions:....................................................................................... 6
5.1
Reading the TAG-ID from a TAG ........................................................................ 6
5.2
Writing information to TAG ................................................................................ 7
5.2.1 Writing sample start information: ................................................................... 7
5.2.2 Writing sample end information:..................................................................... 8
5.3
Reading information back from a TAG:................................................................ 9
5.4
Clearing all the sample information on a TAG: ................................................... 10
6.0
The TAGSCRIBE user interface ................................................................................ 11
6.1
Editing/reading and writing to the tube information fields.................................... 12
6.1.1 Tube information field descriptions................................................................ 12
6.1.2 Clear sample info on write tick box ............................................................... 13
6.1.3 Read tube information button....................................................................... 13
6.1.4 Write tube information button ...................................................................... 13
6.1.5 Clear TAG Tube info button .......................................................................... 13
6.2
Editing/reading and writing to the sample start information fields ........................ 14
6.2.1 Sample Start Information field descriptions:................................................... 14
6.2.2 “Use Current Time for sample start time” tick-box .......................................... 14
6.2.3 Start Sample Button.................................................................................... 15
6.3
Editing/reading and writing to the sample end information fields .......................... 15
6.3.1 Sample End Information field descriptions: .................................................... 15
6.3.2 “Use Current Time for sample end time” tick-box............................................ 15
6.3.3 End Sample Button ..................................................................................... 15
6.4
The Read TAG info button ............................................................................... 16
6.5
The Clear TAG Sample information area ............................................................ 16
6.6
The Events Log .............................................................................................. 17
6.7
The Preferences dialogue ................................................................................ 17
6.7.1 List Editors................................................................................................. 17
6.7.2 Moving personalized lists from one PC to another ........................................... 18
6.7.3 TAGSCRIBE Controls ....................................................................................... 18
6.7.4 Log Files .................................................................................................... 19
6.8
Opening, viewing and using logged data ........................................................... 19
6.9
Troubleshooting and Error Messages................................................................. 19
6.10
Feedback ...................................................................................................... 19
7.0
Attaching and removing TAGs to and from tubes ................................................... 20
7.1
¼” (6.35 mm) Metal tubes .............................................................................. 20
7.2
Glass tubes ................................................................................................... 21
8.0
Re-order part numbers....................................................................................... 23
1.0 Warnings:
1.1
General:
Under no circumstances should you expose TAGs to temperatures exceeding 110 oC
1.2
•
•
•
•
TAGs on ¼”-metal tubes (stainless steel, Silcosteel® and glass)
Must be removed prior to loading on ULTRAs preceding serial number (GB00)M20467
May remain on tubes during analysis on a TAGIT™ ULTRA s/n (GB00)M20467 and later
or TD-100
Must be removed prior to analysis on UNITY series 1
Must be removed prior to conditioning on TC20
2.0 Software compatibility
TAGSCRIBE software runs on all 32-bit versions of Windows®
3/23
www.markes.com
www.markes.com
QUI-1038 TubeTAG user manual
3.0 Introduction
Associating sample and usage data with thermal desorption (TD) tubes, has historically relied
on manually recording tube serial numbers. Barcode technology has proved difficult to apply to
TD tubes because the high temperatures required limit the lifetime and readability of labels. In
addition, barcodes cannot be programmed to record tube history or sample specific information
(e.g. sampling time and date, etc.).
TubeTAG represents a revolutionary advance in sorbent tube informatics. The product
comprises an RFID TAG and clip that can be attached to individual sorbent tubes. A TAGSCRIBE
can then be used to read and write tube and sample specific data to these tagged-tubes in the
laboratory and/or in the field.
TubeTAGs are generally used in two ways:
-
Sample specific mode – here a given TAG is attached to a conditioned sample tube in
the laboratory prior to field deployment. That TAG then stays with and tracks that
sample tube whilst sampling in the field until its return to the laboratory. On return to
the laboratory the information is read back off the TAG just prior to sample analysis.
The TAG is then removed, the sample information cleared and the tube analysed. The
TAG is then ready to go out with another tube to track another sample.
-
Tube specific mode – In this case a specific TAG is associated with a specific tube
throughout its life time – so that it logs both sample specific data and tube history
information – number of thermal cycles, back pressure during sampling, when the tube
needs repacking, etc.
Both modes of operation offer a significant step forward and a new range of benefits to the
busy air monitoring lab. TAGs themselves can be re-used almost indefinitely.
Note: If you have a ‘TAG-ready’ (TAGIT™) ULTRA-UNITY / TD-100 system you do not need to
remove the TAGs prior to analysis – This greatly facilitates use of the TAGs in tube-specific
mode. However, it is also possible to run in Tube-specific mode on non-TAG ready thermal
desorbers provided that you re-attach the same TAG to the same tube post
analysis/conditioning.
3.1
TAGSCRIBE
This manual describes the installation and use of the TAGSCRIBE and TAGSCRIBE software – which
allows the user to read and write to TubeTAGs.
www.markes.com
QUI-1038 TubeTAG user manual
4/23
4.0 Installing TAGSCRIBE software
Driver
Connect the USB cable to your PC and the TS, in Windows 7 the software driver will be
automatically downloaded from the internet (if connected). If prompted to install the driver it
can be found on the software CD.
Software
Note: If you have previously installed TAGSCRIBE on your PC then you should back up your
customized lists before updating (see section 6.7.2). Update can then be performed by
installing this version on top of the existing one into the same directory; this way all historical
read/write logs will be retained. Finally the customized lists should be copied back into the
program directory to recover your personalized choices before using the program again.
Locate the TAGSCRIBE installation package (TAGScribeInstall.exe) and double click it to launch it.
Follow the installation steps as prompted on-screen to install the program to its default
location (C:\Program Files\TAGScribe\).
On completing installation TAGSCRIBE should run automatically, if not the program may be
launched from the Windows® start menu.
4.1
Setting up communications between the PC and TAGSCRIBE
Before using TAGSCRIBE to read and write to TAGs it is important to set the correct COM-port for
communications. To do this click on the file menu, select preferences then select the correct
serial COM-port from the drop down menu (default COM1), then click OK to close the
preferences window and return to the main user interface.
Figure 1:
Preferences window showing serial COM port selection
www.markes.com
www.markes.com
QUI-1038 TubeTAG user manual
5/23
5.0 Quick-start instructions:
5.1
Reading the TAG-ID from a TAG
Connect the USB cable from your PC to the TAGSCRIBE, the LED on the TAGSCRIBE will turn red.
Once a TAG or a tagged-tube has been placed as shown in figure 2 the LED will turn green to
indicate the TAG has been detected.
Figure 2:
Tube loaded on TAGSCRIBE and TAGSCRIBE connected to a PC
Return to the main user interface and click the “Read TAG info” button (see figure 3) – if the
system has been set up correctly you should see the message “TAG Read OK” reported in the
Event log at the bottom of the user interface (see figure 3) and the unique TAG ID will be
reported in the tube information section. An unsuccessful read attempt will be accompanied by
the “TAG read failed” message in the Event Log; refer to troubleshooting (section 6.9).
Figure 3:
After clicking “Read TAG Info” both the unique TAG ID and TAG Read OK
message should appear
www.markes.com
www.markes.com
QUI-1038 TubeTAG user manual
6/23
5.2
Writing information to TAG
Writing to the tube information section is limited to admin use only (more details on this are
given in section 6.1). The process of reading from the tube information fields and writing
sample start and sample end parameters to a TAG is accessible to all users.
5.2.1 Writing sample start information:
Figure 4 shows the TAGSCRIBE GUI filled out with some random Sample Start information –
filling this out and then clicking “Start Sample” writes this sample start information to the TAG.
This is what a user would do when starting sampling/writing sample information to the TAG in
the field; confirmation of a successful write is given in the event log – if the write is
unsuccessful then a warning window pops up to say “TAG write faled”.
Figure 4:
Writing sample start information to the TAG in the field
www.markes.com
QUI-1038 TubeTAG user manual
7/23
5.2.2 Writing sample end information:
Figure 5 shows the TAGSCRIBE GUI filled out with some random sample end information – filling
this out and then clicking “End Sample” writes this sample end information to the TAG. This is
what a user would do when ending sampling/writing sample end information to a TAG in the
field; confirmation of a successful write is given in the event log – if the write is unsuccessful
then a warning window pops up to say “TAG write failed”.
Figure 5:
Writing sample end information to the TAG in the field
www.markes.com
QUI-1038 TubeTAG user manual
8/23
5.3
Reading information back from a TAG:
To read back the information that has just been programmed into the TAG click the Read TAG
info button on the TAGSCRIBE GUI. A successful read will fill out the fields in the GUI with the
information that is contained on the TAG and will be accompanied by a TAG Read OK message
in the Event Log.
Figure 6:
TAGSCRIBE GUI showing successful TAG read
www.markes.com
QUI-1038 TubeTAG user manual
9/23
5.4
Clearing all the sample information on a TAG:
To clear all the sample information stored on a TAG click the “Clear TAG sample info” button in
the TAGSCRIBE GUI. This is what a user would do to clear all sample information on a TAG – for
example post analysis; confirmation of a successful “clear” is given in the event log – if the
“clear” is unsuccessful then a warning window pops up to say “TAG write failed”.
This stage can be done in conjunction with the “Set tube status to” tick-box alongside to set
the tube status once the sample information has been cleared. This is useful for non-admin
users when they are unloading desorbed sample tubes from an ULTRA-autosampler as they can
set the tube status to “Desorbed” for example – which indicates that the sample is no longer
on the tube.
Figure 7:
Clearing sample information on a TAG
www.markes.com
QUI-1038 TubeTAG user manual
10/23
6.0 The TAGSCRIBE user interface
As shown in figure 8 the TAGSCRIBE user interface is broken down into five main sections: tube
information, sample start information, sample end information, clear TAG sample information
and the event log.
Figure 8:
The TAGSCRIBE user interface sections
The tube information section allows you to view and edit information pertinent to the sample
tube to which a given TAG is attached (by default this section is editable for administrator
users only).
The “Clear TAG sample information” section allows you to clear all sample information (not
tube information) on a TAG – and allows non-admin users to change the current tube status.
The event log will show the results of the read/write commands for the current session.
QUI-1038 TubeTAG user manual
11/23
www.markes.com
The sample start and sample end information sections are pertinent to the current sample and
are generally edited and written in the field.
6.1
Editing/reading and writing to the tube information fields
By default access to the tube information fields is limited to administrators only – this prevents
accidental overwriting or wiping of data pertinent to the sample tube to which the TAG is
currently attached. This information is generally only edited in the laboratory during set up of a
sampling campaign or post analysis/conditioning of the sample tubes.
To enter administrator mode click File -> Admin Mode – a password dialogue box will
appear asking for the admin user-name and password – enter “admin” in both of
these fields and click OK.
If the user-name and password is entered correctly a confirmation dialogue box will appear
saying “Entering admin mode”; click “OK” and the tube information fields will now be
accessible.
To exit admin mode shut the software and open it again.
Figure 9:
The Tube Information Zone in the TAGSCRIBE GUI
6.1.1 Tube information field descriptions
TAG ID:
Read-only field containing the factory set unique identifier for a given
TAG
Tube type:
By default this field is designed to take the tube type – i.e. ¼“ stainless
steel, ¼” Silcosteel® etc. The options available in this drop down list are
completely customizable – and could be used for example to designate
“Environmental Tubes for Diffusive Sampling” or “General Purpose
Screening Tubes” etc. For information on editing the available options in
these drop down menus – see section 6.7.1.
QUI-1038 TubeTAG user manual
12/23
www.markes.com
Tube Letter/Number: These two fields are designed to take the tube serial number (and letter)
to which the TAG is attached they are limited to one letter and six digits
(note: numbers beginning with zero(s) will be truncated – i.e. 078323
will be truncated to 78323 when read back from the TAG).
Adsorbent Packing:
Designates the nature of the sorbent packing inside the sample tube – by
default the list contains a selection of some of the most common
packings. The options available in this drop down list are customizable –
see section 6.7.1.
Packing date:
If entered this designates the date on which the sample tube was packed
and allows the user to track the age of the sorbent packing.
Thermal cycles:
Can be used to track the number of times the sorbent in the tube has
been heated (conditioned or analysed) a value may be typed in directly
or incremented by clicking up or down on the arrows to the right of this
box.
TD Method:
Allows the user to designate the recommended TD analytical method for
analysis of this sample tube. The options in this list box are customizable
– information on editing the contents is given in section 6.7.1.
Pressure ratio:
Allows a user to enter the most recent pressure ratio measurement –
large changes here could denote a tube that is becoming blocked – or has
lost its sorbent packing. Valid values are between 0.000 and 1.000 where
0.000 would denote completely blocked and 1.000 would denote
completely free flowing. Note these values are reported in the sequence
reporter when using an ULTRA5050 auto-sampler.
Tube status:
This field should be used to denote the current status of the sample tube
to which the TAG is attached. The default options include conditioned,
sampled and desorbed. The options for this list box are customizable –
information on editing the contents is given in section 6.7.1.
6.1.2 Clear sample info on write tick box
If this is ticked when the “Write Tube Information” button is clicked then the sample
information stored on the TAG will be cleared. This setting would typically be used post
analysis/conditioning when the sample is no longer on the tube and the user wishes to
designate the tube as “requires conditioning” or “conditioned”.
6.1.3 Read tube information button
Clicking this button reads the tube information currently stored on a TAG into the
corresponding fields in the user interface. A user would use this function for example to verify
the status of a sample tube or when matching TAGs back to tubes if they wished to keep the
same TAGs associated with the same tubes all the time.
6.1.4 Write tube information button
WARNING:
Please note that there is no UNDO function for this – although data may be
manually recoverable from the log files.
6.1.5 Clear TAG Tube info button
Clicking this button resets all the data stored in the tube information area of the TAG to default
settings – overwriting the data previously stored there.
QUI-1038 TubeTAG user manual
13/23
www.markes.com
www.markes.com
Clicking this button writes the data currently stored in the tube information zone fields to the
TAG overwriting any data previously stored there. If used in conjunction with the “Clear
Sample Info on write” tick box this will also clear any sample information previously stored on
the TAG.
WARNING:
6.2
Please note that there is no UNDO function for this – although data may be
manually recoverable from the log files.
Editing/reading and writing to the sample start information fields
Figure 10:
The Sample Start Information Zone in the TAGSCRIBE GUI
6.2.1 Sample Start Information field descriptions:
Sample Ref:
Free text field limited to eight alphanumeric characters that will allow the
user to uniquely identify this sample. (Written and read in full from TAG)
Sample Comments: Unlimited free text field for comments. (Neither written nor read from
TAG*)
*WARNING: Contrary to all other fields this information is written to the
log file when the “Start Sample” button is pressed – it will not be recalled
automatically when the TAG is read later – this information can only be
recovered manually. For further information on opening and interpreting
log-files please refer to section 6.8.
Free text field limited to three alphanumeric characters that will allow the
user to identify the pump used to take this sample. (Written and read in
full from TAG)
Sampling mode:
Drop down menu allowing the user to define whether this is a
pumped/active sample or a diffusive/passive sample. (Written and read
in full from TAG)
Sample start time:
Allows user to define Sampling start date and time to a two-second
resolution. (Written and read in full from TAG)
Now Button:
Sets sample start time to current date and time on the user interface.
Start flow rate:
Allows the user to log the pumped sampling flow rate at the start of
sampling. (Written and read in full from TAG)
6.2.2 “Use Current Time for sample start time” tick-box
Used in conjuction with the “Start Sample” button this will write the current date and time as
the sample start time to the TAG.
QUI-1038 TubeTAG user manual
14/23
www.markes.com
www.markes.com
Pump Reference:
6.2.3 Start Sample Button
Clicking this button writes the current contents of the Sample Start Information fields to the
TAG currently on the TAGSCRIBE – and writes a new line to the TAG-write CSV file in the
TAGLogs folder on the local PC (see section 6.8 for further information on CSV log-files).
WARNING:
6.3
Please note that there is no UNDO function for this – although data may be
manually recoverable from the log files.
Editing/reading and writing to the sample end information fields
Figure 11:
The Sample End Information Zone in the TAGSCRIBE GUI
6.3.1 Sample End Information field descriptions:
Sample end time:
Allows user to define Sampling end date and time to a two second
resolution. (Written and read in full from TAG)
Now Button:
Sets sample end time to current date and time on the user interface.
Start flow rate:
Allows the user to log the pumped sampling flow rate at the end of
sampling. (Written and read in full from TAG)
6.3.2 “Use Current Time for sample end time” tick-box
6.3.3 End Sample Button
Clicking this button writes the current contents of the Sample End Information fields to the
TAG currently on the TAGSCRIBE – and writes a new line to the Tag-write CSV file in the TagLogs
folder on the local PC (see section 6.8 for further information on CSV log-files).
WARNING:
Please note that there is no UNDO function for this – although data may be
manually recoverable from the log files.
QUI-1038 TubeTAG user manual
15/23
www.markes.com
www.markes.com
Used in conjuction with the “End Sample” button this will write the current date and time as
the sample end time to the TAG.
6.4
The Read TAG info button
Figure 12:
The Read TAG info button and Events Log
The “Read TAG info” button will interrogate the TAG currently on the TAGSCRIBE, fill out all the
fields in the tube information and sample information zones of the TAGSCRIBE GUI with data
from the current TAG. A successful read will also write a new line to the current day’s Tag-read
CSV file in the TagLogs folder on the local PC (see section 6.8 for further information on CSV
log-files).
The “Clear TAG Sample info” button will clear the sample start and sample end information on
the TAG currently on the TAGSCRIBE. It will also write a new line to the current days Tag-write
CSV file in the TagLogs folder on the local PC (see section 6.8 for further information on CSV
log-files).
WARNING:
6.5
Please note that there is no UNDO function for this – although data may be
manually recoverable from the log files.
The Clear TAG Sample information area
Figure 13:
The Clear TAG Sample information area
WARNING:
Please note that there is no UNDO function for this – although data may be
manually recoverable from the log files.
QUI-1038 TubeTAG user manual
16/23
www.markes.com
www.markes.com
The Clear TAG Sample information area comprises the “Clear TAG info” button and an
associated tick box and drop down menu for updating tube status. Clicking the “Clear TAG
info” button clears the sample start and sample end information on the TAG currently on the
TAGSCRIBE. It will also write a new line to the current day’s Tag-write CSV file in the TagLogs
folder on the local PC (see section 6.8 for further information on CSV log-files). When used in
conjunction with the “set tube status to” tick box and drop down menu it allows a non-admin
user the ability to update the tube status in the tube information area. This functionality would
typically be used when unloading analysed samples from an autosampler – clearing the now
irrelevant sample information and setting the tube status to “Analysed”.
6.6
The Events Log
The Events log located to the bottom of the user interface (see figure 14) contains the results
of all the read/write events from the current TAGSCRIBE session. The events log is cleared
whenever the TAGSCRIBE software is closed. This data is not stored anywhere if you wish to keep
a copy of this data then select all the text and copy and paste into another program.
6.7
The Preferences dialogue
The dialogue is broken up into four main sections: Communications Port, List Editors, TAGSCRIBE
Controls and Log Files (see figure 14).
Figure 14:
The Preferences dialogue
6.7.1 List Editors
The list editors allow you to modify and add to the contents of the drop down menus accessible
from the Tube Information zone of the TAGSCRIBE GUI.
Editing each of these lists is done in the same fashion – by first clicking on the relevant list
editor button and then using the list editor to modify the available options. Figure 15 shows
the list editor for the Tube Types.
QUI-1038 TubeTAG user manual
17/23
www.markes.com
There is a list editor, as shown in figure 15, for the analytical methods, tube types, adsorbent
packings and tube statuses.
Figure 15:
Tube Types list editor
New list item entry box
Add to list
Raise or lower
item position
Locked item
Delete item
The lists comprise locked items and unlocked items – locked items are there by default and
cannot be deleted.
To add custom items to a list they should be entered in the “item entry box” and then the “add
to list” button should be clicked. Unlocked items can then be re-ordered by clicking the up and
down arrows to the left of the list. To delete items the line should first be selected and then
the delete item button should be clicked.
6.7.2 Moving personalized lists from one PC to another
If the TAGSCRIBE software is being run on several PCs then it is desirable to have the same
personalized list options available on all stations. The easiest way to do this is to copy the list
definition files from the PC where you have created these options to the one where you would
like them available. The files to copy are: tagadsorbents.txt, tagmethods.txt, tagstatus.txt
and tagtubetypes.txt; by default these files are located in C:/Program Files/TagScribe/.
6.7.3 TAGSCRIBE Controls
QUI-1038 TubeTAG user manual
18/23
www.markes.com
The TAGSCRIBE controls allow you to reset the TAGSCRIBE without switching off/on and to resend
the firmware to the electronics in cases of firmware corruption. These buttons will only be used
when troubleshooting communications problems – see section 6.9.
6.7.4 Log Files
The Log Files settings allow you to change the base name for a log file (the default “Tag”
produces log files with the format “Tag_Write/Read_yyyymmdd”) and alter the directory into
which the log files are saved should you wish to. This could be useful if you have multiple
systems and wish to write all the log files to a network drive – in this case however you must
ensure that the base name for each system is different otherwise the files will overwrite one
another.
6.8
Opening, viewing and using logged data
Each time a successful read or write command is executed all the data is logged to a text file
stored with the “base name” and in the location defined in the preferences dialogue (see
section 6.7.5).
Each day a new set of text files are created – one for Read actions and one for Write actions.
These files are plain text “csv” (comma separated variable) files – and as such can be opened
in any text editing application or better still imported into spreadsheet or database software.
6.9
Troubleshooting and Error Messages
Symptom
LED does not light up when
TAGSCRIBE is switched on
Frequent TAG read/write errors
Remedy
• Check USB cable is correctly inserted
• Check TAGSCRIBE is switched on and that LED turns
green when a TAG is placed on the TAGSCRIBE
• Check that USB cable is securely fixed to PC and
TAGSCRIBE
• Open the preferences dialogue, and use the
TAGSCRIBE controls to reset the scribe and send
configs 1+2
If you are unable to resolve a problem with your TAGSCRIBE in referring to the table above then
please contact your local Markes representative or alternatively send an email to
[email protected] including your contact details and outlining the problem.
If you would like to comment or suggest improvements to the TAGSCRIBE software then please
email [email protected]. Here at Markes International we pride ourselves on being
able to respond to our customers’ requirements.
QUI-1038 TubeTAG user manual
19/23
www.markes.com
6.10 Feedback
7.0 Attaching and removing TAGs to and from tubes
7.1
¼” (6.35 mm) Metal tubes
A special removal/replacement tool is required to take the TAGs off metal tubes and to
correctly position them when putting them back on – figure 18 shows this tool in use.
Figure 18:
Using the TAG removal tool to take TAGs on and off ¼” metal tubes
Note how the TAG
removal tool locates
in the TAG clip
Removing:
Squeeze handles of tool tightly to
loosen clip before removing TAG
from ungrooved end of tube
Note how the metal stop on
TAG tool locates the TAG-clip
and prevents the TAG being
pushed on too far
www.markes.com
Replacing:
Squeeze handles of tool tightly
whilst sliding TAG into place onto
ungrooved end of tube and then
release
QUI-1038 TubeTAG user manual
20/23
7.2
Glass tubes
To install the TAGs onto glass tubes follow the instructions below.
TAG must be fitted to the cold end of the sampling tube.
Sampling direction
Slide the TAG onto the tube so that it is exactly 75mm from the
sampling end of the tube.
75MM
www.markes.com
QUI-1038 TubeTAG user manual
21/23
Secure the TAG using the grub screw so that it cannot
slide from side to side (DO NOT OVER TIGHTEN). Once
the TAG is secured in place re-check the 75mm one
more time.
www.markes.com
QUI-1038 TubeTAG user manual
22/23
8.0 Re-order part numbers
Some common part numbers for spares are given below – for a more exhaustive list of
available options please contact your local Markes International representative or alternatively
email [email protected].
Part number
C-TAG10
C-TAG100
C-TAGG10
C-TAGG100
C-TCF10
C-TAGTL
C-TAGKY
C-TAGLOK
C-SCRIBE
Description
TAGs suitable for ¼” metal tubes (pk 10)
TAGs suitable for ¼” metal tubes (pk 100)
TAGs suitable for ¼” glass tubes (pk 10)
TAGs suitable for ¼” glass tubes (pk 100)
Extended brass storage caps for TAG end of ¼” sample tubes (pk 10)
TubeTAG fixing / removal tool for ¼-inch stainless steel tubes
TubeTAG key for fixing / removal of TAGs from all glass tubes
Extended CapLok tool for use with ¼” brass storage caps, extended and
standard
TAGScribe – unit for reading and writing to TAGs in the laboratory/field
www.markes.com
QUI-1038 TubeTAG user manual
23/23