1
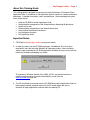
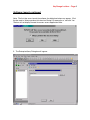
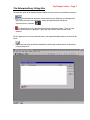
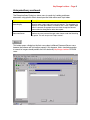
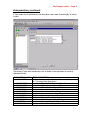
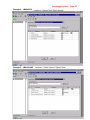
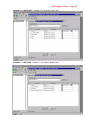
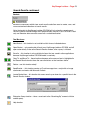
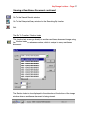
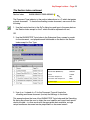
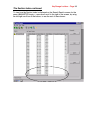
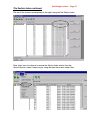
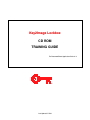
Key2Image Lockbox
CD ROM
TRAINING GUIDE
For DocumentDirect Application Suite v1.3
Last Update 5/17/02
Key2Image Lockbox – Page 2
Overview
Key2Image Lockbox is a new service for retrieving, viewing, and storing images of
Wholesale Lockbox remittance documents.
Key2Image Lockbox represents the name of the entire image product offering for
KeyBank Wholesale Lockbox and includes all channels for image delivery such as CD
ROM, Internet (KTT), and Direct Transmission.
Image delivery via CD-ROM is currently available effective May 2002. Internet delivery
via the Key Total Treasury (KTT) web site for same-day access to images is currently in
development. Direct transmission of images is a future enhancement.
The software that will be used to access and view checks and documents under
Key2Image Lockbox CD ROM will be DocumentDirect Application Suite v1.3.
Application Suite is a Windows based program provided by Key’s Enterprise Archive
vendor Mobius Management Systems Inc.
Features of the software include:
•
The compatibility of DocumentDirect Application Suite with Windows 95,
Windows 98, Windows 2000m, Windows NT 4.0, and Windows XP.
•
MultipleTopic Index combinations that allow users to easily search for items
based on criteria entered into the viewing software.
•
Standard search fields which include Lockbox #, Routing/Transit #, Check
DDA #, Check Serial #, Deposit Date, Batch #, Batch Sequence #, Batch
Amount, Check Amount, Transaction Sequence #, and Transaction Item
Sequence #.
•
Optional search fields which include Check Serial #, Customer Number,
Invoice Number, Net Amount, Payor Name, Payor City, and Payor State.
•
The ability of users to search for exact matches or ranges using Boolean
logic such as “Greater than or equal to“, “Less than or equal to”, “Between“
and “Equal to“.
•
Additional convenience for users because the viewing software is loaded
directly onto the CD instead of users having to download and install the
viewing software onto every desktop PC. The viewing software will
automatically launch from the CD when loaded into the CD ROM drive.
Specific hardware requirements include:
• Intel Pentium or compatible 100 MHz processor (Pentium II 266 MHz or
higher recommended).
•
16 Mb RAM (32 or more recommended).
Key2Image Lockbox – Page 3
About this Training Guide
This training guide is designed to acquaint users with the features of Document Direct
Application Suite v1.3 and how to use Application Suite to search for Lockbox remittance
documents. It includes instructions, terms and definitions. After completing this guide,
users will be able to:
o
o
o
o
o
o
o
Load the CD ROM to launch Application Suite.
Understand the components of the EnterpriseQuery Searching By dialog box.
Search for an item.
Understand the components of the Search Results box.
View Lockbox Remittance Documents.
Use Navigation functions.
Exit Application Suite.
Important Notes:
1. CD ROMs for Key2Image Lockbox are read-only media.
2. In order to properly run the CD ROM application, an additional .DLL file may be
required for users that have the Windows 95 Operating system. If the error below
appears upon launching the CD ROM application, Windows 95 users must install the
necessary file before proceeding any further.
The necessary Windows Sockets 2 file (WS2_32.DLL) can be obtained from a
KeyBank representative or can be downloaded by a user from the
www.microsoft.com web site.
3. The CD should not be removed from the CD ROM drive unless Application Suite has
been properly closed. Improper removal of the CD could require the user to
terminate all open applications and shut down the desktop PC.
Key2Image Lockbox – Page 4
Table of Contents
Software Launch
5
The EnterpriseQuery Dialog Box
7
Topic Index Descriptions
9
Fields In EnterpriseQuery Box
10
Topic Index Examples
14
Initiate A Query
21
Search Results
22
Search Results Tool Bar
23
View a Remittance Document
25
Viewing Tool Bar
26
Section Index
27
Go To Function
27
Error Messages
32
Exit Application Suite
33
Key2Image Lockbox – Page 5
Software Launch
1. Load the CD into the CD ROM drive.
2. The software should automatically launch once the disc drive is closed.
3. The software can also be opened through the desktop PC by clicking on
“Start” from the Taskbar:
And then “Run” from the Start menu:
4. Type in the appropriate drive for a CD ROM and rdswin.exe to launch the
application:
Key2Image Lockbox – Page 6
Software Launch continued:
Note: The first time users launch the software, the dialog box below may appear. Click
the box next to “Always perform this check on Startup” to remove the
and click Yes.
The box will not display the next time users access Application Suite.
5. The EnterpriseQuery Dialog box will appear:
Key2Image Lockbox – Page 7
The EnterpriseQuery Dialog Box
The lower left corner of the EnterpriseQuery window has three icons that have different functions:
•
The Desktop icon represents server communication. When the icon background is
grey, communication is not in progress. A black background would indicate that
communication is in process.
•
The Stop Sign icon halts communications with local document servers. The icon is red
when communication is in progress. A grey stop sign indicates communication is not
required.
For this application, local server communication is not required therefore these icons will never be
active.
•
The Printer icon brings up the DocumentDirect Print Manager window which lists documents
in the printer queue:
Key2Image Lockbox – Page 8
EnterpriseQuery continued:
The EnterpriseQuery Dialog box allows users to search for Lockbox remittance
documents using specific criteria based upon the fields within each Topic Index:
Option
Description
Searching By
Used to select a topic index for the search request. The drop-down list
displays all of the topic indexes available for use. Once a specific topic
index is selected, the appropriate search fields change the columns
below within the dialog box to reflect the request.
Document Server
Reflects the same name of the topic index chosen under the Searching
By option. This will always read “Topic <name>”.
This button opens a dialog box that lets users select a different Document Server name
however the software will not function properly if this happens. Note: standard procedure
to search for images should prohibit use of this button by Key2Image Lockbox CD ROM
users.
Key2Image Lockbox – Page 9
EnterpriseQuery continued:
A Topic Index can be selected from the drop-down menu under “Searching By” to initiate
a query:
The following Topic Index combinations are available on the drop-down list sorted in
alphabetical order:
TOPIC INDEX NAME
1. LBAMASTER
2. LBACHKBTCH
3. LBACHKAMT
4. LBACHKSER
5. LBAINVDUE
6. LBAPAYCITY
7. LBAINVDAT
8. LBACUSTNO
9. LBABATCH
10. LBACHKDAT
11. LBARTDDA
12. LBAPAYOR
FIELD DESCRIPTION
Lockbox # / Deposit Date / Batch # / Transaction Sequence
# / Transaction Item Sequence #
Lockbox # / Deposit Date / Batch # / Batch Sequence #
Lockbox # / Check Amount / Deposit Date
Lockbox # / Check Serial # / Deposit Date
Lockbox # / Invoice Number / Net Amount
Lockbox # / Payor Name / State / City
Lockbox # / Invoice # / Invoice Date / Deposit Date
Lockbox # / Customer Number / Check Amount
Lockbox # / Deposit Date / Batch Amount
Lockbox # / Check Amount / Check Date
Lockbox # / Routing & Transit # / Check DDA
Lockbox # / Payor Name / Deposit Date
Key2Image Lockbox – Page 10
EnterpriseQuery continued:
Any Topic Index such as LBAMASTER will populate the EnterpriseQuery dialog box with
the appropriate fields for a query:
The following describes the columns and fields in the EnterpriseQuery dialog box:
Column Heading
#
Description
Displays the row number in numerical order.
Search For
Displays the search fields available for the Topic Index that was
selected for the query. These fields will automatically change to
reflect the appropriate Topic Index.
Comparison
Boolean Logic fields that allow a user to search for exact matches
or ranges. Note that default comparison fields are set based on
the Topic Index selected, but the user can change them if
appropriate.
From
The beginning of a range if the query requires a range of values.
To
The end of a range if the query requires a range of values.
Key2Image Lockbox – Page 11
EnterpriseQuery continued:
Each column also has various fields:
“Search For” Fields
Description
Default Fields for every Topic Index:
Version
The Version will always be listed as “Most Recent” under the From field.
The Locate icon is functional in the From field but is only used to view
different versions for other applications. Note: standard procedure to
search for images should prohibit use of this icon by Key2Image Lockbox
CD ROM users.
Lockbox Number
A bank assigned number per lockbox client that represents the unit
under which lockbox remittance documents are grouped for processing.
Each CD contains data for only one Lockbox Number.
Fields that Vary by Topic Index:
Document Type
Represents the type of image and will display either a “C” or an “I” for
Check or Invoice respectively. Invoice (I) will represent any documents
which are not processed as checks.
Deposit Date
Date that is entered at the start of processing day, which is the date that checks
will be deposited.
Batch #
Numeric reference for a group of items processed as part of a Lockbox deposit.
Batch Sequence #
The numeric reference to an item's location within a batch, or the order or
sequence in which checks are processed within a batch.
Batch Amount
Dollar total of a grouping of items within the Lockbox deposit. Some Lockbox
accounts will have one or more grouping totals that equal the Lockbox deposit
total.
Transaction Sequence #
A number assigned to a document which uniquely identifies it's position within a
group of incoming or outgoing work, such as within a batch.
Transaction Item Sequence #
A number assigned to a document that will uniquely identify its position within a
transaction.
Routing & Transit #
A nine-digit number that is part of the MICR line printed at the bottom of a check
and which breaks down into groups of numbers: the first two digits identify FED
District; next one digit identifies Main FED Office, Branch Office, or Special
Collection; the next one digit identifies Immediate Credit or Not; the next four
digits identify a unique bank number; and the last digit is a Check Digit.
Check DDA
The checking account number is also part of the MICR line printed at the bottom
of a check, and can be varied in length. The checking account number
determines which bank account will be debited for the check amount.
Check Amount
Hand-written or machine-printed number on a check that is applied as
the payment received.
Key2Image Lockbox – Page 12
EnterpriseQuery continued:
“Search For” Fields
Description
These fields represent optional search fields in which data can be populated through the
Data Entry Service or retrieved from an OCR line:
Check Serial #
The number located on the check document, assigned by the check issuing
bank, which identifies the sequence of documents as they are issued for
payment against the checking account.
Customer Number
A unique identification number assigned to a customer by a billing company,
which is used to identify a customer and to apply payments on the appropriate
account.
Invoice Number
The identification number associated with a document that accompanies a single
check or group of checks, and which describes the account information pertinent
to the client.
Net Amount
The dollar amount listed on the invoice document as total payment due.
Payor Name
The First and last name including titles, initials, etc. listed on the first line
of the address section of a check or invoice (remittance document).
Payor City
The City that is listed within the address section of a check or invoice
(remittance document).
Payor State
The State, which is listed within the address section of a check or
invoice (remittance document).
“Comparison” Fields
Description
Greater Than or Equal To
Locates documents with index entries greater than or equal to the value
entered in the From field.
Less Than or Equal To
Locates documents with index entries less than or equal to the value
entered in the From field.
Greater Than
Locates documents with index entries greater than the value entered in
the From field.
Less Than
Locates documents with index entries less than the value entered in the
From field.
Between
Locates documents with index entries between and inclusive of the
values entered in the From and To fields.
Not Between
Locates documents with index entries not between the values entered in
the From and To fields.
Equal To
Locates documents with index entries identical to the values entered in
the From field.
Not Equal To
Locates documents with index entries different from the values entered
in the From field.
Key2Image Lockbox – Page 13
EnterpriseQuery continued:
Once a user enters a value in the From or To column, click the Go button once to exit
the field, and then Click again to initiate a document search.
Another option to initiate a document search is to click the Go icon twice or
press enter.
Close the EnterpriseQuery dialog box without initiating a query.
Note: Users can navigate through the fields by using the mouse or tab key.
Note: The New Search Icon
is not available at this time.
EnterpriseQuery Dialog Box - Examples
The examples on the following pages are screen prints of the Enterprise Query dialog
box for each Key2Image Lockbox Topic Index.
The first example is for LBAMASTER, which contains the following fields:
Lockbox #
Deposit Date
Batch #
Transaction Sequence #
Transaction Item Sequence #
Document Type
Notice that each “Search For” field defaults to the appropriate fields noted above. The
“Search For” fields will always change based on the Topic Index selected under the
“Searching By” option.
The “Comparison” fields in this example all default to “Greater Than or Equal To”, but
can be changed by clicking the appropriate drop-down box.
Key2Image Lockbox – Page 14
Example 1 – LBAMASTER:
Remember this Helpful Hint:
Key2Image Lockbox CD ROM queries work best with “Greater than or Equal to”
as the default Comparison fields.
In particular for the Lockbox Number field, current procedures limit the data on
each CD to one lockbox account. Therefore it isn’t necessary to input a specific
value for Lockbox Number and the field can be left blank for “Greater than or
Equal to” as the Comparison field.
“Equal To” would not be efficient as the Comparison field, because a search
cannot be completed based on a value “Equal To” blanks, and therefore Lockbox
Number would be required for every search request.
Key2Image Lockbox – Page 15
Example 2 – LBABATCH – Lockbox # / Deposit Date / Batch Amount:
Example 3 – LBACHKAMT – Lockbox # / Check Amount / Deposit Date:
Key2Image Lockbox – Page 16
Example 4 – LBACHKBTCH – Lockbox # / Deposit Date / Batch # / Batch Sequence #:
Example 5 – LBACHKDAT – Lockbox # / Check Amount / Check Date:
Key2Image Lockbox – Page 17
Example 6 – LBACHKSER – Lockbox # / Check Serial # / Deposit Date:
Example 7 – LBACUSTNO - Lockbox # / Customer Number / Check Amount:
Key2Image Lockbox – Page 18
Example 8 – LBAINVDAT – Lockbox # / Invoice # / Invoice Date / Deposit Date:
Example 9 – LBAINVDUE – Lockbox # / Invoice Number / Net Amount:
Key2Image Lockbox – Page 19
Example 10 – LBAPAYCITY – Lockbox # / Payor Name / State / City:
Example 11 – LBAPAYOR – Lockbox # / Payor Name / Deposit Date:
Key2Image Lockbox – Page 20
Example 12 – LBARTDDA Lockbox # / Routing & Transit # / Check DDA:
Key2Image Lockbox – Page 21
Initiate a Query for Remittance Documents
1. Select LBACHKAMT for this example.
Note that the appropriate fields appear for this Topic Index under “Search For”:
Lockbox # / Check Amount / Deposit Date:
2. Populate the fields under “From” to initiate a query:
•
The field for Lockbox Number should remain blank.
•
Enter a dollar amount of $100.00 in the “From” column on the line for Check
Amount. Decimal places will appear as default and do not have to be keyed.
•
Enter a date of 02/01/02 in the “From” column on the line for Deposit Date.
Display masks for dates (forward slashes) will appear in the date field
MM/DD/YY as default and do not have to be keyed.
•
The column for “To” can be left blank on each line.
3. Click the Go button twice. Remember users can also click the Go icon or press the
Enter key twice.
Key2Image Lockbox – Page 22
The Search Results Window
The Search Results window appears with data that matches the search request:
My Search Results
Notice the column headings under “My Search Results” correspond to the fields in the
Topic Index LBACHKAMT used for the query:
•
Lockbox Number is listed for each line.
•
Every Check Amount matches the request for ”Greater Than or Equal To
$100.00”.
•
The Deposit Dates listed match the request for ”Greater Than or Equal To
02/01/02”.
Use the up/down and right/left scroll bars to review each line.
The number of search results shown in the first screen is always 29 and is reflected in
the bottom left corner of the search results page. Users must use ther mouse and click
on the down scroll bar section to refresh the amount as a cumulative total. In order to
determine if there are additional search results other than what is viewable on the
screen, continue scrolling down with the scroll bar.
Key2Image Lockbox – Page 23
Search Results continued:
Baskets
Baskets are containers which store search results and allow users to create, save, and
re-use customized collections of search results.
Note: the basket for Key2Image Lockbox CD ROM will only show the current search
results of queries initiated through the EnterpriseQuery function. Each CD ROM is readonly and therefore data cannot be saved into a customized basket.
Tool Bar Icons
New Basket -- this function is not available at this time as indicated above.
Open Basket – only one basket will exist on a Key2Image Lockbox CD ROM and will
open automatically in the active Search Results window, after a query is initiated.
Save As -- this function is only available for items that are saved in other applications
because Key2Image Lockbox CD ROM media is read-only.
Copy To and Move To – these functions become active once an item is highlighted in
the Search Results box but have the same limitations as the functions above.
Delete – use this function wisely!
Send Basket -- this function creates an E-mail message from a script with an image
attachment and works with Microsoft Outlook.
Locate Basket Item -- this function lets users search up or down for a specific item in the
Search Results window:
Enterprise Query function – takes a user back to the “Searching By” screen to initiate
another query.
Help function.
Key2Image Lockbox – Page 24
Search Results continued:
Commands
If the Search Results box does not contain the particular item desired, exit this screen by
clicking on the close button.
Then click on the Search Icon to return back to the Searching By screen and initiate
another query.
Users can also quickly return back to the Searching By screen to initiate another query
by simply by clicking on the Search button.
This is a quick print function, while in the Search Results box, which does not bring up a
dialog box but prints the line item that has been chosen (highlighted).
This button allows a user to view the item that has been chosen (highlighted) in the
Search Results box.
The following pages will introduce users to the View function.
Key2Image Lockbox – Page 25
Viewing a Remittance Document
Once the desired item is located, highlight the appropriate line in the Search Results box
and click the View button. Another option is to double-click the highlighted selection.
The software will return the first page of the item selected:
Note: all confidential information has been removed from the image for this training
manual.
The remittance document image can be enlarged by clicking the maximize button in the
upper right hand corner.
Users can also close the remittance document image clicking the X in the upper right
hand corner.
To view another image, click on the Search Results icon to return back to the Search
Results screen.
Use the Reduce and Enlarge icons to decrease or increase the image window by 25%.
Use the Rotate icons to rotate an image clockwise or counter-clockwise 90 degrees from
original orientation.
Key2Image Lockbox – Page 26
Viewing a Remittance Document continued:
These icons are also available for viewing functions.
Clear View -- use to reverse all previous adjustments to the image window.
Undo Last Action – use to reverse only the most recent adjustment to the image.
Copy to Clipboard – use to copy image of remittance document into other
Windows applications for email, letters, or other correspondence.
Print the current page or the image in the active window.
Next and Previous Search Items – to view remittance document images in the
same order as listed in the Search Results box.
OR
Next and Previous Page – to view the second or any subsequent page of the
remittance document, or the next remittance document image within the batch of
items.
(See next page of training manual)
Script functions:
Start / Stop Recording -- when recording is turned on all commands within
Application Suite are recorded.
Playback Script File – allow users to save and play back the recorded script.
Save Script / Run DocuAnalyzer – a data-mining application.
Key2Image Lockbox – Page 27
Viewing a Remittance Document continued:
Go To the Search Results window
Go To the EnterpriseQuery window for the Searching By function
Exit.
The Go To Function / Section Index
This function lets a user go directly to another remittance document image using
the Section Index or reference number, which is unique to every remittance
document:
The Section Index is also displayed in the status bar at the bottom of the image
window when a remittance document is being viewed:
Key2Image Lockbox – Page 28
The Section Index continued:
The Section Index 94958 020403279099 00200003 C is broken down into six
different fields:
Field
94958
Definition
Lockbox Number
Less than or equal to 7 numeric characters
020403
Deposit Date
6 numeric characters -- Displayed here in YYMMDD format
279099
Batch Number
Less than or equal to 7 numeric characters
002
Transaction Sequence Number
3 numeric characters
0003
Transaction Item Sequence Number
4 numeric characters
C
Document Type
1 alpha character
Using the Section Index, a user can locate an offsetting transaction for any
remittance document;
i.e., locate invoice(s) that belong to check(s) or check(s) that belong to
invoice(s),
by changing the search criteria in the Document Type or Transaction Item
Sequence Number.
Key2Image Lockbox – Page 29
The Section Index continued:
Section Index
94958 020403279099 0020003 C
The Document Type indicator in the section index above is a C which designates
a check document. To locate the offsetting invoice document, users can do the
following:
1. Use the Locate function in the GoTo dialog box and type in the same data as
the Section Index except for the C which should be replaced with an I;
OR
2. Use the LBAMASTER Topic Index in the Enterprise Query screen to search
for the document, and populate each field based on the data in the Section
Index except for Doc Type:
Lockbox #
94958
Deposit Date (MM/DD/YY)
04/03/02
Batch #
279099
Transaction Sequence #
002
Transaction Item Sequence #
0003
Document Type
I
3. Use of an I instead of a C for the Document Type will locate the
offsetting remittance document (invoice) that belongs to the check.
This example shows that use of the LBAMASTER Topic Index and the Searching
By dialog box allows the user to obtain the most specific and lowest level search
results possible -- in other words with the appropriate data available, a single
unique remittance document can be pinpointed in a document search.
Key2Image Lockbox – Page 30
The Section Index continued:
To view how the Section Index is displayed on the Search Results screen for the
same LBAMASTER inquiry – users must scroll to the right of the screen, by using
the left/right scroll bar at the bottom, to see the rest of the columns:
Key2Image Lockbox – Page 31
The Section Index continued:
The rest of the columns are displayed to the right, along with the Section Index:
Note: Users can also choose to remove the Section Index column from the
Search Results screen if necessary by using the drop-down menu under View.
Key2Image Lockbox – Page 32
Error Messages
Application Suite will search through a group of 500 remittance documents to
locate an item for a query but will not continue through another 500 unless
approved by the user.
An error message will appear on the screen during the search, which only
requires the user to click on “Yes” or “No”.
If additional error messages appear a user can access the on-line help menu by
clicking the Help icon.
A help index can be used to find details on any error message:
Key2Image Lockbox – Page 33
Logging Off Application Suite
1. Close all open windows in the application by clicking on the X in the upper right hand
corner of each active window:
The background screen within Application Suite should now be blank:
2. To exit Application Suite, click on the X again in the upper right hand corner of the
main window or click on the Door icon located on the toolbar.
3. The CD can now be removed from the CD ROM drive.