1
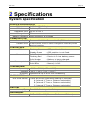
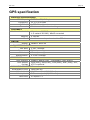
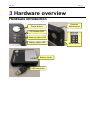
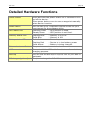
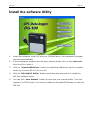
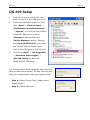
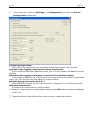
DG-100 Data Logger User Manual Version 1.2 DG-100 page 2 Table of Content 1 Introduction and Features................................................ 3 Introduction ...................................................................3 Features.........................................................................4 2 Specifications ................................................................... 5 System specification ........................................................5 GPS specification .............................................................6 3 Hardware overview .......................................................... 7 Hardware introduction......................................................7 Detailed Hardware Functions .............................................8 Package contents ............................................................9 4 Software Utility .............................................................. 10 Software Utility features ................................................. 10 Install the software Utility............................................... 11 DG-100 Setup............................................................... 12 5 Getting Started............................................................... 15 DG-100 Usage .............................................................. 16 Transfer data to your PC ................................................. 16 Save data..................................................................... 17 Displaying the data on map ............................................ 18 Export data .................................................................. 21 Speed filter................................................................... 22 Delete the data from memory ......................................... 22 Metric system or imperial system..................................... 22 Using the G-mouse function ............................................ 23 6 Troubleshooting ............................................................. 24 ► Change the battery .................................................... 24 DG-100 page 3 1 Introduction and Features Introduction GlobalSat DG-100 is a GPS data logger that records track data from the received GPS signal. With a GPS logger and antenna built in a miniature construction, DG-100 features an all-in-one, cost-effective GPS logger solution. The DG-100 records time, date, speed, altitude and GPS location at preset intervals. Based on the SiRF star III chipset, DG-100 offers accurate position tracking capabilities. All recorded GPS information can be downloaded to the computer. It is a convenient, economical way for later review of your recorded histories. Simply connect the DG-100 to your PC or Notebook, and then download the track-log to your PC for use with Windows based software utility. User can easily export the recorded points to Google Earth and Google Maps. It is ideal application in fleet management, marine navigational aids, traveling and consumer personal use. You also can use the DG-100 as an USB GPS mouse. It is another good feature for DG-100. DG-100 page 4 Features The 1. 2. 3. 4. 5. 6. 7. 8. 9. 10. 11. main features of DG-100 GPS data logger SiRF StarIII chipset 20 channels. Allowing user to store up to 60000 points. Two NiMh batteries for more than 20 hours continuous operation. USB interface. Power On/Off button for easy use. Three preset saving intervals (Time/Distance) can be selected by slide switch. Three LEDs to show the status of GPS, battery and memory. MMCX port for external GPS antenna. USB G-mouse function. Configuration Wizard helps you to quickly make the configuration. User friendly Windows based software utility. User may use the software utility to do the following functions: Upload recorded data Change Recording Interval Configuration setting Delete recorded data Exporting and mapping your recorded data: (1) Exploring to KML (Interface with Google Earth) (2) Show recorded data on Google Maps (3) Text format (4) Excel file format (5) RMC Compatible format (6) GPX format DG-100 2 Specifications System specification Electrical Characteristics GPS standard SiRF StarⅢ/LP Single GPS Antenna Built-in patch antenna Operation time Up to 20 hrs + Charge time 7 hrs Battery Charging USB connector @ 350mah POWER BUTTON Power On/Off Press and hold for 3 second to On/Off the device. Instant Save Press button once to save a waypoint manually when device is active. STATUS LED’S GPS status Flashing Green – GPS position is fixed. Steady Green – GPS position is not fixed. Power status Solid Red – Device is power on. Flashing Red – Device is in low battery power. Solid Amber – Battery is being charged. Memory status Flashing Blue – Memory is 2/3 full. Solid Blue – Memory is full. TEMPERATURE Operating -20°C ~ 50°C (-4°F ~ 122°F) Storage -20°C ~ 35°C (-4°F ~ 95°F) Humidity Operational up to 95% non-condensing SLIDE SWITCH One Slide Switch There are three customized setting of intervals. A (interval 1 Time or Distance selectable) B (interval 2 Time or Distance selectable) C (interval 3 Time or Distance selectable) BATTERY Battery Type Two NiMh Rechargeable Battery MECHANICAL Dimension 3.15 x 2.15 x 0.7 (80mm x 54.6mm x 17.8mm) page 5 DG-100 GPS specification Electrical Characteristics GPS Chipset SiRF Star III/LP Single Frequency L1, 1575.42 MHz C/A Code 1.023 MHz chip rate Channels 20 channel all-in-view tracking ACCURACY Position Horizontal 10 meters, 2D RMS 1-5 meters 2D RMS, WAAS corrected Velocity 0.1m/sec Time 1 micro-second synchronized to GPS time DATUM Datum Default: WGS-84 ACQUISITION RATE Hot start 1 sec., average Warm start 38 sec., average Cold start 42 sec., average Reacquisition 0.1 sec. average PROTOCOL GPS Protocol Default: NMEA 0183 (Secondary: SiRF binary) GPS Output GGA(1sec), GSA(1sec), GSV(5sec), RMC(1sec), GLL, format VTG is optional DYNAMIC CONDITION Acceleration Limit Less than 4g Altitude Limit 18,000 meters (60,000 feet) max. Velocity Limit 515 meters/sec. (1,000 knots) max. Jerk Limit 20 m/sec**3 page 6 DG-100 page 7 3 Hardware overview Hardware introduction Power button External antenna port GPS status LED Memory status LDE Battery status LDE Battery cover USB connector Mode switch DG-100 page 8 Detailed Hardware Functions Power button Mode Switch GPS status LED Memory status LED Battery status LED External antenna Port Press and hold the power button for 3 seconds to turn on/off the device. Press power button once to save a waypoint manually when device is active. You can set up to 3 different interval modes for your requirement by the software utility. Flashing Green – GPS position is fixed. Steady Green – GPS position is not fixed. Flashing Blue – Memory is 2/3 full. Solid Blue – Memory is full. Solid Red – Device is power on. Flashing Red – Device is in low battery power. Solid Amber – Battery is being charged. For you to connect an external antenna. USB connector Connect with the USB cable for data transfer or battery charging purpose. Belt clip You can use the belt clip to clip DG-100 on your belt or backpack. DC charger (optional) For you to charge the DG-100 in car or use it in car. DG-100 page 9 Package contents Check the contents of your DG-100 package. If you find any accessories are missing or appear damaged, please contact your dealer immediately. DG-100 Two rechargeable NiMh batteries Belt clip CD (user manual, software utility) DC charger (optional) DG-100 page 10 4 Software Utility Software Utility features Upload recorded data: User can upload recorded data and save it to PC. Information Stored: 1. Only Position 2. Position, Time, Date, Speed. 3. Position, Time, Date, Speed, Altitude. User programmable via software utility. Speed Filter: Speed Filter Threshold: Disables data save if speed falls below a threshold value. Distance Filter Disable data save if data logger hasn’t moved greater than the selected radius. Saving intervals: Saving interval (Time or Distance) can be selectable. User programmable via utility. Mode Switch to select saving interval. Converting Output format (1) Exploring to KML ( Interface with Google Earth) (2) Show recorded data on Google Maps (3) Text format (4) Excel file format (5) RMC Compatible format (6) GPX format Configuration Wizard Using Configuration Wizard to help you quick adjust the settings, including Mode A, B, C. DG-100 page 11 Install the software Utility 1. Insert the software utility CD into your CD-ROM drive, the installation program will start automatically. 2. If the installation program did not start, please double click on the “auto.exe” from the CD to start it. 3. Click on “Install USB Driver” button to install the USB driver which is needed when you connect DG-100 to your PC. 4. Click on “DG-100 PC Utility” button and follow the instruction to install the 5. You can click “User Manual” button to open the user manual folder. The user DG-100 software utility. manual is in PDF format. You have to install the Acrobat PDF Reader to view the PDF file. DG-100 DG-100 Setup 1. Turn on the power of DG-100, and then connect it to the USB port on PC. 2. Check the COM port of DG-100 first. Click [Start] > [Control Panel] > [Performance and Maintenance] > [System], you will see the System Properties dialog box; click on [Hardware] tab and then the [Device Manager] button. Expand the [Ports (COM & LPT)] item, and the “Prolific USB-to-Serial Comm Port” is the COM port of you DG-100. 3. Click from [Start] > [All Programs] > [GlobalSat Data Logger] > [DG-100 Utility] to start the GlobalSat DG-100 utility. The Configuration Wizard appears when the first time you start the program. It helps you to quickly setup the configuration with easy step by step. y Step 1: Select Device Type. Please select “Data Logger”. y Step 2: Select COM port. page 12 DG-100 y page 13 Step 3: Select the Mode switch. There are 3 default predefined modes, including “Walk/Jog”, “Bicycle”, and “Vehicle”. The data saving interval is 30 seconds for “Walk/Jog”, 10 seconds for “Bicycle” and 5 seconds for “Vehicle”. You can change the different time or distance interval in the Device Configuration window. y Step 4: Select the Metric or Imperial unit. y Step 5: Select the directory for exporting files. y When you finished the setup, a successful message appears and all settings are saved in system. 4. The DG-100 utility will import the setting you just made from Configuration Wizard. If you did not use Configuration Wizard to do the settings, please manually select the correct COM port and set the Baud Rate to “115200”. If later on you want to enable Configuration Wizard again, please click from menu bar, [File] > [Quick Configuration]. DG-100 5. page 14 From menu bar, click on [Settings] > [Configuration] to open the Device Configuration dialog box. f Data logging format: There are three options for you to choose those data items to be recorded. f Disable data logging if speed falls below a threshold: If your speed is below this specified value, DG-100 will not save the data of current position. f Disable data logging if distance is less than the selected radius: If the distance between your last point and current point is less than this specified value, DG-100 will not save the data of current position. f Data logging interval Mode A, B, C Setup the Mode Switch for the interval (time or distance) for recording the data. f System information It shows the current memory usage status. 6. When you have done the configuration setup, press OK button to save the settings to DG-100. 7. These setting will take effect when next time you restart the device. DG-100 page 15 5 Getting Started Tool Bar Configuration GPS information Tree Bar Status Bar 1 Open a training file. 8 The Configuration for GPS device. 2 Save training information to a file. 9 Metric system. 3 Preference 10 Delete records. 4 Select all files. 11 Load Track Points. 5 Export training information to the KML format. 12 Export to Google Earth. 6 Export to CSV file. 13 Display program information, version number and copyright. 7 Export to the text file. DG-100 page 16 DG-100 Usage 1. When you press the power button to turn on the DG-100, it starts to search the GPS signal. After the GPS position is fixed, it will begin to record and save the position data. 2. You can select the Mode Switch for the different recording interval as you need. 3. If you want to stop recording, just press the power button to turn it off. 4. When the battery power is exhausted, it will shut down automatically. Note: When you connect DG-100 to your PC, DG-100 will enter the “data transfer mode”, it can not record the data in this mode. After you disconnect it from PC, please remember to power off and restart DG-100 to make it return to Data Logger mode. Transfer data to your PC 1. Turn on the power of DG-100, and then connect it to the USB port on PC. Start the software utility. Select the correct COM port and set the Baud Rate to “115200”. From menu bar, click on [TrackRecord] > [Load Track Points]. Select the data item which you want to load and click on “Load” button. DG-100 page 17 2. The data is loaded in the Tree Bar area, and the entire track points will be sorted by time order displaying on the right bottom window. 3. Select the data you want from Tree Bar area. From menu bar click [Map] > [View Points]; the data you select will be combined and displayed in details in a new window or the right side. (You can click on [File] > [Select All Files] to automatically select all data record in Tree Bar, or click on [File] > [Select All Files] again to deselect all.) Save data From menu bar click on [File] > [Save] to save the data to a DataLogger (*.gsd) format. This will save all data items in Tree Bar no matter they are selected or not. You can open the saved gsd file by [File] > [Open]. DG-100 page 18 Displaying the data on map 1. Display the track points on Google Earth: You can display all the data from “active window” on Google Earth. Just click [Map] > [Google Earth] from the menu bar. Check the root record to display all information. Check “TrackPoints” to display the route by red line. Check any point which you want to display its position and information in map. 1.1 By default, it only shows the track points on the map. 1.2 You can select from [File] > [Preference], and check the “Show Speed/Time in Google Earth” to have the Speed and Time info of the points shown on the map. 1.3 To display the route on Google Earth, you must install Google Earth and the internet connection is also needed. For more information, please visit http://earth.google.com/. DG-100 2. page 19 Display the track points on Google Maps: You can display all the data from “active window” on Google Maps. Just click [Map] > [Show Track Points in Google Maps] from the menu bar. To display the track points on Google Maps, your PC must have the internet connection enabled. DG-100 3. page 20 Display one track point on Google Maps: You can double click on any track point to display its position on Google Maps. Double click on any track point to display its position on Google Maps window. DG-100 page 21 Export data Inactive window Active window 1. With the export function, you can export the data in “active window” to the following three kinds of data format. 2. Click [File] > [Export] > [KML File] to export the data to the Google Earth KML file format. 3. Click [File] > [Export] > [CSV File] to export the data to the Excel file format. 4. Click [File] > [Export] > [TXT File] to export the data to the TXT file format. 5. Click [File] > [Export] > [RMC Compatible Format] to export RMC file which only include “UTC Time”, “Status”, “Latitude”, “N/S Indicator”, “Longitude”, “E/W Indicator”, “Speed Over Ground” and “Date”. The other fields will be left blank. 6. Click [File] > [Export] > [GPX File] to export the data to the GPX file format. DG-100 page 22 Speed filter The Speed filter function allows you to display the data which match the criteria. Select the range criteria and input speed value (integer), then click “Refresh” button. Delete the data from memory If you have already saved your data to PC, then you can click on [TrackRecord] > [Delete All] to delete all data from the DG-100 memory. Metric system or imperial system You can click on [Settings] > [Metric System] to check this item for displaying the distance by “meters” and speed by “km/hour”, or uncheck it for displaying the distance by “feet” and speed by “mile/hour”. DG-100 page 23 Using the G-mouse function You can connect the DG-100 to your Notebook and use it as a GPS mouse. 1. Connect DG-100 to your Notebook. 2. Turn on the DG-100. 3. Start the DG-100 software utility. 4. Select the correct COM port and set Baud Rate to 115200. 5. Click the “Start GMouse mode” button. This would start DG-100 G-mouse function. Now you can close the DG-100 software utility. 6. Start your Navigation software and set the COM port and Baud Rate if necessary. The G-mouse is ready for your use. 7. If you want to end the G-mouse mode, and return to the data logger mode, you must turn off the DG-100 and turn on it again. DG-100 page 24 6 Troubleshooting ► Change the battery 1. Press downward to open the battery cover. 2. If there are rechargeable batteries in the DG-100, then you can connect the device to PC’s USB port for battery charging or for data downloading. 3. The USB port of computer will provide power to DG-100 via the USB cable when you make the connection. If you use the non-rechargeable battery, please remove it to avoid any hazard. DG-100 page 25 FCC Notices This device complies with part 15 of the FCC rules. Operation is subject to the following two conditions: (1) This device may not cause harmful interference, and (2) This device must accept any interference received, including interference that may cause undesired operation. FCC RF Exposure requirements: This device and its antenna(s) must not be co-located or operation in conjunction with any other antenna or transmitter. NOTE: THE MANUFACTURER IS NOT RESPONSIBLE FOR ANY RADIO OR TV INTERFERENCE CAUSED BY UNAUTHORIZED MODIFICATIONS TO THIS EQUIPMENT. SUCH MODIFICATIONS COULD VOID THE USER’S AUTHORITY TO OPERATE THE EQUIPMENT.