1
MULTI VIEW
12
2
1
3
4
5
6
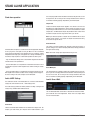
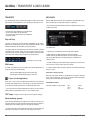
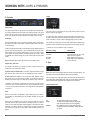
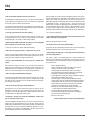
UVI Workstation is a multi-timbral instrument that provides unlimited Parts. Parts
are where you load Presets and can be accessed by clicking individual part slots
(as shown below). A Part is like a channel on a mixing console (or an instrument
track in a DAW) and can contain its own preset and settings.
7
8
9
10
11
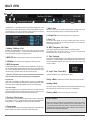
7. Mute / Solo
Next to the Preset name are the Mute and Solo buttons. Pressing the “M” button
will mute the part while pressing the “S” button will enter solo mode.
8. Volume/Pan control volume and pan just like a regular mixer.
9. Aux 1 & 2
The two Aux sliders enable you to send a desired signal amount to the UVI
Workstation’s two auxiliary FX. For more info, please refer to the “FX” chapter to
read more about FX Aux1 & 2.
1. Adding / Deleting a Part
10. MIDI Transpose : Oct / Semi
2. MIDI LED MIDI activity LED lights up when a part receives MIDI data.
11. Play / Autoplay
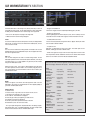
By default, a UVI Workstation session starts with 4 parts. You can add as many
parts as you want by clicking on “+”. The new Part will be added after the last part
on the list. To delete the currently selected part, press “-”
3. VU-Meter Next to the MIDI LED, it displays the volume of the part.
4. MIDI Assignment
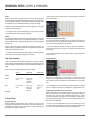
UVI Workstation provides up to 64 MIDI channels, divided into four banks (A-D).
You can assign any MIDI channel for any part. Parts can also share a MIDI channel. To select a bank and a MIDI channel, click on the channel number of the part
you want to assign, and then select a bank and a channel number.
A part can be transposed using the the octave and semitones controls.
The transpose range is of 4 octaves (from -2 to +2) for the “Oct” control and 48
semitones (from -24 to +24) for the “Semi” control.
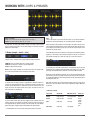
If a loop has been loaded into the part, the Autoplay button (Lock symbol) and the
Play button (“>” symbol) will display. Activate autoplay if you need the part to play
when UVI Workstation’s playback starts. Click on the “Play” button to play or stop
the part as needed.
12. Load / Save / Clear Multi
-> New in V.2: omni mode, parts can now receive data from all midi channels.
(very useful when saving single instrument presets in GarageBand)
Load and Save Multi use the standard Open File dialog.
Important note:
4 MIDI banks are available in the MAS and RTAS versions of UVI Workstation.
However, the VST and Audio Unit standards do not support multiple banks of MIDI
channels, but you can always open additional instances of UVI Workstation.
Saving a Multi > a Multi can be saved to any location on your hard drive.
Tip to stack sounds:
If you assign multiple parts to the same MIDI channel you can easily create interesting and complex textures by stacking the presets: all parts that share the same
MIDI channel will play exactly at the same time with the same notes.
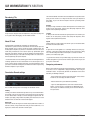
5. Previous / Next arrows
These two arrows lets you intuitively navigate through the presets, whether loops
or instruments. Click the “<“ symbol to load the previous preset in the Browser list,
while clicking the “>” symbol will load the next preset listed in the Browser.
6. Preset name
This caption display the name of the currently selected preset. Please refer to the
Browser section in this manual to read more on how to load a preset.
12
Loading a Multi
> Be aware that your existing settings will be replaced by the loaded Multi, so if you
want to preserve the current state, be sure to save it as a Multi before
Clearing a Multi > There is no UNDO here
so be careful!
What is a Multi ?
A Multi is a complete “snapshot” of the UVI Workstation. A Multi saves the entire
engine’s state, including: all presets and effects that are currently loaded, as well
as any tempo and loop settings. Using a Multi is a convenient way to transfer your
UVI Workstation settings to other projects, clients, colleagues, and even other host
applications. Multis are platform independant.
UVI Workstation™ Manual