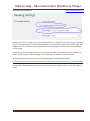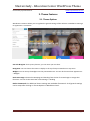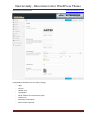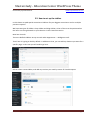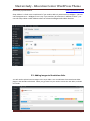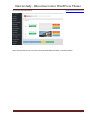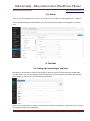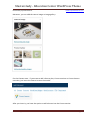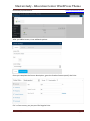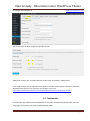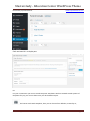
1
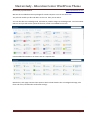
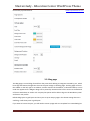
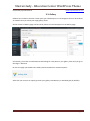
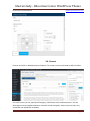
Masterstudy - Education Center WordPress Theme
Powered by StylemixThemes
www.stylemixthemes.com
A short guide and general information to help
you get to know your new theme.
Above all, I would like to thank you for purchasing this theme, your contribution is very much
appreciated.
This document covers the installation and use of this theme and reveals answers to common
problems and issues - I encourage you to read this document thoroughly if you are experiencing any
difficulties. If you have any questions that are beyond the scope of this document, feel free to pose
them in the dedicated support forum.
Masterstudy – Education Center WordPress Theme
Page 1
Masterstudy - Education Center WordPress Theme
Powered by StylemixThemes
www.stylemixthemes.com
1. Getting Started
1.1. Installation of the theme
1.2. Setting up the Homepage
2. Theme Features
2.1. Theme Options
2.2. How to set up the sidebar
2.3. Adding the Images to Revolution slider
2.4. Menus
3. Content
3.1. Setting up Content pages and posts
3.2. Blog page
3.3. Gallery
3.4. Courses
3.5. Demo content import
3.6. WooCommerce settings
3.7. Events page
Masterstudy – Education Center WordPress Theme
Page 2
Masterstudy - Education Center WordPress Theme
Powered by StylemixThemes
www.stylemixthemes.com
1. Getting Started
To install this theme you must have a working version of WordPress already installed. For information
regarding the installing of the WordPress platform, please see the WordPress Codex http://codex.wordpress.org/Installing_WordPress
1.1. Installation
When you are ready to install a theme, you must first upload the theme files and then activate the
theme itself. The theme files can be uploaded in two ways:
• FTP Upload: Using your FTP client, upload the non-zipped theme folder into the /wp-content/themes/
folder on your server.
• WordPress Upload: Navigate to Appearance -> Add New Themes -> Upload. Go to browse, and select
the zipped theme folder. Hit “Install Now” and the theme will be uploaded and installed.
Once the theme is uploaded, you need to activate it. Go to Appearance -> Themes and activate your
chosen theme.
After that you need to activate the pre-installed plugins:
1.
2.
3.
4.
WPBakery Visual Composer
WooCommerce (for courses)
Revolution Slider
Contact Form 7
1.2. Setting up the Homepage
To set up the homepage you must create a new page, you can do so by navigating to Pages > Add New.
The title for this page can be up to your liking. Under Settings > Reading please setup the new
Homepage.
Masterstudy – Education Center WordPress Theme
Page 3
Masterstudy - Education Center WordPress Theme
Powered by StylemixThemes
www.stylemixthemes.com
Actually you can set any page to be your homepage. Once it’s created you can compose your homepage
layout. The design layout is created under Bootstrap framework which is split into 12 columns grid. Each
widget has its own maximum and minimum widths, so depending on that you can work out the layout
for each page.
As you can see the homepage just like any the page is now 100% constructible out of the modules we
have in Visual Composer. The homepage can be created by any element in Visual Composer.
To view the short manual on how to use the Visual Composer, please follow this link:
http://codecanyon.net/item/visual-composer-page-builder-for-wordpress/full_screen_preview/242431
The detailed documentation of Visual Composer can be found in main ZIP archive under ‘User Manual’
folder.
Masterstudy – Education Center WordPress Theme
Page 4
Masterstudy - Education Center WordPress Theme
Powered by StylemixThemes
www.stylemixthemes.com
2. Theme Features
2.1. Theme Options
WordPress Customize allows you to regulate the general settings of the website. In WordPress menu go
to Appearance > Customize
Site title & tagline: that’s pretty obvious, you can name your site here.
Navigation: You can choose the menu to display in the top from precreated sets in wp-menu
Widgets: You can set up the widgets into the precreated areas. You can do the same later Appearance > Widgets
Static Front Page: Choose the Homepage and the Blog from the list of created Pages to assign their
functions. You can do the same later under Settings -> Reading
Redux Framework: For additional theme settings we use Redux framework. So all general settings
can be setup after clicking on Theme Options in WordPress Panel:
Masterstudy – Education Center WordPress Theme
Page 5
Masterstudy - Education Center WordPress Theme
Powered by StylemixThemes
www.stylemixthemes.com
Using Redux framework you can easily change:
-
Logo
Favicon
Header area
Typography
Setup sidebars for Custom Post types
Footer area
Mailchimp subscription
Demo Content upload
Masterstudy – Education Center WordPress Theme
Page 6
Masterstudy - Education Center WordPress Theme
Powered by StylemixThemes
www.stylemixthemes.com
2.2. How to set up the sidebar
In this theme we paid special attention to Sidebars for your biggest convenience and on multiple
previous requests.
We have two types of sidebar: shop sidebar and blog sidebar, either of them can be positioned on
the left or on the right based on your selection in the Customize section.
Now how it works.
There are default sidebars set up as usual under Appearance - > Widgets as well.
That’s how it is going to look by default. In addition to that, you can add any element you want for a
specific page, in this case you will need to go here:
Edit or create a new sidebar, and add any sections you need by means of VisualComposer
Masterstudy – Education Center WordPress Theme
Page 7
Masterstudy - Education Center WordPress Theme
Powered by StylemixThemes
www.stylemixthemes.com
Shop sidebar is a little more complicated. If you need to add only woocommerce widgets – you can
use the Appearance -> Widgets to set it up. If you need any VC elements in addition to that – you
can edit shop sidebar under Sidebars above or below the Widgetsized sidebar element.
2.3. Adding images to Revolution slider
You will need to upload various images to the Layer slider. You can add items from Revolution Slider
plugin in the WordPress backend. When you go there first you need to create the new Slider, and add
new slides.
Masterstudy – Education Center WordPress Theme
Page 8
Masterstudy - Education Center WordPress Theme
Powered by StylemixThemes
www.stylemixthemes.com
More detailed manual you can find in the downloaded Manual folder “Revolution Slider”.
Masterstudy – Education Center WordPress Theme
Page 9
Masterstudy - Education Center WordPress Theme
Powered by StylemixThemes
www.stylemixthemes.com
2.4. Menus
There is only one navigation on the site – in the top, so you can adjust it under Appearance - > Menus
This is standard Wordpress functionality, you can choose from the pages, post categories, or custom
links.
3. Content
3.1. Setting up Content Pages and Posts
All pages can be created as simple content pages or built by means of Visual Composer page builder.
You will need to first set up the page and then add and set up content blocks. Just add a row and add
the modules to row from the Visual Composer dashboard.
Now you can choose how to compose your template. Add Content modules, Testimonials, etc. You have
everything to realize your imagination.
Masterstudy – Education Center WordPress Theme
Page 10
Masterstudy - Education Center WordPress Theme
Powered by StylemixThemes
www.stylemixthemes.com
We have also included extension packages for Visual Composer. You can use them free.
Just pick the module you like and add it to the row. Then you can edit it.
You can also edit the row background, add video or parallax images to the background. Just click on Row
edit icon and you will see the options & features, which are available for this row.
Custom added shortcodes in our theme are on a separate tab:
Besides this, each page contains these options which include header color or background image, title
fonts and colors, breadcrumbs and button settings:
Masterstudy – Education Center WordPress Theme
Page 11
Masterstudy - Education Center WordPress Theme
Powered by StylemixThemes
www.stylemixthemes.com
3.2. Blog page
The Blog page is a usual blog, formed from the posts which belong to categories created by you, which
have tags and featured images that show in the post listings on the blog page. The blog page can have
the sidebar on the left, right or no sidebar, and the contents of the sidebar, as described above, are set
under the Appearance > Widgets. Blogs can be posted by someone who has the access to the backend
of the site with admin or author role. Anyway that person will be able to log into the WordPress panel
and have a user profile.
Default blog layout is grid layout and once you set up an empty page in the theme setting where it is
said blog, it will show posts in grid layout.
If you want to have List layout, you will need to create a page and set a template for it named Blog-list.
Masterstudy – Education Center WordPress Theme
Page 12
Masterstudy - Education Center WordPress Theme
Powered by StylemixThemes
www.stylemixthemes.com
3.3. Gallery
Galleries are created as another custom post type called Projects. It has Categories that can be ordered
as needed. Here you create just single gallery photo.
All the content of Gallery page can be built by means of Visual Composer on the Gallery page.
So basically, you create an individual post describing for each photo in your gallery. After that you go to
the Pages > Add new
On the new page you should insert Gallery Grid shortcode from Visual Composer.
After that you can have an option go make your gallery view Masonry or Standard grid (by default):
Masterstudy – Education Center WordPress Theme
Page 13
Masterstudy - Education Center WordPress Theme
Powered by StylemixThemes
www.stylemixthemes.com
3.4. Courses
Courses are built on WooCommerce Products. To create a course you need to add a Product:
For each course you can specify the Category, add Course name and Description. For the
Description we use standard Content area with Visual Composer, where you can insert any
shortcode you would like to display.
Masterstudy – Education Center WordPress Theme
Page 14
Masterstudy - Education Center WordPress Theme
Powered by StylemixThemes
www.stylemixthemes.com
Moreover, you can add the course image or image gallery:
For the Content area – if you want to add a Course plan, Course sections or Course lessons
overview, just insert the Course Lessons shortcode:
After you insert it, you have the option to add a lesson into the Course section:
Masterstudy – Education Center WordPress Theme
Page 15
Masterstudy - Education Center WordPress Theme
Powered by StylemixThemes
www.stylemixthemes.com
After you add a Lesson, it has addional options:
Once you complete the Course description, go to the Product Data to specify the Price:
If it’s a Free course, you just put 0 for Regular Price.
Masterstudy – Education Center WordPress Theme
Page 16
Masterstudy - Education Center WordPress Theme
Powered by StylemixThemes
www.stylemixthemes.com
If you have limited seatings in classes, you should go to Inventory tab specify Stock Qty.
After that you can specify the Course Details information and assign a Teacher of that Course.
3.5. Content import in one click
Don’t know where to start on building up your site? We have created an option for you to recreate our
theme demo site in just one click. You should just go to Theme Options - > Demo Importer and click the
import button.
3.6. WooCommerce shop
WooCommerce is the most popular e-commerce plugin for WordPress. We are using WooCommerce for
creating and selling courses here.
Before you start adding products, please go through the WooCommerce plugin settings and specify
everything you need for your site.
Go to WooCommerce > Settings > Products > Display
Masterstudy – Education Center WordPress Theme
Page 17
Masterstudy - Education Center WordPress Theme
Powered by StylemixThemes
www.stylemixthemes.com
Specify the Single Product Image and Thumbnails sizes:
Adding the courses: You can easily add new courses now via Products > Add Product
For a single product you can upload several photos in Product Gallery. More information about the
WooCommerce features you can find in the Chapter 3.4 or here:
http://docs.woothemes.com/documentation/plugins/woocommerce/getting-started/
3.7. Testimonials
In order that you could create testimonials in one place and then use all over the site, just
inserting a VC element, we have created custom posts.
Masterstudy – Education Center WordPress Theme
Page 18
Masterstudy - Education Center WordPress Theme
Powered by StylemixThemes
www.stylemixthemes.com
Each testimonial is a simple post
FYI
For your convenience you can use Visual Composer Templates. We have created several options of
templates for you, you can use them once you do the demo import.
this button works with templates, here you can choose from defaults, created by us,
Masterstudy – Education Center WordPress Theme
Page 19
Masterstudy - Education Center WordPress Theme
Powered by StylemixThemes
www.stylemixthemes.com
or you can create your own templates
Again, thank you for purchasing this theme!
If you have any questions that are beyond the scope of this document, feel free to pose them in the
dedicated support forum at www.stylemixthemes.com
Masterstudy – Education Center WordPress Theme
Page 20