1
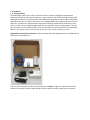
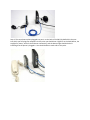
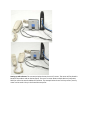
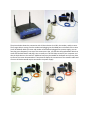
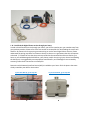
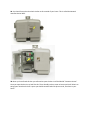
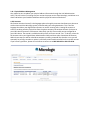
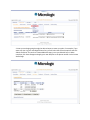
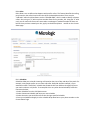
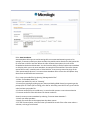
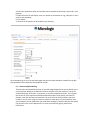
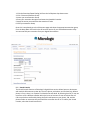
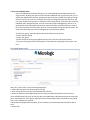
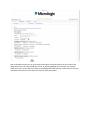
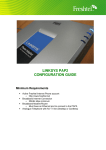
Digital Phone - User Manual
The following are simple instructions and suggestions on how to better utilize your Digital Phone service
from Micrologic. Should you need further assistance, do not hesitate to contact us at 866.3WLOGIC or
304.472.9100.
Table of Contents
1. Introduction to Service
a. Getting Started
b. Back Feed Dial Tone through Your Home
c. Number Porting
2. Logging into the VoIP Admin
3. Address Management
a. 911 Address Management
b. Physical Address Management
4. SIP Accounts
5. Using your Digital Phone Service
a. Dial Plans
b. Rules
c. Schedules
d. Auto-Attendants
e. Extensions & Speed Dialing
f. Virtual Console
6. Voicemail
7. User Level Administration
8. Call Detail
1. Introduction
1. A - Getting Started
Once Micrologic receives your order, the wheels are set in motion to configure the appropriate
equipment and ship to your home or business. In most instances, you will be receiving a Linksys PAP2
digital phone converter. This device allows your traditional analog phones to work with the Micrologic
Digital Phone Service. This device will come to your shipping address pre-configured for use. For most
new users, you will have a single computer using the existing high speed internet connection in your
home. You will now be sharing that high speed internet connection with the phone adapter. To share
this connection, you will need to utilize a router. Please follow the instructions below on installing the
device in your home. There are instructions on how to set this up with or without a router.
Digital Phone Connection Instructions The picture below shows the equipment that is included with the
box that you received from us:
Step 1: In the next picture you will see our equipment, the PAP2, along with a cable modem that we
used for this example: The blue cable coming from the modem currently is going to your computer.
Step 2: The picture below shows the connection directly from your modem (DSL or Cable apply). In this
step you will take the cable that is currently going to the computer from the modem and plug into our
device the PAP2. The picture shows the blue cable coming from the modem and plugging into the blue
port on the back of the PAP2, marked Ethernet. The picture to the Right is showing the connection
without either device plugged into the wall outlet for power. This is just and example.
Step 3: This step shows a phone plugged into port 1 on the back of the PAP2, by default this the port
into which you will plug your telephone. At this point you should have 3 lights lit on the PAP2 device, the
top light for power, second is the Ethernet connectivity, and the bottom light should also be lit
indicating that the phone is plugged in. You should be able to make calls at this point.
Setting up with a Router The connection below shows the use of a router. The router will be placed in
between the modem and our device (Pap2). The use of a router allows multiple devices (computers,
PAP2) to utilize the same broadband connection. The example below shows a Linksys router, but any
router can be used. Linksys is the brand that we prefer.
The picture below shows the connection with all three devices: the PAP2, the modem, and the router.
The orange cable is coming from the modem and plugging into the WAN port on the back of the router
(it will be labeled). With the router and modem connected and plugged into a power supply, you can
now plug your computer(s) into any of the router ports. Also, you will take the supplied blue cable that
came with the PAP2 device and plug it into a router port. This will allow access for your computer and
also the Pap2 device to the internet. Additional setup may be needed for the Router and you may have
to refer to the router documentation. These pictures display the connections of the network cables and
of course all devices would require connection to a power supply.
1. B – Back feed the Digital Phone service through your home.
In order to back feed the service through your home, you will first need to port your number away from
your previous provider. Please refer to the next section to accomplish this. Back feeding the service will
allow for all phones in the house using common wiring to use the same Digital Phone account. Please
understand the wiring may differ from home to home, so there are no guarantees that this will operate
as desired. (***Please be sure that the previous provider has disconnected the dial tone feed to your
home or you could damage the PAP2 device, your phones, and/or the wiring in your home. Back feeding
the dial tone is not suggested by some equipment manufacturers, and if damaged is not covered by
warranty) Follow these instructions to accomplish:
Determine which Network Interface Device (NID) is installed at your home. Click the picture that most
closely resembles your NID for instructions.
If you have NID A, go to step 2A
A
If you have NID B, go to step 2B
B
2A. You should have a box that looks similar to this outside of your home. This is called the Network
Interface Device (NID).
The NID closed.
The NID open.
3A. Once you have found this box you will need to open the box. It will be labeled "Customer Access."
Once you open the box it may look like this.
4A. Now that you have the box open, loosen the screws and disconnect the wires from them. This will
disconnect you entirely from the Outside phone company.
5A. The next step is what connects the Digital Phone Service to all the other jacks.
Phone Jack: located on the wall in your home.
6A. You will want to run a cable from the PAP2 (Port 1) to an available phone port in your home.
7A. The process is complete; you should now have dial tone on all your jacks in the home.
2B. You should have a box that looks similar to this outside of your home. This is called the Network
Interface Device (NID).
3B: Once you have found this box you will need to open the box. It will be labeled "Customer Access".
Once you open the box it may look like this. There should just be a screw to loosen and it will allow it to
swing open. Now that the box is open you should see what looks like phone cords, like those in your
home.
4B. Now that you have the box open, unplug the phone cords, just like you would unplug the phone line
from the wall jack in your home. This will disconnect you entirely from the Outside phone company
5B. You are now disconnected from your previous telephone provider and you will be able to back feed
our service throughout your home. You will just need to run the phone cord from Port1 on the PAP2, the
grey box that we sent to you, to an available wall jack which should look like the picture above. During
this procedure, your Ethernet cable should remain connected to the router and the router should
continue to receive power. Once you have completed this procedure, you should be able to use the
working phone jacks in your home and your existing phones.
1. C – Porting Your Number
Now that you have set up your Digital Phone account, make some test calls inbound and outbound to
ensure that everything is working correctly. You may now wish to port your existing telephone number
to the 3WLogic Digital Phone Account. If test calls were successful, you should log into your 3WLogic
VoIP Administration Utility. At the top of the screen should be a gray box asking if you would like to keep
the 3WLogic temporary number or if you would like to replace with an existing number. Follow the
instructions for porting an existing number. This operation creates the needed workflows in the
Micrologic office system to port your number. You will be notified via email of a pending port date and
again notified when the port is complete. Once complete, you will be using your existing number on the
Micrologic Digital Phone Service. (If you do not receive the notification box at the top of the page, you
can select the “Number Porting” link and request your port.)
2. Logging into the VoIP Administration Utility
The Micrologic VoIP Admin site is where you can adjust and view all the settings on your Digital Phone
account. To visit this site, go to http://voipadmin.3wlogic.com. There you will be prompted to enter your
account number or user ID and password. Entering this information will allow you to manipulate your
dial plans, rules, schedules and all the other exciting features of the Micrologic Digital Phone service. If
you are having difficulty logging in, please contact us at 866.3WLOGIC or 304.472.9100.
Address Management
3. A – 911 Address Management
Through Micrologic’s VoIP Administration Utility (http://voipadmin.3wlogic.com), you will have the
opportunity to tell Micrologic where you are at all times. Because VoIP technology allows you to take
the same phone or device with you anywhere there is high speed internet access, it is very important
that you do this. Without proper 911 listings for your account, we cannot guarantee proper and
accurate 911 emergency management information. Please be sure to monitor the address listed for your
phone number by clicking the “911 Addresses” tab and double checking the address listed. Also be sure
to check that the appropriate 911 address is associated with your phone number by selecting the phone
number through your Current Status page. To add or modify your 911 addresses, select the My Account
tab and then the 911 Addresses tab.
PLEASE NOTE:
IF YOU MOVE EQUIPMENT TO ANOTHER LOCATION, YOU MUST IMMEDIATELY REGISTER YOUR NEW
LOCATION. IF YOU DO NOT REGISTER YOUR NEW LOCATION, ANY CALL YOU MAKE USING THE 911
DIALING FEATURE WILL BE SENT TO AN EMERGENCY CENTER NEAR YOUR OLD ADDRESS. A CHANGE
OF LOCATION MAY TAKE UP TO A WEEK TO REGISTER SUCH THAT YOUR 911 CALLS ARE SENT TO THE
APPROPRIATE LOCATION. You will register your initial location of use when you subscribe to the
Service. Thereafter, you may register a new location by following the instructions from the “911”
registration link on your Micrologic web account page. For purposes of the 911 dialing feature, you may
only register one location at a time for each phone line you use with the Service.
Permitted Locations. Please note that you will only be able to register your 911 locations in the certain
counties.
3. B – Physical Address Management
Also, please be sure to update your physical address information through the VoIP Administration
Utility. This will assist us in making sure you receive the proper service from Micrologic, and allows us to
check and balance your listed 911 addresses with the physical location of the device.
4. SIP Accounts
SIP (Session Initiation Protocol) is the language spoken through the Internet that allows your phones to
communicate with the Micrologic system, and ultimately your calling destination. This is also the
language that allows your Digital Phone Account to receive incoming calls. Creating SIP accounts is
similar to ordering another physical line from the phone company; but without the wait. Each port on
your PAP2 device represents a SIP account. Most likely you only have one SIP account configured on
your PAP2 device. The second is available should you wish to have a second “line.” To do this, select the
SIP Accounts tab in your Digital Phone Administration Utility and then select Create New SIP Account.
Within these steps you will be asked what temporary number you would like, whether or not you will
eventually be porting a number to replace it, and how you will handle voicemail on the new SIP account.
If you have any questions, please do not hesitate to contact us at 866.3WLOGIC or 304.472.9100.
5. Using your Digital Phone Service
5. A – Dial Plans
Dial plans allow you to route your incoming calls in any fashion that you prefer. For example,
many people like the simple approach of having your phone ring and if no one answers, it goes
to voicemail. To accomplish this, place the “Ring SIP Device” dial plan in the Dial Plan drop down
box next to your phone number. You can also quickly change your dial plan to Call Forward to a
certain number or to Do Not Disturb, which sends callers directly to voicemail. Many people,
however, like to use this function for its “hunting” or simultaneous ring capability. For the
example below, one couple has a Digital Phone account in their home. If nobody answers that
phone, the call will ring each of their cell phones at the same time. If neither answers the cell
phone, it will go into their Digital Phone’s voicemail account. We encourage you to come up
with your own ideas and try them out. The possibilities are endless.
1. To create a custom dial plan select Dial Plan from the Call Options drop down menu. Select
Create New Dial Plan and create a name for your new plan.
2. Now you can begin going through the desired steps to create your plan. For example, if you
want step 1 to ring your new Digital Phone line, you will select that from the options and click
Submit and Done. You can then create additional steps, just as you did with Step 1. When
complete, click Save Changes and apply your new dial plan to the phone number in the Current
Status Page.
5. B – Rules
Rules allow a user to define what happens with specific callers. This feature identifies the calling
party based on the caller ID and routes the call to the desired destination. There are also
“wildcards” within the Rules feature such as “000-000-0000”, which is used to identify unknown
callers. Also, using an “X” within a phone number allows for any number, 0-9. Using the “X” wild
card, you can route calls from entire area codes or exchanges if needed. Examples of these are
below. Once you have created your rule, apply it to the desired phone number on the Current
Status page.
5. C – Schedules
Schedules allow you to handle incoming calls based on the time-of-day and day-of-the-week. For
example, many people prefer not to receive calls after 10:00 PM. Another example is if you
wanted to create a “Work Day” schedule that forwards calls from 9:00 am through 5:00 pm to
your work number or cell phone. To accomplish this or any other desired schedule, follow the
instructions below:
1. Select Schedules from the Call Options menu
2. Select Create new Schedule and name your new schedule
3. Select the action you would like calls to take during a specified schedule
4. Save your schedule and apply it to the schedule drop down box to your phone number on the
Current Status Page
5. D – Auto Attendants
Auto Attendants allow you to send incoming calls to an automated answering service. For
example, if someone called your phone number they would receive directions to dial option 101
for John Doe or 102 for Jane Doe. When the caller chooses these options, the call will be
forwarded to the desired destination. You also have the ability to invoke another auto attendant
or dial plan within your main auto attendant. An example of this would be if the caller chooses
option 103 for sales, it would invoke a “Sales Dial Plan” that you may create that rings all the
sales representatives phones. To create an Auto Attendant select it from the Call Options drop
down menu and follow these instructions:
First, create your audio files by selecting “Manage Audio Files”.
1. Select “Create New Audio File”
2. Name your Audio File, such as “Greeting”
3. Create your greeting by picking up your phone and dialing 9000. Record your greeting at the
prompt (such as “Thank you for calling, press 101 for John Doe, press 102 for Jane, press 103 for
sales) and save your audio file
4. Create an audio file for an invalid entry, in case the caller presses a non-existent selection
5. Create an audio file if the caller does not choose a selection
Second, create your auto attendant by selecting “Create an Auto Attendant”:
1. Name your Auto Attendant
2. Apply your audio files to the appropriate drop down menus
3. For the Time out Option, select the action you would like to take if the caller never makes a
selection, such as go to Voicemail
4. Enter your option description and number that corresponds to the options you listed in your
greeting
5. Select the action for that option, such as a number or SIP account to ring, a dial plan, or even
another auto attendant.
6. Click Submit
7. Continue for all options you described in your Greeting
Once completed, go to your Current Status page and select the auto attendant created from the dial
plan drop down menu beside the desired phone number.
5. E – Extensions/Speed Dialing
The Extensions and Speed Dial function of your Micrologic Digital Phone account allows you to
set up extension dialing to any domestic location, whether or not the extension is set up for
another Micrologic SIP account, a cell phone, or any other telephone provider. This is a great
tool to have all your important and frequently dialed numbers to be quickly accessed. For
example, John and Jane Doe have extensions set up for all their family members and work
numbers. You can even assign an extension number to a dial plan, so if you needed to reach
your company’s service department you could dial a few digits to invoke a dial plan that would
ring all those in the service department. To create your extension group, follow these
instructions:
1. Click the Extension/Speed Dialing link from the Call Options drop down menu.
2. Click “Create an Extension Group”
3. Name your new Extension Group
4. Enter your extension description and extension/speed dial number
5. Apply the action you would like that extension to take
6. Save your extension Group
Once this is completed, go to the SIP Account page and select the appropriate extension group
from the drop down menu within the SIP account section of your VoIP Administration Utility.
You can now dial your extensions from your Digital Phone device.
5. F – Virtual Console
The Virtual Console function of Micrologic’s Digital Phone service allows homes or businesses
with multiple SIP accounts to view who is on the phone, with whom, and for how long. When a
phone is in use, there is an “Options” link beside that call detail. By selecting that link, a user can
transfer a call to a different number within the home or business or even terminate the call.
Calls may also be transferred by hitting the flash hook button on your phone, *98, and the
phone number or extension that you would like to transfer the call to. To utilize your Virtual
Console, select the Virtual Console Link.
6. Voicemail
There are four ways to check the voicemail for your Micrologic Digital Phone Account.
1. From the phone itself, by dialing 777#
2. From the VoIP Administration Utility by selecting the Voicemail tab and “View Messages”
3. Through your email (This is a copy of the voicemail in WAV format)
4. Remotely by dialing your Digital Phone number and waiting for your greeting to start. Once
started, press (*) and then enter your password.
7. User Level Administration
User Level Administration feature allows you to create individual users and groups for your
single account. By doing this you can limit what each individual user or group can view, use, or
add to your Digital Phone Services. Perhaps you don’t want your children to be able to change
the main line in your house or a co-worker to be able to change other workers Dial Plans. You
can create separate user groups, for example, an Accounting Group. From there you can create
individual users among that group. You can create user groups among groups, such as a Tax
group within the Accounting Group with their own users. Many companies prefer to create a
User Tree that limits what each group and user can manipulate among their phone system, but
at the same time allow each user to manage their personal phone number.
To add a user group, select the My Account tab and then Security (Users).
1. Select Add User Group
2. Name your group
3. Name the parent of this group (Master Group if this is the first new group of users)
4. To create a sub group of this, follow steps 1-3 but select the new group as the parent. Your
User
Tree should appear as this:
Now, let’s create a user in the Accounting Department.
1. Select Add User below the Accounting User Group
2. Enter the email of the new user and a password for him/her
3. Select the functions of the Digital Phone Service that you would like him/her to have access to.
In the example below, this user can only use pre-existing dial plans and features and cannot create any
other users under him. If this person should be able to create new dial plans and features they should
have “User + Add Access” checked.
4. Now select the Digital Phone accounts, phone number(s), and Voicemails that they will be able to
view.
5. Select Save
Now as the administrator you can go through the dial plans and other features on your account and
apply those to the users that should have access, by selecting Manage Users for each. For example,
select one of your custom dial plans and then the Manage Dial Plan Users link. Select the users that you
would like to have access to this particular dial plan. Save your update.
8. Call Detail
Through the Call Detail tab of the VoIP Administration Utility, a user will be able to view their
most recent call detail. To further add to this feature, the user can select the “Click for more
calls” link. Using this link you can create a report that will show you call detail for specified
phone numbers during a selected date range. You can sort this report by duration, direction
(inbound & outbound), and more.