1
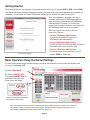
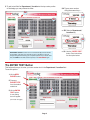
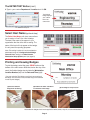
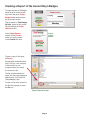
TEMPbadge Visitor Management Software
User Manual
Version 6.0 ~ 02-2015
Thank you for downloading the new TEMPbadge Visitor Management Software!
Table of Contents
Click the links below to go directly to a section.
System Requirements ......................................... 1
Changing Your Passcode ..................................... 8
Capabilities .......................................................... 1
Configure Default Badge Format & Host............. 8 - 9
Terms and Conditions .......................................... 1
Include Host Information Setting .......................... 9
Tech Support ........................................................ 1
Configure Passcode Reset
(Recovering a Forgotten Passcode) ..................... 9
Getting Started ..................................................... 2
The Database Management Utility .............. 10 - 11
Basic Operation Using the Default Settings ..... 2 - 5
The “Enter Text” Button ................................... 3 - 4
Editing “Badge Type and
Department/Location” Names ............................ 11
Select Host Name ................................................ 4
Editing Workstation Location Information........... 12
Printing & Issuing Badges .................................... 4
Adding or Changing a Logo ............................... 12
Returning Badges................................................... 5
Printer Setup....................................................... 12
The Help Button.................................................... 5
Report Center ..................................................... 13
Creating a Report of the Current Day’s Badges .... 6
Addendum A - Sample Reports................... 14 - 15
Administrator Options ................................... 7 - 12
Addendum B - Suggested Badge Types ............ 16
About TEMPbadge VMS ...................................... 7
Addendum C - VMS Troubleshooting ......... 17 - 18
System Requirements
Operating Systems: Compatible with Windows XP (sp3), Windows 7, Windows 8 and Windows 8.1 (note: Microsoft
no longer supports Windows XP). Minimum Requirements: 500 MHz or faster processor / 256 MB RAM or more /
2.0 GB available disk space / 1024 x 576 or higher resolution monitor.
Capabilities
TEMPbadge Visitor Management software is a simple, stand-alone visitor identification system. It is not designed
to interact with other installations or communicate with a network. Each station has a unique identification number
so that, when using multiple stations, the source of every badge can be seen at a glance.
Terms and Conditions
TEMPbadge’s Visitor Management software may be used only under the terms of our Software License Agreement.
A fifteen day free trial is available. Once you purchase the software, you will receive a key code that will allow you
to operate the system indefinitely.
Tech Support
For help call 866-422-3437 or send an email describing your
issue or question to [email protected].
Page 1
Getting Started
When downloading the new software if a message appears asking you to choose SAVE or RUN, choose RUN.
Then follow the screen prompts to install the program. (You must accept the license agreement to complete the
installation.) The operation will install TEMPbadge VMS along with Microsoft Access Runtime 2010.
When the installation is complete you’ll see a
message confirming that TEMPbadge VMS has
been successfully installed and the TEMPbadge
VMS application will launch. To re-launch the
program after the initial installation, just double-click
the TEMPbadge VMS icon on your desktop.
When the program first opens you will see a
screen with 3 options:
•P
urchase TEMPbadge VMS Software
To purchase the software, contact your
TEMPbadge sales representative.
•A
ctivate TEMPbadge VMS Software
Choose this option if you have already purchased
the software and have a valid Key Code.
•E
valuate TEMPbadge VMS Software
Choose this option if you would like to try the
program FREE for fifteen days.
First Screen With 3 Options
Basic Operation Using the Default Settings
To create a new badge using the default settings, just follow the instructions on the screen that appears when
you launch TEMPbadge VMS.
1. Select NEW BADGE.
2. Choose a BADGE TYPE.*
The selected BADGE TYPE will
be added to the upper right
corner of the new badge...
1
2
and the current day of the week
will appear at the bottom.
*Note: The system can also be set up to create badges with an additional field for a visitor name. Users with
Administrator access can activate this option using the Configure Default Badge Format button in the
Administrator’s Workstation Setup Options panel (see pages 7-8).
Page 2
3. To add a text field for Department / Location to the top center portion
of the badge you may choose to either:
3A
3A. Type a room number
using the screen keys …
3A
3B
or 3B. Select a Department /
Location key.
3C
3B
ADDITIONAL OPTION: Custom text can be added to any of the text fields
on the badge. Just place your computer’s cursor in the field you want to
change and type the text using your computer keyboard. If you need to start
over, hit CLEAR on the VMS screen keyboard, or hit NEW BADGE again.
The ENTER TEXT Button
or 3C. U
se the “ENTER TEXT”
button. See instructions
for this option below.
This button allows you to enter your own custom text in the Department / Location field.
To use this option:
1. Hit the NEW
BADGE button.
2. C
hoose a
BADGE TYPE
from the default
selections.
3. H
it the ENTER
TEXT button.
A new dialog
box will appear.
1
2
3
(continued next page)
Page 3
The ENTER TEXT Button (cont.)
4. Type in your custom Department / Location text. Hit OK.
The finished
badge displays
your custom
text in the
center field.
4
The “ENTER TEXT” dialog box
Select Host Name (optional step)
The Select Host Name pull-down menu allows
you to assign a “host” to a visitor’s badge.
The host is the name of the person in your
organization that the visitor will be seeing. The
name of the host will not appear on the badge;
it is only used for reporting purposes.
Note: This setting is optional. It can be activated or
deactivated using the “Configure Default Badge
Format & Host” setting in the Administrator
Workstation Setup Options panel (see page 8).
Printing and Issuing Badges
o print the badge, select the green PRINT button at the
T
bottom of the main screen. Note that, below the day of the
week, the finished badge also includes the Workstation
Location Number (left) and the Date and Time (right).
( If you are using the Trial Version you will only see a preview of
the badge. You must have a valid, activated copy of the software
in order to print badges.)
(A) Peel the adhesive
badge from its backing.
(B) Fold the tab under and adhere
it to the back of the badge.
(C) The badge is ready to issue.*
* Note: adhesive badges should not be applied to leather, suede, vinyl, silk, or other delicate fabrics.
Page 4
Returning Badges
For an additional layer of security
you may require visitors to return
their ID’s at the end of their visit.
You can then track returned badges
using the Return Badge feature.
To process a badge that is being
returned, hit the Return Badge
button at the left of the screen.
This will bring up a screen that
allows you to search for an
individual Badge three ways:
1. by Badge Number
2. by Name
3. by Scrolling through images of
all open badges using the scroll
arrows on the bottom left side
of the screen.
Once the correct badge has
been located, hit the green
Return Badge button to check
the visitor out.
To check out ALL open badges,
hit the Return All Open Badges
button at the bottom.
1
2
3
The “Return Badges” Screen
Note: At the end of each day, It is
recommended that ALL open badges be
returned. This will prevent open records
from carrying over to future days.
The Help Button
You can hit the yellow HELP button
at the bottom left of the main
screen at any time to access this
User Manual.
Page 5
Creating a Report of the Current Day’s Badges
To create a report of all Badges
issued thus far on the current
day, select the green Today’s
Badges button at the bottom
left of the main screen.
This will create a “Total Badges
By Date” report for the current
day and display an Output
Options window.
In the Output Options
window hit the Preview
button to view the report,
or use Control P to print.
Output
Options
Window
To save a copy of the report
hit Export.
Choose a file format (Microsoft
Excel, PDF, etc.), then navigate
to the location on your
computer where you would
like to save the file.
The file will automatically be
saved with the current date and
default name: (YYYY.MM.DD_
TodaysBadges_Rpt).
To return to the main screen hit
the X at the top right or press
the Esc key.
Export Options Screen
Page 6
Administrator Options
There are a number of options available
only to users with Administrator access.
To access these settings, click on the
Admin button at the bottom left of
the main screen.
This will display the Login screen
for access to the Workstation Setup
Options panel.
Enter your User ID and Passcode* on the Login screen and click the Login button.
JoeP
•••••••
The Workstation Setup Options
panel displays.
Workstation Setup Options Panel
*Note: be sure to change the default passcode
after activating your software – see instructions
under “Changing Your Passcode.”
About TEMPbadge VMS
The first selection in the Administrator
Options window, About TEMPbadge VMS,
will open a window containing TEMPbadge
copyright information.
If you have not yet activated the software
this window will show the amount of time
left on your free trial.
Page 7
Changing Your Passcode
1. To change your Passcode, select the
Change Passcode button. Type your
existing Passcode in the first field.
1
2. Type a new Passcode (4-12 characters,
no spaces) in the next field, then re-enter
the new Passcode in the third field.
2
3. Hit Save.
3
Configure Default Badge Format & Host
The Configure Default Badge Format &
Host settings allow you to control two
important options:
Default
Layout
(Type 1)
1. You may configure the system to create
badges with or without an additional
text field for a visitor name.
The Type 1 button, for badges without
a visitor name, is the default setting.
If the Type 2 button is selected, when
creating a new badge, after choosing a
Badge Type, the user will be prompted
to type in a name for the visitor.
1
Custom Visitor Name Dialog Box
The system will then create an additional text field for a visitor name.
Continued next page.
Page 8
Configure Default Badge Format & Host (cont.)
2. When the Include Host
Information setting is checked
the system will remember the
name of the person in your
organization that the visitor will
be seeing (referred to as “host”).
The name of the host will not
appear on the badge; it is only
used for reporting purposes
(see Host Data Tools, p.10).
2
Note: host data is added and
managed using the Database
Management Utility (p.10).
Configure Passcode Reset (Recovering a Forgotten Passcode)
If you forget your Passcode you can hit the
“Configure Passcode Reset” button on
the Administrator Options screen. This
will display a list of security questions.
Answer the questions to reset your Passcode.
To select a set of questions and record the answers:
1. Select Configure Passcode Reset.
2. In the next window, choose three security
questions from the pull-down menus
and type in your answers.
3. Click Next;
click Submit;
then click
Yes on the
confirmation
screen.
Note: If the administrator who set up the challenge
questions is no longer available, please call TEMPbadge
VMS Tech Support at 866-422-3437 for assistance.
Page 9
The Database Management Utility
This section contains three tabs of tools that are used to manage data. Using these tools various badge and
workstation information can be imported, exported, archived or purged.
FIRST TAB - Visitor Data Tools
The Visitor Data Tools allow you to Archive a portion of your visitor records. You can restore the archived data
to the system later by using the Restore setting. The Purge setting allows you to permanently delete selected
portions of your visitor records.
To use the Visitor Data Tools:
1. Choose one of the three options
on the left: Archive, Purge or
Restore Visitor Data.
2. Type a date range in the Select
Date Range boxes, (mm/dd/yyyy
format), or select start and end dates
by clicking on the calendar icons
next to those boxes.
Click Continue.
2
1
3. To Archive visitor data select
Archive Visitor Data and choose
a file format. The archive file will be
named with your chosen date range:
(VMS_ARCHIVE-MM.DD.YY MM.DD.YY). Navigate to a location
on your computer to store the file.
Click OK.
To Restore visitor badge data
that has been previously archived,
select the Restore Visitor
Data button. Navigate to the
corresponding archive file on
your computer and click OK.
The archived data is restored.
3
SECOND TAB - Host Data Tools
The Host Data Tools are used to
manage the names of people in
your organization that visitors will be
visiting (“hosts”).
1. The Edit Host Data setting allows
you to manually key in updates or
corrections to existing host names
and information.
2. The Import Host Data setting
allows you to import a list of host
names in Excel or Text format.
The names on the imported list will
be ADDED to the existing names.
3. The Export Host Data setting allows you to export an existing
list of host names, which can then be imported to another device
running TEMPbadge VMS software.
Page 10
The Database Management Utility (cont.)
THIRD TAB
Workstation Settings Tools
The Workstation Settings Tools
allow you to import and export
data such as custom Department
Name Buttons, Printer Settings, etc.
Once Workstation information
has been set on one device, the
settings can be exported and
then imported to another device
running TEMPbadge VMS software,
allowing settings to be duplicated
uniformly from station to station.
Note: the imported settings will Replace the existing settings for that item.
Editing “Badge Type and Department/Location” Names
The Edit Badge Type & Departments setting allows you to change the names of the Badge Type
buttons (limit 10 characters) and the Department / Location buttons (limit 14 characters).
1. Select a Badge Type or
Department Name from
the pull-down menu in
the first field.
1
2
2. T
ype the new button
name in the second field.*
3. Select Save to apply
changes. You will then
be given the option to
configure additional
buttons. Hit Yes to
change another
button. Hit No to
return to the
Workstation Setup
Options screen.
3
*For suggested Badge Types
and Department Names
see addendum on page 16.
Note: Badge Type and Department/Location fields may be left blank. Just select the Badge Type or
Department from the pull-down menu in the first field and click in the second field without typing anything.
Page 11
Editing Workstation
Location Information
The Edit Workstation Location Name setting allows
you to change the four digit Location ID number and
the Location Name. Hit Close to save changes.
Adding or Changing a Logo
1. To add a logo or to change an existing
logo, click on Import Company Logo.
2. In the next window, click the Browse button and
navigate to a logo image file on your computer.
3. Click Save/Update.
Logo image should be a horizontal rectangle, no
larger than 1” wide x 1/2” high, 72 pixels per inch,
in .bmp, .jpg, or .png format)
Note: The TEMPbadge BP4 Printer uses direct-thermal technology, which means that all information on the badge will
print in black & white. Even if you upload a color logo it will display on the main screen and print only in black & white.
Printer Setup
Select Printer Setup to set the badge format, choose from the available printers, and choose a badge size.
1
Choose a Badge Format: set to
print badges without a visitor name
(Destination Only) or with a visitor
name (Name and Destination).
2
Under Choose
an Available
Printer, select:
TEMPbadge BP4.
Page 12
3
Under Choose an
Available Badge Size,
select: 02050 Sm
TEMPbadge VMS Badge.
Report Center
Select Report Center to access the TEMPbadge VMS reporting options. The software can generate
reports for badges issued by Destination (i.e. MAIN OFFICE), Badge Type (i.e. VISITOR), Date,
Host Name, or Visitor Name.
1. For all reports, first Select a
Date Range by placing your
cursor in each of the two Date
Range boxes and typing a date
(mm/dd/yyyy format), or by
clicking on the small calendar
icons next to those boxes.
1
2
3A
2. Choose the type of data to
report from the buttons
in the center of the screen.
3A.
For all reports (except badges by Visitor Name) next hit the Preview button to view, or Control P to print the
report. Or hit the Export button to choose a file format (Microsoft Excel, PDF, HTML, Rich Text, etc.), and navigate
to the location on your computer where you would like to save a copy of the report.
3B. F
or badges issued by Visitor
Name, first select a search
method from one of the three
buttons below the date range:
Exact: Type a specific name
into the text field (i.e. John).
Contains: Type in part of a
name (i.e. Jo or hn)
3B
Begins with: Type the first
letter of a name (i.e. J)
After the search method is selected and text for a name or part of a name has been entered, hit
Preview to view, Control P to print, or Export to choose a file format and save a copy of the report.
See pages 14-15 for samples of the reports.
Page 13
Addendum A - Sample Reports
Page 14
Addendum A - Sample Reports (cont.)
Page 15
Addendum B - Suggested Badge Type & Department / Location Names
Default
MEDICAL FACILITY
SCHOOL FACILITY
CORPORATION
BadgeType1
VISITOR
VISITOR
VISITOR
BadgeType2
OUTPATIENT
PARENT
CONTRACTOR
BadgeType3
CONTRACTOR
GUARDIAN
VENDOR
BadgeType4
VENDOR
VOLUNTEER
TEMPORARY
BadgeType5
VOLUNTEER
CONTRACTOR
Dept1
Emergency
Conf Room A
Administration
Dept2
ICU
Conf Room B
Executive
Dept3
Cardiology
Special Ed Room
Marketing
Dept4
Neurology EEG
Kindergarten
Sales
Dept5
Sleep Lab
Grade 1 - A
Purchasing
Dept6
Hand Clinic
Grade 1 - B
Human Resources
Dept7
Phys. Therapy
Grade 2 - A
Facilities
Dept8
Occup. Therapy
Grade 2 - B
Security
Dept9
Speech Therapy
Grade 3
Operations
Dept10
Rehab Records
Grade 4
Manufacturing
Dept11
Rehab Admin
Grade 5
Conf. Room A
Dept12
Rehab Pool
Music Room
Conf. Room B
Dept13
Blood Lab
Cafeteria
Conf. Room C
Dept14
Admin.
Gymnasium
Meeting Room A
Dept15
XRAY
Auditorium
Cafeteria
Note: Not all Badge Types or Department/Locations need to be used.
Unused buttons can be blanked out to avoid confusion.
Page 16
Addendum C - VMS Troubleshooting - 02.2015
Problem: Microsoft Access 2010 Runtime “The installation of this package failed”
(File: c:\...\Tempbadge_VMS-256X256sm.ico)
Solution: Virus software is blocking the MSAccess
Runtime executable.
................................................................................................................................................................................
Problem: Error Code 42 “Run As
Administrator” (when logging into
the TEMPbadge VMS Software)
Solution: Browse to C:\Program
Files (x86)\Microsoft Office\Office14
Find the MSACCESS.EXE file.
Right click on the file,
choose Properties.
Click the compatibility tab.
Check “Run this program as
administrator.”
Click Apply and OK.
................................................................................................................................................................................
Problem: Error Code 2501 “The Open Report action was canceled”
Solution: Printer setup needs to be configured. Once the printer driver is set up to use the proper label
settings, log into the Administrator Options Panel and configure the printer setup.
Log in as Administrator
Click on Printer Setup
Select a Badge format to configure, an Available Printer, and an Available Badge Size.
................................................................................................................................................................................
Page 17
Problem: Microsoft Access Security Notice “A potential security concern has been identified”
Solution: (depends on the version
of MS Access)
Click on the Office Button
Select Trust Center
Select Trust Center Settings
Select Trusted Locations and
add your new trusted location
................................................................................................................................................................................
TEMPbadge Printer
Problem: The print is not aligned correctly on my label.
Solution: The printer needs to be calibrated.
Power the printer off.
Hold down the yellow power button (on the top of the printer) while turning the power back on.
Continue holding until the LED (inside the yellow button) flashes , then turns green
Release the button and press once or twice (ejecting a label each time).
................................................................................................................................................................................
Problem: Labels are coming out of the printer blank. No data is printing on the label.
Solution: Labels are upside down in the printer. Turn the roll the other way and re-install in the printer.
................................................................................................................................................................................
Page 18