1
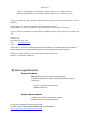
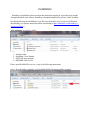
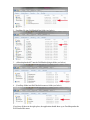
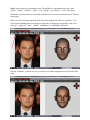
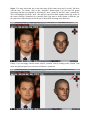
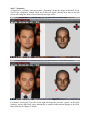
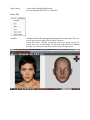
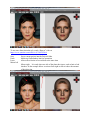
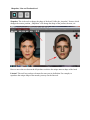
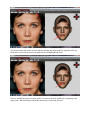
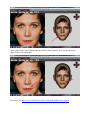
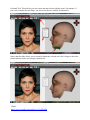
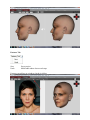
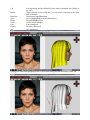
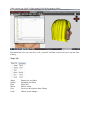
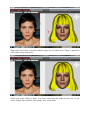
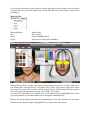
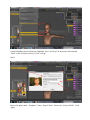
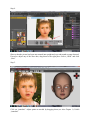
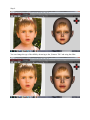
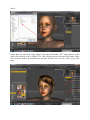
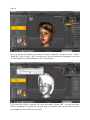
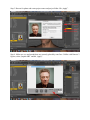
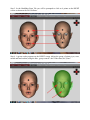
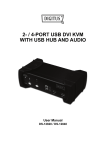
HeadShop 9 PC User Manual www.abalonellc.com, [email protected] Abalone LLC. First edition March 2015 Author’s copyright holder of the HeadShop 9 program is Abalone LLC. ©AbaloneLLC 2015. Publishing copyright holder of the HeadShop program is Abalone LLC, . ©AbaloneLLC 2015. Copying, merchandizing, public exhibiting or other commercial utilization of the software without licence is strictly prohibited. The HeadShop User’s Manual is under global author and publishing copyright. @2015 Abalone LLC. This User’s Manual was written and edited by Laslo Vespremi, Abalone LLC. Copying, extraction or translation to another language is forbidden without the written approval of the holder of this right. Abalone LLC 190 Arbor Lane, Moss Beach CA 94038, USA Web: www.abalonellc.com E-mail: [email protected] ABALONE LLC IS IN NO CASE RESPONSIBLE FOR THE DIRECT OR INDIRECT DAMAGES ARISING FROM THE USAGE OF THE HEADSHOP PROGRAM OR THE HEADSHOP USER’S MANUAL. Abalone LLC and the HeadShop 9 are the registered trademarks of Abalone LLC Windows is the trademark of Microsoft. . System requirements Required hardware WIN: HeadShop runs with the following minimal hardware: A Windows-based personal computer or laptop with the following minimal requirements: Screen of a resolution at least 1024x768 500 MB free disk space Needed system software HeadShop runs under the following system software: Windows VISTA, W7 or W8 operating systems. To read pdf manuals Adobe Acrobat is recommended To watch “How-to” videos Windows Media player is recommended: http://abalonellc.com/watchdemovideo.html Abalone LLC offers tech support through email. Email address is [email protected] About the manual Preface – What is New in HeadShop 9? Chapter 1 – HeadShop QuickStart Chapter 2 – HeadShop Menus and Tools Chapter 3 – HeadShop Advanced Operations Chapter 4 – Using HeadShop with Poser Preface HeadShop 9 is a software product used to create 3D heads from photographs. It can accomodate user at different skill levels, from beginners to advanced 3D users. It uses a number of advanced features, such as: a. Automatic „Face-rotation” to rotate tilted portraits into the upright position b. Automatic recognition of eye and mouth features c. „Autodot” feature automatically adds dots to describe face shape, position and shape of eyes, mouth and nose. HeadShop 9 can be used for a number of applications: 1. Create custom characters to be used within another 3D software such as DAZ Studio, Poser or Maya. 3D faces and morphs can be used with most softwares that can import OBJ formats. 2. „Age” characters like children to see how they will look like in a few years in the future. 3. HeadShop 3D heads can be also used to create 3D prints for non-commercial purposes. OBJ files can be sent to print shops that use the files to produce solid objects with 3D printers, either in single color or multi-color. 4. At the Stage tab of the applications users also can take „photos” of newly created charcters with any number of imported backgrounds and use the saved JPG image with Photoshop or other image software. HeadShop can be installed as a „plugin” for DAZ Studio 4.7 or higher. Notice that HeadShop can be used both with 32-bit or 64-bit Studio (separate installations). More about installation in the Installation chapter or watch a „how-to” video about installation. HeadShop 9 has an EZ mode to create Male, Female and Child heads based on DAZ Studio’s popular Genesis 2 series of charcters. In addition, HeadShop can use any additional non-Genesis 2 charcter via the „Import OBJ” function. These charcters from DAZ, Poser or Maya need to have a „head” bone to read correctly into HeadShop. HeadShop 9 incorporates elements of another Abalone software; HairShop. Thus, the workflow is divided into 9 tabs, of which the first 3 tabs (Front, Profile and Features) are focused on 3D head creation, and the next 5 tabs (Style, Cut, Shape, Accessories and Color) on adding and modifying hair and accessories. The last tab, Stage, is to view and capture both face and hair, either for 2D photos or 3D printing. Installation HeadShop 9 installation (please note that this instruction pertains for copies that were bought through Abalonellc.com website. HeadShop 9 bought through DAZ may have a DAZ installer). Download and unzip the HeadShop9.01.zip file from Abalonellc.com. (if you have difficulties downloading, see separate instructions about downloading at http://abalonellc.com/headshop-9-coming-soo9.html ) After unzipping you will see 4 files: 1. 2. 3. 4. Abalone folder HeadShop 9 User Manual MYFILES-setup installer README-First text file Please open README-First to see a copy of the following instructions. Step 1. Drag the folder „Abalone” to Users/Public/Public Documents folder as shown. Step 2. Launch „MYFILES-setup” installer by double clicking on it. Enter license key if needed IMPORTANT!!! For destination folder browse/select „Program Files/DAZ 3D” as shown Click OK. On next screen click „Install”. This will install many files in your Program Files/DAZ 3D folder. A list of folders and files are here (you can double check to make sure it installed correctly) 1. HeadShop plugin folder into the DAZ 3D folder (see below) 2. FaceShop file into DAZStudio4/bin folder (see below) 3. „dzfaceshoploader.dll” into the DAZStudio4/plugin folder (see below) 4. „FaceShop folder into DAZStudio4/resources folder (see below) If you have all these in the right place, the application should show up as FaceShop under the DAZ Studio Edit menu. Chapter 1: QuickStart In the following we discuss a QuickStart project that we recommend for inexperienced users. A more advanced example is in Chapter 3. We use the DAZ Studio plugin version to explain how HeadShop 9 is used with DAZ Studio. Step 1. Place a Genesis 2 charcter, such as Genesis 2 Male on stage as shown. Start HeadShop under the File menu. Step 2. When prompted, enter a Morph/Texture name, and highlight „Face” and „Lips” in the Surface Slection box, and „Head” in the „Geometry to Morph” box. Click „Accept”. Step 3. When HeadShop launches, you will see a Selection dialog. Browse for a photo (JPG) to use. Enter a „Project name”. Browse for a location of your „Project folder”. HeadShop will save all your files in this folder. Click „Apply”. Step 4. In the next, „Set-up” dialog choose „Male”, and move any of the blue Autodots if needed. Click „Next”. Step 5. Next screen is your working screen. The workflow is represented in the top 9 tabs, „Front”, „Profile”, „Features”, „Style”, „Cut”, „Shape”, „Accessories”, „Color” and „Stage”. Remember, you do not have to use all tabs to finish work, you can stop and export your 3D head at any stage. Below you will see buttons and tools used in the first (default) tab. Click on „Autodots”. You will see that HeadShop puts down groups of green dots. Each group of green dots, such as for „left-eye”, „right-eye”, „nose”, „mouth”, „headshape” is controlled by a blue dot. Unclick „Autodots”. Chances are you get a fairly close texture mapped over the 3D head on the right. Step 6. You may notice that one or the other part of the texture does not fit exactly, like here with the nose. To remedy, click on the „Autodots” button again. You can move all points associated with the nose together by selecting all „nose” points via the blue „nose” controll dot. This will highlight red all the „nose” dots and you can move them together on the left screen to the correct position. Sometimes it is possible, that if the nose or nostril shape is different, you may also move individual green dots or pair of dots (Shift-selecting more than one). Finally, if you are happy with the result, unclick „Autodot” and by clicking on the „Rotate” tool in the navigational panel you can rotate and observe your head. Step 7 - Shapedots As opposed to „Autodots” that map texture, „Shapedots” change the shape of the head. If you click on the „Shapedots” button, a new set of dots will appear. Moving these dots on the left screen will change the shape of the 3D head on the right screen. For instance, moving the 2 jaw dots on the right will shape the jaw more „square” on the right. Similarly, moving other dots, either individually or together makes similar changes to the head. More about this in Chapter 2: Menus. A good way to observe theshape changes is by hitting the „Space bar”. This will hide the texture and will show you the shape only. If satisfied, select „export” from the „File” menu and click OK. HeadShop will export and close. Your work will be transfered back into DAZ Studio, where you can continue to work with your character. You can change the amount of morph you apply in the „Parameters” tab under „Morphs/FaceShop” with a simple slider, applying more or less „shape” to the head. Chapter 2: Menus, Tabs and Tools Tabs As noted before, HeadShop’s main workscreen is supported by 9 tabs to describe the workflow. This workflow will start with the „Front” tab where texture and shape is applied to a 3D head. The next tab, „Profile” would allow the change of a head’s profile, maybe changing the shape of the nose or chin. The „Features” tab can change the head’s age or weight with simple sliders. Notice that you can go back and forth between these tabs to further refine your product. The next 5 tabs will be dedicated to add hair and accessories, such as glasses, jewelry or hats to the head. This can come handy if you plan to prepare for a 3D print. The first tab here is „Style”, which let’s you choose among 8 premade hair styles. Advanced users can also add to this „Hair library” by impporting OBJ meshes of other hair items (for example from DAZ libraries). The advantage of doing so is to make changes to that hair. Next tab is „Cut”, where a haitr can be cut. More about this in advanced modeling in Chapter 3. In the „Shape” tab users can shape the hair, making it longer, wider, narrower, etc. In the next tab. „Accessories”, library items such as glasses, jewelry or hats can be added. Like with the „Hair library”, „Accessories library” can add other OBJ items from other applications. The „Color” tab is self-explanatory; here you select a hair or accessoriy and change its color and transparency, or add textures from the „Color library”. Like with other libraries, this library can be added to with JPG patterns. The last tab is „Stage”. Here you can preview your creation in fron of different backgrounds (similar to other libraries, „Stage library” also accepts JPG images). There’s a snapshot photo function that lets you take and send JPG images of your work. In all tabs and stages user can stip and Export the work. Clicking on Export will terminate HeadShop and send the morph and texture back to DAZ Studio. Menus File New (Ctrl+N) Open (Ctrl+O) Save (Ctrl+S) Save as... Creates new project Opens existing project Saves project Saves project in formats (HeadShop project, OBJ Hair, DAE model) Recent File Exit Shows recent files Exits application Edit Undo Parts Library Style Library Accessory Library Material Library Undoes last step Shows parts saved ot used in the project. Parts can be highlighted and sized, show or stay hidden Comes with 8 standard styles. Hair-lenght can be changed via slider (except for #1). User can add other OBJ files via „Add New”. Comes with 10 standard items. Size can be changed via slider (except for #1). User can add other OBJ files via „Add New”. Comes with 13standard textures. Size and angle can be changed via slider. User can add other OBJ files via „Add New”. Stage Library Comes with 2 standard backgrounds. User can add other OBJ files via „Add New”. Front_Tab Autodots Autodots facilitate the placing and adjusting of the texture map. There are several ways to move dots to fit the photo’s features: Group dots (blue). Clicking on the blue dots move group of dots for mouth, nose, eyes or head shape. For the head shape, there’s a bounding box that user’s can resize and move via the corners as show below To see more about Autodots, pls. watch „How-to” video at https://www.youtube.com/watch?v=JC5z64YP1xA Save Undo Lasso Mirror left Saves current project into the Project Folder Multi-step Undo undoes last few operations Allows the selection of several dots at the same time Mirror right It is used when one side of the photo has issues, such as hair or bad shadows. In the example below we mirror from right-to-left to reduce the amount of hair showing. Shapedots, Line and Freehand tool. Shapedot. This is the tool to change the shape of the head. Unlike the „Autodots” feature, which changes the texture position, „Shapedots” will change the shape of the jawline, the nose, etc. Here we move the two dots on the left jawline to achieve the unique narrow shape of the head. Linetool. This tool lets you draw elements for more precise definition. For example; to reproduce the unique shape of her mouth, you may use the line tool. You start from the left corner of the mouth by clicking and connecting line segments until you finish back to the first dot (notice the guide on the left highlights the task). Now the middle line turns red on the guide. You start to draw the middle line, beginning at the right corner. When finished, both guides show green. Unclick the line tool. Notice that the line is now shaped right, but maybe a bit too narrow. You can still adjust the shape further with „Shapedots”. See more visit: https://www.youtube.com/watch?v=pIlrJUByJj8&feature=youtu.be Freehand Tool. This tool lets you select areas and move them with the cursor. For instance, if you want to change the chin shape, you may select the area with the Freehand tool. Notice that the slider allows you to expand or shrink the selected area. Don’t forget to check the mirror button to make your changes symmetrical. Watch: https://www.youtube.com/watch?v=c2Yvd2DaiDg Profile Tab Save Undo Line Saves project Multi-undo undoes last several steps Line tool traces new profile. Steps: a. Zoom right head to be of a comfortable size for tracing. b. Click on „Line” tool. This will give you two large blue dots. Top dot denotes where to start tracing on the left. c. The first line ends just over the mouth (see guide on the right side of the screen). d. Hit enter twice to see results. If necessary continue from the leip to draw the lower half of the head (or you can skip this step). Features Tab Save Undo Saves project Multi-undo undoes last several steps Features can add age ot weight to a head via sliders Style Tab Open Save Delete Export Opens Hair Library Saves Hair into Parts Library Deletes highlighted hair Exports project to DAZ Studio and terminates HeadShop Style is the place to add hair to the head. Choose and drag hair to fit model. Use slider to make hair longer or shorter (except #1). Cut Tab Cut Mirror Duplicate Save Delete Undo Line Plyline Arc Cuts hair along the lines defined by user (eithr by using the line, plyline or arc tool). When selecting a Part of the hair, you can mirror selections to the other side of the hair. Duplicates a highlighted item Saves a highlighted item into Parts Library Delets highlighted item Undoes recent changes Line cutting tool Polyline cutting tool Arc cutting tool Cutting tool works on highleghted items, by activation cutting tool and unclicking it after cut After cut user can „Lasso” all the strands of hair he/she needs to delete Hair that needs to be save also have to be „Lassoed” and then saved as one piece into the Parts Library. Shape Tab Shape Stretch Pleat Mirror Save Undo Shapes hair via sliders Stretching via sliders Pleats hair Mirrors action Saves new hair into the Parts Library Undoes recent changes Shape tool lat user draw a centerline and also adjust box size (short arrow). Shape is performed with a slider on top (long arrow). Stretch tool works similar to Shape. User draws center-line and shapes the box size via the corner controls. Onec satisfied, user stretches area via the slider. Accessories Tab AccessoryLibrary Save Delete Exports Opens library Saves accessory Deletes accessory Exports project and closes HeadShop User can drag accessories, such as glasses, earrings, hats into position. Library items are sizable via slider and can be rotated if needed. Iser can also add OBJ items to the library or delete items from library. Materials Tab MaterialsLibrary Save Delete Export Opens library Saves project Deletes highlighted item Exports project and closes HeadShop Material library allows to apply either solid colors or patterns to an item. To apply solide color, user double-clicks on square next to „Pick Solid Color” button. This opens a color picker, where user can pick or select color and click „Add to Custom Colors”. When clicking OK, this custome color will appear nin the square next to the „Pick Solid Color” button. User clicks on „Pick Solid Color” and the color will be transfered to the highlighted item. Colors are solid in default (255) but that number can be changed to add tranparency. Patterns also can be added, either from the standard library or by other patterns user can add to the library items. Patterns apply to highlighted items, such as hair or accessories. Stage Tab Stage Library Photo Library Creates jpg snapshots Chapter 3: Advanced Operations In the following we offer a few hints for Advanced Operations. The objective is to show the use of a photo to create a 3D printable item. Let’s start with putting Genesis 2 Female on stage. Step 1. If we have „Growing Up for Genesis2 Female(s) and V6” installed, we can convert Gen 2 Female into a child, using the “Youth Morph” and Neutralize Head” sliders as shown. Step 2. Launch HeadShop (from Edit menu). Highlight “Face” and “Lips” in the texture selection and “Head” in the Geometry selection. Click “Accept”. Step 3. Browse for photo under „Templates”. Enter „Project Name”. Browse for „Project Folder”. Click Apply. Step 4. Observe that the picture has been auto-rotated into upright and eyes and mouth are auto-detected. If need to adjust any of the blue dots, drag them to the right place. Select „Child” and click „Next” Step 5. Click on „Autodots”. Adjust points as needed by dragging them (see also Chapter 1). Unlick „Autodots” Step 6. You can change the age of the child by advancing to the „Features Tab” and using the slider. Step 7. You can add hair to the project via the „Style Tab”. Select and drag a hair style to the right. Make sure it fits. Step 8. Export project via the „Export” button. This will close HeadShop and transfers you back into DAZ Studio. Once back in Studio, you may want to go to the Parameter tab in Studio and reset he morph’s slider to „0%”. Step 9. Import hair you created by using „Import” from the DAZ Studio „File” menu. Browse to the project file and click on the „fs3dhair” file. This will bring the hair also into DAZ Studio. Make sure you move the hair up and down into position. If needs to be, also use „scale” to get it just right. Step 10. Now you can turn off visibility (eye symbol) to all parts of Genesis 2 except for „Neck”, „Head” „Right Eye” and „Left Eye”. Also, you can preview your 3D sculture by resetting the view from „Texture Shaded” to „Smooth Shaded” via the visibility ball. If you know hit „Export” under the File menu and choose „Export OBJ”, you just saved your head as something a service bureau can print using a 3D printer. (Note: not all service bureaus are equipped to convert OBJ files into STL). Chapter 4 : Using Poser Figures Unlike previous FaceShop products HeadShop is NOT DESIGNED TO BE USED AS A STANDALONE. You can still use Poser or other figures but must do so in DAZ Studio. Step 1. Pleace a Poser figure on stage in DAZ Studio (shown is Ryan from Poser 8). Step 2. Launch HeadShop from DAZ Studio’s Edit menu. When prompted, select „Head” and „Lips” for surfaces and „Head” for Geometry. Click „Accept”. Step 3. Browse for photo and create project name and project folder. Hit „Apply”. Step 4. Make sure eye and mouth dots are correctly placed by auto-face. Unlike with Genesis 2 figures, select „Import OBJ” and hit „Apply”. Step 5. In the HeadShop Front Tab you will be prompted to click on 4 points on the RIGHT screen as shown on the left. Hit Enter. Step 6. A green overlay appears on the RIGHT screen. Adjust the group of points (eyes, nose, mouth and head outline) using the blue „group controll” dots. When done, hit „Enter” Step 7. From here on use the same steps as outlined in Chapter 1, 2 and 3. Step 8. Once you are satisfied with the model, select „Export” from under the „File” menu and this will close HeadShop and will carry the morph and texture back to DAZ Studio. You can save the new model in a Poser compatible format and open it in Poser.