1
Funds Transfer User Guide
Oracle FLEXCUBE Universal Banking
Release 12.0.2.0.0
Part No. E49740-01
September 2013
Funds Transfer User Guide
September 2013
Oracle Financial Services Software Limited
Oracle Park
Off Western Express Highway
Goregaon (East)
Mumbai, Maharashtra 400 063
India
Worldwide Inquiries:
Phone: +91 22 6718 3000
Fax:+91 22 6718 3001
www.oracle.com/financialservices/
Copyright © 2007, 2013, Oracle and/or its affiliates. All rights reserved.
Oracle and Java are registered trademarks of Oracle and/or its affiliates. Other names may be trademarks of their respective
owners.
U.S. GOVERNMENT END USERS: Oracle programs, including any operating system, integrated software, any programs installed
on the hardware, and/or documentation, delivered to U.S. Government end users are "commercial computer software" pursuant to
the applicable Federal Acquisition Regulation and agency-specific supplemental regulations. As such, use, duplication, disclosure,
modification, and adaptation of the programs, including any operating system, integrated software, any programs installed on the
hardware, and/or documentation, shall be subject to license terms and license restrictions applicable to the programs. No other
rights are granted to the U.S. Government.
This software or hardware is developed for general use in a variety of information management applications. It is not developed or
intended for use in any inherently dangerous applications, including applications that may create a risk of personal injury. If you use
this software or hardware in dangerous applications, then you shall be responsible to take all appropriate failsafe, backup,
redundancy, and other measures to ensure its safe use. Oracle Corporation and its affiliates disclaim any liability for any damages
caused by use of this software or hardware in dangerous applications.
This software and related documentation are provided under a license agreement containing restrictions on use and disclosure and
are protected by intellectual property laws. Except as expressly permitted in your license agreement or allowed by law, you may
not use, copy, reproduce, translate, broadcast, modify, license, transmit, distribute, exhibit, perform, publish or display any part, in
any form, or by any means. Reverse engineering, disassembly, or decompilation of this software, unless required by law for
interoperability, is prohibited.
The information contained herein is subject to change without notice and is not warranted to be error-free. If you find any errors,
please report them to us in writing.
This software or hardware and documentation may provide access to or information on content, products and services from third
parties. Oracle Corporation and its affiliates are not responsible for and expressly disclaim all warranties of any kind with respect
to third-party content, products, and services. Oracle Corporation and its affiliates will not be responsible for any loss, costs, or
damages incurred due to your access to or use of third-party content, products, or services.
Contents
1.
Preface ...................................................................................................... 1-1
1.1
1.2
1.3
1.4
1.5
1.6
2.
Specifying Preferences for Product ......................................................................... 3-3
3.1.1 Specifying Message Related Details for Product ....................................... 3-4
3.1.2 Processing Back Values Payment Messages for Outgoing FT Contracts . 3-6
3.1.3 Specifying Payment Related Preferences .................................................. 3-7
3.1.4 Specifying Rate Related Details for Product .............................................. 3-7
3.1.5
After Rate Refresh..................................................................................... 3-9
3.1.6 Specifying Clearing Related Details for Product....................................... 3-10
3.1.7 Specifying Instrument Related Details...................................................... 3-10
3.1.8 Specifying Contract Authorization Details for Product.............................. 3-11
3.1.9 Specifying Other Preferences for Product ................................................ 3-11
3.1.10 Maintaining Product Event Accounting Entries for Outgoing Funds Transfer 3-13
3.1.11 Processing Split Dr/Cr Liquidation for FT Contracts................................. 3-13
3.1.12 Batch Processing of FT Contracts ........................................................... 3-14
3.1.13 Applying Currency Cut-off Checks on Transactions Involving Product .... 3-14
3.1.14 Specifying Rate Variance ......................................................................... 3-15
3.1.15 Specifying Back Value Date Preferences for Funds Transfer Transactions 3-15
Maintenance Required for Processing FTs ........................................... 4-1
4.1
4.2
4.3
4.4
4.5
4.6
MT102+
5.
Introduction.............................................................................................................. 2-1
Funds Transfer - An Introduction............................................................................. 2-2
2.2.1
Media Supported ....................................................................................... 2-2
Defining Attributes of FT Product .......................................................... 3-1
3.1
4.
1-1
1-1
1-1
1-1
1-2
1-3
Funds Transfer - An Overview ................................................................ 2-1
2.1
2.2
3.
Introduction..............................................................................................................
Audience..................................................................................................................
Documentation Accessibility....................................................................................
Organization ............................................................................................................
Related Documents .................................................................................................
Glossary of Icons.....................................................................................................
Introduction.............................................................................................................. 4-1
Maintaining Value Date Spreads ............................................................................. 4-1
4.2.1 Maintaining Clearing Network Details......................................................... 4-3
Maintaining National Clearing Codes ...................................................................... 4-6
4.3.1 Maintaining Network Details ....................................................................... 4-6
4.3.2 Maintaining Clearing Codes for Individual Banks ....................................... 4-8
4.3.3 Uploading Clearing Codes.......................................................................... 4-9
4.3.4 AdditionMaintaining Clearing Code Exclusion List .................................. 4-11
Blacklisted BIC Codes ........................................................................................... 4-11
Maintaining RTGS Directory.................................................................................. 4-12
4.5.1 RTGS Directory Upload............................................................................ 4-13
Maintaining Branch Parameters for Funds Transfer.............................................. 4-15
4.6.1 Maintaining Currency and Transaction Amount Agreements for MT102 and
4-17
Processing Funds Transfer .................................................................... 5-1
5.1
5.2
5.3
5.4
5.5
Introduction.............................................................................................................. 5-1
Entering Details of Funds Transfer......................................................................... 5-1
Specifying FT Contract Details ................................................................................ 5-2
Description of FT Contract Details Screen ............................................................. 5-3
5.4.1 Body of Screen ........................................................................................... 5-5
Processing Funds Transfer ..................................................................................... 5-6
5.5.1 Specifying Details for Debit Leg of Transfer ............................................... 5-7
5.5.2 Specifying Details for Credit Leg of Transfer.............................................. 5-9
5.5.3 Specifying Party Details............................................................................ 5-15
5.5.4 Capturing Additional Details ..................................................................... 5-18
5.5.5 Note on Rate Pickup and Message Generation ....................................... 5-30
5.5.6 Limit Amounts for Cross Currency Transactions for Default of Exchange Rates 5-
31
5.6
5.7
5.8
5.9
5.10
5.11
5.12
5.13
5.14
5.15
5.16
5.17
5.18
5.19
5.20
5.21
5.22
5.23
5.24
5.25
5.5.7 How Limits are applied when Transaction is Entered............................... 5-32
5.5.8 Exchange Rate for Cross Currency Transactions .................................... 5-32
5.5.9 Internal Remarks ...................................................................................... 5-33
5.5.10 Capturing Payment Details....................................................................... 5-33
5.5.11 Specifying Upload Details......................................................................... 5-33
Viewing Settlement Route of Transfer................................................................... 5-33
5.6.1 FT Fields and Information Flow ................................................................ 5-35
Viewing Details of Transfer Events........................................................................ 5-37
5.7.1 Viewing Accounting Entries that are Passed............................................ 5-38
Specifying Advices for Transfer............................................................................. 5-38
Selecting User Defined Fields ............................................................................... 5-39
Generating Charge Claim Advice .......................................................................... 5-40
Specifying Customer Cover Details....................................................................... 5-41
Viewing OFAC Check Response........................................................................... 5-43
Capturing MIS Details............................................................................................ 5-45
Viewing Change Log ............................................................................................. 5-45
Specifying Settlement Details................................................................................ 5-45
Viewing All Messages............................................................................................ 5-46
Specifying Project Details...................................................................................... 5-47
Viewing Duplication details.................................................................................... 5-48
Generation of MT 210 for Funds Transfer Contract .............................................. 5-49
Generation of MT900 and 910............................................................................... 5-49
Checks for Generation of MT103+ Messages ....................................................... 5-50
Currency Cut-off Checks for Funds Transfer Transaction..................................... 5-52
5.22.1 Exceptions for Currency Cut-off Checks .................................................. 5-53
Funds Transfer Transactions with Blacklisted BIC Codes..................................... 5-53
5.23.1 Authorizing Funds Transfer Transaction with Blacklisted BIC Codes ...... 5-54
5.23.2 Processing Uploaded Payment Transactions with Blacklisted BIC Codes 5-54
Operations that you can perform on contracts ...................................................... 5-54
Viewing Different Versions of Contract.................................................................. 5-55
5.25.1 Verifying and Authorizing Funds Transfer Transaction ............................ 5-55
5.25.2 Viewing Transaction to be Authorized ...................................................... 5-56
5.25.3 Specifying Details in Rekey Fields ........................................................... 5-56
5.25.4 Verifying Transaction................................................................................ 5-57
5.25.5 Rejecting Transaction............................................................................... 5-57
5.25.6 Amending Transaction that has ‘failed verification’ .................................. 5-57
5.25.7 Deleting Transaction that has ‘failed verification’ ..................................... 5-57
5.26
5.27
5.28
5.29
5.30
5.31
5.32
5.33
6.
6.4
7.3
7.4
7.5
7.6
7.7
7.8
7.9
6-1
6-1
6-2
6-3
6-3
6-4
6-4
6-4
Introduction.............................................................................................................. 7-1
Maintaining Upload Sources.................................................................................... 7-1
7.2.1 Deleting Uploaded Contract ....................................................................... 7-2
Amending Uploaded Contract ................................................................................. 7-2
Reversing Uploaded Contract ................................................................................. 7-2
Automatic Upload of MT 103 and MT 202 S.W.I.F.T Messages ............................. 7-3
Uploading Contracts through STP Function ............................................................ 7-3
7.6.1 FT Upload Tables (Gateway Tables).......................................................... 7-3
7.6.2 Structure of FT Upload (Gateway) Tables .................................................. 7-6
Uploading Contracts through Upload Master Screen ............................................ 7-35
Upload of Incoming SWIFT Payment Messages................................................... 7-35
Processing Single Debit Multiple Credit (SDMC) for Bulk Payments .................... 7-36
7.9.1 Upload Process ........................................................................................ 7-36
7.9.2 Liquidation Process .................................................................................. 7-36
7.9.3 Reversing a Liquidated Contract .............................................................. 7-38
Straight through Processing - An Overview ......................................... 8-1
8.1
9.
Introduction..............................................................................................................
Autobook Function...................................................................................................
Rate Update Function..............................................................................................
6.3.1 Invoking Rate Update Function ..................................................................
6.3.2 Processing Contract with Rate Update ......................................................
Referral Queue Function .........................................................................................
6.4.1 Invoking Referral Queue Function..............................................................
6.4.2 Processing Contract with Referral Queue Function ...................................
Batch Upload Function ........................................................................... 7-1
7.1
7.2
8.
5-57
5-58
5-58
5-59
5-60
5-61
5-68
5-72
5-74
5-74
5-74
5-74
5-74
5-75
5-75
5-76
5-80
Automatic Processes .............................................................................. 6-1
6.1
6.2
6.3
7.
5.25.8 Authorizing Verified Transaction...............................................................
Multi-level Authorization of a Contract...................................................................
Transaction Queues (Transaction Status) Management.......................................
Summary Dash Board for Funds Transfer Transactions .......................................
Examples on how to Enter Details of FT Contracts...............................................
5.29.1 Outgoing Customer Transfer ....................................................................
5.29.2 Outgoing Bank Transfer for Own Account................................................
Authorizing Bulk FT Contracts...............................................................................
5.30.1 Indicating Ignore Overrides ......................................................................
5.30.2 Indicating Generate Messages.................................................................
5.30.3 Authorizing Contracts ...............................................................................
5.30.4 Viewing Errors .........................................................................................
5.30.5 Viewing Settlement Details ......................................................................
5.30.6 Viewing Contract Details ..........................................................................
Maintaining MT101 Agreements with Ordering Customer.....................................
MT101 Transaction Input Screen ..........................................................................
Viewing FT Contract ..............................................................................................
Introduction.............................................................................................................. 8-1
Maintenance for Straight through Processing ...................................... 9-1
9.1
Introduction..............................................................................................................
9.1.1 Maintaining Funds Transfer Products.........................................................
9.1.2 Maintaining Settlement Instructions............................................................
9.1.3 BIC Directory ..............................................................................................
9-1
9-1
9-2
9-2
9.1.4
9.1.5
9.1.6
9.1.7
9.1.8
9.1.9
9.1.10
9.1.11
9.1.12
9.1.13
9.1.14
Messaging Maintenance............................................................................. 9-2
Mapping Message Types to Products and Queues.................................... 9-4
D to A Converter Records Maintenance ..................................................... 9-6
STP Rule Maintenance............................................................................... 9-7
Specifying Branch Details......................................................................... 9-13
Indicating ‘Pending Cover Match’ ............................................................. 9-13
Selecting ‘Suppress Message’ Option...................................................... 9-18
Maintenance Related to Upload Source................................................... 9-19
Maintaining Branch-Level STP Preferences............................................. 9-19
External Account Maintenance................................................................. 9-21
Overrides Maintenance ............................................................................ 9-21
10. Straight through Processing – Sequence of Events .......................... 10-1
10.1 Introduction............................................................................................................ 10-1
10.2 Incoming Message Browser ................................................................................. 10-1
10.3 Message Upload Function..................................................................................... 10-2
10.3.1 Automatic Execution of Message Upload Function .................................. 10-2
10.4 Interpreting Contents of Incoming Message.......................................................... 10-2
10.4.1 D to A Conversion .................................................................................... 10-3
10.4.2 Derivation of Debit and Credit Accounts................................................... 10-3
10.4.3 Processing ISO 11649 in Field 70 ........................................................... 10-3
10.4.4 Processing of Field 72 .............................................................................. 10-4
10.4.5 Processing of ‘BNF’ in Field 72 .............................................................. 10-10
10.4.6 Derivation of FT Product ........................................................................ 10-10
10.4.7 Build-up of FT Upload Transaction Record ............................................ 10-11
10.5 Validations Performed on Incoming SWIFT Message......................................... 10-11
10.5.1 Validations for Back Value Days ............................................................ 10-11
10.5.2 Validation of Local Clearing Codes ........................................................ 10-11
10.5.3 Available Balance Check........................................................................ 10-12
10.5.4 Currency Cut-off Checks ........................................................................ 10-13
10.5.5 Processing Uploaded Future Valued Payment Message Transaction ... 10-13
10.5.6 Exchange Rates Default for Cross-Currency STP Transactions ............ 10-13
10.5.7 Checking for Blocked BIC Codes ........................................................... 10-14
10.5.8 Validating Transfer Currency and Account Currency ............................ 10-14
10.5.9 Validating Credit Card Payments ........................................................... 10-14
10.6 Cover Matching ................................................................................................... 10-15
10.6.1 Detection of Messages for ‘Pending Cover’ Status ................................ 10-15
10.6.2 Matching Payment Message with its Cover............................................ 10-16
10.7 Payment Cover (MT 202) Generation Rules ....................................................... 10-17
10.7.1 Incoming MT 202.................................................................................... 10-17
10.8 FT Upload Process.............................................................................................. 10-18
10.9 Operations on Incoming Message....................................................................... 10-18
10.9.1 Handling Exceptions in STP Process (Repair of Messages).................. 10-18
10.9.2 Suppression of Incoming SWIFT Payment Messages .......................... 10-18
10.9.3 Verifying and Authorizing an Incoming SWIFT Payment Message ........ 10-20
10.10 Payment Transaction Status Management ......................................................... 10-21
10.11 Payments Summary Dash Board ........................................................................ 10-22
10.12 Examples of STP................................................................................................. 10-23
10.12.1 Maintenance (assumed for illustration purposes).................................. 10-24
10.12.2 FT Products ........................................................................................... 10-25
10.12.3 BIC codes .............................................................................................. 10-25
10.13
10.14
10.15
10.16
10.17
10.18
10.12.4 Settlement Instructions .........................................................................
10.12.5 Other maintenance ................................................................................
10.12.6 ...............................................................................................................
Example 1: Internal Transfer ...............................................................................
10.13.1 Incoming Message ................................................................................
10.13.2 Interpretation of Message......................................................................
Example 2: Incoming Transfer.............................................................................
Example 3: Outgoing Customer Transfer ............................................................
Example 4: Outgoing Customer Transfer with Cover ..........................................
Example 5: Outgoing Bank Transfer ...................................................................
Viewing Funds Transfer Multi Customer Summary .............................................
10-25
10-26
10-26
10-26
10-26
10-27
10-28
10-30
10-32
10-35
10-37
11. Processing of Non SWIFT Incoming Payment Messages .................. 11-1
11.1 Introduction............................................................................................................ 11-1
11.2 Maintaining Common Payment Gateway Message Parameters ........................... 11-1
11.2.1 Maintaining Common Payment Gateway Messages ................................ 11-2
11.3 Viewing Payment Gateway Browser ..................................................................... 11-4
11.3.1 Viewing ‘Main’ Tab Details ....................................................................... 11-8
11.3.2 Viewing ‘Additional’ Tab Details ............................................................... 11-9
11.3.3 This indicates the customer’s country of birth.Viewing ‘Other Details’ Tab 11-11
11.3.4 Maintaining ‘Other Details1’ Tab ............................................................ 11-15
11.4 Viewing Incoming File Details.............................................................................. 11-18
12. Annexure A - Accounting Entries and Advices for FTs ..................... 12-1
12.1 Accounting Entries for FTs .................................................................................... 12-1
12.2 FT Events .............................................................................................................. 12-1
12.3 Advice Tags........................................................................................................... 12-2
12.3.1 CHARGE_CLAIM ..................................................................................... 12-3
12.3.2 DEBIT_ADVICE........................................................................................ 12-3
12.3.3 PAYMENT_MESSAGE .......................................................................... 12-10
12.3.4 RECEIVE_NOTICE ................................................................................ 12-10
12.3.5 STOP_PMNT.......................................................................................... 12-10
12.3.6 CREDIT_ADVICE................................................................................... 12-10
12.4 Amount Tags ....................................................................................................... 12-15
12.5 Accounting Roles................................................................................................. 12-15
12.6 Advices for FT ..................................................................................................... 12-21
12.6.1 FT Messages.......................................................................................... 12-21
12.6.2 Other Messages ..................................................................................... 12-25
13. Annexure B - Derivation of Debit and Credit Accounts for STP ....... 13-1
13.1 Introduction............................................................................................................ 13-1
13.1.1 Derivation of Debit Account (MT 100/103) ............................................... 13-1
13.1.2 Derivation of Credit Account (MT 100/103) ............................................ 13-11
13.1.3 Derivation of Debit Account (MT 200) .................................................... 13-24
13.1.4 Derivation of Credit Account (MT 200) ................................................... 13-24
13.1.5 Derivation of Debit Account (MT 202) .................................................... 13-24
13.1.6 Derivation of Credit Account (MT 202) ................................................... 13-31
13.1.7 Checks for Derived Account ................................................................... 13-41
14. Glossary ................................................................................................. 14-1
14.1 List of Important Terms.......................................................................................... 14-1
15. Reports ................................................................................................... 15-1
15.1 Introduction............................................................................................................ 15-1
15.2 FT Daily Activity Journal ........................................................................................
15.2.1 Contents of the Report .............................................................................
15.3 FT Contract Report................................................................................................
15.3.1 Selection Options .....................................................................................
15.3.2 Contents of the Report .............................................................................
15.4 Remittance Received Report.................................................................................
15.4.1 Contents of the Report .............................................................................
15-1
15-2
15-3
15-4
15-5
15-6
15-7
16. Function ID Glossary ............................................................................. 16-1
1. Preface
1.1
Introduction
This user manual is designed to help you quickly get acquainted with the Funds Transfer (FT)
module of Oracle FLEXCUBE.
The manual gives you an overview of the FT module, and takes you through the various steps
involved in processing incoming and outgoing funds transfers (FTs).
You can obtain information specific to a particular field by placing the cursor on the relevant
field, and striking <F1> on the keyboard.
1.2
Audience
You will need to use the Funds Transfer sub-system whenever you are sending:
Outgoing payments by the media types defined in the Messaging System (MS) Module
of Oracle FLEXCUBE
Outgoing payments with Reimbursement
Incoming payments
Internal transfers
This manual is intended for the following User/User Roles:
1.3
Role
Function
Back office clerk
Input functions for contracts
Back office managers/officers
Authorization functions
Product Managers
Product definition and authorization
End of Day operators
Processing during End of Day/ Beginning of Day.
Financial Controller/Product Managers
Generation of reports
Documentation Accessibility
For information about Oracle's commitment to accessibility, visit the Oracle Accessibility
Program website at http://www.oracle.com/pls/topic/lookup?ctx=acc&id=docacc.
1.4
Organization
This manual is organized into the following chapters:
Chapter 1
About this Manual gives information on the intended audience. It also lists
the various chapters covered in this User Manual
Chapter 2
Funds Transfer - An Overview is a snapshot of the features that the module provides.
1-1
1.5
Chapter 3
Defining Attributes of FT Product explains at length how to capture the
details of the FT product in Oracle FLEXCUBE.
Chapter 4
Maintenances Required for Processing FTs details the procedure for
maintaining debit or credit value date spreads for internal customer transfers, as well as the maintenance of national clearing codes
Chapter 5
Processing Funds Transfer describes the processing of FTs.
Chapter 6
Automatic Processes explains the Batch Processes that are initiated at
the beginning or at the End of Day.
Chapter 7
Batch Upload Function explains the FT ‘upload’ facility that the module
offers.
Chapter 8
Straight Through Processing - An Overview is a snapshot of the features
that the STP function provides.
Chapter 9
Maintenance for Straight Through Processing details the maintenance or
reference information that you need to set up to configure the system for
straight through processing
Chapter 10
Straight Through Processing – Sequence of Events details the sequence
of events according to which the STP function creates and processes contracts. This chapter also presents a few examples relating to how the STP
function processes different kinds of funds transfers.
Chapter 11
Processing of Non SWIFT Incoming Payment Messages details the maintenances required and explains the upload of non-SWIFT messages.
Chapter 12
Annexure A - Accounting Entries and Advices for FTS contains a list of
suggested accounting entries and advices for the FT module.
Chapter 13
Annexure B - Derivation of Debit and Credit Accounts for STP lists the
step–wise sequence of the derivation logic of both the debit account and
credit account for each of the incoming payment message types
Chapter 14
Glossary defines the terms used in this manual.
Chapter 15
Reports provides a list of reports that can be generated in this module and
also explains their contents.
Chapter 16
Function ID Glossary has alphabetical listing of Function/Screen ID's used
in the module with page references for quick navigation.
Related Documents
You may need to refer to any or all of the User Manuals while working on the Funds Transfer
module:
Procedures
Settlements
User Defined Fields
1-2
1.6
Glossary of Icons
This User Manual may refer to all or some of the following icons.
Icons
Function
Exit
Add row
Delete row
Option List
1-3
2. Funds Transfer - An Overview
2.1
Introduction
As the trend towards automated processing increases, and as the demands of the financial
business become more complex, Oracle FLEXCUBE, a sophisticated package, breaks down
these complexities by its quick, easy-to-use features, which are essential to successful
financial management.
The Funds Transfer (FT) Module that constitutes a part of Oracle FLEXCUBE is a front office
system that handles the processing of the transfer of funds (local and foreign) between
Financial Institutions. Financial institutions or banks can initiate these transfers for
themselves, or on behalf of their customers.
The FT Module is a comprehensive transaction handling and management system, which
integrates with the overall system for settlement of payments, charges, commissions and
MIS. The system handles all the necessary activities during the life of a contract, once it is
booked. All the relevant account balances will be updated when Transfers are processed.
Exchange rate conversions are automatically effected in cases of Cross-currency Transfers
based on the rate and method of conversion that you define. The essence of a funds transfer
(i.e., transfer of money and the generation of messages) is handled comprehensively by this
module.
With regard to funds transfers, you will encounter some basic terms frequently, which are
listed below:
SWIFT
Equivalent
Field/ Term
Explanation
Applicability
Ordering Customer
The initiator of the transfer
instruction also referred to as
the Remitter. The remitter is
the source of funds in a payment order
Only in the
case of customer transfers
(refer section
‘Classifying
Funds Transfers’, below)
Field 50
Ultimate Beneficiary
The Ultimate recipient of
funds as a result of the funds
transfer (also called beneficiary customer).
Only in the
case of customer transfers
Field 59
Ordering Institution
The financial institution that
originates a bank transfer /
customer transfer
Account with
Institution
A financial Institution that services the account for the beneficiary customer beneficiary
institution
Customer and
Bank Transfers
Field 57
Credit Advice
An advice given by the
Account With Institution indicating credit to the account of
the beneficiary
Any transfer
MT 910
2-1
Field 52
2.2
Cover Payment
The reimbursement of an
intermediary through one’s
correspondent
Customer and
Bank Transfers
Sender
Sender of a Payment Message (Not necessarily the
Ordering Institution)
Any transfer
Receiver
Receiver of a Payment Message (Not necessarily the
Beneficiary Institution)
Any transfer
MT202 Cover
Message
Funds Transfer - An Introduction
A Funds Transfer is a sequence of events that results in the movement of funds from the
remitter to the beneficiary. It is also defined as the remittance of funds from one party to itself
or to another party through the banking system. It is an essential support function for other
financial products such as loan repayment, settlement of trade bills etc., apart from being an
important stand-alone function in a typical bank.
Classifying Funds Transfers
Funds Transfers can be classified as Incoming, Outgoing or Internal depending on the
direction of flow of funds in the transfer. Incoming or Outgoing transfers are indicative of
whether funds are coming in or going out of the bank. Internal transfers indicate funds being
transferred within the bank itself (between two accounts within the Bank). No other financial
institution is involved in such transfers. Based on the parties involved in the transfer, Funds
Transfers can also be classified as customer transfer, bank transfer and bank transfer for own
account.
Customer Transfer: A customer transfer is a transfer in which either the ordering customer
or the beneficiary customer, or both, are non-financial institutions, i.e. at least one party in the
chain is not a financial institution.
Bank Transfer: A bank transfer refers to the transfer of funds between the ordering institution
and beneficiary institution. Here the originator and beneficiary and all intermediary parties are
financial institutions.
Bank Transfer for Own Account: A transfer initiated by a bank to transfer funds from one of
its accounts (held in one Bank) to another account (held in another Bank).
2.2.1
Media Supported
Messaging which constitutes an important ingredient of a Funds Transfer is supported. In
Oracle FLEXCUBE, FTs can be executed using any of the following media types:
Mail
Telex
SWIFT
The following SWIFT messages are supported for FTs:
Type of transfer
Message type
Customer Transfer
MT 103 and 103+
Customer Transfer with Cover
MT103 and 103+ and MT202
2-2
Bank Transfer
MT202 and MT205
Bank Transfer with cover
MT 202 and MT205
Bank Transfer for Own Account
MT200 and MT210
Notice to Receive
MT 210
Incoming Bank Transfer with Notice to Receive
MT 202 and MT 210
Confirmation of Debit
MT 900
Confirmation of Credit
MT 910
Multiple Customer Credit Transfers
MT102 and 102+
Request for Transfer
MT101
Multiple Bank Transfers
MT203
Multiple Bank Transfers for Own Account
MT201
2-3
3. Defining Attributes of FT Product
3.1Introduction
In this chapter, we shall discuss the manner in which you can define attributes specific to a Funds
Transfer product.
You can create an FT product in the ‘Funds Transfer Product Definition’ screen. You can invoke
the ‘Funds Transfer Product Definition’ screen by typing ‘FTDPRMNT’ in the field at the top right
corner of the Application tool bar and clicking the adjoining arrow button.
In this screen, you can enter basic information relating to a FT product such as the Product Code,
the Description, etc.
For any product you create in Oracle FLEXCUBE, you can define generic attributes, such as
branch, currency, and customer restrictions, tax details, etc., by clicking on the appropriate icon
in the horizontal array of icons in this screen. For a FT product, in addition to these generic
attributes, you can specifically define other attributes. These attributes are discussed in detail in
this chapter.
You can define the attributes specific to a FT product in the FT Product Definition Main screen
and the FT Product Preferences screen. In these screens, you can specify the product type and
set the product preferences respectively.
For further information on the generic attributes that you can define for a product, please refer
the following Oracle FLEXCUBE User Manuals under ‘Modularity’:
Product Definition
User Defined Fields
Settlements
1
Product Type
An important detail in defining a product is to specify the type of product you are creating. The
product type identifies the basic nature of a product. This helps to classify the product.
The entries that are passed, the messages that are generated and the processing of contracts
depend on the Product Type. An FT product that you create can either be:
Incoming
Outgoing
Internal
An Incoming Transfer is one in which the beneficiary of the transfer is a customer of your
bank. Since funds are coming into your bank, it is termed as an incoming transfer.
Ordering
Customer
Sender
Receiver
Beneficiary
Customer
An Outgoing Transfer on the other hand, indicates a transfer initiated by your bank, either for
itself or on behalf of its customers. As the beneficiary of the transfer is not a customer of your
bank, you will have to pass on these funds to the ultimate beneficiary through another bank
or a series of banks. Such a transfer of funds is termed as an outgoing transfer since funds
are going out from your bank.
Sender
Receiver
Account
With Institution
An Internal Transfer involves funds that are transferred from one account to another within
your bank or between the branches of your bank.
A few instances of Internal Transfers have been listed below:
If a customer of your bank, with more than one account requests you to initiate a transfer
of funds from one of his accounts to another.
If a customer of your bank initiates a transfer from his account to the account of another
customer of your bank.
Therefore, internal transfers do not involve funds that are transferred through a chain of
banks, or payments made from or to a correspondent bank account. As the transfer of funds
does not involve a party outside the circle of your bank, it is termed as an internal transfer.
The customers involved in the transfer will be kept informed by means of debit or credit
advices.
Product Description
Give the narration about the product.
Slogan
Enter the text that should appear in the report or an advice generated with regard to this
product.
Start Date
Specify the date from which this product should be open for contracts to be created under it.
End Date
Specify the date until which contracts should be created using this particular product.
3-2
3.1
Specifying Preferences for Product
‘Preferences’ are the attributes or terms related to core processing that you define for a
product. By default, a transfer involving a product inherits all the attributes defined for the
product. However, some attributes (preferences) that are defined when the product was
created can be changed during the processing of individual FT contracts (i.e., at the contract
level) involving the product.
Click ‘Preferences’ button to invoke the FT Product Preferences screen. Through this screen
you can define the following Preferences for a product:
Specify Rate related preferences
Specify Message related preferences
Specify the Override limit preferences
Specify Instrument related preferences
Indicate whether Cross Currency transfers are allowed
Indicate whether Future Valued transfers are allowed
Indicate whether the value of certain fields should be re-keyed at the time the contracts
linked to this product are being authorized. You can also specify the fields whose values
have to be keyed in during authorization.
Charge Options
RTGS preferences
3-3
The product code together with a brief description that you specified for the product in the
product definition screen will be displayed at the top of the screen. The FT ProductPreferences screen contains nine sections. Each of these sections captures specific
information about the product.
Note
Not all product preferences are allowed to be amended, after the product has been authorized once. So care needs to be taken before authorization of the product to ensure that the
product attributes (preferences) have been maintained correctly.
3.1.1
Specifying Message Related Details for Product
In this section you can define message related details for outgoing transfers.
Transfer Type
Indicate the type of transfers that the product can be associated with. From the option list you
can choose any of the following options:
3-4
Customer transfer – Choose if the remitter or the beneficiary of the transfer is not
financial institution.
Bank transfer – Select if the originator and beneficiary of the transfer are financial
institutions.
Bank transfer for own A/c – Select when your bank is initiating a transfer of funds from
one Nostro account to another Nostro account with another financial institution. For
these types of transfers, cross-currency option is not allowed.
Direct Debit Advice – Select if your bank receives a direct debit advice.
Customer Transfer with Cover – Select to generate cover messages in 202COV,
205COV, or CUST_RTGS_COV format.
Note
–
The ‘transfer type’ preference is applicable only for ‘outgoing’ type of funds transfer
products.
–
You cannot select ‘Customer Transfer with Cover’ option for ‘Internal’ product types.
–
You cannot select ‘Cover Required’ option when the transfer type is ‘Customer
Transfer with Cover’.
The type of transfer that you indicate, will determine the type of payment message that will be
generated for contracts involving the product.
Suppress BV Payment messages
Indicates whether or not the system should suppress by default, the payment message for all
back valued contracts (contracts with debit value date less than the system date) of the
product. This would be enabled only for outgoing funds transfers. By default, this option
would be unchecked for all outgoing FT products.
For instance, if the bank wishes not to generate and send outgoing payment message for a
back valued dated contracts, then the bank can check this option to enable the option.
Multi Credit Transfers
Enabling this option indicates that the particular FT product can be used for Multi Credit
Transfers and also to generate MT201 message A Multi Credit Transfer may be either a Multi
Customer Transfer or a Multi Financial Institution Transfer or Multi Transfer for Own Account.
In case of a Multi Customer Transfer, the payment message sent will be MT102 not MT103.
In case of a Multi Financial Institution Transfer, the payment message sent will be MT203. In
case of a Multi Financial Transfer for Own Account, the payment message sent will be MT201.
Multi Credit Transfer will be allowed in the following instances:
Outgoing ‘Customer Transfer’ or ‘Bank Transfer’ or type of FT Products
Incoming Transfer FT Products
Payment Method is through a Message
‘Allow Message before accounting’ is not enabled
‘Message as of’ and ‘Rate as of’ is equal to the Booking Date
‘After Rate Refresh’ is not enabled
Split Dr/Cr Liquidation is not enabled
Cover Required
Indicates whether a cover message needs to be sent for the transfer or not. Check against
‘Cover Required’ to indicate that a cover is required. Leave it unchecked to indicate otherwise.
3-5
Generate 103+
Indicate whether MT 103 messages for outgoing transfers using the product must be
generated in the MT 103+ format.
As a result of this maintenance, the system will generate payment messages in the MT 103
+ format for all contracts involving the product.
Note
If you are enabling the MT 103+ option for a product, also ensure to enable the same option for the branch, customer and currency involved in the transaction. The criteria for validation will be as follows:
–
Product Type – Outgoing
–
Transfer Type – Customer
–
Payment By – Message
If the validation criteria fail due to some reason the system displays an error message
informing you about its inability to generate the payment message in the preferred MT 103 +
format.
Generate MT102+
Check this box to indicate that MT 102+ messages can be processed for the Product code
you are maintaining. On checking this box, you must also select Multi Customer Transfer so
as to process MT102+ messages.
Remit Message
Check this field to send remit messages using this product. Also, If you wish to send the
envelope contents, you need to check this field.
The following validations will be carried out in Oracle FLEXCUBE if the ‘Remit Message’ box
is checked:
The Sender and Receiver are Remit members
Envelope contents are mandatory
If the ‘Remit Message’ box is checked, the value of the Transfer Type will be
‘CUST_TRANSFER’
An override message is displayed if payment details are maintained
The remit message will be displayed in the message in the Block 119 as 119:REMIT.
Note
The ‘Remit Message’ box is enabled only for customer transfer.
3.1.2
Processing Back Values Payment Messages for Outgoing FT Contracts
In case of an outgoing FT contract which is back-dated (debit value date of the contract is
earlier than the system date) and the ‘Suppress BV payment message’ option is checked for
the product, the system will set the Generate Message option as ‘No’ for both the credit and
debit legs of the contract.
Upon saving the contract, the system will show an over-ride saying ‘The contract is Back
Valued’. If you press ‘OK’, another over-ride indicating ‘Message will be Suppressed will be
displayed. Click OK to Proceed?’ will be displayed. If you press ‘OK’ again, you will continue
3-6
to save suppression of the messages. If you press ‘CANCEL,’ you will cancel suppression of
the messages. However, you can still generate the payment message by visiting the
Settlements screen and checking the ‘Generate Message’ option there.
The option ‘Suppress BV payment message’ at the product level will decide the default value
of the ‘Generate Message’ option for backdated outgoing funds transfer. However, the
generation of payment message can be controlled at the contract level by checking or unchecking the ‘Generate Message’ option manually in the Contract Settlements screen.
Note
For more details on FT contracts, please refer the Contracts chapter.
3.1.3
Specifying Payment Related Preferences
For an FT product, you can specify the mode in which the payment processing would be put
through, for contracts involving the product. The mode may differ based on the classification
of the contract – whether incoming or outgoing, whether bank or customer, and so on.
Message
For instance, in an outgoing customer funds transfer, payment may be made (i.e., the transfer
of funds can be effected) through SWIFT messages such as MT 103. To specify this, indicate
the payment option as ‘Message’ type, in the Preferences screen.
Instrument
For manager’s check type of funds transfer product, the payment could be typically effected
through a payment instrument. To specify this, indicate the payment option as ‘Instrument’, in
the Preferences screen.
3.1.4
Specifying Rate Related Details for Product
In this section you can specify rate related details for the product. The rate details that you
define for the product will be defaulted to all contracts involving this product. However, you
have the option to change them for the contract.
Rate Type
Specify a valid exchange rate type that has to be applied to the transfer amount for contracts
involving the product, from the adjoining option list.
If you choose 'Standard Rate', the system computes the transfer amount by picking up the
exchange rates from the currency table maintained in the Core Services module of Oracle
FLEXCUBE.
The system applies the spread that you define for the product to the standard exchange rate.
Refer to the chapter ‘Batch Processes’ for details of the Rate Update function
Spread Code
The Standard exchange rate is the Mid Rate advised by the Central bank of the country for
all foreign exchange operations. Based on the Mid Rate quoted for a currency and other
market trends each bank determines its spread.
Spreads are nothing but the margins on either side of mid rate (plus or minus) calculated to
determine the rate at which your bank will buy or sell currencies. Spreads are maintained in
the Currency Spread table of the Core Services module.
3-7
For a product, you can specify the fraction of the spread that should be applied to contracts
involving this product. The options available are:
1 Spr – indicating that the full spread specified for the currency in the currency spread
table will be applied to the components of transfers involving this product.
1/2 Spr – indicating that only half the spread will be applied to the components of
transfers involving this product.
1/4 Spr – indicating that only one fourths of the spread will be applied to the components
of transfers involving this product.
1/8 Spr – indicating that only one eighths of the spread will be applied to the components
of transfers involving this product.
No spread – indicating that no spread will be applied to the components of transfers
involving the product.
Rate as of
After you have defined preferences for the exchange rate pickup, you can indicate the date
or the day as of when these rates should be picked up and applied to the transfer amount.
This preference is applicable only for outgoing and internal product types. Also, the rate pickup preference applies only cross currency contracts (contracts in which the debit and credit
legs are in different currencies) and for the conversion between the two contract amounts
(debit amount and credit amount).
The possible dates for Rate pickup
Booking date
Spot date
Value date
Dr. Value date
Cr. Value date
Instruction date
Booking date - If you indicate ‘Booking Date’, the rate type prevailing as of the date you
entered the contract will be picked up. In the case of a normal contract (a contract that is
liquidated on the booking date) you should specify that the rates should be picked up as of
the booking date. For future valued transfers you can specify that the exchange rates can be
picked up as of the booking date, value date or spot date.
Spot date - For each currency that your bank deals with, you have also specified a spot date.
The spot date for the currency is maintained in the Currency Definition Maintenance table of
the Core Services module.
If you specify that the exchange rate should be picked up as of the ‘Spot Date’, then messages
will be generated on the spot date (depending on the spot date you have maintained for the
currency involved in the transfer.
Value date - If you specify value date, exchange rates prevailing as of the date on which the
transfer becomes effective will be applied to the transfers. The Accounting Entries for the
contract will be passed as of this date.
You can also enter the value date of your choice here. The date that you enter can be one of
the following:
Today’s date
3-8
A date in the past
A date in the future. You can enter a date in the future only if future dating has been
allowed for the product to which this contract is linked.
The Value Date (transfer initiation date) should not be earlier than the Start Date or later than
the End Date of the product involved in the transfer.
Dr. Value date - If you specify this option, exchange rates prevailing as of the value date of
the debit leg of the contract will be applied to the transfer.
Cr. Value date - If you specify this option, exchange rates prevailing as of the value date of
the credit leg of the contract will be applied to the transfer.
Instruction date - If you specify this option, exchange rates prevailing on the date on which
the customer placed the instruction to debit the customer account will be applied. This is
similar to debit value date.
Message as of
You can specify the date on which messages for the contracts linked to the product should be
generated and accounting entries be posted. This is applicable only for outgoing and internal
product types.
Possible dates for Message generation
Booking date
Spot date
Value date
Dr. Value date
Cr. Value date
Instruction date
3.1.5
After Rate Refresh
After Rate refresh indicates that the standard exchange rate maintained in the Core Services
module of Oracle FLEXCUBE should be used to compute the transfer amount, only after the
rate refresh program has been run for the day.
If you check this check box, the contracts linked to this product will not be processed, until the
Rate Refresh process has been run and authorized for the day. Until then the contract
remains as if on hold and cannot be authorized.
Further operations on such a contract are possible only by means of the FT Rate Update
function. When this function is run, the contract gets displayed and if you confirm that you
want to process the contract using the rates now available, then the contract is processed,
entries will be passed and messages generated.
Allow Message before Accounting
You can indicate whether the system must allow generation of messages before the relevant
accounting entries are passed for contracts using the product. This preference is only
applicable for outgoing product types.
3-9
If this option is set for a product, it is defaulted to all contracts using the product. When you
enter a contract using such a product, you can specify whether accounting entries must be
passed on the date of message generation or on the debit value date.
A Note on Rate Picks Up and Message Generation Dates
There exists a definite link between the rate pick up and the message generation code. The
Rate pickup and message generation codes need to be combined in a fashion to facilitate the
following flow:
1. Rate pickup
2. Message Generation
Based on the combination that you specify, exchange rates will be picked up and messages
generated. Accounting entries will be passed and then messages will be generated.
All the possible combinations between the rate pickup and the message generation codes
have been explored and detailed below.
Standard rate as of Booking date - Message as of Spot date
If you select this combination;
The amounts will be converted using the rates available in the Currency table (on the
booking date). The spread will be applied to the rate, based on the spread code you
specify.
Messages will be generated Spot days before the settlement date.
Rate as of Spot - Message as of Spot
If you choose this combination;
The contracts involved in a product with this combination will not be processed in the
same manner as a normal contract. The Autobook function (a batch process explained
in the chapter 7) run either at EOD or BOD picks up the exchange rates as of spot days
before settlement date and applies this rate to the contract and commission amounts
and also passes accounting entries.
Messages will also be generated by the Autobook function on the spot date.
Rate and Message as of Value date
If you choose this combination the transfer amount will be converted based on;
The rates that will be picked up on the value date and
Messages will be generated on the value date.
Rate as of Booking date - Message as of Booking date
If you select this combination, the system converts the transfer and commission amount
based on the:
3.1.6
Rates that are available in the Currency table at the time of contract input
Messages will be generated after the contracts involving this product are authorized.
Specifying Clearing Related Details for Product
If you indicate the Payment Type as ‘Clearing’, you have to identify the Clearing Network.
Further, if the FT product you are creating is used for processing ‘ZUS’ transactions, select
the ‘Special Clearing’ option under Clearing Related information.
3.1.7
Specifying Instrument Related Details
In this section you can define Instrument related details for the product:
3-10
Instrument Number Required
Check against this option to indicate whether the Managers Check No should be a mandatory
input at the Contract level. This would typically be applicable only for funds transfer product
types such as Demand Drafts / Managers Check Issuance.
Managers Check Payable GL
If you have specified that an instrument number is required, you should also indicate the
Managers check payable GL to be used by transfers involving the product. This GL would be
used to park the outgoing funds till liquidation is done, whereby the amount in this GL would
be washed out to the credit of the appropriate nostro account.
This field will be activated only if you had indicated that an Instrument Number is required.
You can select a valid foreign and local currency type GL from the pick list that is available.
DAO GL
In the case of incoming transfers where the payment is routed to the ultimate beneficiary
through a suspense GL (which is an intermediary parking account), you must specify the DAO
GL number.
You can select a DAO GL from the option list that is available.
Note
The DAO GL is also credited when an Incoming FT is received, in case the credit account
is closed or the account number mentioned is invalid.
3.1.8
Specifying Contract Authorization Details for Product
You can specify whether certain important details of the contract involving this product need
to be re-keyed at the time when the contract is being authorized. If you indicate positively then
the fields that you specify will have to be re-keyed at the time the contract is authorized.
Under ‘Fields’ you will have to check against the specific fields that need to be re-keyed during
contract authorization.
This facility has been incorporated as a safety measure. It would do you well to indicate
positively in these fields as the possibility of human error cannot be discounted. For instance
let us assume that the value date has been input incorrectly for a contract. If you have
specified 'Yes' at the Re-key Required field and checked on Value date under 'Rekey Fields'
then at the time when the contact is being authorized this field will have to be re-keyed and
the error which would have otherwise cost you dearly can be corrected.
3.1.9
Specifying Other Preferences for Product
Split Dr/Cr Liquidation
Check this option, then both initiation and liquidation events get triggered for any outgoing FT
product. By default, this option is not enabled.
Future Value Allowed
Check this option if the future valued contracts can be input using this product
Cross Currency Allowed
Check this option if the Cross-currency transactions can be input using this product
3-11
Process Overdraft for Auto Book
Check this option if the Process overdraft for Autobook facility should be made available for
the product. This field is applicable to future dated contracts involving this product. The
Autobook function automatically liquidates future dated contracts. There could be a situation
where a customer requests you transfer an amount that actually exceeds the amount in his
account. In this field you can specify whether contracts involving this product which is picked
up by the Autobook function can be processed in spite of the overdraft.
Validate Beneficiary Name
Check this option if the Beneficiary Name should be validated against the authorized
variations of the customer’s name maintained in the Customer Names screen. This feature is
applicable only for incoming funds transfers. If you enable this option, all incoming FTs
involving the product are processed only after the customer’s Account Number and Name
correspond to the authorized variations of the customer’s name.
Beneficiary IBAN mandatory
You can indicate whether IBAN validation needs to be done in respect of the Beneficiary
account number of the contract. If the IBAN validation fails, an error message is displayed by
the System.
The following details can be specified:
3.1.9.1
Even during upload of incoming FTs the first line of the beneficiary name will be
validated against the authorized validations. The contract is marked as authorized only
if the beneficiary Account Number and Name correspond to the authorized variations of
the customer’s name.
If the validation fails the contract will be uploaded as unauthorized. Even during manual
authorization of such contracts, an override is displayed asking whether the customer
name needs to be added to the existing list. It will be added to the existing list on
confirming the override.
Indicating whether Referral is Required
Referral refers to the process of handling customer transactions which force the accounts
involved in such a transaction to exceed the overdraft limit. Funds Transfers are examples of
typical transactions, which can force an account to move into overdraft. While maintaining the
details of an FT product you can indicate whether transactions involving the product need to
be considered for referral checks. Enabling this option indicates that transactions involving the
product need to be considered for referral.
The referral process is handled for the future dated contracts through the FT Auto batch
process.
For more details on the referral function in the batch process, refer to the chapter ‘Automatic
Processes’ of the Funds Transfer user manual.
If a product is marked for referral, the details of transactions resulting in the account (involved
in the transaction) moving into Overdraft will be sent to the Referral Queue.
Note
If an FT transaction breaches the specified limits, the details of the transaction will be displayed in the Unposted Entries section of the queue. You can either choose to accept or
reject it.
For further details on Referrals refer to the Processing Referrals in Oracle FLEXCUBE
chapter of the Core Entities manual.
3-12
3.1.10
Maintaining Product Event Accounting Entries for Outgoing Funds
Transfer
Oracle FLEXCUBE will route all outgoing funds transfer through suspense GL called
INTMD_SUSPENSE. This is a liability type of GL. The accounting entries passed in this GL
for an initiation event would be as follows:
Dr/Cr
Indicator
Accounting Role
Dr
REMITTER
AMT_EQUI
V
Dr Value Date
Cr
INTMD_SUSPENS
E
AMT_EQUI
V
Dr Value Date
Amount
Tag
Value Date
The accounting entries for a liquidation event would be as follows:
Dr/Cr
Indicator
Accounting Role
Amount
Tag
Dr
INTMD_SUSPENS
E
AMT_EQUI
V
Cr Value Date
Cr
BENEFICIARY
TFR_AMT
Cr Value Date
Value Date
If the Split Dr/Cr Liquidation option is unchecked, then charges, other than Liquidation
Charges, would be defined for the Book event and liquidated during initiation
If the Split Dr/Cr Liquidation option is checked, then the Charge Accounting Entries would be
defined for both initiation and liquidation events. The corresponding Charge Accounting
Entries would be passed and the charge liquidated during initiation, provided, Charge Whom
is ‘Remitter’ or ‘Shared’. In case Charge Whom is ‘Beneficiary’,’ then the corresponding
charge accounting entries would be passed at the time of liquidation.
3.1.11
Processing Split Dr/Cr Liquidation for FT Contracts
If the ‘Split Dr/Cr Liquidation’ option is enabled for a product, then the system will trigger
initiation and liquidation event simultaneously, even if the value date for both the debit and
credit legs is the same. If the credit value date for a contract is after the system date, then
liquidation will not be triggered immediately.
The following cases are possible.
Case I – The value of ‘Accounting as of’ is a message date.
In such a case, the entries would be passed along with the message.
For an outgoing product
Of type customer transfer
For payment type as message
With ‘Split Dr/Cr Liquidation’ option enabled for the product
And if the credit value date is greater than the Application date
The system would trigger the initiation event ‘INIT’ along with the message generation.
3-13
The liquidation would be deferred and event ‘LIQD’ would be triggered only on the Credit
Value date.
Case II – The value of ‘Accounting as of’ is a Debit value date.
For an outgoing product
Of type customer transfer
For payment type as message
With ‘Split Dr/Cr Liquidation’ option enabled for the product
And if the Credit Value date is greater than the Application date
The initiation event ‘INIT’ would be triggered on the Debit Value date.
The liquidation would be deferred and the event ‘LIQD’ would be triggered only on the Credit
Value date.
Note
For more details on FT contracts, please refer the corresponding chapter.
For further details on generic attributes that you can define for liquidation of a FT contract,
please refer the ‘Liquidation’ User Manual under Modularity.
3.1.12
Batch Processing of FT Contracts
FT batch would be enhanced to pick up those contracts with credit value date less than or
equal to the current date and trigger Liquidation event for those contracts.
In case the Split Dr/Cr Liquidation option is enabled, then the corresponding Charge
Accounting Entries would be passed and the charge, liquidated, during initiation of the
contracts. This would happen, provided, Charge Whom is ‘Remitter’ or ‘Shared’. In case
Charge Whom is ‘Beneficiary’, then the charge accounting entries would be passed during
liquidation.
Note
For more details on FT contracts, please refer the corresponding chapter.
3.1.13
Applying Currency Cut-off Checks on Transactions Involving Product
You can choose to restrict the time within which (or before which) funds transfer transactions
involving a customer, in the product, involving a specific currency, must be received for
processing. For a specific customer, product, and a currency, you can specify a certain
number of days before which a transaction involving the combination must be received, as
well as a cut-off time before which transactions must be received. These parameters are
known as currency cut-off parameters, and you maintain these parameters in the Value Dated
Spread maintenance. You also maintain cut-off parameters to be applied for each currency,
in the Currency Definition.
To specify that such cut-off checks must be performed in respect of a funds transfer
transaction, select the option ‘Cut-off Days Check’ in the ‘Product Preferences’ screen. The
cut-off days and the cut-off time that is to be applicable, for each currency, is picked up from
the Value Dated Spread maintenance, if available, and if not, from the Currency Definition
specifications.
3-14
3.1.14
Specifying Rate Variance
For an FT product you can specify the Rate type to be either Standard, Standard (after rate
refresh). These values will be defaulted to all contracts involving this product. At the time you
input a contract you have the option of changing the default and specifying an exchange rate
of your choice. This field is applicable only if you have decided to change the product default
and if the contracts linked to the product are cross currency transfers.
In this section you can specify the minimum and maximum limit by which the exchange rate
you input for contracts involving this product can exceed the standard exchange rate.
In the Override limit field you can specify the minimum percentage over which you can
exceed the normal exchange rates and save a contract, with an override from the
system.
In the Maximum Limit field you can specify the maximum percentage upto which you
can exceed the normal exchange rate, above which the system will not allow you to
store the transaction.
3.1.14.1 Specifying Charge Details
There are obvious costs involved in transferring funds from one location to another. You need
to indicate who will actually bear these service charges. You can select an option from the
option list that is available.
Identify the party that would bear the charges in respect of a funds transfer contract that is
processed using this product. The following options are available:
Remitter – All Charges (all charges are borne by the remitter)
Beneficiary – All Charges (all charges are borne by the beneficiary)
Remitter – Our Charges (the remitting bank’s charges are borne by the remitter)
Own Charges
Receiver Bank Charges
This specification is inherited by all contracts using the product. If you require not allowing this
specification to be changed when a contract is entered using the product, you must check the
‘Allow Change in Contract’ box.
3.1.15
Specifying Back Value Date Preferences for Funds Transfer Transactions
You can post back value dated transactions in Oracle FLEXCUBE. However, for the purpose
of risk tracking, you can specify a limit beyond which users will be prevented from posting a
back value dated transaction in the system.
3.1.15.1 Specifying Dr Back Value Days
This is the number of days within which a user will be allowed to post a back value dated debit
funds transfer transaction. In other words, for a back value dated FT, the date on which the
remitter’s account is to be debited, should fall within the limit maintained here.
3.1.15.2 Specifying Cr Back Value Days
Likewise, for a back value dated FT, the date on which the beneficiary’s account is to be
credited, should fall within the limit maintained here.
3-15
If the value dates do not fall within the Debit or Credit Back Value Days maintained, the
system will display the message as ‘The Debit or Credit value date is earlier than the
Permitted value days’.
If the message is configured as an error, you will not be able to proceed with the
transaction, till you specify a date, which is within the limits maintained.
If the override is configured as a warning, you will be able to proceed with entering the
transaction, but an override is logged into the database, that the date specified does not
fall within the limits maintained.
If it is configured as a ‘ignore’ message, then no back-valuation check will be performed.
These validations are also carried out for transactions that are uploaded from external
systems.
Note
You will be allowed to specify the ‘Dr Back Value Days’ and ‘Cr Back Value Days’ only if
the ‘Dr Back Valuation Check Required’ and ‘Cr Back Valuation Check Required’ options
are enabled. If the options are not enabled, the system will allow you to post back-valued
transactions up to any date in the past (no check will be done). Further, if the option is
checked but you have not maintained the ‘Back Value Days’ (maintained as NULL), the
system will interpret it to be ‘Zero’ days allowed (for back valued transactions).
3.1.15.3 Specifying RTGS Preferences for Product
You need to specify the following RTGS preferences:
RTGS Product
Click this box if the product is of RTGS type.
Note
This field is applicable only for outgoing and incoming transfers. It will not be enabled for
internal type of transfers.
Sender Notification Required
Check this box to indicate whether a notification is to be sent to the sender from the PM on
the status of the original payment message.
When this box is checked and the original payment message is settled in the PM, the sender
will receive an incoming MT012 message and if the original payment message is rejected in
the PM the sender will receive an incoming MT019 message.
Network
Specify the FIN Y – copy network if the product is intended for FIN – Y Copy message
generation. FIN Y copy payments are mostly used for sending a copy of a message or parts
thereof to a third party, for example a Central Bank.
Note
This field is enabled only for outgoing and incoming transfers and for RTGS type of products. It will not be enabled for internal type of transfers.
3-16
Payment Type
Select the types of payment available in case of TARGET-2 FIN Y-Copy from the adjoining
drop-down list. This list displays the following values:
Domestic Payment
Cross Border Payment within EU Zone
Cross Border Payment outside EU Zone
All
By default, the payment type is shown as ‘All’.
For TARGET2 payments, an error will be displayed if the beneficiary bank is not consistent
with the product level payment type (domestic, within EU or outside EU).
Banking Priority
Select the priority of the payment messages from the adjoining drop-down list. This list
displays the following values:
Highly Urgent
Urgent
Normal
The banking priority is chosen as ‘Normal’ by default. However, you can modify this value.
You will not be allowed to amend the RTGS preferences, after the product has been
authorized once.
Note
The Priority will be displayed in the RTGS messages in tag 113 as 4 Alphabets. For example, 113:NNNN – For a Normal Priority.
Duplication Recognition
You can specify the following details related to duplication check for transactions. The
duplication check is carried out based on the combination of the preferences maintained at
the FT product level.
Product Code
Check this box to indicate that the product code needs to be considered while checking for
duplicate transactions.
Booking Date
Check this box to indicate that the booking date needs to be considered while checking for
duplicate transactions.
Dr Amount
Check this box to indicate that the Dr amount needs to be considered while checking for
duplicate transactions.
Cr Amount
Check this box to indicate that the Cr amount needs to be considered while checking for
duplicate transactions.
3-17
Dr Value Date
Check this box to indicate that the Dr value date needs to be considered while checking for
duplicate transactions.
Cr Value Date
Check this box to indicate that the credit value date needs to be considered while checking
for duplicate transactions.
Ultimate Beneficiary Account
Check this box to indicate that the ultimate beneficiary account details need to be considered
while checking for duplicate transactions.
Ultimate Beneficiary Address
Check this box to indicate that the ultimate beneficiary address details need to be considered
while checking for duplicate transactions.
Note
If the field ‘Ultimate beneficiary Account’ is checked, the system checks for duplication and
the following logic is applied:
–
The value in line 1 of the Ultimate Beneficiary is taken and checked for the
occurrence of ‘/’. If it is present then the value following the ‘/’ is picked as the
account.
–
If ‘/’ is not present then it will be considered as address. In this case, duplication
check will not be done based on the Ultimate Beneficiary account, but would be
done based on the Ultimate Beneficiary address if the checkbox for the same is
checked.
Dr Currency
Check this box to indicate that the Dr currency needs to be considered while checking for
duplicate transactions.
Cr Currency
Check this box to indicate that the Cr currency needs to be considered while checking for
duplicate transactions.
The check for duplicate transactions is carried out based on the duplication check days
maintained at Branch Parameter level. An override message gets displayed if any duplicate
transaction is encountered.
Note
If none of the above checkboxes are selected, duplication check will not be performed,
even if duplication check details have been specified at branch parameter level.
For more details on the duplication check preferences maintained at branch level, refer the
section titled ‘Maintaining Duplication Check Details’ in Core Services user manual.
3-18
4. Maintenance Required for Processing FTs
4.1
Introduction
This chapter enumerates the maintenance of the following reference information used by the
Funds Transfer module in Oracle FLEXCUBE:
4.2
Value Date Spreads
National Clearing Codes
Maintaining Value Date Spreads
The debit or credit value date spread refers to the number of days that should be added to the
value date of an transfer.
Debit and credit value date spreads are applicable to all transfers like; internal customer
transfers, incoming transfers, and outgoing transfers.
Internal customer transfers can be of three types:
1. A customer transfers funds from one account to another (the CIF is the same but the
accounts are different).
2. The ordering and the beneficiary customer belong to the same customer category.
3. The ordering customer and the beneficiary customers are different but customers of your
bank.
In cases 1 and 2, the value date for both the debit and credit legs will be defaulted to today’s
date.
In case 3, the defaulted Debit and Credit Value Dates will need to be modified based on the
spread that is maintained. Incoming transfers are received as MT 103 SWIFT messages,
which are uploaded into Oracle FLEXCUBE and processed as incoming payment
transactions in the Payments and Collections module.
You can invoke the ‘Value Date Spread details’ screen by typing ‘FTDVDSPR’ in the field at
the top right corner of the Application tool bar and clicking the adjoining arrow button.
4-1
Specifying the Value Date Spread
The debit and credit value date spread can be maintained for a customer + product + currency
combination. You can select the identification codes of the customer, product, and currency
from the option lists available at the respective fields.
Indicating the Spread Details
Indicate the debit and the credit value date spread that is applicable for the combination that
you specified. The spread can be positive or negative. It is important to note that the spread
that you indicate is always taken to be in calendar days.
In addition to maintaining spreads for individual customers, you can specify debit and credit
value date spreads for all customers for a given product and currency combination. Click
option list and select ‘ALL’ from the all valid values available at the field Customer.
While processing FT transfer, where the initiator and beneficiary, are different customers of
your Bank, Oracle FLEXCUBE applies the spread you maintained for the customer + product
+currency combination in the following manner:
Dr account leg
Modified Value Date = Today + Debit Value Date Spread for Customer
1
Cr. account leg
Modified Value Date = Today + Credit Value Date Spread for Customer 2
Specifying Cut-off Details for a currency, product and customer combination
Specify time within which (or before which) you want to receive FT transactions for
processing, for the specified customer, product, and currency.
You can specify the following:
Number of days before which a transaction involving the combination must be received.
Cut-off time, in hours and minutes, before which transactions must be received.
4-2
These parameters are known as currency cut-off parameters.
In this screen, you can maintain the cut-off time, cut-off days and the value spreads to be
applicable for:
Each customer, for a product and currency combination
All customers, for each product and currency combination
These currency cut-off parameters are validated in respect of a funds transfer transaction only
if currency cut-off checks are specified as applicable in the product preferences, for the
product involving the transaction.
4.2.1
Maintaining Clearing Network Details
In the Clearing Networks screen, you can maintain the networks (such as SORBNET and
ELIXIR) through which you communicate with other banks and financial institutions for funds
transfers.
You can invoke this screen by typing ‘PCDCLRNT’ in the field at the top right corner of the
Application tool bar and clicking the adjoining arrow button. The screen is as below:
4-3
In this screen, you should specify the following details:
4.2.1.1
4.2.1.2
4.2.1.3
Specifying the Networks
The Name of the Clearing Network. This will uniquely identify the network in Oracle
FLEXCUBE.
A brief description of the network
Clearing currency of the network
Clearing system ID code
Clearing Network BIC
Specifying the Handoff Directory
The Incoming and Outgoing Handoff directories. Incoming and Outgoing transactions
will be handed off to the respective directories that you indicate in this screen.
IBAN validation for the Counterparty Account Number is required for outgoing payments
and incoming collections using the clearing network.
Indicate whether the processing bank is an indirect participant of the clearing network.
If yes, then the counterparty account will be replaced with the currency correspondent
account.
Specifying the RTGS
The following RTGS network details should be specified:
Network Type
Select the network type. This can be RTGS or Non-RTGS. By default, system selects Non–
RTGS.
New COV Format Required
Check this box to indicate that the cover message needs to be sent in the new format. If you
select this option, CUST_RTGS_COV message will be sent which will follow the same format
as 202COV.
For more details on new cover message formats, refer the settlements user manual.
Network Qualifier
If the network type is RTGS, indicate whether the network is TARGET 2 system. To enable
the system to perform TARGET -2 specific validations during contract input and message
generation, select TARGET-2 from the network qualifier drop down list.
You can either choose ‘TARGET 2’ or ‘Others’ as the network qualifier. The default value is
‘Others’.
Note
This field is enabled only if the network type is chosen as ‘RTGS’.
TARGET-2 is a RTGS clearing system for high value Euro payments. All the participants in
the current National RTGS system automatically become members of TARGET-2.
Following are the units of TARGET-2:
Direct TARGET-2 participant
Indirect TARGET-2 participant
4-4
If payment is done from direct TARGET-2 participant to another direct TARGET-2, the
account of the sender will be debited and that of receiver is credited.
If payments are sent from a direct TARGET-2 participant to a direct TARGET-1 participant,
an interlinking account is used.
Swift Type
Select the swift type from the drop down list. The drop down list contains the options ‘FIN’ and
‘FIN Y- Copy’.
Network Service Identifier
The service identifier that is specified here will be displayed in Field 113 of Block 3 header in
the RTGS message.
Note
This will be enabled if network type chosen is ‘RTGS’.
4.2.1.4
Specifying the Incoming Transactions
Branch Code
Specify the code for the branch that is participating in the incoming account process.
Incoming Currency Code
If you select the currency code, all the accounts associated with the chosen currency code
will be displayed in the option list provided in the adjacent field.
Incoming Account
In case of incoming transactions received over the network, the account that you indicate here
will be debited by default.
Description
In case of TARGET 2 clearing network, the default incoming account will be the primary nostro
account with the central bank that should be debited while processing an incoming TARGET
2 payment.
4.2.1.5
Specifying the Outgoing Transactions
Branch Code
For all outgoing transactions sent over the network you are maintaining, you can specify the
default account that should be credited.
Outgoing Currency code
If you select the currency code, all the accounts associated with the chosen currency code
will be displayed in the option list provided in the adjacent field.
Outgoing Account
In case of outgoing transactions received over the network, the account that you indicate here
will be credited by default.
Description
In case of TARGET 2 clearing network, the default incoming account will be the primary nostro
account with the central bank that should be credited while processing an outgoing TARGET
2 payment.
4-5
Note
You are not allowed to maintain the same default incoming or outgoing accounts for different networks.
4.2.1.6
Specifying Dispatch Accounting Parameters
To consolidate the accounting entries such that the Clearing Nostro GL is netted to post single
debit and credit entries for each file that is dispatched, you will need to identify the Clearing
Nostro account through the Dispatch Accounting Parameters section in the ‘Clearing Network’
screen.
Branch
Select the appropriate branch code and the currency code from the corresponding option lists
available.
Nostro Account
You can maintain different clearing Nostro accounts for the above combination of branch and
currency.
Outgoing and Incoming Transaction Code
After you identify the nostro account to which the consolidated entry will be passed for all
Dispatch entries you have to select separate transactions codes against which all the
incoming and outgoing transactions are to be tracked. The BIC codes for the clearing network
will be derived using the Nostro Account so maintained.
4.2.1.7
Specifying the UDF Details
Click ‘Fields’ button to provide values for the UDFs associated with the screen.
4.3
Maintaining National Clearing Codes
As part of maintaining reference information for the different banks with which your bank
transacts in various countries, you can maintain the National Clearing Codes for each of them.
These codes are identifiers for local banks in the clearing network, similar to, but distinct from,
the Bank Identifier Codes (BIC).
When you enter or upload a funds transfer transaction, you can specify the National Clearing
Codes for banks that form part of the settlement route, which correspond to fields 56, 57 and
58 in a SWIFT message – the Intermediary Institution, Account with Institution and the
Beneficiary Institution.
You maintain National Clearing Codes as follows:
1. Maintaining network details for each clearing network, of which the local banks form a part
2. Maintaining the National Clearing Codes for the individual banks (or branches) in a
network
4.3.1
Maintaining Network Details
You can maintain details of clearing networks, of which local banks and their branches form
a part.
For each network, you maintain the following details:
A unique identifier for the network
4-6
The prefix to be used for the network code
A first party field
A description for the network
The unique mask or format that will be used for the clearing codes of banks that form
part of the network
The local currency for the network
You can invoke the ‘Clearing Network Maintenance’ screen by typing ‘ISDNTMNT’ in the field
at the top right corner of the Application tool bar and clicking the adjoining arrow button.
Network Code and Description
The network code uniquely identifies the network. The Clearing Code information for each of
the banks that form part of the clearing network will contain the network code.
Network Prefix
Specify a prefix for the network code. For instance, //CH.
Clearing Code Mask
A unique Clearing Code identifies each individual bank that forms part of the network. Each
network has a unique mask or format to which the clearing codes of individual banks must
conform. You can specify a mask comprising a maximum of 35 alphanumeric characters.
Here, you have to define the minimum number of digits in lower case ‘n’ and the variable digits
in upper case ‘N’.
In Oracle FLEXCUBE, you can maintain variable length clearing code. However, this is
supported only for numeric clearing codes.
Currency
For each network, specify the applicable local currency.
First Party Field
If you check this flag, the network code can appear only once in the MT103, MT103+, MT102,
MT102+ MT202 messages of the payment instruction.
4-7
4.3.2
Maintaining Clearing Codes for Individual Banks
You can maintain the Clearing Code details for individual banks (or branches) in a network,
in the ‘Clearing Code Maintenance’ screen.
You can invoke the ‘Clearing Code Maintenance’ screen by typing ‘ISDCTMNT’ in the field at
the top right corner of the Application tool bar and clicking the adjoining arrow button.
The Clearing Code details comprise the following:
The clearing network of which the bank forms a part
The nationality of the bank, i.e., the country in which the bank operates
The name, description and address of the bank
The bank’s own clearing code, if any
The customer number for the clearing code
The BIC for the bank
Network Code
The individual bank is part of a clearing network, for which you have maintained details in
Oracle FLEXCUBE. Specify the code of the clearing network, of which the bank (or branch)
forms a part.
Country
Specify the country in which the bank operates.
Clearing code
The National Clearing Code that has been assigned to the bank, in the clearing network you
have specified, must be indicated.
Customer Number
This is a number used to identify the customer. The swift upload process in Oracle
FLEXCUBE will check if the customer number is a clearing code. In case the customer
4-8
number is a clearing code, Oracle FLEXCUBE will check if this is a bank’s customer and
based on that, will fetch the customer’s account number.
Bank Name, Description, Address
Specify the name, description and address of the bank.
Own clearing code
Each individual bank in a clearing network could have two different, distinct clearing codes:
The National Clearing Code
The bank’s own clearing code
The National Clearing Code is the identifier for the bank as a clearing agent in a settlement
route for any transaction, in the network. However, when the bank is the beneficiary institution
as well as the receiver of funds in the settlement route for a transaction, within the network,
the National Clearing Code is not used, but the bank’s own clearing code is used.
For example,
For Global Services Bank (GSB), Paris, the National Clearing Code used when the bank just
acts only as a clearing agent in the settlement route, is (20-00-00). However, when GSB is
the beneficiary of the funds, the local clearing code used is (20-32-53). This is the bank’s ‘own
clearing code’. In both cases, the SWIFT BIC used for the bank would be the same.
Bank Identification Code
As part of the clearing codes details for a bank, you must also specify the SWIFT BIC code
that corresponds to the bank. The system uses this association between the BIC Code and
the Clearing Code to convert BIC Codes to local clearing codes.
Clearing Code Indicator
Here, you need to specify whether the network code is in clearing or not. Select ‘Yes’ or ‘No’
from the drop-down list as required.
4.3.3
Uploading Clearing Codes
You can upload clearing codes from the BIC Plus directory to Oracle FLEXCUBE through the
‘BIC Upload’ screen.
4-9
You can invoke the ‘BIC Upload’ screen by typing ‘ISDBICPU’ in the field at the top right
corner of the Application tool bar and clicking the adjoining arrow button.
In the BIC Upload screen, specify the source code from which you want to upload details.
Select an appropriate source code from the adjoining drop-down list by clicking the alongside
arrow. Specify the file name as well as the file path in the respective fields and click ‘Submit
Params’ button. The options available are:
BIC - Select this to upload the BIC file
CCH - Select this to upload the country-wise holiday file
BICPLUSIBAN - Select this to upload BIC plus IBAN file.
BankDirectoryPlus - Select this to upload Bank Directory Plus file.
IBANPlus - Select this to upload IBAN Plus file.
IBANStructure - Select this to upload IBAN structure file.
BICPLUSIBANIS - Select this to upload BIC plus IBAN structure file.
Note
–
For a record with the modification option U, if there is no existing record in the
Oracle FLEXCUBE clearing code table, then the same is inserted. If the record
exists, the data is updated with the one in BIC upload.
–
For a record with the modification option M, if there is no existing record in the
Oracle FLEXCUBE clearing code table, then the same is inserted. If the record
exists, the data is updated with the one in BIC upload.
–
For a record with the modification options A and W, if there is an existing record in
the Oracle FLEXCUBE clearing code table, then an error is logged and the upload
continues.
–
For a record with the modification option D, if there is no existing record in the
Oracle FLEXCUBE clearing code table, then an error is logged and the upload
continues.
–
On upload the national ID for all bank codes and the default network code for those
countries are populated in the clearing upload tables.
4-10
The sequence of upload is based on the modification option and follows the order given
below:
4.3.4
Deletion
Modification
AdditionMaintaining
Clearing Code Exclusion List
Oracle FLEXCUBE allows you to maintain a list of clearing codes that should not be uploaded
during the clearing code upload. You can specify this list in the ‘BIC Upload Maintenance’
screen.
You can invoke the ‘BIC Upload Maintenance’ screen by typing ‘ISDBICUM’ in the field at the
top right corner of the Application tool bar and clicking the adjoining arrow button.
Here you can capture the following details:
BIC upload Source file
You can select the BIC upload source file as BICPLUS or BIC from the adjoining drop-down
list, through the BIC upload Maintenance screen.
Network Code exclusion List
You can specify a list of Network codes for which the clearing codes need not be uploaded
during clearing code upload operation. This BICPLUS upload file will be invoked during
clearing code upload into the directory.
4.4
Blacklisted BIC Codes
Your bank may wish to avoid dealing with blacklisted entities, in a funds transfer settlement.
Entities are identified by their SWIFT BIC Codes.
If the entity for which you are specifying the BIC code is a blacklisted entity, you can indicate
the same in the BIC Code Details screen, by selecting the ‘Blacklisted’ checkbox.
4-11
If the BIC code of a blacklisted entity is specified as part of the party information in a funds
transfer settlement, Oracle FLEXCUBE prompts you for an override before you can save the
transaction.
For details about how funds transfer transactions with blacklisted BIC codes are processed,
refer the chapter ‘Processing a Funds Transfer’, in this user manual.
4.5
Maintaining RTGS Directory
You can maintain the details of the Real Time Gross Settlement (RTGS) directory in the
‘RTGS Directory Structure’ screen.
You can invoke the ‘RTGS Directory Maintenance’ screen by typing ‘ISDRTGSD’ in the field
at the top right corner of the Application tool bar and clicking the adjoining arrow button.
Network
Select the relevant Network ID from the available option list. The option list defaults only those
networks which are maintained as RTGS type Network type in the clearing networks
Maintenance.
Sender Bank Identification Code
Specify the BIC assigned to the participant from the option list. A participant can be a ‘Direct
Participant’ or an ‘Indirect Participant’.
For more details on Direct and Indirect participant refer ‘Maintaining Information specific to the
Payments and Collections Module’ chapter in the Payments and Collections user manual.
Addressee
Specify the BIC of the addressee, i.e., the receiver of the payment message.
Account Holder
Specify the BIC of the settlement bank.
4-12
Institution Name
Specify the institution where the participant’s account is to be credited with the amount of the
funds transfer.
City Heading
Specify the city where the institution is sited.
National Clearing Code
Enter the national clearing code to be used in case the system is not able to resolve the
TARGET-2 participant based on the bank code.
TARGET–2 is a high value Euro Payment clearing system.
For more information on TARGET-2, refer to the Maintaining Information specific to the
Payments and Collections Module chapter in the Payments and Collections user manual.
Valid From Date
Specify the date from which the clearing code is valid. The application date is defaulted here.
You can change this, if required.
Valid Till Date
Specify the date up to which the clearing code is valid. If you do not specify the valid till date,
then it will be set to 31-12-9999.
Main Bank Identification Code Flag
Main BIC Flag is used to resolve 8 characters BIC. Check this option to indicate that the main
BIC must be used if the bank code is incomplete.
4.5.1
RTGS Directory Upload
Upload the updated TARGET directory into Oracle FLEXCUBE. The files are fixed length
ASCII format files. You can trigger the upload by using the RTGS Directory Upload screen.
You can invoke the ‘RTGS Upload’ screen by typing ‘ISDRTGSU’ in the field at the top right
corner of the Application tool bar and clicking the adjoining arrow button.
You can specify the following details in this screen.
4-13
File name
Specify the name of the upload filename.
Directory
Specify the directory i.e., the file path or area in your system where the ASCII files are to be
stored.
Network Code
Specify the network from which the upload is being triggered from the option list. The list
contains all the RTGS networks defined in the ‘PC Clearing Network’ screen whose network
qualifiers are TARGET2.
Intraday Sequence Number
Specify the sequence number for the upload. In case you have multiple uploads on the same
day, this number may be used as the identifier of each upload.
Upload Type
Select the type of the upload required from the adjoining drop-down list. This list displays the
following values:
Full Refresh
Current
The format of the file is as below:
Sl. No.
Field Name
Data type
1
BIC
Varchar2(11
)
Participant’s BIC
2
Addressee
Varchar2(11
)
BIC to be
used in
header
3
Account
Holder
VARCHAR2
(11)
BIC identifying the
settlement
bank
4
Institution
Name
VARCHAR2
(105)
Participant’s
company
name
5
City Heading
VARCHAR2
(35)
6
National
Sorting
Code
VARCHAR2
(15)
7
Main BIC
Flag
VARCHAR2
(1)
4-14
Values
‘Y’ OR ‘N’
Remarks
8
VARCHAR2
(1)
A:added
M:modified
D:deleted
U:unchanged
9
Valid From
Date
‘YYYYMMDD’
10
Valid Till
Date
‘YYYYMMDD’
11
Reserve
VARCHAR2
(25)
The following actions will be performed based on the type of change:
Added
A new record will be created. If the record already exists then the latest details will be updated
in this.
Modified
A new record will be created. If the record already exists then the latest details will be updated
in this.
Unchanged
A new record will be created. If the record already exists then the latest details will be updated
in this.
Deleted
An existing record will be marked as closed. If the record doesn’t exist then it will be ignored.
If the BICs present in RTGS directory is not present in the RTGS upload file they will be closed
once the upload is over. This will happen when upload type chosen is ‘Full Refresh’.
4.6
Maintaining Branch Parameters for Funds Transfer
You can use the ‘Funds Transfer - Branch Parameters’ screen for maintaining parameters
related to Funds transfer. These parameters can be maintained for each branch of your bank.
4-15
You can invoke the ‘Funds Transfer Branch Parameters’ screen by also entering
‘FTDBRMNT’ in the field at the top right corner of the Application toolbar and clicking the
adjoining arrow button.
The following fields can be specified in the above screen.
Branch Code
Specify the Branch Code for which the Funds Transfer parameters are being maintained.
Multi Customer Transfer
Check this box to indicate that multiple customer transfer messages - MT102 – can be
processed for the transactions entered in the branch. By default this check box will be unselected, in which case MT102 message will not be processed.
Multi Bank Transfer
Check this box to indicate that multiple Bank/Financial institution transfer messages - MT203
- can be processed for the transactions entered in the branch. The valid values allowed are
‘Y’ and ‘N’. By default this check box will be un-selected, in which case MT203 message will
not be processed.
Generate MT102+
Check this box to indicate that MT102+ messages can be processed for the transactions
entered in the branch. By default this check box will be un-selected, in which case MT102+
message will not be processed.
To process an MT 102+ message, select both Generate MT102+ and Multi Customer
Transfer check boxes.
Incoming General Ledger
Specify the Bridge GL for the incoming MT102 and 102+.
Outgoing General Ledger:
Specify the Bridge GL for outgoing MT102 and 102+.
4-16
For SDMC, the system picks the credit leg for consolidated internal contract as outgoing
general ledger.
Note
You must specify both incoming and outgoing GLs if ‘Multi Customer Transfer or ‘Multi
Bank Transfer’ is selected.
Customer Consolidation Debit Product
Specify the customer consolidation debit product. The option list displays all valid internal type
FT products. Select the appropriate one.
This product will be used for creating consolidated FT contract for Single Debit Multiple Credit
(SDMC).
4.6.1
Maintaining Currency and Transaction Amount Agreements for MT102
and MT102+
You can capture the accepted currencies and transaction amounts as agreed bilaterally
between the Sender and receiver in `Agreements with Sender / Receiver BIC’.
You can invoke the screen by typing ‘ISDCCYRS’ in the field at the top right corner of the
Application toolbar and clicking the adjoining arrow button.I
The following fields can be specified in the above screen:
4-17
BIC Code
Specify the BIC code from the option list. The value entered here must be a valid BIC code in
the system with the options Generate MT102, Generate MT102+ and Generate MT101
selected.
Message Type
Select the message type from the option list:
MT101,
MT102
MT102+
Direction
Indicate whether the BIC-currencies amount maintenance is for incoming or outgoing or both
type of messages. You have the following options here
Incoming
Outgoing
Both
Product for Consol Debt
Specify the product for consolidated debit entry to ordering customer. This can be specified
for incoming MT101.
No. of Transactions per Message
Specify the total number of transactions for each message (MT101).
Cutoff Incoming
Specify the cutoff time in hours and minutes for the incoming messages.
Cutoff Outgoing
Specify the cutoff time in hours and minutes for the outgoing messages.
4.6.1.1
Transaction Currency Limit Details
The details displayed here depend on the direction specified. They are used for MT101,
MT102 and MT102+.
If the direction is Incoming, these fields indicate the transaction limit for individual
transactions in the incoming message.
If the direction is Outgoing, these fields indicate the transaction limit for individual
transactions in the outgoing message.
If the direction is Both, these fields indicate the transaction limit for individual
transactions in the outgoing and incoming message.
Incoming MT101
If the message is an incoming MT101, on receiving the message the following checks will be
made before uploading the transactions.
If the Sender has an agreement for Incoming MT101.
If the Cut-off time for Incoming MT101 for the receiver has not passed.
Check for the Transaction currency & Transaction amount limit.
Check for the debit authority of the Instructing party, in case the instructing party is different
than the ordering customer.
4-18
5. Processing Funds Transfer
5.1
Introduction
A Funds Transfer (FT) contract is a transaction whereby funds are moved from the account
of one party (called the remitter) to another party (called the beneficiary). Such movement of
funds may involve a sequence of events, but is treated as one contract.
For example, if a customer of Berliner Bank, instructs them to pay Pounds Sterling to Midland
bank, London into the account of Mr. Silas Reed. The sequence of the events that will follow,
to effect the transfer can be considered an FT contract.
Ordering
Customer
Berliner
Bank
Midland
Bank
Mr. Silas
Reed
An FT Contract would therefore require information on:
Who is the remitter?
What is the transfer amount and currency?
Is it a cross currency transfer?
Are any intermediate banks involved in the transfer?
What route should the transfer follow before it actually reaches the beneficiary?
When is it to be settled?
Details of the beneficiary (name, account number etc.)
The mode of reimbursement
The method of transfer
The type of transfer (incoming, outgoing or internal)
Under each Product that you have defined, you can enter specific FTs based on the needs of
your customer. Each of these will constitute a contract. While products are general and serve
to classify or categorize funds transfers, contracts are customer specific and represent the
actual funds transfers that you are involved in. The attributes that you define for a product will
be inherited by all contracts linked to the product. While some of these attributes (for instance
the exchange rate) inherited from a product can be changed when a contract is entered
involving the product, there are some attributes (such as accounting treatment) that cannot
be changed when the contract is entered.
5.2
Entering Details of Funds Transfer
Through the screens that follow in this section you can initiate all the three major types of FT’s
(incoming, outgoing and internal).
You can choose to enter the details of a transfer either by:
Copying contract details from an existing contract and changing only the details that are
different for the contract you are entering.
Using your keyboard or the option lists that are available at the various fields to enter
the details of an FT afresh.
To enter the details of a contract, you need to just enter a product code and a few details about
the beneficiary and the remitter. Depending on the product code that you select, many of the
fields will be defaulted. You can over write some of these defaults to suit the FT that you are
processing. After specifying the details, you can save the record. In case of internal transfer
when you are saving the records, the system checks whether the accounts mentioned in the
5-1
‘from’ and ‘to’ leg of the transaction belong to the same netting group or not. If they belong to
the same netting group, the accounting entries will not be posted. Instead the transaction will
be logged for the netting batch. The system will automatically place an amount block on the
debit account. However, for the credit account, the amount will be reflected only after the
netting batch.
On authorisation, the transaction will be made available for the netting batch if logged for
netting batch.
Refer the section ‘Maintaining Netting Group’ in the chapter ‘Accounts for Inter-Branch
Transactions’ in the Core Services User Manual for further details about netting.
5.3
Specifying FT Contract Details
You can invoke the ‘FT Contract Details’ screen by typing ‘FTDTRONL’ in the field at the top
right corner of the Application tool bar and clicking the adjoining arrow button.
Click the ‘New’ button on the application toolbar.
Enter valid inputs into all the mandatory fields, or you will not be able to save the contract.
After you have entered all the details of a funds transfer, save the contract. To save a contract,
Select ‘Save’ from the Actions menu in the Application tool bar or click save icon.
5-2
If you have multi branch operation rights, you can create new transactions for a different
branch. However, the system will not allow you to query or authorize a transaction which is
already created in another branch.
5.4
Description of FT Contract Details Screen
The FT Contract Detailed screen as it appears, contains a header and a footer containing
fields that are specific to the contract you are entering. Besides these, you will also notice four
tabs and a vertical array of icons, along the lines of which you can enter details of a transfer.
Contract details are grouped into various screens according to the similarities they share.
Product
This is the product that is involved in the contract you are entering. Enter the code of an
authorized product defined through the Product definition table. Select the product code of the
product to which you want the contract to be linked. The contract will inherit all the attributes
of the product you have selected.
To facilitate fast input, you need to input the product code. Click ‘P’ button placed next to the
Product Code field. The system displays the details of primary keys. Depending on the
product code, the system defaults the values against many fields.
The default values will be displayed in the screens that correspond to the four tabs on the
‘Funds Transfer Contract Input’ screen.
Product Description
Based on the product you have chosen, the system displays the description of the product.
Contract Reference Number
As you click ‘P’ button, the system generates the reference number sequentially. This number
tag is used to identify the FT contract you are entering, it is also used in all the accounting
entries and transactions related to this contract. Hence the system generates a unique
number for each contract.
The contract reference number is a combination of a three-character branch code, a fourcharacter product code, a five-digit Julian Date and a four-digit serial number. The Julian Date
has the following format:
‘YYDDD’
Here, YY stands for the last two digits of the year and DDD for the number of day (s) that has/
have elapsed in the year.
For example,
January 31, 1998 translates into the Julian date: 98031. Similarly, February 5, 1998 becomes
98036 in the Julian format. Here, 036 is arrived at by adding the number of days elapsed in
January with those elapsed in February (31+5 = 36).
User Reference
Enter a reference number for the contract. The contract will be identified by this number in
addition to the ‘Contract Reference No’ generated by the system. This number should be
unique and cannot be used to identify any other contract. By default, the Contract Reference
No. generated by the system will be taken as the User Reference No.
Source Reference Number
This is the reference number of the source from which the FT contract was uploaded.
5-3
Message Reference Number
This is a unique message identification number that will be used to identify an incoming
message coming from an external system. This is defined as the ICN number. On upload of
an incoming message into Oracle FLEXCUBE, this number, given by the external system, will
be stored in Oracle FLEXCUBE and passed on to the contract generated as a result of the
incoming message. If the incoming message results in an outgoing message, the ICN number
will be linked to the outgoing message also.
This number will help you in creating a relationship between the incoming message, the
resultant contract in Oracle FLEXCUBE, and the outgoing message, if any.
For instance, if an incoming MT103 results in an FT transaction, then ICN number of the
incoming MT103 will be linked to the FT contract generated due to the upload of the incoming
payment message.
If an Incoming message results in an outgoing contract (outgoing message), Oracle
FLEXCUBE will store the External reference number (ICN Number) at the following levels.
Incoming Message Level
Contract Level (Resulted due to the Incoming message)
Outgoing message (As a result of the above contract)
The external reference number will also double up as the related reference number in Field
21 of the bank transfer message or MT 202. In the Funds Transfer Contract Details screen,
this field will be enabled for Bank Transfer Type product. The value will be validated for ‘/’ at
the start, ‘/’ at the end or ‘//’ in the value.
The following tags under MT 202 message will support a clearing code ‘PL’:
52A, 52D
56A, 56D
57A, 57D
58A, 58D
The details of these messages will be stored in data store and will be used during message
validation.
Note
This field should not have ‘/’ at the start or end or ‘//’ in the value.
Transaction Type Code
Specify the transaction type code.
Source Code
The system displays the source code of the source from which the FT contract was uploaded.
Instruction Code
Select the instruction code from the adjoining option list.
Book Date
Specify the date of booking.
5-4
Version Number
Select the version number
5.4.1
Body of Screen
The FT Contract Screen is designed to contain four tabs along the lines of which you can enter
details of the contract. The four tabs are:
Main
Click this tab to enter vital details of a contract. This screen, along with its
fields, has been detailed under the head Processing a Funds Transfer.
Other
Details
Click this tab to set the preferences and specify other details. The details
of this tab have been explained under the head ‘Capturing Other Details’.
Settleme
nt
Details
Click this tab to specify the details pertaining to regulatory reporting and
envelope. You can specify the details on this screen if you have checked
the option ‘Remit Messages’ in ‘Product Preferences’ screen.
Settleme
nt Route
Click this tab to view a screen which depicts the route that a transfer will
take before it actually reaches the ultimate beneficiary. The details of this
screen have been detailed under the head Viewing the settlement route
of a transfer.
On the contract detailed screen you will notice a vertical toolbar. The buttons on this toolbar
enable you to invoke a number of functions that are vital to the processing of a transfer. These
buttons have been briefly enlisted below.
Settlement
Click this button to invoke the Settlement screens. A transfer is settled
based on the settlement details that you specify. This has been discussed in the Settlements manual.
MIS
Click this icon to define MIS details for the transfer
Charges
This button invokes the Charges, Commissions and Fees (ICCF) service. On invoking this function you will be presented with a screen
where the ICCF rate, amount, currency, waive charge Y/N parameter
can be specified.
In the Charges and Fees manual you will find the entire procedure for
maintaining charge rules. It also deals with the linking of a charge
scheme to a product and the application of the scheme on a transfer.
Events
Click this button to view details of the events in the life cycle of the
transfer you are processing.
This button invokes the Tax services. On invoking this function you
can define the tax scheme that is applicable to the transfer.
Tax
The Processing Tax manual details the entire procedure of maintaining tax rules and schemes. It also deals with the linking of a tax
scheme to a product and the application of the scheme on a transfer.
Advices
Click on this button to suppress or prioritize the advices that are to be
generated for a contract. The details of the advices screen have been
detailed under the head ‘Specifying advices for a transfer’.
Fields
Click on this icon to invoke the User Defined Fields screen.
5-5
Charge Claim
Message
Generation
Click this button to specify details for the generation of a Charge Claim
Advice (MT 191).
Click on this button to generate the messages for the contract.
Change Log
If a contract has more than one version, you can use this screen to
identify the details that have been changed.
Customer
Cover Details
Click this button to specify or view all details related to the new COV
format of customer cover.
OFAC Check
Click this button to call the OFAC service and view the
response from the OFAC system.
All Messages
Click this button to view all messages generated for a
particular contract.
Project Details
Click this button to capture project details if the beneficiary
account is a Trust account.
Duplication
Details
Click this button to view the details of duplicate contracts.
After you have made the required mandatory entries and saved the record, your User ID will
be displayed at the bottom of the screen. The date and time at which you save the contract
will be displayed in the Date Time field.
A user bearing a different User ID should authorize a contract that you have entered before
the EOD is run. Once the contract is authorized the Id of the user who authorized the contract
will be displayed. The status of the contract will be marked as Authorized.
Click ‘Exit’ button to exit the screen. You will return to the Application Browser.
5.5
Processing Funds Transfer
While defining a product, you have defined a broad outline that will be applicable to all
transfers involving it. While processing a transfer, you need to enter information that is specific
to the transfer. This information is captured through the Funds Transfer Contract Input – Main
5-6
screen. From the Funds Transfer Contract Input screen, click the tab titled Main to define
important contract details.
The entries that you make to the various fields on this screen depend on whether the funds
involved in the contract are incoming, outgoing, or internal. Details of information that can
captured through the ‘FT Contract Main’ screen have been detailed below.
5.5.1
Specifying Details for Debit Leg of Transfer
Debit Currency
Specify the currency of the remitter’s account. You can choose a valid currency code from the
list of values that is available.
If you do not specify the debit currency, the currency of the account entered in the Remitter
Account field will be taken as the debit currency for the transfer. However, if you indicate only
the GL of the remitter account and not the account itself in the account field, input into the
currency field becomes mandatory.
Debit Branch
If the account of the remitter is in a branch different from your branch, enter the code of that
branch. Choose a branch code from the adjoining option list.
This field will be defaulted with the branch code of your bank.
Note
If you have specified an account that uses an account class that is restricted for the product, an override is sought.
5-7
Debit Account
Specify the account number of the remitter i.e., the account to be debited for the transfer
amount. This account number should exist in the list of accounts maintained for the branch
you had specified in the ‘Branch’ field.
If you are processing an incoming transfer, enter the account of the bank from which your
bank has received funds (typically this will be your nostro account in the currency of the
transfer). If it is an outgoing transfer, specify the account of the Ordering customer (the
ordering customer of your bank). If the remitter is your bank itself, you can specify just the GL
of the account. The appropriate account will be picked up by the system, in the currency of
the transfer (the currency you specified in the currency field).
Debit Account Description
The description corresponding to the debit account selected is displayed here. If the debit
account number keyed in has only one value matching it in the option list, then system will not
open the option list on tab out and the description of the debit account will be automatically
displayed.
Debit Amount
In this field, enter the amount that is being transferred. This amount is taken to be in the same
currency indicated in the previous field. In the case of incoming transfers, this will be the
transfer amount indicated in the event definition by the amount tags TFR_AMT. In the case
of outgoing transfers, the amount that you enter here will be corresponding to the amount tag
AMT_EQUIV, since in an outgoing transfer the actual transfer amount is the amount that is
being transferred to the Beneficiary.
On saving the transaction after entering all the required details in the system, the system
validates the value of the debit amount against the following:
Product transaction limit
User Input limit
If the transaction currency and the limit currency are different, then the system converts the
amount financed to limit currency and checks if the same is in excess of the product
transaction limit and user input limit. If this holds true, the system indicates the same with
below override/error messages:
Number of levels required for authorizing the transaction
Transaction amount is in excess of the input limit of the user
Debit Value Date
This is the date on which the debit leg of the funds transfer becomes effective, i.e., the value
date with which the remitter’s account is debited. This date must be earlier than or same as
the credit date.
If you do not enter a debit value date, the system defaults the system date (today’s date).
The generation time of an outgoing transfer effected directly in the FT module, through
settlements of any other module or on account of a straight through process should be
checked against the cut-off time defined for the currency involved in the transfer.
5-8
If the system time at the time of message generation for Outgoing transfers is beyond the cutoff time, the value date of the transfer is amended according to the number of days to be
added.
Debit Spread
The system displays the number of spread days maintained in the ‘Value Date Spread
Detailed’ screen for a customer, product and currency.
Debit Spread Date
The system displays the debit spread date for product, customer and currency in this field. It
is derived after adding the spread days to the debit value date maintained in ‘Value Date
Spread Details’ screen.
5.5.2
Specifying Details for Credit Leg of Transfer
Credit Currency
Specify the currency in which the beneficiary is to be credited. If you do not enter a credit
currency, the currency of the account entered in the ‘Credit Account’ field will be defaulted.
It is mandatory for you to enter a credit currency if you have indicated a GL as the credit
account. You can choose a valid currency from the list of values available for this field.
Credit Branch
Enter the branch to which you are crediting funds (i.e.) the branch into which you are crediting
the transfer amount, on behalf of the Ultimate beneficiary. You can select a valid branch code
from the adjoining option list.
Note
If you have specified an account that uses an account class that is restricted for the product, an override is sought.
Credit Account
This is the account that will be credited with the transfer amount. For an outgoing transfer it
refers to the next bank in the chain (typically your nostro in that currency), for the movement
of funds. Depending on the settlement route the funds will in turn be transferred to the next
bank in the chain before the ultimate beneficiary is paid. For an incoming transfer this will be
ultimate beneficiary’s account in your bank. If you specify a Trust account in this field, you will
have to specify project related details in the ‘Project Details’ sub-screen by clicking ‘Project
Details’ button. If you do not capture project details, the system will display an error message
while saving.
Credit Account Description
The description corresponding to the credit account selected is displayed here.. If the credit
account number keyed in has only one value matching it in the LOV, then system will not open
the LOV on tab out and the description of the credit account will be automatically displayed.
Credit Amount
Indicate the amount that is to be credited to the beneficiary account. If you are effecting an
outgoing cross currency transfer, you need to only enter the credit amount; the other
component of the transfer, that is, the debit amount will be derived based on the exchange
rate that you specify.
In the case of incoming transfers, the amount that you enter in this field will correspond to the
amount tag AMT_EQUIV (the equivalent amount in the remitter’s account currency), while in
the case of outgoing transfers, the amount that you enter here will be corresponding to the
amount tag TFR_AMT (representing the actual amount that is being remitted.
5-9
On saving the transaction after entering all the required details in the system, the system
validates the value of the debit amount against the following:
Product transaction limit
User Input limit
If the transaction currency and the limit currency are different, then the system converts the
amount financed to limit currency and checks if the same is in excess of the product
transaction limit and user input limit. If this holds true, the system indicates the same with
below override/error messages:
Number of levels required for authorizing the transaction
Transaction amount is in excess of the input limit of the userCredit Value Date
This is the value date with which the Beneficiary’s account is to be credited. The credit value
date is in reality the value date (transaction date) of the transfer. This date must be later than
or equal to the debit date.
The system defaults the value date as explained below:
For incoming and internal transfers the default is the system date
For outgoing transfers the default date is the system date + spot days as defined in the
currency table in the Core Services module of Oracle FLEXCUBE.
Transfer
Type
Internal
Transfer
Remitter
Beneficiary
For an internal transfer, it is mandatory
for you to enter details of remitter of the
funds.
For an internal transfer, it is
mandatory for you to enter
details of beneficiary of the
funds. The beneficiary of an
internal transfer can be a customer or a bank.
The remitter in this case can be a customer or a bank.
Incoming
Transfer
For an incoming transfer the remitter of
the funds is always a bank. Once the
debit leg currency is chosen the system
will default the nostro account maintained in that currency as the debit
account.
The beneficiary in the case of
an incoming transfer can be
either a bank or a customer.
Outgoing
Customer
Transfer
For outgoing transfers, it is mandatory
for you to enter details of remitter of the
funds. The remitter in this case is
almost always a customer. However if
you input a bank as the remitter of such
a transfer, then the system will seek an
override. If you input a GL as the remitter, then it is mandatory for you to enter
the details of the Ultimate beneficiary.
If it is a Nostro, then it is mandatory for you to enter the
details of the Ultimate beneficiary.
5-10
The system automatically
default s the nostro maintained in that currency in the
credit account field once you
enter the credit leg currency.
Outgoing
Bank
Transfer
If you are entering an outgoing bank
transfer, input into this field is mandatory.
In this case the beneficiary
must be a bank or a Managers
Check Payable.
In the case of Outgoing Bank Transfers,
the remitter can be either a bank or a
GL. If you enter a GL in this field then
input into the ‘By Order Of’ field
becomes mandatory.
Outgoing
Own A/C
Transfer
In case of Outgoing Own A/C transfer,
the remitter account has to be a ‘Nostro’
Account. It is also mandatory to maintain the mapping of this Nostro account
with the external account.
The beneficiary account also
needs to be a Nostro account
but with a different Bank than
that of the remitter
Credit Spread
The system displays the number of spread days maintained for a customer, product and
currency as specified in the ‘Value Date Spread Detailed’ screen.
Credit Spread Date
The system displays the credit spread date for product, customer and currency in this field. It
is derived after adding the spread days to the credit value date maintained in ‘Value Date
Spread Details’ screen.
IBAN for the debit and credit accounts
The IBAN or International Bank Account Number is a unique account number that is used to
identify a customer’s account in a financial institution internationally.
International Bank Account Numbers in your bank are generated in the format of the account
mask that you specify in the IBAN Masks section of the Branch Parameters.
You may need to provide the IBAN for the debit and credit accounts involved in a funds
transfer transaction.
Debit IBAN
In this field, indicate the IBAN corresponding to the debit account that you have entered for
the transaction.
Credit IBAN
In this field, indicate the IBAN corresponding to the credit account that you have entered for
the transaction.
5.5.2.1
Specifying Exchange Rate Details
The system ascertains the CIF ID based on the debit (for outgoing customer transfers) or
credit account (for incoming customer transfers) that you specify. This, along with your
specification of the Currency Pair and the Value Date for the transaction, enables the System
to automatically assign the exchange rate that is to be used for the FT deal, if currency
conversion is involved.
The Exchange Rate applicable for the transaction = Base Rate +/- Customer Spread
(depending on whether it is a Buy or a Sell).
5-11
The Base Rate is derived from the Mid Rate and the Buy/Sell Spreads that you maintain for
the currency pair in the exchange rate maintenance table. The system displays the rate type
based on the specifications defined in the product to which the contract is linked.
Similarly, the spread that you have maintained for the specified Counterparty, Currency Pair
and Tenor combination in the Customer Spread Maintenance screen is picked up and applied
for the customer involved in the deal. The tenor for an FT contract is zero (0) – therefore, you
need to maintain Customer Spread for zero tenor in the Customer Spread Maintenance
screen.
If spread details for a specific counterparty (for the currency pair) are unavailable, the System
looks for the customer spread maintained for the wildcard ALL entry. If even that is not
available, then the Customer Spread defaults to zero.
The method of spread definition – whether percentage or points – as well as the spread code
are displayed based on the specifications defined for the product to which the contract is
linked.
Note
For a customer availing any Relationship Pricing scheme, the customer specific exchange
rate gets defaulted here, on clicking the ‘Enrich’ button.
FX Contract Reference
Specify the FX Contract Reference number you need to link to the FT contract, for the
currency pair. The adjoining option list displays a list of valid FX contract reference number.
Select the appropriate one.
If you specify the FX Contract Reference number, you will not be allowed to specify Rate Date
and Rate Serial. You cannot Link FX Contract to the FT contract, if 'Split Dr/Cr Liquidation'
check box is checked at FT product level
Rate Reference
The Rate Reference for the currency pair can be selected from the option list provided. If you
specify the Rate Reference, you will not be allowed to specify Rate Date and Rate Serial.
Rate Date
Rate Date is used for picking up the exchange rate for the currency pair involved in the
transaction and is applicable only in the case of cross currency transactions.You need to
specify the Rate Date for the currency pair. The Rate Date must be less than or equal to the
application date. If you specify Rate Date and Rate Serial, you will not be allowed to specify
Rate Reference.
Rate Serial
You can specify the Rate Serial for the Rate Date you have entered. All the rate serials
existing for the selected Rate Date will appear for selection. Select a Rate Serial from the
option list provided. If you have specified Rate Date and Rate Serial, you cannot specify Rate
Reference.
Validations for the Rate Date, Rate Serial and Rate Reference
You cannot specify Rate Date and Rate Serial and Rate Reference simultaneously. You can
specify either Rate Reference or Rate Serial and Rate Date. To choose Rate Reference,
select from the option list provided. This list will show all active spot FX contracts for the same
currency pair as the FT transaction. The currency pair is determined based on the product
type of the FT.
5-12
Upon choosing the FX contract, the system will default the Exchange Rate of the FX deal as
the Base Rate as well as the Exchange Rate for this FT contract. If the Rate Reference is
chosen, then no Spread will be applied to the Exchange Rate. The System will take the
Exchange Rate of the FX contract as it is. There will not be any variance validation in this
case.
If you specify the Rate Date and Rate Serial, then system will look into the Exchange Rate
Maintenance and get the rate for the combination. If the Rate Serial number is not present,
the system will throw up an error saying the Rate for the Serial Number does not exist. If the
Rate Serial Number and Rate Date are entered, then the base rate will be defaulted with the
Rate for this combination. In addition to this, the Customer Spread and Product Spread will
be applied and the Exchange Rate will be arrived at.
The Rate Serial will be used only if the transaction amount is less than the limit defined for a
currency pair. The Funds Transfer Contract Input will default the Rate only if the transaction
amount is less than the maximum amount defined for the Rate Code maintained at the FT
product level. If the amount is more than the specified amount, then the system will not default
the Rate. Instead, it will force you to enter the Rate. If you enter the Rate, the system will not
add the Customer Spread, as this will be the final Exchange Rate for the contract.
The rate variance validation will also be done only if the Transaction Amount is less than the
Maximum Amount defined for the Rate Code maintained at the FT product level. If the amount
is more than the specified amount, the system will not perform rate variance validation.
Instead, there will be an override to specify that the transaction amount is greater than the
maximum amount for rate variance check.
For more details on customer specific exchange rates, refer the section titled ‘Specifying
Pricing Benefit Details’ in Relationship Pricing user manual.
5.5.2.2
Specifying Transaction Details
Local Currency Equivalent
The system displays the local currency equivalent of the transfer amount.
Charge Bearer
There are obvious costs involved in transferring funds from one location to another. You need
to indicate who will actually bear these service charges. You can select an option from the
option list that is available. The options available are:
Remitter — All Charges
Beneficiary — All Charges
Remitter — Our Charges
This specification is inherited from the specification involving the product used by the contract.
It can be changed for a specific FT only if such a change is allowed in the preferences for the
product.
Message As Of
Specify the date as of when the messages are to be generated.
Rate As Of
Specify the date as of when exchange rates should be picked up and applied to the
components of a transfer.
Accounting As Of
Specify the date as of when accounting entries are posted.
5-13
Message Date
Specify the message date.
Accounting Date
Specify the date on which the accounting entries are posted.
Rate Pickup Date
Specify the date on which rate is picked up.
5.5.2.3
Specifying Other Details
Receiver
Indicate the name of the receiver or receiving institution that receives the message regarding
the transfer of funds, if it is different from the Account with Institution.
5.5.2.4
Enriching FT Contract
In case of an outgoing FT contract, specify the credit amount and click the ‘Enrich’ button. The
system displays the debit amount. Similarly, in case of an incoming FT contract, you need to
specify the debit amount. The system will display the credit amount on clicking ‘Enrich’ button.
Each time you modify the transaction details such as Debit Account, Credit Account,
Exchange Rate, Debit Value Date, Credit Value Date or Transaction Amount, you need to
click ‘Enrich’ button before saving the modification.
Note
If you do not click ‘Enrich’ button before saving the record, the system will validate the data
with the corresponding values as per the product, settlements and customer spread maintenance. If the values specified on this screen do not match those in the maintenances,
the system will overwrite the values entered by you.
5-14
5.5.3
Specifying Party Details
Click ‘Party Details’ tab to invoke the following screen.
Here you can enter the following details:
5.5.3.1
Specifying Name and Address of Ordering Customer (By Order Of)
Indicate the name and address of the ordering customer or institution of the transfer in the
field ’By Order Of‘. Input into this field depends on the type of transfer that has been initiated.
You can also choose the BIC of the customer from the adjoining option list that displays all
the BIC maintained in Oracle FLEXCUBE. The details that you enter will be used to determine
the settlement route of the transfer and in the SWIFT messages that are generated for the
transfer.
This field corresponds to field 50 in the MT 103/MT 103+ message that will be generated for
the customer transfer. Here you can specify up to 4 lines (each of 35 characters) indicating
the ordering customer’s name and address or BIC. The details in this field will be defaulted
automatically once you enter the debit account in the case of an outgoing transfer. For
instance, the IBAN of the customer will be fetched from customer account and defaults the
same as the first line of Ordering Customer. Note that for an outgoing MT102, MT103,
MT103+ and MT210 the first line should have number 1 present for option F. The customer’s
name will be defaulted in the second line and the address on the third.
5-15
Country
Specify the country of the ordering customer/institution. This adjoining option list displays all
valid country codes maintained in the system. You can choose the appropriate one.
5.5.3.2
Specifying Account with Institution
Indicate the institution where the beneficiary’s account is to be credited with the amount of the
funds transfer. This is known as the account with institution. This field corresponds to Field 57
of the payment message.
Country
Specify the country of the beneficiary’s account with institution. This adjoining option list
displays all valid country codes maintained in the system. You can choose the appropriate
one.
5.5.3.3
Specifying Details of Ultimate Beneficiary of Transfer
Indicate the name and address of the ultimate beneficiary of the transfer. The ultimate
beneficiary can be a customer or institution depending on the type of transfer that you have
initiated.
For incoming or internal transfers, you can select the ultimate beneficiary from the option list.
If you have maintained settlement instructions for the ultimate beneficiary the transfer will be
routed through the default settlement route. This field corresponds to Field 59 of the customer
transfer messages (MT 103/103+) and field 58 in case of a bank transfer. When you choose
the credit account (in the case of an incoming transfer) the details of the ultimate beneficiary
(like IBAN) will be defaulted automatically by the system. While saving the contract, System
will Validate Ultimate beneficiary (59) for a valid IBAN account number. IBAN validation will
be done in the below cases for both Ordering Customer and Ultimate beneficiary. The system
will consider the IBAN valid only if:
The first character is ‘/’
The second and third characters represent a valid country code
Both Sender’s and receiver’s countries should be for Mandatory IBAN Check
Country
Specify the country of the ultimate beneficiary. This adjoining option list displays all valid
country codes maintained in the system. You can choose the appropriate one.
Note
The country information is captured to enable Mantas to analyze the transactions for possible money laundering activities.
For more details on Mantas, refer 'Mantas' interface document.
5.5.3.4
Capturing Remittance Information
You can specify the sender to receiver information of the transfer by selecting the appropriate
value from the adjoining option list. The details that you enter will be populated in field 70 of
the payment message MT 103. The following values are available in the option list:
//
/INV/
/IPI/
/RFB/
5-16
/ROC/
/TSU/ - The code placed between slashes ('/') must be followed by the invoice number,
a slash ('/') and the amount paid.
Apart from the values provided in the list, you can also specify a valid ISO11649 creditor
reference number in the Remittance Information field.
Validations
System validates the specified reference number and displays the error message, if found
wrong as ‘Invalid Value for field Remittance Information’.
The Creditor Reference Number, if specified, should adhere to the following:
First 2 characters should be ‘RF’.
‘RF’ should be followed by 2-digit check digit.
The total length of the Creditor Reference Number should not exceed 25 characters.
If Creditor Reference Number is specified in any of the remittance information fields, then
during message generation the system ignores rest of the remittance information.
5.5.3.5
Specifying Beneficiary Advice Preferences
For outgoing remittances, you can indicate the mode of sending advice to beneficiary here.
The details specified in Ultimate Beneficiary Maintenance get defaulted here. You can modify
these values, if required.
Fax Number
Specify the fax number of the ultimate beneficiary for whom you are maintaining details.
Mobile Number
Specify the mobile number of the ultimate beneficiary for whom you are maintaining details.
Email Address
Specify the email address of the ultimate beneficiary for whom you are maintaining details.
Note
You can specify only one of the options among fax number, mobile number and e-mail address.
The system generates the beneficiary advice based on the details specified here, during
contract initiation or during the batch for future dated remittances. ‘BEN_ADV’ message type
is used for generating the advice. The advice generated contains the following tags:
FAX/Email Address
Order By(50)
Beneficiary (59)
Payment Details (70)
Value date
Currency
Amount (Credit Amount)
5-17
Amount in words
Originating bank/branch address
Note
–
Generic Interface is used to send out the beneficiary advice via fax or mobile.
–
The advice will not be generated if beneficiary details are not specified
For more details on Ultimate Beneficiary maintenance, refer the section titled ‘Maintaining
Ultimate Beneficiary details’ in Settlements user manual.
5.5.4
Capturing Additional Details
Capture more information with regard to the product from ‘Funds Contract Transfer Input –
Other Details’ screen. From the ‘Funds Transfer Contract Input’ screen, click the tab titled
‘Additional Details’ to invoke the following screen.
5.5.4.1
Indicating Preferences
Oracle FLEXCUBE allows you to indicate your preferences. You can check the boxes
corresponding to the following fields as required.
5-18
Override Overdraft
The Override Overdraft field is applicable to future dated contracts. This field is defaulted
based on the specifications you made in the Process overdraft for Autobook field on the
product preference screen.
The Autobook function automatically liquidates future dated funds transfer contracts. There
could be a situation where a customer requests you transfer an amount that actually exceeds
the balance in his account. In this field you can specify whether such future dated contracts,
can be processed when it is picked up by the autobook function, despite the overdraft. If you
check against this field the system will allow overdrawing and process such contracts.
Otherwise the auto book function will skip the contract with an error message. You can view
all the contracts that are not processed by the Autobook function because of the overdraft in
the FT Exception Report.
Remit Message
This is defaulted from the product level. If you wish to send the envelope contents, you need
to check this box.
The following validations will be carried out in Oracle FLEXCUBE if the ‘Remit Message’ box
is checked:
The Sender and Receiver are Remit members
Envelope contents are mandatory
If the ‘Remit Message’ box is checked, the value of the Transfer Type will be
‘CUST_TRANSFER’
An override message is displayed if payment details are maintained
The remit message will be displayed in the message in Block 119 as 119:REMIT.
Our Correspondent Required
If the transfer is routed through a correspondent bank, you can indicate so, by selecting this
option.
After Rate Refresh
To recall, you have specified the exchange rates to be used and indicated when they are to
be applied to the components of the transfer. You have the option to indicate that the rates
should be picked up only after the rates have been refreshed and authorized for the day.
Check against this field to indicate that the standard rate as of as of a future date can be
applied to the transfer only after the rates have been refreshed and authorized for the day.
Leave it unchecked to indicate otherwise.
If you have checked against this field, the exchange rate is picked up by the same method
mentioned for the standard rate, except that the rate as of booking, spot or value is picked up
only after the rate refresh has been completed and has been authorized.
When you run the Rate Update function, all contracts that require a rate update will be
displayed. It is from this screen that you can allow the refreshed rates to be applied to the
components of the transfer.
Refer to the chapter titled Automatic Processes for details of the rate update function.
Uploaded
If the contract has been uploaded from the Oracle FLEXCUBE FT gateway interface then the
field marked Uploaded will be automatically checked to indicate that the contract has come
5-19
from an external system. For details, refer the section ‘Specifying upload details’ in this
chapter.
5.5.4.2
Specifying Check Details
Indicating the Manager’s Check number
This is the identifying number of the Manager’s check that you issue for outgoing transfers by
check. This number should be unique across contracts and is used as a reference for
outgoing transfers.
For transfer types involving a Manager’s Check, the beneficiary account field will be defaulted
with the Manager’s Check payable account defined for the product.
Note
It is mandatory for you to enter a manager’s check number if you have checked against
Instrument Number Required in the Product Preferences screen. On the other hand, you
will not be allowed to make entries into this field, if the Managers check allowed field is
unchecked in the FT Product Preference Screen.
Indicating a customer check number
If you are processing an outgoing transfer and need to debit a check into a customer account,
you should indicate the identifying number of the check being used in the transfer.
The
check
number that
you
willAccount
have to and
match
number
validations
in the
checkofbook
details
table maintained
in
the enter
Current
Savings
Account
(CASA)
module
Oracle
FLEXCUBE.Delivery
Mode
Select the mode of delivery of the cheque book from the adjoining drop-down list. This list
displays the following values:
Courier
Branch
Note
If the delivery mode is ‘Courier’, then you will need to specify the delivery address.
Delivery Address 1
Specify the address to which the cheque book should be delivered. The adjoining option list
maintains all valid addresses maintained in the system. You can choose the appropriate one.
Delivery Address 2- 4
Specify the address to which the cheque book should be delivered.
5.5.4.3
Specifying Regulatory Reporting Details
Specify the regulatory reporting details.
5.5.4.4
Specifying Multi Credit Transfer Details
Enabling Multi Credit transfer
You cannot enable or disable the Multi Credit Transfer option. It is defaulted from the product/
branch level and cannot be changed by you at the contract level. This option will be enabled
for ‘Multi. Customer Transfer’ and ‘Multi Financial Institution Transfer’ type of payments only
and will not be enabled for other normal products.
5-20
Multi Credit Reference Number
You can assign a Multi Credit Reference number to a specific contract by clicking the option
list to choose from the list of Multi Credit Reference Numbers that are pending closure. During
contract save, the system validates the above-mentioned fields with existing contracts and if
the current transfer/transaction is identical to an existing contract it is pooled together with the
existing contract and it also assumes the same ‘Consol Account Reference ’ number as the
existing one. [Only Consolidation Pool pending closure, will be considered] In case the above
fields are not identical or if the number of contracts in the Pool exceeds 10, the system
generates a new ‘Consol Account Reference’. In case you do not specify any ‘Multi Credit Ref
No’ the system would generate a ‘Consol Account Reference’ for the first time.
Note
Processed Consolidation Pools will not be considered for matching.
If grouping is done by the system, based on grouping criteria then ‘Multi Credit Ref No’ would
be NULL and ‘Consol Account Reference’ would be used to consolidate accounting entries.
In case you are doing the consolidation by yourself, the ‘Multi Credit Ref No’ would be the
Reference Number given by you and ‘Consol Account Reference’ would be used to
consolidate Accounting Entries.
All Multi Financial Institution Transfer contracts would have Messaging, Accounting and Rate
as of booking date only. The ‘After Rate Refresh’ field will not be enabled for such contracts.
Amendment of Contract will be allowed only if Message has not been generated. If any of the
above mentioned fields used for grouping are changed, the contract would be tracked against
a different consolidation pool depending on the new values.
During the contract authorization, payment messages will be generated in suppressed stage.
Message generation happens after the individual queue is closed.
If you close a Consolidation Record by means of the Close Button or the Close option from
the menu, the consolidation record is liquidated. The system generates MT102, MT203 or
MT201 for multi customer credit transfer, multi credit bank transfer or multi credit own account
bank transfer respectively. Further, consolidated accounting entries are posted. Generation
of MT102 and MT203 provides for the generation of consolidated cover messages. One cover
per each MT102/MT203 is sent along with the consolidated amount.
During closure of consolidated record, the system triggers CINT (Consolidation Event for both
Messaging and Accounting) event.
Consol Account Reference Number
The consol account reference number is system-generated. This number is the reference that
facilitates consolidation of the various transfers of a customer, based on the grouping criteria.
It facilitates passing Consolidated Accounting entry to the Beneficiary Account/Settlement
Account.
The following items are checked for consolidating transfers across the system:
Product Code
Settlement Account
Receiver
Currency
Credit Value Date
Bank Operation code
5-21
Sender Correspondent
Receiver Correspondent – Line1 to 5
Sender to Receiver Info (Tag 72) – Line1 to 6
Message Date
Multi Credit Ref. No
Consol Account Reference
All transactions that have identical above-mentioned fields/items are validated and
consolidation happens if intermediary party [tag 56] is not mentioned in any of the transaction.
The systems checks whether the beneficiary of the message is MT102/ MT203 enabled and
also if ‘Multi Credit Transfer’ flag is enabled at the BIC level. If the field is not enabled, the
system will generate an error message.
Consolidation Status
The system indicates whether the consolidated contracts for a given multi credit reference
number are pending closure (P) or closed (C).
Note
The Multi transfer message is generated upon the closure of the reference number. However upon the authorization of each individual contract, the corresponding payment message is in the generated status. But the status of the Suppress Flag is ‘Y’ for the same.
Hence the Job which processes the outgoing message does not process these messages.
Debit Consolidation Reference Number
The system displays the contract reference number of the consol internal FT contract created
for customer debit consolidation.
Message Generation
For incoming and outgoing Existing MT102 message, processing will be extended to
handle MT102+ format.
For outgoing MT102+, flag field 119 will be populated with STP in the third user header
block.
For incoming MT102+ flag, field 119 will be checked for code STP in the third User
header block. If value is STP then MT102+ validations will be done before uploading
transactions.
For processing outgoing MT102+, the following validations are done:
Ordering Institution and AWI are used with letter option A.
Sending Institution is not used.
Bank Operation Code contains codes ‘CREDIT’ and ‘SPAY’
Sender to Receiver Information.
Contains INS in the beginning and followed by a valid BIC.
Contain codes ‘REJT’ and ‘RETN’
Must not contain ERI information.
Must contain Account field or Beneficiary Customer
MT102+ will not be generated on booking or authorization of a transaction. It will be
generated from Outgoing Consolidation screen similar to MT102.
If with the above validation, you check the option ‘Generate MT102+’ in addition to ‘Multi
Credit Transfer ’ in the following screen, MT102+ will be processed
5-22
Funds Transfer Branch Parameters
BIC
FT Product
Outgoing Consolidation Queue
You can generate MT 102 and MT102+ message from Queue called ‘Funds Transfer Multi
Customer Summary’ where Consolidation of individual MT102s is done.
You can invoke the screen by entering ‘FTSTCONS’ in the field at the top right corner of the
Application toolbar and clicking the adjoining arrow button.
In this screen, you can query on record based on the following criteria:
Consolidated Reference
Product Code
Consolidation Status
Multi Credit Reference number
Settlement Currency
Settlement Branch
This Queue gives the summary of all the consolidated transactions. Drill down gives the
Summary screen of the FT contract.
Close of the Consolidation Record initiated through the Close Button or Close option from the
menu liquidates and creates MT102 and consolidate accounting is also passed. Events called
‘CINT’ (Consolidation Event for both Messaging and Accounting) get triggered during closure
of consolidated record.
Generation of MT102 would also generate Consolidate Cover message if required with
consolidated amount i.e. one cover per MT102 would be send with consolidate amount if
cover is required.
MT203 size restrictions
MT203 will be generated only if there are more than one transaction to consolidate
–
If only one message is consolidated, MT202 is generated. Similarly, if only one
message is consolidated for MT103, system generates MT102.
5-23
5.5.4.5
Maximum number of transactions for a MT102/MT203 is limited to ten i.e. a maximum
of ten transactions (FT Contracts) will be allowed to be consolidated in a single pool.
This restriction is based on the parameter ‘MT102_TXN_LIMIT’ setup in CSTB
parameters.
If multiple pools have been created because of size restrictions, any subsequent
amendment, deletion, reversal of contracts in these pools will not result in the re
alignment of the pools.
Specifying Other Details
External Deal Linkage Number
Select the deal reference number of the related external deal from the option list provided.
The option list contains system generated reference numbers for all external deals.
The exchange rate, Dr amount, Dr account, Dr currency, Cr amount and Cr currency get
defaulted on selecting the external deal reference number.
Note
This is applicable only for outgoing remittance transactions.
Deal Reference Number
The deal reference number associated with the selected deal linkage number gets displayed
here.
On initiating this transaction, the amount block maintained against this deal reference number
gets released. The amount blocks associated with future dated contracts are released when
the corresponding batches are run.
If the contract is deleted or reversed, the amount block gets reinstated with the expiry date as
the expiry date maintained in External Deal linkage screen.
Note
–
The amount block released corresponds to the debit leg of the transaction and the
expiry date of the amount block defaults to the debit leg value date of the contract.
–
Only one amount block can be linked to an FT contract.
–
The contract amount should be equal to the amount block maintained in the system.
–
The debit value date of the contract should be less than or equal to the expiry date
of the deal.
For more details on external deal maintenance, refer section titled ‘External Deal
Maintenance’ in Core Services user manual.
5.5.4.6
Specifying Envelope Details
Specify the envelope content.
5.5.4.7
Reversal of Outgoing Multi Credit Customer Transfers
In case of reversal of outgoing multi credit transfer, the system passes accounting entries
based on the status of MT102 generation.
5-24
Scenario 1 - MT102 Not Generated
If MT102 is not generated, the system will pass the following accounting entries during
reversal process.
Dr/
Cr
Account
Description
Dr.
Remitter
With –ve Transaction Amount
Cr.
MT102 Suspense
With –ve Transaction Amount
Once these entries are passed, the system will adjust the total consolidated amount and
remove the corresponding contract from the consolidation queue.
Scenario 2 - MT102 Already Generated
If MT102 is already generated, during reversal, the system will display an override ‘Message
has already been generated’. If you choose ‘OK’, the system will proceed with the reversal
operation. The following accounting entries will be passed in this case.
Dr/
Cr
Account
Description
Dr.
Remitter
With –ve Transaction Amount
Cr.
MT102 Suspense
With –ve Transaction Amount
Account
Description
Dr.
MT102 Suspense
With –ve Transaction Amount
Cr.
Cr. Beneficiary
With –ve Transaction Amount
Dr/
Cr
On reversal of an individual transaction, the corresponding CINT event will also be reversed.
The system will recalculate the consolidation pool amount.
Closure of consolidation pool is allowed for authorized transactions only. If you attempt to
close an unauthorized transaction, the system will display an error message.
While marking EOTI, if there are pending consolidated transactions in MT102 consolidation
queue, the system will display a configurable override message. You can choose to proceed
or cancel.
5.5.4.8
Indicating when Settlement Messages should be Generated
Indicate the day or date on which Settlement messages related to the transfer should be
generated. You can select an appropriate date from the option list that is available.
The options available are:
As of Booking date
As of Spot date
5-25
As of Value date
As of Debit Value Date
As of Credit Value Date
As of Instruction Date
If the transfer you are processing is associated with a product, the message generation
specifications you made for the product is defaulted. You can change the values that are
defaulted if required.
Message as of Booking Date
If you specify ‘Booking Date’, settlement messages will be generated as of the date you enter
the contract after the contract is authorized.
Message as of Spot Date
For each currency that your bank deals with, you would have also specified a spot date in the
Currency Definition Maintenance table of the Core Services module.
If you choose ‘Spot Date’, messages will be generated spot days depending on the spot date
you have maintained for the currency involved in the transfer.
Message as of Value Date
If you specify value date, messages will be generated on the day the transfer becomes
effective.
You can enter a value date of your choice. However, it should be one of the following:
Today’s date
A date in the past
A date in the future
You can enter a date in the future only if future value dating is allowed for the product to which
the transfer is associated. The Value Date (transfer initiation date) should not be earlier than
the Start Date or later than the End Date of the product involved in the transfer.
Message as of Debit Value Date
If you choose this option, the messages will be generated, as on the value date, with which
the remitter account will be debited, will be used for the transfer. This would be earlier than
the credit value date.
Message as of Credit Value Date
If you choose this option, the messages will be generated on the value date with which the
beneficiary account will be credited, will be used for the transfer. The credit value date is in
reality the value date (transaction date) of the transfer.
Messages can be generated only after the exchange rate for the contract has been fixed.
Thus, based on the rate pick up code that you specify, you will have to match the options for
message generation.
For normal contracts (as of booking date) messages will be generated only after
authorization. In the case of Future Valued transfers messages will be generated as of spot
date.
Message Date
This is the actual date on which the messages are to be generated. This date is computed on
the basis of the input in the ‘Message as of Field’ in the ‘Contract – Others’ screen.
5-26
5.5.4.9
Specifying when Accounting Entries must be passed
For the contract, you can specify whether accounting entries must be passed on the date of
message generation (if message generation is indicated on booking date) or on the debit
value date of the transaction.
If you indicate that accounting entries must be passed on the date of message generation, the
entries related to the contract will be passed on the date of message generation. If message
generation is indicated on booking date, and you have indicated that accounting entries are
to be posted on the debit value date of the transaction, the messages are generated on the
booking date, and the accounting is deferred to the debit value date.
The accounting date
When you make your specification in the Accounting As Of field, the system arrives at the date
on which accounting entries will be posted, and displays it in the Accounting Date field on the
FT Contract Online screen. If you select ‘Message Date’, the date on which messages are
generated is taken as the accounting date. If you select ‘Debit Value Date’, the debit value
date of the transaction is taken as the accounting date.
You can only specify the Accounting As Of date if:
Message generation is indicated to be on the booking date (the option chosen in the
Message As Of field is ‘Booking Date’). If message generation is indicated on any date
other than the booking date (that is, if the option in the Message As Of field is not
‘Booking Date’), the default option in the ‘Accounting As Of’ field is ‘Message Date’, (that
is, accounting entries will be passed only on the date of message generation), and it
cannot be changed.
If message generation before accounting is allowed for the product used by the contract.
If allowed, and if the contract involves a customer for whom the facility of message
generation before passing of accounting entries has been set in respect of FT
transactions, in the Customer Information Maintenance, the preference is defaulted to
the contract, and you can change the default if required.
For the messages as of specific dates, you can choose accounting as of specific dates as
listed in the table below.
Message as of
Accounting as of
Booking Date
Message Date or Debit Value Date
Value Date
Message Date
Spot Date
Message Date
Debit Value Date
Message Date
Credit Value Date
Message Date
Instruction Date
Message Date
If the parameter ‘SGEN_PARAM’ in CSTB_PARAM is set as ‘Y’, the process will be as
discussed below.
Message as of’’ is set to ‘Booking Date’. Suppose that ‘Accounting as of’ is chosen as ‘Debit
Value Date’.
The system will trigger ‘BOOK’ event on the booking date of the contract.
5-27
On authorization of the FT contract, the system will trigger SGEN event and generate
settlement messages linked to INIT event or LIQD event. For a contract, if you have checked
the option ‘After Rate Refresh’, this happens during End of Day operations. INIT and LIQD
events are triggered based on the Debit Value Date. For these events, the system will not
generate settlement messages.
5.5.4.10 Indicating Date on which Rates should be picked up
You need to specify the date as of when exchange rates should be picked up and applied to
the components of a transfer.
If the transfer you are processing is associated to a product, the preferences you stated for
the product will be defaulted. You can change the values that are defaulted.
In the case of a contract that is liquidated as of the booking date, the rates will also be picked
up as of the booking date.
For future valued transfers, you can specify the rate pick up date as of booking date, value
date or spot date. You can select one of the following options:
Rate as of Booking Date
If you specify that the rates should be picked up as of the ‘Booking Date’, the exchange rates
prevailing as of the date you enter the contract is used to compute the components of the
transfer.
The spread that you specify for the transfer will be applied to the exchange rates that are
picked up.
Rate as of Spot Date
Specify that exchange rates can be picked up as of spot days only for future dated funds
transfers.
To recall, for each currency that your bank deals with, you have also specified a spot date in
the Currency Definition Maintenance table of the Core Services module.
The spread that you specify for the transfer will be applied to the exchange rates to compute
the components of the transfer.
We shall examine an example wherein the ‘rate as of’ is specified as Spot Date:
A customer of your bank approaches you on 1 March 1998 (the booking date) to initiate a
cross currency transfer for US $ 10,000. Assume the offset currency of the transfer to be INR.
Also assume that you had maintained the spot days for USD to be 2 days in the Currency
Definition table of the core services module.
The transfer is to be initiated on 5, March, 1998 (the Value Date). It is therefore a future dated
transfer.
Booking Date - 01/03/96
Value Date - 05/03/96
Contract Currency - USD
Contract Amount - 1000 $
Spot Days maintained for USD -2
5-28
In this case the exchange rates to be applied to the transfer will be picked up from the
currency table on 3, March, 1997, Spot days (2 days) before the Value date of the transfer.
Rate as of Value Date
If you specify ‘Value date’ then the rates to be used to process the transfer amount will be
picked up on the day the transfer is effected. The accounting entries for the contract will be
passed as of this date.
Enter a value date of your choice. In which case, it should be one of the following:
Today’s date
A date in the past
A date in the future. You can enter a date in the future only if Future Dating has been
allowed for the product to which this contract is linked.
The Value Date (transfer initiation date) should not be earlier than the Start Date or later than
the End Date of the product involved in the transfer.
Indicating that exchange rates will be ‘User Input’
If you do not want to make the standard exchange rates applicable to a transfer you can
choose ‘User Input’ from the option list.
In this case, the exchange rate that you enter in the exchange rate field of the Contract Main
screen is picked up to compute the components of the transfer.
Indicating that exchange rates are not applicable
If you are processing a transfer wherein the currency that is remitted is the same, as the
currency that is credited, you can indicate that exchange rates are not applicable to the
transfer.
Rate as of Instruction Date
If you chose this option, the rate as of the date on which the customer placed his instruction
will be taken. This is similar to booking date.
Rate as of Debit Value Date
If you choose this option, the exchange rate as on the value date with which the remitter
account will be debited, will be used for the transfer. This may be earlier than the credit value
date.
Rate as of Credit Value Date
If you choose this option, the exchange rate as on the value date with which the beneficiary
account will be credited, will be used for the transfer.
Rate Pickup Date
This is the actual date on which the rate is picked up. This date is computed based on the
input given in the ‘Rate as of’ field on the ‘Contract Other’ screen.
Social Security Number
If you are processing a funds transfer on behalf of a customer of your bank, the Social Security
Number of the customer involved in the transaction will be defaulted from the CIF
Maintenance details screen. However, if you are initiating the funds transfer for a walk-in
customer you will have to capture the walk-in customer’s SS Number.
5-29
Note
Each outgoing customer type of transfer initiated by an individual type of customer can be
tracked against the customer’s SS number. If the value of debits within a specific customer
account exceeds USD 2500, with-in a seven-day working period the system notifies you
of the same with an override message.
For example,
Let us assume that on the 24th of September 2001, Mrs. Wendy Klien a customer of your bank
initiates an outgoing FT for USD 2000. Since all weekends are considered as holidays at your
bank, while processing the transfer all debits against her account for six working days
preceding the 24th i.e., up to the 16th September will be tracked against her SS number.
Again, on the 1st of October 2001, she initiates another outgoing transfer, which necessitates
a deduction of USD 700 on her account. While processing the transfer the system checks for
all debits up to the 21st of September.
An amount of USD 2000 has already been tracked against her SS number on the 24th of
September. However, since the current debit exceeds the maximum limit of USD 2500 for a
running seven-day working period the transfer will be processed only if your confirm the
override.
5.5.5
Note on Rate Pickup and Message Generation
The Rate pickup and message generation codes that you specify for a transfer need to be
combined in a fashion to facilitate the following flow of events:
1. Rate pickup
2. Message Generation
Accounting entries will be passed and then messages will be generated. All the possible
combinations between the rate pickup and the message generation codes have been
explored and detailed below.
Note
If message generation has been indicated to occur before accounting is done for a contract, the accounting entries are posted on the Accounting As Of date. This could be either
the date of message generation or the debit value date of the transaction, as explained in
the earlier section.
Standard rate as of booking date - Message as of Spot Date
If you select this combination:
The amounts will be converted using the rates available in the currency table (on the
booking date). The spread will be applied to the rate, based on the spread code you
specify.
Messages will be generated Spot days before the settlement date.
Rate as of Spot - Message as of Spot
If you choose this combination:
The contracts with this combination will not be processed in the same manner as a
normal contract. The Autobook function (a batch process explained in the chapter 7) run
either at EOD or BOD, automatically picks up the exchange rates as of spot days before
5-30
settlement date and applies this rate to the components of the transfer and also passes
accounting entries.
Messages will also be generated by the autobook function on the spot date.
Rate and Message as of Value Date
If you choose this combination the transfer amount will be converted based on;
The rates that will be picked up on the value date and
Messages will be generated on the value date.
Rate as of Booking Date - Message as of Booking Date
If you select this combination, the system converts the transfer and commission amount
based on the:
Rates that are available in the Currency table at the time of contract input
Messages will be generated after the contract is authorized
Rate as of Spot Date - Message as of Booking Date
In this example the rate date is later than the message date and hence this would not be
allowed by the system. The message generation in Oracle FLEXCUBE happens along with
the accounting and therefore, the rate pick-up date must be on or before the message
generation date.
5.5.6
Limit Amounts for Cross Currency Transactions for Default of Exchange
Rates
Typically, the exchange rates applicable for cross currency funds transfer transactions is
defaulted by the system depending upon the preference indicated in the product preferences,
for the product involving the transaction.
In your bank, for high-value cross currency transactions, you may want the user to manually
enter the exchange rate involved, rather than let the system automatically pick up a default
rate during transaction input. You can define such a preference to be applicable to cross
currency transactions involving:
a currency pair
a specific product, or all products
a specific module, or all modules
a specific branch, or all branches
a specific Rate Code
The transaction amount limit, above which the exchange rate must be entered, for a high
value transaction, could be defined in terms of any currency pair where the currency of the
transaction is currency1 in the CCY pair defined in the maintenance.
To ensure that users manually enter exchange rates for high-value cross currency
transactions in Oracle FLEXCUBE, you must specify the limit amounts that must be validated
against for each currency pair, product, module and branch combination. You can use the
Exchange Rate Limits screen to specify the limits.
When you have specified these limits, the system automatically validates the amount each
transaction for the currency pair, product, module and branch combination, and accordingly,
if the limits are exceeded, enforces the manual entry of exchange rates.
In case, the limit between ccy1 and ccy2 is given in ccy2, the system will automatically convert
the transaction amount to an amount in ccy 2 using standard mid rate and check against the
limit amount for manual entry of exchange rates.
5-31
5.5.7
How Limits are applied when Transaction is Entered
Whenever a cross currency funds transfer or teller transaction is entered, Oracle FLEXCUBE
checks for appropriate limits, in the Exchange Rate Limits Maintenance. If no limits are
maintained for the currency, product, module and branch combination, then no limits are
applied.
The example given below illustrates how the system identifies the appropriate limit from the
Exchange Rate Limit Maintenance.
For example,
You have maintained the following amount limits for cross currency teller and funds transfer
transactions in your bank, in the Exchange Rate Limit Maintenance:
Numbe
r
Branc
h
Modul
e
Produc
t
currency
1
Currenc
y2
Limi
t
Ccy
1
001
DE
PRD1
USD
GBP
GBP
Standard
25000
2
001
FT
PRD2
USD
INR
USD
Spot
40000
3
ALL
FT
PRD3
GBP
USD
GBP
Forward
20000
Rate
Type
Limit
amoun
t
For each transaction, the corresponding limit amount to be validated against is derived by
checking if a limit has been maintained for the following combination of parameters in
sequence:
Currency pair
Product
Module
Branch
For instance, for a teller transaction involving USD-GBP and product PRD1 in branch 001, the
limit amount that will be used for validation is 25000 GBP (corresponding to Number 1 in the
table above).
For a funds transfer transaction involving any currency pair and product PRD3, in any branch,
the limit applicable would be 20000 GBP (corresponding to Number 3 in the table)
5.5.8
Exchange Rate for Cross Currency Transactions
After the limit applicable for a cross currency transaction has been identified, it is validated in
the following manner:
1. The limit amount, which is expressed in the limit currency, is converted to the
corresponding amount in currency1, using the standard exchange rate, mid rate for
comparison.
2. If the transaction amount falls below the limit amount in currency1, the limit has not been
exceeded. In such a case, the exchange rate for the transaction is picked up from the
Currency Rates Maintenance for the rate code specified in the preferences of the product
involving the transaction, and is defaulted to the transaction.
5-32
3. If the transaction amount exceeds the limit amount in currency1, the exchange rate for
the transaction is not picked up according to the rate code defined in the product
preferences, but will have to be specified by the user entering the transaction. The
specified rate is checked to verify that it falls within the variance limits and the stop limit
specified for the product.
5.5.9
Internal Remarks
You can specify additional information pertaining to the contract here. The details that you
specify here can be retrieved later.
5.5.10
Capturing Payment Details
Specify the sender to receiver information of the transfer by selecting the appropriate value
from the adjoining option list. The details that you enter will be populated in field 72 of the
payment message MT 103.
The following values are available in the option list:
5.5.11
//
/INV/
/IPI/
/RFB/
/ROC/
Specifying Upload Details
If the contract has been uploaded from the Oracle FLEXCUBE FT contract upload tables by
the FT Upload function then the field marked Uploaded will be automatically checked to
indicate that the contract has come from an external system. The code of the source from
which the contract was uploaded will be displayed in the Source Code field. Each time
contracts are uploaded, the system automatically generates a source reference number. This
number will be displayed in the Source Ref Number field.
(Refer to Chapter titled The Batch Upload Function for details on the FT Upload function)
Storing the External System Generated Reference Number
Oracle FLEXCUBE interfaces with the MUREX system, uploading and processing funds
transfer contracts from MUREX. A contract uploaded from MUREX can result in one or more
contracts in Oracle FLEXCUBE. Therefore, in order to relate the Oracle FLEXCUBE contracts
with the corresponding MUREX system generated contract, the source (MUREX) reference
number will be stored in field 21 of MT 900 (Dr Advice) and MT 910 (Cr Advice) for handoff to
customers.
Note
This feature is only available for contracts uploaded from the MUREX system.
MT940 (detailed account statement) and MT950 (summary statement) will also store the
source reference number in field 61 (sub-field 8) for handoff to customers.
5.6
Viewing Settlement Route of Transfer
After entering the details of a transfer click the tab titled Settlement Route from the contract
details screen. A screen depicting the route that you have defined for the transfer is displayed.
5-33
This facility provides you a quick means of verifying the transfer route. If the route of the
transfer is incorrect, you can delete or change the contract suitably.
Based on the type of transfer that you have initiated and on the settlement details that you
specify for the transfer, the fields of this screen will be populated. We shall explore all the
possible routes that a transfer can take before it reaches the ultimate beneficiary.
Ordering Customer - The name of the ordering customer (the party that has initiated the
transfer). This field will be populated only if you have initiated a customer transfer (MT103/
103+).
Ourselves - The financial institution or the branch, thereof, initiating the transaction on behalf
of itself or its customer.
Our Correspondent - The name of the correspondent bank if the transfer is routed through
a correspondent.
Receiver’s Correspondent - The institution that will receive funds on behalf of the receiver
is displayed. Hence this field will be populated only for outgoing transfers.
Intermediary Reimbursement Institute – The financial institution between the Sender’s
Correspondent and the Receiver’s correspondent, through which the reimbursement of the
transfer will take place.
Intermediary - The intermediary between the receiver and the account with institution.
Account With Institution - The Financial Institution at which the Ordering Party requests the
Beneficiary to be paid. This field will not be populated for incoming and internal transfers.
Receiver - This is the receiver of the message.
Ultimate Beneficiary - The Ultimate Beneficiary that you specified in the Contract Main
screen is defaulted.
5-34
If there is one bank between the remitter and the beneficiary then it is a one party transfer. In
such a transfer, funds move directly from the bank of the remitter to the bank of the
beneficiary.
If a correspondent bank is used to transfer funds form the bank of the remitter to the bank of
the beneficiary then it a two party transfer and so on. This has been illustrated
diagrammatically,
A Two Party Transfer
A One Party Transfer
Remitter
Remitter
Sending
Bank
Sending
Bank
Receiving
Bank
Our
Correspondent
Beneficiary
Receiving
Bank
Beneficiary
The number of banks that are involved in the transfer would depend on the:
5.6.1
Relationship and arrangements between the sending and receiving banks
Customer instructions
Location of parties
Banking regulations of a country
FT Fields and Information Flow
The fields in the FT input screen that decides the direction and flow of funds and messages
are:
Ordering Customer (‘by order of’)
Remitter (sender)
Senders Correspondent
Intermediary Bank
Receiver’s correspondent
Account with bank (beneficiary’s bank)
Ultimate Beneficiary
The following examples illustrate how information flows in various conditions.
An Example of a one party transfer
Girozentrale Uno Bank, Vienna, receives a letter from Wonderdrug Pharmaceuticals ordering
them to pay US $ 40,000 to the National Bank, New York into the account of Silas Reed.
At Girozentrale Uno Bank, the settlement screen will be populated with the following details:
5-35
Field name on the Settlement Screen
Entry
Ordering Customer
Wonderdrug Pharmaceuticals
Ourselves
Girozentrale Uno Bank.
Receiver
National Bank, New York.
Ultimate Beneficiary
Mr. Silas Reed.
An Example of a two party transfer
Vanbee Traders orders Banca Commerciale, Naples to pay, value 27 May 1997, and 120,000
Francs into the account of Mr. Silas Reed with Banque Nationale de Paris, Grenoble. Banca
Commerciale asks LeanderBank to make the payment which in turn pays through Banque
Nationale de Paris, Paris branch.
At LeanderBank the settlement screen will be populated with the following details:
Field name on the Settlement Screen
Entry
Ordering Customer
Vanbee Traders.
Ourselves
Banca Commerciale, Naples.
Our Correspondent
LeanderBank.
Receivers Correspondent
Banque Nationale de Paris, Paris.
Receiver
Banque Nationale de Paris, Grenoble.
Ultimate Beneficiary
Silas Reed.
An Example of a three party transfer
On May 10, 1997, Wendy Klien orders Leander bank Vienna to pay US dollars 20,000 to Silas
Reed, whose account is with Algemene Bank Nederland (ABN), Amsterdam. The beneficiary
is to be notified by phone. A cover message for the US Dollar payment is provided through
Hansen Trust Company, New York to ABN New York.
At Leander the settlement screen will be populated with the following details:
Field name on the Settlement Screen
Entry
Ordering Customer
Wendy Klien
Ourselves
Leander Bank, Vienna
Our Correspondent
Hansen Trust, New York.
Receivers Correspondent
ABN, New York
Receiver
ABN, Amsterdam
5-36
Ultimate Beneficiary
Silas Reed.
An Example of a four party transfer:
G.A. Imports Naples orders Banca Italiana Milan to pay USD 500000 to BNP bank, Normady
to the account of Silas Reed. Banca Italiana Milan makes the USD payment through its US
Correspondent, Banca Italiana, New York. Payment is made to BNP Paris in favor of BNP
Normandy through its US correspondent Bank of New York, NY.
At Banca Italiana, Milan the settlement screen will be populated with the following details:
5.7
Field name on the Settlement Screen
Entry
Ordering Customer
G.A Imports.
Ourselves
Banca Italiana, Milan.
Our Correspondent
Banca Italiana, NY.
Receivers Correspondent
Bank of New York, NY.
Receiver
BNP, Normandy.
Ultimate Beneficiary
Silas Reed.
Viewing Details of Transfer Events
Click ‘Events’ button in the 'FT Contract Detailed View screen to go to the FT Contract View
Events screen. In the FT contract view events screen the list of events that have already taken
place on a contract along with details of pending events is displayed. The date on which the
event took place will also be displayed.
Click ‘Account Entries’ button to view the accounting entries for the event. Click ‘Exit’ button
to go back to the FT Contract Detailed View screen.
5-37
5.7.1
Viewing Accounting Entries that are Passed
From FT Contract — View Events screen, click ‘Accounting Entries’ to view the Accounting
Entries for the event. You can view the details of the accounting entries that were passed for
the event whose details were displayed in the contract -- View Events screen. The accounting
entries that are passed depend on the type of transfer that you initiate. The following
information is provided for each event:
Branch
Account
Transaction Code
Booking Date
Value Date
Dr/Cr indicator
Currency
CCY (Currency)
Amount in contract CCY
Amount in local currency
All the overrides that were allowed for an event will also be displayed.
5.8
Specifying Advices for Transfer
From the ‘Funds Transfer Contract Input’ screen, click ‘Advices’ button to view the ‘Advices’
screen is displayed. In this screen you can specify the advices that are to be generated for
the various events that occur during the lifecycle of a funds transfer, after the authorization of
the product.
Suppressing the generation of an advice
By default all the advices defined for the product to which the FT is associated will be
applicable to the FT.
As all the messages defaulted from the product may not be applicable to the contract you are
processing, you can suppress their generation.
5-38
Select a value from the adjoining drop-down list to the relevant message. This list displays the
following values:
Yes — to suppress the generation of the message
No — to indicate that the message should be generated
Indicating the priority with which a message should be sent
Specify the priority with which an advice should be generated. By default the priority of all
advices is marked as ‘Normal’. You can prioritize advices into one of the following:
Normal
Medium
High
Note
–
You can change the priority of a message to Urgent only for Payment Advices.
–
The ‘Priority’ of a message is a field that is available for processing of the message
by external systems or interfaces that handle the onward transmission to the Receiver after the generation of the message. Oracle FLEXCUBE itself does not perform any specific processing based on priority of the message.
After you have selected the advices to be generated for the contract, click ‘Ok’ button to save
it. Click ‘Exit’ button to exit the screen without saving the entries. In either case, you will return
to the FT Contract Main screen.
5.9
Selecting User Defined Fields
Click ‘Fields’ button from the ‘Contract Main’ screen to invoke the ‘User Defined Fields’
screen. The list of fields and default values specified for the product to which the transaction
is associated is displayed.
Add to the list of fields defaulted from the product but you will not be allowed to remove a field
from the defaulted list.
Change the values defaulted from the product to suit the transaction you are processing.
5-39
5.10 Generating Charge Claim Advice
For incoming FTs, the remitter bears the charges if the option ‘Charge’ is set as ‘Ours’. For
such contracts, you can direct the remitter to pay the defined charge amount by generating a
Charge Claim Advice (MT191). Click ‘Charge Claim’ button from the Funds Transfer Main
screen to specify details for the generation of the message MT191.
Contract Reference Number
The system displays the reference number of the contract in this field.
Event Sequence Number
The system displays the event sequence number. This indicates a number corresponding to
the number of events for which the operation has been performed.
Specifying a Charge Reference Number
Enter a reference number to identify the message. The identification should ideally indicate
the incoming FT for which it was generated. The User Reference of the FT is defaulted. You
can change the reference that is defaulted. The charge reference number will be displayed in
field 21 of the charge claim advice.
Indicating the Charge amount and currency
Enter the consolidated charge amount that is to be claimed for the FT. The charge amount is
expressed in the charge currency that you specify. If all the charge components are in the
same currency, the system automatically calculates the charge amount in the charge
currency.
If the FT involves several charge components, in different currencies, you should consolidate
them and express the charge amount in the collection currency.
Charge Details
The details that you enter in this field are printed on the SWIFT message. Therefore the
details that you enter here should conform to SWIFT standards. In this field you can enter
specifications of the charges, interest, or other expense(s) associated with the transfer. An
MT 191 can contain one or more of the following codes, followed, where relevant, by the
currency and amount:
COMM — Our commission
INT — Interest related charges
5-40
PHON — Our telephone cost
TELE — Charges relating to the most appropriate and efficient means of
telecommunications available, e.g. S.W.I.F.T., telex, telephone, facsimile, as
determined by the party executing the payment instruction.
Sender to Receiver Information
Here you can enter a message that the sender would like to send to the receiver of the
message.
Account with Institution
An ‘Account With Institution’ refers to the financial institution, at which the ordering party
requests the Beneficiary to be paid. The Account With Institution may be a branch or affiliate
of the Receiver, or of the Intermediary, or of the Beneficiary Institution, or an entirely different
financial institution.
This field corresponds to Field 57A of S.W.I.F.T. You can enter one of the following:
ISO Bank Identifier Code of the bank
The branch of the Receiver’s Correspondent
Name and address of the Receiver’s Correspondent.
Other identification codes (for example, account number)
Local Clearing Code of the bank
Ordering Institution
Indicate the ordering institution of the original incoming FT. The ‘Ordering Institution’ is the
financial institution, which is acting on behalf of itself, or a customer, to initiate the transaction.
This field corresponds to 52a of S.W.I.F.T.
In this field you can enter one of the following:
The ISO Bank Identifier Code of the Ordering Institution
The branch or city of the Ordering Institution
The Name and address of the Bank
Local Clearing Code of the bank
5.11 Specifying Customer Cover Details
You can specify the cover details associated with the customer involved in the transfer in
‘Customer Transfer Details’ screen. To invoke this screen, click ‘Customer Cover Details’
button in ‘Funds Transfer Contract Input’ screen. For STP transfers these details are
automatically defaulted from the party details captured.
5-41
You can input details here only for if the contract is being booked using the product having
transfer type as ‘Customer Transfer with Cover’. (STP Failure cases).
You can specify the following details in this screen:
Ordering Customer
The Ordering Customer refers to the customer ordering the transfer. Here, you can enter the
name and address or the account number of the customer, ordering the transaction. This field
corresponds to field 50 of SWIFT. You will be allowed to enter details in this field only if STP
has failed or while manually booking the FT contract using the incoming SWIFT message.
Intermediary
The ‘Intermediary’ in a payment refers to the financial institution between the ‘Receiver’ and
the ‘Account With Institution’, through which the transfer must pass.
The Intermediary may be a branch or affiliate of the Receiver or the account with Institution,
or an entirely different financial institution. This field corresponds to field 56a of a SWIFT
message.
You can either enter the:
ISO Bank Identifier Code of the bank
The Name and address of the Bank
Ordering Institution
The Ordering Institution is the financial Institution, which is acting on behalf of itself, or a
customer, to initiate the transaction. This field corresponds to 52a of SWIFT. In this field, you
can enter one of the following:
The ISO Bank Identifier Code of the Ordering Institution
The branch or city of the Ordering Institution
The Name and address of the Bank
5-42
Account with Institution
An ‘Account with Institution’ refers to the financial institution, at which the ordering party
requests the Beneficiary to be paid. The Account With Institution may be a branch or affiliate
of the Receiver, or of the Intermediary, or of the Beneficiary Institution, or an entirely different
financial institution.
This field corresponds to Field 57A of a SWIFT message. You can enter one of the following:
ISO Bank Identifier Code of the bank
Branch of the Receiver’s Correspondent
Name and address of the Receiver’s Correspondent
Other identification codes (for example, account number)
Ultimate Beneficiary Details
The Ultimate Beneficiary refers to the customer to whom the amount of the component is to
be paid. This field refers to field 59A of SWIFT. You can make entries into this field only if STP
has failed or while manually booking the FT contract using the incoming SWIFT message.
This would not be applicable for Bank Transfers.
Specify the identification, name and address details of the ultimate beneficiary involved in the
transaction.
Sender to Receiver Information
This could be instructions or additional information for the Receiver, Intermediary, Account
With Institution or Beneficiary Institution.
This field corresponds to field 72 of the S.W.I.F.T. message. The format of the message
depends on the type of S.W.I.F.T. message that is generated. Refer to the S.W.I.F.T. manual
for details on the format of the message and the code words to be used.
Remittance Information
Specify the payment details of the FT contract here.
This field corresponds to field 70 of the SWIFT message. This will be populated only for RTGS
related messages.
External reference number
Specify the reference number of the customer transfer, received from the originating bank.
This field corresponds to field 21 of the SWIFT message. This is the reference number (Field
21) of the incoming message received.
Currency
Specify the currency associated with the customer transfer.
Amount
Specify the amount associated with the customer transfer.
5.12 Viewing OFAC Check Response
OFAC check enables the application to call an external web service to perform black list check
for customer and customer accounts and give warnings appropriately while transacting with
black listed customers. You can also capture your remarks before overriding the black list
warning.
Click ‘OFAC Check’ button in ‘Funds Transfer Contract Input ‘Customer Account Creation’
screen to view the OFAC check response in the ‘External System Detail’ screen On clicking
5-43
’OFAC Check’ button, system will build the request XML and call the web service. The
‘External System details’ screen displays the response is received from the external system
and you will be also allowed to enter your remarks in this screen. The response received will
also be sent to Oracle FLEXCUBE Database layer for any further interpretations of the same.
This button can be made visible while carrying out the actual customization. Request building
response interpretation in the database layer needs to be done as part of customization to
enable this.
Here, you can view /capture the following details:
External System Response
The response from the external system regarding the black listed customer is displayed here.
User Remarks
Specify your remarks regarding the black listed customer here.
5-44
5.13 Capturing MIS Details
5.14 Viewing Change Log
5.15 Specifying Settlement Details
You can capture the settlement details associated with a transfer in ‘Settlement Details’
screen. Click ‘Settlement’ button in ‘Funds Transfer Contract Input ‘screen to invoke the
‘Settlement Details’ screen.
5-45
The FT transaction is settled based on the details specified in this screen.
For more details on this screen, refer the section titled ‘Processing Settlements’ in
Settlements User Manual.
5.16 Viewing All Messages
You can view a list of all the messages generated for a particular FT contract using ‘View
Messages’ screen. Click ‘All Messages’ button on ‘Funds Transfer Contract Input’ screen. M
Contract Reference Number
The system displays the reference number of the contract.
5-46
Messages
The system displays a list of all messages generated for the above contract. The list contains
the following details of each contract:
DCN
ESN
Medium
Receiver
Name
Test Status
Authorization Status
From this screen, you can view the details of a particular message. Use the adjoining
checkbox to select a message and click ‘Message’ button. The system displays the details of
the selected message on a separate window.
5.17 Specifying Project Details
Click the ‘Project Details’ button in the ‘Funds Transfer Contract Input’ screen and invoke the
‘Project Details’ screen. You will have to capture project details in this screen only if the credit
account is a Trust account.
Specify the following details:
Project Name
Specify the developer project name for which payment is being made. The adjoining option
list displays all valid projects maintained in the system. You can select the appropriate one.
Input to this field is mandatory.
If you specify the Unit ID, the system will display the corresponding project name here.
Unit Payment
Indicate whether the transaction is a unit payment or not by choosing the appropriate value
from the adjoining drop-down list. The following values are available:
Yes
No
5-47
Unit ID
Specify the unit ID of the project. This field will be enabled only if you have selected ‘Yes’
against ‘Unit Payment’. The adjoining option list displays all unit IDs along with the unit holder
names corresponding to the project name chosen. You can select the appropriate one.
Transfer Request Number
Specify the transfer request number for the payment.
5.18 Viewing Duplication details
The system checks for duplicate transactions while booking contracts based on the number
of days for duplicate check maintained at the ‘Branch Parameters Maintenance’ screen and
the duplication preferences set at the product level. The system displays the duplicate
contract reference number if there is a single match else it displays the override message as
‘Duplicate Contracts recognized based on the product preference’
You can view all the duplicate contracts in the ‘Duplication Details’ screen. Click ‘Duplication
Details’ button in the ‘Fund Transfer Contract Input’ screen to invoke this screen.
Here you can view the following details:
Product Type
Event Sequence Number
Version number
Product
User Reference
Debit Value Date
Credit value Date
Credit Currency
Credit Amount
Debit Account Branch
Debit Currrency
Debit Amount
Payment Details
5-48
Note
Duplication check is done based on the following criteria:
–
Number of days that are maintained for duplicate check at the ‘Branch Parameters
Maintenance’ screen.
–
Duplication recognition that is selected at ‘Funds Transfer Product Definition’
screen.
–
The duplication details are persistent and can be viewed by the authorizer too.
–
If duplication details are not maintained at branch level for Funds Transfer, no du-
plicate checks will be carried out.
5.19 Generation of MT 210 for Funds Transfer Contract
If a nostro account is being debited during the posting of accounting entries in a funds transfer
contract, a Notice to Receive message (MT 210) is generated by default, if this preference is
indicated in the nostro account profile, in the Customer Account Maintenance screen.
If applicable, the MT 210 message will be generated whenever the nostro account is debited,
except in the following circumstances:
In the case of a funds transfer contract created due to an incoming SWIFT message, in
which the Sender BIC is the Nostro Agent.
When the nostro account is being debited when accounting entries are being passed
due to a back valued funds transfer contract, for which the value date is earlier than the
system application date of the logged-in branch.
In the case of a funds transfer contract involving the nostro account, which was created
due to an incoming SWIFT payment message that is mapped with a corresponding
incoming SWIFT cover message (MT 202)
When you enter a funds transfer contract, with the nostro account as the debit account, the
MT 210 specification made for the account is defaulted to the contract. You can change this
specification when you are entering the contract. If you do so, the specification made when
you enter the contract is considered instead of the specification at the account level. Also, an
override is sought if you make any changes to this preference, which must be confirmed when
the authorizer of the contract verifies the contract.
You can view this information in the Settlements Screen, in the Payment Message Generation
checkbox field.
5.20 Generation of MT900 and 910
Oracle FLEXCUBE generates the confirmation SWIFT messages MT900 and MT910 to be
sent to owners of accounts that have been debited or credited due to any transaction. The
MT900 is a debit confirmation message, and the MT910, a credit confirmation message. The
necessary information in each field of the SWIFT messages is picked up from the contract
settlement field information. The SWIFT address of the customer is used for the generation
of the debit or credit advices.
Whenever the system receives MT910, the message is verified against field 21 to match
whether it can be taken as a cover message for a payment message. In case the system finds
a match, the message is taken as a cover message and the payment message is processed.
In case a match is not found, the system marks the MT910 for repair.
5-49
5.21 Checks for Generation of MT103+ Messages
Upon authorization of an outgoing FT contract, Oracle FLEXCUBE generates the applicable
MT103 message in the MT103+ format, if the MT103+ option has been enabled as follows:
In the Product Preferences for the FT product used by the contract
In the Branch Parameters for the branch at which the contract has been put through
In the BIC Code Maintenance for the counterparty of the contract
In the Currency Definition for the account currency of the contract
The MT103 payment message is generated in MT103+ format if:
The generation of MT 103+ has been enforced at all the levels mentioned above, as well
as if,
All checks in respect of MT 103+ message generation (mentioned below) are successful
during input
If MT 103+ has not been enforced for the branch, currency and BIC code, the MT103 payment
message is generated in the original MT103 format, that is, without the code ‘STP’ in field 119
in the third block of the message.
If MT 103+ has not been enforced for the product, an override is sought, and the message is
displayed as ‘'103P format not enforced for the product. Do you still want to generate
message in 103p?’
If you confirm the override by clicking OK, the MT 103 message is generated in MT 103+
format. If you reject the override by clicking Cancel, the MT 103 message is generated in the
original MT 103 format.
Checks for MT103+ format
The following checks are performed by the system for the generation of MT 103 messages in
the MT 103+ format:
Field 23E (Instruction Code) must only contain the codes CORT, INTC, SDVA and
REPA
Field 51A (Sending Institution) is not required
Fields 52, (Ordering Institution) 54, (Receiver’s Correspondent) 55, (Third
Reimbursement Institution) 56 (Intermediary Institution) and 57 (Account With
Institution) should be in format option A
Field 53 (Sender’s Correspondent) should only be in format option A or B
If field 53a is in format option B, party identifier must be used
The sub-field 1 (Account) of either field 59 or 59A (Beneficiary Customer) is always
mandatory
In Field 72 (Sender to Receiver Information), the code INS must be followed by a valid
BIC
In Field 72, the codes ACC, INS, INT, REC, REJT and RETN can be used
Field 72 must not include ERI information
Field 77T (Envelope Contents) is not required
In addition to these checks, for outgoing MT103/ MT103+ messages being generated in
response to incoming MT103/MT103+ messages, the fields 33B (Currency/Original Ordered
Amount) and 36 (Exchange Rate) should have been unchanged through the transaction
chain. When such contracts are being uploaded or entered, the instructed amount, instructed
currency, and exchange rate are picked up from the contract settlement details during
outgoing MT103/MT103+ message generation, and populated in fields 33B and 36.
5-50
The following tags in MT 103 message will support a clearing code ‘PL’:
52A, 52D
56A, 56C, 56D
57A, 57C, 57D
MT 103+ message type will support 52A, 56A and 57A tags:
The details of these messages will be stored in data store and will be used during message
validation.
Generation of RTGS Messages
For FIN Y-Copy messages, the system validates whether it is a payment message alone or
payment + cover message. If it is a payment message, then the system will generate it as a
FIN Y-copy payment message. If it is a payment + cover message, then the cover message
alone will be generated as a FIN Y-copy message.
The following message generation logic will be used for FIN Y-copy messages:
The service identifier gets defaulted from the clearing network maintenance as part of
message generation and updated in field 103 of header 3.
Field 113 in header 3 will be defaulted based on banking priority and sender notification
required field.
The receiver of the message will be changed and defaulted with the Intermediary, (if not
present, the Account with Institution (AWI) and if the AWI is not present the receiver
itself). This will be applicable only for Pay message. For Pay + cover message, the pay
message receiver remains the same, while the cover message receiver will be modified
and defaulted with the receivers correspondent.
If the receiver arrived at from the above logic, happens to be an in-direct participant of
the RTGS network, then its direct participant would be populated
If the message is being sent to a TARGET1 participant, then field 52 will get defaulted.
TARGET1 participant will be identified if the addressee field in clearing directory
matches with TARGET1 ADDRESSEE in system static data maintenance
(CSTB_PARAM).
At the time of message generation for Direct Debits (MT204), if the debit institution is an
indirect participant then it will default its direct participant as the receiver. Otherwise, it
will default the debit institution itself as the receiver.
Following are the message types for RTGS:
SWIFT
Message
Message
Description
CUST_TSFR_RT
GS
Used when a Pay message generation is for a corporate and sent through the RTGS Network.
MT103
BANK_TSFR_RT
GS
Used when a message belongs to an interbank
deal and sent through the RTGS Network.
MT202
DIRDR_RTGS
Used when a direct debit message is sent through
the RTGS Network.
MT204
COVER_RTGS
Used when a cover payment is sent through the
RTGS Network.
MT202
5-51
Checks for Generation of MT201 Messages
The BIC code of the Debit Account and the BIC code of the Credit Account should be
different
Debit Account currency and Credit Account Currency should be the same.
There should not be multiple account relationship with the AWI in the currency of transfer.
The following are the consolidation criteria’s while generating MT201 messages:
Value Date
Transaction currency
Receiver
Credit Account
5.22 Currency Cut-off Checks for Funds Transfer Transaction
If currency cut-off checks are applicable for the transaction, as specified in the preferences
for the product that the transaction involves, they will be performed when you save the
transaction.
The value date of the transaction is validated against the cut-off days and cut-off time
specified for the product, currency and customer involved in the transaction.
The checks are applied as follows:
1. Oracle FLEXCUBE checks to see if cut-off parameters have been maintained in the Value
Dated Spread maintenance for the customer involved in the transaction, the product for
the transaction and the currency of the transaction. If so, the parameters maintained for
the combination are applied to the transaction.
2. If no cut-off parameters have been maintained in the Value Dated Spread maintenance
for the specific customer, product and currency combination, Oracle FLEXCUBE checks
to see if cut-off parameters have been maintained for the product and currency, for all
customers. If so, the parameters maintained for the combination are applied to the
transaction.
3. If no cut-off parameters have been maintained either for the specific customer or all
customers, for the product and currency combination, the cut-off parameters maintained
in the Currency Definition for the currency involved in the transaction are applied.
If a transaction fails any of the currency cut-off checks, the system displays a warning
message informing you of the same.
You can then adopt either of the following courses of action:
‘Force’ the transaction for processing, without changing the value date (this is allowed
only for transactions that are uploaded by the STP function)
Change the value date and save the transaction again
If you force the transaction without changing the value date, an override is given at
authorization, to the user that authorizes the transaction. If the override has been configured
to be an error, the transaction would be rejected, and an appropriate reason for rejection
would be sought from the authorizer. If the override has been configured to be a warning
message, the authorizer can authorize the transaction.
If you choose to change the value date, the currency cut-off checks will be performed again,
based on the new value date.
5-52
5.22.1
Exceptions for Currency Cut-off Checks
The currency cut-off checks, if applicable according to the product preferences, are performed
for all transactions involving the product, and the currency, except in the following
circumstances:
If the transaction is a future valued transaction. A future valued transaction is one for
which the value date is after the Oracle FLEXCUBE application date, and is arrived at
as follows:
Value Date = Oracle FLEXCUBE Application Date + Transfer Currency Spot Days.
If the Currency Cut off Time is exceeded, then, the Value date is arrived at, will be
incremented by one working day.
The system marks the status of all such future valued transactions as ‘pending release’, and
defers the currency cut-off checks in respect of them. The checks will subsequently be
performed on the value date.
If both debit and credit accounts involved in the funds transfer transaction are internal
GL’s.
Future valued transactions can be invoked, authorized and force-released by a user with
appropriate rights, other than the one that entered it into the system.
5.23 Funds Transfer Transactions with Blacklisted BIC
Codes
If a SWIFT BIC Code identifying a bank or a financial institution has been blacklisted (as
specified in the BIC Code Details), an override is sought when a funds transfer transaction is
entered which involves any of these blacklisted codes in the party information.
The system checks for blacklisted codes when you specify any of the following parties in a
funds transfer settlement:
Ordering Customer
Ultimate Beneficiary
Beneficiary Institution
Ordering Institution
Intermediary
Intermediary Reimbursement Institution
Receiver’s Correspondent
Account With Institution
If you specify a blacklisted BIC code in the party information, you will be prompted for an
override:
If the override is configured as an error, you will not be able to proceed with entering the
transaction, till you have changed your specification and specified a non-blacklisted
code.
If the override is configured as a warning, you will be able to proceed with entering the
transaction, but an error is logged into the database, that a blacklisted code has been
specified as part of the party information.
If the sensitivity assigned to the override is ‘Ignore’, you will be able to proceed with
entering the transaction, and no error is logged into the database regarding the
blacklisted code.
5-53
5.23.1
Authorizing Funds Transfer Transaction with Blacklisted BIC Codes
If a blacklisted code has been specified for a transaction, the authorizer of the transaction can
view the same at the time of authorization. All the blacklisted codes specified for the
transaction are displayed to the authorizer as part of the transaction details.
At this stage, the authorizer can choose to proceed with the authorization despite the
blacklisted codes. If so, an override is sought from the authorizer, and the authorization can
only proceed if the sensitivity of the override is configured as ‘Warning’. If the override is
configured as an ‘Error’, the authorizer cannot authorize the transaction.
5.23.2
Processing Uploaded Payment Transactions with Blacklisted BIC Codes
At the time of uploading payment transactions through the upload gateway tables, if the STP
process encounters transactions involving SWIFT BIC codes (in the fields containing party
information) that have been blocked, the system will display an error message.
The STP will check for blocked BIC codes in following fields of a payment transaction that is
being uploaded:
Field 53A
Field 58A (Beneficiary Institution)
Field 52A (Ordering Institution)
Field 56A (Intermediary)
Field 54A (Receiver’s Correspondent)
Field 57A (Account with Institution)
If the STP process detects a blocked BIC code in any of the above party details, you will be
prompted with an override:
If the override is configured as an error, the STP process will reject the payment
transaction that is being uploaded.
If the override is configured as a warning, the STP will log the error and proceed with
the upload process.
5.24 Operations that you can perform on contracts
You can perform the following operations on a contract:
Copy a contract
Amend a contract
Delete a contract
Reverse a contract
Authorize a contract
Liquidate a contract
Print the details of a contract
View contract details
Place a contract on hold
Refer to the User Manual on Common Procedures, as well as the section ‘Verifying and
authorizing a funds transfer transaction’, later in this chapter, for details of these operations.
5-54
Functi
on
When it is Allowed
Result
Revers
e
After authorization
All accounting entries will be
deleted. No advices will be
generated.
Amend
Only for contracts for which no entries or
messages have been passed (future valued)
Delete
Before authorization
Accounting entries will be
deleted. Messages have not
yet been generated so no
action is required.
Hold
Before first save; typically done when
incomplete details of a contract are filled
up and the contract must not be processed.
Contract will be put on HOLD
status and will not be processed by any Oracle Flexcube process including EOD
processes.
Liquidate
When the contract is in active status (and
LIQD event is yet to be triggered); for
instance, the second stage of an Incoming
FT where funds from DAO GL have to be
made available to the Beneficiary Customer
The LIQD event gets triggered and the contract
becomes ‘LIQUIDATED’
5.25 Viewing Different Versions of Contract
When you enter a contract, it is allotted the version number 1. From then on each amendment
results in the next version of the contract being created. When you come to the Detailed View
screen of a contract, the latest version will be displayed. To navigate between the various
versions use the arrows to move to the previous version and to the next version.
5.25.1
Verifying and Authorizing Funds Transfer Transaction
Every funds transfer transaction that you enter manually must be verified and authorized.
Only a user who has appropriate rights can perform the verification and authorization
functions. Such a user is called an authorizer.
You can invoke the ‘Funds Transfer Contract Authorization’ screen by typing ‘FTDTRAUT’ in
the field at the top right corner of the Application tool bar and clicking the adjoining arrow
button.
Before a transaction is authorized, it must be verified. Verification is the process of checking
the details of the transaction and ensuring their correctness. If any of the details are incorrect,
the transaction could either be amended or rejected by the authorizer. After verification, the
transaction can be authorized, or rejected, as is deemed necessary.
5-55
You can use the FT Contract Authorization screen to verify and authorize a funds transfer
contract that has been entered manually through the FT Contract Online screen.
5.25.2
Viewing Transaction to be Authorized
To verify a transaction, you must first display its details in the FT Contract Authorization
screen. To do so, you must:
1. Select the Contract Reference Number assigned to the contract by Oracle FLEXCUBE,
in the Contract Ref No field
2. Specify the appropriate values for the rekey fields designated in the preferences for the
product that the transaction involves
If you key in an incorrect value for any of the rekey fields, you cannot proceed with the
verification and authorization process. You will not be able to navigate out of the rekey field
for which you specified an incorrect value.
When you have specified the correct values for the rekey fields, the transaction details are
displayed in the Contract Authorization screen.
5.25.3
Specifying Details in Rekey Fields
The system displays the default values in the following fields. However, you can modify them.
Transfer Currency
Transfer Amount
Value Date
Credit Account
Debit Account
Reject Reason
5-56
Generate Message
You can control the generation of payment messages for events at the contract level by
checking or un-checking this option. By default, this checkbox is unchecked. However, you
can check this box to generate payment messages for contracts upon authorization.
5.25.4
Verifying Transaction
After you have displayed the details of the transaction in the FT Contract Authorization
screen, you can verify the displayed details to ensure their correctness.
The contract will be displayed in view mode in the ‘FT Contract Online’ screen if invoked from
the authorization screen.
5.25.5
Rejecting Transaction
During verification, if any details are found to be incorrect, you can reject the transaction. You
must specify your reasons for rejection, as mandatory information.
If you wish to reject the transaction, click ‘Reject’ button in the Contract Authorization screen.
A rejected transaction is marked for repair by the system, with the reasons for rejection you
have specified. Such a transaction is marked as one that has ‘failed verification’.
Any user with appropriate ‘amend’ or ‘delete’ rights can retrieve a transaction that has ‘failed
verification’ in the Funds Transfer Summary screen, and make changes to it, or delete it.
Oracle FLEXCUBE maintains an audit log of transactions that are rejected. The following
details are stored for each rejected transaction:
5.25.6
User ID of the authorizer who rejected the transaction
Date on which the transaction was rejected, with the time stamp
Reason for rejection
Amending Transaction that has ‘failed verification’
To recall, any user with appropriate ‘amend’ rights can retrieve a transaction that has ‘failed
verification’ in the Funds Transfer Summary screen, and make changes to it.
5.25.7
Deleting Transaction that has ‘failed verification’
A user with appropriate ‘delete’ rights can retrieve a transaction that has ‘failed verification’ in
the Funds Transfer Summary screen, and delete it. Oracle FLEXCUBE records the following
details as part of the audit trail when a ‘failed verification’ transaction is deleted:
Transaction Reference Number of the deleted transaction
User ID of the user who deleted the transaction
Date on which the transaction was deleted, with the time stamp
These details can be found in the SMS Exception Report
5.25.8
Authorizing Verified Transaction
If the details of a transaction are found to be correct in all respects during verification, you can
authorize it. Use the ‘Authorize’ button in the FT Contract Authorization screen to perform the
authorization. This is considered to be the final authorization for the transaction.
5-57
Note
At any point during the verification and authorization process, you can cancel the entire
operation without affecting the status of the transaction. Close the window to cancel the
operation.
You cannot authorise a contract in the following cases:
the contract has multilevel of authorization pending, the same will be done using the
‘Multilevel Authorization Detailed’ screen
the level of authorization is greater than or equal to ‘N’
the ‘Nth’ or the final level of the users authorisation limit is less than the difference
between amount financed and sum of the limits of all the users involved in authorizing
a transaction, this case holds good when the ‘Cumulative’ field is checked in the
‘Product Transaction Limits Maintenance’ screen
the transaction amount is greater than the authoriser’s authorisation limit if the
‘Cumulative’ field is unchecked in the ‘Product Transaction Limits Maintenance’ screen
5.26 Multi-level Authorization of a Contract
High value contracts may require multilevel of authorization. The levels of authorizations are
defined in the ‘Product Transaction Limits’ screen. You can use the ‘Multilevel Authorization
Detailed’ screen for authoring a contract n-1 times.
However, final authorization can take place only in the contract screen.
For more details, refer the ‘Multilevel Authorization of Contract/Loan Account’ section in the
‘Procedures’ User Manual.
5.27 Transaction Queues (Transaction Status) Management
The status of a funds transfer transaction (which appears in the right bottom of the FT contract
screen) indicates the stage in the processing cycle in which the transaction currently stands.
The status also indicates the operations that are possible on a funds transfer transaction with
respect to its processing. This is distinct from the ‘Contract Status’ which can be any of Y, A,
L, V or H (standing for yet to be Initiated, Active, Liquidated, Reversed and Hold).
Funds transfer transactions that have been entered manually can be in any of the following
(process) statuses:
Processed (Liquidated)
Cancelled
Suppressed
Funding Exception
Pending Release
Pending Authorization
Failed Verification
Hold
The table below explains the operations that are possible on a funds transfer transaction
when it is in any of the states listed above:
5-58
Possible Course of
Action
Status
Explanation
Processed
This is the logical end-state of a transaction. All accounting/ messaging has been
processed.
None
Cancelled
Contracts that are deleted before authorization will be in this status.
None
Suppressed
Contract which is reversed after authorization will be in this status
None
Funding
Exception
When contract processing results in
account being debited more than the
available balance, the contract will be in
this status
Funding exception contract needs to be authorized.
Pending
Release
Future valued FT input manually and
awaiting payment value date will be in
this status.
On the relevant BOD, the
contract would get automatically processed.
No
Leave the message as it
is; message gets picked
up on the value date
Pending
Authorization
Transaction awaiting authorization (after
input)
Authorize the transaction
Failed Verification
Contract that has been rejected during
the contract verification process.
Amend the contract
To view a summary of funds transfer transactions queues, use the Payment Transactions
User Summary screen.
The following details are displayed for each transaction in a queue:
Contract and Authorization Status
Contract (Processing status)
Contract Ref No
Debit account, currency, value date and amount
Credit account, currency, value date and amount
5.28 Summary Dash Board for Funds Transfer Transactions
To view a summary of funds transfer transactions that has been sorted according to status
queues, you can also use the Dash Board Summary screen. In this screen, the following
details are displayed for each type of queue:
The name of each process queue or status
The time stamp corresponding to the last action performed for the queue
Number of Outstanding Items in a Queue
5-59
The Inbound Message Count (this is the number of inbound SWIFT messages received
on the application date after the Beginning of Day Run)
The time when the Summary Dash Board Information was last refreshed
You can invoke the ‘Dash Board Summary’ screen by typing ‘FTDDSHBD’ in the field at the
top right corner of the Application tool bar and clicking the adjoining arrow button.
Choosing the transaction currency
Choose to view the transaction queues summary for any transaction currency, or for all
currencies.
Choosing the transaction type
To view transaction status queues for manually entered funds transfers chose ‘Manual’ in the
‘Manual/STP’ field. To view transaction status queues for funds transfers uploaded through
the STP function chose ‘STP’ in the ‘Manual/STP’ field. To view both types, choose ‘Both’.
When you choose, all transaction queues pertaining to the type selected are displayed on the
screen.
Viewing Transaction Summaries
To view the transaction summary for each transaction queue for manually entered
transactions, click ‘Payment’ button. The FT Summary screen is opened, with transactionwise details.
To view the transaction summary for each transaction queue for STP transactions, click
‘Message’ button. The Incoming Browser is displayed.
Refreshing the Dash Board Information
Refresh the information displayed in the Dash Board by clicking on the ‘Refresh’ button in the
Dash Board Summary screen.
5.29 Examples on how to Enter Details of FT Contracts
We shall now venture into actually entering an FT Contract using Oracle FLEXCUBE.
5-60
5.29.1
Outgoing Customer Transfer
Let us assume that Silas Reed, a customer of your bank (American Bank) requests you to
effect a transfer on his behalf for 1000 £ from his USD account (AS1302614) on 03-01-2000
(the value date), to Wendy Klien’s account with Chasebank London as a birthday gift. You will
have to effect an outgoing transfer as funds are going out from your bank. You are initiating
the transfer on behalf of your customer therefore an MT 100 will be generated as it is a
customer transfer.
In order to enter the details of this contract quickly onto the FT contract screens we shall link
this contract to a product that you have already created, which caters to outgoing customer
transfers. Assume that you had assigned a product code FOCT to the product. So at the
product prompt choose FOCT. The system will automatically generate a reference number for
the contract; you can specify a reference number of your choice at the User Reference
Number prompt. Based on the product you have linked this contract to, the product type is
defaulted in the Product type field. In this case it will be Outgoing.
Therefore the debit currency is USD and the credit currency is GBP. Since your customer
wishes to transfer 1000 £, enter 1,000.00 at the Credit Amount field. Since we have not
checked against the ‘After Rate refresh’ field, the standard rate you specified for the currency
pair (here USD-GBP) in the Currency table will be applied to the 1000£. This exchange rate
will be displayed in the Exchange Rate field (1.4000000). Based on the exchange rate the
system automatically computes the equivalent of 1000 £ in USD (1,400.00 USD). This amount
will be displayed in the Debit Amount field.
Therefore you will have to credit the Nostro account of Chasebank London with 1,400.00 USD
and credit the account of Silas Reed (AS1302614) for 1000 £ in the Debit account field.
We shall specify that the rates to be applied to the transfer amount are to be picked up as of
the Value date and that Messages are to be generated as of Value date.
The value date for the contract is 03-JAN-2000. Based on the Spot date you specified for the
USD, the value date will be defaulted. For our example assume that the Spot date maintained
for USD is 2 days. Therefore the Value date is 05-JAN-2000.
Since the transfer is not effected through a Managers check or a Check, you need not enter
anything in these fields, as they are not applicable to the transfer you are entering.
For the charges incurred to effect the transfer, let us charge the Remitter (Silas Reed).
Therefore you will have to choose Remitter Our Charge in the Charge Bearer field.
Under Payment Details you can specify information that Silas Reed would like to send to
Wendy Klien, as to the reason of the payment. In this case you can specify Birthday Gift in
this field.
In the By Order of Field you can specify the name and address of Silas Reed, who is the
ordering Customer. At Ultimate Beneficiary Details you can specify the name and address of
Wendy Klien (the Ultimate Beneficiary of the transfer).
A screen depicting the entries that you will have to make, on the FT Contract screens to effect
this transfer successfully, has been captured below:
Earlier we had specified that the Rates and Message as of to be Value date. Therefore the
rates to be applied to the transfer amount will be applied on 05-JAN-00, and an MT 100
(payment order) from American Bank, NY, will be sent to Chasebank, London, on 05-JAN-00.
5-61
Viewing the Settlement Route of the transfer
In the Settlement Route screen you can view the route that the transfer will take before it
actually reaches Wendy Klien. In our case American Bank has a Correspondent relationship
with Chasebank, London. Therefore funds will pass from the account of Silas Reed (the
ordering Customer) with American Bank, NY, to Chasebank, London. Chasebank will in turn
credit the account of Wendy Klien.
Specifying Settlement Details for the transfer
So far, we have discussed the basic information about a transfer, which is captured through
the Funds Transfer Contract Details screen. Click ‘Settlement’ button to invoke the settlement
screen.
Specifying Account Details for the transfer
The details of the two accounts, involved in the transfer will be displayed. In our example Silas
Reed bears the charges incurred to effect the transfer. Therefore Silas Reed’s account
together with the currency of the account to be debited for charges will be displayed. Here you
can view details for each component item applicable to this transfer.
Verifying signatures online
You can choose to verify customer signatures while you are processing a debit transaction
involving a customer account. You can also choose to verify signatures while initiating a DD,
a telegraphic transfer, or a Charge payment. Click ‘Signature Verification’ button in the
‘Settlement Details – Account Details’ screen. The Signature Verification screen will be
displayed.
5-62
In this screen all the relevant details pertaining to the particular account signatory will be
displayed. You can verify the account signatory details you have received against the details
available in the instrument.
Specifying Message Details for a transfer
We shall settle this contract by means of a message. Therefore click on the radio button next
to Message. The payment message you specified on the Contract Main screen will be
defaulted here.
Since the funds in our example move from the account of Silas Reed (a non-financial
institution) with American Bank, NY, to the account of Wendy Klien (a non-financial institution)
with Chasebank, London; it is a customer transfer. Therefore an MT 103 (Payment Order) will
be generated.
Specifying Party details for the transfer
You have two tabs to specify the parties’ details. You can specify the name and address of
the following parties in these screens.
Intermediary Reimbursement Institution
Intermediary
Receiver Correspondent
Account with Institution
Ordering Institution
Beneficiary Institution
Ordering Customer
Ultimate Beneficiary
Cover Parties
Specify the local clearing external counterparty details, such as the counterparty name and
account details etc. You need to specify this if a cover is required for the contract.
5-63
Other Details
The system displays the default details as mentioned in the settlement instruction maintained
for the customer, currency, product and module combination. The details specified in the
respective fields are used in the message MT103.
Specifying the tax applicable for the transfer
Now in order to specify the tax that is applicable to the contract we you are entering click ‘Tax’
button on the Contract Main screen. Here, the tax specifications you made for the product to
which this contract is linked will be defaulted. You can waive the tax to be levied on the
transfer amount. To do so, click against the box next to Waive All.
Specifying the charges that are to be collected to effect the transfer
Click ‘Tax’ button in the Funds Transfer Contract Input screen to specify the charges and fees
that are applicable to the transfer. Here, all the details of the charges applicable to the transfer
you have entered are displayed. You can choose to waive them or charge Silas Reed for
them.
You can choose to waive the charge levied on the component. Check against the Waiver
option for COMPST. The specified tax will be waived.
After you have defined all, the relevant details of the transfer you can save it either by
Selecting ‘Save’ from the Actions menu in the Application tool bar or clicking save icon.
5.29.1.1 Bank Transfer
The Aragones Bank requests Edward Fowles Bank, London to transfer USD 10000 to the
account of beneficiary institution Noble Financial Services with Anton Miller Bank, London.
The transfer is to be made effective on 3rd June 2001.
Edward Fowles Bank has a correspondent relationship with Anton Miller Bank, London, and
therefore, no cover is required for the funds transfer message.
The charges are to be borne by Aragones Bank. A Payment Order, MT 100 must be
generated on the value date of the contract, from Edward Fowles Bank London, to Anton
Miller Bank, London.
The parties involved are as follows:
Party
Name
Ordering Institution
Aragones Bank
Sender
Edward Fowles Bank, London
Receiver
Anton Miller Bank, London
Account with Institution
Anton Miller Bank, London
Beneficiary
Noble Financial Services
Your specifications in the Funds Transfer Input Screen would be as follows:
Field
Entry
5-64
Product
Outgoing Bank Transfer Type of Product (for example, if you have
maintained a product with the code FBTO for outgoing bank transfers, then you can select it here)
Debit Currency
USD
Credit Currency
USD
Credit Amount
10000
Debit Account
The account of Aragones Bank in Edward Fowles Bank (say
ARAG005)
Credit Account
The account of Noble Financial Services in Anton Miller Bank (say
NFS005)
Value Date
03-06-2001
Charge Bearer
Remitter – Our Charges
Message as of
Value Date
Payment Details
The reason for the transfer could be mentioned here, for instance,
‘payment for delivery of goods’
By Order Of
Aragones Bank, London
Ultimate Beneficiary Details
Noble Financial Services
Account with
Institution
Anton Miller Bank, London
Receiver
Anton Miller Bank, London
Your specifications in the Settlement Message Details screen would be as follows:
5-65
Message Details tab
Field
Entry
Payment By
Message
Details of Payment
The reason for the transfer, which you had specified in the Payment
Details field in the main Contract Input screen, is defaulted here
The first Parties tab:
Field
Entry
Account With Institution
Anton Miller Bank, London (this information is defaulted in this field, from
the main Contract Input screen)
The second Parties tab:
Field
Entry
Ordering Institution
Aragones Bank. Typically, this information is defaulted here from the main
Contract Input screen
Beneficiary Institution
Anton Miller Bank. Again, this information is defaulted here from the main
Contract Input screen
5.29.1.2 Outgoing Customer Transfer with Cover
Mr. Albert Williams asks Fina Bank, London to transfer USD 10000 to the account of Mr.
Alfred Werker with Gemm Bank, London. Fina Bank, London does not have an accounting
relationship with Gemm Bank. Therefore, it will route the payment through CSN Global Bank,
London.
The transfer is to be made effective on 22nd September 2001. The charges are to be borne
by the beneficiary.
An MT 103 will be generated as on the value date, from Fina Bank, London, to Gemm Bank,
London. Also, a cover message will be sent to CSN Global Bank London, as on the value
date.
The parties involved are as follows:
Party
Name
Ordering Customer
Mr. Albert Williams
Sender
Fina Bank, London
Sender’s Correspondent
CSN Global Bank, London
Receiver
Gemm Bank, London
Account with Institution
Gemm Bank, London
Beneficiary Institution
Gemm Bank, London
5-66
Beneficiary
Mr. Alfred Werker
Your specifications in the Funds Transfer Input Screen would be as follows:
Field
Entry
Product
Incoming Customer Transfer with Cover Type of Product (for example, if you have maintained a product with the code FCCO for outgoing customer transfers with cover, then you can select it here)
Debit Currency
USD
Credit Currency
USD
Credit Amount
10000
Debit Account
Mr. Albert Williams’ account in Fina Bank, London
Credit Account
Mr. Alfred Werker’s account in Gemm Bank, London
Value Date
22-09-2001
Charge Bearer
Beneficiary – All Charges
Message as of
Value Date
Payment
Details
The reason for the transfer could be mentioned here
By Order Of
Mr. Alfred Williams
Ultimate Beneficiary Details
Mr. Alfred Werker
Account with
Institution
Gemm Bank, London
Receiver
Gemm Bank, London
In the Settlement Route tab, you can view the Sender’s Correspondent (CSN Global Bank) in
the Our Correspondent field.
Your specifications in the Settlement Message Details screen would be as follows:
5-67
Message Details tab:
Field
Entry
Payment By
Message
Details of
Payment
The reason for the transfer, which you had specified in the Payment Details
field in the main Contract Input screen, is defaulted here
The first Parties tab:
Field
Entry
Account With Institution
Gemm Bank, London (this information is defaulted in this field, from the
main Contract Input screen)
The second Parties tab:
Field
Entry
Ordering Institution
Fina Bank, London. Typically, this information is defaulted here from the
main Contract Input screen
Beneficiary Institution
Gemm Bank, London. Again, this information is defaulted here from the
main Contract Input screen
The Cover Parties tab:
5.29.2
Field
Entry
Beneficiary Institution
for Cover
CSN Global Bank, London. Typically, this information is defaulted
here from the main Contract Input screen
Outgoing Bank Transfer for Own Account
Barclays Bank, London holds the nostro account with Chase bank, Manhattan and Citi Bank,
New Jersey. It wants to transfer USD 100000 from Chase Manhattan’s account to Citi Bank
in New Jersey. The transfer is to be made effective on 15th December, 2001.
So, in order to process this transfer, Barclays Bank credits Chase Manhattan’s replicated
account in its books and debits Citi Bank’s replicated account in its books. In the same
process it sends out an Outgoing MT 200 to Chase Manhattan Bank.
When Chase Manhattan Bank receives the Incoming MT 200 from Barclays London, it debits
the nostro of Barclays London and sends out an MT 202 to Citi Bank, New Jersey.
Also Citi Bank, New Jersey will receive an MT 210 (Receive Notice).
The parties involved in the contract are as follows:
5-68
Party
Name
Sender
Barclays Bank , London
Receiver
Chase Bank, London
Account with Institution
Citi Bank, New Jersey
Your specifications in the Funds Transfer Input Screen would be as follows:
Field
Entry
Product
Bank transfer for Own Account (E.g.: FBTO – Bank Transfer For
Own account Transfer Type of Product).
Debit Currency
USD
Credit Currency
USD
Credit Amount
100000
Debit Account
Citi Bank, New Jersey’s Nostro Account
Credit Account
Chase Bank, Manhanttan’s Nostro Account
Value Date
15-12-2001
Message as of
Booking Date
Account with
Institution
Citi Bank .New Jersey
Receiver
Chase Bank , Manhattan
Your specifications in the Settlement Message Details screen would be as follows:
5-69
The first Parties tab:
Field
Entry
Account With
Institution
Citi Bank, New Jersey (this information is defaulted in this field, from
the main Contract Input screen)
The second Parties tab:
Field
Entry
Ordering Institution
Barclays Bank, London. Typically, this information is defaulted here
from the main Contract Input screen
Beneficiary
Institution
Citi Bank, New Jersey. Again, this information is defaulted here from
the main Contract Input screen
5.29.2.1 Incoming Customer Transfer
Mrs. Catherine Crenshaw asks Fina Bank, London to transfer USD 10000 to the account of
Mrs. Wendy Klein with Gemm Bank, London. At Gemm Bank, this is an incoming transfer and
the bank receives an incoming message from Fina Bank for the same.
The transfer is to be made effective on 15th December, 2001. The charges are to be borne
by the beneficiary.
Gemm Bank receives an MT 103 from Fina Bank, as on the value date of the contract. Gemm
Bank also receives an MT 202, for transfer with cover.
The parties involved in the contract are as follows:
Party
Name
Ordering Customer
Mrs. Catherine Crenshaw
Sender
Fina Bank, London
Receiver
Gemm Bank, London
Account with Institution
Gemm Bank, London
Beneficiary
Mrs. Wendy Klein
Your specifications in the Funds Transfer Input Screen would be as follows:
Field
Entry
Product
Incoming Customer Transfer Type of Product (for example, if you
have maintained a product with the code FICO for incoming customer transfers, then you can select it here)
Debit Currency
USD
5-70
Credit Currency
USD
Credit Amount
10000
Debit Account
Mrs. Catherine Crenshaw’s account in Fina Bank, London
Credit Account
Mrs. Wendy Klein’s account in Gemm Bank, London
Value Date
15-12-2001
Charge Bearer
Beneficiary – All Charges
Message as of
Value Date
Payment
Details
The reason for the transfer could be mentioned here
By Order Of
Mrs. Catherine Crenshaw
Ultimate Beneficiary Details
Mrs. Wendy Klein
Account with
Institution
Gemm Bank, London
Receiver
Gemm Bank, London
Your specifications in the Settlement Message Details screen would be as follows:
5-71
Message Details tab:
Field
Entry
Payment By
Message
Details of
Payment
The reason for the transfer, which you had specified in the Payment Details
field in the main Contract Input screen, is defaulted here
The first Parties tab:
Field
Entry
Account With Institution
Gemm Bank, London (this information is defaulted in this field, from the
main Contract Input screen)
The second Parties tab:
Field
Entry
Ordering Institution
Fina Bank, London. Typically, this information is defaulted here from the
main Contract Input screen
Beneficiary Institution
Gemm Bank, London. Again, this information is defaulted here from the
main Contract Input screen
5.30 Authorizing Bulk FT Contracts
Typically, FT contracts have to be authorized in the respective Contract Online (Summary)
screens. This method of authorizing the contracts can be quite cumbersome, especially if the
volume of transactions is large. In view of this, Oracle FLEXCUBE allows bulk authorization
of all unauthorized FT contracts from the ‘Bulk Authorization Detailed’ screen.
5-72
You can invoke the ‘Bulk Authorization Detailed’ screen by typing ‘CSDUAUTH’ in the field at
the top right corner of the Application tool bar and clicking the adjoining arrow button.
Select a module from the drop-down list and click ‘Fetch’ button to get the details of
unauthorized FT contracts.
This screen has the following features:
You can view all the unauthorized FT contracts through this screen
You can authorize the contracts in a single action
The system will authorize only the current branch contracts not created by you.
You have the option to ignore the overrides associated with the contract and to specify
messages generation associated with the events upon authorization.
If an error is encountered while authorizing the contract, the system will skip that
contract and process the next contract.
For each contract, you can view the error encountered during authorization (if any) using
the ‘View Error’ option.
You can view the contract details of an unauthorized contract through this screen.
You can view the settlement account details for each contract through this screen.
You can query for specific records based on certain criteria
5-73
Note
Contracts with mandatory re-key fields would be displayed here, but without the re-key option being available. Global Interdict check would also not be available.
5.30.1
Indicating Ignore Overrides
Indicate whether or not overrides should be ignored during authorization of the contract. If this
option is unchecked, and if there are any overrides for which confirmation or dual
authorization is required, then the contract will be skipped with an error ‘Overrides not
confirmed’ upon authorization. Otherwise, the contracts will be authorized without generating
errors.
5.30.2
Indicating Generate Messages
Control the generation of payment messages for events at the contract level by checking or
unchecking this option. Checking this box will generate payment messages for contracts upon
authorization.
5.30.3
Authorizing Contracts
You can either opt to authorize all the contracts that are displayed or choose only certain
contracts for authorization.
To authorize only specific contracts, check against the boxes positioned before each
contract reference number.
If all the contracts that are displayed have to be authorized, check against the box
positioned before ‘Contract Ref No’.
After selecting the contracts, click ‘Authorize’ button to authorize the contracts.
5.30.4
Viewing Errors
If the system encounters any errors during the authorization of a particular contract, it will
record the error and move on to the next contract.
Click the ‘View Error’ button to view the details of the errors recorded. In this screen, system
will display the reference number of the contracts, which could not be authorized, and the
reason for the failure of the authorization.
5.30.5
Viewing Settlement Details
The settlement account details of each contract will be displayed in the ‘Settlement
Instructions section of the Bulk Authorization Detailed screen. Click on the contract for which
you want to view the settlement details and it will be displayed in the ‘Settlement Instructions’
section. For each amount tag, the following settlement details are displayed:
Amount Tag
Tag Currency
Settlement account currency
Settlement Branch
Settlement Account
Pay Receive Indicator
Inter Reimbursing Institution
Receivers Correspondent
5-74
Intermediary
Account with Institution
Ordering Institution
Ordering Customer
Beneficiary Institution
Ultimate Beneficiary
Note
The settlement details for the latest event of the contract are displayed.
5.30.5.1 Fund Asset Management
The settlements processing is enabled only if ‘Allow Corporate Access’ has been checked
while defining branch parameters in the Branch Parameters – Detail View screen.
5.30.6
If ‘Allow Corporate Access’ is checked for a fund branch and the fund is Portfolio type,
then during settlement processing, the settlement account is chosen based on the
settlement instructions maintained for the counterparty.
Even if ‘Allow Corporate Access’ is not checked for a fund branch, the system picks up
the customer settlement account in the accounting entries of a Fund Transfer Contract.
All other components including charges will pick up the bank account values maintained
for the fund in the accounting entries.
If the corporate account exists in a different branch, then the Inter branch account/GL
maintenance is used for resolving the bridge account.
Viewing Contract Details
The details of the unauthorized contracts can be viewed by selecting the contract reference
number in this screen.
5.31 Maintaining MT101 Agreements with Ordering Customer
You can maintain agreements with the ordering customer for MT101 through the ‘MT101
Customer Agreements’ screen. You can invoke the ‘MT101 Customer Agreements’ screen by
typing ‘FTDCXFRA’ in the field at the top right corner of the Application tool bar and clicking
the adjoining arrow button.
5-75
You need to capture the following information in this screen:
Customer Number
Specify the customer number.
Incoming MT101
Select this option if it is incoming MT101.
Outgoing MT101
Select this option if it is outgoing MT101.
Customer Identifier
Here the Instructing Parties authorized to debit Ordering customer’s account for incoming
MT101 is listed.
Ordering Customer Identifier
Here the Party Identifiers for the Ordering customer are listed. These identifiers are used to
look up the customer no in an Incoming MT101 message.
5.32 MT101 Transaction Input Screen
You can input the details for Outgoing MT101 through the ‘Swift MT101 Outgoing
Maintenance’ screen. You can invoke the ‘Swift MT101 Outgoing Maintenance’ screen by
5-76
typing ‘FTDMT101’ in the field at the top right corner of the Application tool bar and clicking
the adjoining arrow button.
You need to capture the following information in this screen:
Customer Number
Specify the customer number.
Customer Specified Reference
Provide the reference number of the specified customer.
Senders Reference
On pressing the New button system would generate a reference number which would be
populated in the Sender’s reference field. This reference number would be populated in the
outgoing MT101 SWIFT message.
Receiver
Specify the receiver number. This field will be populated based on the maintenance in
‘Bilateral Agreement’ Screen.
5.32.0.1 Specifying Instructing Party Details
Specify the following details for the instructing party
Identifier Code
Specify the identifier code of the instructing party. The option list shows only BEIs.
Party Identifier
Specify the party identifier code.
5-77
Requested Execution Date
Specify the requested execution date.
Authorization
Specify the additional security provisions.
For instance a digital signature between the ordering customer/instructing party and the
account servicing financial institution.
5.32.0.2 Specifying Ordering Customer Details
Specify the following details for the ordering customer
Account Number
Specify the account number of the ordering customer. The option list shows only BEIs.
Identifier Code
Specify the identifier code of the ordering customer.
Party Identifier
Specify the party identifier of the ordering customer.
Address Line
Specify the address of the ordering customer.
5.32.0.3 Specifying Account Servicing Institution Details
Specify the following details for the account servicing institution
National Clearing Code
Specify the national clearing code.
BIC Code
Specify the BIC code.
Transaction Reference Number
Specify the reference number of the transaction.
FX Deal Reference Number
Specify the reference number of the deal.
Transaction Currency
Specify the currency used for transaction.
Transaction Amount
Specify the amount of transaction.
Exchange Rate
Specify the exchange rate.
Other Details
Specify the other details in the following screen. To invoke the ‘Other Details’ screen click
‘Other Details’ button.
5-78
Here you can maintain the other details for the outgoing MT101.
Click ‘Message’ button to view the SWIFT message generated in the ‘Messages’ screen.
Click ‘View Message’ button the following screen will display the full message.
5-79
5.33 Viewing FT Contract
You can view the FT contract using ‘Funds Transfer Contract Summary’ screen. To invoke
this screen, type ‘FTSTRONL’ in the field at the top right corner of the Application tool bar and
click the adjoining arrow button.
You can click ‘Search’ button to view all the pending functions. However, you can to filter your
search based on any of the following criteria:
5-80
Authorization Status
Select the authorization status of the contract from the drop-down list.
Process Status
Select the process status from the drop-down list.
Product
Select the product code from the option list.
Consolidated Account Reference
Select the consolidated reference number from the option list.
Debit Amount
Specify the amount debited.
Credit Amount
Specify the amount credited.
Counterparty
Select the contract amount from the option list..
Contract Status
Select the status of the contract for which you want to check the pending function from the
drop-down list.
Reference Number
Select the contract reference number from the option list.
Source
Select the source from the option list.
Debit Consolidation Reference Number
You can specify the console contract reference number. This is used for retrieving the list of
contracts for which the corresponding single debit contract has been created.
Debit Currency
Specify the debit currency.
Credit Currency
Specify the credit currency from the option list.
Source Reference
Select the source reference number from the option list from the option list.
Branch
Select the branch code for which you want to check the contract from the option list.
When you click ‘Search’ button the records matching the specified search criteria are
displayed. For each record fetched by the system based on your query criteria, the following
details are displayed:
Product
Contract Reference Number
Event Sequence Number
Contract Status
Authorization Status
Debit Amount
5-81
Transfer Amount
Debit Currency
Transfer Currency
Debit Account
Credit Account
Debit Value Date
Credit Value Date
FX Contract Reference
Source Reference
Source Reference Number
Receiver
Ordering Customer
Ordering Institution
Account with Institution
Ultimate Beneficiary
Consolidated Account Reference Number
Source Code
Counterparty
User Reference
Branch Code
Process Status
Debit Consolidation Reference Number
Click ‘Advanced Search’ to display the screen below:
You can query a contract based on any of the following details:
Authorization Status
Contract Status
Process Status
5-82
Reference Number
Product
Source
Consolidated Reference
Debit Currency
Debit Amount
Credit Currency
Credit Amount
Source Reference
Counterparty
Branch
5-83
6. Automatic Processes
6.1
Introduction
Certain processes that are initiated either at Beginning of Day (BOD) or End of Day (EOD),
execute certain events on the days they fall due. The Batch processes that are applicable to
Funds Transfers are discussed in this chapter. They are:
6.2
Autobook of a contract
The Rate Update Function
Referral Queue Function
Autobook Function
The autobook function handles the processing of future valued contracts. A future valued
contract is one that has been stored with a value date in the future and may have rate pickup
specifications as of the day you defined for the contract.
The values that you enter in the ‘rate as of’, ‘message as of’ and ‘accounting as of’ fields will
drive the processing of a future dated contract. All authorized contracts that are due for
initiation as of a particular day are picked up and processed by this batch processing function
at EOD or BOD as the case may be.
If you have specified that the contract requires a rate update on a particular day then the rate
as of that day is picked up from the exchange rate table and applied to the transfer amount
and to the other components of the transfer.
However, if you have specified that the rate of the day must be applied to the transfer amount
only after the rate refresh program for the day has been run, then the Autobook function will
just mark these contracts as ‘to be processed by the Rate Update Function’. The Rate Update
function will process transfers that require a rate update after the rate refresh process has
been run and authorized.
The Autobook function will also automatically pass Accounting Entries for all Contracts
processed by it. These Accounting Entries will bear the date of the transfer i.e., the value date
of the transfer. Based on the specifications you make in the ‘Message as of’ field’, settlement
messages and advices will be generated.
The Auto book function posts accounting entries for a contract that it processes based on the
option set in the Accounting As Of specification in the contract details. If accounting is
indicated as of ‘Message Date’, the relevant accounting entries are passed before the
messages are generated, on the date of message generation.
For contracts involving products for which the Allow Messaging Before Accounting option has
been set, the messages are indicated to be generated on the booking date, and the
accounting could be indicated either on the message generation date (that is, on the booking
date) after the generation of messages, or on the debit value date of the contract, depending
on the specification made in the Accounting As Of field.
In a nut shell the main functions of ‘Autobook’ is to:
Update the transfer amounts based on the Rate Pick up code or mark contracts as
needing a Rate Update on that day.
Pass Accounting Entries
6-1
Generate settlement messages and advices based on the message code that you
specify.
All transfers that have been processed by the Autobook Function will be marked as
‘Liquidated’ once the accounting entries for the transfers have been passed.
The Over ride overdraft check box has to be checked at the contract level which is defaulted
from the product level for all the FT transactions which exceeds the amount available in the
account, However if the same is not checked, then the contract will not be liquidated and will
remain active.
6.3
Rate Update Function
When you create an FT product and define preferences for it, you can also specify the time
at which the exchange rates need to be picked up for contracts involving this product.
Exchange rates are maintained by the Head Office and propagated to the branches. Rates
may either be maintained by individual branches or can be input by the HO and propagated
to all branches. Once the HO authorizes the exchange rate record, it becomes applicable to
all other branches.
You can specify ‘After Rate Refresh' for the field, ‘Rate Type’at the Product Preferences
screen
If you specify 'After Rate Refresh' then the contract will be put on hold. No accounting entries
will be passed, neither will any messages be generated. Such a contract will not be processed
until the rate refresh process for the day has been run.
You can perform further operations on a contract whose rate pick up is defined as 'After Rate
Refresh' only by means of the rate update function.
The applicable exchange rates will be picked up and applied to the transfer amount on a day
that you can specify. The Rate pick up code that you define for a contract basically signifies
the date or day on which the standard rate (after rate refresh) needs to be picked up and
applied to the transfer amount.
This date can be as of:
Booking date
Spot date
Value date
Contrac
t
Rate pickup
code
Message generation
code
Normal
Booking date
After authorization
Future
Dated
Booking date
After Authorization
Spot date
On spot date
Value date
On value date
Note
If the Rate Pick Up code is of Spot date and Value date, then the BOD batch of the corresponding day will do the liquidation as per the rate pickup code at BOD.
To sum it up, the rate update function can be used to process:
6-2
6.3.1
–
Cross currency transfers, i.e., the ‘pay’ currency is not the same as the ‘receive’
currency
–
Contracts marked with Rate type as After rate refresh
Invoking Rate Update Function
From the Application Browser choose EOC Operations. Thereafter, choose Intraday Batch,
and from the LOV of function ID choose the Rate Update (FTRTUPDT) under it.
When you invoke this function, the system gives the message as ‘The rates have been
refreshed and sent to the host. Do you want to continue’.
Click on ‘Yes’ in the message box to indicate that the rates have been refreshed. Thereafter,
you can proceed with the rate update function.
Once the rate update function is completed successfully, the applicable contracts will be
updated with the event ‘RATE’ and the latest rate will be applied and the contract will be
liquidated.
6.3.2
Processing Contract with Rate Update
All the contracts which have been booked as cross currency and the rate refresh checked
remain as active. Invoke the Rate refresh batch and run the same. Once the rate refresh batch
is run, then those contracts are updated with the latest rate and the contract is liquidated.
You can update the rates of an unauthorized contract. However the status of the contract
remain as unauthorized.
Thereafter, the necessary accounting entries and messages are passed for the transfer in
accordance with the specifications you made in the ‘Message As Of’ field of the contract main
screen.
If there are contracts for which a rate update is due and exchange rates for the day have been
refreshed; however but the rate update function is not invoked, then the Autobook function
automatically picks up those contracts and processes them with the refreshed rates.
For example,
Let us assume that a customer of your bank requests you to initiate a transfer on his behalf
on 23 March 1999 (Booking date). Assume that for the contract you had specified 30 March
1999 (Value date) in the ‘Rate as of’ and ‘Message as of’ fields. Assume that you had
specified that the rates to be used for the contract are to be picked up from the currency table,
after the rates have been refreshed (Standard rate - ‘after rate refresh’).
On 23 March 1999 (the day on which you enter the contract), the contract will not be
processed, no Accounting Entries will be passed nor will any messages be generated.
On the 30 March 1999, when you invoke the Rate Update function; the system will ensure that
the rates have been refreshed before it allows you to update the contract with the refreshed
rates.
Since the Message and Rate is as of ‘Value date’, accounting entries and messages will be
generated on 30 March 1999.
6-3
6.4
Referral Queue Function
Referral refers to the process of handling transactions hitting the customer’s account which
forces the account to exceed the overdraft limit on the account.
The referral function works on a three tier process. The “Referral required” flag should be
checked at “Account Class” level. The “referral required” field at the customer account class
level will be defaulted to the customer Account level. In case the account is marked for
referral, transactions resulting the account to go into overdraft, then the same transaction
would be sent to referral queue. For accounts not marked for referral, normal Flexcube
transaction processing would be done. At the FT product level, referral required flag is
provided. For the corresponding account class, customer account and product, if the
transaction is resulting into the account going into overdraft, then the transaction will be sent
to the referral queue.
Please note the following
6.4.1
The FT Referral function is applicable only for the future dated contracts.
The Referral Required Flag has to be mandatorily checked at the Account Class level
for the referral process to function which is then defaulted to the customer account level.
Invoking Referral Queue Function
From the application browser, choose Function Inputs under EOC operations. Maintain the
Referral batch CSREFQPR for the respective branch and EOC group under Transaction
Input.
Thereafter, from the application browser, select the Intra Day Batch from EOC Operations.
Select the referral batch (CSREFQPR) from the LOV Function ID and run the batch.
6.4.2
Processing Contract with Referral Queue Function
When a FT contract is booked with the product which is checked as “Referral required”, for
the customer whom the “Referral required” is checked and of the account class where
“Referral required” is checked, then the same transaction is booked with the status as active
and only the BOOK event fired.
However during the EOD process, the FTAUTO, BOD batch picks up all the transactions
marked for referral and puts them under “Unposted” in the referral queue.
From the Application browser, select Customer accounts and under that Customer accounts
Maintenance. Select Function ID STDREFQU (Referral Queue) to view all the transactions
which have been updated by the batch process as Unposted. The same can be viewed each
customer account wise.
Once the BOD process is completed, then you have to manually unlock the record customer
wise and select each transaction as Pay flag / Unpay Flag. When you select the transaction
as Pay Flag, it means you have accepted that transaction and the over draft facility can be
used. However in case you select the Unpay flag for the transaction, then the transaction is
rejected. Once this is done you have to save the record.
Note
The fields Pay Posted and Unpay Posted field can be used to do bulk postings.
6-4
Once the record is saved, the intraday batch CSREFQPR should be run. This batch
processes all the contracts where the Pay Flag has been checked. INIT is fired for all the
selected transactions. It also rejects all the contracts where the ‘Unpay’ field has been
checked.
On unpay, the transaction will be reversed.
The process to check the account statistics of a customer account is given below:
Ensure that account statistics is enabled for the account class associated with the
account for which ‘Referral’ option is checked.
If the above condition is satisfied, the system verifies the list of credit account balance
for the account and the branch.
The system checks for the feature ‘PTDSTATS’ in the ‘Feature ID Maintenance’ screen.
Further, the system checks the period code maintenance.
If all the above conditions are met and the values exist, the system will populate the records
during the BOD operations in the account period statistics/financial statistics table.
6-5
7. Batch Upload Function
7.1
Introduction
Entering high volume funds transfer contracts can be laborious and time consuming. You can
avoid entering such contracts by using the Batch Upload Function. The FT Batch Upload
function is designed to accept raw data that can be processed into an FT contract in Oracle
FLEXCUBE. This function when invoked, automatically reads the data that is resident in the
gateway (upload) tables of Oracle FLEXCUBE and create contracts in the FT module of
Oracle FLEXCUBE. FT contracts can come into the gateway (upload) tables from any
external system or source depicted as the Outer World in the diagram. Contracts to be
uploaded onto Oracle FLEXCUBE should match certain validations, which will be discussed
in the course of this chapter.
FT contracts can come into Oracle FLEXCUBE from any source depicted as the ‘Outer World’
in the diagram. However, Oracle FLEXCUBE will pick up contracts for upload only from the
upload tables of Oracle FLEXCUBE.
FT Contract
Tables
Outer World
FLEXCUBE Upload
Tables
FLEXCUBE
For FT contracts to be successfully uploaded on to Oracle FLEXCUBE, the details of such
contracts resident in the upload tables should pass all validations checked by the system.
In the course of this chapter we will discuss:
7.2
The maintenance that is required prior to uploading FT contracts in Oracle FLEXCUBE.
The steps involved in the contract upload process, including handling of errors/
overrides.
The structure of the gateway (upload) tables and the type of data that Oracle
FLEXCUBE expects to be available in the upload tables prior to the upload process.
Maintaining Upload Sources
Oracle FLEXCUBE provides the facility of uploading funds transfer transactions on an online
basis, from external upstream systems.
To recall, FT contracts can be uploaded onto Oracle FLEXCUBE from any external source,
such as an upstream system. However, Oracle FLEXCUBE will pick up transactions for
upload only from its FT upload (or gateway) tables.
For FT transactions to be successfully uploaded on to Oracle FLEXCUBE, the details of such
transactions resident in the upload tables should pass all validations done by the system.
Oracle FLEXCUBE validates the uploaded transactions, and after successful validation, they
are taken up for processing as FT contracts in the system. Any transactions that fail the
validations are rejected, and the reason for rejection recorded.
7-1
For reporting purposes, before you actually begin to upload FT contracts onto Oracle
FLEXCUBE, you should maintain details of the sources from which contracts can come into
the upload tables. A source in Oracle FLEXCUBE is simply a collection of attributes for a
batch of contracts coming in through the upload tables.
For a source, you can define the operations (post upload) that can be performed on contracts
uploaded from a particular source, and also define the status that uploaded contracts should
be marked with. You can also define the exception handling attributes at this level.
Upload sources can be maintained at the Head Office level and propagated to the branches
of your bank.
The maintenance of upload sources helps to retrieve information for a given source.
The procedure for maintaining details of an upload source has been discussed under the
head ‘Maintaining Upload Source Details’, and ‘Specifying Upload Source Preferences’ in the
‘External System Maintenance’ chapter of the ‘Gateway Services’ user manual.
7.2.1
Deleting Uploaded Contract
Deleting an uploaded FT contract (from the Oracle FLEXCUBE front end, post upload) may
or may not be allowed. It is determined by the specifications you made in the ‘Delete Allowed’
field of the ‘Source Detail Maintenance’ screen.
To delete an uploaded FT contract, Select ‘Delete’ from the Actions menu in the Application
tool bar or click delete icon, when you view the contract in the summary or detailed view.
You can delete an uploaded contract only if:
7.3
the record is unauthorized
you have allowed the delete operation for the record in the Source Detail Maintenance
screen.
Amending Uploaded Contract
Amending an uploaded FT contract after upload, may or may not be allowed. It is determined
by the specifications you have made in the ‘Amend Allowed’ field on the ‘Source Detail
Maintenance’ screen. To amend an uploaded record, choose upload from the Actions Menu.
Amendments to an unauthorized uploaded contract
If the uploaded contract bears the status ‘unauthorized’, Oracle FLEXCUBE will allow you to
amend only those fields that have been marked with ‘Amend allowed’.
Amendment to an authorized uploaded contract
If the uploaded contract bears the status ‘authorized’, you can amend only those fields that
have been marked with ‘Amend allowed’ in authorized state.
Amending an uploaded contract placed on ‘hold’
If an FT Contract has been uploaded and placed on hold, you will be allowed to amend only
those fields of the uploaded contract for which you had specified that amendment is allowed.
7.4
Reversing Uploaded Contract
Reversing an uploaded FT contract may or may not be allowed. It is determined by the
specifications you have made in the ‘Reverse Allowed’ field on the ‘Source Detail
Maintenance’ screen.
7-2
To reverse an uploaded contract select ‘Reverse’ from the Actions menu in the Application
tool bar or click reverse icon. You can reverse an uploaded record if:
7.5
the record is authorized
you have allowed the reverse operation for the record in the ‘Source Detail
Maintenance’ screen
Automatic Upload of MT 103 and MT 202 S.W.I.F.T
Messages
The Message Upload facility of Oracle FLEXCUBE allows you to automatically process all
incoming MT 100, MT 103 and MT 202 messages, which result in either incoming or outgoing
Funds Transfers. The Message Upload facility is a part of the Straight Through Processing
(STP) function in Oracle FLEXCUBE.
7.6
Uploading Contracts through STP Function
One of the most important features of the Funds Transfer module is the facility of processing
contracts without user intervention. Messages received from ordering customers are
interpreted, resolving the details of the contract, which is then booked automatically in the
system and then processed to closure. This kind of automatic processing is known as straight
through processing or STP.
The Message Upload function, which is a part of STP, resolves incoming SWIFT messages
and writes the interpreted details into the FT Upload tables.
When the FT upload function is invoked, it uploads contracts that have been written into the
upload tables by the STP Message Upload function, in addition to contracts from external
sources. It processes data resident in the FT Upload tables and creates FT contracts in the
system, which is then processed normally, just as contracts booked in the normal way,
through the FT Contract Online screen.
Note
The branch-level STP preferences are applicable for upload of contracts through the FT
Upload process. For details about the branch-level STP preferences, refer the Straight
Through Processing chapter in this user manual.
The FT upload can either be invoked independently as a process after populating the data in
the FT upload tables (i.e., as described in the section titled ‘Starting the FT Upload function)
or will be invoked automatically as a part of the overall STP process.
For details on the complete STP process (and more details on the message upload
component of the process), refer to the Straight Through Processing chapter in the Funds
Transfer user manual. Only the FT Upload function process, which is part of the overall STP
process, is described here.
7.6.1
FT Upload Tables (Gateway Tables)
Transactions can only be uploaded into the gateway tables by an upstream system only when
Oracle FLEXCUBE is in transaction input stage. No transactions can be uploaded after the
End of Transaction Input (EOTI) stage is marked off in Oracle FLEXCUBE. Any transactions
that are uploaded into the gateway tables by an upstream system are marked with the status
‘U’, denoting ‘unprocessed’, in the CSTBS_EXT_CONTRACT_STAT table, which is the
7-3
control master table for all transactions uploaded into Oracle FLEXCUBE from external
systems.
An Oracle background process (Oracle job) constantly checks the gateway tables during
Oracle FLEXCUBE’s transaction input to see if any transactions have been uploaded into the
tables by an external upstream system, that have not been processed, i.e., marked with the
status ‘U’. All such transactions are identified by the Oracle background process and picked
up for the purpose of validating the uploaded transaction information.
The FT Upload tables, which are populated with FT contracts from external sources and
through the STP Message Upload process, will be examined in detail in this section. The
upload tables are also called the gateway tables. The following are the upload tables that
need to be populated before invoking the FT Upload function, either manually or automatically
through the overall STP process.
7.6.1.1
Table Name
Mandato
ry
CSTBS_EXT_CONTRACT_STAT
Yes
Master table of all contract
uploads
FTTBS_UPLOAD_MASTER
Yes
Funds Transfer Upload Master
ISTBS_UPLOAD_CONTRACTIS
No
Settlement Information for Customer Accounts / Nostro
CFTBS_UPLOAD_CHARGE
No
Charge details for the contract
TATBS_UPLOAD_RULE
No
Tax details for the contract
MITBS_CONTRACT_MAPPING_UPL
OAD
No
MIS details for Funds Transfer
contracts
CSTBS_UPLOAD_CONTRACT_UDF
No
User defined fields for Funds
Transfer contracts
FTTBS_UPLOAD_EXCEPTION
No
Exception details in case of
upload failure
FTTBS_UPLOAD_LOG
No
Mandatory download table populated by Oracle FLEXCUBE after
successful / failed upload
Remarks
Upload into Gateway Tables
The contract details of all the contracts to be uploaded from external sources are populated
into gateway tables (i.e., the upload tables) of Oracle FLEXCUBE initially, either from a frontoffice contract booking system or by the Message Upload function of Oracle FLEXCUBE (in
the case of STP) .
Every contract that is uploaded is identified by a Source name (as maintained in the FT
Upload Source maintenance) and a unique number called Source Reference Number
(typically the reference number of the contract in the system in which it was first initiated, such
as a front-office system). Once a contract is uploaded into the gateway tables, the Oracle
FLEXCUBE system generates a unique Contract Reference Number for each uploaded
contract. Subsequently, for all other operations that need to be performed, such as
amendment, authorization, reversal and so on, this number identifies the contract.
7-4
The gateway tables for Charges, Management Information System (MIS), Tax, and User
Defined Field (UDF) components are optional in nature. In the absence of entries in these
tables, the system picks up the default details from the product or the customer involved in
the contracts, as applicable.
Note
The source reference number also gets displayed in the field 21 of MT 202, as the related
reference number. The number should not start or end with a slash ‘/’ and should not have
two consecutive slashes ‘//’.
7.6.1.2
Processing and Validations
The Oracle FLEXCUBE FT Upload process can be configured to be invoked either manually
or automatically by an Oracle process that continuously checks for newly uploaded contracts.
This process picks up all contracts that have a status of ’U‘ in the
CSTBS_EXT_CONTRACT_STAT table, and performs validations on the data populated in
the upload tables.
All successfully validated contracts will result in creation of contracts in the FT module of
Oracle FLEXCUBE and the import status is set to ’Y‘ (Processed) in the CSTBS_EXT_
CONTRACT_STAT table (which is the control table for uploads into Oracle FLEXCUBE).
The post import status of a contract can either be authorized or unauthorized based on the
preferences set in the ‘Upload Sources Preferences Maintenance’ screen.
The status of the uploaded contract will be unauthorized if the contract amount is greater than
or equal to the transaction limit maintained for the product.
The system converts the contract credit amount into the transaction limit currency using the
standard mid rate if the contract currency is different from the transaction limit currency.
The contracts are uploaded as per the ‘Upload Sources Preferences Maintenance’ screen if
the contract amount is less than the maintained transaction limit.
For the contracts that are auto authorized, the authorizer of the contract will be ‘SYSTEM’.
For contracts to be put on hold only basic validations are done and the import status and post
import status are changed to “Y” (Processed) and “H” (Hold) respectively.
For the contracts that encountered errors and rejected, the import status is set to “E” (‘Error’
and ‘Rejected’).
The FT Upload process does not delete the exception records of an existing FT Upload
Transaction that has been marked as ‘E’, i.e., ‘Error’ and ‘Rejected’.
The user ID in the contract information must be a valid Oracle FLEXCUBE user ID, and have
appropriate permissions for the upload of FT contracts. The number of contracts uploaded
using the user ID is also validated, to see that it does not exceed the maximum number of
transactions allowed.
Debit or credit customer types are used based on the product type. Debit customer type is
used for internal and outgoing payments. Credit customer type is used for incoming
payments.
Any contracts rejected by Oracle FLEXCUBE (i.e. by the FT Upload function) should be
corrected at source and re-sent with a different payment reference and status “U”.
7-5
Charges and Tax information
The charges and tax information is uploaded by the upstream system into the
CFTBS_UPLOAD_CHARGE and TATBS_UPLOAD_RULE gateway tables respectively. The
system checks to ensure the correct amount tags, components and tax rule to be used are
provided for appropriate charges and taxes applicable to the contract (as maintained in the
Oracle FLEXCUBE funds transfer product), in the uploaded transaction information.
Settlement Details
The settlement route for the payment in a transaction is uploaded by the upstream system into
the ISTBS_UPLOAD_CONTRACTIS gateway table. If the settlement information is not
uploaded into this table, the standard settlement route maintained in Oracle FLEXCUBE
under standard settlement instructions maintenance is picked up.
Note
7.6.1.3
–
For uploaded FT contracts, the System checks for the charge bearer for the
contract. If found, and the specification is different from that defined for the FT
product, an error is raised (if the Allow Change in Contract option has not been
enabled). If not specified in the upload information, it is defaulted from the
preferences for the product of the contract.
–
Also, the Beneficiary Account would undergo IBAN validations if the Beneficiary
IBAN Mandatory option has been enabled for the FT Product. A configurable
override is logged if the IBAN validations fail.
–
The message generated for an incoming transaction may at times contain incorrect
beneficiary account number. Invalid account numbers and closed accounts are considered as incorrect for this purpose. In such cases, the system uploads the contract
and makes credits to the DAO GL mentioned for the product associated with the
contract. Further while liquidating the contract, the system automatically debits the
DAO GL. You can specify the actual credit account (valid customer account). However, you will not be allowed to select a GL at this level.
Generation of Accounting Entries and Messages
Appropriate accounting entries and messages are passed for all successfully validated
contracts except for those in “Hold” status based on the events defined for the product
involving the contract.
7.6.1.4
Recording Exceptions and Errors
The Funds Transfer Upload process logs the errors encountered for each contract during the
upload process. The error codes indicating the reasons for rejections are populated in an
exception table, the FTTBS_UPLOAD_EXCEPTION table.
7.6.1.5
Maintenance Log
All contracts that are processed, irrespective of their status, are recorded in
FTTBS_UPLOAD_LOG, which is the log table for all upload processing. If, for a Source
Reference, a record already exists in the table, the data is overwritten by the latest values.
7.6.2
Structure of FT Upload (Gateway) Tables
Each of the upload tables is described in detail below:
7-6
7.6.2.1
FTTBS_UPLOAD_MASTER
This table consists of the funds transfer contracts information, which will be loaded to the
Funds Transfer Contract Master table. This table must be compulsorily populated for the FT
Upload function to be invoked.
Column Name
Data Type
Mandator
y
SWI
FT
Fiel
d
Defaul
t Value
Description
SOURCE_COD
E
Alphanumeric (15)
Yes
Valid Source Code
– Primary Key
SOURCE_REF
Alphanumeric (16)
Yes
Reference Number of the Other
System – Primary
Key
FT_CONTRACT
_REF
Alphanumeric (16)
No
Will be populated
by Oracle FLEXCUBE. Oracle
FLEXCUBE Reference Number
for cross verification
BRANCH_CODE
Alphanumeric (3)
Yes
Branch to which
contract needs to
Be uploaded. Valid
branch in Oracle
FLEXCUBE
USER_REF_NO
Alphanumeric (16)
Yes
7-7
IF
NULL,
Source
Reference
will be
Copied by
Oracle
FLEXCUBE
User Reference
Number for the
transaction
FT_TYPE
1 Character
Yes
Type of fund transfer Transaction.
Should be the
same as Product
Maintenance.
I - Incoming Funds
Transfer
O - Outgoing
Funds Transfer
N – Internal Funds
Transfer or Book
Transfer
MSG_COVER
CHAR (1)
Yes
Default
from
Product
Cover Message
Required
N-Cover not
required
Y-Cover required
MSG_AS_OF
CHAR (1)
Yes
Default
from
Product
When Outgoing
Message should
be sent
B-Booking Date
S-Spot Date
V-Value Date
N-Not applicable
D-Debit Value
Date
C-Credit Value
Date
I-Instruction Date
7-8
RATE_AS_OF
CHAR (1)
Yes
For
Cross
Currency,
Default
from
Product
For
Non
Cross
Ccy,
Default
N
Date as of which
the exchange
rates must be
picked up
B-Booking Date
S-Spot Date
V-Value Date
U-User Input
N-Not applicable
D-Debit Value
Date
C-Credit Value
Date
I-Instruction Date
For cross currency
contracts, should
be one of
'B','S','V','U'
AFTER_RATE_
CHANGE
CHAR (1)
Yes
N
Pickup rate as of
parameter specified or not
Y-Input
N-As per rate as
of parameter
RATE_TYPE
Alphanumeric (8)
No
Valid Oracle
FLEXCUBE Rate
Type. Should be
null for non cross
currency contracts
SPREAD_CODE
1 Character
Yes
Spread Code
1 – 1 Spread
2 – ½ Spread
4 – ¼ Spread
8 – 1/8 Spread
9 – No Spread For
non cross currency, should be
9.
EXCHANGE_RA
TE
Number
(14,7)
No
7-9
User Input
Exchange Rates.
Mandatory for
cross currency
user input rates
DR_BRANCH
Alphanumeric (3)
Yes
Debit Account
Branch. Valid
branch code to
which Debit
Account belongs
DR_ACCOUNT
Alphanumeric (20)
Yes
Debit Account.
Valid Oracle
FLEXCUBE
account
DR_CCY
Alphanumeric (3)
Yes
Debit Currency.
Valid Currency
Code in Oracle
FLEXCUBE
DR_AMOUNT
Number
(22,3)
No
Debit Amount. For
non cross currency, cannot be
Null.
For Incoming FT
cannot be null
Should Be same
as CR_AMOUNT
for non cross currency contracts
DR_VALUE_Dat
e
Date
Yes
Debit Value Date.
Holiday Maintenance should exist
for this value date
CR_BRANCH
Alphanumeric (3)
Yes
Credit Branch.
Valid branch code
to which Credit
Account belongs
CR_ACCOUNT
Alphanumeric (20)
Yes
Credit Account.
Valid Oracle
FLEXCUBE
account
CR_CCY
Alphanumeric (3)
Yes
Credit Currency.
Valid Currency
Code in Oracle
FLEXCUBE
7-10
CR_AMOUNT
Number
(22,3)
No
Credit Amount.
For non cross currency cannot be
Null.
For Outgoing FT
cannot be null
Should be the
same as
CR_AMOUNT for
non cross currency contracts
CR_VALUE_Dat
e
Date
Yes
Credit Value Date.
Holiday Maintenance should exist
for this value date
MCK_Number
Alphanumeric (16)
No
Manager’s Check
Number.
If MCK Required
is ‘Y’ at Product
Level then this
field is mandatory.
Should be unique
if supplied. Should
not be present if
Managers Check
required is 'N' at
Product Level
CHECK_Number
Alphanumeric (16)
No
Check Number.
Should not be present if DR Account
is a GL.
BY_ORDER_OF
1
Alphanumeric (35)
No
By Order of. For
Incoming FT, if
Credit Account is
A GL, one of the
fields of By order
Of is mandatory.
For Outgoing/
Internal FT, if
Debit Account is a
GL, one of the
fields of By Order
Of is mandatory
7-11
BY_ORDER_OF
2
Alphanumeric (35)
No
By Order of. For
Incoming FT, if
Credit Account is
A GL, one of the
fields of By Order
Of is mandatory.
For Outgoing/
Internal FT, if
Debit Account is a
GL, one of the
fields of By Order
Of is mandatory
BY_ORDER_OF
3
Alphanumeric (35)
No
By Order Of. For
Incoming FT, if
Credit Account is
A GL, one of the
fields of By Order
Of is mandatory.
For Outgoing/
Internal FT, if
Debit Account is a
GL, one of the
fields of By Order
Of is mandatory
BY_ORDER_OF
4
Alphanumeric (35)
No
By Order of. For
Incoming FT, if
Credit Account is
A GL, one of the
fields of By Order
Of is mandatory.
For Outgoing/
Internal FT, if
Debit Account is a
GL, one of the
fields of By Order
Of is mandatory
ULTIMATE_BEN
1
Alphanumeric (35)
No
7-12
59
Ultimate Beneficiary. For Incoming/Internal FT, if
Credit Account is
a GL, one of the
fields of Ultimate
Beneficiary is
mandatory. For
Outgoing FT, if
Credit Account is
a Nostro Account
and it is a Customer Transfer,
one of the fields of
Ultimate Beneficiary is mandatory
ULTIMATE_BEN
2
Alphanumeric (35)
No
59
Ultimate Beneficiary. For Incoming/Internal FT, if
Credit Account is
a GL, one of the
fields of Ultimate
Beneficiary is
mandatory. For
Outgoing FT, if
Credit Account is
a Nostro Account
and it is a Customer Transfer,
one of the fields of
Ultimate Beneficiary is mandatory
ULTIMATE_BEN
3
Alphanumeric (35)
No
59
Ultimate Beneficiary. For Incoming/Internal FT, if
Credit Account is
a GL, one of the
fields of Ultimate
Beneficiary is
mandatory. For
Outgoing FT, if
Credit Account is
a Nostro Account
and it is a Customer Transfer,
one of the fields of
Ultimate Beneficiary is mandatory
ULTIMATE_BEN
4
Alphanumeric (35)
No
59
Ultimate Beneficiary. For Incoming/Internal FT, if
Credit Account is
a GL, one of the
fields of Ultimate
Beneficiary is
mandatory. For
Outgoing FT, if
Credit Account is
a Nostro Account
and it is a Customer Transfer,
one of the fields of
Ultimate Beneficiary is mandatory
7-13
ULTIMATE_BEN
5
Alphanumeric (35)
No
59
Ultimate Beneficiary. For Incoming/Internal FT, if
Credit Account is
a GL, one of the
fields of Ultimate
Beneficiary is
mandatory. For
Outgoing FT, if
Credit Account is
a Nostro Account
and it is a Customer Transfer,
one of the fields of
Ultimate Beneficiary is mandatory
INT_REIM_INST
1
Alphanumeric (35)
No
55
Reimbursement
Institution
INT_REIM_INST
2
Alphanumeric (35)
No
55
Reimbursement
Institution
INT_REIM_INST
3
Alphanumeric (35)
No
55
Reimbursement
Institution
INT_REIM_INST
4
Alphanumeric (35)
No
55
Reimbursement
Institution
INT_REIM_INST
5
Alphanumeric (35)
No
55
Reimbursement
Institution
INTERMEDIARY
1
Alphanumeric (35)
No
56
Intermediary
INTERMEDIARY
2
Alphanumeric (35)
No
56
Intermediary
INTERMEDIARY
3
Alphanumeric (35)
No
56
Intermediary
INTERMEDIARY
4
Alphanumeric 35)
No
56
Intermediary
INTERMEDIARY
5
Alphanumeric (35)
No
56
Intermediary
RECVR_CORRE
S1
Alphanumeric (35)
No
Receiver correspondent
RECVR_CORRE
S2
Alphanumeric (35)
No
Receiver correspondent
RECVR_CORRE
S3
Alphanumeric (35)
No
Receiver correspondent
RECVR_CORRE
S4
Alphanumeric (35)
No
Receiver correspondent
7-14
RECVR_CORRE
S5
Alphanumeric (35)
No
ACC_WITH_INS
T1
Alphanumeric (35)
No
57
Account With
Institution. Mandatory if cover is
required
ACC_WITH_INS
T2
Alphanumeric (35)
No
57
Account With
Institution. Mandatory if cover is
required
ACC_WITH_INS
T3
Alphanumeric (35)
No
57
Account With
Institution. Mandatory if cover is
required
ACC_WITH_INS
T4
Alphanumeric (35)
No
57
Account With
Institution. Mandatory if cover is
required
ACC_WITH_INS
T5
Alphanumeric (35)
No
57
Account With
Institution. Mandatory if cover is
required
SNDR_TO_REC
VR_INFO1
Alphanumeric (35)
No
72
Sender Receiver
Information
SNDR_TO_REC
VR_INFO2
Alphanumeric (35)
No
72
Sender Receiver
Information
SNDR_TO_REC
VR_INFO3
Alphanumeric (35)
No
72
Sender Receiver
Information
SNDR_TO_REC
VR_INFO4
Alphanumeric (35)
No
72
Sender Receiver
Information
SNDR_TO_REC
VR_INFO5
Alphanumeric (35)
No
72
Sender Receiver
Information
SNDR_TO_REC
VR_INFO6
Alphanumeric (35)
No
72
Sender Receiver
Information
PAYMENT_DET
AILS1
Alphanumeric (35)
No
70
Payment Details
PAYMENT_DET
AILS2
Alphanumeric (35)
No
70
Payment Details
PAYMENT_DET
AILS3
Alphanumeric (35)
No
70
Payment Details
PAYMENT_DET
AILS4
Alphanumeric (35)
No
70
Payment Details
ORDERING_INS
T1
Alphanumeric (35)
No
52
Ordering Institution
7-15
Receiver Correspondent
ORDERING_INS
T2
Alphanumeric (35)
No
52
Ordering Institution
ORDERING_INS
T3
Alphanumeric (35)
No
52
Ordering Institution
ORDERING_INS
T4
Alphanumeric (35)
No
52
Ordering Institution
ORDERING_INS
T5
Alphanumeric (35)
No
52
Ordering Institution
BENEFICIARY_I
NST1
Alphanumeric (35)
No
58
Beneficiary Institution
BENEFICIARY_I
NST2
Alphanumeric (35)
No
58
Beneficiary Institution
BENEFICIARY_I
NST3
Alphanumeric (35)
No
58
Beneficiary Institution
BENEFICIARY_I
NST4
Alphanumeric (35)
No
58
Beneficiary Institution
BENEFICIARY_I
NST5
Alphanumeric (35)
No
58
Beneficiary Institution
UPLOAD_STAT
US
1 Character
Yes
U
Upload Status.
Populate with Null
at the time of
Upload.
After Upload, HContract Put on
Hold
U- Unauthorised
A-Authorised
APPLY_ICCF
1 Character
Yes
Y
ICCF Pickup
Required
Y- ICCF Pickup
Required
N-ICCF Pickup
Not Required
Cannot be Y when
PASS_ACC_ENT
RIES is N or
APPLY_SETTLE
MENTS is N
CHARGE_WHO
M
1 Character
Yes
Whom to Charge
O- Rem - All Chgs
B- Ben - All Chgs
U- Rem - Our
Chgs
7-16
APPLY_TAX
1 Character
Yes
Tax Pickup
Required
Y-Tax Pickup
Required
N-Tax Pickup Not
Required. Should
be N when
PASS_ACC_ENT
RIES is N
APPLY_SETTLE
MENTS
1 Character
Yes
Y
Settlement Pickup
Required
U-Populate Beneficiary Institution
N-Settlement
Pickup Not
Required
D- Don’t Populate
intermediary reimbursement institution, intermediary,
receiver correspondent, sender
receiver info,
ordering institution, beneficiary
institution
Y-Populate Settlement
PASS_ACC_EN
TRIES
1 Character
Yes
Y
Pass Accounting
Entries
Y-Pass Accounting Entries
N-Don’t Pass
Accounting
Entries
INTERNAL_RE
MARKS
Alphanumeric (255)
No
PRODUCT_CO
DE
Alphanumeric (4)
Yes
N
Valid Product
Code
LCY_EQUIVALE
NT
Number
(22,3)
Yes
Y
Local Currency
Equivalent
ERI_CCY
Alphanumeric (3)
No
Y
Euro Re-denomination Currency
ERI_AMOUNT
Number
(22,3)
No
Y
Euro Re-denomination Amount
7-17
Remarks.
7.6.2.2
RECEIVER
Alphanumeric (11)
Yes
UPLOAD_MSG_
TYPE
Alphanumeric (3)
No
Receiver for Settlements.
CSTBS_EXT_CONTRACT_STAT
This is the ‘status driving’ table into which details of uploaded contracts are written, for all
modules of Oracle FLEXCUBE. Each single row represents an uploaded contract. The
system will update certain columns such as the import status automatically, after the upload
is completed.
Mandator
y
SWIFT
Field
Default
Value
Descript
ion
Column Name
Data Type
BRANCH_CODE
Alphanumeric (3)
Yes
Valid
Branch
Code
SOURCE
Alphanumeric (15)
Yes
Source
Code –
Primary
Key
PRODUCT_CODE
Alphanumeric (4)
Yes
Product
Code
COUNTERPARTY
Alphanumeric (9)
Yes
Customer for
the contract
EXTERNAL_INIT_Dat
e
Date
No
Oracle
System
Initiation
Date
MODULE
Alphanumeric (2)
Yes
Module
Code.
Should
be FT
EXTERNAL_REF_NO
Alphanumeric (16)
Yes
Source
Reference.
Should
be equal
to
Source
Ref on
FTTB_U
PLOAD_
MASTER –
Primary
Key
7-18
IMPORT_STATUS
1 Character
Yes
U
Upload
Status.
Should
be U. UUnprocessed
Y-Processed.
E – Error
&
Rejected
7.6.2.3
CONTRACT_REF_NO
Alphanumeric (16)
No
Oracle
FLEXCUBE
Will populate
with
Actual
Contract
Ref
Number
POST_IMPORT_STAT
US
1 Character
No
Status of
contract
after
upload.
H- Hold,
U-Unauthorized,
AAuthorized
EXPORT_STATUS
1 Character
No
USER_ID
Alphanumeric (12)
Yes
Valid
Oracle
FLEXCUBE
User ID
with sufficient
permissions to
upload
ISTBS_UPLOAD_CONTRACTIS
This table contains details of settlement related information for each component (which is
debited/ credited to a customer or nostro type of account) of each of the uploaded contracts
Column Name
Data Type
Mandator
y
7-19
SWIFT
Field
Default
Value
Description
BRANCH_CODE
Alphanumeric (3)
Yes
Branch Code –
Same as that of
FTTB_UPLOA
D_MASTER
SOURCE_CODE
Alphanumeric (15)
Yes
Source Code –
Same as that of
FTTB_UPLOA
D_MASTER –
Primary Key
SOURCE_REF
Alphanumeric (16)
Yes
Source Reference – Same
As that of
FTTB_UPLOA
D_MASTER –
Primary Key
AMOUNT_TAG
Alphanumeric (20)
Yes
Amount Tag
Name – Name
used to identify
each customer
account/nostro
entry within the
Funds transfer
Transaction –
Primary Key
TAG_CCY
Alphanumeric (3)
Yes
Currency of
Amount Tag.
Should be a
valid currency
code and
should relate to
the component
Definition.
AMT_IN_TAG_C
CY
Number(22,3)
Yes
Amount in
Amount Tag
currency
ACC_BRANCH
Alphanumeric (3)
Yes
Branch to
which the
account
belongs
ACCOUNT
Alphanumeric (20)
Yes
Valid account to
which accounting entry is to
be posted.
ACC_CCY
Alphanumeric (3)
Yes
Currency of the
account
AMT_IN_ACC_C
CY
Number
(22,3)
Yes
Amount in
account currency
7-20
EX_RATE
Number
(14,7)
Yes
Exchange rate
between tag
currency and
account currency
PAYMENT_BY
1 Character
Yes
Payment
Method
M-Message
I-Instrument
C-Clearing
INSTRUMENT_T
YPE
Alphanumeric (15)
No
Instrument
Type
MCK – Manager’s Check,
CHECK Check,
DRAFT –
Demand Draft
INSTRUMENT_
NO
Alphanumeric (16)
No
COVER_REQUI
RED
1 Character
Yes
Instrument
Number
N
Cover Required
Y- Cover
Required
N- Cover Not
Required
VALUE_Date
Date
Yes
Value Date of
the transaction
CHARGES_DET
AILS
1 Character
No
Charges
Details
OUR_CORRESP
ONDENT
Alphanumeric (9)
No
Our Correspondent.
Should be Null
if payment is by
‘Instrument’
RECEIVER
Alphanumeric (11)
No
Should be a
Valid Swift
Code / Customer number,
if cover is
required and
Receiver is
NOT NULL
INT_REIM_INST
1
Alphanumeric (35)
No
7-21
55
Intermediate
Reimbursement Institution
INT_REIM_INST
2
Alphanumeric (35)
No
55
Intermediate
Reimbursement Institution
INT_REIM_INST
3
Alphanumeric (35)
No
55
Intermediate
Reimbursement Institution
INT_REIM_INST
4
Alphanumeric (35)
No
55
Intermediate
Reimbursement Institution
INT_REIM_INST
5
Alphanumeric (35)
No
55
Intermediate
Reimbursement Institution
RCVR_CORRES
P1
Alphanumeric (35)
No
54
Receiver Correspondent
RCVR_CORRES
P2
Alphanumeric (35)
No
54
Receiver Correspondent
RCVR_CORRES
P3
Alphanumeric (35)
No
54
Receiver Correspondent
RCVR_CORRES
P4
Alphanumeric (35)
No
54
Receiver Correspondent
RCVR_CORRES
P5
Alphanumeric (35)
No
54
Receiver Correspondent
INTERMEDIARY
1
Alphanumeric (35)
No
56
Intermediary.
For Payment by
= ‘I’ or Cover
Required = Y
should not be
present.
INTERMEDIARY
2
Alphanumeric (35)
No
56
Intermediary.
For Payment by
= ‘I’ or Cover
Required = Y
should not be
present.
INTERMEDIARY
3
Alphanumeric (35)
No
56
Intermediary.
For Payment by
= ‘I’ or Cover
Required = Y
should not be
present.
INTERMEDIARY
4
Alphanumeric (35)
No
56
Intermediary.
For Payment by
= ‘I’ or Cover
Required = Y
should not be
present.
7-22
INTERMEDIARY
5
Alphanumeric (35)
No
56
Intermediary.
For Payment by
= ‘I’ or Cover
Required = Y
should not be
present.
ACC_WITH_INS
TN1
Alphanumeric (35)
No
57
Account With
Institution. If
Cover Required
= Y at least one
Acc With Institution should be
present
ACC_WITH_INS
TN2
Alphanumeric (35)
No
57
Account With
Institution. If
Cover Required
= Y at least one
Acc With Institution should be
present
ACC_WITH_INS
TN3
Alphanumeric (35)
No
57
Account With
Institution. If
Cover Required
= Y at least one
Acc With Institution should be
present
ACC_WITH_INS
TN4
Alphanumeric (35)
No
57
Account With
Institution. If
Cover Required
= Y at least one
Acc With Institution should be
present
ACC_WITH_INS
TN5
Alphanumeric (35)
No
57
Account With
Institution. If
Cover
Required = Y at
least one Acc
With Institution
should be present
PAYMENT_DET
AILS1
Alphanumeric (35)
No
70
Payment
Details. Not
required for FT.
Always Null
PAYMENT_DET
AILS2
Alphanumeric (35)
No
70
Payment
Details. Not
required for FT.
Always Null
7-23
PAYMENT_DET
AILS3
Alphanumeric (35)
No
70
Payment
Details. Not
required for FT.
Always NULL
PAYMENT_DET
AILS4
Alphanumeric (35)
No
70
Payment
Details. Not
required for FT.
Always NULL
SNDR_TO_RCV
R_INFO1
Alphanumeric (35)
No
72
Sender to
Receiver Information. Should
follow the
SWIFT standards of Sender
Receiver Information
SNDR_TO_RCV
R_INFO2
Alphanumeric (35)
No
72
Sender to
Receiver Information. Should
follow the
SWIFT standards of Sender
Receiver Information
SNDR_TO_RCV
R_INFO3
Alphanumeric (35)
No
72
Sender to
Receiver Information. Should
follow the
SWIFT standards of Sender
Receiver Information
SNDR_TO_RCV
R_INFO4
Alphanumeric (35)
No
72
Sender to
Receiver Information. Should
follow the
SWIFT standards of Sender
Receiver Information
SNDR_TO_RCV
R_INFO5
Alphanumeric (35)
No
72
Sender to
Receiver Information. Should
follow the
SWIFT standards of Sender
Receiver Information
7-24
SNDR_TO_RCV
R_INFO6
Alphanumeric (35)
No
72
Sender to
Receiver Information. Should
follow the
SWIFT standards of Sender
Receiver Information
ORDERING_INS
TITUTION1
Alphanumeric (35)
No
52
Ordering Institution. Should
be present only
for Customer
Transfers
ORDERING_INS
TITUTION2
Alphanumeric (35)
No
52
Ordering Institution. Should
be present only
for Customer
Transfers
ORDERING_INS
TITUTION3
Alphanumeric (35)
No
52
Ordering Institution. Should
be present only
for Customer
Transfers
ORDERING_INS
TITUTION4
Alphanumeric (35)
No
52
Ordering Institution. Should
be present only
for Customer
Transfers
ORDERING_INS
TITUTION5
Alphanumeric (35)
No
52
Ordering Institution. Should
be present only
for Customer
Transfers
ORDERING_CU
STOMER1
Alphanumeric (35)
No
50
Ordering Customer
ORDERING_CU
STOMER2
Alphanumeric (35)
No
50
Ordering Customer
ORDERING_CU
STOMER3
Alphanumeric (35)
No
50
Ordering Customer
ORDERING_CU
STOMER4
Alphanumeric (35)
No
50
Ordering Customer
ORDERING_CU
STOMER5
Alphanumeric (35)
No
50
Ordering Customer
7-25
BENEF_INSTITU
TION1
Alphanumeric (35)
No
58
Beneficiary
Institution. Not
allowed for
Module FT.
Should always
be NULL.
BENEF_INSTITU
TION2
Alphanumeric (35)
No
58
Beneficiary
Institution. Not
allowed for
Module FT.
Should always
be NULL.
BENEF_INSTITU
TION3
Alphanumeric (35)
No
58
Beneficiary
Institution. Not
allowed for
Module FT.
Should always
be NULL.
BENEF_INSTITU
TION4
Alphanumeric (35)
No
58
Beneficiary
Institution. Not
allowed for
Module FT.
Should always
be NULL.
BENEF_INSTITU
TION5
Alphanumeric (35)
No
58
Beneficiary
Institution. Not
allowed for
Module FT.
Should always
be NULL.
ULT_BENEFICIA
RY1
Alphanumeric (35)
No
59
Ultimate Beneficiary. Not
allowed for
Module FT.
Should always
be NULL.
ULT_BENEFICIA
RY2
Alphanumeric (35)
No
59
Ultimate Beneficiary. Not
allowed for
Module FT.
Should always
be NULL.
ULT_BENEFICIA
RY3
Alphanumeric (35)
No
59
Ultimate Beneficiary. Not
allowed for
Module FT.
Should always
be NULL.
7-26
7.6.2.4
ULT_BENEFICIA
RY4
Alphanumeric (35)
No
59
Ultimate Beneficiary. Not
allowed for
Module FT.
Should always
be NULL.
ULT_BENEFICIA
RY5
Alphanumeric (35)
No
59
Ultimate Beneficiary. Not
allowed for
Module FT.
Should always
be NULL.
ERI_CCY
Alphanumeric (3)
No
Euro Redenomination
Currency
ERI_AMOUNT
Number
(22,3)
No
Amount in ERI
Currency
CFTBS_UPLOAD_CHARGE
This table contains the details of charges applicable for funds transfer contracts. When the
components in this table are validated, the amount of the charge and the waiver is updated.
Through this table you can alter the default amount of charge or waive charges totally.
Mandato
ry
SWIF
T
Field
Defau
lt
Value
Column Name
Data Type
BRANCH_CO
DE
Alphanumeric (3)
Yes
Branch Code – Same
as that of
FTTB_UPLOAD_MAST
ER
SOURCE_CO
DE
Alphanumeric (15)
Yes
Source Code – Same
as that of
FTTB_UPLOAD_MAST
ER – Primary Key
SOURCE_REF
Alphanumeric (16)
Yes
Source Reference –
Same as that of
FTTB_UPLOAD_MAST
ER – Primary Key
COMPONENT
Alphanumeric (10)
Yes
Component Name or
Charge Name should
be defined at product
level – Primary Key
WAIVER
1 Character
Yes
N
Description
Charge Waive
Y-Waived
N-Not Waived
AMOUNT
Number
(22,3)
Yes
Amount in Tag Currency
7-27
7.6.2.5
ACC_AMT
Number
(22,3)
No
ACC_CCY
Alphanumeric (3)
No
TATBS_UPLOAD_RULE
This table contains the details of tax applicable for funds transfer contracts. Through this you
can waive the default application of tax.
Mandato
ry
SWIF
T
Field
Defau
lt
Value
Column Name
Data Type
BRANCH_CO
DE
Alphanumeric (3)
Yes
Branch Code – Same
as that of
FTTB_UPLOAD_MAST
ER
SOURCE_CO
DE
Alphanumeric (15)
Yes
Source Code – Same
as that of
FTTB_UPLOAD_MAST
ER – Primary Key
SOURCE_REF
Alphanumeric (16)
Yes
Source Reference –
Same as that of
FTTB_UPLOAD_MAST
ER – Primary Key
RULE
Alphanumeric (10)
Yes
Tax Rule – Should be
defined at the product
level - Primary Key
WAIVER
1 Character
Yes
N
Description
Tax Waive
Y-Waived
N-Not Waived
7.6.2.6
MITBS_UPLOAD_CONTRACT_MAPPING
This table contains the MIS details for the uploaded FT contracts.
Column Name
Data Type
SOURCE_REF
Alphanumeric (16)
Mandator
y
Yes
7-28
SWIFT
Field
Default
Value
Description
Source Reference – Should
be the same
as that of
FTTB_UPLOA
D_MASTER –
Primary Key
SOURCE_CODE
Alphanumeric (15)
Yes
Source Code
– Should be
same as that
of
FTTB_UPLOA
D_MASTER –
Primary Key
BRANCH_CODE
Alphanumeric (3)
Yes
Branch Code
– Same as
that of
FTTB_UPLOA
D_MASTER
PRODUCT
Alphanumeric (4)
Yes
Product Code
– Should be
same as that
of
FTTB_UPLOA
D_MASTER
CUSTOMER
Alphanumeric (9)
Yes
Customer of
the contract
RELATED_ACCOU
NT
Alphanumeric (20)
No
Oracle FLEXCUBE
Account Number for MIS
purposes
RELATED_REF
Alphanumeric (16)
No
Oracle FLEXCUBE Transaction
Reference
Number for
MIS Purposes
CCY
Alphanumeric (3)
Yes
MIS_HEAD
Alphanumeric (9)
No
Oracle FLEXCUBE MIS
Head
POOL_CODE
Alphanumeric (9)
No
Oracle FLEXCUBE MIS
Pool Code
RATE_FLAG
1 Character
No
Rate Flag
From Pool
Code or Contract
Default
from
Funds
Transfer Contract
Currency
Code of the
contract
P- Pool Code
R-Contract
7-29
REF_RATE
Number
(14,7)
No
Oracle FLEXCUBE MIS
Refinancing
Rate
CALC_METHOD
1 Character
No
Calculation
Methods:
30(Euro)/360
30(US)/360
Actual/360
30(Euro)/365
30(US)/365
Actual/365
30(Euro)/
Actual
30(US)/Actual
Actual/Actual
MIS_GROUP
Alphanumeric (12)
No
Oracle FLEXCUBE MIS
Group Code
MIS_GROUP_TXN
Alphanumeric (9)
No
Oracle FLEXCUBE MIS
Group Transaction
MIS_GROUP_CO
MP
Alphanumeric (9)
No
Oracle FLEXCUBE MIS
Group Composite
COMP_MIS_1
Alphanumeric (9)
No
Oracle FLEXCUBE Composite MIS
Code 1
COMP_MIS_2
Alphanumeric (9)
No
Oracle FLEXCUBE Composite MIS
Code 2
COMP_MIS_3
Alphanumeric (9)
No
Oracle FLEXCUBE Composite MIS
Code 3
COMP_MIS_4
Alphanumeric (9)
No
Oracle FLEXCUBE Composite MIS
Code 4
7-30
COMP_MIS_5
Alphanumeric (9)
No
Oracle FLEXCUBE Composite MIS
Code 5
COMP_MIS_6
Alphanumeric (9)
No
Oracle FLEXCUBE Composite MIS
Code 6
COMP_MIS_7
Alphanumeric (9)
No
Oracle FLEXCUBE Composite MIS
Code 7
COMP_MIS_8
Alphanumeric (9)
No
Oracle FLEXCUBE Composite MIS
Code 8
COMP_MIS_9
Alphanumeric (9)
No
Oracle FLEXCUBE Composite MIS
Code 9
COMP_MIS_10
Alphanumeric (9)
No
Oracle FLEXCUBE Composite MIS
Code 10
TXN_MIS_1
Alphanumeric (9)
No
Oracle FLEXCUBE Transaction MIS
Code 1
TXN_MIS_2
Alphanumeric (9)
No
Oracle FLEXCUBE Transaction MIS
Code 2
TXN_MIS_3
Alphanumeric (9)
No
Oracle FLEXCUBE Transaction MIS
Code 3
TXN_MIS_4
Alphanumeric (9)
No
Oracle FLEXCUBE Transaction MIS
Code 4
TXN_MIS_5
Alphanumeric (9)
No
Oracle FLEXCUBE Transaction MIS
Code 5
TXN_MIS_6
Alphanumeric (9)
No
Oracle FLEXCUBE Transaction MIS
Code 6
7-31
TXN_MIS_7
Alphanumeric (9)
No
Oracle FLEXCUBE Transaction MIS
Code 7
TXN_MIS_8
Alphanumeric (9)
No
Oracle FLEXCUBE Transaction MIS
Code 8
TXN_MIS_9
Alphanumeric (9)
No
Oracle FLEXCUBE Transaction MIS
Code 9
TXN_MIS_10
Alphanumeric (9)
No
Oracle FLEXCUBE Transaction MIS
Code 10
COST_CODE1
Alphanumeric (9)
No
Oracle FLEXCUBE MIS
Cost Code 1
COST_CODE2
Alphanumeric (9)
No
Oracle FLEXCUBE MIS
Cost Code 2
COST_CODE3
Alphanumeric (9)
No
Oracle FLEXCUBE MIS
Cost Code 3
COST_CODE4
Alphanumeric (9)
No
Oracle FLEXCUBE MIS
Cost Code 4
COST_CODE5
Alphanumeric (9)
No
Oracle FLEXCUBE MIS
Cost Code 5
REF_SPREAD
Number(10,5)
No
Floating Rate
Spread for
MIS
REF_RATE_TYPE
Alphanumeric (1)
No
Rate Type for
MIS
X – Fixed Rate
L - Floating
Rate
REF_RATE_CODE
Alphanumeric (10)
No
7-32
Floating Rate
Code for MIS.
Should be a
valid Floating
Rate Code
7.6.2.7
CSTBS_UPLOAD_CONTRACT_UDF
This table contains the User Defined Field (UDF) details for the uploaded funds transfer
contracts.
7.6.2.8
Mandato
ry
SWIF
T
Field
Defau
lt
Value
Column Name
Data Type
BRANCH_CO
DE
Alphanumeric (3)
Yes
Branch Code – Same
as that of
FTTB_UPLOAD_MAST
ER
SOURCE_CO
DE
Alphanumeric (15)
Yes
Source Code – Same
as that of
FTTB_UPLOAD_MAST
ER – Primary Key
SOURCE_REF
Alphanumeric (16)
Yes
Source Reference –
Same as that of
FTTB_UPLOAD_MAST
ER – Primary Key
FIELD_NAME
Alphanumeric (105)
Yes
Valid Field Name Maintained for the Product –
Primary Key
FIELD_VALUE
Alphanumeric (150)
Yes
Value For User Defined
Field. Mandatory if
maintained as ‘Mandatory’. Unique if maintained as ‘Unique’.
Description
FTTBS_UPLOAD_EXCEPTION
This table is updated by Oracle FLEXCUBE in case of errors encountered in respect of
uploaded contracts, during the upload. As soon as Oracle FLEXCUBE encounters the first
error in respect of a record, it is logged in this table, and the Upload function proceeds with
the next record.
Only one error is logged in the Exception Table in respect of a single record.
Mandato
ry
SWIF
T
Field
Defaul
t
Value
Column Name
Data Type
BRANCH_CODE
Alphanumeric (3)
Yes
Branch Code
SOURCE_CODE
Alphanumeric (15)
Yes
Source Code
– Primary Key
SOURCE_REF
Alphanumeric (16)
Yes
Source Reference – Primary Key
7-33
Description
7.6.2.9
SEQUENCE_NO
Alphanumeric (16)
Yes
Sequence
Number of
error within
the source
reference –
Primary Key
ERROR_CODE
Alphanumeric (11)
Yes
Oracle FLEXCUBE Error
Code
ERROR_CODE_PARA
MS
Alphanumeric (128)
No
Parameters
responsible
for the error
ERROR_MESSAGE
Alphanumeric (255)
Yes
Derived Oracle FLEXCUBE Error
Message with
parameters
substituted.
FTTBS_UPLOAD_LOG
This table is updated by Oracle FLEXCUBE after successful completion of the entire Upload
process.
Mandato
ry
SWIF
T
Field
Defaul
t
Value
Column Name
Data Type
BRANCH_CODE
Alphanumeric (3)
Yes
Branch Code
SOURCE_REF
Alphanumeric (16)
Yes
Source Reference – Primary Key
SOURCE_CODE
Alphanumeric (15)
Yes
Source Code
– Primary Key
STATUS_FLAG
Alphanumeric (1)
Yes
Status
Description
E – Error Not
Uploaded
H – Contract
Put on Hold
U – Contract
Unauthorized
A – Contract
Authorized.
STATUS_TIMESTAMP
Date
Yes
7-34
Oracle System Date and
Time of Latest
Upload
7.7
CONTRACT_REF_NO
Alphanumeric (16)
Yes
Oracle FLEXCUBE Transaction
Reference
OST_ID
Number
Yes
Unique
Sequence
Number for
OST reference
EVENT_STATUS
Alphanumeric (1)
Yes
EVENT_ERROR_STRI
NG
Alphanumeric (255)
Yes
Oracle FLEXCUBE should
populate with
NULL
PROCESS_ID
Alphanumeric (255)
Yes
Oracle FLEXCUBE should
populate with
NULL
U
OST Status.
Oracle FLEXCUBE should
populate with
‘U’
Uploading Contracts through Upload Master Screen
Once data is uploaded in the Upload Tables using files like; excel file, CSV file etc, system
uses Upload Master screen (CVDUPLOD) to process data available in the FT upload tables
and then creates an FT contract. To upload this data, you need to select FTDTRONL function
ID in the Upload Master screen.
7.8
Upload of Incoming SWIFT Payment Messages
Oracle FLEXCUBE interfaces with an external system for uploading incoming SWIFT
payment messages 103, 200 and 202. The external system writes the incoming messages
into the Oracle FLEXCUBE message upload table, marking the status of the messages as
‘unprocessed’.
Oracle FLEXCUBE processes the incoming messages in the following manner:
1. The uploaded messages are picked up for processing from the message upload table.
The system checks to see that any messages other than 103, 200 or 202 are marked as
rejected, with an appropriate reason for rejection. Also, the system checks that the BIC of
the Sender of the message is a valid BIC in Oracle FLEXCUBE. If not, the message is
rejected and a rejection reason logged.
2. After performing the validations mentioned above, the system loads the incoming
messages into the incoming messages queue, and marks the same in the upload table
as ‘processed’.
7-35
7.9
Processing Single Debit Multiple Credit (SDMC) for
Bulk Payments
The external system parses the bulk payment file and populates the file level information and
detailed records into Common Payment Gateway Browser in Oracle FLEXCUBE. The order
of population is based on CPG detail data and then CPG file level information.
Oracle FLEXCUBE identifies the SDMC cross border transactions from the CPG file level
information and CPG detail data stores based on the status of the field ‘Customer
Consolidation Required’ and ‘Service Type' parameters. For SDMC cross border
transactions, the option ‘Customer Consolidation Required’ is checked (Yes) and the ‘Service
Type’ is ‘FT’.
For SDMC cross border transactions, the system consolidates the following payment
attributes,
Debit Account
Debit Currency
Debit Value Date
File Reference Number
All the above payment attributes must have the same value for them to be eligible for
consolidation.
You can identify the corresponding payment record for a file in CPG based on the file
reference number in the uploaded file. For each file reference number, there can be multiple
transactions.
When the payment records is populated in CPG detail, the status of the file at CPG file level
is set as ‘W’ (Waiting). Once the records are populated in CPG detail, the external system
updates the file status at CPG file level to ‘C’, (Completed).
7.9.1
Upload Process
The CPG upload process (CPG_UPLOAD) picks up the unprocessed cross border transfer
records from CPG file level which comes for customer debit consolidation. For these records,
the option ‘Customer Consolidation Required’ must be set to ‘Yes’ and the value of ‘Service
Type’ set to ‘FT’. The payment records are picked up form CPG details by matching file
reference number.
The CPG upload process creates FT payment contracts for all the payment records that are
picked up from CPG details under products that are derived from the STP rule maintenance.
However, the contracts will not be liquidated at this stage.
The CPG upload process will then process the subsequent file reference numbers.
7.9.2
Liquidation Process
Once the contracts are created, the liquidation process (PR_PROCESS_FT_CONS) creates
a consolidated FT contract for the total transfer amount that is derived from each individual
payment records. The consolidated FT contract is created using the internal FT product which
is identified in the ‘Customer Consolidation Debit Product’ field in ‘Funds Transfer Branch
Parameters’ screen.
7-36
The system passes the following accounting entries.
Accounting Role
Dr/Cr
Amount
Currency
REMITTER
Dr
Total Transfer amount
Debit Account Currency
INTMD_SUSPENSE
Cr
Total Transfer amount
Debit Account Currency
Note
The general ledger for ‘INTMD_SUSPENSE’ role is picked up from the 'Outgoing General
Ledger' field in the ‘Funds Transfer Branch parameters’ maintenance.
This process liquidates the individual FT payment contracts created earlier for the payment
records. Each payment contract is liquidated with the respective transfer amount.
Bank can collect the charges either at consolidated FT contract level or at individual FT
contracts level.
The liquidation job process can be either parallel or sequential based on the parameter
liquidation mode (LIQD_MODE).
Parallel - Liquidation happens for multiple payments in parallel. If the bank applies
charges at consolidated FT contract level and there is no remitter charge at the
individual FT contracts level, then the liquidation mode can be configured as ‘Parallel’.
Sequential - Liquidation of payments happens sequentially one after the other. If the
bank applies charge at individual FT contracts level and there is no remitter charge at
consolidated FT contract level, then the liquidation mode can be configured as
‘Sequential’.
This is a onetime setup and you cannot change it. By default, the liquidation mode is set to
‘Sequential’.
For sequential liquidation mode, the following accounting are passed.
Accounting Role
Dr/Cr
Amount
Currency
INTMD_SUSPENSE
Dr
Transfer Amount
Debit Account Currency
NOSTRO GL
Cr
Transfer Amount
Transfer Currency
REMITTER
Dr
Charge Amount
Charge Currency
Charge Income GL
Cr
Charge Amount
Charge Currency
In the field ‘Debit Consolidated Reference Number’ of the individual payment contracts, the
system defaults the contract reference number of consolidated FT contract. However, the
details of the customer and customer account will remain the same as those received in the
incoming file.
The system will process the liquidation of each individual FT contracts for all the file reference
numbers.
7-37
7.9.3
Reversing a Liquidated Contract
In case you reverse a liquidated individual contract described above, the system will pass the
reversal accounting entries for the single customer debit FT contract also. However, the
charges collected are not reversed.
The following accounting are passed on the reversal of individual FT contract:
Accounting Role
Dr/Cr
Amount
Currency
INTMD_SUSPENSE
Dr
(-1) * Transfer Amount
Debit Account Currency
NOSTRO GL
Cr
(-1) * Transfer Amount
Transfer Currency
The following accounting would be passed for the consolidated FT contract.
Accounting Role
Dr/Cr
Amount
Currency
REMITTER
Dr
(-1) * Transfer Amount of
Reversed individual FT
contract
Debit Account Currency
INTMD_SUSPENSE
Cr
(-1) * Transfer Amount of
Reversed individual FT
contract
Debit Account Currency
7-38
8. Straight through Processing - An Overview
8.1
Introduction
The Funds Transfer Module
The Funds Transfer (FT) Module that constitutes a part of Oracle FLEXCUBE is a front office
system that handles the processing of all kinds of payments, both local and foreign. These
can be initiated by financial institutions or banks for themselves, or on behalf of their
customers.
The FT Module is a comprehensive transaction handling and management system, which
integrates with the overall system for accounting and messaging pertaining to payments and
the relevant charges/taxes and capture of related MIS information. The system handles all the
necessary activities during the life cycle of a contract, once it is booked. All the relevant
account balances will be updated when Transfers are processed.
The essence of funds transfer transactions (transfer of money and the generation of
appropriate messages) is handled comprehensively by this module.
Straight Through Processing
One of the most important features of the Funds Transfer module of Oracle FLEXCUBE is the
facility of processing incoming payment messages to their logical end without manual
intervention. Even though the term Straight Through Processing (STP) refers to the
processing of all sorts of incoming messages (without manual intervention), in this chapter,
the term refers to STP of incoming Payment Messages alone.
Payment Messages received from originating Banks through the SWIFT network are received
and parsed; the contents of the message together with the static maintenance in the system
result in resolution of the contract fields, which then leads to automatic booking of contracts
in the system. Straight through processing begins with an incoming payment message (for
instance, MT 103 or an MT 202) and ends with an FT contract in Oracle FLEXCUBE, which
may be a Customer or a Bank transfer.
A general outline of the sequence of events during a Straight Through Processing cycle in the
system is given below:
1. Message Capture: Incoming payment messages received from other Banks through the
SWIFT network are picked up by Oracle FLEXCUBE and displayed in the Incoming
Message Browser.
2. Message Upload: This function interprets the messages in the incoming browser and
propagates the interpreted messages into the Funds Transfer (FT) Upload tables in the
system. The FT upload tables are a set of standard gateway tables through which FT
contracts can be uploaded into Oracle FLEXCUBE.
3. Funds Transfer (FT) Upload: This is the function which interprets the contents of the FT
Upload (gateway) tables and creates Funds Transfer contracts in Oracle FLEXCUBE.
4. Life Cycle Processing: Subsequent to the creation of the contracts by the FT Upload
function, they can be viewed or processed just as any other FT contract in the system.
The above sequence is explained just to understand the processing logic in Oracle
FLEXCUBE. As far as the end user is concerned, all these steps would happen seamlessly
as if it were one continuous process, which begins with receiving the message and results in
the creation of the resultant FT contract.
The interpretation of an incoming message can lead to the creation of the following types of
funds transfer contracts in Oracle FLEXCUBE:
8-1
Incoming Customer Transfer
Incoming Bank Transfer
Outgoing Customer Transfer
Outgoing Customer Transfer with Cover
Outgoing Bank Transfer
Internal Transfer
This user manual explains the straight through processing feature exhaustively, taking you
through each process in the sequence of events.
8-2
9. Maintenance for Straight through Processing
9.1
Introduction
For straight through processing of uploaded funds transfer contracts, you would need to
maintain all the reference information that you would typically maintain for normal funds
transfer contracts and a few other parameters which are specific to STP.
The basic information to be set up before the STP function becomes fully operational can be
broadly classified under:
1. FT Product Maintenance
2. Settlement Instructions Maintenance
3. BIC Directory Maintenance
4. Messaging Maintenance
5. Media Maintenance
6. Queue Maintenance
7. Customer address maintenance
8. Message Format Maintenance
9. Product-Queue Message Type Mapping Maintenance
10. D to A Converter Maintenance
11. STP Error Codes Maintenance (User Defined Error Codes)
12. STP Rule Maintenance
13. Branch-level STP Preferences
14. Upload Source Preferences Maintenance
15. External Account Maintenance (Reconciliation sub-system) Maintenance
16. Overrides Maintenance
9.1.1
Maintaining Funds Transfer Products
A product, in Oracle FLEXCUBE, is a service your bank offers to your customers. The
different types of funds transfers that your bank supports could be thought of as products.
You would need to maintain products for funds transfer contracts that are initiated through
straight through processing. The preferences for such products would need to be defined in
the same manner as you would for a normal funds transfer product.
The product maintenance is required for the system to interpret the incoming message and
create the appropriate FT contract. Since the STP process invokes the FT upload process,
the product becomes one of the most important fields to be derived for creation of the contract
upload table.
For more information on setting up products and defining specific preferences and attributes
for products used for processing funds transfer contracts, consult the Funds Transfer user
manual.
9-1
9.1.2
Maintaining Settlement Instructions
For each of the customers or banks (i.e., BIC Codes), you must maintain details of settlement
accounts and settlement preferences, which would be used for processing funds transfer
contracts being initiated through straight through processing. You must maintain this
information for the straight through processing feature, just as you would do for normal funds
transfer contracts. These standard instructions would be used when the incoming message
itself does not contain the account information for the debit and credit accounts. The actual
pick-up of the account is based on the contents of the incoming message itself. Details of this
process are described in the discussion of the logic of pick-up of debit and credit accounts.
For more information on the settlements service in Oracle FLEXCUBE, and defining specific
settlement preferences and attributes for funds transfer contracts, consult the Funds Transfer
user manual.
9.1.3
BIC Directory
You will need to maintain the Bank Identifier Codes for the banks, just as you would do for
normal funds transfer processing.
For more information on BIC Codes, consult the Funds Transfer user manual.
9.1.4
Messaging Maintenance
9.1.4.1
Media Maintenance
Advices and messages are generated at the specified events in the lifecycle of funds transfer
contracts. You should maintain the different media through which these advices and
messages would be generated (from and to your bank).
At your bank, you can only receive or route messages through a media that you have
maintained in Oracle FLEXCUBE. These specifications can be made only at the main branch
and will be applicable to all the branches of your bank.
You must maintain the media that would be used for generation of advices and messages
relating to funds transfer contracts that have been initiated through straight through
processing, in the Media Maintenance screen.
In the context of STP, the relevant media type for which STP function is supported would be
SWIFT.
For more information about the Media Maintenance screen and the messaging system
module, consult the Messaging System user manual.
9.1.4.2
Queues Maintenance
As discussed earlier, all Incoming SWIFT and Non Swift Messages are routed through a
messaging queue. You are therefore, required to maintain the different user queues to which
incoming messages will be directed. Users with appropriate rights will be allowed to access a
particular queue.
To invoke this screen, click on Messages in the Application Browser, select Queues and click
on Detailed under it. You can invoke the ‘Message Queue Maintenance’ screen by typing
9-2
‘MSDQUEUE’ in the field at the top right corner of the Application tool bar and clicking the
adjoining arrow button.
In this screen you can capture the following details for a queue:
A name to identify the queue uniquely throughout the system.
A short description of the queue
The codes of various SWIFT and Non SWIFT messages that would be routed to this
queue.
If the unique queue you are maintaining is a collection Queue, select collection queue
flag.
Note
The codes of various SWIFT and Non SWIFT messages list in the grid is not applicable
for the collection queue.
You can assign a message to more than one messaging queue. At the time of maintaining
rules for a message (discussed in the subsequent sections of this document), you can select
the appropriate queue for each rule from the list of queues to which the message is linked.
As and when an Incoming SWIFT and Non SWIFT Common Payment Gateway Messages
satisfy a particular rule, the system will automatically route it to the relevant queue associated
with the rule. The product and other associated details (maintained at the product mapping
level, discussed later) defined for the branch; queue and message type combination will be
made applicable to translate the Message into a normal FT Contract.
Select ‘Add’ from the Actions menu in the Application tool bar or click add icon to add a
message to the queue being defined. To remove a message from the queue, Select ‘Delete’
from the Actions menu in the Application tool bar or click delete icon.
9-3
9.1.4.3
Customer Address Maintenance
As mentioned earlier, the messages and advices that are sent to the customers of your bank
can be transmitted through different media types. You will need to maintain the address
details for each media type. In the STP context, the relevant media type would be SWIFT. You
can maintain multiple addresses for each media type. The unique location specified for each
address will help you to differentiate between one address of a customer and another for a
given media type. These details are captured in the ‘Customer Address’ screen.
For more information about the Customer Address Maintenance consult the Messaging
System User Manual.
9.1.4.4
Message Format Maintenance
The advices that are generated from your bank will have a definite format. In the Advice
Format Maintenance screen you can specify formats and indicate the messages and advices
that should use the formats you have defined.
By maintaining message formats you can ensure consistency across the branches of your
bank.
Message formats are maintained at the bank level and will be applicable to all the branches
of your bank.
For each message format, you can specify the following details:
A unique code to identify the format
The number of lines that should be contained in a page when the advice is printed
The number of columns that should be contained in a page when the advice is printed
The language of the message
The form type attached to the format
For more information about message formats, refer to the chapter ‘Maintaining Advice Formats’
in the Messaging System User Manual.
9.1.5
Mapping Message Types to Products and Queues
You must also map the message types and queue combinations to the relevant funds transfer
products / product types / instrument types that you create, for straight through processing.
This can be specified in the Product Mapping Screen, for each branch.
For each product / product types / instrument type, you must specify the message types, with
details such as whether the messages would be incoming or outgoing and whether a cover is
required.
From the Application Browser, you can invoke the Product Mapping Detailed screen.
You can invoke the ‘Message Product Mapping Maintenance’ screen by typing ‘MSDPRMAP’
in the field at the top right corner of the Application tool bar and clicking the adjoining arrow
button.
Through this screen, you can map a message type to a product / product type / instrument
that you have created in Oracle FLEXCUBE thereby supporting creation of instrument
transactions and mapping of message queues for instrument types.
9-4
In the Product mapping screen on indicating the branch and message type you can map a
product / product type / instrument to the combination.
All messages belonging to the ‘type’ you have indicated will be enriched with attributes
defined for the product to which it is mapped.
Queue
For a branch, message and product combination, you can also specify the messaging queue
to which the messages should be routed. As discussed earlier, you can assign multiple
queues to a message type. All the queues defined for a message is available in the optionlist. Select the appropriate queue from the list.
At the time of maintaining rules for a message type, you will indicate the queue to which the
message must be routed, if it satisfies the rule being defined. The STP process will then
associate the payment message with the product (and other related details) mapped to the
queue to which it is routed and will subsequently process the payment transaction.
Note
You can map a message type with different funds transfer products and maintain unique
preferences for each branch, message and product combination. Depending on the message type, the appropriate product will be picked up for creating the FT contract.
Cover Required
Whether a cover is required or not is decided based on the settlement instructions maintained
for the party to which the onward message is sent.
Based on whether a cover needs to be sent to the reimbursement bank along with the
payment message the appropriate FT product is selected for creating an FT contract.
9-5
Direction Flag
Specify whether the message for which you are maintaining details will result in an incoming
FT or an outgoing FT.
Depending on your specification here the appropriate product will be picked up by the upload
process and an FT Contract will be generated automatically.
Product
The system displays the FT product for creating an FT contract. It is selected on the basis of
the requirement to send a cover to the reimbursement bank along with the payment message.
9.1.5.1
Indicating Preferences when Message Carries No Information of Beneficiary
For your branch, you can indicate how Oracle FLEXCUBE should handle S.W.I.F.T.
messages that do not carry information on the ultimate beneficiary and Non SWIFT Common
Payment Gateway. The options available for SWIFT Messages that do not carry beneficiary
information are:
Suspense
Repair
If you indicate Suspense, the transfer amount indicated in the MT100, MT 103 or MT 202 is
posted to suspense GL of your bank. This is applicable only when the incoming message
results in an incoming Funds Transfer. In other words, your bank should be the last stop in
the transfer route.
When you receive adequate information on the beneficiary, you can transfer the funds posted
to the suspense GL to the customer account by liquidating the transfer. If you indicate
‘Repair’, the message will not be processed, and will be placed in ‘Repair’ status.
The preference that you stated for your branch in the Product Mapping detailed screen is
defaulted. You can change the default to suit the current upload session.
9.1.6
D to A Converter Records Maintenance
An incoming SWIFT payment message may contain information regarding parties involved in
a funds transfer, in the ‘D’ format, i.e., names and addresses, instead of the appropriate BIC
Codes (or the ‘A’ format).
You can maintain mappings, which translate the ‘D’ formats to ‘A’ formats (BIC codes), which
the STP process can use while processing. These details are known as converter records.
These are maintained in the ‘D to A Converter Maintenance’ screen invoked from the
Application Browser.
You can invoke the ‘D to A Converter Maintenance’ screen by typing ‘ISDDACNV’ in the field
at the top right corner of the Application tool bar and clicking the adjoining arrow button.
9-6
When an incoming SWIFT payment message contains party information in the form of names
and addresses (D format), the STP function uses the converter records to derive the BICs (A
format) for the parties involved in the funds transfer.
The STP function replaces the name and address information (D format) in the message with
the corresponding BIC (A format), picked up from the converter record.
The name and address information contained in the incoming SWIFT message will be
matched exactly, line for line, literally and without case sensitivity, with the address lines
information in the converter record to fetch the corresponding BIC to be used by the STP
function.
The STP function will not convert this information using the converter record, as it does not
literally match, line for line, with the address details maintained in the converter record.
As a convenience feature, Oracle FLEXCUBE also allows you to Copy the ‘D’ field from an
incoming message’ and ‘Paste’ it onto the Converter Record.
9.1.7
STP Rule Maintenance
In addition to the core processing logic that has been built into the system for processing
SWIFT and Non SWIFT Common Payment Gateway Payment Messages, Oracle
FLEXCUBE also allows you to maintain certain rule based processing logic and status control
on the Incoming Messages, based on the contents of specific fields of the message.
Just as you define custom fields (User Defined Fields - UDF) to be associated with the various
Oracle FLEXCUBE Products and Function Ids (Maintenance screens), you can also maintain
UDFs for each Incoming Message (MT 100, MT 103, MT 200, MT 202). Based on your
requirement, you can specify the default values (derived from field logic) and validations for
the UDF. The system will validate all the entries made to the field of an Incoming Message
against the validations (rules) you define for a field. All unprocessed messages in the
Incoming Message Browser will be assigned a status (Repair, Pending Cover Match or
Suppress) depending on the rules that you maintain for each message.
9-7
You can define the STP related fields (UDFs) and assign values to it in the ‘User Defined
Fields for SWIFT Messages’ invoked from the Application Browser.
You can invoke the ‘STP Rule Maintenance’ screen by typing ‘MSDMTUDF’ in the field at the
top right corner of the Application tool bar and clicking the adjoining arrow button.
Message Type
Maintain UDFs for the following SWIFT Payment Messages:
MT 103
MT 103+
MT 200
MT 202
Specify the message for which you want to define the Rule based on which the STP will
process the same.
Field Name
Specify a unique name to identify a field that you define. The STP process will get the value
of the field from the logic specified in the ‘Field Logic’ column and will validate the entries
made to these fields based on certain pre-defined conditions. You can use a maximum of 16
characters to assign a name to the UDF being defined.
Field Type
The type of field that you can create can be of the following formats:
Number — Select this option to create a Numeric field
Text — Select this option to create a Text field
Date— Select this option to create a Date field
Field Logic
The value of the field (UDF) being defined for a message type is derived based on the logic
that you specify here. The value derived thus is subsequently validated against the rules
maintained for the UDF.
9-8
The tags and the syntax for using these in the ‘Field Logic’ are as follows:
TAGS
SYNTAX
Value of the Field
@SENDER
@VALUE:=@SENDER()
Sender of the Message
@BIC
@VALUE:=@BIC('TAG')
BIC code of the tag contained within
quotes, for example, @BIC(‘57’)
@ACC
@VALUE:=@ACC('TAG')
Account number specified in the tag
@TAGVALUE
@AMT
@VALUE:=@TAGVALUE('TAG')
@VALUE:=@AMT(3)
The value of the tag specified
@CCY
@VALUE:=@CCY(2)
The currency of the transfer
@VALDT
@VALUE:=@VALDT(1)
The value date of the transfer
@TRAILER
@VALUE:= @TRAILER
The trailer of the message
@HEADER
@VALUE:= @HEADER(3);
To get the value of tag 119 in block 3
The amount in the field 32
@CUST_TY
@VALUE:= @CUST_TYPE()
The value returned is ‘I’, ‘B’ or ’C’ (
PE
‘Individual’,’Bank’,’Corporate’ respec@VALDT
@VALUE:=@VALDT(1);
Depending on the value of the UDF (obtained from the Field Logic), you can define additional
conditions (or rules) to process the message. You can also specify a status for each condition.
If a particular condition is satisfied, the system will automatically assign the corresponding
status to the message.
To define the conditions for a message, click ‘Show Rule’ button in the ‘User Defined Fields
for SWIFT Messages’ screen. The ‘Rule Maintenance’ screen is displayed.
9-9
If you expect user interaction for the Non Swift Message, choose ‘Waiting for Queue change’
as the Status.
The Message Type is defaulted from the previous screen.
Priority
For a particular message type, you can define multiple conditions to validate the UDF’s based
on which the message is assigned a particular status. Each set of five conditions will be
associated with a priority number. The system automatically assigns the next available priority
number to the next set of five conditions. If a condition with a higher priority level is satisfied,
the status associated with that condition is assigned to the message.
Select ‘Add’ from the Actions menu in the Application tool bar or click add icon to specify the
next set of conditions. To remove a set of conditions, select ‘Delete’ from the Actions menu in
the Application tool bar or click delete icon.
Conditions
Using the tags mentioned above, you can specify the following conditions for processing the
Incoming SWIFT and Non SWIFT Messages:
1. @EXISTS: Depending on your requirement, you can use this tag to check for the
existence of a specific field in the Incoming SWIFT Message. For instance, you may want
to check for the presence of field 56 in the message. If present, the function will return
‘TRUE’. If the field is not present in the message, it will return a ‘FALSE’ value
2. @BIC: This function will check for the presence of the BIC code in the party information
fields of the message. It will then validate the BIC and if found valid will assign it to the
field (UDF) for which you are defining the condition. For instance, you may want all
incoming MT100 messages with 'BMRLUSLY' in field 57 to be routed to Queue 'XYZ' with
the status as 'Repair'. For this you will need to maintain the following details:
–
Define an UDF ‘57BIC.
–
Specify the field logic as ‘@VALUE: =@BIC ('57')’
–
Maintain the condition as ‘UDF_57BIC='BMRLUSLY'
9-10
–
Assign the result as ‘TRUE’.
This Rule will ensure that any Incoming MT100 with ‘BMRLUSLY’ in field 57 is
routed to the queue XYZ with a status as Repair.
3. @ACC: Likewise, this function will check for the account no. of the party initiating the
transaction. If the field exists, the system will validate the account no. before assigning it
to the UDF.
4. @TAGVALUE: This will assign the value of a specific field of the SWIFT message to the
UDF. For example, you may want to suppress all MT 100 messages with ‘CITI001’ in field
56A (Intermediary). For this you will define:
–
Define an UDF, VAL56.
–
The field logic as ‘@VALUE:=@TAGVALUE('56A')
–
Specify the condition as UDF_VAL56 = ‘CITI001’
–
Assign the result as ‘TRUE’
–
This will ensure that all MT 100 messages with ‘CITI001’ in field 56A are assigned
with the ‘Suppress’ status.
5. @OCCVALUE: Some fields of the SWIFT message may contain more than one line of
information. You can use this function to check and assign the value of such fields to the
UDF.
6. @NUMOCC: Using this function, you can track the number of times a particular field
appears in the SWIFT message. For instance you may want to route all MT 100
messages to the ‘Pending Cover’ queue if field 32A is present only once in the message.
For this you can maintain the following:
–
Define an UDF ‘OCC01’.
–
Specify the filed logic as ‘@VALUE: =@NUMOCC('32A')
–
Maintain the condition as ‘UDF_OCC >1’.
–
Assign the result as ‘FALSE’.
–
This Rule will ensure that all MT 100 messages will be routed to the ‘Pending Cover’
queue if field 32A has occurred only once in the message.
7. @AMT: This function will assign the value of the transaction amount, if present in field 32
of the SWIFT message to the UDF that you have defined.
8. @CCY: Similarly, you can use this function to assign the transaction currency as the
value of the UDF being defined and subsequently define a condition to suit your
requirement.
9. @VALDT: This function will assign the value date of the transaction, if present in the
SWIFT message, to the UDF.
10. @SENDER: This function will assign the name of the sender of the message to the field
being defined.
11. @TRAILER: This function will check for the trailer in the message and assign the value
of the trailer to the UDF.
12. @MT: This function will identify the type of message being received.
–
To assign the value of a field in the Common Payment Gateway Rule Maintenance,
the following will be used:
AWI = @VALUE:=@PYMTGATEWAYFIELD('ACC_WITH_INSTN1');
–
@HEADER: This function will retrieve the value of tag 119 in block 3
Result
Select multiple conditions for validating the value (derived from the Field logic) of an UDF.
Each condition can be assigned one of the following values:
TRUE
9-11
FALSE
Queue Name
Choose the queue, to which a message will be routed if a particular condition is satisfied. As
discussed earlier, you can specify multiple queues for a message. All the queues maintained
for a specific message will be available for selection in the form of an option-list. Select the
appropriate ‘Queue Name’ from the list.
Status
Each condition that you define can be associated with a status. If a condition is satisfied, the
status defined for that condition will be assigned to the Incoming Message. The following
statuses are available for selection:
Repair
Pending Cover Match
Suppressed
Repair Reason
In case you choose to assign the status as ‘Repair’, you can indicate the reason for repair.
Select the appropriate error code from the option list.
Note
The ‘Repair Reason’ field is enabled only if you have chosen the status as ‘Repair’.
The repair reason that you can assign is in turn user definable, as explained below.
9.1.7.1
Maintaining Error Codes
You can invoke the ‘Error Message Maintenance’ screen by typing ‘CSDERMSG’ in the field
at the top right corner of the Application tool bar and clicking the adjoining arrow button.
In the Error Messages screen, you can maintain your own error codes and appropriate
messages. These will be displayed during message upload if that particular condition (for
which the error message is mapped) occurs.
9-12
You can specify the following details for an error message:
9.1.8
The language in which the message is to be displayed and its short description.
A unique code to identify the error throughout the system
The text of the message
The function Id
The number of parameters that can be taken
The type of message - Error, Override or Ignore
The type of message occurred while running a batch - Error, Override or Ignore
Whether confirmation is required from the authorizer for the error or override
Specifying Branch Details
Specify the details pertaining to the branch for converting the old error code to a new one for
a branch based on the Function Id.
Branch Code
Specify the code of the branch for which you want to map update the error code.
Old Error Code
Specify the old error code that needs to be replaced with the new one.
New Error Code
Specify the new error codes that with which you want to replace the old one.
Function Id
Specify the Function Id on the basis of which you want to replace the error code.
9.1.9
Indicating ‘Pending Cover Match’
If you wish to defer processing of a message till receipt of a cover, based on certain criteria,
then you can select the ‘Pending Cover Match’ status for that condition. If that condition is
encountered, Oracle FLEXCUBE will update the message status to ‘Pending Cover Match’
and process the payment only after receipt of the cover.
9.1.9.1
Processing MT103/MT202/MT200
When the system receives an MT103/MT202/MT200, it will process the message based on
the STP Rule you have defined for the same.
Straight through processing of MT103 and MT202 can be performed based on the customer
type and amount limit. You can maintain STP rules for a combination of customer type and
transaction amount, based on which the transaction is either processed or moved to ‘Repair’
status.
If, as per the rule, the message moves to a queue which requires ‘Cover Matching’, it will be
marked as ‘Pending Cover Match’. Subsequently, as mentioned above, when the Cover
message is received, the system will process the original MT103/MT202 message.
If the Queue is mapped to a PC Product Category then a PC Contract will be created. The
‘PC Message Mapping’ screen will be used to map the message fields to the PC Contract
fields.
While processing an incoming MT200, the system checks for the following:
Whether AWI in the incoming message is different from the receiver of the message
9-13
If the BIC of the receiver and the AWI are same then the transaction is treated as the
transaction ending with us. If this condition is not satisfied, the system will not upload this
incoming message which would further result in the generation of outgoing MT205.
In case of an incoming MT103, if the beneficiary account is a Trust account, the system will
put the transaction in ‘Unauthorized’ status even if the post upload status has been
maintained as ‘Authorized’ in the STP preference. If field 70 is null in the incoming MT103
message for Trust account payment, the system will not process that payment. Instead, it will
move the transaction in the repair queue. It will also raise the override message as ‘Project
Details needs to be captured for the trust account transaction’.
You will have to manually unlock the transaction and capture project details for it. While
saving the transaction, the system will check whether project details have been captured or
not.
9.1.9.2
Processing of Incoming MT101
System checks the execution date. Messages with execution date in the past or
matching the application date would be taken up for processing. Messages with
execution date in the future would be stored as unprocessed messages & would be
taken up on the execution date. If the execution date falls on a holiday, these would be
taken up for processing on the previous working day.
Individual transactions in the MT101 would be uploaded into Common Payments
Gateway.
Individual transactions would undergo a product code resolution via the STP rule
maintenance.
Individual transactions in the message would be booked as FT or PC contracts in the
system.
Note
Following maintenances are mandatory before initiating MT101 from interfaces. Function
IDs to access the respective maintenance screens are given in brackets.
‘MT101’ flag should be checked for a BIC code (ISDBICDI)
Bilateral agreements between sender and receiver (ISDCCYRS)
Transfer agreements between customer and bank (CFTDCXFRA)
Accounting
In case of a single debit to the customer account is required, system would debit the
total amount from the Ordering Customer’s account upfront and the corresponding
credit would be posted to a suspense GL.
In case of multiple debits to the customer account, system would post accounting
entries to the customer account directly.
By routing the transaction to the appropriate module & product, without manual intervention
system will be capable to interrupt the following instruction codes and also book appropriate
transactions
NETS (payment settled via Net Settlement)
RTGS (payment should be settled via RTGS)
CHQB (pay beneficiary by cheque)
Transactions View
The Common Payment Gateway Summary Screen can be used to view all transactions
of an incoming MT 101 message for the sender’s reference number.
9-14
9.1.9.3
Incoming MT201
MT201 message is for Multiple Financial Institution Transfer for its Own Account. The
Incoming MT201 message is processed in the same manner as MT203. The Incoming MT201
is split into individual MT200 messages and then these generated MT200 messages are
processed as individual MT200.
Refer the ‘Maintenance’ chapter of the Payment & Collections (PC) User Manual for details
on mapping the SWIFT tags to the PC contract fields.
Let us understand the processing of different messages for various types of transactions
through few examples:
Case 1:
The following example illustrates the successful processing of MT103 in the system.
Assume Company A orders Bank A to pay Company B’s account in Bank B. The diagram
depicts the transaction and message flow in the system.
Once the PC transaction is booked and if the product is an RTGS product, the system
processes the transaction in the following sequence:
First the system generates an MT103 with the funding status of the message as ‘WAIT’
and Reply Status as NULL.
Secondly, NBS which is the RTGS servicing bank sends an MT900. This MT900 puts
the MT103 funding status as ‘FUNDED’ and the funds are debited from Bank A’s
account in NBS.
Thirdly, NBS then sends an MT103 to Bank B. If the message has to wait for the MT910
to be processed, then the message is in a ‘Pending Cover Match’ status. If the message
need not wait for the MT910 to be processed, the MT103 will be processed as a PC
transaction.
Next, NBS credits the Bank B’s account and then sends out an MT910 message to Bank
B. Bank B then tries to process this MT910 as a cover message. If it does not find a
matching transaction, it suppresses the same.
Thus, a payment initiated from Bank A is successfully processed in Bank B.
Case 2:
The following example illustrates the processing MT103 in case of insufficient Funds in
Initiating Bank.
Assume Company A orders Bank A to pay Company B’s account in Bank B. The diagram
below depicts the transaction and message flow in the system.
9-15
Once the PC transaction is booked and if the product is an RTGS product, the system
processes the transaction.
When a payment initiated from Bank A is rejected by NBS for lack of funds, the message is
processed in the following manner:
First the system generates an MT103 with the funding status of the message as ‘WAIT’
and the Reply Status as ‘NULL’.
Subsequently, NBS which is the RTGS servicing bank sends an MT196 message. If the
status of MT196 is ‘ERRC’, then the original transaction is reversed. The Funding Status
of the Original MT103 is updated to NON-FUNDED and the Reply Status of the original
MT103 is updated to ‘CANC’.
Case 3:
The following example illustrates the processing of MT103 message which is in Wait State.
Assume Company A orders Bank A to pay Company B’s account in Bank B. The diagram
below depicts the transaction and message flow in the system.
Once the PC transaction is booked and if the product is an RTGS product, the system
processes the transaction.
When a payment initiated from Bank A is in the wait status in NBS, the message is processed
in the following manner:
First the system generates an MT103 with the funding status of the message as ‘WAIT’
and the Reply Status as ‘NULL’.
Consequently, NBS which is the RTGS servicing bank sends an MT196 message. If the
status of the message MT196 is ‘WAIT’, then the system marks the Reply Status of the
original MT103 message as ‘WAIT’ state.
Case 4:
The following example illustrates the MT195 check carried out for MT103 message in Wait
State.
Assume Company A orders Bank A to pay Company B’s account in Bank B.
9-16
Let us assume the following:
–
MT103 is sent from Bank A to NBS
–
NBS sends an MT196 with a wait state
–
Bank sends an MT195 to check the status of the 103
–
NBS sends an MT196 with a wait state
Once the PC transaction is booked and if the product is an RTGS product, the system
processes the transaction. When a payment initiated from Bank A is in the wait status in NBS
and subsequent checking from the Bank on the status of the message, the processing for the
message is done in the following sequence:
First the system generates an MT103 message with the funding status ‘WAIT’ and the
Reply Status as ‘NULL’.
Subsequently, NBS which is the RTGS servicing bank sends an MT196. If the status of
the MT196 is ‘WAIT then the Reply Status of the original MT103 is marked as ‘WAIT’
state.
The bank then sends an MT195 to verify the status of the MT103 message.
Finally, NBS sends an MT196. If the status of this MT196 is ‘WAIT’ then the reply status
of the MT195 is marked as ‘WAIT’ state.
Case 5:
The following example illustrates the process in which MT192 request for cancellation of the
MT103 in Wait State is handled in the system along with the approval of cancellation by NBS.
Assume Company A orders Bank A to pay Company B’s account in Bank B. The diagram
below depicts the transaction and message flow in the system.
Let us assume the following:
MT103 is sent from Bank A to NBS
9-17
NBS sends an MT196 with a wait state
Bank sends an MT195 to check the status of the 103
NBS sends an MT196 with a wait state
Bank sends an MT192 requesting for cancellation of the 103
NBS sends an MT196 indicating Success for the request for Cancellation.
Once the PC transaction is booked and if the product is an RTGS product, the system
processes the transaction.
9.1.10
The system generates an MT103 with the funding status as ‘WAIT’ and the Reply Status
as ‘NULL’.
NBS which is the RTGS servicing bank sends an MT196. If the status of this MT196 is
‘WAIT’, then the Reply Status of the original MT103 is marked as ‘WAIT’ state.
Then an MT195 is sent to verify the status of the MT103 message.
NBS sends an MT196 and if the status of MT196 is ‘WAIT’, then the reply status of the
MT195 is marked as ‘WAIT’ state.
The bank sends out an MT192 requesting for cancellation of the MT103 message sent
earlier.
NBS sends out an MT196 message indicating that the Cancellation request is accepted.
The system then reverses the original transaction. The Funding Status of the original
MT103 is marked as ‘NON-FUNDED’ and the Reply Status of the MT192 is marked as
CANC.
Selecting ‘Suppress Message’ Option
If you choose the ‘Suppressed’ status, the incoming message itself gets suppressed. The
Oracle FLEXCUBE STP process will not pick up SWIFT Payment Messages with a
Suppressed status for further processing.
If a message is in repair, you can pre-define two possible statuses to which the message
would go after the message is manually repaired. These are indicated by the two check boxes
viz.:
Cover Required
Suppress Message
If ‘Cover Required’ flag is checked, the message would move to the ‘Pending Cover Match’
status after repair of the message, while if the ‘Suppress message’ flag is on, the payment
(post-repair) would be processed normally, but the resultant outgoing messages would be
suppressed.
Viewing Errors
After you specify the logic for deriving the value of an UDF, it will be validated by the system
(on Save of the Rule maintenance). The system automatically generates a procedure based
on the logic specified by you and if any checks fail, you can view the errors in the ‘Errors’
screen invoked from the ‘User Defined Fields for SWIFT Messages’ screen. The statement
containing the error will be highlighted for easy identification. You can return to the previous
screen and alter the statement so that the validations are carried out successfully.
9-18
Click ‘Error’ button to view the errors.
9.1.11
Maintenance Related to Upload Source
FT contracts can be uploaded onto Oracle FLEXCUBE from any external source. However,
the details that come in the form of SWIFT messages are converted to data in the FT Upload
tables by the Message Upload function, from where the FT Upload function picks them up for
processing.
When you maintain details of a source, you can also specify characteristics for contracts
coming into the FT Upload tables from the source. Besides defining the operations that can
be performed on contracts uploaded from the source, you can also define the status that
uploaded contracts should be marked with.
Upload sources can be maintained at the Head Office level and propagated to the branches
of your bank.
The maintenance of upload sources helps to retrieve information for a given source.
The procedure for maintaining details of an upload source has been discussed under the
head ‘Maintaining upload sources’, in the Batch Upload chapter of the Funds Transfer user
manual
9.1.12
Maintaining Branch-Level STP Preferences
You can maintain preferences for contracts uploaded by the FT Upload process, to be
applicable based on the branch that is initiating the upload. The following preferences can be
set:
How contracts for which no Beneficiary has been resolved must be handled
9-19
Whether the contracts must be uploaded as authorized or unauthorized contracts.
How contracts in respect of which errors and / or overrides are encountered during
upload.
To set up the branch-level preferences, to be applicable for uploads, for a branch and
message type combination, you can use the STP Branch Preferences screen.
You can invoke the ‘STP Preferences’ screen by typing ‘MSDSTPRF’ in the field at the top
right corner of the Application tool bar and clicking the adjoining arrow button.
In this screen, you can maintain the preferences to be applicable for uploads initiated in:
All branches and applicable for all message types (this setup can be done at the head
office branch only).
All branches and applicable for a specific message type (this setup can be done at the
head office branch only).
For a specific branch, applicable for a specific message type
For a specific branch, applicable for all message types
You can maintain the following preferences:
The status of the contract on successful upload (Post Upload Status). This could be :
–
Authorized – The uploaded contract is created as an authorized contract if all
validations are successful
–
Unauthorized – The uploaded contract is created as an unauthorized contract if all
validations are successful.
–
On Hold– The uploaded contract is put on ‘Hold’ if all validations are successful.
How errors encountered in respect of contracts during upload, would be handled (On
Error). You can specify any of the following options:
–
Put on hold – The message is marked as processed but the created contract is
placed on ‘Hold’.
–
Reject Record – The message is marked for repair and no contract is created.
9-20
How overrides encountered in respect of contracts during upload, would be handled (On
Error). You can specify any of the following options:
–
Put on hold - The message is marked as processed but the created contract is
placed on ‘Hold’.
–
Ignore – The message will be marked as processed but the created contract will be
created based on the Post Upload Status.
–
Reject Record – The message is marked for repair and no contract is created.
How incoming funds transfers in respect of which the beneficiary is not found, are
handled during upload. You can specify any of the following options:
–
Use Suspense – If the Beneficiary is not found, the DAO GL defined for the product
of the contract is used.
–
Repair - The message is marked for repair and no contract is created
Note
9.1.13
–
These preferences are applicable only for the FT Upload process, and not the
message interpretation process or the Message Upload process.
–
‘When No Beneficiary’ is not applicable in case of Non SWIFT incoming payment
message.
External Account Maintenance
This maintenance is part of the Reconciliation module of Oracle FLEXCUBE. This is used to
map the nostro accounts in your Bank’s books to the actual account numbers in the books of
you Correspondent Banks.
The procedure for maintaining details of External Accounts has been discussed in the
Reconciliation Module user manual
9.1.14
Overrides Maintenance
The STP process (apart from the User defined Error Codes) also checks for various error
conditions based on the contents of the message and their interpretation during the
processing of the message., for instance limit checks, available balance checks, dormant
account checks, etc. The actual result of the upload (whether it fails with an error or goes
through with an override) depends on the configuration of the error codes.
9-21
10. Straight through Processing – Sequence of
Events
10.1 Introduction
To recall, straight through processing of funds transfer contracts begins with an incoming
SWIFT message, which is displayed in the Incoming Message Browser.
The Messages sub-system of Oracle FLEXCUBE receives SWIFT messages, and stores
them in the incoming directory. The STP function then reads these messages and begins
processing them.
After the Messaging system stores incoming SWIFT messages in the incoming directory, the
STP function executes the following sequence of events:
1. Reads the message from the incoming directory and displays it in the Incoming Browser.
At this stage, the message is not interpreted or resolved, and the contract details have
not been extracted yet. Also, you can view the details of the message in the incoming
browser at this stage.
2. The Message Upload function then interprets the message, extracting the contract
details. These details are propagated into the Funds Transfer (FT) Upload tables in the
system. These tables, therefore, store the extracted details of the contracts contained in
the incoming SWIFT messages. Any default information is appended, and if any
message has been rejected for any reasons, or an error has been encountered, the same
is logged as an exception.
3. When the Message Upload function interprets the message, it also resolves the Oracle
FLEXCUBE FT product to be used for the contract, using the Product Message Mapping,
for the incoming message type. The product code thus resolved is also stored in the FT
Upload tables, with the other contract details. Based on the parties in the message, the
settlement accounts are also resolved using the data maintained in the Settlement
Instructions table.
4. The Funds Transfer (FT) Upload function creates contracts using the interpreted
messages, reading them from the FT Upload tables. This involves matching the extracted
contract details with the information fields in Oracle FLEXCUBE, for funds transfer
contracts. In the process, the product level and customer level defaults are also picked
up for sub-systems such as charges, taxes MIS, etc. If any contract upload gets rejected
for any reasons, or if an error is encountered, the same is logged.
5. Subsequent to the creation of the contracts by the FT Upload function, they can be
processed just as any other FT contract in the system, and can be amended, authorized
and so on.
10.2
Incoming Message Browser
Incoming SWIFT messages containing details of funds transfer contracts are stored in the
incoming directory that you have designated for receiving messages through SWIFT. The
incoming browser is therefore the repository of all incoming messages in Oracle FLEXCUBE.
At this stage, the details of the funds transfer contract are not extracted, and the fields in the
message that pertain to the funds transfer contract are not yet resolved.
For more information on the structure of the Incoming Browser and the operations that can be
performed on the Incoming Message Browser, consult the Messaging system user manual.
10-1
As mentioned earlier, the end user queues and the access rights to the users in the
department who will need to view the messages should already have been defined for your
branch.
10.3 Message Upload Function
When the incoming message is displayed in the incoming browser, the message upload
function resolves the contents of the message under the different information heads (fields)
in Oracle FLEXCUBE.
The message upload facility of Oracle FLEXCUBE allows you to automatically process all
incoming MT 103, MT 103+ and MT 202 messages, which result in either incoming or
outgoing Funds Transfers.
Subsequent to the upload, the details of each message will be updated in Oracle FLEXCUBE
as an FT contract. After this, the Funds Transfer can be processed as any other contract in
Oracle FLEXCUBE.
All the information that you would normally specify in the fields in FT Input Detailed screen
when you enter an FT contract, is resolved from the incoming message, by the message
upload function. The contents of the message are translated into Oracle FLEXCUBE fields,
and populated in the FT upload tables.
The Message Upload function resolves the contents of the incoming message into Oracle
FLEXCUBE funds transfer contract field information, but the actual contracts are not created
as yet. The creation of the actual contracts is performed by a separate function, the FT
Upload function, which is enumerated in the Batch Upload chapter of the Funds Transfer User
Manual.
10.3.1
Automatic Execution of Message Upload Function
The upload of MT 101, MT 103, MT 103+ and MT 202 messages by the Message Upload
function can either be on-line or can be done as a batch process. If you have specified that
the automatic upload of MT 101, MT 103, MT 103+ and 202 messages should be on-line then
the Message Upload function will automatically upload and process these S.W.I.F.T
messages.
The upload will be in line with the specifications you made for the source, from which the
message was uploaded, and will be enriched based on the product linked to the message
type.
Note
The contracts uploaded through this process will bear the status (authorized or unauthorized) defined for the source from which it is uploaded.
10.4 Interpreting Contents of Incoming Message
While the actual interpretation of the contents of the message depends upon the message
type (i.e., whether the message is a 103 or an MT 200 or an MT 202, and so on), a logical
sequence of steps is performed irrespective of the message type. Some of the key steps in
the process of interpretation of a message are as follows:
1. Conversion of D Fields to A Fields
2. Derivation of Debit and Credit Accounts
10-2
3. Processing of Field 72
4. Derivation of FT Product
5. Build-up of a FT upload transaction record
Each of these steps is described in detail below:
10.4.1
D to A Conversion
When an incoming SWIFT payment message contains information regarding parties involved
in a funds transfer, in the ‘D’ format, i.e., names and addresses, the STP function uses the D
to A converter records (which we have discussed earlier) to derive the BIC Codes (A format)
for the parties involved in the funds transfer.
The STP function replaces the name and address information (D format) in the message with
the corresponding BIC Code (A format), picked up from the converter record.
The name and address information contained in the incoming SWIFT message must be
matched exactly, line for line, literally and without case sensitivity, by the address lines
information in the converter record, for the corresponding BIC Code to be picked up by the
STP function.
10.4.2
Derivation of Debit and Credit Accounts
This is one of the most important steps in the message upload process. It is through this step
that the system identifies the accounts that have to be debited and credited for the resultant
FT contract.
For instance, if the incoming message is an MT 103 sent by the Bank’s correspondent, which
orders the Bank to pay a certain sum to a customer of the Bank, the system (from the
message) deciphers that the Debit account is the relevant nostro account (mirror of it’s
account with the Sender of the MT 103) and that the Credit account is the relevant customer’s
account. The logic for derivation of the debit and credit account depends upon the incoming
payment message type, viz. whether the incoming message is an MT 103, 200 or a 202.
While derivation of the debit account is primarily driven by the contents of fields 53 to 55 of
the incoming message, the derivation of the credit account is primarily driven by the contents
of the fields 56 to 59, together with the settlement instructions maintenance table, where the
Standard Settlement Instructions are maintained for both Customers and BIC’s.
The step–wise sequence of the derivation logic of both the debit account and credit account
is given in Annexure - B of this user manual for each of the incoming payment message types.
10.4.3
Processing ISO 11649 in Field 70
ISO 11649 Creditor Reference number, also referred to as Structured Creditor Reference
number, is an International Business Standard and is based on ISO 11649.
The Creditor Reference number is an alphanumeric string with 25 characters in length.
The first 2 digits of the string are always maintained as ‘RF’.
The 2 digits after ‘RF’ represent check digits. These check digits confirm that the
reference number is entered correctly.
The remaining digits of the Creditor Reference number represent the Reference
Number.
ISO 11649 Creditor Reference, if present in Field 70, will be available in the first line without
any characters preceding it and is the only information available in the first line.
10-3
If an outgoing MT 101, MT 102, MT 102 +, MT 103, or MT 103 + messages are generated,
then the system identifies the ISO 11649 Creditor Reference and validates the following, if
specified:
10.4.4
The specified ISO 11649 Creditor Reference number should be available in the first line,
without any characters preceding it.
First 2 characters should be ‘RF’.
‘RF’ should be followed by 2-digit check digit. System will not validate the specified
check digits.
The total length of the Creditor Reference Number should not exceed 25 characters
length.
Processing of Field 72
The STP process of Oracle FLEXCUBE will handle the processing of field 72 (Sender to
Receiver Information) for all Incoming SWIFT Payment Messages (MT 103, MT 200 and MT
202) based on the abbreviation code associated with field 72. It is also dependent on whether
the beneficiary of the payment transaction resides with the Oracle FLEXCUBE bank or not.
Case 1: The processing of field 72 for all payment messages where the beneficiary resides
with the Oracle FLEXCUBE bank is summarized in the table below:
SlNo
.
1
2
Field
72
Code
Categ
ory
Field 72
Code
Parties
ACC
Parties
INS
(Info for
Acc with
Inst)
(Instructing Inst)
Field 72
Code
processi
ng for
MT 103
Field 72
Code
processi
ng for MT
200
Copy to field 72
of Payment
Transaction
being created.
Copy to
field 72
of Payment
Transaction
being
created.
Copy to
field 72 of
Payment
Transaction being
created.
Copy to field
72 of Payment Transaction being
created.
Copy to field 72
of Payment
Transaction
being created.
Copy to
field 72
of Payment
Transaction
being
created.
Not Applicable
Copy to field
72 of Payment Transaction being
created.
Field 72 Code
processing for
MT 100
10-4
Field 72
Code
processing
for MT 202
3
4
5
6
7
8
Parties
RCB
Parties
INT
Parties
REC
Parties
BNF
Metho
d of
Payment
BENONLY
Metho
d of
Payment
CHEQUE
(Receiver’s
Correspondent)
Try and Derive
the Debit
Account from
contents specified after //RCB.
If Debit Account
Derivation is
successful, then
do not copy the
code and its
contents to field
72 of Payment
Transaction
being created.
Not
Applicable
Not Applicable
Not Applicable
Not Applicable
Copy to
field 72
of Payment
Transaction
being
created.
Copy to
field 72 of
Payment
Transaction being
created.
Copy to field
72 of Payment Transaction being
created.
Not Applicable
Mark
Incoming
SWIFT
Payment
Message for
Repair
with an
appropriate
repair
reason.
Mark
Incoming
SWIFT
Payment
Message
for Repair
with an
appropriate repair
reason.
Mark Incoming SWIFT
Payment
Message for
Repair with
an appropriate repair
reason.
Not Applicable
Not
Applicable
Not Applicable
Copy to field
72 of Payment Transaction being
created.
Copy to field 72
of Payment
Transaction
being created.
Not
Applicable
Not Applicable
Not Applicable
Copy to field 72
of Payment
Transaction
being created.
Not
Applicable
Not Applicable
Not Applicable
(Info for
Intermediary)
(Info for
Receiver of
Payment)
(Info for
Beneficiary)
(Payment
for Ben
only)
(Payment
by cheque
only)
10-5
9
Metho
d of
Payment
CORPTRAD
Metho
d of
Payment
HOLD
11
Metho
d of
Payment
12
10
13
14
15
16
17
Copy to field 72
of Payment
Transaction
being created.
Not
Applicable
Not Applicable
Not Applicable
Copy to field 72
of Payment
Transaction
being created.
Not
Applicable
Not Applicable
Not Applicable
INTRACOM
Copy to field 72
of Payment
Transaction
being created.
Not
Applicable
Not Applicable
Not Applicable
Metho
d of
Advice
PHON
Copy to field 72
of Payment
Transaction
being created.
Not
Applicable
Copy to
field 72 of
Payment
Transaction being
created.
Copy to field
72 of Payment Transaction being
created.
Metho
d of
Advice
PHONBEN
Copy to field 72
of Payment
Transaction
being created.
Not
Applicable
Not Applicable
Copy to field
72 of Payment Transaction being
created.
Metho
d of
Advice
PHONIBK
Copy to field 72
of Payment
Transaction
being created.
Not
Applicable
Copy to
field 72 of
Payment
Transaction being
created.
Copy to field
72 of Payment Transaction being
created.
Metho
d of
Advice
TELE
Copy to field 72
of Payment
Transaction
being created.
Not
Applicable
Copy to
field 72 of
Payment
Transaction being
created.
Copy to field
72 of Payment Transaction being
created.
Metho
d of
Advice
TELEBEN
Copy to field 72
of Payment
Transaction
being created.
Not
Applicable
Not Applicable
Copy to field
72 of Payment Transaction being
created.
Metho
d of
Advice
TELEIBK
Copy to field 72
of Payment
Transaction
being created.
Not
Applicable
Copy to
field 72 of
Payment
Transaction being
created.
Copy to field
72 of Payment Transaction being
created.
(FX Settlement)
(Pay upon
customer
ID)
(Advise
Acc with
Inst by
phone)
(Advise
Ben by
phone)
(Advise
Intermediary by
phone)
(Advise
Acc with
Inst)
(Advise
Ben)
(Advise
Intermediary)
10-6
Case 2: The processing of field 72 for all payment messages where the beneficiary does not
reside with the Oracle FLEXCUBE bank is summarized in the table below:
Field 72
Code
Catego
ry
Field 72
Code
Parties
ACC
(Info for Acc
with Inst)
Parties
INS
(Instructing
Inst)
Parties
RCB
(Receiver’s
Correspondent)
Parties
INT
Field 72 Code
processing for
MT 100
Field 72
Code
processing
for MT 103
Field 72
Code
processin
g for MT
202
Field 72
Code
processi
ng for MT
200
Mark Incoming
SWIFT Message
for Repair with
appropriate repair
reason.
Mark Incoming SWIFT
Message for
Repair with
appropriate
repair reason.
Mark
Incoming
SWIFT
Message
for Repair
with
appropriate repair
reason.
Not Applicable
Copy to field 72 of
Payment Transaction being created & process
Incoming SWIFT
Message.
Copy to field
72 of Payment Transaction being
created &
process
Incoming
SWIFT Message.
Copy to
field 72 of
Payment
Transaction being
created &
process
Incoming
SWIFT
Message.
Not Applicable
Try and Derive
the Debit Account
from contents
specified after //
RCB. If Debit
Account Derivation is successful,
then do not copy
the code and its
contents to field
72 of Payment
Transaction being
created else mark
SWIFT Message
for Repair.
Not Applicable
Not Applicable
Not Applicable
Not Applicable
Copy to field
72 of Payment Transaction being
created &
process
Incoming
SWIFT Message.
Copy to
field 72 of
Payment
Transaction being
created &
process
Incoming
SWIFT
Message.
Not Applicable
(Info for Intermediary)
10-7
Parties
REC
Not Applicable
Mark Incoming SWIFT
Message for
Repair if line
no. 2 of field
72 does not
contain a
valid SAP
Code.
Mark
Incoming
SWIFT
Message
for Repair
if line no. 2
of field 72
does not
contain a
valid SAP
Code.
Not Applicable
Not Applicable
Not Applicable
Copy to
field 72 of
Payment
Transaction being
created &
process
Incoming
SWIFT
Message.
Not Applicable
Copy to field 72 of
Payment Transaction being created & process
Incoming SWIFT
Message.
Not Applicable
Not Applicable
Not Applicable
Mark Incoming
SWIFT Message
for Repair with
appropriate repair
reason.
Not Applicable
Not Applicable
Not Applicable
Copy to field 72 of
Payment Transaction being created & process
Incoming SWIFT
Message.
Not Applicable
Not Applicable
Not Applicable
Mark Incoming
SWIFT Message
for Repair with
appropriate repair
reason.
Not Applicable
Not Applicable
Not Applicable
Copy to field 72 of
Payment Transaction being created & process
Incoming SWIFT
Message.
Not Applicable
Not Applicable
Not Applicable
(Info for
Receiver of
Payment)
Parties
BNF
(Info for Beneficiary)
Method
of Payment
BENONLY
Method
of Payment
CHEQUE
Method
of Payment
CORPTRAD
Method
of Payment
HOLD
Method
of Payment
INTRACOM
(Payment for
Ben only)
(Payment by
cheque only)
(FX Settlement)
(Pay upon
customer ID)
10-8
Method
of
Advice
PHON
Method
of
Advice
PHONBEN
Method
of
Advice
PHONIBK
Method
of
Advice
TELE
Method
of
Advice
TELEBEN
(Advise Acc
with Inst by
phone)
(Advise Ben
by phone)
(Advise Intermediary by
phone)
(Advise Acc
with Inst)
(Advise Ben)
Copy to field 72 of
Payment Transaction being created & process
Incoming SWIFT
Message.
Not Applicable
Copy to
field 72 of
Payment
Transaction being
created &
process
Incoming
SWIFT
Message.
Not Applicable
Mark Incoming
SWIFT Message
for Repair with
appropriate repair
reason.
Not Applicable
Mark
Incoming
SWIFT
Message
for Repair
with
appropriate repair
reason.
Not Applicable
Copy to field 72 of
Payment Transaction being created & process
Incoming SWIFT
Message.
Not Applicable
Copy to
field 72 of
Payment
Transaction being
created &
process
Incoming
SWIFT
Message.
Not Applicable
Copy to field 72 of
Payment Transaction being created & process
Incoming SWIFT
Message.
Not Applicable
Copy to
field 72 of
Payment
Transaction being
created &
process
Incoming
SWIFT
Message.
Not Applicable
Copy to field 72 of
Payment Transaction being created & process
Incoming SWIFT
Message.
Not Applicable
Copy to
field 72 of
Payment
Transaction being
created &
process
Incoming
SWIFT
Message.
Not Applicable
10-9
Method
of
Advice
10.4.5
TELEIBK
(Advise Intermediary)
Copy to field 72 of
Payment Transaction being created & process
Incoming SWIFT
Message.
Not Applicable
Copy to
field 72 of
Payment
Transaction being
created &
process
Incoming
SWIFT
Message.
Not Applicable
Processing of ‘BNF’ in Field 72
If the account number field (field 59 for MT 103 & field 58 for MT 202) for an Incoming
Payment Message is not populated, the STP process of Oracle FLEXCUBE will automatically
route it to the ‘Repair’ queue. It will then check for the presence of the abbreviation code ‘BNF’
(Info for Beneficiary) in field 72 (Sender to Receiver Information) of the message. If the code
is found, the system will automatically ignore the non-numeric characters in the code and read
only the account number specified after the code. The account number will then be validated
in the current branch. If found valid, it will be assigned to field 58 or 59, depending on the
message type and subsequently marked as the credit account for the incoming payment
transaction.
As the payment transaction is automatically repaired by the system, it will be routed to the
‘Repair’ queue with the repair reason as ‘Auto Repaired’. A user with authorization rights will
authorize the Payment Transaction after which the STP process will pick it up for further
processing.
If Oracle FLEXCUBE encounters a field 72 abbreviation code that is not listed in the table
above, the SWIFT Payment Message will be marked with ‘Repair’ status, indicating the
appropriate reason for repair.
10.4.6
Derivation of FT Product
Another key step in the STP process is the association of the payment message with the
appropriate FT product.
All Incoming SWIFT Payment Messages can be associated with any one of the following
types of Payment Products:
Outgoing
Incoming
Internal
However, the STP process of Oracle FLEXCUBE will first derive the Debit and Credit account
for an Incoming SWIFT Payment Message before determining the Payment Product to be
associated with it. Based on the type of accounts derived, the process will automatically
associate the appropriate type of Payment Product.
The type of Payment Product to be associated based on the derived Credit and Debit Account
type for an Incoming SWIFT Payment Message is summarized in the table below:
Debit Account Type
Credit Account Type
Payment Product Type
Nostro
Nostro
Outgoing
10-10
Nostro
Non-Nostro
Incoming
Non-Nostro
Non-Nostro
Internal
Non-Nostro
Nostro
Outgoing
Internal GL Account
Internal GL Account
Internal
To recall, you can map a message type to different payment products in the Product Mapping
screen. Depending on the product type (Outgoing, Incoming, or Internal), the relevant product
is picked up for processing the FT contract.
10.4.7
Build-up of FT Upload Transaction Record
The key details required for the FT contract such as Debit and Credit accounts, the amount
and currency of transfer, etc, are derived from the message contents. Once the product is
derived, all the product level processing preferences are picked up.
10.5 Validations Performed on Incoming SWIFT Message
As mentioned earlier, the message upload function of Oracle FLEXCUBE will resolve the
contents of the SWIFT message, in the Incoming Message Browser. During this process, the
system will also perform certain validations on the contents of the message. Only after
carrying out the validations, the contents of the message are translated into Oracle
FLEXCUBE fields, and populated in the FT upload tables.
Each of these validations is discussed in the subsequent sections of this document.
10.5.1
Validations for Back Value Days
Oracle FLEXCUBE will process back valued SWIFT messages if the value date is within the
‘Back Value Days’ limit maintained for the FT product to which the message is eventually
associated.
If the date does not fall within the limits maintained, the message will be marked for ‘Repair’
indicating the appropriate reason for repair. The corresponding error code can be configured
alternatively as ‘Override’, in which case Oracle FLEXCUBE will only log an override and go
ahead with processing or ‘Ignore’ in which case, the error condition will not affect the
processing in any way.
For information on maintaining ‘Back Value Days’ for an FT product, consult the Products
chapter of the Funds Transfer User Manual.
10.5.2
Validation of Local Clearing Codes
The STP process of Oracle FLEXCUBE will validate the Local Clearing Codes specified in the
fields (56, 57 & 58 – Intermediary Institution, Account with Institution, and Beneficiary
Institution) of an Incoming SWIFT Payment Message in the following manner:
After deriving the Local Clearing Code, the STP process will check if the derived code
is a valid Local Clearing Code in the system. If it is not a valid code or if the Clearing
Code Indicator field of the message is ‘N’, the STP process will mark the Incoming
SWIFT Message for repair. The appropriate reason for repair is also indicated.
10-11
Note
The Local Clearing Code is always prefixed by the Local Clearing Code Indicator. For example, the Local Clearing Code for the clearing agent UK Chaps is ‘//SC23-09-85’ where
‘SC’ is the Clearing Code Indicator and 23-09-85 is the actual Local Clearing Code. The
STP process will ignore the first four non-numeric characters (‘\\SC’ in //SC23-09-85) to
derive the Clearing Code. The Clearing Code derived thus should conform to the mask or
format specified for the Clearing Code Network to which it belongs.
The STP process will check to ensure that the Local Clearing Code is present only once
in the fields of an Incoming Message. That is, if fields 56, 57 and 58 are present in a
SWIFT Payment Message, the Local Clearing Code should be specified in field 56
alone. Likewise, if only fields 57 and 58 are present in the message, the Local Clearing
Code should be specified in field 57. If these validations fail, the SWIFT message will
be marked for repair, indicating the appropriate reason for repair.
If a Local Clearing Code is present in one of the fields of an Incoming SWIFT Payment
Message but if the Incoming SWIFT Payment Currency is different from the local
currency of the branch, the message will be marked for repair.
If the Local Clearing Code present in an Incoming SWIFT Message is a valid Local
Clearing Code in the system, the STP process will assign the same code (with the
prefix) to the fields (56 or 57 as the case may be) of the resultant Outgoing SWIFT
Payment Message.
If in an outgoing MT 202 to be generated through the STP process, the field 57A and
field 58A are the same as the Receiver of the MT 202 (i.e., in cases where field 57A is
not present, field 58A equal to Receiver), the system will assign the ‘Own Clearing
Code’ of the party in field 57 (or 58) in the outgoing message (to 57 or 58).
Note
You can maintain ‘Own Local Clearing Codes’ for all Local Clearing Codes within the same
network. If in an Incoming SWIFT Message, the same bank is the beneficiary institution as
well as the receiver of funds, the STP process will assign the Own Local Clearing Code to
the party fields of the resultant outgoing payment message.
10.5.3
Available Balance Check
At the time of processing a SWIFT payment message transaction, the STP process will check
for the availability of funds in a customer account when posting an accounting entry.
Note
The STP process will perform the check only if you have selected the ‘Available Balance
Check Required’ option for both the Transaction Code associated with the accounting entry (the transaction code associated with the Debit leg of the transaction in the Product
Event Definition) and the Customer Account Class to which the customer account that is
being debited, belongs.
10.5.3.1 Handling Failure of Available Balance Checks by STP
In the event the available balance check fails for an Incoming SWIFT Payment Message
transaction, the STP process of Oracle FLEXCUBE will automatically move such transactions
to the ‘Funding Exception’ status. The corresponding error code can be configured
alternatively as ‘Override’, in which case Oracle FLEXCUBE will only log an override and go
ahead with processing or “Ignore” in which case, the error condition will not affect the
processing in any way.
10-12
Oracle FLEXCUBE also enables users with appropriate rights to ‘Force Release’ all Payment
Message Transactions with ‘Funding Exception’ status and insufficient funds to the Incoming
Message Browser. In other words, the system will post the required accounting entries for
such transactions regardless of insufficient funds in the accounts. The system will also
maintain a detailed audit trail for such transactions.
10.5.4
Currency Cut-off Checks
The STP process of Oracle FLEXCUBE performs the currency cut-off checks for all Incoming
SWIFT Payment Messages. The message is validated against the cut-off days and cut-off
time specified for the customer, product and currency involved in the payment message.
Note
The cut-off checks are performed only if applicable for the product derived during the processing of the Incoming SWIFT Message.
For details on maintaining Cut-Off Times and Cut-Off Days for a currency, refer the Core
Services User Manual.
If the SWIFT message fails the currency cut-off checks, the system displays an override
message. You can configure the override as an error message or a warning, depending on
your requirement.
10.5.5
If the override is configured as an error, the STP process will reject the SWIFT message
by indicating the appropriate reason for rejection.
If the override is configured as a warning, the system will log the error and proceed with
the upload process.
Processing Uploaded Future Valued Payment Message Transaction
If the value date of a SWIFT payment message transaction is a date in the future, it is referred
to as a ‘Future Valued’ transaction. The STP process updates the status of such payment
messages to ‘Pending Release’. The system does not generate the accounting entries and
payment advices for transactions that are future valued and subsequently, pending release.
The system also defers the currency cut-off check for future valued transactions.
10.5.5.1 Processing Payment Transactions with Pending Release Status
The batch processing function run at BOD (Beginning of Day) will check all future valued
payment transactions. It will then release those transactions whose value date are earlier than
or equal to the current system date. The batch processing function will also check for the
availability of funds before posting the required accounting entries and subsequently,
generates the outgoing payment advices for all transactions that are released on the day.
The currency cut-off checks will also be performed on the value date.
10.5.6
Exchange Rates Default for Cross-Currency STP Transactions
You can place restrictions on the amount involved in cross currency payment message
transactions that are uploaded by the Oracle FLEXCUBE STP process.
Note
The ‘Exchange Rate Limits’ maintained for the relevant branch, currency, and product
combination will be used to perform the check.
10-13
At the time of uploading cross-currency payment message transactions, the STP process will
validate the limits in the following manner:
10.5.7
The limit amount, which is expressed in the limit in currency, is converted to the
corresponding amount in the limit for currency, using the standard exchange rate, mid
rate for comparison.
If the transaction amount is less than the limit amount in limit for currency for a given
product and branch combination, the STP process will pick up the exchange rate from
the Currency Rates Maintenance for the rate code specified for the product involving the
transaction.
If the cross currency transaction amount exceeds or is equal to the limit amount in limit
for currency, the STP process will reject the payment message transaction being
uploaded. The appropriate reason for rejection is also indicated.
The corresponding error code can be configured alternatively as “Override”, in which
case Oracle FLEXCUBE will only log an override and go ahead with processing or
“Ignore” in which case, the error condition will not affect the processing in any way.
Checking for Blocked BIC Codes
At the time of processing a SWIFT Payment Message, if the STP process encounters
messages involving SWIFT BIC Codes (in the fields containing party information) that have
been blocked (or blacklisted), the system will mark the message with a ‘Repair’ status along
with the appropriate reason for repair.
The corresponding error code can be configured alternatively as ‘Override’, in which case
Oracle FLEXCUBE will only log an override and go ahead with processing or ‘Ignore’ in which
case, the error condition will not affect the processing in any way.
The STP will check for blocked BIC codes in following fields of a payment message:
10.5.8
Field 53A (Sender’s Correspondent)
Field 58A (Beneficiary Institution)
Field 52A (Ordering Institution)
Field 56A (Intermediary)
Field 54A (Receiver’s Correspondent)
Field 57A (Account with Institution)
Validating Transfer Currency and Account Currency
For messaging resulting in an incoming transfer, if transfer currency differs from the account
currency for incoming transfer, the corresponding message goes to the repair queue.
The upload process of incoming message provides a validation of account currency with
transfer currency. If the currencies are different, the message is routed to the repair queue.
The error-code is configurable to be either an Error or Override, depending upon your
installation.
10.5.9
Validating Credit Card Payments
Oracle FLEXCUBE provides a facility to processes incoming Credit Card payments through
SWIFT message. The system processes these FT messages as follows:
1. External Bank initiates Credit Card payment and the system receives an incoming swift
message for FT payment.
2. System validates this incoming message against the rule maintained for Field 59 for the
existence of Credit Card account and status.
10-14
3. If the validation is successful, the system posts the message to an appropriate queue
maintained for Credit Card incoming FT payment.
4. Based on the queue type, the system triggers the appropriate FT product maintained for
Credit Card.
5. Triggered FT product initiates the FT transaction by debiting the NOSTRO account and
crediting the card product GL.
6. After successful transaction, the system generates an advice based on the following
details:
Credit Card Number
Credit Card Holder Name
Customer No
Branch Code
Branch Name
Teller Id
Transaction Date & Time
Exchange Rate
Transaction Reference No
Debit Currency
Debit Amount
Credit Currency
Credit Amount
Payment Date
Remarks – narration field details
Charge amount
Charge CCY
10.6 Cover Matching
10.6.1
Detection of Messages for ‘Pending Cover’ Status
If an incoming MT 103/MT 202 is in the Local Currency of the branch where it is received and
the Sender of the message does not have the authority to specify the Debit Account for the
message, the system will automatically route the message to the ‘Pending Cover Queue’.
If the STP process detects an Incoming SWIFT Payment Message (MT 103/ MT 202) with the
status as ‘Pending Cover Match’, the message is kept on hold until a ‘Payment Cover
Message’ (MT 202/MT205) is received from the Intermediary bank. Upon receipt of a
Payment Cover Message, it is automatically matched with the Payment Message that is on
hold. After it is matched, the Payment Cover Message is suppressed and Payment Message
that was on hold is picked up for processing.
If the system uploads an MT205 first, the message will be suppressed and though a matching
MT103/202 is uploaded later, the auto cover matching will not take place.
Note
When the existing MT103 is received from anyone other than our correspondents, then the
MT 103 message will be moved to a Cover matching queue (which is a user maintained
10-15
queue) with the status mapped as ‘Pending Cover match’. (Status =’C’, Process Status
=’R’, Force Cover Match =’N’)
Once the MT 202 is identified as the cover message, the MT 202 will be suppressed. (Status
= ‘S’, Process Status =’P’, Suppress_message = ‘F’ – indicating Full suppress). Also MT 103
will be moved from the Cover match queue and processed.
10.6.1.1 Processing of MT 910
The processing of Cover Matching can also be done when an Incoming MT 910 is received
based on the following conditions
The contents of field 21 (Related Reference) of the Credit Advice message (MT 910)
are same as the contents of field 20 (Transaction Reference Number) of a (non-cover)
Payment Message (100 or 103).
The contents of field 32 (Payment Amount, Payment Value Date and Payment
Currency) of a 910 are identical to the contents of field 32 of a (non-cover) Payment
Message (100 or 103).
When the MT 910 is received and the above mentioned conditions are satisfied, then MT 910
are suppressed and the corresponding MT 100 / MT 103 are processed.
You can send an MT 202 either as a Payment Cover Message or a normal Payment Message.
The system will identify the MT 202 as a Payment Cover Message if it satisfies the following
conditions:
The contents of field 21 (Related Reference) are different from those of field 20
(Transaction Reference Number) of the Incoming MT 202.
The Payment Currency specified in field 32 (Currency) of the SWIFT message is same
as the Base Currency of the branch in which the MT 202 is being processed.
Note
‘Payment Cover Messages’ are always received later than the related SWIFT Payment
Messages.
10.6.2
Matching Payment Message with its Cover
After the receipt of the ‘Payment Cover Message’, the STP process matches it with a normal
SWIFT Payment Message that satisfies the following conditions:
The contents of field 21 (Related Reference) of the Payment Cover Message (MT 202)
are same as the contents of field 20 (Transaction Reference Number) of a (non-cover)
Payment Message (100 or 103).
The contents of field 32 (Payment Amount, Payment Value Date and Payment
Currency) of a Payment Cover Message are identical to the contents of field 32 of a
(non-cover) Payment Message (100 or 103).
The STP process may encounter one of the following three conditions, in its search for a
related Normal Payment Message that matches with a Payment Cover Message (MT 202).
Finds more than one Payment Message that matches the criteria
Finds a single matching normal Payment Message (desirable)
Finds no Payment Message matching the criteria
10-16
Processing an MT 202 with more than one matching Payment Message
If the STP process detects more than one related normal Payment Message matching the
above conditions, the Payment Cover Message is moved to the ‘Repair’ status and the
appropriate reason for repair is also indicated. The user will manually process all the normal
Payment Messages matching the Payment Cover Message.
Processing an MT 202 with a single matching Payment Message
If the STP process finds a single related Normal Payment Message that matches the above
conditions, the Payment Cover Message is marked as ‘Matched’ and its status is updated to
‘Suppressed’. The related Payment Message (100 or 103) is also marked as ‘Matched’ and it
is moved from the Cover Queue to the unprocessed queue from where the STP picks it up for
further processing.
Processing an MT 202 without a matching Payment Message
If the Oracle FLEXCUBE STP process does not find any related Payment Messages
matching the above-mentioned criteria, it will check for the presence of field 72 (Sender to
Receiver Information) in the Payment Cover Message. If field 72 does not exist, the system
will automatically suppress the Payment Cover Message and maintain a detailed audit trail for
the same. The suppressed Payment Cover Message will not require any further verification.
If field 72 exists in the Payment Cover Message, the STP process will automatically route the
Payment Cover Message to the ‘Repair’ queue indicating the appropriate reason for repair.
10.7 Payment Cover (MT 202) Generation Rules
Oracle FLEXCUBE STP process will automatically generate an Outgoing Payment Cover
Message (MT 202) if the following criteria are satisfied:
10.7.1
The contents of Field 56 (Intermediary) and Field 57 (Account with Institution) are
always populated in an Incoming SWIFT Payment Message.
If the contents of both Fields 56 and 57 are populated and if field 56 contains the name
of a customer or branch of your bank, then only one Outgoing Payment Message will be
sent either to the Customer or to the Branch. Since the Intermediary in this case is your
customer or a branch of your bank, a Payment Cover Message will not be sent even if
both the fields (56 and 57) are present in the Payment Cover Message. This is because
of the presence of a direct account relationship between your bank and the Intermediary
(customer or branch as the case may be).
If the credit account of the Incoming Payment Transaction is your preferred Nostro
Agent’s account (for the Payment Currency) and if both Fields 56 and 57 are populated,
the system will check if the country code of the Payment Currency matches with the
country code associated with the SWIFT BIC (characters 5 & 6 in a SWIFT BIC) present
in Fields 56A and 57A. If the country codes match, Oracle FLEXCUBE will not generate
a Payment Cover Message as the ‘Intermediary’ and the ‘Account with Institution’ will
be treated as belonging to the same local area network.
Incoming MT 202
For an incoming MT202, the system determines the Queue while uploading messages based
on the STP Rule maintained for a Message Type. Subsequently, the Product Message
mapping information for a particular Queue is used to determine the Module and the Product
(in case of FT) or the Product Category (in case of PC) to which the message needs to be
routed. Mapping a particular message type for a particular branch to different Queues is
possible.
10-17
10.8 FT Upload Process
The FT upload process is explained in detail in the chapter on FT Upload. The same process
gets invoked automatically by the STP process also. The message upload process, described
in the previous section, ends with the population of data in the FT upload tables. During the
STP process, the next step is the invoking of the FT contract upload function automatically.
This function reads the contents of the FT upload tables and creates FT contracts in the
system. Once the FT upload process has created a contract, the rest of the life-cycle
processing of such contracts (which have come through STP) is identical to contracts created
from the Oracle FLEXCUBE front-end or through FT upload.
10.9 Operations on Incoming Message
Oracle FLEXCUBE lets you perform a variety of operations on the incoming messages, such
as suppression, amendment, authorization, etc. This section describes these workflow
aspects in some detail.
10.9.1
Handling Exceptions in STP Process (Repair of Messages)
The message upload process takes one message at a time and applies a sequence of logical
steps to derive information required to populate FT contract upload tables. In this process it
may encounter various errors. These may be due to errors in the incoming SWIFT message
itself or errors encountered in processing due to absence of proper maintenance or other
exceptional conditions.
If the message upload process encounters an error for a particular message, its processing
status is updated automatically to ‘Repair’ and the same is available for the user to view on
the incoming message browser. The user can then manually choose to take appropriate
action to rectify the situation. The user may choose to input the relevant FT contract (when
the message is in repair) manually through the regular contract input function provided by
Oracle FLEXCUBE. Alternatively, the user may also like to ’repair’ or correct the incoming
message and let Oracle FLEXCUBE try to process the message automatically again.
10.9.1.1 STP Repair Statistics Report
As discussed earlier, the Message Upload Function interprets the Incoming SWIFT Payment
Message received by your bank and propagates the interpreted messages into the Funds
Transfer (FT) Upload tables in the system. The various errors it encounters during this
process are logged in a separate table. Each error is identified by a unique number. The error
code and the possible reason for the error are also logged in the table.
You can choose to generate an ‘STP Repair Statistics Report’ from the data logged in the
table. Generating such a report will help you in identifying the causes for the errors. The report
is generated through Business Objects, a reporting tool. You can choose to generate the
report at any point or for a specific period.
10.9.2
Suppression of Incoming SWIFT Payment Messages
You can choose to suppress an Incoming SWIFT Payment Message with the following
statuses:
Repair
Unprocessed
Pending Cover Matching
10-18
All Incoming SWIFT Messages are displayed in the Incoming Message Browser. To suppress
a message, click ‘Suppress’ button in the Incoming Browser. The ‘Suppress Message’ screen
is displayed.
The following options are available to suppress a Payment Message:
Suppress Message Generation
Suppress Full
No Suppress
Specifying the ‘Suppress Message Generation’ option
If you select this option, Oracle FLEXCUBE will stop the generation of the Payment Message.
However, the system will post the necessary accounting entries for the messages being
suppressed.
Indicating the ‘Suppress Full’ option
If you select the full suppress option for a message, the system will not post the related
accounting entries. Advice generation will also be stopped. In other words, the system will not
pick up the Payment Message for any further processing.
Specifying the ‘No Suppress’ option
A message marked with the ‘No Suppress’ option will be processed like any other normal
Incoming SWIFT Payment Message.
Specifying the remarks for a suppressed message
You can specify the reason for suppressing a Payment Message in the ‘Remarks’ field.
Click ‘Ok’ button to save the details and return to the Incoming Message Browser.
Authorizing Suppressed Message
A different user with appropriate rights will be required to authorize the suppressed Payment
Messages. The system will display an appropriate warning message to the authorizer
indicating that the Payment Message has been suppressed.
The system will maintain a detailed audit trail along with the suppression remarks for all
Incoming SWIFT Payment Messages that have been suppressed.
10-19
Note
You will not be allowed to suppress Incoming SWIFT Payment Messages that have already been processed by the system.
10.9.3
Verifying and Authorizing an Incoming SWIFT Payment Message
Oracle FLEXCUBE allows you to amend the details of an Incoming SWIFT Payment Message
that is marked for repair.
At the time of amending a SWIFT payment message, you can specify the details of the
amendments along with the reasons for carrying out the amendments.
Authorizing Amended SWIFT Payment Message
All the amendments made to a SWIFT payment message, have to be authorized by a user
with appropriate authorization rights.
At the time of authorizing, Oracle FLEXCUBE will display the earlier version of the SWIFT
payment message along with the amended version, in the same window. A list of all the errors
due to which the message was marked for repair is also displayed. The authorizer can view
all the errors and also verify the changes that were made to correct them. After verification,
if all the details are found to be appropriate, the message is authorized.
Oracle FLEXCUBE maintains a detailed audit log of all amended SWIFT Payment Messages.
The following details are captured for each authorized message:
User ID of the person who authorized the amendments
Date and time of authorization
Note
At any point during the verification and authorization process, the authorizer can choose
to cancel the entire operation without changing the status of the message.
10.9.3.1 Rejecting Amended SWIFT Payment Message
During verification, if the amendments are found to be inappropriate or wrong, the authorizer
can choose to reject the message. The authorizer should specify the reasons for rejection, as
mandatory information.
The STP process will update the status of a SWIFT payment message as rejected, specifying
the reasons for rejection. A rejected message is marked as one that has ‘failed authorization’.
You can perform a query on all messages that have failed authorization, in the Incoming
Message Browser.
Oracle FLEXCUBE maintains a detailed audit log of all SWIFT Payment Messages that are
rejected along with the reasons for rejection.
10.9.3.2 Amending or Deleting Incoming SWIFT Payment Messages
Any user with appropriate rights can amend or delete a SWIFT Payment Message that has
failed authorization or is pending authorization.
10-20
Note
Oracle FLEXCUBE will not allow you to delete the first original version of a SWIFT Payment Message received from the SWIFT network.
10.10 Payment Transaction Status Management
The status of a funds transfer transaction indicates the stage in the processing cycle in which
the transaction currently stands. The status also indicates the operations that are possible on
a funds transfer transaction with respect to its processing.
Funds transfers that have been uploaded through the gateway tables using the STP (Straight
Through Processing) function can be in any of the following statuses:
Processed
Unprocessed
Repair
Suppressed
Pending Cover Matching
Funding Exception
Pending Authorization
Failed Authorization
The table below explains the operations that are possible on a funds transfer transaction
when it is in any of the states listed above:
Status
End
State?
Possible Course of
Action
Possible Result
Processed
Yes
None
None
Repair
No
Manual Repair of message
Post correction message
goes through the STP process again.
Suppress the entire
message
The entire message is suppressed and no further
action is taken on the message
Suppress the resultant
outgoing message but
process the accounting
Resultant funds transfer
contract is created but the
messaging is suppressed
Suppressed
Yes
None
None
Funding Exception
No
Force the message
through
Transaction will go through
with override
Pending
Release
No
‘Force Release’ the
message
Transaction will go through
with override
No
Leave the message as it
is; message gets picked
up on the value date
Funds transfer contract is
created on the value date
10-21
Pending Authorization
No
Failed Authorization
No
Pending Cover
Match
No
Unprocessed
No
Authorize the transaction
Message is picked up
for processing
The system maintains queues of transactions in each status
To view a summary of funds transfer transactions queues, use the Payment Summary screen.
You can set certain filters as follows for viewing the details on this screen:
Contract Status
Status
Source Reference Number
Credit Currency
Authorization Status
Contract Reference Number
Debit Currency
Once you have set the filters you want, click ‘Refresh’ button to view the payment summary.
The following details are displayed for each transaction in a queue:
The SWIFT BIC of the sender, if applicable
The sender’s unique identifying reference number for the transaction, (corresponding to
Field 20 of Incoming SWIFT Message) or the User Reference Number assigned to the
transaction by Oracle FLEXCUBE
The Transaction Reference Number assigned by Oracle FLEXCUBE
If applicable, the SWIFT Message Type - MT 100 or MT 103
The debit currency
Transfer amount
Transfer Value Date
Debit account
Error Code
The most recent user who modified the record of the transaction
10.11 Payments Summary Dash Board
To view a summary of funds transfer transactions that has been sorted according to status
queues, you can also use the Payments Dash Board screen. You can invoke the ‘Dash Board
Summary’ screen by typing ‘FTDDSHBD’ in the field at the top right corner of the Application
tool bar and clicking the adjoining arrow button.
In this screen, the following details are displayed for each type of queue:
The name of each process queue or status
10-22
The time stamp corresponding to the last action performed for the queue
Number of Outstanding Items in a Queue
The Inbound Message Count (this is the number of inbound SWIFT messages received
on the application date after the Beginning of Day Run)
The time when the Summary Dash Board Information was last refreshed
Currency
You can choose to view the transaction queues summary for any transaction currency, or for
all currencies.
Type
To view transaction status queues for manually entered funds transfers, chose ‘Manual’ in the
‘Manual/STP’ field. To view transaction status queues for funds transfers uploaded through
the STP function, chose ‘STP’ in the ‘Manual/STP’ field. To view both types, choose ‘Both’.
When you choose, all transaction queues pertaining to the type selected are displayed on the
screen.
Viewing Transaction Summaries
To view the transaction summary for each transaction queue for STP transactions, click
‘Message’ button. The Incoming Browser is displayed.
Refreshing the Dash Board Information
You can refresh the information displayed in the Dash Board by clicking the ‘Refresh’ button
in the Dash Board screen.
10.12 Examples of STP
This Section contains examples of incoming payment messages, a brief illustration of the
processing logic and an indication of the resulting outgoing messages and the accounting
entries that would get passed. All the examples below draw upon a common set of
maintenances assumed to have been done in the system as detailed below:
10-23
10.12.1 Maintenance (assumed for illustration purposes)
Assume that the following maintenance has been done in the system.
10-24
10.12.1.1 Customers and Customer Accounts
Custo
mer
Name
Customer
type
CIF ID
BIC
MIDLGB
2A
Accou
nt Type
Acco
unt
Ccy
Current
GBP
MIDLGB00BKCU
1GBPxA
Account ID
Bank
MIDLAND
BANK
MIDLB0
0
Individual
PETER
SMITH
PSMIT1
0
Savings
GBP
PSMIT10INDSB1
GBPaD
Individual
JOHN
BULL
JBULL1
0
Savings
USD
JBULL10INDSB1
USDaD
CITIBANK
CITIB1
0
CITIUS3
3
Nostro
USD
CITIB10NOSTR
OUSDnA
BARCLAYS
BANK,
LONDON
BARCB
90
BARCG
B2A
Nostro
GBP
BARCB90NOST
ROGBPxT
Bank
Bank
10.12.2 FT Products
Product
code
Product type
FTNN
Internal funds transfer
FTIN
Incoming funds transfer
FTOC
Outgoing Customer transfer
FTOB
Outgoing Bank transfer
10.12.3 BIC codes
Bank Name
BIC code
ABN Amro, Frankfurt
ABNADEFF
Hambros Bank, London
HAMBGB00
Standard Bank, London
STDBGB20
ABN Amro, New York
ABNAUS33
Chase Manhattan, New
York
CHASUS33
10.12.4 Settlement Instructions
Assume that the following settlement instructions have been maintained:
10-25
Counte
rparty
type
CIF ID /
BIC
Currenc
y
BIC
HAMBGB
00
CIF
Pay account
Receive account
GBP
BARCB90NOSTROGB
PxT
BARCB90NOSTROGB
PxT
PSMIT10
GBP
PSMIT10INDSB1GBPa
D
PSMIT10INDSB1GBPa
D
CIF
JBULL10
USD
JBULL10INDSB1USDa
D
JBULL10INDSB1USDa
D
CIF
MIDLB00
GBP
MIDLGB00BKCU1GBP
xA
MIDLGB00BKCU1GBP
xA
10.12.5 Other maintenance
10.12.6
Branch code
Branch
BIC
010
FCBKGB10
10.13 Example 1: Internal Transfer
In this example, an incoming payment message results in an internal funds transfer i.e. both
the debit and credit accounts are serviced by this branch. Thus, the bank here acts as the
account with institution.
10.13.1 Incoming Message
Message type: MT 103
Description
Tag
Contents
Sender
1:
MIDLGB2A
Receiver
2:
FCBKGB10
Transaction reference number
:20:
020615/025/4214
Value date, amount, currency
:32A
:
020615GBP2000
Ordering customer
:50:
STEPHEN LEE
Beneficiary customer
:59:
/
PSMIT10INDSB1GBPaD
10-26
10.13.2 Interpretation of Message
Debit Account:
Since fields 72, 54 and 53 are absent from the incoming payment message, Oracle
FLEXCUBE tries to derive the debit account from the Sender’s BIC.
In this case, the sender is a bank customer and has an account with this branch in the
currency of payment.
After successful validation of the customer, account, settlement instructions etc, the debit
account is derived as MIDLGB00BKCU1GBPxA.
Credit Account
Since fields 56 and 57 are absent, Oracle FLEXCUBE derives the credit account from Field
59 (Beneficiary customer).
In this case, the account is a valid account for this branch. On successful validation, the credit
account is derived as PSMIT10INDSB1GBPaD.
Product
In this case, both parties are customers of the bank, and have accounts in the payment
currency. No external party is involved in the transaction, and therefore the transfer is an
internal one.
An incoming payment message resulting in an internal transfer has been mapped to product
FTNN.
Thus, the contract is created under the product FTNN.
Results
Thus, the following contract results from the incoming MT 103.
Product
FTNN
Contract reference number
000FTNN021660152
User reference number
020615/025/4214
Dr currency
GBP
Dr amount
2000
Dr branch
010
Dr account
MIDLGB00BKCU1GBPx
A
Cr currency
GBP
Cr amount
2000
Cr branch
010
Cr account
PSMIT10INDSB1GBPaD
10-27
Value date
15-JUN-2002
The accounting entries passed would be:
D
r
MIDLGB00BKCU1GBPx
A
GB
P
200
0
C
r
PSMIT00INDSB1GBPaD
GB
P
200
0
A credit advice will be sent to Peter Smith, and a debit advice to Midland Bank.
10.14 Example 2: Incoming Transfer
In this example, an incoming payment message instructs the bank to receive funds from its
USD Nostro agent (Citibank) and to credit the funds to its customer. Thus, the message
results in an Incoming funds transfer, with the bank acting as the account with institution.
Incoming Message
Message type: MT 100
Description
Tag
Contents
Sender
1:
ABNADEFF
Receiver
2:
FCBKGB10
Transaction reference number
:20:
020615/AXT/0009
Value date, amount, currency
:32A
:
020615USD15000,
Ordering customer
:50:
STEPHEN LEE
Sender’s correspondent
:53A
:
CITIUS33
Beneficiary customer
:59:
/
JBULL10INDSB1USDaD
Interpretation of Message
Debit account:
Since fields 72 and 54 are absent from the incoming message, Oracle FLEXCUBE considers
field 53A for the derivation of the Debit account.
In this case, the BIC maps on to the USD Nostro for the bank. Oracle FLEXCUBE performs
various validations, such as whether the sender (ABN Amro) is authorized to specify this
account as the debit account. After successful validations, the debit account is derived as
CITIB10NOSTROUSDnA.
10-28
Note
Citibank would also send an MT 202 to the bank, confirming that the funds have been received and credited to the bank’s vostro account.
Credit account:
Since fields 56 and 57 are not present, the credit account is to be derived from field 59. Based
on the given account number, the credit account is derived as the USD savings account of
John Bull.
Product:
In this case, the ultimate beneficiary’s account belongs to this branch, whereas the debit
account is a Nostro. Thus, it is an incoming transfer. Based on the rules maintained, Oracle
FLEXCUBE will pick up the relevant Incoming product, and create a new contract.
Results
The following contract results from the above MT 103.
Product
FTIN
Contract reference number
000FTIN021660837
User reference number
020615/AXT/0009
Dr currency
USD
Dr amount
15000
Dr branch
010
Dr account
CITIB10NOSTROUSDn
A
Cr currency
USD
Cr amount
15000
Cr branch
010
Cr account
JBULL10INDSB1USDaD
Value date
15-JUN-2002
The accounting entries passed are:
D
r
CITIB10NOSTROUSDn
A
US
D
1500
0
C
r
DAO GL
US
D
1500
0
D
r
DAO GL
US
D
1500
0
10-29
C
r
JBULL10INDSB1USDaD
US
D
1500
0
John Bull would receive a credit advice from the bank.
10.15 Example 3: Outgoing Customer Transfer
The incoming payment message in this example instructs the bank to credit funds to the
account of Ben Jones with Midland Bank.
Since the ultimate beneficiary is not a bank customer, this results in an outgoing customer
transfer. However, since the account with institution has an account with the bank, no cover
is required.
Incoming Message
Message type: MT 103
Description
Tag
Contents
Sender
1:
ABNAUS33
Receiver
2:
FCBKGB10
Transaction reference number
:20:
020630/DE-3275
Bank Instruction Code
:23E
:
SPRI
Value date, amount, currency
:32A
:
020630GBP4000,
Ordering customer
:50K
:
STEPHEN LEE
Sender’s correspondent
:53A
:
CHASUS33
Receiver’s correspondent
:54A
:
BARCGB2A
Account with institution
:57A
:
MIDLGB2A
Beneficiary customer
:59:
/
BENJONESGBP2148
Details of charges
:71A
:
OUR
10-30
Interpretation of Message
10.15.0.1 Debit Account:
In this message, the debit account is derived from field 54. After performing the required
validations, this is taken as the nostro account (BARCB90NOSTROGBPxT)
Note
Barclays would also send an MT 202 to the bank, confirming that the funds have been received and credited to the bank’s vostro account.
Credit Account:
Since field 56 is absent, the Cr account in this case is derived from the BIC in field 57A of the
incoming MT 103.
This BIC (MIDLGB2A) has a CIF ID linked to it, and has a valid account in the transfer
currency. Thus, the credit account in this case is MIDLGB00BKCU1GBPxA.
Product:
This is an outgoing customer transfer, since the ultimate beneficiary is not a customer of this
bank. Based on the rules maintained, the contract will be created under the product FTOC.
Result
The following are the contract details:
Product
FTOC
Contract reference number
000FTOC021810006
User reference number
020630/DE-3275
Dr currency
GBP
Dr amount
4000
Dr branch
010
Dr account
BARCB90NOSTROGBPx
T
Cr currency
GBP
Cr amount
4000
Cr branch
010
Cr account
MIDLGB00BKCU1GBPxA
Value date
30-JUN-2002
The accounting entries passed are:
10-31
D
r
BARCB90NOSTROGBPx
T
GB
P
400
0
C
r
MIDLGB00BKCU1GBPxA
GB
P
400
0
An MT 103 (customer transfer) is sent to Midland Bank. Since there is a direct accounting
relationship between the banks, a cover is not required.
The contents of the outgoing message are shown below:
MT 103 sent to Midland Bank
Description
Tag
Contents
Sender
1:
FCBKGB10
Receiver
2:
MIDLGB2A
Transaction reference number
:20:
000FTOC021810006
Value date, amount, currency
:32A
:
020630GBP4000,
Ordering customer
:50K
:
STEPHEN LEE
Beneficiary customer
:59:
/
BENJONESGBP2148
10.16 Example 4: Outgoing Customer Transfer with Cover
The message below requests the bank to credit funds to Ben Jones’ account with Standard
Bank, through Hambros Bank.
The bank therefore sends a payment instruction to Hambros Bank; however, since there is no
direct account relationship between the banks, the payment is made through the bank’s GBP
Nostro agent, Barclays. A cover payment message is therefore sent to Barclays.
Incoming Message
Message type: MT 103
Description
Tag
Contents
Sender
1:
MIDLGB2A
Receiver
2:
FCBKGB10
Transaction reference number
:20:
020630/DE-3271
Bank Instruction Code
:23E
:
SPRI
10-32
Value date, amount, currency
:32A
:
020630GBP3821,50
Ordering customer
:50K
:
STEPHEN LEE
Intermediary
:56A
:
HAMBGB00
Account with institution
:57A
:
STDBKGB20
Beneficiary customer
:59:
/
BENJONESGBP453
Details of charges
:71A
:
OUR
Interpretation of Message
Debit Account
Here, the debit account is derived from the sender’s BIC since fields 55, 72, 54 and 53 are
absent. As in the previous example, the debit account is derived as
MIDLGB00BKCU1GBPxA.
10.16.0.1 Credit Account
Here, the Cr account is derived from the BIC in field 56 of the incoming MT 103.
The BIC (HAMBGB00) does not have a CIF ID linked to it, since this is not a bank customer.
However, since standard settlement instructions have been maintained for this BIC, the credit
account is derived from these. In this case, the credit account is maintained as the bank’s
GBP nostro i.e. account BARCB90NOSTROGBPxT with Barclays Bank, London.
Thus, the credit account in this case is BARCB90NOSTROGBPxT.
10.16.0.2 Product
This is an outgoing customer transfer. Based on the rules maintained, the contract will be
created under the product FTOC.
Result
The following are the contract details:
Product
FTOC
Contract reference number
000FTOC021810005
User reference number
020630/DE-3271
Dr currency
GBP
Dr amount
3821.50
Dr branch
010
10-33
Dr account
MIDLGB00BKCU1GBPxA
Cr currency
GBP
Cr amount
3821.50
Cr branch
010
Cr account
BARCB90NOSTROGBPx
T
Value date
30-JUN-2002
The accounting entries passed are:
D
r
MIDLGB00BKCU1GBPxA
GB
P
3821.5
0
C
r
BARCB90NOSTROGBPx
T
GB
P
3821.5
0
The messages sent out are:
1. An MT 103 (customer transfer) to Hambros Bank, London.
2. A cover MT 202 (bank transfer) to Barclays Bank, London.
The contents of the outgoing messages are shown below:
MT 103 sent to Hambros Bank
Description
Tag
Contents
Sender
1:
FCBKGB10
Receiver
2:
HAMBGB00
Transaction reference number
:20:
000FTOC02181000
5
Value date, amount, currency
:32A
:
020630GBP3821,50
Ordering customer
:50K
:
STEPHEN LEE
Sender’s correspondent
:53A
:
BARCGB2A
Account with institution
:57A
:
STDBKGB20
Beneficiary customer
:59:
/
BENJONESGBP453
Description
Tag
Contents
Sender
1:
FCBKGB10
MT 202 (cover) sent to Barclays
10-34
Receiver
2:
BARCGB2A
Transaction reference number
:20:
000FTOC02181000
5
Related reference number
:21:
020630/DE-3271
Value date, amount, currency
:32A
:
020630GBP3821,50
Account with institution
:57A
:
HAMBGB00
Beneficiary institution
:58A
:
STDBKGB20
10.17 Example 5: Outgoing Bank Transfer
In this example, all the parties to the transfer are banks. The incoming message (MT 202:
General Financial Institution Transfer) instructs the bank to credit funds to Hambros Bank.
Since Hambros Bank does not have a direct account relationship with the bank, the payment
is routed through Barclays. Thus, the incoming message here results in an Outgoing Bank
Transfer, with a cover.
Incoming Message
Message type: MT 202
Description
Tag
Contents
Sender
1:
MIDLGB2A
Receiver
2:
FCBKGB10
Transaction reference number
:20:
020630/BK-3110
Related reference
:21:
NONREF
Value date, amount, currency
:32A
:
020630GBP50000
,
Beneficiary institution
:58:
HAMBGBXX
Interpretation of Message
Debit Account:
In this message, the debit account is derived from the sender BIC. After performing the
required validations, this is taken as the customer account (MIDLGB00BKCU1GBPxA)
Credit Account:
Since field 56 and 57 are absent, the Cr account in this case is derived from the BIC in field
58A of the incoming MT 202.
10-35
The BIC (HAMBGB00) does not have a CIF ID linked to it, since this is not a bank customer.
However, since standard settlement instructions have been maintained for this BIC, the credit
account is derived from these. In this case, the credit account is maintained as the bank’s
GBP nostro i.e. account BARCB90NOSTROGBPxT with Barclays Bank, London.
Thus, the credit account in this case is BARCB90NOSTROGBPxT.
Product:
This is an outgoing bank transfer, since the ultimate beneficiary institution is not a customer
of this bank. Based on the rules maintained, the contract will be created under the product
FTOB.
Result
The following are the contract details:
Product
FTOC
Contract reference number
000FTOB021815458
User reference number
020630/BK-3110
Dr currency
GBP
Dr amount
50000
Dr branch
010
Dr account
MIDLGB00BKCU1GBPxA
Cr currency
GBP
Cr amount
50000
Cr branch
010
Cr account
BARCB90NOSTROGBPx
T
Value date
30-JUN-2002
The accounting entries passed are:
D
r
MIDLGB00BKCU1GBPxA
GB
P
5000
0
C
r
BARCB90NOSTROGBPx
T
GB
P
5000
0
An MT 202 is sent to Barclays Bank. The contents of this message are:
MT 202 sent to Barclays Bank
Description
Tag
Contents
Sender
1:
FCBKGB10
10-36
Receiver
2:
BARCGB2A
Transaction reference number
:20:
000FTOB02181545
8
Related reference
:21:
020630/BK-3110
Value date, amount, currency
:32A
:
020630GBP50000,
Beneficiary institution
:58A
:
HAMBGBXX
10.18 Viewing Funds Transfer Multi Customer Summary
You can generate a consolidated message for all the funds transfer transactions grouped
under a consolidated reference maintained in the system using ‘Funds Transfer Multi
Customer ‘ screen. You can invoke the ‘Funds Transfer Multi Customer Summary’ screen by
typing ‘FTSTCONS’ in the field at the top right corner of the Application tool bar and clicking
the adjoining arrow button.
Here you can query on records based on the following criteria:
Consolidated Reference
Multi credit Reference Number
Product Code
Consolidation Status
Settlement Account
Settlement Currency
Value Dates
10-37
11. Processing of Non SWIFT Incoming Payment
Messages
11.1 Introduction
One of the most important features of the Funds Transfer module of Oracle FLEXCUBE is the
facility of processing incoming payment messages to their logical end without manual
intervention. Even though the term Straight Through Processing (STP) refers to the
processing of all sorts of incoming messages (without manual intervention), in this chapter,
the term refers to STP of non SWIFT incoming Payment Messages alone.
The Common Payment Gateway infrastructure is used to upload data into FT and PC
modules from sources that supply the data in a non SWIFT Format. Such non SWIFT sources
will populate a single Oracle FLEXCUBE Upload data structure. Subsequently you can define
rules to determine the module to which the uploaded contract belongs viz. PC or FT.
11.2 Maintaining Common Payment Gateway Message Parameters
For non SWIFT, incoming, payment message processing of uploaded funds transfer
contracts, you would need to maintain all the reference information that you would typically
maintain for normal funds transfer contracts, maintenances specific to straight through
processing and a few other parameters which are specific to non SWIFT incoming payment
message processing.
The basic information to be set up before the Common Payment Gateway message becomes
operational can be broadly classified under:
FT Product Maintenance
Settlement Instructions Maintenance
BIC Directory Maintenance
Messaging Maintenance
Media Maintenance
Queue Maintenance
Customer address maintenance
Message Format Maintenance
Product-Queue Message Type Mapping Maintenance
STP Error Codes Maintenance (User Defined Error Codes)
STP Rule Maintenance
Branch-level STP Preferences
Upload Source Preferences Maintenance
External Account Maintenance (Reconciliation sub-system) Maintenance
Overrides Maintenance
Maintenances specific to Non SWIFT Incoming Payment Messages
Maintaining Common Payment Gateway Message
Capturing preferences specific to common payment gateway messages
Maintaining Labels for the user defined fields for common payment gateway messages
11-1
11.2.1
Maintaining Common Payment Gateway Messages
You can invoke the ‘Common Payment Gateway Messages’ screen by typing ‘MSDCOMPY’
in the field at the top right corner of the Application tool bar and clicking the adjoining arrow
button.
In the Common Payment Gateway Message Type screen, you have to maintain the following
information:
Message Type
Specify the message type applicable for Common Payment Gateway Processing.
For more details on SEPA transactions, refer section ‘Handling SEPA Credit Transfers and
Direct Debits’ in the chapter ‘Processing a Payment or Collection Transaction’ in Payment and
Collections User Manual.
Description
Enter a brief description of the message type maintained.
11.2.1.1 Queues Maintenance
For more information about the Queues Maintenance screen, refer the STP chapter of this
module.
11.2.1.2 Mapping Message Types to Products and Queues
For more information on Mapping Message Types to Product and Queues, refer the STP
chapter of this module.
11.2.1.3 Maintaining Branch-Level STP Preferences
For more information on Maintaining Branch level STP preferences, refer the STP chapter of
this module.
11-2
11.2.1.4 STP Rule Maintenance
For more information on STP Rule Maintenance, refer the STP chapter of this module.
11.2.1.5 Maintaining Error Codes
For more information on Error Code Maintenance, refer the STP chapter of this module.
11.2.1.6 UDF Label Maintenance
You can maintain labels for the thirty user defined fields of Common Payment Gateway
messages in the UDF Label Mapping screen. You can invoke the ‘Common Payment UDF
Label Mapping Maintenance’ screen by typing ‘MSDCPYUD’ in the field at the top right corner
of the Application tool bar and clicking the adjoining arrow button.
You need to maintain the following information:
Message Type
Choose the message for which you need to maintain a label. Select the appropriate one from
the adjoining option list.
Description
This will display a brief description of the chosen message type.
Field Number
Enter a UDF serial number ranging between one and thirty.
Field Label
Specify the label you wish to assign for the UDF. This label will be populated in the Common
Payment Message Browser screen.
11.2.1.7 Maintaining Common Payment Gateway Message Type Preferences
You can maintain the details of the amendable fields for a common payment gateway
message type in the Common Payment Gateway Message Type Preferences screen. You
11-3
can invoke the ‘Common Payment Message Type Preference Maintenance’ screen by typing
‘MSDMPYPR’ in the field at the top right corner of the Application tool bar and clicking the
adjoining arrow button.
The following details need to be maintained:
Message Type
Choose the message type for which maintenance has to be performed. The adjoining option
list displays all valid message types for the chosen source will be available for selection.
Field Name
Choose the field which you want to qualify as ‘amendable’. The adjoining option list displays
all the valid Common Payment Gateway fields.
11.3 Viewing Payment Gateway Browser
The Payment Gateway Browser acts as the repository of all common payment gateway
transactions.
11-4
You can invoke the ‘Common Payment Message Browser Summary’ screen by typing
‘MSSPMBRW’ in the field at the top right corner of the Application tool bar and clicking the
adjoining arrow button.
You can set certain filters as follows for viewing the details on this screen:
Authorization Status
File Reference Number
Version Number
Source Code
Record Status
External Reference
Branch Code
Once you have set the filters you want, click ‘Search’ button to view the payment summary.
The screen will display a summarized version of the upload instructions and will contain the
following details:
Authorization Status
Record Status
File Reference Number
External Reference
Version Number
Branch Code
Message Type
Source Code
Queue
11-5
Amount
Value Date
Currency
Status
Error Reason
Contract Reference
Message Reference
Message Name
Message Creation Date
You can do the following operations in the Common Payments Gateway Browser:
Unlock –
This operation will allow amendment of contract details in the CPG browser. The
fields allowed for amendment will be based on the field list maintained in the
Message Type preferences maintenance.
–
The contracts in the repair status can be amended and a new version with the
changes will be created with status as ‘Unprocessed’.
–
The unauthorized contracts can be changed and the latest version of the contract
will be updated with the changes.
Delete –
–
This operation will allow deletion of contracts from the CPG browser. Only
unauthorized contracts will be allowed for deletion.
Close –
–
The contracts in the repair status can be rejected in the common payments gateway
message browser.
–
On rejection the status of the message will be marked as rejected and reject
message will be generated if the same is specified in the message type
maintenance.
–
This operation will create a new version with the status change and should be
authorized.
–
No further operation will be allowed on contracts with status ‘Rejected’
–
The following reject messages will be generated in the Common Payments
Gateway browser on reject operation -
–
Customer payment status report – (pain.002.001.02) for customer initiated
payments and direct debits.
–
Reject payment status Report – (pacs.002.001.02) for indirect participants outgoing
payments and outgoing direct debits.
Re-open –
–
This operation will mark the queue status as ‘Waiting for queue exchange’.
–
This can be done only on contracts with status as ‘Repair’.
–
This operation will create a new version with status as ‘Waiting for Queue
Exchange’ and needs to be authorized.
Authorize –
–
This operation will authorize an unauthorized contract.
–
Contracts that are repaired or closed or reopened need to be authorized.
You can query for common payment messages with different criteria by clicking the ‘Search’
button.
11-6
To get a detailed view of an upload instruction, click the ‘View’ button. It invokes the Common
Payment Message Browser screen.You can also invoke this screen by typing 'MSDPMBRW'
in the field at the top right corner of the application toolbar and clicking the adjoining arrow
button..
The following details pertaining to an upload transaction will be displayed in the Common
Payment Message Browser screen:
Source Code
The source code is defaulted from the upload instruction and cannot be overridden by you
during the edit operation.
External Reference
The system defaults the external reference number of the source from which the contract has
been uploaded.
Status
The transaction status viz. Processed, Repair, Unprocessed, Waiting for Queue is system
generated and you cannot override it during the edit operation.
Queue
The system displays the queue number of the transaction. This number is generated by the
system based on the rule definition for a source. You cannot override it during the edit
operation.
Amount
The transaction amount will be displayed here.
This is defaulted from the original instruction and you can modify this during edit operation if
it has been defined as ‘amendable’ in the maintenance.
Error Reason
This will display the reason for the error if any. You cannot override this value during the edit
operation.
11-7
Currency
The currency of the customer’s account will be displayed here.
This is defaulted from the original instruction and you can modify this during edit operation if
it has been defined as ‘amendable’ in the maintenance.
Value Date
The value date of the transaction will be displayed here.
This is defaulted from the original instruction and you can modify this during edit operation if
it has been defined as ‘amendable’ in the maintenance.
Contract Reference
This system generates and displays the unique reference number which is used to identify the
contract. It is generated automatically and sequentially.
Instruction Date
The system displays the instruction date.
Message Type
Specify the message type applicable for Common Payment Gateway Processing.
Version
This will display the version number of the change. If there are no changes, the version
number will be 1 and for every change hence, it will be incremented with an audit trail.
11.3.1
Viewing ‘Main’ Tab Details
The following details of the transaction are displayed in the ‘Main’ tab of the Common
Payment Message Browser screen and can be modified if you have defined it as an
‘amendable’ field in the Message Type Maintenance.
Customer Account Number
Customer Currency
Customer Value Date
Customer Amount
Customer Bank Code
Exchange Rate
Remarks
Counterparty Account Number
Counterparty Currency
Counterparty Value Date
Counterparty Amount
Message Reference Number
Message name
Message Creation Date
File Reference Number
Service Identification
File Type
Customer consolidation required
Reject Code which will display the reject code
Reject Details
11-8
11.3.2
Reference Number
Originator Name
Originator Bank
Reject Code Additional
Debtor Reference Party
Creditor Reference Party
Bank Operation Code
Instruction Code
Service ID
UDF Details
Viewing ‘Additional’ Tab Details
The following details of the transaction are displayed in the ‘Additional’ tab of the Common
Payment Message Browser screen.
Note
You can amend most of the below mentioned fields if you have defined it as an ‘amendable’ field in the message type maintenance.
11.3.2.1 Viewing Transaction Details
Charge Bearer
This indicates which party will bear the charges associated with payment. This will always
have the value ‘SLEV’ for SCT and SDD.
Service Level Code
This indicates the service level rules under which the transaction should be processed.
11-9
Priority
This indicates the processing priority of the transaction.
Instructing bank
This indicates the bank sending the transaction. You cannot modify this field.
Instructed bank
This indicates the bank receiving the transaction. You cannot modify this field.
Settlement Method
This indicates the method used to settle the transactions. You cannot modify this field.
Settlement Account Number
This indicates the settlement account used for the message bulk. This is applicable only for
settlement method INDA or INGA.
Clearing System Id
This indicates the identification code of the clearing system. This is applicable only for
settlement method ‘CLRG’. You cannot modify this field.
Currency
This indicates the settlement currency used for the message bulk. This is applicable only for
settlement method INDA or INGA.
11.3.2.2 Viewing Beneficiary Details
Counterparty Type
This indicates the creditor identification as Organization Id or Private Id.
Counterparty Identification Type
This indicates the identification type of the creditor.
Counterparty Identification Value
This indicates the identification value for the type selected.
Customer Other ID Type
This indicates the type of other identification details.
Counterparty Identification Issuer
This indicates the identification issuer of the creditor.
Counterparty Birth City
This indicates the beneficiary's city of birth.
Counterparty Birth Country
This indicates the beneficiary's country of birth.
11.3.2.3 Viewing Customer Identification
Counterparty Type
This indicates the Debtor identification as Organization Id or Private Id.
Customer Identification Type
This indicates the identification type of the Debtor.
Customer ID Value
This indicates the identification value for the type selected.
11-10
Customer Other ID Type
This indicates the type of other identification details.
Customer ID Issuer
This indicates the identification issuer of the debtor.
Customer Birth City
This indicates the customer’s city of birth.
Customer Birth Country
11.3.3
This indicates the customer’s country of birth.Viewing
‘Other Details’ Tab
The following details of the transaction are displayed in the ‘Other Details’ tab of the ‘Common
Payment Message Browser’ screen.
11.3.3.1 Viewing Initiation Party Details
Initiating Party Name
This indicates the name of the initiating party.
Initiating Party Address Line 1
This Indicates address line1 (like the Door No., street name etc) of the initiating party
Initiating Party Address Line 2
This indicates address line2 (like the Location etc) of the initiating party.
Initiating Party Country
This indicates the country code of the initiating party.
Initiating Party Type
This indicates the initiating party identification as Organization Id or Private Id.
Initiating Party Id Type
This indicates the identification type of the initiating party.
11-11
Initiating Party Id Value
This indicates the identification value for the type selected.
Initiating Party Other Id Type
This indicates the type of other identification details.
Initiating Party Id Issuer
This indicates the Identification Issuer of the initiating party.
Initiating Party Birth City
This indicates the initiating party’s city of birth.
Initiating Party Birth Country
This indicates the initiating party’s country of birth.
11.3.3.2 Viewing Original Message Details
Original Message Name
This indicates the name identifier of the original message bulk. This is applicable only for
payment return/refund and payment status report. You cannot modify this value.
Message Reference Number
This indicates the reference number of the original message bulk. This is applicable only for
payment return/refund and payment status report. You cannot modify this value.
Original Source Reference
This indicates source reference number of the original transaction. You cannot modify this
field.
Original Settlement Date
This indicates the original settlement date of the rejected/recalled transaction. You cannot
modify this value.
Original Settlement Amount
This indicates the original settlement amount of the rejected/recalled transaction. You cannot
modify this value.
Original Settlement Currency
This indicates the currency of the rejected/recalled transaction. You cannot modify this value.
11.3.3.3 Viewing Mandate Details
Mandate ID
This indicates the reference of the direct debit mandate that has been signed by the debtor
and the creditor. You cannot modify this value.
Mandate Signature Date
This indicates the date on which the direct debit mandate has been signed by the debtor. You
cannot modify this value.
Mandate Amendment Indicator
This indicates if the mandate has been amended or not. You cannot modify this value.
Mandate Amendment Type
Indicates type of the mandate amendment.
11-12
Original Mandate ID
This indicates the mandate ID of the original mandate if the original mandate is amended. You
cannot modify this value.
Sequence Type
This indicates the direct debit sequence. The valid values are
FNAL - Final
FRST - First
OOFF - One Off collection
RCUR - Recurring
You cannot modify this value.
Original Debtor Bank
This indicates the original debtor bank. You cannot modify this field.
Original Debtor Account
This indicates the original debtor bank. You cannot modify this field.
11-13
11.3.3.4 Mapping between Common Payment Gateway Fields and FT Fields
Common Payment Gateway Field
Name
FT Field Name
Source Code
Source Code
Source Reference
Source Reference, User Reference
Customer Account Branch
If FT type is “O” or “N”, then it is Dr Account
Branch, else it is Cr Account Branch
Customer Account Number
If FT type is “O” or “N”, then it is Dr Account Number, else it is Cr Account Number
Customer Currency
If FT type is “O” or “N”, then it is Dr Currency, else
it is Cr Currency
Value Date
If FT type is “O” or “N”, then it is Dr Value Date,
else it is Cr Value Date
Amount
If FT type is “O” or “N”, then it is Dr Amount, else
it is Cr Amount
Exchange Rate
Exchange Rate
Counterparty Account Branch
If FT type is “I”, then it is Dr Account Branch, else
it is Cr Account Branch
Counterparty Account Number
If FT type is “I”, then it is Dr Account Number,
else it is Cr Account Number
Counterparty Currency
If FT type is “I”, then it is Dr Currency, else it is Cr
Currency
Counterparty Value Date
If FT type is “I”, then it is Dr Value Date, else it is
Cr Value Date
Amount
If FT type is “I”, then it is Dr Amount, else it is Cr
Amount
By Order Of
By Order Of
Our Correspondent Account
Our Correspondent Account
Our Correspondent
Our Correspondent
Receiver’s Correspondent
Receiver’s Correspondent
Account With Institution
Account With Institution
Beneficiary Account
Beneficiary Line 1
Beneficiary
Beneficiary
11-14
Bank Operation Code
Bank Operation Code
Instruction Code
Instruction Code
Related Reference
Not Mapped
Reject Code
Not Mapped
Reject Detail
Not Mapped
11.3.3.5 Common Payments Gateway Message Upload
Common Payments Gateway Messages upload will process the payment as an instrument if
an instrument type is linked as the product. In such a case, the instruments data store is
populated based on the mappings mentioned above and the system shall invoke the
instruments routine to upload the instrument record.
The upload of instruments with the following status will be through the common payments
gateway – INIT, LIQD, CNCL and LOST. The other operations of upload will include reversal
and amendment of issued drafts.
11.3.4
Maintaining ‘Other Details1’ Tab
You can maintain the following details of the SEPA transaction in the ‘Other Details1’ tab of
the ‘Common Payment Message Browser’ screen.
11.3.4.1 Maintaining Ultimate Debtor Identification Details
Id
Select the identification code of the ultimate debtor from the drop-down list. Following are the
options available in the drop-down list:
11-15
Organization Identification
Private Identification
Initiating Party Id Type
Specify the identification type of the ultimate debtor from the option list.
Id Value
Specify the identification value of the ultimate debtor.
Other Id Type
Specify the identification type of other identification specified for the ultimate debtor.
Customer Id Issuer
Specify the other identification type issuer of ultimate debtor.
Counterparty Birth City
Specify the city of birth of ultimate debtor.
Counterparty Birth Country
Specify the country of birth of ultimate debtor.
11.3.4.2 Maintaining Ultimate Creditor Identification Details
Id
Select the identification code of the ultimate creditor from the drop-down list. Following are the
options available in the drop-down list:
Organization Identification
Private Identification
Id Type
Specify the identification type of the ultimate creditor from the option list.
Id Value
Specify the identification value of the ultimate creditor.
Other Id Type
Specify the identification type of other identification specified for the ultimate creditor.
Counterparty Identification Issuer
Specify the other identification type issuer of ultimate creditor.
Counterparty Birth City
Specify the city of birth of ultimate creditor.
Counterparty Birth Country
Specify the country of birth of ultimate creditor.
11.3.4.3 Maintaining Purpose Details
Category Purpose
Specify the purpose of the credit transfer from the option list.
Purpose Type
Select the purpose type of the credit transfer from the drop-down list. Following are the
options available in the drop-down list:
Proprietary
11-16
Code
Purpose Value
Specify the purpose value of the credit transfer.
Local Instrument Type
Select the local instrument type from the drop-down list. Following are the options available
in the drop-down list:
Proprietary
Code
Local Instrument Value
Specify the local instrument value.
Electronic Signature
Specify the electronic signature of the debtor.
Compensation Currency
Specify the currency of the compensation amount that the debtor bank has to receive from
the option list.
Note
It should always be Euro (EUR)
Compensation Amount
Specify the amount that the debtor bank has to receive from the creditor bank.
Note
It should always be Euro (EUR)
11.3.4.4 Maintaining Creditor Scheme Details
Id
Select the scheme identification code of the creditor from the drop-down list. Following are the
options available in the drop-down list:
Private Identification
Scheme Id Type
Specify the scheme identification type of the creditor from the option list.
Scheme Id Value
Specify the scheme identification value of the creditor.
Scheme Type
Specify the scheme type of the creditor.
11.3.4.5 Maintaining Original Creditor Scheme Details
Id
Select the scheme identification code of the original creditor from the drop-down list.
Following are the options available in the drop-down list:
Private Identification
11-17
Name
Specify the name of the original creditor.
Id Type
Specify the scheme identification type of the original creditor from the option list.
Id Value
Specify the scheme identification value of the original creditor.
Scheme Type
Specify the scheme type of the original creditor.
11.4 Viewing Incoming File Details
You can view the details of incoming files received by Oracle FLEXCUBE using ‘Payment
Gateway - Incoming File Details’ screen. To invoke this screen, type ‘PCSSINFD’ in the field
at the top right corner of the application toolbar and click the adjoining arrow button.
You can search for the incoming files based on one of more of the following parameters:
Service type, whether FT or PC
File reference
Sender of the file
Whether customer consolidation required or not
Once you have specified the search parameters, click ‘Search’ button. The system displays
the following details of the incoming files that match with the search criteria.
Service type
File reference
11-18
File type
File date
Sender
Receiver
File business date
File cycle
Rounding indicator
Original reference
Original file name
File reject code
Total instrument bulks
File status
Error code
Error parameters
Customer consolidation required or not
11-19
12. Annexure A - Accounting Entries and Advices for
FTs
12.1 Accounting Entries for FTs
This section contains details of the suggested accounting entries that can be set up, for the
FT module of Oracle FLEXCUBE. The details of the suggested accounting entries are listed
event-wise.
12.2 FT Events
The following is an exhaustive list of events, related advices that are supported for Funds
Transfer contract.
Event
Event
Description
Advices
Advice Description
INIT
Initiation of an FT
CHARGE_CLAIM
MT 191 - Charge claim advice
sent to the previous bank in the
chain to claim charges due to
our bank.
INIT
Initiation of an FT
DEBIT_ADVICE
Debit advice sent to the customer upon debiting the customer account with the transfer
amount.
INIT
Initiation of an FT
PAYMENT_MESSAG
E
Payment Messages are sent
depending on the transfer type
being processed. Listed below
are the various payment messages that can be sent while
processing different types of
FTs:
MT100 - Customer Transfer
MT103 - Multiple customer
transfer with cover
MT202 – Bank Transfer/Cover
MT200 -.Bank Transfer for own
account
MT900 - Confirmation of Debit
MT910 - Confirmation of Credit
INIT
Initiation of an FT
RECEIVE_NOTICE
MT 210 – Receiver’s Notice
INIT
Initiation of an FT
DEBIT_ADVICE
When charges for cancellation
have been defined the Debit
Advice is sent to the Customer
after debiting the customer
account.
12-1
CANC
Cancellation of
Banker’s Check
STOP_PMNT
MT 111 - Banker’s check cancellation advice is sent to the
SC from the SB.
LIQD
Liquidation
CREDIT_ADVICE
Advice sent to the Beneficiary
upon crediting the transfer
amount to the Beneficiary
account.
REVR
Reversal
STOP_PMNT
MT 111 - Banker’s check cancellation advice is sent to the
correspondent bank provided
the MT 110 (bankers check) has
already been generated and the
cancellation advice has not
been generated through any
other event.
12.3 Advice Tags
The following are the advice wise advice tags that are supported for Funds Transfer contract.
12-2
12.3.1
CHARGE_CLAIM
Advice Tags
Description
SWIFT
12.3.2
DEBIT_ADVICE
Tab/Button-Field
Name
VARCHA
R/
Number/
Date
Leng
th
Advice Tags
Description
_CONTRACTREFN
O_
Contract Reference
Number
Fund Transfer-Contract Input ScreenReference Number
VARCHAR
16
_USERREFNO_
User Reference
Number
Fund Transfer-Contract Input ScreenUser Reference
VARCHAR
16
_PRODDESC_
Product Description
Fund Transfer-Contract Input ScreenProduct Description
VARCHAR
105
_SLOGAN_
Product Slogan
Fund TransferProducts-DetailedSlogan
VARCHAR
255
_CUSTOMER_
Receiver ID
Fund Transfer-Contract Input ScreenMain Tab-Debit
Account
VARCHAR
9
_CUSTOMERNAME_
Receiver Name
Customer Maintenance-CustomersDetailed-Customer
Name
VARCHAR
105
_CPARTY-NAME_
Counterparty Name
Fund Transfer-Contract Input ScreenParty Details TabPayment Details
VARCHAR
105
_CPARTYADDRESS1_
Counterparty
Address Line 1
Fund Transfer-Contract Input ScreenParty Details TabPayment Details
VARCHAR
105
_CPARTYADDRESS2_
Counterparty
Address Line 2
Fund Transfer-Contract Input ScreenParty Details TabPayment Details
VARCHAR
105
_CPARTYADDRESS3_
Counterparty
Address Line 3
Fund Transfer-Contract Input ScreenParty Details TabPayment Details
VARCHAR
105
12-3
_CPARTYADDRESS4_
Counterparty
Address Line 4
Fund Transfer-Contract Input ScreenParty Details TabPayment Details
VARCHAR
105
_ACC-BRANCH_
Branch Code of the
Customer Account
Fund Transfer-Contract Input ScreenMain Tab-Debit
Branch
VARCHAR
3
_BRANCHNAME_
Name of the Branch
Branch ParametersBranch ParametersDetailed-Branch
Name
VARCHAR
105
_BRANCHDATE_
Today's Date for the
Branch
Fund Transfer-Contract Input ScreenMain Tab
Date
_ACCOUNT_
Account Number
Fund Transfer-Contract Input ScreenMain Tab-Debit
Account
VARCHAR
20
_ACC-DESC_
Account Description
Customer
Accounts-Customer AccountsDetailed
VARCHAR
35
_CCY_
Currency
Fund Transfer-Contract Input ScreenMain Tab-Debit Currency
VARCHAR
3
_CCY-NAME_
Currency Name
Currency Maintenance-CurrenciesDetailed
VARCHAR
105
_SETTLEMENTAMT_
Settlement Amount
Fund Transfer-Contract Input ScreenMain Tab-Debit
Amount
Number
22,3
_AMOUNTINWOR
DS_
Amount in Words
System derived
from Fund TransferContract InputDetailed-Main Tab
VARCHAR
255
_VALUE-DATE_
Transaction Value
Date
Fund Transfer-Contract Input ScreenMain Tab-Debit
Value Date
Date
_SNDR-RECVINFO1_
Sender to Receiver
Information Line 1
Fund Transfer-Contract Input ScreenSettlement TabMessage DetailsSender to reciever
information
VARCHAR
12-4
105
_SNDR-RECVINFO2_
Sender to Receiver
Information Line 2
Fund Transfer-Contract Input ScreenSettlement TabMessage DetailsSender to reciever
information
VARCHAR
105
_SNDR-RECVINFO3_
Sender to Receiver
Information Line 3
Fund Transfer-Contract Input ScreenSettlement TabMessage DetailsSender to reciever
information
VARCHAR
105
_SNDR-RECVINFO4_
Sender to Receiver
Information Line 4
Fund Transfer-Contract Input ScreenSettlement TabMessage DetailsSender to reciever
information
VARCHAR
105
_SNDR-RECVINFO5_
Sender to Receiver
Information Line 5
Fund Transfer-Contract Input ScreenSettlement TabMessage DetailsSender to reciever
information
VARCHAR
105
_SNDR-RECVINFO6_
Sender to Receiver
Information Line 6
Fund Transfer-Contract Input ScreenSettlement TabMessage DetailsSender to reciever
information
VARCHAR
105
_PAYMNTDETAILS1_
Payment Details
Line 1
Fund Transfer-Contract Input ScreenSettlement TabMessage DetailsDetails of Payment
VARCHAR
105
_PAYMNTDETAILS2_
Payment Details
Line 2
Fund Transfer-Contract Input ScreenSettlement TabMessage DetailsDetails of Payment
VARCHAR
105
_PAYMNTDETAILS3_
Payment Details
Line 3
Fund Transfer-Contract Input ScreenSettlement TabMessage DetailsDetails of Payment
VARCHAR
105
_PAYMNTDETAILS4_
Payment Details
Line 4
Fund Transfer-Contract Input ScreenSettlement TabMessage DetailsDetails of Payment
VARCHAR
105
12-5
_ADDRESS1_
Receiver Address
Line 1
Fund Transfer-Contract Input ScreenSettlement TabLocal ClearingReciever Information
VARCHAR
105
_ADDRESS2_
Receiver Address
Line 2
Fund Transfer-Contract Input ScreenSettlement TabLocal ClearingReciever Information
VARCHAR
105
_ADDRESS3_
Receiver Address
Line 3
Fund Transfer-Contract Input ScreenSettlement TabLocal ClearingReciever Information
VARCHAR
105
_ADDRESS4_
Receiver Address
Line 4
Fund Transfer-Contract Input ScreenSettlement TabLocal ClearingReciever Information
VARCHAR
105
_ORD1_
Ordering Customer
Name and Address
Fund Transfer-Contract Input ScreenSettlement Tab-Parties-Ordering Customer
VARCHAR
105
_ORD2_
Ordering Customer
Name and Address
Fund Transfer-Contract Input ScreenSettlement Tab-Parties-Ordering Customer
VARCHAR
105
_ORD3_
Ordering Customer
Name and Address
Fund Transfer-Contract Input ScreenSettlement Tab-Parties-Ordering Customer
VARCHAR
105
_ORD4_
Ordering Customer
Name and Address
Fund Transfer-Contract Input ScreenSettlement Tab-Parties-Ordering Customer
VARCHAR
105
_BEN1_
Ultimate Beneficiary
Name and Address
Fund Transfer-Contract Input ScreenSettlement Tab-Parties-Ultimate Beneficiary
VARCHAR
255
12-6
_BEN2_
Ultimate Beneficiary
Name and Address
Fund Transfer-Contract Input ScreenSettlement Tab-Parties-Ultimate Beneficiary
VARCHAR
255
_BEN3_
Ultimate Beneficiary
Name and Address
Fund Transfer-Contract Input ScreenSettlement Tab-Parties-Ultimate Beneficiary
VARCHAR
255
_BEN4_
Ultimate Beneficiary
Name and Address
Fund Transfer-Contract Input ScreenSettlement Tab-Parties-Ultimate Beneficiary
VARCHAR
255
_AVAIL_SET_AMT
_
LC Availment
Amount being Settled
Letters of CreditAvailment InputDetailed-Availment
Amount
Number
22,3
_AVAIL_SET_AMT
EQ_
LC Availment
Amount being Settled
Letters of CreditAvailment InputDetailed-Availment
Amount
Number
22,3
_TFR_AMT_
FT Transfer Amount
Fund Transfer-Contract Input ScreenMain Tab-Credit
Amount in case of
Outgoing and Internal FT Contracts.
And Debit Amount
in case of Incoming
FT Contract.
Number
22,3
_AMT_EQUIV_
FT Transfer Amount
Equivalent
Fund Transfer-Contract Input ScreenMain Tab-Debit
Amount in case of
Outgoing and Internal FT Contracts.
And Credit Amount
in case of Incoming
FT Contract.
Number
22,3
_PRINCIPAL_
MM Contract Principal
Money Market-Payment InputDetailed-Main
Screen-Amount
Number
22,3
_PRINCIPAL_INCR
_
MM Contract Principal Increase
Money Market-Payment InputDetailed-Main
Screen-Amount
Number
22,3
12-7
_PRINCIPAL_DEC
R_
MM Contract Principal Decrease
Money Market-Payment InputDetailed-Main
Screen-Amount
Number
22,3
_comp_LIQD_
Amount of the Component ('comp')
being Liquidated
Money Market-Payment InputDetailed-Main
Screen-Amount
Number
22,3
For Netted Transactions, the following will appear for each of the Transactions that got netted
Tab/Button-Field
Name
VARCHA
R/
Number/
Date
Lengt
h
Advice Tags
Description
_AMTDESC_
Transaction Description
Funds Transfer-Contract Input-DetailedEvents ButtonAccounting Entries
Tab-Accounting Entries
Title-Code(Transaction
Code)
VARCHAR
3
_TCY_
Amount Tag Currency
Funds Transfer-Contract Input-DetailedEvents ButtonAccounting Entries
Tab-Accounting Entries
Title-Amount Tag
VARCHAR
25
_FCYAMT_
Amount in Amount
Tag Currency
Funds Transfer-Contract Input-DetailedEvents ButtonAccounting Entries
Tab-Accounting Entries
Title-Foreign Currency
Amount
VARCHAR
22
_RATE_
Exchange Rate Used
Funds Transfer-Contract Input-DetailedMain Tab-Exchange
Rate Details title Exchange Rate field
Number
3
_ACY_
Account Currency
Funds Transfer-Contract Input-DetailedEvents ButtonAccounting Entries
Tab-Accounting Entries
Title-Currency field
VARCHAR
3
12-8
_AMT_
Amount in Account
Currency
Funds Transfer-Contract Input-DetailedEvents ButtonAccounting Entries
Tab-Accounting Entries
Title-Local Currency
Field(Amount in local
Currency)
VARCHAR
22
_DRCR_
Debit Credit Indicator
Funds Transfer-Contract Input-DetailedEvents ButtonAccounting Entries
Tab-Accounting Entries
Title-Dr/Cr
VARCHAR
1
12-9
12.3.3
PAYMENT_MESSAGE
Advice Tags
Description
SWIFT
12.3.4
RECEIVE_NOTICE
Advice Tags
Description
SWIFT
12.3.5
STOP_PMNT
Advice Tags
Description
SWIFT
12.3.6
CREDIT_ADVICE
VARCHA
R/
Number/
Date
Leng
th
Advice Tags
Description
Tab/Button-Field Name
_CONTRACTREF
NO_
Contract Reference Number
Fund Transfer-Contract
Input Screen-Reference
Number
VARCHAR
16
_USERREFNO_
User Reference Number
Fund Transfer-Contract
Input Screen-User Reference
VARCHAR
16
_PRODDESC_
Product
Description
Fund Transfer-Contract
Input Screen-Product
Description
VARCHAR
105
_SLOGAN_
Product Slogan
Fund Transfer-ProductsDetailed-Slogan
VARCHAR
255
_CUSTOMER_
Receiver ID
Fund Transfer-Contract
Input Screen-Main TabCredit Account
VARCHAR
9
_CUSTOMERNAME_
Receiver Name
Customer MaintenanceCustomers-DetailedCustomer Name
VARCHAR
105
_CPARTY-NAME_
Counterparty
Name
Fund Transfer-Contract
Input Screen-Party
Details Tab
VARCHAR
105
_CPARTYADDRESS1_
Counterparty
Address Line 1
Fund Transfer-Contract
Input Screen-Party
Details Tab-Payment
Details
VARCHAR
105
12-10
_CPARTYADDRESS2_
Counterparty
Address Line 2
Fund Transfer-Contract
Input Screen-Party
Details Tab-Payment
Details
VARCHAR
105
_CPARTYADDRESS3_
Counterparty
Address Line 3
Fund Transfer-Contract
Input Screen-Party
Details Tab-Payment
Details
VARCHAR
105
_CPARTYADDRESS4_
Counterparty
Address Line 4
Fund Transfer-Contract
Input Screen-Party
Details Tab-Payment
Details
VARCHAR
105
_ACC-BRANCH_
Branch Code of
the Customer
Account
Fund Transfer-Contract
Input Screen-Main TabCredit Branch
VARCHAR
3
_BRANCHNAME_
Name of the
Branch
Branch ParametersBranch ParametersDetailed.
VARCHAR
105
_BRANCHDATE_
Today's Date for
the Branch
Fund Transfer-Contract
Input Screen-Main Tab
Date
_ACCOUNT_
Account Number
Fund Transfer-Contract
Input Screen-Main TabCredit Account
VARCHAR
_ACC-DESC_
Account
Description
Customer Accounts-Customer Accounts-Detailed
VARCHAR
_CCY_
Currency
Fund Transfer-Contract
Input Screen-Main TabCredit Currency
VARCHAR
3
_CCY-NAME_
Currency Name
Currency MaintenanceCurrencies-Detailed
VARCHAR
105
_SETTLEMENTAMT_
Settlement
Amount
Fund Transfer-Contract
Input Screen-Main TabCredit Amount
Number
22,3
_AMOUNTINWOR
DS_
Amount in
Words
System derived from
Fund Transfer-Contract
Input-Detailed-Main TabCredit Amount
VARCHAR
255
_VALUE-DATE_
Transaction
Value Date
Fund Transfer-Contract
Input Screen-Main TabCredit Value Date
Date
_SNDR-RECVINFO1_
Sender to
Receiver Information Line 1
Fund Transfer-Contract
Input Screen-Settlement
Tab-Message DetailsSender to receiver information
VARCHAR
12-11
20
105
_SNDR-RECVINFO2_
Sender to
Receiver Information Line 2
Fund Transfer-Contract
Input Screen-Settlement
Tab-Message DetailsSender to receiver information
VARCHAR
105
_SNDR-RECVINFO3_
Sender to
Receiver Information Line 3
Fund Transfer-Contract
Input Screen-Settlement
Tab-Message DetailsSender to receiver information
VARCHAR
105
_SNDR-RECVINFO4_
Sender to
Receiver Information Line 4
Fund Transfer-Contract
Input Screen-Settlement
Tab-Message DetailsSender to receiver information
VARCHAR
105
_SNDR-RECVINFO5_
Sender to
Receiver Information Line 5
Fund Transfer-Contract
Input Screen-Settlement
Tab-Message DetailsSender to receiver information
VARCHAR
105
_SNDR-RECVINFO6_
Sender to
Receiver Information Line 6
Fund Transfer-Contract
Input Screen-Settlement
Tab-Message DetailsSender to receiver information
VARCHAR
105
_PAYMNTDETAILS1_
Payment
Details Line 1
Fund Transfer-Contract
Input Screen-Settlement
Tab-Message DetailsDetails of Payment
VARCHAR
105
_PAYMNTDETAILS2_
Payment
Details Line 2
Fund Transfer-Contract
Input Screen-Settlement
Tab-Message DetailsDetails of Payment
VARCHAR
105
_PAYMNTDETAILS3_
Payment
Details Line 3
Fund Transfer-Contract
Input Screen-Settlement
Tab-Message DetailsDetails of Payment
VARCHAR
105
_PAYMNTDETAILS4_
Payment
Details Line 4
Fund Transfer-Contract
Input Screen-Settlement
Tab-Message DetailsDetails of Payment
VARCHAR
105
_ADDRESS1_
Receiver
Address Line 1
Fund Transfer-Contract
Input Screen-Settlement
Tab-Local ClearingReceiver Information
VARCHAR
105
_ADDRESS2_
Receiver
Address Line 2
Fund Transfer-Contract
Input Screen-Settlement
Tab-Local ClearingReceiver Information
VARCHAR
105
12-12
_ADDRESS3_
Receiver
Address Line 3
Fund Transfer-Contract
Input Screen-Settlement
Tab-Local ClearingReceiver Information
VARCHAR
105
_ADDRESS4_
Receiver
Address Line 4
Fund Transfer-Contract
Input Screen-Settlement
Tab-Local ClearingReceiver Information
VARCHAR
105
_ORD1_
Ordering Customer Name
and Address
Fund Transfer-Contract
Input Screen-Settlement
Tab-Parties-Ordering
Customer
VARCHAR
105
_ORD2_
Ordering Customer Name
and Address
Fund Transfer-Contract
Input Screen-Settlement
Tab-Parties-Ordering
Customer
VARCHAR
105
_ORD3_
Ordering Customer Name
and Address
Fund Transfer-Contract
Input Screen-Settlement
Tab-Parties-Ordering
Customer
VARCHAR
105
_ORD4_
Ordering Customer Name
and Address
Fund Transfer-Contract
Input Screen-Settlement
Tab-Parties-Ordering
Customer
VARCHAR
105
_AVAIL_SET_AMT
_
LC Availment
Amount being
Settled
Letters of Credit-Availment Input-DetailedAvailment Amount
Number
22,3
_AVAIL_SET_AMT
EQ_
LC Availment
Amount being
Settled
Letters of Credit-Availment Input-DetailedAvailment Amount
Number
22,3
_TFR_AMT_
FT Transfer
Amount
Fund Transfer-Contract
Input Screen-Main TabCredit Amount in case of
Outgoing and Internal FT
Contracts. And Debit
Amount in case of
Incoming FT Contract.
Number
22,3
_AMT_EQUIV_
FT Transfer
Amount Equivalent
Fund Transfer-Contract
Input Screen-Main TabDebit Amount in case of
Outgoing and Internal FT
Contracts. And Credit
Amount in case of
Incoming FT Contract.
Number
22,3
_PRINCIPAL_
MM Contract
Principal
Money Market-Payment
Input-Detailed-Main
Screen-Amount
Number
22,3
12-13
_PRINCIPAL_INCR
_
MM Contract
Principal
Increase
Money Market-Payment
Input-Detailed-Main
Screen-Amount
Number
22,3
_PRINCIPAL_DEC
R_
MM Contract
Principal
Decrease
Money Market-Payment
Input-Detailed-Main
Screen-Amount
Number
22,3
_comp_LIQD_
Amount of the
Component
('comp') being
Liquidated
Money Market-Payment
Input-Detailed-Main
Screen-Amount
Number
22,3
For Netted Transactions, the following details appear for each of the transactions that is
netted:
VARCHA
R/
Number/
Date
Leng
th
Advice Tags
Description
Tab/Button-Field Name
_AMTDESC_
Transaction
Description
Funds Transfer-Contract
Input-Detailed-Events Button-Accounting Entries
Tab-Accounting Entries
Title-Code(Transaction
Code)
VARCHAR
3
_TCY_
Amount Tag
Currency
Funds Transfer-Contract
Input-Detailed-Events Button-Accounting Entries
Tab-Accounting Entries
Title-Amount Tag
VARCHAR
25
_FCYAMT_
Amount in
Amount Tag
Currency
Funds Transfer-Contract
Input-Detailed-Events Button-Accounting Entries
Tab-Accounting Entries
Title-Foreign Currency
Amount
VARCHAR
22
_RATE_
Exchange
Rate Used
Funds Transfer-Contract
Input-Detailed-Main TabExchange Rate Details
title -Exchange Rate field
Number
3
_ACY_
Account Currency
Funds Transfer-Contract
Input-Detailed-Events Button-Accounting Entries
Tab-Accounting Entries
Title-Currency field
VARCHAR
3
12-14
_AMT_
Amount in
Account Currency
Funds Transfer-Contract
Input-Detailed-Events Button-Accounting Entries
Tab-Accounting Entries
Title-Local Currency
Field(Amount in local Currency)
VARCHAR
22
_DRCR_
Debit Credit
Indicator
Funds Transfer-Contract
Input-Detailed-Events Button-Accounting Entries
Tab-Accounting Entries
Title-Dr/Cr
VARCHAR
1
12.4 Amount Tags
The amount tags required to define accounting entries in FT Module are listed below..
Amount Tag
Description
AMT_EQUIV
Equivalent Amount – For Outgoing and Internal FTs this is the debit
amount. For Incoming Transfers this is the Credit Amount.
TFR_AMT
Transfer Amount - For Outgoing and Internal FTs this is the Credit
Amount. For Incoming FTs this is the Debit Amount.
FT_COURIR_C
HG
Courier Charges
FT_FAX_CHG
Fax Charges
FT_MAIL_CHG
Mail Charges
FT_SWIFT_CH
G
SWIFT Charges
FT_TELEX_CH
G
Telex Charges
FT_RVR_CHGS
FT Receiver Charges
RVR_CHGS
Receiver Charges
12.5 Accounting Roles
The following list contains details of the accounting Roles that are applicable to the FTs you
can process at your bank.
Accounting Role
Description
Role Type
REMITTER
Remitter’s account
Real/Type
“X”
CUSTCHARGEACC
Customer account
Real/Type
“X”
12-15
BENEFICIARY
Beneficiary
account
Real/Type
“X”
For your convenience we have defined a typical set of accounting entries for each of the
events mentioned above, for an incoming and an outgoing funds transfer contract. Also note
that some of the Amount Tag’s linked to the Accounting Roles are user defined.
Outgoing FT Product (where payment is by message)
BOOK: Booking of an Outgoing FT Contract
If the charges are to be collected when the FT contract is booked, the entries that will be
passed for the same would be as indicated below:
Accounting Role
Amount Tag
Dr./Cr. Indicator
CUSTCHARGEACC
ChargeCom
p
Debit
ChargeCompINC
ChargeCom
p
Credit
Note
Here, ChargeComp refers to the charge component that you have defined for the product
involving the contract, through the Product-ICCF screen.
INIT: Initiation of an outgoing FT contract
Accounting Role
Amount Tag
Dr./Cr. Indicator
REMITTER
AMT_EQUIV
Debit
BENEFICIARY
TFR_AMT
Credit
CUSTCHARGEACC
ChargeCom
p
Debit
ChargeCompINC
ChargeCom
p
Credit
These two events shown above are the only events (with accounting) applicable for a simple
outgoing FT product.
CINT: Consolidation Event for Messaging and Accounting
CINT is triggered during Closure of consolidated records. Consolidated accounting entries are
passed after MT102 message is generated.
Dr./
Cr.
Accounting Role
Amount Tag
MT102 Suspense GL (Outgoing) for Consolidated
amount
TFR_AMT/
AMT_EQUIV
Debit
Settlement Account/Beneficiary for Consolidated
amount
TFR_AMT/
AMT_EQUIV
Credit
12-16
In case the charge is borne by the beneficiary then the following entry is passed
Dr./
Cr.
Accounting Role
Amount Tag
Settlement Account/Beneficiary for Consolidated
amount
CHARGE COMPONENT
Debit
MT102 Suspense GL (Outgoing) for Consolidated
Charge Amount
CHARGE COMPONENT
Credi
t
Payment Message for Multi Credit Transfer contracts will not be generated during contract
authorization. The above entries would be passed using “Consolidated Accounting Entry”
Reference number. The transaction codes used for these Accounting Entries would be picked
up from Accounting Entries defined for the FT product. In case of multiple charges one pair
of entries will be passed for each charge component. In case Netting is true for the accounting
entries defined then netted entries would be passed.
Accounting entries for Multi Financial Institution Transfer
In the case of Multi Financial Institution Transfer, consolidated accounting entries will be
passed after the generation of MT203 message. The entries will be posted using
‘Consolidated Accounting Entry’ Reference number which was used for consolidation. The
Transaction codes for the accounting entries will be selected from the Product Accounting
Entries defined for the FT product. If ‘Netting’ has been enabled for the accounting entries,
netted entries will be passed. CINT is not maintained at the product level. They are
automatically triggered for a MT102/ MT203 kind of contract.
Accounting Role
Dr./Cr. Indicator
Suspense GL(Outgoing) for consolidated amount
Dr
Settlement/Beneficiary for consolidated amount
Cr
REVERSAL: Reversal of an Outgoing Multi Credit Financial Institution Transfer
During reversal process, accounting entries will be posted with the negative transaction
amount.
Case 1: Outgoing Payment for which MT 203 is not generated.
Accounting Role
Dr./Cr. Indicator
REMITTER
Debit
Outgoing Suspense
GL
Credit
The total consolidated amount will be adjusted and the corresponding contract will be
removed from the consolidation queue.
Case 2: Outgoing Payment for which MT 203 is already generated.
An override will be displayed stating the ‘Message has already been generated’. If you confirm
the override, Reversal will be effected.
12-17
Accounting Role
Dr./Cr. Indicator
REMITTER
Debit
Outgoing Suspense
GL
Credit
Outgoing Suspense
GL
Debit
Beneficiary
Credit
Incoming FT Product
BOOK: Booking of an Incoming FT Contract
If the charges are to be collected when the FT contract is booked, the entries that will be
passed for the same would be as indicated below:
Accounting Role
Amount Tag
Dr./Cr. Indicator
CUSTCHARGEACC
ChargeCom
p
Debit
ChargeCompINC
ChargeCom
p
Credit
INIT: Initiation of an incoming FT contract
Accounting Role
Amount Tag
Dr./Cr. Indicator
REMITTER
TFR_AMT
Debit
ADVISED_OUTST
D
AMT_EQUIV
Credit
CUSTCHARGEACC
ChargeComp
Debit
ChargeCompINC
Charge
Comp
Credit
While processing an incoming payment message where the value for field 71A is ‘OUR’ and
71G is also present, the system will compute the transfer amount by subtracting the receiver’s
charges from the credit amount. In such cases, the following accounting entries will be passed
for the INIT event:
Accounting Role
Amount Tag
Dr./Cr. Indicator
REMITTER
TFR_AMT
Debit
BENEFICIARY
AMT_EQUIV
Credit
CUSTCHARGEACC
FT_RVR_CH
G
Debit
12-18
FT_RVR_CHGINC
FT_RVR_CH
G
Credit
The ‘ADVISED_OUTSTD’ role is a role that must be mapped to the “Advised Outstanding”
(payable) GL in the Product Role to Head Mapping, for the product involving the contract.
LIQD: of an Incoming FT
Accounting Role
Amount Tag
Dr./Cr. Indicator
ADVISED_OUTST
D
AMT_EQUIV
Debit
BENEFICIARY
AMT_EQUIV
Credit
CUSTCHARGEACC
ChargeCom
p
Debit
ChargeCompINC
ChargeCom
p
Credit
Outgoing FT Product such as Manager’s Check Product (where payment is by instrument)
BOOK: Booking of an Outgoing FT Contract
If the charges are to be collected when the FT contract is booked, the entries that will be
passed for the same would be as indicated below:
Accounting Role
Amount Tag
Dr./Cr. Indicator
CUSTCHARGEACC
ChargeCom
p
Debit
ChargeCompINC
ChargeCom
p
Credit
Note
Here, ChargeComp refers to the charge component that you have defined for the product
involving the contract, through the Product-ICCF screen.
12-19
INIT: Initiation of an outgoing FT contract
Accounting Role
Amount Tag
Dr./Cr. Indicator
REMITTER
AMT_EQUIV
Debit
ADVISED_OUTST
D
TFR_AMT
Credit
CUSTCHARGEACC
ChargeCom
p
Debit
ChargeCompINC
ChargeCom
p
Credit
LIQD: Liquidation of an Outgoing (MCK) type of FT
Accounting Role
Amount Tag
Dr./Cr. Indicator
ADVISED_OUTST
D
AMT_EQUIV
Debit
BENEFICIARY
AMT_EQUIV
Credit
CUSTCHARGEACC
ChargeCom
p
Debit
ChargeCompINC
ChargeCom
p
Credit
The other events do not require any accounting entry definition to be maintained.
REVR: Reversal for Outgoing Multi Credit Customer Transfers:
Example1: Outgoing Payment for which MT 102 is not generated
Accounting
Role
Amount
Tag
Dr./Cr. Indicator
Remitter
Debit
Remitter
Credit
The Total Consolidated amount will be adjusted for the same Corresponding contract and will
be removed from the consolidation queue. If the charges are being borne by the beneficiary
the following entry will be passed:
Accounting
Role
Amount
Tag
Dr./Cr. Indicator
MT102 Suspense
Debit
Charge Income
Credit
12-20
Example 2: Outgoing Payment for which MT 102 is already generated
A configurable override -’Message has already been generated’ will appear on your screen.
If you click ’Ok,’ then a reversal will be affected .In this case, the reversed contract will pass
the following entries
Accounting
Role
Amount
Tag
Dr./Cr. Indicator
Remitter
Debit
MT102 Suspense
Credit
MT102 Suspense
Debit
Beneficiary
Credit
In case the charges are being borne by the beneficiary:
Accounting Role
Amount
Tag
Dr./Cr. Indicator
MT102 Suspense
Debit
Charge Income
Credit
Beneficiary
Debit
MT102 Suspense
Credit
12.6 Advices for FT
In this section you will find an event-wise listing of advices that can be generated during the
life-cycle of an FT.
12.6.1
FT Messages
The following is an exhaustive list of messages that can be generated for an FT.
12-21
INIT: Initiation of an FT
Even
t
Message / Advice
Description
12-22
SWIFT
Messag
e
Format
New
Advice
s in FC
Remarks
INIT
PAYMENT_MESSAG
E
Customer
Transfer
MT 103,
MT
103+,
MT 102
, MT
102 +
Customer
Transfer With
Cover
MT 103,
MT
103+,
MT 202,
Bank Transfer
MT 202
/ MT
203
Financial Institution Transfer
Execution
message is
sent by the
Receiver of a
category 2
transfer message, i.e., MT
200, 201, 202,
203 or 205 to
further transmit a funds
transfer
instruction
domestically.
MT 205
Bank Transfer
- Own Account
MT 200
Multiple Bank
Transfer - Own
Account
MT 201
Confirmation
of Debit
MT 900
Confirmation
of Credit
MT 910
MT202 old
cover format
MT202
(old
cover
format)
COVER
Cover for Customer Transfer
MT202C
OV
CUST_
COVER
New RTGS
COV form
MT202C
OV
CUST_
RTGS_
COV
Old RTGS
cover format
MT202C
OV
RTGS_
COV
12-23
IN FT Module, only
PAYMENT_M
ESSAGE is
maintained. It
resolves
which message to generate on the
basis of maintenance at
BIC / Currency / Country Code /
Product / Customer / Contract Level
CONS_
OWNA
C_TFR
REVSWIFT
Generation of
MT292 on
reversal of a
contract
Note
Messages such as ‘Allow Message before Accounting’ parameters can have an influence
on messages and accounting entries which you intend to initiate. If you enable the ‘Allow
Message before Accounting’ option, then you can associate PAYMENT_MESSAGE to
INIT event only.
CANC: Cancellation of Banker’s Check
Even
t
CAN
C
SWIFT
Message
Format
Message / Advice
Description
DEBIT_ADVICE
Debit advice to the customer for Cancellation Charges
STOP_PMNT
Banker’s check cancellation advice
MT 111
FXGN: Adhoc generation of Customer Transfer Message
Event
Message / Advice
Description
FXG
N
FAX_PMT_MSG
MT 103 - A copy of the Customer Transfer message
Note
Accounting Entry definition for receiver bank charges in MT103 are as follows:
Dr
Remitter
AMT_EQUIV
Cr
Beneficiary
TFR_AMT
Dr
Custchargeacc
CHARGES (Own)
Cr
Charge Inc
CHARGES (Own)
Dr
Custchargeacc
FT_RVR_CHGS
Cr
Beneficiary
RVR_CHGS
12-24
LIQD: Liquidation
Event
Message / Advice
Description
LIQD
CREDIT_ADVICE
Credit advice to the beneficiary for Transfer
Amount
DEBIT_ADVICE
Debit advice to the Remitter for Transfer
Amount.
DEBIT_ADVICE
Debit advice to the Bearer of Charges for
the charge amount.
REVR: Reversal
12.6.2
Event
Message / Advice
Description
REVR
DEBIT_ADVICE
Debit advice to the customer for Cancellation
Charges
STOP_PMNT
Banker’s check cancellation advice (Provided
not generated in CANC)
SWIFT
Message
Format
MT 111
Other Messages
Customer / Financial Transfer related SWIFT Messages supported in Oracle FLEXCUBE but
not generated from FT Contract in FT Module are detailed below:
Common Group Messages
You can generate following Common Group Messages using Function ID MSDCOMMS.
Description
SWIFT Message Format
Advice of Charges, Interest and other
Adjustments
MT 190
Request for Payment of Charges, Interest and other Expenses
MT 191
Request for Cancellation
MT 192
Queries
MT 195
Answers
MT 196
Proprietary Message
MT 198
Free Format Message
MT 199
12-25
MT920 Request Message
You can generate MT 920 using ‘Generate MT920’ screen, function ID MSDMT92 (Menu
Path Messages -> MT920 -> Detailed).
Description
SWIFT Message
Format
Request Message
MT 920
To request one or more MT 940 Customer Statement(s), MT941 Balance Report(s), MT942 Interim Transaction Report(s), or MT 950
Statement Message(s)
Balance Report (MT 941) & Interim Statement (MT942)
You can generate Balance Report (MT 941) and Interim Statement (MT942) using ‘Adhoc
Report Generation’ screen – Function ID ACDADCRP (Menu Option – Messages > Account
Balance and Interim Report > Detailed).
Description
SWIFT Message
Format
ACST_BALANCE
MT 941
Balance Report
ACST_INT_DTL
MT 942
Interim Statement
12-26
13. Annexure B - Derivation of Debit and Credit
Accounts for STP
13.1 Introduction
This is one of the most important steps in the message upload process. It is through this step
that the system identifies the accounts that have to be debited and credited for the resultant
FT contract.
For instance, if the incoming message is an MT 100 sent by the Bank’s correspondent, which
orders the Bank to pay a certain sum to a customer of the Bank, the system (from the
message) deciphers that the Debit account is the relevant nostro account (mirror of it’s
account with the Sender of the MT 100) and that the Credit account is the relevant customer’s
account. The logic for derivation of the debit and credit account depends upon the incoming
payment message type, viz. whether the incoming message is an MT 100, 103, 200 or a 202.
While derivation of the debit account is primarily driven by the contents of fields 53 to 55 of
the incoming message, the derivation of the credit account is primarily driven by the contents
of the fields 56 to 59, together with the settlement instructions maintenance table, where the
Standard Settlement Instructions are maintained for both Customers and BIC’s.
The step–wise sequence of the derivation logic of both the debit account and credit account
is given below for each of the incoming payment message types.
Note
The list of checks (C1, C2, etc.) that have been listed in each of the tables are summarized
at the end of this section. The checks are common across message types.
13.1.1
Derivation of Debit Account (MT 100/103)
The logic of deriving the Debit account for an incoming MT 100 / 103 is summarized below:
Ord
er
of
Prio
rity
SWIF
T
Mess
age
Type
1
MT
103
Fiel
d
Nam
e
Sub
Prio
rity
Sub
Fiel
d
Nam
e
Processi
ng field
format
55B
Processi
ng
Descript
ion
If
field
doe
s
not
exis
t
Go
to
next
priority
field
13-1
If
field
exis
ts
and
proc
essi
ng
fails
Mark
SWI
FT
Message
for
repai
r.
If field
exists
and
proces
sing
succee
ds
2
MT
103
1.1
Acc
ount
Line
/C/
[Account
Number]
Derive
Debit
Account
Go
to
next
sub
priority
field
Mark
SWI
FT
Message
for
repai
r.
Perform
Checks
C1 &
C2 and
process
accordingly.
1.2
Acc
ount
Line
/D/
[Account
Number]
Derive
Debit
Account
Go
to
next
sub
priority
field
Mark
SWI
FT
Message
for
repai
r.
Perform
Checks
C3 &
C2 and
process
accordingly.
1.3
Acc
ount
Line
/[Account
Number]
Derive
Debit
Account
Mar
k
SWI
FT
Mes
sage
for
repai
r.
Mark
SWI
FT
Message
for
repai
r.
Perform
Checks
C3 &
C2 and
process
accordingly.
Go
to
next
priority
field
Mark
SWI
FT
Message
for
repai
r.
Go
to
next
sub
priority
field
Mark
SWI
FT
Message
for
repai
r.
55A
2.1
Acc
ount
Line
/C/
[Account
Number]
13-2
Derive
Debit
Account
Perform
Checks
C1, C4
& C2
and
process
accordingly.
3
MT
103
2.2
Acc
ount
Line
/D/
[Account
Number]
Derive
Debit
Account
Go
to
next
sub
priority
field
Mark
SWI
FT
Message
for
repai
r.
Perform
Checks
C3, C4
& C2
and
process
accordingly.
2.3
Acc
ount
Line
/[Account
Number]
Derive
Debit
Account
Go
to
next
sub
priority
field
Mark
SWI
FT
Message
for
repai
r.
Perform
Checks
C3, C4
& C2
and
process
accordingly.
2.4
SWI
FT
BIC
SSI for
SWIFT
BIC +
Payment
Currency
Derive
Debit
Account
Mar
k
SWI
FT
Mes
sage
for
repai
r.
Go
to
next
sub
priority
field
Perform
Checks
C5 &
C2 and
process
accordingly.
2.5
SWI
FT
BIC
SSI for
SWIFT
BIC's
Customer
+ Payment Currency
Derive
Debit
Account
Mar
k
SWI
FT
Mes
sage
for
repai
r.
Mark
SWI
FT
Message
for
repai
r.
Perform
Checks
C5 &
C2 and
process
accordingly.
Go
to
next
priority
field
Mark
SWI
FT
Message
for
repai
r.
55D
13-3
4
MT
100
3.1
Acc
ount
Line
/C/
[Account
Number]
Derive
Debit
Account
Go
to
next
sub
priority
field
Mark
SWI
FT
Message
for
repai
r.
Perform
Checks
C1 &
C2 and
process
accordingly.
3.2
Acc
ount
Line
/D/
[Account
Number]
Derive
Debit
Account
Go
to
next
sub
priority
field
Mark
SWI
FT
Message
for
repai
r.
Perform
Checks
C3 &
C2 and
process
accordingly.
3.3
Acc
ount
Line
/[Account
Number]
Derive
Debit
Account
Mar
k
SWI
FT
Mes
sage
for
repai
r.
Mark
SWI
FT
Message
for
repai
r.
Perform
Checks
C3 &
C2 and
process
accordingly.
Go
to
next
priority
field
Go
to
next
priority
field
Go
to
next
priority
field
Go
to
next
sub
priority
field
72
4.1
Any
line
SSI for
SWIFT
BIC +
Payment
Currency.
SWIFT
BIC
should be
specified
in the format '/
RCB/
[SWIFT
BIC]'
13-4
Derive
Debit
Account
Perform
Checks
C5 &
C2 and
process
accordingly.
4.2
5
MT
100 &
MT
103
Any
line
SSI for
SWIFT
BIC's
Customer
+ Payment Currency.
SWIFT
BIC
should be
specified
in the format '/
RCB/
[SWIFT
BIC]'
Derive
Debit
Account
54B
Go
to
next
priority
field
Mark
SWI
FT
Message
for
repai
r.
Go
to
next
priority
field
Mark
SWI
FT
Message
for
repai
r.
Perform
Checks
C5 &
C2 and
process
accordingly.
5.1
Acc
ount
Line
/C/
[Account
Number]
Derive
Debit
Account
Go
to
next
sub
priority
field
Mark
SWI
FT
Message
for
repai
r.
Perform
Checks
C1 &
C2 and
process
accordingly.
5.2
Acc
ount
Line
/D/
[Account
Number]
Derive
Debit
Account
Go
to
next
sub
priority
field
Mark
SWI
FT
Message
for
repai
r.
Perform
Checks
C3 &
C2 and
process
accordingly.
5.3
Acc
ount
Line
/[Account
Number]
Derive
Debit
Account
Mar
k
SWI
FT
Mes
sage
for
repai
r.
Mark
SWI
FT
Message
for
repai
r.
Perform
Checks
C3 &
C2 and
process
accordingly.
13-5
6
MT
100 &
MT
103
54A
Go
to
next
priority
field
Mark
SWI
FT
Message
for
repai
r.
6.1
Acc
ount
Line
/C/
[Account
Number]
Derive
Debit
Account
Go
to
next
sub
priority
field
Mark
SWI
FT
Message
for
repai
r.
Perform
Checks
C1, C4
& C2
and
process
accordingly.
6.2
Acc
ount
Line
/D/
[Account
Number]
Derive
Debit
Account
Go
to
next
sub
priority
field
Mark
SWI
FT
Message
for
repai
r.
Perform
Checks
C3, C4
& C2
and
process
accordingly.
6.3
Acc
ount
Line
/[Account
Number]
Derive
Debit
Account
Go
to
next
sub
priority
field
Mark
SWI
FT
Message
for
repai
r.
Perform
Checks
C3, C4
& C2
and
process
accordingly.
6.4
SWI
FT
BIC
SSI for
SWIFT
BIC +
Payment
Currency
Derive
Debit
Account
Mar
k
SWI
FT
Mes
sage
for
repai
r.
Go
to
next
sub
priority
field
Perform
Checks
C5 &
C2 and
process
accordingly.
13-6
6.5
7
8
MT
100 &
MT
103
MT
100 &
MT
103
SWI
FT
BIC
SSI for
SWIFT
BIC's
Customer
+ Payment Currency
Derive
Debit
Account
54D
Mar
k
SWI
FT
Mes
sage
for
repai
r.
Mark
SWI
FT
Message
for
repai
r.
Go
to
next
priority
field
Mark
SWI
FT
Message
for
repai
r.
Perform
Checks
C5 &
C2 and
process
accordingly.
7.1
Acc
ount
Line
/C/
[Account
Number]
Derive
Debit
Account
Go
to
next
sub
priority
field
Mark
SWI
FT
Message
for
repai
r.
Perform
Checks
C1 &
C2 and
process
accordingly.
7.2
Acc
ount
Line
/D/
[Account
Number]
Derive
Debit
Account
Go
to
next
sub
priority
field
Mark
SWI
FT
Message
for
repai
r.
Perform
Checks
C3 &
C2 and
process
accordingly.
7.3
Acc
ount
Line
/[Account
Number]
Derive
Debit
Account
Mar
k
SWI
FT
Mes
sage
for
repai
r.
Mark
SWI
FT
Message
for
repai
r.
Perform
Checks
C3 &
C2 and
process
accordingly.
Go
to
next
priority
field
Mark
SWI
FT
Message
for
repai
r.
53B
13-7
9
MT
100 &
MT
103
8.1
Acc
ount
Line
/C/
[Account
Number]
Derive
Debit
Account
Go
to
next
sub
priority
field
Mark
SWI
FT
Message
for
repai
r.
Perform
Checks
C1 &
C2 and
process
accordingly.
8.2
Acc
ount
Line
/D/
[Account
Number]
Derive
Debit
Account
Go
to
next
sub
priority
field
Mark
SWI
FT
Message
for
repai
r.
Perform
Checks
C3 &
C2 and
process
accordingly.
8.3
Acc
ount
Line
/[Account
Number]
Derive
Debit
Account
Mar
k
SWI
FT
Mes
sage
for
repai
r.
Mark
SWI
FT
Message
for
repai
r.
Perform
Checks
C3 &
C2 and
process
accordingly.
Go
to
next
priority
field
Mark
SWI
FT
Message
for
repai
r.
Go
to
next
sub
priority
field
Mark
SWI
FT
Message
for
repai
r.
53A
9.1
Acc
ount
Line
/C/
[Account
Number]
13-8
Derive
Debit
Account
Perform
Checks
C1, C4
& C2
and
process
accordingly.
10
MT
100 &
MT
103
9.2
Acc
ount
Line
/D/
[Account
Number]
Derive
Debit
Account
Go
to
next
sub
priority
field
Mark
SWI
FT
Message
for
repai
r.
Perform
Checks
C3, C4
& C2
and
process
accordingly.
9.3
Acc
ount
Line
/[Account
Number]
Derive
Debit
Account
Go
to
next
sub
priority
field
Mark
SWI
FT
Message
for
repai
r.
Perform
Checks
C3, C4
& C2
and
process
accordingly.
9.4
SWI
FT
BIC
SSI for
SWIFT
BIC +
Payment
Currency
Derive
Debit
Account
Mar
k
SWI
FT
Mes
sage
for
repai
r.
Go
to
next
sub
priority
field
Perform
Checks
C5 &
C2 and
process
accordingly.
9.5
SWI
FT
BIC
SSI for
SWIFT
BIC's
Customer
+ Payment Currency
Derive
Debit
Account
Mar
k
SWI
FT
Mes
sage
for
repai
r.
Mark
SWI
FT
Message
for
repai
r.
Perform
Checks
C5 &
C2 and
process
accordingly.
Go
to
next
priority
field
Mark
SWI
FT
Message
for
repai
r.
53D
13-9
11
MT
100 &
MT
103
10.1
Acc
ount
Line
/C/
[Account
Number]
Derive
Debit
Account
Go
to
next
sub
priority
field
Mark
SWI
FT
Message
for
repai
r.
Perform
Checks
C1 &
C2 and
process
accordingly.
10.2
Acc
ount
Line
/D/
[Account
Number]
Derive
Debit
Account
Go
to
next
sub
priority
field
Mark
SWI
FT
Message
for
repai
r.
Perform
Checks
C3 &
C2 and
process
accordingly.
10.3
Acc
ount
Line
/[Account
Number]
Derive
Debit
Account
Mar
k
SWI
FT
Mes
sage
for
repai
r.
Mark
SWI
FT
Message
for
repai
r.
Perform
Checks
C3 &
C2 and
process
accordingly.
Mar
k
SWI
FT
Mes
sage
for
repai
r.
Che
ck
whet
her
SWI
FT
Message
has
to be
mov
ed to
the
Cov
er
Matc
hing
queu
e
else
mark
SWI
FT
Message
for
repai
r.
Sen
der
SWI
FT
BIC
13-10
13.1.2
11.1
SWI
FT
BIC
SSI for
SWIFT
BIC +
Payment
Currency
Derive
Debit
Account
Mar
k
SWI
FT
Mes
sage
for
repai
r.
Go
to
next
sub
priority
field
Perform
Checks
C5 &
C2 and
process
accordingly.
11.2
SWI
FT
BIC
SSI for
SWIFT
BIC's
Customer
+ Payment Currency
Derive
Debit
Account
Mar
k
SWI
FT
Mes
sage
for
repai
r.
Che
ck
whet
her
SWI
FT
Message
has
to be
mov
ed to
the
Cov
er
Matc
hing
queu
e
else
mark
SWI
FT
Message
for
repai
r.
Perform
Checks
C5 &
C2 and
process
accordingly.
Derivation of Credit Account (MT 100/103)
The logic of deriving the Credit account for an incoming MT 100 / 103 is summarized below:
Ord
er
of
Prio
rity
SWIF
T
Mess
age
Type
Field
Nam
e
Sub
Prio
rity
Sub
Fiel
d
Nam
e
Processi
ng field
format
13-11
Process
ing
Descript
ion
If
field
doe
s
not
exis
t
If
field
exis
ts
and
proc
essi
ng
fails
If field
exists
and
proces
sing
succee
ds
1
MT
100 &
MT
103
56A
Go
to
next
priority
field
Mar
k
SWI
FT
Mes
sage
for
repai
r.
1.1
SWI
FT
BIC
:56A:[SWI
FT BIC]
Check
and Validate
SWIFT
BIC
Mar
k
SWI
FT
Mes
sage
for
repai
r.
If
Che
ck
C6
fails
then
Go
to
next
sub
priority
field.
If Check
C6 succeeds
then Go
to next
priority
field
1.2
Acc
ount
Line
//SC[Local
Clearing
Code]
Check
and Validate
Local
Clearing
Codes
Go
to
next
sub
priority
field
If
Che
ck
C7
fails
then
Go
to
next
sub
priority
field.
If Check
C7 succeeds
then Go
to next
priority
field
1.3
Acc
ount
Line
/C/
[Account
Number]
Derive
Credit
Account
Go
to
next
sub
priority
field
Mar
k
SWI
FT
Mes
sage
for
repai
r.
Perform
Check
C8 and
process
accordingly.
1.4
Acc
ount
Line
/D/
[Account
Number]
Derive
Credit
Account
Go
to
next
sub
priority
field
Mar
k
SWI
FT
Mes
sage
for
repai
r.
Perform
Check
C9 and
process
accordingly.
13-12
1.5
Acc
ount
Line
/[Account
Number]
Derive
Credit
Account
Go
to
next
sub
priority
field
Mar
k
SWI
FT
Mes
sage
for
repai
r.
Perform
Check
C9 and
process
accordingly.
1.6
Acc
ount
Line
//SC[Local
Clearing
Code][Acc
ount Number]
Derive
Credit
Account
Go
to
next
sub
priority
field
Mar
k
SWI
FT
Mes
sage
for
repai
r.
Perform
Check
C10
and
process
accordingly.
1.7
SWI
FT
BIC
SSI for
SWIFT
BIC +
Payment
Currency
Derive
Credit
Account
Mar
k
SWI
FT
Mes
sage
for
repai
r.
Go
to
next
sub
priority
field
Perform
Check
C5 and
process
accordingly.
1.8
SWI
FT
BIC
SSI for
SWIFT
BIC's
Customer
+ Payment Currency
Derive
Credit
Account
Mar
k
SWI
FT
Mes
sage
for
repai
r.
Go
to
next
sub
priority
field
Perform
Check
C5 and
process
accordingly.
1.9
SWI
FT
BIC
:56A:[SWI
FT BIC]
Derive
Credit
Account
Mar
k
SWI
FT
Mes
sage
for
repai
r.
Mar
k
SWI
FT
Mes
sage
for
repai
r.
Perform
Check
C11 and
process
accordingly.
13-13
2
3
MT
103
MT
100 &
MT
103
56C
Go
to
next
priority
field
Mar
k
SWI
FT
Mes
sage
for
repai
r.
2.1
Acc
ount
Line
//SC[Local
Clearing
Code]
Check
and Validate
Local
Clearing
Codes
Go
to
next
sub
priority
field
If
Che
ck 7
fails
then
Go
to
next
sub
priority
field.
If Check
C7 succeeds
then Go
to next
priority
field
2.2
Acc
ount
Line
//SC[Local
Clearing
Code][Acc
ount Number]
Derive
Credit
Account
Go
to
next
sub
priority
field
Mar
k
SWI
FT
Mes
sage
for
repai
r.
Perform
Check
C10
and
process
accordingly.
2.3
Acc
ount
Line
//SC[Local
Clearing
Code][Acc
ount Number] or //
SC[Local
Clearing
Code]
Derive
Credit
Account
Mar
k
SWI
FT
Mes
sage
for
repai
r.
Mar
k
SWI
FT
Mes
sage
for
repai
r.
Perform
Check
C12
and
process
accordingly.
Go
to
next
priority
field
Mar
k
SWI
FT
Mes
sage
for
repai
r.
56D
13-14
3.1
Acc
ount
Line
//SC[Local
Clearing
Code]
Check
and Validate
Local
Clearing
Codes
Go
to
next
sub
priority
field
If
Che
ck 7
fails
then
Go
to
next
sub
priority
field.
If Check
C7 succeeds
then Go
to next
priority
field
3.2
Acc
ount
Line
/C/
[Account
Number]
Derive
Credit
Account
Go
to
next
sub
priority
field
Mar
k
SWI
FT
Mes
sage
for
repai
r.
Perform
Check
C8 and
process
accordingly.
3.3
Acc
ount
Line
/D/
[Account
Number]
Derive
Credit
Account
Go
to
next
sub
priority
field
Mar
k
SWI
FT
Mes
sage
for
repai
r.
Perform
Check
C9 and
process
accordingly.
3.4
Acc
ount
Line
/[Account
Number]
Derive
Credit
Account
Go
to
next
sub
priority
field
Mar
k
SWI
FT
Mes
sage
for
repai
r.
Perform
Check
C9 and
process
accordingly.
3.5
Acc
ount
Line
//SC[Local
Clearing
Code][Acc
ount Number]
Derive
Credit
Account
Go
to
next
sub
priority
field
Mar
k
SWI
FT
Mes
sage
for
repai
r.
Perform
Check
C10
and
process
accordingly.
13-15
3.6
4
MT
100 &
MT
103
Acc
ount
Line
//SC[Local
Clearing
Code][Acc
ount Number] or //
SC[Local
Clearing
Code]
Derive
Credit
Account
57B
Mar
k
SWI
FT
Mes
sage
for
repai
r.
Mar
k
SWI
FT
Mes
sage
for
repai
r.
Go
to
next
priority
field
Mar
k
SWI
FT
Mes
sage
for
repai
r.
Perform
Check
C12
and
process
accordingly.
4.1
Acc
ount
Line
//SC[Local
Clearing
Code]
Check
and Validate
Local
Clearing
Codes
Go
to
next
sub
priority
field
If
Che
ck 7
fails
then
Go
to
next
sub
priority
field.
If Check
C7 succeeds
then Go
to next
priority
field
4.2
Acc
ount
Line
/C/
[Account
Number]
Derive
Credit
Account
Go
to
next
sub
priority
field
Mar
k
SWI
FT
Mes
sage
for
repai
r.
Perform
Check
C8 and
process
accordingly.
4.3
Acc
ount
Line
/D/
[Account
Number]
Derive
Credit
Account
Go
to
next
sub
priority
field
Mar
k
SWI
FT
Mes
sage
for
repai
r.
Perform
Check
C9 and
process
accordingly.
13-16
5
MT
100 &
MT
103
4.4
Acc
ount
Line
/[Account
Number]
Derive
Credit
Account
Go
to
next
sub
priority
field
Mar
k
SWI
FT
Mes
sage
for
repai
r.
Perform
Check
C9 and
process
accordingly.
4.5
Acc
ount
Line
//SC[Local
Clearing
Code][Acc
ount Number]
Derive
Credit
Account
Go
to
next
sub
priority
field
Mar
k
SWI
FT
Mes
sage
for
repai
r.
Perform
Check
C10
and
process
accordingly.
4.6
Acc
ount
Line
//SC[Local
Clearing
Code][Acc
ount Number] or //
SC[Local
Clearing
Code]
Derive
Credit
Account
Mar
k
SWI
FT
Mes
sage
for
repai
r.
Mar
k
SWI
FT
Mes
sage
for
repai
r.
Perform
Check
C12
and
process
accordingly.
Go
to
next
priority
field
Mar
k
SWI
FT
Mes
sage
for
repai
r.
Mar
k
SWI
FT
Mes
sage
for
repai
r.
If
Che
ck 6
fails
then
Go
to
next
sub
priority
field.
57A
5.1
SWI
FT
BIC
:57A:[SWI
FT BIC]
13-17
Check
and Validate
SWIFT
BIC
If Check
C6 succeeds
then Go
to next
priority
field
5.2
Acc
ount
Line
//SC[Local
Clearing
Code]
Check
and Validate
Local
Clearing
Codes
Go
to
next
sub
priority
field
If
Che
ck 7
fails
then
Go
to
next
sub
priority
field.
If Check
C7 succeeds
then Go
to next
priority
field
5.3
Acc
ount
Line
/C/
[Account
Number]
Derive
Credit
Account
Go
to
next
sub
priority
field
Mar
k
SWI
FT
Mes
sage
for
repai
r.
Perform
Check
C8 and
process
accordingly.
5.4
Acc
ount
Line
/D/
[Account
Number]
Derive
Credit
Account
Go
to
next
sub
priority
field
Mar
k
SWI
FT
Mes
sage
for
repai
r.
Perform
Check
C9 and
process
accordingly.
5.5
Acc
ount
Line
/[Account
Number]
Derive
Credit
Account
Go
to
next
sub
priority
field
Mar
k
SWI
FT
Mes
sage
for
repai
r.
Perform
Check
C9 and
process
accordingly.
5.6
Acc
ount
Line
//SC[Local
Clearing
Code][Acc
ount Number]
Derive
Credit
Account
Go
to
next
sub
priority
field
Mar
k
SWI
FT
Mes
sage
for
repai
r.
Perform
Check
C10
and
process
accordingly.
13-18
6
MT
103
5.7
SWI
FT
BIC
SSI for
SWIFT
BIC +
Payment
Currency
Derive
Credit
Account
Mar
k
SWI
FT
Mes
sage
for
repai
r.
Go
to
next
sub
priority
field
Perform
Check
C5 and
process
accordingly.
5.8
SWI
FT
BIC
SSI for
SWIFT
BIC's
Customer
+ Payment Currency
Derive
Credit
Account
Mar
k
SWI
FT
Mes
sage
for
repai
r.
Go
to
next
sub
priority
field
Perform
Check
C5 and
process
accordingly.
5.9
SWI
FT
BIC
:57A:[SWI
FT BIC]
Derive
Credit
Account
Mar
k
SWI
FT
Mes
sage
for
repai
r.
Mar
k
SWI
FT
Mes
sage
for
repai
r.
Perform
Check
C11 and
process
accordingly.
Go
to
next
priority
field
Mar
k
SWI
FT
Mes
sage
for
repai
r.
Go
to
next
sub
priority
field
If
Che
ck 7
fails
then
Go
to
next
sub
priority
field.
57C
6.1
Acc
ount
Line
//SC[Local
Clearing
Code]
13-19
Check
and Validate
Local
Clearing
Codes
If Check
C7 succeeds
then Go
to next
priority
field
7
MT
100 &
MT
103
6.2
Acc
ount
Line
//SC[Local
Clearing
Code][Acc
ount Number]
Derive
Credit
Account
Go
to
next
sub
priority
field
Mar
k
SWI
FT
Mes
sage
for
repai
r.
Perform
Check
C10
and
process
accordingly.
6.3
Acc
ount
Line
//SC[Local
Clearing
Code][Acc
ount Number] or //
SC[Local
Clearing
Code]
Derive
Credit
Account
Mar
k
SWI
FT
Mes
sage
for
repai
r.
Mar
k
SWI
FT
Mes
sage
for
repai
r.
Perform
Check
C12
and
process
accordingly.
Go
to
next
priority
field
Mar
k
SWI
FT
Mes
sage
for
repai
r.
57D
7.1
Acc
ount
Line
//SC[Local
Clearing
Code]
Check
and Validate
Local
Clearing
Codes
Go
to
next
sub
priority
field
If
Che
ck 7
fails
then
Go
to
next
sub
priority
field.
If Check
C7 succeeds
then Go
to next
priority
field
7.2
Acc
ount
Line
/C/
[Account
Number]
Derive
Credit
Account
Go
to
next
sub
priority
field
Mar
k
SWI
FT
Mes
sage
for
repai
r.
Perform
Check
C8 and
process
accordingly.
13-20
8
MT
103
7.3
Acc
ount
Line
/D/
[Account
Number]
Derive
Credit
Account
Go
to
next
sub
priority
field
Mar
k
SWI
FT
Mes
sage
for
repai
r.
Perform
Check
C9 and
process
accordingly.
7.4
Acc
ount
Line
/[Account
Number]
Derive
Credit
Account
Go
to
next
sub
priority
field
Mar
k
SWI
FT
Mes
sage
for
repai
r.
Perform
Check
C9 and
process
accordingly.
7.5
Acc
ount
Line
//SC[Local
Clearing
Code][Acc
ount Number]
Derive
Credit
Account
Go
to
next
sub
priority
field
Mar
k
SWI
FT
Mes
sage
for
repai
r.
Perform
Check
C10
and
process
accordingly.
7.6
Acc
ount
Line
//SC[Local
Clearing
Code][Acc
ount Number] or //
SC[Local
Clearing
Code]
Derive
Credit
Account
Mar
k
SWI
FT
Mes
sage
for
repai
r.
Mar
k
SWI
FT
Mes
sage
for
repai
r.
Perform
Check
C12
and
process
accordingly.
Go
to
next
priority
field
Mar
k
SWI
FT
Mes
sage
for
repai
r.
59A
13-21
8.1
Acc
ount
Line
/D/
[Account
Number]
Derive
Credit
Account
Go
to
next
sub
priority
field
Mar
k
SWI
FT
Mes
sage
for
repai
r.
Perform
Check
C9 and
process
accordingly.
8.2
Acc
ount
Line
/[Account
Number]
Derive
Credit
Account
Go
to
next
sub
priority
field
Mar
k
SWI
FT
Mes
sage
for
repai
r.
Perform
Check
C9 and
process
accordingly.
8.3
Acc
ount
Line
//SC[Local
Clearing
Code][Acc
ount Number]
Derive
Credit
Account
Go
to
next
sub
priority
field
Mar
k
SWI
FT
Mes
sage
for
repai
r.
Perform
Check
C10
and
process
accordingly.
8.4
SWI
FT
BIC
SSI for
SWIFT
BIC +
Payment
Currency
Derive
Credit
Account
Mar
k
SWI
FT
Mes
sage
for
repai
r.
Go
to
next
sub
priority
field
Perform
Check
C5 and
process
accordingly.
8.5
SWI
FT
BIC
SSI for
SWIFT
BIC's
Customer
+ Payment Currency
Derive
Credit
Account
Mar
k
SWI
FT
Mes
sage
for
repai
r.
Mar
k
SWI
FT
Mes
sage
for
repai
r.
Perform
Check
C5 and
process
accordingly.
13-22
9
10
MT
100 &
MT
103
MT
100 &
MT
103
59
Go
to
next
priority
field
Mar
k
SWI
FT
Mes
sage
for
repai
r.
9.1
Acc
ount
Line
/D/
[Account
Number]
Derive
Credit
Account
Go
to
next
sub
priority
field
Mar
k
SWI
FT
Mes
sage
for
repai
r.
Perform
Check
C9 and
process
accordingly.
9.2
Acc
ount
Line
/[Account
Number]
Derive
Credit
Account
Go
to
next
sub
priority
field
Mar
k
SWI
FT
Mes
sage
for
repai
r.
Perform
Check
C9 and
process
accordingly.
9.3
Acc
ount
Line
//SC[Local
Clearing
Code][Acc
ount Number]
Derive
Credit
Account
Go
to
next
sub
priority
field
Mar
k
SWI
FT
Mes
sage
for
repai
r.
Perform
Check
C10
and
process
accordingly.
Mar
k
SWI
FT
Mes
sage
for
repai
r.
Mar
k
SWI
FT
Mes
sage
for
repai
r.
72
13-23
9.1
13.1.3
Line
1
/BNF/
[Account
Number]
Derive
Credit
Account
Mar
k
SWI
FT
Mes
sage
for
repai
r.
Mar
k
SWI
FT
Mes
sage
for
repai
r.
Perform
Check
C9 and
process
accordingly.
Derivation of Debit Account (MT 200)
The logic of deriving the Debit account for an incoming MT 200 is summarized below:
13.1.4
Derivation of Credit Account (MT 200)
The logic of deriving the Credit account for an incoming MT 200 is summarized below:
13.1.5
Derivation of Debit Account (MT 202)
The logic of deriving the Debit account for an incoming MT 202 is summarized below:
Orde
r of
Prior
ity
1
SWI
FT
Mes
sag
e
Typ
e
MT
202
Fiel
d
Nam
e
Sub
Prio
rity
Sub
Fiel
d
Nam
e
Processi
ng field
format
Process
ing
Descript
ion
54B
1.1
Acc
ount
Line
/C/
[Account
Number]
13-24
Derive
Debit
Account
If
field
doe
s
not
exis
t
If
field
exis
ts
and
proc
essi
ng
fails
Go
to
next
priority
field
Mar
k
SWI
FT
Mes
sage
for
repai
r.
Go
to
next
sub
priority
field
Mar
k
SWI
FT
Mes
sage
for
repai
r.
If field
exists
and
proces
sing
succee
ds
Perform
Checks
C1 &
C2 and
process
accordingly.
2
MT
202
1.2
Acc
ount
Line
/D/
[Account
Number]
Derive
Debit
Account
Go
to
next
sub
priority
field
Mar
k
SWI
FT
Mes
sage
for
repai
r.
Perform
Checks
C3 &
C2 and
process
accordingly.
1.3
Acc
ount
Line
/[Account
Number]
Derive
Debit
Account
Mar
k
SWI
FT
Mes
sage
for
repai
r.
Mar
k
SWI
FT
Mes
sage
for
repai
r.
Perform
Checks
C3 &
C2 and
process
accordingly.
Go
to
next
priority
field
Mar
k
SWI
FT
Mes
sage
for
repai
r.
54A
2.1
Acc
ount
Line
/C/
[Account
Number]
Derive
Debit
Account
Go
to
next
sub
priority
field
Mar
k
SWI
FT
Mes
sage
for
repai
r.
Perform
Checks
C1, C4
& C2
and
process
accordingly.
2.2
Acc
ount
Line
/D/
[Account
Number]
Derive
Debit
Account
Go
to
next
sub
priority
field
Mar
k
SWI
FT
Mes
sage
for
repai
r.
Perform
Checks
C3, C4
& C2
and
process
accordingly.
13-25
3
MT
202
2.3
Acc
ount
Line
/[Account
Number]
Derive
Debit
Account
Go
to
next
sub
priority
field
Mar
k
SWI
FT
Mes
sage
for
repai
r.
Perform
Checks
C3, C4
& C2
and
process
accordingly.
2.4
SWI
FT
BIC
SSI for
SWIFT
BIC +
Payment
Currency
Derive
Debit
Account
Mar
k
SWI
FT
Mes
sage
for
repai
r.
Go
to
next
sub
priority
field
Perform
Checks
C5 &
C2 and
process
accordingly.
2.5
SWI
FT
BIC
SSI for
SWIFT
BIC's
Customer
+ Payment Currency
Derive
Debit
Account
Mar
k
SWI
FT
Mes
sage
for
repai
r.
Mar
k
SWI
FT
Mes
sage
for
repai
r.
Perform
Checks
C5 &
C2 and
process
accordingly.
Go
to
next
priority
field
Mar
k
SWI
FT
Mes
sage
for
repai
r.
Go
to
next
sub
priority
field
Mar
k
SWI
FT
Mes
sage
for
repai
r.
54D
3.1
Acc
ount
Line
/C/
[Account
Number]
13-26
Derive
Debit
Account
Perform
Checks
C1 &
C2 and
process
accordingly.
4
MT
202
3.2
Acc
ount
Line
/D/
[Account
Number]
Derive
Debit
Account
Go
to
next
sub
priority
field
Mar
k
SWI
FT
Mes
sage
for
repai
r.
Perform
Checks
C3 &
C2 and
process
accordingly.
3.3
Acc
ount
Line
/[Account
Number]
Derive
Debit
Account
Mar
k
SWI
FT
Mes
sage
for
repai
r.
Mar
k
SWI
FT
Mes
sage
for
repai
r.
Perform
Checks
C3 &
C2 and
process
accordingly.
Go
to
next
priority
field
Mar
k
SWI
FT
Mes
sage
for
repai
r.
53B
4.1
Acc
ount
Line
/C/
[Account
Number]
Derive
Debit
Account
Go
to
next
sub
priority
field
Mar
k
SWI
FT
Mes
sage
for
repai
r.
Perform
Checks
C1 &
C2 and
process
accordingly.
4.2
Acc
ount
Line
/D/
[Account
Number]
Derive
Debit
Account
Go
to
next
sub
priority
field
Mar
k
SWI
FT
Mes
sage
for
repai
r.
Perform
Checks
C3 &
C2 and
process
accordingly.
13-27
4.3
5
MT
202
Acc
ount
Line
/[Account
Number]
Derive
Debit
Account
53A
Mar
k
SWI
FT
Mes
sage
for
repai
r.
Mar
k
SWI
FT
Mes
sage
for
repai
r.
Go
to
next
priority
field
Mar
k
SWI
FT
Mes
sage
for
repai
r.
Perform
Checks
C3 &
C2 and
process
accordingly.
5.1
Acc
ount
Line
/C/
[Account
Number]
Derive
Debit
Account
Go
to
next
sub
priority
field
Mar
k
SWI
FT
Mes
sage
for
repai
r.
Perform
Checks
C1, C4
& C2
and
process
accordingly.
5.2
Acc
ount
Line
/D/
[Account
Number]
Derive
Debit
Account
Go
to
next
sub
priority
field
Mar
k
SWI
FT
Mes
sage
for
repai
r.
Perform
Checks
C3, C4
& C2
and
process
accordingly.
5.3
Acc
ount
Line
/[Account
Number]
Derive
Debit
Account
Go
to
next
sub
priority
field
Mar
k
SWI
FT
Mes
sage
for
repai
r.
Perform
Checks
C3, C4
& C2
and
process
accordingly.
13-28
6
MT
202
5.4
SWI
FT
BIC
SSI for
SWIFT
BIC +
Payment
Currency
Derive
Debit
Account
Mar
k
SWI
FT
Mes
sage
for
repai
r.
Go
to
next
sub
priority
field
Perform
Checks
C5 &
C2 and
process
accordingly.
5.5
SWI
FT
BIC
SSI for
SWIFT
BIC's
Customer
+ Payment Currency
Derive
Debit
Account
Mar
k
SWI
FT
Mes
sage
for
repai
r.
Mar
k
SWI
FT
Mes
sage
for
repai
r.
Perform
Checks
C5 &
C2 and
process
accordingly.
Go
to
next
priority
field
Mar
k
SWI
FT
Mes
sage
for
repai
r.
53D
6.1
Acc
ount
Line
/C/
[Account
Number]
Derive
Debit
Account
Go
to
next
sub
priority
field
Mar
k
SWI
FT
Mes
sage
for
repai
r.
Perform
Checks
C1 &
C2 and
process
accordingly.
6.2
Acc
ount
Line
/D/
[Account
Number]
Derive
Debit
Account
Go
to
next
sub
priority
field
Mar
k
SWI
FT
Mes
sage
for
repai
r.
Perform
Checks
C3 &
C2 and
process
accordingly.
13-29
6.3
7
MT
202
Acc
ount
Line
/[Account
Number]
Derive
Debit
Account
Sen
der
SWI
FT
BIC
7.1
SWI
FT
BIC
SSI for
SWIFT
BIC +
Payment
Currency
13-30
Derive
Debit
Account
Mar
k
SWI
FT
Mes
sage
for
repai
r.
Mar
k
SWI
FT
Mes
sage
for
repai
r.
Mar
k
SWI
FT
Mes
sage
for
repai
r.
Che
ck
whet
her
SWI
FT
Mes
sage
has
to be
mov
ed to
the
Cov
er
Matc
hing
que
ue
else
mar
k
SWI
FT
Mes
sage
for
repai
r.
Mar
k
SWI
FT
Mes
sage
for
repai
r.
Go
to
next
sub
priority
field
Perform
Checks
C3 &
C2 and
process
accordingly.
Perform
Checks
C5 &
C2 and
process
accordingly.
7.2
13.1.6
SWI
FT
BIC
SSI for
SWIFT
BIC's
Customer
+ Payment Currency
Derive
Debit
Account
Mar
k
SWI
FT
Mes
sage
for
repai
r.
Che
ck
whet
her
SWI
FT
Mes
sage
has
to be
mov
ed to
the
Cov
er
Matc
hing
que
ue
else
mar
k
SWI
FT
Mes
sage
for
repai
r.
Perform
Checks
C5 &
C2 and
process
accordingly.
Derivation of Credit Account (MT 202)
The logic of deriving the Credit account for an incoming MT 202 is summarized below:
Orde
r of
Priori
ty
1
SWIF
T
Mess
age
Type
MT
202
Field
Nam
e
Sub
Prio
rity
Sub
Fiel
d
Nam
e
Proce
ssing
field
format
56A
Proce
ssing
Descri
ption
If field
does
not
exist
Go to
next
priority field
13-31
If field
exists
and
proce
ssing
fails
Mark
SWIFT
Message
for
repair.
If field
exists
and
proce
ssing
succe
eds
1.1
SWI
FT
BIC
:56A:[
SWIFT
BIC]
Check
and
Validate
SWIFT
BIC
Mark
SWIFT
Message
for
repair.
If
Check
6 fails
then
Go to
next
sub
priority
field.
If
Check
C6
succeeds
then
Go to
next
priority field
1.2
Acco
unt
Line
//
SC[Lo
cal
Clearing
Code]
Check
and
Validate
Local
Clearing
Codes
Go to
next
sub
priority field
If
Check
7 fails
then
Go to
next
sub
priority
field.
If
Check
C7
succeeds
then
Go to
next
priority field
1.3
Acco
unt
Line
/C/
[Accou
nt
Number]
Derive
Credit
Accou
nt
Go to
next
sub
priority field
Mark
SWIFT
Message
for
repair.
Perform
Check
C8 and
process
accord
ingly.
1.4
Acco
unt
Line
/D/
[Accou
nt
Number]
Derive
Credit
Accou
nt
Go to
next
sub
priority field
Mark
SWIFT
Message
for
repair.
Perform
Check
C9 and
process
accord
ingly.
1.5
Acco
unt
Line
/
[Accou
nt
Number]
Derive
Credit
Accou
nt
Go to
next
sub
priority field
Mark
SWIFT
Message
for
repair.
Perform
Check
C9 and
process
accord
ingly.
13-32
2
MT
202
1.6
Acco
unt
Line
//
SC[Lo
cal
Clearing
Code][
Accou
nt
Number]
Derive
Credit
Accou
nt
Go to
next
sub
priority field
Mark
SWIFT
Message
for
repair.
Perform
Check
C10
and
process
accord
ingly.
1.7
SWI
FT
BIC
SSI for
SWIFT
BIC +
Payment
Currency
Derive
Credit
Accou
nt
Mark
SWIFT
Message
for
repair.
Go to
next
sub
priority field
Perform
Check
C5 and
process
accord
ingly.
1.8
SWI
FT
BIC
SSI for
SWIFT
BIC's
Customer
+ Payment
Currency
Derive
Credit
Accou
nt
Mark
SWIFT
Message
for
repair.
Go to
next
sub
priority field
Perform
Check
C5 and
process
accord
ingly.
1.9
SWI
FT
BIC
:56A:[
SWIFT
BIC]
Derive
Credit
Accou
nt
Mark
SWIFT
Message
for
repair.
Mark
SWIFT
Message
for
repair.
Perform
Check
C11
and
process
accord
ingly.
Go to
next
priority field
Mark
SWIFT
Message
for
repair.
Go to
next
sub
priority field
If
Check
7 fails
then
Go to
next
sub
priority
field.
56D
2.1
Acco
unt
Line
//
SC[Lo
cal
Clearing
Code]
13-33
Check
and
Validate
Local
Clearing
Codes
If
Check
C7
succeeds
then
Go to
next
priority field
2.2
Acco
unt
Line
/C/
[Accou
nt
Number]
Derive
Credit
Accou
nt
Go to
next
sub
priority field
Mark
SWIFT
Message
for
repair.
Perform
Check
C8 and
process
accord
ingly.
2.3
Acco
unt
Line
/D/
[Accou
nt
Number]
Derive
Credit
Accou
nt
Go to
next
sub
priority field
Mark
SWIFT
Message
for
repair.
Perform
Check
C9 and
process
accord
ingly.
2.4
Acco
unt
Line
/
[Accou
nt
Number]
Derive
Credit
Accou
nt
Go to
next
sub
priority field
Mark
SWIFT
Message
for
repair.
Perform
Check
C9 and
process
accord
ingly.
2.5
Acco
unt
Line
//
SC[Lo
cal
Clearing
Code][
Accou
nt
Number]
Derive
Credit
Accou
nt
Go to
next
sub
priority field
Mark
SWIFT
Message
for
repair.
Perform
Check
C10
and
process
accord
ingly.
2.6
Acco
unt
Line
//
SC[Lo
cal
Clearing
Code][
Accou
nt
Number] or
//
SC[Lo
cal
Clearing
Code]
Derive
Credit
Accou
nt
Mark
SWIFT
Message
for
repair.
Mark
SWIFT
Message
for
repair.
Perform
Check
C12
and
process
accord
ingly.
13-34
3
MT
202
57B
Go to
next
priority field
Mark
SWIFT
Message
for
repair.
3.1
Acco
unt
Line
//
SC[Lo
cal
Clearing
Code]
Check
and
Validate
Local
Clearing
Codes
Go to
next
sub
priority field
If
Check
7 fails
then
Go to
next
sub
priority
field.
If
Check
C7
succeeds
then
Go to
next
priority field
3.2
Acco
unt
Line
/C/
[Accou
nt
Number]
Derive
Credit
Accou
nt
Go to
next
sub
priority field
Mark
SWIFT
Message
for
repair.
Perform
Check
C8 and
process
accord
ingly.
3.3
Acco
unt
Line
/D/
[Accou
nt
Number]
Derive
Credit
Accou
nt
Go to
next
sub
priority field
Mark
SWIFT
Message
for
repair.
Perform
Check
C9 and
process
accord
ingly.
3.4
Acco
unt
Line
/
[Accou
nt
Number]
Derive
Credit
Accou
nt
Go to
next
sub
priority field
Mark
SWIFT
Message
for
repair.
Perform
Check
C9 and
process
accord
ingly.
3.5
Acco
unt
Line
//
SC[Lo
cal
Clearing
Code][
Accou
nt
Number]
Derive
Credit
Accou
nt
Go to
next
sub
priority field
Mark
SWIFT
Message
for
repair.
Perform
Check
C10
and
process
accord
ingly.
13-35
3.6
4
MT
202
Acco
unt
Line
//
SC[Lo
cal
Clearing
Code][
Accou
nt
Number] or
//
SC[Lo
cal
Clearing
Code]
Derive
Credit
Accou
nt
57A
Mark
SWIFT
Message
for
repair.
Mark
SWIFT
Message
for
repair.
Go to
next
priority field
Mark
SWIFT
Message
for
repair.
Perform
Check
C12
and
process
accord
ingly.
4.1
SWI
FT
BIC
:57A:[
SWIFT
BIC]
Check
and
Validate
SWIFT
BIC
Mark
SWIFT
Message
for
repair.
If
Check
6 fails
then
Go to
next
sub
priority
field.
If
Check
C6
succeeds
then
Go to
next
priority field
4.2
Acco
unt
Line
//
SC[Lo
cal
Clearing
Code]
Check
and
Validate
Local
Clearing
Codes
Go to
next
sub
priority field
If
Check
7 fails
then
Go to
next
sub
priority
field.
If
Check
C7
succeeds
then
Go to
next
priority field
4.3
Acco
unt
Line
/C/
[Accou
nt
Number]
Derive
Credit
Accou
nt
Go to
next
sub
priority field
Mark
SWIFT
Message
for
repair.
Perform
Check
C8 and
process
accord
ingly.
13-36
4.4
Acco
unt
Line
/D/
[Accou
nt
Number]
Derive
Credit
Accou
nt
Go to
next
sub
priority field
Mark
SWIFT
Message
for
repair.
Perform
Check
C9 and
process
accord
ingly.
4.5
Acco
unt
Line
/
[Accou
nt
Number]
Derive
Credit
Accou
nt
Go to
next
sub
priority field
Mark
SWIFT
Message
for
repair.
Perform
Check
C9 and
process
accord
ingly.
4.6
Acco
unt
Line
//
SC[Lo
cal
Clearing
Code][
Accou
nt
Number]
Derive
Credit
Accou
nt
Go to
next
sub
priority field
Mark
SWIFT
Message
for
repair.
Perform
Check
C10
and
process
accord
ingly.
4.7
SWI
FT
BIC
SSI for
SWIFT
BIC +
Payment
Currency
Derive
Credit
Accou
nt
Mark
SWIFT
Message
for
repair.
Go to
next
sub
priority field
Perform
Check
C5 and
process
accord
ingly.
4.8
SWI
FT
BIC
SSI for
SWIFT
BIC's
Customer
+ Payment
Currency
Derive
Credit
Accou
nt
Mark
SWIFT
Message
for
repair.
Go to
next
sub
priority field
Perform
Check
C5 and
process
accord
ingly.
4.9
SWI
FT
BIC
:57A:[
SWIFT
BIC]
Derive
Credit
Accou
nt
Mark
SWIFT
Message
for
repair.
Mark
SWIFT
Message
for
repair.
Perform
Check
C11
and
process
accord
ingly.
13-37
5
MT
202
57D
Go to
next
priority field
Mark
SWIFT
Message
for
repair.
5.1
Acco
unt
Line
//
SC[Lo
cal
Clearing
Code]
Check
and
Validate
Local
Clearing
Codes
Go to
next
sub
priority field
If
Check
7 fails
then
Go to
next
sub
priority
field.
If
Check
C7
succeeds
then
Go to
next
priority field
5.2
Acco
unt
Line
/C/
[Accou
nt
Number]
Derive
Credit
Accou
nt
Go to
next
sub
priority field
Mark
SWIFT
Message
for
repair.
Perform
Check
C8 and
process
accord
ingly.
5.3
Acco
unt
Line
/D/
[Accou
nt
Number]
Derive
Credit
Accou
nt
Go to
next
sub
priority field
Mark
SWIFT
Message
for
repair.
Perform
Check
C9 and
process
accord
ingly.
5.4
Acco
unt
Line
/
[Accou
nt
Number]
Derive
Credit
Accou
nt
Go to
next
sub
priority field
Mark
SWIFT
Message
for
repair.
Perform
Check
C9 and
process
accord
ingly.
5.5
Acco
unt
Line
//
SC[Lo
cal
Clearing
Code][
Accou
nt
Number]
Derive
Credit
Accou
nt
Go to
next
sub
priority field
Mark
SWIFT
Message
for
repair.
Perform
Check
C10
and
process
accord
ingly.
13-38
5.6
6
MT
202
Acco
unt
Line
//
SC[Lo
cal
Clearing
Code][
Accou
nt
Number] or
//
SC[Lo
cal
Clearing
Code]
Derive
Credit
Accou
nt
58A
Mark
SWIFT
Message
for
repair.
Mark
SWIFT
Message
for
repair.
Go to
next
priority field
Mark
SWIFT
Message
for
repair.
Perform
Check
C12
and
process
accord
ingly.
6.1
SWI
FT
BIC
:58A:[
SWIFT
BIC]
Check
and
Validate
SWIFT
BIC
Mark
SWIFT
Message
for
repair.
Go to
next
sub
priority field
Perform
Check
C14
and
process
accord
ingly.
6.2
Acco
unt
Line
/C/
[Accou
nt
Number]
Derive
Credit
Accou
nt
Go to
next
sub
priority field
Mark
SWIFT
Message
for
repair.
Perform
Check
C8 and
process
accord
ingly.
6.3
Acco
unt
Line
/D/
[Accou
nt
Number]
Derive
Credit
Accou
nt
Go to
next
sub
priority field
Mark
SWIFT
Message
for
repair.
Perform
Check
C9 and
process
accord
ingly.
13-39
7
MT
202
6.4
Acco
unt
Line
/
[Accou
nt
Number]
Derive
Credit
Accou
nt
Go to
next
sub
priority field
Mark
SWIFT
Message
for
repair.
Perform
Check
C9 and
process
accord
ingly.
6.5
Acco
unt
Line
//
SC[Lo
cal
Clearing
Code][
Accou
nt
Number]
Derive
Credit
Accou
nt
Go to
next
sub
priority field
Mark
SWIFT
Message
for
repair.
Perform
Check
C10
and
process
accord
ingly.
6.6
SWI
FT
BIC
SSI for
SWIFT
BIC +
Payment
Currency
Derive
Credit
Accou
nt
Mark
SWIFT
Message
for
repair.
Go to
next
sub
priority field
Perform
Check
C5 and
process
accord
ingly.
6.7
SWI
FT
BIC
SSI for
SWIFT
BIC's
Customer
+ Payment
Currency
Derive
Credit
Accou
nt
Mark
SWIFT
Message
for
repair.
Mark
SWIFT
Message
for
repair.
Perform
Check
C5 and
process
accord
ingly.
Go to
next
priority field
Mark
SWIFT
Message
for
repair.
Go to
next
sub
priority field
Mark
SWIFT
Message
for
repair.
58D
7.1
Acco
unt
Line
/D/
[Accou
nt
Number]
13-40
Derive
Credit
Accou
nt
Perform
Check
C9 and
process
accord
ingly.
8
MT
202
7.2
Acco
unt
Line
/
[Accou
nt
Number]
Derive
Credit
Accou
nt
Go to
next
sub
priority field
Mark
SWIFT
Message
for
repair.
Perform
Check
C9 and
process
accord
ingly.
7.3
Acco
unt
Line
//
SC[Lo
cal
Clearing
Code][
Accou
nt
Number]
Derive
Credit
Accou
nt
Go to
next
sub
priority field
Mark
SWIFT
Message
for
repair.
Perform
Check
C10
and
process
accord
ingly.
Mark
SWIFT
Message
for
repair.
Mark
SWIFT
Message
for
repair.
Mark
SWIFT
Message
for
repair.
Mark
SWIFT
Message
for
repair.
72
8.1
13.1.7
Line
1
/BNF/
[Accou
nt
Number]
Derive
Credit
Accou
nt
Perform
Check
C9 and
process
accord
ingly.
Checks for Derived Account
All the above six tables refer to a common set of Checks which must be performed. The list
of checks is summarized below:
Check
Reference
C1
Description
Check for the existence of a valid external Nostro Account to Oracle FLEXCUBE Customer Account mapping record in Oracle FLEXCUBE. If a valid
mapping record exists in Oracle FLEXCUBE, then assign the Oracle
FLEXCUBE Customer Account to be the Debit Account for the Payment
Transaction.
13-41
C2
Check whether the Payment Currency is the Local Currency for the Oracle
FLEXCUBE Branch. If the Payment Currency is the Local Currency and if
the Sender BIC does not have the authority to specify the Debit Account for
the Payment Transaction, then move the Incoming SWIFT Payment Message to the Cover Matching queue. If the Payment Currency is not the
Local Currency and if the Sender BIC does not have the authority to specify the Debit Account for the Payment Transaction and the if the beneficiary
account is not in the books of the bank, then mark the Incoming SWIFT
Payment Message for repair with an appropriate repair reason. If the Payment Currency is not the Local Currency and if the Sender BIC does not
have the authority to specify the Debit Account for the Payment Transaction and if the beneficiary's account is in the books of the bank, then move
to Credit Account derivation processing. If the Sender BIC has the authority to specify the Debit Account for the Payment Transaction, then move to
Credit Account derivation processing.
C3
Check whether the derived Account exists as a valid Account in Oracle
FLEXCUBE for the current Branch. If the Account is not a valid Oracle
FLEXCUBE Account for the current Branch, then mark the Incoming
SWIFT Message for repair with an appropriate repair reason.
C4
Check whether the SWIFT BIC specified with A format of the field is same
as the SWIFT BIC of the Customer of the Account specified in the Account
line of the field. If this check fails then mark the SWIFT Message for
Repair.
C5
Check whether the Account specified in the SSI (Standard Settlement
Instruction) for the SWIFT BIC/SWIFT BIC's Customer ID is a valid
account in Oracle FLEXCUBE. If the Account specified in the SSI is invalid
then mark the SWIFT Message for Repair with an appropriate reason.
C6
Check whether the SWIFT BIC specified with A format of the field is
mapped to the current Branch of Oracle FLEXCUBE and the account line
sub field is not present along with the SWIFT BIC specified in the A format.
C7
Check whether only the Local Clearing Code for the Payment Currency
has been specified in the account line sub field. If only the Local Clearing
Code has been specified (and the account after the Local Clearing Code
has not been specified) in the account line sub field, then check whether
the Local Clearing Code specified in the account line sub field is mapped to
the Current Branch of Oracle FLEXCUBE.
C8
Check for the existence of a valid external Nostro Account to Oracle FLEXCUBE Customer Account mapping record in Oracle FLEXCUBE. If a valid
mapping record exists in FLEXCUBE, then assign the FLEXCUBE Customer Account to be the Credit Account for the Payment Transaction.
C9
Check whether the derived Account exists as a valid Account in FLEXCUBE for the current Branch. If the Account is not a valid Oracle FLEXCUBE Account for the current Branch, then mark the Incoming SWIFT
Message for repair with an appropriate repair reason. If the Account is a
valid Account in the current Branch, then assign the same to be the Credit
Account of the Payment Transaction.
13-42
C10
Check whether the Local Clearing Code specified in the account line of the
field is mapped to the Current Branch of Oracle FLEXCUBE. If the Local
Clearing Code specified maps to the Current Branch of FLEXCUBE, then
check whether the account number specified after the Local Clearing Code
is a valid Account in the current branch of FLEXCUBE and if so, assign to
be the Credit Account of the Payment Transaction. If the Account number
specified after the Local Clearing Code is not a valid account in Oracle
FLEXCUBE, then mark the SWIFT Message for repair with an appropriate
repair reason.
C11
Check whether Country Code of SWIFT BIC specified in the field with A
format matches with the Country Code of the Payment Currency specified
in field 32a and if so assign the default Nostro Account of the Payment
Currency to be the Credit Account of the Payment Transaction.
C12
Check whether the Local Clearing Code specified in the account line of the
field is mapped to the Current Branch of Oracle FLEXCUBE. If the Local
Clearing Code specified is not mapped to the Current Branch of Oracle
FLEXCUBE, then assign the default Nostro Account for the Payment Currency in field 32a to be the Credit Account for the Payment Transaction.
C13
Check whether the Sender SWIFT BIC has the authority to specify the
Account as the Debit Account of a Payment Transaction. If the Sender
SWIFT BIC does not have the authority, then mark the SWIFT Payment
Message for repair.
C14
Check whether the SWIFT BIC specified in field with A format is mapped to
the Current Branch of Oracle FLEXCUBE. If the SWIFT BIC is mapped to
the Current Branch of Oracle FLEXCUBE and if field 72 is not present then
Oracle FLEXCUBE should automatically suppress the SWIFT Message. If
field 72 is present then Oracle FLEXCUBE should mark the SWIFT Message for repair with an appropriate repair reason.
13-43
Notes
Notes
Reference
Notes Description
N1
Account line sub field of any field in an Incoming SWIFT Payment Message
should always start with '/'
N2
All SWIFT BICs specified in fields of an Incoming SWIFT Payment Message with A format will be validated against the SWIFT BIC directory maintained in Oracle FLEXCUBE. The SWIFT BIC specified in a field with A
format should have been defined as a valid SWIFT BIC in SWIFT BIC directory and should not have been blacklisted (blocked). Separate error messages shall be raised if the SWIFT BIC specified in a field with A format
does not exists or if SWIFT BIC specified in a field with A format is blacklisted (blocked).
N3
The ISO Currency code specified in field 32a of an Incoming SWIFT Payment Message should be valid Currency code defined in Oracle FLEXCUBE.
N4
The Local Clearing Code prefix specified in the Account line of fields 56, 57
and 58 shall be valided against the Currency code specified in field 32a.
For example if UK CHAPS code has been specified with a prefix of //
SC232023, then Oracle FLEXCUBE shall validate to ensure that //SC is a
valid local clearing code prefix for payment currency GBP. If the Local
Clearing Code prefix is invalid for the payment currency specified in field
32a as per Local Clearing Code configuration, then Oracle FLEXCUBE
shall raise an error message denoting the same.
N5
All Local Clearing Codes specified after the local clearing code prefix in
fields 56, 57 and 58 shall be validated to check that they are valid Local
Clearing Codes defined in Oracle FLEXCUBE. Oracle FLEXCUBE shall
also validate to ensure that the Local Clearing Code indicator is set to 'Y'
else Oracle FLEXCUBE shall raise an error for the same.
N6
Oracle FLEXCUBE shall remove all non-numeric characters from the
account line of a field to extract the account number specified in the
account line of a field in an Incoming SWIFT Payment Message.
N7
Oracle FLEXCUBE shall remove all non-numeric characters from the
account line of a field after the Local Clearing Code prefix to extract the
Local Clearing Code specified in the account line of a field in an Incoming
SWIFT Payment Message. After extracting the Local Clearing Code specified in the field after the Local Clearing Code prefix, Oracle FLEXCUBE
shall extract the account number, if specified after the Local Clearing Code
and validate the same.
13-44
14. Glossary
14.1 List of Important Terms
The following terms have been used in this manual.
Account Head
The general ledger and / or sub ledger in the chart of accounts that is debited or credited every
time a balance type account is liquidated or interest is accrued in respect of it.
Account Servicing Institution
This is the financial institution where the ordering customer’s account resides.
Account with Institution
This is the institution designated by the ordering customer, at which the beneficiary will
receive the transfer payment.
Accounting Role
This is the category under which any general ledger / sub ledger is classified.
Amount Item
This is the amount entry that is passed into a general ledger / sub ledger in the chart of
accounts for each transaction.
Auto book Function
This is the function that will process funds transfer contracts for which the rate pickup is
specified to be done on a future date
Bank Transfer
This is the funds transfer contract involving the movement of funds from the ordering
institution to the beneficiary institution.
Booking Date
This is the date on which the contract is entered into the Oracle FLEXCUBE system.
Charge Bearer
This is the entity that would bear the service costs incurred by the bank that processes a
contract.
Cover Payment
This is the reimbursement of a correspondent bank on behalf of the ordering institution.
Credit Advice
This is the advice generated by the account servicing institution, which indicates crediting the
receiver’s account.
Customer Transfer
This is the funds transfer effected by the financial institution of the ordering customer, to the
financial institution of the beneficiary. The initiating entity (i.e., the ordering customer) and the
receiving entity (i.e., the beneficiary) are not financial institutions.
Debit Advice
This is the advice generated by the account servicing institution, which indicates debiting the
ordering customer’s account.
14-1
Incoming Transfer
This is the funds transfer contract, which results in an inflow of funds to the bank.
Instrument Preferences
This is the instrument details for funds transfers, as maintained in the Product Preferences for
a funds transfer product.
Intermediary
This is the entity that bridges the gap between the ordering customer’s correspondent and
that of the beneficiary of a funds transfer.
Internal Transfer
This is the funds transfer contract, which results in funds being moved between customer
accounts within the bank. The bank manages internal transfers on behalf of its customers.
Message Preferences
The messaging details for outgoing transfers, as maintained in the Product Preferences for a
funds transfer product.
Netting
This is the summing of two or more accounting entries passed to an account for the same
event, so as to arrive at a net figure for posting.
Ordering Customer
This is the customer who requests for a transfer of funds contract, also known as the Remitter.
The cycle of a funds transfer contract begins with the ordering customer.
Ordering Institution
This is the financial house that is approached by an ordering customer to initiate the funds
transfer contract. The institution processes the funds transfer contract on behalf of the
ordering customer.
Our Correspondent
This is the name of the correspondent bank through which an ordering customer puts through
a funds transfer contract.
Outgoing Transfer
This is the funds transfer contract, which results in an outflow of funds from the bank.
Override Limit
This is the limit within which exchange rates are allowed to be changed over and above the
default value, without requiring an override. If the rate variance exceeds this limit, an override
is necessary for the changed rate to be accepted.
Product
This is the identifier, in Oracle FLEXCUBE, for any type of service that a bank offers its
customers. A set of attributes and preferences are maintained for the product, which will
apply to the processing of any contracts, transactions or deals involving the product (service).
Product Group
This is the group under which a product is logically classified, under which logically similar
products are placed together.
Product Remarks
This is the descriptive text about a product.
14-2
Product Slogan
This is the text or phrase that could be used as a declaration or an announcement of the
product, to customers.
Rate Preference
This is the specification as to the rate types and when exchange rates are to be picked up to
be applicable on funds transfer contracts involving a product.
Rate Update Function
This is the function used to process funds transfer contracts for which a rate update or refresh
is required, as specified in the Product Preferences.
Rate Variance
This is the difference between the default value and the changed value of an exchange rate
employed for currency conversion. Limits can be set for the variance.
Receiver’s Correspondent
This is the name of the correspondent bank who will receive the funds that are payable to the
receiver or the beneficiary.
Rekey Option
This comprises the fields that are to be keyed in by an authorizer of a transaction, for the
purpose of cross-checking, when the transaction is being authorized. Complete details of the
transaction will only be displayed when the authorizer ‘rekeys’ the values for these fields.
Settlement Route
This is the route that a funds transfer will take before it actually reaches the ultimate
beneficiary.
Spot Date
This is the date on which the contract is to be settled. The number of spot days specified for
the contract is taken into consideration.
Transaction Code
This is the identifier for each accounting entry that is used to track a particular transaction.
Value Date
This is the date on which a contract comes into effect. This date could be a future date, past
date or today.
DAO GL –
This is the draft advice outstanding General Ledger – mainly used for instrument / inward type
of product.
14-3
15. Reports
15.1 Introduction
The report programs available under the Funds Transfer (FT) module are explained in this
chapter. All activities that are performed by the FT module are recorded. The inputs you have
made at different stages of the contract are pieced together and can be extracted in the form
of meaningful reports as and when you may require them.
The reports that can be generated for the FT Module are as follows:
FT Daily Activity Journal
FT Contract Report
Note
Note that for some of the reports you do not have to make any specifications. For such
reports, there is no Report Options screen.
15.2 FT Daily Activity Journal
Every day Teller doing the financial transactions, prints hard copy of the three reports: 1. Cash
Position, 2.Teller Transaction Report, 3. Batch Journal Report for reconciliation with the
vouchers and cheques for onward submission. These reports are required to be developed in
Oracle FLEXCUBE.
The Daily Activity Journal reports all the FT contracts of your branch, for which some event
has taken place during the day. These details are printed and sorted on the basis of event and
product code.
You can invoke this screen by typing ‘FTRACTD’ in the field at the top right corner of the
Application tool bar and clicking on the adjoining arrow button.
The report details all activities that were performed on FT contracts as of a given day. All
contracts that were initiated either manually, or by the Autobook program together with those
15-1
processed by the FT Update Function will be listed in this report. The relevant details of a
Transfer, including the contract status such as reversed, reconciled etc., will be reported.
This report also indicates the overrides that were encountered during the day, while contracts
were processed. However the actual overrides can be viewed in the contract detailed view.
Click ‘OK’ button to generate the Daily Activity report, click ‘Exit’ to return to the Reports
Browser.
The Daily Activity Journal is provided with two options:
The Summary Option, and
The Detailed Option.
The Summary Option briefly highlights the basic aspects of a contract like the account
numbers of the remitter and beneficiary, the currencies used in the contract etc. The Detailed
Option on the other hand gives you a comprehensive report of the contract.
If you choose to generate this report as a part of the end-of-day processes, all the activities
performed during the day will be reported. You have the option to spool, print or view the
report.
15.2.1
Contents of the Report
The contents of the report are discussed under the following heads:
Header
The Header carries the Branch of the report, information on the branch and date, the ID of the
user who generated the report, the date and time at which it was generated and the module
of the report.
15-2
Body of the report
Contract
Indicates the contract.
Override
Indicates Override.
Spread
Indicates Spread.
Remitter Currency
This is the detail regarding the currency of the remitter.
Beneficiary Currency
This is the detail regarding the currency of the beneficiary.
Payment Details
This is the detail regarding the payment in the bank.
Product Description
This is the description of the respective product.
Contract Status
This is the current status of the FT Contract.
Remitter Amount
It gives the sum of remitter amount.
Beneficiary Amount
It gives the sum of beneficiary amount.
Exchange
This is the rate at which the exchange of currency is done.
Input
The Login ID of the user that created the reconciliation class
record.
Remitter Branch &
Account
This is the description of the branch and the account of the remitter.
Beneficiary Branch &
Account
This is the description of the branch and the account of the beneficiary.
Ordering Party
Indicates ordering party.
Authorized
The Login ID of the user that has authorized the record.
Debit Value Date
Debit value date of the entries contained in the external statement.
Credit Value Date
Credit value date of the entries contained in the external statement.
Check Number
This is the details regarding the check number.
Remitter A/C And
Description
This is the description of the remitter’s account.
Beneficiary A/C And
Description
This is the description of the beneficiary’s account.
Ultimate Beneficiary
A/C
This is the details regarding the ultimate beneficiary account.
Manager Check
Number
This is the details regarding the manager’s check.
15.3 FT Contract Report
The FT Contract reports all the FT contracts of your branch, for which some event has taken
15-3
place during the day. These details are printed and sorted on the basis of event and product
code.
You can invoke this screen by typing ‘FTRCON’ in the field at the top right corner of the
Application tool bar and clicking on the adjoining arrow button.
Click ‘OK’ button to generate the FT Contract report, click ‘Exit’ to return to the Reports
Browser.
15.3.1
Selection Options
The contents of the report are determined by the preferences that you specify.
You can specify the following preferences for the report:
Start Date
Select the start date of the contract from the option list.
End Date
Select the end date of the contract from the option list provided.
Currency
You need to specify the currency type. You have the following options:
All
One
Based on the currency type, you can select the currency from the option list provided.
Customer
You need to specify the customer type. You have the following options:
All
One
Based on the customer type, you can select the customer from the option list provided.
Account
You need to specify the account type. You have the following options:
All
15-4
One
Based on the account type, you can select the account from the option list provided.
Branch
You need to specify the branch type. You have the following options:
All
One
Based on the branch type, you can select the branch from the option list provided.
Amount
You need to specify the amount type. You have the following options:
All
One
Based on the amount type, you can select the required amount from the option list provided.
15.3.2
Contents of the Report
The contents of the report are discussed under the following heads:
Header
The Header carries the Branch of the report, information on the branch date, the ID of the user
who generated the report, the date and time at which it was generated and the module of the
report.
15-5
Body of the report
Contract
Indicates the contract
Remitter Currency
This is the detail regarding the currency of the remitter.
Beneficiary Currency
This is the detail regarding the currency of the beneficiary.
Payment Details
This is the detail regarding the payment in the bank.
Receiver Correspondent
This field captures Receiver Correspondent.
Spread Code
This is the description of the spread code.
Contract Status
This is the current status of the FT Contract.
Remitter Amount
It gives the sum of remitter amount.
Exchange Rate
This is the rate at which the exchange of currency is
done.
Beneficiary Amount
It gives the sum of beneficiary amount.
Remitter Branch & Account
This is the description of the branch and the account of
the remitter.
Beneficiary Branch &
Account
This is the description of the branch and the account of
the beneficiary.
Account with Institution
This is the details regarding the institution’s account.
Ordering Party
Indicates ordering party.
Input By
This field gives description regarding Input By.
Authorized By
The Login ID of the user that has authorized the record.
Debit Value Date
Debit value date of the entries contained in the external
statement.
Credit Value Date
Credit value date of the entries contained in the external
statement.
Check Number
This is the details regarding the check number.
Remitter A/C And Description
This is the description of the remitter’s account.
Beneficiary A/C And
Description
This is the description of the beneficiary’s account.
Ultimate Beneficiary A/C
This is the details regarding the ultimate beneficiary
account.
Product Description
This is the description of the respective product.
Manager Check Number
This is the details regarding the manager’s check.
15.4 Remittance Received Report
15-6
The Remittance Received Report gives details on remittance received.
You can invoke this screen by typing ‘FTRPREMR’ in the field at the top right corner of the
Application tool bar and clicking on the adjoining arrow button. .
You can specify the following preferences for the report:
Branch Code
Specify the branch code from the adjoining drop down list.
Report Date
Select the date from the option list.
15.4.1
Contents of the Report
The parameters specified while generating the report are printed at the beginning of the
report. Other content displayed in the Remittance Received Report is as follows:
Header
The following details are displayed in the header section:
Sr. No.
Field Name
Field Description
1
Branch
Indicates Branch name
2
Branch Date
Indicates Branch code
3
User ID
Indicates User ID
4
Module
Indicates Module name
5
Run Date
Indicates Date on which report is generated
15-7
Body of the Report
Contract Reference
Number
Indicates the contract reference number.
Dr Reference Number
Indicates the dr reference number.
Amount
Indicates amount.
Currency
Indicates currency.
Value Date
Indicates value date.
Correspondent
Bank
Indicates correspondent bank.
Beneficiary Details
Indicates beneficiary details.
Beneficiary Account
No
Indicates beneficiary account no.
Beneficiary Title
Indicates beneficiary title.
Remitter Detail
Indicates remitter detail.
Remitter Bank
Indicates remitter bank.
Remitter Account
Number
Indicates remitter account number.
Remitter Name
Indicates remitter name.
15-8
16. Function ID Glossary
C
CSDERMSG .......................9-12
CSDUAUTH ........................5-73
F
FTDBRMNT ........................4-16
FTDCONON .........................5-2
FTDCXFRA .........................5-75
FTDDSHBD ........................5-60
FTDMT101 ..........................5-77
FTDPRMNT ..........................3-1
FTRACTD ...........................15-1
FTRCON .............................15-4
FTRPREMR ........................15-7
FTSCONON ........................5-80
FTSTCONS ........................5-23
I
ISDBICPU ...........................4-10
ISDBICUM ..........................4-11
ISDCCYRS .........................4-17
ISDCTMNT ...........................4-8
ISDDACNV ...........................9-6
ISDNTMNT ...........................4-7
ISDRTGSD .........................4-12
M
MSDCOMPY ......................11-2
MSDCPYUD .......................11-3
MSDMPYPR .......................11-4
MSDMTUDF .........................9-8
MSDSTPRF ........................9-20
MSSPMTBR .......................11-5
P
PCDCLRNT ..........................4-3
PCSSINFD............................. 18
16-1


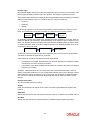


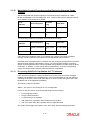
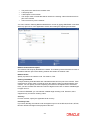
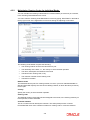
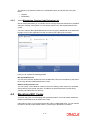
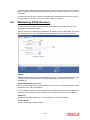
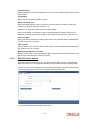
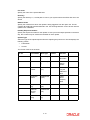
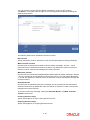
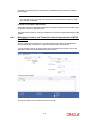

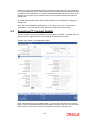
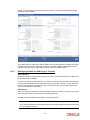

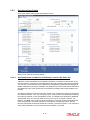
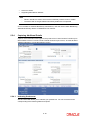
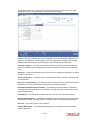
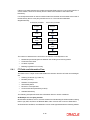

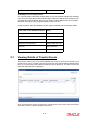
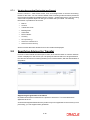
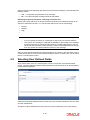
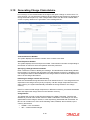
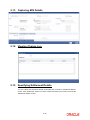
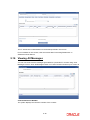


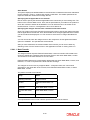
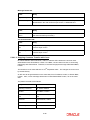
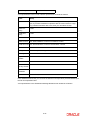
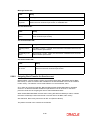
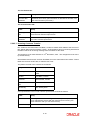
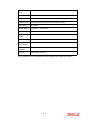

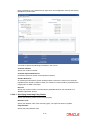
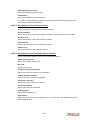
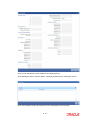
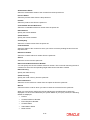
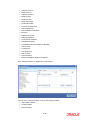


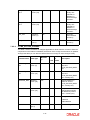
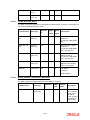

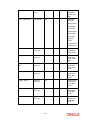


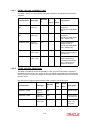
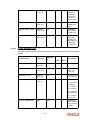
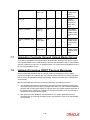

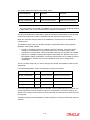


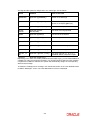


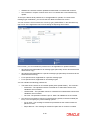

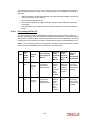
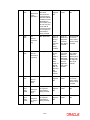

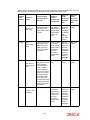
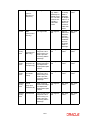
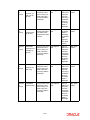
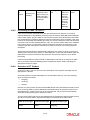

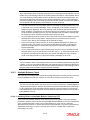


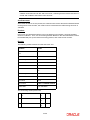
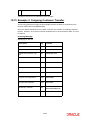
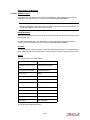
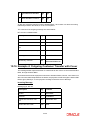
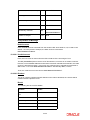
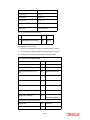
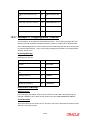
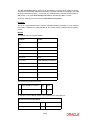
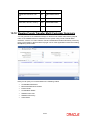
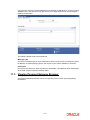
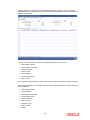
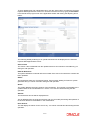
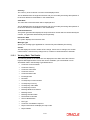
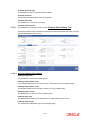


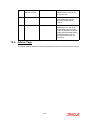

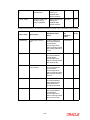
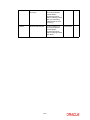

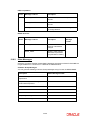
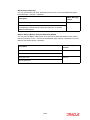
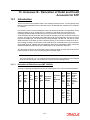


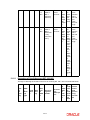


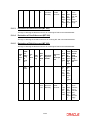


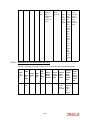


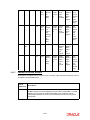

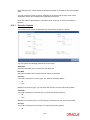


![[December] [2011] Oracle Part Number E51535-01](http://vs1.manualzilla.com/store/data/005639894_1-7cab28abe75641f653b0af59966ce958-150x150.png)