1
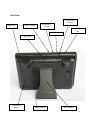
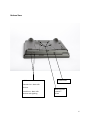
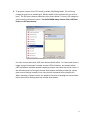
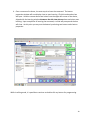
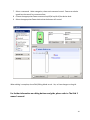
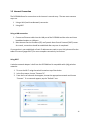
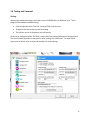
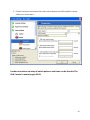
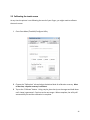
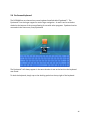
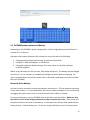
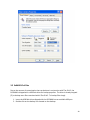
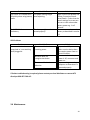
User’s Manual Version 2.2 ATS, LLC 216 Seaboard Lane Suite C Franklin, TN 37067 800.457.2318 www.atsaac.com [email protected] 1 Table of Contents 1. Getting Started 1.1. Getting to Know Your Device 1.2. Initial Setup 1.3. EzCOMM infrared (IR) features 1.4. Zwave environmental control 1.5. Internet Connection 1.6. Texting & Voicemail 2. Access Features 2.1. Input Devices 2.2. Switches 2.3. Calibrating the touch screen 2.4. On-Screen Keyboard 3. General Information 3.1. EzCOMM power options and battery 3.2. EzBACKUP of files 3.3. Troubleshooting 3.4. Maintenance 3.5. Battery Care 3.6. Warranty Notice of Compliance: Complies with Canadian ICES-003 2 1.1 Getting to Know Your Device Side view eSATA External Video DISABLED Stylus Mic Jack Infrared learning window Ethernet Port Firewire Port – Plug in Firewire peripherals here. Modem Port – Use for dialup internet access Headphone Jack USB Ports – Plug in peripherals such as keyboard, mouse, and external DVD/CD drives. 3 Back View Power Input Wi-Fi – On/Off Dual Infrared Emitters Bluetooth – On/Off Power Button PCMCIA Type II Slot Finger Hold Extended Life Battery Battery Release Table top Stand 4 Back Side Ports Dual Switch Ports External Headphone Jack USB Ethernet Port 5 Bottom View USB Ports – Firewire Port Outside Port – Basic USB devices Inside Port – Basic USB devices and signaling. Mounting Plate Location – 75mm 6 1.2 Initial Setup The EzCOMM user manual is written specific to the hardware components inclusive to the device itself. Details for integration of certain hardware components with pre-loaded software will be contained within this manual. Software specific questions or tablet pc questions can be further supported by the accompanying user manuals respectively. In most cases, your EzCOMM is shipped ready to use with applicable software already loaded. In the event that you wish to load a software title that did not ship with the device, simply plug the external DVD/CD player into one of the USB ports and follow the onscreen instructions to load the software (non-dedicated devices only). What’s in the Box EzCOMM Software (applicable software that was ordered with the device and preinstalled) Carrying Case Mouse Keyboard External DVD/CD drive USB flash drive (mapped as Z drive) Users manual(s) o EzCOMM o Software (if applicable) o Tablet PC Power Cord Fine lint cloth for screen basic screen cleaning 7 1.3 EzCOMM infrared (IR) Features The EzCOMM is equipped with a Universal-Learning remote control. It is comprised of two parts: 1) learning window as shown on the side view in Sec. 1.1 2) Dual infrared emitters as shown on the back view of Sec. 1.1. When the EzCOMM is used in conjunction with The Grid 2, practically an infrared controlled device can be learned and controlled within The Grid 2 software. The following steps will setup your remote controlled device: 1. Launch The Grid 2 2. Open a grid that is designed for environmental controls (EC). Some user profiles that ship with The Grid 2 already have EC grids designed. Some customization is all that is needed to have these grids work for you. Below is a screen shot of an EC grid that is included with StarTalker and Grid Talk. 8 3. To program a button on an ECU board, go under Edit/Editing Mode. This will bring change the grid into an editable grid. Merely double click any button that you wish to learn. This will open a button properties menu shown below. For ease, click categories and choose Environmental control. For the EzCOMM always choose either UIRT hold button or UIRT press button. For most remote commands, UIRT press button should suffice. For commands where a longer string of commands is needed, choose UIRT hold button. An example where UIRT hold button would be needed is adjusting volume more than one step at a time. If the desired outcome of using the volume down button would be to lower the volume down several settings instead of one, then the hold command will accomplish this. When operating a remote control, this would be the same as tapping the volume down button once versus holding down the volume down button. 9 4. Once a command is chosen, the next step is to learn the command. The button properties window will now display a box to start learning. Click this and another box will open. Hold the remote about two inches from the upper left corner of the device, aligned with the learning window shown on the side view picture above and select start learning. Upon completion of learning the command, a sound will prompt and the box will close. At this point you may test the button by selecting test button under button properties. While in editing mode, it is possible to continue to double click any button for programming. 10 Note: a button can contain multiple commands. For example, if you needed to program a button to execute changing a TV channel to channel 54 then two commands would need to be programmed for this button. Between commands, insert a wait command between the 5 and 4 commands. This would also apply to creating speed dial buttons to use with an IR enabled telephone. Below is an example of a button containing multiple commands: When editing is complete, chose Edit/Editing Mode to exit. Yes, to Save changes to the grid. For further information on editing buttons and grids, please refer to The Grid 2 owner’s manual. 11 1.4 Zwave environmental control The EzCOMM is equipped with a Zwave controller that allows the EzCOMM to operate Zwave enabled electronics. Home automation has always been a sought after solution for people with disabilities. However, delivering a dependable, simple, and affordable solution has been a formidable task. Over the years, power-line technologies such as X-10 have been the primary means of deploying home automation to users with varying disabilities. While there are some end results that can be accomplished using technologies such as X-10, deploying a large network of automated responses has not been consistent in regards to outcome. Too many variables can affect power-line commands i.e. wiring within your house, age of wire, gauge of wire, and interference from particular appliances. This is where Zwave excels: Dependable Simple Affordable Zwave is a low radio frequency technology developed by a consortium of the leading, global manufacturers that build automation products based on an open standard. In essence, all Zwave enabled products will work with each other regardless of the manufacturer. Furthermore, all automation products network with each other to create a mesh network within your home. Lamp module one will pass a signal to a thermostat which in turn will pass the command to lamp module two in a different room. 12 New Zwave enabled products are coming to market at a rapid pace. For a simplistic example of setting up a Zwave appliance using the EzCOMM we will use a lamp module. 1 Plug a lamp module into a wall socket. 2 Launch The Grid 2. Select Edit/User Settings/Environmental Control/Zwave 3 With the EzCOMM in close vicinity to the lamp module (4 feet or less), choose add device. At this time a window will open asking you to press the button on the module to be added. After adding the module, rename it as an applicable descriptor (bedroom lamp for example). You may test it by using the turn on and turn off buttons in the dialog box. 4 Continue adding modules as needed. Each module should have a unique name. Additional modules can be added at any time to the network. 5 The next step is similar to editing a button described in the previous section. Open the grid that will contain the zwave control buttons. Next chose Edit/Editing Mode. Double-click on the button to be programmed to open the edit cell dialog box. 6 Add a command. Note, some buttons may have a GEWA command already present. Delete this command before adding the new command. 13 7 Select a command. Under categories, chose environmental control. Zwave can also be typed into the search for a command box. 8 Choose the appropriate Zwave command on/off/all on/all off/set device level. 9 Select the appropriate Zwave device that the button will control. When editing is complete, chose Edit/Editing Mode to exit. Yes, to Save changes to the grid. For further information on editing buttons and grids, please refer to The Grid 2 owner’s manual. 14 1.5 Internet Connection The EzCOMM allows for connection to the internet in several ways. The two most common ways are: 1 Using a LAN (Local Area Network) connection 2 Using Wi-Fi Using a LAN connection 1. Connect an Ethernet cable into the LAN port of the EzCOMM and the other end into a broadband modem or LAN port. 2. Most Internet Service Providers (ISP) use Dynamic Host Control Protocol (DHCP) server. As a result, connection should be established after step one is completed. If a connection is not established or Static IP addresses are used on your LAN, please utilize the tablet PC manual (pages 64-67) for more complete connectivity instructions. Using Wi-Fi A wireless network adapter is built into the EzCOMM and is compatible with a/b/g wireless networks. 1. Turn on the Wi-Fi using the switch located on top of the device. 2. In the Start menu, choose “Connect To” 3. From the list of networks that appear, choose the appropriate network and choose “Connect.” If no networks appear, tap the “Refresh” icon. 15 4. If the wireless network you are attempting to connect to is security-enabled, a dialog box will appear requesting a key. Enter the key and connect. 16 1.6 Texting and Voicemail Texting: Inbound and outbound texting is possible on your EzCOMM with no additional cost. Three things will be needed to enable texting: Email configured within The Grid 2 using a POP3 email account. Telephone # of the person you will be texting. The cellular carrier of the person you will texting. Email can be configured within The Grid 2 under Edit/User Settings/Workspace Settings/Email. The Grid 2 already provides an example for email settings for Gmail users. For other email types such as Yahoo, refer to the email provider for email settings. 17 Upon completion, contacts saved in your contact list should include a contact specific for texting. Thus each contact will have two saved contacts. One contact used for email and phone number. The second for texting. Email and phone contact information: Texting information: 18 List view of contacts: As shown above, there are two distinct contacts saved for one contact. Select the appropriate contact based on if sending email or text. Phone # and carrier information is needed to add texting contacts. Listed below are texting addresses for the most common cellular carriers in the U.S. 19 20 Voicemail: Voicemail is available via the pairing of an IR enabled phone. However, a more simplistic approach is to obtain a Google Voice phone #. Google Voice is a free service provided by Google. One may obtain a number that is local or any number they wish across the U.S. Google Voice allows for an end user to point any # of phone numbers to the Google Voice #. Thus, giving the ability to manage one phone number shared with friends or family. Once a Google # is obtained, then you configure all voicemails to be forwarded to the email address of your choice. By doing so, all voicemails will be converted to text and emailed to your email account configured in the EzCOMM. Sign-up for Google Voice at the following web address: www.google.com/voice Once your Google # has been established, go to your Google Voice inbox and select settings. Select the Voicemail & Text tab and under Voicemail Notifications select email the message to: and input your email address configured within The Grid 2. Under Voicemail Transcripts, check the box to Transcribe Voicemails. 21 2.1 Input Devices Your EzCOMM is capable of accepting a wide variety of input devices. These include: Touch screen On-Screen Keyboard External keyboard External mouse/trackball/joystick Head mouse Switch(s) Eye Tracker Camera System Bluetooth enabled devices Most of the listed hardware will connect to the EzCOMM using one of the USB ports. For detailed information on connecting a Bluetooth device, please refer to the Tablet PC manual pages 70-71. Please contact your local distributor for more information regarding integration with an Eye Tracker Camera System. 22 2.2 Switches The EzCOMM is equipped to work with one or two switches without the need for any external hardware. For the purpose of this manual, setup of switches with The Grid 2 will be covered. For setup with use with different software, please refer to that respective software user manual. When a switch is used with The Grid 2, simply plug the switch into SW port 1 on the back of the EzCOMM and a connection should be established. 1 2 3 4 Launch The Grid 2. Go under Edit/User Settings Locate Input Settings/Switch Check the box to enable switch input 23 5 Choose Connection and ensure that under switch adapter that USB Joycable is chosen. Under port, choose port 1. Further instructions on setup of switch patterns and times can be found in The Grid 2 owner’s manual pages 82-94. 24 2.3 Calibrating the touch screen At any time the pointer is not following the touch of your finger, you might need to calibrate the touch screen. 1 Go to Start Menu/TouchKit/Configure Utility 2 Choose the “Calibration” tab and select the desired level of calibration accuracy. Most of the time, a 4 point accuracy is sufficient. 3 Tap on the “Calibrate” button. Using a stylus, place the tip on the target and hold down until a beep is generated. Continue to the next target. When complete, the utility will automatically exit and the calibration is complete. 25 2.4 On-Screen Keyboard The EzCOMM has an enhanced on-screen keyboard installed called Eyesboard™. The Eyesboard™ has the larger targets for easier finger navigation. As well it can be resized or docked at the bottom of the screen allowing for use with other programs. Eyesboard can be accessed via the Start menu, Start/Eyesboard The Eyesboard™ will always appear in the same location it was at the last time the keyboard was closed. To dock the keyboard, simply tap on the docking symbol on the top right of the keyboard. 26 3.1 EzCOMM power options and battery Depending on the EzCOMM’s power configurations, a fully charged battery should allow for a runtime of 5.5 to 8 hours. Operations that impact the battery life include, but are not limited to the following: 1 Using external peripheral devices such as optical and hard drives 2 Using Wi-Fi, Bluetooth adapter, or USB devices 3 Using high-brightness display settings, 3D screens savers or any other hardware intensive programs. Before using the battery for the first time, fully charge the battery. The battery may be charged at any time. It is not necessary to completely discharge the battery before recharging. For more complete battery instructions, please refer to the battery operating instructions included with your EzCOMM. Removal of the battery: At times it may be necessary to remove the battery and reinsert it. This can be done to perform a hard reset on the pc. It is recommended in the event a reboot is needed, to first try restarting by toggling the power button over for several seconds until a reboot is initiated. To remove the battery, turn the EzCOMM over screen down on a flat surface. Make sure that the surface is clear of any foreign substances in order to protect the screen. Place the back of the palm of hand on the center of the battery. At the same time, with the other hand slide the battery lock up. Push the battery out. To reinsert, simply slide back in until it locks into place. 27 Power Options: The EzCOMM is shipped with power option settings configured to create a balance of performance and extension of battery life. As noted above, several factors can have a negative impact on battery life. Power settings can be changed by: 1 Right-click anywhere on the desktop. If using a finger, point finger on the screen and continue to touch the screen until and menu appears. Select properties 2 Choose the Screen Saver tab and select Power Options at the bottom of the screen. 28 3.2 EzBACKUP of files Due to the amount of customization that can be done in conjunction with The Grid 2, the EzCOMM is shipped with a USB flash drive for backup purposes. The drive is already mapped (Z:) to backup users files contained within The Grid 2. To backup files simply: 1. Insert the USB flash drive shipped with the EzCOMM into an available USB port. 2. Double-click on the backup icon located on the desktop 29 At this point Windows NT backup will automatically backup The Grid 2 user’s files. Any custom grid sets and settings will be backed up as well. This will function as described if The Grid 2 user files have been saved to the default location given with The Grid 2 software. Restoration of Files 1. Re-insert the USB flash drive into an available USB port. 2. Open My Computer and double-click on Z: 3. Locate the Windows Backup File (WBF) and double click 30 4. The Backup or Restore Wizard will launch. Click Next. 5. On the next screen, choose restore files and settings and Next. 6. Next choose the backup file to restore by choosing Browse/Z:/ats.bkf. Once this is chosen, it will populate in the window below. Check in the box next to the file and select Next. 31 7. The next screen will show the file being restored (ats.bkf) and by default will restore the file in the original locations. Select Finish and the file will be restored. 3.4 Troubleshooting 32 While every step is taken to ensure that your EzCOMM is thoroughly tested before shipment, a few common hardware/software problems and suggestions are presented in the tables below: Audio Problems/Solutions Problem There is no sound or low volume Possible Cause The wrong sound card might be selected There are no voices generated A voice is not selected for the when using The Grid 2 current User. Solution Start/Control Panel/Hardware and Sound/Sound/Manage Audio Devices. Select USB C Media audio device. With The Grid 2 open, go under Edit/User settings/Speech/Public Voice. Make sure a voice has been selected. Access Problems Problem When touching the screen, the mouse cursor does not follow my finger. A switch is non-responsive Possible Cause The touch screen may need re-calibrated Solution Recalibrate the screen as described in section 2.3 The proper switch setting may Grid 2/User Settings/Switch not be applied. Check Ensure switch input Grid 2/User Settings/Switch/Connection Make sure for switch adapter, USB Joycable is chosen. Port 1 is usually the default port. Power Problems 33 Problem The screen or EzCOMM turns off quickly when using battery power Possible Cause The power settings might need adjusting. The EzCOMM does not see the battery The battery might not be seated properly. Solution Right-Click on the desktop and choose, Properties/Screen Saver/Power. Ensure that the power settings for screen are not set to a low value under battery power e.g. 1 to 5 minutes. Please remove and reseat the battery as described in section 3.1 USB Problems Problem An external device is not recognized or is not working when plugged in. Possible Cause The external device is not receiving power Windows does not recognize the device. The external device is defective Solution Try another USB port. Make sure the device does not require power from an electrical outlet. Disconnect the device, power it off, reconnect and power on. Try connecting to another computer to determine if it operated properly. If further troubleshooting is required, please contact your local distributor or contact ATS directly at 800.457.2318 x15. 3.4 Maintenance 34 Your EzCOMM was manufactured to withstand the rigors of everyday use. However, please avoid using the EzCOMM in extreme environments. The EzCOMM is equipped with an outdoor-viewable screen and form normal use will show finger prints from using the touch screen. Please use the lint-free cloth to wipe the screen for fingerprints or dust occasionally. Never use glass cleaner or a wet cloth. Avoid using or storing the EzCOMM in extreme temperature environments. Avoid using around water or damp environments where water can rest on the surface of the screen or device. As a general rule of thumb, never use around water. Only use the unit that has a 2 or 3 wire 120V single phase connector/plug. Outside of the U.S.A. and Canada, an adapter must be used. 35 3.5 Battery Care 36 3.6 Warranty Standard Warranty ATS, LLC warrants our products to conform to ATS published specifications and to be free from defects in materials or workmanship for a period of (1) year from the date of shipment. This warranty only applies to ATS, LLC manufactured products. This warranty does not cover loss or theft or damage that was caused by, in our estimation, servicing (upgrading, expansion, disassembly, repair, or other modification) by anyone who is not explicitly authorized by ATS, LLC. This warranty does not cover any damages ATS considers to be a result of misuse malicious intent. For all warranty service and repair, ATS will make a best effort to provide a loaner replacement for the time service is rendered. All warranty and service should be arranged through ATS, LLC. Please contact ATS at 800.457.2318 x 15 for assistance. If it is deemed that the device needs to be shipped back for service, a Return Authorization (RA) will be issued. If a product is returned under warranty, ATS will provide pre-paid return shipping and address information. For all non-warranty service, or repair, or replacement, you are responsible for the cost of shipping the device to the ATS address provided to you. Extended Warranty An Extended Standard Warranty for a period of one (1) or two (2) years is available from ATS, LLC. The Extended Standard Warranty warrants the product from defects in materials or workmanship for a period that is purchased. This warranty does not cover loss or theft or damage that was caused by, in our estimation, servicing (upgrading, expansion, disassembly, repair, or other modification) by anyone who is not explicitly authorized by ATS, LLC. This warranty does not cover any damages ATS considers to be a result of misuse malicious intent. The Extended Warranty period will extend from the date that the Standard Warranty expires. Prior to the expiration date of the Standard Warranty, an Extended Warranty may be purchased at the published price at the time of purchase. 37