1
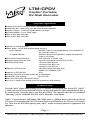
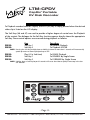
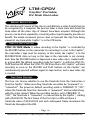
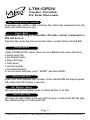
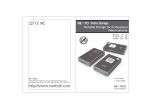
LTM-CPDV User Manual
LTM-CPDV
CapDiv™ Portable
DV Disk Recorder
© 2003 Laird Telemedia.
CE
LAIRD LIMITED WARRANTY
THIS WARRANTY APPLIES ONLY TO EQUIPMENT PURCHASED IN THE UNITED STATES.
Warranty Time Period
Laird warrants your product (excluding the batteries) to be free from malfunctions and defects in both materials
and workmanship for one year from the date of purchase.
Warranty Repair Coverage
This warranty will be honored within the geographical location that the product was purchased.
If this equipment does not function properly during the warranty period due to defects in material or workmanship, Laird will, at its option, either repair or replace the equipment without charge, subject to the conditions and
limitations stated herein. Such repair service will include all labor as well as any necessary adjustments and/or
replacement parts.
If replacement parts are used in making repairs, these parts may be remanufactured, or may contain remanufactured materials. If it is necessary to replace the entire system, it may be replaced with a remanufactured system.
Limitations of Warranty
Warranty service will not be provided without dated proof of purchase. Please return the Warranty Registration
card within 30 days of purchase.
This warranty becomes null and void if you fail to pack your unit in a manner consistent with the original product packaging and damage occurs during product shipment.
This warranty does not cover: circumstances beyond Laird's control; service or parts to correct problems resulting
from the use of attachments, accessories, or alterations not marketed by Laird; service required as the result of
unauthorized modifications or service; misuse or abuse; failure to follow Laird's operating, maintenance or
repackaging instructions; failure to use items supplied by Laird (such as adapters and cables).
Laird makes no other warranties, express, implied, or of merchantability or fitness for a particular purpose for this
equipment or software.
Repair or replacement without charge is Laird's only obligation under this warranty.
LAIRD WILL NOT BE RESPONSIBLE FOR ANY CONSEQUENTIAL OR INCIDENTAL DAMAGES RESULTING FROM THE
PURCHASE, USE, OR IMPROPER FUNCTIONING OF THIS EQUIPMENT REGARDLESS OF THE CAUSE. SUCH DAMAGES FOR WHICH LAIRD WILL NOT BE RESPONSIBLE INCLUDE, BUT ARE NOT LIMITED TO, LOSS OF REVENUE OR
PROFIT, DOWNTIME COSTS, LOSS OF USE OF YOUR UNIT, COST OF ANY SUBSTITUTE EQUIPMENT, FACILITIES, OR
SERVICES, OR CLAIMS OF YOUR CUSTOMERS FOR SUCH DAMAGES.
Outside the United States
In countries other than the United States, warranty terms may be different. Unless a specific Laird warranty is
communicated to the purchaser in writing by Laird, no warranty or liability exists even though defect, damage,
or loss may be by negligence or other act of Laird.
Laird Telemedia is a division of Tower Products, Inc.
LTM-CPDV
CapDiv™ Portable
DV Disk Recorder
TABLE OF CONTENTS
Included Equipment & Features . . . . . . . . . . . . . . . . . . . . . . . . . . . . . . . . . . . . . . . . . . .2
Power Options / Battery Pack Recharging . . . . . . . . . . . . . . . . . . . . . . . . . . . . . . . . . . . .3
Front / Top Panel Designations (Figure 1.0) . . . . . . . . . . . . . . . . . . . . . . . . . . . . . . . . . . .4
Rear / Bottom Panel Designations (Figure 2.0) . . . . . . . . . . . . . . . . . . . . . . . . . . . . . . . . .5
CapDiv Operations . . . . . . . . . . . . . . . . . . . . . . . . . . . . . . . . . . . . . . . . . . . . . . . . . . . . .6
Stop & Record Key Functions . . . . . . . . . . . . . . . . . . . . . . . . . . . . . . . . . . . . . . . . . . . . .7
Playback & Softkey Functions . . . . . . . . . . . . . . . . . . . . . . . . . . . . . . . . . . . . . . . . . . . . .8
Setting Up CapDiv . . . . . . . . . . . . . . . . . . . . . . . . . . . . . . . . . . . . . . . . . . . . . . . . . . . . .9
Recording with CapDiv . . . . . . . . . . . . . . . . . . . . . . . . . . . . . . . . . . . . . . . . . . . . . . . . .13
Operating in AV Hard Drive Mode . . . . . . . . . . . . . . . . . . . . . . . . . . . . . . . . . . . . . . . .18
Support Information . . . . . . . . . . . . . . . . . . . . . . . . . . . . . . . . . . . . . . . . . . . . . . . . . . .22
Glossary of Terms Used in this Manual . . . . . . . . . . . . . . . . . . . . . . . . . . . . . . . . . . . . .23
Safety Precautions . . . . . . . . . . . . . . . . . . . . . . . . . . . . . . . . . . . . . . . . . . . . . . . . . . . .24
Topics Covered in this Manual
• General media organization in VTR mode
• Menu setup mode
• Recording in Sync-to-tape Mode & Recording without Sync-to-tape
• Time code control
• Marking while recording & Jumping to a recorded mark
• Playback
• Connecting to NLE as a VTR
• General media organization in HDD mode
• OS compatibility list
• Translating file systems
• Connecting to a Windows based computer
• Disconnecting from a Windows based computer
• Connecting to a Mac computer
• Disconnecting from a Mac computer
• Importing files
- Page 1 800-898-0759 • 845-339-9555 • 2000 Sterling Road • Mount Marion, NY 12456 • www.lairdtelemedia.com
LTM-CPDV
CapDiv™ Portable
DV Disk Recorder
INCLUDED EQUIPMENT
■
■
■
■
■
■
Integrated 40 GB (LTM-CPDV3) or 60 GB (LTM-CPDV4) ATA HDD.
Video Utility Belt – Nylon, utility waist-belt wired for battery operation.
Battery & Charger - 12 VDC rechargeable battery and charger.
AC Power Adapter – 12V AC Power Supply.
6-Pin to 6-Pin IEEE 1394 cable.
4-Pin to 6-Pin IEEE 1394 cable.
CAPDIV™ FEATURES
■ Belt-worn or desktop operation
■ Power options - see full detail of power option on page 4
Battery Operated:
Provided 12-Volt DC re-chargeable battery or any Compatible 12Volt source @1.5Amps DC.
AC Adapter Operated:
Provided 110/220 switch regulated AC adapter with regulated
12Volt DC @ 1.5Amps
■ IEEE1394 DV Format Recording:
Trade referred to as Firewire, i-Link
■ Organize footage while you shoot:
Clip media management system of Bins and Files
■ Audio Recording Ability:
2 channels 16 bits @48 kHz
2 channels 16 bits @44.1 kHz
4 channels 12 bits @32 kHz
■ Operates in VTR Emulation:
Front Panel Control of RECORD, PLAY,
REWIND, FAST FORWARD, STOP
■ Operates as IEEE1394 HDD:
FAT32
■ Recording controlled by FireWire camera, NLE or independently
■ Drop Marks while recording:
Tags media files
■ Non-Linear Edit systems control and interface
■ Less than 2 seconds of lost footage in the case of power loss while recording
INTRODUCTION
™
The Laird CapDiv digital video recorder (DVR) is a portable, self-contained open format DVR. CapDiv™
is a belt-worn and/or camera mounted DVR that can play and record DV video captured directly from a
DV camera and/or Camcorder onto a hard disk drive (HDD). The captured video clips are considered
“edit-ready” and are compatible with Mac and PC based Non Linear Editors.
CapDiv™ is manufactured in two models: LTM-CPDV3 which is a 40Gbyte drive system and can hold up
to 3 hours of DV recording and LTM-CPDV4 which features a 60Gbyte drive for 4.5 hours of DV recording. Other than the HDD drive capacity, both CapDiv™ models are exactly identical in appearance and
operations.
- Page 2 800-898-0759 • 845-339-9555 • 2000 Sterling Road • Mount Marion, NY 12456 • www.lairdtelemedia.com
LTM-CPDV
CapDiv™ Portable
DV Disk Recorder
CAPDIV™ POWER OPTIONS
CapDiv™ is able to draw power from several convenient sources.
These include:
■ CapDiv™ must be powered at all times by a 12V DC source @ 1 Amp. It DOES NOT
draw power via the 6-Pin IEEE 1394 FireWire connector.
■ It may be powered with the enclosed, belt-worn 12V DC rechargeable battery.
■ It may be powered from the included 110-220V AC to 12V DC adapter.
CAPDIV™ PORTABLE BATTERY POWER
Your CapDiv™ includes a 12V portable battery power pack. Although this battery pack is
shipped with a charge, it is recommended that the battery be charged for six (6) hours before
its initial use.
USE:
Simply plug the battery pack output cord into the power input of CapDiv™.
CHARGING:
WARNING:
Never leave your battery in the charge mode for longer than 24
hours. Excessive charging can cause permanent damage to your battery and can cause leakage. If the installed AUTOMATIC FUSE should
blow out, return the unit for replacement.
The battery power pack should be charged after each use. To charge, simply connect the
battery pack to the charging station. The time required for a full charge depends on the
amount of power left in the battery (see guide below).
Charge Time
Charge Needed
25%
2 Hours
50%
4 Hours
100%
8 Hours
STORAGE:
Battery should be stored with a full charge and be charged again every three months when
not in use. It should also be stored in a cool, dry place. This will help preserve the battery
and insure long life. Under no circumstances should the battery pack be punctured or disassembled in any way. NEVER insert the battery plug into anything other than the charging
station or the CapDiv™.
- Page 3 800-898-0759 • 845-339-9555 • 2000 Sterling Road • Mount Marion, NY 12456 • www.lairdtelemedia.com
LTM-CPDV
CapDiv™ Portable
DV Disk Recorder
FIGURE 1.0 / TOP PANEL FUNCTIONS
2
1
3
4
5
6
7
1
LCD - for LCD readout definitions, see page 11
2
PLAY/PAUSE
• In idle mode, pressing this button plays the
current bin from its beginning, or from its last
play position.
• In play mode, pressing this button will toggle
between the play and pause function.
• In idle mode, holding down the REC(5) button
and pressing PLAY(2) will begin a recording
session.
3
MENU
• Scroll through five CapDiv™ functions by
pressing the MENU button.
• Use softkeys to select and set different functions (Functions listed under MENU SETUP
MODE).
• To select MENU option, press ENTER :Right
Softkey(7)
• To leave MENU function, press CANCEL: Left
Softkey(6)
4
STOP
• In play mode, pressing this button will stop
playing.
• In record mode, pressing this button will stop
recording.
5
RECORD
• Begins a recording session by holding down
REC and pressing PLAY at the same time.
When sync to tape is enabled, actual recording
will begin when the camera starts recording.
• While recording, press the REC button to drop
marks.
6
LEFT SOFTKEY
7
RIGHT SOFTKEY
• The functions of the softkeys depend entirely
on the currently displayed mode. The softkey’s
current function is always displayed directly
above each softkey, on the bottom line of the
LCD panel. For example, as seen in the photo,
in idle mode, the LEFT and RIGHT softkey’s
function as PREVIOUS and NEXT, respectfully.
To scroll through the bins, press RIGHT softkey
(NEXT) to advance forward one bin, or press
LEFT softkey (PREVIOUS) to scroll back one
bin.
NOTE: Pressing and holding either softkey beyond
2 seconds when CapDiv is in Fast Forward or
Reverse will increment search speed up to 32X.
- Page 4 800-898-0759 • 845-339-9555 • 2000 Sterling Road • Mount Marion, NY 12456 • www.lairdtelemedia.com
LTM-CPDV
CapDiv™ Portable
DV Disk Recorder
FIGURE 2.0 / BOTTOM PANEL FUNCTIONS
3
1
2
1
IEEE 1394 6-Pin Connector
This connector is used to connect to a compatible camera or NLE. POWER IS
NOT PROVIDED VIA THE 6PIN CABLE . THE CapDiv™ MUST BE POWERED
EXTERNALLY AT ALL TIMES.
2
Power-Idle & Mode Switch (three positions)
This switch has three-positions. In the center position, power is turned off and the
CapDiv™ is put in standby mode. Sliding the switch off center and toward the
“VTR” position turns the CapDiv™ on and initializes VTR mode. Sliding the switch
off center and towards the “HDD” position turns the CapDiv™ on and in the AV
HDD mode.
NOTE: When switching between HDD and VTR, allow two seconds at
the center position to permit idle reset. If the switch “pause”
operation is not done, the CapDiv™ may not initialize in the
proper mode.
3
DC Power Connector
Power can be supplied to the CapDiv™ via this connector. The device is designed
to operate over a 10V to 24V DC range with the center post connected to the
positive terminal. DC Current draw is 1.5 Amps.
- Page 5 800-898-0759 • 845-339-9555 • 2000 Sterling Road • Mount Marion, NY 12456 • www.lairdtelemedia.com
LTM-CPDV
CapDiv™ Portable
DV Disk Recorder
CAPDIV™ OPERATIONS
2
1
3
4
5
6
7
Front Panel LCD Menus
The LCD (#1) on CapDiv is a four line display depicting symbols in 122x32 pixel graphics. The four lines are displayed
on the LCD as follows:
• Line 1
Top line of display contains permanent icons for current operating modes and general status. From left to right,
• Battery Level
• Sync to Tape (on = ST1, off = ST0)
• Time Code Preserve (on = TC1, off = TC0)
• Loop Play (symbol is on only when loop play is enabled)
• Time Remaining (Displayed in hours and minutes, next to a tape symbol)
• Line 2:
Prompt Messages displayed during:
Playback
[M] = >> Mark
Pressing the Menu Key will ADVANCE to the next Mark
Record
Mark = 0
Pressing Record will DROP a Mark
• Line 3:
Video Clip Information includes, from left to right:
Bin #: 99
File Time Code and Frame Information: HH:MM:SS: FF.
• Line 4:
Soft Keys Function Options are displayed above the appropriate Soft Key:
Soft Key Option 1 (#6)
Soft Key Option 2 (#7)
- Page 6 800-898-0759 • 845-339-9555 • 2000 Sterling Road • Mount Marion, NY 12456 • www.lairdtelemedia.com
LTM-CPDV
CapDiv™ Portable
DV Disk Recorder
STOP & RECORD KEY FUNCTIONS
The STOP (#4) key halts any current active command and puts CapDiv into the IDLE Mode to
await the next issued command function.
The RECORD (#5) key by itself will not provide the manual execution of the RECORD command. The RECORD key has two functions as follows:
Functions
Manual RECORD
DROP MARK during RECORDING
Keys
RECORD (#5) & PLAY (#2):
RECORD (#5):
In order to manually RECORD, both the RECORD (#5) key and the PLAY (#2) key must be
simultaneously pressed. This is designed to prevent accident recording over captured video
clips.
2
1
3
4
5
6
7
- Page 7 800-898-0759 • 845-339-9555 • 2000 Sterling Road • Mount Marion, NY 12456 • www.lairdtelemedia.com
LTM-CPDV
CapDiv™ Portable
DV Disk Recorder
PLAYBACK & SOFT KEY FUNCTIONS
To Playback recorded video on CapDiv, the PLAY (#2) key is simply pressed when the desired
video clip is listed on the LCD display.
The Soft Keys (#6 and #7) are used to provide a higher degree of control over the Playback
of the content. The dialogue for the Soft Key function appears directly above the appropriate
Soft Key. These control options are accessed during playback as follows:
PRESS:
PRESS:
Function
To Reverse Playback
To Playback FASTER
Key
Soft Key 1
Soft Key 2
NOTE: Pressing the Soft Key multiple times or holding it down for more than 2 seconds will incrementally
speed up reverse or forward playback up to 32X.
PRESS:
PRESS:
PRESS:
Play #2 (a 2nd time)
Soft Key 1
Soft Key 2
To PAUSE Playback
To REVERSE by Single Frame
To FORWARD by Single Frame
NOTE: Holding down a Soft Key beyond 2 seconds will cause the video to rapidly frame-step in the chosen direction.
- Page 8 800-898-0759 • 845-339-9555 • 2000 Sterling Road • Mount Marion, NY 12456 • www.lairdtelemedia.com
LTM-CPDV
CapDiv™ Portable
DV Disk Recorder
SETTING-UP THE CAPDIV
CapDiv is a versatile device that provides for several modes of operation
for different tasks. In order to use the CapDiv™ properly it must first be
configured for the desired operation or function.
™
The MENU SETUP mode provides the user the options to configure the
CapDiv™ for the required task at hand. Pressing the MENU button repeatedly
will sequentially display these five (5) Menu Setup Mode functions on the
LCD:
• Making Media Files
• Sync-to-Tape Control
• TimeCode Control
• Empty BIN ?
• System Setup
The right Soft-Keys, which will read “ENTER”, provides the option to select
any given menu option. At any time during the selection, pressing the left
Soft-Key, which will read “CANCEL”, will exit from the Menu Setup Mode and
return CapDiv™ to Idle Mode.
NOTE: When CapDiv™ is powered off,
all settings return to the default settings.
- Page 9 800-898-0759 • 845-339-9555 • 2000 Sterling Road • Mount Marion, NY 12456 • www.lairdtelemedia.com
LTM-CPDV
CapDiv™ Portable
DV Disk Recorder
MAKING MEDIA FILES
This selection will convert all the clips in each BIN into a video format that can
be recognized by a computer. The process takes a short time and should be
done when all the video clips of interest have been acquired. Although the
process can be done repeatedly, converting video clips frequently provides no
benefit. The media conversion process does not prevent the clips from being
viewed at any time while CapDiv™ is in the VTR mode.
SYNC-TO-TAPE CONTROL
SYNC-TO-TAPE Mode is where recording in the CapDiv™ is controlled by
the RECORD button on the camcorder. For recording to occur in the CapDiv™,
the camcorder’s tape must be moving. In this mode, the CapDiv™ is in the
RECORD/PAUSE state as long as the tape in the camcorder is not moving.
Each time the RECORD button is depressed a new video clip is created within a given BIN. The default recording mode for CapDiv™ is with the SYNC-TOTAPE function ON. When the SYNC-TO-TAPE function is OFF, CapDiv™ will start
recording as soon as the RECORD and PLAY buttons on the CapDiv™ are
simultaneously pressed without regard to tape motion, and a new video clip
is created.
TIME CODE CONTROL
The User can choose whether to use the TimeCode from the Camcorder or
from the CapDiv™. When recording, TimeCode can either be “preserved” or
“reinserted”. The power-on default recording mode is PRESERVE TC “ON”;
where the TimeCode from the camcorder is “preserved” and recorded along
with the video content. When the recording mode is set to PRESERVE TC
“OFF”, the TimeCode is “reinserted” or over-written by the CapDiv™, starting
with 00:00:00:00. The first frame of the first clip in a BIN will have a
TimeCode value of 00:00:00:00 and each subsequent frame increments the
TimeCode throughout the BIN.
- Page 10 800-898-0759 • 845-339-9555 • 2000 Sterling Road • Mount Marion, NY 12456 • www.lairdtelemedia.com
LTM-CPDV
CapDiv™ Portable
DV Disk Recorder
TIME CODE CONTROL (cont’d)
Appending clips within a BIN continues this TimeCode seamlessly from the
end point of the previous clip.
EMPTY BIN?
WARNING! This step is irreversible! All video content contained in a
BIN will be lost!
Selecting this menu function erases the entire content of the selected BIN.
SYSTEM SETUP
Under SYSTEM SETUP option, there are six additional sub-menu functions:
• Setup Loop Play
• Set Default Audio
• Select AVI Type
• Total Space
• Init File System
• Firmware Revision
To access these functions, press “ENTER” and then MENU.
SETUP LOOP PLAY
With LOOP PLAY enabled, the contents of the selected BIN are played repeatedly when the PLAY button is pressed.
SET DEFAULT AUDIO
The user can set the default audio to either 48 KHz or 32 KHz.
SELECT AVI TYPE
The user can select either a Canopus AVI file type or a Microsoft AVI file type.
The default setting is for Microsoft AVI.
- Page 11 800-898-0759 • 845-339-9555 • 2000 Sterling Road • Mount Marion, NY 12456 • www.lairdtelemedia.com
LTM-CPDV
CapDiv™ Portable
DV Disk Recorder
TOTAL SPACE
This displays the total recording capacity of the CapDiv™ in total recording
time (HH:MM:SS:FF)
INIT FILE SYSTEM
WARNING! This step is irreversible! All video media on the CapDiv
will be lost!
Selecting this menu function will reinitialize the file system in the rare occasion
that CapDiv™ performs sporadically or displays performance abnormalities. This
function is also a convenient way to erase all BINs at once.
FIRMWARE REVISION
Displays the current firmware revision.
- Page 12 800-898-0759 • 845-339-9555 • 2000 Sterling Road • Mount Marion, NY 12456 • www.lairdtelemedia.com
LTM-CPDV
CapDiv™ Portable
DV Disk Recorder
RECORDING WITH CAPDIV
Operation in VTR Emulation Mode
In order to record with CapDiv™, the unit must be placed in the VTR Emulation
mode by switching the three-position Mode Switch on the Rear Panel to VTR.
CapDiv™ is designed to operate in the same familiar manner in which you
operate your VTR. When CapDiv™ is in the VTR Emulation mode it will “slave”
to the controls on your camcorder. For example, when you press the RECORD
button on your camcorder CapDiv™ will automatically start recording.
CapDiv™ can be configured for either automatic or manual recording.
General Media Organization
The storage volume in the VTR mode can be logically separated in up to ninety-nine (99) BINs. Each BIN can be logically separated in up to one hundred
twenty-eight (128) recorded video clips. A BIN is analogous to a tape
in a VTR with a series of recorded video clips on the tape. CapDiv™ always
defaults to BIN 01 upon power-up or entering Idle mode.
All video clips within a given BIN are recorded end-to-end with their start
points recorded as “Marks”. The size of a BIN can be made to take the entire
available storage space of the HDD or only a few frames. Each BIN can have
up to 128 video clips appended to it at any time provided there is still time
remaining on the overall HDD storage volume. Clips and BINs are automatically added in sequence, but only BINs are actually numbered. The start of
each clip is identified by a Mark that can only be referenced by advancing
sequentially through the clips within a BIN. In the HDD mode, each BIN is represented as a folder and the clips appear as files. An individual clip, once
recorded, cannot be erased. Only the total content of an
individual BIN can be erased.
- Page 13 800-898-0759 • 845-339-9555 • 2000 Sterling Road • Mount Marion, NY 12456 • www.lairdtelemedia.com
LTM-CPDV
CapDiv™ Portable
DV Disk Recorder
Idle mode
When CapDiv™ is first switched to VTR Emulation mode it defaults to Idle
mode to await commands. In the Idle mode, CapDiv™ is neither playing nor
recording. It is from Idle mode that CapDiv™ functions such as PLAY or
RECORD can be selected. When in Idle mode the user can select BINs. The two
Soft Keys annotated “PREVIOUS” and “NEXT” refer to scrolling through associated sequential BIN numbers. Holding down either Soft Key beyond 1.5 seconds will cause the BIN count speed to increase and advance rapidly in the
chosen direction. After exiting PLAY mode, Idle mode switches to its subset,
STOP mode. When CapDiv™ is in STOP mode, the STOP icon appears between
the words “PREVIOUS” and “NEXT” on the bottom line of the LCD Display. In
STOP mode, the TimeCode displayed on the top line of the LCD Display is the
TimeCode of the last video frame played. At all other times, the TimeCode displayed indicates the total duration of the content present in that BIN.
Recording
Recording with CapDiv™ is simple & intuitive. CapDiv™ emulates both VTR and
camcorder recording methods by providing two recording options for the user:
Manual Record with Sync-to-Tape Disabled
In Manual Record, CapDiv™ emulates the VTR recording method and the
SYNC-TO-TAPE mode “OFF” is enabled. This means that CapDiv™ will start
recording as soon as the two front panel buttons, PLAY and RECORD, on
CapDiv™ are simultaneously depressed. Step 1: Hold the RECORD button
and press the PLAY button at the same time. (This is a standard two-button
record method utilizing the front panel control buttons.)
NOTES:
• Some camcorders will issue a RECORD command via the IEEE 1394 cable
when the RECORD button is depressed. In this case, even if CapDiv™ is left in
the SYNC-TO-TAPE mode “OFF”, it will automatically begin recording when
the RECORD button is pressed on the camcorder – regardless of the
SYNC-TO-TAPE mode condition.
- Page 14 800-898-0759 • 845-339-9555 • 2000 Sterling Road • Mount Marion, NY 12456 • www.lairdtelemedia.com
LTM-CPDV
CapDiv™ Portable
DV Disk Recorder
• There is no PAUSE mode condition with SYNC-TO-TAPE mode “OFF” selected, so all video is recorded. The only way to “pause while recording” is to
press the PLAY/PAUSE button on CapDiv™ during recording.
• A discrete video clip can only be created within an individual BIN. To record
a clip in another BIN the recording must first be stopped; the BIN number
changed; and the video recording process restarted.
• If SYNC-TO-TAPE mode “ON” is selected, CapDiv™ can not record until the
camcorder tape is moving.
Automatic Record with SYNC-TO-TAPE Enabled
In Automatic Record CapDiv™ emulates the camcorder recording method and
the SYNC-TO-TAPE mode “ON” is enabled, and recording to CapDiv™ is
“slaved” or controlled by the RECORD button on the camcorder. In SYNC-TOTAPE mode “ON”, recording only occurs when the camcorder tape is moving.
Step 1: Hold the RECORD button and press the PLAY button at the same time.
This puts the CapDiv™ into a RECORD-PAUSE mode. In the RECORD-PAUSE
mode, CapDiv™ waits for the camcorder Time Code movement (vis-à-vis the
movement of the tape) to initiate the RECORD function. Step 2: Press the
RECORD button on the camcorder. (CapDiv™ will begin to record simultaneously with the camcorder.) Step 3: When all recording sessions are completed,
press the STOP button on CapDiv™.
NOTES:
• If recording using the camcorder controls is temporarily halted, CapDiv™ will
enter into PAUSE Mode and pause recording. Each time CapDiv™ enters
PAUSE mode, a clip boundary is created, resulting in a new, sequential clip.
• When all recordings have ended, the STOP button on CapDiv™ must be
pressed to end its recording session.
• A discrete video clip can only be created within an individual BIN. To record
a clip in another BIN the recording must first be stopped; the BIN number
changed; and the video recording process restarted.
- Page 15 800-898-0759 • 845-339-9555 • 2000 Sterling Road • Mount Marion, NY 12456 • www.lairdtelemedia.com
LTM-CPDV
CapDiv™ Portable
DV Disk Recorder
Marking while Recording
A “Mark” represents a particular TimeCode value, or in other words a “bookmark” of a video clip, in any given BIN of video content recorded on CapDiv™.
Each BIN can hold as many as one hundred twenty-eight (128) Marks. When
a recording is paused and restarted, a Mark is inserted or “dropped”. Pressing
the RECORD button during recording will also drop a Mark. In VTR mode, all
Marks can be sequentially accessed through the controls on CapDiv™ within
a given BIN. In the AV HARD DRIVE mode, NLE software recognizes Marks as
TimeCode boundaries of discreet files, or video clips.
Playback
To playback video content on CapDiv™ from a selected BIN, first select the
BIN while in the Idle or Stop mode. Next, press the PLAY button and CapDiv™
will start playing the first clip in the selected BIN in real-time rate or at 1x
real-time speed. Repeatedly pressing the PLAY button will alternate CapDiv™
between playing and pausing the selected clip in the BIN. During playback,
the Soft Keys control the FAST FORWARD and FAST REVERSE functions. The
Soft Key functions are annotated in the fourth line of the display. Selecting
FAST FORWARD or FAST REVERSE will accelerate the video stream at 2x realtime speed in the direction chosen. Repeatedly pressing the Soft Key selection will increase the video stream speed in 1x increments, up to 32x.
Playback in the PAUSE mode provides the function to advance a video
stream one single frame-step at a time, forward or step reverse, using the
Soft Keys. Holding down a Soft Key beyond 2 seconds will cause the video
stream to rapidly frame-step in the chosen direction. The TimeCode displayed
during playback is always what was originally recorded with the video.
Pressing the STOP button on CapDiv™ stops playback and displays the current TimeCode. Pressing the PLAY button will continue playback from that
point forward.
- Page 16 800-898-0759 • 845-339-9555 • 2000 Sterling Road • Mount Marion, NY 12456 • www.lairdtelemedia.com
LTM-CPDV
CapDiv™ Portable
DV Disk Recorder
Advance to a Recorded Mark
While in either PLAY or PAUSE mode, pressing the MENU button will advance
the TimeCode and video stream to the next Mark point. The last Mark in a BIN
is the last frame recorded. You can then press PLAY to view the video content
or press MENU again to advance to the next Mark point.
Connecting to an NLE as a VTR
The CapDiv™ can be connected to an NLE as a VTR by simply switching CapDiv
to VTR mode and making a 1394 connection to a PC or Mac computer. NLE
packages such as in iMovie and Final Cut Pro for the Mac and Avid’s Xpress
DV and Adobe Premiere for the PC will instantly recognize the CapDiv™ as a
camcorder or VTR. The NLE will then be able to control CapDiv™ within a single selected BIN. To select different BINs is equivalent to changing tapes in a
VTR. Consequently, selecting a new BIN on CapDiv™ must be done by manually prior to capturing.
Capturing Video to Your NLE in VTR Mode
CapDiv™ is recognized by and functions with NLE’s exactly in the same manner as a normal VTR would. To capture video content from a CapDiv™ BIN,
select the desired BIN on CapDiv™ and follow your NLE’s instructions for capturing footage from a VTR.
Capturing under Manual Control
Capturing video content manually from selected BINs from an NLE functions
much in the same manner as capturing video content from a tape in a VTR.
Within each BIN, all playback functions are controllable through the NLE. This
includes the standard VTR functions of reverse play, shuttle, toggle, etc. BINs
must be selected manually as previously described, then the user can playback and capture as they would with a tape. The user should follow the specific directions from their NLE manual.
Batch Capturing
Within the NLE interface, BINs are treated exactly as tapes. As a result, the
user cannot batch capture across more than one BIN, just as one cannot batch
capture across more than one tape. While clips can be logged across BINs,
- Page 17 800-898-0759 • 845-339-9555 • 2000 Sterling Road • Mount Marion, NY 12456 • www.lairdtelemedia.com
LTM-CPDV
CapDiv™ Portable
DV Disk Recorder
those clips selected for batch capture must be within the same BIN. The appropriate BIN must be selected on CapDiv™ when the user initiates the NLE’s
batch capture functions.
Helpful Hint: Since the user must always batch capture clips within a single BIN, one way to ensure the correct clips are captured without error is to
log clips to be captured in a batch one BIN at a time. In this manner, you will
be assured that all your logged clips may be captured at once. Presently, NLE’s
require a minimum of one second pre-roll media to batch capture any video
content. While this function is generally compatible with most VTR’s, it is a
concern for the first second of media from any CapDiv™ BIN. This is because
video content from CapDiv™ BINs is instantaneously captured without the
tape lag-time inherent to tape-based recording systems. CapDiv™ is not
designed to need pre-roll and does not include negative TimeCode adjustments for this function. Currently, most NLE’s do not permit pre-roll to be disabled, so you must customize pre-roll conditions within the NLE to the minimum possible settings (generally, this is one sec.). This means that video content from the first second of footage from a CapDiv™ BIN cannot be batch
captured; however, it can always be manually captured when necessary.
Error: File System
If you receive a file system error in VTR Mode, press and hold the RECORD and PLAY buttons simultaneously. Manually recording will re-initialize the file system.
OPERATING IN AV HARD DRIVE MODE
In addition to emulating a VTR, CapDiv can also emulate an AV Hard Drive (AV
HDD). In AV HDD mode, video clips appear to NLE’s as video files and can be
manipulated as data files without being constrained by the real-time limitations of the video format. In this manner, clips can be transferred from the
CapDiv™ to the processor at greater than realtime speeds, limited only by the
operating systems and applications software. In this manner, the capture
process has been eliminated and significant time has been saved through
instant access to your DV content.
- Page 18 800-898-0759 • 845-339-9555 • 2000 Sterling Road • Mount Marion, NY 12456 • www.lairdtelemedia.com
LTM-CPDV
CapDiv™ Portable
DV Disk Recorder
General Media Organization
As mentioned previously in the General Media Organization of the VTR operation, in the AV HDD mode each BIN is represented as a folder and each clip
inside the BIN is represented as a file. In the AV HDD mode, the name of each
folder is BINxx where xx represents the BIN number ranging from 01 to 99.
Each file within each folder is named BxxCyyy.avi where yyy represents the
clip number ranging from 001 to 128 and xx represents its BIN number.
CapDiv™ converts native, digital video (.dv) content to a .AVI Type-2 file format in a FAT-32 file system for universal computer access.
NOTE: During the file conversion process in HDD mode, the boundaries of
the video clips set by Marks are not as accurate as in Marks in the VTR mode.
CapDiv™ design limits the conversion boundary location to an accuracy of
one-second resolution. While no data is lost, it does means that a few frames
of video within the resolution of the conversion process may possibly end up
in the previous clip. As a rule, it is better to start recording video clips with at
least one-second’s worth of non-critical footage.
OS Compatibility List
CapDiv™ supports these Personal Computers with these Operating Systems:
• Windows ME
• Windows 2000
• Windows XP
CapDiv™ also works with Macintosh computers with these Operating
Systems:
• OS-9
• OS-X.
Making Media Files for PC and Mac in HDD Mode
Before CapDiv™ can make its video content available as data to a PC, proper
files structures must be generated that are compatible with computer file systems. This function in CapDiv™ is called MAKING MEDIA FILES, found under
- Page 19 800-898-0759 • 845-339-9555 • 2000 Sterling Road • Mount Marion, NY 12456 • www.lairdtelemedia.com
LTM-CPDV
CapDiv™ Portable
DV Disk Recorder
the MENU options. Media, or video content, recorded by CapDiv™ must be
converted to a compatible format in order to be accessed by a Windowsbased or Mac computer. CapDiv™ converts its captured, native digital video
(.DV) content to an .AVI Type-2 file format supported by all operating systems,
and to enhance cross-compatibility with major NLE’s.
The MAKING MEDIA FILES process generates “FAT32-compatible” files,
which is a file system compatible with both PC and Macintosh computers. The
FAT32 file system has a file size limitation of 2GB. Since video content can
easily exceed that limit, CapDiv™ breaks larger video files into groups of numbered sequentially, 2GB files. After the MAKING MEDIA FILES conversion function has been performed, the video content can be viewed in the VTR operating mode directly from CapDiv™.
Connecting to a Windows Based Computer
Connect CapDiv™ to your Windows based personal computer (PC) with a 6pin-to-6-pin IEEE 1394 cable. Your PC must have an IEEE 1394 interface card,
generally refereed to as a “FireWire” adapter. When CapDiv™ is plugged into
your PC, the Windows Operating System (OS) will automatically mount
CapDiv™ as an IEEE 1394 HDD and provide instant “Drag & Drop” access to
the digital video content on CapDiv™ as a local, removable storage device.
Disconnecting from a Windows Based Computer
When you wish to disconnect CapDiv™ from your Windows based computer,
you must dismount the removable storage device. On the bottom right-hand
corner of your PC on the “task bar” you will see an icon of a green arrow.
This is the Remove Hardware utility Windows provides with its OS to dismount removable storage devices. Click on the program icon to access the
pop-up menu. Highlight the CapDiv™ device and click on the “Stop” button.
CapDiv™ can then be safely dismounted.
- Page 20 800-898-0759 • 845-339-9555 • 2000 Sterling Road • Mount Marion, NY 12456 • www.lairdtelemedia.com
LTM-CPDV
CapDiv™ Portable
DV Disk Recorder
Connecting to a Mac Computer
Connect CapDiv™ to your Mac based computer with a 6-pin-to-6-pin IEEE
1394 cable. Macintosh computers provide native support for Firewire, or IEEE
1394, devices and will automatically mount CapDiv™ when it is plugged in.
CapDiv™ will appear on your desktop as a CapDiv™ HDD and you can then
instantly have “Drag & Drop” access your video content.
Disconnecting from a Mac Computer
To dismount CapDiv™ from your Macintosh computer, simply drag the
CapDiv™ icon on your desktop to the “Trash” icon and you may unplug
CapDiv™ from your Mac.
Importing Files to your NLE
When in the HDD mode, video clips on CapDiv are available in the .AVI
Type-2 file format. These video clips will appear as files and Bins as folders
on CapDiv when in the AV Hard Drive mode. To import the AVI-Type-2 file
format into your non-linear editor (NLE), please refer to the import requirements in the instructions that came with your NLE.
- Page 21 800-898-0759 • 845-339-9555 • 2000 Sterling Road • Mount Marion, NY 12456 • www.lairdtelemedia.com
LTM-CPDV
CapDiv™ Portable
DV Disk Recorder
TECHNICAL SUPPORT
For current support issues and answers to common questions,
please visit the Laird support website at:
http://www.laird-support.com
- Page 22 800-898-0759 • 845-339-9555 • 2000 Sterling Road • Mount Marion, NY 12456 • www.lairdtelemedia.com
GLOSSARY OF TERMS
NLE:
Non-Linear-Editing. It is an equipment system made up of a computer and specialized software, used to create finished edited media product. Popular NLE software packages are
Final Cut Pro, Avid, and Adobe Premiere.
VTR:
Video Tape Recorder. The CapDiv™ has an operating mode where it emulates the functions
of a VTR. Unlike CapDiv™ which records on a Hard Drive, VTRs typically record on magnetic tape.
DVR:
Digital Video Recorder. A group of media recorders where the recording format is digital
and the storage medium is a Hard Disk Drive.
HDD:
Hard Disk Drive. A media storage device for computers. The typical HDD offers quick random access to its data and boasts large storage capacity and high data throughput.
DV:
Acronym used to refer to a standard set of specifications for the transmission of an encoded stream of digital A/V media and related signals as specified by the IEEE1394 development group. DV is a compressed digital media system.
1394:
Short form for the standard IEEE-1394. This standard describes a physical means, as well as
the protocol for the transmission of digital data between compatible devices. The system is
sometimes referred to as Firewire and iLink.
Sync to Tape:
A mode of recording where the CapDiv™ will stay in a record pause until tape
in the camera is rolling. In this mode, the CapDiv™ is slaved to the camera
record start/stop controls.
ST1:
CapDiv™ menu LCD readout to indicate that the Sync to Tape mode is ON.
ST0:
CapDiv™ menu LCD readout to indicate that the Sync to Tape mode is OFF.
TC1:
CapDiv™ menu LCD readout to indicate that the time code information from the camera
is preserved.
TC0:
CapDiv™ menu LCD readout to indicate that the time code info from the camera is discarded and replaced by a new time code that always starts with 0(zero) for the first frame of
a bin.
Bin:
A partitioning of the storage space technique used on NLE systems and computers. Ninety
nine(99) bins are reserved in each CapDiv™ for storage of recorded clips. The actual space
allocated for each bin is on demand on a first come first served basis.
Clip:
A segment of recorded media within a bin defined by sequential start and stop operation.
Each new clip is appended to the last clip recorded in that bin.
FAT32: A file management system for a HDD that is compatible in Microsoft Windows based PCs
and Apple Computer’s Mac computers running OS-9 and OS-X.
FFWD: Fast Forward indication in VTR mode.
FREV:
Fast Reverse indication in VTR mode.
- Page 23 800-898-0759 • 845-339-9555 • 2000 Sterling Road • Mount Marion, NY 12456 • www.lairdtelemedia.com
SAFETY PRECAUTIONS
1. To prevent fire or shock hazard, do not expose this equipment to the environment of Humidity
and/or dust. Do not use this equipment in an unprotected outdoor installation or any area classified as a wet area.
2. The operating temperature of this product must be kept between -40°C and +95°C. Direct sunlight or an intense source of heat, direct or ambient, must not be introduced to the product either
by induction or contact.
3. Always keep the product on a stable and secure base or enclosure. Do not drop the product or
subject it to sudden heavy impact.
4. Provide adequate ventilation so that thermal characteristics do not cause an increase in product
temperature to resulting in overheating.
5. Do not clean the unit by using electrically conductive or corrosive chemicals. Always be certain to
unplug the unit from AC wall power before any major cleaning. Use a damp cloth only for cleaning.
6. Do not subject the product to electrical mains power over voltage: The product must be used at
the rated supply voltages indicated on the product rear panel only.
7. Do not plug the product into an overloaded electrical outlet. This may result in fire or electrical
shock.
8. Object Ingress and Liquid Entry: Never insert or push sharp metal objects into the product or use such
devices for an attempt at opening or servicing the product. Servicing should be referred to a trained
and qualified technician only. Do not allow liquid of any type to enter the unit. Do not allow the unit
to be submersed in water as this may cause a shock hazard.
9. A trained qualified technician should perform all servicing of the unit. There are no serviceable components within the unit for user access.
ENVIRONMENTAL REQUIREMENTS
■ Handling:
Proper attention should be given when handling the unit. Normal body motion is
acceptable, but one should avoid moving the unit with rapid, jarring movements.
Try to avoid using the unit on a surface with noticeable vibration. Do not drop the
unit, particularly while operating, as damage could occur.
■ Ventilation:
The unit should be operated with adequate space around it so that proper heat
dissipation is accomplished. Allow at least 3 cm of clearance space around the
unit with at least 5 cm of clearance from the rear panel.
■ Temperature:
Do not use the unit near sources of heat that exceed 55°C. It is also critical to
not use the unit in temperatures lower than 5°C.
■ Moisture:
Do not use or store the unit in high humidity environments, if possible.
■ Altitude:
Do not use the unit in altitudes above 3000m from sea level.
■ Electric:
Connect the unit to power sources utilizing the power adapter supplied. Do not
use any other sources other than those supplied with the unit.
■ Maintenance:
Keep the unit clean and dust free.
- Page 24 800-898-0759 • 845-339-9555 • 2000 Sterling Road • Mount Marion, NY 12456 • www.lairdtelemedia.com
Rev. 3 [01/27/05]
2000 Sterling Road • Box 720
Mount Marion, NY 12456
800-898-0759 • 845-339-9555
Fax: 845-339-0231
www.lairdtelemedia.com