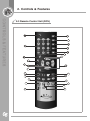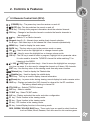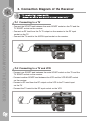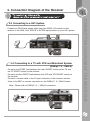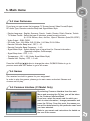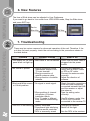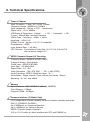
1
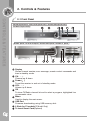
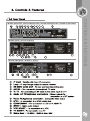
All the safety and operating instructions should be read before operating this
product. The safety and operating instructions should be retained for future reference.
All warnings on the product and in the operating instructions should be adhered to.
All operating and usage instructions should be followed.
Unplug this product from the wall outlet before cleaning.
Do not use liquid or aerosol cleaners. Use a damp cloth for cleaning and place
the receiver in well ventilated and no-heat environment. Do not use attachments
not recommended by the product manufacturer as they may cause hazards.
Do not use this product near water for example, near a bath tub, wash bowl,
kitchen sink or laundry tub, in a wet basement, or near swimming pool, and
the like. Do not place this product on an unstable cart, stand, tripod, bracket, or table.
The product may fall, causing serious injury to a child or an adult and serious
damage to the product. Use only with a cart, stand tripod, bracket, or table
recommended by the manufacturer or sold with the product. Any mounting of the
product should follow the manufacture's instructions, and should use a mounting
accessory recommended by the manufacturer.
This apparatus shall not be exposed to dripping or splashing and that no object
filled with liquids, such as vases, shall be placed on the apparatus.
The main plug is used as the disconnect device. The disconnect device shall
remain operable.
CONTENTS
1. Introduction
1-1 Main Features
1-2 Accessories
2. Controls & Features
2-1 Front Panel
2-2 Rear Panel
2-3 Remote Control Unit(RCU)
3. Connection Diagram of the Receiver
3-1 Connecting to a TV
3-2 Connecting to a TV and VCR
3-3 Connecting to a HiFi system
3-4 Connecting to a TV with VCR and motorized system (DiSEqC 1.2 / USALS)
4. Function Guide
4-1 Channel Information
4-2 Changing Channels
4-3 Volume Control
4-4 Channel List for TV/Radio/Favorite
4-5 Language
4-6 Zoom
4-7 Teletext
4-8 Subtitles
5. Main Menu
5-1 Installation
5-2 System Setting
5-3 User Preference
5-4 Games
5-5 Common Interface (CI Model Only)
6. New Features
6-1 PIP Function
6-2 A/V Selection
6-3 Time Machine Function
6-4 Firmware upgrade using USB flash drive
6-5 JPEG viewer
7. Troubleshooting
8. Technical Specifications
1. Introduction
1-1 Main Features
120 programmable satellites / 6,000 programmable channels
950~2150 Mhz IF range
2 Slot Common Interface (CI Model Only)
MCPC/SCPC, C/KU reception
Fully MPEG 2 / DVB compliant
1 LNB input, IF loop through for 2nd receiver
Variable input symbol rate 1 ~ 45Msps
Oscilloscope / spectrum analyzer function for easy signal detection
Easy auto satellite program searching
Manual PID scan function
Picture-In-Graphics function
Multi-Picture(4,9,10,13 or 16 pictures) function
Multi language menu
Electronic Program Guide
8 favorite channel group selection / parental lock
Auto NTSC / PAL switching
Teletext supported by OSD and VBI
RS 232 downloading
Data transfer / receiver-to-receiver and / or PC-to-receiver
DiSEqC version 1.2/1.3 supported
1-2 Accessories
User's manual : 1
Remote control unit : 1
Batteries (AAA Type) : 2 pieces
Warranty Card : 1
2. Controls & Features
2-1 Front Panel
(GI-S801 Xpeed Class / GI-S770 CR Xpeed Class / GI-S780 CRCI Xpeed Class/
GI-S805 CI Xpeed Class)
(GI-S801 Xpeed / GI-S770 CR Xpeed / GI-S780 CRCI Xpeed / GI-S805 CI Xpeed )
Display
Shows channel number, error message, remote control commands and
time in standby mode.
CH. -,+
Channel up & down.
Power ( )
To put the receiver in and out of standby mode.
VOL. -,+
Volume up & down.
OK
To show TV/Radio channel list and to select a program, highlighted line
or parameter value.
Menu
Used to display the main menu.
USB Port
Firmware downloading using USB memory stick
2 Slots for CI module(CI Model Only)
To insert Smart Card(Optional)
(GI-S801 Xpeed Class / GI-S770 CR Xpeed Class / GI-S780 CRCI Xpeed Class / GI-S805 CI Xpeed Class)
(GI-S801 Xpeed / GI-S770 CR Xpeed)
(GI-S780 CRCI Xpeed / GI-S805 CI Xpeed )
2. Controls & Features
2-3 Remote Control Unit (RCU)
2. Controls & Features
2-3 Remote Control Unit (RCU)
(POWER) Key : The power key turns the receiver on and off.
(MUTE) Key: This key switches the sound on and off.
EPG Key : This key show program information about the selected channel.
FAV key : Change to last favorite channels or selects the favorite channels in
the channel list
key : Selects TV or Radio channels.
Numeric keys(0~9) : Numeric keys enable direct channel selection.
A~Z keys : Use these keys in the channel list ti fine channels alphabetically.
MENU key : Used to display the main menu.
BACK key : This key returns you to the previous mode or menu.
CH. , : Used to move the highlight bar or change channel up/dn.
VOL. , : Used to move the highlight bar or change volume up/dn.
OK key : The OK key is used to select a program, highlight line or parameter value.
It is also used to show the TV/RADIO channel list while watching TV or
listening to the RADIO.
(+100), (-100)(Page up/down key)s : Used to move the highlight bar one page
at a time on menu. It is also used to change the channel up & down 100 channels.
EXIT key : Use this key return to the viewing mode from any menu function.
(Teletext) key : Used to display the Teletext data.
(Subtitle) key : Used to display the subtitle data.
INFO key : This key is used to display channel information.
(Pause) key : to pause video during viewing normal display but audio remains active.
UHF key : Display and select the UHF channel for channel for the RF modulator.
The factory default setting in channel 36
FTA/CAS key : Selects FTA/CAS channel.
SAT key : Select a satellite.
TV/SAT key : Select TV/SAT mode.
A/V key : Display and select the audio and video configuration.
F1 key : Zoom function in the viewing mode.
F2 key : Zoom function in the viewing mode.
F3 key : PIP function in the viewing mode.
F4 key : Instant-Replay function in the viewing mode.
RED, GREEN, YELLOW, BLUE keys : These color keys are used to select functions
such as Delete, Move, Rename, Sort also used for slot machine game.
3. Connection Diagram of the Receiver
3-1 Connecting to a TV
- Connect the SCART lead between the main SCART socket on the TV and the
TV SCART socket on the receiver.
- Connect an RF lead from the To TV output on the receiver to the RF input
socket on the TV.
- Connect the TV aerial to the ANT.IN input socket on the receiver.
3-2 Connecting to a TV and VCR
- Connect one SCART lead between the main SCART socket on the TV and the
TV SCART socket on the receiver.
- Connect another SCART lead between the VCR and the VCR SCART socket
on the receiver.
- Connect a RF lead from the RF output on the VCR to the TV aerial input
on the TV.
- Connect the TV aerial to the RF input socket on the VCR.
3. Connection Diagram of the Receiver
3-3 Connecting to a HiFi System
- Connect an RCA/Cinch stereo cable from the AUDIO L/R sockets on the
receiver to the LINE, AUX, SPACE or EXTRA input sockets on your HiFi system.
3-4 Connecting to a TV with VCR and Motorized System
(DiSEqC 1.2 / USALS)
- Connect one SCART lead between the main SCART socket on the TV and
the TV SCART socket on the receiver.
- Connect another SCART lead between the VCR and VCR SCART socket on
the receiver.
- Connect a coaxial cable to the IF input connector on the receiver and the
other to the REC or receiver connector on the DiSEqC 1.2 / USALS motor.
· Note : Please refer to DiSEqC 1.2 / USALS connection.
4. Function Guide
4-1 Channel Information
Every time you change channels, program information will be displayed for
a few seconds.
The information may include :
1) Current time
2) Channel name
3) Current channel number & name, satellite
name & TP information
4) Symbol for CAS, Teletext, Alternate A/V, EPG,
Parental lock information
5) Signal meta
6) Program information : Whenever you press
the Info button, the program information
window will appear.
You can change the channel list with the , keys on your RCU or Front panel.
4-2 Changing Channesl
You may change the channel by simply entering the channel number using
your RCU 0~9 keys. Alternately, you may use the , keys on the RCU
and/or the front panel of the receiver.
4-3 Volume Control
To control the volume, use the , keys on
the RCU.
The volume indicator will show for a few
seconds before automatically disappearing.
4. Function Guide
4-4 Channel List for TV/Radio/Favorite
When you press the OK key, you can directly see the channel list
.
You can select the channel you would like to
watch by moving the highlighted bar to the
channel of your choice using ?,?and then
pressing the OK key.
You can select the TV or Radio channel list by
using the
key.
Use the FAV(grey) key for selecting the favorite
channel list.
(See the page 20 to set favorite channel)
Whenever you press the FAV button, the channel mode will be changed
as follows :
Normal
Favorite1 Favorite2 Favorite3 ... Favorite8 Normal.
[Color Keys]
1) RED(FTA/CAS) : The mode will be changed when you press as follow
Normal FTA CAS Normal.
2) GREEN(Satellite List) : When you want to change the channels of the
satellite you want, select the satellite and press OK button.
3) YELLOW(Sort) : By pressing the yellow key,
you will be able to select the sort method,
either Normal, Alphabetical, or Satellite.
Normal sort shows channels in the order in
which they have been added to the channel
list. Alphabetical sort shows channels in
Alphabetical order. If you select satellite sort,
only the channels on the selected satellite will
be shown, in the order in which they were
added. If you have selected satellite sort and
need to select a channel not on the selected
satellite,
you will need to change the sort method before you can select that channel.
After changing the sort method, the channel numbers will likely change to
reflect the new ordering. The sort method may also be changed from the
Edit Channel screen or the EPG screen.
4. Function Guide
4) BLUE(Multi Pictures) : If you press the Blue
key, you will be able to choose between a
4, 9, 10, 13 or 16 pictures display. After making
your selection, the screen will be divided and
the current channel will be displayed in the first
box in the upper-left corner, followed by the next
channels in the successive boxes until the screen
is full. You may then change and view the channel
by using the up, down, left, right keys to highlight
a box with the red box.
When you are finished with multi-picture mode, press OK again, or the EXIT key
to return to the full screen viewing mode or BACK to return to the channel list.
4-5 Language
You can set up a new Menu language you want
to see at the User Preference in MAIN MENU.
Select the desired menu language simply by
using the , keys.
[Key usage]
1) OK key : Confirm the language you selected
and return to the MAIN MENU.
2) BACK key : Cancel your selected language
and return to the MAIN MENU.
3) EXIT key : Return to the channel viewing mode.
4)
, keys : Change the language (Language will be changed to ENGLISH / ARABIC
/ PERSIAN / TURKISH / GERMAN / FRENCH / POLISH / RUSSIAN / CZECH / GREEK / DUTCH
/ PORTUGUESE / SPANISH / HUNGARIAN / ITALIAN / INDONESIA / SLOVAK / SWEDISH in order)
4-6 Zoom
When in TV mode, F1 key will freeze the
screen and goes to zoom function.
OK key enables increase and decrease in size.
, , , : MOVE
: Enlarge
: Reduce
OK : Returns
4. Function Guide
4-7 Teletext
The display of Teletext is based on transmitted
data using the EBU teletext specification and
DVB Bitmap. It is available only when the current
channel carries teletext service data.
VBI insertion mode and OSD(On Screen Display)
mode are supported.
In the VBI insertion mode, which is always on,
can only be viewed on a TV which supports
teletext using your TV's RCU.
In the OSD mode, you can view teletext even though your TV does not support teletext.
To watch teletext in OSD mode, press the
button on the RCU.
0 ~ 9 : Press page number.
, : Page up and down.
, : Page left and right list.
, : Page number increase and decrease by 100.
4-8 Subtitles
If the current channel provides subtitles, you can
see the
or symbol indication in the channel
information box. When you want view subtitles,
press the
button on the RCU and the
language selection menu will appear.
Press the OK button to view subtitles after
selecting one of languages in the language
selection menu.
5. Main menu
5-1 Installation
5-1-1 Installation (Antenna Configuration)
This mode will display the antenna adjustment
menu on the screen and can adjust all required
installation information for each selected Satellite. By selecting the Red, Green or Yellow keys
in satellite name list box, you can delete the
satellite, add a new satellite, rename a satellite.
The blue key will be explained later(5-1-2) below.
When you select a satellite name in the list box,
the required installation information is displayed.
Press the Right( )key and adjust the items
according to your system such as LNB, DiSEqC
input and Network search, 22KHz. When finished,
press the OK key again.
5-1-2 Multi Search All
By pressing the BLUE key, this mode will search
all channel of the satellite staying in the bar.
You can select satellites in multi by pressing
OK (You can see the name of satellite changing
to Yellow color) so that you can search all
channels of the satellite you have selected.
5. Main menu
5-1-3 TP Setup
The information to enter in this menu is available in magazines covering satellite TV reception, or from your service provider.
You can use this menu if you are looking for
some special channels (i.e. Non DVB standard
channels) which can only be found when you
have entered the necessary settings here by
typing specific frequency you want. To add or
delete a specific frequency, you can use Green
and Red keys.
The required installation information is displayed. Press the Right( )key and adjust
the items according to your system such as Frequency, Symbol Rate input and
Polarity, Code Rate.
When finished, press the OK key again.
Transponder Frequency : Specify the frequency in MHz
Symbol Rate : Enter with the numeric keys
Polarization : Select Horizontal or Vertical
Code Rate : Select the FEC (Forward Error Correction) value
5-1-4 PID Edit (Yellow button in TP Setup)
Use this in case of a specific Transponder
which has non-DVB standard channels and
which only can be found when you have entered the necessary settings. You can also add or
delete channels from a specific TP.
PCR PID : Enter the PID (Packet Identifier) for
the PCR (Program clock Reference).
Video PID : Enter PID for the video signal.
Audio PID : Enter PID for the audio signal.
5. Main menu
5-1-5 Search All (Blue key in TP Setup)/TP Search
By pressing the BLUE key in the TP Setup, this
mode will search all channel of the satellite
without regarding the frequency. By pressing
Right( ) key and adjusting the frequency or
leave as it is, you can search the specific
channel regarding the frequency you choose.
5-1-6 Antenna Positioning
Antenna Positioning (DiSEqC1.2)
This mode will allow you to set the antenna
position for each satellite.
In order to use antenna positioning you must
use a motor controlled by DiSEqC1.2
commands.
To move the antenna, select the desired satellite, transponder, and step size. Then select
Move Dish and press , to move the
antenna West or East.
If you selected continuous for the step size,
the antenna will move continuously until you press another key. Once the antenna is
positioned properly, select Command Mode and choose Save, then press OK to save
the position. The position number will then be displayed next to the satellite name.
When you want to move the antenna to a saved satellite position, select the satellite,
choose Go To for the Command Mode and press OK. To clear a saved satellite position
select satellite, choose Reset for the Command Mode and press OK.
5. Main menu
Antenna Positioning (USALS)
This mode will allow you to use a DiSEqC1.3/
2.3 motor controlled by a USALS (Universal
Satellite Automatic Location System).
To move the antenna, press the OK key to
select the Satellite Position, My Longitude and
My Latitude.
Select "Go To 0" and press "OK" in Command
Mode for "Position 0" which, for the polar positioner, is the imaginary the polar positioner, is
the imaginary point on the geo-stationary orbit
of the satellite, which has the same longitude as the place of installation. Select
"Go To Position" and press "OK" in Command Mode to send the "Reference"
command for the polar positioner which is utilized during re-calibration of the polar
motor function. If you wish to manually control the positioner, use the "Step Size" an
"Move Dish" commands to move the antenna.
5-2 System Setting
5-2-1 Edit Channel
The factory set password is 0000.
From these menus you can create and edit
channel lists. You can create a favorite channel
list, delete, rename and arrange the order of the
channels within the lists.
The TV list can contain hundreds of channels.
By creating your own favorite list, you can make
channel handling a bit more convenient or by
factory default.
5. Main menu
Delete Channels / Delete All
In this mode you can delete individual channels
or all channels from within your lists.
Please note : Channels deleted in this way will
be permanently deleted. The only way to get
them back is to perform a new channel search.
1) Select the channel you wish to delete using
the , keys.
2) Select Delete Mode by pressing the Red Key.
3) Select Selected Channel or All Channels by
using the , keys.
4) Confirm the deletion by pressing the OK keys,
or else press the BACK or EXIT key
if you wish to cancel the operation.
Move Channels
In this mode you can arrange the sequence of
channels within your lists.
1)Select the channel you want to move using
the , keys.
2) Press the GREEN key to select the Move
mode. The right side of the highlighted channel
will change to indicate Move mode has been
selected.
3) Press , keys again to move the channel.
4) When the channel is in the desired position,
press OK to confirm the move.
5. Main menu
Rename Channels
Within any of your favorite lists you can rename
the channels. Mark the channel you want to
rename and press the YELLOW key.
The rename dialog box will then appear and let
you modify the existing name.
1) Select the specific channel which you want to
change the name of.
2) Press the YELLOW key on your RCU to display
Rename mode.
3) Enter the characters (A...Z, 0...9) one-by-one using the , , , keys.
4) Press the OK key for typing.
5) Press the YELLOW(Skip) key to make a space between characters.
6) Press the RED key if you wish to delete a character.
7) Press the GREEN(save) key to save the name.
Sort
See the page 9 (4-4 Channel List for TV/Radio/Favorite)
Channel Lock / Favorite
Pressing INFO key will select Lock mode and
release.
If you turn on the favorite attribute the channel
will be added to your favorite list.
You can make favorite channel groups by press
FAV.
Normal - Favorite1 - Favorite2 .. - Favorite8 Normal
5. Main menu
5-2-2 Parental Control
Parental Control
In the Parental Control menu, you can set the
censorship classification or change the PIN
code. From the factory the default access PIN
code is set to 0000.
You can set On/Off by pressing Left( ) or
Right( ).
The following settings can be altered from this
menu.
1) Menu Lock : Only available SYSTEM SETTING and INSTALLATION.
2) Channel Lock : If you turn the lock attribute on by pressing the , keys, the
channel will only be viewable after you enter a password. This feature is useful to
prevent young viewers from watching inappropriate channels.
3) Rating Lock : This mode for Age Limits Control. If this mode is set up to OFF,
you will skip the Age Limit Control.
4) Age Limit Control : Only available ON mode of Rating Lock. If you want everyone to
have access to all available types of programs, select OFF. If you select ON you may
block programs unsuitable for children. Select Age Limit between 4~18 years on the
line that appears.
Change Password
From here you can change the access Password from the standard 0000.
DO NOT FORGET IT. Without it you do not have
access to any of the functions where the code
is required.
To change the new access Password, enter the
new password number and press OK.
You will then need to confirm your new password by entering it once more and press OK.
5. Main menu
5-2-3 Time Adjustment
To set the current time, input the offset value by
using the standardized information of your current service area. The time setting will be used as
the standardized time for the TV Guide, Wake
up / Sleep time. Current time is based on the
TDT (Time Description Table) in the stream of
the current program (Automatic Update should
be ON). If the stream of current service doesn't
contain the TDT, you can adjust current time
after you set up Automatic Update to OFF.
To adjust current time, move a cursor to Current
Time and then press OK button. Afterward you can adjust time by using , button.
You can complete the time adjustment by press OK key.
5-2-4 Receiver Upgrade
All program and/or data in the master receiver
can be transferred to the next(slave) receiver
using this function.
1) Connect the serial cable between the two
receivers.
2) Enter the Data Transfer menu on the Master
receiver.
3) Select the type of transfer you wish using the
, keys. You can select to transfer both Software & channel list, Software only or Channel list only and press OK key.
4) Power on the Slave Receiver.
5) Once the data transfer is completed, a message will appear informing you that the
transfer was successful. If an error message appears, you will need to start the
transfer process over again.
6) If you are updating multiple receivers, transfer the serial cable to the next receiver
and power it on. When you are finished, press EXIT to return to the cancel viewing
mode.
5. Main menu
5-2-5 Default Setting
In the Default Setting mode, you will be asked
to confirm your desire to clear all settings to the
factory default or not. Default Channel List will
replace the existing channel list with the factory
default channel list. All satellite and transponder
lists will be set to the factory default as will the
user preference settings. When you are ready to
confirm setting the system to the factory default,
Press the OK key. If you press the EXIT key, the
function will be cancelled and return to the
System Installation Menu.
5-2-6 System Information
This displays general information about which
hardware and software version your receiver is
running on.
5-2-7 Event Timer
Event Type: Stop Time, Wake Up, Sleep
Mode: once, daily, weekly.
Press the Green key, and you can add more
reservation list. You can change Event type by
Left/Right key, and you can select the channel in
Channel List by OK key. You can change Once,
Daily and weekly in Mode. Press OK key in Mode
or Duration after adjusting date, time and channel,
and the reservation is done. In case that Mode is
Sleep or Stop Time, confirmation window appears
and informs before 1 minute to be reserved
All reservation lists need the reserved time after 1 minute from now on.
Select the EPG list in Tip Program guide and press Red key, and then you can simply
enter the date, time and channel into event timer.
5. Main menu
5-3 User Preference
From here you can access the language, TV Screen format, Video Format/Output,
RF Audio Type, Remote controller Beep and Signal Meter Style.
- Display Language : English, Germany, French, Arabic, Persian, Polish, Russian, Turkish
- TV Screen Format : Select the type of television screen format you have
(4×3 Full Screen, 4box, 4er Box, 16pe of Television (Auto,PAL,NTSC)
- Video Output : RGB, CVBS
- RF Audio Type : M 4.5Mhz, B.G 5.5 Mhz, I 6.0 Mhz, D.K 6.5 Mhz
- Remote Controller Beep level : OFF, 1~10
- Remote Controller Beep Frequency : 1~40
- Signal Meter Style : Select display type of signal level for Channel information
(Spectrum analyzer, Oscilloscope)
- Signal Beep lever : OFF, 1~10
- Transparency : Off, 1~32 (Under Signal Meter Style)
- Channel Info. Display : OFF, 1~5 sec
Press the Left/Right( / )button to change the value, OK/BACK Button to go to
previous menu and EXIT button to go to full screen.
5-4 Games
Our receiver has built in games for your enjoyment.
In order to play the games, please go to main menu and select Games and
choose one to play.
5-5 Common Interface (CI Model Only)
By selecting Common Interface from the main
Menu and pressing the OK key, you will be taken
to the Common Interface Menu.
From here, select the smart card for which you
wish to view information / change parameters and
press the OK key. From this point, the menus you
see will be determined by the particular smart card
you have selected.
Refer to your smart card instructions for details on
the use of the menus.
6. New Features
6-1 PIP(Picture In Picture)
If you press F3 key in TV mode, you can convert to PIP mode. PIP mode supports not
only PIP mode but also changing mode of place / size of division in 2 sub channels.
You can see the channel list of sub channel by pressing F2 key.
Press F1 key to convert to
position move mode.
You can adjust the position
of Sub channel
with , , , keys.
Input F3 Key in TV Mode.
If you want to convert to
division in 2 modes, Press
F1 key.
You can change the sub channel size by mode
key and using , , , keys will change the size of the sub.
If you want to go to normal
mode from PIP mode, Please
press F3 again.
You can view sub channel list by F2 Key and use
, , , keys to change sub channels.
6-2 A/V Selection
Press Blue key in the viewing mode, and you can adjust the setting of Audio/Video.
Output Mode: select the audio output mode among stereo(LR), Mono(LL) and Mono(RR)
Alternate Audio: select the audio channel in case that several audio channels input.
Alternate Video: select the video channel in case that several video channels input.
Spdif Output: adjust Spdif output (PCM, AC3).
TV Screen Format: adjust the Screen format among 4X3 Full Screen, 4X3 Letter Box,
4X3 Pan & Scan, 16X9 Full Screen, 16X9 Letter Box and 16X9 Pan & Scan.
Brightness: adjust the brightness of the screen in the step of -128 ~ 127
Contrast: adjust the Contrast of the screen in the step of 0 ~ 63
6. New Features
6-3 Time Machine Function (Instant replay)
This function enables a viewer to watch previously missed live screen for about 15 to 30
seconds according to the size of data format. Please use button on the RCU F4 Key
in order to activate this function. If you want to stop watching, please press F4 again
6-4 Firmware upgrade using USB flash drive
(1)Copy the latest firmware upgrade file to a USB
flash drive.
(2)Connect the USB flash drive to the USB port in
receiver, and a window will be appeared in the
TV Monitor.
(3)Select the firmware upgrade file and press OK
key on your RCU, and then the selected data
are transferred to the receiver and upgrade
gets started. When the upgrade is completed,
the receiver will be automatically rebooted.
If you do not press any key on RCU for 5
seconds, the upgrade will automatically
started with the presently selected firmware.
(4)The upgradeable firmware is Program file and
Channel data file
6-5 JPEG viewer
Insert the USB flash drive with JPG file into the USB port in STB and press OK key
After then, Press F1 key, and you can see the JPG file list in USB flash drive.
Select 1 JPG file you wants to play back among the JPG files and press OK key,
and then you can see the selected JPG file.
In addition, press UP and Down keys, and you can see the next JPG file.
Furthermore, press Info key, and you can see the information of the file.
F1 key.
OK key.
Select the JPG files you want to be included in the slide show with Blue key and Red
key in JPG file list, and press OK key. After then, the Slide show gets started. In
addition, press OK key again, and the Slide show gets stoped.
6. New Features
The time of Slide show can be adjusted in User Preference.
If you want to go back to Live mode from JPEG VIEW mode, Stop the Slide show
and press EXIT key.
Red or
Blue Key
OK Key
7. Troubleshooting
There may be various reasons for abnormal operation of the unit. Therefore, if the
unit dies not work properly, check the unit according to the procedures shown in
the table below.
Problem
Possible causes
What to do
*The display on the front *Main cable is not connected. *Check that the main cable is
plugged into the power
panel does not light up.
socket
*No sound or picture.
*Wrong connection of the
video/audio output to the
TV input terminal.
*Wrong connection of
satellite antenna cable.
*Wrong direction of satellite
antenna.
*Black-and-White screen *No signal or weak signal.
or V-Hold problem
*Wrong setting of channel
information in System
Installation Menu.
*Your TV mode is different
from satellite broadcasting
mode.
*The RCU is not working *Battery exhausted.
*Fluorescent light interfering
with the remote controller.
*RCU is incorrectly aimed
*Connect two terminals correctly with a SCART cable
or RCA or RF cable.
*Connect the antenna cable
correctly.
*Adjust the direction of
antenna.
*Check the cable connections
LNB and other equipment
connected between the LNB
and the receiver or adjust
the antenna.
*Type the setting value
correctly.
*Use TV of same mode. Use
a NTSC/PAL converter
connected to the receiver TV.
*Change the batteries.
*Switch off the light.
*Aim the RCU at the receiver.
8. Technical Specifications
Tuner & Channel
Input Connector : F-type, IEC 169-24, Female
Frequency Range : 950MHz to 2150Mhz
Input Impedance : 75ohm or 75Ω . Unbalanced
Signal Level : -25 to -65dBm
LNB Power & Polarization : Vertical
- +13V / Horizontal - +18V
Current : 500mA Max overload Protection
22KHz Tone : Frequency - 22KHz ± 4KHz
Amplitude : 0.6V±0.2V
DiSEqC Control : Version 1.0/1.2/1.3 compatible
Demodulation : QPSK
Input Symbol Rate : 1-45 Ms/s
FEC Decoder : Convolutional Code Rate 1/2, 2/3, 3/4, 5/6 and 7/8
with constraint Length K=7
MPEG Transport Stream A/V Decoding
Transport Stream : MPEG-2 ISO/IEC 13818
Transport Stream : Specification
Profile Level : MPEG-2 MP@ML
Input Rate : 100 Mbit/s Max
Aspect Ratio : 4:3, 16:9
Video Resolution : 720 x 576 (PAL) / 720 x 480 (NTSC)
Audio Decoding : MPEG / MusiCam Layer Ⅰ& Ⅱ
Audio Mode : Single channel / Dual channel joint stereo / Stereo
Sampling : 32, 44.1 and 48KHz
Memory
Main Processor : NEC UPD61217 (32bit @ 284MIPS)
Flash Memory : 2 Mbyte
Program DRAM : 32 Mbyte
Common Interface (CI Model Only)
2 full independent module capability common interface standard compliant
DVB_CI (CENELEC EN-50221)
Up to 20Mbits/s on Command Interface
Up to 100Mbits/s on Transport Stream
MPEG ll Transfer Stream compliant
3.3V or 5V l/O buffer for direct interface with FEC and DEMUX lcs
8. Technical Specifications
A/V & Data In / Out
TV SCART : Output (CVBS, RGB, Audio R/L)
VCR SCART : In / Output (CVBS, Audio R/L)
VIDEO OUT : 1 × RCA Cinch
AUDIO OUT : 2 RCA Cinch
SPDIF : Fiber Optic Digital Audio Output
RS232C : Transfer rate 115,200 bps / 9 pin D-sub Type
COMPONENT OUT(YPbPr) : 3 x RCA Cinch
USB
Power Supply
Input Voltage : 100-250V~ 50 / 60Hz
Type : SMPS
Power consumption : Max. 25W
Standby Power : 8W
Protection : Separate internal fuse.
The input should have lightning Protection
Physical Specification
Size (WxDxH) : 340 x 240 x 60mm (GI-S801 Xpeed / GI-S770 CR Xpeed /
GI-S780 CRCI Xpeed / GI-S805 CI Xpeed )
260 x 215 x 44mm (GI-S801 Xpeed Class / GI-S770 CR Xpeed Class /
GI-S780 CRCI Xpeed Class / GI-S805 CI Xpeed Class )
Weight (Net) : Approximately 2 Kg,
Operating Temp : 0 C to + 45 C
Storage Temp : -10 C to + 70 C
Storage Humidity : 5% ~ 95% RH (Non-Condensing)
RF Modulator
Connector : 75Ω IEC 169-2, Male / Female
Frequency : 470MHz to 860MHz
Output Channel : Ch21 ~ 69 for the Demodulator
TV Standard : PAL G/I/K, NTSC M selectable by Menu Setting
Pre-Set Channel : Channel 38 (or TBD)