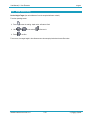
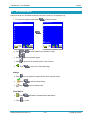
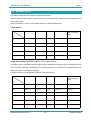
1
User Manual | I. View Excavator
User Manual
I. View Excavator
English
Codice Manuale | Manual Code
000282-IVWESC.uso.EN.00-TRI
English
User Manual | I. View Excavator
English
I
Index - Chapters
I
Index - Chapters ......................................................................................................................................................... 2
I
Index – Revision Notes ............................................................................................................................................. 5
1
Preview ........................................................................................................................................................................ 6
2
Warnings ..................................................................................................................................................................... 7
3
Characteristics ........................................................................................................................................................... 9
3.1
VIEW2.............................................................................................................................................................. 9
3.1.1
Panel ................................................................................................................................................. 9
4
Digging System ........................................................................................................................................................ 11
4.1
4.2
4.3
4.4
4.5
MAIN OPERATING SCREEN ......................................................................................................................11
4.1.1
Buttons............................................................................................................................................13
4.1.2
Bucket Icons ...................................................................................................................................14
DEPTH FUNCTION ......................................................................................................................................15
4.2.1
Height Reference Zeroing .............................................................................................................15
4.2.2
Depth Offset Setting.......................................................................................................................16
REACH FUNCTION......................................................................................................................................17
4.3.1
Reach Reference Zeroing .............................................................................................................17
4.3.2
Reach Offset Setting ......................................................................................................................18
LASER FUNCTION.......................................................................................................................................19
4.4.1
Laser Setting ..................................................................................................................................19
4.4.2
Laser beam acquiring ....................................................................................................................20
SLOPE FUNCTION ......................................................................................................................................21
4.5.1
Set Slope function ..........................................................................................................................21
000282-IVWESC.uso.EN.00-TRI
I2I
Index - Chapters
User Manual | I. View Excavator
4.6
English
4.5.2
Y Axle slope setting .......................................................................................................................22
4.5.3
X Axle slope settings .....................................................................................................................23
4.5.4
How to dig a sloped surface ..........................................................................................................24
PROFILE FUNCTION ...................................................................................................................................25
4.6.1
Set Profile function .........................................................................................................................26
4.6.2
Use Profile ......................................................................................................................................27
4.6.3
Delete Profile ..................................................................................................................................27
4.6.4
Create Profile .................................................................................................................................28
4.6.5
Graphical Summary .......................................................................................................................30
4.6.6
Work with a profile .........................................................................................................................31
4.7
MEMORY FUNCTION ..................................................................................................................................32
4.8
LIMITS FUNCTION .......................................................................................................................................33
4.8.1
Limits off .........................................................................................................................................33
4.8.2
Max Height .....................................................................................................................................34
4.8.3
Min Depth .......................................................................................................................................35
4.9
BUZZER ........................................................................................................................................................36
4.10
BUCKET FUNCTION....................................................................................................................................37
4.11
OPTIONS MENU ..........................................................................................................................................38
4.11.1 Graphics .........................................................................................................................................39
4.11.2 Clock Setting ..................................................................................................................................40
4.11.3 Alarm Clock ....................................................................................................................................41
5
Weighing System ..................................................................................................................................................... 42
5.1
MAIN OPERATING SCREEN ......................................................................................................................42
5.2
WEIGHING PROCEDURE ...........................................................................................................................46
5.2.1
Remote Booking Switch ................................................................................................................47
5.2.2
Weighing Angle Setting .................................................................................................................48
5.3
TARE SETTING ............................................................................................................................................49
5.4
PARTIAL/TOTAL DELETION.......................................................................................................................50
5.5
OPTIONS MENU ..........................................................................................................................................51
5.6
5.5.1
Buzzer function (Wait Beep)..........................................................................................................51
5.5.2
Auto-Book function.........................................................................................................................51
5.5.3
Countdown function .......................................................................................................................52
MATERIALS MENU ......................................................................................................................................53
5.6.1
Set names ......................................................................................................................................54
5.6.2
Set density ......................................................................................................................................54
000282-IVWESC.uso.EN.00-TRI
I3I
Index - Chapters
User Manual | I. View Excavator
English
5.7
CUSTUMER MENU ......................................................................................................................................55
5.8
TRUCKS MENU............................................................................................................................................56
5.8.1
Set max load ..................................................................................................................................57
5.8.2
Set names ......................................................................................................................................57
5.9
PROJECTS MENU .......................................................................................................................................58
5.10
OPERATORS MENU....................................................................................................................................59
5.11
STP6 PRINT MENU......................................................................................................................................60
5.11.1 Total (truck): Print Ticket ...............................................................................................................61
5.11.2 Options ...........................................................................................................................................62
5.11.3 End of the day ................................................................................................................................63
5.11.4 Header 1 / 2 ....................................................................................................................................64
5.11.5 Show Totals ....................................................................................................................................65
5.12
STM295 PRINT MENU.................................................................................................................................66
5.12.1 Total (truck): Print Ticket ...............................................................................................................67
5.12.2 End of the day ................................................................................................................................69
5.12.3 Show Totals ....................................................................................................................................70
5.13
MULTI-PRODUCT AND MULTI-TRUCK FUNCTION ................................................................................71
5.14
MEASURE UNITS ........................................................................................................................................72
6
Calibration Mode ...................................................................................................................................................... 74
6.1
BUCKET ........................................................................................................................................................74
6.1.1
Dog Bone........................................................................................................................................75
6.1.2
Bucket .............................................................................................................................................77
6.1.3
None / Grab Setting .......................................................................................................................83
6.2
LASER SPEED COMPENSATION..............................................................................................................84
6.3
WEIGHING CORRECTION..........................................................................................................................86
7
Alarms ........................................................................................................................................................................ 87
000282-IVWESC.uso.EN.00-TRI
I4I
Index - Chapters
User Manual | I. View Excavator
English
I
Index – Revision Notes
Rev. Index
Rev. Date
Sw Compatibility
Revision Notes
00
10/05/2012
WS 10_23
View2
000282-IVWESC.uso.EN.00-TRI
I5I
1 | Preview
User Manual | I. View Excavator
English
1
Preview
The information on this document could be subject to change without notice.
The constructor is not responsible for possible content mistakes or misprints that could be present in this manual.
Any reproduction, translation or copy of parts of this manual is forbidden without prior written authorization by the
constructor.
WARNING:
Modifications not expressly approved by COBO Division 3B6 cause the loss of authorization to operate the
system.
WARNING:
Before starting operations, the user should read and understand this manual and follow the contained
instructions
000282-IVWESC.uso.EN.00-TRI
I6I
1 | Preview
User Manual | I. View Excavator
English
2
Warnings
1.1 Use of the System
The following directions should enable the person responsible for the system, and the person who actually uses the
instrument, to anticipate and avoid operational hazards.
The person responsible for the instrument must ensure that all users understand these directions and adhere to
them.
Prohibited uses
•
Using the system without instruction
•
Using outside the stated limits
•
Opening of the equipment by using tools (screwdrivers etc.)
•
Carrying out modification or conversion of the product
•
Use of accessories from other manufacturers without the express approval of COBO Divisione 3B6
•
Inadequate safeguards at the surveying site (e.g. when measuring on roads, power lines)
WARNING:
The chance of injury, malfunctions and damage to the equipment if not used as specified. The owner has to
inform the user of the hazards in use, protective and counter measures to take.
1.2 Areas of Responsibility
WARNING:
The person responsible for the instrument must ensure that the equipment is used in accordance with the
instructions. This person is also accountable for the deployment of personnel and for their training and for
the safety of the equipment when in use
The Person in charge of the instrument has the following duties:
•
To understand the safety instructions on the product and the instructions in the User Manual.
•
To be familiar with local safety regulations relating to accident prevention.
•
To inform COBO Divisione 3B6 immediately if the equipment becomes unsafe.
1.3 Checks the user must perform
To ensure continuous and safe operations of the system the following checks must be performed regularly by the
user.
Before to start to work with the system, following checks should be made:
•
Cable integrity and connectors tightening
000282-IVWESC.uso.EN.00-TRI
I7I
2 | Warnings
User Manual | I. View Excavator
•
English
Angle Sensors integrity and tightening
1.4 Hazards in Use
All users must follow the safety instructions given by the manufacturer and the directions of the person responsible
for the instrument.
WARNING:
The absence of instruction, or the inadequate imparting of instruction, can lead to incorrect or prohibited use,
and can give rise to accidents with far-reaching human, material, financial and environmental consequences.
000282-IVWESC.uso.EN.00-TRI
I8I
2 | Warnings
User Manual | I. View Excavator
English
3
Characteristics
3.1
VIEW2
3.1.1
Panel
View2
Description
LEFT/RIGHT ARROWS KEYS
Refer to system in use, Digging or Weighing
UP/DOWN ARROWS KEYS
Refer to system in use, Digging or Weighing
ENTER KEY
Refer to system in use, Digging or Weighing
000282-IVWESC.uso.EN.00-TRI
I9I
3 | Characteristics
User Manual | I. View Excavator
View2
English
Description
SETTINGS KEYS
Refer to system in use, Digging or Weighing
FUNCTION KEYS
Refer to system in use, Digging or Weighing
000282-IVWESC.uso.EN.00-TRI
I 10 I
3 | Characteristics
User Manual | I. View Excavator
English
4
Digging System
4.1
MAIN OPERATING SCREEN
5
6
7
1
8
2
9
3
10
4
11
Functions Area
Ref
Description
1
Graphical indication the relative depth (cm)
2
Real time bucket frontal view (from the cabin side) over the ground
3
The line below the front bucket view reflects the ground X slope
4
X-Axle set slope
5
Clock
6
Dynamic figure which represents the angular position of the bucket (lateral view from left side)
7
The line below the lateral bucket view reflects the ground Y slope
8
Depth value
9
Reach value
10
Y-Axle set slope
11
“Info box”: information about the active functions
000282-IVWESC.uso.EN.00-TRI
I 11 I
4 | Digging System
User Manual | I. View Excavator
English
FUNCTIONS AREA
Ref
Description
Depth function
,
:Longitudinal , Transversal (Y&X) Slopes disabled
: Longitudinal , Transversal (Y&X) Slopes manual setting
: Longitudinal , Transversal (Y&X) Slopes automatic setting
: Profile active
Buzzer Function
: buzzer disabled
: buzzer enabled
Max&Min Limits Function
: No limits set
: Maximum Height set ;
: Minimum Depth set ;
: Maximum & Maximum limits set
: Maximum Height reached
: Minimum Depth reached
Bucket Number
Laser Function
: Laser disabled
: Relative laser enabled
: Absolute laser enabled
000282-IVWESC.uso.EN.00-TRI
I 12 I
4 | Digging System
User Manual | I. View Excavator
Ref
English
Description
LEDs Bar
4.1.1
Key
•
Red LED: ON when the bucket is one meter higher than the reference zero.
•
Red LED: ON when the bucket is higher than the reference zero.
•
Green LED: ON when the bucket is on grade
•
Red LED : ON when the bucket is lower than the reference zero
Buttons
Description
Shift to the Weighing System (if enabled)
Show the profile summary graph with Profile Function active
Short press: Option Menu
Long press: Setup Menu (diagnostic and calibration functions)
Zero the Rotation Sensor Angle Reference
Set the Depth Offset (Height Target)
Switch Off the Alarm Clock buzzer (when active)
Zero the Depth, Reach and Laser References
Set the Reach Offset (Reach Target)
000282-IVWESC.uso.EN.00-TRI
I 13 I
4 | Digging System
User Manual | I. View Excavator
4.1.2
English
Bucket Icons
The bucket icons (lateral view from left side and frontal view from the cabin side) are real time indications to know
how much the bucket is rotated.
The horizontal line reflects the ground (drawn in blue) eventually with the relative slope.
The line below the lateral bucket view reflects the Y slope, the line below the frontal bucket view the X slope.
When the depth value is zero, the bucket blame are on the ground line (system refers indication to the centre of the
blame).
Please note that the bucket draw is an indication and doesn’t reflect the real excavator bucket shape, so it’s not an
indication to work with the bucket bottom or with a blame corner if a X slope is in use.
000282-IVWESC.uso.EN.00-TRI
I 14 I
4 | Digging System
User Manual | I. View Excavator
4.2
English
DEPTH FUNCTION
Remember that the values are referred to the bucket blame centre.
4.2.1
Height Reference Zeroing
DEPTH
A
Bucket on grade:
Zero depth.
Set the Height Reference “0”
From the operating screen:
Position the bucket on the ground in a desired reference point (A).
Press
to zero the depth value.
From now on the display will show the depth zero respect to the reference point acquired.
The depth below the reference point is negative, above positive.
A
A
Bucket too low:
Negative depth.
Bucket too high:
Positive depth.
A
Bucket on grade:
Zero Depth.
(no tilt indications).
Every time the machine will be moved it’s necessary to take again the reference zero point.
Note: If the laser function is enabled the system does not zero the height on pressing the depth key because it is in
“wait for laser beam” condition and the depth height zeroing (reference) is done with the laser beam acquisition.
000282-IVWESC.uso.EN.00-TRI
I 15 I
4 | Digging System
User Manual | I. View Excavator
4.2.2
English
Depth Offset Setting
Set the Height Target (the vertical distance from the acquired reference value A)
From the operating screen:
Press
Use
Press
to enter the setting : depth value will start to flash.
,
to set value or
to fast zero it.
to confirm.
From now on, the target height is the reference zero value acquire plus/minus the set offset value.
000282-IVWESC.uso.EN.00-TRI
I 16 I
4 | Digging System
User Manual | I. View Excavator
4.3
English
REACH FUNCTION
Remember that the values are referred to the bucket blame centre.
4.3.1
Reach Reference Zeroing
REACH
A
Bucket on grade:
Zero reach.
Set the Reach Reference “0”
From the operating screen:
Position the bucket on the ground in a desired reference point (A).
Keep pressed
to zero the reach value.
From now on the display will show the reach zero respect to the reference point acquired.
The reach closer to the cabin is negative, going away positive.
A
Bucket on the reach
zero reference
A
Bucket too close.
Negative reach
Bucket too far,
Positive reach
A
Every time the machine will be moved it’s necessary to take again the reference zero point.
Note: If the laser function is enabled the system does not zero the height on pressing the depth key because it is in
“wait for laser beam” condition and the depth height zeroing (reference) is done with the laser beam acquisition.
000282-IVWESC.uso.EN.00-TRI
I 17 I
4 | Digging System
User Manual | I. View Excavator
4.3.2
English
Reach Offset Setting
Set the Reach Target (the horizontal distance from the acquired reference value A)
From the operating screen:
Press
Use
Press
to enter the setting : its value “R” will start to flash.
,
to set value or
to fast zero it.
to confirm.
From now on, the reach target is the reference zero value acquire plus/minus the set offset value.
000282-IVWESC.uso.EN.00-TRI
I 18 I
4 | Digging System
User Manual | I. View Excavator
4.4
LASER FUNCTION
4.4.1
Laser Setting
English
LASER
Laser Speed Bar:
White BAR = speed OK
Red BAR =speed out of range
LASER FUNCTION
Laser not in use - disabled
Confirming this option the corrections taken by using the laser are not considered and enabling again a laser
mode means that the laser acquisition has to be done again.
Laser in use – enabled
With a laser transmitter it’s possible to refer the machine to the laser beam and work at a fixed height to the laser
level itself instead to transport a quote from different landmark.
Set Laser Function
From the operating screen:
•
Press
•
Press again
to enter the Laser function.
to set the desired Laser mode (disabled / relative/ absolute). The icon of the selected
function will start to flash.
•
Press
,
,
to confirm. The icon off.
000282-IVWESC.uso.EN.00-TRI
I 19 I
4 | Digging System
User Manual | I. View Excavator
4.4.2
English
Laser beam acquiring
The reference with the laser beam is done rising the laser receiver sensor trough the laser beam.
The rising movement has to be done at constant and moderate speed.
The speed indication is shown on the screen with a graph bar inside the “info box”. Keep the speed indicator inside
the bar. To have a constant speed in the moment that the laser beam is crossed, start with the receiver at least a
couple of meters below the laser beam plane before to start to rise the boom.
Relative Reference Laser
•
Set the Relative Laser mode.
The LASER message will appear into the “infobox” together with the vertical speed graph bar.
Take care that the laser level is switched on. High rpm is preferred.
•
Perform the laser acquisition and you will see the “ OK! “ message into the “infobox”.
•
Move down the booms (laser receiver below the laser level) until the message “ OK” “ will be replaced with
“REF.0” that means that it’s possible to perform the first depth zeroing
•
Put the bucket to a defined height (usually the target depth) and pressing
key.
After each acquisition the laser receiver is disabled to avoid unwanted acquisitions. The message “OFF“ will be
shown.
To enable again the laser receiver for a new acquisition press
To manually disable press
.
.
Every time that the excavator has been moved a new laser acquisition has to be done. The REF.0 procedure is no
more needed, the reference in use (distance from laser to target height) still the acquired on the first laser caught and
you will continue to work at the same distance from the laser.
Absolute Reference Laser
Differently from Relative Laser, instead to reach with the bucket the target height and do a REF.0, it’s possible to
manually set a depth value and the target height (zero depth) will be at that distance from the laser beam.
•
Set the depth offset from laser beam to the final ground depth. If the laser is 5 meters higher set -5.00 meters.
•
Set the Absolute Laser mode.
•
Proceed as with Relative Laser. Just after the first acquisition the REF.0 procedure is no more needed and the
system is ready to dig, (“ OK! “ message on the screen, the depth zero value will be at the desired height).
000282-IVWESC.uso.EN.00-TRI
I 20 I
4 | Digging System
User Manual | I. View Excavator
4.5
English
SLOPE FUNCTION
Y AXLE SLOPE
X AXLE SLOPE
SLOPE FUNCTION
Y Axle (standard) :
X Axle:
Longitudinal Slope
Transversal Slope
Positive
slope
4.5.1
Positive
slope
Set Slope function
Slopes Settings:
•
Longitudinal (standard) and transversal slopes disabled
•
Slopes manual settings
•
Slopes automatic settings
Press
to enter the Slope function
Press again
Press
to set the Slope mode
to confirm
000282-IVWESC.uso.EN.00-TRI
I 21 I
4 | Digging System
User Manual | I. View Excavator
4.5.2
English
Y Axle slope setting
Longitudinal Slope disabled / No slope in use
Disable slope when you work on a flat surface (0%)
If a value has been previously set is not considered (0.00% slope in use). A saved value will be available again
when the slope mode will be recalled again.
Longitudinal Slope Manual Setting
Press
to enable the manual mode.
While the icon flashes use
,
to set value or
to fast zero it.
The slope is positive when higher in front of the excavator.
Longitudinal Slope Automatic Setting
If a piece of slope is already available you can automatically acquire is % value and use it to continue to dig.
Press
Press
to select the proper icon. The “SET 1” message will display into the “infobox”.
to acquire the point (bucket positioned on the far away point).
The “SET 2” message will display into the “infobox”.
Press
Press
to acquire the second point (closer to the cabin).
to calculate the slope. The icon will stop to flash.
000282-IVWESC.uso.EN.00-TRI
I 22 I
4 | Digging System
User Manual | I. View Excavator
4.5.3
English
X Axle slope settings
Icons are with a X symbol for identification.
The slope X is positive when higher on the left side of the excavator (reference: operator seated in the cabin).
All the functions works as for the Y axle.
Transversal Slope disabled / No slope in use
Transversal Slope Manual Setting
Transversal Slope Automatic Setting
000282-IVWESC.uso.EN.00-TRI
I 23 I
4 | Digging System
User Manual | I. View Excavator
4.5.4
English
How to dig a sloped surface
Second location
point, accessed from
X
Y Axle
Reference direction (Angle Zeroing): parallel to the Y Axle.
The excavator has to start aligned parallel to this “Y” field
Y
side
No rotation sensor installed
•
Reference direction (Angle Zeroing): parallel to the Y axle.
•
The excavator has to start aligned parallel to this “Y” field side!
•
If a laser transmitter is in use, the “Y” line generated by the laser has to be parallel too! With big slopes a bad
alignment can generate a heavy error!
Note: The excavator can’t be rotated
Rotation sensor installed (option)
The rotation sensor (option) allows to dig rotating the chassis even there are slopes set.
With the rotation sensor (option) enabled proceed as follow:
•
Align the excavator chassis parallel to the Y axle of the surface (reference direction: angle zeroing)
•
Then press
to save the angle.
A “REF.Y” confirmation message is shown into the “infobox”. The acquired angle it’s now the “zero” angle of the
chassis.
The following laser acquisitions (after the machine has been moved) can be taken at any rotation angle.
Note: If “NOROT” instead of “REF.Y” message is shown, means that the rotation sensor is not connected or not
working.
000282-IVWESC.uso.EN.00-TRI
I 24 I
4 | Digging System
User Manual | I. View Excavator
4.6
English
PROFILE FUNCTION
A profile is the sequence of more different slopes along the same axle (Y).
Differently from the single slope it’s possible to cross all the slopes without additional setting during the work.
Bucket actual position
Profile
Next profile point
Reach Distance to the point
PROFILE FUNCTION ACTIVE
This icon shows that a profile is in use. A single slope set before is no more considered when this icon is
shown.
Info box:
In this box “PROFILE” is shown the following profile conjunction point that has to be reached (closer to the cabin) and
the reach distance to it (R).
000282-IVWESC.uso.EN.00-TRI
I 25 I
4 | Digging System
User Manual | I. View Excavator
4.6.1
English
Set Profile function
Select in this page the profile that has to be edited or used. It’s possible to keep saved up to 4 different profiles.
•
From the operating screen keep pressed
to enter in the “Profile Selection” page.
PROFILE
selection
Disabled
Profile
Profile
Profile
Profile
Press&hold
1
2
3
4
Profile 1
Disabled : No profile in use and return to the main working page.
Profile 1 ÷ 4: Enter the selected Profile Menu.
PROFILE
Selection
Use existing
Create or Editor
Delete
Disabled
Profile 1
Profile 2
Profile 3
Profile 4
Use
Press
,
PROFILE:
to select function and press
1
Selected Profile
Active the profile
Create or change the profile
Delete the profile
to confirm.
to go back to the previous screen.
000282-IVWESC.uso.EN.00-TRI
I 26 I
4 | Digging System
User Manual | I. View Excavator
4.6.2
English
Use Profile
Activate the selected profile and return to the main working page.
PROFILE:
1
Use existing
Create or Editor
Delete
4.6.3
Delete Profile
Zeroing the selected profile.
PROFILE:
1
PROFILE:
Use existing
Create or Editor
Use existing
Create or Editor
Delete
Delete
1
Enter: confirm
Home: exit
Press again
Press
when requested to confirm.
to go back to the previous screen.
000282-IVWESC.uso.EN.00-TRI
I 27 I
4 | Digging System
User Manual | I. View Excavator
4.6.4
English
Create Profile
Automatic Profile
Create a profile putting the bucket on the conjunction points between the various slopes sections to acquire the
coordinates (max 10 points).
PROFILE:
1
Set Profile:
Use existing
Create or Editor
Automatic
Manual
Delete
Take Point?
Acquire:
Take Point?
1
End
•
Acquire:
10
Take Point?
Acquire:
10
End
End
With the bucket steadily positioned on a conjunction point press
to acquire. The point number increases.
It’s now possible to move to next point.
•
Press
on “End” command after that the last point of the profile has been taken to finish the acquisition.
The graphical summary of the profile will be shown.
000282-IVWESC.uso.EN.00-TRI
I 28 I
4 | Digging System
User Manual | I. View Excavator
English
Manual Profile
Create a profile inserting manually the profile coordinates (junction points values).
PROFILE:
1
PROFILE:
Set Profile:
Use existing
Automatic
Create or Editor
Manual
Delete
Point:
Depth
Reach
Slope
1
1
0.000
0.000
0.000
Point
Profile point under editing. From 1 (start) to 10.
Depth / Reach
Set depth and reach values referred to the starting point.
First point (1 - start) has usually 0 depth and 0 reach: other points are referred to this.
In case some values is set in point 0, there will be an offset of the starting point respect to the physical point where
REF.0 will be done with the bucket to reference the machine to the profile.
Slope
The Slope value is the % value automatically calculated that refers to the slope segment to be done between the
actual selected point and the previous.
Select function with
Use
Press
,
,
and
to set value and
to enter the setting.
to confirm.
to end the profile. The graphical summary of the profile will be shown.
000282-IVWESC.uso.EN.00-TRI
I 29 I
4 | Digging System
User Manual | I. View Excavator
4.6.5
English
Graphical Summary
At the end of a profile setting (manual or automatic mode) it’s shown a summary graph.
Bucket actual position
Graphic Bars
Target Point:
number and reach
Zoom
Depth
Reach
Slope
Graphic Bars
Green bar: Profile start
Red bar: Profile End
Target Point
Progressive point number () and reach “R”: (value referred to the target point).
Depth / Reach / Slope
Depth and reach values are referred to the starting point.
The slope (in %) is referred to the slope section that has to be dig to reach the actual selected point.
Press
or
to return to the main working page.
From working screen it’s possible to recall the profile summary graph with
000282-IVWESC.uso.EN.00-TRI
I 30 I
.
4 | Digging System
User Manual | I. View Excavator
4.6.6
English
Work with a profile
It’s possible to move the excavator along the longitudinal axle of the profile in case the mechanical reach of the
machine is not enough or for operative comfort.
Press
to see the “Set Reference” icon
Put the bucket on a profile point and press
The “Keep Reference” icon
.
to store the reach.
is now show.
Move now the excavator and put the bucket on the previous stored point.
Press
to complete the procedure and continue to work. The profile icon
It’s possible to jump out from the procedure at any moment pressing
000282-IVWESC.uso.EN.00-TRI
I 31 I
is show again.
.
4 | Digging System
User Manual | I. View Excavator
4.7
English
MEMORY FUNCTION
The memory function provides a way to move the excavator when you are not using a laser as a reference (eg:
moving the excavator on its tracks to dig to the same level at a different location on the site).
MEMORY REFERENCE SET
Memory Reference Icons:
•
•
Set Reference
Keep Reference
Work with the memory function
Position the bucket tip on a reference point. Choose anything stable that can also be accessed from the next
location. After moving the excavator, you will need to use this same reference point (or another point that is at
exactly the same elevation).
Press
, the “Set Reference” will start to flash
Press
to store this point. The reference icon off
.
.
Move the excavator to your next position and place your excavator bucket tip on that same reference point used
in the previous step.
Press
again to flash the “Keep Reference”
Press
to acquire the value. The reference icon off.
.
It’s now possible to continue to work.
First location
000282-IVWESC.uso.EN.00-TRI
Same reference
point, accessed from
both digging sites
I 32 I
Second location
4 | Digging System
User Manual | I. View Excavator
4.8
English
LIMITS FUNCTION
LIMITS FUNCTION
Limits Icons:
•
No Limits
•
Min Depth set
•
Max Height set
•
Min/Max Limits set
WARNING
These functions are only an indication and don’t affect the machine movements at all. Note also that pivots
and bucket blade (where indication are referred) are not really the lowest or highest point of the excavator.
Indication on the display can have also a delay when the excavator is moved fast.
4.8.1
Limits off
•
Press
•
Press
to see the icon of the limit to delete (Max Height, Min Depth) will start to flash:
to erase the set value. The
000282-IVWESC.uso.EN.00-TRI
or
,
.
icon off and exits from the setting.
I 33 I
4 | Digging System
User Manual | I. View Excavator
4.8.2
English
Max Height
Set Height
H MAX
Actual Height
Max setting
Max Height reached
Max Height set
Max Height
It’s possible to save a maximum height, when the excavator reaches this elevation a warning on the screen is shown.
It’s used the highest pivot of the excavator.
Set max limit
•
Press
when the excavator it’s at the maximum desired height. The “Max” icon will start to flash
In the “infobox” the actual height value will flashes.
•
Press
•
To exit without changes press
The icon
.
to confirm max height setting.
until the “No limits” icon will start to flash
. Press
to confirm.
indicates a max limit set.
During the work, reaching this height, the “H-MAX” message will be shown into the “infobox” and the buzzer will
sound.
000282-IVWESC.uso.EN.00-TRI
I 34 I
4 | Digging System
User Manual | I. View Excavator
4.8.3
English
Min Depth
Set Height
H MIN
Actual Height
Min Depth reached
Max setting
Min Depth set
Enable/Disable limit
•
Press
•
Press
•
To exit without changes press
The icon
when the excavator it’s at the maximum desired height. The “Min” icon will start to flash
.
to confirm/exit from mix height setting.
until the “No limits” icon will start to flash
. Press
to confirm.
indicates a max limit set.
During the work, reaching this height, the “H-MIN” message will be shown into the “infobox” and the buzzer will
sound.
000282-IVWESC.uso.EN.00-TRI
I 35 I
4 | Digging System
User Manual | I. View Excavator
4.9
English
BUZZER
Buzzer
disabled
Buzzer
enabled
Buzzer Enabled
Buzzer steadily sounds when the bucket is on grade and discontinuously sounds away from zero depth.
Buzzer Disabled
Bucket position doesn't affects the buzzer sound (disabled).
•
Press
•
Press again
•
Press
to enter the function. The Buzzer Icon will start to flashes
to select the desired mode
to confirm and exit from the setting
000282-IVWESC.uso.EN.00-TRI
I 36 I
4 | Digging System
User Manual | I. View Excavator
English
4.10 BUCKET FUNCTION
Control box can store up to 9 different buckets. This function allowed to select the bucket calibration to use.
The calibration of each bucket can be done by the system installer or directly by the user following the instruction at
the end of this manual.
BUCKET
•
Press
•
Select the desired bucket with
•
Press
to enter the function
or
.
to confirm and exit from the setting
NOTE: if the control box is used on 2 different excavators (machine 1 and machine 2) the 9 buckets are shared
between the 2 machines.
000282-IVWESC.uso.EN.00-TRI
I 37 I
4 | Digging System
User Manual | I. View Excavator
English
4.11 OPTIONS MENU
•
From the operating screen press
to enter the Options Menu
OPTIONS
Brightness
Graphics
Clock Settings
Alarm Clock
Key Beep
Remote Beep
Touch Point
Machine N.
100
OFF
OFF
C
1
About
Brightness
Display brightness settable from 0 to 100
Graphics
Menu to set the display item colours
Key Beep
OFF: no sound when a control box button is pressed
ON: sound when a control box button is pressed
Remote Beep
Touch Point
Machine N.
System can store up to 2 calibrations (same control box on 2 different machines). Select here the machine in use.
Clock Settings
Time and date setting menu.
Alarm Clock
Alarm clock setting menu.
Use
,
to select function and
Use
,
to set function and
000282-IVWESC.uso.EN.00-TRI
to enter the setting or menu
to confirm
I 38 I
4 | Digging System
User Manual | I. View Excavator
English
4.11.1 Graphics
Is possible to change the control box display item colours. The colour number is shown together with an example
box.
OPTIONS
Brightness
COLOURS
100
Bucket
OFF
OFF
C
1
Menu Text
Menu Backgr
Oper Text
Oper.Sky
Oper.Ground
Icon Backgr
Graphics
Clock Settings
Alarm Clock
Key Beep
Remote Beep
Touch Point
Machine N.
1
Colour Number
4
0
4
248
243
0
Load Default
SAVE
About
Load default
Load the default settings
SAVE
It’s necessary to press
over SAVE to keep the change the next time the system will be powered on.
•
Use
•
In the colour palette use arrows keys (up, down, left, right) to select the desired colour and “enter” key to confirm
,
to select item and press
to enter the setting. The colours palette will be displayed.
Colour selected
000282-IVWESC.uso.EN.00-TRI
I 39 I
4 | Digging System
User Manual | I. View Excavator
English
4.11.2 Clock Setting
Control box clock setting.
OPTIONS
Brightness
Graphics
Clock settings
Alarm Clock
Key Beep
Remote Beep
Touch Point
Machine N.
CLOCK SETTING
100
OFF
OFF
C
1
Hour
Minutes:
Seconds:
Day
:
Month :
Year
:
10
mm
ss
DD
MM
YYYY
CONFIRM
About
•
Use
,
to select function and
•
Use
,
to set the desired value and press
•
Press
over “CONFIRM” to save.
•
Press
to exit without changes.
000282-IVWESC.uso.EN.00-TRI
to enter the setting
I 40 I
confirm.
4 | Digging System
User Manual | I. View Excavator
English
4.11.3 Alarm Clock
When the alarm occurs, the buzzer will irregularly sound and the time indication in the working screen will became
red.
1st Alarm Clock is used to sound at a specified time.
2nd , 3rd Alarm Clock sound always at the same time (like start and end of the day).
OPTIONS
Brightness
Graphics
Clock Settings
Alarm Clock
Key Beep
Remote Beep
Touch Point
Machine N.
100
OFF
OFF
C
1
About
CLOCK SETTI
ON
CLOCK SETTI
Hour
:
Minutes:
Day
:
Month :
Year
:
OFF
hh
mm
DD
MM
YYYY
CLOCK SETTI
Hour
:
Minutes:
ON
10
30
CLOCK SETTI
Hour
:
Minutes:
OFF
hh
mm
10:30
CLOCK SETT OFF/ON
Enable/disable (ON/OFF) the desired alarm clock
Hour/Minutes/Day/Month/Year
Alarm Clock Settings
Change the alarm clock time over the proper line
•
Use
,
to select function and
•
Use
,
to set the desired value and press
•
Press
to exit.
•
Press
to disable the alarm
000282-IVWESC.uso.EN.00-TRI
to enter the setting
I 41 I
confirm.
4 | Digging System
User Manual | I. View Excavator
English
5
Weighing System
The system is based on the measurement of the pressure of the lifting cylinder in the rising phase (by means of the
pressure transducer) and the calculation of the up speed (with an inclinometer).
5.1
MAIN OPERATING SCREEN
In the working screen is possible to check the truck load and all the active functions.
Settings
1
2
3
4
5
6
7
Weighing Database
Ref
Description
1
Clock (hh.mm.ss)
2
Status and Instructions
3
Bucket number
4
Partial load (last bucket load)
5
Total load (material on the truck)
6
Truck load graphical bar / Depth value
7
Weighing Database displayed in sequence: max load, project, operator, material, client, truck
000282-IVWESC.uso.EN.00-TRI
I 42 I
5 | Weighing System
User Manual | I. View Excavator
Ref
English
Description
LEDs Bar
Weighing Instructions
•
•
•
Red LED ON : move down the bucket
Green LED ON : bucket on grade
Red LED ON : move up the bucket
Max Load Indication
•
Red LEDs ON: actual load > to the max load set
•
Green LED ON: actual load < to the max load set
SETTINGS
Ref
Description
Auto-Book
Auto-Book function active
Auto-Book function disable
Max Load
Max load function non active
Max Load set
Max Load reached
Tare
Tare set
No Tare set
Count-Down
Count-down function active
Count-down function active
000282-IVWESC.uso.EN.00-TRI
I 43 I
5 | Weighing System
User Manual | I. View Excavator
Ref
English
Description
Buzzer Function
Buzzer disabled
Buzzer enabled
WEIGHING DATABASE
Database Area with selected item number
Key
Description
Materials Menu Enter the Materials Database
Clients Menu Enter the Clients Database
Trucks Menu Enter the Trucks Database
Projects Menu Enter the Projects Database
Operators Menu Enter the Operators Database
KEYS
Key
Description
Shift to the Digging System (if enabled)
Shift between load graph bar and depth indication
Short press: Enter Option Menu
Long press: Enter Setup Menu (diagnostic and calibration functions)
Tag the weighing
000282-IVWESC.uso.EN.00-TRI
I 44 I
5 | Weighing System
User Manual | I. View Excavator
Key
English
Description
Short press: Enter Printer page
Long press: Print ticket
Enter the Weighing Angle Setting
Switch Off the Alarm Clock buzzer (when active)
Enter the Tare Setting
Enter the Partial/Total Deletion page
With the digging system enabled together with the weighing system, pressing “down” key will appear the depth
indication instead of the truck icon / truck % load graph bar.
000282-IVWESC.uso.EN.00-TRI
I 45 I
5 | Weighing System
User Manual | I. View Excavator
5.2
English
WEIGHING PROCEDURE
During the weighing phase it’s necessary to:
Keep the machine on a levelled ground.
Don’t move the machine!
The bucket should be completely closed when you start the weigh (or at the correct angle position if bucket
angle check has been enabled) and can’t be manually moved during the weighing phase.
Don’t move the dipper stick.
On a 3 booms machine the middle boom (boom 2) has to be completely open.
Don’t stop the movement (dynamic weighing!).
Keep a constant speed.
Weighing Instructions
Partial Load
Total Load
STEP 1
1. Press
STEP 2
STEP 3
to perform the weighing.
With “Auto-Book” function active, it’s not needed to press the button every time that it’s necessary to weigh
because the weighing system it’s always ready and this button will work as enable or disable switch of the
weighing system.
2. Follow the on-screen instruction:
If the boom is above the “start weigh” point, will be necessary to move down the boom.
3. When the boom will be in the correct position “Ready to weigh”, with the indication “move up”, it’s possible to
perform the weighing rising up the boom.
4. Overtaken the “start weigh” point there will be the on screen “Weighing…” indication and the control box buzzer
will be ON.
If the weighing is correct the load in the bucket will be shown on the partial weight and the value will be also added to
the total. In a negative (or 0) load in the bucket will be computed, the value will be not added to the total.
If an error happens during the weighing phase there will be the relative message on the screen. The load will be not
added to the total.
000282-IVWESC.uso.EN.00-TRI
I 46 I
5 | Weighing System
User Manual | I. View Excavator
5.2.1
English
Remote Booking Switch
The remote booking switch it’s an external button that has the same functionality of the button
of the control box.
When installed, it’s usually placed on the excavator joystick. Can be also replaced by an available internal button of
the joystick itself.
•
Short press: Tag the weighing (replaces the
•
Long press: the following page will appear:
button).
Booking switch
kept pressed:
print and
delete truck
exit without
changes
Press again the booking switch (or the
button) to print the actual load (truck) and automatically delete
the on-screen values.
Press
to exit without changes.
000282-IVWESC.uso.EN.00-TRI
I 47 I
5 | Weighing System
User Manual | I. View Excavator
5.2.2
English
Weighing Angle Setting
It’s possible to select at witch angle of the first boom the system will start to weigh. This setting can be changed at
any moment to best fit the working condition.
•
From the main operating screen press
to access the “START WEIGH” page.
START WEIGH
Angle:
Start:
0
Actual:
0.0
Min:
Max:
0.0
0.0
Start
First boom Angle used as start weigh trigger
•
Use
•
Press
keys to manually change the actual start weigh angle.
to use the actual boom angle as start weigh angle.
Actual
Actual angle of the first boom
Min/ Max
Weighing Range: Min and max angles (first boom) that can used as start weigh
000282-IVWESC.uso.EN.00-TRI
I 48 I
5 | Weighing System
User Manual | I. View Excavator
5.3
English
TARE SETTING
To keep the system accurate, it’s necessary to perform a new tare acquisition in particular work conditions:
- The machine is cold (first movements of the day). Repeat the check when the oil temperature is stable.
- The bucket has been changed (smaller/bigger).
- Some material stays in the bucket (not possible to unload it).
- The hydraulic circuit oil has been changed.
•
From the main operating screen press
to access the “SET TARE” page.
SET
TARE
Tare:
0
Actual Set Tare
BucketLoad:
0
Load of the last weigh
Ente r
save last
bucket as the
tare
exit without
changes
Tare Setting
•
In the “SET TARE” page select the “Tare:” function and press
Use
,
to set tare and
to enter the setting
to confirm
Tare Zeroing
•
Perform an empty bucket weigh
•
In the “SET TARE” page select the “BucketLoad:” function
•
Press
to update the tare value with the last bucket load
Tare Deletion
•
Enter the “SET TARE” page
Press
to delete the set tare
Press
to go back to the operating screen.
000282-IVWESC.uso.EN.00-TRI
I 49 I
5 | Weighing System
User Manual | I. View Excavator
5.4
•
English
PARTIAL/TOTAL DELETION
From the main operating screen press
to access the Delete Menu.
DELETE
DELETE
Partial (bucket)
Partial (bucket)
Partial x 2
Partial x 2
Total (truck)
Total (truck)
Materials Total
Materials Total
Enter: confirm
Home: exit
Partial (bucket)
To be used if the bucket has been wrong or accidentally weighed and the material will not be putted on the truck.
Press
to delete the last bucket weighed.
Total (truck)
Press
to cancel the total load (before start a new truck loading).
Partial x 2 (TRUCK FILL / RESIDUE MATERIAL)
When the last bucket load did not empty completely, to find out the effective total quantity unloaded, weigh the
material which has remained in the bucket and use this function. This function will remove twice the last value
weighed from the total so that you can find out the total value of material which has really been put into the truck.
Use
to select the function and press
to enter.
Materials Totals
To delete the totals in the memory (example material summary totals).
Use
Press
Press
to select the function and press
to enter.
to confirm the deletion.
to go back to the previous screen. Once confirmed, the screen goes back to the operating screen.
000282-IVWESC.uso.EN.00-TRI
I 50 I
5 | Weighing System
User Manual | I. View Excavator
5.5
English
OPTIONS MENU
•
From the main operating screen press
to access the menu
OPTIONS
Brightness
100
Graphics
Key Beep
OFF
Wait Beep
ON
Clock Settings
Alarm Clock
Auto-Book
Countdown
OFF
OFF
Machine N.
1
Use
,
to select functions and
Use
,
to enable/disable functions and
Press
to access the setting.
to confirm.
to go back to the operating screen.
Brightness, Graphics, Key Beep, Clock Settings, Machine N.
This functions are described in the Digging Mode “Options Menu”.
5.5.1
Buzzer function (Wait Beep)
Wait Beep function enabled the buzzer will sound (flashing) when the weighing is booked. The frequency changes if
the boom is higher or lower than the start weigh point.
ON: Function enabled
OFF: Function disabled
5.5.2
Auto-Book function
With this function enabled is possible to weight material that will be not loaded on the truck (moving it, levelling the
ground) that has to be manually deleted with delete partial command.
000282-IVWESC.uso.EN.00-TRI
I 51 I
5 | Weighing System
User Manual | I. View Excavator
English
ON: The weighing function is always enabled. This function avoids to press
button before to weigh. The
weighing procedure will be activated every time that the first boom overtakes the start weigh angle.
OFF: Function disabled The weighing has to be tagged every time. Necessary to press
5.5.3
to tag the weight.
Countdown function
Countdown function to weigh decreasing from the truck max load.
ON: Function active. The initial value for the scalar counting is the value set as maximum load (to set the maximum
load see the dedicated page in this manual).
On activating the Countdown function the maximum load value is shown on the display. Each partial is subtracted
from the maximum load and the maximum load exceeded will be indicated on the screen with a warning when the
load drops below zero.
OFF: Function disabled. The partial load is added to the total load at every weighing.
000282-IVWESC.uso.EN.00-TRI
I 52 I
5 | Weighing System
User Manual | I. View Excavator
5.6
English
MATERIALS MENU
System can store up to 200 different materials, each with a name up to 16 characters long.
•
From the main operating screen press
MATERIALS
1
2
3
4
5
6
7
8
9
10
MATERIALS
1
2
3
4
5
6
7
8
9
10
Delete?
,
Use
Use
,
to select materials (10 materials for page)
to scroll materials pages
to go back to the operating screen or exit a function
Press
Press
to access the menu
to return to the first material page
Settings
to set the material to weigh and return to the operative screen.
Press
Press
Press
to set the material density
to set the material name
Delete Material
Press
Press
to delete the selected material data deletion
to confirm
000282-IVWESC.uso.EN.00-TRI
I 53 I
5 | Weighing System
User Manual | I. View Excavator
5.6.1
Set names
MATERIALS
1
2
3
4
5
6
7
8
9
10
Use
Material
1
A BCDEFGHIJKLM
NOPQRSTUVWXYZ
abcdefghijklm
nopqrstuvwxyz
0123456789< >
A
,
to select value and
Name set
to enter it.
to confirm value and return to the previous page.
Press
5.6.2
English
Set density
MATERIALS
1
2
3
4
5
6
7
8
9
10
Use
Specific Gravity
Kg/m3
0
Enter: save
Home: exit
,
to set value (available only in Kg/m3).
Press
to confirm value.
Press
to go back to the previous screen.
000282-IVWESC.uso.EN.00-TRI
I 54 I
5 | Weighing System
User Manual | I. View Excavator
5.7
English
CUSTUMER MENU
System can store up to 500 different clients, each with a name up to 16 characters long.
•
From the main operating screen press
CLIENTS
1
2
3
4
5
6
7
8
9
10
Delete?
Client
1
A BCDEFGHIJKLM
Press
Client name setting
NOPQRSTUVWXYZ
abcdefghijklm
nopqrstuvwxyz
0123456789< >
A
Name set
Instructions
,
Use
Use
to access the “CLIENTS” menu.
to select clients (10 clients for page) .
,
to scroll clients pages
to go back to the operating screen or exit a function
Press
to return to the first client page
Settings
Press
to set the client and return to the operative screen.
Press
to enter the selected client data deletion and confirm with
key.
Set Client name
Press
Use
Press
to set the client name
,
to select value and
to enter it
to confirm value and return to the previous page
000282-IVWESC.uso.EN.00-TRI
I 55 I
5 | Weighing System
User Manual | I. View Excavator
5.8
English
TRUCKS MENU
System can store up to 500 different trucks, each with a name up to 16 characters long.
•
From the main operating screen press
to access the menu.
TRUCKS
1
2
3
4
5
6
7
8
9
10
TRUCKS
1
2
3
4
5
6
7
8
9
10
Delete?
,
Use
Use
,
Press
to select trucks (10 for page) .
to scroll trucks pages
to go back to the operating screen or exit a function
Press
to return to the first truck page.
Settings
Press
to set truck and return to the operative screen.
Press
to set the max load for all the trucks.
Press
to set the max load that the truck can handle.
Press
to set the truck name.
Delete Truck
Press
Press
to enter the selected truck data deletion
to confirm
000282-IVWESC.uso.EN.00-TRI
I 56 I
5 | Weighing System
User Manual | I. View Excavator
5.8.1
Set max load
TRUCKS
1
2
3
4
5
6
7
8
9
10
•
Use
•
Press
•
Press
5.8.2
English
MAX LOAD
generic
Ton
0.00
Enter: save
Home: exit
,
to set value.
to confirm value.
to go back to the previous screen.
Set names
TRUCKS
1
2
3
4
5
6
7
8
9
10
•
Use
•
Press
Truck
1
A BCDEFGHIJKLM
NOPQRSTUVWXYZ
abcdefghijklm
nopqrstuvwxyz
0123456789< >
A
,
to select value and
Name set
to enter it.
to confirm value and return to the previous page.
000282-IVWESC.uso.EN.00-TRI
I 57 I
5 | Weighing System
User Manual | I. View Excavator
5.9
English
PROJECTS MENU
System can store up to 100 different projects, each with a name up to 16 characters long.
•
From the main operating screen press
PROJECTS
1
2
3
4
5
6
7
8
9
10
Delete?
Use
Press
Project
1
A BCDEFGHIJKLM
NOPQRSTUVWXYZ
abcdefghijklm
nopqrstuvwxyz
0123456789< >
A
Name set
Instructions
,
Use
to access the “PROJECTS” menu.
,
to select projects (10 projects display for each page) .
to scroll projects pages
to go back to the operating screen or exit a function
Press
to return to the first project page.
Settings
Press
to set the project and return to the operative screen.
Press
to enter the selected project data deletion and confirm with
key.
Set project name
Press
Use
Press
to set the project name.
,
to select value and
to enter it.
to confirm value and return to the previous page.
000282-IVWESC.uso.EN.00-TRI
I 58 I
5 | Weighing System
User Manual | I. View Excavator
English
5.10 OPERATORS MENU
System can store up to 50 different operators, each with a name up to 16 characters long.
•
From the main operating screen press
OPERATORS
1
2
3
4
5
6
7
8
9
10
Delete?
Use
Press
Operator
1
A BCDEFGHIJKLM
NOPQRSTUVWXYZ
abcdefghijklm
nopqrstuvwxyz
0123456789< >
A
Name set
Instruction
,
Use
to access the “OPERATORS” menu.
,
to select operators (10 projects display for each page) .
to scroll operators pages
to go back to the operating screen or exit a function
Press
to return to the first operator page.
Settings
Press
to set the operator and return to the operative screen.
Press
to enter the selected operator data deletion and confirm with
key.
Set operator name
Press
Use
Press
to set the operator name.
,
to select value and
to enter it.
to confirm value and return to the previous page.
000282-IVWESC.uso.EN.00-TRI
I 59 I
5 | Weighing System
User Manual | I. View Excavator
English
5.11 STP6 PRINT MENU
Print Menu for printer STP6.
•
From the main operating screen press
to access the “PRINT” menu.
PRINT
Total (truck)
Options
End of the day
Ticket N.
Header 1
Header 2
1
Show Totals
Total (truck)
Print the total load of the actual truck.
Options
Menu of the additional information that can be enabled/disabled in the ticket options page.
End of the day
Print summary Menu
Ticket N. Sequential number of the printer ticket automatically increased at every total (truck) print.
Press
to enter the setting ,
Press directly
or
to set value. Press
to confirm.
to return to “1”.
Header 1 / Header 2
First and second header of the ticket
Shows Totals
Totals Menu
000282-IVWESC.uso.EN.00-TRI
I 60 I
5 | Weighing System
User Manual | I. View Excavator
English
5.11.1 Total (truck): Print Ticket
Printing of the total load of the actual truck. The ticket has various additional information that can be enabled/disabled
in the ticket “OPTIONS” menu.
PRINT
Total (truck)
Options
End of the day
Ticket N.
Header 1
Header 2
1
Press&hold
Show Totals
•
From the “Print Menu” press
•
The ticket can be also printed immediately from the main operating screen by keeping pressed
to print the ticket.
.
Header 1
Date & Hour
N. ticket
Header 2
Code and Name of the selected
material
Code and Name of the selected
customer
Code and Name of the selected truck
Code and Name of the selected project
Code and Name of the selected operator
Bucket number (bucket performed to load the truck)
Total load (load in the truck)
000282-IVWESC.uso.EN.00-TRI
I 61 I
5 | Weighing System
User Manual | I. View Excavator
English
5.11.2 Options
It’s possible to customize the printer ticket in the Options menu.
PRINT
TICKET OPTIONS
Total (truck)
Options
End of the day
Ticket N.
Header 1
Header 2
1
Show Totals
Copies Nr.
Same Number
ON
Print:
Material
ON
Client
ON
Operator
ON
Trucks
ON
Projects
ON
Bucket N.
OFF
Ticket N.
OFF
Signature
OFF
Delete after the
printing
OFF
Copies Nr.
Number of copies printed automatically.
Same Number
ON: Keep the same ticket number for all the copies printed automatically.
Print (Material, Client, Operator, Trucks, Projects, Bucket N., Ticket N., Signature)
Ticket optional information
ON: Optional information included in the ticket
Delete after the printing
ON: for zeroing the actual truck load automatically after the printing.
•
Press
to enter the setting and use
•
Press
to return to the previous page.
000282-IVWESC.uso.EN.00-TRI
,
to set (ON/OFF or values).
I 62 I
5 | Weighing System
User Manual | I. View Excavator
English
5.11.3 End of the day
At the end of a truck load, when the “Delete Total” function is used, the total load shown on the display is added in a
dedicated memory that creates the history (summary) of the loaded material called “totals” (end of the day
summary). Is recorded all the material loaded separated by Materials, Clients, Trucks and Projects.
PRINT
END OF THE DAY
Total (truck)
Options
End of the day
Ticket N.
Header 1
Header 2
Print Summary
1
Show Totals
Print:
Materials
Clients
Trucks
Projects
ON
ON
ON
ON
Print Names
OFF
Delete after the
printing
OFF
Print Summary
Pressing
will be printed the total of every item.
Eventually it’s possible to choose what has to be printed (Print: OFF/ON).
Print :Materials / Clients / Trucks / Projects Enable/disable the totals to print.
•
ON : Total to print
•
OFF : Total not to print
Print Names Enable/disable the printing of the eventually materials, clients, trucks and projects names.
•
ON: Print names
•
OFF: Not print names
Delete after the printing
•
ON: The totals database will be automatically deleted at the print end.
•
OFF: The totals database will stay in memory and incremented (in case of new loads) up to the use of the
function “Materials Total” from the DELETE menu.
•
Press
to enter the setting and use
•
Press
to return to the previous page.
000282-IVWESC.uso.EN.00-TRI
,
to set. Confirm with
I 63 I
key.
5 | Weighing System
User Manual | I. View Excavator
English
5.11.4 Header 1 / 2
It’s possible to customize the ticket header.
PRINT
Header 1
A BCDEFGHIJKLM
Total (truck)
Options
End of the day
Ticket N.
Header 1
Header 2
NOPQRSTUVWXYZ
abcdefghijklm
nopqrstuvwxyz
0123456789< >
1
A
Show Totals
Header 1 / 2
In the ticket header 1 it’s possible to set 8 lines of 16 characters that will be printed at the beginning of the ticket.
In the ticket header 2 it’s possible to set 8 lines of 16 characters that will be printed below the date and time.
•
To set a name select in the text matrix the desired character using the arrows and press
to add it to the text
in creation.
It’s possible to use the special character “<“ and “>” to move the cursor in the text and change/correct a
character.
•
Press
to confirm value and return to the previous page.
000282-IVWESC.uso.EN.00-TRI
I 64 I
5 | Weighing System
User Manual | I. View Excavator
English
5.11.5 Show Totals
Totals Summary Menu
PRINT
SHOW TOTALS
Total (truck)
Options
End of the day
Ticket N.
Header 1
Header 2
1
Materials
Clients
Trucks
Project
Show Totals
MATERIALS
1 999
2 999
3 999
4 999
5 999
6 999
7 999
8 999
9 999
10 999
Delete?
0.00
0.00
0.00
0.00
0.00
0.00
0.00
0.00
0.00
0.00
The complete list of the selected item with is total load is shown.
Use
Press
,
to scroll pages
to singularly zero the total of each material and confirm with
. To zeroing all the totals
summary use “Materials Total” in the “Delete” menu.
Press
Press
to return to the first page.
to go back to the operating screen or exit a function
000282-IVWESC.uso.EN.00-TRI
I 65 I
5 | Weighing System
User Manual | I. View Excavator
English
5.12 STM295 PRINT MENU
Print Menu for printer STM295
•
From the main operating screen press
to access the “PRINT” menu.
PRINT
Total (truck)
Options
End of the day
Ticket N.
1
Show Totals
Total (truck)
Print the total load of the actual truck.
Options
Menu of the additional information that can be enabled/disabled in the ticket options page.
End of the day
Print summary Menu
Ticket N. Sequential number of the printer ticket automatically increased at every total (truck) print.
Press
to enter the setting ,
Press directly
or
to set value. Press
to confirm
to return to “1”.
Shows Totals
Totals Menu
000282-IVWESC.uso.EN.00-TRI
I 66 I
5 | Weighing System
User Manual | I. View Excavator
English
5.12.1 Total (truck): Print Ticket
Printing of the total load of the actual truck.
PRINT
Total (truck)
Options
End of the day
Ticket N.
1
TICKET
Show Totals
•
•
Press&hold
From the “Print Menu” press
to print the ticket.
The ticket can be also printed immediately from the main operating screen by keeping pressed
.
Option
The ticket has to be created based on the needed information and the space on the ticket paper.
Every information has its proper command that has to be entered on the “option” menu.
PRINT
Header1
A BCDEFGHIJKLM
Total (truck)
Option
End of the day
Ticket N.
1
NOPQRSTUVWXYZ
abcdefghijklm
nopqrstuvwxyz
0123456789< >
BAFAKALA
Text Matrix
Command example
Show Totals
•
To set a name select in the text matrix the desired character using the arrows and press
to add it to the text
in creation.
It’s possible to use the special character “<“ and “>” to move the cursor in the text and change/correct a
character.
•
Press
to confirm value and return to the previous page.
000282-IVWESC.uso.EN.00-TRI
I 67 I
5 | Weighing System
User Manual | I. View Excavator
English
Command string example: BAFAKALA (Refer to the following command list)
•
Will print the following information with text at standard height (“B” command):
•
Time and Date (“F” command)
•
(“A” command)
•
Ticket Number (“K” command)
•
(“A” command)
•
Total (truck load) (“L” command)
•
(“A” command)
COMMAND LIST
Command
A
Function
Line Feed
B
Normal Character
C
Double Width Character
D
Double Height Character
E
Double Width and Height Character
F
Time and Date
G
Material Code
H
Material Name
I
Operator Code
J
Operator Name
K
Ticket Number
L
Total Load (truck)
M
Customer Code
NOPQ RSTU
Customer Name (each character is a name line – up to 8 lines)
V
Cubic Meters
W
Truck Code
XYZa b cde
f
ghijklmn
o
Truck Name – number plate (each character is a name line – up to 8 lines)
Project Code
Project Name (each character is a name line – up to 8 lines)
Buckets Number
000282-IVWESC.uso.EN.00-TRI
I 68 I
5 | Weighing System
User Manual | I. View Excavator
English
5.12.2 End of the day
At the end of a truck load, when the “Delete Total” function is used, the total load shown on the display is added in a
dedicated memory that creates the history (summary) of the loaded material called “totals” (end of the day
summary). Is recorded all the material loaded separated by Materials.Enable/disable the totals to print.
PRINT
END OF THE DAY
Total (truck)
Options
End of the day
Ticket N.
Print Summary
Print:
Materials
ON
1
Delete after the
printing
OFF
Show Totals
Print Summary
Entering the page “End of the day” is possible to start immediately the print pressing again
over “Print Summary”
and will be printed the total of every item.
Eventually it’s possible to choose what has to be printed (OFF/ON).
Note: this printing can’t be customized so be careful about the paper size / quantity of data.
Print :Materials
Enable/disable the totals to print separated by materials (ON / OFF)
Delete after the printing
•
ON: The totals database will be automatically deleted at the print end.
•
OFF: The totals database will stay in memory and incremented (in case of new loads) up to the use of the
function “Materials Total” from the DELETE menu.
•
Press
to enter the setting and use
•
Press
to return to the previous page.
000282-IVWESC.uso.EN.00-TRI
,
to set. Confirm with
I 69 I
key.
5 | Weighing System
User Manual | I. View Excavator
English
5.12.3 Show Totals
Totals Summary Menu
PRINT
SHOW TOTALS
Total (truck)
Options
End of the day
Ticket N.
Header 1
Header 2
1
Materials
Clients
Trucks
Project
Show Totals
MATERIALS
1 999
2 999
3 999
4 999
5 999
6 999
7 999
8 999
9 999
10 999
Delete?
0.00
0.00
0.00
0.00
0.00
0.00
0.00
0.00
0.00
0.00
The complete list of the selected item with is total load is shown.
Use
Press
,
to scroll pages
to singularly zero the total of each material and confirm with
. To zeroing all the totals
summary use “Materials Total” in the “Delete” menu.
Press
Press
to return to the first page.
to go back to the operating screen or exit a function
000282-IVWESC.uso.EN.00-TRI
I 70 I
5 | Weighing System
User Manual | I. View Excavator
English
5.13 MULTI-PRODUCT AND MULTI-TRUCK FUNCTION
Last bucket
Total of the actually selected material that has been loaded on the truck
Total load of the truck (includes all the materials loaded)
The Multi-Product function enables the possibility to load up to 10 different products on the same truck.
The operator can load on the same truck different materials. See this example:
1) Select as usual the first material to load (GRAVEL) and start to fill the truck
2) After one or more buckets the operator is free to select another material (SAND) and start to load this
material.
3) When the quantity of the second material is enough the operator can select a third material to load or return
to the first (GRAVEL in this example) continuing from the previous value of load reached.
If you have used the Multi-Product function during the load of a truck you can see in the printer ticket the total truck
load as usual and the single load of each material.
The system memorizes these data at the end of the truck load as usual (“delete total”) keeping the correct load for
every material.
The Multi-Truck function is always enabled and is completely transparent by the operator. Changing the truck
selected during a load (Total Load > 0) system freezes in memory actual load and it starts again to load from 0. Then
you can finish the second truck (usually with print total and delete total) and load again previous truck selecting it’s
code (previous values are restored on the display!).
NOTE: using Multi-Product and Multi-Truck all the partial values are lost switching off the system during a load!
000282-IVWESC.uso.EN.00-TRI
I 71 I
5 | Weighing System
User Manual | I. View Excavator
English
5.14 MEASURE UNITS
The system is designed to use a machine to load trucks / dumpers.
Using the system for other reasons / work environment it’s maybe possible to reach the system computation (max
values shown) limits.
Please note that the “.” shown into the numbers below it’s the decimal separator sign.
6 digits (default)
Value
Total load
Partial load
Bucket n°
Target Load
Display Totals max
value x each material
shown
Kg
999990
999990
1-999
1-999990
999999
metric ton
999.99
999.99
1-999
0.01-999.99
999999
pounds
999990
999990
1-999
1-999990
999999
short ton
999.99
999.99
1-999
0.01-999.99
999.99
long ton
999.99
999.99
1-999
0.01-999.99
999.99
U.M.
9 digits with parameter “Fixed UM” = ON (refer to the Calibration Manual)
If six digits are few, it’s possible to set more digits through a parameter that allows the use of nine digits (this is the
limit). Then if the “Fixed UM” is disenabled (OFF) there are limits while if the “Fixed UM” is enabled (ON) there are
another limits (refer to the Calibration Manual).
The limits of values with nine digits and “Fixed Unit” ON are the following:
Value
Total load
Partial load
Bucket n°
Target Load
Display Totals max
value x each material
shown
Kg
200000000
200000000
1-999
1-200000000
200000000
Lbs
200000000
200000000
1-999
1-200000000
200000000
metric ton
999.99
999.99
1-999
0.01-999.99
200000000
pounds
999990
999990
1-999
1-999990
200000000
short ton
200000.00
200000.00
1-999
0.01-200000.00
200000.00
long ton
200000.00
200000.00
1-999
0.01-200000.00
200000.00
U.M.
000282-IVWESC.uso.EN.00-TRI
I 72 I
5 | Weighing System
User Manual | I. View Excavator
English
9 digits with parameter “Fixed UM” = OFF
If six digits are few , it’s possible to set more digits through a parameter that allows the use of nine digits (this is the
limit). Then if the “Fixed UM” is disenabled (OFF) there are limits while if the “Fixed UM” is enabled (ON) there are
another limits (refer to the Calibration Manual).
The limits of values with nine digits and “Fixed Unit” OFF are the following:
Value
Total load
Partial load
Bucket n°
Target Load
Display Totals max
value x each material
shown
Kg
90700000
90700000
1-999
1-90700000
90700000
Lbs
199956313
199956313
1-999
1-199956313
90700000
metric ton
999.99
999.99
1-999
0.01-999.99
90700000
pounds
999990
999990
1-999
1-999990
90700000
short ton
99977.70
99977.70
1-999
0.01-99977.70
90700.00
long ton
89266.03
89266.03
1-999
0.01-89266.03
89266.03
U.M.
000282-IVWESC.uso.EN.00-TRI
I 73 I
5 | Weighing System
User Manual | I. View Excavator
English
6
Calibration Mode
WARNING: this setting affects the system accuracy! Proceed only after the reading of the following instructions!
6.1
BUCKET
Note: Take care to have all the needed tools to calibrate the bucket or call a qualified installer.
Adjust an existing bucket or calibrate a new one.
From the working page press
Use
,
Press
to enable the bucket selection. The bucket icon flashes.
to select the bucket to calibrate (change bucket number).
to enter in the bucket calibration menu.
Bucket Calibration Menu
DogBone Setting
Bucket Setting
No sensor or Grab Setting
•
Use
or
to select the setting to perform and confirm with
000282-IVWESC.uso.EN.00-TRI
I 74 I
key.
6 | Calibration Mode
User Manual | I. View Excavator
6.1.1
English
Dog Bone
1. Dog Bone Setting
Dog Bone setting must be done before the bucket setting (next page)
CALIBRATION
Digging
•
Seg1Length
0.000
Seg2Length
0.000
Seg3Length
0.000
Seg4Length
0.000
Seg1Angle
0.0
Offset
0.0
key to scroll next screen.
Press
Seg1Length – Seg2 Length – Seg3 Length – Seg4 Length (1,2,3,4: referring to the picture)
•
Measure the four segments (the bones) of the dog bone and set lengths into the proper line.
Seg1Angle – Seg2Angle (referring to the picture)
•
Measure the segments1&2 angles (the bones) of the dog bone and set values into the proper line.
+90.0°
Measure the inside angle between the segment axle (from
Seg1Angle
pivot to pivot) and the system horizontal axle:
- Positive angle above horizontal axle
- Negative angle (-) under horizontal axle
0°
-90.0°
Seg2Angle
Offset : Angle correction value (difference from set and read value). Press
to adjust.
Note: Changing the DogBone setting means that the bucket setting must be done again.
000282-IVWESC.uso.EN.00-TRI
I 75 I
6 | Calibration Mode
User Manual | I. View Excavator
English
2. Bucket Setting
CALIBRATION
Digging
AXLE Y:
Length
0.000
Angle Y
-90.0
Offset
90.0
Actual
-90.0
AXLE X:
Length
Press
0.000
to go back to the operating screen.
AXLE Y:
Length: Length of the bucket measured straight from pivot (L) to bucket blame (M)
•
Measure with accuracy the bucket length and set the value.
Angle Y: Bucket angle (x10) between axle from pivot (L) to bucket blame (M) and the horizontal reference system.
•
Measure the angle and set the value
0.0°
Offset : Angle correction value (difference from set and read value). Press
to adjust.
X AXLE:
Length: Width of the bucket measured straight from corner to corner (A - B).
•
A
Measure with accuracy the bucket length and set the value.
B
000282-IVWESC.uso.EN.00-TRI
I 76 I
6 | Calibration Mode
User Manual | I. View Excavator
6.1.2
English
Bucket
1. Bucket Type Selection
Select the bucket type to calibrate
Bucket
Bucket
DogBone:
Only InOut
InOut Bucket Setting (1.1)
Tilt Bucket Setting (1.2)
Tilt Bck
Bucket
Use
or
1.1
to select the used bucket type and confirm with
key.
InOut Bucket Setting
As for each boom, it’s necessary to set length and angle of the bucket.
Bucket
CALIBRATION
Digging
Bucket
Only InOut
Side
L
AXLE Y:
Tilt Bck
Length
0.000
Angle Y
-90.0
Offset
90.0
Actual
-90.0
InOut Bucket Page
Press
to go back to the operating screen.
Side: Bucket side where the sensor is installed
•
Right (R)
•
Left (L)
000282-IVWESC.uso.EN.00-TRI
I 77 I
6 | Calibration Mode
User Manual | I. View Excavator
English
Y AXLE:
Length: Length of the bucket measured straight from pivot (L) to bucket blame (M)
•
Measure with accuracy the bucket length and set the value.
Angle Y: Bucket angle (x10) between axle from pivot (L) to bucket blame (M) and the horizontal reference system.
•
Measure the angle and set the value
0.0°
-90.0°
Offset : Angle correction value (difference from set and read value).
•
Press “ENTER” to adjust.
X AXLE:
Length: Width of the bucket measured straight from corner to corner (A - B).
•
Measure with accuracy the bucket length and set the value.
A
B
000282-IVWESC.uso.EN.00-TRI
I 78 I
6 | Calibration Mode
User Manual | I. View Excavator
1.2
English
Tilt Bucket Setting
CALIBRATION
Digging
Bucket
Bucket
Only InOut
Side
L
AXLE Y:
Length
0.000
Angle Y
-90.0
Offset
90.0
Actual
-90.0
AXLE X:
Length
0.000
Tilt Bck
Set Y
CALIBRATION
Digging
Tilt Bucket
Tilt Pivot
Length
Angle
Offset
Actual
0.000
0.0
0.0
0.0
Tilt Setting page
Bucket Setting page
CALIBRATION
Digging
Mounting Compens.
Bucket
CALIBRATION
Digging
Angle
Offset
Actual
0.0
0.0
0.0
Pivot Setting page
to
-45 deg:
-90 deg:
0.0
0.0
1) Bucket Setting page
CALIBRATION
Digging
Bucket
Side
L
AXLE Y:
Length
0.000
Angle Y
-90.0
Offset
90.0
Actual
-90.0
AXLE X:
AXLE X:
Refer to
InOut Bucket Calibration
AXLE X:
- Length value to set
- Angle value to set
- Angle value adjusted
Length: Bucket length (Refer to InOut Bucket calibration)
Angle X: Bucket angle (x10) between axle A-B and the horizontal reference system.
•
Measure the angle and set the value
X = 0° for A = B
000282-IVWESC.uso.EN.00-TRI
X < 0° (negative) for A < B
I 79 I
X > 0° (positive) for A > B
6 | Calibration Mode
User Manual | I. View Excavator
English
Offset : Angle correction value (difference from set and read value).
•
Press “ENTER” to adjust.
2) Tilt Setting page
CALIBRATION
Digging
Tilt Bucket
Length
- Length value to set
0.000
Angle
Offset
Actual
- Angle value to set
0.0
- Angle value adjusted
0.0
0.0
- Angle value read from the system
Length: Length of the bucket measured straight from the pin (A) to the tip of the tooth/blade (B). Pin A is the tilt
bucket (transversal inclination) centre of rotation.
•
Measure accurately the length of the bucket currently installed and set the value.
A
B
Angle: Angle of the projection A-B as described for InOut Bucket calibration - Angle Y
•
Measure the angle and set the value
Offset : Angle correction value (difference from set and read value).
•
Press “ENTER” to adjust.
000282-IVWESC.uso.EN.00-TRI
I 80 I
6 | Calibration Mode
User Manual | I. View Excavator
English
3) Pivot Setting page
CALIBRATION
Digging
Tilt Pivot
Angle
0.0
Offset
Actual
0.0
0.0
Angle: Angle of the bucket lateral inclination pivot.
•
Measure the angle and set the value
A
B
If “A” is higher than “B” then the angle is positive (same convention as booms).
Offset : Angle correction value (difference from set and read value).
•
Press “ENTER” to adjust.
000282-IVWESC.uso.EN.00-TRI
I 81 I
6 | Calibration Mode
User Manual | I. View Excavator
English
4) Mounting Compensation page
This optional calibration is needed to correct the X angle of the bucket if the sensor isn’t mounted completely parallel
with the Y axis of the machine.
CALIBRATION
Digging
Mounting Compens.
Bucket
Set Y
Bucket Y Axle Calibration:
-45°
to
-45 deg:
0.0
-90°
-90 deg:
Press
•
0.0
Bucket Axles actual angles
to go back to the operating screen.
Put the bucket perfectly horizontal (zero degree X) using laser or a reference instrument and try to have
chassis horizontal too.
•
Move Y Bucket (longitudinally, in-out). The X angle must be always “0” for every Y angle.
If not, to compensate the installation move the Y axis to:
-45.0°
-90.0°
•
Select the proper calibration and press
000282-IVWESC.uso.EN.00-TRI
to perform the compensation.
I 82 I
6 | Calibration Mode
User Manual | I. View Excavator
6.1.3
English
None / Grab Setting
Bucket
CALIBRATION
Digging
DogBone:
Length
0.000
Bucket
Use
Press
or
to set the grab length and confirm with
key.
to go back to the operating screen.
000282-IVWESC.uso.EN.00-TRI
I 83 I
6 | Calibration Mode
User Manual | I. View Excavator
6.2
English
LASER SPEED COMPENSATION
This procedure improves the laser accuracy especially compensating the laser acquisition delays due rising speed.
Before to start the calibration, set the depth distance between the laser beam level and the reference point on the
ground.
(example -4.00 if the reference point if 4 meters below the laser).
CompL “CompL”: Low speed Compensation
Laser Speed Indicator: Low speed
•
Press
•
to enter in the laser selection mode
. Press again to select the desired mode and confirm with
.
Low Speed
Press
. The icon
will continue to flash and the “CompL” message will appear.
Cross the laser beam rising the laser receiver at the minimum allowed speed (speed indicator has to be in
the lower part of the bar but not completely down attached to the border – too slow and not acquired in this
case).
When the laser is acquired the “OK! “ message appears.
Move down the laser receiver below the laser beam and the “REF.0” message will appear.
Move the bucket to the reference point and press
000282-IVWESC.uso.EN.00-TRI
I 84 I
6 | Calibration Mode
User Manual | I. View Excavator
English
High Speed
CompH
CompH
“CompH”: High speed compensation
Laser speed indicator: high speed level
Press
. The icon
will continue to flash and the “CompH” message will appear.
Cross the laser beam rising the laser receiver at the maximum allowed speed (speed indicator has to be in
the higher part of the bar but not completely up attached to the border – too fast and not acquired in this
case).
When the laser is acquired appears the “OK! “ message.
Move down the laser receiver below the laser beam and the “REF.0” message will appear.
Move the bucket to the reference point and press
000282-IVWESC.uso.EN.00-TRI
I 85 I
.
6 | Calibration Mode
User Manual | I. View Excavator
6.3
English
WEIGHING CORRECTION
If the system weighs always heavier or lighter than the real load weighed (compared to a certified weigh bridge for
example) it’s possible to tune the accuracy using the correction function and adjust it with a % variation.
The correction must be the same as the found error.
MENU
System Setup
Diagnostic
Press&hold
Correction
•
100
From the main operating screen (Digging or Weighing) keep pressed
key.
Will be displayed the Setup &Diagnostic menu.
System Setup
Refer to the Installation and Calibration Manual
Correction Speed Compensation Setting
This % correction value is directly applied to the measured load.
In the speed compensation is limited from 70% to 130%
If a limit is reached, usually something in the calibration is not good like reference speed different from calibration or
too slow.
•
Press
to enter the setting and use
•
Press
to return to the previous page.
,
to set. Confirm with
key.
Example :
If the system weights 5% less than the real weight, the value of correction must be increased of 5 percentage points.
If the system weights 5% more than the real weight the value of correction must be decreased of 5 percentage
points.
000282-IVWESC.uso.EN.00-TRI
I 86 I
6 | Calibration Mode
User Manual | I. View Excavator
English
7
Alarms
During the normal work, if the control box doesn’t receive a sensor, the alarm page will appear.
Please note that if the problem is a broken cable, all the sensor after the failure in the line will be in alarm.
It’s also possible that if there’s a short circuit in the line all the angular sensor will be in alarm.
The user can verify the status of the cables/connectors and restart the control box to see if the problem persist.
In this situation the system can’t be used and it’s only possible to enter in the system menu / diagnostic and
eventually in the calibration section with the proper password.
ALARMS
Chassis
Boom1
Boom2
Boom3
Bucket
Pression Low C.
Pression High C.
Rotation
Sensors in alarm
Alarms Table
Alarms
Active on
1
Chassis
Chassis not found
2
Boom 1
Boom 1 not found
3
Boom 2
Boom 2 not found
4
Boom 3
Boom 3 not found
5
Bucket
Bucket not found
6
Pressure Low C.
7
Pressure High C.
8
Rotation
Pressure Transducer not
found
Pressure Transducer not
found
Rotation too fast for five
seconds
000282-IVWESC.uso.EN.00-TRI
I 87 I
Digging (S1),
Digging & Weighing (S3)
Digging (S1),
Weighing (S2),
Digging & Weighing (S3)
Digging (S1),
Weighing (S2),
Digging & Weighing (S3)
Digging (S1),
Weighing (S2),
Digging & Weighing (S3)
Digging (S1),
Digging & Weighing (S3)
Weighing (S2),
Digging & Weighing (S3)
Weighing (S2),
Digging & Weighing (S3)
Digging (S1),
Weighing (S2),
Digging & Weighing (S3)
7 | Alarms
User Manual | I. View Excavator
English
The details contained in this
document are only supplied as a
way of information. They may be
changed without notice and must
not be intended as binding for
C.O. B. O. S.p.A.
All
rights
reserved.
Any
reproduction,
adaptation
or
translation of this material, with
the exception of those cases
allowed within the prescriptions of
copyright
laws,
are
strictly
forbidden,
unless
expressly
authorised in writing by C.O. B. O.
S.p.A.
The
only
guarantees
of
C.O.B.O.S. S.p.A. products or
services are those outlined in the
actual
warranty
documents
accompanying such products or
services. Nothing contained in this
document shall be considered as
an additional guarantee.
C.O. B. O. S.p.A. shall not be
responsible for any technical or
printing errors, or omissions,
contained in this document.
C.O. B. O. S.p.A. is a trademark
registered in Italy. Any reference
to companies or marks in this
document is strictly coincidental:
its inclusion is only for illustration
purposes, and excludes any
ulterior motives. Any names and
terms used in this document are
the exclusive property of C.O.B.O.
S.p.A.
C.O.B.O. S.p.A. - Divisione 3B6
Headquarters:
Via Sivo, 74
C.O.B.O. S.p.A.
28053 Castelletto Sopra Ticino (Novara)
Via Tito Speri, 10
ITALY
25024
Tel. +39 0331 9286.1
ITALY
Fax +39 0331 972160
Tel. +39 030 90451
[email protected]
000282-IVWESC.uso.EN.00-TRI
www.3b6.it
I 88 I
Leno
(Brescia)
Fax +39 030 9045330
7 | Alarms
[email protected]
www.cobospa.it