1
User Manual KITS™ V4.13
8th February 2010
Table of Contents
1.
KITS™ Overview ......................................................................................................... 3
1.1. What Does KITS™ Software Do? ......................................................................... 3
1.2. What’s New in This Version.................................................................................. 4
1.3. Versions & Support ............................................................................................... 6
1.4. System Requirements ............................................................................................ 7
1.5. Software Installation / Removal ............................................................................. 7
1.6. Configuring Office 2003 and Office 2007.............................................................. 9
1.7. Installing Office MUI for Running KITS™ in Another Language........................ 10
1.8. Online Manual ..................................................................................................... 10
2.
KITS™ Start up .......................................................................................................... 11
2.1. General Overview................................................................................................ 11
2.2. Getting Started..................................................................................................... 11
2.3. Quick Tour / Demonstration ................................................................................ 13
A. Using a KI 7000 Series Source and a Power Meter ................................................. 13
B. Using a KI 734x Series ORL & Two-way Loss Test Set ......................................... 17
C. Download Memory Data from any Meter to KITSTM .............................................. 18
D. Using Save CSV ..................................................................................................... 19
3.
Using KITS™ ............................................................................................................. 20
3.1. Autotest ............................................................................................................... 20
3.2. Using the Kingfisher Menu System...................................................................... 20
3.3. Using the Meter Reading Sheet............................................................................ 21
3.4. Using the Live Data Sheet ................................................................................... 22
Suggested Operating Sequence for Live Data Sheet..................................................... 23
Load or Merge Log Data for Live Data Sheet .............................................................. 25
Memory Download for Live Data Sheet ...................................................................... 25
3.5. Using the Data Logging Sheet.............................................................................. 26
Manual Data Logging.................................................................................................. 26
Automatic Data Logging ............................................................................................. 27
User Manual KITS™ V4.13
Page 1 of 46
3.6.
3.7.
Using the Loss Testing Sheet ............................................................................... 27
Using the Meter Dump Sheet ............................................................................... 28
4.
KITS™ Advanced Functions....................................................................................... 29
4.1. Customising the Workbook.................................................................................. 29
Add or Delete a KITS™ Worksheet ............................................................................ 29
Change Meter Port....................................................................................................... 29
Save a Template .......................................................................................................... 29
Change KITSTM Master Layout Template Workbook .................................................. 30
4.2. Designing a Customised Report Sheet.................................................................. 31
Tips Working with a New Report Sheet....................................................................... 32
4.3. Technical Tips in Using KITS™.......................................................................... 33
Run the Second KITS™ Workbook............................................................................. 33
Re-enabling the KITS™ Add-In .................................................................................. 33
Opening an Old KITS™ Workbook............................................................................. 33
5.
Contact Us................................................................................................................... 34
6.
Appendices.................................................................................................................. 35
Appendix A - Data Transfer from Meter(s) to Kits™ ...................................................... 35
Appendix B - Use of International and Other Standards................................................... 36
Appendix C - KITS™ Localisation Instructions .............................................................. 39
Modifying Spreadsheet Cells ....................................................................................... 40
Localising Menu Bars, Dialog Boxes and Error Messages ........................................... 40
7.
License and Warranty.................................................................................................. 43
End-User License Agreement for Kingfisher Software .................................................... 43
Software Product License................................................................................................ 43
Warranty......................................................................................................................... 45
User Manual KITS™ V4.13
Page 2 of 46
1. KITS™ Overview
1.1.
What Does KITS™ Software Do?
KITS™ is used for testing and reporting fiber optic attenuation, power, and
return loss, typically while using Kingfisher KI7000 series test instruments.
Test set up and data acquisition are controlled from KITS™, and include
automatic, data logging, and manual (for other equipment compatibility).
KITS™ provides fully customisable cable acceptance reporting, and also data
logging, meter memory dump, and a real time meter display.
KITS™ also provides a simple “one touch” utility to download instrument
data into a csv file.
Typical applications include:
•
Test, accept and report loss and ORL on fiber optic cable systems or
components
•
Facilitate (LAN) standards compliant two way cable loss & ORL testing
•
Test, accept and report fiber optic Tx / Rx power levels
•
Perform low speed data acquisition and display for monitoring, fault
finding and general testing
•
Use the live data display for classroom education, training etc
•
Customise KITSTM into any other language
•
Fully customised
requirements
reporting
capability to
match customer
KITS™ software connects to KI 7000 Series Power Meters or Loss Test Sets
to perform real time data acquisition and instrument control. Measurement
data from any other incompatible instrument can be entered manually.
This means that KITS™ can be used across any size of organisation as a true
enterprise level solution for performing measurement, reporting and database
entry. KITS™ data files can be easily imported to most databases through
Excel import utilities built into commercial database software, or using Excel
Smart Tags if used with Office XP or beyond.
Benefits include improved productivity, lower required skill level, fewer
mistakes and extensive report customizing capability. KITS™ enables
customized professional reporting to your customers, while making the
measurement process simpler and faster.
User Manual KITS™ V4.13
Page 3 of 46
In typical fiber optic cable acceptance testing operations, about 50% of the
testing cost is related to field operations and the other 50% is related to office
procedures related to reporting and database entry. KITS™ greatly reduces the
field testing cost, and practically eliminates the office procedures.
KITS™ is built into Excel, which is a convenient out-of-the-box solution for
most users, and can be easily customised in many ways.
# Font conventions used in this manual
•
The bold italic font, like Kingfisher / Data Logging, is used for a
command (or a command sequence) in Windows menu system, whether it
is for Windows, Office, or KITSTM.
•
The text in square brackets, such as [AUTOTEST], is an operation on the
meter.
1.2.
What’s New in This Version
New in this version V4.13
•
Updated Pass / Fail formula for 2 or 3 cord referencing
•
Updated standard to allow different 1 or 3 cord uncertainty values
•
Allow memory download from a meter with non contiguous memory cells
•
Dynamically updated fiber number count in the user designed “New
Report” worksheet
•
Fixed an issue of cannot find USB meter in some computers
•
Selective installation of user documents depending on user option of
installing for all users or current user
•
Simplified KITSTM software installation procedure
New in V4.12
•
Updated support for Regional Language Options. KITSTM decides the
spelling of Excel function names automatically for any user selected
language, and thus no user intervention is required
•
Updated support for choosing different decimal symbol and list separator
from the system default
•
Removed all ANSI dependent code to make KITSTM fully Unicode
compatible
•
Allow non numeric fiber ID (such as AAA-1) in Live Data sheet
•
Moved KITSTM code to avoid any impact on other Excel applications
•
Bug fix for Excel 2003 Standard support, where XML is not available
New in V4.11
User Manual KITS™ V4.13
Page 4 of 46
•
New function to work with different Regional Language Options. User can
add Excel formula keywords to run KITSTM for another language
•
Improved Test Setup summary diagram on the Live Data sheet
•
Added the “Terminal ID Names” button to the Kingfisher menu bar
•
Rearranged KITS support file folders to work for different versions of
Windows
•
Bug fixing and improved functions in memory download
•
Bug fixing to manage data rows correctly in the Loss Testing sheet
•
Update on chart scales and log interval in the Data Logging sheet
New in V4.10
•
New Live Data worksheet for improved data capture and display during
on-site loss testing, as well as for restricted reporting
•
Any instrument of 1 – 4 wavelengths
•
IEC 11801/14763-3 standards compliant pass fail testing. Custom
standards easily added
•
Redesigned menu system for better streamlining of KITSTM operations
•
Full multiple customisations of loss testing reports
•
Add or delete a KITSTM worksheet at any time
•
Updated memory download to support the latest meter versions
•
Meter reading sheet displays Autotest data when meter is in 1- or 2-way
Autotest mode
•
User editable KITSTM style workbook and resource files for customization
to other languages
•
Enhanced Windows/Office compatibility from Windows XP to Windows
Vista and Office XP to Office 2007
•
Eliminated the dependency on external text files for system configuration
and user interaction
•
Software internal data structures and function modules redesigned for any
number of wavelengths
•
The old Loss Testing Sheet is retained for backwards compatibility
•
A large number of bug fixes
New in V3.03
•
2nd generation Windows XP compatible program using Microsoft .net
technology
•
Macros removed from spreadsheet
•
Supports 1 - 4 wavelength instruments
•
Faster loading & improved productivity
•
Turns laser on for manufacturing specific applications
User Manual KITS™ V4.13
Page 5 of 46
•
Improved capacity
•
Scans attached instrument for supported wavelengths
•
Faster data logging
•
Program Installation screens in English, French, German, Spanish and
Chinese Simplified
•
No need to re-customise templates every time KITS™ is updated
•
Requires Windows 2000 or later, and Office 2000 or later
New in V3.02
•
CWDM loss testing
•
Protect test results with a password in Preferences
•
Support for printing labels with custom fiber numbering
•
Custom report filenames can be used
•
Supports one wavelength memory download
•
Last version to support Windows 95 / 98 / ME and Office 97 onwards
New in V3.00
•
Improved support for two-way Autotest in Loss Testing Sheet
•
Meter Reading Sheet support for Two-way Autotest and Return Loss
•
Bug fixes and refinements
•
Improved instrument communications response time
•
Printing support for return loss
•
Support for US distance units
•
New digital security certificate
•
Integrated update and set-up into one program
1.3.
Versions & Support
For KITS™ versions that are currently supported, visit our Web site at
www.kingfisher.com.au, contact your agent, or e-mail us to Sales.
To receive technical support, let us know your KITS™ version and build date,
located in KITS™, under Kingfisher / about KITS, and also your instrument
firmware version and serial number. The instrument firmware version is
displayed during instrument start-up, and the serial number is on the rear label.
If you have ideas for useful features or changes, please send your comments to
Bruce. We may be able to add your ideas to a future release.
User Manual KITS™ V4.13
Page 6 of 46
1.4.
System Requirements
•
Microsoft Windows XP / Vista.
•
Microsoft Office (Excel) XP / 2003 / 2007.
•
Appropriate Microsoft MUI for running Excel in another language.
•
145 MB of disk space.
•
RS232 or USB port. To use an RS232 instrument on a USB computer port,
use Kingfisher option OPT188. This is a USB to RS232 converter which is
installed on the computer as a device.
•
Any KI 7000 series Power Meter or Loss Test Set with firmware version
5.00 or later. Earlier firmware versions may provide reduced functionality.
The firmware version is displayed on the instrument LCD during turn on.
Firmware upgrades must be performed at a service centre.
•
If using the software with a KI76xx series Power Meter, a suitable
Autotest compatible light source is required for optimum functionality
when testing at more than one wavelength.
•
Two-way loss testing (bi-directional) requires a pair of suitable two-way
loss test sets.
•
Successive link testing with a Power Meter or simple Loss Test Set can
also be used to achieve Two-way loss testing. This method is much slower
and requires data merging.
•
Measurement of ORL (Optical Return Loss) requires one or two Two-way
+ ORL Testers.
1.5.
Software Installation / Removal
If updating from a previous version of KITS™, perform a manual back-up of
the previous version before proceeding.
It is recommended that any previous versionof KITS be removed prior to
installing the new version.
Before installation, first ensure that the following programs are installed:
•
Microsoft Office XP or later (Excel is required).
The KITS™ installation package determines if required components or
hotfixes are missing from your computer, and then installs them before
installing the software. The installer may also request the user to change
Office 2003 / 2007 settings as follows:
1. Go to Start / Settings / Control Panel / Add/Remove Programs. Click
Microsoft Office and press the Change button.
2. Select Add or Remove Features then click the Next (or Continue) button.
User Manual KITS™ V4.13
Page 7 of 46
3. Office 2003 only: Choose Advanced customization of applications and
click Next
4. Enable both features below:
•
Under Microsoft Office / Microsoft Office Excel, enable .NET
Programmability Support
•
Under Office Tools,
Programmability Support
enable
Microsoft
Forms
2.0
.NET
To install KITS™, the user must log into the computer using a profile with
local administrator rights.
If installing KITS™ from a CD: Insert disk into CD drive, the CD will autostart, and you can select the option to install KITS™.
•
If installing KITS™ from a file: Double click on the setup.exe file, and the
set-up program will start. In some IT configurations this file should be run
from the local machine.
•
Select Yes to accept the licence conditions.
•
Specify if the icon should be visible to all users of this PC, or name a
specific profile.
•
Accept the default installation directory C:\Program Files\Kingfisher
\KITS, or specify another directory (advisable to retain previous
customisations).
•
If setup is run again, the user will be prompted to perform a repair, modify
(custom) or uninstall.
•
Having now installed KITS™, run the program. You will be shown an
initial “Welcome to KITS™ 4.12” screen which allows you to input
parameters to configure your workbook. You can either click Setup to do
your configuration at this point, or click Finish to start with a default
workbook and do your configuration later.
•
You may receive a screen “KITSTM installation needs your assistance”
during the installation. Refer the section Configuring Office 2003 or Office
2007 for further details.
Do not attempt to move the program or change related directory names after
installation.
Note:
•
To use a full stop or comma for the decimal point: This is set in the
Windows Regional and Language Options. If it hasn’t been done already,
start Control Panel (either from Start / Settings or Windows Explorer /
My Computer), then Regional and Language Options / Customize (in
Regional Options tab), enter a full stop “.” or comma “,” for decimal
symbol (in Numbers tab), and OK.
•
To use miles for distances: This is also set in the Windows Regional and
Language Options. If it hasn’t been done already, in the same Numbers
User Manual KITS™ V4.13
Page 8 of 46
tab, select “US” in measurement system, and OK. To use km for the
distance select "Metric" for the measurement system.
•
Office XP tip: MS Outlook is usually installed as part of MS Office. If the
Outlook Journal function is not used, you can speed up all other
applications by turning this off. Open Outlook, select Tools / Options /
Journal tab, and de-select all items in ‘Also record files from’. Click OK
and exit.
•
If KITS™ seems to hang for no reason on a laptop, this may be due to
the laptop power management settings. KITS™ is a real-time data
acquisition program, and computer power management settings may need
to be modified or disabled.
1.6.
Configuring Office 2003 and Office 2007
If during installation you see the screen “KITS™ installation requires your
assistance” please modify your Office 2003 or Office 2007 installation. When
you click Finish, KITS™ setup will close. Perform these steps before you
start KITS™ setup again.
Configuring Office 2003
1. Go to Start / Settings / Control Panel / Add/Remove Programs. Click
Microsoft Office and press the Change button.
2. Select Add or remove features then click the Next button.
3. Tick Choose advanced customization of applications and click Next
4. Enable both features below
• Under Microsoft Office select Microsoft Office Excel, enable .NET
Programmability Support
•
Under Office Tools enable
Programmability Support
Microsoft
Forms
2.0
.NET
Configuring Office 2007
1. Go to Start / Settings / Control Panel / Add/Remove Programs. Click
Microsoft Office and press the Change button.
2. Select Add or remove features then click the Continue button.
3. Enable both features below
• Under Microsoft Office select Microsoft Office Excel, enable .NET
Programmability Support
•
Under Office Tools enable
Programmability Support
Microsoft
Forms
2.0
.NET
If the installation program prompted you for both Office 2003 and Office 2007
then your PC has both Office 2003 and Office 2007 installed. You will find
Microsoft Office has two entries in the Control Panel. You should enable
.NET Programmability Support in both.
User Manual KITS™ V4.13
Page 9 of 46
This enables Excel to use the .net Framework, an essential requirement for
KITS™. After this re-start the KITS™ installation from the beginning.
1.7.
Installing Office MUI for Running KITS™ in
Another Language
Microsoft Office Multilingual User Interface Pack (MUI) is a separated
product that allows users to switch user interface languages in Office.
If you use non-English Windows, or choose another language from “Regional
and Language Options”, you may receive an error message “Old format or
invalid library …” when you start KITS™. In this case, you need to install the
Office MUI for that language. If you selected language is “close enough” to
the language which MUI has been installed already, you may not receive the
error message.
Follow the normal software installation procedure to install the Office MUI
for you selected language.
If you still have any problem with the language, you may also need to install
Windows MUI, another separated product from Microsoft.
KITS™ uses Excel formulae for its operations. The spellings of the function
names in formulae differ from language to language. KITS™ 4.12 decides the
spelling of the function names automatically for any user selected language,
and thus no user intervention is required.
1.8.
Online Manual
•
Help Hints. The on-line help icon links to this user manual, which
encourages users to learn faster.
•
There are two different help arrangements: an on-line html document, and
a separate MS Word document. The Word document can be easily edited
by users to allow for specific work instructions, languages etc. To print the
MSWord manual, go to the KITS™ directory, open the User Guide.doc
file, and print it.
•
To return to the spreadsheet, use the ‘back’ button on the Web toolbar
(normally a light blue arrow on left side), or select Excel on the Windows
start bar.
User Manual KITS™ V4.13
Page 10 of 46
2. KITS™ Start up
2.1.
General Overview
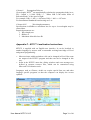
The KITS™ Excel workbook contains five worksheets (plus user created
report sheets), and an interface to a KI 7000 Series ORL & Two-way Loss
Tester, One Way Loss Test Set or Power Meter. The software provides fully
interactive control & measurement acquisition.
•
Live Data Sheet - For cable acceptance testing applications. This enables
parameters to be set up for pass / fail testing and performs the test of up to
4 wavelengths per test. Its main functions are on-site test configuration and
acquisition, though the sheet can be printed “as is” for reporting.
•
Loss Testing Sheet – This worksheet provides backwards compatibility
with report formats in previous versions of KITSTM. It is a reporting part of
cable acceptance testing applications, supporting up to 2 wavelengths. Test
data cannot be directly inputed to this sheet, all data is obtained from the
Live Data Sheet using Excel formulae.
•
Data Logging Sheet - For flexible data logging of loss at one wavelength,
including a graph and statistical functions.
•
Meter Reading Sheet - This provides a large real time power meter
display on your computer screen, and includes a data table to display
Autotest data that is otherwise hidden on the instrument display.
•
Meter Dump Sheet - For a simple instrument memory dump.
•
New Report Sheet – Created by the end users, initially not in the KITS™
workbook.
KITS™ is developed using Microsoft .Net technology. This enables powerful
features to be embedded within a program format that looks and feels like a
familiar Excel application.
An intermediate level Excel user can modify the KITS™ Excel spreadsheets.
User instructions, language and extra reporting data fields are easily
changeable.
2.2.
Getting Started
1. Connect a KI 7000 series power meter or loss test set to an RS232 or USB
serial port on the computer, using the supplied connecting lead. Ensure the
jack plug is pushed fully into the instrument. Alternatively use the OPT188
USB to serial converter cable. This (or any other suitable RS232 - USB
adaptor) must first be installed as a device on the computer, and the
User Manual KITS™ V4.13
Page 11 of 46
installation is specific to particular USB port. We suggest either label the
one USB port, or install on all USB ports.
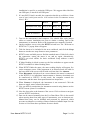
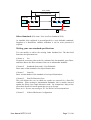
2. If a new RS232 lead is needed, the connection details are as follows. Some
(out of spec) serial ports need a 10 K resistor in the D connector across
wires 1 & 2.
Wire 1
Wire 2
Instrument Jack Plug Body (Gnd) Ring (Tx)
Wire 3
Tip (Rx)
9 Pin D connector
Pin 5 (Gnd) pin 2 (Rx) Pin 3 (Tx)
25 pin D connector
Pin 7 (Gnd) Pin 3 (Rx) Pin 2 (Tx)
3. Turn on the instrument(s) and computer. Use suitable fiber optic jumper
cables to connect instrument test ports to obtain a reading, and set the
instrument(s) to Autotest. Refer to the instrument user manuals if needed.
4. On the computer screen, select the KITS™ wizard icon. The “Welcome to
KITS™ 4.12” popup form will appear.
5. Tick the sheets to be included in the new workbook, and click the Setup
button to run the two setup forms to enter parameters.
6. KITS™ scans available ports to find the attached meter. If this fails, check
the connection, ensure the meter is on, and try again. Alternatively,
KITS™ can work offline for basic workbook setup without a meter
connected.
7. If Meter Reading is ticked on start up, the first worksheet to appear on the
KITS™ workbook is Meter Reading sheet.
8. When KITS™ finds the meter, the meter reading display will appear live
on the computer screen. If the instrument is in Autotest mode, the table in
the lower half of the screen will fill with real time data. See Autotest.
9. When Disconnect is displayed (on a screen button), the meter is connected
to the KITS™. Live instrument measurements or memory downloads can
be transferred to KITS™. In this mode, the computer controls the
instrument, and the meter front panel buttons are inoperative.
10. When Connect is displayed, the instrument is not connected. Click the
button to toggle meter connect/disconnect.
11. User can directly manipulate the instrument controls using buttons on the
KITS™ menu system or worksheets.
12. Note the sheet tabs at the bottom of the screen. Click on them to navigate
various KITS™ worksheets.
13. Data can be entered manually into the Live Data Sheet. This is also useful
when entering data from other types of instruments, over an intercom etc.
Manual data entry can be disabled and protected by password, which
prevents accidental over-writing of data or undesired manual input. See the
section on Live Data sheet operations for more details.
User Manual KITS™ V4.13
Page 12 of 46
•
Excel tip: To improve your screen display, on the Excel 2003 main
toolbar, you can select View / Full Screen; and select View / Full Screen
again to return to normal display. On Excel 2007, you can select View /
Workbook Views / Full Screen; and press the Esc key to return to normal
display (or alternatively use ALT-V-U to enter full screen mode and the
Esc key to return to normal).
2.3.
Quick Tour / Demonstration
This quick tour provides 3 example scenarios. The first one demonstrates loss
measurement using a Source and Power Meter or simple Loss Test Set
(Assuming KITS™ software is already installed). The second one illustrates
the much simpler operation using Two-way Tester. And the third one shows
the simplest way to download meter memory data to the KITS™ workbook.
This section is a general demonstration of KITS™. There is more information
on each option in this manual.
A. Using a KI 7000 Series Source and a Power Meter
1. Turn on the instruments. It is convenient to defeat the auto-timeout by
holding down the green [POWER] button for 3 seconds when turning on.
2. Assuming no required test data stored, clear the power meter’s memory.
To do this, hold down :RS232: [CANCEL] & [RECALL MEMORY] together for a few seconds
until ‘clr’ is shown.
USB: [MR] & [Exit] together for a few seconds until ‘clr’ is shown
3. Connect the Source and Meter ports with a test lead, and press
[AUTOTEST] (on the source). The meter will briefly display ‘auto’ and
then change to Autotest mode without any intervention.
4. Save say 4 new Autotest meter readings into memory, i.e. press [STORE] /
[M+] 4 times.
5. Connect the Power Meter to the PC with the RS232 or USB lead. The
RS232 connector on the instrument is an audio jack style connector
marked ‘RS232’. The nine pin D type connector is suitable for a typical
PC.
6. Start KITS™ wizard. This will launch KITS™ to build a new workbook.
7. For this quick tour, in the Welcome dialogue box, select all 4 checkboxes.
Click the Setup button. If a connected meter is not detected, a “Meter
Connection” panel will appear. Check if a meter is securely connected and
power switched on, and click the Connect button and then the Setup
button again.
User Manual KITS™ V4.13
Page 13 of 46
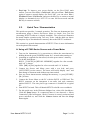
8. This will bring you to the Test Setup dialogue form.
In the Test Setup form, you can select any of 'Loss Test A -> B', 'Loss Test
B -> A' readings. Select to which end the instrument is connected to
KITS™. Select wavelengths for testing. The checkboxes under “Source
Wavelengths” are sources found from the connected instrument, and other
wavelengths in the dropdown lists under “Test Wavelengths” are meter
wavelengths. If the connected instrument is a power meter, there is no
Source Wavelengths. You can manually select from the dropdown lists
any wavelengths for test.
Fill in parameters for the test configuration and click the right arrow icon
to move to the Pass/Fail Setup form.
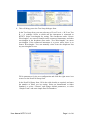
In the Pass/Fail Setup form, fill in the cable details as required, and enter
the number of fibers you are testing. Select an International or Other
Standard, or select “Custom” and change default parameters, or select
“Simple Limit” and enter simple Pass/Fail numbers.
User Manual KITS™ V4.13
Page 14 of 46
Fill in parameters in this form. Click OK to complete the setup.
If the setup is not complete at this stage (you clicked the Finish button on
the Welcome dialogue, or Cancel in a setup form), you can do it later
using the KITS™ menu items in the Live Data sheet.
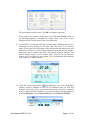
9. A new KITS™ workbook will open with the Meter Reading sheet active,
and display meter readings in real time. Since the meter is in Autotest
mode, all relevant loss testing data is also displayed in the table below, and
updated in real time. Use the on-sheet buttons to start and stop the display,
disconnect and re-connect the meter, and change between absolute and
relative display modes, etc. In relative mode, you can set the reference
value to zero, or define it as any number. The wavelength up/down buttons
do not operate in Autotest mode.
10. Click the on-line help button
(the rightmost icon in the Kingfisher
toolbar) which is common to all KITS™ worksheets and you will find
detailed, clear and concise operational instructions written by technical
staff for technical staff. Alternatively you can find help from the toolbar by
selecting Kingfisher / User Manual (Word) or User Manual (HTML).
User Manual KITS™ V4.13
Page 15 of 46
11. Set the Light Source to manual mode (ie. not [Autotest]). Wait for 8
seconds while the meter quits Autotest. Switch to the Data Logging sheet
(use tab at the bottom of the screen. If the Data Logging tab is not present,
click Kingfisher / Data Logging). Click Start Autolog (on the sheet),
name a log file, and watch the progress of data logging. Try bending the
patch lead to create varying losses, and watch the graph auto-scale. You
can interrupt this by selecting Stop, and then continue. You can easily
change any of the auto-logging parameters.
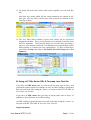
12. Switch to the Live Data sheet. Set the Light Source to [Autotest] mode.
Note: The 'Date', 'Report/File No' and 'Meter S/N' cells have been
automatically inserted.
In the cells with a brownish background (this colour indicates the cells
requiring manual data entry), type some project-related text, such as Job
No, Project, etc. Select the cell under the “Terminal ID” sub heading with
yellow background (this colour indicates the data is filled in by KITS™
but it also allows manual data entry), the Location Setup popup form is
launched. Enter the location names of the two ends of the fiber.
13. To set the reference value, click Setup / Set Reference, and set or define a
reference value (with the meter still in Autotest mode).
14. Now you have set up your test. With the meter still in Autotest mode, click
on a Ref A or Meas B cell (yellow background), and you will get reference
A values and Measurement B values entered for all wavelengths of the
selected fiber. The other cells (in light blue colour which indicates system
output) are filled in automatically.
User Manual KITS™ V4.13
Page 16 of 46
15. Go ahead, fill some more values, and see how quickly you can work like
this.
Note how any results which fail the setup parameters are shown in red.
Note also that any fibres which have been retested are marked in the
TimeTag column.
16. The Live Data Sheet contains several areas which can be selectively
displayed or hidden. These are Job Details (on by default), Pass/Fail Setup
and Test Summary. The Pass/Fail Setup are is useful when providing a
report to your customer whilst the Test Summary area is particularly useful
during testing as it shows your test configuration. To show or hide these
areas click on Setup, then choose Job Details, Pass/Fail Setup and/or Test
Summary.
B. Using a KI 734x Series ORL & Two-way Loss Test Set
If you have an ORL meter then you may do all the same tests as above, and
perform the optical return loss readings as well. An ORL reading is performed
from one end of the fiber using the ‘source’ or left port of the KI 734x ORL &
Two-way Loss Test Set.
If you have an ORL meter then you may do all the same tests as above, in
addition to Optical Return Loss (ORL) testing.
An ORL reading is performed from one end of the fiber using the ‘source’ or
left port of the KI 734x ORL & Two-way Loss Test Set.
Single instrument
User Manual KITS™ V4.13
Page 17 of 46
1. Connect the instrument to the test circuit and to KITSTM as per scenario A
above. Ensure that the instrument is in manual mode, not Autotest. ORL
measurement is not possible for 1 Way Autotest mode.
2. Click on the required ORL reading cell for the selected location. This will
automatically initiate the ORL measurement for the selected wavelength
and insert the result in the cell. Depending upon the type and purpose of
the test, a non reflective termination (eg a mandrel wrap) may be required
at the remote end of the fibre.
Pair of two-way KI7340 series Autotest instruments
If a pair of two-way KI7340 series Autotest instruments is used at each end of
the fibre under test, then all measurements for that fibre (including ORL from
each end) can be automatically entered following a single click on any
measurement cell related to that fiber. Both instruments must be connected to
the fiber using their left port.
1. Connect the instrument to the test circuit. In this configuration, both
instruments are connected to the fiber using their left port.
2. Press the [AUTO TEST] button on either instrument to initiate the twoway Autotest mode.
3. Connect to KITSTM as per scenario A above.
4. Now you have set up your test. With the meter still in Autotest mode, click
on any Ref, Meas or ORL cell (yellow background), and you will get
Reference, Measurement and ORL values entered for all wavelengths of
the selected fiber. The other cells (in light blue colour which indicates
system output) are filled in automatically.
Switch to the Loss Testing sheet (use tab at bottom of screen. If the Loss
Testing tab is not present, select Kingfisher / Loss Testing). The data area is
filled with test data obtained from the Live Data sheet using Excel formulae.
Click the 1st or 2nd wavelength cell (with yellow background) to bring out a
popup form, from which to choose another wavelength.
Go back to the Live Data Sheet. Print the worksheet and then select “Save As
…” to save the workbook to your choice of file folder. The print-out is your
un-customized report Select one of the Clear buttons to clear the report data.
A traditional KITSTM style report for any 2 wavelengths can produced via the
Loss Testing worksheet. Alternatively you may design your own report layout
using the inbuilt XML based New Report feature discussed elsewhere in this
manual.
C. Download Memory Data from any Meter to KITSTM
Memory may be downloaded into either the Meter Dump worksheet or into
the Live Data worksheet.
User Manual KITS™ V4.13
Page 18 of 46
•
•
A download to the Meter Dump worksheet sends all the meter’s
memory into a Meter Dump worksheet. No filtering or formatting is
performed.
A download to the Live Data worksheet sends all the meter’s memory
that matches specified selection criteria into Live Data worksheet.
Filtering is performed on wavelength and memory location.
In this Overview we will perform a meter download into the Meter Dump
worksheet.
1. Prepare the meter with some data stored in its memory and connect to an
RS232 or USB port (Follow steps 1 to 5 of scenario A above).
2. Start a new KITSTM workbook with Meter Dump selected, or open a saved
KITSTM workbook and click Kingfisher / Meter Dump.
3. Click the Download button on the toolbar, all memory data will be
downloaded to the worksheet.
D. Using Save CSV
KITSTM has an option to download data from KI7000 instrument memory
directly into a text file.
1. Connect the instrument to the RS232 or USB port of the PC.
2. Click Start / Kingfisher / Save CSV.
3. In the Open box specify a filename and choose the location to save the
file.
4. Click the Close button and the data will be saved to this text file.
(When the instrument does not show the RS232 or USB symbol the download
is complete).
User Manual KITS™ V4.13
Page 19 of 46
3. Using KITS™
3.1.
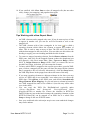
Autotest
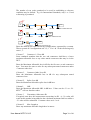
Autotest synchronises source and meter wavelengths and transfers data along
the optical fiber being measured. It requires both Source and Meter (or both
Loss Test Sets) to be Autotest compatible instruments.
Any combination of KI3800 Source, KI74xx Source, KI78xx Source, KI 7600
Meter, KI73xx Loss Test Set or KI77xx Loss Test Set can be used provided a
"Source" test port is connected to a "Meter" test port for one way testing, or a
"two-way" port is connected to a "two-way" port for two way testing, and both
ports must have at least one common wavelength.
•
Initiate 'Autotest' by clicking [AUTOTEST] on the Light Source (or one
Two-way Tester), after which the meter will switch to 'Autotest' mode.
•
The Meter Reading sheet will automatically show Autotest data in the
table.
•
If a dual, 3 or 4 wavelength Source and Meter are used, the Live Data
sheet can be automatically filled in all values at each mouse click or
keystroke (ie. both Ref and Meas values for all wavelengths in one
direction).
•
If ‘two-way Autotest’ capable instruments are used at each end of a fibre,
the Live Data sheet can be automatically filled in with all values by a
single mouse click or keystroke (ie both Ref and Meas values for all
wavelengths for each direction, plus the ORL reading in each direction).
This is up to a total of 24 measurements with one mouse click or
keystroke.
•
The collection of remote Autotest measurement data is made possible
because a Light Source port can transmit data in one direction to a Power
Meter port. A pair of two-way ports can transmit data in both directions.
3.2.
Using the Kingfisher Menu System
KITS™ provides a menu system as a standard Office toolbar. To view this
toolbar, click View / Toolbar and then select Kingfisher in Excel 2003 or
earlier Excel versions, or click Add-Ins in Excel 2007. The toolbar is loaded
only when the user opens a KITS™ workbook and will be removed from
Excel when a non-KITS™ workbook is open.
The menu system is composed of a number of menu groups and command
buttons. The Kingfisher menu group and Help button (the rightmost icon in
User Manual KITS™ V4.13
Page 20 of 46
the Kingfisher toolbar) are common to all KITS™ worksheets, while the other
menu groups and command buttons present only on a relevant worksheet.
Click on a menu item or command button will trigger an action. That includes
loading or activating a KITS™ worksheet, connecting/disconnecting the
instrument, popping up a Windows form for setup, changing data or
hiding/showing a region in the worksheet, or a combination of them. The
operation is interactive and intuitive. No training is required if the user has the
basic knowledge of fiber optical testing and Kingfisher Meters operation.
3.3.
Using the Meter Reading Sheet
The Meter Reading display shows various status indicators, e.g.
1. Connect / Disconnect
2. Normal / Autotest
3. Absolute power in dBm units, relative power in dBr units
4. Reference value in dBm
5. Current calibration wavelength in nm
6. Hold
7. Return Loss / Normal
The Meter Reading sheet allows the user to:
•
See that the instrument is connected and software is working correctly
•
Update a reference value from the computer
•
View the optical power or return loss reading on the computer screen from
a distance
•
View a live table of one or two-way Autotest data, when the power meter
is in one or two-way Autotest mode, and
•
Change wavelengths, and hold /continue display updates
Operations can be as follow (most of these operations directly control the
meter):
8. Click Connect, if “Connect” is displayed, to connect KITS™ and the
power meter
9. To stop / resume the display update, click the Hold/Continue button.
10. To change the wavelength display, click the ◄ or ► up/down button. (not
in Autotest mode)
11. To toggle absolute / relative modes, click the Abs/Rel button.
12. To toggle Return Loss / Normal, click the Ret Loss/Normal button.
User Manual KITS™ V4.13
Page 21 of 46
13. Under the main display, the Autotest display shows live data when
Autotest is in operation.
14. To set the current meter reading as the new reference, click Set ref (not
available in two-way Autotest mode).
15. To enter a reference manually, enter the reference value in the textbox, and
click Define ref (not available in two-way Autotest mode).
3.4.
Using the Live Data Sheet
The Live Data sheet automates the task of Optical Attenuation Testing,
Acceptance and, partially, Reporting. The first part of this is section is a
general description. For specific operation details go to sub-sections below.
Operations on this sheet include:
•
Control all general test parameters, which can be printed on the report.
•
Set the Pass/Fail criteria from a standard, a simple limit value, or from a
custom formula.
•
Use the Job Details section of the sheet for general record keeping.
•
Use the Pass/Fail Setup section for particular test details such as fiber
count, test parameters and so on.
•
Use the Test Summary section to show test statistics analysis and a simple
diagram of test setup configuration.
•
The test Results section at the bottom of the sheet contains test data and
Pass/Fail results.
•
The data cells are colour coded:
o
Brownish background cells for user manual input;
o
Light yellow cells for system automatically inserted data but also
allowing user input;
o
Light blue cells for system output that the user cannot change; and
o
White cells mean no data.
Generally using the mouse to click in a yellow data cell will trigger an
automatic data insertion from the connected instrument in one or more
data cells.
•
The cells used as headings for A and B meter specific data are coloured
orange and green respectively. If the meter is connected to the A end, the
background of the B cell in the diagram will become white; and vice versa.
•
Use Setup menus to configure the spreadsheet automatically to enable a
wide variety of operating methods, such as number of wavelengths, test
directions, and combinations of memory downloads or direct data entry.
Appendix A is a summary of possible combinations.
User Manual KITS™ V4.13
Page 22 of 46
•
Dump the contents of an instrument’s memory into the spreadsheet,
mapped as required. Results from several instruments can be put into one
report.
•
The spreadsheet supports Autotest operations. This automatically and
simultaneously displays as many wavelength results as possible, and
captures additional data that is transmitted from source to meter. Autotest
is started from the Light Source. If ‘Two-way Tester’ instruments are
used, two-way Autotest may be started from either end.
•
Save reports and files in various file formats for compatibility with
other software.
•
Clear part or all data. This is handy when creating multiple reports, since
the project information generally only changes slightly between each
report.
•
Attempts to over-write previously entered data will be prompted before the
old data is erased. Acquired data can be password protected (set in the
preferences dialog box) to prevent alteration.
•
The Time Tag cells record the last time the test was performed. If the test
is repeated, the cell will change background colour and insert a comment
for attention.
•
The Min, Mean, Max columns in the Statistical Analysis section show the
lowest, average, and highest margins for a given wavelength between the
Pass/Fail limits and the measured values. This is a handy way of
examining consistency of results.
•
The diagram appears to the right of the Statistical Analysis section is a
summary of the test configuration for quick reference.
Suggested Operating Sequence for Live Data Sheet
1. To get to the Live Data sheet, select the Live Data tab at the bottom of the
screen, or Kingfisher / Live Data menu item.
2. If previous unwanted data is in the sheet, select Clear on the toolbar, and
select one of the menu items to clear the data. If the sheet protection is
removed, normal Excel Delete commands can be used, but is less
convenient.
3. Fill relevant project description text in the brownish cells. This text will be
printed on reports, but does not affect the test data or Pass/Fail criteria.
4. The default 'Date' and 'Report/File No' names are inserted automatically.
The latter is used as default file name for saving test data as a log file
(.rlg). You can manually overwrite these two cells.
5. Click in the Terminal ID “A” or “B” cell will bring out the Location Setup
form to specify test location names and number of characters as
abbreviation. Terminal IDs will also appear in the diagram and the test
data section.
6. Select Setup to define the required test or the viewing of the worksheet.
User Manual KITS™ V4.13
Page 23 of 46
o
Pass/Fail Setup specifies the optical parameters such as the
number of fibers, cable details and pass/fail criteria for each
wavelength.
o
Test Setup specifies test directions, in which end the meter is
connected, local / remote referencing methods, and wavelengths
being tested. Appendix A summarizes the possible combinations.
To minimise Sub Menu interaction, Pass/Fail Setup should be
performed before
o
Set Reference provides a convenient form to view and set the
optical reference value. To set up the meter to display the required
value, select Set. To manually set the reference value, type in the
value and select Define.
o
Protect Manual Data Entry protects the worksheet against
unauthorised or accidental manual data modification. The default
setting is no protection. To set up this option, a password in
requested. Once the protection has been applied, the password can
only be removed or changed after re-entering the original
password. Don't lose your password!
o
Set Autotest Wait Time allows user to choose the time interval to
receive update of Autotest readings.
7. Also under Setup, 3 show/hide menu items allow user to choose which
sheet sections to view and print:
o
Show/Hide Job Details toggles in between showing or hiding the
Job Details / Site Data section to provide more sheet viewing
flexibility.
o
Show/Hide Pass/Fail Setup toggles in between showing or hiding
the Pass/Fail Setup section for cable and optical parameters.
o
Show/Hide Test Summary toggles in between showing or hiding
the Test Summary section for Statistical Analysis and test setup
diagram.
8. To enter the measurement data, select a yellow cell. You can also enter the
reference value automatically, and calculate the Pass/Fail status. In
Autotest configuration, you can enter all values simultaneously, relevant to
the settings in Setup.
9. If using 1 way instruments, bi-directional measurements can be achieved
by performing single direction measurements from each end. The second
set of values can be entered directly or downloaded.
10. When the report is complete, save the report using the standard Excel Save
or Save As command.
11. Select Test data to manage save and load of the test data
o
Save as KITS Log File saves test parameters and data to a text
based KITSTM data file (file extension .rlg).
o
Load to Current Workbook loads the test parameters and data from
the saved .rlg data file to the current Live Data sheet, and replaces
test configuration parameters by those from the saved data file.
User Manual KITS™ V4.13
Page 24 of 46
o
Merge with Current Workbook allows user a choice to decide
whether to replace the parameters on the current worksheet, if a
swap of “A” and “B” end data is required, which data to load, and
if the data can be overwritten.
o
Memory Download gives quick access to the memory download
dialogue.
Load or Merge Log Data for Live Data Sheet
The Load or Merge command allows import to the current worksheet the test
log data from another instrument and/or saved by another computer.
Click Test Data / Load to or merge with Current Workbook, then select a log
file (*.rlg) to open. If the log file has a different set of wavelengths, fiber
count, or fiber ID start number from the current workbook, a popup message
will provided this information to the user.
In the Merge function, user can select:
•
Whether or not to use the stored Job Details / Site Data in the log file
•
Whether or not to use the stored Cable/Optical Parameters
•
Whether to load data straight A to A and B to B, or swap A and B ends
•
In loading data, whether to overwrite existing data cells, or only fill in
when the cells of the current workbook are blank
•
Individual selection of A to B, B to A, ORL at A, and ORL at B data
Load is a special case of merge where the saved data will overwrite all test
data in the worksheet as well as test parameters.
Memory Download for Live Data Sheet
The instrument memory contents can be selectively dumped and mapped into
a Live Data sheet.
You can select particular blocks of instrument memory, and select how to map
them onto the worksheet. Appendix A is a summary of possible combinations
of actions.
1. Select Setup / Test Setup. In this Sub-Menu ‘test direction, ‘wavelength’
and ‘meter reference ocation’ is specified.
2. Specify Meter connected at. This determines how the data will be
transferred. Refer to Appendix A to review the options.
3. Specify required wavelengths. Up to 4 wavelengths may be specified.
4. Save the change if any and select Test Data / Memory Download.
User Manual KITS™ V4.13
Page 25 of 46
5. In the dialog box, select the Start Memory location. This determines the
first instrument memory block to download. A ‘Select” checkbox indicates
if the memory data for that wavelength is to be downloaded. You may
need to change the spreadsheet wavelengths for a proper download. Type
shows if the stored measurement is for Autotest ('Dual' or 'Dual Two
Way') or Manual ('Single').
6. Specify No. of Fibers to download. This determines the number of
sequential memory blocks that will be downloaded.
7. Specify Start at Fiber No. This determines the first fiber in the
spreadsheet to start download memory data.
8. Select OK, and the data will appear on the spreadsheet in the requested
location and format.
Memory download supports 'Power' and 'Reference' readings only.
3.5.
Using the Data Logging Sheet
The Data Logging sheet supports data logging weather the meter is in Power
Meter, one-way or two-way Autotest mode. But the reading may become
unreliable when the instrument is in one- or two-way Autotest mode.
Manual Data Logging
1. Select the Data Logging tab.
2. To clear existing data, select the Clear Log button.
3. To set the wavelength, use the arrow buttons next to Wavelength.
4. Select the relative mode if required using Relative Mode.
5. Optionally add a Description, which can be any text you like.
6. For each click of Manual Reading, a data point is logged. The data point
index and the size of the log is automatically incremented.
7. To undo the last reading, select Undo Reading. This decreases the data
point index, but not the size of log value.
8. To save the data log, Click the Save Log button and enter file name in the
dialog box.
9. The following statistical information is updated with each new data point:
max, min, mean, standard deviation and current reading.
10. Click Show Log Data Top on the toolbar to show the bottom of the data
logging area; and click again to show the top.
11. A saved log can be later brought back into the spreadsheet. On the toolbar
select Load Log and then select the log file name.
User Manual KITS™ V4.13
Page 26 of 46
12. To print, select Print / 'Data + Summary', 'Graph + Summary' or 'Graph
Only'.
Automatic Data Logging
Automatic data logging allows user to specify the number of data points and
log time interval. During the data logging, each data point is automatically
written to the specified log file, minimising data loss in case of a process
interruption.
1. To select the wavelength, use the arrow buttons next to Wavelength.
2. Define Size of Log.
3. Define Log Interval (sec).
4. To select relative mode, select Relative Mode.
5. Optionally add a Description, which can be any text you like.
6. To clear existing data, select Clear Log.
7. Click Start Autolog to start. You will be asked to enter a log file name.
While logging is in progress, each data point is written direct to disk.
8. The log finishes when the number of log points reaches the specified size
of log. To stop a log before it is completed, use Stop. Click Continue to
continue Autolog.
3.6.
Using the Loss Testing Sheet
The Loss Testing worksheet cannot be used for manual data input. The Loss
Testing worksheet derives all its input from the Live Data worksheet.
In KITS™ 3.x and earlier versions, the Loss Testing sheet was the main data
acquisition and report generation sheet. Realising it is impossible to satisfy all
different needs of reporting in one worksheet, from KITS™ 4.10 an attempt is
made to separate the two functions. The Live Data sheet is the place to
perform all data acquisition functions (including input of job details and site
data). The Loss testing sheet is retained in this release to give users a familiar
view of KITS™ reporting sheet.
After filled some data in the Live Data sheet, user can select the Loss Testing
tab (or click Kingfisher / Loss testing) to view the Loss Testing sheet. The
data cells are filled in automatically using Excel formulae. By default, it uses
the data of the first and second wavelength. User can choose different
wavelengths by click on either the 1st or 2nd wavelength cell (with yellow
background).
The three show/hide menu items under Show/Hide Details allow user to
choose which sheet sections to view and print:
User Manual KITS™ V4.13
Page 27 of 46
•
•
•
Show/Hide Job Details toggles in between showing or hiding the Job
Details / Site Data section.
Show/Hide Cable Details toggles in between showing or hiding the cable
parameters.
Show/Hide Formula Section toggles in between showing or hiding the
pass/fail formula parameters.
All other functions previously implemented for this sheet have been moved to
the Live Data sheet.
3.7.
Using the Meter Dump Sheet
The Meter Dump sheet provides a simple and convenient way for the user to
download and view the loss test data stored in an instrument.
Unlike the Live Data sheet where only the memory readings that match the
selected wavelengths are downloaded, the Meter Dump sheet downloads all
data from meter memory.
Click on Add-Ins / Download button, all memory cells are downloaded to the
sheet.
User Manual KITS™ V4.13
Page 28 of 46
4. KITS™ Advanced Functions
4.1.
Customising the Workbook
Add or Delete a KITS™ Worksheet
KITS™ 4.13 has 5 worksheets: Live Data, Loss Testing, Data Logging, Meter
Reading, and Meter Dump. Depending on the application, some sheets may
not be needed and thus can be removed from the KITS™ workbook. This can
be done either by not including a sheet in initial setup, or using the standard
Excel Delete Worksheet command during the operation.
A deleted KITS™ worksheet can be added to the workbook at any time during
the operation. To do so, select Kingfisher / <Sheet name>. If the required
sheet is not in the workbook, it will be loaded and initialised with the current
setup parameters.
Because the Loss Testing sheet relied on the Live Data sheet for test data, it
does not function properly without the Live Data sheet.
User can change a sheet name to any other text accepted by Excel. KITS™
remembers the new sheet name when the workbook is saved.
Change Meter Port
Users normally do not need to consider the meter port as KITS™ finds the
port automatically on connection. The sequence is that KITS™ searches an
available USB port first, and then search for an RS232 port.
The Change Meter Port menu item is useful if multiple KITSTM applications
are running in the same computer (e.g. in a laboratory situation). In this
situation, the user may need to specify the COM port manually for a particular
instance of KITS™.
Save a Template
The KITS™ software is supplied with a default Excel workbook. You can
easily create a new KITS™ workbook and customise it. Then use File Save
As to save as a Workbook or Template. To use the customised workbook
simply reopen it. This is very handy for working on assorted jobs, changing
languages, terminology, and so on.
For detailed instructions, see Appendix C – KITS™ Localisation Instructions
User Manual KITS™ V4.13
Page 29 of 46
Customised templates are also useful to store parameters such as printer
settings, custom hyperlinks etc, which must be correctly selected when the
template is stored.
Excel tip: To save the workbook as a template, select File / Save As…, then
select Template (*.xlt) in the “Save as Type” dropdown list (Excel 2003 and
earlier) or Excel Button (top left corner of Excel) / Save As… / Other
Formats / Excel Template (*.xltx) (Excel 2007). By default Excel will save
the file under the folder <Drive>:\Documents and Settings\<Your login
id>\Application data\Microsoft\Templates. After saving, Excel will add a
shortcut to this template on the Recent Documents list.
Excel tip: The supplied template is protected to prevent accidental alteration.
To enable changes, on the Excel toolbar, select Tools / Protection / Unprotect
Sheet (Excel 2003 and earlier) or Review / Unprotect Sheet (Excel 2007).
User tip: Many users prefer to create several customised worksheets with
distinctive names. Using Explorer they right click on the customised files to
make them write protected. When used, as the file is write protected Excel
will automatically prompt for a different file name.
Change KITSTM Master Layout Template Workbook
KITS™ uses an Excel workbook KitsXls.xls (typically installed under
<Drive>:\Documents and Settings\All Users\Application Data\Kingfisher\
KITS4) as the Master Layout template for starting a new KITS™ workbook or
adding a new worksheet.
KITS™ allows customisation in some cells of the workbook. If you change
these cells, the changes will appear in all future new KITS™ workbooks or
worksheets.
KITS™ uses colours to indicate different types of cells (See the top right
corner of the Live Data sheet for an interpretation).
•
•
•
User can freely change the text in a cell of white background. This is
often useful for a limited localisation to another language (Refer to
Appendix C for full scale localisation).
The Live Data sheet has some cells in purple colour. User can change
their values if the KITS™ default parameters are not desirable. Purple
is used as an indicator for changing the template only. These cells will
have yellow background colour in a KITS™ workbook.
Don’t add or delete a cell, row or column. The current implementation
of KITS™ 4.1x does not support this change.
User Manual KITS™ V4.13
Page 30 of 46
4.2.
Designing a Customised Report Sheet
From years of experience in customer support, it is recognised that a generic
report sheet format can never satisfy different user needs. A new report
generating function is provided in KITS™ that allows users to design their
own report sheets and automatically populates the test data to the custom
designed report sheets.
1. Create a new or open a saved KITSTM workbook, set up all parameters for
the Live Data sheet.
2. From the Kingfisher menu bar, click New Report. A “New Report Sheet”
form will pop up.
3. Enter in a sheet name. Choose data layout option A or B (A is the layout of
the Loss Testing sheet, where one Excel row has data for all wavelengths
of one fiber. B is the layout of the Live Data sheet, where one Excel row
has data for one wavelength and data for one fiber is grouped in
consecutive rows). For option B, you can tick checkboxes to decide which
wavelengths to include in the report. By default the new report sheet uses
the same XSD (XML Schema Definition) file as used by the Live Data
sheet. You can customise this file and supply it to the new report. XML
Map Name shows the name of the XML map for this sheet. It is empty
before the sheet is created.
4. Click Ok to complete. A new sheet is created which contains a picture
frame with instructions to customise a report sheet. Read and delete this
frame before you start designing the sheet (or copy it somewhere else as
you may need to revisit it).
5. Design the layout of the sheet as you work on a normal Excel worksheet.
Or if you have an existing worksheet to use as a template, you can copy
part or whole sheet and paste to the new report sheet.
6. In KITSTM, click the Excel menu item Data / XML / XML Source (Office
2003) or Developer / XML / Source (Office 2007) to open the XML
Source pane. A dropdown list on the top of the pane shows the XML maps
in the workbook. KITS_Map is used by the Live Data sheet, and each new
report sheet has an XML map named KITS_Map1, 2, 3, …. You need to
use the right map for this report sheet otherwise the data cannot be
populated correctly.
7. You can drag and drop an XML element to a cell in the report sheet. Or
right click the mouse on the XML element in the pane and select Map
element … or Remove element.
8. If you choose layout option A, you will map each wavelength data in its
selected columns. In the XML map, use elements under KITS/Test Data to
map the first wavelength, KITS/Test Data2 the second wavelength, etc. If
you choose option B, use only KITS/Test Data for mapping.
9. To test your mapping, click Populate Data to map the data from the Live
Data sheet. The current implementation copies the data from the Live Data
sheet instead of using formulae, as Excel may not show the data correctly
for the XML mapped cells.
User Manual KITS™ V4.13
Page 31 of 46
10. If not satisfied, click Clear Data to clear all mapped cells (but not other
cells), change your mapping, and populate data again.
Tips Working with a New Report Sheet
•
An XML element can be mapped only once. If you do want a piece of data
to appear in another cell, you can use an Excel formula to refer to the
mapped cell.
•
The XML element with a blue rectangular in its icon ( ) is called a
repeating element which allows the element to appear any number of
times. This is used to map an array of data. The first cell is for the title
with the data mapped to the rows below. You can either use this title as the
heading or supply your own heading and hide the title element.
•
To remove a mapped repeating element, first do Remove element from the
XML pane, then click on the mapped element (where the dropdown icon
still appears), click Excel menu List / List / Convert to Range (Office
2003) or Design/Convert to Range (Office 2007) to convert the area to
normal Excel range. After that, you can remap the element.
•
To know which XML is mapped to the current report sheet, open the XML
pane, click on a mapped cell, the pane will show the map with the element
that is mapped to the cell selected. Alternatively, click the Setup button,
the XML Map Name in the popup form shows the name of the map.
•
If you map repeating elements to adjacent columns in the sheet you may
receive an “XML map is not exportable” error when you try to export the
XML data. Click Options in the XML pane, and deselect Automatically
Merge Elements When Mapping. Or you can insert a column in between
two XML mapped lists and set its width to 0 (but this may affect other
rows in the sheet).
•
You can copy the XSD file KitsXml40.xsd (typically under
<Drive>:\Documents and Settings\All Users\Application Data\
Kingfisher\KITS4) to another file, remove the elements in KITS/Test
Data[234] that are not needed and rearrange the remaining elements so that
KITS/Test Data[234] can be mapped to an XML list as a whole. Run
Setup to change to the new XSD file name.
•
Save your workbook after each major step in case some undesired changes
may not be undone.
User Manual KITS™ V4.13
Page 32 of 46
4.3.
Technical Tips in Using KITS™
Run the Second KITS™ Workbook
Due to the restriction in resource sharing, only one KITSTM workbook can run
within one Excel application. To run the second KITSTM workbook, user can
start another Excel application (Start / programs / Microsoft Office / Excel),
then open an existing or new KITSTM workbook.
The two KITSTM workbooks run each in its own workspace without
interfering with another.
Re-enabling the KITS™ Add-In
KITS™ runs as an Excel Add-In named KIAddin. Occasionally this Add-In
may become disabled. When this happens, you can follow these steps to reenable it (in Excel 2007):
1. Click the Office button (the top left corner of Excel), then click Excel
Options / Add-Ins
2. If KIAddin is disabled, you can see it in the list “Disabled Application
Add-Ins” (near the bottom)
3. In the drop down list (at the bottom), select Manage: Disabled Items / Go
4. Select KIAddin / Click Enable / Close
5. Back to the same drop down list, select Manage: COM Add-Ins / Go
6. Select KIAddin / Ok
In Excel 2003 and earlier: Click Help / about Microsoft Office Excel /
Disabled Items… Select KIAddin and then Enable.
If KIAddin is not visible in the list of disabled items, you need to run “Add or
Remove Programs” from Windows Control Panel to repair KITS™.
Opening an Old KITS™ Workbook
If you have a workbook saved by an earlier release of KITS™, it may not
work properly with the new release because of the changes made to the
program as well as sheet layout. Open the workbook in Excel and see how
much existing data is still available. You may still be able to retain some of the
data.
User Manual KITS™ V4.13
Page 33 of 46
In the worst case, you can create a new KITS™ workbook, enter the setup
parameters following the settings of the old one, and manually copy the data
you want to keep and paste it to the new KITS™ workbook.
5. Contact Us
Kingfisher International Pty Ltd.
30 Rocco Drive
Scoresby, Victoria, 3179, Australia
Tel:
(613) 9757 4100
Fax:
(613) 9757 4193
E-mail: Sales
Web site: www.kingfisher.com.au
Thanks for staying with us
We hope you enjoy using our software
User Manual KITS™ V4.13
Page 34 of 46
6. Appendices
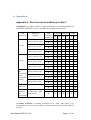
Appendix A - Data Transfer from Meter(s) to Kits™
Assumption: If a direct transfer, or later download, is performed between an
instrument and KITS™, there is no difference in what is transferred.
Test
Directions
Reference
Options
Remote Reference
2 power meters used
A to B
Local Reference
1 power meter used
Manual Reference
1 power meter used
Remote Reference
2 power meters used
B to A
Local Reference
1 power meter used
Manual Reference
1 power meter used
Remote Reference
2 power meters used
BiDirectional
Local Reference
using
1 power meter used
successive
testing
Manual Reference
1 power meter used
ORL at A
ORL at B
Two-way
Autotest 2 x Two-way + ORL
Testers used
BiDirectional
Kits
Reference Measure
connected
B A B
to meter at A
A
X
B
X
A
B
X
X
A
B
X
A
X
B
X
A
X X
B
A
X
B
A
X
X
B
X
X
A
X X
B
X
X
A
X
B
X
A
B
A
X
X X X
B
X
X
X
X
ORL
A
X
X
X
X
X
X
A remote reference is usually performed on a "long" link where it is
inconvenient to use one power meter to measure the power at both the ends of
the link.
User Manual KITS™ V4.13
B
Page 35 of 46
Two power meters are used to perform one loss test in one direction. One
power meter is used to measure the Reference Level (eg the light source
output power), and the other meter is used to measure the 2nd value at the other
end of the link. These measurements are performed sequentially, to minimise
the effect of source drift over time. However in this test sequence, the absolute
measurement accuracy of the two meters becomes critical. To overcome this
defect, this method is commonly combined with in a two-step bi-directional
test sequence, and the losses in both directions are averaged. Using this bidirectional process eliminates meter absolute accuracy as a source of
measurement error.
A local reference is performed when one power meter is used to measure both
Reference Level and 2nd value measurements. This is commonly used in a
situation where both ends of a system can be accessed readily by the one meter
(for instance loop-back testing, or bench testing).
So Bi-Directional testing is commonly used with the remote referencing
method in situations where the two ends of the system are far apart. This
method eliminates the effect of absolute calibration discrepancies between two
power meters. This method is affected only by short-term source stability and
power meter linearity. Source long term stability and meter calibration
accuracy are both eliminated. So this is the preferred method for telecom use.
Manual reference is performed when the reference values are entered into the
KITS™ worksheet manually.
Appendix B - Use of International and Other Standards
KITSTM 4.10 introduced the option of Standards based testing. When selected,
KITSTM automatically configures the workbook with a set of pre-defined
parameters for Pass/Fail assessment.
Two standard based options are provided:
International Standards (File name: Int-LossTest-Standards.XLS)
International Standards can be referenced. As installed, this workbook is
preconfigured for 11 International Standards, being 3 IEC Permanent Link, 6
IEC Channel and 2 spare standard locations. The file iswrite protected.
Additional standards can be added if desired. Should other International
Standards be required to be referenced, contact your nearest KI distributor or
Kingfisher International directly.
User Manual KITS™ V4.13
Page 36 of 46
Link (1995)
Permanent link
CD or BD
EQP
C
BD or FD
C
C
C
C
Channel
C
EQP
C
= connection
Other Standards (File name: User-LossTest-Standards.XLS)
As installed, this workbook is preconfigured for 6 user definable standards.
Supplied as a Read/Write enabled worksheet it can be write protected if
required.
Writing your own standard specifications
You can modify or add to the existing Other Standard list. The data field
functions & requirements are:
Column A:
No.
If required, set mouse point to the No. column of the last standard, press Enter,
and enter data to the other columns of the row to add another standard.
Column B:
Standards (Protected) / User Definable.
Enter name of the standard or local specification here.
Column C:
Issue No
Enter version number of the standard or local specification here.
Column D:
Pass/Fail Insertion Loss
This cell defines the way in which test results are assessed for a Pass/Fail
condition. When testing to International Standards, this is usually assessed
against the Worst Case single direction result. By comparison, many telcos
assess their Pass/Fail criteria against the two-way average.
Enter an ‘A’ for two-way average a ‘W’ for Worst Case assessment here.
Column E:
Allowed Reference Configuration.
User Manual KITS™ V4.13
Page 37 of 46
The number of test cords permitted to be used in establishing a reference
condition may be defined. E.g. for International Standards, only 1 or 3 lead
referencing is permitted.
3
LS
S
D
Launch cord
2
LS
Field
calibration cord
S
D
Launch cord
1
Tail cord
Tail cord
PM
Reference measurement P0
PM
Reference measurement P0
LS
D
S
Launch cord
PM
Reference measurement P0
Enter the allowed test cord referencing configurations, separated by a comma.
Thus to permit all 3 configurations use 1,2,3. For 1 & 3 lead referencing only
enter 1, 3.
Column F:
Connector 1-2 Loss dB
Some standards mandate that the two end connectors shall have a lower
maximum allowable loss to any other mated connectors that may be in the
DUT.
Enter the Maximum Allowable loss in dB for the first two or end connectors
here. You must also enter a value for any subsequent mated connectors under
‘Connector other loss’.
Column G:
Connector Other Loss dB
Enter the Maximum Allowable loss in dB for any subsequent mated
connectors here.
Column H:
Splice Loss dB
Enter the Maximum Allowable splice loss in dB here.
Column I:
ORL
Enter the Maximum Allowable ORL in dB here. Values can be +Ve or –Ve.
KITSTM will use absolute values.
Column J:
Uncertainty Allowance dB
If required enter here the measurement uncertainty in dB. A +Ve value will
result in this number being added to the calculated maximum link loss whilst a
–Ve value will be subtracted. Common values are 0.3 or 0.
Column K:
Max Length m
Enter any maximum allowable length here in metres.
User Manual KITS™ V4.13
Page 38 of 46
Column L:
Propagation Delay ns
Given length, KITSTM can automatically calculate the propagation delay in ns.
PD = length m * (1000 *IOR) / C. Where IOR is the cables Index of
Refraction and C is the speed of light.
For example: IOR = 1.469 => 4.90 ns/m, IOR = 1.490 => 4.97 ns/m.
For International Standards based testing use 5 ns.
Columns M-X:
Wavelength parameters
Specifications in dB/Km or maximum loss for up to 4 wavelengths may be
entered here.
Required parameters are:
1. Wavelength, nm
2. dB/km, or
3. Maximum allowable loss dB
Appendix C - KITS™ Localisation Instructions
KITS™ is supplied with an English user interface. It can be localised to
another language by anyone with a reasonable working knowledge of Excel
and general programming:
•
Most test items within worksheet cells can be changed in Excel. But some
are output of the KITS™ program and thus can not be changed in this
way.
•
Items in the KITS™ menu bar, dialog windows and error messages are
defined in separate resource files, which can be customised using
Microsoft™ localisation tools.
Languages such as Chinese, Arabic etc require special font sets and other
language specific programs so that the computer can display the correct
symbols.
User Manual KITS™ V4.13
Page 39 of 46
Modifying Spreadsheet Cells
1. KITS™ uses KitsXls.xls (typically under <Drive>:\Documents and
Settings\All Users\Application Data\Kingfisher\KITS4) as the layout
template when creating a new workbook. You need to decide if you should
make changes in the template, so that the changes will apply to all future
workbooks, or make changes only for an existing workbook.
2. The Kitsxls.xls workbook is not protected. That leaves the user
organisation to decide if or how to protect it.
3. To make changes in an existing workbook, remove sheet protection (using
Tools / Unprotect Sheet menu in Excel) and then modify the text in the
cells as required.
4. Remember to re-apply sheet protection, if applicable, when the required
changes are done!
•
Cells that change contents during the running of the program need not be
changed. They are overwritten by the program.
•
Do not modify the contents of cells containing formulae.
•
The explanatory note in the upper right corner of the Live Data sheet is a
drawing. To change this, delete it and make a new drawing. The drawing
should be grouped together into a single item.
Localising Menu Bars, Dialog Boxes and Error Messages
KITS™ installation package supplies a set of .resources files to the end user
for localisation. The file names look like KIUIForms2003.
ctlxxxToolbar.resources or KIUIForms2003.frmyyy.resources. The former is
the resources file for a User Control, where xxx is the name of the module it is
applied to, and the latter is for a Form, where yyy is the name of the form.
KITS™ 4.11 has 8 ctl and 20 frm resources files.
The resources file for a User Control contains a Toolbar which defines the
texts of the top level command buttons and menus. It also contains a number
of Context Menus which are used to define:
•
Texts of the second level menu items to appear on the toolbar
•
Dialogue messages to present to the user
•
Texts to appear in worksheet cells or on-sheet GUI controls, and
•
Texts used by KITS™ to output to an external file
The resources file for a Form contains texts for all controls to appear in the
GUI form. It may contain one or more Context Menus which are used to
define:
•
Texts of the menu items that may need to change during the
application
User Manual KITS™ V4.13
Page 40 of 46
•
Texts for a dropdown list, and
•
Dialogue messages to present to the user when the form is open.
Following is a step by step guide to localise the KITS™ resources files. It has
been tested in the Windows XP/Visual Studio 2003 environment. The actual
steps may be different in another environment.
1. Localizing a Resources File with WinRes.exe
WinRes.exe is a Windows based localization tool (typically under
C:\Program Files\Microsoft Visual Studio .NET 2003\SDK\ v1.1\Bin).
Launch WinRes from Windows Explorer and open a resource file for
editing, e.g. frmTestSetup.resources. Change the text of the controls on the
GUI form. Adjust sizes and locations if necessary.
If the text of a control is changeable at the runtime, or a pop-up message is
required when the form is active, the extra text messages are stored in the
Context Menu section of the form (in WinRes, context menu items can
only be accessible from the Properties window).
To save a localised version, click the Save As command on the File menu.
The tool displays the Select Culture window. Double-click the appropriate
culture. The tool saves the file, using the naming convention that the
runtime expects for localized resource files. For example, if you localize
for German in Germany, the tool saves the file as frmTestSetup.deDE.resources.
Repeat the above procedure for all .resources files that need localization.
2. Creating a .dll File with Al.exe
After all resources files for another culture are generated, run command al
(typically under C:\Windows\Microsoft.NET\Framework \v1.1.4322\) to
generate a localized .dll file. For example:
al /t:lib /embed:
KIUIForms2003.ctlKingfisherToolbar.de.resources
/embed: KIUIForms2003.frmTestSetup.de.resources
/embed: <any other ctl and frm resources files to
be included> /culture:de /out:
KIUIForms2003.resources.dll
compiles a KIUIForms2003.resources.dll file for the German culture.
Command al has to be run under its current directory (or a system variable
is defined to include this path), as it needs to access other files under that
directory.
After the file KIAddin2003.resources.dll is generated, copy it to the
satellite assembly directory for running the KITSTM application in another
User Manual KITS™ V4.13
Page 41 of 46
language
(typically
\Kingfisher\KITS\de\).
User Manual KITS™ V4.13
under
<KITS
installation
directory>
Page 42 of 46
7. License and Warranty
End-User License Agreement for Kingfisher Software
IMPORTANT - READ CAREFULLY: This Kingfisher International EndUser License Agreement ("EULA") is a legal agreement between you
(either an individual or a single entity) and Kingfisher International for
the Kingfisher software products, which include computer software and
may include associated media, printed materials, and "online" or
electronic documentation ("SOFTWARE PRODUCT"). By installing,
copying, or otherwise using the SOFTWARE PRODUCT, you agree to
be bound by the terms of this EULA. If you do not agree to the terms of
this EULA, do not install or use the SOFTWARE PRODUCT; you may,
however, return it to place of purchase for a full refund.
Software Product License
The SOFTWARE PRODUCT is protected by copyright laws and
international copyright treaties, as well as other intellectual property
laws and treaties. The SOFTWARE PRODUCT is licensed, not sold.
1. GRANT OF LICENSE. This EULA grants you the following
rights:
•
Applications Software. You may install and use one copy of the
SOFTWARE PRODUCT, or any prior version for the same
operating system, on a single computer. The primary user of the
computer on which the SOFTWARE PRODUCT is installed may
make a second copy for his or her exclusive use on a portable
computer.
•
Storage/Network Use. You may also store or install a copy of the
SOFTWARE PRODUCT on a storage device, such as a network
server, used only to install or run the SOFTWARE PRODUCT on
your other computers over an internal network. However, you must
acquire and dedicate a license for each separate computer on
which SOFTWARE PRODUCT is installed or run from the storage
device. A license for the SOFTWARE PRODUCT may not be
shared or used concurrently on different computers.
•
License Pack. If you have acquired this EULA in a Kingfisher
License Pack, you may make the number of additional copies of the
computer software portion of the SOFTWARE PRODUCT
authorised on the printed copy of this EULA, and you may use each
copy in the manner specified above. You are also entitled o make a
User Manual KITS™ V4.13
Page 43 of 46
corresponding number of secondary copies for portable computer
use as specified above.
2. DESCRIPTION OF OTHER RIGHTS AND LIMITATIONS
•
Not for Resale Software. If the SOFTWARE PRODUCT is labelled
"Not for Resale" or "NFR", then, notwithstanding other sections of
this EULA, you may not resell, or otherwise transfer for value, the
SOFTWARE PRODUCT.
•
Limitations on Reverse Engineering, Decompilation, and
Disassembly. You may not reverse engineer, decompile, or
disassemble the SOFTWARE PRODUCT, except and only to the
extent that such activity is expressly permitted by applicable law
notwithstanding this limitation.
•
Separation of Components. The SOFTWARE PRODUCT is
licensed as a single product. Its component parts nay not be
separated for use on more than one computer.
•
Rental. You may not rent, lease, or lend the SOFTWARE
PRODUCT.
•
Support Services. KINGFISHER may provide you with support
services to the SOFTWARE PRODUCT ("Support Service"). Use of
Support Services is governed by the Kingfisher policies and
programs described in the user manual, in "online" documentation,
and/or in other Kingfisher-provided materials. Any supplemental
software code provided to you as part of the Support Services shall
be considered part of the SOFTWARE PRODUCT and subject to
the terms and conditions of this EULA. With respect to technical
information for product support and development. Kingfisher will not
utilise such technical information in a form that personally identifies
you.
•
Software Transfer. You may permanently transfer all of your rights
under this EULA, provided you retain no copies, you transfer all of
the SOFTWARE PRODUCT (including all component parts, the
media and printer materials, any upgrades, this EULA, and, if
applicable, the Certificate of Authenticity), and the recipient agrees
to the terms of this EULA. If the SOFTWARE PRODUCT is an
upgrade, any transfer must include all prior versions of the
SOFTWARE PRODUCT.
•
Termination. Without prejudice to any other rights, Kingfisher may
terminate this EULA of you fail to comply with the terms and
conditions of this EULA. In such event, you must destroy all copies
of the SOFTWARE PRODUCT and all of its component parts.
3. UPGRADES
If the SOFTWARE PRODUCT is labelled as an upgrade, you must
be properly licensed to use a product identified by Kingfisher as
being eligible for the upgrade in order to use the SOFTWARE
User Manual KITS™ V4.13
Page 44 of 46
PRODUCT. A SOFTWARE PRODUCT labelled as an upgrade
replaces and/or supplements the product that formed the basis for
your eligibility for the upgrade. You may use the resulting upgraded
product only in accordance with the terms of this EULA. If the
SOFTWARE PRODUCT is an upgrade of a component of a
package of software programs that you licensed as a single
product, the SOFTWARE PRODUCT may be used and transferred
only as part of that single product package and may not be
separated for use on more than one computer.
4. COPYRIGHT
All title and copyrights in and to the SOFTWARE PRODUCT
(including but not limited to any images, photographs, animations,
video, audio, music, text, and "applets" incorporated into the
SOFTWARE PRODUCT), the accompanying printed materials, and
any copies of the SOFTWARE PRODUCT are owned by Kingfisher
or its suppliers. The SOFTWARE PROUCT is protected by
copyright laws and international treaty provisions. Therefore, you
must treat the SOFTWARE PRODUCT like any other copyrighted
material except that you may install the SOFTWARE PRODUCT on
a single computer provided you keep the original solely for backup
or archival purposes. You may not copy the printed materials
accompanying the SOFTWARE PRODUCT.
5. DUAL-MEDIA SOFTWARE
You may receive the SOFTWARE PRODUCT in more than one
medium. Regardless of the type or size of medium you receive, you
may use only one medium that is appropriate for your single
computer. You may not use or install the other medium on another
computer. You may not loan, rent, lease, or otherwise transfer the
other medium to another user, except as part of the permanent
transfer (as provided above) of the SOFTWARE PRODUCT.
Warranty
LIMITED WARRANTY. Kingfisher warrants that (a) the SOFTWARE
will preform substantially in accordance with the accompanying written
materials for a period of ninety (90) days from the date of receipt, and
(b) any Kingfisher hardware accompanying the SOFTWARE will be
free from defects in materials and workmanship under normal use and
service for a period of one (1) year from the date of receipt. Any implied
warranties on the SOFTWARE and Kingfisher hardware are limited to
ninety (90) days and one (1) year respectively. In states/jurisdictions
which do not allow limitations on duration of an implied warranty, these
limitation may not apply to you.
User Manual KITS™ V4.13
Page 45 of 46
CUSTOMER REMEDIES. Kingfisher's entire liability and your exclusive
remedy shall be, at Kingfisher’s option, either (a) return of the price
paid, or (b) repair or replacement of the SOFTWARE or hardware that
does not meet this Limited Warranty and which is returned to
Kingfisher with a copy of your receipt. This Limited Warranty is void if
failure of the SOFTWARE or hardware has resulted from accident,
abuse, or misapplication. Any replacement SOFTWARE or hardware
will be warranted for the remainder of the original warranty period or
thirty (30) days, whichever is longer.
NO OTHER WARRANTIES. To the maximum extent permitted by
applicable law, Kingfisher disclaim all other warranties, either express
or implied, including, but not limited to implied warranties of
merchantability and fitness for a particular purpose, with regard to the
SOFTWARE, the accompanying written materials, and any
accompanying hardware. This limited warranty gives you specific legal
rights. You may have other which vary from state/jurisdiction to
state/jurisdiction.
NO LIABILITY FOR CONSEQUENTAL DAMAGES. To the maximum
extent permitted by applicable law, in no event shall Kingfisher be liable
for any damages whatsoever (including without limitation, special,
incidental, consequential, or direct damages for personal injury, loss of
business profits, business interruption, loss of business information, or
any other pecuniary loss) arising out of the use of or inability to use this
product, even if Kingfisher has been advised of the possibility of such
damages. In any case, Kingfisher’s entire liability under any provision
of this agreement shall be limited to the amount actually paid by you for
the SOFTWARE and/or Kingfisher hardware. Because some
states/jurisdictions do not allow the exclusion or limitation of liability for
consequential or incidental damages, the above limitation may not
apply to you.
If you acquired the SOFTWARE in the United States of America, this
Software License Agreement and Warranty are governed by the laws
of the State of Victoria, Australia. If you acquired the SOFTWARE
outside Australia, local law may apply.
End of document
User Manual KITS™ V4.13
Page 46 of 46