1
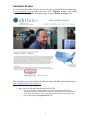
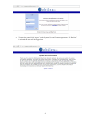
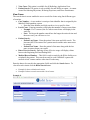
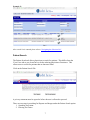
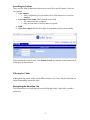
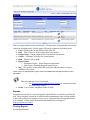
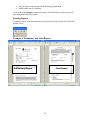
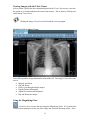
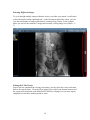
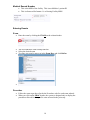
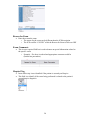
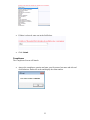
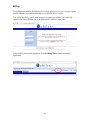
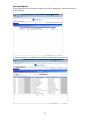
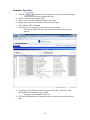
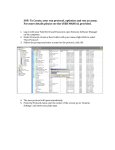
MobilexUSA Report, Image and Billing Portal January 2014 1 CUSTOMER ACCESS ..................................................................................................... 3 SYSTEM REQUIREMENTS .......................................................................................... 5 WEB APPLICATIONS .................................................................................................... 5 ADMINISTRATOR ........................................................................................................................................ 5 RADIOLOGY ................................................................................................................................................ 5 View Cases ............................................................................................................................................ 6 Patient Search ....................................................................................................................................... 7 Searching for Patient ......................................................................................................................................... 8 Filtering for Claim ............................................................................................................................................ 8 Navigating the Selection List ................................................................................................................ 8 Reports .................................................................................................................................................. 9 Viewing Reports ............................................................................................................................................... 9 Printing Reports .............................................................................................................................................. 10 Example of Preliminary and Final Reports ..................................................................................................... 10 Viewing Images with the ULite Viewer .......................................................................................................... 11 Using the Magnifying Glass ............................................................................................................................ 11 Image Adjustment Tools ............................................................................................................................ 12 Selecting Different Images ........................................................................................................................ 14 Exiting the ULite Viewer ........................................................................................................................... 14 ONLINE ORDER ENTRY ..............................................................................................................................15 Date of Service .....................................................................................................................................15 Priority .................................................................................................................................................15 MobilexUSA Patient ID .......................................................................................................................16 Searching for a Patient .................................................................................................................................... 16 Adding a Patient .............................................................................................................................................. 16 Wing/Unit .............................................................................................................................................17 Room ....................................................................................................................................................17 Medical Record Number ......................................................................................................................18 Entering Exam/s ...................................................................................................................................18 Exam ............................................................................................................................................................... 18 Procedure ........................................................................................................................................................ 18 Laterality (LT / RT) ........................................................................................................................................ 19 Follow Up ....................................................................................................................................................... 19 ICD’s (Diagnosis Codes) ................................................................................................................................ 19 Reason for Exam ............................................................................................................................................. 20 Exam Comments ............................................................................................................................................. 20 Hospice Flag ................................................................................................................................................... 20 Entering the Ordering Doctor..............................................................................................................21 Searching ........................................................................................................................................................ 21 Adding a Doctor .............................................................................................................................................. 22 Special Instructions ..............................................................................................................................22 Reason for Portable Exam ...................................................................................................................22 Compliance ..........................................................................................................................................23 BILLING .....................................................................................................................................................24 Activity Reports ....................................................................................................................................25 Insurance Type Entry ...................................................................................................................................... 26 Per Diem Entry ............................................................................................................................................... 27 PRINT AND FAX ACTIVITY REPORT ...........................................................................................................28 Invoices ................................................................................................................................................29 OTHER TOOLS ...........................................................................................................................................29 Help......................................................................................................................................................29 Logoff ...................................................................................................................................................29 User Management ................................................................................................................................30 2 Customer Access To access the MobilexUSA Customer Access web page, go to the MobilexUSA home page at www.mobilexusa.com and place the mouse over “Customer Access” menu option located at the bottom left side of the home page, click the “Results & Images” link. This will redirect you to the MobilexUSA Report, Image and Billing Portal login page at https://support.mobilexusa.com/mxlive Enter your User ID and Password and click LOGIN o o If you do not have or have forgotten your user name and password please contact your Facility Administrator to create an account or reset your password. If you have previously set your secret question and answer, you can reset your password using the “Forgot Password” link. 3 To enter the portal click “Agree” to the System Use and Consent agreement. If “Decline” is selected the user will be logged out. 4 System Requirements Viewer Requirements CPU: Intel Core2Duo CPU (E2140 or higher) Memory: DDR2 PC2-6400 2GB or higher HDD: SATA/SATA2 HDD (Faster is better) VGA: ATI Radeon HD 3850 512MB (or higher) LCD Monitors: 1280 x 1024 x 32bpp display or higher Fast Ethernet Network Interface Card Gigabit Ethernet Network Interface Card (optional) Software requirements INFINITT ULite Viewer uses HTML5 API. The recommended Browsers are as follows: Microsoft Internet Explorer 9.0 or higher Google Chrome 16.0 or higher Apple Safari 5.1 or higher Web Applications Four web applications can be enabled. Administrator: Enables a facility designate to manage facility users. This user will have the access needed to create users, delete users and reset passwords for facility users. Radiology: This web application enables current MobilexUSA Clients, Ordering and Consulting Physicians access to search for claims to view diagnostic reports, and images Billing: This web application enables current MobilexUSA client’s access to view and submit patient activity reports. Access to this application must be coordinated with the MobilexUSA Billing Department. Orders: This web application enables current MobilexUSA client’s access to enter order request, X-Ray, Ekg, Ultrasound, Holter. Administrator An administrator is a user that has access to create and modify users. There are three administrator types. Please refer to the Admin Guide for detailed information regarding the Administrator type user Radiology The Radiology Application has two methods for searching for patients. 5 1. View Cases: This option is available for all Radiology Application Users 2. Patient Search: This option is only available for non-facility accounts. Accounts created for Ordering Physicians, Referring Physicians, and Nurse Practitioners. View Cases The search criteria screen enables the user to search for claims using four different types of searches. Case Number – A case number is a unique claim identifier that is assigned by the MobilexUSA dispatching system. o Enter the claim number and click search to view a specific claim. Last # Cases – Entering a number will display that number of most recent claims. o Example: If a 5 is entered, the five most recent claims will display in the work list. o Note: The larger the number entered here the longer the retrieval time and the more cases you will have to view. Patient Search o Patient Last Name – Enter the patient’s last name and click search. The last name MUST be entered for a patient search and the entire name must be entered. o Patient First Name – Enter the patient’s first name along with the last name to narrow down your search. Date of Service Search - Entering a Date of Service range will display claims between the Beginning DOS and Ending DOS Medical Record Number – This field is used to search by the ID the facility uses to indentify the patient. This search can only be used if MobileX captures the medical record / inmate number at the time of order entry. Enter the data to be search in the appropriate field/s and click the Search button. To clear all search criteria click the Reset Search button. Example #1 shows a blank search screen Example #2 shows a search screen with a list of exams. Example #1 6 Example #2 After a work list is returned please refer to “Navigating the Selection List” Patient Search The Patient Search tab allows physicians to search for patients. This differs from the View Cases tab as you do not have to be the ordering physician or Practioner. This allows users to search for patients that are known to them. Click on the Patient Search Tab A privacy statement must be agreed to before the user is allowed to proceed. There are two steps in searching for Reports and Images under the Patient Search option. 1. Searching for Patient 2. Filtering for Claims 7 Searching for Patient There are four fields of data that can be used to search for a specific patient. Only two are required. Case Number o This is a MobilexUSA case number (aka: Claim Number or Accession Number) Last Name, First Name (This is treated as one field) o The entire last name is required o Only the first letter of the first name is required. DOB SSN (Last 4 digits) The last four digits of the patients social security number. After entering the search criteria, click Patient Search, any matches to the patient search will display as shown below Filtering for Claim Although the top section of the screen differs from the View Cases Tab, the selection list and its functionality remain the same. Navigating the Selection List The selection list is located below the search fields and is only visible after a search is performed. 8 There are eight columns on the selection list. Clicking on the column header will sort the column in ascending order, clicking again will sort the column in descending order. Case # -Displays the unique MobilexUSA claim ID. DOS -Date of Service of the current listed case number. Patient Name – Patient’s name of the current listed case number. Facility – Full name of Facility for current patient. DOB – Patient’s date of birth. Report Status o Preliminary Report – Initial diagnostic impression. o Final Report - Detailed diagnostic signed report. Img – The presence of one of the following icons indicates there are images available to be viewed. NOTE: This is an optional feature; please contact your MobilexUSA Sales Representative for more information. - This icon indicates viewer is activated. See Viewing Images with the ULite Viewer for instruction on how to use the image viewer. Exam – List of exams completed at time of study. Reports Diagnostic reports can be viewed and printed; Adobe Reader is required to perform this task. Most computer systems have Adobe installed, attempting to open a report without Adobe will not harm you computer, however you will get an error message that it needs to be installed. Adobe can be downloaded and installed free of charge at http://get.adobe.com/reader/ Viewing Reports System Requirements 9 Same as System requirements for the Radiology Application Adobe Reader must be installed. Click on the Case Number to display the report. The Preliminary or Final report will open using and Adobe PDF reader. Printing Reports To print the report; click the print button, usually located at the top left side of the PDF Reader screen. Example of Preliminary and Final Reports Preliminary Report Final Report 10 Viewing Images with the ULite Viewer After a patient’s profile has been found and opened in the View Cases screen, a user has the option to view and manipulate the actual exam images. This is done by clicking once on the Image Viewer Icon. Clicking the Image Viewer Icon will launch the viewer program. MobilexUSA ULite Image Viewer The Image Viewer has three sections; the full image section on the right, the tools section across the top and the image thumbnail section on the left. The Image Viewer allows the user to: Magnify and Zoom Flip and Rotate Easily cycle through multiple images Display Patient Information Adjust the Contrast and Brightness Flip and Rotate the Images Using the Magnifying Glass - Use this icon to activate and start using the Magnifying Glass. It’s located in the Tools Section running across the top of the image and circled in the image below. Once 11 the magnifying glass is activated, move the mouse to pan the magnifying glass over the image. This will zoom the selected section of the image to be a larger size. Image Adjustment Tools Use this icon to activate the Rotation tool, launched from Tools Section running across the top of the image. The Image Viewer allows the user to flip the image both vertically and horizontally, rotate the image left and right as well as image invert. 12 Flip and Rotate Clicking either of these buttons will flip the image either vertically or horizontally. Clicking either of these two buttons will rotate the image either to the left or to the right 90° at a time. Clicking the below will invert the image or show it 180 degrees rotated from its current view. Normal Image Inverted Image Patient Information Overlay Clicking this button will display the patient information within the corners of the image which includes Patient Name, Date of Service, Facility Name and more. No Patient Overlay With Patient Overlay \ 13 Selecting Different Images To cycle through multiple images within the viewer, use either your mouse’s scroll wheel or the selection bar on the right hand side. At the far bottom-right of the screen, you can view the total number of images and which is currently being viewed. In the example below you can see the claim has 3 images and currently viewing image two of three ( 2 / 3) Exiting the ULite Viewer Once a user has completed the viewing of an image, you may close the viewer and return back to the search screen. Close the ULite image viewer tab of your internet browser and the system will return back to the MobilexUSA MXLive webpage were you may log out completely or search for another patient or exam. 14 Online Order Entry Note: It is best to press the TAB key to cycle through the input fields. Required fields are identified with a red asterix ( * ) MobileUSA Online Order Entry Screen. Date of Service The date of service is defaulted to the current date. If a different date is desired, click the calendar to display and select another date of service. Priority Select Priority of Claim from the dropdown list. o Normal o Stat 15 MobilexUSA Patient ID This is the MobilexUSA MRN, it can be found on prior Mobilex diagnostic reports. However, it can be searched. Search for a patient prior to manually adding a new patient Searching for a Patient Click SEARCH to Search Start your patient search Enter known information about the patient o Last Name and DOB is the recommended search, a list of patients that match your search criteria will display Select the patient by Clicking on the Mobilex Patient ID Adding a Patient Click Add Patient to manually enter a patient o Fields with the *asterix are mandatory. Add the patient demographic information and insurance information. Click Submit 16 The Patient Information Screen will display o Review and edit where appropriate and click Submit Wing/Unit Select a Wing / Unit from the drop down o Each wing/unit has an associated fax number, selecting the correct unit will ensure the final report is faxed back to the appropriate unit. Room Enter the room number of the patient. If there is no Room enter the location of the patient Example: Medical or Infirmary 17 Medical Record Number This is the MRN of the facility. This is not Mobilex’s patient ID. This is often used for Inmate #’s or Nursing Facility MRN. Entering Exam/s Exam Enter the exam by clicking the EXAM on the column header This will launch the exam lookup function. Select the desired exam To refine your search, enter text in the Exam Desc and click Refine. Procedure Follow the same steps above for the the Procedure code for each exam ordered. When you click on the PROC header, the system is designed only to display the procedures allowed for the specific exam selected in the prior step. 18 Laterality (LT / RT) If required you will need to specify right or left. If the LT/RT modifier is not required, “NA” will default in the laterality field. Follow Up Select whether or not the exam is a follow up Yes or No. ICD’s (Diagnosis Codes) Select the Diagnosis by clicking on the ICD buttons. By clicking on the ICD buttons you will get the ICD Code search function. Make your selection by clicking on the ID. The system is designed to display ICD’s that are related to the exam selected. 19 Reason for Exam Enter the reason the exam o The reason for the exam can be different than the ICD description o The ICD could be “COUGH” while the Reason for Exam is Rule out CHF Exam Comments This is not a required field but is used to denote an special information related to the specific exam o Example – If a chest is ordered and appropriate comment would be (Patient has pacemaker) Hospice Flag In an earlier step it was identified if the patient is currently on Hospice. This field is to identify if the exam being performed is related to the patient’s current hospice diagnosis. 20 Entering the Ordering Practitioner Although the field is labeled Ordering Doctor, this field is used to select the person that is ordering the exam. In some instances this could be a Nurse Practitioner or a Physician Assistant. Searching Click on Search to find the ordering doctor. Enter the doctor’s last name and first name then click search. This will give you a list of doctors based on your search criteria. o Last and First Name are the best way to search for doctors in the database. o Partial Names may also be used. If the ordering doctor appears select by clicking on the Doc No. shaded in Blue. This will populate the ordering doctor field with the doctor you selected PECOS Warning o If the ordering Physician is not enrolled in PECOS the following message will appear. If the ordering physician is correct click Yes, Click No to return to the doctor search screen. 21 Adding a Doctor If the ordering doctor is not found a doctor may be manually added to the system. Click Add Doctor. Enter the required information o First Name, Last Name, Telephone o Enter the address if available o o Click Submit Special Instructions This field is a free text field used to add any notes or comments regarding the visit. o Example: (Example: patient is out of building until (time) or the patient needs to be medicated 30 minutes prior to exam.) Reason for Portable Exam Please select the condition of patient that indicates why a portable xray is required. 22 If Other is selected, enter text in the field below. Click Submit. Compliance The Compliance Screen will launch. Answer the compliance question and enter your first name, last name and title and click Submit to finalize the order and display the claim number 23 Billing The billing portal enables the MobilexUSA Clients gain access to review activity reports, provide insurance type information and view & print Mobilex invoices. You will be notified by email when your activity report is available. The email will contain a link that will bring you to the MobilexUSA MXLive login page. After you have successfully logged in, click the Billing Tab to launch the billing application. 24 Activity Reports If more than one Activity Report available, user will be prompted to select from an active Activity Report If only one invoice is available, the user will be brought into the open invoice. 25 Insurance Type Entry Click the drop down box to display a list of possible insurance types. o The drop down list only displays the code. Select a code from the dropdown list. After a code is selected, the drop down list will close. Repeat these steps for each patient on the Activity Report Click Submit, when completed. You can save your progress at any time by clicking Submit o The activity report will close after all the patient insurance types are entered. To display a list of insurance code descriptions click the “Click Here” link directly above the Insurance Type column. o This page can be printed for later use. Click the Back button on you internet browser to return to the Activity Report page. 26 Per Diem Entry If the activity report displays the Per Diem entry under the activity report, please provide the total days for the current invoice month in the association per diem category. 27 Print and Fax Activity Report The system also allows the user to print the activity report, manually enter the data, and fax the report back to the MobilexUSA billing center. Click the Click here for a PDF version of the Report. You will be prompted to download the PDF File Click Open to open the PDF File Your system will open the file in your PDF viewer 28 Print to your local printer Fill out the insurance type for each patient listed Fill out the per diem days if applicable Fax completed form to the fax number listed in the top section of the Activity Report. Invoices Available invoices can be found under the Downloads tab Other Tools Help To display / print the newest version of the MobilexUSA On-Line System user manual, click the HELP option on the main menu. Adobe PDF viewer is required to display the document. Logoff To logoff off of the MobilexUSA On-Line system, lick the LOGOFF option on the main menu. 29 User Management To edit your user settings, click on the User Management option on the main menu. This will open the User Management Screen. 30