1
LetUgo v4.4.0
User’s Manual v2.8
2012. March
Table of Contents
1. Introduction ................................................................................................................................... 3
2. Installation..................................................................................................................................... 4
3. Main Screen of the LetUgo ......................................................................................................... 11
4. Menu Items ................................................................................................................................. 13
4.1 Lanes..................................................................................................................................... 13
4.1.1 Steps of the Entry Process ............................................................................................. 17
4.1.2 Manual Lead out with Plate Matching............................................................................. 19
4.2 Permissions........................................................................................................................... 23
4.2.1 New Permission.............................................................................................................. 25
4.3 Reports.................................................................................................................................. 26
4.3.1 Events............................................................................................................................. 26
4.3.2 Parking............................................................................................................................ 28
4.4 Settings ................................................................................................................................. 31
4.4.1 Users .............................................................................................................................. 32
4.4.2 Blacklist........................................................................................................................... 33
4.4.3 Cameras ......................................................................................................................... 35
4.4.4 System............................................................................................................................ 37
4.4.5 License key..................................................................................................................... 38
4.4.6 System log ...................................................................................................................... 39
4.4.7 Parking Fee .................................................................................................................... 40
4.5 Exit ........................................................................................................................................ 41
2 / 41
1. Introduction
LetUgo is an automated entry and exit control software product. During the development of the
application the main emphasis was put on quick and simple setup and manageability of the
application. The LetUgo program provides the following features:
creating complex entry rules (permission and prohibition),
recording and storing entry and exit events (image, license plate number, time and
location),
to retrieve subsequently, list and export events,
determining the time spent in the parking facility and the payable parking fee,
setting the access privileges,
opening gates and barriers manually.
The main purpose was to create an entry system that is built up of as few components as possible
but still provides an easy to use, completely automated and fast management of vehicles.
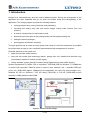
Essential elements of the system are:
digital license plate reader camera;
entry and exit control gate technology (barrier, garage door etc.) installed with inductive loop
(requirement: capable of sending contact signal);
LetUgo software system (with the Carmen Parking Digital license plate reader engine);
System requirements: P4 2GHz CPU or equivalent, 1GB RAM (2GB for Windows 7), 100Mbit/sec
or better LAN connection, Ethernet switch in case of more cameras, min. 1 available USB port
(v2.0), min. 30GB HDD (approx. 30Mbytes for the application, the rest is for storing images, etc.),
Windows XP SP3 or Windows 7 OS, HD ready (1366x768) or Full HD (1920x1080) screen
resolution, 64MB dedicated video RAM.
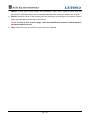
Figure 1: structure of the LetUgo
3 / 41
2. Installation
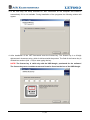
1. The install program starts automatically after inserting the disc into the optical drive. The
following window will appear:
If the AutoRun is disabled, navigate to the CD-ROM drive and double-click on
“CD\\INSTALL\LetUgo_Setup.exe”.
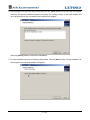
2. In the next window the END-USER LICENSE AGREEMENT must be read. Select I accept the
agreement (I agree to the terms of this Agreement) to accept the agreement and then click the
[Next] button to continue the installation process!
4 / 41
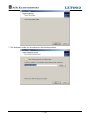
3. In the next step, the setup searches for .NET framework on the computer and installs it
automatically if it is not available. During installation of the programs the following window will
appear.
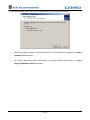
4. After installation of the .NET framework enter the license key. The license key is a 26-digit
alphanumeric character string, which is delivered with the product. The field of the license key is
divided into sections (6x4 + 1x2) to ease typing the key.
NOTE! The license key is valid only with the USB dongle, purchased for the software!
The license key never contains zeroes and it can be found on the box of the USB dongle.
5 / 41
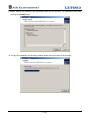
5. After typing the 26 character long license key click the [Next] button! As a next step the installer
searches for already installed programs necessary for running LetUgo. In the next window the
list of programs that are not installed (but required) will appear.
Click the [Cancel] button to cancel the installation.
6. To start installation process of missing components, click the [Next] button. During installation of
the programs the following window will appear.
6 / 41
7. The destination folder can be selected in the following window.
7 / 41
8. In the next window some tasks can be selected to be performed after installation.
The setup program creates a LetUgo shortcut icon on the desktop by checking the Create
a desktop icon checkbox.
The LetUgo application starts automatically at Windows startup by checking the Start
LetUgo at Windows startup checkbox.
8 / 41
9. Before starting the installation the destination folder can be checked. The installation starts after
clicking the [Install] button.
10. During the installation the following window shows the current step of the process:
9 / 41
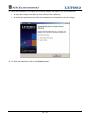
11. When the installation is complete the following window will appear. Use the checkboxes
to open the LetUgo User Manual (View LetUgo User’s Manual);
to launch the application right after the installation has completed (Launch LetUgo).
12. To finish the installation click on the [Finish] button!
10 / 41
3. Main Screen of the LetUgo
After the application is started, the following main screen with the login window is displayed:
Enter the username and the password then click on the [OK] button to enter the program. The
application can be closed by clicking the [EXIT] button.
NOTE! At the first login use admin login name and password to start using the program with
administrator privileges. Change the password after the installation! For more information on
changing the password see the 4.4.1 Users menu item.
The resolution of the application depends on the parameters of the used computer. The application
will operate in a Full HD (1920x1080) resolution if it is possible. If the available screen resolution is
less than Full HD, the application will operate in HD ready (1366x768) resolution.
11 / 41
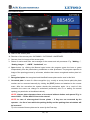
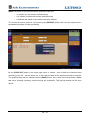
If a camera is already added to the system, the Lanes menu will appear automatically after login. If
not, the Settings/Cameras submenu will appear with a warning massage (see below).
12 / 41
4. Menu Items
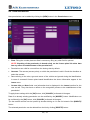
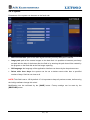
4.1 Lanes
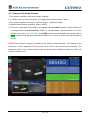
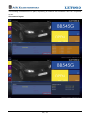
By clicking the [Lanes] button in the left side, the following window will appear:
NOTE! The layout of the screen depends on the number of used cameras (4, 2 or 1 used
camera(s)).
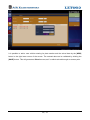
The color of the Lane menu indicates the current event. This button can be seen at all menus, so
the operator can identify the following events:
- if the button is GREEN, a “Drive in” event is in progress (After a few seconds, it turns to the
standard color),
- if the button is YELLOW or RED, the application is waiting for user intervention (On user
intervention, it turns to the standard color).
In case of multiple camera usage the live image of the cameras can be seen parallel on the
minified screens. These screens include the recognized plate text and an [OPEN] button signaling
the type of the current event with its color:
- Green: AUTHORIZED
- Yellow: UNAUTHORIZED
- Red: ACCESS DENIED
One of the minified screens is always active (marked with its altered frame color). A screen can be
activated by simply clicking on it.
13 / 41
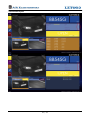
The following screen layouts can be seen depending on the number of the used cameras.
Four-camera layout:
Two-camera layout:
The color of the [OPEN] button at the main- and the minified screens turns to purple in case of no
motion.
14 / 41
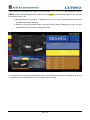
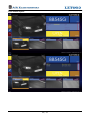
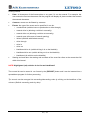
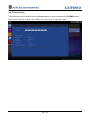
One-camera layout:
1a. Name of the access point.
1b. Direction of the access point: INCOMING / OUTGOING / UNDEFINED.
2. Camera view: live image of the access point.
3. Status of entries and exits: text message of the access and exit processes. E.g. “Waiting…”,
“Getting images…”, “ANPR”, “Authorized”, etc.
4. Open button: by clicking the Manual open button the program opens the bars or gates
independently from the permissions, prohibitions or other processes. The program captures an
image of the opening process by all means, whether there was a recognized number plate in it
or not.
5. Recognized plate: the recognized and identified license plate can be seen in this field.
6. Corrected plate: in case of a false recognition (e.g.: muddy or snowy license plate) the plate
number can be corrected manually by clicking the [EDIT] button and attached to the current
event. After the correction the system checks the permission again. As a result of this
correction the event can change to authorized (automatic) drive in or waiting for manual
opening (no permission or blacklisted vehicle).
NOTE! License plate characters have to be entered without dashes and spaces! E.g. in
case of ABC – 123 the ABC123 has to be entered.
NOTE! In case of misrecognized license plates – if they are not corrected by the
operator – the list of cars within the parking facility and the parking time calculation will
be incorrect!
Tip: the corrected license plate can be saved by the Enter key.
15 / 41
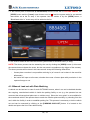
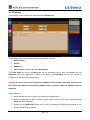
7. Details: in this part of the screen the permission, type, color, owner’s name and the
permission’s expiration date of the successfully identified and authorized vehicle can be seen.
8. Events: previous events of the access point are listed here (according to the vehicles’ license
plate, the exact date and the type of the event).
NOTE! In case of four camera usage, click the Details/Event button to switch between
the Details and Event lists.
9. Help: Click this button or press F1 to open the User’s Manual.
16 / 41
4.1.1 Steps of the Entry Process
1. The system is waiting for an event. Status: „Waiting”
2. A vehicle arrives to the access point. The trigger status indicator turns to green.
3. The camera captures an image of a vehicle. Status: „Capturing images”
4. Applying license plate recognition. Status: „ANPR”.
5. If there is no permission according to the settings in 4.4.3 Cameras section, OR the vehicle has
a valid permission (4.2 Permissions) (AND it is not blacklisted), then the status of the drive
through event will be AUTHORIZED, the [OPEN] button and the [Lanes] menu button will be
green and the barrier will open automatically. Moreover, a “Drive in” event entry will be added to
the list.
NOTE! Only the barrier opening is affected by the settings of the permission. The analysis of the
permission is done regardless of this process. Green will be only vehicles with permission. The
permission check of the camera controls only the barrier status: whether it opens for “Red” and
“Yellow” vehicles or not.
17 / 41
If the vehicle has no permission, then the event will be UNAUTHORIZED, the background of the
[OPEN] button and the [Lanes] menu button turns to yellow and the system waits for an external
intervention that can be:
a. Manual opening: in this case, a “Manual drive in” event will be generated and the system
considers the vehicle entering.
b. Reversing from (loop signal stops): the event will be saved ("Backing up" type), but the
system does not consider the vehicle entering.
6. Correction of the recognized license plate: if the corrected license plate is authorized (it is on the
permissions list), the procedure in the 5th point is the next step.
18 / 41
7. If the license plate is blacklisted (4.4.2 Blacklist) then the event will be ACCESS DENIED, the
[OPEN] button and the [Lanes] menu button turns to red and the system waits for an external
intervention as at the 5th step. If the operator lets the vehicle in by the [OPEN] button, a
“Blacklisted drive in” event entry will be added to the list.
8. The event is added to the event list and the system waits for a further event (1st step).
NOTE! The above process can be started by the user by clicking the [OPEN] button (in this case,
the camera does not detect the event, but the user starts it regardless to the trigger of the camera).
The above process will be done in this case as well except the following differences:
-
license plate correction is not possible at driving in (of course it can be done in the result list
afterwards)
-
the barrier will open at all means, whether there was a license plate with permission in the
captured image or not.
4.1.2 Manual Lead out with Plate Matching
A vehicle can be lead out in case of such OUTGOING events, when it can not be decided whether
the outgoing, unauthorized vehicle is inside the parking facility or not (e.g. the operator has not
corrected the misrecognized plate text on vehicle entry). Since the ‘entry plate’ is not available for
the mentioned vehicle, the operator has to match the number plate manually, by choosing from the
cars’ within the facility in order to establish parking fee. This process is necessary to let the vehicle
out and can be executed by clicking on the [PARKING CAR LIST] button. It is located at the
details and opens the list of cars within facility.
19 / 41
The following screenshots are in pairs, depending on whether the PARKING CAR LIST is opened,
or not:
One-camera layout:
20 / 41
Two-camera layout:
21 / 41
Four-camera layout:
22 / 41
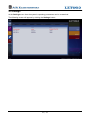
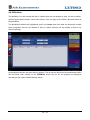
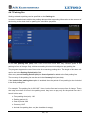
4.2 Permissions
The entry and exit is granted for authorized vehicles only. Permissions are assigned to license
plates (with exact matching). The system allows entry and exit of the successfully identified
vehicles with valid permission automatically and also creates a log of entry/exit events.
By clicking on the [Permissions] button on the left side, the following screen will appear:
Permissions can be seen in the appearing list.
Steps of filtering:
-
select the field you want to filter (by checking the checkboxes before the Plate, Owner,
From and To)
-
enter the characters to filter for and/or set the time interval
-
clicking on the [SEARCH] button, the list will be updated and displayed according to the
newly entered filtering options
Filter criteria:
Plate number: all characters of the license plate or any part of it can be entered. For
example: if the user enters only the first two characters, the program will display all plate
numbers that contain the entered characters.
Owner: the full name or any part (characters) of it can be entered as in case of the previous
filtering option.
23 / 41
Starting and end date (From - To): by the drop-down calendar the issuing and the expiration
date of the permission can be specified as filtering criteria. In this case the program will
display all permissions that fall within the specified interval (e.g. owner AB has a one year
permission from 01-Jan-2009 to 31-Dec-2009, owner MN has a permission from 15-Mar2009 to 14-Apr-2009 and owner XY has a one day permission from 01-Dec-2009 to 02-Dec2009. If the starting date is set to 01-Jan-2009, all three permissions will be displayed. If the
end date is set to 30-Sep-09, only permissions of the AB and MN owners will be displayed. If
both dates are set (from 01-Apr-2009 to 01-Dec-2009), all three permissions will be displayed
because the specified interval is covering all three expiration dates).
The current list can be saved in .csv format with the [EXPORT] button and it can be inserted into a
spreadsheet program for further processing. After clicking [EXPORT], both events of a specified
period and all events can be exported.
NOTE! The header and the records are exported into separate files in this way providing flexible
processing possibilities for users. Note, that event lists containing more than 2500 records are
exported in more data files (max. 2500 lines/file).
Tip: it can be arranged into ascending/descending order by clicking on the headlines of the column
(permissions are listed in alphabetical order according to the number plate by default).
24 / 41
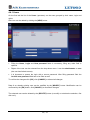
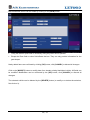
4.2.1 New Permission
New permissions can be added by clicking the [NEW] button in the Permissions menu.
Plate: Filling the number plate text field is necessary; filling any other field is optional.
NOTE! Checking of the permission is based solely on the license plate! No other data
has any effect on establishment of the permissions!
Permissions are valid for a month from the issuing date by default.
Cameras: The camera (access point), on which the permission is valid. Check the checkbox to
select the camera.
Data referring to the color, type and owner of the vehicle are ignored during the identification.
In case of successful license plate based identification the above information appear in the
Lanes menu.
Contact info and Note fields: text information that is displayed in the Lanes interface for the
user as well. They also have no effect on the recognition process or the establishment of the
permission!
To apply these settings click the [OK] button; click [CANCEL] to discard all changes.
Data of an already existing permission can be modified by the [MODIFY] button. Modification can
be confirmed by the [OK] button; click [CANCEL] to discard all changes.
Tip: the modifier window can be opened by double-clicking on it in the list instead of the [MODIFY]
button.
The selected permission can be deleted from the list by clicking [DELETE] button.
25 / 41
NOTE! All the existing permissions will be applied to the newly added camera!
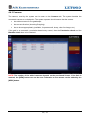
4.3 Reports
The system registers and stores every event. The list of these events can be viewed in the reports
menu and can be used for various user purposes (e.g. determining if a car is within the facility).
By clicking [Events] button on the left side of the window the following screen will appear:
4.3.1 Events
By clicking the Event tab, the entry/exit events of the last 24 hours can be seen in the appearing
list by default. These events can be filtered for cameras checked in the Cameras tab, moreover, if
the SHOW DELETED CAMERAS checkbox is checked, events of former, already deleted cameras
can be listed.
Steps of filtering:
-
select the field you want to filter (by checking the checkboxes)
-
enter the characters to filter for and/or set the time interval
-
click on the [SEARCH] button the list will be updated and displayed according to the newly
entered filtering options
26 / 41
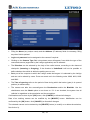
Filtering criteria:
Plate: all characters of the license plate or any part if it can be entered. For example: the
user enters the first two characters and the program will display all plate numbers that contain
the entered characters.
Cameras: events can be filtered by cameras.
Events: the type of the event can be specified. It can be:
o
unauthorized (vehicles have no permission to drive through)
o
manual drive in (allowing a vehicle in manually)
o
manual drive out (allowing a vehicle out manually)
o
manual open (all events of manual opening)
o
limited (vehicles with limited access)
o
drive through
o
drive in
o
drive out
o
blacklisted drive in (vehicle driving in is on the blacklist)
o
blacklisted drive out (vehicle driving out is on the blacklist)
o
blacklisted (all vehicles on the blacklist)
Starting and end date: the starting and end date of the event list refers to the events that fall
within this interval.
NOTE! Highlighted (red) vehicles in the list are blacklisted!
The current list can be saved in .csv format by the [EXPORT] button and it can be inserted into a
spreadsheet program for further processing.
Tip: records can be arranged into ascending/descending order by clicking on the headlines of the
columns (Default: ascending order by date).
27 / 41
4.3.2 Parking
The following screen will appear after clicking the Parking tab:
The following data of the arrived vehicles can be seen in the list:
Plate number,
Arrival,
Departure,
Time spent in and the calculated Parking fee.
The Time spent in and the Parking fee can be calculated only if both the Arrival and the
Departure has been registered. If there is no data in the Departure column, the vehicle is
considered to be within the parking facility.
NOTE! If in case of a Drive out event, the recognition of the number plate was incorrect and
the vehicle was allowed out manually (without plate correction), then the database may be
incorrect!
Steps of filtering:
1. select the field you want to filter (by checking the checkboxes)
2. enter the characters to filter for and/or select status and/or set the time interval (Default:
From and To is selected)
3. clicking on the [SEARCH] button the list will be updated and displayed according to the
newly entered filtering options
28 / 41
Status: the status of the vehicles can be specified in this field.
o
in (vehicle is in the access controlled area)
o
out (vehicle is outside the access controlled area)
o
undefined (the status of the vehicle cannot be defined)
The current list can be saved in .csv format by the [EXPORT] button and it can be inserted into a
spreadsheet program for later processing.
By the [LEAD OUT] button in the lower right corner, a vehicle – that is within the controlled area
according to the list – can be driven out. In this case the date of the departure should be entered.
The specified date can be validated by the [SAVE] button. As a result, this will generate a Drive
out event, imitating a passing vehicle through the checkpoint. This pop-up window can be seen
above.
29 / 41
It is possible to add a new vehicle entering its plate number and the arrival date by the [NEW]
button in the right lower corner of the screen. The entered data can be validated by clicking the
[SAVE] button. This will generate a Drive in event, as if a vehicle arrived through an access point.
30 / 41
4.4 Settings
At the Settings menu item the system's operating parameters can be customized.
The following screen will appear by clicking the Settings button:
31 / 41
4.4.1 Users
On the first tab the list of the Users (operators) can be seen grouped by their name, login and
rights.
New user can be added by clicking the [NEW] button.
Filling the Name, Login and New password fields is necessary; filling any other field is
optional.
Rights of the user can be selected from the drop-down menu. It can be administrator or user
(the user has limited access).
It is important to protect the login with a secure password. After filling password field the
Confirm new password field has to be filled as well.
To confirm the changes click [OK]; click [CANCEL] to discard all changes.
Data of an already existing user can be modified by the [MODIFY] button. Modification can be
confirmed by the [OK] button; click [CANCEL] to discard all changes.
The selected user can be deleted by the [DELETE] button (to modify or to delete the selection, first
click on it).
32 / 41
4.4.2 Blacklist
The blacklist is on the second tab (list of vehicles that are not allowed to enter for some reason),
grouped by the plate number, name of the owner, color end type of the vehicle, date and reason of
the prohibition.
The blacklisted vehicles are highlighted (red) in the Lanes menu item after the automatic number
plate recognition and are not allowed to drive in (these vehicles can be allowed to drive in by
manual opening).
All blacklisted vehicles are listed here by default. The list can be filtered by the checkboxes before
the text fields; then clicking on the [SEARCH] button the list will be updated and displayed
according to the newly entered filtering criteria.
33 / 41
New blacklisted vehicle can be added by clicking on the [NEW] button.
Filling the Number plate field is necessary; filling any other field is optional.
Except the Plate field no other field affects the ban. They can only provide information for the
gate-keeper.
Newly added items are confirmed by clicking [OK] button; click [CANCEL] to discard all changes.
Click on the [MODIFY] button to modify data of an already existing blacklisted vehicle. All fields can
be modified. Modification can be confirmed by the [OK] button; click [CANCEL] to discard all
changes.
The selected vehicle can be deleted by the [DELETE] button (to modify or to delete the selection,
first click on it).
34 / 41
4.4.3 Cameras
The camera, used by the system can be seen on the Cameras tab. The system handles the
connected camera as a checkpoint. The system operator should ensure that the camera
has obvious name for the gatekeeper
has correct direction (Incoming/Outgoing)
has to be set appropriately (available, it operates well, sharp, clear live image, etc.)
If the goal is an automatic, permission-based entry control, then the Permission check and the
Blacklist check have to be checked.
NOTE! The number of the added cameras depends on the purchased license. If the limit is
reached, the [NEW] button can not be seen. Otherwise a new camera can be added by the
[NEW] button.
35 / 41
Filling the Name (any unique name) and the Address (IP address) fields is necessary; filling
any other field is optional.
Login and password can be assigned to the camera if required.
Clicking on the Camera Type field a drop-down menu will appear, from which the type of the
connected camera (supported by the LetUgo application) can be selected.
The Direction can be selected by the help of the radio buttons, according to the observed
checkpoint (Incoming or Outgoing). If the direction is Undefined it will not be possible to
define whether the vehicle is within the parking zone or not.
Port: port of the computer to which the LetUgo sends the images. It is selected by the LetUgo
and can not be altered by users. Ports are sorted out in the following order: 8080, 8081, 8082
and 8083.
The Time of opening refers to the period of time during which the barrier (gate) is in opened
position (in milliseconds).
The camera can take into account/ignore the Permissions and/or the Blacklist. Use the
checkboxes near the Check option to turn them on. If it is not checked, the system lets all
vehicles in regardless to the permission and the recognition.
Confirmation can be done by the [OK] button; click [CANCEL] to discard all changes.
Data of an existing camera can be modified by the [MODIFY] button. Modification can be
confirmed by the [OK] button; click [CANCEL] to discard all changes.
The selected camera can be deleted by the [DELETE] button (to modify or to delete the selection,
first click on it).
36 / 41
4.4.4 System
Parameters of the system can be seen on the fourth tab.
Path of sound files: path of the alarm signal sounding on entry attempts of vehicles.
Image path: path of the camera images on the hard disk. It is possible to browse a previously
set path with the help of the button after the field or by entering the path that will be created by
the program on the hard disk at the first image capturing.
GUI language: the language of the application interface can be set by the drop-down menu.
Delete older than…days: the system can be set to delete events older than a specified
number of days. Set 0 to not clear at all.
NOTE! This field is set to 180 by default. If it is important to keep all previous events, before using
the LetUgo software change this value!
Modification can be confirmed by the [SAVE] button. Factory settings can be reset by the
[RESTORE] button.
37 / 41
4.4.5 License key
The license key can be entered on the License key tab. It can be stored by the [STORE] button.
Data on the screen is related to the validity of the license (e.g.: expiration date).
38 / 41
4.4.6 System log
Log entries of the events and user operations are logged by the application and can be viewed by
clicking the System log tab. The list of the log entries can be filtered according to the entry type by
the checkboxes above the list.
39 / 41
4.4.7 Parking Fee
Settings related to parking can be specified on the Parking tab.
In case of unauthorized vehicles the parking data provides supporting information at the moment of
the leaving to the desk clerk for parking fee calculation purposes.
In the Free parking time (min) field it can be set how much time may vehicles spend in the
parking lot free of charge. Only vehicles exceeding this time limit obliged to pay parking fee.
The program supports the use of time units for measuring parking time. The length of this time unit
can be set in the Parking Period (min) field.
After every started Parking Period (min) the Cost of period is added to the final parking fee.
The currency of the parking fee can be set in the Currency field (text data).
If the Include free parking time option is enabled, then the period of free parking is also included
in the final parking fee.
For example: The parking fee is 200 HUF / hour, but the first two hours are free of charge. Those
who stay more than 2 hours in the parking zone, they have to pay only for the period over the 2
hours! In this case:
Free parking time (min): 120
Parking period: 60
Cost of period: 200
Currency: HUF
Include free parking time: no (the checkbox is empty)
40 / 41
4.5 Exit
By clicking on the [EXIT] button on the left side, the following window appears for logging off or
quitting the program.
NOTE! While a user is logged off (by clicking LOG OFF or pressing F10), LetUgo is still running in
the background. The user can return to LetUgo by Logging in again.
41 / 41


![[Scan] button on the ScanSnap.](http://vs1.manualzilla.com/store/data/005658366_1-513fc66afaf683e0c3b25d8948918383-150x150.png)