1
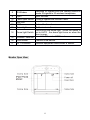
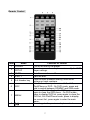
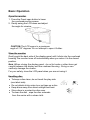
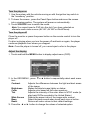
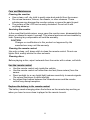
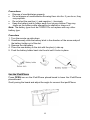
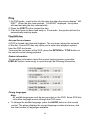
ROOF MONITOR INSTRUCTION MANUALS Contents Safety Information.................................................................................... 2-3 DVD Player Features....................................................................................4 DVD Video Features..................................................................................4 Controls........................................................................................................5 Monitor Stowed View...............................................................……….....5-6 Monitor Open View.....................................................................……….....6 Remote Control....................................................................... ……….....7-8 Basic Operation........................................................................... ……….....9 Open the monitor....................................................................... ……….....9 Stow the monitor........................................................................ ……….....9 Handling disc..............................................................................................9 Turn the player on...................................................................................... 10 Turn the player off...................................................................... …..…...... 10 Adjust the display....................................................................... …..…...... 10 Care and Maintenance................................................................... ...........11 Use the remote control................................................................... ...........11 Replace the battery in the remote control.................................. ……….....12 Use the iPod/iPhone.................................................................. ……….....12 Play...............................................................................................................13 Play DVD disc....................................................................... ……….....13-14 Play Audio CD disc..................................................................... ……….....15 Play MP3 disc.............................................................................……….....16 Play USB device and SD/MMC card..........................................……….....16 Play iPod/iPhone...................................................................……….....17-19 Installation and Wiring................................................................ …........….20 What's in the box........................................................................………… 20 Mounting and Wiring Precautions.............................................. ……….....21 Installation procedure.................................................................……….....21 Wiring diagram........................................................................... ……….....22 System Setup..........................................................................…........….23-24 Troubleshooting...............................................................................……….25 Specifications.............................................................................. …........….26 Legal notice.................................................................................. ....……….26 . . . . 1 Safety Information Thank you for buying the Roof Mount LCD Monitor with DVD player. Please read this manual carefully before using the player in order to get the most out of all the features and functions. Keep this manual in a safe place, as it can be a valuable tool in helping you to understand all the features and functions. Do not operate the unit in any way other than described within this manual. Failure to follow the instructions within the manual will invalidate your warranty. SAFETY FIRST! Do not install the display where it may (i) obstruct the driver’s vision, (ii) impair the performance of any of the vehicle’s operating systems or safety features, including airbags, or (iii) impair the driver’s ability to safely operate the vehicle. When using the system, make sure you are firmly secured by your seat belt to ensure you do not accidentally hit your head on the screen during sudden braking or other incidents. If you are ever in an accident, injuries can be more severe if the seat belt is not properly buckled. Do not attempt to install or service your display by yourself. Installation or servicing of the display by persons without training and experience in electronic equipment and automotive accessories may be dangerous and could expose you to the risk of electric shock or other hazards. Be careful not to drain the car battery while using the unit with the car engine stopped. To avoid draining the battery, it is suggested that the vehicle engine always is running while using the unit. Do not disassemble or alter the unit in any way. Failure to do so can cause damage to the unit and invalid the warranty. Never clean the surface of the screen with chemical solvent or corrosive detergent, which may cause permanent damage to the TFT LCD screen. Avoid installing the unit wherever is under direct sunlight or near hot air vent. Please note that the normal working temperature of the unit is between -5℃ to +50℃. If the internal temperature of the vehicle is extremely high, a short cooling down period is necessary before operating the unit. If the temperature inside the car is very low and the monitor is used soon after switching on the heater, moisture may form on the panel of the unit. Turn off the unit immediately! Failure to do so may cause the internal components to short. Allow the unit to rest for about one hour to allow the condensation to disappear before continue operation. In extremely cold temperatures, the movement of the picture may be slow and the picture may be dark. It is not a malfunction. The unit will work normally once it reaches its operating temperature. Do not drop or hit the LCD panel with a hard object, as it may cause 2 permanent damage to the LCD panel. Should LCD panel break, avoid touching glass and fluid. If do, please clean it with plenty of water and ask for medical attention immediately. Due to different car specifications, please kindly ensue that the display monitor is properly located and not obstructing the air-conditioning vent. Avoid inserting any foreign objects into the slot of the disc Player. Failure to observe this may cause malfunction due to the precise mechanism of this unit. Protect your disc. When you leave the car, be sure to eject the disc from this unit and store it separately away from direct sun light. Heat and humidity may damage the disc and you may not be able to play it again. Use the supplied screws to fix the monitor Metal Mounting Plate. 3 DVD Player Features This player is a Roof Mount 10.2" TFT-LCD Color Display with DVD player that can be used as a stand-alone display, or can be integrated into a mobile multimedia system. This player has the following features: 10.2" TFT-LCD color monitor(16:9) Roof Mounting Application Pixel(dots):1152 x 234 Wide Viewing angle(up/down/left/right):45/65/65/65 NTSC and PAL Compatible Adjustable Contrast / Brightness / Color / Tint Manual Viewing Angle Adjustment Vertical Angle Adjustable: up/down<120° White LED Dome Light Automotive Startup Protection Built-in IR Transmitter IR Remote Control On Screen Display 2xAV Input 1xAV Output Slot-in DVD mechanism Support SD/MMC card and USB Made for iPod / iPhone Note: Made for : iPod touch (4th generation), iPod touch (3rd generation), iPod classic, iPod nano (6th generation), iPod nano (5th generation), iPod nano (3rd generation), iPhone 4S, iPhone 4, iPhone 3GS. Capability to read : DVD Format/DVD-ROM/DVD±R/DVD±RW/CD-DA/CDRW/CD-R/CD-ROM(XA)/MP3/WMA/VCD/SVCD/JPEG/MPEG4 . Note:Multi-session CDs and 320kbps WMA files can't be played. DVD Video Features DVD drive that supports the following formats: DVDs(12cm), video CDs(12cm), audio CDs(12cm), MP3 CDs(12cm) • Playback of CDs with two recorded sessions (one audio and one data) • Multi-sound: DVD audio that supports up to eight languages per film • Subtitles: support up to 32 languages • The playback of MP3 music files stored on a CD-R/CD-RW disc or USB SD or MMC or Card device 4 Controls Monitor Stowed View Item Name 1 MENU 2 ►II 3 4 5 6 7 ◄ ▲ ► ▼ SOURCE Function or Control Touch and hold to display the OSD menu , touch again to close the OSD menu . On DVD mode , touch to display DVD list, touch again to close the DVD list ; On iPod/iPhone mode , touch to display the current list ,touch again to enter the main menu . Play or pause . Previous Chapter or Track / Navigation Left ; Press and hold to fast reverse at 2x,4x,8x,16x , 32x and normal speed. Navigation Up . Next Chapter or Track / Navigation Right ; Press and hold to fast forward at 2x,4x,8x,16x , 32x and normal speed. Navigation Down . Selects the video input source: AV 1, AV 2, iPod/iPhone or DVD; On DVD mode , touch and hold to switch the mode between SD/MMC and USB . 5 16 Receives IR signals from the remote control or sends IR signals to IR wireless headphone. Eject the disc. Eject Panel open switch Press to release the monitor Panel. Insert the disc. Disc slot Enter / Confirm choose. ENT. To illuminate in the car. Dome light Turns on/off the dome light . When the switch is Dome light Switch set to AUTO , the dome light turns on when the door is open . SD/MMC card slot Insert the SD card or MMC card. Connect USB device. USB socket 17 AV 1 IN socket 8 9 10 11 12 13 14 15 IR Window External equipment audio/video in socket. Monitor Open View 6 Remote Control Item Name 1 POWER 2 SETUP 3 4 MUTE EJECT 5 0-9 Number key 6 SRC 7 MENU 8 Function or control Turn on or turn off the player. Press to access the setup menu to modify the DVD player settings. Turn the sound on or off. Eject the disc. Press to enter numbers directly, such as for settings or track numbers. Selects the video input source: AV 1 , AV 2, iPod/iPhone or DVD ; On DVD mode, press and hold to switch between SD/MMC and USB mode . Press and hold to display the OSD menu , press again to close the OSD menu . On DVD mode , press to display DVD list, press again to close the DVD list; On iPod/iPhone mode, press to display the current list , press again to enter the main menu . Press to go to the previous chapter or track . 7 9 Arrows and ENTER 10 Fast reverse 11 RANDOM Navigation Up/Left/Right/Down and confirm choose . Press to fast reverse playback at 2x, 4x, 8x,16x and 32x speeds. Press to play chapters or tracks in random order. 12 A-B Press to repeat playback from point A to point B. 13 AUDIO For a DVD: Change the language during play . For a VCD/CD: Change audio channel (left, right, stereo) during playback . 14 RETURN Press to return the main menu, press again to return the last position of playback. 15 ANGLE Press to select a different filming angle. This feature only works if the DVD is recorded with multiple angles. 16 ZOOM Press to set the zoom for movie viewing. 17 REPEAT Press to repeats the track or the entire disc. 18 SUBTITLE 19 Fast forward 20 TITLE 21 ■ Stop 22 23 24 ►II 25 DISPLAY 26 GOTO VOL - / + Press to select and turn on subtitles during playback. Press to fast forward playback at 2x, 4x, 8x,16x and 32x speeds. Press to view the DVD disc’s title menu. Press to stop playback, press►II or ENTER button to start playing at the last position; Press this button twice to fully stop playback, press►II or ENTER button to start playing at the beginning of DVD. Press to go to the next chapter or track. Play or pause . Press to decrease / increase the volume. Press to display the playback information (such as title, chapter, track and time). Press to start playback at a selected chapter, track or time. 8 Basic Operation Open the monitor 1. Press the Panel open button to lower the overhead monitor screen. 2. Gently swing the LCD down and adjust the angle for viewing. CAUTION:The LCD opens to a maximum angle of 120° degrees. Do not attempt to open it further. Stow the monitor Gently push the back side of the display panel until it clicks into the overhead housing.The monitor turns off automatically when you return it to the closed position. Note :When closing the display panel , do not let cords or other items get caught between the display and the overhead housing . Doing so can seriously damage the screen. For your safety, close the LCD panel when you are not using it. Handling disc z z z z z To keep a disc clean, do not touch the play side (non-label side). Do not attach sticky notes to or put tape on a disc. Keep discs away from direct sunlight and heat. Store discs in a protective disc case. To clean the disc , wipe the disc outwards from the center with a clean cloth. 9 Turn the player on 1. Use the system with the vehicle running or with the ignition key switch in the "accessory" position . 2. To lower the screen , press the Panel Open button and move the screen into a viewing position. The system will power on automatically . 3. Touch SOURCE icon to switch the mode. Note:You cannot insert a DVD into the slot if you have selected an alternate audio-video source (AV IN1 ,AV IN2 or iPod/iPhone). Turn the player off Close the monitor or press the power button on the remote control to turn the player off . If a disc is playing when you turn the power off and back on again, the player continues playback from where you stopped. Note: Once the player is turned off, you cannot eject a disc in the player. Adjust the display 1. Touch and hold the MENU button to display adjust menu (OSD) 2. In the OSD MENU , press ▼or ▲ button to sequentially select each menu item . Contrast Adjusts the differences between the light and dark areas of the image Brightness Makes the whole image lighter or darker Color Adjusts color based on the color spectrum Tint Adjusts the intensity of the color when in NTSC mode (to play back DVDs recorded in the United States) Wide Screen Selects the aspect ratio of the image wide ,normal . Beep Select the beep sound when touch each icon or button . Reset Returns all menu values to their default settings. 3. Press the ◄ or ► button to change the values of selected option. 10 Care and Maintenance Cleaning the monitor z z z Use a clean, soft, dry cloth to gently wipe dust and dirt from the screen. Do not use benzene, thinner, car cleaner, or other cleaners. These substances may damage the monitor system or cause the paint to peel. The surface of the LCD can be easily scratched. Do not rub it with anything abrasive. Servicing the monitor In the event that trouble arises, never open the monitor case, disassemble the player or attempt to repair it yourself. The internal parts are not serviceable by user. Opening any components will void the warranty. CAUTION: Changes or modifications to this product not approved by the manufacturer may void the warranty. Cleaning the remote control Use only a clean, soft, damp cloth to clean the remote control. Do not use lighter fluid, methyl alcohol or other solvents. Cleaning discs Before playing a disc, wipe it outwards from the center with a clean, soft cloth. Use the remote control z z z z Use the remote control only inside the vehicle. Use the remote control no further than ten feet (three meters) from the sensor. Direct sunlight (or a very bright light) reduces sensitivity to remote signals. Do not use the player in direct sunlight. Any object than comes between the infrared sensor and the remote control may disrupt reception. Replace the battery in the remote control The battery needs changing when the buttons on the remote stop working or when you have to move close to player for the remote to work. 11 Precautions Dispose of used batteries property. z Do not dispose of used batteries throwing them into fire. If you do so, they may explode. z Do not short the positive (+) and negative (-) terminals. z Keep the battery and its holder away from young children.They may choke on the battery while attempting to swallow or chew on it. Note: The battery type must be CR2025. Do not replace with any other battery type. z Procedure 1. Turn the remote up-side-down. 2. Simultaneously slide the battery latch in the direction of the arrow and pull the battery holder out of the slot. 3. Remove the old battery. 4. Place the new battery in the slot with the plus(+) side up. 5. Push the battery holder back into the slot until it locks in place. Use the iPod/iPhone Press OPEN icon on the iPod/iPhone placed board to lower the iPod/iPhone placed board . Gently swing the board and adjust the angle for connect the ipod/iPhone. 12 Play 1. On DVD mode , insert a disc into the disc slot when the screen display " NO DISC ". When the disc was inserted , “LOADING” displayed , the system will read and play the disc automatically . 2. Press the EJECT button to eject the disc. 3. If the disc have not been take away in 10 seconds , the system will slot it in automatically and play again. Play DVD disc Access the root menu A DVD is divided into titles and chapters. The root menu shows the contents of the disc. Some DVD disc only allow you to select disc playback options from the DVD root menu. To access the root menu of the DVD, press the RETURN or TITLE button on the remote control during playback. Status information To view status information about the current viewing session, press the DISPLAY button continuously to cycle through the following information. Chang languages Note: All audible languages must be pre-recorded on the DVD. Some DVD disc only allow language access through the DVD menu. z To change the audible language, press the AUDIO button on the remote control. The player displays the current language number and name, and the total number of languages available. 13 z To cycle through all available languages, continue pressing the AUDIO button on the remote control. The audio information will disappears automatically after three seconds. Use subtitles Language subtitles are normally off. Note:Subtitles must be on the DVD. Some DVDs only allow subtitle access through the DVD menu. z z z To turn subtitles on, press the SUBTITLE button.The player displays the current language number and name, and the total number of languages for which subtitles are available. If the DVD provides subtitles in multiple languages, continue pressing the SUBTITLE button to change the subtitle language. To turn subtitles off, press the SUBTITLE button until the screen displays "SUBTITLE OFF ", The display of the subtitle options disappears automatically if you wait for three seconds. Repeat DVD chapters and titles To repeat a chapter or title, during playback continue pressing REPEAT to alternate among options. • CHAPTER--- Repeats the current chapter. • TITLE --- Repeats the current title. • ALL--- Cycles play all chapters and titles • REPEAT OFF--- Resumes normal playback. Repeat favorite sections To repeat a favorite section you must first mark where it begins and ends. 1. Play back the DVD. 2. To identify the beginning of your favorite section (point A), press the A-B button when the section starts playing back. 3. To identify the end of your favorite section (point B), press the A-B button again when play back reaches the end of the section. To cancel the repeat playback and resume normal playback, press the A-B button again. Chang viewing angle Note: Multiple angles must be pre-recorded on the DVD . Look for the multiple angles icon ( ) on the jacket of the DVD. • To cycle through the available viewing angles, press the ANGLE button on the remote while playing back the DVD . The player displays the current angle number and the total number of angles available. • To change the angle, press the ANGLE button again. 14 • To return to normal viewing, press the ANGLE button again. Zoom in and out • To zoom in (enlarge) the image when watching a DVD, press ZOOM during playback. As you press ZOOM on the remote, the player alternates among the available zoom settings (2x, 3x, 4x, 1/2, 1/3, 1/4). • To zoom in when viewing photographs (JPEG/JPG images) stored on a disc , press ZOOM on the remote, the player alternates among the available zoom settings: ZOOM 100%, ZOOM 125%, ZOOM 150%, ZOOM 200%, ZOOM 75%, ZOOM 50%. Play Audio CD disc Display CD information Insert a CD disc , the screen will display SINGLE ELAPSED . Continue pressing DISPLAY button to view SINGLE ELAPSED, SINGLE REMAIN, TOTAL ELAPSED, TOTAL REMAIN , DISPLAY OFF. Repeat CD tracks To repeat a track or the entire CD, press REPEAT button on the remote during playback. To cycle through the available options, continue pressing REPEAT. • TRACK --- Repeat play the current music • ALL ---Cycles play all music • REPEAT OFF ---Resume normal playback Repeat favorite sections To repeat a favorite section you must first mark where it begins and ends. 1. Play back the CD. 2. To identify the beginning of your favorite section (point A), press the A-B button on the remote when the section starts playing back. 3. To identify the end of your favourite section (point B), press the A-B button again when play back reaches the end of the section. To cancel the repeat playback and resume normal playback, press the A-B button again . 15 Play MP3 disc MP3 is a format for storing digital audio, compresses each audio track with little loss of audio quality. The result takes up much less disc space than the track would without MP3 compression. 1. Insert a CD that contains MP3 files into the player .The player display the MP3 menu . 2. To select the folders and tracks to play, press the ENTER button. The player displays the folder structure. 3. To choose a folder from the list, press the ▲ / ▼ button . 4. Press the ENTER button, the player displays the contents of the selected folder. 5. To select the MP3 file, press the ▲ / ▼ button. 6. Press the ENTER button to play the file. MP3 controls z z To play back to the next MP3 file, press the next button ( ). To play back the previous MP3 file, press the previous button ( ). Repeat MP3 To repeat a single MP3 file, press the REPEAT button on the remote. To cycle through all the following settings , continue to press REPEAT. z z z ● REPEAT ONE---repeats the current file. REPEAT ALL---cycles play all current of the disc . REPEAT FOLDER---repeats the current the folder. REPEAT OFF---turns off repeat and resumes normal playback. Play USB device and SD/MMC card 1. Insert a USB device into the USB socket of the main unit. 2. On DVD mode, touch SOURCE button on the panel or press SRC button on the remote control for more than 2 seconds to switch to the USB mode. The system will play USB device automatically . 3. Use the arrow buttons to select a file type and press enter to play it . 4. Playing SD/MMC card is the same operation of USB device , please refer to the steps of playing USB device. 16 Play iPod/iPhone On DVD mode , open the iPod/iPhone door, connect iPod/iPhone correctly . Then the system will switch to the iPod/iPhone mode automatically. There three kinds of mode to choose : MUSIC , VIDEO , PHOTO. MUSIC MODE: 1. Select the icon and Music press ENTER to enter the mode . The system will play iPod/iPhone automatically . 2. To return to the main menu of the 'iPod / iPhone, press MENU and the " " icon, until they reach the level of the main menu. 3. There six kinds of mode to choose: PLAYLIST, ARTIST,ALBUM,GEMRE,TRACK,COMPOSER. Select one of the 6 items from the menu and press Enter to select the desired track. VIDEO MODE: 1.Select the Video icon and press ENTER to confirm the selection, 17 the unit plays the 'iPod / iPhone automatically on the first available video 2.During play, press MENU button to return to the VIDEO menu. Apply to iPod Classic for the Video of Podcast ( for iPod Classic only, not applicable for iPhone and other iPod products ), please switch to Photo Mode in system and press Enter when you want to play the Podcast Video, and refer the steps below : 1.In the iPod menu,choose the "PHOTO" icon. 2.Enter the menu after the screen appears " NO SIGNAL ". 3. Select the Podcast from your iPod Classic. 18 4.Press " ENTER ", the program title will show up. 5.Select the Video program it enters the Podcast video play mode. PHOTO MODE: 1. Select the Photo icon and press ENTER to confirm the selection, the unit plays your iPod / iPhone automatically on the first picture available. 2. For faster scrolling of images before and after using the remote control, pressing the " " and " ". Note : Before enter the PHOTO mode , must set the iPod/iPhone to the photo mode and play starts . 19 Functions Pressing the " " icon to return to the previous chapter or track, pressing the " " icon, you go to the chapter to the next track. Holding a long time the " " icon it displays the icon " " represents the rewind. Holding a long time the " " icon it displays the icon " " which is the fast forward. To return to normal modality play press ENTER. Pressing the " " icon will scroll up the track list, press the icon " " you scroll down the list of songs. Installation and Wiring Do not attempt to install or service your player by yourself. Installation and servicing in electronic equipment and automotive accessories . If you do not have knowledge or experience this installation may be dangerous and could expose you to the risk of electric shock or other hazards. Read these instructions and precautions carefully . Improper installation can damage the monitor and the vehicle . What's in the box In addition to this manual , the box contains : Parts Name Quantity Player 1 IR remote control with battery 1 Power cable 1 AV 1 IN cable 1 AV 2 IN cable 1 AV OUT cable 1 ST4.2x16 screw 8 TB2.6x6 screw 7 PM 4x8 screw 4 Installation Bracket 1 Trim Ring 1 User manual 1 20 Note : Use only the contents of this package to install and use the system. Using accessories not provided with this player may damage the player. Mounting and Wiring precautions This unit is exclusively for vehicles with a negative ground, 12V power supply. z This unit may be installed with additional mobile audio components, such as a digital camera. z Always use great care when attaching anything to a vehicle. Check clearances on both sides of the planned installation before drilling any holes or installing any screws. z A good chassis ground connection is critical to minimize resistance and avoid noise problems. Use the shortest wire possible and securely connect it to the car chassis. z When routing RCA cables, keep them away from the power cables and output speaker wires, engine, exhaust system, ect. Heat may damage wires. z If the fuse should blow, make sure that all connections are correct, the cables have not caused a short circuit, and no wires are damaged. Then replace the fuse with a new fuse of the same amperage value as the original fuse. When replacing a fuse, never let the power cable touch any metal part or other wire. z Never let disconnected cables or terminals touch metal on the car or any other conducting material. z To prevent short circuit, do not remove the caps from unused terminals or from the ends of unconnected cables. z Insulate unconnected wires with vinyl tape or other similar material. Warning! To prevent short circuits during installation, disconnect the vehicle’s negative battery lead before making any power connections. z Installation procedure 1. Screw the Installation Bracket to the beam or plywood using the ST4.2x16 2. 3. 4. 5. screws. Installing the trim ring on the player using the TB 2.6x6 screws . Plug in power harness and audio/video source cablesinto the overhead monitor . Attach the player to the Installation Bracket using the PM4x8 . Check the car’s brake lights, blinkers, wiper, etc. to ensure they are working property 21 Wiring diagram 22 System Setup 1. 2. 3. 4. 5. 6. 7. Press SETUP on the remote control to access the setup menu. Press ▲ / ▼ button to select among menu items. Press ◄ / ► button to change the values of selected option . Press ▲ / ▼ button to select the option you wish to change. Press ENTER to confirm your selection. Press ◄ to return the previous grade menu. Press SETUP to exit the setup menu. Menu Description ANGLE MARK: Turn the multiple-angle feature on or off , the multiple-angle must be prerecord on the DVD disc. ·ON ·OFF OSD LANG: Selects a language for menu. GENERAL SETUP ·ENGLISH ·FRENCH ·SPANISH ·ITALIAN PAGE CAPTIONS: Selects the caption . ·ON ·OFF SCREEN SAVER: Protects the screen if it paused about 5 minutes. ·ON ·OFF SPEAKER SETUP DOWNMIX: Applies to Dolby digital sound. ·LT/RT ·STEREO PAGE PREFERENCE PAGE TV TYPE: Selects the TV system . ·PAL ·NTSC AUDIO: Selects the audio track language. · ENGLISH · FRENCH · SPANISH · GERMAN ·CHINESE ·RUSSIAN ·THAI SUBTITLE: Selects the language of the subtitles displayed on the screen. · ENGLISH · FRENCH · SPANISH · GERMAN ·CHINESE ·RUSSIAN ·THAI ·OFF DISC MENU: Selects the language of the current disc. · ENGLISH · FRENCH · SPANISH · GERMAN ·CHINESE ·RUSSIAN ·THAI 23 PARENTAL: Restricts the viewing of movies to children of appropriate age levels only. You can select 1 to 8. 1 KID SAF (safe for children) 2 G (general audience) 3 PG (parental guidance suggested) 4 PG 13 (some material unsuitable for children under 13) 5 PGR (some material unsuitable for children under 17) 6 R (some material unsuitable for under 17) 7 NC 17 (not recommended viewing for children under 17) 8 ADULT (Only for adults due to graphic content.This is the default setting . ) After you select the parental setting, press ENTER, then enter the 4-digit password (default is 3308). Press ENTER again to confirm. PASSWORD: Lets you change the 4-digit password using the number keys on the remote control . The default password is 3308, but no longer works after you change the password. DEFAULT : Resets all settings to the factory defaults. 24 Troubleshooting If operation freezes, the screen goes black or the unit should otherwise not function properly, try turning the unit on and off. If the unit does not respond, press the reset switch on the Front Panel. Problem Cause Solution Disc inserted incorrectly Player does not Disc format is not play disc supported Check the disc format. Disc is dirty or scratched The player suddenly stopped working or Player error the screen went black The car ignition (or ACC/Accessory) is off Player doesn’t turn on Condensation in the player Battery needs replacing Player operates Dirty IR window on the Player or remote control erratically Loose connections Picture Skips Occasions Blur picture on the screen. The picture on the screen is dark. Reinsert the disc with the label side up (facing the ceiling). Disc is dirty or scratched Interfered by shortdistanced strong interference. (E.g. high voltage wire, transformation station or aircraft etc…) 1. The equipment locates at a low temperature area. 2. Brightness is set too low. 25 Clean or replace the disc. Try turning the player off and on. If the player still doesn’t respond, press the reset button. Insert the key into the ignition and turn it to ACC/Accessory. Wait for about one hour or until condensation evaporates. Replace the battery. Clean the player’s and the remote control’s IR windows. Check and tighten all connections. Clean or replace the disc . Move the vehicle away from the interference. 1. This is the characteristics of LCD display in low temperature, it will restore to normal brightness after starting the display for few minutes. 2.Adjust the brightness setting. Specifications Specifications and design are subject to change with out notice. Power Source Vehicle battery (DC +10V ~ +16V) Operating Voltage DC +14V Mechanism Manual Open / Close Display Angle Vertical Adjustable: Up/Down < 120° Pixel 1152 x 234 High Brightness 350 cd/m2 Viewing angle(up/down/left/right) 45/65/65/65 Operating current <2000mA(Typical VDD=14V) Dome Light <2W Operation Temperature -10℃ to +50℃ Storage Temperature -20°C to +70°C Legal Notice and Credit Line: "Made for iPod," and "Made for iPhone," mean that an electronic accessary has been designed to connect specifically to iPod or iPhone, respectively, and has been certified by the developer to meet Apple performance standards. Apple is not responsible for the operation of this device or its compliance with safety and regulatory standards. Please note that the use of this accessory with iPod or iPhone, may affect wireless performance. iPhone,iPod,iPod classic,iPod nano, and iPod touch are trademarks of Apple inc.,registered in the U.S. and other countries. 26 The MACROM brand is a registered trade mark of MACROM SA and any use of such marks by ALDINET S.p.A. is under license. Declaration of Conformity