1
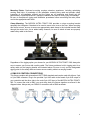
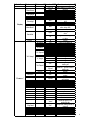
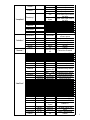
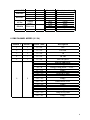
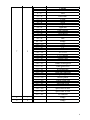
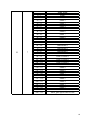
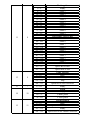
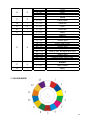
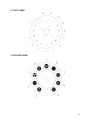
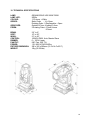
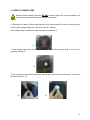
1
1. INTRODUCTION AND UNPACKING
Thank you for purchasing the MICROH ULTRA TRINITY 280 moving head fixture. For your own
safety and knowledge, please read this manual before installing or operating the device. This
manual covers the important information on installation and applications. Please install and
operate the fixture according to instructions. Meanwhile, please keep this manual for future
reference.
The MICROH ULTRA TRINITY 280 model is a moving head light with the latest advancements in
smart, efficient and beautifully designed products. Combined with the advanced technology of
today's stage lighting products, advanced control technology and it’s very user-friendly industrial
design; this unit fully complies with CE standards. The Ultra Trinity 280, uses a ceramic
luminescent film reflector, coupled with high-quality optical lens and broadband voltage. These
factors give you clear patterns; as well as sharp and uniform efficient light output. Intelligent LCD
display module has an intuitive operating menu with shortcuts.
The MICROH ULTRA TRINITY 280 has 16/24 bit modes or DMX512 channels. Horizontal scan:
540 ° vertical scanning 270 ° (16bit precision scanning) electronic correction, dot-matrix display,
four touch switch LCD + single-Key flying shuttle can spin. They can be inverted 180 °, the color
wheel is combined with white and 14 colors. 2 Gobo wheels: 9 patterns + white effect round by 8
prism+ 6 prism and atomization function. 0-100% mechanical dimmer, mechanical strobe and
variable strobe effect, strobe macro function. The optical system of the lens group electric
focusing, the beam angle of 0 to 4 ° with overheating protection function
Ultra Trinity 280 can be used in television, banquet and convention centres, nightclubs, largescale performances and other professional venues. Please carefully unpack the fixture when you
receive it and check to see if it was damaged during the transportation. Please check whether the
following items are included inside the box:
Fixture - One
Power Cord – One User Manual – One
Omega Bracket – Two
Safety Cable – One
DMX Cable - One
2. SAFTEY INSTRUCTIONS
This device has been delivered in safe working condition. In order to maintain this condition and
to ensure safe operation, it is absolutely necessary for the user to follow the safety instructions
and warning notes written in this user manual.
If the device has been exposed to temperature changes, do not switch it on immediately. The
arising condensation could damage the device. Leave the device switched off until it has reached
room temperature, and is dry.
This device falls under protection-class I, therefore it is essential that the device be grounded.
The electrical connection must be carried out by a qualified technician.
2
The device should only be used with rated voltage and frequency. Make sure that the available
voltage is not higher than 120V as stated at the end of this manual.
Make sure the power cord is never crimped or damaged in any way, as this could cause shock
and damage. If your power cord is damaged in any way, please purchase a new cable from your
local MICROH dealer. Always disconnect power, when the device is not in use or before cleaning
it. Never pull out the plug by tugging the power cord.
During initial start-up, some smoke or smell may arise. This is a normal process, and does not
necessarily mean that the device is defective. It should decrease gradually. Please do not project
the beam onto combustible substances.
Fixtures cannot be installed on or near combustible substances. Keep more than 3m distance
from wall for proper ventilation and air flow. If your fixture is or has become damaged in any way,
it shall be exclusively replaced or repaired by the manufacturer to avoid any hazard.
3. MOUNTING AND INSTALLATION
Caution: For added protection, mount the fixtures in areas outside walking paths, seating areas,
or in areas were the fixture might be reached by unauthorized personnel. Before mounting the
fixture to any surface, make sure that the installation area can hold a minimum point load of 10
times the device’s weight. Fixture installation must always be secured with a secondary safety
attachment, such as an appropriate safety cable. Never stand directly below the device when
mounting, removing, or servicing the fixture.
Whether installing inverted on a truss, ceiling or set on a flat level surface (see illustration below).
Be sure this fixture is kept at least 3m (3.3 ft.) away from any flammable materials (decoration
etc.). Always use and install the supplied safety cable as a safety measure to prevent accidental
damage and/or injury in the event the clamp fails.
3
Mounting Points: Overhead mounting requires extensive experience, including calculating
working load limits. A knowledge of the installation material being used and periodic safety
inspection of all installation material and the fixture are all imperative and should only be
performed by a qualified technician. Improper installation can result in bodily injury and damage.
Be sure to complete all rigging and installation procedures before connecting the main power
cord to the appropriate wall outlet.
Clamp Mounting: The MICROH ULTRA TRINITY 280 provides a unique mounting bracket
assembly that integrates 2 brackets to be used to mount on a truss or the floor. When mounting
this fixture to truss, be sure to secure an appropriately rated clamp to the included bracket fitted
through the center hole. As an added safety measure, be sure to attach at least one properly
rated safety cable to the fixture.
Regardless of the rigging option you choose for your MICROH ULTRA TRINITY 280, always be
sure to secure your fixture with a safety cable. The fixture provides a built-in rigging point for a
safety cable on the hanging bracket as illustrated above. Be sure to only use the designated
rigging point for the safety cable and never secure a safety cable to a carrying handle.
4. DMX-512 CONTROL CONNECTIONS
This fixture complies with international USITT DMX standards and can be used with either a 3 pin
or 5 pin DMX connector. Plug in the provided 3 pin XLR cable to the female 3-pin XLR output of
your controller and the other side to the male 3-pin XLR input of the MICROH ULTRA TRINITY
280. To connect the units to DMX, you must daisy chain the fixtures together as referred in the
diagram below. Always end your DMX-512 connection with a DMX terminator.
4
For installations where the DMX cable has to run a long distance, or is in an electrically noisy
environment, it is recommended to use a DMX terminator. This helps in preventing corruption of
the digital control signal by electrical noise. The DMX terminator is simply an XLR plug with a 120
Ω resistor connected between pins 2 and 3,which is then plugged into the output XLR socket of
the last fixture in the chain. Please see illustrations below.
120Ω
2
3
1
PIN 3
PIN 2
5. SETUP MENU
Display: Displays all of the fixture information
Control Wheel: Rotate Left or Right to scroll through menu. Press to select menu item
5
Main Menu Submenu 1 Submenu 2 Function SET
Function description
DMX Address
001-512
DMX Address number set
"Natu"
Normal
"ShowReve"
"Revl"
reverse 180°
"Chin"
Chinese 中文
"Language"
"English"
English
"BrigSett"
000-255
Brightness set
Backlight close after delay
"60S "
"Backligh"
60S
"Ligh"
Backlight light always
Display
Menu back to main menu
90S
MenuBack"
after delay 90S
"Off "
Menu back not automatic
Backlight blinking when no
open
dmx
Backflah
Backlight not blinking when
off
no dmx
"Return "
▲
return
"Xreverse"
"Off "
PAN SCAN Normal
"Open"
Pan Scan Reverse
"Off "
Tilt Scan normal
"Yreverse"
"Open"
Tilt Scan Reverse
"Fast"
PAN/TILT FAST SPEED
"XY Speed"
"NORM"
PAN/TILT NORMAL
"Solw"
PAN/TILT SLOW
"XY Setup"
"360 ", "360 "
Pan Angle 360°
"X Angle"
"540 ", "540 "
Pan Angel 540°
"630 ", "630 "
Pan Angel 630°
PAN/TILT optical sensor
"Off "
testing off
"XY Fback"
PAN/TILT optical sensor
"Open"
testing on
Return
▲
Return
Shortcut off for colours and
"Shortcut"
"Off "
gobos
Shortcut open for colours
"Feature "
"Open"
and gobos
"FullColr"
"Off "
half colour function
"Open"
full colour function
"ChanMode"
16 bit
16 bit mode
24 bit
24 bit mode
"ReceMode"
"DMX "
Accept DMX
"Wire"
Accept Wireless
"Auto"
AutoRun
"RunMode "
"Slve"
Accept DMX & Slave
"Musc"
Sound active
Inside program Run
"Auto"
automatically
Keep last DMX position if
"SigClear"
"Off "
data off
Open
clear signal data
DMX Reset
Off
Dmx reset not accept
Open
Dmx reset accept
Return
▲
Return
6
Off
Open
Off
Open
"Default "
"Control "
"Off "
"DmxLamp "
"LampSett"
Open
"LampTime"
Return
0000-9999
★
"Ilum"
Off
Open
▲
"WorkHour"
0000-9999
"Times "
"Fan1Rota"
"Fan2Rota"
"Version "
Return
0000-9999
0000-9999
0000-9999
XMOA
▲
Chan 00-Chan
40
★
"Fold"
"Save"
★
"Fold"
★
Reset01-10
Colour wheel
Rotation 001
000……040
★
0000-9999
0000-9999
clear
clear
000-255
000-255
000-255
000-255
000-255
000-255
000-255
000-255
"Off "
"total 5V",
"Open"
000-255
000-255
"ClearTim"
"LampStat"
"InfoSee "
"Control "
"Factory "
"Defaults"
Redress
Chdefine
"Brightne"
"TimeLimi"
"TimsLimi"
TimeCLEA
CutClea
"Passwor1"
"Passwor2"
"Passwor3"
"Passwor4"
"X Drivin"
"X Driven"
"Y Drivin"
"Y Driven"
"LampPowe"
"AssiTool"
"Checksum"
Return
"YAngle "
"Return "
01-10"
▲
Lamp off
Lamp on
Lamp off by manual
lamp on by manual
Close other signal control
the lamp
Open other signal control
the lamp
Lamp used time recorded
Password input Enter
Clear Lamp time
Lamp off
Lamp on
Return
working hours memo for
connect power
Open times memo
Fan rotation speed 1
Fan rotation speed 2
Version
Return
Control the Channels
Password input Enter
Recover Factory set
Save factory set
Password input Enter
Recover to default
Password input enter
Set the motors
Channels set by define
Channels set by define
Password input Enter
Open fixture time limit
fixture times limit
Clear the time of used
Clear the times of used
Revise password 1
Revise password 2
Revise password 3
Revise password 4
pan main drive gear
Pan slave drive gear
Tilt main drive gear
Tilt slave drive gear
Ballast earthed
Ballast 5V
Tilt angel rotation set
return
Check Cabrilate data
Return
7
CHANLEVE
MotorRst
Chan1..140
Colour...focus
▲
"Annu"
"Exec"
"Annu"
"Exec"
"Annu"
"Exec"
▲
Return
All Reset''
XY Rst
PAN/tilt
RESET
EffecRst
Effect reset
"ExitMenu"
Show the dmx address
Display the status
Cancel
Reset
Cancel
Reset
Cancel
Reset
Exit
6. DMX CHANNEL MODES (16 / 24)
MODE 1
1
2
3
4
5
6
MODE 2
1
*
2
*
3
4
DMX Value
0-255
0-255
0-255
0-255
0-255
0-19
20-24
25-129
130-139
140-149
150-159
160-169
170-199
200-209
210-229
230-239
240-255
Description
Pan
Pan Fine
Tilt
Tilt Fine
Pan/Tilt speed
Special Functions
Empty
Energy-saving mode(230W)
Empty
Lamp on by dmx
PAN/TILT reset
Empty
Small motors reset
Empty
Full unit reset
Empty
Lamp off by dmx
Empty
8
7
5
8
9
*
6
0-8
9-17
18-26
27-35
36-44
45-53
54-62
63-71
72-80
81-89
90-98
99-107
108-116
117-127
128-129
130-134
135-138
139-143
144-147
148-152
153-157
158-161
162-166
167-171
172-176
177-180
181-185
186-189
190-220
221-250
251-255
Colours
White
Red
Dark Blue
Yellow
green
Magenta
Light blue
Dark Orange
Deep green
Amber
blue
orange
CTO
UV
White
UV+CTO
CTO+orange
Orange+blue
blue+amber
Amber+Dark green
Dark green+red
Red+light blue
Light blue+magenta
magenta+green
Green+yellow
Yellow+Dark blue
Dark blue+Red
Red+white
Speed fast to slow
Speed slow to fast
No function
Empty
Empty
9
10
7
0-3
4-9
10-15
16-21
22-27
28-33
34-39
40-45
46-51
52-57
58-63
64-69
70-75
76-87
88-95
96-103
104-111
112-119
120-127
128-135
136-143
144-151
152-159
160-167
168-175
176-183
184-199
200-255
Static gobo
Empty
Gobo 1
Gobo 2
Gobo 3
Gobo 4
Gobo 5
Gobo 6
Gobo 7
Gobo 8
Gobo 9
Gobo 10
Small beam 1
Small beam 2
Small beam 3
Gobo shake slow to fast
Gobo 5 Beam 1
Gobo 5 Beam 2
Gobo 5 Beam 3
Gobo 10
Gobo 9
Gobo 8
Gobo 7
Gobo 6
Gobo 5
Gobo 4
Gobo 3
Gobo 2
Gobo 1
Static gobo speed slow to fast
10
0-8
9-17
18-26
27-35
36-44
45-53
54-62
63-71
72-80
81-89
11
8
12
9
13
*
14
10
15
11
90-97
98-106
107-115
116-124
125-133
134-142
143-151
152-160
161-169
170-179
180-217
218-255
0-127
128-177
178-203
204-255
0-255
0-19
20-75
76-255
0-127
128-191
192-193
194-255
Rotate gobo
Empty
Gobo 1
Gobo 2
Gobo 3
Gobo 4
Gobo 5
Gobo 6
Gobo 7
Gobo 8
Gobo 9
Gobo shake slow to fast
Gobo 9
Gobo 8
Gobo 7
Gobo 6
Gobo 5
Gobo 4
Gobo 3
Gobo 2
Gobo 1
Gobo 1 no movement
Speed fast to slow
Speed slow to fast
Gobo rotation
index
Speed slow to fast counter clockwise
stop
Speed fast to slow clockwise
Empty
Prism
Empty
6 linear prism
8 facet prism
Prism rotation
index
Speed fast to slow clockwise
Empty
Speed slow to fast counter clockwise
11
16
12
17
13
18
19
20
21
*
14
*
*
22
15
23
16
24
*
0-64
65-255
0-255
0-255
0-255
0-255
0-255
0-31
32-63
64-95
96-127
128-143
144-159
160-191
192-223
224-255
0-255
Frost
Empty
linear frost
Zoom
Linear zoom
Zoom fine
focus
Focus fine
Empty
Shutter
Shutter close
Shutter open
Strobe slow to fast
Shutter open
Fast to slow, slow close fast open
Slow to fast, fast open slow close
Shutter open
Random strobe slow to fast
Shutter open
Dimmer
Linear dimmer
Empty
7. COLOUR WHEEL
12
8. STATIC GOBO
9. ROTATING GOBO
13
10. TECHNICAL SPECIFICATIONS
LAMP:
LAMP LIFE:
COLOUR:
GOBOS:
GOBO SIZE:
PRISM:
BEAM:
SPOT:
WASH:
CONTROL:
DIMMER:
PAN/TILT:
POWER:
FIXTURE DIMENSION:
WEIGHT:
OSRAM SIRIUS HRI 280W 7800K
2000hr
13 Colours + White
Static Gobo - 14 + Open
Rotating Gobo - 9 Replaceable + Open
Outside14.7mm, Viewing13.6mm
2 Rotating Prism, 6 Facet Linear
8 Facet.
2.5° to 8°
10° to 20°
21° to 45°
16/24CH DMX, Auto, Master Slave
0 – 100% Linear
540° Pan, 250° Tilt
110~240V 470W 50/60hz
385 x 365 x 589mm (15.2”x14.4”x23.2”)
16kg (35.25Lbs)
14
11. HOW TO CHANGE LAMP
Attention! When replacing the lamp DO NOT touch the lamp with your bare hands, to oil
on your skin may cause the lamp to explode once ignited.
1. Disconnect the power. Before replacing lamp, the fixture needs 20 minutes for lamp cooling.
Lock the head in place using the Y axis lock in the 60 ° position.
Use a Philips (star) screwdriver to open the lamp cover(picture 1)
(1)
2. After opening the cover, you can see the lamp inside. Be sure the lamp is cool prior to
removing. (picture 2)
(2)
3. Use one hand to press the lamp holder and the other hand to remove the lamp. and pull out
the wires (picture 3, 4)
(3)
(4)
15
After taking out the lamp, please check the lens inside and make sure that it is clean and clear;
this will help the light output.
(Picture 5)
(5)
Install the replacement lamp and the cover once finished.
11. MAINTENANCE AND CLEANING
The following points have to be considered during the inspection:
1) All screws for installing the device or parts of the device must be tightly connected, and must
not be corroded.
2) There must not be any deformations on the housing, colour lenses, fixations or installation
spots (ceiling, suspension, trussing).
3) Mechanically moved parts must not show any traces of wearing and must not rotate with
unbalances.
4)The electric power supply cables must not show any damage, material fatigue or sediments.
Further instructions depending on the installation spot and usage must be handled by a skilled
installer or technician. Any safety issues must be resolved.
16
In order to keep the fixture in good condition and extend the life, we suggest regular cleaning to
the fixture.
1) Clean the inside and outside lens each week to avoid the light output from darkening due to
accumulation of dust, dirt, etc.
2) Clean the fan each week.
3) A detailed electrical check by approved technician every three months is advised. Ensure the
circuit contacts are in good condition.
We recommend a frequent cleaning of the device. Please use a moist, lint- free cloth. Never use
alcohol or solvents.
There are no serviceable parts inside the device. Please refer to the instructions under
“Installation instructions”.
Should you need any spare parts, please order genuine MICROH parts from your local dealer.
IF YOU SHOULD EXPERIENCE ANY PROBLEMS OR ISSUES PLEASE CONTACT MICROH
PROFESSIONAL PRODUCTS BY EMAIL AT [email protected]
In the event that your unit is defective in any way, please contact your local dealer to
obtain an RA number for service repair.
DISCLAIMER – MICROH believes that the information contained within this user manual is
accurate. However, MICROH is not responsible for any error or addendums to this manual.
If you have any comments or general suggestions on how this manual can be improved
please contact [email protected]. Thank you.
17
Notes:
18