1
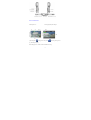
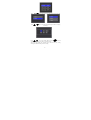
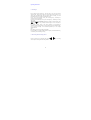
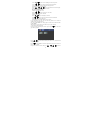
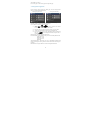
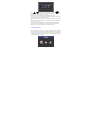
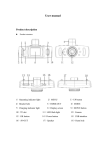
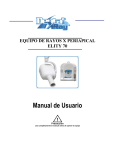
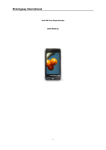
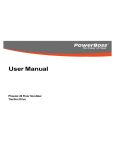
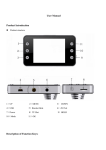
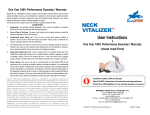
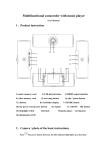
Instruction Manual for Waterproof DV
Thanks for choosing HD portable DV - HAPPY waterproof type series
Please read the manual before you use
Please follow below instructions if design or specification has changed in you
camera.
Matters need to be attended whiling using the CAMCORDER
About the battery
Your camcorder is powered by a built-in battery, which can’t be taken out. It is
specially design for the camera. If you need to take it out you need to power off
the camera. The battery need to be charged at least every three months
Note for shooting and playing
This camera can’t ensure to play the moving imagine shot by the other
cameras.
Note for storage card
To ensure the working stability of the storage card, it will be formatted
systematically when the first time use. While in the formatting, all the data will
be deleted including the protected files and without restored. So be sure the
important data backed up before matting.
Note for the water proof
When opening the waterproof cover, be careful not let the water getting inside
for fear damaging the machine.
Be sure all the covers are closed when in normal application, for fear getting
into water.
Don’t open any cover under the water operation circumstances.
1
Contents
Matters need to be attended whiling using the CAMCORDER……………….1
Component and control device recognition ………………..……..…………….3
LCD screen instructions………………………………………………………….4
Getting ready…………………………………………………………..…………8
Check the accessories……………………………………………………………....8
1.Charging battery………………………………………………………………9
2.Insert SD card…………………………………………………………………9
3.Start the CAMCORDER ……………………………………………………10
4.Setting the language and time………………………………………10
Operating Instructions………………………………………………………12
1.Shoot images ……………………………………………..………………12
2.The shooting functions setting and use ………………………………………12
3.Viewing video……………………………………………………..…………13
4.Viewing functions application ………………………………………………15
5.Menu settings…………………………………………………………………16
6.The CAMCORDER system custom settings…………………………………16
USB interface application……………………………..……………………17
1. PC Camera functions……………………………………………….………18
2. Memory functions…………………………………………………...…...…18
3. Connection to a printer:………………...…………………………………18
View images with TV…………………………………………………..….….18
1.Connection to HD TV………………………………………………………18
2.Connection to ordinary standard TV……………………………….……..…19
Trouble shooting and guide ………………………………………….….……19
The camcorder specifications………………………………………………...20
2
Component and control device recognition
-------------------------------------------------------------3
LCD screen instructions
Take still pictures :
[1] Shooting mode:
[2]
Shooting digital dynamic image:
:
-Taking picture(still picture);
- Recording(Moving action)
Recording Capacity:
When taking picture:numbers of total available for shooting;
4
Recording preview time:remaining recording time;
On recording: Time for recorded;
[3]
storage medium status:
-SD card;
[4]
Residual quantity of battery;
-SD card protection
[5] Recording image resolution:
When taking pictures – size of photograph;
When recording - image resolution
[6]White Balance:
lamp;
-Automatic;
- Cloudy;
- Sunny;
- fluorescent
- Osram Lamp
[7] Digital effects:
- Normal ;
[8] Image Quality:
-Best;
- BLK & WHT ;
-Better;
- SEPIA mode;
-Ordinary
[9] Exposure Compensation;
[10] Autodyne time: shut/10 seconds /20 seconds;
[11] Exposal Model:
-shoot one by one;
- Continuous photo shot;
[12] Times of digital zoom;
[13] Recording(moving image recording)on going;
[14] Video sound: -Open;
-Close
Viewing images:
:
5
[1]
File types of viewing:
-Dynamic moving image;
[2]
Time for file played / total time for file play:
[3]
Image resolution;
-Still picture。
[4] The No. of the recording file /the total number of the same type of imagine files;
[5] Volume;
[6] Play/Pause indicator;
-Play;
-Pause。
[7] REW indicator;
[8] FWD indicator
6
Menu of view:
:
[1] File type :
-Still image;
-Moving image。
[2] Total numbers of currently file selected /total pages:
Setting menu:
:
7
[1] Current mode of the device:
[2] Current mode of menu:
[3] Menu setting of the system;
[4] Menu Options
[5] Menu Options contained sub-menu
[6] Current value of menu options
Getting ready
Check the accessories
This device attaching following accessories, please have a check when purchasing:
(1) Charger
(2) HDMI connecting wire;
(3) USB connecting line;
(4) CD
(5) Wrist strap
(6) Instruction book
8
1. Charging battery
This unit is powered by the built-in-battery, which can be charged at any time.
Steps for charging battery
(1) Open the left side waterproof cover
(2) Plug in the battery charger into USB slot;
(3) Turn the power switch to off the switch and the red charging indicator will
start to flash, showing that the battery is charging.
(4) When the red light off it means the battery is fully charged, (3 hours need
before fully charged)
(5) Pull out the charger from the USB slot.
Note for charging the battery:
This unit can be only charged by the charger attached to it; which can’t be charged by
the USB connection to the computer.
The unit needs has to be turned off while charging, under working conditions the
battery can’t be charged.
The battery is forbidden to be charged while the operation around the water.
2. Insert SD card
The camcorder is of limited capacity with only room available for a few recordings or
imagines with resolutions of 720P or recordings of VGA. To solve this problem
please insert your SD storage card for extending the storage capacity. The maximum
capacity supported by the unit is a SD card with 32GB capacity.
Steps for insert the SD card:
(1) Open the water proof cover of the right side
(2) Insert the Memory card with its nick down into the SD card slot until it
gives a clicking sound. (The direction is indicated in this unit).
(3) Close the cover
Note:
SD card can be only inserted by one direction, which will be damaged if try to insert
the wrong direction with force.
The steps taking SD card out
(1) Open the right side water proof cover
(2) Push the memory card to the inward before the indicator flashed.
Attention: Do not take the memory card out when the indicator is flashing; for
fear in which data may be damaged.
9
To insure the SD card performance and stability, it will be formatted before it is used.
By formatting, all the data stored in the SD Card will be erased including the
protected imagines and can’t be recovered. So, be sure the important data is baked up
before re- formatting.
3. Start the CAMCORDER
Start the CAMCORDER
(1) Press “ON/OFF” to start the CAMCORDER, while the green lamp is
lighting.
Turn off the CAMCORDER:
(1) While the CAMCORDER is on working, press “ON/OFF” can turn it off,
while the green indicator will be distinguished.
(2) If the CAMCORDER is left turned on, without any operation during the
preset time, it will be automatically turn off, to prevent the consumption of
battery power (automatic shutdown functions)
Attentions:
(1) The function of automatic shutdown can be set in the menu, and adjusted
to suit your need.
(2) After the unit is turned on and without any operation within on minute, it
will be switched to the power save mode, and the LCD and lens will be
distinguished. While the green indicator is still in lighting. Press any key
(Except ON/OFF key); the unit will be backed to the working conditions.
4. Setting the language and time
After turning on the CAMCORDER, the page will show ask you to set the language,
date type and date, and can be amended through this setting Menu.
10
Press “
”key for the options; press “ OK” for the options you want.
Press “
” key, to choose the currently filed; press “OK” for accepting
the settings.
Press”
“to set the currently filed, and press “
“into the
previous/next field; by press “OK” to accept the settings.
After accept the settings, the camcorder moves into the status for viewing
shooting, the default shooting mode is recording.
11
Operating instructions
1. Shoot images
Press “switch shooting mode key”, the unit will go into the view imagine
shooting mode. If the current status isn’t the shooting mode (recording or the
photo), then the default mode under the phone mode is recording, or it will
switched between the recording mode and photo mode.
Under the preview-recording mode, press “Shooting Key”, Start/Stop for
recording the moving imagines.
Under the preview-shooting mode, press “Shooting Key”, Start/Stop for taking
still pictures.
The functions used on shooting. Digital zoom: under the preview mode, press
“
(T)/
(W)”key, to adjust the focal length ( T is for zoom, W for
shrinking)
For getting a perfect picture or for moving imagines, it is suggested the
camcorder needs to be kept steady, if the unit needs to be moved when shooting,
move it slowing and stably. If the conditions permitted try to use a Tripod
stabilize the unit.
Note:
If the battery is low, then recording is impossible.
It is impossible for recording normally when the capacity of the media deficiency,
or the lower speed of reading or writing.
2. The shooting functions setting and use
Under the preview of the shooting mode, press “
shortcut key for shooting functions and parameter.
12
”、“
” key for setting
“
“
” Shortcut for the menu setting and of the following recording and
parameter:
Resolutions(1080P-30fps、
、720P-30fps、
、VGA);
White Balance (Auto, Cloudy, Daylight, Fluorescent, osram
lamp)
Special effects for Digital (normal, black and white, Sepia
mode)
” Shortcut Menu can set the following recording functions and
parameter:
Exposure Compensation(-2.0 ~ 0 ~ 2.0)
Voice (on / off)
“
” Shortcut Menu , can set the following functions and parameter:
resolution (16M、10M、8M、5M、3M);
White Balance (Auto / Cloudy / Daylight / Fluorescent / Tungsten)
Digital effects (Normal / black / Sepia mode)
Image Quality (best/better/ ordinary)
“
” shortcut is for setting the following functions and parameters.
Exposure compensation (-2.0 ~ 0 ~ 2.0);
Time delay (off /10 second/ 20/second)
Shooting mode (one by one photo/ continues shot)
The default settings of the unit are marked with the blue character, which can be
recovered by setting n the system. Please refers to the No. 6 for Custom Settings
(3) Under the shooting mode, press “ setting” key, also ca set the shooting
founctions and parameters. Plasese see the “ setting” key for seting the
recording and parameter. See the opeartion 5 of the setting menu.
3. Viewing video
(1) The viewing video status
Under the non viewing video mode, press” view” key, in the viewing mode, and
open the current file.
If you are viewing the still pictures
13
Press “
/
”key for zoom or shrinking the size of the picture
/
”key, for viewing the previous/next still picture.
Press “
Press “OK” key to go into the still picture autoplay mode
The method of autoplay as followings:
Press ““
/
/
/
” key to change the direction of the autoplay
Press “OK” key back to the normal view mode.
IF you are viewing the video:
Under the stop and pause mode:
Press ““
/
” go into the previous/ next video;
Press “OK” start to play the video file.
Under the play status:
Press “
/
”key for adjusting the volume;
/
”key into the status of Fast forward /Fast backward
Press “
Press “OK” key into the pause status.
Press “OK” for two seconds and into the stop status.
It will automatically play the next one after one played over for when the
numbers of the video larger than “1”,
Note: this CAMCORDER can’t always play the video shot or edited with other
CAMCORDER.
When shooting moving images, some times it may not play smoothly.
(2) Viewing the image index page
Under the viewing mode and press “View” again, or press “
”, the view index
page will be appeared.
Press “
/
” to choose the file format you want to view, (Audio file/ still
image/ Moving image).
” or using “OK” to activate the options fram, then you can choose the
Press “
file you want to display.
Using choice box for activate, and press “
14
/
/
/
” to choose
what the file to be viewed.
Press “setting key’ for back to the page of viewing index page.
4. Viewing functions application
Under the image viewing mode, press “Setting key” into the viewing function
menu, to practice the following functions.
Viewing image functions:
viewing video functions:
As to operation the menu, please refer to the operation 5 -Menu settings.
File delete: delete current-for delete the current image.
Choose delete-can choose and delete multi files.
(1) “Press “
/
/
/ ” to move the blue color activate
frame to the file to be deleted.
Press “OK” to choose the file you want to delete
(2) Repeat the above procedures till choose the file you want to delete.
(3) Again choose the file marked, and remove the mark selected.
(4) Press “setting key” enter into the confirmation menu for deletion the
file, press“
” “ ”for choosing if delete the file, and press “OK” to
execute the operation.
Delete all-once only delete all the files unprotected
Protect/release file: protect/release file for prevention accidentally delete the file.
Protect the current
Release the current
Protect the current
Release all
Automatically display: The function can turn on automatically displayed still
images, and setting the moving direction and intervals between each imagine to
be played.
File information: using this function to check the image file information.
15
5. Menu settings
Under each variety of the mode of this unit (except the viewing image index
page), press “Setting” enter into the menu setting page, to set the different
functions and parameters based on the operation mode before entering.
In the page of the menu, press “
/
/
/
” enter into the filed
need to be set up; press “OK” for confirming accept the settings, and the selected
mark is as : “
”
Choose again “Setting key” to exit the setting page.
6. The CAMCORDER system custom settings
Enter into setting menu, press “
” for system settings, for customize setting.
For how to operation in the menu, can refer to basic operation 5 menu settings.
Formatting: to format the SD Card or the internal storage.
Formatting will delete all the data of stored on the SD Card including protected
image and can’t be restored. So be sure to bake up the important file before
formatting.
Date/time: (1) set up date format
(2)Reset up the date and time
16
Press “
” for setting up the currenty filed, and press “
” enter
into previous/next filed; press “ OK” for acceptance the settings.
Language: choose the language for being shown.
Date mark: choose if the still image need stamped the time or date.
TV output: to set up the video signal output system (NTSC or PAL) according to
the color system of the TV equipment connected.
Automatic shutdown: to set if to turn on the automatic shutdown functions and its
time.
The unit will be automatic shutdown if it is turned and without any operation, for
prevention the power energy.
Tone of pressing key: to set up if turn on the beep function while pressing keys.
Frequency: the frequency of the light source is set up to be (50HZ and 60Hz).
Default settings: to make the settings back to the default settings.
USB interface application:
Open the left side water proof cover, using the USB cable which comes bundled
with the camera connection with the unit USB slot and the USB of the computer
or the printer, the USB connection can be appeared for the unit has the functions
of automatically showed, and choosing the relative USB operation (mode of PC
Camera, EMS memory and printer).
17
Press “
/
”to choose the opeation you want to do, and press “OK” for
confiration for what you want to operation.
(1) PC Camera functions:
When the unit is connection with the computer and if it is the first time for it
connection with the computer, please install the “install tools’ which attached to
the CAMCORDER.
This camcorder is suggested to be operation under the Windows status (Microsoft
Windows XP,Microsoft Windows 7,Microsoft Windows vista), if your
computer is supported by the Linux or MAC system, then they should have the
functions of UVC for using PC Camera.
After installment, my computer will have two catalogs: :Coach Digital Camera
and Coach Video Camera.
Or use other Pc Camera on the PC, the lens of this CAMCORDER for the image
shootings.
(2) Memory functions:
The unit supports USB2.0 HIGH Speed protocol.
The Removable drive will appear on my computer when choosing the memory.
(3) Connection to a printer:
The unit supports PictBridge standard protocol, and can connection the printer
which supports PictBridge.
The CAMCORDER shows the following printing menu:
Press “
/
/
/
” to move the blue Activation box to the file you want
to print, press “OK” for confirm selection/cancel the file wanted to be printed, press
“set up key” enter into the operation conform menu, print the file you selected according
to the hint showed on the screen .
View images with TV
Connection the CAMCORDER to TV, and the image can be viewed on TV
Connection HD (16:
:9) TV
Open the left side water proof cover, and insert the HKMI slot which attached to the unit,
another end HDMI standard jack insert to the HK TV’s HKMI slot; switch the TV signal
source to the HDMI slot of the unit, then the unit will spontaneous output the HD
HDMI signal .
18
Note:
(1) While using this camcorder, you may need to switch the video output signal, for
matching your TV color system;
(2) When the signal input to the TV, the image won’t be displayed on the LCD screen.
(3) When displaying the HD moving image with the Standard definition (SD) TV, the
black band appears on the upper and lower edge.
Trouble shooting and guide
If the problems occurred in using, please try to solve it with the following methods:
(1) Please inspection the following trouble shooting and the solution items:
(2) Please check the power first and meanwhile press OK, the system will
disconnection the power and RESET, then restart the unit;
(3) Please consult your regional distributor or authorized service agency.
Common problem shootings
(1) Battery and power
The camcorder can’t turn on:
(1) The power of the batter has run out or there is too low of remaining power, please
take the mains charger to charge for the unit.
(2)If it is still not turn on, then press the power key and meanwhile press OK, to
disconnection of the system, and then start again.
The CAMCORDER is can’t be charged:
(1)Using the USB cable connection with the computer, can’t charge the unit. The
CAMCORDER can be only charged by the battery charger which attached with the
CAMCORDER.
(2) The unit can’t be charged while under the operation status, charge it before
turn it off.
Suddenly power off
The unit will be automatically turned off when there isn’t any operation on it after
it is turned on, for prevention the power energy (automatical shutdown
19
functions).
Display Screen turned black suddenly, while the green indicator is still
lighting:
Without any operation on the unit after 1 minute it is turned on, the unit is entered
the power save mode, press any key (except ON/OFF key), the unit will be
backed to the normal working status.
(2)
) Shooting video
Image is not recorded
(1) The battery is low power, please charge the unit:
(2) If the SD card isn’t being formatted when the first time using it, would
affect the stability to read or write for the CAMCORDER.
(3) The lower speed for accessing the SD card, please change the High-speed
card
(4)The capacity of the SD card is fully loaded, please delete the file you do not
want to keep longer, or replace another SD card;
(5)SD card is broken, please replace it.
(6)The resolution of the moving image over 1080P, which is cant, be stored-in.
The display screen does not show the recording images.
The camcorder is on the other mode of operation; switch the work mode to the
image shooting mode.
(3)
)Display image
The CAMCORDER can not play image:
(1) You used to have changed the file name or the folder’s name
(2)If the file of image have been treatment, or if the imagine isn’t shoot by this
unit, the unit cant assure to display it.
(3)Memory card has been damaged
Date and time of shooting isn’t stamped on the still image
Please turn on the ‘date stamp’ functions during the system settings
Date and time can’t be stacked on the moving images
This unit has no such functions
Can’t delete image:
It is being protected, to cancel the protection for the file
Can’t view the image with TV: inspect if the connection is connected well or
not, and if the signal of the TV changed to the signal source in the connection of
the slot
The camcorder specifications
Size :
Weight:
Sensor :
Lens:
About 112 mm x 54 mm x 18 mm(L,W,H)
About 121 g
COMS sensor 5million effictive pixels
F2.8
20
Exposure Control:
automatic exposure
LCD screen:
File format:
2.0 -inch TFT LCD
Static picture JPEG
Moving images MPEG-4 AVC/H.264 (.mp4)
Internal storage,
SD Card (maximum support 32 G)
Recording medium:
Input and output
Interfaces:
Hi-speed (USB2.0)
HDMI HD Interface
TV-Output AV- Interface
Battery:
Built-in lithium battery(1100mAh)
Operating Temperature: : -10-40℃
The design and specifications is changed without prior notice.
21