1
®
Document - Management
USER MANUAL
The software described in this manual is supplied on the basis of a licence agreement and the obligation not to pass it on.
No part of this manual may be copied in any form (photocopies, print, microfilm or other process) or copied using electronic
systems without written agreement from Dr. DOC GmbH.
This manual may be incomplete or contain errors despite our utmost care. We are not liable for errors or loss of data as a
consequence of this.
Our software is continually being developed further. For this reason, new functions are not always described in the manual.
But brief descriptions of these new functions are included in the continually updated README file.
Status 01/09
Copyright 1984 - 2009
Dr.DOC GmbH
Software from Germany
“Dr.DOC” and “DOC it” are registered trademarks of Dr.DOC GmbH, Munich.
All trade and product names may be registered trademarks, even if they are not identified as such.
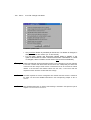
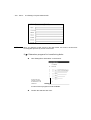
Manual: Division - 11 -
INFORMATION REGARDING THE
MANUAL
Manual: Division - 13 -
DIVISION
This manual contains all the details required to instal and to work with Dr.DOC.
The manual applies to use by a single user, in a conventional standardnet and
in client/server operation. Modified or extended processes have to be executed
for some functions for client/server (C/S). This will be indicated by a note at the
respective places.
The content of the manual is structured as follows:
Introduction
This part explains the Dr.DOC philosophy and provides information
regarding legal issues to introduce document management.
Part 1
Technical Prerequisites, Installation
Part 2
includes basic information regarding the menu structure, the screensetup, the keyboard and mouse control as well as a quick
introduction with the help of the sample archive
Part 3
shows you how to work effectively with Dr.DOC.
The individual topics are usually introduced with some brief details,
followed by the specific workflow. Topical examples and
supplementary hints illustrate the work options
Part 4
helps you to set up an archive step by step and to carry out a wide
variety of basic settings. As a system administrator you will also find
important information regarding the client/server operation here.
Appendix
includes a glossary, error messages and their treatment as well as a
comprehensive index.
- 14 - Manual: Division
The following subdivisions are helpful for extensive topics:
BRIEF INFO
!
initial basic subject information and a brief overview of the workflows
STEP BY STEP
!
the specific workflow
EXAMPLE
!
specific examples for the respective operation
TIP
!
ongoing information and suggestions regarding the subject.
Manual: Conventions - 15 -
CONVENTIONS
CONVENTIONS
In general, the following spellings are used in this manual:
•
Names of commands or menu items, which are selected:
e.g. "OK"
•
Commands, which are executed with one or several keys:
e.g. Ctrl + F4
•
Text, which has to be entered or which can be entered:
e.g. install c:\drdoc
•
Variables for another text, which must be entered:
e.g. file name.
•
Additional information especially for client/server applications:
C/S
•
"
Links to other subject information in other chapters of the manual:
FURTHER INFORMATION ..
#
...
- 16 - Manual: Important terms
IMPORTANT TERMS
Some terms are frequently used in the manual. Therefore we have provided
some brief explanations of these terms. Links to explanations of other terms are
referring to this list or to the comprehensive glossary in the appendix.
Archive
An application within the Dr.DOCprogram, for example a collection of written
documents and the respective available process potential, e.g. a word processing
interface. An archive does not necessarily have to contain documents - it may also be
used as a simple database, e.g. for address data.
Client/Server
A special type of network mode, which enables fully parallel working. The installation
chapter includes explanations and recommendations regarding various application
options.
Record
Saved → profile data with or without document. An → archive consists of a certain
number of data records.
Document
Administrative object consisting of →administrative data and →CI/NCI data.
Field
The → pofile data is entered into input mask fields, which can be unreservedly
determined. There are single-line fields, so-called continuous fields (for continuous text;
d.i. memo field) and tables (e.g. for a distributor).
Tab
On screen the → fields are arranged in tabs.
Mask
The grouping of → fields and → tabs on the screen.
Profile data
Descriptive part of a record for entering mostly ordering features, for example reference,
subject, person responsible etc. for easy retrieval of the document.
Thesaurus
"dictionary" of possible entries in the →profile data fields.
Introduction: - 17 -
INTRODUCTION
The following section provides some introductory information:
Dr.DOC and its philosophy
Legal status
Introduction: What is Dr.DOC - 19 -
WHAT
WHAT IS DR.DOC?
Dr.DOC could simplistically be called a very efficient database, which offers
more than just simple data management. Dr.DOC manages illustrations (socalled NCI documents) and "active" documents, e.g. CAD drawings, tables of a
table calculation or formatted, coded wordprocessing files (so-called CI
documents). In addition, Dr.DOC also manages the associated programs and
offers workflow components for workflow automations.
Dr.DOC is a hybrid system, which combines the advantages of objectorientated and relational systems.
=
object-oriented
+
relational capabilities
+
work-flow
With which programs does Dr.DOC work together?
Dr.DOC works with all application programs, so the user can carry on working
in the familiar program environment. During the archiving process the
documents are given a note (program app) indicating with which program they
are associated. When the document is called again, it is automatically opened
in the associated program and can be edited immediately without the user
having to know the path or program name.
PHILOSOPHY OF Dr.DOC
With Dr.DOC a revolutionary document management concept has been
realised. The following describes the basic ideas on which the development of
Dr.DOC is based.
- 20 - Introduction: What is Dr.DOC
What is the actual situation?
In the individual operational fields, many varied types of data are accrued
ranging from personnel data to written documents and all kinds of supporting
documents, which have to be recorded.
A wide variety of programs are then used to log and/or to process this data,
ranging from wage and salary programs to wordprocessing and invoicing or
bookkeeping programs.
In addition, there is progressive decentralisation in the area of data processing.
The decentralisation does not reduce the overwhelming quantity of data, but
with continual acceleration moves it over to the user. As a result, the user is
increasingly confronted with the management of data s/he produced.
Where is the problem?
An individual file or a handful of files can surely still be managed by data
processing without any additional assistance. But as soon as the papers leaving
the company are archived on disks and only the competent clerical staff knows
which document was archived on which disk and in which format, any senior
officer soon realises, e.g. when the clerical staff goes on holiday, how much
s/he is already affected by these problems, when s/he cannot find anything.
How can the situation be improved?
A management software, which can facilitate as many of the accrued tasks
while at the same spending the minimum amount on the familiarisation process,
is required.
Performance characteristic "User friendliness"
The most important performance characteristic of a modern program is by far its
user friendliness. Because through the related acceptance increase, a system's
yield and thus its profitability can be increased.
User friendliness can be defined in the following way:
User friendliness = reducing complexity
For example, an executive officer works in certain sectors of his comprehensive
field: he maintains addresses, writes a letter and afterwards deals with data security
and other work. The more of these sectors are included in his field, the more frictional
loss is caused each time when a sector is changed. It must therefore be the task of any
software to prevent these losses and to reduce the complexity for the user.
Introduction: What is Dr.DOC - 21 -
Which data management concepts exist?
The key to reduce complexity is in the organisational structure of the data and
the corrensponding access philosphy, the so-called databasing. There are two
relevant basic types of these data management concepts:
!
!
hierarchical, strictly relational systems
object-orientated systems
Simple object-orientated systems in the sense assumed here, do not have the
disadvantages of strictly relational systems regarding the complexity of data
maintenance; on the other hand they have no functional capacity for
overcoming sectoring (separation of the various fields). While hierarchical,
strictly relational systems administer individual records in a very complicated
manner, they are capable of linking different archives very well; this is exactly
the other way round for normal object-orientated systems: Managing the
individual record is very easy here, but the simple connection between the
different archives is not guaranteed.
What is the solution?
In Dr.DOCobject-orientated technologies are linked with relational system
characteristics. This hybrid system meets all the described requirements of a
DMS and a data warehouse system.
HYBRID SYSTEM Dr.Doc
Object-oriented
+
Relational capabilities
+
Processing
First of all, Dr.DOC is like other programs, which manage data, documents and
programs at the same time and also make provisions for future needs, i.e. is
object-orientated. This is the only way of guaranteeing the required flexibility per
se.
Relational or associative capabilities are also integrated in Dr.DOC, which help
to overcome the problem of sectoring with a hyperlink.
In addition, the user also has the advantage of not having to work strictly
hierarchically due to the link of object-orientated work and relational capabilities.
- 22 - Introduction: What is Dr.DOC
That is very advantageous in particularly for the user when carrying out
searches "quer" for possible hierarchies, as the search query can be formulated
much easier and the search generally also proceeds considerably faster.
The third component ist the so-called workflow capability, under which it is
intended to assume workflow editing in the widest sense in this case.
Based on these characteristics, it is possible to work with Dr.DOC in an objectrelated or a project-related manner.
How does the management change when Dr.DOCis used?
Dr.DOC can ensure a logical, comprehensive workflow. This should of course
ultimately also be implemented organisationally, e.g. by keeping a document
(as far as is permitted by law) only in electronic format on the system.
When a document is required again, the executive officer can make a purely
project and subject-related query without having to deal with the location of the
file, the program with which it has to be called or the folder in which the
concerning information can be found:
Question: What was agreed with XYZ regarding ...?
With Dr.Doc
Without Dr.Doc
Find "company XYZ and subject ..."
W hen was the event?
W here is the event filed?
Where is the folder?
Fetch/request folder
Browse folder
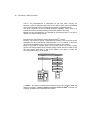
Document
Profile data
CI/NCI data
TEDI D
Name1:
Name2:
FAO
Street:
Town
Company
Ms Smith
Blumenstr. 3
90809 Neustadt
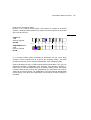
The document management
system you need is called
PFAFF ARCHIVE: no other i s
as fast , as fl exible, as
ef ficient.
See for yourself!
It leaves si mpl y nothing
Document
to be desired
See for yourself!
All your data can be
networked and you wil l f inal ly find
al l t he data on asubj ect
with one si ngle but ton!
The document management
system you need is cal led
PFAFF ARCHIVE: no other is
as fast, as flexible, as ef ficient.
See for yourself!
It leaves simply nothing
to be desi red
See for yourself!
All your dat a can be
networked and you will fi nall y find
al l t he dat a on a subj ect
with one single but ton!
AZ:
serial
Event:
Received:
9480/02
15
...
15/12/92
Do you know any other system
with so many advant ages? Some
of our customers have
lookedf or a long time and have not f ound
si milar!
The document management
system you need is called
PFAFF ARCHIVE:no other is
as fast , as fl exible, as effi ci ent.
See for yourself!
It leaves si mpl y nothing
to be desired
See for yourself!
All your data can be
networked and you wil l f inal ly find
al l t he data on asubj ect
with one si ngle but ton!
Do you know any other syst em
with so many advant ages? Some
of our customers have
looked for a l ong time and havenot f ound
si milar!
thi
In addition, all previous management workflows should be checked under the
aspect of Dr.DOC's diverse options. In many cases Dr.DOC can help you
to design workflows more efficiently than before.
Introduction: What is Dr.DOC - 23 -
User action
automat. action by Dr.Doc
Select address
Start word processing
Enter address on letter head
Write letter
and print
Start document management
Enter recipient, date etc.
Archive letter
Ready for next action
- 24 - Introduction: What is Dr.DOC
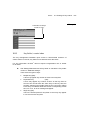
When is Dr.DOC particularly efficient?
Dr.DOC can be used as a hybrid data managent system in all work areas
where electronic data is gathered. The profitability is usually highest, when
Dr.DOC is used in as many areas as possible.
Dr.DOC helps to decrease operational costs. When using or implementing a
data management system, the acquisition cost for software and hardware is
only a small part of the total costs accrued.
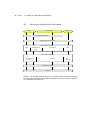
Cost apportionment
% 55
50
45
40
35
30
25
20
15
10
5
0
Software
acquisition
Introduction
Hardware
acquisition
Access
System
Coverage
maintenance
The largest part of the overheads are accrued through the registration costs for
the documents.
COST ASPECTS
Purchasing costs
Operating costs
Subject to:
User friendliness
Acceptance
Brief migration phase
Speed
Scope
By efficiently using Dr.DOC
in many operational fields
and by designing an efficient
work station these operating
costs can also be kept
comparably low.
Part of a "holistic" software like Dr.DOC is a holistic management frame in
technical as well as in "workstationphilosophical" respect. Dr.DOC should be
seen as a central component of the operational infrastructure, as motive and
instrument for optimising business processes. Dr.DOC is only a filing system to
a certain degree, it is more of a "retrieval" and "transport" system.
Introduction: What is Dr.DOC - 25 -
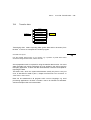
How are the documents filed?
Dr.DOC is a container based system. That means: In contrast to file based
systems, container based systems only require the memory space for the actual
size of the documents.
Example
FILEbased:
Total
memory required:
264 KB
Cluster
32
64
96
128
160
192
224
256
288
KB
CONTAINERbased:
Total
memory required:
85 KB
In a container based system practically all documents are put into a large
container, which portrays itself as a file for the operating system. This filing
principle permits any size of archives independent of the operating system.
Another advantage is that a container based system like Dr.DOC can carry out
sequential searches considerably more efficiently and therefore requires no
index trees for full text retrieval and thus no memory relating to this. And finally,
increased data security is thus also guaranteed: The documents can only be
called via the archive (which can additionally be secured through differentiated
access rights). The call or the manipulation of a document via a file manager is
excluded.
- 26 - Introduction: Legal status
LEGAL STATUS
The commercial code, the code of civil procedure, the fiscal code and the
generally accepted accounting principles regulate the filing of all electronically
archived data and the corresponding access controls. The Federal Data
Protection Act regulates the access controls and the maintenance of personrelated data even more strictly.
Storage in accordance with commercial and fiscal law
The legislator in Germany only stipulates that every businessman is obligated to
keep books. The legislator does not stipulate any technology regarding the type
of data storage, the legislator only makes certain process requirements:
•
•
•
proper transformation
proper storage
proper reproduction
The transfer from one medium to one of the same kind or to a different one is
called transformation. This transformation is in due form, if the storage
process is permissible, the transformation is complete, correct and
comprehensible and if the method is defined. The process must be documented
and verifiable. Therefore it must also be possible to determine who has archived
which documents. This can either be ensured organisationally or more simply
via the corresponding functions of the document management system (DMS).
The storage is in due form, if the data remains complete and stable during the
period of storage, the storage is ordered and the data is available at any time
and can be read again in adequate time. The data should therefore only be
archived on data media (WORM, CD) that is not rewrite-able, as the stability is
thus guaranteed per se. It is completely up to the user which order pattern is
realised with the help of the DMS, from a legal point of view every verifiable
fixed order is an order.
The reproduction must be readable and must be correct visually and/or correct
in its contents to be called in due form.
In addition, the commercial code and the fiscal code prescribe that a number of
document types, e.g. letters, consignment notes and accounting records, must
be reproduced visually, for the other documents a reproduction in substance is
sufficient. Documents, which have to be reproduced visually, as a CI document,
e.g. as a word processing document, can also be stored, if a visually identical
Introduction: Legal status - 27 -
printout can be reproduced using word processing functions (and that is
obviously the case for documents that were created internally).
Opening balances, annual accounts, group accounts and supporting documents
in connection with turnover tax on imports, i.e. customs documents, are
excluded from being archived purely electronically. These documents must also
be available in paper format.
To meet the stated requirements, it is necessary to stipulate the entire process
flow in writing. This also includes data localisation, data security and error
handling.
Dr.DOC meets the described requirements in accordance with the commercial
code, code of civil procedure, fiscal code and the generally accepted accounting
principals and can thus be used for purposes pursuant to commercial and fiscal
law.
The longterm service life of data media, which is often guaranteed for 30 years,
is of high quality. Nevertheless a second provision of security should not be
forgotten because of the danger of theft and fire.
If you want to or have to familiarise yourself in more detail with the subject "obligation to
preserve and record retention periods", we recommend specialist literature as regards
this, e.g. by the "Working group for commercial administration (registered society) AWV", Eschborn.
Note
Part 1 - 29 -
PART 1
The following chapters include
Information on technical specifications
Installation instructions
Part 1: Technical Specifications - 31 -
TECHNICAL SPECIFICATIONS
To work with Dr.DOC you require the following components:
!
Client or single user hardware:
•
•
!
PC (32 BIT)
Memory:
at least 16 MB RAM (64 MB RAM recommended)
if using the OCR module: at least 64 MB RAM
CD drive (for installing Dr.DOC)
3.5 disk drive"
Hard disk
Archive server hardware:
PC (32 BIT)
Memory: at least 64MB RAM,
problem
CD drive (for installing Dr.DOC)
3.5 disk drive"
Hard disk
!
subject
to
operating
system
Operating system:
Windows 95,´98, Windows NT or Windows 2000
in Dr.DOC N:
for separate archive/network server:
- Network server: any
- Archive server and clients:PC operating system (see above)
!
Mouse:
With MS-Windows compatible mouse.
!
Printer:
Any printer supported by MS-Windows.
!
Scanner:
Any scanner, which is controllable via Kofax or TWAIN.
!
Graphics support:
Any graphics cards and screens supported by the operating system.
and
- 32 - Part 1: Technical Specifications
!
Computer storage:
-
!
any storage medium, e.g. disk systems: CD, MO, WORM, jukeboxes.
Miscellaneous:
-
Application programs of all types
for transferring data to other programs: Programs with Macro language, e.g.
word processing (e.g. Word for Windows) or similar.
You will need Word for Windows 6.0, ´95 (7.0), ´97 (8.0) or 2000 (9.0) for
the transfer data Macro supplied as standard.
In addition, appropriate macros to transfer data can be created in all
programs with Macro language.
Part 1: Installation - 33 -
INSTALLATION
You can use Dr.DOC in various variations:
• Single user:
When used as single usersystem the program only runs on a computer
locally independent of any net that may exist. It cannot be accessed by other
workstations.
• Network:
Use Dr.DOC in the network to enable several users fully parallel access to
the same archives. There are two possibilities:
Standard net:
The data is kept centrally on a net server. A considerable disadvantage is the
extra burden on the network up to 1000 times. The use as standard net
should only be selected, if the client/server operation is not possible for
hardware technical reasons.
Client/Server:
The use as C/S system is preferable to the standard net. The burden on the
network, which is kept as low as possible, as well as increased access
protection and more data security are important criteria.
- 34 - Part 1: 1. Installation single user version
1.
INSTALLATION SINGLE USER VERSION
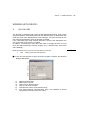
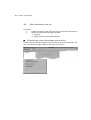
(1) To install Dr.DOC insert the Dr.DOC CD into the CD drive.
(2) If the installation program does not start automatically, proceed as follows:
either select the CD drive in Explorer and double click the file "Setup.exe"
(3)
(4)
(5)
(6)
(7)
(8)
(9)
or press the "Start"button and call the command "Execute...". Click on the
"browse"button in the "Execute" dialogue and select the "Setup.exe" file in
the CD drive and click on the "Open"button. Now start the installation
process with "OK"in the "Execute"dialogue.
The Dr. DOC Setup will be started. You can select the required language in
the first window
Dr. DOC Setup main options: Select "Install Dr.DOC...“
Install Dr.DOC: Select "Dr.DOC single user version" and confirm this
dialogue with "ok“
Welcome to the Dr. DOC installation program: Confirm this dialogue with
"OK".
Software license agreement: Read this agreement carefully and confirm
that you agree with the software license agreement with "OK".
Select destination directory: The path for the destination directory where
Dr.DOC will be installed is defined here. We recommend the path
C:\drdoc. With this path you can use the supplied standard letter templates
"brief.for“ directly to bring in data from the address management (demo
archive supplied on CD) to Winword. If you install Dr.Doc in a different
destination directory, please note that the path for the data source and for
the control file must be adapted in the Winword standard letter template.
Selecting the software components: Select the software components you
want to install the following dialogue.
Part 1: 1. Installation single user version - 35 -
Attention! Important update note!!!
DO NOT install the sample archives, if you are already using these for
archiving your important data and documents. (When the sample archives
are being installed, the existing data is overwritten).
1
2
3
4
5
6
1.
2.
3.
4.
5.
6.
Dr.DOC system files: Program and system files of Dr.DOC. (Click on
this item to install Dr.DOC )
WinWord data transfer: select when you want to transfer data from
Dr.DOC to Winword standard word documents.
Help: Dr.DOC offers an extensive help function, which can be edited
(recommended).
Sample archives: To familiarise yourself with Dr.DOC, you can install
sample archives including address management and document
management, (recommended for first installation).
Powerpoint Presentation: A self-running presentation, which introduces
the most important functions of Dr.DOC .
Scanner support: If you are using a scanner, state whether it is controlled
via a Twain or via a Kofax driver.
- 36 - Part 1: 1. Installation single user version
Note
1.) If you have problems with the internal Twain driver of your scanner, please refer
to the enclosed installation notes. If required, check the demo-driver under
www.cfm.de.
2.) The directories, in which the individual components are installed, can be
modified if required. We recommend to apply the suggested Dr.DOC directories.
(10) The following "Note“ will appear, if you install the "WinWord data transfer“
component:
Please check your items in "document association“ when next working with
DrDOC:
(call via the menu bar:
Settings / document association)
Please replace any existing item
WINWORD,DOC,[DrDocTv],[DrDoc.Openfile“%s“],[DrDocNew]
with
WINWORD,DOC,[DrDocTv.main()],[DrDoc.WEITERSUCHE“%s“],[DrDocNe
w.main()]
Confirm this note with "ok“ and check after exiting the installation.
The installation will now be executed.
(11) Install program symbols?: Select whether you want to add the Dr.DOC
program symbol to the start menu.
If you are working with MS-Office ´97 or later versions, the installation is now
completed. The Winword macros are installed with the template file drdoc.dot. In
older versions the macros are installed as follows:
(12) Winword macros installation
• Word processing macro: Determine whether the Winword macros for
transferring data are to be installed now:
• If you have answered the question with "Yes", Winword will be
automatically started and the document drdocmak.doc will be opened. If
you receive a Word query asking whether the document should be
opened without macros, be sure to select "No".
Part 1: 1. Installation single user version - 37 -
• The window "Transfer data macro Dr.DOC" contains some basic
information on transferring data
• Set path details: The local working directory is "c:\drdoc\tmp" as standard.
We recommend that it is adopted.
• When the installation of macros is completed, please ensure you close
the Winword program again to complete the Dr.DOC installation.
(13) Completing the Dr.DOCinstallation:
Successful installation is completed with a corresponding message. Restart
Windows when prompted.
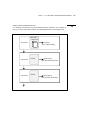
- 38 - Part 1: 2 Installation Client/Server
2.
INSTALLATION CLIENT/SERVER
Basics
There are two possiblities for the configuration of network server, archive server
and clients. The configuration (B) is recommended to ensure optimum
performance and data security.
(A)
The network server and the archive server are on the same
computer:
Client
C:
NS/AS
C: + E:
Client
C:
This configuration is only purposeful, if you do not have your own computer as
an archive server, if the network server has sufficient memory capacity and if it
is not already used to capacity. This mode is not possible in Novell nets.
Part 1: 2 Installation Client/Server - 39 -
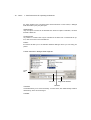
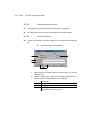
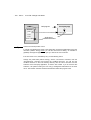
(B)
Recommended configuration:
The archive server is a network client:
Client
Client
ARCHIVE
NETWORK-
SERVER
SERVER
Client
Client
The data security is considerably easier to guarantee with this optimum
configuration. The archive server is not released for direct access, the clients
only have access via the WIN sockets function and thus only within the Dr.DOC
program.
Thus manipulation of data outside of Dr.DOC is ruled out (this security can be
increased even more, if the computer is put in a locked room). Within Dr.DOC
the data can also be very well protected through the differenciated user set with
access rights that can be defined freely.
In addition, further server processes for an abundant, failure-safe and scalable
system or for distributed data maintenance can be used.
CLIENT
NETWORK
SERVER
CLIENT
CLIENT
ARCHIVE
SERVER
ARCHIVE
SERVER
1
2
Data
Data
- 40 - Part 1: 2 Installation Client/Server
Installation
(1) To install Dr.DOC place the Dr.DOC CD into the CD drive.
(2) If the installation program does not start automatically, proceed as follows:
either select the CD drive in Explorer and double click the file "Setup.exe"
or press the "Start"button and call the command "Execute...". Click on the
"browse"button in the "Execute" dialogue and select the "Setup.exe" file in
the CD drive and click on the "Open"button. Now start the installation
process with "OK"in the "Execute"dialogue.
(3) The Dr. DOC Setup will be started. You can select the required language in
the first window
(4) Dr. DOC Setup main options: Select "Install Dr.DOC...“
(5) To install the net version select the relevant line, select the number of users
and confirm with "ok“. You require two "keys" for a N2 license (you will
receive these with the delivery note when ordering a N2 license). For N5
and higher you require the relevant dongle, which you clip onto the archive
server's parallel port.
(6) Welcome to the Dr. DOCinstallation program: Confirm this dialogue
with "OK".
(7) Software license agreement: Read this agreement carefully and confirm
that you agree with the software license agreement with "OK".
(7a) For a N2 version, the two "keys“ will now be queried, enter these without
blanks and confirm with "ok“ (for better legibility we supply the keys with a
blank after every third character)
(7b) Select the type of installation:
Select which task the computer to be installed is intended to have. Whether
it is used as "Client“ or as "Archive server".
2.1
Installation Archive Server:
(7b) Select the "Archive Server“ item and confirm with "ok“
(8) Select destination directory: The path for the destination directory where
Dr.DOC will be installed, is defined here. We recommend the path
C:\drdoc.
(9) Selecting the software components: Select the software components you
want to install in this dialogue.
Part 1: 2 Installation Client/Server - 41 -
1.
2.
3.
4.
5.
6.
7.
Dr.DOC system files: Program and system files of Dr.DOC. This item
must be clicked to install Dr.DOC
WinWord data transfer: Deactivate to install the archive server
Compound functions for Winword: Deactivate to install the archive server
Help: Dr.DOC offers an extensive help function, which can be edited:
Recommended component
Sample archives: Deactivate to install the archive server
Powerpoint Presentation: A self-running presentation, which introduces
the most important functions of Dr.DOC ; Deactivate to install the
archive server
Scanner support: If you are using a scanner, state whether it is controlled
via a Twain or via a Kofax driver; deactivate to install the archive server.
(10) The following "Note“ will appear, if you install the "WinWord data transfer“
component:
Please check your items in "document association“ when next working with
DrDOC:
(call via the menu bar:
Settings / document association)
- 42 - Part 1: 2 Installation Client/Server
Please replace any existing item
WINWORD,DOC,[DrDocTv],[DrDoc.Openfile“%s“],[DrDocNew]
with
WINWORD,DOC,[DrDocTv.main()],[DrDoc.WEITERSUCHE“%s“],[DrDocNe
w.main()]
Confirm this note with "ok“ and check after exiting the installation.
The installation will now be executed.
(11)Install program symbols?: Select whether you want to add the Dr.DOC
program symbol to the start menu.
(12) Completing the Dr.DOCinstallation:
Successful installation is completed with a corresponding message. Restart
Windows when prompted.
(13) The configuration of the Dr.Doc server process icon must be as follows:
print to: <path>\docserv.exe <path>\<name of the user set>.bvd <path for
Dr.Doc communication directory>
Note!
"
The archive and the user set must be created on the archive server before
the
server
process
is
started
for
the
first
time!
Start the drdoc.exe program (in the "drdoc/system“-directory) on the
archive server
SUBJECT INFORMATION:
"SET UP ARCHIVE“ SEE CHAPTER 14
"USER SET“ SEE CHAPTER 16
Part 1: 2 Installation Client/Server - 43 -
2.2
Client installation:
Basics:
There are principally two possibilities for setting up the Dr.DOCclients:
(A)
Central program and help setup
The program with all files and applications must be made available
centrally on the archive server or on the network drive.
To set up the client, Dr.Doc must be installed locally once. Afterwards
the local directory "drdoc/system“ is removed again.
(B)
Local part setup of program and help
In addition, the program and/or online help is locally at the archive client.
The local installation of the program on the client is necessary, if the
clients are equipped with different operating systems.
When configuring the Dr.Doc
client icon, you must refer to "drdoc.exe“.
Installation:
Starting the setup at the client as described in the installation under 2.1 of (1)(7a)
"Setup of the archive server“. Afterwards proceed as follows.
(7b) Select the type of installation: Select the task the computer to be installed
is intended to have. Select "Client" and confirm with "ok".
(8) Select destination directory: The path for the destination directory where
Dr.DOC will be installed, is defined here. We recommend the path
C:\drdoc, if Dr.Doc is to be installed locally.
(9) Selecting the software components: Select the software components you
want to install in this dialogue.
- 44 - Part 1: 2 Installation Client/Server
1.
2.
3.
4.
5.
6.
7.
Dr.DOC system files: Program and system files of Dr.DOC. This item
must be clicked to install Dr.DOC
WinWord data transfer: If this function is required, it must be activated for
the client installation
Compound functions for Winword: Possible option for client installation
Help: Dr.DOC offers an extensive help function, which can be edited:
recommended
Sample archives: Deactivate to install the client
Powerpoint Presentation: A self-running presentation, which introduces the
most important functions of Dr.DOC ; Possible option for client installation
Scanner support: If you are using a scanner, state whether it is controlled
via a Twain or via a Kofax driver; activate at scanner key stations
(10) The following "Note“ will appear, if you install the "WinWord data transfer“
component:
Please check your items in "document association“ when next working with
DrDOC:
(call via the menu bar:
Part 1: 2 Installation Client/Server - 45 -
Settings / document association)
Please replace any existing item
WINWORD,DOC,[DrDocTv],[DrDoc.Openfile“%s“],[DrDocNew]
with
WINWORD,DOC,[DrDocTv.main()],[DrDoc.WEITERSUCHE“%s“],[DrDocNe
w.main()]
Confirm this note with "ok“ and check after exiting the installation.
The installation will now be executed.
(11)Install program symbols?: Select whether you want to add the Dr.DOC
program symbol to the start menu.
(12) Completing the Dr.DOCinstallation:
Successful installation is completed with a corresponding message. Restart
Windows when prompted.
(13) Start Dr.Doc 6.0 and log on via "Archive/user login“(enter host name or
IP address of the archive server and log on name with password).
Afterwards select an archive (menu item "Archive/select“).
- 46 - Part 1: 2 Installation Client/Server
Note!
The archives and the user set must have been created on the archive
server
before
the
first
log
in
action
at
the
client!
In addition, the Dr.Doc -server process must have been started on the
archive server.
(14) Exit Dr.Doc
and save the settings.
(15) Optional configuration of the Dr.Doc
#
client icon
Direct archive call via IP address or host name
- Minimum configuration:
<Path>\drdoc.exe <host or IP address of the archive server>
<Port No.> <archive name>
- Extended configuration:
<Path>\drdoc.exe <host or IP address of the archive server>
<Port No.> <archive name> <path>\whilfe <host or IP address
of the archive server>\ <Name of Dr.Doc user set>.bvd
(16) When Dr.Doc
automatically.
is called next time, the log on dialogue will appear
transforming sample archives into C/S applications:
If you have installed the sample archives locally on the archive server and want
to make them available to all clients, carry out the transformation for every
archive as described in chapter 24.
transformation of local online help into central application:
If you want to make the online help available centrally to all clients, carry out the
transformation as described in chapter 24.
Part 1: 3. Installation in the standard network - 47 -
3.
INSTALLATION IN THE STANDARD NETWORK
You want to set up Dr.DOC in the network to enable several users access to
the various archives. So the archives are centrally on the server. The program
can either also be central (prerequisite: all connected workstations have the
same operating system) or it can be installed locally on every workstation.
The installation for the default network operation is always done from one
workstation. Carry out the following action:
1. Place the Dr.DOC diskette labelled "Disk1" or the Dr.DOC CD into the
corresponding drive.
2. Start your operating system, select the CD or disk drive in Explorer and
double click on the "setup.exe" file.
OR:
Start your operating system, select the START button in Explorer, call
"Execute" and enter the following in the "Execute" window: drive\setup
drive stands for the name of your drive. (e.g. a:)
3. Follow the detailed installation instructions and answer the queries according
to your requirements.
Also take a look at the enclosed supplementary "installation notes".
"
- 48 - Part 1: Changes from earlier versions
UPDATE INFORMATION
If you have already worked with Dr.DOC 4.x, the existing data, fields and forms
will be adopted.
A reorganisation is carried out - after a corresponding message - to adapt the
data.
Note
If required, follow the enclosed separate update information!
Part 1: 3. Installation in the standard network - 49 -
CHANGES FROM EARLIER VERSIONS
If you have already worked with previous versions, the following will give you an
overview about important new additions and changes.
But even if you have never worked with Dr.DOC before, this information may be
interesting as an initial insight.
% WIN sockets – C/S - communication
•
•
•
•
•
Based on Internet standard: TCP/IP protocol
Increased performance and security:
user set, database configuration files and communication folders are no
longer accessible by the client at Explorer level.
Client only requires host name or IP address, port number and archive
name for communication
Efficient administration
Simplified archive structure
% Automatic generation of new document containers:
•
•
•
The container size can be set up to a maximum of 2 gb.
The default size is 600MB, this allows simple swapping of containers on
CD
When the predefined container size is reached, a new container is
automatically created;
Forming a container pool with firmly predefined container structure is
possible
% Tree view
•
•
User friendliness is increased with a clearer program interface.
The Dr. DOC program window is divided into three parts for clear data
and document presentation
1. Tree view or virtual filing/folder structure
2. Tabular select list
3. detailled record view
- 50 - Part 1: Changes from earlier versions
% New Twain module:
•
•
The current TWAIN standard 1.8 driver (CFM-TWAIN driver V.5.2) is
supported
Thus achieving increased compatibility with a variety of scanner types
% New scan module:
•
•
•
•
•
New OCR and barcode module
has been integrated
The following barcodes are recognized: Check Code 39, Check
Interleaved 25, Code 128, Code 39, EAN 13, EAN 8 and Interleaved 25
New function "Barcode as document separator“
In "batch mode“: the barcode can be used as document separator for
automatic archiving.
Batch mode:
• Processing files in batches: Registration of NCI documents with
simultaneous OCR recognition possible
• Processing files in batches: Multipage documents can be completely
adopted
% Expanded e-mail interface:
•
•
Compatible with MS Outlook, MS Outlook Express and Netscape
Messenger
Sending e-mails from Dr.DOC:
• E-mail types:
mail;
MS Outlook in addition:
task, appointment
• Appendix:
profile data, documents;
MS Outlook: in addition:
link (calling Dr.DOC document from MS
Outlook e-mail)
% Automatic log in with NT log-in name:
• Length of the log-in name longer than 7 characters
• The network log-in can optionally be coordinated for all users or userspecific
Adaption option for existing user set
Part 1: 3. Installation in the standard network - 51 -
% COLD viewer:
•
TIFF and JEPEG in addition to BMP are now also allowed as document
form image templates
% New data type "XD“ for "date and time:
% Field pre-valuation for new entry possible
% Workflow:
Apart from the previous "ad hoc" workflow (now renamed "transfer data")
there is now also a complex workflow system with graphic workflow manager
for controlling the document flow and for modelling workflows in companies.
Please find information about the comprehensive new workflow system in the separate
instructions.
"
Part 2 - 53 -
PART 2
The following section describes
how to gain an initial insight into Dr.DOC
how to start and exit Dr.DOC
how to call menus and activate commands
Part 2: 5. Quick approach: Simple workflows - 55 -
QUICK APPROACH
4.
SAMPLE ARCHIVES: OVERVIEW
Before you start:
As you already know, Dr.Doc allows you to create your own applications - databases, archives - according to your exact ideas. Some preproduced sample
archives are available to facilitate your first attempts. You may keep these as
they are or redesign them for your purposes.
The following is supplied:
Address management
for addresses, bank details, photos, marketing information;
with WinWord data transfer-standard letter document and
subsequent archiving in document managment
File plan
as a Thesaurus for document management
Supporting documents
archive
as a Thesaurus for document management and purchase/sales
User archive
for information on individual users; with additional information shortcut to address management
Library management
for bibliographic data, drawing up inventories, acquisition,
lending out, Thesaurus for keywords
Image archive
for sample purposes for different documents
Purchase/Sales
With archiving of supporting documents, stock management,
dunning; shortcut to address management as Thesaurus
Stock management
for merchandise stock; shortcut to address management as
Thesaurus
Press archive
for bibliographic data, keywords, archiving newspaper articles etc.
Document management
for incomings/outgoings; with shortcut to address management
The most important and most used sample archives are address management
and document management. The following chapter shows initial simple workflows based on these two archives.
Address management:
- 56 - Part 2: 5. Quick approach: Simple workflows
1st tab
2nd tab
3rd tab
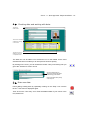
Part 2: 5. Quick approach: Simple workflows - 57 -
Document management:
1st tab
- 58 - Part 2: 5. Quick approach: Simple workflows
2nd tab
3rd tab
4th tab
Part 2: 5. Quick approach: Simple workflows - 59 -
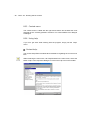
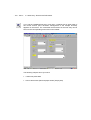
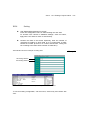
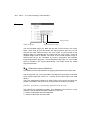
5.
FIRST ATTEMPTS - SIMPLE WORKFLOWS
!
Start Dr.Doc:
Double-click the Dr.Doc icon in the Windows program manager or select the
symbol using the direction keys and invoke with ENTER or select the symbol on
the programs start menu.
"
Select archive:
Menu item "archive / select" call:
Mark this entry
and confirm with "OK".
#
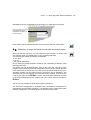
Find and retrieve:
Initially, find existing sample data to familiarise yourself with the address management:
- 60 - Part 2: 5. Quick approach: Simple workflows
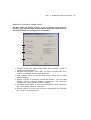
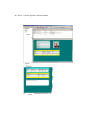
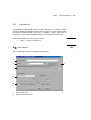
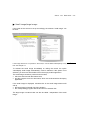
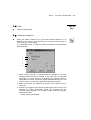
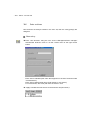
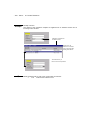
When you click on the "search fields"icon, the following dialogue form appears.
Enter "*“ in the "Name“ line. You will receive all records containing an entry in
this line, as the search result.
Start "find" with the key combination CTRL+S or the icon - a hit list will be
displayed:
Part 2: 5. Quick approach: Simple workflows - 61 -
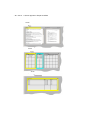
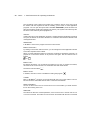
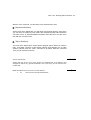
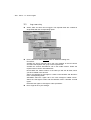
$
Checking data and working with data:
The data are
divided in tabs.
The document "Kleinbild"
is displayed by clicking
on the window.
The table can also be
displayed in large view
in a separate window.
The data can now be edited. You will find an icon on the toolbar for the most
essential functions to enable you to call up these functions quickly.
By clicking on the icons, you can browse the results. Carry on browsing until you
get to the "Practice Dr. Pichl" record.
Click on the additional info icon:
The document management displays
a letter belonging to this address.
Return to the address data by clicking
on the “Stop” icon.
%
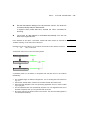
Enter new data:
Finish editing existing data by repeatedly clicking on the "Stop" icon until the
Dr.Doc start menu is displayed again.
Then click on the "new entry" icon. Enter the address data of your choice in the
new, blank form.
- 62 - Part 2: 5. Quick approach: Simple workflows
Save the record by clicking on the save icon; a new data record has been created. You can create more records or exit the function by clicking on the "Stop“
button.
It is best to test the archiving of new documents in document management.
Click on the "Stop" icon again until the Dr.Doc start menu is displayed. Then
call document management (as described under " ) . Initially try archiving any
file:
Call the document association using the icon.
For source and view, mark the Autolink option and confirm with "OK".
Also check the document source (menu item "Settings/Document source"): the
"file" option must be selected.
After these preparations you can start with a new entry via "Database/New entry“ or the corresponding icon.
Start archiving the file now with "Document/New" or the corresponding icon.
Select the file you want to archive from the file-selection dialogue.
Part 2: 5. Quick approach: Simple workflows - 63 -
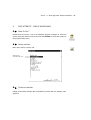
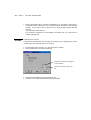
Afterwards enter the profile data of the document. To make this entry simpler:
IIf e.g. you click on "T" here,
kyou obtain a list of file
indicators to be taken over
from the file plan
Enter further data as required and then save the record with the "save button“.
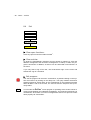
&
Redisplay, change and save record with document again:
When you exit the new entry, you can retrieve the record again. To do this, call
text retrieval. Enter any (partial) term of your record's profile data.
The following association characters are available:
„&“ for "and"
„|“ for "or"
( ) for logical delimitation
Do not allow any blanks between keywords and association characters. Start
searching with "OK".
The record can now be viewed again. Click on the "Text" tab. The name of the
program, where the document was created and where it can be viewed, appears
in the window for the document. If you click on this document window, the corresponding program will be started and the document will be displayed. The
document can now be changed. If the document was modified, save and close
it. When you return to the Dr.Doc screen, you will be asked whether you want
to save the modified document. Confirm with "yes“ to also save the changes in
Dr.Doc.
This is only one example for archiving any type of document.
The document management is associated with the address management to
automatically archive letters. WinWord – documents can be created from within
address management. The following section describes this process.
- 64 - Part 2: 5. Quick approach: Simple workflows
'
Transfer data - create letter and archive:
Call address management again and find one or several records.
Then click on the "transfer data" icon.
The selected record shall be
transferred to brieffor.doc,
the specimen serial file in Winword.
The data is automatically imported. The content of the letter is not restricted.
When the letter is finished - saved and is to be registered in Dr.Doc , click on
"Dr.DOC archiving“ (appears on the WinWord menu bar). If you want to save
the letter prior to registration, simply click on the "Save“ button in Word. The
letter is then automatically saved under the predetermined name in the predetermined directory.
After you have clicked on "Dr.DOC archiving“, you will automatically return to the
Dr.Doc document management. The name of the recipient is automatically
entered in the relevant field. You can enter further profile data. To finish the
process, click "Save".
To retrieve the letter - e.g. directly in document management - call document
management and start the text retrieval. If you now also activate the "search in:
documents" option you can search for any word from your letter.
To view the record and the document, follow the steps described above.
Finally:
Part 2: 5. Quick approach: Simple workflows - 65 -
You have now met some of the basic principles of Dr.Doc . The respective
chapters of the manual describe in detail the procedures for individual workflows
and include examples.
- 66 - Part 2: 6. Prerequisites
Basics
6.
PREREQUISITES FOR WORKING WITH DR.DOC
Before you work with Dr.DOC you should familiarise yourself with the basic
Windows operating sequences.
Knowledge of how to use the (individually different) programs, from which
documents are intended to be archived, is mostly assumed. The basic workflows for Winword are explained with examples, e.g. for transferring data to
word processing.
If you are not yet familiar with Windows, the following chapter will provide a brief
introduction of the most important basic elements.
Part 2: 7. Brief instructions for operating in Windows - 67 -
7.
BRIEF INSTRUCTIONS: OPERATING IN WINDOWS
This chapter describes the basic elements for operating in Windows. You can
find more information on working with Windows in the Windows user guide.
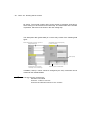
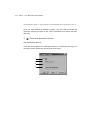
Window
A window may look like this:
System menu
Button "cloWindow
Title bar
Menu command
Menu bar
Icon
"Icon“ button
Toolbar
Indicates an overlapping menu
Status bar
Window corner
System menu field:
se“
- 68 - Part 2:
7. Brief instructions for operating in Windows
The commands of the system menu enable you to enlarge, reduce, move and to close
the window with the keyboard as well as enabling you to switch to other application
programs. You can open the system menu with ALT+SPACEBAR. (These functions can
also be executed by clicking and dragging the mouse). The system menu field may also
be shown in the same way as the program icon.
Title bar:
contains the name of the application program. If several windows (application programs)
are open, the title bar of the active window is in a different colour than the title bar of the
unassigned window.
Window title:
in Dr.DOC: Name of the program and of the active archive.
Button "full screen":
by clicking on this button with the mouse, you can enlarge the active application window
so that the complete screen is filled.
When you have enlarged a window to full screen, the button is replaced by "Restore". Its
purpose is to restore the window to its previous size again. The two buttons look as
follows:
or
Button "Icon":
By clicking this button, you can reduce the window to icon size. To restore the window,
move the mouse cursor onto the icon and double-click with the left button.
The button looks as follows:
Button "close":
In addition, the button "close" is available for exiting the program:
Toolbar:
Many of Dr.DOC's functions can be executed with the icons on the toolbar. The toolbar can be shown and hidden with the menu command "View/toolbar".
Quick information:
As soon as the mouse cursor is moved onto an icon of the toolbar, you obtain information on the meaning of the icon.
Status bar:
The status bar will show a brief explanation, if the mouse cursor is moved onto an icon
or a menu command. The status bar can be shown and hidden with the menu command
Part 2: 7. Brief instructions for operating in Windows - 69 -
"View/toolbar".
Window corner:
You can enlarge or reduce the window on two sides at the same time with the window
corner. Click on one corner, hold the left mouse cursor down and enlarge/reduce the
window to the required size.
Menu bar:
shows the available menus.
Menu command:
a menu contains the individual functions (menu commands), which are called by clicking
or by selecting using the keyboard. Blanked functions are not available. A triangle on the
right hand side next to a function indicates an overlaid menu, which lists additional
commands.
Dialogue field
Within programs, additional information or commands are shown in dialogue
fields. A dialogue field may include the following elements:
Control boxes
Option button
Command button
Command button:
- 70 - Part 2:
7. Brief instructions for operating in Windows
the action stated on the command button will be executed. In some cases, a dialogue
field with another query may also open.
Option button:
only one option at a time can be selected here. When an option is selected, it is identified with a black dot.
Control boxes:
any number of control boxes may be activated at the same time. To deactivate an option, click once more on the activated box.
Printer:
this button will take you to the standard Windows dialogue where you can setup your
printer.
Further elements in dialogue fields might be:
Scroll
bar
Text field
Single-line list field
List field
Text field:
A text field allows you to enter text directly. In some cases, such fields already contain a
default entry, which can be changed.
List field:
Part 2: 7. Brief instructions for operating in Windows - 71 -
A list field shows various selection options (e.g. file names). If there are more options,
which do not fit into the list field, you can scroll up and down or left and right using the
scroll bar. You can click with the left mouse key on one of the arrows of the scroll bar or
drag the scroll field while holding down the left mouse key.
Single-line list field:
the initial single-line field shows the current selection. By clicking with the left mouse key
on the arrow symbol next to the field, a list box is opened allowing the user to select
another entry. If the list box was opened, but the user does not want to change the current entry, a mouse click next to the list box (i.e. in the "blank space") will close the selection without applying any changes.
The file-selection dialogue shown in the above illustration is identical for many
menu items in Dr.DOC. Therefore we would like to include some basic instructions at this point:
File name:
If the list field is empty, this indicates that no files with the extension stated in the text
field exist in the current directory. The file format, which the files listed beneath it have
(e.g. *.BMP), is initially always shown under FILE NAME in the text field.
Overwrite the file format with another one if required (e.g. *.DOC instead of *.BMP). This
change will be applied, as soon as you click on "OK".
A click on an entry in the list box applies this entry to the text field and thus selects it for
the required action. (Exception: if the batch mode is activated, several entries can be
selected in the list box at the same time. In this case, the program will not make an entry
in the text field).
The files can be viewed in list format or with detailed information for every file.
File format:
The file format can also be selected from a list for image files. To select another file
format, click on the arrow symbol next to the field to open the list box, in which another
format can be selected.
Directory/folder:
Next to LOOK IN the current directory is displayed, e.g. C:\DRDOC. Always check that the
directory stated here is the one you require! If this is not the case, another directory can
be selected from the list box below.
The corresponding icon also allows you to change to the next directory.
If a document is to be exported to a directory (folder) that has not yet been created, this
can easily be done with the icon.
- 72 - Part 2:
7. Brief instructions for operating in Windows
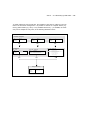
Part 2: 8. Workflow - 73 -
8.
WORKFLOW: START - WORK - EXIT
Brief information
Start Windows
Windows
starten
Start Dr.
Doc
Dr.Doc
starten
Archiv archive
wählen
Select
Mit
Working
dem Archiv
with an
arbeiten
ar-
Exit Dr.
Doc
Dr.Doc
beenden
- 74 - Part 2: 8.1 Start
8.1
Start
Start Windows
Start Dr.Doc
Select archive
Working with an archive
Exit Dr.Doc
STEP BY
STEP
!
Start Windows:
If you have not done so yet: start Windows.
"
Start Dr.DOC:
Double-click the Dr.Doc icon in the Windows program manager or select the
symbol using the direction keys and invoke with ENTER or select the symbol on
the programs start menu.
An (authorized) user must be logged in with name and password for an active
user set.
For C/S mode it is necessary to also run the server program (will be set up on
the server during the installation) while working. This program creates the communication between archive server and individual clients (independent of the
network protocol). Start this program on the archive server with the corresponding icon in Explorer.
)
FURTHER SUBJECT INFORMATION:
(
Part 4 BASIC NOTES FOR THE C/S SYSTEM ADMINISTRATOR
Part 2: 8.1 Start - 75 -
#
Select archive:
Menu item "archive/select" call on "archive" menu. Select the required archive in
the list box and invoke by double-clicking or with the command "OK" (see also
chapter 9 SELECT ARCHIVE)
If an archive does not yet exist or a new one is to be created, call the menu item
"Archive/new" (for detailled information see chapter 14 SET UP ARCHIVE)
Attention
The program is equipped with the option of a user set, in which users with various access rights can be defined.
To be able to call an archive for the first time, a supervisor (= highest level of access;
access to entire program) is automatically determined. If this supervisor exists, there will
be no further query when the archive is called. If a user set is not required, this entry
should definitely not be deleted in a single user version.
If the user set is intended to be used in a single user version or if several net licenses
exist, allowing several users to work at the same time, this existing user entry must first
be deleted and a personal supervisor-user with password must be set up immediately in
the same operation! Please take note of the corresponding chapter 16 USER SET.
- 76 - Part 2: 8.1 Start
ADVICE
Start a certain archive automatically as soon as a program is called
Optionally, the names of an archive, of a certain helper application or of a user set can
be transferred, when the program is started.
Select the Dr.DOC icon (i.e. not a double-click). Then call the "Characteristics" command.
In the "print to" command input data according to the following pattern:
drdoc path\archive path\help path\user set
Example
c:\drdoc\system\drdoc.exe c:\drdoc\letters c:\drdoc\help\whilfe c:\drdoc\system\bvw
Confirm with "OK".
If you now double-click the Dr.DOC icon, the stated archive is automatically called.
)
ADVICE
There are also further options for automatically logging in users. Please study the corresponding chapter.
Automatically restart the archive that was last edited, when the program is called
Part 2: 8.1 Start - 77 -
When the program is exited, the archive, the help and the user set that have been
called, are optionally saved. If this setting is saved with "Yes", this combination is automatically called again, when the program is next started. (Exception: if, as described in
the advice above, a certain archive is called when the program is started, the last saved
setting is ignored).
An existing archive cannot be found in the user set
ADVICE
If you do not find an existing archive in the user set, this may be for several reasons:
•
The archive is listed on the user set list under another name. Example: The archive
was created named "letters". But "document management" is entered in the user set.
•
The archive is not entered in the user set you have called. The entry is only possible
in one user set. If the archive is not yet entered in a user set, it can be included via
the menu item "Management/user manager".
Please note for C/S archives:
C/S archives are only opened by the client via "archive/select“.
At the archive server, C/S archives can be opened from the subdirectory
KOMM\SERVER at the network server.
C/S
Part 2: 8.2 Working with an archive - 79 -
8.2
Working with an archive
Start Windows
Start Dr.Doc
Select archive
Working with an archive
Exit Dr.Doc
All options for working with Dr.DOC are individually described in detail in part 3
and 4 of the manual.
As an initial overview, you will find out about the following:
• the menu items and functions that Dr.DOC offers and how they are apportioned
• the appearance of the user interface
• the keyboard and mouse control in Dr.DOC
• the use of the online help.
- 80 - Part 2: 8.1 Start
8.3
Working with an archive
Start Windows
Start Dr.Doc
Select archive
Working with an archive
Exit Dr.Doc
All options for working with Dr.DOC are individually described in detail in part 3
and 4 of the manual.
As an initial overview, you will find out about the following:
• the menu items and functions that Dr.DOC offers and how they are apportioned
• the appearance of the user interface
• the keyboard and mouse control in Dr.DOC
• the use of the online help.
Part 2: 8.2 Working with an archive - 81 -
8.3.1
Overview of the menu structure
The menu...
offers:
Archive
*
Select archive, create new archive, open archive, close archive, enter
archive in user set, log on and log off user, workflow activity list and editor,
exit Dr.DOC
Edit
*
undo, cut/ copy/ paste/ delete, select all, print field contents, field rights,
reproduce, call Thesaurus, call additional info
View
*
Show/Hide toolbar, status bar, tree view and select list
Automatically show small and large image, show large image floating
freely, large image in foreground, grey scale presentation for black/white
images, adjust large image to window size/width/height, 100%, userdefined, show redlining, keep entry position (=cursor position in profile data)
for next record
Database
*
New entry, text retrieval, search fields, search fields with template,
Import in ASCII/ANSI or DBASE format
Export in DBASE format
Information on the current archive, e.g. number of records and size of
profile data and archived CI/NCI documents
Record
*
Save, cancel editing, next, back, allocate workflow, transfer data, e-mail,
print, import and export in ASCII/ANSI format, copy, delete, replace, permissions, owner
Document
*
New, view, export; attach/discard image, redlining editor, print/ export/
delete/ zoom/ rotate 90°, 180°, 270° large image, back, next
- 82 - Part 2: 8.2 Working with an archive
Settings
*
Document source setting (e.g. file, OCR scanner, third-party application
etc.), and the program association of archived documents
Version management
Batch mode for file or archiving of paper submissions; in addition: automatic archiving
video view, compression, print setup
Select mask; field selections for search templates, selection list, column
titles, sorting, print tables, preserve field entries (new entry), output duplication check, data transfer archiving, ASCII import/export, d-BASE import/export, data types, automatic fields, mandatory fields, key fields, input
duplication checks, field selection table;
Formula for statistics, automatic calculations etc.
Hypersearch definition; template search,
Thesaurus and additional information definition, calculation definition
Workflow
Management
*
Edit archive parameter
Setup archive (all archive, forms and field definitions)
reorganise archive, unset, delete; New numbergenerator; Copy archive
structure, archive rights, user information, user manager
Window
*
Arrange overlay
Help
*
Index, topics, context, select help, about Dr.DOC
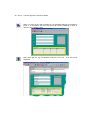
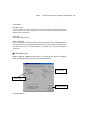
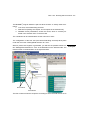
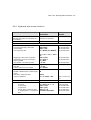
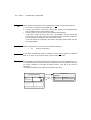
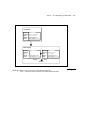
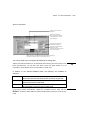
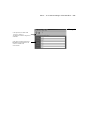
8.3.2 Screen setup/user interface
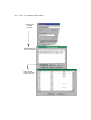
When an archive is called, you see the Dr.DOC basic menu on the screen. You
can enlarge, reduce or move this window.
If an archive and a record within it has already been selected, you may see the
following on your screen. The toolbar and status bar can be shown or hidden
under the menu item "view":
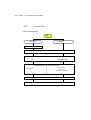
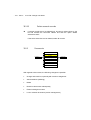
Menu bar
Tree view
Title bar program
Toolbar
Name of the
tabs
Select list
Database field "Image“
Tabs
(small image/preview)
Field identifier
Status bar
Table
Part 2: 8.2 Working with an archive - 83 -
The Dr. DOC program window is split into three sections to clearly show documents.
1. Tree view; virtual folder-filing structure
2. Selection list (setting see chapter 18.2.2 Outputs in the selection list)
3. Detailled record presentation; shows the record, which is currently selected in the selection list or in the tree view
The 3 windows can be shown/hidden via the menu item "View“.
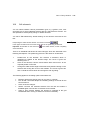
The configuration of the tree view (the virtual folder-filing structure) takes place
under the menu item "Settings/field selection for../sort“.
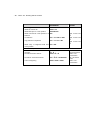
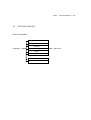
When a postal code register is generated, you will see the possible entries under "Settings/field selection for../sort“ in the illustration on the left hand side. The
result is shown in the illustration on the right hand side.
2nd number
3rd number
The first number means the sequence according to which the field entries are to
Example
- 84 - Part 2: 8.2 Working with an archive
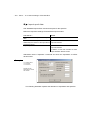
be shown. The second number refers to the number of positions according to
which sorting is to be executed in an initial step. The third number is the number
of positions, which are to be shown in the next sorting step.
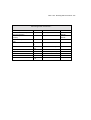
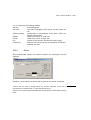
The description data (profile data) of a record may consist of the following field
types :
Endless field: clicking in the bottom right corner
enlarges the field view.
Several fields can be grouped optically
by means of a frame.
Switch (on/off)
Single-line field: can be scrolled
horizontally over the visible range
Table arrangement of several fields
In addition, fixed (i.e. which cannot be changed by the user) comments can be
created for the individual fields.
)
FURTHER SUBJECT INFORMATION:
(
Windows User Guide
CHAPTER. 14 SET UP ARCHIVE
CHAPTER 18.2 DEFINE/CHANGE OUTPUT CRITERIA
Part 2: 8.2 Working with an archive - 85 -
8.3.3 Toolbar
The most important commands and functions in Dr.DOC can also be executed
via the toolbar :
1
2
3
4
5
6
7
8
9
10
11
12
13
14
15
16
17
18
19
20
1:
2:
3:
Select archive
New entry mode
Text retrieval
4:
5:
6:
7:
8:
9:
10:
Search fields
Search fields with template
Cancel respective action
Save record (with archived document), (menu item "record/save")
Go back to previous record on selection list
Go to next record on selection list
Archive documents, (menu item Document/New). The basic setting for the document source is defined under the menu item "Settings/Doc.source"
Document/Display: View the archived document in the relevant third-party application or - for images - show via the internal viewer
Page up (for multi-page image documents)
Page down (for multi-page image documents)
Start data transfer (workflow) to third-party application
Start E-mail function
Display activity list (workflow)
Display workflow manager
Print
Settings/Doc.Association: Set the document association (third-party application or
internal viewer)
Call help
11:
12:
13:
14:
15:
16:
17:
18:
19:
20:
In addition, some functions have the following extra icons:
Start search action
Activate/deactivate duplication check when searching
Case-sensitive search on/off
Hypersearch
- 86 - Part 2: 8.2 Working with an archive
Recurse hypersearch
Save configuration
Select form
Typeface (redlining editor)
Font colour (redlining editor)
The icons for the user set are explained in the corresponding chapter in more
detail.
)
Part 2: 8.2 Working with an archive - 87 -
8.3.4 Keyboard and mouse functions
YOU WOULD LIKE TO ...
+
WITH
KEYBOARD:
call menu item or command
(dimmed menu items or commands are
not available.)
Abort menu item
WITHIN THE INPUT MASK:
go to various positions:
- next field (according to tab order)
- previous field
- next or previous tab
ALT + underlined letter of the
menu item or command
Left mouse button
ALT+F4 or Ctrl+A
Left mouse button
TAB, ENTER
SHIFT + TAB
Ctrl + IMAGE ↓ or IMAGE ↑
or
Ctrl + tab or Ctrl + Shift +
Tab
POS1 or END
Ctrl + POS1 or
Ctrl + END
←↑ → ↓
Left mouse button
Left mouse button
Left mouse button
- Beginning or End of the current line
- at beginning or end of a continuous
field / of a table
- any position of a continuous field
Edit tables:
- New line
- insert line above cursor position
Insert:
- Enable or disable insert mode/overtype
mode
- New line in continuous field
- Text from clipboard
THE , WITH
MOUSE:
THE
Left mouse button
Left mouse button
Left mouse button
←↑ → ↓
Ctrl + ENTER
INS
ENTER
Ctrl + V orSHIFT + INS
Right mouse button
Select (from cursor position):
-
one letter
one word
to start of line
to end of line
Line by line in continuous field
to beginning/end of continuous
field
SHIFT + ← or →
Ctrl + SHIFT + ← or →
SHIFT + POS1
SHIFT + END
SHIFT + ↑ or ↓
Ctrl+SHIFT+POS1/END
Left mouse button
Double-click left
Left mouse button
Left mouse button
Left mouse button
Left mouse button
- 88 - Part 2: 8.2 Working with an archive
YOU WOULD LIKE TO ...
+
WITH
KEYBOARD:
THE , WITH
MOUSE:
Delete/Copy:
SHIFT + F4
- delete the current tab
BACKSPACE
- delete letter prior to cursor position
- delete one letter at cursor position or a DEL
selection
- cut selection
Ctrl + X or SHIFT + DEL
- copy selection to clipboard
Ctrl + C or Ctrl + INS
- delete entry of single-line field from Ctrl + DEL
cursor position
WITHIN A LIST (selection list or list box) :
select on a list:
- one entry
↑ or ↓
SHIFT + ↑ or ↓
- several consecutive entries
- several not consecutive entries
Ctrl + ↑ or ↓ + SPACEBAR
- to end or beginning
SHIFT + END or POS1
THE
Right mouse button
Right mouse button
Right mouse button
Left mouse button
SHIFT + left
mouse button
Ctrl + left mouse
button
SHIFT + left
mouse button
Part 2: 8.2 Working with an archive - 89 -
More keyboard commands...
Context help
Additional information (control
via cursor position)
Thesaurus (control via cursor
position)
Delete entire profile data on all
tabs
Previous record
Next record
Page up in document
Page down in document
Menu control: "Archive"
Document - View
Save
F1
F2 or Ctrl +
I
F3 or Ctrl +
T
F4
Select archive
New entry
Text retrieval
ALT + F2
ALT + F3 or
Ctrl + N
ALT + F4 or
Ctrl + A
ALT + F5
F6 or Ctrl +
U
F7 or Ctrl
+O
F8
F9
F10
F11
F12 or Ctrl
+S
Search fields
ALT + F6
Search fields with template
ALT + F7
New document
Transfer data (workflow)
E-mail
Print
Redline editor
ALT + F10
ALT + F11
Ctrl + M
Ctrl + P
Ctrl + R
Exit
- 90 - Part 2: 8.2 Working with an archive
8.3.5 Context menu
The context menu is called with the right mouse button and includes the most
essential of the "currently possible“ functions. The content differs from dialogue
to dialogue
8.3.6 Using help
If you ever get stuck while working with the program, simply call the "Help"
menu.
Context help:
The context help offers immediate direct assistance regarding the current menu
item.
Without leaving the menu item, call "Help/Context"in the main menu, select the
button "Help" in the respective dialogue or click on the help icon on the toolbar.
Part 2: 8.2 Working with an archive - 91 -
With the "OK" command, you will return to the selected menu item.
Keyword directory:
Via the menu item "Help/Index" you will arrive at a keyword directory, from which
you can select a certain key term. Select the required keyword and activate the
command "View" to obtain detailled information about this term. Exit the menu
item with the command "OK".
Topic directory:
The menu item "Help/Topics" shows various program topics. When you select a
topic, a keyword overview of this specific subject area allowing you to make
another selection with the "View" command is provided. With the command
"OK" you can exit the menu item.
Archive-specific help
ADVICE
Special help can be set up for every archive for standard texts to be added to and
changed as desired. E.g. special information on the new entry can be entered in the
context help.
MORE INFORMATION ON THIS TOPIC IS INCLUDED IN:
(
31.
HELP SELECTION AND MAINTENANCE
)
- 92 - Part 2: 8.4 Exit
8.4
Exit
Start Windows
Start Dr.Doc
Select archive
Working with an archive
Exit Dr.Doc
Close open functions:
Close any open menu items within Dr.DOC.
Close archive:
An archive is automatically closed as soon as another is called (e.g.: after the
address management the document management is called) or when the program is shut down. In addition, an archive can be closed with "archive/close" on
the menu.
If you only want to log off as user, call "archive/user login" on the menu and
activate the "log off" command.
Exit program:
You exit the program via the menu "archive/exit", by double-clicking on the system menu field or by clicking on the "Stop icon“. The query whether the archive
settings should be saved refers to the arrangement of the individual windows
within Dr.DOC and to the archive, the user set and the help that were previously called.
C/S
In C/S mode the Dr.Doc server program is operating at the archive server to
communicate between the individual workstations. This program should only be
closed down, when there is no other C/S application active. This process is shut
down properly via "Server/Exit“.
Part 3 - 91 -
PART 3
The following describes
how to work with an archive
Part 3: 9. Select archive - 93 -
WORKING WITH DR.DOC
9.
LOG ON USER
The program is protected with a user set with passwordprotection. User names
and the respective associated passwords are determined by an authorized user
under the menu item "Management/ User manager". The user is asked for the
user name and password, when the program is started.
If the “automatic login using network username” function was allocated to the
user in the user set, this query is omitted.
In addition, "Archive/log on user" offers the option to change the user or to log
off a user without having to exit the program (e.g. if several users work at the
same desktop).
MORE INFORMATION ON THIS TOPIC IS INCLUDED IN CHAPTER:
!
16.2
BRIEF INSTRUCTIONS USER SET
If the user set specifies a query when the program is started, the following
dialogue will appear:
1)
2)
3)
4)
5)
6)
Display preset archive
Name of the user set
Host name on archive server
Port for C/S communication
Text field user name; Case-sensitive entry
Text field password; Case-sensitive entry. The password is shown
encrypted (in contrast to the user name).
"
- 94 - Part 3: 10. Log on user and select form
Tip
The user name or the password is not accepted
•
•
•
Is your entry case-sensitive?
Perhaps you are trying a name or password, which is not set up in the current user
set.
If you cannot solve the problem: the system administrator can read the authorised
correct entries in the user manager (except the password)!
When the menu item "Archive/user login" is called, the following dialogue
appears:
1
4
5
6
1:
2:
3:
4:
5:
6:
7:
2
3
7
Display current user (cannot be changed).
Change password for current user: Enter the new password twice (with
confirmation).
The current user is logged off, a new user is not logged on.
Log off current user and log on new user (with name and password).
Log on current or other user in a user set to be selected.
Log off curent user in all user sets.
Exit user login, changes will be applied.
Part 3: 9. Select archive - 95 -
MORE INFORMATION ON THIS TOPIC IS INCLUDED IN CHAPTER:
!
16
USER SET
10.
10.1
"
SELECT FORM AND ARCHIVE
Select archive
If you call an archive or if you want to change to another archive, activate the
menu item "Archive/select". When you call an archive, you do not need to know
the drive or the directory where certain archives are stored, once this entry has
been made once. This makes it considerable easier, particularly for C/S
applications.
When the menu item "Archive/select" is called, a selection list of the available
archives is displayed. Select the required archive and open it with a double-click
(left mouse button) or with the command "OK".
You want to call an archive, which is not entered in the user set?
Tip
Via "Archive/open" select the relevant directory and the name of the archive. This is only
possible for the single user version, in the standard network and at the archive server in
C/S mode.
The following must be observed for C/S archives:
# Call at the client:
Only archives, which were allocated in the active user set, can be
selected (via “archive/select”)!
If a user set is not yet active, you can log on to one via “archive/user
set/additional login”.
# Call at archive server:
Archives in the KOMM/SERVER subdirectory can be opened here.
MORE INFORMATION ON THIS TOPIC IS INCLUDED IN CHAPTER:
!
14.
SET UP ARCHIVE
C/S
"
- 96 - Part 3: 10. Log on user and select form
10.2
Select form
The text fields of the archive are arranged in so-called forms on the screen.
With the selection of the archive, an associated mask is also generally called.
If no form is active, the data cannot be accessed and the icon for "form "select"
appears on the toolbar.
To call a form, click on this icon or call the menu item "Settings/select form".
Select the required form from the list and confirm with "OK".
Note
The access to forms is subject to the user definition.
Part 3: 11. New entry - 97 -
11.
NEW ENTRY
So-called profile data is also saved for every document. But it is also possible to
create and save only profile data without a document (as in a classic database).
A simple example is the address management. For some addresses thumbnail
images are managed here, only the transparent address data exists for others.
Documents can of course also be attached subsequently to existing records.
It is also possible to link two archives, e.g. the communications of a selected
address can be displayed in the document management
The relevant chapters describe how to define basic presets for the new entry
(e.g. data types, mandatory field entry).
MORE INFORMATION ON THIS TOPIC IS INCLUDED IN CHAPTER:
!
18.1
DETERMINE ENTRY CRITERIA
"
- 98 - Part 3: 11.1 New entry: General brief information
11.1
New entry: General brief information
Datei
Papiervorlage
Objekt
Einstellungen/Stapelbetrieb
Einstellungen/Dok.Verbindung
Einstellungen/Dok.Quelle
Datei
Fremdprogramm
OCR-Scanner
Video
(beliebig)
Neueingabe/Dok.Neu
Datei wählen bzw.
neu erstellen
OCR-Modul
Bild
aufnehmen
Profildaten eingeben
Speichern
Dr.DOC can manage data of all types, e.g. paper sheets, which are scanned
and edited with OCR and/or bar code recognition, files of any format, "Objects"
e.g. recordings with video, etc.
Part 3: 11.1 New entry: General brief information - 99 -
Advance planning facilitates the task!
It is definitely most effective to process identical archive material in one operation to
then go on to the next archive material. The following illustration is an example of this.
Paper sheets
(image + text)
1st procedure
Scanning
evtl. OCR processing
2nd procedure
Text files
File archiving
evtl. with batch processing
3rd procedure
CAD files
File archiving
evtl. with batch processing
etc.
Tip
- 100 - Part 3: 11.1 New entry: General brief information
If you call the "database/new entry" menu item, a window with an input mask of
the current archive (here document management of the sample archives)
appears on the screen. The commands and functions for the new entry can be
found on the corresponding menus and on the toolbar.
The following chapters show you how to
• create new profile data
• archive documents (files and paper sheets) step by step
Part 3: 11.2 New entry: profile data - 101 -
11.2
Create new profile data
If you want to create records without documents or enter profile data for a
document, proceed as follows:
%
%
%
%
The cursor is initially always in the first field. Enter the data using the
keyboard.
The next field is reached by clicking on it with the mouse or with the TAB
or ENTER key. The next field can be determined via the tabulator
sequence under "Edit elements".
Exception: Using the ENTER key in continuous fields results in a line
break.
for several tabs click on the next one with the mouse or browse with Ctrl
+ TAB.
To create a new line in a table above the cursor position press the key
combination CTRL + ENTER.
Be aware that single-line fields can also be scrolled. That means: the entries
may be longer than the space that can be seen. A maximum of 128 characters
can be entered in a single-line field. Nevertheless you should try not to write too
far into the space that cannot be seen to in order to keep fields easy to read.
Please refer to chapter 8.2.4 KEYBOARD AND MOUSE FUNCTIONS for detailed
information on the keyboard functions when data is being entered.
"
If the cursor is not to jump into the first field of the first tab in the next record, but instead
the last entry position is to be kept, the menu item "View/keep entry position" must be
activated.
Tip
- 102 - Part 3: 11.2 New entry: profile data
There are various other helpful additional functions for entering data:
•
Thesaurus
•
Maintaining records for subsequent entries
•
Importing ASCII/ANSI data
•
Simplifying inputs by duplicating existing records (only profile data)
•
Input duplication check
These functions are explained in the following section.
Thesaurus:
To facilitate the input of field entries, e.g. hierarchical orders, and to guarantee
the consistency of these entries,an option is provided for applying entries from
another archive using the "Thesaurus" command.
A prerequisite for this function is that
"
•
the link has been determined under the "Settings/Thesaurusdefinition" menu
item in the archive, in which the data is to be applied.
•
this Thesaurus includes a record with an identical profile data entry in the
reference field concerned.
MORE INFORMATION ON THE THESAURUS IS INCLUDED IN CHAPTER:
!
19
CREATE THESAURUS
Part 3: 11.2 New entry: profile data - 103 -
%
Simply enter the term from the reference field of the Thesaurus in the field
concerned. This may be:
- the complete field entry
- part of a word (in connection with the * (as in the "search fields"
function!))
- the "*" sign or nothing at all (i.e. only the cursor flashes), if you want to
view the complete list, or
- an abbreviation, if the Thesaurus is defined accordingly.
%
Activate the "Edit/call Thesaurus" command or click on the icon in the
right corner of the field:
Exceptions:
If the option "Autoadopt from Thesaurus" is activated, the entry will be
adopted when the "Save" command is used
If the "check automatically" option is selected, a consistency check to
establish whether the same entry exists in the Thesaurus archive is
carried out when saving. Only then can the record be saved.
%
If only one relevant Thesaurus entry is found, you have to state whether
the entry is to be appended to any already existing entries or whether
these are to be overwritten.
If several entries are found, a selection list will be displayed and the
required entry can be selected with the "Append" or "Overwrite"
command.
Exceptions:
If the option "Autoadopt from Thesaurus" is activated, it must be possible
to clearly allocate the "search string" to a Thesaurus entry.
If the "Append" or "Overwrite" option was already selected on defining, a
selection list will not be displayed.
- 104 - Part 3: 11.2 New entry: profile data
Tip
"
There may be several reasons for the entered term not being found in the Thesaurus:
• The cursor is not placed in the relevant field.
• The entry was incorrect. In this case, exit the query whether a new Thesaurus entry
is to be applied with "No" and correct the entry.
• The entry does not yet exist, but is to be included in the Thesaurus.
In this case, confirm the query with "Yes". The programm will then call up the
Thesaurus for a new entry. Input your new Thesaurus entry and confirm it with "Ok".
You can then exit the Thesaurus entry screen with "cancel".
If you now activate the "Thesaurus" command in the original archive again, the new
entry will be applied.
MORE INFORMATION ON THIS TOPIC IS INCLUDED IN CHAPTER:
!
19
CREATE THESAURUS
Note
If the "check automatically" option is activated, an entry must be made in a Thesaurus
field, as "no entry" is synonymous with an incorrect entry in this case
Example
Any completely nonsensical numbers can be entered in a document management, e.g.
in a "Reference" field. The structural order is maintained, but not as regards its contents.
To ensure consistency of the data as regards content, a file plan is put down as
Thesaurus.
The file plan includes the exact references with the event name.
Schriftgutverwaltung
THESAUR US
Anfrage
Aktenplan
?
AZ:
Lfd.Nr.:
Vorgangsbez.: ?
Eingangsdatum:
Einsender:
Import
Import
01/49 80
AZ:
Vorgangsbez.: Beschaffung EDV
Part 3: 11.2 New entry: profile data - 105 -
To adopt references from the file plan, the Thesaurus (=file plan) is called up in the AZ
field in the document management. It is possible to search for complete entries (e.g.
001/2), partial entries (e.g. 001/*) or any available references ( *). If available, the same
entry can be adopted in every case, as the following illustration shows:
i
Document management
AZ :
No.:
Pr ocess
001/2
A Z:
No.:
Pr ocess
:
Query
001/*
:
Query
THESAURUS
plan
F il
AZ :
Lfd.Nr.:
P rocess
e
001/2
.: P urc hase
AZ:
No.:
Pr oc es s
IT
F i le plan
AZ
001/1
001/2
001/3
Import
Select list
Process
Purchase general
Purchase IT
Purchase Office Material
Import
Schriftgutverw altung
AZ:
Lfd.Nr.:
Pr oc ess
001/2
.: Purchase IT
*
:
Query
F i l e plan
AZ
001/1
001/2
001/3
002/1
002/2
003/1
Select list
Process
Purchase general
Purchase IT
Purchase Office Material
Room internal
Rooms external
HR planning
Import
- 106 - Part 3: 11.2 New entry: profile data
Maintaining entries:
After a record has been saved, the entries in individual fields are deleted on
screen or maintained - subject to the archive setup. This can be changed on the
"Management/edit archive parameter..." menu by selecting the option "delete
form after entering new record".
•
If this option is not selected, all entries in all fields are maintained after
saving and can be used for the following record. With "overwrite" or "delete",
the new profile data is changed accordingly.
•
If this option is selected, all entries in all fields will be deleted when saving.
This option is recommended, if the profile data records to be entered are
very different or if there is some danger that certain entries from the
previous record will be accepted by mistake and without being questioned
(e.g. entries on hidden tabs).
If you nevertheless want to maintain individual field entries, enter any
character in the fields concerned under the menu item "Settings/maintain
field selection for field entry ".
You will see an example on the next page.
Part 3: 11.2 New entry: profile data - 107 -
1st record
Name1: XYZ
Name2: Dept. Advert
Mrs Miller
FAO
Street: Flow Str. 3
Town New Town
2nd record
Name1: XYZ
Name2:
FAO
Street: Flow Str. 3
Town New Town
Name1: XYZ
Name2: Purchasing
Mr Hobbs
FAO
Street: Flow Str. 3
Town New Town
Before
After
Editing
MORE INFORMATION ON THIS TOPIC IS INCLUDED IN CHAPTER:
!
18.1.7 MAINTAIN FIELD ENTRIES ON ENTERING NEW RECORD
"
- 108 - Part 3: 11.2 New entry: profile data
Import ASCII/ANSI data:
ASCII/ANSI data can be adopted in the new entry of a record with the
"Record/import ASCII" command.
Example Descriptions for sales articles, which do not have to be copied, but are simply to be
imported in a continuous field in the new record, are available.
The prerequisite is that the field or fields for including the imported data are stated under
the menu item "Settings/field selection for ASCII import".
Note
"
%
Call up the "Record/import ASCII" command on the new record.
%
If the data is to be imported from another archive, select this option.
When importing external data, enter ASCII or ANSI format.
Enter the file name for the import file.
If required, also enter the ASCII values for the field, record and document
separators of the import file using the "Separator" command.
%
The import is executed with "OK".
Only one record is imported in this way. To import several data records, use
"Database/import ASCII/ANSI".
MORE INFORMATION ON THIS TOPIC IS INCLUDED IN:
!
21.2.1 IMPORT ASCII/ANSI FILE ...
Part 3: 11.2 New entry: profile data - 109 -
Simplifying entries by duplicating existing records:
A new record, which is in large parts identical to an already existing one, is
easily created in edit mode. Find the existing record and duplicate it using
"record/copy". A dialogue field allowing you to determine whether the record is
copied as new document, as new version, with or without document data, will
appear. If you confirm with ”OK”, "Duplicated record" will be shown in the
dialogue title line. This can now be edited and changed.
Be aware that
•
changes in the record found, which have not yet been confirmed with "save",
only exist in the newly created record.
•
prior to duplicating, changes have to be made (without saving them), if an
input duplication check is set up. Otherwise you will receive an error
message stating that duplicates are not permitted.
•
any existing documents found in the record are not included in the
duplicated record. However, it is possible to attach new documents to the
duplicated record during the same operation.
•
the duplicated record will not be shown on the selection list until a new
search query is carried out.
- 110 - Part 3: 11.2 New entry: profile data
Input duplication check:
The input duplication check is for the many cases, where the user wants to
prevent an entry being input twice by mistake on capturing (i.e. is filed as a socalled duplication), a helpful control instrument for increasing acquisition quality.
"
DEFINITION INFORMATION IS INCLUDED IN CHAPTERS:
!
18.1.5 KEY FIELDS/CREATE INDEX
!
18.1.6 INPUT DUPLICATION CHECK
As soon as two records have the same entry in a certain field when a new
record is entered, the program examines further default fields to establish
whether matching entries are also in existence here. If yes, an error message
will be issued. Change the new entry accordingly to achieve uniqueness.
As a reference may be the same for several documents, the input duplication
check should also be defined for several fields.
Example
Tip
An address management has a field for "Name", a field for "Town" and one for "Street".
The entry "Mr Smith" may exist several times in London, it only becomes unique with the
exact address. The uniqueness is given in this case, if Mr Smith lives in Lord Street in
London. Mr Smith in Lion Street in London is unique.
Work with the data from the new record straight away
When a record is saved, you can execute some editing functions immediately without
exiting the new form. The functions itself have to be operated as in edit mode, therefore
we only refer to the corresponding chapters here.
Part 3: 11.2 New entry: profile data - 111 -
You can
•
•
•
•
print the profile data with the "record/print" command
RELEVANT INFORMATION IS INCLUDED IN CHAPTER:
!
13.3
PRINT
transfer the profile data optionally with or without image document with the
"record/transfer data" command to a third-party application
RELEVANT INFORMATION IS INCLUDED IN CHAPTER:
!
13.4
TRANSFER DATA
export the profile data optionally with document using the "record/export"
command
RELEVANT INFORMATION IS INCLUDED IN CHAPTER:
!
21.3.1 EXPORT IN ASCII FORMAT ...
delete the entire record (e.g. in the case of a false entry) using the
"record/delete" command
RELEVANT INFORMATION IS INCLUDED IN CHAPTER:
!
13.2. CHANGE AND DELETE
Be aware that these functions only refer to the last record just saved!
"
"
"
"
- 112 - Part 3: 11.3 New entry: Documents
11.3
Archive documents
You can archive
•
Files of any programs of any type (texts, graphics etc.)
•
Any text and image models via a scanner
•
Video recordings or similar via a video camera
Files of other programs are recalled with the respective program via a so-called
link (= connection), which is stated on archiving. This call via an external
Dr.DOC program has the big advantage that all of this program's editing
options, with which, as a rule, the archived document was also created, are
available for this document.
Newly scanned sheets or still videos recorded via a video camera are normally
recalled with the internal viewer.
"
Step by
Step
ON IMPORTING DOCUMENTS VIA THE COLD INTERFACE, SEE
!
21.4
COLD INTERFACE
Before entering the new record, determine the methods for archiving the various
types of documents. These basic settings, which are defined within the
"Settings" menu on the main menu, can be changed at any time, even whilst
entering the new record.
The following points should be decided in advance and the relevant settings
should be determined:
1.
2.
3.
Batch processing
Document association
Document source
Part 3: 11.3 New entry: Documents - 113 -
&
Batch processing:
Call "Settings/batch mode"
.
1
2
3
4
5
6
7
8
1:
Multi page documents (e.g. TIF files with several pages) are adopted in full,
otherwise you have to confirm each individual page
2:
Any files can be processed in batches. But please be aware:
• A batch may only include files with the same format.
• A document may only be created from one file (exception: NCI files,
which are linked with the internal viewer). The other files selected in the
batch are automatically displayed in the title line of the input window
after the previous one has been archived.
3:
Scanning paper batches automatically is only possible using scanners with
automatic feed.
- 114 - Part 3: 11.3 New entry: Documents
4:
"
"
The archiving action for batch or individual processing can be further
automated here. Files or Model pages are archived in set intervals (see 5:
and 6:) :
• automatic fields for user, date, number generator and in the case of
files, the file name (Attention: if several files are combined into one
document for the internal viewer, the automatic field "file name" will not
be filled!).
• adoption of manual entries, which were entered in the first record prior
to starting batch processing (possibly in connection with various
automatic fields).
MORE INFORMATION ON THIS TOPIC IS INCLUDED IN CHAPTERS:
!
18.1.2 AUTOMATIC FIELDS
!
18.1.7 MAINTAIN FIELD ENTRIES ON ENTERING NEW RECORD
5:
Barcode as document separator:
A new record is created, when the system recognises a barcode in the
barcode frame when using batch processing and bar code recognition.
6:
Enter the number of pages, which are to be combined into a document.
This information is relevant in conjunction with the automatic archiving.
7:
You can only select this field, if you belong to an owner group, which is
associated with the archive and if you have the relevant archive rights.
8:
By activating field 8, “lock access automatically” can also be operated.
YOU WILL FIND SOME INFORMATION REGARDING THE “USER SET” IN CHAPTER
16.3.
Part 3: 11.3 New entry: Documents - 115 -
Document association (program link):
'
The following are distinguished:
•
Documents originating from CI programs enabling direct searches with text
retrieval (e.g. word processing or spreadsheet programs)
•
Documents originating from NCI programs or available as raster image, i.e.
which are not suitable for text retrieval.
Call "Settings/doc.association".
1
2
4
3
1:
The CI documents column allows you to enter word processors,
spreadsheets, vector-orientated drawing programs etc.
2:
The NCI documents column contains the Dr.DOC internal image data
viewer , which can also be used for viewing documents archived via a
scanner. In addition, it is possible to enter various other types of programs
in this column (e.g. raster-orientated drawing programs, CAD, notation
etc.).
3:
When the "auto-associate app" option is selected, Dr.DOC automatically
sets the app subject to the file type (file extension).
- 116 - Part 3: 11.3 New entry: Documents
Example
If a file selected for archiving is named expenses.xls, Dr.DOC automatically selects
Excel as association.
Note
In archives, which were created with a previous version of Dr.DOC 5.0, the autoassociate app function must be activated subsequently. Create the following two fields
(both single-line fields, data type text): "ContentType" and "Extension" (match case).
Afterwards reload the archive. (These fields cannot be inserted in the mask).
4:
"
The association for exporting data to third-party applications (e.g. word
processing) is createdin the TD column (transfer data). This association is
not required for archiving documents and is therefore not described in any
detail.
MORE INFORMATION IS INCLUDED IN CHAPTER:
! 18.3. PREPARE DATA TRANSFER TO THIRD-PARTY APPLICATION
Dr.DOC must know the origin of the data to be archived (selection "Source")
and how the data is meant to be viewed (selection "view").
The source does not have to be identical to the view app of the archived
document.
Example
An Excel spreadsheet is to be archived. Excel is selected as the source app. The
archived document is to be viewed in Winword, when it is retrieved and not in Excel - i.e.
the Winword association is selected as view application. This association with Winword
will be archived with the document. Should you subsequently wish to view the
spreadsheet in Excel or in another wordprocessing program, you can simply change the
association - instead of the archived association with Winword, select the one you
require for this particular instance.
The Winword association is the default entry, as Dr.DOC has no way of
knowing the programs that are available to each respective user.
It is best to enter the programs, which are available for files to be archived or for
viewing documents, in one operation.
Part 3: 11.3 New entry: Documents - 117 -
Note for the entry:
C:\WINWORD\WINWORD,DOC,[DrDocTv],[WEITERSUCHE"%s"],[DrDocNeu
a
b
c
d
e
The following details are generally stated
a: drive, directory and program name.
In addition, you can enter (separated by commas, without blank)
b:
a file name extension. The file selection list box will be filled with this file
type.
c:
the macro for the data transfer. The program contains a macro for Winword
as default, which is entered in the way stated above.
d:
For DDEcapable programs a DDE command to open files. These
commands are subject to the respective program to be contacted and are
always in square brackets.
In Winword, any macro can basically be used as DDE command. Further
examples of corresponding DDE commands of other programs:
Excel: [Open("%s")]
AmiPro: [FileOpen("%s" 1 "")].
The applicable DDE commands for the programs you use can be found in
the respective guides.
e:
A macro, which automatically creates a new file in the program concerned,
if it is started via document/new. Such a macro is supplied as standard for
Winword.
The order in which these arguments are entered must be strictly observed. e.g.
if you do not want to enter a data transfer macro, but a DDE command, you still
have to set the commas for both arguments (i.e.: two commas before the DDE
command).
In order to open archived Winword 8.0 documents without problems, change the
Winword-app as follows:
Note
- 118 - Part 3: 11.3 New entry: Documents
WINWORD,DOC,[DrDocTv.main()],[DrDoc.CONTINUESEARCH"%s"],[DrDocNew.main()]
Once you have defined all possible programs, you only need to left-click the
respective required program for the current association and confirm the entry
with "OK".
(
Determine document source:
Call "Settings/Doc.Source".
There are various options for creating documents. You determine the origin of a
document to be archived with "Doc.Source"on the menu.
1
2
3
4
Part 3: 11.3 New entry: Documents - 119 -
Select the required option:
1:
already existing files of all types
2:
Paper sheets (text+image) via a scanner; Buffer as image
3:
Paper sheets via a scanner with additional OCR processing
4:
Recordings from moving or still video
5:
A new file to be created with any third-party application (in contrast to
no. 1), which is then to be archived immediately.
- 120 - Part 3: 11.3 New entry: Documents
11.3.1
Archive files
Brief information
File
Available
Create
Batch process. options
Doc.Association
Doc.Source
File
Third party app.
Database/New entry: Document/New
Create new file,
Select file(s)
save and
change to ARCHIVE
Enter profile data
Save
Part 3: 11.3 New entry: Documents - 121 -
&
Batch mode:
Step by
Step
If a larger number of existing similar files are to be archived, you should
consider whether these files
- should be processed in a batch
and/or
- whether they should be archived automatically.
Call "Settings/batch mode" and
%
%
select "batch processing file"
and/or "automatic archiving"
.
MORE INFORMATION ON THIS TOPIC IS INCLUDED IN CHAPTER:
!
11.3
ARCHIVE DOCUMENTS
'
"
Doc.Association:
Call "Settings/doc.association".
%
%
select the program, with which the file was created or is to be created, as
source-app.
select the program, with which the archived document is to be associated
for any subsequent call, as view-app.
The "auto-associate app" can optionally also be selected as source-app
and/or view-app. Dr.DOC will then select the program, which works with
the file name extension stated in file archiving as standard, as source or
viewing program.
You want to archive a file from a spreadsheet calculation.
Define the spreadsheet calculation as source. Select either the spreadsheet calculation
or another program, e.g. word processing, as the view association for the archived
document.
Example
- 122 - Part 3: 11.3 New entry: Documents
(
Doc.Source:
Call "Settings/Doc.Source".
%
Select the "file" option to archive already existing files.
%
If a file is initially to be created with another program, select the "thirdparty application" option.
)
Document/New:
Call "Database/new entry" on the menu bar.
%
Activate the "Document/New" command.
For existing files (i.e.: Doc.Source "File"):
%
Select the required file in the file selection dialogue. If batch processing is
activated, several files can be selected in the list box. Confirm the
selection with "OK".
For new files (i.e.: Doc.Source"third-party application"):
%
The third-party application stated in the association is started
automatically. Create the required new file and work with the program
concerned as usual. When the file is complete, save it: To enable
automatic processing (archiving), the file must be put in the local directory
(as standard: c:\drdoc\tmp) and must be named archive.erw . Instead of
erw enter the usual file name extension for the program concerned.
%
Exit the third-party application or change back to Dr.DOC with ALT+Tab.
Part 3: 11.3 New entry: Documents - 123 -
The following steps apply to existing as well as newly created files.
%
Enter the profile data (for options to simplify data entry, see chap. 11.2
CREATE PROFILE DATA).
If "batch processing" and "automatic archiving" are activated for existing
files, you should be aware of the following:
As soon as you select "save" for the first time, batch processing and
archiving will start. An individual record will be created for every file.
Therefore please ensure that the profile data for every record is available
and unique. The program offers various possibilities for this:
- The entries in the fields can be completely or partially maintained, as
soon as a record is saved.
- Create automatic fields, e.g. a number generator and/or a field, where
the file name is automatically entered.
%
When the profile data has been entered, activate the "save"command.
The selected existing or the newly created file is now linked with this data
and filed as document.
In batch processing of already existing files, the next one will now be
automatically made available for archiving. All you have to do is enter the
profile data.
In automatic archiving of existing files, the batch is automatically
processed and saved without further commands being entered.
Delete source file
Tip
The files, which are archived, are no longer required after successful archiving, as they
are now managed in the "archive container". Memory space is also being saved, when
these source files are deleted. You can (and should) do this manually from time to time.
This deletion is automated, if the archive is equipped with the "delete source file after
archiving" option (via the menu item "Management/edit archive parameter"). Every
source file, which is being archived, will then immediately be deleted.
A number of drawings were created for a project with a CAD system and arranged as
files with unique file names. These files are now to be archived with as little effort as
possible.
• For this purpose, the options "batch processing file" and "automatic archiving" are
selected under the menu item "batch mode" as presetting.
• The "file" option is selected as "Doc.Source".
• The CAD system is selected as source and as view for "Doc.Association".
• In addition,
Example
- 124 - Part 3: 11.3 New entry: Documents
-
the archive is equipped with an automatic field for adopting the respective file
name.
the entire profile data entries are maintained on screen (i.e. the setting "delete
form after entering new record" is deactivated).
In the new entry, all required files are selected in the file selection dialogue and
confirmed with "OK". Fixed data for all files (e.g. the project title, date etc.) is now
entered into the profile data.
With "Save", each file is now automatically archived as a document. The profile data is
changed accordingly only in the field for the file name (automatic field); the rest of the
entries (project title etc.) is identical everywhere.
Tip
Image files with view-archive internally
Archive image files (e.g. TIFF, BMP) with the view-app "Internal", even if you may want
to continue editing these later.
This link has several advantages
• When viewing the archived documents, you have quicker access via this internal
"Viewer", as a third-party application is not started.
• Varied compression options are available.
• For further processing (and new archiving) set the view-app on the corresponding
program and activate the "document/view" command to load the document (or the
document page) into the third-party application.
The program uses the associations for the original document when rearchiving the
edited documents: i.e. the new document is also associated with the internal view as
standard.
Tip
Browse images containing text,
CI documents can be browsed directly with text retrieval , i.e. you do not have to enter
any further keywords or contents. This relates to text documents (e.g. word processing,
spreadsheet etc.) as well as e.g. drawings of certain programs, provided these include
text. A prerequisite is that the original program works in a vector-orientated manner (in
contrast to raster-orientated programs).
It is a prerequiste within Dr.DOC that the corresponding program is entered in the CI
documents column and selected as association.
Tip
Automatic archiving after data transfer
If you have imported data from an archive (e.g. address management etc.) into your
word processing system for example, the new entry of an archive can automatically be
called up after exiting the word processing program to administer the text (e.g.
document management). You enter the profile data of the document as described and
Part 3: 11.3 New entry: Documents - 125 -
confirm the entry with "save". The document that has just been created in word
processing is then automatically archived without further query.
- 126 - Part 3: 11.3 New entry: Documents
11.3.2
Importing documents via a scanner
Paper form
Settings/document source/OCR scanner
Database/new entry
Document/new
Scanner settings like
OCR processing
Compression
Bar code recognition Batch mode
File as image
Scan Job
Start scanning
Enter profile data
Save
Text models can be scanned as images and edited using optical character
recognition (OCR).
Dr.DOC automatically generates an image frame, which initially does not have
to be defined.
Tip
The automatic image frame can be disabled via an archive.ini entry.
[SCANNER]
AUTO_FRAME=0
Part 3: 11.3 New entry: Documents - 127 -
The OCR process has the advantage that in subsequent search actions the
scanned text can be browsed directly (i.e. no further manual entry of keywords is
required, in contrast to text that is archived only as image). The same applies to
bar codes: The bar code can be recognized automatically by the program and converted into alphanumeric code - can be entered in a profile data field.
Prior to working with the scanner, make sure the correct scanner type is selected. Call
up the "select scanner" command in the OCR module under general settingsto
determine the scanner type. Left-click the appropriate name (for TWAIN then select the
driver with "Selection") and confirm the selection with "OK".
11.3.2.1
Basics: Why OCR ?
Dr.DOC allows you to archive any types of documents, e.g. models, files, audio
and video sequences to be scanned.
If texts, e.g. incoming letters, invoices, newspaper cuttings etc., are imported via
the scanner, "only" the image information is initially available to the archive, i.e. a
digital copy has been created.
This image can be archived - but to be able to retrieve it, keywords must be
entered, as a computer cannot recognize image (so-called NCI) information as
text.
As the additional entering of keywords and brief content details is often taking up
a lot of time, so-called OCR (Optical Character Recognition) is used. Such an
OCR program can convert the image information (NCI) into computer-readable
text information (CI) - and thus make it available for searches.
Note
- 128 - Part 3: 11.3 New entry: Documents
Performance of the Dr.DOC OCR module?
The OCR module of Dr.DOC...
• supports the so-called dynamic threshold value recognition (provided the
scanner is equipped accordingly).
• can manage compound documents, i.e. documents with mixed image and
text.
• can recognize bar code (currently check code 39, check interleaved 25, code
128, code 39 EAN 13, EAN 8 and interleaved 25).
• includes formular processing. That means: For regularly recurring models
(e.g. delivery notes of a certain supplier), a "Template" can be created
defining where the text to be recognized is located. For "unique" templates,
text that does not have to be recognized, can be filtered out in this manner.
• automatically adopts the recognized text into the profile data of the record.
The text can be split into several areas, which can be allocated to various
profile data fields.
• can save all settings with various configuration names, so that the optimum
configuration for each respective template can be called up immediately.
• processes not only newly scanned templates, but also existing image files,
which contain text.
• has an internal clipboard for the template so that several workflows can also
be executed one after the other without having to scan in the template again.
• also works independently with batch processing and automatic archiving
(either a preset number of template pages is combined into a document or
bar codes are used as document separator), which could save a lot of time.
• can for example be used for document management, press archiving, library
management, inventory management etc.
Part 3: 11.3 New entry: Documents - 129 -
Brief information
Commands in Dr.Doc
Procedure
Define Doc.Source
%
Settings/Doc.Source: OCR Scanner
Batch processing?
%
Settings/batch processing (also possible later)
Call new entry
%
Create new entry/new document via icons
Check settings
%
•
In the dialogue area “Settings” predefined settings or “Edit”
(compression, OCR settings, scanner settings)
•
Select predefined in the “Frame” dialogue. For new definition of a
frame -> scan first
•
Select options to be executed
(OCR, stop word list etc., if a frame has not been defined yet, do not
select anything!)
•
Make selection in the “Source” dialogue
(ADF, flatbed, file...)
*
Scan template
%
“Start” -> template is displayed in the “image” window
%
•
enter name in the dialogue area “frame” (if saving is required)
•
draw required frame in the “image” window
•
select frame type (OCR, image or bar code)
•
select the destination field in which the result is to be entered for OCR
and bar code
•
Draw further frames and allocate definition, then “save”
•
Select required process option (OCR, bar code,...)
•
select “internal buffer” as source and activate processing with “start”
•
The result can either be checked and, if required, improved directly in
the profile data or via “Result/edit OCR text”
•
If the result is not satisfactory at all “discard”
select “edit” in the “Settings” dialogue and make adjustments in “OCR
setting” or “Scanner setup”, e.g. resolution, brightness, contrast, etc.)
and “Start” again
*
If frame and processes were already
selected, processes will be executed
immediately.
If frames have not been created
or selected
Check OCR result
%
*
Scan more pages
%
With “Start” the previous page is automatically archived and processing of
the new page is started
Enter profile data and save
- 130 - Part 3: 11.3 New entry: Documents
Tip
Advance planning facilitates the task!
As for all types of document archiving, it is surely also most effective for OCR
processing, to process templates of the same kind one after another in one operation
and then to proceed to the next batch of similar templates.
As a first step, arrange the templates to be scanned according to quality (brightness of
the background and the font etc.), size of the template and other criteria, which varies
from case to case. It may also be practical to sort the templates by content.
It is also possible to presort according to template type for automatic feed or the flatbed
of the scanner, e.g. thin copies of delivery notes or newspaper cuttings are sometimes
not suitable for the automatic feed (ADF) of the scanner.
11.3.2.2
Preset
Define some basic settings prior to entering a new record. These details, which
are defined within the "Settings" menu on the main menu, can be changed at
any time, even whilst entering the new record.
The following points should be decided in advance and the corresponding
settings should be determined:
1.
2.
3.
&
Document source
Document association
Batch processing
Define document source:
Call "Settings/Doc.Source".
There are various possibilities for the origin of a document. You determine the
origin of a document to be archived with "Doc.Source"on the menu.
Part 3: 11.3 New entry: Documents - 131 -
1
1:
'
The "OCR scanner" – document source applies to:
• scan with OCR
• scan without OCR
• OCR in files
• bar code recognition
• etc.
Doc.Association:
Call "Settings/Doc.Association" and select as source and view-app image
file/internal.
(
Batch processing:
If a larger number of paper templates is to be archived in the same way, you
should consider whether these
• are to be processed as a batch (only possible for scanners with ADF).
and/or
• whether they should be archived automatically.
Call "Settings/batch mode".
The batch mode settings can also be called directly from the OCR module dialogue.
Note
- 132 - Part 3: 11.3 New entry: Documents
1
2
3
4
5
6
7
8
1:
Multi page documents (e.g. TIFF files with several pages) are adopted in
full, otherwise you have to confirm each individual page
2:
Any files can be processed in batches. But please be aware:
• A document may only be created from one file (exception: NCI files,
which are linked with the internal viewer). The other files selected in the
batch are automatically displayed in the title line of the input window
after the previous one has been archived.
3:
Scanning paper batches automatically is only possible using scanners with
automatic feed.
4:
The archiving action for batch or individual processing can be further
automated here. Files or model pages are archived in set intervals (see 5:
and 6:) :
• automatic fields for user, date, number generator and in the case of
files, the file name (Attention: if several files are combined into one
document for the internal viewer, the automatic field "file name" will not
be filled!).
• adoption of manual entries, which were entered in the first record prior
to starting batch processing (possibly in connection with various
automatic fields).
Part 3: 11.3 New entry: Documents - 133 -
MORE INFORMATION ON THIS TOPIC IS INCLUDED IN CHAPTERS:
!
18.1.2 AUTOMATIC FIELDS
!
18.1.7 MAINTAIN FIELD ENTRIES ON ENTERING NEW RECORD
5:
Bar code as document separator:
A new record is created, when the system recognises a barcode in the
barcode frame when using batch processing and bar code recognition.
6:
Enter the number of template pages, which are to be combined into a
document. This information is relevant in conjunction with the automatic
archiving.
7:
You can only select this field, if you belong to an owner group, which is
associated with the archive and if you have the relevant archive rights.
8:
By activating field 8, “lock access automatically” can also be operated.
"
- 134 - Part 3: 11.3 New entry: Documents
11.3.2.3
The functions of the OCR dialogue
Editing Options
This column allows you to define the process to be executed.
•
Note
OCR processing/bar code recognition:
Select OCR processing and/or bar code recognition , if required. If
this/these option(s) are activated, they will be executed immediately after
scanning, provided the relevant frame have been defined. If a relevant
frame has not been defined yet, this can be done subsequently (see
below).
Further options for OCR processing are selected in the OCR module in the
“Settings” dialogue “ edit/ OCR settings” (see below).
The bar code can be used as document separator for batch processing
(see “batch processing").
The following codes are currently supported as bar codes: Check code 39, check interleaved 25,
code 128, code 39 EAN 13, EAN 8 and interleaved 25. If the bar code cannot be recognized, a
message is issued. In this case, it is often enough to increase the bar code frame a little.
Part 3: 11.3 New entry: Documents - 135 -
•
Stop word list:
A stop word list filters frequently occuring words, which are not search
words, out of the recognized text (e.g. and, with, by, I, you, if, but, and in
addition punctuation marks like full stops, commas etc.) so the profile data
is not unnecessarily burdened, which is especially practical for large
quantities of data. The other words of the text can of course also be
searched as one pleases, when the stop word list is used. The entire text
can be read - as generally recommended - in the archived image.
A standard stop word list containing frequently recurring words is supplied.
This list can be maintained and added to. It is also possible to create further
stop word lists - this may be practical for use in different archives.
The stop word list to be used (if selected), is defined in the OCR module in
the “Settings” dialogue via “Edit/OCR settings” (see below).
To edit or to create a stop word list, go to start menu/programs/Dr.DOC.
The stop word list must never be edited with a Windows Editor, as it must Important
be purely ASCII format.
- 136 - Part 3: 11.3 New entry: Documents
•
Dialogue “OCR processing”
After OCR processing is complete, the "recognized: %" field states the
recognition quality in percent. A warning signal will alert you if this number is
below the threshold (default setting 99.50 %) stated above. In this case,
scanning and optical character recognition can be repeated with modified
parameters.
You will receive a list of texts recognized in the document (subject to the number
of current OCR frames) via “Result”. By selecting a line and clicking on “Edit
OCR text”, the window is split into two. You will see the scanned image in the
upper window while the lower part shows the recognized text.
To facilitate the comparison, the text in the image (upper part) is marked in
yellow at the position where the cursor is located in the editable sector (lower
part).
Part 3: 11.3 New entry: Documents - 137 -
•
Dialogue “Rotation”
A template can be rotated in steps of 90°. The rotation can be defined prior to
scanning or calling the file, but is also possible subsequently.
The rotation is a component of the frame setting and is saved with these
configuration names (see below).
•
Batch mode / display image:
You find explanations regarding the batch mode function in the previous
chapter 11.3.2.2.
It can be particularly useful not to have the scanned image displayed in
batch mode. Processing then takes place automatically in the background.
•
Create new scan jobs / change / delete:
To define a new scan job, all scan settings have to be determined in
advance. When this is completed, confirm the “Scanjobs...” button The
following dialogue will appear:
- 138 - Part 3: 11.3 New entry: Documents
•
Job/check boxes selection
Select one check box (5 possible boxes) for the new job.
•
Job Name:
Change the name or enter a new one. If you are only checking the settings
for a job or you want to assign modified settings, do not make any changes
here.
•
Display settings
Here, you can view the scan settings for the selected job.
•
Assign settings
Here, you assign the current scan settings for the job selected above.
•
Delete
Here, the job assigned to the selected check box is deleted again. The
check box is then available again for a new job.
•
Start scan jobs:
Activate “display scan job dialog” in the “enter new image data” dialogue
and exit with “close”.
If you now click on the icon for “Create new document”, the selection dialog
for scan jobs will be displayed. If you then manipulate the button for the
required scan job, the job will be started.
Part 3: 11.3 New entry: Documents - 139 -
•
Discard scan job
Discards the current unsaved scan result (corresponds to “discard” in the
“enter new image data” dialogue).
•
Settings
You reach the settings options of the “enter new image data” dialogue via
this function.
To continue, there are 2 options:
• Deactivate “display scan job dialog” function
If you now go to “close” and click on the icon for “Create new document”
again, the normal “enter new image data” dialogue will be displayed
again.
• Change settings and return to the scan job selection dialogue with
“close”.
If the changes were not reassigned to the scan job, they will apply
temporarily until they are changed again or this dialogue is restarted.
If the changes were reassigned to the scan job, they will apply in future.
•
Close
Here, the scan job selection dialogue is completed. However, when you
next click on the icon for “Create new document”, the dialogue will be
started again until you deactivate “display scan job dialog” (see above)
- 140 - Part 3: 11.3 New entry: Documents
•
Template source
The following are available as template source : file (e.g. Tiff), scanner (ADF or
flatbed) and internal buffer.
The program initially copies a read template to an “internal buffer” so that no
repeated reading is required for further editing.
i.e. if you determine the frames after scanning, select “internal buffer” and click
“start”. The optical character recognition is now executed via the data in the
internal buffer and the document does not have to be scanned again.
•
Frames
Define frames
To edit a template, corresponding frames have to be set. That means: For OCR
processing and bar code recognition, you have to define the section of the
template to be edited and the profile data field where the result is to be
transferred to. Another frame must be set for archiving the image.
These frames can be saved together under a configuration name (including the
set rotation) and can then be called again as "template" at any time.
Proceed as follows to define the section to be edited:
Part 3: 11.3 New entry: Documents - 141 -
&
Scan template or call file, rotate if required.
The rotation setting is saved together with the frame configuration.
'
A frame is drawn between opposite corners with the left mouse button.
If the mouse button is released, a definition dialogue appears:
• The frame no. is issued automatically.
• Select OCR, bar code or image from the list box of frame types.
• If the frame type is “OCR” or “bar code”, you must enter a destination
identifier, i.e. a profile data field in which the data will be imported. All
field names will be displayed in the list box.
• If the frame type is “OCR”, select the language for the template in the
Language field via the selection button.
• The field Text type is also relevant for the optical character recognition.
The text type is recognized automatically for most texts. Set to
“Automatic” for this purpose. You can increase the recognition quality of
texts from needle printers and typewriters, if you select “Typewriter” or
“Matrix printer” (for needle printers).
The OCR default settings appear in brackets ( ) for the “Standard” setting.
The settings here overwrite the preset!
Important
- 142 - Part 3: 11.3 New entry: Documents
• For OCR and bar code you also have to select whether the text will be
attached to any already existing entry or whether it will replace this entry.
It is necessary to attach it, if it is an OCR text, which is split into several
frames, but is to be entered in one continuous field (see Tip).
• With the “delete” button the entire frame is deleted.
Tip
As the last tab in your set of tabs create a continuous field, which is called e.g. "OCR
text", because most times an entire text complex will be edited with OCR, which is then
entered here - possibly shortened by using the stop word list. This field is not meant for
subsequent reading, therefore it can easily be in the background.
(
Confirm the details with OK. In this way, further frames can still be set.
Do not forget that you have to set one (or several) image frames to
archive the image. An image will not be archived without an image
frame.
If a frame is not positioned as required or is to be edited later, place the mouse
cursor in this frame and press the right mouse button. The corresponding frame
definition is called up again in this way and you can make changes or delete the
frame.
Save frame
If you want to save the frame configuration, enter a name in the OCR module in
the dialogue section "frame" and activate "save".
It is also possible to display the individual frame definitions of a configuration in
a table here with "overview".
Part 3: 11.3 New entry: Documents - 143 -
A frame configuration is archive-specific and cannot be transferred to another archive.
Note
Change frame / delete
If you want to change a frame configuration, call it up from the list box and click
on “overview”. You will see a tabular view of the allocated frames. Select the
frame you want to change. You can now make changes in the “frame
definitions” dialogue or delete the selected frame.
Delete frame configuration
To delete an entire frame configuration, select the required configuration. Click
on “delete”, a selection dialogue will appear:
-
•
•
•
•
•
from the memory: if the configuration was loaded and displayed on
screen, but is not desired (i.e., it still remains on the list)
from the hard disk: if the configuration is to be removed from the list.
Frames do not have to saved. You can also set frames for a unique action without
giving it a name. This is the case for very different material, which is to be gathered
in a derived manner.
However, we recommend to create a comprehensive configuration, e.g. named "all".
Set one OCR and image frame each across the entire template.
Do not worry that too much may be edited in the OCR text through this action. It may
take considerably more time to set individual frames for each template.
Do not set the OCR frames too narrow. The models are always fed in differently by
the scanner, but the template remains at the same position - in that way the required
text may easily only be in the frame half and OCR processing is no longer possible.
The same also applies to bar code frames.
Therefore, in the case of close successive lines, do not attempt to define an
individual frame for each line to place the texts in different fields. It is better to set a
large frame over several lines and enter the result in a collective field - the text can
be found in the same way and, of course, reading takes place in the image.
Tips
- 144 - Part 3: 11.3 New entry: Documents
11.3.2.4
Global settings
The following basic settings can be saved as scan configuration:
•
•
•
•
Scanner type (select scanner)
Scanner settings (scanner setup)
Compression
OCR settings
It makes sense to create different standard settings. Enter a new name and
activate "edit".
The direct settings in this dialogue are for KOFAX scanners. For scanners with
TWAIN driver define your settings under “Scanner setup”. Your scanner
documentation describes how to manipulate this dialogue.
Part 3: 11.3 New entry: Documents - 145 -
•
Resolution:
As a rule, a resolution of 200-300dpi is sufficient for OCR (better
300 dpi). The available resolutions are subject to the scanner
used. The resolution can also usually be determined directly in the "scanner
setup".
•
Threshold recognition (only for scanner types that are equipped
accordingly):
The value 0 is recommended for activated threshold recognition. Higher
values (1-3) change the brightness.
•
DTC Options (only for scanner types that are equipped accordingly):
These options (Dynamic Threshold Circuit) apply to the text recognition and
can considerably improve the OCR result for poor templates. If required,
select DTC options and other options.
•
IPC Options (only for scanner types that are equipped accordingly):
These options (Image Processing Circuit) apply to the buffer as image. If
required, select IPC options and other options.
•
Select scanner:
Left-click the appropriate name (for TWAIN, select the driver with
"Selection") and confirm the selection with "OK".
If CFM-TWAIN drivers are not used and not all scanner functions are supported as
a consequence, you should activate the check box "Scan via TWAIN dialog box"
(Application example: with the HP-TWAIN driver, colour scanning is only possible
with "Scan via TWAIN dialog box").
•
Scanner Setup:
You can define settings here subject to scanner type and driver.
Note
- 146 - Part 3: 11.3 New entry: Documents
•
Compression:
Compression is possible for black/white images and for color and grayscale
images. You should basically be aware: the higher the compression, the
bigger is the loss of quality when the document is called again!
The best compression is on the one hand subject to the type of documents
and on the other hand subject to the requirements made on image quality
or memory.
4
1
3
2
%
Call “edit/compression" in the "Settings” dialog.
1:
For black-white templates, you can select between various TIFF
compressions and Dr.DOC-specific settings.
2+3:
For color and grayscale images, the "ARCHIVE" setting
recommended, as in addition the compression quality can be set.
4:
Basically only documents, which are archived with the internal app, are
compressed. In addition, NCI documents with app to third-party
applications can also optionally be compressed. Select the option, if
required.
is
Part 3: 11.3 New entry: Documents - 147 -
CI documents are never compressed, as text retrieval can only be executed in
uncompressed documents. If you do not require text retrieval, enter the corresponding
program (e.g. word processing) additionally into the column of NCI documents, select
this app and the compression option.
Note
Determine the required setting by clicking on it and save with "OK".
Compression and scanner setting
•
Experiment! There is no general recommendation for the right compression. It is best
to try out various compressions with a template that is typical for your application
and save the settings under an individual name before you proceed to actual
archiving.
•
In principle, it is best to have a different scan setting for various template types.
•
You should also know: The optimum setting for OCR is not the optimum setting for
the image. It is not possible to scan both most favourably at the same time, as the
scanner has to be operated in a different way each time. If you nevertheless cannot
or will not do without the optimum image quality, you have to scan the template twice
- once with the OCR settings, once with the image settings.
•
For the best text images you should decrease the contrast, select a high resolution,
and, if possible subject to the scanner, dither. If the text images are to be shown on
screen in best quality, the grey scale compression is recommended, as it is best to
read. The disadvantage compared to TIFF compression: slightly fuzzy image on
printout.
•
If text images are only rarely required on screen or are to be at optimum quality in
printout, TIFF compression is recommended. Here, small fonts can be relatively well
read in printout.
•
If black/white photos are to be archived, please observe the following rules, subject
to scanner:
•
A grey scale scanner reads the "black/white" template as grey scale image. You will
achieve good results with 100-150 dpi, no dithering, JFIF compression and quality in
accordance with selection.
•
A black/white scanner takes the template as black/white image. You will achieve
good results with 400 dpi, dither 2-3 and Dr.DOCgrey scale compression.
Tips
- 148 - Part 3: 11.3 New entry: Documents
•
OCR settings:
You should check the corresponding settings for OCR processing.
Dialogue “Text recognition”:
•
Stop word list:
Enter the name of the stop word list here. Whether a stop word list is used,
is defined in the OCR module dialogue itself.
To edit or to create a stop word list, call the start menu/programs/Dr.DOC.
Important The stop word list must never be edited with a Windows Editor, as it must be purely
ASCII format.
•
Typographical image:
Part 3: 11.3 New entry: Documents - 149 -
The text type is recognized automatically for most texts. Set to “Automatic”
for this purpose. You can increase the recognition quality of texts from
needle printers and typewriters, if you select “Typewriter” or “Matrix printer”
(for needle printers). Settings regarding this, which were assigned to the
“frame”, overwrite this setting.
Dialogue “Formatting”
Here, you can determine the settings concerning the formatting of the result.
Dialogue “Edit results”
Here, you can define whether you want text errors assumed by the system to be
displayed for the direct processing of the result.
Dialogue “Page analysis”
Recognize page orientation
This is useful if the sheet is not straight.
Remove spots
Function to improve the result for older sheets or sheets that are not completely
white.
Structured background
Function to improve the result for backgrounds that are not white.
Dialogue “Error recognition”
Functions for changing the error recognition.
This function can be switched in grades, by clicking on the line you step up to
another grade.
Dialogue “Frame analysis”
This function can change the OCR result. You have to make individual decisions
to determine the setting that is most practical.
This function can also be switched in grades, by clicking on the line you step up
to another grade.
- 150 - Part 3: 11.3 New entry: Documents
If you have defined your settings here, confirm with OK.
Part 3: 12. Find: General brief information - 149 -
12.
FIND
12.1
General brief information
Feldauswahl für Sortierung
Feldauswahl für Auswahlliste
SUCHEN
Im Datensatz (Profildaten)
Feldspezifisch
Feld
Im Redlining des
NCI-Dokumentes
Global über alle Felder
Volltext
(evtl. mit Vorlage)
Suchergebnis (Auswahlliste)
eingrenzende Suche ( innerhalb der Auswahlliste)
Feldsuche
Volltext
Daten bearbeiten, drucken etc.
Im archivierten
CI-Dokument
- 150 - Part 3: 12. Find: General brief information
With the help of the search fields function you can carry out a field-orientated
search for any entries of the archive. You can search fields via indexed and/or
non-indexed fields. It is also possible to link search terms in various fields or
logically within a field.
When you search fields with template, the search with a template containing
predefined search criteria is started. This is useful if you frequently look for the
same group of records.
Text retrieval gives you the option to find certain terms or parts of text fieldindependent at any position of the profile data or within CI documents or in the
redlining of NCI documents in contrast to "search fields" .
For text retrieval, you can choose between standard search, phonetic search
and error-tolerant search and limit the number of hits as a presetting.
These search functions can also be used in a restricting search (within the hits
found) and in a hypersearch . This search automatically starts the basic
searches in accordance with a previously determined definition either within an
archive or across-archives, after the search actively selected by the user. In
addition, a "loop" option can be selected, i.e., the search will continue until no
more hits are found (recurse).
"
MORE INFORMATION ON THIS SUBJECT IS INCLUDED IN CHAPTERS:
!
12.2
OPTIONS FOR ALL BASIC SEARCHES
!
12.5
HYPERSEARCH
Part 3: 12.2 Find: Options for all basic searches - 151 -
12.2
Options for all basic searches
Enter the data to be found as described in the following individual chapters.
When the respective search action is completed, a record will appear on your
screen if only one record was found or a select list will be shown if several
records were found.
In the new appearance of Dr.Doc , which is split into three sections from
version 6.0 (tree view, selection list, record tab), the result on the selection list
and the first record of the result can be seen on the record tab. The items “tree
view” and “selection list” must be activated under “view” for this purpose.
Before you work with the search functions, you should read the following notes.
Select selection list:
Call "Settings/field selection for / selection list".
#
One or several defined lists will be displayed. Select the required one and
confirm with "OK".
You can predefine several lists under different names. Such a list can be created or
changed at any time.
MORE INFORMATION ON THIS SUBJECT IS INCLUDED IN CHAPTERS:
!
14
SET UP ARCHIVE
!
18.2.2
ENTRIES ON THE SELECTION LIST
Select sorting:
Call "Settings/field selection for/sorting".
#
One or several defined sortings will be displayed. Select the required one
and confirm with "OK".
Note
"
- 152 - Part 3: 12.2 Find: Options for all basic searches
Note
"
You can predefine several sortings under different names. Such a list can be created or
changed at any time.
MORE INFORMATION ON THIS TOPIC IS INCLUDED IN CHAPTER:
!
18.2.4
SORTING
Output duplication check:
Dr.DOC can optionally do a duplication check when searching to stop the
output of duplications on the selection list.
Example
An address management contains several records with various contact partners for
each company address. A selection list should now only show each company once.
Another instance of output duplications is for example in the scientific sector: A biologist
looking after a zoological collection would like to know which species are in the
collection to create a so-called species list. Although there are 100 different dogs and
100 different cats in the collection, he would like to create a list, on which dog and cat
are each only listed once. This provides him with an overview of the subject areas of his
collection.
To use an output duplication check, call "Settings/field selection for/output
duplication check". One or several configurations will be displayed. Select the
required one and confirm with "OK".
The duplication check is either activated with the option in the search dialogue
or with the corresponding icon.
"
MORE INFORMATION ON THIS SUBJECT IS INCLUDED IN CHAPTER:
!
18.2.7
OUTPUT DUPLICATION CHECK
Part 3: 12.2 Find: Options for all basic searches - 153 -
Restrict search:
A further restricting search can be carried out within the records found through a
search.
Use the mouse to call up a search command from the main menu again without
cancelling the selection list and enter more restricting search commands. The
records selected from the selection list will be displayed in a new selection list.
This procedure can be repeated as often as required.
You return to the previous selection list with "cancel" or via the stop icon. However, the
system only remembers the current and the previous list. So if you want to start a
completely new search, click 2x on the stop icon to reach the Dr.Doc basic window.
Note
Case-sensitive:
A case-sensitive search can be selected.
This setting can be changed in the respective search within the search dialogue
or with the corresponding icon.
Find current date:
You can search for this ”automatic field” in field, template and text retrieval.
The entry for the automatic field type (corresponding to field selection for
automatic fields) is enclosed by ”%”.
%D% is replaced by the current date.
(Apart from ”D” (Date), ”U” (User) and ”T” (Time) are also possible.)
Example
- 154 - Part 3: 12.4 Find: Search fields
12.3
Text retrieval
SUCHEN
Im Datensatz (Profildaten)
Feldspezifisch
Feld
Im Redlining des
NCI-Dokumentes
Im archivierten
CI-Dokument
Global über alle Felder
Volltext
(evtl. mit Vorlage)
Text retrieval you can search:
• field-independent at any position of the profile data
• within CI documents
• in the redlining of NCI documents
For text retrieval, you can choose between standard search, phonetic search
and error-tolerant search and limit the number of hits as a presetting.
$
Selection list/determine sorting:
In most cases, selection list and sorting are maintained. If you want to make any
changes, you have to apply these changes prior to searching (See the previous
chapter for a detailed description).
%
Find:
Call "database/text retrieval" or click on the icon for "text retrieval".
Part 3: 12.4 Find: Search fields - 155 -
1
2
3
4
5
3
6
1:
Enter search term. You can
•
search only for part terms (e.g.: Bow instead Bowman or Town
instead New Town )
•
enter several search terms and link logically. Use the following
characters for linking and ensure that there are no blanks between
search terms and association characters:
&
|
!
for "and"
for "or"
for "not"
to link operators, use the brackets ( ) .
In connection with an "error tolerant search" (see 3.!) the following
entries are also possible:
?
[ ]
{ }
as joker for one character
for "classes": one of the characters in the
bracket should be at this position in the hit
for "compulsory characters": these characters
must definitely - despite permitted errors - be
in the hit
• With joker:
Ma?er finds Mayer, Maier, Maser, Mauer ...
Example
- 156 - Part 3: 12.4 Find: Search fields
• With classes:
M[ae][iy]er
finds Mayer, Maier, Meier, Meyer ...
•
2:
3:
With compulsory characters:
{M}ei{er}
finds Mayer, Maier, Meier, Meyer, Maxer, Moper, Mauer ...
Select what you want to browse: profile data, CI documents or redlining.
You can also browse several data areas together.
Apart from the standard search, a phonetic or an error-tolerant search
can be carried out.
The "phonetic search" setting looks for "phonetically-similar", i.e. for
similar sounding words. The phonetic search is not case-sensitive. If you
search for, e.g. "Mayer", you could get the following result: Mayer, mAIEr,
Meir, Moier.
In the "error-tolerant search" you can also find records, where individual
characters do not correspond to the search term entered with the help of
the "permitted number of errors". The "maximum errors allowed"
determines the maximum number of characters, which may be "wrong".
Example
This error-tolerant text retrieval with the maximum errors
allowed 2 finds all records, which have field entries, e.g.
"Meier", "Bayer", "Baier", "Fayer", "Mayer".
4:
If the "remove duplicates" option is activated, only one of the records,
which have the same entries in defined areas, is displayed (the
prerequisites for such an output duplication check are in the previous
chapter)
5:
Select case-sensitive, if required.
6:
The search time can be reduced for large quantities of data, if a search
limit is entered.
Part 3: 12.4 Find: Search fields - 157 -
The stock management is looking for the article "mountain bike", which only exists twice.
The number of hits in text retrieval is restricted to 2. As soon as the program has found
two records with "mountain bike", it stops browsing the rest of the records and thus
saves time.
Example
If you work with a search limit and the stated maximum number of hits
has been reached, you will receive a corresponding message.
The result will be displayed
on a selection list.
Another text retrieval
will be carried out.
The search of the rest of the
data stock will be continued.
Entries in currency and date fields will only be found, if the search term is entered in the
same way as the dates are saved in the relevant field (i.e., an abbreviated entry of the
currency or of a date is not possible).
Note
Start the search action with "OK".
You will find examples for all search types at the end of the FIND chapter.
Example
- 158 - Part 3: 12.4 Find: Search fields
12.4
Search fields
SUCHEN
Im Datensatz (Profildaten)
Feldspezifisch
Feld
Im Redlining des
NCI-Dokumentes
Im archivierten
CI-Dokument
Global über alle Felder
Volltext
(evtl. mit Vorlage)
With the help of the "search fields" function, you can carry out a field-orientated
search for any entries of the archive. You can search fields via indexed and/or
non-indexed fields. It is also possible to link search terms in various fields or
logically within a field.
$
Selection list/determine sorting:
In most cases, selection list and sorting are maintained. If you want to make any
changes, you have to apply these changes prior to searching. (You find a
detailled explanation in the previous chapters.)
%
Find:
Call "database/search fields..." or click on the icon for "search fields".
#
Enter search term(s) in the fields. The following entries are possible:
Part 3: 12.4 Find: Search fields - 159 -
• Find certain entries in a field:
Enter the search term in the respective field. You are searching all records,
which have the entry "Maier" in the name field.
Fields defined as range data type are a special case : you can find a value
here, which is within the stated range.
You are looking for 1830 and also find records, which include the entry 1815-1864.
Example
• Finding parts of words:
You find parts of words with the help of * , which you can use as "joker" at
any position:
Mai* finds all records starting with "Mai" in the field concerned
*aier finds all records ending with "aier" in the field concerned
*aier* finds all records showing the entry "aier" in the field concerned at any
position.
Exampl
e
• Finding any field entries:
If you only enter * in a field, all records containing any entry in the respective
field are selected.
• Finding entries between two stated limits:
Enter the marginal data separated by <->. You can for example look for
entries within a certain period or for number entries, which show a turnover
between 1000 DM and 2000 DM (1000<->2000).
There is also the option to find strings. Search combinations are available as
in the following examples:
Alfred<->Berta
D*<->H*
B*<->*
*<->M*
finds all names from Alfred to Berta
finds all names starting with letters from D to H
finds all names starting with letters from B to Z
finds all names starting with letters from A to M.
For the range search of numbers or dates the data type of the field
concerned must be defined as number or date.
Exampl
e
- 160 - Part 3: 12.4 Find: Search fields
•
Find date range – relative to the system date
%D-1%<->%D+1% finds all records containing a date entry “1 day before”
(%D-1%) and “1 day after” (%D+1%) the current date. This is useful for
example for resubmission periods.
If you only look for %D%, you will find all records containing the system
date in this field
• Find check boxes:
- Check box is grey: the entry is ignored (standard)
- Check box is selected: All records with selected check box are searched.
- Check box is not selected: All records with blank check box are searched.
Click on the check box to activate or deactivate it.
"
MORE INFORMATION ON THIS SUBJECT IS INCLUDED IN CHAPTER:
!
18.1.1 DATA TYPES
• Find number and term combinations:
You have the option to find combined field entries where all of the search
criteria entered must be met.
You can for example look for all records, where the name starts with "Mai*"
and where the turnover is between 100 GBP and 200 GBP.
Enter the word parts or entries in the respective fields, which are between
two stated limits and start the search action with "OK".
• Logical operators:
The following characters are available to logically link various search terms in
one field:
&
|
!
for "and"
for "or"
for "not"
Use the brackets ( ) to link operators and for logical delimitations.
Ensure that there are no blanks between the search terms and the
association characters. Linking the logical characters with * is not
Part 3: 12.4 Find: Search fields - 161 -
necessary: As soon as you search with one or several logical characters, the
term is automatically searched at any position in the field concerned.
Logical links can only be stated in one single field in a search.
Note
For an excluding search, ! is entered (without blank) in front of the
character or word concerned. The excluding search can be linked with the
other search options.
!Meier
!*Meier*
!Meier&Huber
!Meier&!Huber
!*
finds all records that do not have the entry "Meier" in the field
concerned.
finds all records that do not have the entry "Meier" at any
position in the field concerned.
finds all records that do not have the entry "Meier"at any
position in the field concerned, but the entry "Huber"
finds all records, which have neither the entry "Meier" nor the
entry "Huber"at any position in the field concerned
finds all records that have no entry in the field concerned
Example
Enter the search term(s) with the described options.
#
Carry out duplication check: If you start the search with a duplication
check (icon), only one of the records that have identical entries in defined
areas will be shown (the prerequisites for this output duplication check
can be found in the previous chapter).
#
Start the search with the icon or with "find/start".
After the search a selection list or a record meeting the criteria will be
displayed.
When fields in tables are searched, each existing line of the column is searched for the
search term.
Note
Search date field
Tips
Enter the date in abbreviated format - it is not necessary to enter the saved format
DD.MM.YYYY in full. If you for example enter 020894<->010395 in a range search, then
Dr.DOC looks for all date entries from 02/08/1994 to 01/03/1995.
- 162 - Part 3: 12.4 Find: Search fields
But if you want to search the date field in connection with the asterisk, you have to
correctly enter the rest in long format.
Search fields in the currency field
Enter the amount without blank. But if you want to search the currency field in
connection with the asterisk, you have to correctly enter the rest with a blank.
Search fields with Thesaurus
If you work with a Thesaurus, you can also use it for the search. Apply the entries as
described in the new entry and then start the search. This saves on typing and avoids a
record not being found because of an erroneous entry.
Save recurring field search queries
There are certain search queries that you will repeat. In such cases it is considerably
easier, if you save the search query as search template under a unique name.
You save a search query under "Settings/field selection for search templates"..
At first, enter a name for the search and then activate the command "Edit". Now enter
your search terms as you would for a normal field search. Confirm with "OK".
To use the search template, call the menu item "database/search fields with template"
(or click on the icon), select the corresponding name and start the search with "OK".
Example
You will find examples for all search types at the end of the FIND chapter.
Part 3: Find: Examples - 163 -
The following examples illustrate a wide variety of search options with the help of project
management.
Examples
for all
search
• Question: What has Mr Brown, the officer dealing with the project, archived with
types
regards to project New Town?
Entry in text retrieval, find in profile data: Brown&New Town (will also find the records
showing Mr Brown not as the officer, but e.g. noted in a comment. In any case, each
record contains both terms: Brown and New Town)
Entry in search fields: In the project field: New Town ; In the officer field: Brown
(Only the records which have the relevant entries in both fields will be found)
• Question: What has Mr Brown worked on?
Entry in text retrieval, find in profile data: Brown (will also find the records showing Mr
Brown not as the officer, but e.g. noted in a comment; or data from various projects)
Entry in search fields: In the officer field: Brown
(will only find the records, which explicitly state Mr Brown as officer in the field
concerned)
•
Question: What has Mr Brown worked on and what is available regarding project
New Town? (i.e. you are looking for Brown or New Town)
Entry in text retrieval, find in profile data: Brown|New Town (will also find the records
containing Brown or New Town e.g. in the comment)
Entry in search fields: In the project field: New Town
At first you will find all records regarding project New Town with various officers. Do you
now want to differenciate further, e.g.: ... and which of this data has Mr Brown edited?,
then you select "search fields" again on the main menu and enter Brown in the officer
field. The selection list for the project New Town is then searched again and a new
selection list with all records, which Mr Brown has worked on with regards to project
New Town, will be displayed.
The reverse case is of course also possible: You enter Brown in the officer field and
initially find all records concerning various projects, which Mr Brown has worked on.
• Question: What have Mr Brown and Mr Jones edited in the project New Town? (i.e.
you are looking for Brown or Jones and the project New Town).
Entry in text retrieval: (Brown|Jones)&New Town
(You find all records containing e.g. one of the three search terms in the comment. But
in any case the records contain either "Brown and New Town" or "Jones and New
Town").
Entry in search fields: In the project field: New Town; In the officer field: Brown|Jones
(You find all records regarding project New Town, which have either been edited by
Brown or Jones.)
- 164 - Part 3: Find: Examples
• Question: What has Mr Brown contributed to the project New Town in the first six
months of 1994?
Entry in search fields: In the project field: New Town ; In the officer field: Brown; In the
date field: 01/01/1994<->31/06/1994. (The date can also be entered in a shorter form e.g. 010194<->310694)
• Question: What has Mr Brown written at any time with regards to project New Town
in a report on the subject of estimate of cost?
Entry in text retrieval, find in documents:
Brown&New Town&estimate of cost
(You find all records containing the entries Brown and New Town and estimate of cost in
an archived document. But you will not find the records, which have the name Brown
only in the profile data.)
Entry in text retrieval, find in profile data and in documents:
Brown&New Town&estimate of cost
(You find all records containing the three search terms in profile data or document.)
In this case, text retrieval only in profile data or the field search is not sufficient,
especially if the archived texts were not keyworded further.
Tip
Effective search queries
The following generally applies:
• Do not spend too much time thinking up an exact search query just to find a certain
single record.
Take advantage of only having to enter partial terms, even if you exactly know the
complete search term - e.g. it is sufficient to enter Bro (or Bro* for the field search)
to find "Brown". In the "worst" scenario, you will get some additional hits in the select
list, which you did not actually want to find.
• It tends to be quicker to initially search not too specifically and to restrict the hits
again through another search if required.
• Instead of starting several search queries one after the other, it may be faster to link
these search queries and then to select the respective queries to be processed on
the select list, as different processes are required with the respective records
(example: an order confirmation is to be sent to companies A and B, a inquiry is to
be sent to companies C and D. Find all four companies in one go; at first select
companies A and B and complete the order confirmation, then select companies C
and D and complete the inquiry.).
Part 3: 12.5 Hypersearch - 165 -
12.5
Hypersearch
A hypersearch automatically starts the basic searches in accordance with a
previously determined definition either within an archive or across-archives, after
the search actively selected by the user. In addition, a "loop" option can be
selected, i.e., the search will continue until no more hits are found (recurse).
"
DEFINITION INFORMATION IS INCLUDED IN CHAPTER:
!
18.2.8 DEFINE HYPERSEARCH
$
Step by
Step
Start search:
Call the following dialogue via "database/hypersearch".
1
6
2
3
4
5
1:
2:
Enter search term
Select predefined search
- 166 - Part 3: 12.5 Hypersearch
"
MORE INFORMATION ON THIS TOPIC IS INCLUDED IN CHAPTER:
!
18.2.2.1 Create new search
3:
4:
5:
6:
Shows the setting of the selected search
Select required search algorithms
If a hit limit is required, the field for the number regarding the entry
is released
Shows whether the selected search is a text retrieval or a template
search.
The search is started with “Ok”
%
Second option for starting a search:
Select a search type (field or text retrieval) on the "database" menu, enter
search term.
Select the "hypersearch with search definition" option in text retrieval and if
required "recurse".
Activate the hypersearch icon in the field search and if required the hypersearch
recurse icon.
Start the search with "OK".
After the "basic search" the defined hypersearch is now carried out and a result
list will be displayed.
Part 3: 12.5 Hypersearch - 167 -
13.
EDIT AND EVALUATE
Brief information
Ansicht
Ändern + Löschen
Drucken
Profildaten
Datenübergabe
Email
Exportieren
Statistik
Zusatzinformationen
Dokument
- 168 - Part 3: 13.1. Edit: View
13.1
13.1.1
View
Profile data
Ansicht
Ändern + Löschen
Drucken
Profildaten
Datenübergabe
Dokument
Email
Exportieren
Statistik
Zusatzinformationen
The records found are displayed in the select list.
"
MORE INFORMATION ON THIS TOPIC IS INCLUDED IN CHAPTER:
!
18.2.2 DETAILS IN THE SELECT LIST
Part 3: 13.1. Edit: View - 169 -
The view functions within the select list:
A:
1: Enables and disables the buttons shown below
2: Turns the select list into an independent window
3: Closes the select list
1:
With "|<" and ">|" you reach the beginning or the end of the select list.
2:
The maximum number of the entries shown in the select list The default
setting is 100. This entry has no influence on the number of records found,
but only on the speed of the display or for browsing the list and the records.
The commands "<" and ">" activate the next 100 (or the stated number)
records found. (Note: The maximum number is changed on the menu item
"Management/edit archive parameter". )
Within this maximum number you can also work with IMAGE ↑↓ , Pos1
and End as well as (with the mouse) with the scroll bar.
The selected record is shown in the record tab underneath the select list.
- 170 - Part 3: 13.1. Edit: View
13.1.2
Document
Ansicht
Ändern + Löschen
Drucken
Profildaten
Datenübergabe
Dokument
Email
Exportieren
Statistik
Zusatzinformationen
The document associated with the record is always called via the
"document/view" command.
The association, which was determined when the document was archived, now
applies to this view.
But you can also temporarily create another association for the document than
the archived one.
Example
Change view app
A file with measured values was associated with a simple 2D drawing program on
archiving. But the data is now also required for a 3D drawing program. The record is
called up for this purpose and on the main menu the command
"Settings/Doc.Association". The 3D program is selected as view app.
With "document/view" the document is now called up with this temporary new
association.
Note, the document continues to be associated with the original program, i.e.
the newly selected association is not saved.
Part 3: 13.1. Edit: View - 171 -
Small image/large image:
If the mask of the archive is set up accordingly; the element "small image" can
be seen.
If the image element is not present in the mask, it can be added subsequently at any
time. See chapter 14.
To activate the small image immediately on calling the record, the option
"view/display small image automatically" must be selected. If this option is not
selected, you have to at first double-click in the empty small image frame.
The small image contains a preview for documents,
• which are archived with the internal view,
• and the program name for documents, which are archived with a third-party
application.
If the small image is displayed, a double-click in the small image element will
call up
• the large image in internal view (own window)
• the corresponding program with the document in external view
.
The large image or external view can also be called - independent of the small
image -
Note
- 172 - Part 3: 13.1. Edit: View
• with the menu item "document/view"
• the icon
• for internal view, automatically when calling the record with the menu item
"view/display large image automatically".
External view via third-party application:
If the view app is another application program, the third-party application
concerned is always called with the document.
Tip
Always close documents
Please ensure that you always close these documents in the third-party application
again before returning to Dr.DOC to avoid possible messages when the document is
called up again. The program itself does not have to be exited, if it is DDE capable. That
way you do not need to restart the program for another document - it is simply loaded
into the already started program.
Tip
Screen setup
It may be helpful to arrange various applications next to eachother on screen. If you
want to view several documents one after another for example, which are all associated
with a word processing application, arrange the windows of Dr.DOC and the word
processing application next to eachother or underneath eachother to view the
documents quicker.
Internal view:
If the document was filed internally (e.g. an image file or a scanned template),
the following functions are available for the view:
Small image (preview):
Display automatically when menu item "view/display small image automatically"
is selected or with double-click in the image element.
Part 3: 13.1. Edit: View - 173 -
You can browse the pages of
the document with the scroll bar.
2
Large image:
On the "view" menu you can basically set
• whether the large image is to be displayed automatically as soon as the
record is called
• whether it is to be automatically in the foreground (independent of this you
can define the stacking of windows on the "Window" menu)
• whether image and window size are to be identical (i.e., if the window is
enlarged or reduced, the image is also enlarged/reduced accordingly).
You can find more view functions on the "document" menu and partly as icons:
• "Display": Shows the large image (if it is not automatically displayed)
• "Large image/next" and "Large image/back": Browse several document
pages
• "Large image/rotate": The current document page can be rotated by 90°.
• "large image/zoom": The document page or also sections of it can be
zoomed smoothly. Enter the required percentage in the query.
If a section is to be zoomed, you have to first determine the section. Click in
the left upper corner with the left mouse button, hold the button down and
drag the frame to the required size. Then press the right mouse button, so
only the section is displayed.
- 174 - Part 3: 13.2. Edit: Change and delete
13.2
13.2.1
Change and delete
Profile data
Ansicht
Ändern + Löschen
Drucken
Profildaten
Datenübergabe
Dokument
Email
Exportieren
Statistik
Zusatzinformationen
The most commands are available on the selection list as well as in an
individual record called for viewing. By clicking and selecting individual records
with the left mouse button, another selection can be made within the selection
list for the required process.
Part 3: 13.2. Edit: Change and delete - 175 -
13.2.1.1
Work mode
There are several possibilities for defining in how far a user may change data of
an archive:
•
Edit entry under the menu item "management/archive parameter " for the
"changes after program start possible" option:
- If the option is not activated, you can view the records and use them to
transfer data, print out etc. Users cannot make changes or delete
records.
- If the option is activated, the records can be changed or deleted.
•
In addition, the entries that may be viewed and/or changed by the user are
determined subject to the user's access rights.
MORE INFORMATION ON THIS TOPIC IS INCLUDED IN CHAPTER:
!
16
USER SET
13.2.1.2
Changes in the individual record
#
Call required record or select on the list, the record appears in the record
tab.
#
Add, change, delete text.
Entry simplification for profile data changes and -additions: Use Thesaurus
Thesaurus entries can also be adopted here as in the new entry, if the prerequisites are
met. Chapter 11.2 CREATE NEW PROFILE DATA explains the process in detail.
#
"
Apply changes with "save".
Tip
- 176 - Part 3: 13.2. Edit: Change and delete
13.2.1.3
Delete individual record
#
Call required record and activate the command "record/delete".
#
.
Or: Select the record on the list and activate the command "delete".
13.2.1.4
#
Find and replace
Select records where the same change is to be applied on the selection
list.
#
Call the function "record/replace".
1
4
2
3
5
1:
2:
State whether you want to edit all records of the list or just the
selected ones.
Enter the search term. Apart from entering complete words or
parts of words, the following options are available:
*
^*
^^
#n#
for any entry
for finding the asterisk *
for finding ^
for finding ASCII values. Instead of n, enter the
corresponding value (e.g. #20# )
Part 3: 13.2. Edit: Change and delete - 177 -
3:
Enter the term for replacing the search term or for attaching to
the search term. Apart from entering complete words or parts of
words, the following options are available:
!*
^!*
#n#
4:
for deleting search term or field contents
for replacing with !*
for replacing with an ASCII value. Instead of n enter
the corresponding value
(e.g. #20# )
Select whether the search term is to be replaced or whether the
entered replacement term is to be attached.
Within a table, "attach" inserts a new line.
5:
Note
If you only want to execute the action in certain fields, activate
"field-spec..". Enter any character in the fields concerned and
start with "OK".
If the action is to be global across all data, activate "Global".
In an address management, the abbreviation "str." is to be replaced by "street". For this
purpose search and replacement terms are entered as in the above illustration. As the
action is only to be carried out in the "Street" field, the input mask is called with "fieldspec." and any character is entered in the "Street" field.
Stop changes to automatic fields
Example
Tip
If an automatic field - user, date and/or time is set up, it is of course also changed for
changes in a larger number of records. As this is not necessarily required, it is easiest to
take out the respective entries prior to the change in the menu item "Settings/field
selection for automatic fields". After the changes, enter the respective automatic fields
again.
SEE ALSO THE CHAPTER:
!
18.1.2 AUTOMATIC FIELDS
"
- 178 - Part 3: 13.2. Edit: Change and delete
13.2.1.5
#
Delete several records
If several records are to be deleted (incl. document), select these on the
list and activate the command "delete" and then the option "delete
selected records".
If the entire select list is to be deleted, select all records.
13.2.2
Documents
Ansicht
Ändern + Löschen
Drucken
Profildaten
Datenübergabe
Dokument
Email
Exportieren
Statistik
Zusatzinformationen
With regards to documents, the following changes are possible:
•
Change and rearchive, optionally with version management
•
Add annotations (redlining)
•
Delete
•
Rearchive documents subsequently
•
Extend existing documents
•
Lock or release documents (version management)
Part 3: 13.2. Edit: Change and delete - 179 -
13.2.2.1
Change and rearchive documents
In principle, documents once archived cannot be saved in the same record, but
only as a new record for security reasons.
Exception: the archive is set up with version management. Then every
document can have draft and release status. This particular case is described in
chapter 13.2.2.6.
#
If the view-app is internal, you have to first change it to another view-app
for a program, which can display and edit the image.
#
Call the document with "document/display".
#
You can now make the required changes in the third-party application.
Save the modified document. Ensure that you save it under the
predetermined name document.erw in the predetermined directory.
#
Return to the archive with ALT+Tab. This will initially display the record of
the original document and the query whether the modified document is to
be rearchived, which you confirm with "Yes".
#
A new record is now automatically created. The document is archived with
the same view-app, which the original document has (i.e. if this app is
internal for the original document, then the new document is also archived
in this way - even if it was edited in another program).
The profile data is also adopted. If required, you can make changes.
#
Archive the new record incl. document with "save".
- 180 - Part 3: 13.2. Edit: Change and delete
DMS
CalCall
l program
p r o gra m
TThird
hirdpaparty
r t y app
ap p
A rch ive
DOC1
Editing DOC1
DOC2
DOC3
DOC1 NEW
Tip
Archiving of
modified document
Avoid errors with duplication check
If a single or duplication key exists in the profile data, change the profile data for the new
document (without saving) before you call the document for editing, as otherwise a
(justified) message will appear when you try to archive the new document.
If the error does occur, immediately carry out the following action:
Change the profile data (without saving), call the "record/new" command, then the
"document/new" command and archive the modified document. You will find the
modified document in the local working directory with the name document and the
extension of the third-party application, in which it was created. If you do not know this
extension, call (without leaving the new entry!) "Settings/Doc.Association"on the main
menu. The relevant extension should be stated here behind the program name.
Part 3: 13.2. Edit: Change and delete - 181 -
13.2.2.2
Add annotations (redlining)
For documents, which are archived with the view-app INTERNAL, annotations
can be added subsequently. These annotations (redlining) can
• be created in various typefaces and colors
• be shown or hidden in the document view
• be made visible for various groups, i.e. the visibility can be restricted for
groups and all entries within a group can be viewed by anybody.
(You determine the setting in the user manager/ groups/ right/ record rights:
redlining/ create, print, view.)
MORE INFORMATION ON THE SUBJECT OF USER SET/USER GROUPS IS IN CHAPTERS
16.2 AND 16.3
Every user should have an individual font colour to delimitate the entries of different
users.
Chapter 14 describes how the redlining function is activated for the archive concerned.
$
Activate the large image view of the document you want to equip with
annotations.
%
Start the redline editor with the menu item "document/redline editor" or
the key combination Ctrl + R. The menu and the toolbar change:
&
Select the typeface and color for your annotation with the corresponding
icon or the menu items "Settings/typeface" or "Settings/typecolor".
'
Place the mouse cursor at the position in the document where the
annotation is to be entered and click the left mouse button. When the
cursor flashes, you can enter the text.
"
Tip
"
Step by
Step
- 182 - Part 3: 13.2. Edit: Change and delete
(
For the next annotation you again place the cursor at the required
position.
)
The entries can also be edited subsequently: click in the text with the
mouse. As soon as it is framed, you can make changes or format the text
(typeface, color).
To delete an annotation, select it and activate the menu item "edit/delete
line".
If all annotations are to be deleted, activate the menu item "edit/delete all
entries".
*
To save the redlining, click on the corresponding icon or activate the
menu item "Redlining/save entries".
In addition, the following applies:
• Redlining (edit and view) is only possible in large image view, i.e. existing
redlining is not displayed in the small image/preview.
• There are only single-line entries. The Enter key automatically creates a new
entry in the next line.
• An individual entry can be moved with the right mouse button.
• One font and one color can be selected per entry.
• The font size is an absolute point size relating to the original document as it
appears in the printout.
• Each user can only edit or delete his/her own entries.
• The redlining can also be shown or hidden when printing using "view/display
redlining".
Part 3: 13.2. Edit: Change and delete - 183 -
13.2.2.3
#
Delete documents
Find the records where documents are to be deleted. Activate the "delete"
command on the select list and then the "delete documents" option.
In addition, individual pages can also be deleted for documents with internal
view:
#
Call the document with "document/display" and activate the large image
view.
#
The current page will be deleted with the command "document/ large
image/ delete".
13.2.2.4
Rearchive documents subsequently
A document can also be attached subsequently in records, which so far had no
document.
#
Call the record, where a document is to be added.
#
Any further action is corresponding to the process described in chapter
11.3 ARCHIVE DOCUMENTS.
13.2.2.5
#
Extend existing documents
(for view app internal)
Check the document source using "Settings/Doc.Source" on the main
menu. You can
- attach an existing image file with the "file" option
- scan a new image and attach with the option "OCR scanner"
- create a new file in a (NCI) program and attach with the option "thirdparty application".
- 184 - Part 3: 13.2. Edit: Change and delete
Confirm the selection with "OK".
#
Afterwards check the settings in "Settings/Doc.Association".
- Any program from the NCI column can be selected as source-app.
- Image file/internal is automatically taken as view-app for attaching.
#
If you have not done so yet: Call the record where the document is to be
extended.
#
Activate the command "document/attach image ". Subject to the
Doc.Source activated, a file can be selected or created or a template can
be scanned.
Further editing options for the new document page are the same as for
the new entry.
#
If you want to attach another image, activate the "attach image" command
(i.e. you do not have to hold).
Finally you apply the change with "record/save".
Part 3: 13.2. Edit: Change and delete - 185 -
13.2.2.6
Manage document versions (draft and
releases)
The Dr.DOC version management enables the administration of different
document versions. The prerequisite is that the version management is set up
when creating the archive.
MORE INFORMATION ON THIS TOPIC IS INCLUDED IN CHAPTER:
!
15
VERSION MANAGEMENT
A document can have various statuses:
Draft
free
Release
locked
A draft version can be transformed into a release version, but not vice versa
(i.e., a release cannot be reset to draft status).
The basic configuration is done via the menu item "Settings/version
management":
"
- 186 - Part 3: 13.2. Edit: Change and delete
In addition, please note:
• Only one free release is permitted per document. If a release is changed, it
always leads to a new version (i.e.: a new record).
• For the option "Assign new documents release status by default": If the
option is deactivated, it means: new documents have "draft status". If a draft
is changed, it does not lead to a new version (one record is maintained!).
Example
A letter automatically archived after data transfer is only a draft and is not sent until after
it has been revised. With draft status this document can subsequently be edited and
corrected until the ready-to-send version is achieved and can be archived as locked
release. If the document had release status from the start, a new record with the
respective version would be created with each change.
"
The fields required for version management are created when the archive is created in
the mask. You find more detailled information in the corresponding chapter 14 SET UP
ARCHIVE.
"
More detailled information on locking and releasing is included in the supervisor part in
chapter 17 ACCESS RIGHTS AND CHECK.
Part 3: 13.3 Edit: Print - 187 -
13.3
Print
At first the data is found, then the required print action is selected and the
various options are determined.
13.3.1
Set up printer
The current printer is displayed in "Settings/print setup". Here you can
• select a printer
• select various print options (portrait/landscape, paper format/feed)
• define various printer settings (via "Settings")(different subject to printer and
driver).
- 188 - Part 3: 13.3 Edit: Print
13.3.2
Print profile data
Ansicht
Ändern + Löschen
Drucken
Profildaten
Datenübergabe
Dokument
Email
Exportieren
Statistik
Zusatzinformationen
Profile data can be printed
• as print tables and
• as print tabs.
A printout with data transfer to a third-party application is also possible. This is
described in the following chapter.
Step by
Step
$
Find:
#
Find the required data.
Part 3: 13.3 Edit: Print - 189 -
%
#
Determine options:
When you obtain a select list, you can make another selection in it by
identifying your choice. Then activate the command "print".
If an individual record is called for editing, activate the "record/print"
command.
In any case, you will receive the same print query where you can choose
between print tables and print tabs. For both printout formats the other
queries of the print dialogue are identical:
1
2
3
4
Select
&a.
1:
"All records" for the printout of all selected records.
2:
"current records" or "selected records" for the printout of the record
selected on the list or displayed on the screen.
3:
"printer" for direct output to the connected printer (uses the printer,
which is identified in Windows as current printer. Make changes to
the printer settings via Windows.).
4:
"File" for output to a file, which can then be edited further, e.g. via a
wordprocessing system. Enter drive, directory and name of the
required file in the following query.
Print tables:
Print tables enables a printout in columns with freely selected fields, e.g.:
- 190 - Part 3: 13.3 Edit: Print
DATA DIRECTORY Dr.DOC
Status: 10/12/1996
Customer management
=======================================
Selection: A*<->H*
=======================================
Name
since
Turnover
Customer
--------------------------------------------------------------------------------------------------
Auer
Berger
Elliot
Huber
END
#
35641.00
4561.00
16548.00
15674.00
01/05/1986
05/06/1985
23/10/1990
04/08/1984
Determine fields for print tables:
The fields to appear on a printout of the profile data in columns are
defined under "Settings/field selection for print tables" on the main menu.
Enter the order of the fields to be printed and after a blank the number of
characters to be printed in the field selection in the fields concerned.
Ensure that the number of characters is restricted to 253, where Dr.DOC
automatically adds a character for each selected field to contrast the
columns from eachother. Confirm the entry with "OK".
"
YOU FIND AN EXAMPLE IN CHAPTER:
!
18.2.5
SELECTION FOR PRINT TABLES
#
Determine the options specially for the print tables in the print query:
Part 3: 13.3 Edit: Print - 191 -
Select the "print tables" option.
Select "print tables with heading"as additional option if required (as in the above
example). It takes the heading, which is entered in the menu item "Settings/field
selection for table heading".
Select "print tables with line break" as an additional option, if the chosen column
width is narrower than the text length and an automatic line break within the
column is required.
#
If not done so yet: Determine the other options in the print query as
described above.
#
Start printing with "OK".
Printer does not print?
Check whether there is an entry in the field selection for print tables! If this field
selection is blank, Dr.DOC cannot print.
&b.
Print field contents
The contents of the field where the cursor is positioned will be printed. Via
”record/print” (or the printer icon) the field contents are printed as they are saved
in the record, that means, for the new entry the record saved last. ”Edit/print field
contents” (or right mouse button) prints what is currently in the field.
Tip
- 192 - Part 3: 13.3 Edit: Print
&c.
Print tabs:
Print tabs is for printing out the input mask with the profile data, as it appears on
screen.
Call the "print" or "record/print"command in the record or on the select list after a
search.
#
#
Example
Note
Select the "print tabs" option.
Select whether all tabs, only the current or certain tabs are printed. If
selected tabs are to be printed, enter the tabs page numbers: single
pages by semicola and ranges with hyphen.
If you want print the first, fourth, fifth, sixth and eigth page, enter the following: 1;4-6;8
#
If not done so yet: Determine the other options in the print query as
described above.
#
Start printing with "OK".
The printout of the profile data via the data transfer to another application program is
described separately in the following chapter 13.4, as it concerns profile data as well as
documents.
Part 3: 13.3 Edit: Print - 193 -
13.3.3
Print documents
Ansicht
Ändern + Löschen
Drucken
Profildaten
Datenübergabe
Dokument
Email
Exportieren
Statistik
Zusatzinformationen
Documents can be printed out subject to connection
• via the internal connection and
• via a third-party application.
In addition, it is also possible to print out documents with the data transfer to a
third-party application, as described in the following chapter.
$
#
%a.
#
Find and call document:
At first, find the required records. Then call a record for viewing, as the
document cannot be printed from a select list.
Call the document as large image with "document/display". As an option
you can print out a stamp on scanned images. The stamp may include the
following details:
Executing user, print date, time, document ID and version number of the
version management.
Printout internal:
Activate the command "document/large image/print".
The current printer will be shown. You can change the printer selection
and setup with "Settings/print setup" if required.
- 194 - Part 3: 13.3 Edit: Print
Select what you want to print: the current image, all images (pages) or
selected pages. For the last selection, enter the required page numbers
separated by semicolons.
#
Any existing redlining entries can also be printed, if "view/display
redlining" is activated.
#
Start printing with "OK".
%b.
Printout via third-party application:
This concerns all documents, which are archived with another view-app than
"image file/internal". For these documents the respective third-party application
is started for document view.
The options of this program will then be available for printing.
Part 3: 13.4. Edit: Transfer data - 195 -
13.4
Transfer data
Ansicht
Ändern + Löschen
Drucken
Profildaten
Datenübergabe
Dokument
Email
Exportieren
Statistik
Zusatzinformationen
Transferring data means importing data (profile data and/or document) from
Dr.DOC to a form or a template of a another program.
Print with own layout
Use the transfer data function if you require, e.g. a printout of profile data and/or
documents designed with frame, various fonts etc.
Some preparation work is required for using the transfer data function: You must
state the fields from which profile data is to be applied in the archive and the
third-party application, to which the data is transferred, must have a template for
importing the data.
This basic work, which the system administrator usually only has to carry out
once, is described in detail in part 4, chapter 18.3 PREPARE DATA TRANSFER TO
THIRD-PARTY APPLICATION.
Data can be transferred to all programs with a macro language, e.g. word
processing applications. Dr.DOC includes a macro for Winword as standard.
Various examples refer to this association.
Tip
- 196 - Part 3: 13.4. Edit: Transfer data
Brief information
Datenübergabe
alle Datensätze
markierte Datensätze
aktueller Datensatz
evtl: Dokumentseite(n)
angeben
Formular wählen (Dateiwahl)
Daten werden automatisch in Formular eingespielt
Seriendatei bearbeiten (Text schreiben, Drucken ...)
Seriendatei unter dem vorgegebenem Namen speichern
In das Archiv wechseln
Automatische Archivierung
Part 3: 13.4. Edit: Transfer data - 197 -
$
#
%
#
Find:
Step by
Step
Find the required data.
Determine options:
When you obtain a select list, you can make another selection in it by
identifying your choice. Then activate the command "transfer data" or
click on the icon on the toolbar.
If an individual record is called for editing, activate the "record/transfer
data"command.
1
2
3
4
1: Select "current records" or "selected records" (appears, if you have
selected several records for transfer in the select list). for importing
fixed data of a single record to a template (e.g. transfer carrier or
single letter). Dr.DOC imports the profile data determined by you into
the form, which you can then expand and edit with any entries.
2: Select "all records" for importing all records of the select list into a
series file.
3: Importing one page from the document belonging to the record is only
possible for image documents, which are archived with the
"document"-app internally. For the data transfer of document pages,
please ensure that
- enough memory is available
- 198 - Part 3: 13.4. Edit: Transfer data
- the template must include a corresponding annotation stating the
position where the document is to be inserted. Refer to the note in
chapter 18.3 PREPARE DATA TRANSFER TO THIRD-PARTY APPLICATION in
part 4.
4: When a document is transferred, please also state the size of the
space intended in the template, so that the image receives the
optimum fit.
#
&
#
Note
Confirm your selection with "OK".
Select form:
Now select the name of the template file. "OK" starts the import of data
into the third-party application.
The query "transform file from" may appear in connection with the wordprocessing
system WINWORD. The "MS-DOS Text" option must be selected here.
You have now the option to edit (e.g. insert individual letter text), print and of
course also save the text using your word processing system. Your texts are
initially filed in WINWORD as "archive.doc".
'
Optional: automatic archiving after data transfer:
The archiving of the file with the imported data can be automated. If the archive
is set up accordingly, another archive is automatically called after the data
transfer is completed.
#
To enable automatic archiving, the file must be saved with the imported
data under the preset name archive.erw (.erw = e.g. .doc for Winword) in
the predetermined directory. It is easiest, if you close this file after
completing your work (in Winword via "file/close") and if you answer the
query whether to save with "Yes".
#
The third-party application itself does not have to be terminated. Return
directly to Dr.DOC with ALT+TAB.
Part 3: 13.4. Edit: Transfer data - 199 -
#
Exit the data transfer dialogue in the archive with "cancel". The archive is
now automatically called for data transfer.
If required, enter profile data here. Activate the "save" command for
archiving.
#
The archive for data transfer is terminated automatically. You are now
back in the original archive.
From Winword 95 and later, a document created with data transfer is archived via
“Dr.DOC archiving” on the menu line of Winword.
INFORMATION ON THE SUBJECT OF AUTOMATIC ARCHIVING IS INCLUDED IN CHAPTER:
!
14.
SET UP ARCHIVE
Create letter and archive in document management
Address management
Address
Word processing
Letterhead
Document managemt.
Document
Lette
A (standard) letter is to be written to companies XYZ and ABC and is to be archived
immediately.
• The workflow begins in address management: You are looking with text retrieval for
e.g. XYZ.
• Activate the "transfer data" command on the select list with the record found.
• Select the letter template in the word processing application as form, which is called
e.g. inquiry.doc.
• The two addresses are now automatically imported. You can supplement the text of
the letter if required. Then you can print the letter to be sent.
• Now close and save the file and return to the archive. The document management is
now started automatically.
Note
"
Example
- 200 - Part 3: 13.4. Edit: Transfer data
• Enter some profile data in document management (e.g. the subject of the letter, a
resubmission date or similar). You do not have to enter a "keyword list" with the letter
contents, as you will be able to browse for the archived letter directly with text
retrieval.
You archive the new document.
The document management is automatically terminated and you will be back in
address management.
Example
Create tab from inventory
A tab with the essential data and an image of the object e.g. as "packing slip" is to be
created for the loan transactions from an inventory.
• Find the object in the inventory, e.g. with the inventory number.
• Call "transfer data" in the record. Determine:
State that the first document page is
to be transferred.
State the size of the image on the
tab.
• Select the tab template in word processing as form.
• The data is now automatically imported into the template.
Part 3: 13.5 Edit: Data to e-mail program - 201 -
13.5
Forward data to e-mail program
Ansicht
Ändern + Löschen
Drucken
Profildaten
Datenübergabe
Dokument
Email
Exportieren
Statistik
Zusatzinformationen
Profile data, documents or links to them can be forwarded to an e-mail program
and sent.
Requests to E-mail program
Note
The program must be MAPI capable.
$
#
%
#
#
Find:
Find the required data.
Determine options:
Go to “Settings/field selection for/ASCII export” on the menu bar and
determine the fields, whose content is to be transferred to the e-mail.
When you receive a select list, you can make another selection. Then
activate the “record/e-mail" command or click on the icon on the toolbar.
Step by
Step
- 202 - Part 3: 13.5. Edit: Data to e-mail program
1
2
3
7
8
9
4
10
5
6
1:
2:
3:
The profile data of the selected records is sent
The documents linked to the selected records are sent.
Links to the selected records are sent (for several records, ONE link
is created and sent for each individual record).
The prerequisite is that the recipient:
- works with Dr.Doc from version 6.0
- has access to the same archive server
- is logged on to the same user set
4: The mail address of the recipient is entered here
5: Subject line
6: Editable text field
7: Select for normal mail
8+9: A task/appointment can be sent here. The prerequisite is that sender
and recipient work with Outlook. If the recipient does not work with
Outlook, s/he will receive a normal mail.
10: A user of the current user set can be selected here as recipient.
The transfer of data starts with "OK".
The data is filed in the local work directory in a subfolder “Email” as *.dat (profile
data), *.tif (document) or *.arx (link).
Part 3: 13.6 Edit: Export data - 203 -
13.6
Export data
Ansicht
Ändern + Löschen
Drucken
Profildaten
Datenübergabe
Dokument
Email
Exportieren
Statistik
Zusatzinformationen
You have the following options for exporting data:
Profildaten
ASCII/ANSI
Dbase
Dokument
anderes
Archiv
Datei im
betreffenden Format
The following only describes the export of documents as file. The export of
profile data without or with document is described in detail in the system
administrator part in chapter 21.3.
- 204 - Part 3: 13.6 Edit: Export data
13.6.1
Step by
Step
Exporting documents as file
Archived documents can be exported into a file at any time. The archived
documents remain unaffected.
#
#
#
Call the record containing the document to be exported.
There are two possibilities for exporting documents archived with internal
view:
- Export document by page (i.e.: one page = one file).
Call the document with "document/display" and go to the page to be
exported; activate the "document/export large image"command, check
the directory where the file is to be created and enter the file name. Start
the export with "OK".
- Export document in multipage TIF file (all pages = one file)
Call
the
document
with
“document/display”;
activate
the
“document/export” command; check the directory where the file is to be
created and enter the file name. Start the export with "OK".
For documents, which are associated with a third-party application for
viewing:
Activate the "document/export"command. Check the directory where the
file is to be placed and enter the file name. Start the export with "OK".
Part 3: 13.7 Evaluate: Statistics - 205 -
13.7
Statistics
Ansicht
Ändern + Löschen
Drucken
Profildaten
Datenübergabe
Dokument
Email
Exportieren
Statistik
Zusatzinformationen
The "Statistics" command offers you the option to quickly carry out statistical
calculations in records with certain entries selected by you. The calculation
determined under "Settings/formulas for statistics" will be carried out.
These evaluations should not be mistaken with the calculation definitions!
$
Determine formulas:
Enter the formulas in the form in "Settings/formulas for statistics" according to
the plan (e.g.)
Sum=a+b
Instead of the parameter a and b enter the field name of the field from which the
calculation is to be executed.
The following are valid as operation characters = , + , - , / , *
The following are not valid : and x
Ensure that there are no blanks within the formulas.
Step by
Step
- 206 - Part 3: 13.6 Edit: Export data
Example
At first all entries in the "Profit95" field in the selected records are added as
sum1, then all entries in the "Profit96" field. Sum1 "Profit95" is added to
sum2 "Profit96" as "Total".
%
Carry out calculations:
#
At first find the records, which are to be used for carrying out calculations.
You receive a select list, in which the command ”Statistics” can be
activated and which is used for carrying out the calculation. The
calculation is always carry out in the entire select list, i.e. is not subject to
selections.
#
A table appears as result, e.g.:
#
The displayed list can also be printed using "print".
Part 3: 13.8 Additional info - 207 -
13.8
Call additional information
Ansicht
Ändern + Löschen
Drucken
Profildaten
Datenübergabe
Dokument
Email
Exportieren
Statistik
Zusatzinformationen
You have the option to call additional information on a certain record from
another archive.
Chapter 20 LINK ARCHIVES RELATIONALLY describes how to create the basis for
this relational link of archives.
Call a record. Click with the mouse on the "i" button in the right corner of the
field:
Or: Move the cursor into the field, for which the link is stated. Select the "edit/call
additional info "command.
The linked archive is called with the required data.
If additional information is called up in a table column, the information on the entry in the
table line where the cursor is positioned will be searched.
Note
If a corresponding record does not yet exist in the linked archive, you now have
the option to create it. The entry of the original archive is automatically applied in
the association field.
A project management includes a field with officer name as well as a field for affected
regulations and acts. Various links are set up for these fields:
Officer Name
Act abbrev.
,
,
Address management
Act management
Example
- 208 - Part 3: 13.8 Additional info
these links can be used as follows:
Mr Brown, the officer, must be called. But the telephone number is only in the address
management. The cursor is placed in the officer field and the address management with
the address entry concerned is called with the "additional info" command.
If you now also have to write a letter to Mr Brown, the data transfer to word processing
("record/transfer data") can be started in address management. When the process is
completed, the project management is active again.
Or: More detailled information on the act abbreviated WHG is required. The cursor is
placed in the act field and the "additional info" is started. Now the act management with
the corresponding record is called.
Part 4 - 209 -
PART 4
System Administration and Management
This part includes information
for the system administrator
Part 4: Preliminary remark - 211 -
PRELIMINARY REMARK
We recommend you determine a system administrator for Dr.Doc who deals
with the setup and the basic management of archives. This recommendation
applies to the single user version, if several users work at one workstation and
in particular for standard net and client/server net use.
This 4th part contains information about functions for the system administrator
and supervisor, which are not required in daily work with Dr.Doc .
You will find out how to
•
•
•
•
•
•
•
•
·
·
·
·
·
·
·
·
set up and manage an archive
register users
set up and manage a user set
create a Thesaurus
link archives relationally (additional info)
set up and maintain application-specific help
import and export data
secure the data stock
- 212 - Part 4: Notes for the C/S system administrator
PRINCIPAL NOTES FOR THE CLIENT/SERVER SYSTEM
ADMINISTRATOR
If you work with a client/server system, please observe the respective notes, if
C/S workflows are somewhat different and the additional special tips!
•
It is necessary to additionally run the server program docserv.exe at the
archive server in C/S mode. This program creates the communication
to the individual clients (independent of the net work protocol).
•
On pausing or exiting the server program, all tasks of clients being
processed at this time are stopped (not cancelled). On restarting or
stopping the pause of the server program, the process will be
continued.
•
Some settings and functions can only be defined or executed at the
archive server (see the corresponding notes).
•
If the system administrator makes changes in an archive at the server,
nobody should be working at a client with this archive!
•
For some settings you will be reminded when saving that the client
parameters still have to be called. This is necessary to ensure that the
changes will be available at the clients. In this case only call
"Management/edit archive parameter ..." and then the "Edit client
parameter " command. Do not make any changes here, but just confirm
with "OK".
Part 4: Set up and manage archives - 213 -
SET UP AND MANAGE ARCHIVE
Considerations
Before you set up a new archive, you should consider the following questions
and make brief notes on paper. These considerations help to deal quickly with
the actual work.
!
Collect:
What data shall be archived? Are the documents to be archived
images, files...?
!
Views:
Shall all data be filed in an archive or is it more sensible/clearer to file
certain entries in their own archive, which is linked relationally?
Example: The artists' biographies in a picture collection are filed
separately in their own archive and not with each picture. Or: The entire
recipients' address data of an invoice output archive is not saved with
each invoice, but uniquely in an address archive.
!
Sorting:
Determine the order of the data fields. Decide which fields are
combined on a tab by subject and which fields are for example defined
as continuous text or as table.
If necessary, plan further fields for
• User registration: fields for "created on", "created by", (tables?) fields for
"modified on", "modified by"
• Definition of the access right to a record with document (one field)
• Number generator (one field)
• File name, if the original file name is to be entered automatically when
archiving files (one field)
• Due date calculation: one field for output date, one field for the due date
and one field for result date
• OCR edited text (especially when using the OCR module; one
continuous field)
- 214 - Part 4: Set up and manage archives
•
!
Check box: This field only offers the options "on" (selected) or "off" (not
selected) for data entry.
More questions:
Should one (or several) Thesaurus be created (e.g. as (hierarchical)
Thesaurus, for checking the consistency of an entry etc.)? What is the
best field to link the Thesaurus to?
Part 4: 14. Set up archives - 215 -
14.
SET UP ARCHIVE
Brief information: Procedure for setting up new archives
Vorgehensweise
Neues Archiv anlegen
Datenbankfelder definieren
Befehle in DR.DOC
Menüpunkt Archiv/Neu
Menüpunkt Organisation/ Archiv einrichten:
"Datenbankeinstellungen"
Masken erstellen
Menüpunkt Organisation/ Archiv einrichten:
"Masken", Schaltfläche "Neu einfügen"
Menüpunkt Organisation/ Archiv einrichten:
Karteikarten für Masken definieren
"Masken", Schaltfläche "Bearbeiten"
"Karteikarte", Schaltfläche "Neu"
Menüpunkt Organisation/ Archiv einrichten:
Elemente auf Karteikarten einfügen
"Masken", Schaltfläche "Bearbeiten"
"Elemente einfügen", Schaltfläche "Einfügen"
Pfade etc. festlegen
Archiv in Benutzerverw. eintragen
und Benutzerrechte bestimmen
Evtl. weitere Einstellungen
Menüpunkt Organisation/ Archivparameter editieren
Menüpunkt Organisation/Benutzermanager
Menüpunkte Einstellungen/Feldauswahl für ...
bzw. Einstellungen/Feldauswahl-Tabelle
- 216 - Part 4: 14. Set up archives
14.1
Create new archive
Call "archive/new" to create a new archive.
The Dr.Doc* assistant already offers basic settings:
1
2
3
4
5
6
7
8
9
1:
Enter the directory and the name for the new archive here. You can
also click on the "browse"command to display the file selection
dialogue:
a
c
b
Part 4: 14. Set up archives - 217 -
a:
b:
c:
Shows the current directory. If you do not want to create the new
archive in this directory, select your required directory.
The file type shown here must not be changed.
Enter the name for the new archive here.
2-9:
Select the required settings:
2:
Client/Server Mode:
Select for client/server archives.
Do not forget that C/S applications can only be set up at the archive
server to obtain correct path details.
If archive and network server are separate, the archive must first be
created on the network server in the subdirectory COMM\SERVER (drive
name from the client's view).
For C/S archives, several subdirectories are set up on the path stated.
C/S applications are then called at the archive server from the
subdirectory \comm\server on the path stated
at the client: Only archives, which were assigned in the active user set
can be selected here (via "archive/select")!
If a user set is not yet active, it is possible to log on via "archive/user
set/additional login".
BASIC INFORMATION ABOUT SEPARATING ARCHIVE AND NETWORK SERVER:
" 2.
INSTALLATION: CLIENT/SERVER
3:
Workflow:
Select if you want to use the workflow manager.
4:
Redlining:
Every user can add annotations as redlining to NCI-documents, which
are archived with the view-app internally. This redlining can be shown or
hidden when viewing and when printing and is fully searchable.
If you select the "Redlining" option here, a field with the same name is
created (which is only required internally and cannot be inserted in the
mask).
The redlining function can also be included into an existing archive later on via
"management/set up archive" by creating a new single-line field named "Redlining".
C/S
#
Note
- 218 - Part 4: 14. Set up archives
#
Note
MORE INFORMATION ON THIS SUBJECT IS INCLUDED IN CHAPTER:
"
14.7 EDIT ARCHIVE PARAMETER
5:
Record-specific permissions:
This option later allows records and/or documents to be allocated to
certain owners and permissions, which may vary from record to record.
6:
Change management:
:Modified by, date and time can be logged as soon as the record is
saved. The required fields "modified by", "modified on" and "modified at"
are created automatically when the option is selected.
The relevant fields can also be created manually later on.
Part 4: 14. Set up archives - 219 -
7:
Version management:
Documents may be filed in different versions (draft = can be changed and
release = cannot be changed, but can be copied). Documents archived
as release can in addition also be (optionally in connection with a delay)
locked or released. When this option is selected, approx. 20 database
fields are automatically generated.
FURTHER INFORMATION:
"
15 VERSION MANAGEMENT
8:
Track changes:
To log changes of the profile data (i.e. text before/after), track changes
must be created. This file is created when the option is selected.
The track changes can also be set up later in an existing archive via "management/edit
archive parameter ".
9:
Note
Access log:
Select this option if you want to record log-ins with incorrect password
with an access log.
The access log can also be set up later in an existing archive via "management/edit
archive parameter".
When all options have been set up, you can create the new archive with "OK".
Afterwards the "Editor-Tool" window is automatically displayed. To define
database fields, click on the "database settings" register and continue as
described in the next chapter.
14.2
#
Define database fields
The "database settings" window allows you to create new database fields or to
change or delete existing fields, as well as define a variety of settings.
Call "management/set up archive" and select "database settings" tab :
Note
- 220 - Part 4: 14. Set up archives
Basic explanations:
5
1
3
4
6
2
7
1+2: Context field or field name and field identifier
The database field name (1) is the internal name for the field, which cannot
be changed after it has been defined. The identification for the field (2), as
it then appears on screen, may be different to this database field name!
The field names (1) are required for some settings (e.g. Thesaurus).
Therefore a field name can only be issued once. The field identifiers (2)
may be used more than once.
The context field (1) contains, if the field identifiers are not being edited,
the name of the currently selected setting (4), e.g. the name of the
current search template, sorting etc.
The "image" field (name and identifier) is already in every archive by
default. Please do not delete this field here and do not rename it! (Note:
not all fields have to be displayed; It does not matter if the "image" field
exists for an archive without image documents.)
The fields "ContentType" and "Extension", which are required for the
document association of Dr.Doc* internally, already exist, too. These
fields cannot be inserted in a mask.
Note
The above illustration already includes the fields, which can be automatically created
with the Dr.Doc assistant when an archive is created (redlining, document locked,
modified by/on/at).
Part 4: 14. Set up archives - 221 -
3:
Column headers
are the headings of the individual setting options. Click on the relevant
name to activate the column and make changes in it.
4:
Configuration names
It is possible to save different configurations for some settings. These are
then available on a drop-down list in (4).
5:
Command
"New"
subject to the column selected (see (3)), a new database field
or a new configuration is created.
"Delete"
subject to the column selected, a database field or a
configuration is deleted.
"Print"
prints the entire database settings.
"Edit"
offers the option to make entries directly in the mask for the
selected column (corresponds to "Settings/ field selection
for.."). The command is not available for all columns. If no
mask is active or a mask is not available yet, "Edit" is not
possible.
"OK"
saves all database settings and closes the window.
"Cancel"
closes the window without saving the settings or changes.
"Help"
offers online help with regards to the subject.
- 222 - Part 4: 14. Set up archives
6+7:
Scroll bars
With the horizontal scroll bar (6) you can display more columns. (7)
allows you to scroll vertically, if there are more fields than can be
viewed in the window.
Procedure:
•
Create new fields:
Place cursor in the field identifier and call the "New" command.
1
2
1:
2:
3:
3
4
Issue field names (corresponds to (1) above!)
Select field type (explanations of the individual field types, see chapter
8.3.2 SCREEN SETUP/USER INTERFACE and chapter 14.6.1 to
14.6.6!)
Select data type depending on field type.
Important Field types cannot be changed subsequently, data types and "other identifiers"
can be changed!
4:
Select other identification (only possible for single-line and table fields).
Subject to data type, various selections are available:
Data type
Possible other
Explanation
Part 4: 14. Set up archives - 223 -
identifiers
Text field
automatic field - user
when saving, automatic entry of the current user
automatic field - owner when active record-specific access right, automatic entry
of the current owner
automatic field - import for file archiving: when saving, automatic entry of the
file
original file name for the file archived in this record
Numeric
Date
Range
numeric range; values within this range can be searched
Number generator
automatic counting of records
Range
Date range; Dates within this range can be searched
Automatic field
when saving, automatic entry of the current date
Time
Automatic field
when saving, automatic entry of the current time
Currency
Range
Currency range; values within this range can be
searched
Outline
Format
enter the format of the outline per data type abbreviation
(required for correct sorting)
Selection
Number of radio
buttons
only for field type "button": several option buttons can be
created; only one of the stated buttons can be activated
at one time. The names of the individual buttons are
stated, separated by commas, under "Database field"
(e.g.: free,locked)
DETAILED INFORMATION AND EXAMPLES OF TYPES AND IDENTIFICATIONS:
"
18 SETTINGS
#
!
Leave the definition with "OK" and call the "New" command again for
the next new field.
Define settings for the fields:
! Enter field identifier (corresponds to (2) above), if it is not be identical to the
field name.
! Define the basic settings for each column as far as already known. These
settings can be supplemented or changed at any time. (see chapters 18.1.
and 18.2)
A new archive always already contains the database field "image". With this field,
archived image documents can be shown as so-called "small image" on a tab for
preview purposes. Please do not delete or rename this field!
Issue unique field names:
Note
Tip
- 224 - Part 4: 14. Set up archives
A field name can only be issued once because if you want to use the new archive
together with other archives (e.g. as Thesaurus or for Thesaurus adoption, for additional
info etc.), many definitions are only determined via the field names and unique
allocations would otherwise not be possible. Field identifiers however can have the same
names: e.g. you create the field names "created on" and "modified on", but you select
"date"as identifier for both of them.
Note
By creating a new database field, the field identifiers and the field definitions for data
types and automatic fields are automatically entered in the corresponding columns of the
"database settings" table:
If you subsequently want to change these definitions, enter them into the table.
(see chapter 1 DETERMINE/CHANGE ENTRY CRITERIA)
Part 4: 14. Set up archives - 225 -
14.2.1
Database settings
The "database settings" window not only allows you to define database fields,
but you can also determine basic settings, e.g. search templates, select lists,
sortings, data types, import and export definitions. You can also determine or
change these settings at any time later on.
When you create a new archive, we recommend you initially only determine the
basic definitions (e.g. mandatory field) and create the mask(s) immediately.
The other settings and definitions can then be determined afterwards either in
the table or in the mask (via "Edit" or via "Settings/ field selection for...") .
The following table provides a brief overview of the various settings options.
Detailed information and examples of the individual settings are in chapter 18.
Search templates
Search templates will be used if "database/search fields with
template" is called. Certain search criteria can be saved as
search templates. They help to quickly and conveniently call
search queries, which are required again and again.
Select list
A select(ion) list is the hit list, which is displayed after a search
query. It allows you to define the fields and the number of
characters per field to be shown in the select list. (Number fields
to be listed consecutively and enter the number of characters
after a blank)
Headings
Allows you to enter any heading for the fields shown in the select
list.
Sort
Sorting criteria for organising the records found on the select list.
First enter the sorting order and after a blank the number of
characters to be checked when sorting. If for example you want to
sort according to name, then first name and afterwards town,
enter the following numbers at the corresponding fields:
Name
1
10
First name
2
10
Town
3 10
Print tables
Number the fields to be printed and enter the number of
characters for the table width after a blank.
Maintain
entries
field This command is only available if the check box for "delete form
after entering new record" is activated under "management/edit
archive parameter...". All fields of the input mask are then cleared
in new entry mode for the next record when saving a new record.
Tip
- 226 - Part 4: 14. Set up archives
But it is also possible to determine individual fields where the
entry is to be maintained for the next record with the "Maintain
field entry" function. Enter any character in the fields concerned.
Output duplication The program can carry out an output duplication check for global
and field searches to stop the output of duplications ( = records,
check
where the field entries in the fields stated here are the same) on
the select list. The prerequisite is that the required fields have
previously been numbered under "output duplication check".
Transfer data
"transfer data" (TD) applies to importing data into a form (e.g.
standard letter document) of a third-party application. Number the
fields to be transferred consecutively. Determine the selection of
the fields for all forms (letter, transfer etc. ) together. However,
ensure that you keep to the order of your entries in the control
file. The first field name of the control file must be entered as the
first print field etc.
TD Archiving
It is possible to automatically transfer certain field entries from an
archive (e.g. the company name from an address) into the
associated archive after using the data transfer interface. For this
purpose, the field name of the archive into which the data is to be
imported is entered at "Data transfer archiving" into the field from
which the data is to be adopted.
ASCII Import
ASCII/ANSI archive files created externally or also other
Dr.Doc archives can be imported into the current archive with
"Import ASCII/ANSI file". At first consecutively number the fields,
into which the data is to be entered at "ASCII/ANSI Import".
NOTE: If you want to import a Dr.Doc archive, you only have
to make the selection, if the two archives do not have an identical
structure. If the same format exists, the fields do not have to be
numbered.
ASCII Export
The export of data into another archive or as ASCII file is carried
out via the "Export" command within select lists or within an
individual record to enable a partial selection. Enter the following
(in the archive, from which data is to be exported in ASCII format)
under "ASCII Export":
DBase Import
•
Exporting into another archive: the field names of the
destination archive for the export
•
Exporting into ASCII file: number the fields to be
exported consecutively
Data in DBASE format can be adopted with the help of this
setting. Number the fields in which the data is to be entered
consecutively. Check that the correct data types for the transfer
(e.g. date, number field) are entered. To import, call
Part 4: 14. Set up archives - 227 -
"database/import DBASE" and enter the path and name of the
DBASE file to be imported.
DBase Export
Linking rule
For exporting data into DBASE format, enter the order, in which
the fields are to be adopted. Please observe the following for a
correct export:
•
fields, which are longer than defined in the DBASE file,
will not be transferred if importing into an already
existing DBASE file
•
for number fields, the total length and the positions
behind the comma must be entered behind the number
for the transfer order. That means: Total length of a
number is the entire number of characters with decimal
point and positions after the comma: 852.56 e.g. has the
character number 6. There are 2 positions after the
comma in the previous example. If the number field is to
be transferred as the third item in the sequence, the
entry in this field must be: 3 6 2 . The individual numbers
are separated by blanks.
Please follow the detailled instructions for linking rules of
hypersearch definitions in chapter 12.5 DEFINE HYPERSEARCH
- 228 - Part 4: 14. Set up archives
Data types
Enter:
S for string (letters, digits)
U for string (letters, digits) for workflow
Z for digit
NR for numeric range
D for date
DR for date range
C for currency
CR for currency range
O for outline
F for deadline
XD for date + time
boolean for button (on=activated=1 or off=blank=0)
Automatic fields
Mandatory fields
Apart from determining basic data types for the database fields,
there is also the possibility to have the program make automatic
entries in selected fields. The following are available
B
for user name
D
for current date
T
for current time
F
for file name
N
for number generator
NV
for changeable number generator
V
for adopting an entry from another field.
If a field always has to have an entry, this can be defined by
entering any character in the fields concerned under "mandatory
fields". A record can only be saved, if there is an entry in the
mandatory field.
Part 4: 14. Set up archives - 229 -
Key fields
The key management (index) facilitates quick access when
carrying out a field-orientated search of certain entries in records.
Any fields can be determined as key fields by the user. A key can
be created and/or changed at any time.
Three types of keys can be selected:
Input
check
•
Multiple key (MK): A term may be in this key field
several times
•
Duplication key (DK): A term may be in this key field as
often as you like. As soon as two records have the same
entry in this key field, the program searches further fields
preset by the user when making new entries to establish
whether identical entries exist here, too. If so, an error
message will appear. (also see: Input duplication check)
•
Single key (SK): This is the strictest preset for key fields:
A term may only be in this key field once
duplicates As soon as two records have the same entry in a key field, the
program searches further fields preset by the user when making a
new entry to establish whether identical entries exist here, too. If
so, an error message will appear. To carry out an input
duplication check across determined fields, a key field for
duplication keys must be defined. Enter the required fields for the
input duplication check consecutively numbered.
Additional info
Additional information on a certain field entry can be called up
from another archive. The prerequisite for this is
•
that a field exists in both archives, which has the same
entry in both archives
•
and that the corresponding definitions were determined
in "Settings/additional info definition..."
As soon as you click on the "i" button in the connection field in
edit mode you will fork to the additional info archive. If a record
with identical content in the additional field is found in the
additional info archive, it will be shown.
Thesaurus
To facilitate the input of field entries and to guarantee the
consistency of these entries, you can apply entries from another
archive in the current archive with the "edit/call Thesaurus"
command in the new entry or edit mode. The prerequisite for this
it
•
that an archive was created, which is supposed to act as
Thesaurus archive
•
that the corresponding settings were defined in the
- 230 - Part 4: 14. Set up archives
"Settings/Thesaurus definition..." dialogue.
Field types
Enter:
E
for single-line field
M
for continuous field (memo field)
T
for table
S
for button
max. or min. field The number value entered here indicates the minimum or
maximum number of characters the field entry may have.
length
Part 4: 14. Set up archives - 231 -
14.3
Create forms
The database fields must be arranged on screen. Several different
arrangements are possible and are saved as forms. A mask does not have to
include all available database fields - independent of the data a record contains.
As access to a mask is subject to the access rights of the respective user, forms
are, together with the record access protection through the user set, another
means for keeping data, which is not supposed to be generally available,
secret.
If you create forms, which are used at several workstations, you should use the biggest
screen resolution that is used in the network. That is the only way to ensure that the
complete mask can be seen at all workstations - without having to scroll. If very different
resolutions are used, you should also consider whether two different forms might be
more appropriate - e.g. one for the resolution 800x640 and one for the resolution
1024x768.
!
When setting up a new archive, either exit the database settings with "OK".
The forms editor is called automatically.
Or call "management/set up archive", card "forms" .
Enter the new form identifier or select an existing name for editing.
For a new mask, click on the "insert new" button now. Then select the
"edit" command.
The following other commands are available:
Tip in the
net
- 232 - Part 4: 14. Set up archives
"delete"
deletes the selected mask
"copy"
copies the selected mask (enter new name, confirm with
"OK")
"rename"
gives the selected mask a new name (enter new name,
confirm with "OK")
"cancel"
stops the edit tool without saving.
In addition, the following are available here and when further editing the
commands mask in the command line at the upper end of the screen:
1
2
3
4
5
6
7
8
1:
Exit editor (and mask) and save settings.
2:
Exit mask and save settings; new mask may be created.
3:
hold for all tasks with the editor.
4:
Exit editor (and mask) without saving.
5:
Exit mask without saving.
6+7:
Show or hide editor window (useful when positioning the elements)
8:
Help
The fields can be split onto several tabs in a mask and in addition can be
combined visually with frames.
Part 4: 14. Set up archives - 233 -
14.4
Create tabs
The fields are arranged in tabs. A tab (default name "Page-1") is always
available.
!
Select a form or create a new one and activate "edit" in
"management/setup archive", register "forms".
1
3
2
4
5
6
1:
With the various cards, you can change between database settings,
create tab and insert elements.
2:
Enter the heading for the tab here. If an already existing tab is to be
edited, click on the tab name behind the "Edit tool: tab"window to
activate this tab.
3:
The way the tabs are arranged from left (=Number 1; the top one when
calling new) to right is shown here. You can change the preset
manually.
4-6:
These settings do not only apply for the tab itself, but also as presetting
for the elements to be inserted (which can then still be changed
individually).
4:
Click on "select" and set typeface, typesize and further options.
5:
The x/y coordinates determine the spacing of the fields on the tab. The
X coordinates represent horizontal spacing and the Y coordinates
vertical spacing in pixels. In addition, you can determine whether the
- 234 - Part 4: 14. Set up archives
fields are to be aligned on the grid or not.
6:
Here, you can determine the foreground color for labels (e.g. field
identifiers, comments) and the background color for the tab.
To create a new tab, name tab and define settings, then confirm with "New".
To change an existing tab, click on it, make changes and confirm with "change".
Important When creating a new archive, the first tab created has to be confirmed with "change" , as
it represents a change of the - always existing - "Page?1" tab.
Further commands:
"reset"
"delete"
"OK"
"cancel"
undo all settings not yet entered (new definitions as well as
changes) and set the default values.
deletes the tab, which is in the foreground. This button can
only be selected, if there is more than one tab.
saves the set definitions of all tabs; the "forms" dialogue
will appear again.
discards all new settings and changes.
Part 4: 14. Set up archives - 235 -
14.5
Insert elements
As soon as you have created at least one tab, you can include the fields defined
in "database settings" and other elements like frames and comments as well as
headings in the tab. Click on "insert elements" in the editor window.
At first, determine the tabs where you want to add elements. If the required tab
is covered by other tabs and you do not see it behind the editor window, it has
to be moved into the foreground: click on the name for the tab you want to
change: the required tab is now shown behind the editor window and you can
insert the elements.
We recommend you consider the positioning of the individual elements prior to
inserting the database fields: Dr.Doc positions the elements on the tab from top left
Tip
to bottom left. As soon as the bottom end of the screen is reached, any further elements
are again inserted on the right half of the screen from top to bottom. Therefore we
recommend you insert the elements in the required order straight away. You can
subsequently change the position of the elements, but you should consider that each
element can only be moved on its own, as multiple selection is not possible.
MORE INFORMATION ON THIS TOPIC IS INCLUDED IN CHAPTER:
"
14.6 EDIT ELEMENTS
#
- 236 - Part 4: 14. Set up archives
At first, determine the element type from the list of elements. The adjacent
column shows the existing fields for this type.
Then select the required database field, change the color and font setting if
required and then click on the "paste"button:
The field identifier and the field are transferred to the tab and the database field
is removed from the list of available database fields. The individual positioning
of the fields takes place later (see next chapter).
Special case radio buttons:
Auswahlschalter werden automatisch in der angegebenen Anzahl
untereinander und umrahmt eingefügt:
Part 4: 14. Set up archives - 237 -
Special case table:
Geben Sie hier den Titel der
Tabelle ein.
Markieren Sie die Felder,
die in eine Tabelle zusammengefaßt werden sollen, mit der
linken Maustaste.
Die Anzahl der Spalten wird
automatisch hochgezählt.
Geben Sie an, wieviele Zeilen
sichtbar sein sollen.
(sollte die Tabelle länger werden,
kann gescrollt werden)
Wählen Sie Farbe und Schrift der Tabelle. Differenzierte Einstellungen
innerhalb der Tabelle sind beim späteren edtiieren möglich.
The column width can be changed individually when editing later.
Tables and continuous fields can be increased when entering data via a button in the
lower right field area. You can then view them in their own large window. It is not
necessary to accommodate as much as possible in "small" view.
Tip
In addition to the defined database fields, the following are available as
elements:
"image"
"frame"
"comment"
Inserts the so-called small image element, in which the
documents archived with internal view are shown as preview.
Inserts a frame, which may also have a title. The frame can be
positioned around several fields.
Inserts a text (which has to be entered here), which may contain
an explanation on an entry into a certain field.
If you have already automatically created the "modified by/on/at" fields with the
Dr.Doc-assistant: These fields are defined as table fields, which you insert into the
mask.
Note
- 238 - Part 4: 14. Set up archives
When all elements required in the mask have been inserted, you should hold
with the "save"button in the top command line.
Part 4: Set up archive - 239 -
14.6
Edit elements
You can select between various presentation types, e.g. typeface, size, color
and frame etc for each individual element with the "edit elements" function. It is
also possible to subsequently change or delete elements.
You reach "Edit elements"by double-clicking on the element concerned on the
tab::
Keep hiding the editor window with the "Tool small" command
in the upper command line to have the screen free for the positioning of elements.
Important: Do not click on the close icon
closes the editor!
in the editor window, as this completely
There is an individual edit window for each field type, which are described in the
following subchapters. The positioning process is the same for all elements:
1.
Double-click on the element: The element is activated, which is
identified by handles at the element edge. The cursor is given the
following form: E
Click on the element, hold the mouse button down and move it to the
required position on the tab.
Change the width and/or height of the element by double-clicking on the
element and moving the cursor to the handles. The cursor is given this
form: Ö Hold the mouse down and change the size by pulling.
2.
3.
The following applies to all editing options described here:
•
•
•
•
•
Changes will be executed as soon as you click on "change".
The "as tab" command adopts the formating settings of the tab for the
current element.
"reset" undo the changes.
"delete" removes the selected element from the tab and makes it
available again in the list box of elements to be inserted.
"snap to grid" decides whether the element is snapped at the grid
coordinates when moving or whether it can be moved freely.
Tip
- 240 - Part 4: 14. Set up archives
•
•
14.6.1
Tab order: For data entry, you can determine the order for jumping to
the individual fields when pressing the tabulator key (can only be
edited, if the field itself (i.e. not the identifier) is selected).
Field identifiers can be changed here as well as in the database
settings.
Single-line field
Editieren des Feldes
Tabfolge kann geändert werden.
Editieren des
Bezeichners
Text und Umrandung
können geändert werden.
Bei beiden können geändert werden (unabhängig voneinander!): Farben, Schrift und Rasterausrichtung.
Single-line fields can be scrolled horizontally, i.e. an entry may be longer than
the width of the element. The maximum entry in a single-line field is 128
characters (regardless how wide the field is).
14.6.2
Continuous field
See illustration in the SINGLE-LINE FIELD chapter for options on making
changes!
You can input text continuously when entering records in continuous fields; the
line break is automatic. In addition, a certain number of lines is not prescribed. If
Part 4: Set up archive - 241 -
the viewable lines of the continuous field are filled, the text is moved up. A
maximum of 655360 characters (640KB) fit into a continuous field.
Mit dem Schalter kann zwischen Klein- und Groß-Ansicht des
Endlostextes hin- und hergeschaltet werden.
The large view is an independent window which can be enlarged and reduced
when editing or making new entries, while the small view has a fixed positions
on the tab.
- 242 - Part 4: 14. Set up archives
14.6.3
Table
One or several fields are presented as columns in tables. That means that in
contrast to the single-line field, a record may have several entries (repeat field)
in
a
table
field.
Fields predefined as “table” are combined into a table by selecting these fields
together and adopting them in the required tab.
Titelzeile
Spalte
Spaltenüberschrift
Zelle
Mit dem Schalter kann zwischen Klein- und Groß-Ansicht
der Tabelle hin- und hergeschaltet werden.
The large view is an independent window which can be enlarged and reduced
when editing or making new entries, while the small view has a fixed position on
the tab. In record view, the cursor automatically moves to the end of the table,
to the most current entry.
Part 4: Set up archive - 243 -
You can determine the following settings:
Title line
Enter/change text
Tab order
Tab order of the table (=first column, first line) within the
tab
Column heading
Corresponds to the identifiers of the fields. These can
also be changed here.
SWidth
Width of the column in small view
LWidth
Width of the column in large view
Pos
Position of the column in the table (from left to right)
Colors/Font
Different colors and fonts can be selected for the title line,
headings and cells
14.6.4
Button
When entering data, a button only offers the options "on" (selected) or "off" (not
selected).
Identifiers, colors and font as well as snap on grid can be entered or changed.
There is also the option to accept buttons e.g. onto the select list. In this case, a
selected button is identified with "1" and a blank button with "0".
Please also consider the particular details when searching button entries while searching
fields..
Note
- 244 - Part 4: 14. Set up archives
14.6.5
Image
The field type “image” can only be assigned once per mask. It does not have to
be predefined in the database settings, but can be added directly via
“image/document” in the “insert elements” card of the mask.
Colors and font as well as snap on grid can be changed for showing the small
image. The identifier is firmly preset here.
In addition, several pages of the image document are shown at the same time
in the small image window as preview (thumbnail) by using image splitting.
Select how many pages can be viewed in one go by entering the columns and
lines.
Tip
Memory management for the small image
The larger the number of image pages displayed at the same time the more memory is
required. We recommend you do not use splitting too much so that the main memory
does not become overloaded.
The number of previews loaded into the memory at the same time is determined in an
entry in the Dr.Doc initialising file archive.ini. The default value is "1" - i.e. when browsing
250 images only one image stays in the memory. If images are split, the value is
increased accordingly: e.g. for 3 columns and 3 lines the entered value is "12".
The maximum number of small images can also be changed manually.
Change the entry "MAX_SMALLIMAGE_NUMBER=1 to the required number.
Part 4: Set up archive - 245 -
14.6.6
Further elements
Apart from the elements already listed the following are also available:
•
•
Frame:
for visually grouping individual elements.
Title, colors, font and snap on grid can be changed for this purpose
Comment:
Fixed (i.e. which cannot be changed by the user) comments can be
created for the individual fields.
Text, colors, font, snap on grid and frame can be changed for this purpose.
- 246 - Part 4: 14. Set up archives
14.7
14.7.1
C/S
Edit archive parameter
Set up paths for local and standard net archives:
Setting up C/S archives is described separately under point 14.7.2!
Call "management/edit archive parameter ..." in the newly set up archive or in
the archive, in which changes are to be made.
Call standard network archives from a workstation (i.e. not at the server).
Check the preset entries and correct them if required. You either move from line
to line with the TAB key or by clicking with the left mouse button.
Tip
The same path is generally selected for management, archive and help files for local or
standard network archives.
•
Management file:
Part 4: Set up archive - 247 -
The management file includes all basic path information for calling an
archive. The archive itself is always called with this management file
(extension da ). That means: The path stated here is the path from
which the archive is later started.
•
Archive files:
The profile data and internal management data is filed in this path.
•
Help files:
The various archive-specific settings are considered help files.
If the path details for management, archive and/or help files are subsequently changed in
an existing archive, the files concerned are automatically copied into the new directory
and deleted in the old directory when exiting "edit archive parameter.... "
•
Important
NCI and CI archive:
The archived documents are filed in two "Container files", which are
managed by Dr.Doc . Data is separated into the file for CI documents
and the file for NCI documents. Both files can be created on any data
media - from the hard disk to the jukebox. The data medium you select
depends on the number and size of the documents to be archived.
Enter the corresponding drive or the path here.
Be aware that it is not possible to archive directly on worm media.
The path details for NCI and CI archives can be changed at any time like all other
details, too. But you should be aware that already archived documents remain filed in the
path stated at the time of archiving. If you want to make any changes, please refer to
chapter 23 CHANGE PATH DETAILS!
•
Container size
The container size for NCI and CI documents can be set. As soon as
the preset container size has been reached, Dr.Doc automatically
creates new containers. The container in the directory structure is
always created on the same level in accordance with presetting e.g.:
D:\drdoc\dbase\NCI00; ...\NCI01; ...\NCI02 (NCI00 = directory name)
The default setting is 600 MB. The maximum size is 2GB.
Optionally it is possible to form a container pool, with a strictly
predefined container structure
•
Path for TD templates:
Important
- 248 - Part 4: 14. Set up archives
To transfer data to other programs (e.g. address data on a word
processing letter form), templates (forms, e.g. WinWord standard letter
documents) must be created in these programs. These templates
should be filed in a single directory and its content is always displayed
when calling data transfer. Enter this directory here.
•
Path \ Name for TD archiving:
The archive stated here is automatically called for archiving the created
document after working with the data transfer interface from within an
archive. Enter drive, directory and name of the archive, if you require
this automatic archiving.
•
Local work directory:
The local work directory is required to temporarily hold files for various
actions and user-specific settings. Enter this path (default c:\drdoc\tmp)
here.
In network mode, a local drive of the workstation must be stated. This
directory must be identical on every workstation.
•
Maximum number of list box entries:
This entry concerns the select list, which is shown after a search if
several hits exist.
The maximum default number of entries shown is 100. This entry has
no influence on the number of records found, but only on the speed of
the display or when browsing the list and the records. A smaller number
may be sensible for very large data stock. With the "Next" and
"Previous" commands the next 100 (or the stated number) records
found are activated.
•
User set:
If this option is deactivated, the archive will be removed from the current
user set. The archive can only be reentered into a user set via
"management/user manager".
•
Track changes:
To log changes of the profile data (text before/after), track changes
must be created.
•
Access log:
Part 4: Set up archive - 249 -
To log access attempts with incorrect passwords or unauthorized
access to documents, an access log must be created.
•
Changes after program start possible:
Dr.Doc offers you various basic work modes. The "change possible"
mode allows you to view your records and also make corrections. The
"change locked" mode allows you to view the records, but not to
change. Activate the option for "change possible" or deactivate it for
"change locked".
This option is regarded as a basic setting. In addition, further differentiation is also
possible via the user set.
•
Note
Delete form after entering new record:
Activate the option, if you want to see the blank input mask again after
entering a new record. Deactivate the option, if the entered profile data
is to remain in the mask. This is particularly advantageous, if only minor
details change in several records and the rest of the records is the
same.
This option is regarded as a basic setting. In addition, further differentiation is also
possible by only maintaining entries in selected fields.
Note
MORE INFORMATION ON THIS SUBJECT IS INCLUDED IN CHAPTER:
"
18.1.7 MAINTAIN FIELD ENTRIES WHEN ENTERING NEW
RECORD
#
•
Delete source file after archiving
After successfully archiving an existing file, it is no longer required in the
original form and can be deleted. This deletion can be automated with
the "delete source file" option.
•
Network mode:
Activate the option for standard net archives
No further path details have to be entered for standard net archives. The "edit client
parameter" command is not meant to be called, the communication path does not have
to be taken into consideration either.
Note
- 250 - Part 4: 14. Set up archives
If you have completed all settings, save the data with the "OK" command.
Part 4: Set up archive - 251 -
14.7.2
Set up paths for C/S archives:
Call "management/ edit archive parameter..." at the archive server in the newly
set up archive or in the archive, in which the changes are to be made. .
Check the preset entries and correct them if required. You either move from line
to line with the TAB key or by clicking with the left mouse button.
At first enter all path details from the view of the archive server in the following.
That means: If archive and network server are combined in one device, enter
the local drive name from the view of the server everywhere.
If archive and network server are separate, some details apply to a drive on the
network server, which then has to have the name from the view of the archive
server. This is then noted at the positions concerned.
- 252 - Part 4: 14. Set up archives
•
Management file:
The management file includes all basic path information for calling an
archive. The archive itself is always called with this management file
(extension da ). That means: The path stated here is the path from
which the archive is later started.
In C/S mode, two management files are created for one archive: For
calling at the archive server and for calling at the client.
Now enter the path for the call at the archive server. The subdirectory
COMM\SERVER is preset for this.
•
Archive files:
The profile data and internal management data is filed in this path. The
subdirectory DBASE is preset for it.
If archive and network server are separate, this directory must be on the
archive server (i.e.: local drive name).
•
Help files:
The various archive-specific settings are considered help files. The
subdirectory FORM is preset.
If archive and network server are separate, the directory can be on the
network server. Recommended configuration: create on archive server.
Important If the path details for management, archive and/or help files are subsequently changed in
an existing archive, the files concerned are automatically copied into the new directory
and deleted in the old directory when exiting "edit archive parameter.... "
•
NCI and CI archive:
The archived documents are filed in two "Container files", which are
managed by Dr.Doc . Data is separated into the file for CI documents
and the file for NCI documents. Both files can be created on any data
media - from the hard disk to the jukebox. The data medium you select
depends on the number and size of the documents to be archived.
Enter the corresponding drive or the path here.
Be aware that it is not possible to archive directly on worm media.
•
Container size
Part 4: Set up archive - 253 -
The container size for NCI and CI documents can be set. As soon as
the preset container size has been reached, Dr.Doc automatically
creates new containers. The container in the directory structure is
always created on the same level in accordance with presetting e.g.:
D:\drdoc\dbase\NCI00; ...\NCI01; ...\NCI02 (NCI00 = directory name)
The default setting is 600 MB. The maximum size is 2GB.
Optionally it is possible to form a container pool, with a strictly
predefined container structure
The path details for NCI and CI archives can be changed at any time like all other
details, too. But you should be aware that already archived documents remain filed in the
path stated at the time of archiving. If you want to make any changes, please refer to
chapter 23 CHANGE PATH DETAILS!
•
TD templates:
To transfer data to other programs (e.g. address data in a standard
word processing letter document), templates (forms) must be created in
these programs. These templates should be filed in a single directory
and its content is always displayed when calling data transfer. Enter this
directory here.
•
TD archiving:
After working with the data transfer interface from within an archive, the
archive stated here is called automatically for filing the created file.
Enter drive, directory and name of the archive, if you require this
automatic archiving.
For C/S archives this path must be set in the “Edit client parameter” dialogue (see
corresponding point in this chapter)
•
Local work directory:
The local work directory is required to temporarily hold files for various
actions and some user-specific settings. Enter this path (default
c:\drdoc\tmp) here.
If archive and network server are separate, the directory can be on the
network server. Recommended configuration: create on archive server.
•
Path for communication:
Important
C/S
- 254 - Part 4: 14. Set up archives
This path contains the different tasks of the clients when working
together in the archive. The subdirectory must be called COMM.
This directory is also required for calling an archive at the archive server
(the file concerned is in the subdirectory COMM\SERVER ).
If archive and network server are separate, the directory can be on the
network server (i.e.: Network drive name from the view of the client).
Recommended configuration: create locally on archive server.
•
Tip
Maximum number of list box entries:
This entry concerns the select list, which is shown after a search if
several hits exist.
The maximum default number of entries shown is 100. This entry has
no influence on the number of records found, but only on the speed of
the display or when browsing the list and the records. A smaller number
may be sensible for very large data stock.
Change maximum list box entries subject to requirement
If selections are made on a larger select list, you should take into consideration that the
selections will be deleted, if the list is browsed with "Next" and "Previous". It is therefore
sensible not to set the number too high and only to increase it short-term for major
changes.
Part 4: Set up archive - 255 -
•
Changes after program start possible:
Dr.Doc offers you various basic work modes. The "change possible"
mode allows you to view your records and also make corrections. The
"change locked" mode allows you to view the records, but not to
change. Activate the option for "change possible" or deactivate it for
"change locked".
This option is regarded as a basic setting. In addition, a differentiation is also possible via
the user set.
•
User set:
If this option is deactivated, the archive will be removed from the current
user set. The archive can only be reentered into a user set via
"management/user manager".
•
Track changes:
To log changes of the profile data (text before/after), track changes
must be created.
•
Access log:
To log access attempts with incorrect passwords or unauthorized
access to documents, an access log must be created.
•
Delete form after entering new record:
Activate the option, if you want to see the blank input mask again after
entering a new record. Deactivate the option, if the entered profile data
is to remain in the mask. This is particularly advantageous, if only minor
details change in several records and the rest of the records is the
same.
This option is regarded as a basic setting. In addition, further differentiation is also
possible by only maintaining entries in selected fields.
Note
Note
#
MORE INFORMATION ON THIS SUBJECT IS INCLUDED IN CHAPTER:
- 256 - Part 4: 14. Set up archives
"
18.1.7 MAINTAIN FIELD ENTRIES WHEN ENTERING NEW
RECORD
•
Network mode:
This option must be activated.
•
Delete source file after archiving:
After successfully archiving an existing file, it is no longer required in the
original form and can be deleted. This deletion can be automated with
the "delete source file" option.
•
Edit client parameter
If you have defined all settings, call the client parameter now. These
path details are for calling the archive from the client.
Important Please only edit the paths c and d! The other paths are automatically
determined by Dr.Doc .
a:
b:
c:
Management file:
Configuration file for C/S archive call. The subdirectory CLIENT is preset
Do Not Edit!
Help files (database configuration files)
Do Not Edit!
TD templates:
Enter the location where the template files for transferring data can be
Part 4: Set up archive - 257 -
d:
e:
f:
found in the network as seen by the client.
Automatic archiving after TD:
To call automatic archiving following a data transfer (TD) from the client,
you have to enter: <Host name or IP address of the archive server>\<Port
No.>\<archive name>
e.g. SERVER1\9995\Archive1
Local working directory:
The local work directory must be available identically and physically on
each client. .
Path for communication:
Do Not Edit!
Confirm the client parameter with "OK".
The client parameter can only be edited by the supervisor and only at the archive server.
If e.g. a change of the basic "delete form after entering new record" option is necessary
for the clients, it must be executed at the archive server and then applies to all.
Please be aware that this change at the archive server can only be executed, if the
server process at the archive server was previously terminated.
Now save the settings with the "OK"command.
Tip
- 258 - Part 4: 14. Set up archives
14.7.3
Summarising overview of C/S paths:
The path configuration examples stated apply to both cases:
(a)
(b)
NET AND ARCHIVE SERVER ARE ONE DEVICE
NET AND ARCHIVE SERVER ARE TWO DEVICES
(E.G. NOVELL-NET):
Path for...
Devi
ce
Server parameter
Client
parameter
Management file
S
C:\drdoc\comm\server
C:\drdoc\client
Archive files
S
C:\drdoc\dbase
----
Help files
S
C:\drdoc\form
C:\drdoc\form
NCI archive
(S)
C:\drdoc\dbase\NCI00(default;
Jukebox-LW etc.)
or: ----
CI archive
(S)
C:\drdoc\dbase\CI00(default;
Jukebox-LW etc.)
or: ----
Local WD
S, Cl
C:\drdoc\tmp
C:\drdoc\tmp
Communication
S
C:\drdoc\comm
C:\drdoc\comm
Part 4: 15. Version Management - 259 -
15.
VERSION MANAGEMENT
The Dr.Doc version management enables the management of different
document versions.
A document can have various statuses:
•
draft
•
release
o free
o locked
A draft version can be transformed into a release version, but not vice versa
(i.e., a release cannot be reset to draft status!)
It is configured via "Settings/version management":
- 260 - Part 4: 15. Version Management
Explanations:
• Only one free release is permitted per document!
• first option deactivated means: New document has "draft status":
Changes to a draft do not lead to a new version
• Use: common problem with data transfer: a letter archived after data
transfer is to be edited/corrected (led to a new document so far!, now
old version is overwritten)
Changes to a release leads to new version!
The version management can be activated on creating a new archive via
"archive new" as Dr.Doc function. (The database fields shown below are
automatically generated; as approx. 20 database fields are generated, this
option should only be activated if there is a real need so that the database
structure is kept small.)
Database fields / Mask elements:
Can be called via [i]:
·
[i] document history
·
[i] predecessor
·
[i] successor
Part 4: 16. User set - 261 -
16.
USER SET
16.1
Basics
The user manager is an across-archive function for setting up and managing
users and their archive-specific access rights and rights to use. Permissions can
be differentiated for archives, forms, records and fields. They can be assigned
individually to a single user or to a user group, where the permissions then apply
to all members of the group.
Users are usually entered by name in the user set. In addition, there are
anonymous users, who are allocated a predefined user profile.
Two users are always automatically in a new user set or are automatically linked
with newly entered archives: DRDOC and PUBLIC.
User DRDOC:
If this user name (with the associated password) exists, there will be no user
query when the archive is called. If a user set is not required, this entry should
not be deleted in a single user version.
If the user set is supposed to be used in a single user version or several
licenses exist for several users to work simultaneously, this existing user entry
must first be deleted and an individual supervisor user with password must
immediately be set up in the same operation.
User PUBLIC:
Various settings of an archive are saved user-specific, that means: every user
has only acess to his/her own settings.
But usually, settings that are generally available are also sensible. The user
PUBLIC is required for this purpose: If you are registered with this user name
and you define settings, these can be used by all users of the archive. Only the
user PUBLIC can change these general settings.
In contrast to the user DRDOC, only the user name (case-sensitive!) is preset
for the user PUBLIC. The password and the access rights can be set at liberty.
- 262 - Part 4: 16. User set
The user manager is called under "management/user manager".
The user manager dialogue is divided into three columns:
Left column:
displays users, user groups and archives on tabs on lists. When inputting a new
entry (via "Element/..."), the corresponding list is automatically updated. Here,
you also select the relevant element, for which you want to define the settings.
The "user" register comprises an alphabetic user overview as well as an
alphabetic group overview (which again includes the users). However, the
"group overview" register is only arranged according to groups. Finally, the
"archives” register includes all archives assigned to the user set in alphabetic
order.
Middle column:
You can define the settings for the various elements in this column. The settings
options are divided into several tabs.
Right column:
The right column contains a complete overview of all users and user groups,
archives and settings. Its only purpose is to provide clear information; the entries
are automatically input by the program.
In addition, the user manager has its own toolbar:
Exit / save user manager
Open / create new user set
Create new user / user group / archive
Delete user, user group, archive / group membership
Help
Enter new role (described in the separate workflow module
illustration)
Part 4: 16. User set - 263 -
The “Role definition“ tab (middle column) and the “Enter new role“ button are
described in the separate illustration for the “Workflow module“!
The user manager is called up via "Management/user manager" (regardless
whether an archive is open or not), if
o a user set is not yet loaded
o the user is registered in at least one user set, in which s/he has
access permission for the manager.
Note
- 264 - Part 4: 16. User set
16.2
Brief instructions user set
Procedure:
1.
Create user groups, enter users into user groups and enter archives
2.
Assign user groups the following properties
a. Archives
b. Rights (archive, record, field and form)
1) Create user, enter user groups and archives:
Click on "Group overview" register in the left column of the user manager. Call
up the context menu with the right mouse button or use icons
Part 4: 16. User set - 265 -
Enter new user
The following dialogue will appear when a new user is created, if the steps
described above are followed and if you click on “new user“ on the context
menu. The login name may have more than 7 characters.
If the “Automatic login with network login name“ option is activated, the user
does not have to separately log onto Dr.Doc when Dr.Doc is started. If the
network login name is different to the Dr.Doc login name, this can be
controlled by deactivating the “Identical login names“ field and entering the
network login name into the field (to adapt existing user sets)
“Automatic login with network login name“ is optional for all users or can be
activated user-specific (“Management/user manager“ and then “User set/
properties“)
This field will appear, if you select a
group under „Group overview“ and you
want to enter a new user for this group.
You determine the user’s rights under “Rights/rights pattern”.
- 266 - Part 4: 16. User set
Subsequent changes to user and archive entries:
Select user or archive under “Group overview“ or “Archives“ and edit properties
via “Description“. Changes are automatically applied. When you leave the user
set, you have to save the changes.
2a) Assign archives to user groups (users)
Example: The “Address management“ and “Document management“ archives
are to be assigned to the super group: click on “Super group“ in “Group
Part 4: 16. User set - 267 -
overview“, then select the two archives one after another in “Archive
associations“ in the “Other archives“ window and assign with a double-click or
„<-Add association“.
- 268 - Part 4: 16. User set
2b) Assign rights
Simplest case:
Only group-specific differentiation (the same rights are issued for several
archives, i.e. no differentiation within the archives)
Assign the identifiers group-specific rights definitions in the “Rights“ register (by
selecting the group in the “Group overview“ register and subsequent definition
and allocation of the rights properties on the basis of the “patterns“).
Complex differentiation (group-specific and archive(group)-specific) is done on
the basis of “identifiers“ for rights definitions.
Part 4: 16. User set - 269 -
Different archive rights are to be defined for the two archive categories
“modifiable archives“ (includes “address management“ and “document
management“) and Thesaurus archives (non-modifiable archives, includes
Thesaurus archives with determined data stock). For this purpose, an archive
right identifier “modifiable archives“ and Thesaurus archives in the “Archive
associations“ register is assigned to these archive groups (select archive and
enter archive rights identifier). Afterwards assign group-specific rights definitions
to the identifiers (by selecting the group in the register “group overview“ and
subsequent definition and allocation of the rights properties) in the “rights“
register.
(I.e.: archives can be combined virtually into groups via “identifier“. Groupspecific right definition contents can be assigned to these identifiers)
Right patterns are not modifiable, but can be saved under another name in
modified form.
Archive name
Address archive
Identifier
(Rights)
modifiable
archives
User
group
Supervisor
Author
Thesaurus
archive
Thesaurus
Supervisor
Author
Rights
Archive right: may,
can
do,
knows
everything
May make new entry
and modify
Archive right: may
do almost everything
may only view, not
change or make
new entries
Example
- 270 - Part 4: 16. User set
16.3
User set
Several user sets can be used. A local user set is automatically created.
To create a new user set:
Step by
step
! Call "Management/User manager".
! Click on "User set/New” or the corresponding icon.
1
2
3
4
5
6
1:
2:
3:
4:
Identifier for the new user set. Can be different to the file name.
Select for operation in client/server mode.
Select, if the user set making the enquiry is to be displayed at user login.
Select whether the login is to take place automatically with the network login
name.
5: Enter path and file name for the user set (enter directly or via "select").
6: If a C/S user set is created, enter the path and file name from the server’s
view.
Part 4: 16. User set - 271 -
! Confirm with "OK". The new user set is now active.
Open:
To change between different user sets, use "User set/Open" or the
corresponding icon. Select the required one in the list box and confirm with
"OK".
Properties:
"User set/Properties" displays the descriptive dialog of the current user set,
where changes can be made (name, path).
Delete:
"User set/Delete" deletes a user set.
- 272 - Part 4: 16. User set
16.4
Users and user groups
Create:
In most cases it makes sense to combine several users into groups. The
advantage is that you do not have to assign rights separately to every user.
In addition, it is of course also possible to create individual users or to remove
users from groups.
Note
As described, the user DRDOC automatically has the access right to each new archive.
If this user exists, there will be no user query when calling the archive. For archives with
several users, the user DRDOC must therefore be deleted or replaced by another
"Supervisor" (who has all rights).
Step by
Step
! Click on the "Group overview" register in the left column of the user manager
! Create a new user group with the icon or via the context menu of the right
mouse button.
Name group, and describe if required, and determine, if it is an owner,
permission and/or resubmission group.
! With "Apply" the new group is added to the group overview list (left column):
Part 4: 16. User set - 273 -
! If required, create more groups straight away or "close" the dialog. The data
of each respective group is now in the "description" register in the manager’s
middle column.
! The new users are now entered into the respective group: at first select the
group in the left column of the manager. Then enter users via the icon or the
context menu of the right mouse button.
1
2
3
4
5
6
7
8
- 274 - Part 4: 16. User set
1: The login name must be entered in the user query; the complete name,
which appears everywhere where the user name is displayed, may be
different.
2: Space for comments regarding the user.
3: Select, if the user is to be anonymous.
4: The user login also requires a password. The password is always encrypted.
To ensure that no errors are made when entering the password, it has to be
entered twice for confirmation. Remember this is a case-sensitive entry.
As an additional option you can select that the user has to change his/her
password once or that s/he may not change the password.
5: If the option “Automatic login using network username“ is activated, the user
does not have to login separately in Dr.Doc when starting Dr.Doc . If the
network username is different to the Dr.Doc login name, you can control
this by deselecting “identical login name“ and entering the network username
in the field (to adapt existing user sets).
“Automatic login using network username“ is optional for all users or can be
activated user-specifically (“Management/user manager“ and then “user set/
properties“)
6: Select if the user is to have access to the user manager.
7: Select if the user is also to see the path when selecting a user set.
8: Displays the group, which is selected when creating the user. If membership
is not required, the option can be deactivated.
! "Apply" includes the new user on the group overview list (left column):
! If required, create more users or “close” the dialog. The data of the
respective user is now entered in the middle column of the manager in the
"description" register.
Part 4: 16. User set - 275 -
Subsequent changes:
A group or a user’s basic settings are changed via the "description" register in
the middle column of the manager. In addition, membership of a group can be
changed via the "User groups" register (add/remove membership).
The current display of the "user groups" tab always refers to the group or the
user, which is selected in the left column of the manager.
Users and groups can also be copied. This can save a lot of time, if e.g. another group,
which only differs slightly from an already existing one regarding its rights, is to be
created.
Tip
- 276 - Part 4: 16. User set
16.5
Automate user login:
The user login when starting the program can be automated via an entry in the
command line of the Dr.Doc icon.
As already described in chapter 8.1, several parameters can be included here.
Apart from the ones already stated, the command line can be extended
according to the following pattern.
drdoc path\archive path\help path\userset autologin drdoclogin
C/S
The entries for local archives and C/S archives are different. For the client icon,
the „path“ must be replaced by <host name or IP address of the archive
server>\<port no.>\ for entering the archives and the user set. If the help
function is also used via the archive server, the path must also be replaced with
the above details!!!
Example minimum configuration:
C:\drdoc\System\drdoc.exe SERVER1\9995\Archive1
Example extended configuration:
C:\DrDOC\System\drdoc.exe SERVER1\9995\Archive1 C:\drdoc\help\whelp
SERVER1\user1.bvd AutoLogin=0
Parameter
drdoc
path\archive
path\help
path\user set
autologin
drdoclogin
Explanation
drdoc.exe, possibly with path
Path and name for the archive
Path and name for the help
Path and name for the user set
AutoLogin=1
automatic login in all user sets with the same name
or password
AutoLogin=0
no automatic login
DrdocLogin=1
automatic login as DRDOC
DrdocLogin=0
no automatic login as DRDOC
Part 4: 16. User set - 277 -
User information in C/S mode:
"Management/user information" shows the users currently registered in the
network for the current archive. If required, a user can also be logged off here.
C/S
- 278 - Part 4: 16. User set
16.6
Enter archives
New archives are always entered in the user set; then the user(-groups) are
assigned.
New entry:
! Enter “new archives“ using the icon via the “Management/user manager/
element/new archives“ menu or via the context menu of the right mouse
button.
Enter archive identifier (this name then appears on the list of archives under
"Archive/select").
Enter archive path and file name (enter directly or via "select")
For C/S archives, also enter path from the server’s view.
! "Apply" includes the new archive on the archives’ list (left column):
Part 4: 16. User set - 279 -
! If required, include more archives or “close” the dialog. The data of the
respective archive is now entered in the manager’s middle column in the
"description" register.
The archive is now entered in the user set and appears on the list under
"Select archive".
- 280 - Part 4: 16. User set
16.7
Allocate archives to users and groups
! In the group overview in the manager’s left column click on the group or the
individual user, which are to be allocated to the archive.
Select one archive after the other in the manager’s middle column in the
"Archive associations" register in the "Other archives" window and "Add
association".
In this example, the archive “Address management” is assigned to the group "Superior
department".
Part 4: 16. User set - 281 -
16.8
Assign rights
Rights have to be assigned to the users or the user groups. These can be
differentiated from basic archive editing rights to rights in individual fields. The
following flow chart shows you how to proceed.
Left column, register “group overview”:
Select user/user group
Middle column, register “archive association”:
Select one archive from “associated with”
Archive rights:
Record rights:
Field rights:
Form rights:
Select identifier for archive
rights or rename and assign
Select identifier for record rights
or rename and assign
Select “fields”
option
Select “forms”
option
Select field(s)
Select identifier for field rights
or rename and assign
Select form(s)
Select identifier for form rights
or rename and assign
Middle column, activate “rights” register
Select “archive
rights” option
Select “record
rights” option
Select “field
rights” option
Select “form
rights” option
Select identifier
Select rights pattern and assign
or:
Select functions individually and assign Y/N rights,
Possibly save as rights pattern
Save the entries using "User set/Save" on the menu or by clicking on the icon.
You can also view the archive, record and field rights for information (i.e. not to change)
under the following menu items:
Management/Archive rights - record/permissions - edit/field rights.
Note
- 282 - Part 4: 17. Access rights
17.
ACCESS RIGHTS AND CONTROL
To control access to all data in Dr.Doc you have the following options:
Access (incl. changes) to ...
is controlled by...
1. Entire archive
2. Entire record (= Profile data +
document)
Archive associations in the user set
•
•
•
•
3. Individual profile data fields
4. Document
Owner in conjunction with "record/owner "
Record rights in the user set
Work mode "changes after program start
possible / not possible"
In principle for various functions: user set
(Author/evaluator)
Field rights in the user set
Version management:
• free / locked
• draft / release
In addition, the access to and editing of data can be controlled:
The process ...
is controlled by...
5. New entry
6. Changes to profile data /
documents (apply with "Save")
Automatic fields B, D, T, in conjunction with
change lock
•
•
7. Login with incorrect password
Respective users:
Automatic fields B, D, T in a table
(table not necessary, if only the last
change is to be registered)
Text change:
Entry in track changes (text before/after)
Entry in access log
Most of these access rules are only possible or sensible in connection with a
user set.
#
MORE INFORMATION ON THE TOPIC:
"
16
USER SET
Part 4: 17. Access rights - 283 -
17.1
Lock entire archive
You can determine the users or user groups that have access to an archive via
the "Archive associations" tab under "Management/user manager".
Example
User Kunert is on
principle connected
to address management
and document management
- 284 - Part 4: 17. Access rights
17.2
Lock entire record
If a record is owned, only the owner (if s/he has the corresponding rights) can
change other users’ permissions for this record.
A record may be owned so it can be locked to prevent other users from
editing/changing it or to make it only generally accessible after subsequent
editing after archiving by batch processing (in the last case the user can be
automatically entered as owner when the new records are saved, if the system
is set up accordingly).
As the owner does not have the right to change other or all users’ permissions in
every case, this button (access lock for others users) makes it possible to
automatically lock all other users’ permissions for this record.
The relevant owner can be entered with the "record/owner" command within the
new entry or when the record is open.
An efficient document ownership management is also possible from within the
select list. If a record’s owner wants to release it for others, s/he can do this by
selecting the relevant record on the select list and by changing the owner rights
via “record/owner“.
Part 4: 17. Access rights - 285 -
Work mode:
Under "Management/edit archive parameters" you can select whether all users
are permitted to change existing records or not.
User rights:
Users can be given a wide variety of access rights via the user set. This refers
to new entries, changing, deleting, printing etc.
MORE INFORMATION ON THE TOPIC:
"
16
USER SET
#
- 286 - Part 4: 17. Access rights
17.3
Lock individual profile data fields
Individual profile data fields can be locked for editing. This is done by issuing
field rights for the respective user or the user group within the user set.
Example
The “department B2” group
has an edit and view lock
in the “own A Z” field in
document management under
the identifier “view+change lock”.
#
MORE INFORMATION ON THE TOPIC:
16 USER SET
Part 4: 17. Access rights - 287 -
17.4
Lock/release entire document
To be able to lock/release an entire document, the version management must
be set up in the archive. This is only possible when an archive is created new.
The fields required are automatically defined, if you activate “version
management“ in the Dr.Doc assistant.
The document’s status is then controlled in the
application by activating the corresponding fields
(document status: free/locked).
The document history can be reviewed over
various versions.
Document locks can be assigned
manually or depending on validity and
service life.
A comment can be required
mandatorily for locks and releases.
A „draft“ can still be modified.
The modified document overwrites the
preceding version.
A „release can be free, i.e.
visible, or locked.
- 288 - Part 4: 17. Access rights
17.5
Log new entry
!
Author, date and time can be logged. The required fields are created as
single fields with the corresponding option:
!
Ensure that these fields definitely have an additional editing lock.
Procedure:
Activate the “group overview“ tab in the user manager in the left column
and select the required user group or the required user.
Activate the “archive associations“ tab in the middle column. Select the
required archive under “associated with“.
Now activate the “fields“ buttons. In the table you will see all fields, which
you have created in this archive.
Select ‘the identifier for field rights or create a new identifier and allocate it
to the corresponding fields.
Afterwards select the “rights“ tab in the user manager’s middle column.
Select the “field rights“ button and the identifier used in “identifier for field
rights“.
Determine the rights in “field rights“ under “permitted“.
Don’t forget to save your settings!
!
Part 4: 17. Access rights - 289 -
17.6
Log changes
Log current user:
User, date and time can be logged as soon as the record is saved.
If only the last change is to be entered, the required fields must be created as
single-line fields with the corresponding option (see above).
If all changes are to remain registered, the fields must not be single-line, but
should be created as table fields and combined in a table on the mask.
This change management with the corresponding fields can be directly selected
for new archives in the Dr.Doc assistant.
Example
Log text changes:
To log changes of profile data, a change log must be created.
The change log function is activated
• either when creating a new entry in the Dr.Doc assistant:
- 290 - Part 4: 17. Access rights
• or subsequently via "Management/edit archive parameters".
The change log is automatically updated in a file with the extension chg, which is
placed in the directory, which is stated as path for archive files.
This file is read with an editor.
Example
User, date and time of modification
Name of the field with the modification
Text “before”
Text "after"
Part 4: 17. Access rights - 291 -
17.7
Log access errors
Logins with incorrect password can be logged with an access log.
The access log function is activated
• either when creating a new entry in the Dr.Doc assistant:
• or subsequently via "Management/edit archive parameters".
The access log is automatically updated in a file with the extension acc, which is
placed in the directory that is stated as path for archive files.
Example
Failed attempt to login
as user “Kunert”
- 292 - Part 4: 17. Access rights
17.8
Create messages
Archive-specific messages with showing the time can be created
• for field search or template search
• for missing permission for the document view.
Example
OCR processed text is inserted in an individual field "OCR text". As it is not post-edited
or checked, it is possible that a term you are looking for is not found, as it was
recognized incorrectly.
The corresponding message should therefore appear, if a user carries out a field or
template search in the "OCR text" field
The messages are created via an entry in the archive-specific ini file.
Call the archivename.ini file with an editor from the directory, which is stated as
the path for help files (for C/S: \form). At the end of the file add to the column
[MESSAGES] (case-sensitive!) and your specific messages according to the
following pattern:
For messages when searching fields: Field name=Message;display time in sec.
For messages in Doc.View:
Documents=Message;display time in sec.
Instead of field name enter the name of the field. For messages in document
view Documents must be entered before the message.
A new line within the message is identified with \ (never create a paragraph
within a message with the ENTER key!)
The message window will be hidden again after the time stated in seconds.
Part 4: 17. Access rights - 293 -
Example
[MESSAGES]
OCR text=Attention, OCR processing may contain errors!;5
Documents=Document not released\Ask Mr Miller!;10
- 294 - Part 4:
18. Settings
18.
SETTINGS
All settings options described in the following can be found via these two
options:
• the menu item "Settings/field selection for..."
or:
• in the menu item "Management/setup archive..." tab "Database settings".
In the database setti ngs, tables are used for
the settings. In addition, you are provided with
an overview of all settings.
In the field selection, the settings are entered
directly in the mask.
From within the tabular overview "Database settings" the current mask can be
called with the "Edit" command for making entries. The cursor must be in the
corresponding column. If no mask is currently set, the "Edit" command is not
available.
Note
Entries in "Field selection for..." can of course only be made in the fields, which are
available in the current mask.
#
Further settings for individual fields, which regulate access permission (e.g. edit
lock(change), view etc.) are made via the user set.
Part 4: 18. Settings - 295 -
18.1
Determine/ change entry criteria
The following entry criteria can be determined:
• Data types (numeric, alpha-numeric, date, currency)
• Automatic fields (user, date, time, number generator, file name)
• Calculation definition
• Mandatory field entry
• Maintain entries for new record
• Create key fields
• Input duplication check
• Data transfer archiving
Part 4: 18.1 Settings: Entry criteria - 297 -
18.1.1
Data types
Various data types can be assigned to individual fields.
Call "Settings/field selection for data type" or activate "data types" column in the
"database settings".
!
Enter:
S
U
Z
ZB
D
DB
W
WB
G
F
XD
(„String“) for string (alpha numeric)
(„User)
for
string
is only used for workflow
for digit (numeric)
for numeric range
for date
for data range
for currency
for currency range
for outline
for deadline
for date and time
(alphanumeric)
Only for the "image" field that always exists, a corresponding data type IMAGE is
entered, which may not be changed.
18.1.1.1
Note
Special features data type “date”
The following are allowed for the data type "date":
DD.MM.YY , DD.MM.YYYY , D.M.YY , D.M.YYYY or DDMMYY
The entry will always be automatically extended to DD.MM.YYYY
Entry 100890 will be extended to 10.08.1990
Example
- 298 - Part 4: 18.1 Settings: Entry criteria
As a new feature you can enter the century limit in the field selection for data
types (D or DB).
“D 50“
“D 0“
“D 100“
= year < 50: next century / >= 50: current
= always current century
= always next century
Apart from the definition option per field, there is also the possibility to make
definitions in archive.ini.
[AUTO_DATE]
DEFAULT=<year> =
GLOBAL=<year> =
18.1.1.2
Default for all fields, which have no definition in
field selection
overwrites all other definitions
Special features data type “date and time”
A single-line field with this data type is initially created with the data type “date”.
Via “Settings/field selection for../data types” it can subsequently be changed to
“XD”.
This field can be filled automatically (via automatic field “D”) or manually via the
context menu of the right mouse button and “date/time”.
In this way, the date and time can also be entered in fields with data type “S” (for
“String”), e.g. continuous fields.
18.1.1.3
Special features data type “currency”
Entries in a currency field are automatically set to two places after the decimal
point.
Example
45583 has been entered, the result is 45 583.00
Special features for text retrieval and "search fields" are in the corresponding
chapters.
Part 4: 18.1 Settings: Entry criteria - 299 -
18.1.1.4
Special features range data types
The range data types ZB, DB and WB can include an entry like data types Z, D
and W or a range. For the later search in these fields to run correctly, the
marginal data must be entered separated by <-> . The entry in a range field is
thus, e.g. 58<->456 or 02.06.1994<->05.07.1995
The search in these range fields will also find numbers or dates within this
range.
You are searching for 08.12.1994, you will also find the record, which includes the above
range.
18.1.1.5
Example
Special features data type “deadline”
A deadline field is for calculating a date deadline, e.g. for blocked period, delays
etc.
The entry in a deadline field takes place according to the pattern
Number[unit] , days (D), weeks (W), months (M) and years (Y) can be selected
as unit.
10T means: The date to be calculated is ten days after the related date.
To be able to carry out a deadline calculation, the deadline field itself, the date
field with the respective date and the date field for the result date is necessary.
With the following calculation definition the result of the deadline calculation when
saving the record is entered in the "End" field:
Example
- 300 - Part 4: 18.1 Settings: Entry criteria
These fields are filled in in case of new ent ry
Data types:
Date
Duration
Date
After “Save”, the ersult of the calculation is entered here.
18.1.1.6
Special features data type “outline”
The data type outline refers to the subsequent sorting of data. The input as data
type takes place according to the pattern:
G [alphanum./num.] [separator][alphanum./num.][separator]
etc.
The options state the outline type.
Examples
Outline type
1.5.5.6
A/a-1
Input for data type
G Z.Z.Z.Z
G S/S-Z
It is possible to enter more outline levels in the field than stated here. But sorting
will only be carried out up to the level defined as data type.
Part 4: 18.1 Settings: Entry criteria - 301 -
18.1.2
Automatic fields
Apart from the field selection for basic data types, there is also the option to
have the program make automatic entries in selected fields.
Call "Settings/field selection for/automatic fields" or activate the "automatic
fields" column in the "database settings".
!
In the intended field, enter:
B
D
T
I
N
NV
F
V
18.1.2.1
for user (i.e. the current user if using the user set)
for current date
for current time.
for owner (the current owner’s name will be entered.)
for number generator (automatic numbering; see the following
chapter 18.1.2.3!)
for modifiable number generator (see the following chapter
18.1.2.4)
for file name (File) (the file name will be entered when
archiving files).
for applying an entry from another field.
Special features automatic fields “user”, “date”
and “time”
The user name entered when logging in to the archive will be entered in the
automatic field “user” when making a new entry or changing an entry.
The automatic fields date and time contain the respective current data of the
computer.
Log all changes (Change management)
If you want to log all changes to a record (i.e.: as soon as "Save" is activated), set up a
table and enter the automatic field identifications concerned. A new line is then
automatically created after each change showing the last modified data.
Tip
- 302 - Part 4: 18.1 Settings: Entry criteria
18.1.2.2
Special features “Conditional automatic fields”
Conditional automatic fields are only filled, if other fields have an entry.
The names of the database fields are enclosed by “/“ and separated with blanks.
Example
B /field1 field2/
The automatic field “user“ is only entered, if there is an entry in field1 AND field2.
18.1.2.3
Special features automatic field “Number
generator”
A number generator issues an individual number to each new record; the
numbers of any deleted records are not re-issued.
Step by
step
Create:
!
!
C/S
Call "Settings/field selection for/automatic fields".
Enter N in the required field and confirm with "OK".
Any records entered from now will be numbered.
If records already exist and you want to number them:
Call "Management/number generator new".
Any existing records will be issued with a number in the field
selected with N. Any existing entries in these fields will be
overwritten.
If a number generator is created subsequently, the client parameters must first
be called and confirmed at the server under "Management/edit archive
parameter...” In addition, the program Dr.DOC must be restarted at the clients
for changes to apply.
Terminate automatic numbering:
!
Call "Settings/field selection for/automatic fields".
Delete N and confirm with "OK".
Part 4: 18.1 Settings: Entry criteria - 303 -
Any records entered subsequently will not be issued with a number.
Any already existing numbering will remain, but the field can now be
edited (i.e. changes can be made).
Be aware that the field concerned is automatically identified with the
data type Z (for numeric entries) when the number generator is
created. This data type setting is maintained, even if you delete the
automatic field for number generator again.
18.1.2.4 Special features automatic field "modifiable number generator"
A modifiable number generator suggests an individual number for each new
record; however, this number may be changed – in contrast to the number
generator "N".
The numbers automatically continue in the suggested order, i.e. any change
only refers to the record concerned and has no effect on any records entered
subsequently.
If you do not want numbers to be issued twice, the field concerned should have an input
duplication check.
Create:
!
Tip
Step by
step
Call "Settings/field selection for automatic fields".
Enter NV in the required field and confirm with "OK".
Any records entered from now on will be issued with a number in the
field concerned. This number can be changed.
If a modifiable number generator is subsequently created, the client parameters
must first be called and confirmed at the server under "Management/edit archive
parameter". In addition, Dr.DOC must be restarted at the clients for changes to
apply.
C/S
- 304 - Part 4: 18.1 Settings: Entry criteria
Terminate numbering:
!
Call "Settings/field selection for automatic fields".
Delete NV and confirm with "OK".
No numbers will be suggested for any records entered subsequently.
Be aware that the field concerned is automatically identified with the
data type Z (for numeric entries) when the number generator is
created. This data type setting is maintained, even if you delete the
automatic field for number generator again.
18.1.2.5
Special features automatic field “file name”
The automatic field “file name“ is helpful, if old stock of files are now to be
applied in Dr.DOC per batch processing.
The complete file name with extension is applied.
18.1.2.6
Special features automatic field "automatic
entry"
To automatically apply entries from one field (of the same archive and the same
record) into another field, the following basic setting is required:
The field, into which the entry is to be applied, is identified according to the
following pattern: V [field name]
Instead of [field name] enter the name of the field from which the entry is to be
applied.
The "destination field" (= automatic field) is only filled automatically, if it does not
contain another entry.
Note
Special feature in table columns as automatic field V: a new line is created, if an entry
does already exist!
If the "destination field" is always to be filled automatically and any existing entry
is to be overwritten, identify the field as VU [field name]
Part 4: 18.1 Settings: Entry criteria - 305 -
Instead of [field name] enter the name of the field from which the entry is to be
applied.
In a document management the document’s author is always to be entered for new
documents as the first reproduction as standard. For this purpose the field “reproduce”
is defined as an automatic field with the entry V Author. When a new entry is made,
the “reproduce” field will be filled with the entry of the author field (on saving).
18.1.3
Example
Calculation definition
Fields, which carry out a calculation with entries of other fields and automatically
enter the result, can be defined. The calculation is carried out automatically
when making a new entry, as soon as "Save" is activated.
Call "Settings/calculation definition".
7
1
1:
2:
2
8
5
6
4
3
The program automatically numbers an archive’s calculation definitions.
Select the field for entering the result from the list box.
A date field can only be used as a result field for a deadline calculation.
3-5: Select the first calculation field, the operator and the second calculation
field from the respective list box.
6+7: Determine when the calculation is to be carried out.
8: Save the calculation definition here.
Important
- 306 - Part 4: 18.1 Settings: Entry criteria
Repeat steps 2-8 for all calculation definitions you want to create. When you
have defined all calculations, terminate the dialog with "OK".
Example
#
The above definition means principally: The sum from the “start” and “duration” fields is
to be entered in the “end” field. These can be in numeric or currency format. A deadline
calculation is possible, if the “start” and “end” fields are defined as date fields and the
“duration” field is a deadline field.
MORE INFORMATION ON THE TOPIC:
"
18.1.1.5 SPECIAL FEATURES DATA TYPE “DEADLINE”
18.1.4
Mandatory field entry (Mandatory fields)
If a field always has to have an entry (e.g. a reference entry in document
management) no entry will be made in such a field on entering a new record or if
the entry is deleted when changes are made, there will be an error message.
!
Call "Settings/field selection for/mandatory fields" or activate the
“mandatory fields” columns in "database settings".
Enter any character in the required fields (or for continuous fields at
the start) and confirm with "OK".
Part 4: 18.1 Settings: Entry criteria - 307 -
Example
This field must always
contain an entry.
18.1.5
Key fields / create index
The key management facilitates quick access in field-oriented searches of
certain entries in records; any fields can be determined for this index.
For your information: Dr.DOC does not require reorganisation runs or similar
for an index.
!
Call "Settings/field selection for/key fields" or activate the "key fields"
column in "database settings"
There are three types of keys:
•
•
•
Multiple key (MK):
A term may appear any number of times in this key field
Duplication key
(DK):
A term may appear any number of times in this key field. As
soon as two records have the same entry in this key field, the
program searches other fields preset by the user when making
a new entry to establish whether there are corresponding entries
here, too. If so, an error message will appear.
Single key (SK):
This is the stictest preset for key fields: A term may only appear
in one record in this key field.
- 308 - Part 4: 18.1 Settings: Entry criteria
Enter the corresponding abbreviation in the required fields: MK, DK
or SK.
Tip
Restrict key entries
It makes sense to restrict the key entry to a maximum length by stating the number of
characters after the abbreviation, e.g.: MS 25 only uses the first 25 characters of the
field entry for generating keys.
This saves space!
Tip
Key setup for large data quantities
We recommend you have the operating system cache as large as possible for large
quantities of data to set up the key (only for this purpose!) (e.g. for 8MB RAM: operating
system cache 4MB). This speeds up the key setup.
An index can be deleted, changed or newly generated at any time, if there is no
other user in this archive. But be aware that no single or duplication key check
will take place, when the key is set up subsequently. These checks will only
become active in existing records, when you want to edit them again.
18.1.6
Input duplication check
This duplication check is only possible in connection with a duplication key (see
previous section).
As soon as two records have the same entry in this key field, the program
searches other fields preset by the user when making a new entry to establish
whether there are corresponding entries here, too. If so, an error message will
appear.
!
Call "Settings/field selection for input duplication check" or activate
the "input duplicates" column in the "database settings".
Number the required fields and confirm with "OK".
Part 4: 18.1 Settings: Entry criteria - 309 -
18.1.7
Maintain field entries for new input
After saving a record the entries in the screen view of the individual fields are
deleted or they can be maintained – subject to the archive setup. If the content
is not deleted, you can change and overwrite your data with the overwrite mode
for the following record. This is particularly convenient for records, which only
differ slightly.
In addition, individual fields, in which the entry is to be kept, can also be
selected.
You can save various configurations.
!
Call "Settings/field selection for/maintain field entry" or activate the
"maintain field entries" column in "database settings".
Enter new configuration name or select existing one and "edit".
Enter any character in the required fields and confirm with "OK".
- 310 - Part 4: 18.1 Settings: Entry criteria
Example
1st record
2nd record
these data are taken over
To use an existing configuration, call menu item, select entry and confirm with
"OK".
Note
#
This setting is user-specific, which means, every user can determine his/her own
configurations. In addition, the system administrator can also define general settings,
which anybody may use, but only the PUBLIC user may change.
So if you want to set up general configurations, register as PUBLIC user in the archive
and then define the settings.
MORE INFORMATION ON THE PUBLIC USER IS INCLUDED IN CHAPTER:
"
16
USER SET
Part 4: 18.1 Settings: Entry criteria - 311 -
18.1.8
Field default
User-specific field defaults can be defined under “Settings/field selection for/field
default“. This setting must be defined once, for every user separately.
18.1.9
Data transfer-archiving
You have the option of automatically transferring certain field entries from an
archive (e.g. the company name from an address) into the associated archive
for archiving the text after the data transfer (e.g. to word processing).
!
Call "Settings/field selection for data transfer archiving" or activate
the "data transfer archiving " column in "database settings".
Enter the field name of the archive, into which the data is to be
imported, in the field from which the data is to be applied. The name
of the archive is not stated here; the archive, which was stated in the
archive parameters as "automatic archiving after TD", will be called
up.
MORE INFORMATION ON THE TOPICE IS INCLUDED IN CHAPTER:
"
14.7
EDIT ARCHIVE PARAMETERS
#
Part 4: 18.2. Settings: Output criteria - 313 -
18.2
Determine / change output criteria
The following criteria can be determined for the data output:
• Search templates
• Details in select lists
• Column headings
• Sorting
• Selection for printing tables
• Output duplication check
• Hypersearch configurations
The settings for search templates, select lists, sorting and output duplication check are
user-specific, that means every user can determine his/her own settings. In addition, the
system administrator can also create general settings, which anybody may use, but
which only the PUBLIC user can change.
If you want to define general settings, register in the archive as PUBLIC user and then
define the settings.
MORE INFORMATION ON THE USER PUBLIC IS INCLUDED IN CHAPTER:
"
16
USER SET
Note
#
- 314 - Teil 4: 18.2 Settings: Output criteria
18.2.1
Define search templates
Certain search queries are required again and again. In such cases it is much
simpler, if you save the search query as a template under a unique name.
All associated output parameters (e.g. select list, sorting) must then be assigned
to this search template.
!
Call "Settings/field selection for/search templates" or "Database/field
search with template".
!
Enter new template name and click "Edit".
!
Now enter your search terms as for a normal field search. Confirm
with "OK".
!
Under “Settings/template search“ the output parameters (select list,
sorting, etc.) are allocated and applied with “Save“.
To use an existing search template, call "Database/field search with template",
select entry and start the search with "OK".
Tip
General search templates
It might be useful to save search templates, which are frequently required by all users,
as general search template, e.g. "Find all records of the archive" etc. Register as
PUBLIC user for this purpose and follow the steps stated above.
Part 4: 18.2. Settings: Output criteria - 315 -
18.2.2
Details in the select list
!
Call "Settings/field selection for/select list".
Enter new configuration name or select existing one and "Edit".
Or: activate "select list" column in "database settings", enter new
name, apply with "new" and then "edit" or enter directly.
!
Number the fields to be listed on the select list. Determine the
column width stating a number of characters after a blank behind the
number. The number of characters is restricted to 253 characters.
The list can be scrolled from approx. 80 characters.
Example
Example
of a corresponding
select list
In the example, the name, first name and address fields are defined as columns for the
select list with the corresponding width. The headings for the select list are entered
under "Field selection for headings".
To use an existing configuration, call menu item, select entry and confirm with
"OK".
If you select a table column for the select list and there are several lines with entries,
these entries are all (within the column width) displayed separated by a comma.
Note
- 316 - Teil 4: 18.2 Settings: Output criteria
Tip
General select lists
It may be useful to save standard select lists, which are often required by all users, as
general a configuration. Register as PUBLIC user for this purpose and follow the steps
stated above.
18.2.3
Headings for columns
When printing records in the form of columns, there is a heading above the
columns. You can choose the wording of these headings as you wish.
!
Call "Settings/field selection for column headings" or activate the
"headings" column in the "database settings".
Enter the required headings in the individual fields and confirm with
"OK".
Part 4: 18.2. Settings: Output criteria - 317 -
18.2.4
Sorting
!
Call "Settings/field selection for sorting".
Enter new configuration name or select existing one and "edit".
Or: activate "sort" column in "database settings", enter new name,
apply with "new" and then "edit" or enter directly.
!
Number the fields to be sorted. Optionally, enter the number of
characters according to which data is to be sorted after a blank
behind the number (if there is no number entered here, sorting will
be according to the field’s entire number of characters.)
The illustration shows an example of sorting data.
1st sorting criterion
2nd sorting criterion
The found records are listed alphabetically on names and forenames
To use an existing configuration, call menu item, select entry and confirm with
"OK".
Example
- 318 - Teil 4: 18.2 Settings: Output criteria
Be aware, the number of fields to be sorted, which is stated here, and the
number of sorting characters influences the memory requirement and the speed
of the search.
Tip
General sorting
It may be useful to save standard sorting of data, which is often required by all users, as
a general configuration. Register as PUBLIC user for this purpose and follow the steps
stated above.
18.2.5
Selection for printing tables
!
Call "Settings/field selection for printing tables".
Enter new configuration name or select existing one and "edit".
Or: activate "print tables" column in "database settings", enter new
name, apply with "new" and then "edit" or enter directly.
!
Number the fields whose contents are to be printed and enter the
number of characters for the column width after a blank. If you do
not enter a number, the field’s entire number of characters will be
printed.
Remember the number of characters is restricted to 253 with
Dr.DOC automatically adding one character for each field selected
to separate the columns, i.e. this would be 62 characters in our
example.
Part 4: 18.2. Settings: Output criteria - 319 -
18.2.6
Print tabs
If you want to print tabs as they appear on screen, call the “print” command on
the select list after a search.
You can either print all tabs, the current tab or certain tabs (e.g.: 1-2). You
always have to select the relevant setting each time.
MORE INFORMATION ON THE TOPIC IS INCLUDED IN THE CHAPTER:
"
13.3.2 PRINT PROFILE DATA
18.2.7
#
Output duplication check
Dr.DOC can carry out an optional duplication check for the search to prevent
the output of duplicates on the select list. An example: an address management
contains several records with different contact partners for one company
address. On a select list each company is to appear only once.
!
Call "Settings/field selection for output duplication check".
Enter new configuration name or select existing one and "edit".
Or: activate "output duplicates" column in "database settings", enter
new name, apply with "new" and then "edit" or enter directly.
!
Number the required fields and confirm with "OK".
To use an existing configuration, call the menu item, select entry and confirm
with "OK" (icon “duplication check” must be active).
General output duplication checks
It may be useful to save standard output duplication checks, which are often required by
all users, as a general configuration. Register as PUBLIC user for this purpose and
follow the steps stated above.
Tip
- 320 - Teil 4: 18.2 Settings: Output criteria
Example
To use an existing configuration, call the menu item, select entry and confirm
with "OK".
Note
Tip
If you determine a table for Print Tables, the entries of several lines are all entered
underneath each other in the table.
General print table definitions
It may be useful to save standard table definitions, which are often required by all users
as general configuration. Register as PUBLIC user for this purpose and follow the steps
stated above.
#
MORE INFORMATION ON THE TOPIC IS INCLUDED IN CHAPTER:
"
13.3.2 PRINT PROFILE DATA
Part 4: 18.2. Settings: Output criteria - 321 -
18.2.8
Define hypersearch
18.2.8.1
Create search
A hypersearch automatically starts the basic searches in accordance with a
previously determined definition either within an archive or across-archives, after
the search actively selected by the user. In addition, a "loop" option can be
selected, i.e. the search will continue until no further hits are found (recourse).
The definition of a hyper search may be simple or very complex, subject to
requirements.
$
Consideration:
Consider in advance what you want to find in which archives. There are two
basic options:
• A term or several logically connected terms are searched for in several
archives with text retrieval in profile data and/or CI documents.
• A term and one or several associated terms are searched for in one or
several archives. A recourse search is also possible here (i.e. "loop").
Step by
step
- 322 - Teil 4: 18.2 Settings: Output criteria
Select archive:
%
Call "Settings/hyper search...”
1
2
3
!
Activate the "select" command under "archive" (1)
!
Select the name of the archive, which is to be included in the hyper
search.
Confirm the selection with "OK".
Linking rule:
&
•
Predefined:
Under "linking rule" (2) you can automatically select predefined text
retrieval or search template searches and continue with “apply linking
rules”. The options “Profile data_text”, “Documents_text” and “Search
templates,...“ are already displayed as standard.
Part 4: 18.2. Settings: Output criteria - 323 -
•
Manual definition:
Please be aware that predefined options are not possible in connection
with manually defined links.
That means: you can either only carry out profile data and/or document
text retrieval (with the options already mentioned) in all the stated
archives or different searches (including global and text retrieval!) in all
the stated archives, but these will have to be manually defined.
! The profile data and document text options will find one term or a
logic link of several terms across all archives only in profile data or
documents.
!
The defined link option finds a term and one or several related terms
in one or several archives in a different way.
Enter a name for the definition and then select "edit".
The input form of the selected archive will be shown. Now enter the
search rule in a defined field. That means: the term, which is
displayed by the record found in this field, will be used for the next
search. You determine the way this next search is carried out
according to the following pattern:
[Path\archive name],[search type],[identical or non-identical entry]
[Path\archive name]: the path and the name of the archive, in
which the next search with the field entry found here is to be carried
out.
[Search type]: Profile data text or field search.
For profile data text search enter G; for field search enter F and
behind it the name of the field to be searched, e.g.: Fsurname
Ensure that there is no blank or other character between F and the
field name.
[Identical or non-identical entry]: The entry found in this definition
field is used for the next search. Here, you enter whether the same
entry or anything but this entry is to be found in this next search. The
input for identical entry is: = =
- 324 - Teil 4: 18.2 Settings: Output criteria
for non-identical entry: !=
There must be no blank between the two characters.
Confirm the entry with "OK".
Examples c:\drdoc\address,Fsurname,==
Means: a field search, which finds all records that have the same entry as the one found
in the definition field, is to be carried out in the local address archive in the surname
field.
<Hostname>/<Port number>/<Archive name>,G,!=
Means: a profile data text search, which finds all records that do not include the entry of
the definition field, is to be carried out in the C/S project archive.
Apply linking rule:
'
! Activate the "apply" command. The link stated will be entered in "Search
definition" (3) in the definition view.
Define more searches:
(
! Repeat steps 1-3 until all the searches you require have been defined.
Save search definition:
)
!
18.2.8.2
Step by
step
$
When you have defined all searches, save the entire configuration in
"Search definition".
Enter a new name above the list box and activate the "Save"
command.
Change search definition
Select search definition:
Part 4: 18.2. Settings: Output criteria - 325 -
!
Select the configuration you want to change in the "search definition"
column.
Change:
%
!
You will see the individual defined search queries in the definition
view. You can select and delete a search query directly on this list.
!
If you want to add a new search, proceed as described in the
previous chapter.
!
If you want to delete a defined link rule, select the name in the "link
rule" column and activate the "delete" command.
This only deletes the rule – to delete it from the configuration,
proceed as described above.
Save search definition:
&
!
When you have made all the required changes, save the entire
configuration in the "search definition" column.
The option "recurse" will not be saved, but can be changed from case to case.
Required search flow:
All records with the entry "test" in the field "distributor to do" (profile data text retrieval or
field search) are to be found in the testaw archive. For all hits from testaw, archive
testaw2 is also to be searched for "test". For all hits from testaw2, archive testaw3 is
also to be searched for "test".
A. Hyper search definition:
Call "Settings/hypersearch:search definitions" in the testaw archive.
Note
Example
- 326 - Teil 4: 18.2 Settings: Output criteria
1
2
3
4
5
• Create link from testaw to testaw2:
1: Select start archive for across-archive search: archive testaw
2: Name link rule and click on "edit" button: enter the follow-on archive, the search
type, profile data_text (G) and check for identical entries (==) in the "field selection
for link" window in the "distributor to do" field:
Path\testaw2.da,G,==
Close "field selection for link" window with "OK".
3: Click "apply" in the "definition hyper search" window. The subsequent archive
testaw2 is then applied in the edit field (5).
• Create link from testaw2 to testaw3:
1: Select start archive for the next across-archive search: archive testaw2
2: Name link rule and click "edit" button: enter the archive to be searched after testaw2
in the "field selection for link" window in the "distributor to do" field
Path\testaw3.da,G,==
Close "field selection for link" window with "OK".
3: Click "apply" in the "hyper search definition" window. The subsequent archive
testaw3 will be applied in the edit field (5).
• Save search definition:
4: Enter name for the search definition and save this definition with "Save".
B. Define selection lists:
Select the fields of the archives to be listed on the selection list after starting the hyper
search under "Settings/hyper search/select lists".
C. Carry out hyper search:
Part 4: 18.2. Settings: Output criteria - 327 -
(See fig. on next page)
If you want to carry out the hyper search with a different search to the one stated in the
dialog field of the text retrieval or if you change the archive, you have to click on the
required search under “Settings/hyper search/search” and confirm with “OK”.
Note
- 328 - Teil 4: 18.2 Settings: Output criteria
Start with text
retrieval
in testaw
Result display with
number of matches
Select list with
selected data from
all three archives
Part 4: 18.3 Settings: Prepare data transfer - 329 -
18.3
Prepare data transfer to third party application
In principle, a connection with any program that has a macro language is
possible. Dr.DOC has macros for connecting to Microsoft WORD for
WINDOWS 6.0/7.0 and 8.0 (Office 97) as standard. The following details refer
to this link.
To transfer data without any problems, some preparation is required. Observe
the following steps .
The program requires:
•
The Macro DrDocTv, which automatically imports the data into the
required file.
•
A temporary file letter.txt, into which the respective selected word
processing template is transferred.
•
The data source data.txt, into which the data from the archive is initially
transferred into the word processing program.
•
The control record (always name control.txt)containing the names of
the fields to be imported (see note!),
•
The templates (letter, transfer form etc.) in the word processing
program
When the archive was set up, a path for data transfer templates was entered
in the path information. This path must include all files stated above, which
are supplied with the program except for the forms to be created individually
by the user.
In addition, a local work directory was entered, when the archive was set up.
To ensure correct creation of the first forms in the word processing program,
copy the files stated above with the extension txt into this local directory.
- 330 - Part 4: 18.3 Settings: Prepare data transfer
18.3.1
Step by
step
Winword preparations
Install macro:
$
Dr.DOC creates the individual and standard texts with a WinWord macro. This
macro called "DrDocTv" is supplied with Dr.DOC and must be set up in WinWord’s global template file. For this purpose, call the (supplied) file
drdocmac.doc in WinWord, which was copied into the Winword directory
(standard: c:\winword) when the program was installed.
Follow the instructions within this file. The macro is predefined as standard for
the path C:\DRDOC\TMP. If this path does not correspond to the local directory
you selected, the macro must be changed according to the instructions.
In Winword: create control record:
%
When the data transfer is started, the program looks for a control record
called control.txt in the path for word files and copies this file into the local
directory. If different archives exist (e.g. one address management and one
literature archive), various application-specific control records must be
available. To be able to work with the correct control record, the following
options are available:
•
A separate path for DATA TRANSFER templates is entered for each
archive (e.g. for the address management C:\WINWORD\ADDRESS
and for the literature archive C:\WINWORD\LIT). The respective
directory must always include the files associated with the particular
archive. The control record is always called control.txt in this case.
Or:
• The control records of different archives have different names (e.g. for
the address management control.txt and for the literature archive
conlit.txt). The path for DATA TRANSFER templates can be same for all
archives in this case. But you have to ensure that all the required control
files are copied into the local work directory and are available prior to
creating forms.
Part 4: 18.3 Settings: Prepare data transfer - 331 -
!
!
&
Call WinWord and create the control record. The field names of the
archive in this file are in the selection and order as stated in the archive.
Save this file in the directory, which is named in the archive as path for TV
templates and in the directory, which is named as the local work directory.
Create one common control record for an archive’s template (e.g. for the
address management) containing the field names of all templates. But
you have to ensure that the order of the field names correspond with the
sequence of the field selection in the archive.
A control record could be structured in the following way to apply to letter
as well as transfer form:
name1→name2→name3→street→town→address→bank→bank sort code→
accno
Select fields in the archive:
Dr.DOC needs to know from which record fields the entries are to be applied
into wordprocessing. This can be defined by the user and can also be changed
at any time (a change to this selection is for example necessary, if you have
made changes in your control file).
Call "Settings/field selection for transferring data".
!
It is possible to create several configurations, but it is usually better, if you
determine the selection for all forms together. Ensure that you keep to the
order of your entries in the control record. The first field name of the
control record must be entered as the first field etc.
An example of the control record
firstname→name→name2→name3→street→postcodetown→address
Example
- 332 - Part 4: 18.3 Settings: Prepare data transfer
Note
When you determine a table column for the data transfer, the entries of several fields
are all applied separated by a block end character.
'
Determine program for transferring data:
!
Call "Settings/Doc.association" in the archive.
In this section, the
program is selected
to which data is to be
transferred
A macro for this program must be available.
!
Confirm the selection with "OK".
Part 4: 18.3 Settings: Prepare data transfer - 333 -
(
In WinWord: create text template (form):
!
!
!
Call new document.
Select "Extras/standard print-create main document".
Attach as data source data.txt with path or as control record
control.txt with path. Attention: the path must be the one stated in the
database as local work directory!
! Create fields (the easiest way is stated, but there are also other
possibilities).
! Go to required place in the document, select the "insert data field"
command and select the required field from the list box.
! If required: individual pages from archived documents can also be
applied. To enable this without errors, the template must have a
variable for the graphics to be imported: **Graphics**
Insert this variable manually at the required position in the template
(in exactly this form).
! Once everything is as required, save the text.
Example
MUSTER GmbH
{SERIENDRUCKFELD vorname} {SERIENDRUCKFELD name1}
{SERIENDRUCKFELD name2}
{SERIENDRUCKFELD name3}
{SERIENDRUCKFELD straße}
{SERIENDRUCKFELD ort}
Sehr geehrte(r) {SERIENDRUCKFELD anrede},
Mit freundlichen Grüßen
Muster GmbH
- 334 - Part 4: 18.3 Settings: Prepare data transfer
You now have made all the necessary preparations and are ready to start with
the data transfer.
Notes
Working in the network
•
•
•
Tip
For working within the network, the files listed under 1 above must be available in a
central directory (network drive) . Any changes to the files are only made in this
central directory.
To avoid errors when creating forms, the data.txt files and the control record file
(always named control.txt) should be copied into the local work directory prior to
creating the forms.
IMPORTANT: the path information in the macro DrDocTv must correspond to this
local work directory. If this is not the case, re-install the macro again, please!
Changing the macro
The macro, which runs within WinWord to import data, can of course also be changed.
But it must always contain the routines described in the following chapter. In addition,
you could for example determine that the new document is printed straight away.
18.3.2
Transferring data to other programs
If you want to transfer data to a third party application, this program must have a
macro language and a standard text function.
To transfer data and to automatically import into the standard form, create a
macro. This must contain the following basic steps:
1. If archive.ext is available in the local work directory or this file is open: close
and delete the file.
2. Load the data.txt file from the local work directory, convert from ASCII into
the program’s format.
3. Load the letter.txt. file from the local work directory
4. Start the standard text function with data.txt and associated control record
(see above) from the local work directory.
5. Find **graphics**
Part 4: 18.3 Settings: Prepare data transfer - 335 -
6. Delete **graphics** and insert in its place, if available, the data.bmp file from
the local work directory.
7. Save standard text in the local work directory as archive.ext.
8. Close data.txt and letter.txt.
Instead of ext use the program’s standard extension for the archive.ext. file
name
- 336 - Part 4: 18.3 Settings: Prepare data transfer
You require the relevant templates, which have been set up to import the data
from the data.txt file in the local work directory, for the standard text function.
Note
The data exported from Dr.DOC in data.txt is partly given new separators compared to
the buffer within Dr.DOC:
Separator
Field
Record
Table line
Continuous
paragraph
Tip
Dr.DOCinternal
9
14
1
field 13 10
data.txt for TD
9
13 10
20
11
You find tips and information using WinWord as an example in the previous chapter.
Part 4: 18.3 Settings: Prepare data transfer - 337 -
18.4
Archive-specific program settings in Dr.DOC
"View" and “Find” settings used to be desktop-specific, but are now
archive/desktop-specific by default.
The following settings can be controlled via archive.ini entry to establish whether
they are saved archive or desktop-specific.
[ARCHIVE_SPECIFIC]
DOCUMENT_PREVIEW=1
DOCUMENT_DISPLAY=1
DOCUMENT_FOREGROUND=1
DOCUMENT_SCALETOGRAY=1
DOCUMENT_ImageView_View=1
= display small image automatically
= display large image automatically
= display large image in foreground
= Grey scale for black/white images
= Adjust large image to window size, to
window width, to window height, 100%,
user-defined
DOCUMENT_ZOOMFACTOR=1
= Zoom factor (large image userdefined)
DOCUMENT_INTERPOLATION=1
= Interpolation (large image userdefined)
DOCUMENT_REDLINING=0
= Redlining
WINDOWSETTINGS_Toolbar=0
= Toolbar
WINDOWSETTINGS_Statusbar=0
= Statusbar
WINDOWSETTINGS_MaximizeMDI=0
= maximize MDI
WINDOWSETTINGS_Inputposition=0
= keep input position
Searchsettings_Duplicates=0
Searchsettings_Case=0
Searchsettings_Hypersearch=0
= Duplication check
(find)
= Match case
= Hypersearch
- 338 - Part 4: 19. Create Thesaurus
19.
CREATE THESAURUS
To facilitate the input of field entries, e.g. hierarchical orders, and to guarantee
that these entries are consistent, you have the option to apply entries from
another archive with the "edit/call Thesaurus" command in new entry or edit
mode, .
Important: Any archive can be used as Thesaurus archive.
Examples Reference archive:
You have a reference archive containing all the bibliographic information. To input
magazines with publishers and locations you have created a Thesaurus containing a
record with the "fixed data", i.e. name, publisher, location for every magazine. Via the
"Thesaurus" command these entries will be applied into the destination archive, the
reference archive in this case.
Receipt of invoice:
All incoming invoices are scanned into an incoming invoice archive. The name of the
person rendering the invoice is not entered manually, but applied from an address
archive containing the complete address and other data of the supplier. This also
guarantees that the name is always spelt identically.
The basic prerequisite for this is that
•
•
•
another archive exists, which is used as Thesaurus
a link to a certain field of the Thesaurus is entered
you select the field and entries of the Thesaurus to be applied.
Part 4: 19. Create Thesaurus - 339 -
Connect Thesaurus:
Go to the dialog for connecting the Thesaurus with the current archive (in the
current archive) via “Settings/Thesaurus ...”.
1
2
3
4
6
7
5
8
10
9
11
1:
Shows the field names of the current archive. Select the field, in which
the Thesaurus is to be linked (i.e.: the Thesaurus will be launched
from this field) from the list.
2:
Select the archive to be linked with this field.
3+4: “Search fields:”
Connect the selected Thesaurus field (is shown as standard) as the
first “archive field”. In addition, further fields can be connected (ANDconnection). “Archive fields” shows the field names of the current
archive and “Thesaurus fields” shows the field names of the
Thesaurus archive. Select the link fields from the respective lists.
5:
After clicking on “Assign”, the selection you made will be entered here.
Any further allocations are separated by “ ; “ (semicolon). If you delete
an allocation, ensure that you also delete the semicolon (“ ; “).
6+7: “Import fields:”
- 340 - Part 4: 19. Create Thesaurus
8:
9:
10:
11:
Any entries can be applied from the Thesaurus archive. Select the
destination field (the field, into which the entry is to be applied) and
then the source field (the Thesaurus field from which the entry is
applied).
State each field combination separately and confirm with "assign".
Sorting and the selection list of the Thesaurus archive can be selected
separately and may be different for each connection. This is especially
useful, if an archive is used for several completely different Thesaurus
adoptions. The configurations, which were created directly in the
Thesaurus archive, are available.
Meaning of the various definitions:
Apply manually: The entry from the Thesaurus archive is done
"manually", i.e. using the mouse to click on the "T" button in the
connection field (or menu "edit/call Thesaurus"). If more than one
matching record is found in the Thesaurus archive, the user will see a
selection list, from which the required entry can be applied.
Apply automatically: On saving the record, an automatic check
determines whether a record with a matching entry exists in the
connection field in the Thesaurus archive. If so, the record may be
saved. Otherwise the messages: "No Thesaurus entry for field ...
found" and "Entries in the record do not correspond to Thesaurus
definitions" will appear.
Automatic check: On saving the record, the field contents in the
calling archive’s connection field is compared to the Thesaurus
archive’s connection field. Only if the Thesaurus archive has at least
one record with identical entry, the record can be saved. This
guarantees consistent data management and prevents the input of
incorrect data.
If "apply manually" is activated, different modes can be selected:
Overwrite: The Thesaurus entry found overwrites the search entry
without displaying a selection list.
Attach: The Thesaurus entry found is attached to the existing entry
without displaying a selection list.
Select: A selection list is always shown.
Save the Thesaurus definition with "Save".
Follow steps 1-9 for each connection and do not forget that each individual
connection must be saved (step 9).
Part 4: 19. Create Thesaurus - 341 -
If a field is already connected, the connection will be shown as soon as you
select the field. You can change this connection or redefine the import fields.
The modified connection must be confirmed with "Save".
If you want to completely delete the connection for this field, activate the "delete"
command.
- 342 - Part 4: 19. Create Thesaurus
Example
Receipt of invoice:
The names of the respective recipient are applied from an address archive into an
incoming invoice archive.
A thesaurus is defined for
the field “receiver”.
Select list of the
thesaurus: all records
in the connection field
starting with "Masch" .
The selected entry is
taken over in the import field
#
MORE INFORMATION ON THE TOPIC IS INCLUDED IN CHAPTER:
"
11.2
CREATE NEW PROFILE DATA
Part 4: 20. Connect archives relationally - 343 -
20.
CONNECT ARCHIVES RELATIONALLY (ADDITIONAL
INFORMATION)
Dr.DOC offers the option to call additional information from another archive on
a particular record entry.
What is the difference between Thesaurus and additional information archives?
Any archive can basically be linked and/or relationally connected (additional information)
as Thesaurus for any other archive.
Information is applied from a Thesaurus. That means: a Thesaurus does not provide
information for browsing, but a type of "text building blocks", which are entered into the
archive you are currently working with.
A relationally connected archive provides more information on the keyword. That means:
you are working with existing data in both archives without exchanging this data. This
associative search process is also called hypertext.
What is the difference between additional information and hypersearch?
In common: for both functions you are looking for associated information from various
archives. For the hypersearch, a relational connection can also be automatically carried
out as a further step.
The difference explained with an example:
The problem: you are looking for an invoice from the company Hobbs dated March 1996
and then want to query something over the phone.
The solution with additional information:
Search in the incoming invoices archive for "Hobbs and 03.1996". – The invoice will be
displayed. – Call the address management via the "i" button in the name field. - The
address with telephone number will be displayed.
Advantage: For clarity, you haben initially only the invoice data on screen, on request
you immediately obtain the address data.
The solution with hypersearch:
First option:
Search in the incoming invoice archive and in the address archive for "Hobbs".
You will see the hit list immediately from both archives.
But the incoming invoices archive will display all invoices from Hobbs, not only the ones
dated March 1996. A search for the invoice date would not have been possible, as it
would have also been searched in the address archive in connection with Hobbs.
Note
- 344 - Part 4: 20. Connect archives relationally
Second option:
A hypersearch in the incoming invoices archive is defined in such a way that every entry
found in the name field, is also immediately searched for in the address archive. So you
would be looking for "Hobbs and 03.1996" in the incoming invoices archive.
You will only find the required invoice in the invoice archive and immediately the address
automatically in the address archive.
This search automates the process, which is carried out manually when using the
additional information, but requires a little more time. As a hit list from both archives is
initially shown again, another click with the mouse is required to display the data.
Examples Reference archiv:
You have found a quotation on a certain topic by an author named Miller in a reference
archive containing all the bibliographical information. You can now call the version
concerned in another indep endent archive containing detailled information or short
versions.
Receipt of invoice:
You have read a supplier’s archived invoice and now require the supplier’s
address/telephone number to query something. For this purpose, an address
management function is connected via the supplier’s name containing the necessary
data. (The same address management may also be connected as Thesaurus - see
example in the previous chapter!)
To use the additional information, you must have defined an identical field in
both archives, i.e. a field containing the same entry in both archives.
Part 4: 20. Connect archives relationally - 345 -
Link additional information:
Go to the dialog to link the additional information to the current archive (in the
current archive) via “Settings/additional information ...“
1
2
3
4
5
6
1:
Shows the current archive’s field names. Select the field, in which the
additional information is to be called, from the list.
2:
Select the archive to be connected with this field.
3+4: “Searchfields”:
Connect the selected additional information field (is displayed as
standard) as the first “archive field”. Further searchfields can additionally
be connected (AND link). “Archive fields” shows the current archive’s field
names and “additions fields” shows the field names of the additional
information archive. Select the connection fields from the respective lists.
5:
After clicking the “assign” button the selection will be entered here.
Further allocations are separated by “ ; “ (semicolon). When deleting
allocations, ensure that you also delete the semicolon (“ ; “).
6:
Sorting and the selection list of the additional information archive can be
selected separately and may be different for each connection. This is
particularly useful, if an archive is used for completely different additional
information. The configurations, which were created directly in the
additional information archive, are available.
Divide data
Use the connection option and divide your data according to topics into different
archives, if convenient. You could have a connection from document management to
address management, which is connected (e.g. via a name) to project management
Tip
- 346 - Part 4: 20. Connect archives relationally
(and vice versa). The advantage: The respective data is arranged by topic into different
"drawers" (communication, address data, project texts), which are not “loaded down”
with information that is not essential for the topic, but from within a drawer another one
can be opened directly and all associated information will be available.
#
MORE INFORMATION ON THE TOPIC IS INCLUDED IN CHAPTER:
"
13.8
CALL ADDITIONAL INFORMATION
Part 4: 21. Data exchange - 347 -
21.
DATA EXCHANGE
Brief information
Profile data
Document
Import / Export
ASCII/ANSI
Dbase
Other
archive
File
Import:
any type
The following describes:
• The import of profile data in ASCII/ANSI format or from another archive
• The import of profile data in Dbase format
• The export of profile data in ASCII/ANSI format (optionally with documents)
into another archive
• The export of profile data in Dbase format
• The import of spool files via COLD interface
INFORMATION ON IMPORTING DOCUMENTS OF ALL TYPES IS INCLUDED IN CHAPTER:
"
11.3
ARCHIVE DOCUMENTS
#
INFORMATION ON EXPORTING INDIVIDUAL DOCUMENTS IS INCLUDED IN CHAPTER:
"
13.6.1 EXPORTING DOCUMENTS AS FILE
#
Other format?
If your import file is in another format you can nevertheless import it. Such a data file
can usually either be converted in ASCII/ANSI or Dbase format - this converted file is
then imported.
The same also applies to the export: export the data in ASCII or Dbase format and then
import it to the other system in a second step.
Tip
- 348 - Part 4: 21.1 Data exchange: Data format DR.DOC
21.1
Preliminary remark: data format in DR.DOC
For importing and exporting within Dr.DOC you need data as separator
information from Dr.DOC , only the details for fields and records are required.
The following separators are also used in the profile data within Dr.DOC:
Separator:
Field:
Record:
Paragraph (¶) within a
continuous field:
Table line:
Paragraph mark
Document separator
ASCII value:
9
14
13 10
1
32 11
10
Part 4: 21.2. Data exchange: Import - 349 -
21.2
Import
21.2.1
Importing ASCII/ANSI file or from another archive
Profile data
Document
Import / Export
ASCII/ANSI
Dbase
Other
archive
File
Import:
any type
"Import ASCII/ANSI" allows you to
• import externally created ASCII data record files into an archive
• combine two Dr.DOC archives into one (without document import).
• import spool data (see chapter 21.4.3 COLD-INTERFACE!)
Follow these steps:
!
Call "Settings/field selection for import ASCII" in the archive, into
which data in ASCII/ANSI format is to be imported and consecutively
number the fields, into which the data is to be entered. You can also
combine several "source" fields into one destination field: enter the
corresponding field numbers into the one new destination field for
this purpose and separate with any character, which is then also
applied in the import.
Step by
step
- 350 - Part 4: 21.2. Data exchange: Import
Example
For records in format
should be stated:
Name → Firstname → Name2
the following field selection
But if first name and name (in this order) are to be combined into one field, the entry in
the field "Name" should be: 2 1 . In this case a blank acts as separator.
Example for continuous fields:
For records in the continuous field, the following field selection can be made:
Name: 1
First name: 2
The result looks as follows:
Name: Musterman
First name: Carl
The blanks entered as separators were applied.
Example for table fields:
For table fields, there are special features for the separators. The string between 2
numbers may look as follows:
a) String “=...”:
Import into same line as previous number, all characters
apart from “=” are applied
b) String “!...”:
Import into new line, all characters apart from “!” are applied
c) Other string:
Import into new line, NO character applied
b)
Field selection
1=2
Name: 1= Firstname: 2
Name: 1!Firstname: 2
c)
1 xyz 2
a)
Attention
Result
Musterman Carl
Name: Musterman First name: Carl
Name: Musterman
First name: Carl
Musterman
Carl
Important for the import from other Dr.DOC archives:
Part 4: 21.2. Data exchange: Import - 351 -
1. The field order for numbering is the sequence in the "database settings" (i.e.
independent of arrangements in masks!).
2. The numbering starts with 6 for the first field (as the field numbers 1 to 5 are issued
internally).
If you want to import an archive, you only have to make the field selection, if the two
archives are not structured identically. The field selection is omitted for the same format.
!
Call "Database/Import ASCII/ANSI".
1
2
3
4
8
6
5
7
1:
Enter the path and name of the file to be imported
(e.g. c:\order\hobbs.dat). You can also call a file selection
dialog via the "file" command and select the corresponding file.
2:
Select, if you want to import data from another Dr.DOC
archive.
3:
Select, if the order of data to be imported and the field order in
the archive correspond. If this does not apply, you have to select
a field (see above).
4:
Enter the format of the source data: ASCII or ANSI.
5:
If the current archive already contains data, it can be discarded,
replaced or changed with duplicates, which may exist in the
import file.
Note
- 352 - Part 4: 21.2. Data exchange: Import
A duplication key must exist in the current archive.
6:
Under certain conditions documents can also be imported with
the individual records. These may only be ASCII or CI
documents that are connected with a third party application
(example see below).
To be able to identify the document file, it must have the same
name as the data file with a corresponding different extension.
Select the option "Import documents" and enter the extension of
the document file into the field.
Be aware that the documents are archived with the current
program link. Check the settings under "Settings/
Doc.Association".
7:
If you do not import a Dr.DOC archive, call the "separator"
command and enter the corresponding ASCII number values for
the separators between fields, records and documents. The
default setting (field: 9, record: 14) applies to importing Dr.DOC
archives.
The following separators are also often used:
Part 4: 21.2. Data exchange: Import - 353 -
Character ASCII Code
9
→ [Tab.]
13 or
10 13 or
13 10
"
34
#
35
$
36
%
37
&
38
‘
39
(
40
)
41
*
42
+
43
,
44
45
.
46
/
47
:
58
8:
Character
;
<
=
>
?
@
[
\
]
^
_
`
{
|
}
~
«
»
ASCII Code
59
60
61
62
63
64
91
92
93
94
95
96
123
124
125
126
174
175
*[Tab.]
Space
11
32
To archive spool files, select this option. If the spool import is
defined externally, also select the option and enter the
corresponding ini file.
MORE INFORMATION ON IMPORTING SPOOL DATA:
"
21.4. COLD interface
!
#
The import is started with the "OK" command.
The file customer.dat with customer addresses is to be imported as profile data. In
addition, there is a file called customers.asc with invoices to these customers. The
address file and the invoice file are structured identically regarding the order: the first
invoices are associated with the first address etc.
Example
- 354 - Part 4: 21.2. Data exchange: Import
An editor is entered as document association.
In this way every address is applied into the archive with the associated invoices as one
record.
21.2.2
Importing DBASE data
Profile data
Document
Import / Export
ASCII/ANSI
Dbase
Other
archive
File
Import:
any type
As the ASCII/ANSI data, data in DBASE format can also be imported into an
archive.
•
If the DBASE data is to be imported into the current archive, call
"Settings/field selection for dBASE import" and consecutively number the
field, into which the data is to be entered.
Part 4: 21.2. Data exchange: Import - 355 -
•
If the DBASE data is to be imported into the current archive, check under
"Field selection for data types" on the "Settings" menu that the correct data
types(e.g. date, number field) are entered for the transmission.
If a new archive is to be created for the DBASE data, there is no need to carry
out the action above.
!
Call "Database/import DBASE".
!
Enter the path and name of the DBASE file to be imported.
!
The data will be imported by confirming "OK". If a field selection for
dBASE import is activated, data will be imported into the current
archive (without query). If a field selection is not activated, you will be
asked whether you want to create a new archive.
If a new archive is being created, it will automatically be named according to the
DBASE file.
- 356 - Part 4: 21.3. Data exchange: Export
21.3
Export
21.3.1
Export in ASCII/ANSI format or into another
archive
Profile data
Document
Import / Export
ASCII/ANSI
Dbase
Other
archive
File
Import:
any type
Profile data (optionally with documents) is only exported into another archive or
as ANSI file, to enable a partial selection, via the "Export" command within
selection lists.
!
Note
1)
2)
Call "Fiel selection for ASCII export" on the "Settings" menu in the
archive from which data is to be exported in ASCII/ANSI format and
enter the field names of the destination archive in the fields to be
exported.
If you want export into a Dr.DOC archive, the fields only have to be selected, if
the two archives are not structured identically. If they have the same format,
the selection is not required.
Only the fields displayed in the mask are exported.
!
Find the data to be exported with the search functions and call the
"Export" command within the selection list.
Part 4: 21.3. Data exchange: Export - 357 -
1
2
3
10
4
5
6
7
8
11
9
1:
Enter the path and name of the file, into which the data is to be
exported (e.g. c:\order\hobbs.dat). You can also call a file
selection dialog via the "file" command and enter the relevant
file here.
2:
Select, if you want to export data into another archive.
If the destination is not a Dr.DOC archive, you have the
additional option of selecting ASCII or ANSI format:
3:
Select, if the order of data to be imported and the field order in
the archive correspond. You have to select fields first, if these
details do not correspond (see above).
- 358 - Part 4: 21.3. Data exchange: Export
4:
Select, if the export file already exists and the new data is to be
attached.
5:
If data is exported into another archive, the documents may
optionally also be exported.
6:
Select, if you have made another selection on the selection list,
so that only the selected records are exported.
7:
Select, if the exported records are to be deleted after the export.
8:
Select, if you want to export into individual files.
9:
If you are not exporting into a Dr.DOC archive, call the
"Separator" command now and enter the relevant ASCII number
values for the separators between fields and records of the
destination file.
10: Swapping documents is a separate workflow and is described in
chapter 25.
11: Select this option, if the program environment is to be exported,
too (e.g. when archiving onto CD).
!
Tip
The export is started with the "OK" command.
Remove possible sources of errors in advance
You should know the automatic fields, numerical fields, date fields, key fields and
mandatory fields of the destination archive and these should not disagree with entries in
the data to be exported. An error message will for example appear, if you attempt to
make another entry in an automatic field or if you want to apply a record without an entry
in a mandatory field.
Part 4: 21.3. Data exchange: Export - 359 -
21.3.2
Export in dBase format
Profile data
Document
Import / Export
ASCII/ANSI
Dbase
Other
archive
File
Import:
any type
Profile data without documents can be exported in DBASE format.
!
Enter the order, in which the fields are to be exported under
"Settings/ field selection for DBASE export".
!
To export in DBASE format without any errors, ensure that
•
records with fields that are longer than the default in the DBASE
file are not transferred if you import into an already existing
DBASE file
•
total length and the positions behind the decimal point are
entered for number fields behind the digit for the transfer order.
That means: a number’s total length is the entire number of
characters with decimal point: 852.56 consists of six characters
and two decimal places. If the number field is to be imported
third, the entry in this field must be: 3 6 2 . The individual digits
are separated by blanks.
•
only lower and upper case letters and underscore ( _ ) is
permitted for naming the individual fields in accordance with
DBASE conventions. If other, non-transferrable characters, e.g.
commas etc. are included, replacement characters will be
transferred.
- 360 - Part 4: 21.3. Data exchange: Export
!
Note
Now enter the name to be given to the file in DBASE format under
"Database/Export dBASE...". The extension .dbf is automatically
added. If the file does not yet exist, a Dbase file with the same name
will automatically be created.
Be aware that memory problems may arise when transmitting a large amount of data, as
data requires considerably more memory in DBASE format than in Dr.DOC!
Part 4: 21.4. Data exchange: COLD interface - 361 -
21.4
21.4.1
COLD interface
Overview
• Definition:
COLD (Computer Output to Laserdisc) stands for memory-saving archiving
of documents with uniform form, but different content. Form and content are
saved separately and in different format: the form only once as bitmap, the
modifiable data in ASCII format.
• Scope:
Faithful archiving of documents from payroll accounting and goods
management systems, e.g. pay statements, delivery notes, invoices, balance
lists etc.
• Function overview:
Importing documents: There are two start modes for importing documents
with optional automatic keywords for quick searches (applying data from the
spool file into the archive’s profile data):
- Manual start of COLD archiving
- Automatic start through COLD archive server running in the background.
Presenting documents: The COLD documents can be displayed on screen
and printed. Regardless of the size, high presentation quality is achieved by
showing the data not as bitmap, but as true type fonts. The customer-specific
form is guaranteed by supporting all fixed true type fonts of the operating
system.
- 362 - 21.4. Data exchange: COLD interface
21.4.2
Description of the components
COLD archive server:
Automatic, time-controlled import of spool files from certain directories. These
directories and the spool files to be archived can be entered in the “spoolimp.ini”
file.
Document-specific form template:
The document specific form templates must be saved as image (e.g. BMP, TIFF
or JEPEG file). These form templates must already contain all formatting
elements, e.g. frames, company logo etc.
Document view:
To view the document, the document-specific form image is loaded and the data
is shown.
Conventions for the spool files (print files):
− The file name must always remain the same.
− The profile data is generated (automatic keywords) via the document-specific
ASCII import definition. It can be controlled automatically via the file name,
the file extension (example: data.001 = pay statement, data.002 = health
insurance certificate) or a header entry (document or file header) containing
the document type. Header start and end must be defined with unique control
characters.
− The spool file only contains the text (the data). This guarantees faithful
reproduction of the document as well as reduced memory requirement.
− The font (font type, size and line spacing) is determined with a unique control
character string.
Part 4: 21.4. Data exchange: COLD interface - 363 -
21.4.3
$
Using the COLD interface
Set up COLD server:
For the automatic time-controlled import of spool data, the following action is
required in addition to the settings stated:
• ASCII import definition at client or archive server as user "SERVER" (the
user "SERVER" must be created by the system administrator via
"Management/user manager"). (See step 4)
• Create spool import file (spoolimp.ini) according to the following pattern.
This ini-file must be in the subdirectory \comm.
When editing the “spoolimp.ini”, ensure that the name of the ASCII import
definition is in capital letters and that there are no blanks within the
parameter definition before and after "=".
Part 4: 21.4. Data exchange: COLD interface - 365 -
[SPOOL_IMPORT]
SectionName=
;SectionName=FILEHEADER, <offset>, <length>
;SectionName=DOCUMENTHEADER, <offset>, <length>
;SectionName=FILE NAME, <offset>, <length>
;SectionName=EXTENSION, <offset>, <length>
;Maxnumber=(Default =0; means the number of records to be imported per
interval, 0 = all records are processed, 1 = one record per interval is processed,
2 = two records etc.)
[DEFAULT]
Archive=C:\DRDOC\comm\server\testx
Field selection=SPOOL1
appno=3
Format=ASCII
ImportDocuments=1
Duplications=discard
;(replace or change only, if ImportDocuments=0)
;Duplications=replace
;Duplications=change
NCI_Komp=0
LineSeparator=10
DocumentSeparator=35 49 36 35
PageSeparator=12
DocumentStart=35 50 36 35
DocumentEnd=35 57 36 35
PageStart=
PageEnd=
FileStart=35 49 36 35
FileEnd=
• Two subdirectories (“spool” and “work”) are automatically created by the
server in the “comm” directory:
“spool”:
Destination folder for buffer of the print spool file
- 366 - Part 4: 21.4 Data exchange: COLD interface
“work”:
Pattern
Server's editing directory for cold archiving (the print spool file is
moved here from the spool directory prior to archiving).
The paths can also be defined via an entry in the “spoolimp.ini”.
[FOLDER]
READ=1
ASCII=<Path f.ASCII import files (profile data)>
DOCUMENT=<Path f. ASCII import files (documents)>
SPOOL=<Path f. SPOOL import files (profile data and/or documents)>
WORK=<Working path>
•
!
To activate the SPOOL function, start the server process. Go to “time
control” via the “edit” menu item in the server program window and enter the
required value in the “spool interval in minutes” field of the parameter.
COLD view ini file:
The ini file is created with the help of an editor according to the following pattern.
The fonts are determined by control characters, which can be defined without
restriction. Font, font size and line spacing are determined at the same time by a
control character string. Formats going beyond the standard character format of
the font (standard, italic, bold, bold italic) are not supported (e.g. style
attributes like "underlined" etc.). All fixed true type fonts of the operating system
are supported.
The ini file can be opened with the shortcut Ctrl+Shift+C in the COLD document
view.
Part 4: 21.4. Data exchange: COLD interface - 367 -
Pattern
Definition of the form size and the text start
Unit: mm
Start
coordinates:
Base line of the first
line
Font def. with control characters
Commentary for explanatory documentation
Entry under "1=" is used as default font
Control character: ASCII
decimal
Control characters to be ignored in doc. view
Format=ASCII
'or ANSI
Font entry sequence:
n=Fontname,bold,italics,underline,character height[x.xx],character spacing[x.xx],line spacing[x.xx],control character for font definitio
Syntax for entering the control characters (for font definition, line separator, page separator and
[xx] or [xx xx xx] (control character sequence) or
[xx;yx;zx zy zz] (i.e. several control characters and control character sequences
"
Set document association for COLD archiving:
Call "Settings/document association". Determine
− whether the spool files are filed as CI (searchable) or NCI documents:
subject to your decision, the entry is going to be in the CI or NCI documents
column.
− the name of the document form with file extension (BMP graphics without
extension!), to be filed in the document view. Allowed are, e.g. BMP, TIFF,
JPEG etc.
− the name of the ini file for the graphic import of the archived spool data.
The entry takes place according to the pattern
Cold,[name graphic],[name ini file]
- 368 - Part 4: 21.4 Data exchange: COLD interface
Example
Name of the ini file
Identifies a COLD link
Name of the BMP file (sw.bmp)
The form template image (e.g. BMP file) and the ini file must be in the "Cold"
folder, which must be one level below the archive-specific adm file. For C/S
archives the "Cold" folder must be in the "form" folder. A second image for the
following page can optionally also be created with the ”Cold” viewer. A second
template image must be defined. The name of the second template image is
entered after the ini file, separated by comma, (Cold,[name first template
image.ext],[name ini file],[name –second template image.ext]). The "Cold" folder
must be created by the system administrator. The image names are stated
WITH file extension.
#
Determine import definition:
Now determine the import definition for applying import data to the profile data.
Call the spool file, e.g. in the DOS editor and determine the position of the field
to be imported (line and column no.; is shown at the bottom right in the DOS
editor!).
Then call "settings/field selection for ASCII import in the archive and enter the
position of the field in the spool file in the import field according to the pattern
[Line No.] [Column No.] [Field length] [Definition of the first line]
The numbers are separated by blanks. The "Definition of the first line" is only
required, if the parameter Dok.Start is defined. In that case
0 = First line starts after document separator
1 = First line starts after document start.
Part 4: 21.4. Data exchange: COLD interface - 369 -
Example
In the spool file, the "Name" field
is in line 31, column 6.
The field has a maximum length of 15
characters.
If the value 0 is entered for the field
will be applied from the
lthe content
th
column no. stated to the
end of the line.
- 370 - Part 4: 21.4 Data exchange: COLD interface
$
Import spool data:
Call "database/import ASCII" and enter the path for the spool file.
Define the respective settings for the different import modes:
You want to ...
enter only fields from spool data into profile
data:
attach entries in profile data and
additionally the content of the spool file as
a Word document
import only documents
Select:
spool file is source
spool file is source
Import documents
spool file is source
Import documents
In addition, in this case: activate an ASCII
import definition without entries.
Afterwards call the "separator" command and enter the separators as ASCII
decimal value.
Example
13 = carriage return
10 = line feed
12 = form feed
Separate several
ASCII values in a field
with a blank!
The following illustration explains the allocation of separators and spool file:
Part 4: 21.4. Data exchange: COLD interface - 371 -
1
2
6
7
8
3
9
4
5
SPOOL FILE:
FILE HEADER
Document
Separator
4 Data Range Start
2
Document Header
6 Document Start
Page Separator 3
8 Page Start
9 Page End
3
2
7 Document End
1 Line Separator
Data Range
End
5
- 372 - Part 4: 21.5 Automatic Server ASCII Import
21.5
Automatic Server ASCII Import
File pairs consisting of data file with associated document file of the same name
can be imported automatically by the server.
It is configured according to chapter 20.4.3 COLD interface as described under
point % ”Set up COLD server” (only point %!!).
Please be aware that the entries for the “spoolimp.ini” are as follows:
[ASCII_IMPORT]
SectionName=
;SectionName=FILE NAME, <offset>, <length>
;SectionName=EXTENSION, <offset>, <length>
;MaxNumber=(Default =0; means the number of records to be imported
per interval, 0 = all records are processed, 1 = one record per interval is
processed, 2 = two records etc.)
[DEFAULT_ASCII]
Archive=C:\DRDOC\test\import
Field selection=AUTO_ASCII_IMPORT
AppNo=1
;AppNo=auto-associate app
;AppNo=ImageFileIntern
ImportDocuments=1
;FileTypeDocuments=doc
;FileTypeDocuments=xls
;FileTypeDocuments=*
Format=ASCII
;Format=ANSI
Duplication=discard
;(replace or change only, if ImportDocuments=0)
;Duplication=replace
Part 4: 21.5 Automatic Server ASCII Import - 373 -
;Duplication=change
FieldSeparator=9
RecordSeparator=13 10
DocumentSeparator=12
Carry out the further actions as described in the ASCII import definition under
20.2.
The ASCII files to be imported must be in the
..\COMM\ASCII directory,
the associated document files in the
..\COMM\ASCII\DOCUMENTS directory
The paths can also be defined via an entry in the “spoolimp.ini”.
[FOLDER]
READ=1
ASCII=<Path f.ASCII import files (profile data)>
DOCUMENT=<Path f. ASCII import files (documents)>
SPOOL=<Path f. SPOOL import files (profile data and/or documents)>
WORK=<Working path>
- 374 - Part 4: 22. ISDN data counter check
22.
22.1
DR.DOC ISDN DATA COUNTER CHECK
Short description
The Dr.DOC ISDN counter check program allows automatic central archiving of
decentrally generated documents across the company. The Dr.DOC counter
check function is not only characterised by the fact that it enables the efficient
illustration of complex corporate structures, but also that it guarantees the
immediate availability of all archived data across the company in the central
office.
22.2
No.
1
2
3
22.3
Term definitions
Term
Description
Central archive = counter Archives in the corporate central office: This
check destination archive archive is the destination of the ISDN
counter check and is exclusively for centrally
archiving per ISDN counter check.
Branch archive = counter Decentral archive in company branch.
check source archive
Source archive for ISDN counter check and
working archive for decentral archiving in
company branch.
Dr.DOC
C/S Path
for
Dr.DOC
Client/Server
Communication path
Communication: (e.g.: P:\Drdoc) This path
includes
all
communication
relevant
subfolders, e.g. the communication directory
(P:\Drdoc\Comm)
Basic prerequisite
An ISDN ROUTER software must be installed across the company to establish
the telecommunication link between central office and branch.
Part 4: 22. ISDN data counter check - 375 -
22.4
Creating the ISDN counter check archive structure
Archive setup: The counter check archive structure is set up as follows.
•
•
At first, the complete C/S archive environment for the corporate central
office is created. The following should be observed:
for the date-controlled and the user-specific counter check every counter
check archive must include two corresponding database fields “modified
on” and “modified by”, in which the date and user of the last modification or
of the new record is automatically recorded.
Field name
Modification date
Modified by
Field type
single-line
single-line
Automatic field
D
B
Edit lock
&
&
• On the basis of a copy of this central archive environment, the local
archive environment is created by editing the drive letter for the client
communication path in the following files :
• <Name>.BVP: (<Name>= Name of the user set)
------------------------------[BV]
c=Q:\DrDoc\user\user.bvd
s=P:\DrDoc\user\user.bvd
[1]
c=Q:\DrDoc\CLIENT\Archive1.DA
s=P:\DrDoc\COMM\SERVER\Archive1.DA
[2]
c=Q:\DrDoc\CLIENT\Archive2.DA
s=P:\DrDoc\COMM\SERVER\Archive2.DA
[3]
etc.
• All .da files in the “client” directory: By means of editor via
“find and replace”
• find:
P:\DRDOC\
• replace by:
Q:\DRDOC\
- 376 - Part 4: 22. ISDN data counter check
• IMPORTANT: If the counter check is not supposed to work solely in
the standard mode “replace duplications” (i.e., corresponding record
in the destination archive is overwritten with updated record from
source archive): Counter check content must be configured by
means of ASCII export definition (application example: Table content
in the source archive is to be attached to existing table content in the
destination archive). This ASCII export definition must be carried out
under the user login of the counter check user for the branch archive
environment.
• Dr.DOC C/S communication path structure: The Dr.DOC server
communication path, which is identical across the company (e.g.:
“P:\Drdoc”): is the core of this communication path structure i.e., this
communication path applies respectively for the Dr.DOC server
process in the branch as well as in the central archive environment.
Branch and central archive environment are distinguished via the
client communication path: for central archives the client
communication path is identical to the Dr.DOC server
communication path, e.g.: “P:\Drdoc”). For branch archives, the
client communication path is then for example “Q:\Drdoc”.
Dr.DOC communication path structure for ISDN counter check: Overview
C/S component
Dr.DOC server process
Dr.DOC client
Central archive
P:\Drdoc
P:\Drdoc
Communication path
Branch archive
P:\Drdoc
Q:\Drdoc
A Dr.DOC client accesses a branch archive via the branch client communication
path across the company: “Q:\Drdoc”
A Dr.DOC client can access a central archive via the client communication path
of the central office across the company: “P:\Drdoc”.
Part 4: 22. ISDN data counter check - 377 -
22.5
Dr.DOC program files for ISDN counter check
The following Dr.DOC program files are required at the destinationarchive
server.
No.
File
1
docrepl.exe
2
pt.ini
22.6
Description
Counter check program
Counter check rule
Destination folder
DrDOC system folder
WINNT (Operating system)
Counter check configuration: Counter check rule
The counter check rule is defined in the configuration file “pt.ini” as follows.
(Explanations are emphasized in italics and enclosed with round brackets)
Explanations on “pt.ini”:
• In the first part, the configuration file “pt.ini” contains general control paramter
across the archive for the counter check program (number, start time, start
day and interval).
• In the second part of the “pt.ini” are archive-specific control parameter for the
counter check archives [1] to [n]. The most important archive-specific control
parameters are explained in the following “pt.ini”:
Search type:
The search for data to be counter checked at the beginning of the counter
checking process can be started with one of the following three search types:
Search type = 2 is recommended as standard configuration.
Search
type
1
Name of the search
type
Find with search rule
Explanation
Name of the search rule is to be stated in
“search rule” parameter; The search rule
(field search template) must be defined in
the branch archive
- 378 - Part 4: 22. ISDN data counter check
2
3
Find with date
Find the records, which were newly
generated or changed since the last
counter check: “from till search” in the
date search field (state database field
name in parameter “date field”)
Find with search rule and Combination of search type 1 and 2
date combined
-------------------------Begin “pt.ini”-------------------------------[PT_COUNTERCHECK]
Number=n
(number of branch archives to be counter
checked)
Start time=02:01
(Start time of the counter check)
Start day=29.09.1998
(Start day of the data counter check program)
Interval=1
(time increment in days for data counter check
program)
/* Search type=1
/* Search type=2
/* Search type=3
find with search rule
find with date
find with search rule and date combined
[1]
Connection=\\PCNAME\release\p
(release name branches Comm-Drive)
Source archive=q:\archive\client\archive1
(call path source archive
(=branch archive))
Destination archive=p:\archive\comm\server\archive2 (call path destination
archive (=central office))
Search rule=TEST1
(if “search type” = 1 or 3:
search template))
Export selection=DATACOUNTERCHECK
(if “Export_with selection”=1,
for dpl.)
Search date=28.09.1998
(date of the last counter
check)
Date field=modification date
(database-field name datesearch field)
Search type=2
(defining the search type)
Export_with_selection=0
(“0” = off; “1” = on)
Counter check date=29.09.1998
(archive-specific
counter
check date)
Part 4: 22. ISDN data counter check - 379 -
Interval=1
increment in days)
(archive-specif..
time
- 380 - Part 4: 22. ISDN data counter check
[2]
'
Ÿ
Ÿ
[n]
-------------------------End “pt.ini”--------------------------------
22.7
Starting the counter checking program
The ISDN counter checking program is started at the destination archive server
PC and counter checks the contents of the source archives always and
exclusively in the direction of the central office.
Starting the counter checking program:
• Start type: optionally “automatic” or “manual”
• User login: Enter login name and password of the counter check
user here. This counter check user can be defined as one pleases,
but must have the following attributes:
• access permission for all source archives (i.e. this user
(supervisor rights) must be entered in all user sets
participating in the counter check)
• Access permission for destination archive (supervisor rights)
Part 4: 23. Change path details - 381 -
23.
CHANGE PATH DETAILS
An archive's path details can be changed at any time. To guarantee continued
smooth working with the modified application, the following notes should always
be observed.
All files belonging to an archive must NEVER be moved with the file manager or
explorer, as otherwise the archive internal management does no longer apply! Always
make path changes via "management/edit archive parameter..." and in accordance with
the following instructions!!
•
Changing the details for management, archive and help files:
The files concerned are automatically copied to the new path and at the
same time deleted in the old path. Any existing CI and NCI archives are not
copied or deleted (see below).
For C/S applications the subdirectories MUST keep the defined names
comm\server or client (management files), dbase (archive files) and form
(help files) in the new path!
•
Changing the details for data transfer templates:
This information concerns the directory, which is opened, when you start the
"transfer data" function. The files to be available in the new path must be
copied to the new directory by the user.
•
Changing the details for NCI and CI archive:
The new details will apply to all documents newly archived from this time.
Already existing documents remain in the path stated at the time of
archiving. If this path or this data media cannot be found when viewing a
document, the document cannot be displayed or a message stating the data
media required will be displayed.
If existing documents are to be moved, an extra menu item within the data export is
used for this (see chapter 25). The following applies to this instance, too: NEVER move
with the file manager!!
Important
C/S
Note
- 382 - Part 4: 23. Change path details
•
Changing the details for local working directory:
For this path change, the files with the extension txt should be copied into
the new directory to avoid possible errors occuring in the data transfer
function.
In addition, the data transfer macro must be set to the new path. If you are
using the supplied Winword macro, it is easiest to call the drdocmak.doc
file as in the new installation and to change the details here.
Be aware, the local working directory must be identical on all workstations
and at the archive server!
•
Changing the details for automatic archiving after TD:
This detail must be changed, if the stated archive was moved to a new path
or a new connection is to be created. In any case you must ensure that the
archive stated here does exist.
C/S
Part 4: 24. Transforming archives - 383 -
24.
24.1
TRANSFORMING ARCHIVES
Transforming a local archive into a C/S archive
You might have created an archive locally and entered the data into it. This
archive is now to be accessed by more users and is therefore to be transformed
into a C/S archive in an existing C/S system. The following explains the
individual steps that are required.
All steps are explained with an example for better understanding. It is of course
possible to use other names, which then have to be converted accordingly.
As some other paths have to be stated for a separate archive and network
server, this will also be dealt with at the corresponding positions.
The example is based on the following prerequisites:
There is a C/S system where Dr.DOC is set up on the archive server in the
directory C:\DRDOC. A client's local drive has an archive with the name
"Letters" in the directory D:\TEST.
This archive is to be available to all clients as C/S archive in the future.
If network and archive server are one device: the corresponding archive server
drive is the N:\ drive from the client's view, from the server's view it is the C:\
drive.
If network and archive server are two devices: the network server drive from the
client's view is contacted via E:\, the archive server is contacted via C:\ .
- 384 - Part 4: 24. Transforming archives
At first, you are working at the client (points 1-4):
1.
You open the "Letter" archive and call all records (e.g. by entering * in a
field with an entry in every record).
2.
The records of this select list is completely exported into the drive or
directory, which also contains the other archives at the server. In our
example, it is called:
Network and archive server one device:
N:\DRDOC\COMM\SERVER\LETTERS.DAT.
Network and archive server are two devices:
E:\DRDOC\COMM\SERVER\LETTERS.DAT.
The following options have to be selected for the export:
•
Dr.DOC archive is the destination
•
identical source and target format
•
export documents
confirm with "OK". Confirm the queries whether the destination archive
is to be created or reset with "Yes".
3.
exit archive, answer query after saving the settings with "Yes".
4.
If network and archive server are one device:
Call the .da file (N:\DRDOC\COMM\SERVER\LETTERS.DA) with an
editor (e.g. Windows') and change the paths so that they are correct
from the server's view: In the example, the N:\ drive is always changed
in C:\.
If network and archive server are two devices, this step will not be
necessary.
Now continue working at the archive server (point 5-8):
Please be aware: the server program docserv.exe must not be running.
Part 4: 24. Transforming archives - 385 -
5.
Load Dr.DOC and call the "Letters" archive in the
C:\DRDOC\COMM\SERVER\LETTERS.DA DIRECTORY (or for
separate network and archive server E:\... ) via "archive/open archive".
6.
Call "management/edit archive parameter..." and select network mode
in the archive parameters.
Then the paths for the various files are changed and set up as server
paths.
If you have already archived documents, you have to observe the
following: Do not yet change this path, as the existing documents have
to be moved first. This is done in a separate step.
Change the path concerned in the following way (instead of C:\DRDOC
select the drive\directory, where the archive is meant to be):
Path for...
Network/archive
server
ONE device:
Network/archive server
TWO devices:
Management file:
c:\drdoc\comm\server
e:\drdoc\comm\server
Archive files:
c:\drdoc\dbase
c:\drdoc\dbase
Help files:
c:\drdoc\form
e:\drdoc\form
NCI archive:
DO NOT CHANGE
DO NOT CHANGE
CI archive:
DO NOT CHANGE
DO NOT CHANGE
Communication:
c:\drdoc\comm
e:\drdoc\comm
Now call "edit client parameter" and change the paths there so that they
are correct from the client's view. With reference to our example, the
paths concerned must then be changed in the following way:
Path for...
Network/archive
server
ONE device:
Network/archive server
TWO devices:
- 386 - Part 4: 24. Transforming archives
Management file:
c:\drdoc\client
e:\drdoc\client
Help files:
n:\drdoc\form
e:\drdoc\form
Communication:
n:\drdoc\komm
e:\drdoc\comm
Confirm the client parameter and afterwards the archive parameter with
"OK". If required, confirm error message via the non-copied file with
"OK".
7.
Now call "Settings/ field selection for key fields" in the "Letters" archive
and confirm with "OK".
8.
Now check whether you can call the archive's data (still at the archive
server!). Start any search and check whether the data can be displayed
without error messages. Should error messages appear, check the
above steps again and all path details, in particular the drive names.
9.
If you can view the data without problems, you can now move the
already existing documents. You can do this for identical network and
archive server, but you have to do it for a separate network and archive
server (as the documents are currently still on the network server).
Call all records for this purpose. On the select list activate the "Export"
command and within it the "Move NCI documents" option. Enter the new
path and start moving the documents with "OK".
Important
The path for moving the documents must not be identical to the path for
archive files - i.e. not dbase, but e.g. docu
Part 4: 24. Transforming archives - 387 -
The NCI and CI documents should definitely not remain on the network server (where
they currently are) if network and archive server are separate. The archive server is
used for this by default.
Note
Activate the "Export" command again and then the "Move CI
documents" option. You can put the CI documents on the same path as
the NCI documents.
10.
11.
Now call "management/edit archive parameter ..." again to change the
path for the document archives. This change must be executed, if
network and archive server are two devices.
Path for...
Network/archive server
ONE device:
Network/archive server
TWO devices:
NCI archive:
c:\drdoc\docu
c:\drdoc\docu
CI archive:
c:\drdoc\docu
c:\drdoc\docu
Then exit Dr.DOC.
After you have started the server program at the archive server, carry on
working at the client again:
12.
Now call the "Letters" archive via "archive/open archive":
N:\DRDOOC\CLIENT\LETTERS.DA.
Afterwards
enter
it
via
"management/user manager" into the user set.
A user set is required in C/S mode. If you did not have any users set up
in the local archive, you will nevertheless be asked for a password when
calling as client. Enter "DRDOC" as user and "drdoc" as password
(match case!). Then set up several users in "management/user
manager" (for more details see chapter 16 USER SET).
Note
- 388 - Part 4: 24. Transforming archives
If you receive an error message, e.g. that this archive does not exist, check all steps in
the correct order again to see whether they were executed properly. In particular check
whether all path details in the archive and client parameters (in "management/edit
archive parameter...") correspond exactly to the drives and directories used by you.
Part 4: 23..2 Transform into local archive - 389 -
24.2
Transforming a C/S archive into a local archive
To transform a C/S archive into a local archive, it's easiest to use the export
function.
%
Call archive:
Call the archive to be transformed at the archive server.
!
Find data:
If you want to transform the archive inclusive of all data into a local archive, find
all records.
If you only want to have the database structure available for a local archive, only
find a few records. These are only required to enable you to carry out the export
and are then deleted again in the new local archive.
"
Export:
Then select on the select list the "Export" function and proceed as described in
chapter 20.3.1.
Enter a local directory on the archive server as the destination.
#
Set local archive:
When the export is completed, the new local archive can be copied or moved to
another computer (but to a directory with the same name!) . In addition you
should check and correct, if required, the settings for Thesaurus, additional info
definitions etc.
Step by
Step
- 390 - Part 4: 24. Transforming archives
24.3
%
Creating a DR.DOC CD search archive
Creating the CD on the original archive PC:
• Creating the search archive (archive name e.g. "cdarch") by exporting the
required records from the original archive into a destination folder in the root
directory (!), e.g. c:\export.
This option must
absolutely be activated!
• Open export archive (i.e. "c:\export\cdarch") and the "Settings/ field selection
for.." select list, check sorting and column headings.
• Write CD-ROM:
Using a CD-ROM writing software, write the entire destination folder onto CD
(in the example: the "export") folder.
• If a Dr.DOC help is to be made available for the local CD archive reading
station, the "Help" folder must be 1:1 written onto CD. Ensure that the path
for calling the help on the original archive PC and at the CD archive reading
station is identical (e.g. c:\drdoc\help).
• A folder (e.g. "inifile") must be created on the CD, which contains the archivespecific ini file(s) from the local working directory (e.g. c:\drdoc\tmp) of the
export archive (in the example: cdarch.ini). In addition, this folder must
include the archive.ini file, which is on the original archive PC in the operating
system folder (windows or winnt).
!
Local CD archive reading station:
• The folder for the local working directory (e.g. c:\drdoc\tmp) must be on the
PC or must be created.
• Please copy all archive-specific ini file(s) from the "inifile" folder on the CD
into this directory.
Part 4: 24. Transforming archives - 391 -
• Copy the archive.ini file into the operating system folder (windows or winnt).
• Create a Dr.DOC call icon on the desktop with the command line:
drive\export\system\drdoc.exe drive\export\archive name.
Instead of drive enter the letter of the CD-ROM drive, instead of archive
name the name of the archive.
For the example archive cdarch in the CD drive E: the command line would be:
Example
e:\export\system\drdoc.exe e:\export\cdarch
Open the Dr.DOC CD search archive: Double-click on the Dr.DOC call icon
on the desktop.
The operating system of the original archive PC and the CD archive reading station
should be identical to ensure smooth running.
Note
Part 4: Archive maintenance - 393 -
ARCHIVE MAINTENANCE
An archive should be
• reorganised from time to time
• backed-up frequently subject to how often the data is changed.
In addition, if a number of data media is used, the documents should be moved
from time to time.
- 394 - Part 4: 25. Archive maintenance: Reorganise archive
25.
REORGANISE ARCHIVE
You should call the menu item "reorganise archive" on the "management" menu,
• if you have made many changes in the profile data. The profile data
reorganisation leads to the space, which the deleted records take up, is freed
again. You find out in the "Info" menu item on the "database" menu whether
such deleted records (=data blocks not used) exist. If this overview
information on the current archive includes a larger number of non-used data
blocks, a profile data reorganisation is recommended,
• if documents were moved or deleted. The reorganisation of documents,
which must then be carried out, leads to the space, which is still reserved by
the moved or deleted documents in the "original container", becoming
available again.
• if keys are to be newly established.
Step by
Step
%
Backup archive:
Prior to any reorganisation, you should backup the entire archive or at least the
archive data concerned.
!
Start reorganisation:
Call "management/reorganise archive ....
Part 4: 25. Archive maintenance: Reorganise archive - 395 -
Select the required reorganisation runs:
The reorganisation of ...
Profile data
Documents
Redlining
Keys
Release record lock
Update document
information
Help
leads to:
space of non-used data blocks within the file being freed
space of moved/deleted documents being freed
space of non-used data blocks in the redlining file being
freed
Updating and release of non-used data blocks in the
indices
Release the "record locked" message
Update the document size information on the select list
Release non-used data blocks in the current help (if a lot
of changes were made)
The reorganisation is now carried out.
During a document reorganisation the program ocassionally discovers documents,
which cannot be edited. A corresponding message will be shown in this case. The
documents or records concerned are stated in a log file , which is created under the
name prot.001 in the local working directory and which can be read with any editor. The
profile data of the record on the basis of which you find the corresponding record in the
archive and you can remove the source of the error, is found in the log file.
Note
- 396 - Part 4: 26. Archive maintenance: Back up archive
26.
BACK UP ARCHIVE
Basic considerations:
A general statement about how often you should backup data cannot be made.
This varies from case to case.
Duplicating stocks should only be seen as an additional long-term safety
measure, as this duplicating will not be continuous, but will only take place, e.g.
when a WORM plate is full.
The medium-term backup, which should monitor a system status at a certain
time, must take into account that an error, which may be caused by human
error, has crept into the system. But the transaction security in some networks is
not as high as one would like to see. This backup should generally take place at
the end of a work day either on MO plates or magnetic tapes. The risk can be
considerably reduced with this measure.
In large archives, changes and additions are constantly made. To keep this
work, which may not require a lot of memory, but which is important with regards
to content (e.g. resubmission dates etc.), secure in the system, continuous
backup of the documents and in particular of the management data must take
place, especially if there is a large circle of users. The most elegant solution is
probably the use of failure-safe hard disks. Mirrored disks or RAID systems,
which apart from mirroring also save abundantly and automatically recognize
and correct errors, are useful here.
Part 4: 26. Archive maintenance: Back up archive - 397 -
Data to be backed up?
There are different possibilities for backing up an archive:
To be backed up:
File
name in the directory ..
extension:
Profile data only for possible re- dat
import
for archive files
profile data with its management dat, ptr, rnr, id
files
for archive files
NCI documents (only sensible - svw
together with profile data)
- sdi, sdo
- for archive files
- for NCI archive
CI documents (only sensible - tvw
together with profile data)
- tdi, tdo
- for archive files
- for CI archive
the entire archive
for
- archive files
- help files
- NCI archive
- CI archive
[all]
For C/S :
in the subdirectories
- dbase
- form
- comm\server
- client
- 398 - Part 4: 27. Further tools: Move documents
FURTHER TOOLS
27.
MOVE DOCUMENTS TO CD-ROM
If you have to manage large quantities of documents, a sensible archiving
procedure would include placing the documents initially on the hard disk of the
archive server and moving them to optical disks after a certain period or a
certain number of documents.
Step by
Step
%
Backup
At first, backup the Dr.DOC archive. The data directories to be backed up can
be found in "management/edit archive parameter".
!
Current archive: move documents
Find records, select if required, click on the "Export" button on the select list and
choose "Move CI" or "NCI documents" and state map directory.
Example
Note
The maximum size of the document swap volume can be adapted to the capacity of the
swap data medium with the following entry in the archive.ini (in the Windows directory)
(Match case!):
[PEGASUS]
FREESPACE=500
Explanation: "FREESPACE=500" restricts the document swap volume to 500MB. This
size is recommended, as the profile data automatically exported with the documents
also takes up memory space. When the maximum document swap volume is reached, a
new swap directory can be entered or the process can be cancelled.
Part 4: 27. Further tools: Move documents - 399 -
"
Current archive: Complete reorganisation
Now reorganise the profile data and documents in the current archive.
#
Write CD
The swap directory (in the above example c:\docu1) is now written onto the CD
with a CD-writing software.
If the documents are moved to a subdirectory, the entire directory structure must be
written!
$
Important
Current archive: Adjust drive letter
Edit the archive files with the extensions svw (NCI documents) or tvw (CI
documents) with an editor (e.g. Notepad.exe) and change the drive letter in the
last line, e.g.:
2=C:\ Docu1 change in 2=X:\ Docu1,
"X" stands for the drive letter of the CD ROM drive.
If you use jukeboxes the data media identification must be inserted before the directory
path, e. g.:
2=C:\ Docu1 change in 2=X:\Disk1\Docu1.
(
Note
Identify CD
Now label the CD with the data media number.
)
Check result
Now check the swap process with document view of swapped documents. The
documents must be read by CD: If a jukebox is not used, a message appears
when viewing the document, stating the data media required.
"Please insert data media no. 2 into drive E: on"
*
Example
delete swap directory
Now delete the swap directory on the computer (in the above example
c:\docu1).
The location of the archived documents is noted program internally. If you additionally
would like an overview, you create a note in a field of the profile data. The quickest way
is to activate the "replace" function on the select list and enter the note in all records.
Tip
- 400 - Part 4: 27. Further tools: Move documents
Note
The basic path details for the CI/NCI documents remain untouched by the swap: All
documents newly archived from now on continue to be in the path stated under "edit
archive parameter...".
Part 4: 27-29. Further tools - 401 -
28.
UNSET ARCHIVE
"management/unset archive..." deletes all data (profile data and documents)
from an archive. The archive structure remains and can be filled with new data.
+
29.
Call "management/unset archive". You will be asked whether you
really want to delete all data. Confirm if you are sure.
DELETE ARCHIVE
An archive with all data, forms etc. may no longer be required and you may want
to delete it.
+
30.
Call the archive concerned as usual and then activate
"management/delete archive...". After a security query all files and
data belonging to this archive are deleted.
COPY ARCHIVE STRUCTURE
If you want to use the database settings (fields) of an archive for another
archive, call "copy archive structure" on the "management" menu and enter the
name of the new archive.
31.
HELP SELECTION AND MAINTENANCE
You can call the help menu at any time, if you require information
• on certain keywords (index),
• Topics (Topics)
- 402 - Part 4: 31. Help selection and maintenance
• or on the menu item, in which you are currently (context).
The standard help texts can be changed by the user at any time and archivespecific help can also be created.
31.1
Archive-specific help
Dr.DOC includes extensive help texts on all menu items, which can be called at
any time. But when inputting entries, e.g. into a literature archive, you may come
across a case where certain internal conventions have to be observed, which
not everybody working with this particular archive can always remember
correctly. Dr.DOC solves this problem by allowing the user to change the
standard help texts as required and thus enabling an archive-specific help to be
created. Important information specially for the standard help text in the
literature archive mentioned in the example can then be added to this archive.
The WHELP standard help is activated when calling an archive. Under
"Help/select help" you can select the path and name of another help file you
require.
If you want to create an archive-specific help or convert local help into central
help, enter the required new name and path. In the following file selection
dialogue enter the path and name of the help file to be copied. This will be the
"basic stock" for your new help.
Part 4: 31. Help selection and maintenance - 403 -
Archive-specific help for all
Tip
If you want to use an archive-specific help not only on the clients, but also on the server,
convert this help into a C/S archive. The individual steps for the conversion are included
in chapter 22.
You can also call an (existing) special help on an archive directly with the program or the
archive-call.
MORE INFORMATION IS INCLUDED IN CHAPTERS:
,
8.1
START
,
10
SELECT ARCHIVE
31.2
Change help texts
To change the help texts, move the cursor to the required position and enter
your text. Remember that a paragraph within a help text is created with Ctrl + ↵.
The required changes are applied with the "change" command.
Note
-
- 404 - Part 4: 32. Further tools: Deinstallation
32.
DEINSTALL DR.DOC
If Dr.DOC is to be completely removed from the computer, carry out the
following actions:
%
Start uninstall program:
Start the Dr.DOC uninstall program from the start menu or on the explorer from
the Dr.DOC system directory.
!
Select option:
1
2
1: Select this option to uninstall the complete program without any further
queries.
2: Select this option if only certain components are to be uninstalled.
"
Select components to be removed:
If you had selected the "Custom" option, you can now select files and directories
to uninstall.
Part 4: 32. Further tools: Deinstallation - 405 -
Select the corresponding entries in the list box. To select all entries, choose the
"Select All" command. The "Continue" command takes you to the next selection.
After the last selection, the program will be uninstalled.
Appendix - 407 -
APPENDIX
The appendix contains
a glossary
a description of possible error messages
an index
- 408 - Appendix: Glossary
GLOSSARY
The following briefly explains technical terms used in the manual. Links to other
terms within the glossary are identified with an arrow →.
ADF
Automatic Document Feeder: automatic document feeder for scanners and
copiers.
Archive
The term "archive" describes the data stock of an archiving solution, for
example a document collection, and the respective available process editing
potential, for example the interface to a word processing program.
ASCII
American Standard Code for Information Interchange: Coding of letters, digits
and special characters in →CI documents.
Resolution
Scan or print quality of a documents, stated in dpi (dots per inch: ).
Bit
Smallest information unit in the computer, which has the value 0 or the value 1.
Eight bits are called a →byte.
BMP
Bitmap-Picture: Graphic format under Windows and OS/2 for 1, 4, 8 and 24
→bit color depth.
Appendix: Glossary - 409 -
Byte
Sequence of 8 associated bits. The following further units are normal:
Kilo byte
Megabyte
Gigabyte
Terabyte
1 KB =
1 MB =
1 GB =
1 TB =
1024 Bytes
1024 KB
1024 MB
1024 GB
210 Bytes
220 Bytes
230 Bytes
240 Bytes
CAD
Computer Aided Design: Software for construction drawings.
CD ROM
Compact Disc Read Only Memory: Visual computer storage for the PC. The
data can only be read by the user, but not changed.
→WORM
Cl
Coded Information: Letters, digits, drawings etc. are saved in coded form (for
example wordprocessing documents, →CAD drawings, spreadsheet
documents) and can then be read by the computer.
→NCI
Client/Server
A special type of network mode enabling fully parallel working. Explanations and
recommendations on various application options are included in the installation
chapter.
Record
Saved → profile data with or without document. An →archive consists of a
certain number of records.
DDE
Dynamic Data Exchange: interface for exchanging data between different
application programs.
Decompression
Reversal of the →compression, for example when recalling compressed
archived documents.
- 410 - Appendix: Glossary
Digitalising
Transforming a paper document into a format that can be read by a computer.
→Scanner
Document
→CI/NCI file
dpi
dots per inch: →visual resolution of digital images
Image
Image of a document, which is for example scanned and filed as →NCI
document.
Index
Alphabetic list of terms structured as binary tree, which makes access possible
in seconds when searching.
JPEG
Joint Photographic Experts Group: Compression standard to reduce the
memory requirement of images.
Jukebox
Jukeboxes are storage and management location for visual data media.
Compression
Reducing the data volume of a NCI or CI document to be archived.
→Decompression
MO, MOD
Magneto Optical Disc: Magneto-optical storage disks, which in contrast to
→WORM disks can be written and deleted again by the user several times.
Multimedia
Combination of text, graphics, video and audio on the computer.
NCI
Non Coded Information: Documents saved as →image (image document).
Cannot be interpreted by computers (for example, letter scanned as image).
Appendix: Glossary - 411 -
→CI
OCR
Optical Character Recognition: Transforming image information (NCI document)
into text information that can be interpreted by the computer (CI document).
"Black dots" are converted into the meaning of the individual character.
PCX
PC-Paintbrush-Pixel format to support 1, 4, 8 and 24 →Bit color depth.
Profile data
Descriptive part of a record, in which mostly ordering features, e.g. reference
number, subject, officer etc. are entered for easy retrieval of the document.
Scanner
Electronic copier, which makes the captured image available as →digital image
and not on paper.
→NCI
Keyword
Search terms for a document describing its contents.
Thesaurus
"Dictionary" of possible entries in →profile data fields, which the user can refer
to at any time.
TlFF
Tagged Image File Format: Format of bitmap files. Supports 1, 4, 8, 24 and 32
bit color depth. This format has numerous compressing variants.
Hit list
Result of a search in a DMS.
Text retrieval
Search in a continuous text, which is not structured.
Wildcard
Variables (joker) for not closely defined characters in a search.
- 412 - Appendix: Glossary
Workflow
Automatic control of documents or processes.
WORM
Write Once, Read Many: Optical storage disks (CDs) which the user can write
once, but which can be read many times.
Appendix: Error messages - 413 -
ERROR MESSAGES
file name could not be loaded:
Error: In document/new a file was selected, which does not correspond to the
programapp (e.g. Winword file for app intern).
Procedure:Call "Settings/Doc.Association" on the main menu and correct the
details.
User xxx already has access to archive:
Error: A user (and password) was selected in user login, who already has
access to the archive concerned.
Procedure: Try accessing the archive with another user name you know.
If a user remained logged in when the program was not exited properly and thus
the message appears, another registration can take place. But be sure that you
only confirm a new login, if you are really sure that nobody is working with this
user name.
User has no access right:
Error: An incorrect user name was entered in user login.
Procedure: Correct the entry and match case.
It may be that the user does not have access to the archive concerned. The
header of the dialogue shows the archive for the query.
Please increase memory or reduce resolution:
Error: Memory problems have occured when archiving an image file.
Procedure: Check whether enough free memory is available and if required,
increase it and/or scan the image document with a lower resolution (dpi).
Please state destination directory:
Error: During installation a directory for copying to was not entered.
Procedure: Reenter command with destination directory.
Date fields only permitted for deadline calculation:
Error: A date field was defined as result field within the calculation definition
- 414 - Appendix: Error messages
without the calculation taking place with a deadline field.
Procedure: Call "Settings/calculation definition..." and correct the entry. If a date
field is a result field, one of the two calculation fields must be a deadline field.
File data.bmp does not exist:
Error: When transferring data, document pages were also applied. But the
selected template does not include a variable for importing documents.
Procedure: To import documents, the template must have the variables
**graphics** at the required position. Insert manually or automatically with the
key combination Ctrl+Shift+0.
File cannot be opened:
Error: May occur, e.g. after OCR with third-party application, if the file was not
placed in the local working directory.
Procedure: Archive the file manually: Call the "document/new" command and
find the file in the directory where it was placed. The directory and the file name,
which Dr.DOC requires for automatic archiving, is in the header of the new
record dialogue.
Record locked:
Error: A record was not closed properly and is now locked for editing.
Procedure: Call the "release record lock" option in "management/reorganise
archive".
Appendix: Error messages - 415 -
Dbase file ...dbf cannot be opened:
Error: When importing dbasedata, a file was entered that the program cannot
find.
Procedure: Check entry and correct.
The fields of this dbase file are incompatible with the import selection:
Error: The message may be displayed during dbase import.
Procedure: Check all fields of the archive and the dbase file for identical data
types and field types. For some earlier dbase versions the message may be a
result of memo-fields that cannot be imported. In this case try to load the dbase
file into another program. If this is possible (incl. memofields), save it as ASCII
or ANSI file and import it into the archive with ASCII/ANSI import. If this does not
work, you can import all fields except for the memo fields.
Duplications not permitted:
Error: An input duplicates check was defined to be carried out. Entries were
made, which are already in an existing record or a record was duplicated.
Procedure: Change entry, check and change field selection for input duplication
check if required or determine that a duplication check is not to be carried out.
Entries in the record do not correspond to the Thesaurus default:
Error: An entry was made manually in a field, which does not exist in the
Thesaurus. The message will only be displayed, if the "check automatically with
Thesaurus" option is activatedin "Settings/Thesaurus definition...".
Procedure: If you do not know which entries are permitted by the Thesaurus,
enter * in the corresponding field and activate the "Thesaurus" command.
- 416 - Appendix: Error messages
More than .. characters were selected:
Error: There was no character number entered in "select list" or "print tables" or
it was too large.
Procedure: Check entry: a maximum of 253 characters including blanks
between the columns are permitted.
Incorrect data type or format error:
Error: Entry does not correspond in a certain field with preset of the data type as
date or digit.
Procedure: Check entry and correct. If error message is shown repeatedly,
check whether an automatic fieldentry does not correspond to a data type
setting.
Error in scanner parameter:
Error: The selected setting in the scanner setup is incompatible with the
scanner.
Procedure: The message may occur, if "paper format A4, landscape" is
selected for an A4 scanner. Some scanner drivers also produce this message, if
there is not enough memory for the selected setting incl. resolution.
Error in field selection:
Error: An error occured in field numbering in sort field selection or print field
selection.
Procedure: Check entry. Ensure that the fields are numbered consecutively if
several tabs exist.
Scanning error:
Error: Importing image documents via a scanner was attempted without a
correct connection to the scanner.
Procedure: Check scanner connection.
Appendix: Error messages - 417 -
Error when saving - please check paths:
Error: When setting up or changing an archive, incorrect or non-existing
directory paths were entered.
Procedure: Check entry. If required, check whether the stated directories really
exist.
Field ... on page ... is a date field:
Error: A field with data type date was filled in an input mask. There is an entry
in this field that does not correspond to this data type.
Procedure: Check entry and correct. Refer to the various valid entry options for
dates in the DATA TYPE chapter.
The error may also occur, if a date field is defined as result field of a normal
calculation (date field only possible for deadline calculation).
No bar code found .. for section frame:
Error: Bar code recognition is activated, but no suitable frame available.
Procedure: The frame may be too small - set it again generously and try again.
No Thesaurus stated for this field:
Error: The Thesaurus command was selected in edit or new entry mode. The
cursor is in a field, for which no Thesaurus is defined.
Procedure: To apply Thesaurus entries, the path and name as well as the
connection fields and import fields must be stated in the field concerned in
"Settings/Thesaurus definition...". Please refer to the CREATE THESAURUS
chapter.
Help path/name could not be started:
Error: Several possibilities:
1. The program was started without the standard help being available in the path
with subdirectory \HELP stated at installation. No other help was stated when
the archive was started.
2. The program was started stating a help file which is unavailable.
Procedure: Dr.DOC always tries to start the standard help in the path with
subdirectory \HELP stated at installation. Exception: The archive was called
together with a special help file.
- 418 - Appendix: Error messages
Check whether if using standard help, it is in the path with subdirectory \HELP
stated at installation and install again if required (from the installation disk; do
not copy from other directories!). Or: Call the program according to the notes in
chapter 8.1 START with a certain help file.
Be aware that new help files are only created via "Select help", as path details
are incorrectly applied with other copying options!
Your network licence is only valid for ... user:
Error: An attempt was made to call the program at different workstations by
more users than permitted at the same time.
Procedure: The maximum number of users permitted for your program licence
at the same time is included under "Help/About Dr.DOC".
Thesaurus entry for field ... not found:
Error: "autoadopt" from the Thesaurus is defined for one or several fields.
When the record was saved, the program could not find a suitable entry.
Procedure: Check entries in the corresponding fields. Important: "No entry" is
regarded as "incorrect entry"!
Form could not be opened:
Error: The program tries to find a form, which is not yet activated.
Procedure: Select the "select form" command from the "Settings" menu to
activate the required form.
Appendix: Error messages - 419 -
Cannot open path\document.ext:
Error: The "documents" command was activated and the third-party application
was started with the document. This document was not closed. For the next
record, in which a document is to be called with the same third-party application,
this error message will be shown.
Procedure: Documents are always called as document.ext when calling via a
third-party application (ext stands for the respective extension defined for the
program). This file must first be closed, if another document is to be called with
this third-party application. Change to the third-party application with ALT+TAB
(in Dr.DOC you remain in edit-view) and close the file (the program itself does
not have to be terminated).
Cannot open source file (import):
Error: When importing an ASCII/ANSI file, a file was stated which the program
cannot find.
Procedure: Check entry and correct.
No memory:
Error: The OCR processing could not be executed.
Procedure: This message may be displayed after attempted OCR processing
and means that the OCR software could not read anything. Change the settings
and try again.
Password incorrect:
Error:An incorrect password or one that does not belong to the currently
displayed user was entered in user login.
Procedure: The password entry is shown encrypted on screen. Delete the
incorrect entry, then try again. Ensure you match case.
- 420 - Appendix: Error messages
Search term not found:
Error: A term was searched with the search functions, which does not exist in
the data or errors occured when logical associations or marginal data was
entered.
Procedure: Check entry and correct if required. Check the match case option if
required.
Thesaurus entry not unique:
Error: The "check Thesaurus" and "Autoadopt from Thesaurus" options are
activated. Nothing or an ambiguous search term was entered in a field, which is
linked to a Thesaurus.
Procedure: If "Autoadopt from Thesaurus" is to take place, the previous entry in
the field must be clearly allocated to one single Thesaurus entry.
Index - 419 -
INDEX
Path information 252
A
Archives
Access log 219, 291
Setup archive 249, 255
link 343
Archive Server
Additional information 207
Hardware 31
Definition 343
link 345
Annotations (Document) 181
Installation 41
ASCII (Table) 352
ASCII File
ANSI File
Export 356
Export 356
Import 108, 349
Import 108, 349
ASCII Import
Archive
Automatic Server ASCII Import 372
backup 392, 394
Author (field) 288
Change path information 251
Auto-Link 115
close 90
Automatic entry (automatic field) 305
copy structure 399
Automatic field 114, 131, 301, 414
create 216
Automatic entry 305
delete 399
conditional 302
Edit archive parameter... 246
File name 305
new in user set 278
Modifiable number generator 303
Overview information 392
Number generator 302
Preliminary considerations 213
Special features 301
reorganise 392
Rights 281
B
Term 16
Barcode
select 59, 74, 75, 95
Document separator 114, 132
Set path information 251
Recognition 133
set up 399
supported 133
Setup paths 246, 380
unset 399
Batch processing
automatic archiving 114, 131
archive.doc (WinWord) 198
File 113, 121, 131
Archive files 247
Scanner 114, 130, 131
- 420 - Index
Browse
in select list 169
Button
Client parameter 256
COLD
Import definition 368
on select list 243
import spool data 370
Search fields 160, 244
Overview 361
Button (field type) 243
Set Link 367
Setup Server 363
C
Spool import.ini file 363
Calculation
Definition 306
Calculation definition 306
Calculations
View ini file 366
Commentary
define 245
Term 245
Deadline 299
Communication (path) 254
Statistics 205
Complete reorganisation 392
Capitals 418
Compression 144
CD ROM
Container pool
Move document 396
Search archive 389
Central directory 334
Change 176
Change management 218, 289, 301
C/S archives 253
local archives 248
Container size
C/S archives 253
local archives 248
Change path information 380
Content Type (field) 221
CI archive 247, 252
Context field (term) 220
Client
Context help 88
Installation 43
Client/Server 33
Context menu 88
Continuous field 101
Client parameter 256
Continuous field (field type) 241
Communication path 254
control.txt (WinWord) 329
Convert archive 382
Convert
in local archive 388
CD ROM search archive 389
Installation 38
C/S into local archive 388
New archive 217
local archive in C/S 382
Path information 217, 251, 258
Correct 176
Select archive 95
Create messages 293
Server Program 73, 90, 212, 383
Currency
start 73
Find 157, 162
System administrator 212
Currency (data type) 223
temporary directory 257
Currency (data type) 297
Term 16
Currency range (data type) 297
Index - 421 -
D
DBASE
Data exchange 347
COLD 361
Data media
supported 32
data.txt (WinWord) 329
Data transfer
Export 359
Import 354, 413
DDE 117
Deadline (data type) 297
Delete
Archive 399
Archiving 248, 253
Elements 239
Connection 116
Frame configuration 141
Connection with WinWord 198
Definition 195
Field selection 331
Record 176
Delete
Record 175
for new entry 111
Delete source file 123, 250, 256
import document 198
Dialogue field
Install macro 330
File selection 71
Macro description 335
Digit (data type) 297
Preparations 329
Directory 71
Template 248, 253, 329
Doc.Source
Data transfer archiving 124, 198, 248,
253, 312
Data type 297, 355, 414, 415
Currency 298
File 122
OCR Scanner 129
Third party application 122
Document
Date 297
add annotations 181
Date/Time 298
archiving 112
Deadline 299
attach 184
Outline 300
Batch processing 113, 130
Range 159, 299
change 179
Data types 223
CI 115
Database field name 220
Compression 144
Database fields
delete 183
define 220
Database settings 225, 295
Overview 225
E-mail 201
Export 203
extend 183
Import 183
Date
Automatic field 301
Large image 171, 173
Find 157, 162
Link 112, 115, 121, 130, 170
Date (data type) 223, 297
lock 287
Date and Time (data type) 297
lock 186
Date range (data type) 297
NCI 115
- 422 - Index
Preview 171, 172
Entry 110
print 193
Redlining 181
E
release 186, 287
Elements
reorganise 393
delete 239
rotate 173
edit 239
insert 235
Set section 173
Small image 171, 172
E-mail 201
Source 118, 122, 129
Enter data 101
split (small image) 244
Error-tolerant search 156
swap 396
Exit program 90
Term 16
Export
Version management 219
ANSI 111, 356
View 170, 172
ASCII 111, 356
View (message) 293
DBASE 359
Zoom 173
Document 203
Document source 138
Field selection 356, 359
Dongle 40
New entry 111
Number field 359
Dr.DOC
Data format 348
Extension (field) 221
exit 90
Installation 33
F
legal 26
Field
Menu structure 79
delete content 106
Philosophy 19
Term 16
Prerequisites 66
Field rights 281, 288
remove from hard disk 402
Field selection
Screen setup 80
start 73
uninstall 402
DR.DOC
News 49
print tables 190, 318
Field selection
Automatic fields 301
Data export 356
Data transfer archiving 312
DRDOC (User) 261
Data type 297
DrDocTv (Macro) 329
DBASE export 359
DTC Options 143
Headings 316
Duplicates key 308
Import 354
Additional information 207
Duplication check 152, 156, 161, 309,
319, 413
Input duplication check 309
Key fields 308
maintain field entries 310
Index - 423 -
Mandatory fields 307
field-oriented 150, 158
Output duplication check 152, 319
field-oriented, with template 150
Print tables 318, 414
Find key 308
Select list 151, 315, 414
global 150, 154
Settings 225
Hypersearch 150, 165, 321, 343
Sorting 151, 317, 414
Index 308
Transfer data 331
logical 155, 160
Field selection for
Search template 162, 314
Field types 222
Match case 153
Message when searching field 293
phonetic 156
Buttons 243
Redlining 150, 154
continuous field 101, 241
Restrict number of hits 157
Image 244
restricting 150, 153
optional 82
Search limit 157
single-line field 101, 240
Table 162
Table 101, 242
Text retrieval 150, 154
with * 159
File
archive 122
with classes 155
import 120
with joker 155, 159
File archiving
Delete source file 250, 256
File format 71
with mandatory characters 155
with template 162, 314
with Thesaurus 162
File name 71
Find and replace 176
File name (automatic field) 301, 305
Find templates 162, 314
File pairs 372
Message 293
File selection dialogue 71
Folder 71
Find 418
Form rights 281
after buttons 160, 244
after limit data 159
Forms
create 231
after parts of words 159
Formula (Statistics) 205
Brief info 150
Formula 205
combined 160
Frame
Currency 157
change 141
Currency 162
define 245
Date 157, 162
delete 141
error-tolerant 156
Overview 140
Examples 163
save 140
excluding 160
Frame configuration
field-independent 150, 154
delete 141
- 424 - Index
G
Index 308
Glossary 406
important terms 16
Input duplication check 110, 309, 413
Input field
Graphics support 31
delete content 249, 255
Input mask
H
delete content 310
Headings 316
Help 88
print 319
Installation 33, 412
archive-specific 89
Archive Server 41
change 401
Client 43
Context help 88
Client/Server 38
create 400
Single user 34
Index 89
Standard network 47
reorganise 393
IPC Options 143
select 400
ISDN data counter check 374
Topics 89
Help files 247, 252
K
Hybrid system 19
Keyboard operation 85
Hypersearch 150, 165, 343
Keys
Create new search 321
create 308
define 321
Duplication 308
Link rule 322
Multiple 308
Search definition 165, 324
Reorganisation 392
Single 309
I
Keyword directory 89
Icon bar 83
Identifier (term) 220
L
Image (field type) 244
Large image 171, 173, 193
Image document preview 244
Legal status 26
Import
letter.txt 329
ANSI 349
Link 112, 115, 121, 170
ANSI 108
automatic 115
ASCII 349
Entry 117
ASCII 108
Internal 124
DBASE 354
Macro for data transfer 117
Field selection 354
WinWord 8.0 118
File 120
Link rule 322
Image 126
List box entries (max. number) 169
Paper templates 125
Local working directory 248, 254
Index - 425 -
delete 303
Lock
Document 186, 287
Log file 393
modifiable 303
Numeric (data type) 223
Numeric range (data type) 297
M
Maintain field entry 106, 310
O
Mandatory field entry 97, 307
OCR
change scan job 135
Manual
Information 13
create scan job 135
define frame 138
Mask
select 96
delete scan job 135
Term 16
display image 135
Match case 94, 153
edit result 134
Memory space 411
edit results 147
Menu structure 79
Error recognition 147
Modifiable number generator
Fonts Training 146
delete 305
Formatting 147
Mouse 31
Frame analysis 148
Multiple key 308
Languages 146
Page analysis 147
N
print image (text type) 147
NCI archive 247, 252
Recognition quality 134
Network mode 250
Scan job dialogue 135
Network mode
Stop word list 146
C/S 256
New entry 101
User alphabet 146
OCR processing 133
Batch processing 113, 130
Stop word list 133
display image 135
OCR settings 146
export 111
OCR Software 126
log 288
Operating system 31
Mandatory field entry 97, 307
Outline (data type) 223, 297, 300
print 111
Output duplication check 152, 156, 161,
Profile data 101
319
Record 101
Overwrite mode 106, 310
transmit data 111
Owner
Number field 359
Automatic field 301
Number generator
Automatic field 301
P
create 302
Password 93, 417
- 426 - Index
find and replace 176
Path information
Data transfer archiving 248, 253
New entry 101
Data transfer template 248, 253
print 188
Local working directory 248, 254
print tables 190
print tabs 192
Path information
Archive files 247, 252
reorganise 393
Archive parameter Client/Server 251
Term 16
change 380
Profile data reorganisation 392
CI archive 247, 252
PUBLIC (user) 261
Help files 247, 252
NCI archive 247, 252
R
phonetic search 156
Range data type 159, 299
Preview 171, 172, 244
Range search 159
Print image (Text Type) 147
Record
Author 288
Print
Document 193
change 175, 176, 218, 289
Field content 191
copy 109
Field selection 190, 318
delete 175, 176, 178, 399
new entry 111
duplicate 109
Paper feed 319
locked 412
Partial selection 189
New entry 101
print tables 190
Number (information) 392
print tabs 319
Permissions 218
Profile data 188
print tables 318
Redlining 182, 194
print tabs 192, 319
Statistics 206
Term 16
Tab 192
Record rights 281
to file 189
Records
Print tables 190, 318
Print tabs
Selection 319
Printer
reorganise 392
Redlinig
print 182
Redlining 181
setup 187
find 150, 154
supported 31
print 194
Profile data
change 174
Relational association 207, 343
Release
delete 174
Document 186
E-mail 201
Release (document) 287
View 168
Removable disk system 32
Index - 427 -
Reorganisation
Server Program 90
complete 392
Set section 173
Documents 392
Settings
Keys 392
DTC Options 143
Profile data 392
IPC Options 143
Track changes 393
Resolution 143
Resolution 143, 411
Restrict number of hits 157
Threshold recognition 143
Setup archive
Restricting search 150, 153
Rotation 135
Procedure 215
Single key 309
Single-line field 101
S
Single-line field (field type) 240
Scan jobs 135
Single text 197
Scanning 125
Single user 33
Scanner 112
supported 31
Installation 34
Small image 171, 172
Scanner Setup 143
Small letters 418
Scanner selection 126, 143
Sorting 317
Screen setup 80
Search
Date 153
Field selection 151
Spellings, used in the manual 15
Split (small image) 244
Search definition 324
Spool data 370
Search fields 150, 158
Spool import.ini file 363
buttons 160, 244
Standard letter 197
Message 293
Standard network 33
Range relative to system date 160
Start program 73
System date 160
Statistics 205
with template 150
Formula 205
Search mode 175
print 206
Search key 308, 413
Stop word list 133, 146
Search template 162, 314
String (data type) 297
Select list 169, 284
System administrator 211
Button as column 243
System date
Field selection 151, 315
Search field 160
max. number of entries 248, 254
Sorting 151
Selection (data type) 223
Separators 348, 352, 358
data.txt 336
T
Tab 101
print 192
Term 16
- 428 - Index
Table 101
View 80, 81
Find 162
in data transfer 332
U
in print tables 320
Uninstall 402
Table (field type) 242
User
allocate archive 280
Tables
Heading 316
automatic login 276
on select list 316
change 275
Select list 151
C/S Info 277
DRDOC 261
Tabs
new 272
create 233
PUBLIC 261
Technical specifications 31
Rights 281
Template source 138
Temporary directory 257
User (automatic field) 301
Text field (data type) 223
User (data type) 297
Text retrieval 124, 150, 154
User login
Change 266
Text template 412
New 265
create 333
NT login name 265
Thesaurus 102, 338, 415
automatic check 103, 340
User group
apply automatically 103, 340
allocate archive 280
apply manually 340
change 275
connect 339
new 272
create 338
Rights 281
Definition 338
User manager 76, 93, 261, 283
delete link 341
User set 74, 93, 175, 261
Find with 162
Brief instructions 264
Term 16
delete 271
Enter archive 278
Thesaurus
new 270
Term 409
Thesaurus definition 415
open 271
Third party application 122
Properties 271
Threshold recognition 143
select 75
Thumb nail 244
Setup archive 249, 255
Time (automatic field) 301
Using the mouse 85
Time (data type) 223
Track changes 219, 249, 255, 282, 289
V
Tree view
Version management 219, 259
Configuration 81
Video images 112
Index - 429 -
Viewer 115, 124
edit single text 198
import document 333
W
Standard text
Windows 66
Windows operation 67
WinWord 329
Word processing
Control record file 333
edit 198
Template
create 333
Work mode 175, 249, 255, 285
- 430 - Finally
FINALLY
"Extensions"
There are various "extensions" of Dr.DOC:
Dr.DOC E
Dr.DOC N
Single user version for managing any number of documents
per archive
Network version incl. Client/Server
Both versions include a learnable professional OCR module with DTC/IPC
scanner settings, line algorithm, form management, barcode recognition etc. as
standard.
Additional module
C-programming interface for users, who themselves want to make further
developments on the basis of Dr.DOC .
Service
[email protected]
Requests and Suggestions
Your opinion counts! Please send us your suggestions so the next Dr.DOC
version can be optimised further.
®