1
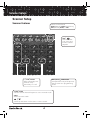
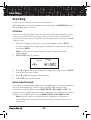
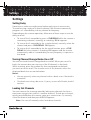
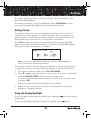
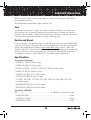
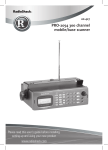
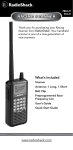
20-136 PRO-136 Desktop Radio Scanner Thank you for purchasing your 200 Channel Desktop Radio Scanner from RadioShack. Please read this user’s guide before installing, setting up and using your new scanner. What’s Included Scanner AC adapter Antenna User’s guide Preprogrammed frequency list Quick start guide www.radioshack.com Contents Scanner Setup ................................................................................ 4 Scanner Features .................................................................................................4 Connecting the Antenna......................................................................................6 Powering Your Scanner........................................................................................6 Installing Batteries...........................................................................................6 Battery Notes.................................................................................................7 Recycle Rechargeable Batteries....................................................................7 Scanner Placement..............................................................................................7 Connecting Headphones .....................................................................................8 Listening Safely ................................................................................................8 Connecting the External Alert Out .....................................................................8 Understanding Your Scanner ..............................................................................8 Turning on the Scanner........................................................................................9 Setting the Clock/Alarm......................................................................................9 Alarm Function .............................................................................................. 10 Programming Frequencies into Channels ..................................................... 10 Searching ..................................................................................... 12 Fine Tune............................................................................................................. 12 Service Bank Search......................................................................................... 12 Storing Frequencies Found During a Search ................................................. 13 Search Skip Memory......................................................................................... 13 Search Speeds ................................................................................................... 14 Scanning....................................................................................... 15 Scanning Stored Channels............................................................................... 15 Manually Selecting a Channel ......................................................................... 15 Weather Scan..................................................................................................... 16 2 Contents Receiving NWR-SAME and Weather Alert Signals ....................................... 16 Turning On the Digital Weather Alert Feature .......................................... 16 Receiving Alerts in Standby Mode...............................................................17 Testing the Weather Alarm...........................................................................17 3URJUDPPLQJ$OHUWVIRUD6SHFLÀF&RXQW\.................................................17 Programming FIPS .....................................................................................17 Skywarn .............................................................................................................. 18 About Skywarn .............................................................................................. 19 Settings ........................................................................................ 20 Setting Delay ...................................................................................................... 20 Turning Channel-Storage Banks On or Off..................................................... 20 Locking Out Channels....................................................................................... 20 Setting Priority ................................................................................................... 21 Using the Display Backlight ............................................................................. 21 Advanced Programming ................................................................. 22 Cloning Your Scanner........................................................................................ 22 Wired Programming.......................................................................................... 23 Additional Information................................................................... 24 FCC Notice .......................................................................................................... 24 Scanning Legally................................................................................................ 24 Care ..................................................................................................................... 25 Service and Repair ............................................................................................ 25 6SHFLÀFDWLRQV.................................................................................................... 25 Troubleshooting ................................................................................................. 27 Resetting your Scanner................................................................................ 27 3 Scanner Setup Scanner Setup Scanner Features Select a service band: MAR (Marine), FD/PD (Fire/Police), AIR (Aircraft), HAM, or FM. WX / Start a weather scan. Press and hold to activate Skywarn. • / CLR / DELAY Enter a decimal point. Clear an entry. Turn delay on or off. ENT (Enter) / PROGRAM Complete the entry of frequencies. Put the scanner in programming mode. SCAN / MAN Scan the stored channel frequencies. Go to manual mode. SRCH Start a fine tune search. S/T Search up and down in a fine tune or service search. 4 Scanner Setup PRI (Priority) / WX ALERT Turns the priority function on or off. Press to turn weather alert on and off. L/O Lockout selected channels or skip specified frequencies during a search. PSE (Pause) Stop and resume search or scan. 0-9 Input a number. Press to turn the backlight on for 15 seconds. Press and hold to turn the backlight on and off. POWER Press and hold to turn the scanner on or off. Alarm Switch Set to Off to disable alarm. Set to Radio to enable the radio alarm. Set to Tone to enable the tone alarm. Clock Switch Set to Alarm Set to set the alarm time. Set to Clock Set to set the current time. Set to Clock to display the current time. 5 Scanner Setup Connecting the Antenna Attach the supplied antenna to the scanner by aligning the arrow on its base with the tab on the scanner’s BNC connector and then pressing into place. When using an external antenna, always connect with 50-ohm, RG-58, or RG-8 coaxial cable. If the antenna is over 50 feet from the scanner, use RG-8 low-loss dielectric coaxial cable. If your antenna’s cable does not have a BNC connector, your local RadioShack store carries a variety of BNC adapters. Powering Your Scanner DC 12V Jack Insert the supplied AC adapter’s barrel plug into the power jack on the back of the scanner. Plug the adapter into a standard household outlet that supplies 120V AC, 60Hz. Do not plug the adapter into a switch-controlled outlet. Installing Batteries 1. Remove the battery compartment cover. 2. Insert three AA batteries (not included) into the battery compartment, matching the polarity symbols (+ and –) marked inside. 3. Replace the cover. 6 Scanner Setup Battery Notes • Use fresh alkaline AA batteries. • Rechargeable batteries can be used, but battery life is shorter than with alkaline batteries. The scanner will not recharge batteries in the compartment. • Always remove old or weak batteries. Batteries can leak chemicals that destroy electronic circuits. • Do not mix old and new batteries, different types of batteries (standard, alkaline, or rechargeable), or rechargeable batteries of different capacities. • The batteries are intended to provide backup power for the clock and for scanning for a short time. When the backup batteries becomes too low, appears. Promptly replace the batteries. • When you either install batteries or connect the AC Adapter to a standard wall outlet, the scanner powers on and goes to STANDBY mode. The display shows the initial clock time of 12:00 AM. The scanner remains in STANDBY mode. Recycle Rechargeable Batteries Placing rechargeable batteries in the trash can be harmful to the environment. Instead, recycle old rechargeable batteries at your local RadioShack store free of charge. RadioShack participates in the RBRC© battery recycling program, and is committed to preserving the environment and conserving natural resources. Call 1-800-THE-SHACK (1-800-843-7422) for more information. Scanner Placement • Do not use the scanner in high-moisture environments such as the kitchen or bathroom. • Avoid placing the scanner in direct sunlight or near heating elements or vents. • If your scanner receives interference or electrical noise, move the scanner or its antenna away from the source. You might also try changing the height or angle of the antenna. 7 Scanner Setup Connecting Headphones For private listening, you can plug a mono earphone or headset into the Headphone Jack on the back of your scanner. This automatically disconnects the internal speaker. Note that the sound is not in stereo. Listening Safely To protect your hearing, follow these earphone or headphones guidelines: • Do not listen at extremely high volume levels. Extended highvolume listening can lead to permanent hearing loss. Headphone Jack • Set the volume to the lowest setting before listening. Turn on the scanner, and adjust the volume to a comfortable level. • After you set the volume, do not increase it. Over time, your ears adapt to the volume level, so a volume level that does not cause discomfort might still damage your hearing. Alert Out Jack Connecting the External Alert Out To provide additional alerting options for the weather alert, connect a switch-closure activated device such as a strobe or siren controller (not supplied). The devise can be up to 200mA, AC/DC 20V and must have a 3.5mm mono plug cable. Plug the device into the Alert Out Jack on the back of your scnner. Understanding Your Scanner We use a few simple terms in this manual to explain the features of the scanner. Familiarize yourself with these terms and the scanner’s features, and you can put the scanner to work for you right away. The scanner scans conventional frequencies. A frequency, expressed in MHz, is the tuning location of a station. To find active frequencies, use the search function or consult an online resource such as www.radioreference. com. 8 Scanner Setup Besides searching within a selected frequency range, you can also search your scanner’s service banks. Service banks are preset groups of frequencies categorized by the type of services that use those frequencies. The scanner is preprogrammed with all the frequencies allocated to the Marine, Aircraft, Police (Fire/Emergency), Ham and FM services. When you search and find a desired frequency, you can store it into a programmable memory location called a channel. Channels are grouped into channel-storage banks. Your scanner has 10 channel-storage banks (numbered 0-9). Each bank contains 20 channels (numbered 0-19), for a total of 200 channels. You can scan the channel storage banks to see if there is activity on the frequencies stored there. Note: Search for frequencies to find your local frequencies, after you have programmed these frequencies into channels, you can scan the channels. Use each channel-storage bank to group frequencies. For example, the police department might use four frequencies in your town while the fire department uses an additional four. You could program the police frequencies in bank 0, and program the fire department frequencies in bank 1. Turning on the Scanner 1. Turn SQUELCH fully counterclockwise. 2. Press and hold the POWER button to turn on your scanner. Turn up the VOLUME until you hear a hissing sound. 3. Turn SQUELCH clockwise until the hissing stops. Note: Make sure the antenna is connected before you turn on the scanner. To perform a quick check of scanner operation, press the WX/ key. If you are near a NOAA weather station, you should hear weather information. Setting the Clock/Alarm Your scanner’s clock displays whenever you turn off the radio functions. It can also be used as an alarm clock. To set the clock time: 1. Slide the Clock Switch to Clock Set. 9 Scanner Setup 2. The hour digits flash. Press T or S or press the number keys to enter the hour. Then press ENT/PROGRAM to set. 3. The minutes digits flash. Press T or S or press the number keys to enter the minutes. Press ENT/PROGRAM to set. Note: When setting the clock minutes, the seconds digits are reset to 00 to enable accurate time adjustment. 4. AM/PM flashes. Press T or S to select AM or PM. Press ENT/PROGRAM to set. 5. To save your selection, slide the Clock Switch to Clock. 6. To set the alarm, slide the Clock Switch to Alarm Set and repeat steps 2-5. Alarm Function • Slide the Alarm Switch to Tone, if you want the alarm to sound a tone at the set time. • Slide the Alarm Switch to Radio if you want the alarm to sound with the channel that was previously selected in Scan Mode. The radio alarm will only sound in Standby Mode. • To silence the alarm, slide the Alarm Switch to Off. If you do not turn off the alarm, it will sound for 20 minutes then reset to alert you again the following day. Programming Frequencies into Channels Before the scanner can begin to scan, you must program a frequency into at least one channel. To locate and store specific frequencies into channels for later use: 1. From Scan Mode, press SCAN/MAN to stop scanning. 2. Press ENT/PROGRAM to put the scanner in programming mode. PGM appears. 3. Use the number keys to enter both the channel storage bank and the channel number you want to assign to a frequency. 4. Press SCAN/MAN. 10 Scanner Setup BANK 1 PGM DLY Example shows entering bank 1 channel 00. Note: If you entered an invalid bank or channel number, Error appears and the scanner beeps. Enter a valid bank or channel. 5. Use the number keys to enter the frequency, pressing •/CLR/DELAY for the decimal point. 6. Press ENT/PROGRAM to store the frequency into the channel. 7. To program the next channel in sequence, press S or T and repeat Steps 5 and 6. Notes: • If you entered an invalid frequency in Step 5, Error appears and the scanner beeps. Enter a valid frequency. • If you entered a frequency in Step 5 that already exists on another channel, the scanner beeps and displays that channel. Press •/CLR/ DELAY to clear the display, or press ENT/PROGRAM to store the frequency in both channels. • The scanner automatically rounds the entered number to the nearest valid frequency. For example, if you enter 151.473 (MHz), your scanner accepts it as 151.475. • After a transmission, the scanner automatically pauses for 2 seconds on the channel before proceeding to the next active transmission. Press •/CLR/DELAY to turn the delay function on or off. The scanner stores this setting in the channel. If you do not have a list of frequencies in your area, you can use a fine tune or service search to find transmissions. You can also use an online resource such as www.radioreference.com. 11 Searching Searching Use the search function to find active frequencies. While doing a fine tune or service bank search, press •/CLR/DELAY to turn the 2-second delay on or off. Fine Tune You can search up or down from the currently displayed frequency using a fine tune search. Searching stops when a transmission is found and resumes after the transmission ends (searching resumes after two seconds if delay is on). 1. When the frequency you want to start from appears, press SRCH. Or, from search pause mode, enter a frequency using the number keys, then press SRCH. Note: If you enter an invalid frequency, the scanner beeps and displays Error. 2. SRCH, PAUSE, and -t- appear. SRCH DLY PAUSE 3. Press T or S to move up or down one frequency step. Or press SRCH to start the fine tune search. 4. Press T or S to change search direction. 5. Press PSE to pause the search. Service Bank Search The scanner is preprogrammed with all the frequencies allocated to Marine, Police (Fire/Emergency), Aircraft, Ham, and FM radio transmissions. To search the service banks, press MAR, FD/PD, AIR, HAM, or FM. The current service symbol appears and the scanner starts searching. To select a different service bank, press desired MAR, FD/PD, AIR, HAM or FM. Note: Because there are many different frequencies allocated to Ham and Aircraft, it can take several minutes to search all the service frequencies. 12 Searching Storing Frequencies Found During a Search To store frequencies you find in a fine tune or service bank search: 1. Press PSE at the frequency you want to store. 2. Press ENT/PROGRAM to enter programming mode. 3. The screen flashes, alternating between the smallest empty channel number in the current bank, 000.000, and the frequency you want to store. BANK0123456789 4. PGM If you want to change the bank, enter the bank number using the number keys. Note: If there are no empty channels, the scanner selects the first channel in the bank. 5. If you want to change the channel, Press T or S. 6. Press ENT/PROGRAM to store the frequency or •/CLR/DELAY to cancel. Note: If the same frequency already exists on another channel, the scanner beeps and displays that channel. Press •/CLR/DELAY to cancel, or press ENT/PROGRAM to store the frequency in both channels. Search Skip Memory You can skip up to 50 unwanted frequencies during a fine tune or service bank search. Note: You cannot skip frequencies during WX service search. To skip a frequency, press L/O when the scanner stops on the frequency during a search. The scanner stores the locked-out frequency in memory and automatically resumes the search. To clear a single frequency from skip memory: 1. Press PSE to stop the search. 2. Press T or S to select the frequency. L/O appears. 13 Searching 3. Press L/O. L/O disappears. To clear all skipped frequencies at once: 1. While searching, press PSE. 2. Hold down L/O until the scanner beeps twice. Notes: • If you select more than 50 frequencies to skip, each new frequency replaces a frequency previously stored, beginning with the first stored frequency. • Press T or S to select a skipped frequency during pause. L/O appears when you select a skipped frequency. Search Speeds The scanner has two search speeds: Normal search at 55 steps/second and Hypersearch at 125 steps/second. Hypersearch applies only to the 5 kHz step bands (25–27.995 MHz, 28–54 MHz, and 137–174 MHz). 14 Scanning Scanning Scanning Stored Channels Press SCAN/MAN to begin scanning your programmed frequencies. SCAN scrolls across the display and the scanner scans through all non-locked channels in the activated banks. Select any combination of banks to scan by pressing the corresponding number keys. The bank numbers appear at the top of the display. The bank number which is currently being scanned blinks. When the scanner finds a transmission, it stops on it. BANK0 23 5 789 DLY When the transmission ends, the scanner resumes scanning. If it is a long transmission and you want to move on, press S to resume scanning. If you press PSE when the scanner stops on a transmission, the scanner goes to manual mode. Press PSE or SCAN/MAN to resume scanning. Notes: • If you have not stored any frequencies into channels, the scanner does not scan. • If the scanner picks up unwanted partial or weak transmissions, turn SQUELCH clockwise to decrease the scanner’s sensitivity to these signals. • To listen to a weak or distant station, turn SQUELCH counterclockwise. • To ensure proper scanning, adjust SQUELCH until the audio mutes. Manually Selecting a Channel You can continuously monitor a single channel without scanning. This is useful if you want to monitor a specific channel or if you hear an emergency broadcast and do not want to miss any details, even though there might be periods of silence. To directly access a channel: 1. Press SCAN/MAN to stop scanning. 2. Enter the bank and channel number and press SCAN/MAN. The selected channel appears. 15 Scanning To stop at a channel while scanning: 1. Press SCAN/MAN to stop scanning. 2. Press T or S to select the next or previous channel. 3. Press SCAN/MAN to resume scanning. Weather Scan To scan for weather transmissions: . WX appears. Change the scan direction by using T or S. 1. Press WX/ 2. To stop the scan, press PSE. PAUSE appears. PAUSE WX Receiving NWR-SAME and Weather Alert Signals The National Oceanic and Aerospace Administration (NOAA) broadcasts alerts that include digitally encoded data. The severity of the alert is identified using Specific Area Message Encoding (SAME). The scanner displays the SAME alert level and sounds an alert for each level: Warning level, Watch level, or Advisory level. To program your scanner to alert you when the weather service issues an alert, turn on the alert feature and then leave the scanner monitoring the weather service in Manual Mode. You cannot scan weather channels and monitor for weather alerts at the same time. Turning On the Digital Weather Alert Feature 1. Press WX/ to start the weather scan. 2. Press PRI/WX ALERT. ALERT appears. This mutes the audio until the scanner receives a SAME-coded signal. ALERT WX 16 Scanning When the scanner receives a SAME-coded signal, ALERT flashes and the SAME alert level appears, alternating with the weather channel. The scanner will also output an alert signal to the external alert output jack. The scanner remains on the weather channel and the audio turns on so you can hear the weather broadcast. Receiving Alerts in Standby Mode The scanner can receive alerts even if it is in standby mode (power off). To receive alerts in standby mode, first turn on the Digital Weather Alert Feature and then press POWER to turn the scanner off. The display indicates the weather channel being monitored for alerts. If an alert is received, the scanner sounds an alert tone and the SAME alert level is displayed. To have an external device activate during an alert, plug it into the Alert Output Jack on the back of the scanner. Testing the Weather Alarm To hear and test the tones for the three alert levels, press WX/ to select the weather service, then hold down PRI/WX ALERT for about one second. The tones sound in the order of Advisory level, Watch level, then Warning level. Press any key to end the test sequence. Programming Alerts for a Specific County To specify a county, SAME uses a standard established by the US Census bureau, called FIPS. The format of a FIPS code is “PSSCCC,” where: P = area subdivision (0=entire area) SS = State code (00=all states) CCC = County code (000=all counties) For example, the FIPS code for Tarrant County, Texas is: 048439 (0=entire area; 48=Texas; 439=Tarrant County). To limit weather alerts to a specific area, you must program in the FIPS codes for the areas you want to receive alerts. The scanner can be set to either alert for all areas, or only an area you have programmed. Programming FIPS 1. Press WX. And then press PSE to go to the Weather Scan Pause Mode. 2. Press and hold ENT/PROGRAM to go to the FIPS Programming Mode. If the scanner is set to alert for all FIPS, ALL FIPS appears in the display. 17 Scanning PGM WX 3. Press T or S to select F0 to F14. If a FIPS code is not programmed, ------- appears. 4. Use the keypad to enter the FIPS code. 5. Press ENT/PROGRAM to store the FIPS code or press •/CLR/DELAY to clear inputted FIPS code. PGM WX 6. To set the scanner so it alerts you when you receive any FIPS code, press T or S to select All FIPS, then press ENT/PROGRAM. The scanner returns to Weather Scan Pause Mode. 7. To set the alert only for one of the areas you have programmed, press T or S to select F0 to F14, then press ENT/PROGRAM. The scanner returns to Weather Scan Pause Mode. To clear a FIPS code: 1. In FIPS Programming Mode, press T or S to select F0 to F14. 2. Press 0 and then press ENT/PROGRAM. ------ appears. PGM WX Skywarn The Skywarn function lets you jump directly to the last channel in memory (Bank 9, Channel 19) from any mode by pressing and holding WX/ . The scanner goes into manual mode and starts receiving transmissions in the last channel. 18 Scanning Note: Before using this feature, enter the local Skywarn frequency for your area into Bank 9, Channel 19. (See “Programming Frequencies into Channels.”) The scanner has 10 channels for Skywarn: Bank 9, Channels 10-19. Press T or S to select other Skywarn channels. Press SCAN/MAN to exit Skywarn. Note: If no frequencies are programmed in the Skywarn channels, No Prg appears and the scanner sounds an error tone. About Skywarn Skywarn is an organized group of trained weather observers. A Skywarn group exists in virtually every US County with a significant population. During inclement weather, reports made by Skywarn observers include information about: • Pea-sized and larger hail • Wind and wind gusts of 40 MPH and greater • Heavy rainfall • Lightning (cloud-to-cloud and especially cloud-to-ground) • Wall clouds seen in severe thunderstorms (which spawn tornadoes) • Severe lowering of a wall cloud • Turbulence in a wall cloud • Funnel clouds • Tornadoes • High water areas • Downed power lines • Other emergency conditions that affect life or property Listen to NOAA for weather alerts and warnings, watch box notices, and weather-forecasts. Listen to Skywarn to hear trained observers in your vicinity call in official reports to a net control station which relays those reports to NOAA and other emergency agencies. Note: If you tune to a Skywarn frequency when the Skywarn net is not active, you may hear nothing, or you may hear amateur radio operators talking on a local repeater system. 19 Settings Settings Setting Delay Sometimes a radio user might pause before replying to a transmission. To avoid missing a reply on a specific channel, the scanner automatically programs a 2-second delay into any channel or frequency. Depending on the scanner operation, follow one of these steps to turn the delay on or off. • To turn off the 2-second delay, press •/CLR/DELAY while the scanner is monitoring a channel, scanning, or searching. DLY disappears. • To turn on the 2-second delay for a single channel, manually select the channel and press •/CLR/DELAY. DLY appears. • To turn on the 2-second delay for the search function, press •/CLR/ DELAY while the scanner is searching. DLY appears and the scanner automatically adds a 2-second delay to every frequency it stops on in that band. Turning Channel-Storage Banks On or Off You can turn each channel-storage bank on and off. When you turn off a bank, the scanner does not scan any of the 20 channels in that bank. While scanning, press the number key that corresponds to the bank you want to turn on or off. The scanner scans all the channels within the displayed banks that are not locked out. Notes: • You can manually select any channel within a bank, even if that bank is turned off. • One bank must always be active. If you try to turn off all banks, bank 0 remains. Locking Out Channels You can increase the scanning speed by locking out channels that have a continuous transmission (such as a weather channel). To lock out a channel, quickly press L/O when the scanner stops on a transmission. Or, manually select the channel and then press L/O. L/O appears. Note: You can still manually select locked-out channels. 20 Settings To remove the lockout from a channel, manually select the channel, then press L/O. L/O disappears. To unlock all channels in the selected banks, press SCAN/MAN to stop scanning, then hold down L/O until the scanner beeps twice. Setting Priority The priority feature lets you scan through the channels and still not miss important or interesting calls on specific channels. You can program one stored channel in each bank as a priority channel. The scanner checks the designated priority channel every two seconds in each bank. Press PRI during scanning to turn the priority feature on and off. Pri ON appears for several seconds when priority is turned on. And Pri OFF appears for several seconds when priority is turned off. BANK0 23 5 789 DLY Note: If you have locked out all priority channels, All Loc appears when you activate the priority feature. The scanner automatically designates each bank’s first channel (Channel 00) as its priority channel. To select a different channel as the priority channel: 1. From Scan or Manual mode, press ENT/PROGRAM. 2. Press T or S to select the channel you want to set as priority, then press and hold PRI/WX ALERT until the scanner beeps twice. Or, enter the bank and channel number you want to set as priority and then press PRI. P appears to the left of the selected channel number. 3. Repeat Steps 1 and 2 for the channel in each bank that you want to program as a priority channel. Using the Display Backlight To turn the display backlight on and off, press and hold beeps twice. To turn on the display backlight for only 15 seconds, press 21 until the scanner briefly. Advanced Programming Advanced Programming You can clone your scanner by transferring the programmed data to or from another PRO-136 scanner using a connecting cable. You can also upload or download programmed data from a PC through wired programming. Cloning Your Scanner You can clone all the frequencies in your PRO-136 to another PRO-136 or PRO-135 using an optional interface cable with 1/8-inch phone plugs on both ends. PC/IF Jack 1. Make sure the scanners are turned off and then plug the cable into each scanner’s PC/IF jack. 2. Turn on both scanners. WirEd and PGM appear. PGM 3. Press T or S on the scanner from which you want to send frequencies. This is the “master unit.” The receiving scanner is the “slave unit.” 4. Press ENT/PROGRAM on the master unit to send the data. SEnd and the transfer progress are displayed in the master unit. BANK0 1 2 3 PGM 22 Advanced Programming CLONE and transfer progress are displayed on the slave unit. BANK0 1 2 3 PGM 5. When the data transfer is completed, donE appears on both units. If the transfer was not successful, Error appears. To clear the error, press •/CLR/ DELAY and go back to step 2. 6. After the clone operation is complete, remove the cable, turn both units off and then on again. Wired Programming You can transfer programming data to your scanner using your PC, an optional interface cable, and software (available at your local RadioShack or www.radioshack.com). 1. Make sure your scanner is turned off. 2. Connect the interface cable to your computer and then connect the other end of the cable to the scanner’s PC/IF jack. 3. Install the software to your computer and run the program. 4. To set up the program, click on Tools, select Configuration, and select PRO-136 (if necessary). 5. Turn the scanner on. The scanner automatically goes into the wired programming mode. WirEd and PGM appear. When the scanner begins to communicate with the PC, PC flashes. PGM 6. PC stops flashing when the scanner has successfully received all data. Turn the scanner off and remove the cable. 7. Turn the scanner on again. 23 Additional Information Additional Information FCC Notice Your scanner might cause radio or TV interference even when it is operating properly. To determine whether your scanner is causing the interference, turn off your scanner. If the interference goes away, your scanner is causing it. Try the following methods to eliminate the interference: • Move your scanner away from the receiver. • Connect your scanner to an outlet that is on a different electrical circuit from the receiver. • Contact your local RadioShack store for help. In some areas, mobile use of a scanner is unlawful or requires a permit. Check the laws in your area. This device complies with Part 15 of the FCC Rules. Operation is subject to the following two conditions: (1) This device may not cause harmful interference. (2) This device must accept any interference received, including interference that may cause undesired operation. Scanning Legally Your scanner covers frequencies used by many different groups including police and fire departments, ambulance services, government agencies, private companies, amateur radio services, military operations, pager services, and wireline (telephone and telegraph) service providers. It is legal to listen to almost every transmission your scanner can receive. However, there are some transmissions you should never intentionally listen to. These include: • Telephone conversations (cellular, cordless, or other private means of telephone signal transmission) • Pager transmissions • Any scrambled or encrypted transmissions According to the Electronic Communications Privacy Act (ECPA), as amended, you are subject to fines and possible imprisonment for intentionally listening to, using, or divulging the contents of such a transmission unless you have the consent of a party to the communication (unless such activity is otherwise illegal). This scanner is designed to prevent reception of illegal transmissions, in compliance with the law which requires that scanners be manufactured in such a way as to not be easily modifiable to pick up those transmissions. Do not open your scanner’s case to make any modifications that could allow it to 24 Additional Information pick up transmissions that are not legal to listen to. Doing so could subject you to legal penalties. We encourage responsible, legal scanner use. Care Keep the scanner dry. If it gets wet, wipe it dry immediately. Use and store the scanner only in normal temperature environments. Handle the scanner carefully; do not drop it. Keep the scanner away from dust and dirt, and wipe it with a damp cloth occasionally to keep it looking new. Service and Repair If your scanner is not performing as it should, take it to your local RadioShack store for assistance. To locate your nearest RadioShack, use the store locator feature on RadioShack’s website (www.radioshack.com), or call 1-800-THE SHACK (800-843-7422) and follow the menu options. Modifying or tampering with the scanner’s internal components can cause a malfunction and might invalidate its warranty and void your FCC authorization to operate it. Specifications Frequency Coverage 25.0000-27.9950 (in 5 kHz steps) 28.0000-54.0000 (in 5 kHz steps) 59.7500, 65,7500, 71.7500, 81.7500, 87.7500 (in 6 MHz steps) 88.000-107.900 (In 100 kHz steps) 108.0000-136.9875 (in 12.5 kHz steps) 137.0000-174.0000 (in 5 kHz steps) 179.7500, 185.7500, 191.7500, 197.7500, 203.7500, 209.7500, 215.7500 (in 6 MHz steps) 380.0000-399.9875 (in 12.5 kHz steps) 400.0000-512.0000 (in 6.25 kHz steps) Sensitivity (AM/FM) FM .................................................................... 20 dB S/N at 3 kHz deviation 28.0000-54.0000..................................................................................... 0.3µV 137.0000-174.0000................................................................................. 0.4µV 400.0000-512.0000................................................................................. 0.5µV 25 Additional Information AM .................................................................. 20 dB S/N at 60% modulation 25.0000-27.9950..................................................................................... 1.0µV 108.0000-136.9875................................................................................. 1.1µV 380.0000-399.9875................................................................................. 1.2µV WMF ............................................................ 20 dB S/N at 22.5 kHz deviation 88.000-107.9000 (in 100 kHz steps) ...................................................... 0.7µV TV .................................................................... 20 dB S/N at 45 kHz deviation 59.7500, 65.7500, 71.7500, 81.7500, 87.7500 (in 6 MHz steps)........... 0.8µV 179.7500, 185.7500, 191.7500, 197.7500, 203.7500, 209.7500, 215.7500 (in 6 MHz steps)..................................................................................... 0.8µV IF Rejection at 453.2500 MHz ................................................................ 60 dB IF Frequencies ........................................ 265.50-60 MHz, 10.80 MHz, 450 kHz Channels......................................................................................................200 Banks .............................................................................................................10 Operating Temperature ...................................... 14° to 122°F (-10° to 50°C) Scan Speed ....................................................................53 Channels/Second Search Speed Normal .................................................................................55 steps/second Hypersearch......................................................................125 Steps/Second Antenna Impedance..................................................................................50ȍ Audio Output.................................................................. 1100 mW maximum Built-in Speaker......................................................... 2.28 Inches (57 mm) 8 ............................................................................................. Dynamic Type Power AC Adapter (12V DC; 400mA; center tip positive) 3 AA Alkaline Batteries (4.5 VDC) Current Drain Squelched...........................................................................................110 mA Full Output .........................................................................................280 mA Dimensions (HxWxD) 2.3 x 8.4 x 5.8 in (74.7 x 210.2 x 144.7 mm) Weight (without antenna or batteries) .................................. 19.4 oz (550 g) Specifications are typical; individual units might vary. Specifications and depictions are subject to change and improvement without notice. 26 Additional Information Troubleshooting Problem Cause Solution Scanner is on but SQUELCH is not adjusted correctly. Adjust SQUELCH. will not scan. Only one channel or no channels are stored. Scanner won’t work at all. Store frequencies into more than one channel. The AC adapter is not connected. Be sure the adapter’s barrel plug is fully plugged into the DC 12V 400 mA jack. is flashing. Batteries are low. Replace batteries. shows (not flashing). Batteries are not installed. Install batteries. Poor or no reception. Antenna loose. Make sure an antenna is connected to the scanner. Scanner is receiving interference or Move the scanner or its antenna away electrical noise, from the source. Change the height or angle of the antenna. Error appears. Programming error. Re-enter the frequency correctly, including the decimal point. Resetting your Scanner If the scanner’s display locks up or stops operating properly, you might need to reset the scanner. Caution: This procedure clears all the information you have stored in the scanner. Before you reset the scanner, try turning it off and on again to see if it begins working properly. Reset the scanner only when you are sure it is not working properly. 1. Unplug the AC adapter and remove the batteries from the scanner. 2. While holding down 2, 9 and PSE, plug the AC adapter back into the scanner. CLEAr appears for about 2 seconds as the scanner clears its memory. Note: Do not turn off the scanner again until CLEAr disappears. Otherwise, the scanner might not clear its memory properly. Follow these steps to restore the 150 preprogrammed frequencies stored in the private bank. 1. Unplug the AC adapter and remove the batteries from the scanner. 2. While holding down 3 and ENT/PROGRAM, plug the AC adapter back into the scanner. LOAd appears for about 2 seconds as the scanner restores the frequencies. 27 Limited One-year Warranty This product is warranted by RadioShack against manufacturing defects in material and workmanship under normal use for one (1) year from the date of purchase from RadioShack company-owned stores and authorized RadioShack franchisees and dealers. For complete warranty details and exclusions, check with your local RadioShack store. RadioShack Customer Relations 300 RadioShack Circle, Fort Worth, TX 76102 Hypersearch, Hyperscan, and Adaptaplug are trademarks used by RadioShack Corporation. ©2008. RadioShack Corporation. All rights reserved. RadioShack and RadioShack.com are trademarks used by RadioShack Corporation. 04/04 20-136 Printed in China UBZZ01354ZZ(0) 03A08