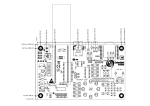
1
ARDUINO to ARM
NXP tools
Jim Schimpf
Document Number: PAN-201406001
Revision Number: 0.3
20 June 2014
Pandora Products.
215 Uschak Road
Derry, PA 15627
Pandora Products.
NXP tools
Program Manual
Creative Commons Attribution 4.0 International License 2014 Pandora Products. All other product
names mentioned herein are trademarks or registered trademarks of their respective owners.
Pandora Products.
215 Uschak Road
Derry, PA 15627
Phone: 724-539.1276
Email: [email protected]
Pandora Products. has carefully checked the information in this document and believes it to be accurate. However, Pandora Products assumes no responsibility for any inaccuracies that this document
may contain. In no event will Pandora Products. be liable for direct, indirect, special, exemplary,
incidental, or consequential damages resulting from any defect or omission in this document, even
if advised of the possibility of such damages.
In the interest of product development, Pandora Products reserves the right to make improvements
to the information in this document and the products that it describes at any time, without notice or
obligation.
PAN-201406001
Revision: 0.3
20 June 2014
NXP tools
ii
Pandora Products.
NXP tools
Program Manual
Document Revision History
Version
0.1
0.2
0.3
Author
js
js
js
PAN-201406001
Revision: 0.3
Description
Initial Version
Editing and add contributors
Fix circuit design
20 June 2014
NXP tools
Date
20-Jun-2014
21-Jun-2014
21-Jun-2014
iii
Pandora Products.
NXP tools
Program Manual
Contents
Contents
1
Introduction
1
2
Materials
2
2.1
Hardware . . . . . . . . . . . . . . . . . . . . . . . . . . . . . . . . . . . . . . .
2
2.2
Software . . . . . . . . . . . . . . . . . . . . . . . . . . . . . . . . . . . . . . . .
2
2.3
Power Supply . . . . . . . . . . . . . . . . . . . . . . . . . . . . . . . . . . . . .
2
2.4
Link 2 Setup . . . . . . . . . . . . . . . . . . . . . . . . . . . . . . . . . . . . . .
3
3
Building the board
3
4
Software
4
5
First Program
4
5.1
Initial build . . . . . . . . . . . . . . . . . . . . . . . . . . . . . . . . . . . . . .
4
5.2
Modifications . . . . . . . . . . . . . . . . . . . . . . . . . . . . . . . . . . . . .
5
6
First Run
7
7
Next
7
PAN-201406001
Revision: 0.3
20 June 2014
NXP tools
iv
Pandora Products.
NXP tools
Program Manual
List of Figures
List of Figures
1
3.3 V supply from other voltage . . . . . . . . . . . . . . . . . . . . . . . . . . .
3
2
LPC1114 circuit . . . . . . . . . . . . . . . . . . . . . . . . . . . . . . . . . . . .
3
3
Link-2 Connector . . . . . . . . . . . . . . . . . . . . . . . . . . . . . . . . . . .
4
4
Pick project . . . . . . . . . . . . . . . . . . . . . . . . . . . . . . . . . . . . . .
5
5
First Build . . . . . . . . . . . . . . . . . . . . . . . . . . . . . . . . . . . . . . .
5
6
board_sysinit.c . . . . . . . . . . . . . . . . . . . . . . . . . . . . . . . . . . . .
6
Thanks
I want to thank the denizens of the NPX LPC11xx forum for their patient and useful answers to my
rather naive questions. I would have never gotten this far without them. LabRat,lxpresso-support
and serge thanks.
1
Introduction
I’ve used the Arduino[1] for a long time and being a lazy person I really like the system. All you
need is the board and the Arduino IDE to be up and going. It’s very low friction to get into and use.
You don’t have to make a deep study of the ATMEL part or how to set up a serial port baud rate, the
Arduino code has that done for you. You can just write the higher levels of your idea and zip it’s
running.
But I also program on PC’s and like the idea of a real debugging system with single step, stack
unwinds and variable viewers. I’ve been wanting to use ARM’s as they have the power to do this and
have become really really cheap. The problem up till now has been that they are kind of high friction
systems. That is unless you go for something like a Raspberry Pi or Beagle Board where you are
running Linux just getting to main() in a program requires rather deep study of the chip, clocking and
hardware. Not that this is a bad thing, you have to master a lot of this to do a complicated program
but is a real pain to do your first “Hello World” or blinky program. In addition getting the ARM tool
chain is not simple although going to http://www.linaro.org/downloads/ will get you
a prebuilt tool chain which save hours of work. Even with it you do still need the startup code to
get you to main(). I found the tool chain link in http://www.meatandnetworking.com/
tutorials/arm-cortex-mx-quickstart/ which is a good article if you are interested in
bare metal programming.
NPX has introduced the LPC1114 ARM M0 in a 28 Pin DIP package for around $3. This chip has
8K of RAM, 40K of Flash and runs at 48 MHz. It is in the running for an Arduino like niche. The
28 pin DIP means you (the average hobbyist) can build this on a standard breadboard. Over and
above that it comes with software packages that bring it almost to the Arduino level of simplicity
and abstracts the hardware enough that you won’t be bogged down in that just to start.
PAN-201406001
Revision: 0.3
20 June 2014
NXP tools
Page 1 of 7
Pandora Products.
NXP tools
Program Manual
Materials
There are debugging pods available for ~$20 that give you JTAG type debugging where you can
breakpoint,single step and view stacks or variables of your running code. This is the part I like,
running code with crossed fingers hoping it works always scares me a lot.
And lastly freeRTOS comes with the development code, it gives you a real time kernel where you
have threads,mutex’s and semaphore’s. You can do true multitasking like you can in Linux.
The rest of this paper will detail how to set this up with the NXP tools so you can develop code and
use the really neat little machine.
2
2.1
Materials
Hardware
LPC1114FN28/102 This is the part, it is available from DigiKey,Mouser and Newark
OM13054UL - Link-2 Debugging Pod, available from DigiKey,Mouser and Newark
Breadboard Solder less Breadboard available from the same or Radio Shack
3.3VDC Power Supply, adjustable supply or see below for a design
LED Any color used in sample programs
330
Resistor Current limiter for LED
15K
Resistor (2) pull-ups for nRESET and PO0_1
2.2
Software
LPCXpresso Available from NXP http://www.lpcware.com/lpcxpresso/download
(Windows/Mac/Linux)
lpcopen_v2_00a_lpcxpresso_nxp_lpcxpresso_11c24 Available from NXP http://www.lpcware.
com/content/nxpfile/lpcopen-software-development-platform-lpc11xx-packages-0
//www.lpcware.com/content/nxpfile/lpcopen-software-development-platform-lpc1
2.3
Power Supply
If you only have a 5V supply then you can create a 3.3V supply on the breadboard with it plus a 3
terminal regulator. Your system when running will draw less than 20 ma, only a small supply will
be needed.
PAN-201406001
Revision: 0.3
20 June 2014
NXP tools
Page 2 of 7
Pandora Products.
NXP tools
Program Manual
Link 2 Setup
Figure 1: 3.3 V supply from other voltage
2.4
Link 2 Setup
After you receive the Link 2 pod move the enclosed jumper to J-2, J-1 does not need a jumper. If
you don’t do this the pod will not connect to the processor.
3
Building the board
The basic circuit for the processor will be quite simple as we will only be blinking an LED for this
demo. Also we will not need a crystal as the internal RC oscillator is quite good enough.
Figure 2: LPC1114 circuit
PAN-201406001
Revision: 0.3
20 June 2014
NXP tools
Page 3 of 7
Pandora Products.
NXP tools
Program Manual
Software
Note the debugging lines SWDIO and SWCLK, these are the connections to the Link-2 Pod. There
is a small 10 pin ribbon cable supplied with the pod and we make connections to it. Shown here is
the end of the cable looking into the 10 pin connector with the notes on the three wires you need. I
have found that cut off small capacitor leads are small enough to stick into the connector then stick
into the breadboard. Leads a few inches long are fine.
Also the LED is hooked to pin 28, this will be used in our test program.
Figure 3: Link-2 Connector
4
Software
Install the LPCXpresso software on your machine. Also create an account at NXP and register the
software. The Free version has a code limitation of 256K which is quite enough for our use here.
The lpcopen_v2_00a_lpcxpresso_nxp_lpcxpresso_11c24 zip file can be left anywhere as we will
browse to it when needed.
Next start LPCXpresso and decide where to put your workspace (it can be anywhere you as a user
can read and write files), don’t worry you can always create another workspace if needed. When you
create the workspace it will ask you to find lpcopen_v2_00a_lpcxpresso_nxp_lpcxpresso_11c24,
point there and it will expand this in your workspace. This gives you a bunch of example projects
plus the board and chip support code.
You can read the LPCXpresso_Getting_Started_User_Guide[2] for installation and registration
instructions. Also notes on the various windows that will be discussed below.
5
5.1
First Program
Initial build
Look at the projects in the left side Project window of LPCXpresso and pick nxp_lpcxpresso_11c24_periph_blinky.
PAN-201406001
Revision: 0.3
20 June 2014
NXP tools
Page 4 of 7
Pandora Products.
NXP tools
Program Manual
Modifications
Figure 4: Pick project
Now in the window below pick build the project and it should build without error.
Figure 5: First Build
If all that worked without error we are almost ready, we have to modify the board support slightly
to get it working with our single chip.
5.2
Modifications
Move up in the project list and open the nxp_lpcxpresso_11c24_board_lib project and open the
board_sysinit.c file.
PAN-201406001
Revision: 0.3
20 June 2014
NXP tools
Page 5 of 7
Pandora Products.
NXP tools
Program Manual
Modifications
Figure 6: board_sysinit.c
We now have to edit this file to tell it our chip is using the RC oscillator and not a crystal to run.
/* Setup system clocking */
STATIC void SystemSetupClocking(void)
{
volatile int i;
/* Powerup main oscillator */
// Don’t start MAIN
//Chip_SYSCTL_PowerUp(SYSCTL_POWERDOWN_SYSOSC_PD);
/* Wait 200us for OSC to be stablized, no status
indication, dummy wait. */
for (i = 0; i < 0x100; i++) {}
/* Set system PLL input to main oscillator */
// USE RC OSC
Chip_Clock_SetSystemPLLSource(SYSCTL_PLLCLKSRC_IRC);
Two lines are changed, the first is to comment out the power up of the main oscillator as it’s not used.
The second is to change the original SYSCTL_PLLCLKSRC_MAINOSC to SYSCTL_PLLCLKSRC_IRC.
This sets up the system to use the RC oscillator as we have built on our breadboard. Note: All the
projects in this workspace will now use this board_sysinit and assume using the RC oscillator. This
is what I meant about having different workspaces, you could have another where your chips did
use a crystal and would not modify this code.
After this is done go back to the blinky project, CLEAN the project the build again, this gets the
board_sysinit.c changes. Now you are ready to run.
PAN-201406001
Revision: 0.3
20 June 2014
NXP tools
Page 6 of 7
Pandora Products.
NXP tools
6
Program Manual
First Run
First Run
After all this you can now press the Debug button either the bug at the top of the screen or the debug
button shown in Figure 6 on the preceding page. If all goes correctly and you have your Link-2
connected and plugged into USB it should then run the code and stop just after main() in blinky.c.
You can single step at this point and if you hit Go (green arrow) it should run and the LED should
blink.
7
Next
All the demo projects should now build and run on the chip. In particular look at the freeRTOS
project as that shows you how to use this RTOS and is the gateway to multitasking projects. You
will also see in the various projects how they have routines to handle chores like setting up ring
buffers for serial I/O, calls to setup hardware like I2C, SPI and GPIO. While not quite as simple as
Arduino the examples make it quite clear how to use them and you don’t have to get involved in Pin
muxing and data direction register setting. You can check in the processor user manual for further
details.[3]
References
[1] Arduino. Arduino home page.
[2] NXP. Getting started with NXP LPCXpresso. NXP B V, 17 april 2013 edition, 2013.
[3] NXP. UM10398 LPC111x/LPC11Cxx User manual. NXP BV, rev. 12.3 edition, June 2014.
PAN-201406001
Revision: 0.3
20 June 2014
NXP tools
Page 7 of 7