1
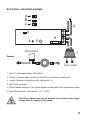
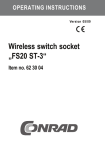
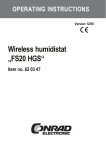
OPERATING INSTRUCTIONS Version 12/06 Remote dimmer ‘FS20 DI20-2’ Item no. 61 72 44 Introduction Dear customer, Thank you for purchasing this product. This product meets the requirements of both current European and national guidelines. In order to preserve this condition and ensure the safe operation of the product we kindly ask you to carefully follow these operating instructions! Please read the operating instructions completely and observe the safety and operation notes before using the product! All company names and product names contained herein are trademarks of the respective owners. All rights reserved. Should you have any further questions, please contact our technical advisory service: Germany: Tel. no.: +49 9604 / 40 88 80 Fax. no.: +49 9604 / 40 88 48 e-mail: [email protected] Mon. to Thur. 8.00am to 4.30pm Fri. 8.00am to 2.00pm 2 Table of contents Page 1. 2. 3. 4. 5. 6. 7. 8. 9. 10. 11. 12. 13. 14. 15. 16. Prescribed use ............................................................................................................... 4 Scope of delivery ........................................................................................................... 4 Technical specifications and features .......................................................................... 4 General information ....................................................................................................... 5 Safety instructions ......................................................................................................... 6 Preparing for operation ................................................................................................. 8 a) Selecting the operating mode ................................................................................ 8 b) Controls, connection example ............................................................................... 9 c) Connecting ............................................................................................................ 10 Programming/operation ............................................................................................... 11 a) Initial operation ..................................................................................................... 11 b) Programming ........................................................................................................ 12 c) Using the basic functions ..................................................................................... 12 Operation using a remote control ........................................................................ 12 Direct operation .................................................................................................... 12 Timer function .............................................................................................................. 14 a) General information .............................................................................................. 14 b) Programming the timer ......................................................................................... 14 Programming the short-term timer ....................................................................... 15 Programming the slow-on timer ........................................................................... 15 Programming the slow-off timer ........................................................................... 15 c) Deactivating/switching off timer functions ........................................................... 15 d) Operation of remote dimmer with activated timer ............................................... 15 Slow-on and slow-off functions ............................................................................ 15 Short-term timer function ...................................................................................... 16 Integrating the remote dimmer into the FS20 address system ................................. 17 a) Assigning further addresses/address types ........................................................ 17 b) Deleting addresses and address types ............................................................... 17 Resetting to the delivery state .................................................................................... 18 Fuse replacement ........................................................................................................ 19 Handling ....................................................................................................................... 20 Maintenance and cleaning .......................................................................................... 21 Disposal ....................................................................................................................... 21 Tips and notes ............................................................................................................. 22 Declaration of conformity (DOC) ................................................................................. 23 3 1. Prescribed use The remote dimmer ‘FS20DI20’ is only suitable for use with the FS20 wireless control system. This wireless control system can wirelessly turn connected consumer loads on and off or dim them (refer to technical specifications and features). Another feature is the integrated programmable timer function. Any use other than the one described above may damage the product and can also increase the risk of short-circuit, fire, electric shock, etc. No part of the product may be modified or adapted. The device may only be operated when its casing is fully closed. All the safety instructions and installation notes in this manual must be observed without fail. 2. Scope of delivery • Remote dimmer • User manual 3. Technical specifications and features • • • • • • • • • 4 Operating voltage: 230V~/50Hz Power consumption: approx. 0.5W Connected load: 25-200VA, for resistive and inductive loads NOT suitable for electronic transformers Memory conservation also without power supply (for instance, during a power outage) Programmable timer duration: 1 second to 270 minutes (= 4 hours 30 min) Reception frequency: 868.35MHz Range: up to 100m (in free-field) Dimensions: 40mm x 32mm x 164mm (W x H x D) 4. General information In selecting the programmable remote dimmer ‘FS20 DI20-2’ you have purchased a versatile device that is easy to use and conveniently allows you to wirelessly switch and dim resistive and inductive loads (25-200VA) over long distances. Resistive loads are, for example, standard 230 V bulbs or 230 V halogen lamps (high-voltage halogen lamps). Inductive load are, for example, conventional halogen lamp transformers with low-voltage halogen lamps (mostly 12V) connected. You can operate the remote dimmer via a button on the device itself, at distances of up to 100 m using the FS20 wireless control system’s remote controls and using other remote switch transmitters. Caution! The remote dimmer ‘FS20 DI20-2’ is not suitable for the operation of electronic halogen transformers! If you are not sure what type of halogen transformer you intend to connect, please ask the supplier of the halogen transformer or a skilled technician. Make sure that you use the remote dimmer ‘FS20 DI22-2’ with electronic halogen transformers. In addition to the switch and dimmer function three separately programmable timers are integrated, each of which can be set within a range of 1 second to 270 minutes (=4 hours 30 min): • The first timer enables automatic shutdown of the lighting after the set time interval. This allows the remote dimmer to be used, for example, for stairway lighting. • The second timer allows you to slowly dim the light up automatically within a set period of time, when switching the light on. This can be used as a particularly lamp-protective mode of turning on a light or give the effect of a sunrise (for example, for a terrarium). • The third timer provides a slow automatic dimming down within a set time for turning off the lighting (for example, artificial sunset). With these three timers, the following functions can be established, for example, for stairway lighting: • Lamp-protective dimming up within three seconds • Automatic gradual dimming down after four minutes within 25 seconds 5 All the programmed data is permanently stored in the device’s integrated memory, even during a power failure. Please note: This user manual refers primarily to operation using a remote control from the FS20 wireless control system, with 2 buttons per channel. When using other remote controls, please refer to their respective user manuals. 5. Safety instructions The product’s guarantee becomes invalid if the product is damaged as a result of failure to observe these operating instructions. We do not assume any liability for any resulting damages! Nor do we assume liability for damage to property or personal injury caused by improper use or failure to observe the safety instructions. In such cases the product’s guarantee becomes invalid! • Do not use this product in hospitals or medical institutions. Although the FS20 wireless control system only emits relatively weak radio signals, these may cause life-support systems to malfunction. This may also be the case in other areas. • For safety and licensing (CE) reasons any unauthorised alterations to and/or modification of the product are not permitted. • The product is designed in accordance with protection class II. Voltage/power may only be supplied via the public power supply (230V~/50Hz). • This product is not a toy. Devices operated via the supply voltage should be kept out of the reach of children. Therefore, take particular care when children are around. • Do not leave packaging material unattended. This may become dangerous playing material in the hands of children. • To connect the device to the supply voltage as well as the consumer load or loads, work must be carried out on the supply voltage or on live voltage-carrying parts. Disconnect the device from the supply voltage (all poles) before you open its covers or casing. Make sure you do the same for all the consumer loads that are to be connected or are already connected. 6 Ensure that the supply voltage cannot be switched on by a third party while work is carried out on the device. This can be done, for example, using mechanical security fixtures and additionally using conspicuous warning signs. The same applies for eventual fuse changes or the adjustment of the jumper in the remote dimmer . • Always close the casing of the remote dimmer, attach its covers and firmly tighten the screws before switching on the supply voltage again. The remote dimmer may only be operated when its casing is fully closed. • Only people who are appropriately trained are permitted to carry out work on voltagecarrying parts. If you are not appropriately trained, please consult a qualified electrician who is authorised to carry out such work. • Make sure you only load the product up to the capacity indicated. An overload may lead to the destruction of the device, a fire or an electrical accident. • Only use approved power cords with a cross-section of 0.75 mm². • The product may only be used in dry indoor areas. • The remote dimmer should be fixed firmly within a solid installation (for example, wall mounted using screws/wall plugs). When using flexible installation cables, suitable wire-end sleeves must be used on the internal multi-wire conductors. • The accident-prevention regulations, established by the Employer’s Liability Insurance Association for electrical equipment and facilities, must be adhered to in commercial facilities. • Consult a skilled technician if you have doubts about the mode of operation, safety or connection of the device. • Handle the product with care; knocks, blows or even a fall from a low height can damage it. 7 6. Preparing for operation Before assembling and using the device, make sure you take note of all the safety and assembly instructions in this user manual. Only people who are appropriately trained are permitted to carry out work on voltage-carrying parts. If you are not appropriately trained, please consult a qualified electrician who is authorised to carry out such work. Any incorrect work carried out on the supply voltage may lead to a fatal electric shock. You endanger not only your own life but also the lives of others! For connection of the remote dimmer, only use approved power cables with a cross-section of 0.75mm². The installation location is, amongst other things, determined by two important factors: • Any cabling that may already exist • Good radio reception We therefore recommend that you test the radio reception at the installation location. a) Selecting the operating mode To change the setting it is necessary to open the remote dimmer’s casing. See the instructions in section 11 ‘Fuse replacement’. Caution! Life-threatening danger! Before you open the casing of the remote dimmer, make sure you disconnect the device from the supply voltage (all poles)! The remote dimmer has three different operating modes, which can be set via a jumper inside the remote dimmer. See the figure on the next page, section 6 b). Jumper set to ‘alt’ (default setting, pin 1-2), ‘A’ Turns on with the same brightness as when last turned off Jumper set to ‘aus’ (= ‘off’, pin 2-3), ‘C’ When the supply voltage is switched on, the lamp initially remains off Jumper not set, ‘B’ Turns on with full brightness 8 b) Controls, connection example A B C 2 3 4 5 6 FS20 DI20-2 1 Example: 230V~/50Hz 1 Input: To the supply voltage, 230V~/50Hz 2 Output: Consumer load’s connection, 25-200VA (no electronic transformers!) 3 Jumper: Selection of operating mode, see section 7. a) 4 LED: Control indicator 5 Button: Manual operation of the remote dimmer and activation of the programming mode 6 Fuse: Required fuse: 1A slow-blow (‘1A T’), 250V~ The remote dimmer may only be operated or connected to the supply voltage when the casing is fully closed! 9 c) Connecting When connecting the remote dimmer it is imperative that you follow the correct order described below! 1. Remove the right cable cover (the one on the side of the remote dimmer marked ‘Ein Aus’); remove both screws with a suitable screwdriver. 2. Carefully strip the wire ends of the power cord between the remote dimmer and halogen transformer to a length of 8 mm. When using a flexible power cord, make sure you apply suitable wire-end sleeves to the wire ends! 3. Connect the output of the remote dimmer to the connection clamps of the halogen transformer. Make sure that all connections are firmly screwed and that no short-circuit can occur between the two strands. 4. Connect the power cable to the input of the remote dimmer. Use a suitable voltage tester, for example, to ensure that the power cord is dead (removed from the supply voltage!) Make sure that all connections are firmly screwed and that no short-circuit can occur between the two strands. 5. Close the remote dimmer’s casing. Guide the cables through the respective openings under the cable cover. Although the cable cover clamps the cable slightly, depending on the power cable used, there may be no strain relief. Therefore, do not pull on the cable! Attach the cable cover correctly and tighten the two attachment screws. 10 7. Programming/operation a) Initial operation Connect the mounted and cabled remote dimmer to the 230V electricity network. In the default setting, when switching on the supply voltage, the same brightness is selected as when the device was last switched off. A ceiling lamp can be easily turned on and off via the light switch and, in addition, be dimmed via remote. When you connect the remote dimmer directly to the electricity supply (and not to a separate on/off switch), you should set the jumper to the ‘AUS’ position. Otherwise, the connected lamp will be turned on after a power outage (with the same brightness as when it was last turned off). To do this you need to open the casing. This is explained in section 11 ‘Fuse replacement’. Caution! Life-threatening danger! Before you open the casing of the remote dimmer, make sure you disconnect the device from the supply voltage (all poles)! You can choose between the following switching functions by resetting the jumper on the remote dimmer’s circuit board: Jumper set to ‘alt’ (default setting) Turns on with the same brightness as when last turned off Jumper set to ‘aus’ (= ‘off’) When the supply voltage is switched on, the lamp initially remains off Jumper not set Turns on with full brightness Now take a thin, insulated object (for example, a plastic screwdriver) and briefly press the recessed button through the small opening on the top of the casing (the larger one of the two openings on the upper surface of the remote dimmer). The connected consumer load (for example, a halogen lamp transformer with connected lamps) should switch on and off with each touch of the button. 11 b) Programming There are two possible ways to call up the programming mode of the remote dimmer: 1. Take a thin, insulated object and press the button through the small opening on the top of the housing (the larger one of the two openings), whilst you connect the remote dimmer to the power supply. The control indicator/LED on the remote dimmer now flashes indicating that the programming mode is activated. 2. If the remote dimmer is already connected to the power supply, press the remote dimmer button for at least 15 seconds. The control indicator/LED on the remote dimmer now flashes indicating that the programming mode is activated. Now press one of the buttons of the desired button combination on your remote control. The control indicator/LED stops flashing once the remote dimmer has received the code. If required, the programming can be replaced at any time by another button on the remote control, as well as by another remote control channel. In this case, please repeat the procedure as explained above. c) Using the basic functions • Operation using a remote control Switching on: Briefly press the right button of the programmed button combination Switching off: Briefly press the left button of the programmed button combination Dimming up: For lamps that are on, press the right button of the programmed button combination for longer than 0.4 seconds. The lamp becomes brighter. Dimming down: For lamps that are on, press the left button of the programmed button combination for longer than 0.4 seconds. The light will go down. When a lamp is switched off and the right button on the remote control or the button on the remote dimmer is pressed for longer than 0.4 seconds, then the remote dimmer does not switch the lamp on at the saved brightness, rather it switches it on at the lowest brightness. If the button remains pressed, the remote dimmer slowly dims the lamp up. 12 When a lamp is switched off and the left button on the remote control is pressed for longer than 0.4 seconds, then the remote dimmer will switch the lamp on with a maximum degree of brightness and then gradually dim the lamp down. • Direct operation: Switching on/off: Briefly press the button on the remote dimmer (switch status of connected consumer load: on, off, on, off, etc. Dimming: Press the button on the remote dimmer for longer than 0.4 seconds. The brightness of the lamp changes while the button is kept pressed. Do not press the button for longer than a maximum of 15 seconds, otherwise you will activate the programming mode! Release the button once you have reached the desired degree of brightness. Each time the button is pressed, the dimming direction reverses. The control indicator/LED lights up on the remote dimmer when a consumer load is switched on. When a consumer load is dimmed to a specific degree of brightness and then switched off, this setting is saved and restored when the consumer load is switched on again. You are now able to use the basic functions of the remote dimmer. If you want to expand your FS20 wireless control system or if you want to use the additional special functions, please also read the following sections. 13 8. Timer function a) General information There are three separate timers for short-term operation, ‘slow-on’ (slow dim up) and ‘slow-off’ (slow dim down), each of which is programmable within a range of 1 second to 270 minutes (4.5 hours). In order to program the timers you require a remote control from the FS20 wireless control system. Once a timer is programmed, it can only be stopped by deactivating the timer functions, see c). During short-term operation the remote dimmer automatically switches off again after the programmed on-time has elapsed (slow-on and slow-off times are not calculated into the ontimes!). Slow-on means that the remote dimmer softly dims up to the desired brightness level within the preset time. Slow-off means that the remote dimmer softly dims down to the desired brightness level within the preset time. b) Programming the timer 1. Simultaneously press the button combination that is assigned to the remote dimmer on the remote control for one to five seconds (1 sec to 5 sec). 2. The control indicator/LED on the remote dimmer blinks and the time measurement for the timer starts. 3. Wait the desired amount of time and then press both buttons on the remote control again simultaneously for one to five seconds (1 sec to 5 sec). The timer duration is now programmed. 14 Please note: If the time measurement is not ended manually, the timer programming mode will automatically be abandoned after 270 minutes (4 hours 30 min). The timer is then programmed with a time of 270 minutes (4 hours 30 min). • Programming the short-term timer Proceed as described above under item b), subsections 1.-3. • Programming the slow-on timer The timer programming is started and stopped as described above. To assign the timer duration to the ‘slow-on’ function, briefly press the Ein button of the button combination on the remote control during the time measurement. • Programming the slow-off timer The timer programming is started and stopped as described above. To assign the timer duration to the ‘slow-off’ function, briefly press the Aus button of the button combination on the remote control during the time measurement. c) Deactivating/switching off timer functions • Simultaneously press the button combination that is assigned to the remote dimmer on the remote control for one to five seconds (1 sec to 5 sec). • The control indicator/LED on the remote dimmer blinks. • Now press the control button on the remote dimmer. The control indicator/LED on the remote dimmer goes out. The timer functions are deactivated/switched off. d) Operation of remote dimmer with activated timer • Slow-on and slow-off functions When you switch the remote dimmer on or off with a brief press of the button (remotely or using the recessed control button on the device), then, within the programmed time, the lamp will be slowly dimmed up to the degree of brightness that was set before the timer started or dimmed down to zero. If, during this dimming operation, the same on or off command is issued again, then the lamp dims immediately to the final brightness level without the timer function. When manually dimmed (keep the button pressed), the timer for this dimming operation is skipped (do not press the button on the remote dimmer for longer than 15 seconds otherwise you will activate the programming mode). 15 The timer function is only available again once the next ‘normal’ power-on command is issued (briefly press button). • Short-term timer function Turn the remote dimmer on by pressing the button briefly (remotely or using the recessed control button on the device). The remote dimmer switches the lamp on with the last brightness level from before the start of the timer and, after the set time has expired, automatically switches it off again. If the remote dimmer is switched on by a long press of the button or is dimmed within the set time, the remote dimmer remains switched on until it is manually switched off. The timer function is available again once the next ‘normal’ power-on command is issued (briefly press button). • Temporary switch-over to continuous operation: If the device is switched on by a long press of the button or is dimmed within the set time, the remote dimmer remains switched on until it is manually switched off. The timer function is available again when the next ‘normal’ power-on command is issued (briefly press button). 16 9. Integrating the remote dimmer into the FS20 address system The remote dimmer can be integrated into the FS20 wireless control system via the latter’s addressing scheme using single addresses, function groups, local and global masters. More detailed information on exactly how this address system is structured is provided in the user manual of each transmitter belonging to the FS20 wireless control system. a) Assigning further addresses/address types Up to four address types can be assigned to the remote dimmer within the address system of the FS20 wireless control system. This makes it possible, for example, to operate the remote dimmer remotely from several transmitters with the same or different address types. You can find more detailed information on the address system in the user manual of each remote control belonging to the FS20 wireless control system. To assign several address types to the remote dimmer, repeat the programming as described in section 7. You can create a list of up to four addresses or address types in the remote dimmer’s memory. b) Deleting addresses and address types If you want to delete a reception channel from the saved list, set the remote dimmer to programming mode and press the corresponding remote dimmer assigned buttons on the remote control for longer than 0.4 seconds. Afterwards the programming mode is automatically exited and the corresponding channel is deleted from the dimmer’s address list. 17 10. Resetting to the delivery state If required, you can delete all the settings stored in the remote dimmer at once. • Press the control button on the remote dimmer for at least 15 seconds. The control indicator/ LED on the remote dimmer starts to blink. • Press the control button again. All stored addresses and the timer mode with its programmed timer duration are deleted or deactivated. The control indicator/LED stops blinking. 18 The remote dimmer no longer responds to any remote commands and must be programmed again! 11. Fuse replacement To protect against overload, the remote dimmer is secured with a mains fuse (glass-tube fuse 1A T, slow-blow, 250V~). It is located on the circuit board within the casing of the dimmer. Caution, life-threatening danger! Before replacing a fuse, completely disconnect the remote dimmer from the supply voltage! Take note of all the safety instructions in this user manual! • If the remote dimmer has a fixed connection to the power supply, remove the mains fuse of the appropriate electrical circuit or turn off the circuit breaker. • Make sure that the electric circuit can’t be switched on by a third party by, for example, using mechanical security fixtures or conspicuous warning signs. • Only afterwards open the casing of the remote dimmer. Proceed as follows: Remove the covers on both sides. Remove the two casing screws for each using a suitable screwdriver. Use a measuring device or a voltage tester to make sure that there is no voltage on the clamps on the remote dimmer. Caution! Life-threatening danger! See above! You can now use a flat screwdriver to lift the upper casing on the long side (there are two small indentations underneath the casing). Carefully separate the upper casing from the lower casing by using the screwdriver alternatively on both indentations. • If necessary, use a measuring device to check the fuse before replacing it. • Replace the fuse with a fuse of the same model and type (1A T, slow-blow, 250V~). Do not bypass defective fuses. This could lead to an electric shock or even a fire! • Check whether an overload of the remote dimmer may have caused the fuse to be defective (connected load of the remote dimmer: 25-200VA; remote dimmer is not suitable for electronic halogen transformers). • Close the remote dimmer’s casing. • Restart the remote dimmer. 19 12. Handling The product should only be used in dry indoor areas. Never use the product immediately after it has been brought from a cold room into a warm one. The condensation that forms could damage the device! Allow the device to reach room temperature before switching it on. This may take several hours. Do not handle the remote dimmer or the connected devices/cables with moist or wet hands! Make sure that the insulation of the entire product is neither damaged nor destroyed. Always check the product for damage before using it! If you detect any damage, do NOT connect the product to the supply voltage! Life-threatening danger! If the product is not operated for a longer period, disconnect the product from the supply voltage. Avoid the following adverse ambient conditions at the installation location or during transport: - Moisture or excessive air humidity Extreme cold or heat Dust or flammable gases, vapours or solvents Strong vibrations Strong magnetic fields such as those found near machines or loudspeakers The remote dimmer may only be operated when its casing is fully closed. 20 13. Maintenance and cleaning This product does not require maintenance. Before you clean the remote dimmer, disconnect it from supply voltage (all poles)! Clean the remote dimmer with a soft, clean and lint-free cloth. To remove heavier dirt, use a cloth which is slightly moistened with lukewarm water. Never use solvent-based cleaning agents, as these may damage the surface of the plastic casing and its inscription. Wait until the remote dimmer is completely dry before reconnecting it to the supply voltage. 14. Disposal When the product is no longer usable, dispose of it in accordance with the applicable statutory regulations. 21 15. Tips and notes Ranges and interference • The FS20 wireless control system works in the 868MHz range, which is also used by other radio services. Therefore devices that operate on the same or neighbouring frequency may restrict both its operation and its range. • The specified range of up to 100m is the free-field range, which means the range with visual contact between the transmitter and receiver. In practice, however, walls, ceilings, etc. between the transmitter and the receiver may affect and reduce the range. Other causes of reduced ranges: • All types of high-frequency interference • Any buildings or vegetation • Conductive metal parts that are located near the devices or within or near their transmission path, for example, radiators, metallised insulation glass windows, reinforced concrete ceilings, etc. • Influence on the radiation pattern of antennas due to the distance from the transmitter or receiver to conductive surfaces or objects (also to human bodies or the ground) • Broadband interference in urban areas that reduces the signal-to-noise ratio; the signal is no longer recognised due to this ‘noise’ • Interference radiation resulting from insufficiently shielded electronic devices, for example, operating computers or similar 22 Please note: Do not position several radio receivers directly next to each other as these may interfere with each other (minimum distance 0.2m, we recommend 0.5m or more). 16. Declaration of conformity (DOC) We, Conrad Electronic, Klaus-Conrad-Straße 1, D-92240 Hirschau (Germany), hereby declare that this product complies with the fundamental requirements and other relevant regulations of directive 1999/5/EG. You can find the declaration of conformity for this product at www.conrad.com 23 http://www.conrad.com Imprint These operating instructions are published by Conrad Electronic SE, Klaus-Conrad-Str. 1, D-92240 Hirschau/Germany. No reproduction (including translation) is permitted in whole or part e.g. photocopy, microfilming or storage in electronic data processing equipment, without the express written consent of the publisher. 100% recycling paper. Bleached without chlorine. The operating instructions reflect the current technical specifications at time of print.We reserve the right to change the technical or physical specifications. © Copyright 2006 by Conrad Electronic SE. Printed in Germany.