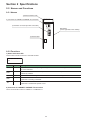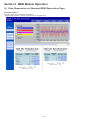
1
series USER’S MANUAL WEB Module <Type: NP1L-WE1> FEH258 Preface Thank you for purchasing Fuji Electric Programmable Controller MICREX-SX Series. This User’s Manual describes the specifications of the WEB module (type:NP1L-WE1) for the MICREX-SX series. Read this manual carefully to ensure correct operation. When using modules or peripheral devices, be sure to read the corresponding user’s manual listed below. Title Manual No. Contents User's Manual Instructions, MICREX-SX series SPH FEH200 Explains the system configuration, the memory and the language of SPH. User's Manual Hardware, MICREX-SX series SPH FEH201 Explains the system configuration, the specifications and operations of modules in the MICREX-SX series. Guide, MICREX-SX series FEH253-1 Self-study guide to understand basic use of MICREX-SX. Redundant System Constructions Guide, MICREX-SX series FEH253-2 Explains the method of MICREX-SX redundancy system to Improve system reliability. ST Language Guide, MICREX-SX series FEH253-3 Self-study guide for high-level language (ST language) used for FA. User's Manual D300win <Reference>, MICREX-SX series SPH FEH254 Explains the installation procedure, functions and operations of D300winV2. User's Manual D300win <Reference>, MICREX-SX series SPH FEH257 Explains the installation procedure, functions and operations of D300winV3. * In addition to the above manuals, the following Fuji Electric FA Components & Systems Co., Ltd. site offers various manuals and technical documents associated with MICREX-SX. URL http://www.fujielectric.co.jp/fcs/eng/ Notes 1. This manual may not be reproduced in whole or part in any form without prior written approval by the manufacturer. 2. The contents of this manual (including specifications) are subject to change without prior notice. 3. If you find any ambiguous or incorrect descriptions in this manual, please write them down (along with the manual No. shown on the cover) and contact FUJI. Safety Precautions Be sure to read the "Safety Precautions" thoroughly before using the module. Here, the safety precautions items are classified into "Warning" and "Caution". Warning : Incorrect handling of the device may result in death or serious injury. Caution : Incorrect handling of the device may result in minor injury or physical damage. Even some items indicated by "Caution" may result in a serious accident. Both safety instruction categories provide important information. Be sure to strictly observe these instructions. Warning Never touch any part of charged circuits as terminals and exposed metal portion while the power is turned ON. It may result in an electric shock to the operator. Turn OFF the power before mounting, dismounting, wiring, maintaining or checking, otherwise, electric shock, erratic operation or troubles might occur. Place the emergency stop circuit, interlock circuit or the like for safety outside the PC. A failure of PC might break or cause problems to the machine. Do not connect in reverse polarity, charge (except rechargeable ones), disassemble, heat, deform, throw in a fire or short-circuit the batteries, otherwise, they might burst or take fire. If batteries have any deformation, spilled fluids, or other abnormality, do not use them. The use of such batteries might cause explosion or firing. Safety Precautions Caution Do not use one found damaged or deformed when unpacked, otherwise, fire, failure or erratic operation might be caused. Do not shock the product by dropping or tipping it over, otherwise, it might be damaged or troubled. Follow the directions of the operating instructions when mounting the product. If mounting is improper, the product might drop or develop problems or erratic operations. Use the rated voltage and current mentioned in the operating instructions and manual. Use beyond the rated values might cause fire, erratic operation or failure. Operate (keep) in the environment specified in the operating instructions and manual. High temperature, high humidity, condensation, dust, corrosive gases, oil, organic solvents, excessive vibration or shock, might cause electric shock, fire, erratic operation or failure. Select a wire size to suit the applied voltage and carrying current. Tighten the wire terminals to the specified torque. Inappropriate wiring or tightening might cause fire, malfunction, failure or might cause the product to drop from its mounting. Contaminants, wiring chips, iron powder or other foreign matter must not enter the device when installing it, otherwise, fire, accident, erratic operation or failure might occur. Remove the dust-cover seals of modules after wiring, otherwise, fire, accident, erratic operation or failure might occur. Connect the ground terminal to the ground, otherwise, electric shock or erratic operation might occur. Periodically make sure the terminal screws and mounting screws are securely tightened. Operation at a loosened status might cause fire or erratic operation. Put the furnished connector covers on unused connectors, otherwise, erratic operation or failure might occur. Put the furnished terminal covers on the terminal blocks, otherwise, electric shock or fire might occur. Sufficiently make sure of safety before program change, forced output, starting, stopping or anything else during a run. Wrong operation might break or cause problems to the machine Engage the loader connector in a correct orientation, otherwise, an erratic operation might occur. Before touching the PC, discharge any static electricity that may have been collected on your body. To discharge it, touch a grounded metallic object. Static electricity might cause erratic operation or failure. Be sure to install the electrical wiring correctly and securely, observing the directions of the operating instructions and manual. Wrong or loose wiring might cause fire, accident or failure. When disengaging the plug from the outlet, do not pull the cord, otherwise, break of cable might cause fire or failure. Do not attempt to change system configurations (such as installing or removing I/O modules) while the power is ON, otherwise, erratic operation or failure might occur. Do not attempt to repair the module by yourself, but contact your Fuji Electric agent. When replacing the batteries, correctly and securely connect the battery connectors, otherwise, fire, accident or failure might occur. Do not remodel or disassemble the product, otherwise, failure might occur. Follow the regulations of industrial wastes when the device is to be discarded. The modules covered in these operating instructions have not been designed or manufactured for use in equipment or systems which, in the event of failure, can lead to loss of human life. If you intend to use the modules covered in these operating instructions for special applications, such as for nuclear energy control, aerospace, medical or transportation, please consult your Fuji Electric agent. Be sure to provide protective measures when using the module covered in these operating instructions in equipment which, in the event of failure, can lead to loss of human life or other grade results. External power supply (such as 24 V DC power supply) which is connected to DC I/O should be strongly isolated from AC power supply, otherwise, accident or failure might occur. (Use of EN60950 conforming power supply is recommended.) Revision *The manual No. is printed at the bottom right of the cover of this manual. Printed on *Manual No. Revision contents Nov. 2005 FEH258 First edition Contents Preface Safety Precautions Revision Contents Section 1 General Page 1-1 Overview of Functions ................................................................................................................... 1-1 1-1-1 1-1-2 1-1-3 1-1-4 1-1-5 WEB observation function .................................................................................................................... 1-1 E-mail sending function ....................................................................................................................... 1-2 Controller data transmission function ................................................................................................. 1-3 Remote loader function ........................................................................................................................ 1-4 User-created observation page function ............................................................................................. 1-5 1-2 Special Notes ................................................................................................................................. 1-6 1-3 Supported Versions ........................................................................................................................ 1-6 Section 2 Specifications 2-1 2-2 2-3 2-4 General Specifications .................................................................................................................. Interface Specifications ................................................................................................................. End Personal Computer Operating Environments ...................................................................... Functional Specifications .............................................................................................................. 2-4-1 2-4-2 2-4-3 2-4-4 2-4-5 2-4-6 2-1 2-2 2-2 2-3 WEB observation function .................................................................................................................... 2-3 E-mail sending function ....................................................................................................................... 2-3 Controller data transmission function ................................................................................................ 2-4 Remote loader function ....................................................................................................................... 2-4 User-created observation page function ............................................................................................ 2-4 RAS information function ..................................................................................................................... 2-4 2-5 Names and Functions .................................................................................................................... 2-5 2-5-1 Names .................................................................................................................................................. 2-5 2-5-2 Functions .............................................................................................................................................. 2-5 2-6 Dimensions ..................................................................................................................................... 2-7 Section 3 System Configuration 3-1 Limits on Mounting ........................................................................................................................ 3-1 3-1-1 Mounting position ................................................................................................................................. 3-1 3-1-2 Number of mountable modules .......................................................................................................... 3-2 3-2 System Configuration .................................................................................................................... 3-3 3-2-1 Example of system configuration ........................................................................................................ 3-3 3-2-2 System configuration definition ........................................................................................................... 3-3 Section 4 WEB Module Setting 4-1 Overview of Operations ................................................................................................................. 4-1 4-1-1 Flow chart from basic setting to operation .......................................................................................... 4-1 4-1-2 Flow chart from basic setting to operation .......................................................................................... 4-2 4-2 Basic Settings ................................................................................................................................. 4-3 4-2-1 Basic settings ....................................................................................................................................... 4-3 4-2-2 Administrator data setup ..................................................................................................................... 4-6 4-2-3 Log-in user registration ....................................................................................................................... 4-8 Contents Page 4-2-4 4-2-5 4-2-6 4-2-7 4-2-8 Network setup - Host setup ............................................................................................................... 4-10 Network setup - DNS setup ............................................................................................................... 4-11 PPP setup ........................................................................................................................................... 4-12 Mail server setup ................................................................................................................................ 4-14 FTP server setup ................................................................................................................................ 4-15 4-3 WEB Observation System ............................................................................................................. 4-16 4-3-1 Observation setting menu ................................................................................................................. 4-17 4-3-2 Controller data settings ..................................................................................................................... 4-18 4-3-3 Table output settings ......................................................................................................................... 4-21 4-3-4 Trend settings .................................................................................................................................... 4-23 4-3-5 Mail address settings ........................................................................................................................ 4-26 4-3-6 Change-state settings ....................................................................................................................... 4-28 4-3-7 Controller memory transmission settings ........................................................................................ 4-33 4-3-8 SX-WEB system settings ................................................................................................................... 4-35 4-3-9 SNTP server settings ......................................................................................................................... 4-39 4-3-10 Loader command port settings ...................................................................................................... 4-40 Section 5 WEB Module Operation 5-1 Data Observation on Standard WEB Observation Page ............................................................. 5-1 5-1-1 5-1-2 5-1-3 5-1-4 5-1-5 Observation screen menu ................................................................................................................... 5-2 Single format observation screen - Table output ................................................................................ 5-3 Single format observation screen - Trend graph ................................................................................ 5-5 Single format observation screen - Output event log ......................................................................... 5-6 Complex format observation screen ................................................................................................... 5-8 5-2 Generating an Alarm and Sending Data by E-mail ................................................................... 5-11 5-2-1 Sending mails informing state change of SPH_CPU ...................................................................... 5-11 5-2-2 Sending data in SPH_CPU as an e-mail attachment ...................................................................... 5-12 5-3 FTP Transmission Function .......................................................................................................... 5-13 5-3-1 FTP transmission of trend data ......................................................................................................... 5-11 5-3-2 FTP transmission of data in SPH_CPU ......................................................................................... 5-14 5-4 Remote Loader Function ............................................................................................................. 5-15 5-4-1 Setting D300win ................................................................................................................................. 5-15 Section 6 Troubleshooting 6-1 Diagnosis on Standard Observation Screen ............................................................................... 6-1 6-1-1 6-1-2 6-1-3 6-1-4 6-1-5 CPU module behavior information ...................................................................................................... 6-3 Version number information ................................................................................................................ 6-3 Network information ............................................................................................................................. 6-4 Warning information ............................................................................................................................ 6-5 Module RAS information ...................................................................................................................... 6-6 6-2 Failure Diagnosis with D300win ................................................................................................... 6-7 6-2-1 6-2-2 6-2-3 6-2-4 Procedure for diagnosis ...................................................................................................................... 6-7 System RAS .......................................................................................................................................... 6-8 Bus transmission information ............................................................................................................ 6-9 Dump list ............................................................................................................................................ 6-10 Section 1 General WEB module (type: NP1L-WE1) is an Internet communication module that is mounted on the base board of the MICREX-SX series (connected to the SX bus). With the WEB module, you can observe data in the PLC module and receive mails via the Internet or intranet. 1-1 Overview of Functions The WEB module has the following functions: 1) WEB observation function: You can observe the PLC system and the data, and perform data settings with a browser. 2) E-mail sending function: E-mails can be sent to specified cellular phones and personal computers. 3) Controller data transmission function: Data in the SPH_CPU can be transmitted to the FTP server. 4) Remote loader function: Via the Internet/intranet, the remote operation of the loader is possible. 5) User-created WEB page function: For the PLC system observation, data observation and data setting, you can use your original pages. 1-1-1 WEB observation function You can display data in the SPH_CPU in tabular form, trend graph form, or event log form in a browser of a personal computer for observation/maintenance and observe it. You can write data into the data in the SPH_CPU from a browser. Data of an event log can be downloaded to the personal computer in “CVS file format”. You can perform basic settings and add or change observation data from the personal computer for observation/maintenance. WEB system PC for observation/maintenance SPH system Internet / intranet <Example of observation page> Browser (Internet Explorer 5.5 or higher) 1-1 WEB module Section 1 General 1-1 Overview of Functions 1-1-2 E-mail sending function On conditions that state of data in SX_CPU changes or a specified controller event or timer event occurs, an e-mail can be sent to the set e-mail addresses (personal computer, cellular phone, and PHS). WEB system Mail server SPH system Mail recipient WEB module Internet / intranet Data at the time of state change Mail recipient Data in SPH_CPU *1 The controller event uses bit data in the SPH_CPU as an event. The timer event uses a timer value (1s to 100000s) set in the WEB module as an event. *2 Mail server to be used For intranet: Use a mail server on the intranet. For Internet: Use a mail server provided by a provider. 1-2 Section 1 General 1-1 Overview of Functions 1-1-3 Controller data transmission function Data in the SPH_CPU can be transmitted to a specified FTP server. WEB system Mail server SPH system Mail recipient WEB module Internet / intranet Data at the time of state change Mail recipient Data in SPH_CPU * Files to be transmitted to FTP server Data file (binary format) Status file (text format) 1-3 Section 1 General 1-1 Overview of Functions 1-1-4 Remote loader function Via the Internet/intranet, the remote operation of the loader is possible. You can use the same loader functions that are available when the loader is directly connected to the loader connector of the CPU module. D300win Monitoring program, rewriting program, etc. SPH system WEB module Internet / intranet Monitoring program, rewriting program, etc. SPH system FL-net, Ethernet WEB module 1-4 Section 1 General 1-1 Overview of Functions 1-1-5 User-created observation page function You can download web pages that you have created with a commercially available homepage creating tool. On the original observation page, you can observe the PLC system and data, and perform data setting. <Example of normal page> Browser (Internet Explorer 5.5 or higher) <Example of user-created page> Browser (Internet Explorer 5.5 or higher) PC for observation/ maintenance The screen can be changed over. * For instructions on how to create user original pages, refer to “MICREX-SX How-to Guide How to create user web pages for WEB module.” 1-5 Section 1 General 1-2 Special Notes Be sure to take notes of your settings. Some setting items of this module (administrator data setup, etc.) cannot be reset to the factory defaults by users for reasons of security. If you lose the setting contents, factory default settings can be restored in Fuji factory. This service is available on a chargeable basis. Do not power the SPH system off while settings are being written into the WEB module; a failure may occur in the module or the SPH system may be stopped in a fatal fault state. Each setting must be uploaded (from the setting page in a browser into the WEB module) in the following order: 1) Controller data settings 2) Mail address settings 3) Change-state settings 4) Table output settings 5) Trend settings 6) Controller memory transmission settings 7) SX-WEB system settings 1-3 Supported Versions When configuring a system using a WEB module, use the following version of the loader: D300winV3: available in all versions D300winV2: V2.2.3.1 or later 1-6 Section 2 Specifications 2-1 General Specifications Item Specification Physical Operating ambient environmental temperature conditions Storage temperature 0 to +55 -25 to 70 Relative humidity 20 to 95%RH, no condensation Pollution degree 2, no condensation Corrosion immunity Free from corrosive gases. Not stained with organic solvents Operating altitude 2000 m or less above sea level Transport condition: 70 kPa (equivalent to 3000 m above sea level) or more Mechanical service conditions Vibration Half amplitude: 0.15 mm, Constant acceleration: 19.6 m/s2 Shock Peak acceleration: 147 m/s2 (3 cycles in each direction) Electrical service conditions Noise immunity Rise time 1 ns, pulse width 1 µs, 1.5 kV (noise simulator) Electrostatic discharge Contact discharge: 6kV, Aerial discharge: 8kV (Class 3 of IEC 61000-4-2) Radioelectromagnetic field 80 MHz to 1000 MHz: 10 V/m (Class 3 of IEC 61000-4-3) Isolation method Not isolated Dielectric strength - Insulation resistance - Number of occupied slots 1 Internal current consumption 24V DC, 80 mA or less (supplied from the power module via the base board) Installation conditions Structure Panel built in type, IP30 Cooling method Natural air cooled Mass Approx. 140g Outside dimensions W35 x H105 x D90 mm 2-1 Section 2 Specifications 2-2 Interface Specifications Setting Specification Ethernet 10BASE-T/100BASE-TX (RJ45 modular jack x 1) Auto-negotiation RS232C (for PPP connection) Max. 115200bps (D-sub 9-pin (male) connector x 1) Character format Data length: 7/8 bits (selectable) Parity: even number/odd number/none (selectable) Stop bit: 1 bit/2 bits (selectable) Hard flow control: available (selectable) 2-3 End Personal Computer Operating Environments Operating environments required for a personal computer to be used for the WEB observation system are shown below. Item Specification Personal computer IBM-AT compatible equipment, NEC PC98 series CPU Intel Pentium 400MHz or higher is recommended. *When WindowsXP is used, 800MHz or higher is recommended. Memory capacity 64MB or more *When WindowsXP is used, 256MB or more is recommended. Communication interface Ethernet Keyboard Japanese 106-key (A01) keyboard (Ctrl + alphanumeric) Display Resolution: 800 x 600 dots (1024 x 768 dots or more is recommended.) Windows95 Japanese or English Edition Windows98SE Japanese or English Edition Operating system WindowsME Japanese or English Edition WindowsNT V4.0 Japanese or English Edition Windows2000 Japanese or English Edition WindowsXP Japanese or English Edition Other software Internet Explorer 5.5 or up 2-2 Section 2 Specifications 2-4 Functional Specifications The WEB module has the following functions: WEB observation function E-mail sending function Controller data transmission function Remote loader function User-created observation page function RAS information function 2-4-1 WEB observation function In a browser of a personal computer, data in the SPH_CPU can be displayed in tabular form, graphic form and event log form and observed. Function Table Trend graph Change-state observation Description Number of displayable tables Max. 2 *Displayed tables can be switched with browser operation. Number of registrable tables Max. 20 Up to 20 items of the controller data can be registered for one table. Update period 5s (default), 10s Data setting function Displayed values of controller data can be rewritten with browser operation. Number of displayable trend graphs 1 * Up to four items of trend data can be displayed on a graph. In addition, displayed trend data can be switched with browser operation. Number of registrable trend graphs Max. 32 Update period Registered controller data update period Data in the SPH_CPU are observed. When the data reachs a specified value, the date and time and the value of the data at the time are stored as an event log in the WEB module. Stored event log Max. 1000 * Event log data can be downloaded with browser operation. * Controller data means data in the SPH_CPU that is registered in the WEB module. You can manage the data in the SPH_CPU under whatever name you please. 2-4-2 E-mail sending function If an event registered as the e-mail sending condition occurs, an e-mail is sent to e-mail addresses registered in the WEB module in advance. There are two types of e-mail send: sending an e-mail to notify you of a state change in the data in the SPH_CPU, and sending data in the SPH_CPU as an e-mail attachment. Function Description Number of registrable mail addresses Max. 16 groups Up to 16 addresses can be registered for one group. Number of registrable mail servers 1 Mail send type Sending an e-mail to notify the user of a state change in data in the SPH_CPU D Register in the "Change-state settings". Sending data in the SPH_CPU as an e-mail attachment D Register in the "Controller memory transmission settings". Mail type Mail can be set for each "Change-state settings" and "Controller memory transmission settings". "Change-state settings" D 32, "Controller memory transmission settings" D 8 Note: The function of sending data in the SPH_CPU as an e-mail attachment is supported by V2033 or later version of this module. 2-3 Section 2 Specifications 2-4 Functional Specifications 2-4-3 Controller data transmission function This function transmits data in the SPH_CPU to FTP server previously designated. Function Description Number of registrable pieces of controller data Max. 8 pieces Max. number of words to be transferred Max. 4096 words Event (transfer condition) Timer event D Timer event specified in the this module: 32 (1s to 100000s) Timer controller event D Bit data in the SPH_CPU: 32 bits Transferable SPH_CPU data M1: Standard memory M3: Retain memory M10: System memory Number of settable FTP server 1 2-4-4 Remote loader function D300win is connected via the Internet. Function Description Number of connectable loaders Up to 4 loaders can be simultaneously connected. Settable port No. 507 to 65533 2-4-5 User-created observation page function With this function, users can download web pages created with a commercially available homepage creating tool. It is possible to observe the PLC system and data, and perform data setting on the original observation page. Function Description Total size of user web pages Max. 1MB User web page creating tool Commercially available homepage creating tool or text editor * For using a text editor, knowledge of HTML is required. Other tool A converting tool is required to convert a created page and transfer it to this module. Download the converting tool from"Technical Information" section of Fuji website. 2-4-6 RAS information function The status of the CPU of the SPH_CPU system, the version information and network information of the WEB module, etc. are displayed. Function Description CPU behavior information Displays the statuses of the CPUs in the SPH system. Version number information Displays the sortware version of the WEB module. Network information Displays the MAC address, host name, domain name, and IP address of the WEB module. Warning information Displays warning information, such as an error occurred while retrieving controller data or sending mails, that have been detected by the module. Module RAS information Displays the status of the WEB module detected by itself. 2-4 Section 2 Specifications 2-5 Names and Functions 2-5-1 Names 1) Status indication LED 2) Connector for 10BASE-T/100BASE-TX connection ONL 100M LNK T/R ERR 3) RS-232C connector (for PPP connection) Nameplate (on the right side of the module) 4) Version label 2-5-2 Functions 1) Status indication LED These LEDs indicate the status of the WEB module. ONL 100M LNK T/R ERR Symbol Color Lighting condition ONL Green Lights when this module is operating normally; Blinks when SX bus is being connected; Unlit when SX bus is abnormal. Red Lights when this module is abnormal (module internal hardware error) or a cause of fatal fault is detected by software. Green Lights when communicating in 100BASE-TX; Unlit: when communicating in 10BASE-T Green Indicates the status of Ethernet connection. Lights when connecting to Ethernet. Green Indicates the status of data transmission. Lights when a send/receive packet occurs. ERR 100M LINK T/R 2) Connector for 10BASE-T/100BASE-TX connection Use a communication cable of 10BASE-T or 100BASE-TX. 2-5 Section 2 Specifications 2-5 Names and Functions 3) RS232C connector (for PPP connection) This connector is used for observing the SX system or sending data via a cellular phone, PHS, or telephone line. M2.6 screw 5 3 4 9 2 7 1 Signal name 1 CD Career detection I 8 2 RD Receive data I 6 3 SD Send data J 4 ER Data end ready J 5 GND - 6 DR Data set ready I 7 RS Send request J 8 CS Send ready I 9 CI M2.6 screw D-sub, 9-pin, male Function I 4) Version label Versions of the hardware and firmware of the WEB module are indicated. 20 32 Direction of signal WEB - External device Pin No. Hardware version Firmware version 2-6 Section 2 Specifications 2-6 Dimensions Unit: mm (Note) 35 90 105 Communication cable Note: When performing installation and wiring work, the bending radius of the cable needs to be taken into consideration. 2-7 Section 3 System Configuration 3-1 Limits on Mounting 3-1-1 Mounting position WEB module (type: NP1L-WE1) can be mounted at any location on the base board that is directly connected to the SX bus of the MICREX-SX series. However, the WEB module cannot be mounted on the base board of a remote I/O, such as OPCN-1, DeviceNet and T-link. <Base board other than 3 or 6-slot base board> Mountable slots <3 or 6-slot base board> Mountable slots Note: WEB module cannot be mounted on T-link, OPCN-1 or other slave station base board. NP1L-RT1 I/O Power supply I/O I/O I/O CPU Power supply NP1L-TL1 3-1 Section 3 System Configuration 3-1 Limits on Mounting 3-1-2 Number of mountable modules Maximum four WEB modules can be connected for one configuration. However, when the modules listed below are connected to the same configuration, the system must be configured such that the total number of WEB modules and the following modules becomes 16 or less. Name Type P-link module NP1L-PL1 PE-link module NP1L-PE1 FL-net module NP1L-FL1/FL2 LE-net loop module NP1L-LL1/LL2 LE-net module NP1L-LE1 General purpose communication module NP1L-RS1/RS2/RS4 PC card interface module NP1L-PC2 Memory card interface module NP1L-MM1 ADS-net module NP1L-AD1 Ethernet module NP1L-ET1/ET2 LONWORKS interface module NP1L-LW1 POD directly connected to SX bus - 3-2 Section 3 System Configuration 3-2 System Configuration 3-2-1 Example of system configuration System definitions with program loader for SX WEB system SPH system PC for observation/ maintenance WEB module Internet / intranet Perform WEB module settings in the browser of a personal computer. Refer to “Section 4 WEB Module Setting.” 3-2-2 System configuration definition <Setting procedure> Double-click “System_Definition” in the project tree to display the system configuration registration screen. 3-3 Section 3 System Configuration 3-2 System Configuration When the WEB module is registered below the CPU module, select the CPU module and then click the [Insert] button. The module insert” dialog appears. Select “Communication” for the module group type and then “NP1L-WE1” from the outline specification box. Click the [OK] button to register the WEB module. Register other modules according to the actual system configuration. * The WEB module is classified as “common module” that does not occupy input/output area. Therefore, it is not necessary to perform “I/O group setting” and “Fail-soft setting”. Compile and download the project, and then reset the SPH system to start up the system. For information about each setting of the WEB module, refer to “Section 4 WEB Module Setting”. 3-4 Section 4 WEB Module Setting 4-1 Overview of Operations 4-1-1 Flowchart from basic setting to operation Start Network connection settings of PC for setting For the system configuration, refer to “Section 4-1-2”. Connect the PC to the WEB module. WEB module basic settings Settings Refer to “Section 4-2-1”. No Use the standard observation page? Yes Create and register user web pages (contents) WEB module observation page settings Connect to the network for operation. Control and observation Operations No An error occurs? Yes Actions to the error (analysis of RAS information, etc.) 4-1 Section 4 WEB Module Setting 4-1 Operations Overview 4-1-2 System configuration for setting Settings of the WEB module are performed in a browser of a personal computer. Prepare a system shown below. <Example of system configuration for initial setting (1)> Program loader for SPH Personal computer loader cable Type: NW0H-CNV (convertor) + NP4H-CB2 (cable) PC for observation MICREX-SX SPH WEB module Category 5 cross-wired cable <Example of system configuration for initial setting (2)> Program loader for SPH Personal computer loader cable Type: NW0H-CNV (convertor) + NP4H-CB2 (cable) PC for observation MICREX-SX SPH WEB module HUB Category 5 straight cable * The program loader for SPH is required to start up the SPH system including the WEB module. For information about the system definition, refer to “Section 3 System Configuration”. Note 1: When connecting a personal computer to the WEB module as shown in “Example of system configuration for initial setting (1)”, use category 5 cross-wired cables. Note 2: When using a hub as shown in “Example of system configuration for initial setting (2)”, use a hub with an uplink to which nothing is connected. For the LAN cable, use category 5 straight cables. Note 3: Use a personal computer with Internet Explorer (IE5.5 or higher) installed. 4-2 Section 4 WEB Module Setting 4-2 Basic Settings WEB module settings are performed on the “WEB observation system” page provided in the WEB module. 4-2-1 Basic settings Connect a personal computer for observation to the WEB module as shown in the examples of system configuration shown in “Section 4-1-2”. Then, activate a browser of the personal computer and access an address “http://192.168.0.1”. The top page of “WEB observation system” is displayed. Note: Set the IP address of the personal computer at “192.168.0.*” (subnet mask: 255.255.255.0). The structure of the top page of the WEB observation system is as follows: WEB system Top page Basic settings Perform network settings to use the WEB module. “Section 4-2” Observation settings Perform settings of data in the SPH_CPU that you want to observe, table/trend observation screen, etc. Control observation The observation screen that is actually used for observing the SPH_CPU is displayed. User contents Observation pages created by users are displayed. RAS information The operating status of the SPH_CPU and errors detected by the WEB module are displayed. 4-3 Section 4 WEB Module Setting 4-2 Basic Settings Clink the [Basic settings] on the top page of WEB observation system to display the “Basic setup list” page. When using for the first time, ignore the user name and pasword entry page and click the [OK] button. The “Basic setup list” page is displayed. Note: Once the administrator information is set, you will need to enter the set user name (administrator log-in ID) and password here. If you failed to enter them three times in a row, this screen disappears and reset is required. 4-4 Section 4 WEB Module Setting 4-2 Basic Settings <Basic setup list> Setup item Overview Administrator data setup Set data about the administrator of this WEB observation system. Once this item is set, only the user registered here can log into the "Basic setup list" page. Basic setting Maintenance Login user registration Set login ID and password of users who access this WEB observation system. Priority setting for limiting each operation or setting is available. Once this item is set, only the administrator and users registered here can access this WEB observation system. Network setup -Host setup Perform network settings of the WEB module. (IP address, subnet mask, etc.) Network setup -DNS setup When obtaining an IP address of the connected device by using DNS server, set data about DNS server to which the WEB module is connected. Network setup -PPP setup Perform PPP settings. PPP is supported by V2033 or later. Mail server setup When using the mail server function of the WEB module, set the necessary items. FTP server setup When using FTP server, set the necessary items. Normally, this setting is not required. User WEB page download setup This setting is used to download user-created contents (observation page, etc.) to the WEB module. 4-5 Section 4 WEB Module Setting 4-2 Basic Settings 4-2-2 Administrator data setup Click the [Administrator data setup] on the “Basic setup list” page to display the “Administrator data setup” page. Setting item Description Number of characters to enter Administrator's name Set the name of the administrator. Max. 39 half-width characters Administrator's organization Set the oraganization to which the administrator belongs. Max. 39 half-width characters Administrator's mail address Set the mail address of the administrator. Max. 31 half-width characters Administrator's Log-in ID Set a log-in ID that permits access to the "Basic setup list" page. Max. 31 half-width characters Password Set a password that permits access to the "Basic setup list" page. Max. 31 half-width characters 4-6 Section 4 WEB Module Setting 4-2 Basic Settings After setting administrator data, click the [Send] button to display the “Administrator data setup check” page. Check the settings and then click the [Write] button to write them to the flash memory of the WEB module. When writing to the WEB module is completed, the “Write complete” page is displayed. Clicking the [Cancel] button stops writing. * It is necessary to power the PLC system off and on again to allow the WEB module to recognize the data written to its flash memory. Important ! Be sure to take notes of your settings. It is not possible for a user to restore factory default settings. To restore factory default settings, you need to send the product back to Fuji factory. This service is available on a chargeable basis. 4-7 Section 4 WEB Module Setting 4-2 Basic Settings 4-2-3 Log-in user registration Click the [Login user registration] on the “Basic setup list” page to display the “Log-in user registration” page. Set the priority, user name and password, and enter the password again for verification. Then click the [Register] button to complete the login user registration. Setting item Description Number of characters to enter Priority Refer to the table shown below. - User name Set a name of a user who is allowed to access this WEB observation system. Max. 31 half-width characters Password Set a password to access this WEB observation system. Max. 31 half-width characters Confirm password Enter the password set above. Max. 31 half-width characters * By using the priority setting, access restrictions can be imposed on a user basis. Priority Target Access right 2 Administrator Allowed to perform basic settings. Allowed to perform observation settings. Allowed to perform control observation. (allowed to write control data during control observation.) 3 Person in charge of observation settings Allowed to perform observation settings. Allowed to perform control observation. (allowed to write control data during control observation.) 4 Person in charge of observation settings Allowed to perform control observation. (allowed to write control data during control observation.) 5 6 Observer Allowed to perform control observation. (read only) Allowed to perform control observation. (read only) 7 Disabled 8 Disabled 4-8 Section 4 WEB Module Setting 4-2 Basic Settings When registration is completed, the user is displayed on the “Registered user ID list”. To delete a registered user, set this checkbox to ON and click the [Delete] button. Clicking [Write] button writes the settings to the flash memory of the WEB module. * It is necessary to power the PLC system off and on again to allow the WEB module to recognize the data written to its flash memory. Important ! Be sure to take notes of your settings. It is not possible for a user to restore factory default settings. To restore factory default settings, you need to send the product back to Fuji factory. This service is available on a chargeable basis. 4-9 Section 4 WEB Module Setting 4-2 Basic Settings 4-2-4 Network setup - Host setup Click the [Host setup] on the “Basic setup list” page to display the “Host setup” page. Setting item Description Use of DHCP To use DHCP, set this checkbox to ON. If DHCP is used, the IP address is automatically obtained. Therefore, it is not necessary to enter the following IP address, subnet mask, and default gateway. By default, this checkbox is set "OFF". Note: If there exists no DHCP server, do not set this checkbox to ON. If this checkbox is set to ON when there exists no DHCP server, it becomes impossible to connect from a browser. Host name Set a host name of the WEB module. (Max. 15 half-width characters) Domain Set a domain name of the WEB module. (Max. 15 half-width characters) IP address Set an IP address of the WEB module. The default is "192.168.0.1". Subnet mask Set a subnet mask of the WEB module. The default is "255.255.255.0". Network name Select an identifier of the network controller that the WEB module uses. Normally, select "eth0". After setting all necessary items, click the [Send] button. The [Host setup check] page is displayed. Check the settings and then click the [Write] button to write them to the flash memory of the WEB module. When writing to the WEB module is completed, the “Write complete” page is displayed. Clicking [Cancel] button stops writing. * It is necessary to power the PLC system off and on again to allow the WEB module to recognize the data written to its flash memory. Important ! Be sure to take notes of your settings. It is not possible for a user to restore factory default settings. To restore factory default settings, you need to send the product back to Fuji factory. This service is available on a chargeable basis. 4-10 Section 4 WEB Module Setting 4-2 Basic Settings 4-2-5 Network setup - DNS setup Click the [DNS setup] on the “Basic setup list” page to display the “DNS setup” page. Setting item Description Number of characters to enter Use DNS To use DNS, set this checkbox to ON and enter a DNS host name, DNS IP address and DNS network name. If there exists no DNS server, do not set this checkbox to ON. - DNS host name Set a host name of DNS. Max. 31 half-width characters DNS IP address Set an IP address of DNS. Max. 31 half-width characters DNS Network name Select an identifier of the network controller that this WEB observation system uses to access DNS server. Normally, select "eth0". - After setting all necessary items, click the [Send] button. The [DNS setup check] page is displayed. Check the settings and then click the [Write] button to write them to the flash memory of the WEB module. When writing to the WEB module is completed, the “Write complete” page is displayed. Clicking [Cancel] button stops writing. * It is necessary to power the PLC system off and on again to allow the WEB module to recognize the data written to its flash memory. Important ! Be sure to take notes of your settings. It is not possible for a user to restore factory default settings. To restore factory default settings, you need to send the product back to Fuji factory. This service is available on a chargeable basis. 4-11 Section 4 WEB Module Setting 4-2 Basic Settings 4-2-6 PPP setup Click the [PPP setup] on the “Basic setup list” page to display the “PPP setup” page. Setting item Description Use PPP To use the PPP function, set this checkbox to ON. Note: If the PPP setting is enabled, an IP address set on this page is enabled and it becomes impossible to access with the IP address set on the "Host setup" page. Host name Set a host name of the mail server. (max. 15 half-width characters) If the host name is changed here, the change is reflected to the host name in the "Host setup". The default is "node". IP address Set an IP address of the WEB module when connecting to the PPP. The default is "192.168.1.1". Subnet mask Set a subnet mask of the WEB module when connecting to the PPP. The default is "255.255.255.0". Network name Select an identifier of the network controller used in the PPP. The default is "com2". Baud rate Select the baud rate, data length, parity bit and stop bit of the serial controller used in the PPP. By default, "9600" is selected for the baud rate, "8 bits" for the data length, "None" for the parity bit, and "1" for the stop bit. Data length Parity bit Stop bit TEL Set a telephone number to connect to a dial-up server . Note: Do not enter any delimiter (hyphen, etc.). 4-12 Section 4 WEB Module Setting 4-2 Basic Settings Note: Do not enter any delimiter (hyphen, etc.). Set an ID and password to log into a dial-up server. Both the ID and password can be up to half-width 31 characters long. ID Password Non-communication supervise time Select a time-up period after which connection is broken. The setting range is 1 to 9999 seconds. The default is "60" seconds. Modem type Select a line type for a modem or adapter to be used. Authentification protocol Select an authentification protocol used when the PPP server is operating. Remote gateway Specify weather the network to which the PPP is connected is used as a remote gateway or not. After setting all necessary items, click the [Send] button. The [PPP setup check] page is displayed. Check the settings and then click the [Write] button to write them to the flash memory of the WEB module. When writing to the WEB module is completed, the “Write complete” page is displayed. Clicking [Cancel] button stops writing. * It is necessary to power the PLC system off and on again to allow the WEB module to recognize the data written to its flash memory. Important ! Be sure to take notes of your settings. It is not possible for a user to restore factory default settings. To restore factory default settings, you need to send the product back to Fuji factory. This service is available on a chargeable basis. 4-13 Section 4 WEB Module Setting 4-2 Basic Settings 4-2-7 Mail server setup Click the [Mail server setup] on the “Basic setup list” page to display the “Mail server setup” page. Setting item Description Number of characters entered Host name Set a host name of the external mail server to which this WEB observation system is connected. Max. 31 half-width characters IP address Set an IP address of the external mail server. When DNS server is not used, be sure to set this IP address. Max. 15 half-width characters Network name Select an identifier of the network controller that this WEB observation system uses to access the external mail server. Normally, select "eth0". Max. 31 half-width characters Port No. Set a port No. of the mail server. Normally, the default of "25" is used. Max. 4-digit number After setting all necessary items, click the [Send] button. The [Mail server setup check] page is displayed. Check the settings and then click the [Write] button to write them to the flash memory of the WEB module. When writing to the WEB module is completed, the “Write complete” page is displayed. Clicking [Cancel] button stops writing. * It is necessary to power the PLC system off and on again to allow the WEB module to recognize the data written to its flash memory. Important ! Be sure to take notes of your settings. It is not possible for a user to restore factory default settings. To restore factory default settings, you need to send the product back to Fuji factory. This service is available on a chargeable basis. 4-14 Section 4 WEB Module Setting 4-2 Basic Settings 4-2-8 FTP server setup Click the [FTP server setup] on the “Basic setup list” page to display the “FTP server setup” page. Setting item Description IP address Set an IP address of the FTP server. Host name Set a host name of the FTP server (max. 15 half-width characters). When the IP address is set, it is not necessary to set this item. Network name Fixed to "eth0" After setting all necessary items, click the [Send] button. The [FTP server setup check] page is displayed. Check the settings and then click the [Write] button to write them to the flash memory of the WEB module. When writing to the WEB module is completed, the “Write complete” page is displayed. Clicking [Cancel] button stops writing. * It is necessary to power the PLC system off and on again to allow the WEB module to recognize the data written to its flash memory. Important ! Be sure to take notes of your settings. It is not possible for a user to restore factory default settings. To restore factory default settings, you need to send the product back to Fuji factory. This service is available on a chargeable basis. 4-15 Section 4 WEB Module Setting 4-3 WEB Observation System You can observe the status of the memory in the CPU and display them in tabular or graphic form on the observation page as shown below. 4-16 Section 4 WEB Module Setting 4-3 WEB Observation System 4-3-1 Observation setting menu Click the [Observation settings] on the top page of “WEB observation system” to display the “Observation setting menu” page. Observation setting menu Controller data settings Set data memory in the CPU that the WEB module deals with. Data set here are used for tables and graphs. Table output settings Set data to output to a table. The data can be selected from the data set in the “Controller data settings.” Trend settings Set a range of a trend graph to be displayed on the observation page and the contents to transmit to the external FTP server. Mail address settings Set destination mail addresses when mails are sent from the WEB module. Change-state settings Perform settings for observing state changes in the data set in the “Controller data settings.” Controller memory transmission settings Set data memory in the CPU to be transmitted to the external FTP server. SX-WEB system settings Set data about the external FTP server that transmits observation data, and “timer event” and “controller data event” that are used as the start timing of transmission. SNTP server settings Set SNTP server. Loader command port settings Set a port to connect D300win loader. The setting range of the port No. is 507 to 65533. 4-17 Section 4 WEB Module Setting 4-3 WEB Observation System 4-3-2 Controller data settings Set memories in SPH_CPU that become the sources of tables and graphs that are to be displayed on the observation page of the WEB module (These memories are called “controller data” in the WEB module) . Controller data are set on a one-by-one basis. Maximum 256 items can be set. (However, for STRING-type data, max. 16 items.) Click the [Controller data settings] on the “Observation setting menu” page to display the “Controller data settings” page. (1) Basic controller data settings Click the [New setting] on the “Controller data settings” page to display the “Basic controller data settings” page. Setting item Description Data name Set a data name within half-width 30 characters long. This is not necessary to be the same as the variable name used in the program of SPH. Note: The following characters are not available: , $ & % ” ’ Data type Select a data type. This must be the same data type as the one specified in the program of SPH. Mamory class Select a memory class in the SPH_CPU. IQ: input/output memory, M1: standard memory, M3: retain memory, M10: system memory SX bus exchange No. Set the SX bus station No. of the target SPH_CPU module. For example, for CPU0, the SX bus station No. is 254. Remote exchange No. If the target module for the controller data setting is remote I/O such as T-link and OPCN-1, set the link station No. Word address Set a word address of the controller data in decimal notation. Bit address Set a bit address of the controller data in decimal notation (0 to 15). Update period Set a period of reading data from the SPH_CPU to the WEB module. The setting range is as follows: 50ms, 100ms, 1s (default), 2s, 5s, 10s, 30s, 1min, 2min, 10min, and 20min. 4-18 Section 4 WEB Module Setting 4-3 WEB Observation System (2) Industry value type setting If you want to use the controller data to be registered after converted to industry values, the data can be converted to industry values by performing industry value type settings in addition to the basic controller data settings. After registering data in “(1) Basic controller data setting”, perform industry value type settings on the “Industry value type setting” box displayed below the “Basic controller data setting” box. Setting item Description Enable industry value type setting If basic controller data is registered in industry value type, select "Enable". Industry value type setting Base scale setting Full case setting Select an industry value type from percentage type, integer type or decimal type. Set a base scale value and full scale value when the industry value is used in percentage type. For the full scale, set a velue at the time when the industry value becomes 100.00%. For the base scale, set a velue at the time when the industry value becomes 0.00%. The industry value can be calculated by the formula shown below. (Industry value) = (Full scale value - Base scale value) x (Input value) 10000 + (Base scale value) * Only following data types can be used for the input value: INT type, DINT type, UINT type, and UDINT type. Unit quantity setting When using the industry value in integer type, enter the quantity of controller data per unit in integer type. Unit setting Set a unit of the industry value within 16 half-width characters long. The following characters are not available: , $ & % ” ’ 4-19 Section 4 WEB Module Setting 4-3 WEB Observation System After setting all necessary items, click the [Send] button to display the page shown below. When you want to continue to register controller data, click the [New setting] button. If you click the [Top setting screen], the specified controller data are displayed. <Other functions on the controller data setting page> 1) Download settings Data registered on the controller data setting page is downloaded to a file in the personal computer in the CSV format. Default name: CNT_DT. CSV 2) Upload settings Data about controller settings that have previously been stored in the file (in “1) Download settings”) is read to the WEB module. Note: Do not edit the CSV file downloaded. Do not upload a CSV file edited with EXCEL, etc. 3) Delete settings All the set data are deleted. Note: If the “Delete settings” command is executed, controller data that are registered in the trend settings, change-state settings, etc. are also deleted. 4-20 Section 4 WEB Module Setting 4-3 WEB Observation System 4-3-3 Table output settings Set contents of tables that are to be displayed on the observation page. Up to 20 tables can be registered. Click the [Table output settings] on the “Observation setting menu” page to display the “Table output settings” page. Click the [New setting] on the “Table output settings” page to display the setting page shown below. Setting item Description Table title Set a table title to be displayed on the observation page within 32 half-width characters long. Note: The following characters are not available: , $ & % ” ’ Update period Select a update period of the table data from 5s (default) or 10s. Data name Set controller data to be displayed on the table. Up to 20 items of controller data can be set for one table. Attribute Select an attribute of the controller data. Raw data: Data in the memory are displayed as it is. Industry value: If the industry value type setting is enabled for the controller data, the data is outputted in the specified industry value type. Integral value: If the controller data is BOOL type and "itegrals" is enabled in the change-state settings discribed later, this is enabled. A value that the leading edges or trailing edges of the data are counted is displayed. 4-21 Section 4 WEB Module Setting 4-3 WEB Observation System After setting all necessary items, click the [Send] button to display the page shown below. When you want to continue the table output setting, click the [New setting] button. If you click the [Top setting screen], the specified tables are displayed. To save the table output data registered, click the “Save settings”. A message appears saying “Setting data was saved to flash memory.” and the setting data is stored in the WEB module. <Other functions on the table output setting page> 1) Download settings Data registered on the table output setting page is downloaded to a file in the personal computer in the CSV format. Default name: CCF_DT. CSV 2) Upload settings Data about table output settings that have previously been stored in the file (in “1) Download settings”) is read to the WEB module. Note: Do not edit the CSV file downloaded. Do not upload a CSV file edited with EXCEL, etc. 3) Delete settings All the set data are deleted. 4-22 Section 4 WEB Module Setting 4-3 WEB Observation System 4-3-4 Trend settings Set trend graphs that are to be displayed on the observation page of the WEB module. Up to 32 trend graphs can be registered. For the retrieval period of the trend data, the period set in the “controller data” is applied. In addition, up to 10000 items of trend data are collected for one trend graph. If more than 10000 items are collected, they are deleted in chronological order. Click the [Trend settings] on the “Observation setting menu” page to display the “Trend settings” page. Click the [New setting] on the “Trend settings” page to display the setting page shown below. Select data for trend setting (only controller data with industry value setting can be selected) and click the “Select” button to display the following setting page. 4-23 Section 4 WEB Module Setting 4-3 WEB Observation System Setting item Description Trend graph range settings Set the maximum value and minimum value when trend data is displayed on the standard observation page. Individual settings for FTP transmission Set these items when trend data is transmitted to an external FTP server. If trend data is not transfmitted to an external server, it is not necessary to set these items. * For details of these settings, refer to "5-3-1 FTP transmission of trend data". 4-24 Section 4 WEB Module Setting 4-3 WEB Observation System After setting all necessary items, click the [Send] button to display the page shown below. When you want to continue the trend setting, click the [New setting] button. If you click the [Top setting screen], the specified trend data are displayed. To save the trend settings registered, click the “Save settings”. A message appears saying “Setting data was saved to flash memory.” and the setting data is stored in the WEB module. <Other functions on the trend setting page> 1) Download settings Data registered on the trend setting page is downloaded to a file in the personal computer in the CSV format. Default name: TREND_DT. CSV 2) Upload settings Data about trend settings that have previously been stored in the file (in “1) Download settings”) is read to the WEB module. Note: Do not edit the CSV file downloaded. Do not upload a CSV file edited with EXCEL, etc. 3) Delete settings All the set data are deleted. 4-25 Section 4 WEB Module Setting 4-3 WEB Observation System 4-3-5 Mail address settings Set destination mail addresses when the WEB module sends mails. Up to 16 mail address groups can be set (up to 16 mail addresses can be set for one group). Click the [Mail address settings] on the “Observation setting menu” page to display the “Mail address settings” page. Click the [New setting] on the “Mail address settings” page to display the setting page shown below. Setting item Description Mail address group name Set a mail address group name within 32 half-width characters long. Note: The following characters are not available: , $ & % ” ’ Mail address settings Set mail addresses. Up to 16 mail addresses can be set for one mail address group. 4-26 Section 4 WEB Module Setting 4-3 WEB Observation System After setting all necessary items, click the [Send] button to display the page shown below. When you want to continue the mail address setting, click the [New setting] button. If you click the [Top setting screen], the specified mail address groups are displayed. To save the mail address settings registered, click the “Save settings”. A message appears saying “Setting data was saved to flash memory.” and the setting data is stored in the WEB module. <Other functions on the mail address setting page> 1) Download settings Data registered on the mail address setting page is downloaded to a file in the personal computer in the CSV format. Default name: MAIL_DT. CSV 2) Upload settings Data about mail address settings that have previously been stored in the file (in “1) Download settings”) is read to the WEB module. Note: Do not edit the CSV file downloaded. Do not upload a CSV file edited with EXCEL, etc. 3) Delete settings All the set data are deleted. 4-27 Section 4 WEB Module Setting 4-3 WEB Observation System 4-3-6 Change-state settings Set how the WEB module works when the state of the specified controller data (BOOL type data or data converted to industry value type) changes. State-change setting can be performed for up to 32 items. Click the [Change-state settings] on the “Observation setting menu” page to display the “Change-state settings” page. Click the [New setting] on the “Change-state settings” page to display the setting page shown below. Select data for change-state setting and click the [Select] button. The event setting page is displayed. The event setting page varies depending on the selected data type (BOOL type or industry value type). 4-28 Section 4 WEB Module Setting 4-3 WEB Observation System (1) For BOOL type controller data Setting item Description Event name Set an event name at the time when the state changes within 20 half-width characters long. Note: The following characters are not available: , $ & % ” ’ Enable integrals If this checkbox is set to ON, the number of times the controller data has risen is counted and an event occurs if the count exceeds the specified integral high high limit value and integral high limit value. Enable event log If this checkbox is set to ON, this data is collected and recorded. 1000 occurrences of the event are held. What are recorded as a event log are as follows: Date/time of occurrence of the event: year, month, day, hour, minute, and second Data value of the controller data in which an event has occurred Integral velue if "integrals" is enabled. Enable mail sending If this checkbox is set to ON, a mail is sent to the specified mail address group when the condicitons are met. The contents of the mail can be set in the "Change-state mail settings" described later. Controller data write setting When an event occurs, a set value is written to a specified controller data. Writing of data is performed only when the event occurs. The value to be written must match the data format of the destination controller data. Integ hh limit value If the integral value exceeds a value set here, an event of "integral high high limit value" occurs. The integral value can be up to 65535 times. Integ h limit value If the integral value exceeds a value set here, an event of "integral high limit value" occurs. The integral value can be up to 65534 times. 4-29 Section 4 WEB Module Setting 4-3 WEB Observation System (2) For intustry value type controller data Setting item Description Event name Set an event name at the time when the state changes and name at the time when restored within 20 half-width characters long. Note: The following characters are not available: , $ & % ” ’ Enable event log If this checkbox is set to ON, this data is collected and recorded. 1000 occurrences of the event are held. What are recorded as a event log are as follows: Date/time of occurrence of the event: year, month, day, hour, minute, and second Data value of the controller data in which an event has occurred Enable mail sending If this checkbox is set to ON, an e-mail is sent to a specified mail address group when the condicitons are met. The contents of the mail can be set in the "Change-state mail settings" described later. Controller data write setting When an event occurs, a set value is written to a specified controller data. Writing of data is performed only when the event occurs. The value to be written must match the data type of the destination controller data. H h limit value If the integral value exceeds a value set here, an event of "high high limit value" occurs. H limit value If the integral value exceeds a value set here, an event of "high limit value" occurs. L limit value If the integral value exceeds a value set here, an event of "low limit value" occurs. L l limit value If the integral value exceeds a value set here, an event of "low low limit value" occurs. Hysteresis value For each high high limit value, high limit value, low limit value and low low limit value, set a hysteresis value for a change in the controller data. Each set value subtracted by the value defined here is the recovery value. 4-30 Section 4 WEB Module Setting 4-3 WEB Observation System (3) Change-state mail settings When an event occurs, mails can be sent to a specified mail address group. The change-state mail setting box is displayed below the event setting box. Setting item Description Select mail destination address group Select mail address groups to which mails are sent when an event occurs. Text Create mail text within 60 half-width characters long. Select data name to be written in mail text Values at the time of occurrence of an event can be written to the mail text. Up to 6 items of controller data can be set. After setting all necessary items, click the [Send] button to display the page shown below. When you want to continue the state-change setting, click the [New setting] button. If you click the [Setting top screen], the set data are displayed. To save the change-state settings registered, click the “Save settings”. A message appears saying “Setting data was saved to flash memory.” and the setting data is stored in the WEB module. 4-31 Section 4 WEB Module Setting 4-3 WEB Observation System <Other functions on the change-state setting page> 1) Download settings Data registered on the change-state setting page is downloaded to a file in the personal computer in the CSV format. Default name: ALARM_DT. CSV 2) Upload settings Data about change-state settings that have previously been stored in the file (in “1) Download settings”) is read to the WEB module. Note: Do not edit the CSV file downloaded. Do not upload a CSV file edited with EXCEL, etc. 3) Delete settings All the set data are deleted. 4-32 Section 4 WEB Module Setting 4-3 WEB Observation System 4-3-7 Controller memory transmission settings The memory in the SPH_CPU is transmitted to FTP or as an e-mail attachment. Click the [Controller memory transmission settings] on the “Observation setting menu” page to display the “Controller memory transmission settings” page. Click the [New setting] on the “Controller memory transmission settings” page to display the setting page shown below. Setting item Description Transmitted controller data setting Specify data to be transmitted by setting "CPU SX bus exchange No.", "Memory class, "Word address" and "Size". * Available memory classes are as follows: M1: Standard memory, M3: Retain memory, and M10: System memory * For the size, up to 4096 words can be specified. However, be sure not to exceed each memory boundary. Transmission system Choose between FTP transmission or transmission as an e-mail attachment. It is possible to choose both. Path name (Note) For FTP transmission, specify a destination file. Set a relative path name from the route path of 4-33 Section 4 WEB Module Setting 4-3 WEB Observation System Path name (Note) For FTP transmission, specify a destination file. Set a relative path name from the route path of the external FTP server. The path name can be up to 63 half-width characters. Use "\" as folder delimiters. Filename (Note) Set a filename used in the destination external FTP server within 31 half-width characters long. No extension is required. Enable date/time appending If "Enable" is selected, date and time data (calendar data of the CPU module) is appended to the filename. For example, when the filename is "ABC" and a date and time is "October 10, 2004 10:32:36," Data file: "ABC20041010_153236.dat" Status file: "ABC20041010_153236.sta" Event class Set a timing of data transmission to the FTP server. Choose between the following two transmission types: Timer event: Data is periodically transmitted by the timer. Controller event: Data is transmitted when its state changes. The settings for data actually used as the timer and trigger are performed on the "SX-WEB system settings" page described later. Up to 32 event flags can be set. What number event flag is used is specified here. Event number Select mail destination address group Select a mail address group to which mails are sent and specify whether a file is attached or not. Subject Set a mail subject within 31 half-width characters long. Text Set mail text within 60 half-width characters long. Note: The following characters are not available: , $ & % ” ’ After setting all necessary items, click the [Send] button to display the page shown below. When you want to continue the controller memory transmission setting, click the [New setting] button. If you click the [Top setting screen], the set data are displayed. To save the controller memory transmission settings registered, click the “Save settings”. A message appears saying “Setting data was saved to flash memory.” and the setting data is stored in the WEB module. 4-34 Section 4 WEB Module Setting 4-3 WEB Observation System <Other functions on the controller memory transmission setting page> 1) Download settings Data registered on the controller memory transmission setting page is downloaded to a file in the personal computer in the CSV format. Default name: CDT_TRN. CSV 2) Upload settings Data about controller memory transmission settings that have previously been stored in the file (in “1) Download settings”) is read to the WEB module. Note: Do not edit the CSV file downloaded. Do not upload a CSV file edited with EXCEL, etc. 3) Delete settings All the set data are deleted. 4-3-8 SX-WEB system settings Set the FTP server for sending observation files, timer event flag and controller data event flag. Click the [SX-WEB system settings] on the “Observation setting menu” page to display the page shown below. (1) FTP server settings for sending observation file Set the destination FTP server. Click the [Edit] for “FTP server settings for sending observation file” on the “SX-WEB system settings” page to display the page shown below. 4-35 Section 4 WEB Module Setting 4-3 WEB Observation System Setting item Description IP address Set an IP address of the FTP server. Host name Set a host name of the FTP server within 15 half-width characters long. When the IP address is set, it is not necessary to set this item. Domain name Set a domain name of the FTP server if necessary. FTP server account setting Set a login name to check users who access the FTP server within 31 half-width characters long. - Login name FTP server account setting Set a password to check users who access the FTP server within 31 half-width characters long. - Password After setting all necessary items, click the [Send] button to display the page to inform you of the completion of the writing. If you click the [Top setting screen], the set data are displayed. (2) Timer event flag settings Set a occurrence period of timer event flag. Up to 32 timer event flags can be set. The interval between events can be set within the range of 1s to 10000s. When setting at “0”, no event occurs. Click the [Edit] for “Timer event flag” on the “SX-WEB system settings” page to display the page shown below. After setting all necessary items, click the [Send] button to display the page to inform you of the completion of the writing. If you click the [Top setting scree], the set data are displayed. 4-36 Section 4 WEB Module Setting 4-3 WEB Observation System (3) Controller data event flag setting Designate a memory in the SPH_CPU as an event occurrence flag Click the [Edit] for “Controller data event flag” on the “SX-WEB system settings” page to display the page shown below. Setting item Description Setting enabled Select "enable" to set a memory in the SX_CPU as an event flag. CPU SX bus exchange No. Set the SX bus exchange No. of the target CPU. For CPU0, select 254. Memory class Set a memory in the CPU. Available memory classes are as follows: M1: Standard memory, M3: Retain memory, and M10: System memory Word address Set a word address. Two words (32 points) from the controller data set here (the set word address and the following address) are reserved as an event flag. * Details of controller event flag Event No. Set word address 15 14 13 12 11 10 9 8 7 6 31 30 29 28 27 26 25 24 23 22 5 4 21 20 3 2 1 0 19 18 17 16 * The set word address and the following address are occupied as the controller event flag. Occurrence of event: An event occurs when the bit corresponding to the event No. that is set in the WEB module is set ON from an application. This area is loaded into the WEB module every one second. End of event: When an event ends (data is transmitted to the FTP server), the WEB module resets the flag of the corresponding event No. 4-37 Section 4 WEB Module Setting 4-3 WEB Observation System After setting all necessary items, click the [Send] button to display the page to inform you of the completion of the writing. If you click the [Top setting screen], the set data are displayed. To save the settings registered, click the “Save settings”. A message appears saying “Setting data was saved to flash memory.” and the setting data is stored in the WEB module. <Other functions on the SX-WEB system setting page> 1) Download settings Data registered on the SX-WEB system setting page is downloaded to a file in the personal computer in the CSV format. Default name: SX_SYS. CSV 2) Upload settings The setting data that have previously been stored in the file (in “1) Download settings”) is read. Note: Do not edit the CSV file downloaded. Do not upload a CSV file edited with EXCEL, etc. 3) Delete settings All the set data are deleted. 4-38 Section 4 WEB Module Setting 4-3 WEB Observation System 4-3-9 SNTP server settings The calendar data in the SPH_CPU is corrected by accessing the external SNTP server. Click the [SNTP server settings] on the “Observation setting menu” page to display the setting page shown below. Setting item Description SNTP server settings IP address Set an IP address of the SNTP server. Server access time At intervals of the specified time, the time is corrected by accessing SNTP server. To save the settings registered, click the “Save settings”. A message appears saying “The set data was saved to the flash memory” and the set data is stored in the WEB module. * If you click the [Send] button, you can immediately access the SNTPserver. <Other functions on the SNTP server setting page> 1) Download settings Data registered on the setting page is downloaded to a file in the personal computer in the CSV format. Default name: NTP_SET. CSV 2) Upload settings The setting data that have previously been stored in the file (in “1) Download settings”) is read. Note: Do not edit the CSV file downloaded. Do not upload a CSV file edited with EXCEL, etc. 3) Delete settings All the set data are deleted. 4-39 Section 4 WEB Module Setting 4-3 WEB Observation System 4-3-10 Loader command port settings When connecting D300win loader via the Internet or intranet, set the communication port of the WEB module for connecting D300win. Click the [Loader command port settings] on the “Observation setting menu” page to display the setting page shown below. Set the port number in the range of 507 to 65533, and then click the [Send] button to display the page shown below. Note: The port whose No. is the set port No. plus 2 is occupied. For example, if you set the port No. at 507, the port Nos. 507 and 509 are occupied. Clicking the [Top setting screen] returns you to the “Loader command port settings” page. Click the “Save settings” to write the set data into the flash memory of the WEB module. <Other functions on the loader command port setting page> 1) Download settings Data registered on the setting page is downloaded to a file in the personal computer in the CSV format. Default name: LCP_SET. CSV 2) Upload settings The setting data that have previously been stored in the file (in “1) Download settings”) is read. Note: Do not edit the CSV file downloaded. Do not upload a CSV file edited with EXCEL, etc. 3) Delete settings All the set data are deleted. 4-40 Section 5 WEB Module Operation To operate the WEB system, use the following three functions of the WEB module: Observation on the WEB screen Generating an alarm via e-mail Data transmission via FTP 5-1 Data Observation on Standard WEB Observation Page Activate a browser of the personal computer for setting, and access the WEB module. The initial screen of the “WEB observation system” is displayed as shown below. * * The IP address of the WEB module is a address specified in “4-2-4 Network setup - Host setup”. By default, this is set at “192.168.0.1” and the subnet mask is set at “255. 255. 255. 0”. 5-1 Section 5 WEB Module Operation 5-1 Data Observation on Standard WEB Observation Page Click the [Control observation] on the screen to display the “Observation screen manu” screen is displayed. 5-1-1 Observation screen menu On the “observation screen menu” screen, select the display format of the observation screen. (1) Single format observation screen Table output ................. One table is displayed on the observation screen. Output event log ........... One event log is displayed on the observation screen. Trend graph ................. One trend graph is displayed on the observation screen. (2) Complex format observation screen Output layout 1 ............. Output layout 2 ............. Output layout 3 ............. Output layout 4 ............. One trend graph, two tables and one event log are displayed on the observation screen. Two tables and one event log are displayed on the observation screen. One trend graph and one event log are displayed on the observation screen. One trend graph and two tables are displayed on the observation screen. 5-2 Section 5 WEB Module Operation 5-1 Data Observation on Standard WEB Observation Page 5-1-2 Single format observation screen - Table output (1) Display Only one table is displayed on the observation screen. Click the “Table output” on the “observation setting menu” screen to display the tables registered in the “Table output settings”. <Display specifications> Display item Description Data name The name of the controller data is displayed. Current value Values of the controller data are displayed. When data cannot be acquired, "\Not acquired\" is displayed, and when data acquisition results in failure, "\Acquisition failed\" is displayed. Unit For raw data: "raw" For integrated value: "product" For industry type: The set unit is displayed. Alter value The controller data is rewritten from the observation screen. Display ordinal The display of the controller data is switched between decimal and hexadecimal. Update period The update period set in the "table output settings" is displayed. [Alter table] button The table currently displayed on the observation screen is switched to another table. [Start/Begin automatic update] The automatic update of a value of the controller data can be enabled or disabled. button 5-3 Section 5 WEB Module Operation 5-1 Data Observation on Standard WEB Observation Page (2) Switching displayed table Click the [Alter table] button to display the [Alter table] screen. Select a table from the menu box and click the [Done] button. The selected table is displayed on the observation screen. (3) Altering a value Click the [Alter value] on the table to display the screen to rewrite the selected controller data. After altering the value, click the [Send] button. The value of the controller data is altered and the following screen is displayed. Note: Only values of memory in the CPU0 can be altered. 5-4 Section 5 WEB Module Operation 5-1 Data Observation on Standard WEB Observation Page 5-1-3 Single format observation screen - Trend graph Only one trend graph is displayed on the observation screen. Click the “Trend graph” on the observation screen menu. The controller data registered in the “Trend settings” is displayed on a trend graph. * Event data registered first in the [Trend settings] of the “Observation settings” is initially displayed on the page. Select trend data that you want to display on the trend graph. For the trend data, data registered in the [Trend settings] of the “Observation settings” can be selected. Select the vertical and horizontal scales of the graph to be displayed. The settings of the trend data whose button is set ON are reflected. Select trend data to be displayed. Set this checkbox to ON. 5-5 Section 5 WEB Module Operation 5-1 Data Observation on Standard WEB Observation Page The selected trend data is displayed. 5-1-4 Single format observation screen - Output event log (1) Display The detection status of the event logs that are set in the [Change-state settings] of the “Observation settings” is displayed on the list. Click the “Output event log” on the observation screen menu to display events that have occurred. <Display specifications> Display item Description Date A calendar value at the time when an event occurs is displayed. The displayed data is a calendar value in the SPH_CPU. Data name The name of the cotroller data is displayed. Value Controller data at the time when an event occurs is displayed. Unit The unit set in the controller data settings is displayed. Event The event log name set in the change-state settings is displayed. Integrated value On/on times of the BOOL-type data during state change is displayed. For events to be displayed, it is necessary to set the [enable integrals] and [enable event log] to ON. 5-6 Section 5 WEB Module Operation 5-1 Data Observation on Standard WEB Observation Page (2) Downloading event logs Up to 1000 items of event log information are stored in the WEB module. These event log data can be downloaded to a specified file in the personal computer. Click the [Download 1000 entries] to display the [File Download] dialog. Click the [Save] button to display the [Save As] dialog. Default filename is “EVENT_LOG.csv”. Enter an arbitrary filename and click the [Save] button to start download. When download is completed, the [Download complete] dialog is displayed. 5-7 Section 5 WEB Module Operation 5-1 Data Observation on Standard WEB Observation Page 5-1-5 Complex format observation screen On the observation screen, multiple contents (table, trend graph, event log) can be displayed at the same time. You can select the layout from among the following four formats. (1) Layout output 1 One trend graph, two tables and one event log are displayed. * Partition lines between contents can be moved by dragging them. 5-8 Section 5 WEB Module Operation 5-1 Data Observation on Standard WEB Observation Page (2) Layout output 2 Two tables and one event log are displayed. * Partition lines between contents can be moved by dragging them. (3) Layout output 3 One trend graph and one event log are displayed. * Partition lines between contents can be moved by dragging them. 5-9 Section 5 WEB Module Operation 5-1 Data Observation on Standard WEB Observation Page (4) Layout output 4 One trend graph and two tables are displayed. * Partition lines between contents can be moved by dragging them. 5-10 Section 5 WEB Module Operation 5-2 Generating an Alarm and Sending Data by E-mail The following two e-mail sending functions are provided. State changes in data in the SPH_CPU are notified by e-mail. Data in the SPH_CPU is sent by e-mail at a specified timing (event). The data in the SPH-CPU is sent as an e-mail attachment. 5-2-1 Sending mails informing state change of SPH_CPU Procedure for sending mails informing state changes 1) Registration of a mail server D Set the “Mail server setup” in the “Basic setup”. 2) Registration of destination of the mail D Perform the “Mail address settings” in the “Observation settings”. 3) Change-state mail settings D Perform the “Change-state settings” in the “Observation settings”. (1) Registration of a mail server 1) Prepare a mail server that receives mails from the WEB module. When the WEB module is connected to the intranet, use a mail server on the intranet. When the WEB module is connected to the Internet, use a mail server that is provided by a provider. 2) Register the prepared mail server to the WEB module in the “Mail server setup” in the “Basic setup” from a browser. D For the setting procedure, refer to “4-2-7 Mail server setup”. (2) Registration of destination of the mail In the WEB module, mail address groups (max. 16 groups) and up to 16 mail addresses per group can be registered. D For the setting procedure, refer to “4-3-5 Mail address settings”. (3) Change-state mail settings 1) Perform event setting in the “Change-state settings” of the “Observation settings”. To designate the set events as conditions for e-mail send, set the “Enable mail sending” checkbox to ON on the setting page. 2) On the “Change-state mail settings” box on the “Change-state detection settings” page, set a destination mail group, mail text, and data appended to the text. 5-11 Section 5 WEB Module Operation 5-2 Generating an Alarm and Sending Data by E-mail 5-2-2 Sending data in SPH_CPU as an e-mail attachment Procedure for sending data in the SPH_CPU as an e-mail attachment 1) Registration of a mail server D Set the “Mail server setup” in the “Basic setup”. 2) Registration of destination of the mail D Perform the “Mail address settings” in the “Observation settings”. 3) Setting data in SPH_CPU to be transmitted D Perform the “Controller memory transmission settings” in the “Observation settings”. (1) Registration of a mail server 1) Prepare a mail server that receives mails from the WEB module. When the WEB module is connected to the intranet, use a mail server on the intranet. When the WEB module is connected to the Internet, use a mail server that is provided by a provider. 2) Register the prepared mail server to the WEB module in the “Mail server setup” in the “Basic setup” from a browser. D For the setting procedure, refer to “4-2-7 Mail server setup”. (2) Registration of destination of the mail In the WEB module, mail address groups (max. 16 groups) and up to 16 mail addresses per group can be registered. D For the setting procedure, refer to “4-3-5 Mail address settings”. (3) Change-state mail settings 1) Select data to be transmitted in the “Controller memory transmission settings” of the “Observation settings”. Select CPU0. Select the retain memory. Specify address 0. The retain memory %MW3.0 to %MW3.9 are specified. Specify 10 words. 2) On the “Individual settings for transmission” box, set the “Mail send” checkbox to ON. In addition, set a filename (a name of an attached file), date/time appending, event to be transmitted, mail destination address group, mail subject, and mail text. 5-12 Section 5 WEB Module Operation 5-3 FTP Transmission Function FTP transmission function is used to transmit data in the SPH_CPU to an external FTP server. For the FTP transmission, the following two types of data transmission functions are provided. Function of transmitting trend data that is loaded into the WEB module to the FTP server. Function of transmitting data in the SPH_CPU to the FTP server. 5-3-1 FTP transmission of trend data Procedure for FTP transmission of trend data 1) Registration of FTP server D Perform the “FTP server settings” in the “SX-WEB system settings” of the “Observation settings”. 2) Individual settings for FTP transmission of trend data D Perform the “Individual settings for FTP transmission” in the “Trend settings” of the “Observation settings”. (1) Registration of FTP server 1) Prepare FTP server that receives data from the WEB module. When the WEB module is connected to the intranet, use FTP server on the intranet. When the WEB module is connected to the Internet, use FTP server, etc. that is provided by a provider. 2) Register the prepared FTP server to the WEB module in the “Individual settings for FTP transmission” in the “Trend settings” of the “Observation settings”. D For the setting procedure, refer to “4-3-8 SX-WEB system settings”. (2) Individual settings for FTP transmission 1) Select “Enabled” for the “Enable trend data FTP transmission” on the “Individual settings for FTP transmission” box in the “Trend settings” of the “Observation settings”. In addition, set a path name (a file in which data is stored), filename, date/ time appending, and event to be transmitted. Setting item Description Enable trend data FTP transmission If "Enabled" is selected, trend data (data file and status file) is transmitted to the FTP server. Path name (Note) For FTP transmission, specify a destination file. Set a relative path name from the route path of the external FTP server. The path name can be up to 63 half-width characters. Use "\" as folder delimiters. Filename (Note) Set a filename used in the destination external FTP server within 31 half-width characters long. No extension is required. Trend data file: "Filename.dat", Status file: "Filename.sta" Enable date/time appending If "Enable" is selected, date and time data (calendar data of the CPU module) is appended to the filename. For example, when the filename is "ABC" and a date and time is "October 10, 2004 10:32:36," Data file: "ABC20041010_153236.dat" Status file: "ABC20041010_153236.sta" Event class Set a timing of data transmission to the FTP server. Choose between the following two transmission types: Timer event: Data is periodically transmitted by the timer. Controller event: Data is transmitted when its state changes. The settings for data actually used as the timer and trigger are performed on the "SX-WEB system settings" page described later. Up to 32 event flags can be set. What number event flag is used is specified here. Event number Note: The following characters are not available: , $ & % ” ’ 5-13 Section 5 WEB Module Operation 5-3 FTP Transmission Function 5-3-2 FTP transmission of data in SPH_CPU Procedure for FTP transmission of data in the SPH_CPU 1) Registration of FTP server D Perform the “FTP server settings” of the “SX-WEB system settings” in the “Observation settings”. 2) Transmitted controller data setting D Perform the “Transmitted controller data setting” in the “Controller memory transmission settings” of the “Observation settings”. (1) Registration of FTP server 1) Prepare FTP server that receives data from the WEB module. When the WEB module is connected to the intranet, use FTP server on the intranet. When the WEB module is connected to the Internet, use FTP server, etc. that is provided by a provider. 2) Register the prepared FTP server to the WEB module in the “Individual settings for FTP transmission” in the “Trend settings” of the “Observation settings”. D For the setting procedure, refer to “4-3-8 SX-WEB system settings”. (2) Controller memory transmission settings In the “Controller memory transmission settings” of the “Observation settings”, set data in the SPH_CPU to be transmitted to the FTP server, destination folder in the FTP server, filename, and transmission timing (transmission event). 5-14 Section 5 WEB Module Operation 5-4 Remote Loader Function D300win can be connected to the SPH_CPU via the Internet or intranet from remote locations. Up to four D300win loaders can be connected to one WEB module. You can use the same loader functions that are available when the loader is directly connected to the loader connector of the CPU module. 5-4-1 Setting D300win Start up D300win and open a project that is stored in the connected SPH_CPU. Then, right-click the resource icon in the project tree and execute the [Setting...] command. The “Resource setting of MICREX-SX” dialog is displayed. Click the [Communication setting...] button on the [Resource setting of MICREX-SX] dialog to display the [Communication setting] dialog. To connect D300win to the WEB module, set the “Communication Board” button to ON. Then, select the “Ethernet” for the board type and enter “the IP address of the connected WEB module and port number set in the WEB module” in the parameter field. * Between the IP address of the connected WEB module and port number set in the WEB module, enter a space. Click the [OK] button to complete the setting. 5-15 Section 6 Troubleshooting The troubleshooting and failure diagnostic functions that can be used from remote locations via the Internet or intranet are as follows: Monitoring RAS information on the standard observation screen of the WEB module. Diagnosing problems with the failure diagnostic function of D300win (connect D300win to the loader connector of SPH_CPU.) 6-1 Diagnosis on Standard Observation Screen With the “RAS information” provided on the standard observation screen of the WEB module, information about the SPH system and the WEB module can be monitored. Click the [RAS information] on the top page of the WEB observation system to display the [RAS information] screen. 6-1 Section 6 Troubleshooting 6-1 Diagnosis on Standard Observation Screen <Structure of RAS information screen> The structure of the RAS information page is as follows: RAS information CPU behavior information Operating information of SPH_CPU is displayed. Version number information The software version of the WEB module is displayed. Network information Network information of the WEB module (MAC address, host name, domain name, and IP address) is displayed. Warning information Errors that occurred while collecting data in SPH_CPU or sending mails are displayed. Module RAS information The status of the WEB module that is detected by itself is displayed. 6-2 Section 6 Troubleshooting 6-1 Diagnosis on Standard Observation Screen 6-1-1 CPU module behavior information The operating statuses of the CPUs in the SPH system to which the WEB module is connected is displayed. (Operating, Suspending, Serious error or Not installed). Click the [CPU behavior information] on the [RAS information] screen to display the [CPU module behavior information] page. 6-1-2 Version number information The software version of the WEB module is displayed. Click the [Version number information] on the [RAS information] screen to display the [Version number information] screen. 6-3 Section 6 Troubleshooting 6-1 Diagnosis on Standard Observation Screen 6-1-3 Network information The “MAC address”, “host name”, “domain name” and “IP address” are displayed. Click the [Network information] on the [RAS information] screen to display the [Network information] screen. 6-4 Section 6 Troubleshooting 6-1 Diagnosis on Standard Observation Screen 6-1-4 Warning information Errors that occurred while collecting controller data or sending mails and have been detected by the WEB module are displayed. Click the [Warning information] on the [RAS information] screen to display the [Warning information] screen. <Warning messages> Message Cause Could not send state-change mail; send queue is full. Displayed when too many mail send requests have occurred in a short time, therefore, it becomes impossible to join the queue for mails waiting to be transmitted (waiting buffer). The queue holds up to 100 mail send requests. If the queue is full, requests that cannot join the queue are abandoned. Could not perform state-change Displayed when too many controller data write requests have occurred in a short time during write of controller data; request state change, therefore, it becomes impossible to join the queue. The queue holds up to 100 write requests. If the queue is full, requests that cannot join the queue are abandoned. queue is full. Failed to send mail. Displayed when mails cannot be sent due to mail server down or a mail setting error. Read failed. Controller data name: *** Displayed when periodic reading of controller data has failed. If it has successively failed, this message is not displayed. This error is caused by disconnection of the destination CPU or a controller data setting error. Write failed. Controller data name: *** Displayed when a write request has occurred from table output, etc. This error is caused by disconnection of the destination CPU or a controller data setting error. Fixed period retrieval of controller data, set with **ms period, failed. Displayed when another retrieval period begins before data rettrieval at the previous period has not ended yet. This can be displayed when the load of the CPU has been increased. An event fired but could not execute because the previous event has not terminated. Displayed when the next timer event occurs before the previous timer event has not ended yet. FTP transmission could not be performed; FTP transmission requests are full. Displayed when too many FTP transmission requests have ocurred in a short time, therefore, it becomes impossible to join the queue. The queue holds up to 40 FTP transmission requests. FTP server connection error Untransmitted filename: *** Displayed when it is impossible to connect to the FTP server. This error is caused by an FTP server setting error. FTP server login error Untransmitted filename: *** Displayed when logging into the FTP server has failed. The login name or password set on the FTP server setup page is not correct. FTP server file write error Untransmitted filename: *** Displayed when a response from the FTP server is erroneous while writing data to the FTP server. Cannot create FTP server directory Untransmitted filename: *** Displayed when a directory for the FTP server cannot be created. 6-5 Section 6 Troubleshooting 6-1 Diagnosis on Standard Observation Screen 6-1-5 Module RAS information The status of the WEB module detected by itself is displayed. Click the [Module RAS information] on the [RAS information] screen to display the [Module RAS information] screen. <Module RAS information> Message Cause Initializing After the SX bus is initialized, "Initializing" is displayed until the WEB module reads the calendar data and configuration information from the SPH_CPU. Observation operating "Observation operating" is displayed when the SPH system is normally operating. Serious error "Serious error" is displayed when the SPH_CPU cannot continue its operation by a cause other than the WEB module. 6-6 Section 6 Troubleshooting 6-2 Failure Diagnosis with D300win The status of the WEB module can be diagnosed with the failure diagnostic function of D300win. 6-2-1 Procedure for diagnosis Connect D300win to the CPU and click the [Failure diagnosis...] button on the [Project Control] dialog. The [Failure diagnosis] dialog is displayed. The CPU internal system memory data is read out to display module configuration and status. When a module is selected from those displayed in the system configuration display window, detail information of the module is displayed on the detail information display window at right. Detail information of the WEB module is analyzed using the detail information window at right. Detail information window can be changed over by clicking the corresponding tab. D For the ontents of each screen, see the following pages. System configuration display window Detail information display window Used to save the content of fault diagnosis in a text file. Because of text format, the data can be checked with commercially available text editor. When the WEB module is selected on the system configuration display window, the following three pieces of information are displayed on the detail information display window. The detail information windows can be changed over by clicking the corresponding tab. System RAS D Module type information, version No. and intensive status information (outline information) are displayed. Bus transmission information D Transmission information of the SX bus is displayed. Dump list D Detail RAS information stored in the WEB module is displayed. Click here. 6-7 Section 6 Troubleshooting 6-2 Failure Diagnosis with D300win 6-2-2 System RAS On the system RAS window, “Type information” and “Module intensive status information” are displayed. Type information The module type and version No. are displayed. Module intensive status information A summary of the module’s status is displayed. <Module intensive status information> Classification Displayed message Description Normal Module running normally Initialization is completed and module is running normally. Module fatal fault: WDT up fault Hardware fault; module needs to be replaced. Module fatal fault: CPU fault Hardware fault; module needs to be replaced. Module fatal fault: RAM fault Hardware fault; module needs to be replaced. Module fatal fault: SX bus fault Hardware fault; module needs to be replaced. Fatal fault 6-8 Section 6 Troubleshooting 6-2 Failure Diagnosis with D300win 6-2-3 Bus transmission information If noise interferes with the SX bus transmission line or if the wiring of SX bus is defective, various errors that are related to SX bus transmission are counted. When such error counter works, it means that the environment of the SX bus system is problematic with respect to noise. And some measure needs to be taken. <SX bus transmission information> SX bus transmission status Descriotion CRC error detected counter (Valid stamp) Counted up if CRC error is detected but stamp is valid. Symbol error detected counter Counted up if symbol error is detected. Frame length error detected counter Counted up if frame length error is detected. Disconnection detected counter Counted up if disconnection is detected (if transmission is stopped for 130 ms or longer time.) CRC error detected counter Counted up if CRC error is detected. Frame error detected counter Counted up if frame receiving is stopped in the middle of frame receiving operation. SD detected counter Counted up if SD (the code indicating the top of a frame) is received in the middle of frame receiving operation. TF1 END position error detected counter Counted up if END is not at specified position during the 1st cycle of total frame receiving. TF2 END position error detected counter Counted up if END is not at specified position during the 2nd cycle of total frame receiving. TF2 stamp error detected counter Counted up if error is found in a received frame during the 2nd cycle of total frame receiving. Buffer full 1 detected counter Counted up if buffer full is detected in the middle of total frame receiving or multicast frame receiving. Buffer full 2 detected counter Counted up if buffer full is detected in the middle of message, ACK or NAK receiving. Buffer full 3 detected counter Counted up if buffer full is detected in the middle of token frame receiving. 6-9 Section 6 Troubleshooting 6-2 Failure Diagnosis with D300win 6-2-4 Dump list On the dump list of the WEB module, the following information is stored. Network setting information (MAC address and IP address of the WEB module.) 0000:4000 101A 1651 A8C0 0100 MAC address IP address The example above represents MAC address and IP address as follows: MAC address: 4000 101A 1651 00. 40. 1A. 10. 51. 16 IP address: A8C0 0100 C0. A8. 00. 01 192. 168. 0. 1 6-10 Mitsui Sumitomo Bank Ningyo-cho Bldg., 5-7, Nihonbashi Odemma-cho, Chuo-ku, Tokyo 103-0011, Japan Phone: +81-3-5847-8011 Fax: +81-3-5847-8172 URL http://www.fujielectric.co.jp/fcs/eng/ Information in this manual is subject to change without notice.